

Page 1
T742
User manual
1
Page 2

Contents
Contents ............................................................................................................. 2
Foreword ............................................................................................................ 3
Key Functions .................................................................................................... 4
Basic Operation.................................................................................................. 5
Points for Attention ............................................................................................ 8
Shapes and K e ys ................................................................................................ 9
Main interface .................................................................................................. 10
Installed APK ................................................................................................... 13
Uninstall APK application................................................................................ 14
Video Player..................................................................................................... 15
Pictures ............................................................................................................ 19
Call function .................................................................................................... 21
Messaging ........................................................................................................ 23
Settings ............................................................................................................ 25
GPS localization .............................................................................................. 27
OTG ................................................................................................................. 27
Connect the computer ...................................................................................... 28
3G network Settings ......................................................................................... 29
Ethernet network Setti ngs ................................................................................ 29
Calendar ........................................................................................................... 30
Sound Recorder................................................................................................ 31
Calculator......................................................................................................... 31
Clock ............................................................................................................... 31
Factory data reset ............................................................................................. 33
Upgrade Player Driver ..................................................................................... 33
Common troubleshooting ................................................................................. 34
2
Page 3

Foreword
Thank you for p ur chasi ng our pro duct.
These operational guidelines for the user, to ensure you a quick and convenient
to use, read the instructions carefully before use.
This player is a specialized top quality portable player product with a series of
remarkable functions. There will be no separate notice in the case of any change in
content of this text.
This c ompany will continue to provide new functions for the development of the
product, and there will be no separate change in the case of any change in the
product’s performance and functions. While this unit is used as a mobile hard disk,
this company will not be held liable for the security of files saved in the disk.
If the actual setup and the application methods are not identical to those as set
forth in this manual, please access to the latest product information of this company's
website.
3
Page 4

Key Functions
Capacitive touch screen, support multi-touch;
Support WIFI, 3G wireless Network;
Integrates dual cameras, front 0.3 mpx, back 2.0 mpx
Network video conversation and support photography function;
Adopt android 4 system;
Support auto rotation the screen ho r iz o ntally or ve r t ic a l ly;
Support Web browsing, chat online, online video, online games and download
etc;
Support ten thousands games and programs download and install.
Supporting lyric synchronous display;
Supports maximum 720P HD resolution video file putout
Supporting picture browsing, rotation and lantern slide playing in multiple
formats;
Support E-book function, playing in multiple formats;
USB2.0 high rate transmission;
Built-in microphone and longtime recording;
Supporting firmware upgrade;
Supporting Micro SD Card; Support OTG function, can expand storage space
4
Page 5

Basic Operation
Power on
In the shutdown state , long pre ss " " button boots
Power off
In the power on state, long press the " " key 3 seconds then pop-up device
options, select “Power off” for shut down.
Sleep
The machine under normal operat ing conditions, Short press the power butto n,
into hi ber nat ion, N ow, Scre en w ill c lose . Sho rt p res s the pow er but to n aga in, be able
to resume normal mode. When the time being use this MID can enable this feature
when, to reduce power consumption.
Power reset
If there is shutd own to t he playe r in the p rocess of opera tion, yo u can tur n off
and restart the player by pressing "reset" key.
Screen time out
If you do not contact the player within the set time, and do no operate by the
button, the contact screen will be auto matically turns off.
In any state, short press " " button and for activation; Then skid the lock
upwards to the green of spotted which will accomplish to access to the upper
interface.
If it is necessary to deactivate the contact screen time out function, you can set
the [Screen time out] option under [display] function into "Never ".
Using the Micro SD card
After this unit is connected with the computer, you will find two moving disks.
The firs t o ne is t he bu ilt -in me mory disk for this unit and the other is the disk for t he
5
Page 6

Micro SD card. If no card is inserted, the second disk cannot be opened. This unit
supports the extension of the Micro SD card from 128MB to 32GB.
Inserting and Pulling out the Micro SD card
Inserting:
Put the Micro SD card face up (side with words), and slightly force the card into
the socket of the card, i.e. connecting the unit. Under this state, you can play the
content in the Micro SD card.
Pulling:
Slightly push t he Mic ro SD, and it will b ounce by a s ectio n, and then y ou ca n
take it out.
Caution:
Please perform inserting and pulling operation when po wer is off! Otherwise, it
will lead to the loss or damage to the files within the unit! If no card is inserted, the
computer will be unable to perform read and write operation for the disk notes o f the
later removable disk (Micro SD card).
Battery:
High capacity Polymer battery is used for this unit.
The duration available of the battery power depends on volume, types of playing
files and operation of batteries. The player can be set up by the user as "user define
power off time" or "display setup" to save batteries.
Charging:
This unit can be recharged by USB port; you can also use DC Char ger:
Take out the DC charger, plug it into the wall outlet with AC 220V, then plug in
the DC jack into the device DC-in jack.
Warnings for charging:
1. A new battery may be empty and not charged before you get the device.
2. If the device is not used for long time, it is better to charge it to full capaci ty
6
Page 7

every 2 or 3 months during storage.
Power adapter is a key component of the portable player, which play a crucial
role in keeping the portable player’s normal work and protecting yo ur security when
using t he p la yer, a lo ng-term c ust o me r surve ys a nd aft er-sales service Practice shows
that the malfunction of the portable player In many cases were caused by using
inappropriate accessories, in particular the power adapter.
Use the substandard power adapter will shorten the life of the portable player by
considerably, the voltage instability will seriously a ffected the normal work o f the
portable player and bring permanent damage on the player’s performance and
reliability, Use the substandard power adapter will also reduce the vocal qua lity of t he
player s, shutdow n the playe r when you u sing it, In a ddition, Us e the substa ndard
power adapter will cause combustion and explosion which will disserve the safety of
the consumers.
Gravity induction and horizontal 、vertical screen switch
Through the clicked " ", open/ lo c k i ng g ravity ind uction a nd ho r iz ontal 、
vertical screen switch function.
Return to main interface
In any interface, touch icon " " to access to main interface.
Return to upper interface or menu
In any interface, touch icon " ", click the "" key to access to upper
interface or menu. You can also click short press the " " k ey to ac complish it.
7
Page 8

Points for Attention
1. Do not use the player in exceptionally cold or hot, dusty, damp or dry
environments.
2. Do not allow the player to fall down while using it.
3. Please charge your battery when
A. Battery pow er icon shows an empty ic on;
B. The system automatically shut s down and the po wer is soon off when
you switch on t he unit once aga in;
C. The re is no res p o ns e i f yo u operate o n any key
4. Please do not disconnect power abruptly when the player is being formatted
or in the process of uploading or downloading. Otherwise it may lead to
the error in the program.
5. When this unit is used as a moving disk, the user shall store or export files in
the proper file management operation method. Any improper operation
method may lead to the loss of files, for which this Company will be held
no liable.
6. Please do not dismantle this unit by yourself. If there is any inquiry, please
contact the dealer.
7. There will be no separate notice in the case of any change in the functions and
performance of this product.
8
Page 9
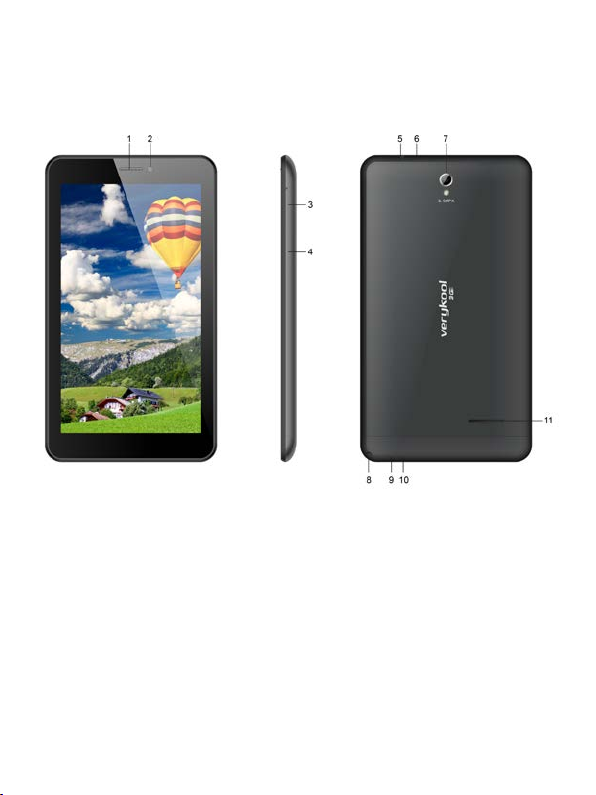
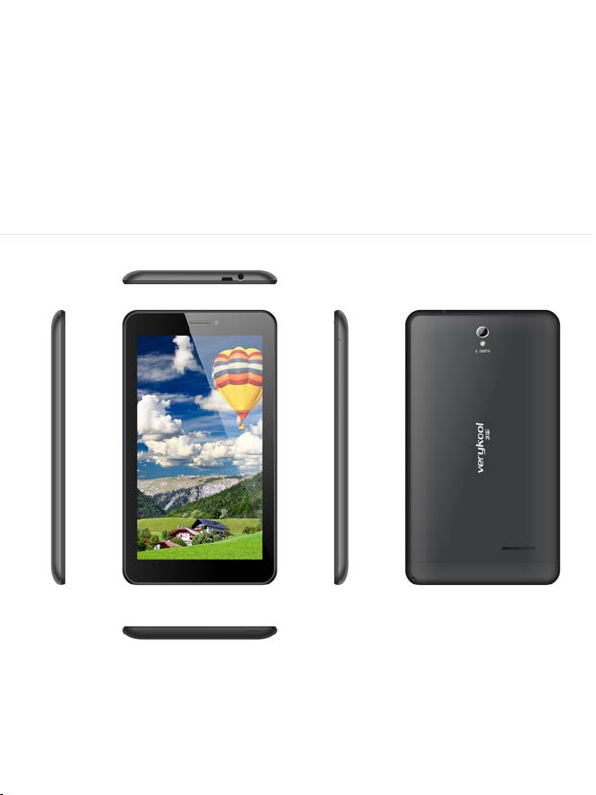
Shapes and Keys
1.Receiver 2. Fr ont camera 3. Power button 4. Volume buttons 5.
Earphone plug 6. USB 7. Back camera 8. TV antenna 9. SIM card slot
(insid e the ho using) 10. MicroSD Slot (inside the h ousing) 11. Loud
speakers
9
Page 10
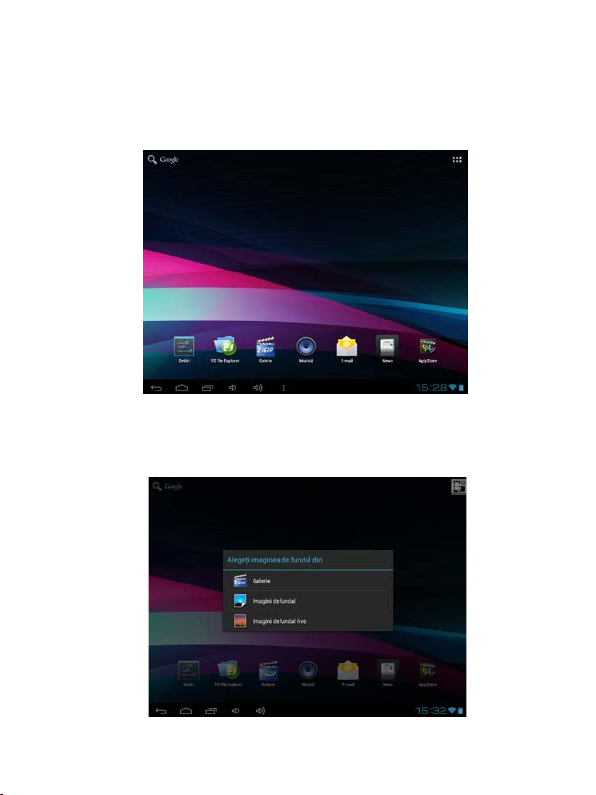
Main interface
The main interface is separated into 5 screen display. Slide screen left or right
which will accomplish to flip file.
Change desktop wallpaper
Press on a blank space on The main interface, can pop up desktop wallpaper
Settings menu
10
Page 11
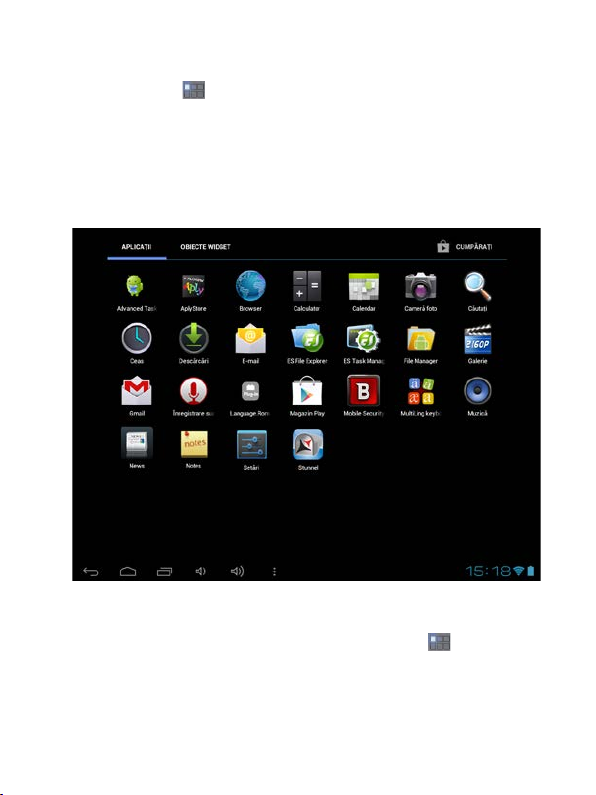
Display al l fu n c t io nal icon
Short press the icon will display the i n stalle d functions icon, click on
corresponding functional icon to be able to access the function menu. In the main
menu, the system can be set to run existing applications, install a new application,
start the touch calibration, music player, video player, web browsing, games and other
operations.
Add window small plugin
The ma in interf ace, to uch the screen on the right side of the " " control icon,
and then click above o n the screen “WIDGETS" long according to select small
plugin, can add to desktop.
11
Page 12

Display the background programs that are running
Any interface, click the " " icon t o the le ft of the screen, p op up the
background is run the program list, click on the program icon, can switch over to the
background of the open programming interface. To right sliding program icon, can
close this program in the operation.
12
Page 13

Shows notice information
The main interface, click on the lower right corner of the screen the clock
display area, can open notice , notice can show the current USB state, networking
state and the battery power and other information
Delete the desktop icon
The main interface, long press on the application of the interface program icon,
stay icon amplification, will be selected to screen the icon of the mobile above a
garbage can, this icon region shows orange, let go can delete.
Move desktop icon
The main interface, long press the interface of the application program icon,
stay icon amplification, may to the selected icon of move.
Installed APK
1. take the need to install the software of the APK format downloaded to the
player or TF card
2. Click "file manager" icon and select the need to install the APK application
13
Page 14

3. Choose the path of the APK is application, click on the APK program to
install, to start the installation
Uninstall APK application
1. Click on the desktop "Settings", into the "Settings"-" application ", select and
click on the need to uninstall program
14
Page 15

2. Click on the "uninstall" icon to start program the unloading
Video Player
In the main menu, select the option of "Gallery" to be able to access video
folder.
File list interface
15
Page 16

Funct i o n o f ke y s
" ":Shot press it to come back to the main interface
" ": Short press it to return to the upper inter face
Touch & slide screen upward and downward which will accomplish to
flip video folder.
Video playing interface
Funct i o n o f ke y s
'' / '': play or pa use current movie
'' / ": shot press to play the last /next mov ie, lo ng pre s s for fast
rewind / forward;
“ / ”: pres s it to volume up or dow n
" " key: short press it to return to the upper interface " M " key: short
press it to popup movie setting interfac e.
Tips:
1. This player support maximum 2160 resolution video files.
2. Subtitle display
16
Page 17

This player supports "*.SRT" subtitle files (The user can download it from the
website) for the synchronous playing of subtitle and video.
When there is any subtitle file with the same name in the folder for playing
video, the player will be able to achieve synchronous subtitle display
3.It’s supports video playing in multiple formats, high-definition video etc. As
parameters such as formats, coding modes, definition and code flow rates of video
files provided by the internet d iffer, the player is unable to be compatible with all
video files (especially those video files with high definition or high code rates). I f the
downloaded video files are out of the range supported by the player, which renders it
impossible to play normally in the player, it is recommended that the video
conversion software from a third party be used, and file formats be converted via
computers into the ones within the range supported by the player before the same are
duplicated into the player for playing.
Player P rogres s, Drag the line to chan ge the player progress.
Audio Player
In the main men u, select t he option of "Music" to be able to access music folder.
Music folde r i nterface
17
Page 18

Funct i o n o f ke y s
'' '': Return to main interface
'' '': Return to upper interface
Up/down to touch screen, can realize the file list to scro ll funct ion
Artist: accord ing to t he singer classification music files
Alb um: acco rd ing to a lbum classification music files
Song: display all music files
Playlis t: to display the play music files i n the list
Now playing: into t he backgro und music pla yed inter face
Music playing interface
Funct i o n o f ke y s
'' '': Return to main interface
'' '': Return to upper interface
18
Page 19

'' / ": shot press to play the last /next music, long press for fast
rewind / forward;
'' '': Click start/stop playing music
'' " : Click into play lists
" ": Click on open/close songs random play mode
" " key: short press it to return to the upper interface
Lyric Display
When there is any lyric file with the same name in the folder for playing music,
the player will directly access the lyric display interface.
This player supports "*.Lrc" lyric files (The user can download it from the
website of "http://www.51lrc.com", or search "LRC Lyric" to have the lyric file) for
the synchronous pla ying of ly rics and music.
Pictures
In the main men u, select the o ption of "Gallery" to be able to access Photo
folder.
Picture viewing interface
19
Page 20

Funct i o n o f ke y s
'' '': In slide form browse all pictures
'' ‘‘: Can through this icon, images batch management, For example: delete,
Rotate left, Rotate right, you can also according to the location, time, people
and tags setting picture group.
'' '': Delete picture
'' '': Through you can click on the icon to s et and und erstand pict ur es
information, including: Slideshow, Edit, Rotate left, Rotate right, Crop,
Details, Set picture as
20
Page 21

Bluetooth Function
Connect the equipme nt to the new equipment
1, to confirm the device you want to pair with bluetooth connectivity is turned o n
and vis ib le .
2, after turn on bluetooth, click “search for devices.”
3, select a device in the list to connect.
4, enter the PIN (eg 0000), then press the “pair” to connect the device.
Note: bluethooth device connection met hods may be different, this manual is for
reference only.
Call function
Make a call
Take one of the following to make a call:
1. In phone tab: Inpu t the phone numbers and press the green Send key; ÿIn call log tab:
press the contact in the list and select the call item to call; ÿIn contacts tab: press the
contact in the list and select the call item to call; ÿIn favorites tab: press the contact in
the list and select the call item to call;
2. Smar t Dialing: press the Smart Dialing, and d irec t input the phone numbers and
press the gree n Send ke y;
Answer calls
To answer a call, press the green Send key.
Hang up the phone
Press hang up key to hang up the phone
21
Page 22

Contacts
To view the contacts, touch Phone icon, and then touch the Contacts tab from the top of
the screen. In the contacts tab contacts i s a specific group th at can be stored by favorites
item.
TIP: To search a contact , press th e Menu k ey, touch the search item in the popup menu .
Then touch the input box to ope n the keyboard, type the name to s earch, the contact
will list below if it exists.
Add contacts
1. Press the green Send key whenever;
2. Touch the Contacts tab;
3. Press the Menu key;
4. Touch New contact ;
5. Type the contact’s information;
6. Touch Done.
22
Page 23

Messaging
All the received messages are classified by con tact nam e. The inbox in cludes SMS and
MMS.
Read messages
1. In the Menu screen, touch t he Messaging icon;
2. Touch the message to ope n.
Send text messages
1. In the Menu screen, touch t he Messaging icon;
2. Touch new me s s age ;
3. Touch to s elect t he To field, type the phone numb er that will receive the message;
4. Touch to select the Type to compose field and type the message that will send;
5. Touch Send.
23
Page 24

MMS
MMS stands for Multi-media Message Service, it could transmit the message contains
Multi-media file, including text, picture, sound, etc.
Send MMS
Photos taken by camera are stored on the memory card. Make sure the memory card
has been installed before using the camera.
1. Touch Attach symbol from top-right corner of the screen;
2. Select one of the following options:
Pictures
Touch to find and attach one of the existing pictures
Camera picture
Touch to take a new picture to attach
Videos
Touch to find and attach one of the exiting videos files
Capture video
Touch to make a new video file to attach
Audio
Touch to find and attach one of the existing audio file
Record Audio
Touch to record an audio file to attach
Slideshow
Touch to attach one o f exist in g s lide s how.
5. Touch t o select the fie l d and type the phone number;
6. Touch to select Type to compose field and type message;
7. Touch Send.
24
Page 25

Settings
In the main menu, select the option of "Settings" to be able to access the
System Set fold. Directly click can assess picture set options interface.
Description of functions:
1. WiFi
Wi-Fi: Open/close the wireless co nnection
Wi-Fi setting: touch the " " icon, can enter WIFI senior set items
2. Date usage
Display Date usage
3. Sound setti ng
Volumes: set the Notice, the media and the alarm clock volume.
Default notification: Click to open not ification bell menu, select the item is set to
25
Page 26

default notification bell
Touch sound s: After checked, Touch screen will make sound
Screen lock sound: After checked, Touch screen will make sound
4. Display settings
Brightness: Set adjust brightness of the screen
Wallpaper: you can choose wallpaper from Super-HD player and wallpaper
Sleep: Set off the screen saver standby time. When the player in the standby screen
saver, WIFI function will be closed to save electricity purpose; When sensei player,
WIFI function will be in 10 seconds to be automatic recovery
Font size: Set shows the font size
Accelerometer coordinate system: you can set Accelerometer coordinate system
Screen adaption: Used to adjust size of some games display screen
5. Storage
Check the PMP memory and available sto rage
6. Apps
Can display and management of t he installation applications
7. Security
Screen lock: Settings screen lock way, slide, Pattern, PIN, and password and so on
many k inds of mecha nisms.
Make password visible: After the check, in the password input box, can show the
input password.
Unknow n sour ce: a llow ins talla tion o f non- Google Market applications, the default
setting is open
8. Language & inpu t
Setting language and area, input method etc. FunctionStorage
26
Page 27

9. Backup & reset
Can backup, restore the machine Settings and data
10. Date & time
Set the date, time, time zone and time display format
11. About device
Check the machine software version and other information.
GPS localization
Now you ca n na viga te anyw here in the wor ld tha nks to the inco rpo rat ed G PS
receive r. If you wa nt to use the GPS function with this device, open the main menu,
click the "Settings" icon, and go to the "Location services". Here, check the "GPS
Satellites" option. Go back to main menu and open "aplicatie navi" application to
start your navigation.
OTG
OTG is the On-The-Go abbreviation. It is a technology that realizes data
transmission between portable devices without a host. Specifically, computers are not
needed to act as a medium when share data with or transfer documents from other
portable devices to your player such as flash disk, audio player and portab le hard
disk.
OTG Connection Steps:
1.Would U disk or move hard disk, and other USB devices through OTG
connected to the machine turned connection to the USB interface.
2.For external USB device display machine after state, to return to the
machine desktop, click "file manager" icon, choose t he "mobile disk", can
access the connection USB device files in the content.
27
Page 28

Remarks:
1. Due to large varieties of portable devices, the player might not recognize some
of them.
2. Compatibility with more and more portable devices will be realized through
firmware imp rovemen t.
3. While using OTG connection, the other portable device relies on the player’s
power s upply. Thus if your playe r main tains le ss tha n 1/3 ba tter y or the o ther
device is a heavy electric consumer, OTG connection might not be proceeded
successfully. As an alternative, please provide power supply to the other device
exclusively
4. Currently the OTG only supports one-way ope ration. Tha t is, documents in
other devices can be read or copied to your player. But files in your player
can’t be pasted to the other device. Nor could you delete files in the other
device.
Connect the computer
This machine can be through the USB cable to connect to a personal computer,
the data is copied or delete operation. The specific procedure is as follows.
28
Page 29

1. Will the machine through the USB cable connected to the PC's USB port, this
machine is the screen Notification will have a "USB already connected" notice
options.
2. Click "USB already connected" notice options, and choose the "open USB
storage devices", and then in the personal computer see mobile operators disk
dish, can as U disk the use of the machine disk data operation.
3G network Settings
1. Insert the SIM card into the dedicate slot.
2. Into the machine "Settings" under a "wireless and network", will be closed
Wi-Fi option, Wi-Fi and 3G are not used in the same time.
Note
Make sure that you turn off the tablet before you insert a SIM card. Also, you
must tu rn off the t ablet b efore you remo ve any SIM card.
Ethernet network Settings
1. Into the machine "Settings" under a "wireless and network", will be closed wifi
options.
2. Will USB Ethernet card through the special OTG line connected to the machine to
the USB interface, the system will automatically recognize and attached to the
network.
29
Page 30

3. Into the machine "Settings" under the "Ethernet Settings" project and check the ""
Ethernet" option ca n.
4. If you need to specify the etheric network IP and gatew ay, can ente r the "Ethernet
configuration" setting.
Note
1. Due to the different communication systems Ethernet card more, this machine
Ethernet function can't ensure that is compatible with all equipment.
2. Due to external Ethernet card equipment from the machine to the USB
interface take electricity, so in Ethernet connection, please ensure that the battery
power in one case above.
Calendar
In the main menu, touch "calendar" icon to be able to access the calendar
interface.
Under this menu, Touc h & s lide sc reen left and right which will accomplish to
flip increase or decrease month by month. If you need record new event. before you
can add an event, you must add at least one Calendar account to the device and make
a calendar visible.
30
Page 31

Sound Recorder
In the main menu, select the option of "Sound Recorder" to be able to access
recorder interface.
Keys of functions :
" ": Return to the recorder folder
" " : Start or pause record
" “: Stop current record and select save the current record.
" " : Record playing setting menu
Calculator
In the main me nu, t ouc h "Calculator" icon to be able to activate the function of
Calculator. The calculators can be used like normal others. It’s a good assistant for
your work and study.
Clock
31
Page 32

In the ma in menu, touch "Clock" icon to be able to activate the function. It’s a
good assista nt for you r everyday life.
1. Click "clock" appear as follows interface
2." ": Click on it yo u can set alarm
It will be automatically alarming whe n yo u s e t time .
You can setti ng Time, ring tone, repeat options for every alarm clock.
32
Page 33

Factory data reset
If this machine is infected, or third party software installed to run this machine
is unus ua l, b ut t hr o u gh t he r e covery fac t o r y Se t ti n gs , re move the third p art y softwa re,
and restore the state out by default. Into this machine "Sett ings"-" privacy ", select
“Factory data reset" item, confirmed, will remove all of the data.
Upgrade Player Driver
The fir mware is a bu ilt-in progra m, by w hich you can run vario us hardware
functions. By upgrading the firmware, you can improve or enhance the performance
and func tions of the player. No upg rading the firmware w ill not affect the norma l
operation of the player itself.
The upgra din g of fir mware may lead to the unit unab le to work properly due to
error operation. Please read carefully the instructions for upgrading before upgrading.
Note. Please make sure that players have the upgrading at more than 60% of the
battery power. Avoid because the batter y power leads to upgrade failure to boot.
2. The upgrade process do not reset or shutdown operation, avoid accident
interrupt upgrade can't boot.
33
Page 34

3. Through our company provide formal or test versions of the firmware update,
but without notice in the premise of the function of the products and the menu
changes.
4. When the firmware upgrade stored in all the data in the player will be deleted.
So in the firmware upgrade will be stored in the user must be before the
important data within the player for backup.
5. The machine firmware does not apply to other type s of products, resulting
from the negative consequences; our company does not undertake any related
responsibility.
Common troubleshooting
1. What is the APK file? It and Android PMP have what relation?
A: APK is the abbreviation of Android Package, that Android installation Package.
Through the APK files dire ctly to And r oid system can be installed in execut i on PMP
players.
2. How to get the APK application
A: You can download via PC-side insta l lat io n, you c a n a ls o “ A nd ro i d ma rk e t ” online
to download and install.
3. Why W IFI connect ion wi ll inte rrupt
A: If set "screen time", when the player overtime in standby screen saver, WIFI
function will be closed to save electricity purpose; When sensei player, WIFI function
will be in about 5 seconds to resume automatic connection.
4. Why some dow nload APK program, not working properly
A: Download the APK software, mostly by the user to development, witho ut the
platform compatibility testing, and part of the hardware and software for Android
system version has a special requirements, so there could be downloaded APK
docume nts not compat ible, not the nor mal op eration o f the phe nomen on, the p layer
34
Page 35

itself quality problems
5. Why connected the charger not show charging state
A: When t he battery is ext r emely low, need to use DC charger cha r ging ha lf an hour
or more to show charging status
6. Why can't realize the gravity induction function
A: This machine support gravity feeling function, can be through the shaking to
switch t he sc re en machine did show, but some of the application does not support the
gravity induction function, it can't realize the screen of switching function, this is the
software supp ort question, the func tionality of the player.
7. Players can't boot
1. Check the battery no electricity
2. Connect the ac adapter after inspection again
3 .If after charging still unable to boot, please contact our customer service
8. Can’t Hear the voice in the headset
1. Please check the volume is set to 0
2)Please check whether the connection headphones
9. Player charging abnormalities
1) Please confirm that the use of the equipment complies with the charger of the
player charger requirements
2) Such as connection USB charging, please do not connect to computers lead USB
interface
10. Why some download video can't normally broadcast
This player can be compatible with the Internet video files of the play, but
because the Internet provide video format, coding method, the resolution, code flow
rate in the parameters are different, and may result in part of the video file cannot be
played or play anomaly, it is recommended to use a third party video conversion
software, in the computer support convert player within the scope of the file format
35
Page 36

and then copied to the p layer to play.
FCC Caution
§ 15.19 Labeling requirements.
This device complies with par t 15 of t h e FCC Ru les. Op erati on is subje ct t o the
following two conditi ons: (1) This device m ay not cause harmful int erference,
and (2) this device must accept any interference received, including interference
that may cause undesired operation.
§ 15.21 Information to use r.
Any Changes or modifications not expressly approved by the party responsible
for compliance could void the user's authority to operate the equipment.
§ 15.105 Information to the user.
Note: This equipment has been tested and found to comply with the limits for a
Class B digital device, pursuant to part 15 of th e FCC Rules. These limits are
designed to provide reasonable protection against harmful interference in a
residential installation. This equipment generates uses and can radiate radio
frequency energy and, if not installed and used in accordance with the
instructions, may cause harmful interference to radio communications.
However, there is no guarantee that inter ference will not occur in a particular
installation. If this equipment does cause harmful interference to radio or
television reception , which can be dete rmined by turnin g the equipment off and
on, the user is e ncouraged to try t o correct the interferenc e by one or more of
the following measures :
‐Reori ent or rel ocate the recei vi ng antenna .
‐I ncrease the separati on between the equ i pment and recei ver.
‐Connect the equipment into an outlet on a circuit different from that to which
the receiver is connected.
‐Consult the deal er or an ex peri enced rad i o /TV technician for help.
Specific Absorption Rate (SAR) information:
The SAR value is tested with a le ather case.
This Tablet meets the government's requ irements for exposure to radi o waves.
The guidelines are based on standards that were developed by independent
scientific organiz ations through periodic and thorough evaluation of sci entific
studies. The standards include a substantial safety margin designed to assure the
36
Page 37

safety of all persons regardless of age or health.
FCC RF Exposure Information and Statement The SAR limit of USA (FCC) is
1.6 W/kg averaged over one gram of tissue. Device types: T742 (FCC ID:
WA6T7A2) has also been tested agai nst this SAR limit.
The highest SAR value reported und er th is st andard durin g product certi fic ation
for use at the ear is 0.95W/kg and when properly worn on the body is
1.13W/kg. This device was tested for typical body worn op erations with the
back of the handset kept 1.5cm from the body. To maintain compliance with
FCC RF exposure requirements, use accessories that maintain a 1.5cm
separation distance betwee n the user's body and the back of the handset. The
use of belt clips, holsters and similar accessories should not contain metallic
components in its asse mbly. The use of accessories that do not satisfy these
requirements may not comp ly with FCC RF exposure requirements , and shou ld
be avoided.
Body worn Operation
This device was tested for typical body worn operations. To comply with RF
exposure requirement s, a minimum separation distance of 1. 5 cm must be
maintained between the user’s body and the handset, in cluding the antenna.
Third par ty belt clips, holsters, and sim il a r ac c essories used by this device
should not contain any met allic components. Body worn accessories that do not
meet these requirements may not comply with RF exposure requirements and
should be avoided. Use only the supplied or an approved antenna.
37
 Loading...