

Page 1
Page 2

1
VERYKOOL® 2011 Copyright
All Rights Reserved
Reproduction, transfer, distribution or storage of
part or all of the contents in this document in any
form is illegal without the prior written permission
as VERYKOOL.
Statement
Some contents of this manual maybe different
from the mobile phone when you using. Please
refer to the mobile phone. VERYKOOL reserves
the right to revise this document or withdraw it at
any time without prior notice.
Page 3

2
Contents
1.1 Phone and fittings ........................... 4
1.2 Available network and service ....... 4
1.3 Keys and Parts ................................ 5
1.4 Screen icons .................................... 8
2. INSTALL AND CHARGE ......... 10
2.1 Install USIM and Memory card ..... 10
2.2 Insert & Remove battery ............... 10
2.3 Charge the battery .......................... 11
2.4 Switch the device on & off ............ 13
3. FUNCTIONS ............................ 14
3.1 Calls ................................................ 14
3.2 Messages ....................................... 15
3.3 Contacts ......................................... 20
3.4 Call record ..................................... 23
3.5 Camera ........................................... 24
Page 4

3
3.6 Entertainment ................................ 25
3.7 Music .............................................. 31
3.8 File manager .................................. 33
3.9 Profiles ........................................... 33
3.10 Settings ........................................ 35
3.11 Tools ............................................. 41
3.12 Bluetooth ..................................... 42
3.13 Browser ........................................ 44
3.14 SIM Tool Kit .................................. 45
4. FAQS ....................................... 46
5. SAFETY INFORMATION ......... 49
Page 5

4
1. UNDERSTAND YOUR PHONE
1.1 Phone and fittings
Unpack the phone package and confirm that all the
accessories of the phone are complete.
Phone
Charger
Lithium battery
Earpiece
Data line
User manual
Certificate of quality
After-sales service manual
For any missing parts or missing pages of the User
Manual, please contact the local distributor.
1.2 Available network and service
The device described in this guide is approved for using
on:
Page 6

5
UMTS band: 850MHz, 900MHz, 1900MHz and 2100MHz
GSM bands: 850MHz, 900MHz, 1800MHz and 1900MHz
Tips:
Contact with your service provider for more detail
information about the networks.
To use the device you must have service from your
service provider. Some of them require special network
features which are not available on all networks. And
others may require that you make specific arrangements
with your service provider before you can use the
network services. Using network service involves
transmission of data, check with your service provider for
more detail information about fees in your home network
and when roaming on other networks.
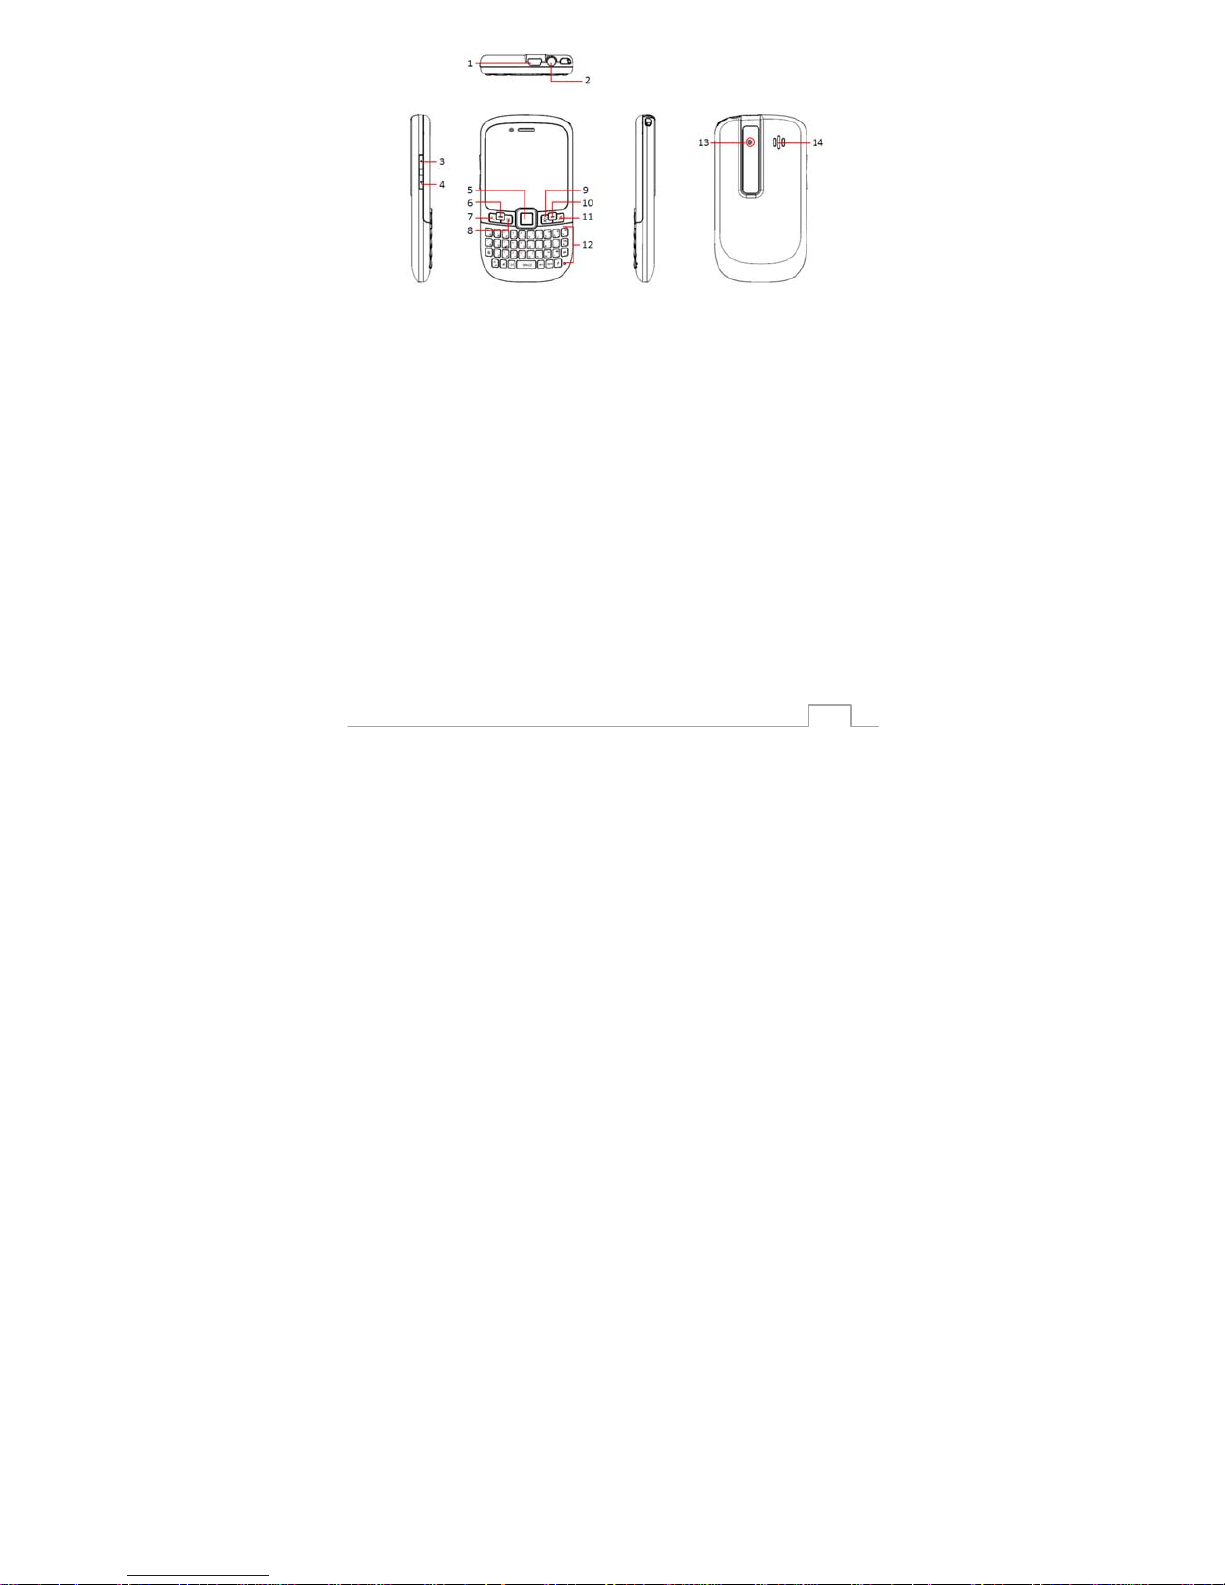
1.3 Keys and Parts
1.3.1 Getting know your phone
Page 7
6
1. USB/Charge connector
2. Earpiece jet
3. Volume up key
4. Volume down key
5. OK key
6. Left soft key (LSK)
7. Dial key
8. Contacts key
9. Menu key
10. Right soft key (RSK)
11. Power key/End key: Press and hold to Power on/off
Page 8

7
the device.
12. Keyboard: Your device has a full keyboard. You can
find the most common punctuations the keyboard.
Alternatively, you can enter the punctuation marks by
using some key combinations.
13. Camera lens
14. Speaker
1.3.2 Text input setting
You can change Input mode and Default input mode
when you write text.
1. Select Option>input mode, and then select the input
method you want or press key to change input
method directly
2. Select Option>Default input method, and then you
can set a special input method as your default input
method.
3. Press key and then you can enter the
corresponding symbol on the full keyboard, also you can
Press key to select the symbol you want.
Page 9
8
4. key is to achieve switching between ABC and
abc.
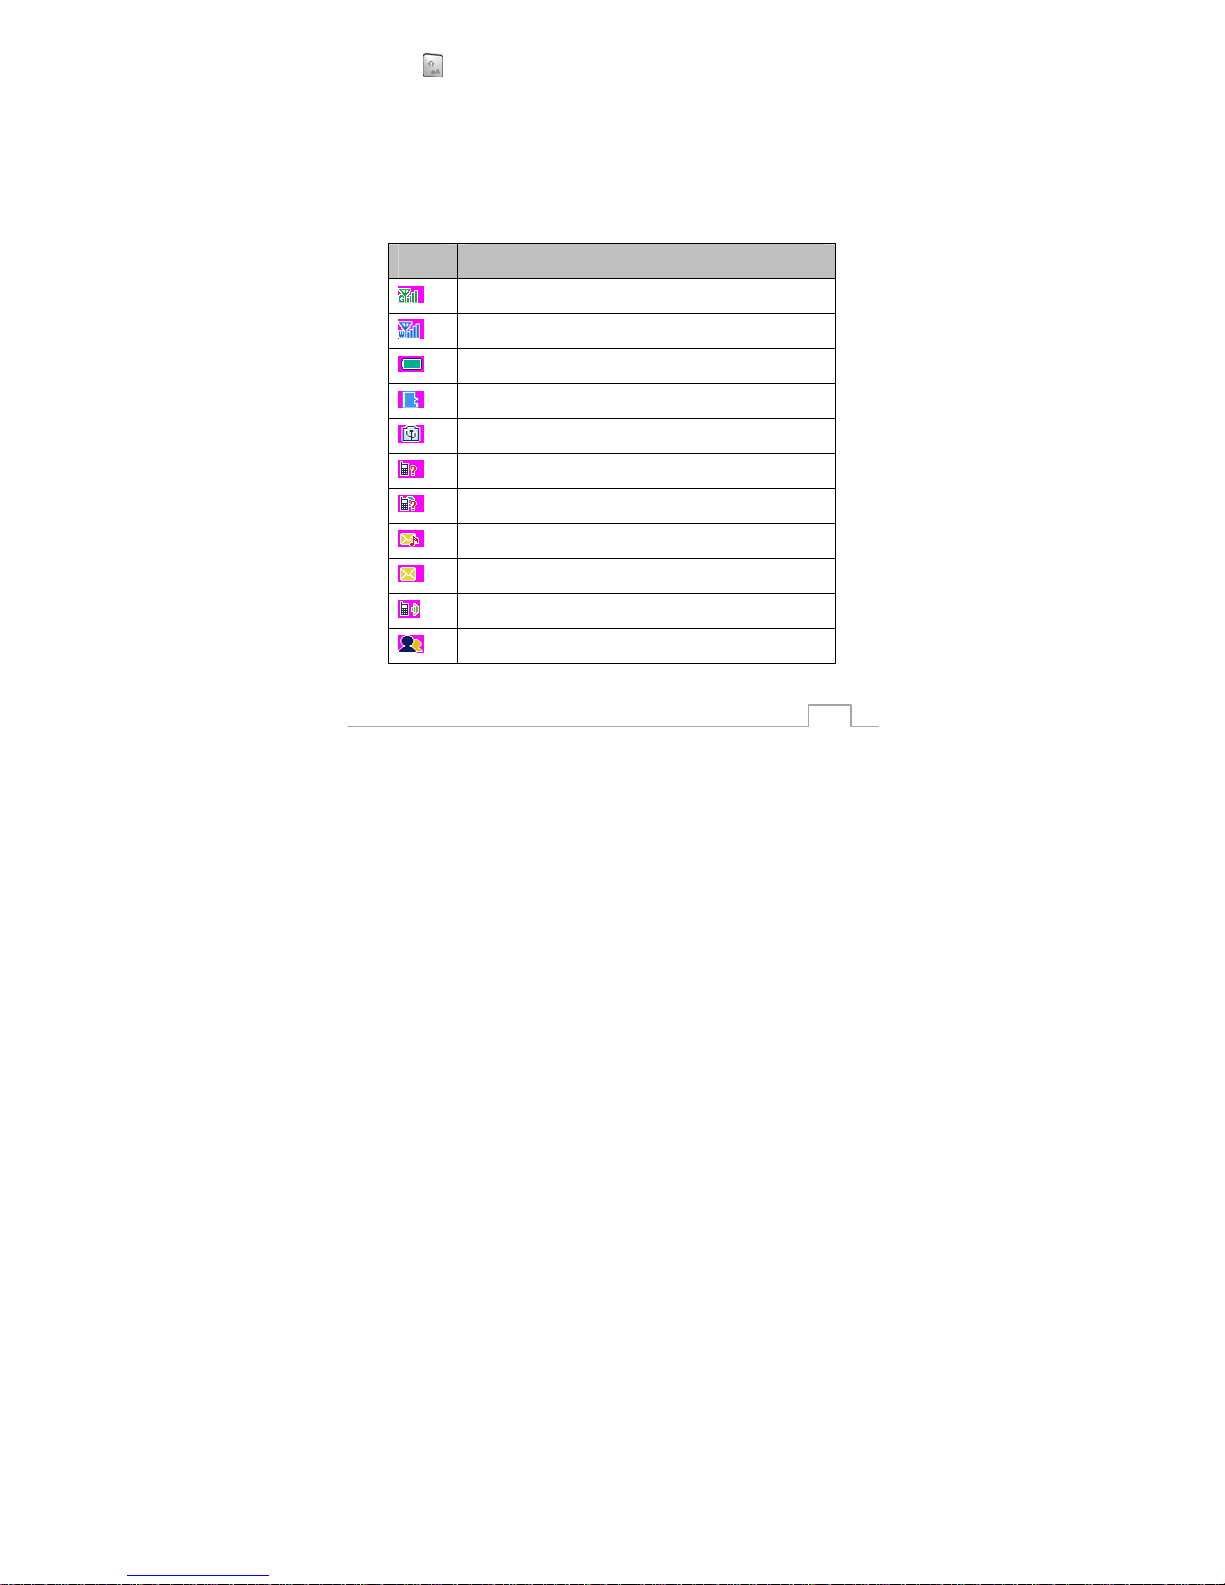
1.4 Screen icons
In Standby mode, you may view icons on the above of
screens as follows:
Icon Description
GSM network signal strength
UMTS network signal strength
Battery capability
Insert a Memory card
Connect with an USB cable
Missed voice calls
Missed video calls
Unread MMS; flash when the storage is full
Unread SMS; flash when the storage is full
Current mode is General
Current mode is Meeting
Page 10
9
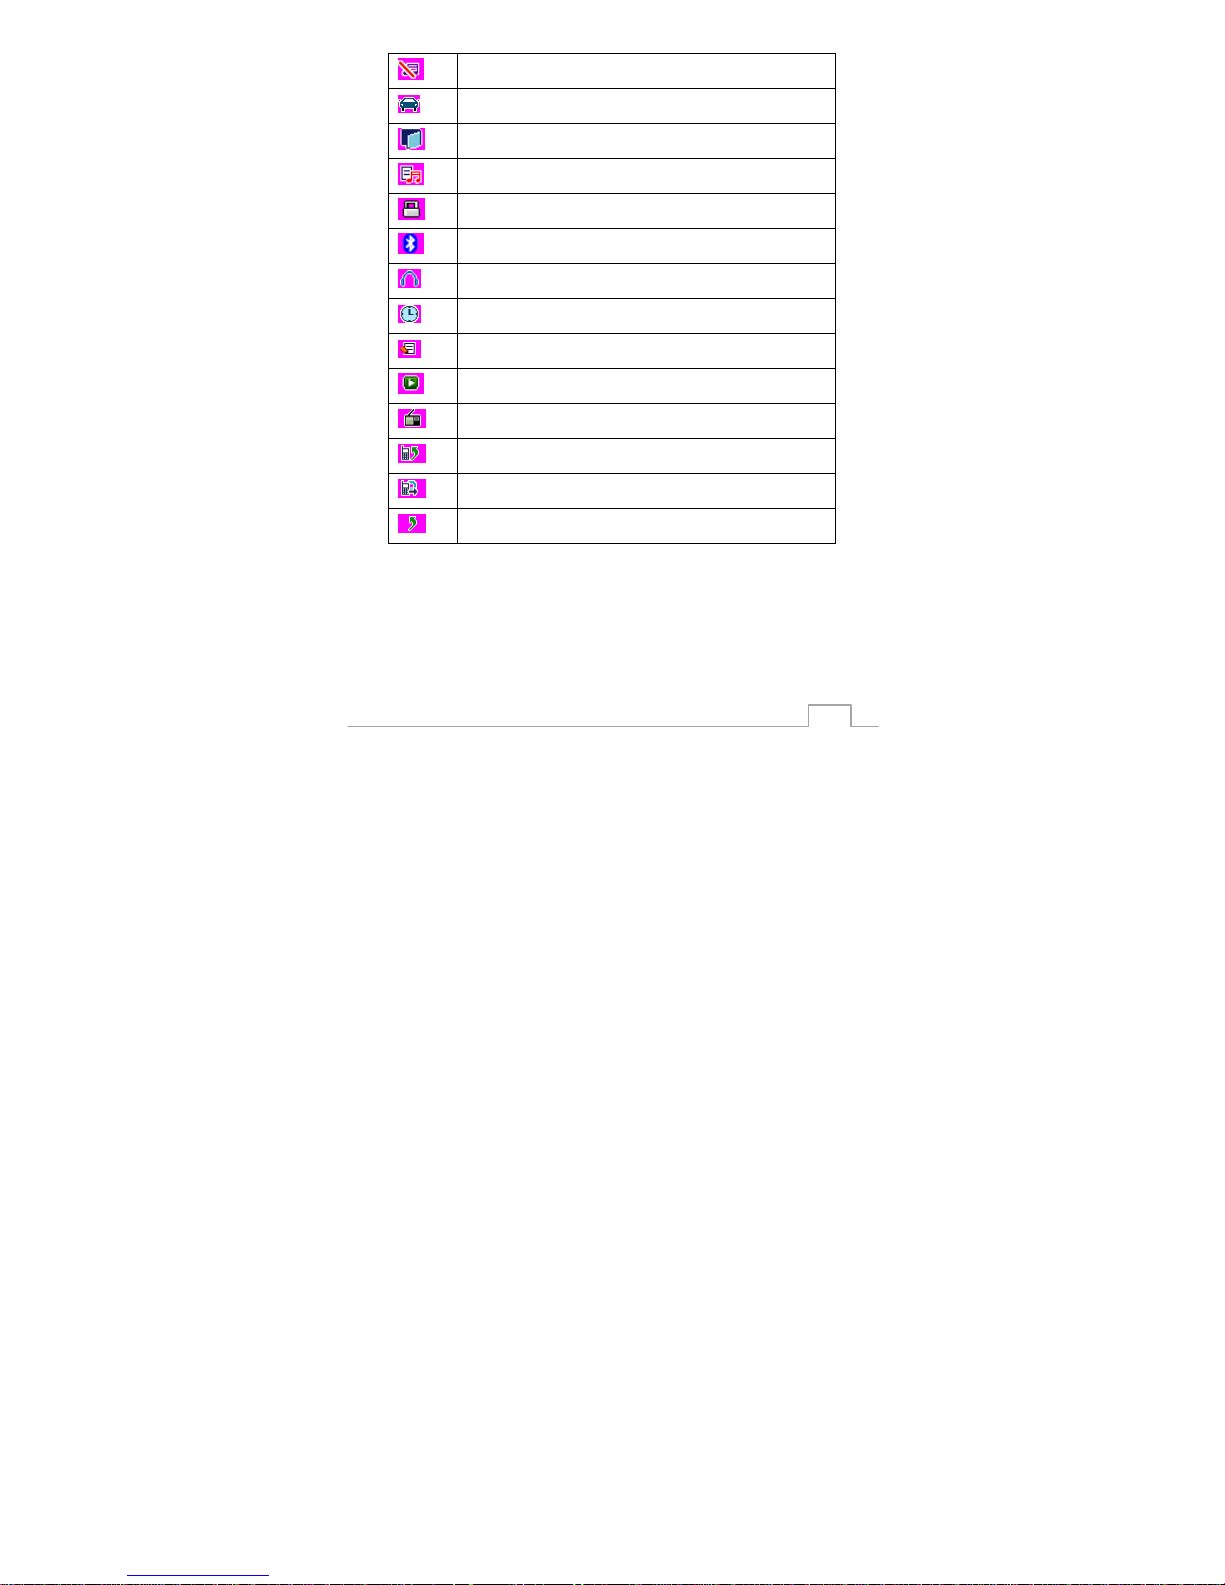
Current mode is Silent
Current mode is Car
Current mode is Outdoor
Current mode is Customize
The phone is locked
Bluetooth is opened
Plug in an earpiece
Set an alarm and turn on
Set an event and open
Play music in background
Play FM in background
Turn on voice call diverting
Turn on video call diverting
Turn on voice and video call diverting
Page 11
10
2. Install and Charge
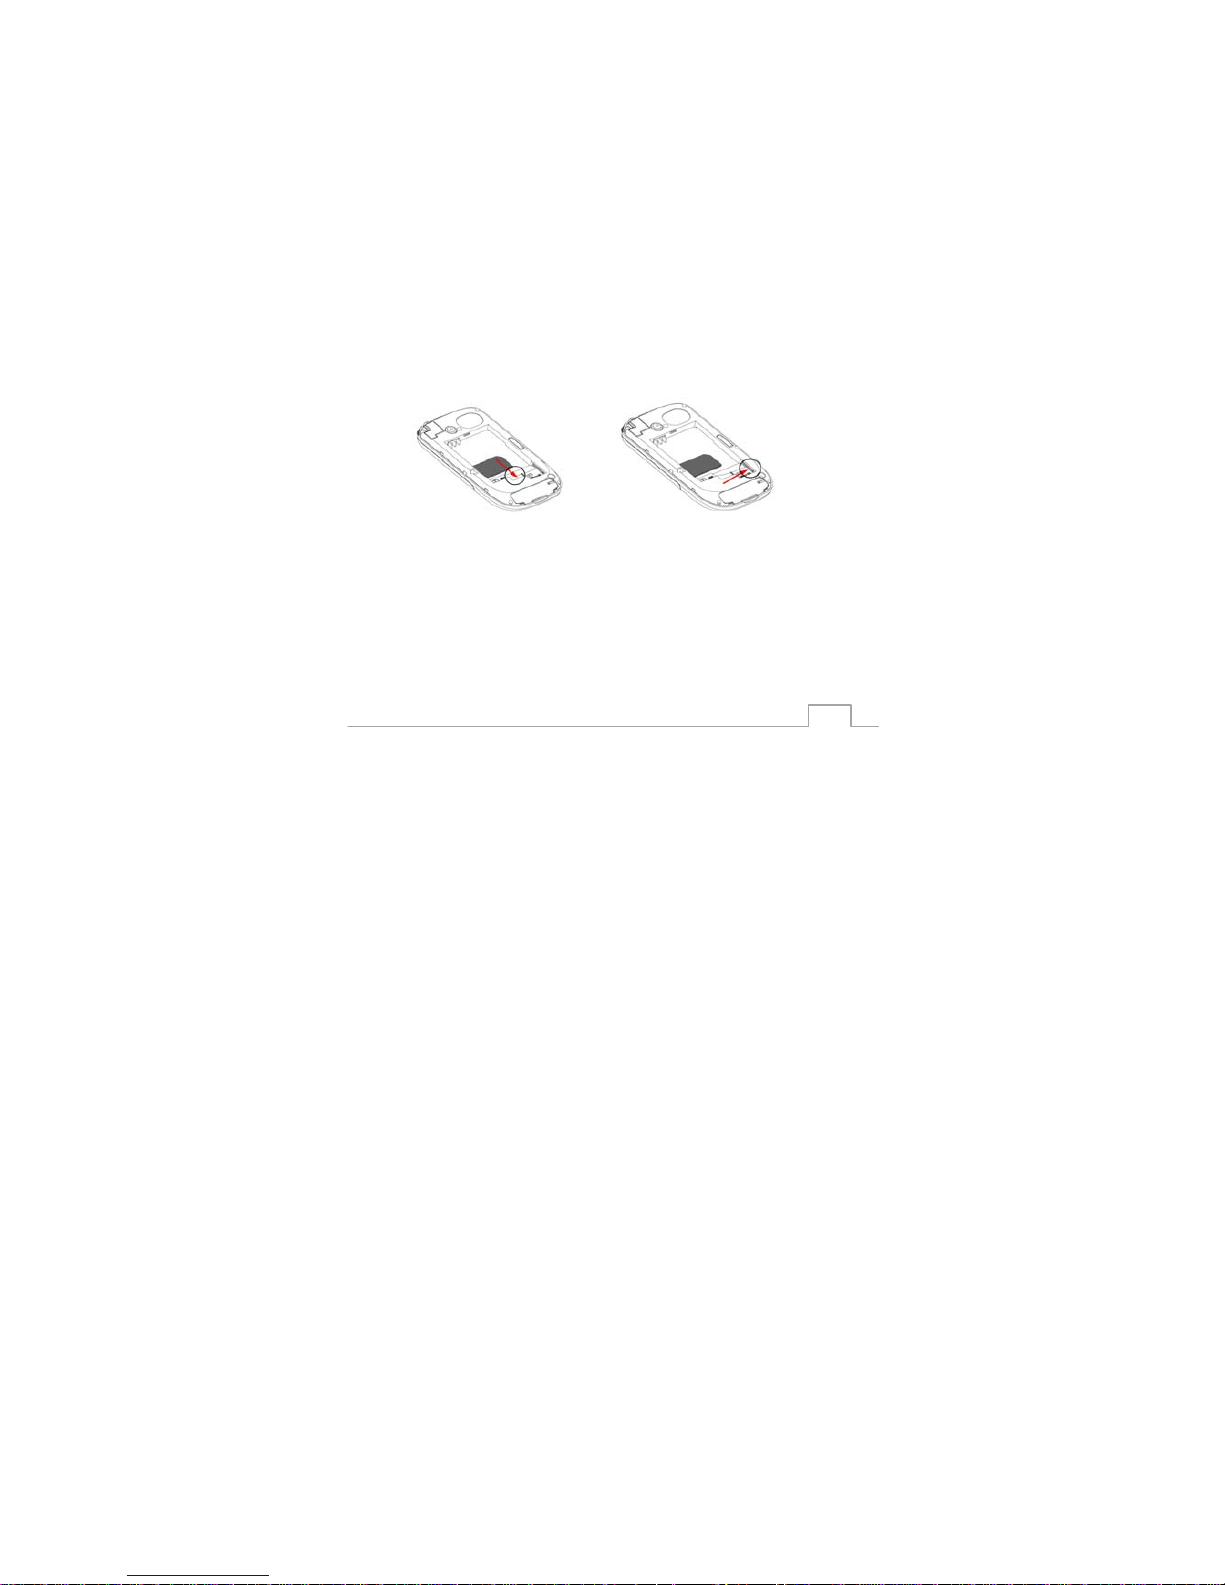
2.1 Install USIM and Memory card
1. Remove the back cover and remove the battery if
inserted.
2. Insert the USIM according the indication on the USIM
holder. Ensure that the contact area on the card is
facing down.
3. Insert a compatible Memory card in the slot. Ensure
that the contact area on the card is facing down and
towards the slot.
(Insert SIM) (Insert Memory card)
2.2 Insert & Remove battery
1. Insert the battery
Align the battery contacts with the battery connectors.
Page 12

11
2. Remove the battery
Lift the battery in the direction of the arrow to remove it.
(Insert battery) (Remove battery)
Tips: Make sure that your phone is powered off.
2.3 Charge the battery
Your battery has been partially charged at the factory. If
the device indicates a low charge, do the following:
1. Connect the charger to a wall outlet.
2. Connect the charger to charge interface of the device.
3. When the device indicates full charge, disconnect the
charger from the device, then from the wall outlet.
Tips: You do not need to charge the battery for a
specific length of time, and you can use the device while
it is charging. If the battery is completely discharged, it
Page 13

12
may take several minutes before the charging indicator
appears on the display or before any calls can be made.
Charging with the USB data cable is slower than
charging with the charger.
Warnings
(1) Use the charger provided by the phone supplier.
Never use unapproved chargers. Otherwise, danger
could occur!
(2) Do not charge the phone without the battery.
Otherwise, the phone or charger may be damaged.
(3) Do not forcibly insert the connector of the charger, lest
that the phone or the charger connector be damaged.
(4) The battery will be automatically discharged if it is not
in use for a long time. Therefore, charge the battery
before use.
(5) Never use any damaged or invalid battery or charger.
(6) Although the battery can be repeatedly charged, it
has a certain service life. If the operating duration of
the battery is obviously shorter after it is fully charged,
replace it by a new one.
Page 14

13
2.4 Switch the device on & off
1. Switch on:
(1) Make sure the battery has been installed correctly,
and then press and hold the Power key until you see the
start animation.
(2) If prompt, input PIN code or phone code and press
OK.
2. Switch off
Press and hold the Power key until you see the shutdown
animation.
Page 15

14
3. FUNCTIONS
3.1 Calls
Your device provides to make voice calls and video calls.
3.1.1 Make calls
Make a voice call
1. Enter the phone number in standby mode, including
the area code, and then press the call key.
Tips: To make a international call, enter “+”character
and then enter the number to dial, in the format of
"country code +area code + phone number";
2. End the call (or cancel the call attempt), press the end
key.
3. To make a call from Contacts, select Menu>Contacts,
scroll to the desired name or number, press the call
key.
Make video calls
1. Enter the phone number in the standby mode or select
a recipient from Contacts, Select Option>Call>Video
call.
Page 16

15
2. To end the video call, press the end key.
3. When you make a video call, you can see a real-time,
two-way video between you and the recipient of the call.
The live video image, or video image captured by the
camera in your device is shown to the video call
recipient.
3.1.2 Answer calls
1. When there is an incoming call, press call key to
answer and press end key to reject the call.
2. To mute the ringtone of the incoming call, select mute
on.
Tips: If the operators netw ork support, you can build
Conference voice calls, it can support up to 5 people
calls
3.2 Messages
Your device provides to send and receive text message
or multimedia message.
Page 17

16
3.2.1 SMS (Short Messaging Service)
Send messages
Select Menu>Messages>SMS>New
1. Edit a message. Select Option, you can insert
contacts, templates and symbols;
2. Press the center key or select Option>Send, then
input the recipient(s) or select recipient(s) from contacts.
You can add 20 recipients at best.
3. If the SMS send successfully, it will be saved in
Sentbox.
If the SMS send failed, it will be saved in Outbox.
4. If you do not want to send the SMS, it can be saved to
Drafts.
Read messages
Select Menu>Messages>SMS>Inbox
1. Read all received SMS from Inbox, while reading a
SMS; you can scroll right to the next message and scroll
left to the previous message.
2. Reading a message, Select Option, you can do
Page 18

17
operations of reply, forward, delete or call the number
etc.
Cell broadcast
Select Menu>Messages>SMS>Cell broadcast
Cell broadcast is that you can receive the public
messages from your service provider. With the cell
broadcast, you can receive various topics: such as
weather, hospital, traffic etc.
Tips: Cell broadcast service need to be supported by
service provider.
Settings
Select Menu>Messages>SMS>Settings
1. Text message settings
1) Service center: If the SMS always send failed, it
maybe the service center number is wrong. Call
operators to check the service center number then
try again.
2) Period of validity: If the recipient cannot be
reached within validity period, the message will be
deleted from message center.
Page 19

18
3) Send settings: If you want to know the SMS send
successful or not, turn on Status report, and there
will be a feedback about the SMS.
4) Memory status: Check the storage status of the
Phone and the USIM card.
2. Voice mail settings: Enter your voicemail number and
save it. In standby mode, you can long press 1 key to call
this number Convenient.
3. Broadcast settings: Select Receive>on to receive
cell broadcast message; Edit channel and select
languages which you want to receive the cell broadcast
message;
3.3.2 MMS (Multimedia Messaging Service)
Send messages
Select Menu>Message>MMS>New
1. Input a subject on the Subject field and Input text
contents on the Text field.
2. Insert picture, sound, video or attachment on
corresponding field, then you can select
Page 20

19
Option>Preview to preview the MMS;
3. Select Option>Send to send the message.(Refer to
SMS.)
Tips: You can send MMS to an Email address.
Read messages
Select Menu>Message>MMS>Inbox
Read all received MMS from Inbox, press scroll right to
next page and scroll left to previous page.(Refer to
SMS.)
Settings
1. MMS center life time: If the MMS receive failed, it will
stay at the service center, and you can set this life time.
2. Priority: While received several MMS, sort by the
priority for download.
3. Report allowed: Allow receiving the report or not.
4. Delivery report: Want to receive delivery report after
send a message or not.
5. Admit anonymity: Allow receiving message from
anonymity or not.
Page 21

20
6. Fetch mode: Select a download mode while received
a MMS.
7. Delivery size limit: The size is range from 0KB to
300KB. But the actual depends on the operators.
8. Reception size limit: Refer to Delivery size limit.
9. Profile settings>Refer to local operators.
3.3 Contacts
Your device provides to store and update contact
information in the internal phonebook or in the memory of
USIM card. Also you can create caller group, customize
personal ringtone and image for group members.
Select Menu>Contacts, or press the contacts key
in the standby mode.
3.3.1 Operations for contacts
Search for contacts
1. Input the first character of the name which you are
searching for
Page 22

21
2. Scroll up and down to Select the desired name or input
more characters to search for.
3. After you searched and highlight the desired name,
press the center key to view the contact detail.
Add & update contacts
Select Menu>Contacts>Option>New/Edit
1. If store in USIM card, you can edit name mobile
number and Email address.
2. If store in internal phonebook, you can edit name,
mobile number, video number other number, group,
Email address, URL, birthday, personal ringtone and
image.
Other operations
Select Menu>Contacts>Option
1. Call: You can make a voice call or a video call.
2. Write message: You can send SMS or MMS to this
number.
3. Delete: Delete or batch to delete the contacts.
4. Send: Send the contacts selected by vCard Via SMS,
Page 23

22
MMS or Bluetooth.
5. Copy: Copy or batch to copy the contacts from Phone
to USIM card or opposite.
Settings
Select Menu>Contacts>Option>Settings
1. My vCard: Save details of my contacts. And it’s
convenient to send my vCard to others.
2. Speed dial: Define the number key of the keypad from
0 to 9 with contacts. And it’s convenient to make a call
from idle by long press each number key. (1 key is fixed
for Voicemail number.)
3. Reject call: Select contacts which you want to reject
their calls. And they cannot call you from now on.
4. Fixed call: This service restricts your outgoing calls to
selected phone number, if this function is supported by
your SIM card. PIN2 code is needed to edit the number.
5. Service dial number: Depends on the operators
6. Own number: Edit and store your number in USIM
card.
7. Memory status: Check the storage status of the
Page 24

23
Phone and the USIM card.
3.4 Call record
Your device provides to view and delete the call history,
view call duration and cost of your calls.
Select Menu>Call record, or press the send key in
the standby mode.
3.4.1 Call history
All calls: List of All call records.
Missed calls: List of the last twenty missed call
records.
Dialed calls: List of the last twenty dialed call
records.
Received calls: List of the last twenty received call
records.
3.4.2 Call duration
Record time of all your dialed and received calls, you can
Page 25

24
clean the records by Reset function.
3.4.3 Call cost
Record call cost of your last calls and all calls. This
operation needs support by the local operators. PIN2
code is needed to set cost limits.
Tips: F or more details refer to oper ators
.
3.4.4 Data transmission
Record data traffic of all sent and received data; you can
clean the records by Reset function.
3.5 Camera
Your device provides to capture photos.
Select Menu>Camera
Capture a photo:
1. The screen is used as viewfinder; press the center key,
the photo will be saved in album.
2. Adjust brightness by press scroll left and scroll right
Page 26

25
key; and adjust focus by press scroll up and down key.
Tips: Z oom is unavailable while the resolution is too
high.
Operations for camera
Select Menu>Camera>Option
1. Sub/Main sensor: Switch sensor between main
sensor and sub sensor.
2. Photo album: go to album
3. Effect: Select color effect
4. Frame mode: Select a frame mode
5. Countdown: Activate Countdown and set time
6. Storage: Select storage location
7. Settings: Setting Image size, Shutter sound, White
balance, Image quality, night mode and Anti-banding;
Tips: The highest image resolution is 1600*1200 pixels.
8. Memory status: Check memory status.
3.6 Entertainment
Your device provides some functions for entertainment.
Page 27

26
Select Menu>Entertainment
3.6.1 Photo album
Manage your photos taken by camera.
Select Menu>Entertainment>Photo album
Operations for photo album
Select Menu>Entertainment>Photo
album>Option
1. View: View the selected photo
2. Set as: Set the selected photo as wallpaper, Contact
image and Screen saver.
3. Send: Send the selected photo to recipients via MMS
or Bluetooth.
4. Delete: Delete or Batch to delete the photos
5. Rename: Rename the selected photo
6. Details: view the selected photo’s details.
3.6.2 Video recorder
Your device provides to take video clips.
Page 28

27
Select Menu>Entertainment>Video record.
Record video clip
1. To Record videos by press the center key, then press
the center key to pause recording, also you can resume
recording. Press Save, the video clip is saved in video
album.
2. Adjust brightness by press scroll left and scroll right
key; and adjust focus by press scroll up and down key.
Operations for video recorder
Select Menu>Entertainment>Video
record>Option
1. Sub/Main sensor: Switch sensor between main
sensor and sub sensor.
2. Video album: go to album
3. Effect: Select color effect
4. Storage: Select storage location
5. Settings: Setting Image size, Record sound, White
balance, Image quality, Record time limit, video type,
night mode and Anti-banding;
Page 29

28
6. Memory status: Check memory status.
3.6.3 Video player
Select Menu>Entertainment>Video player
Play videos which saved in memory. (Refer to Multimedia
player.)
3.6.4 Java
Your device provides to play Java applications or games.
Select Menu>Entertainment>Java
Default Java applications
The device supply three default Java applications to use:
Twim, Opera Mini and Facebook. The default Java
applications cannot be deleted.
Install Java applications or games
You can install your desired Java applications or games,
Select Menu>File manager select a file which format is
Jar of Jad to install. After you install the Java applications
or games, you can run it.
Page 30

29
Tips: some of the Java games were not suitable for this
device, so you should to check if it’s ok before installing.
The suitable resolution of the device is 320*240.
Network access point setting
1. Some Java applications and games need to connect to
the Internet to receive information, so you need to set the
Java profiles.
2. Select Menu>Entertainment>Java>menu>DailSet to
set the profiles. Refer to local operators for details
information.
3.6.5 Recorder
Record the sound clips you desired.
Select Menu>Entertainment>Recorder
Record sound clip
To Record sound by press the center key, Press volume
up and down key can adjust volume level, then press the
center key to pause recording, also you can resume
recording. Press Save, the sound clip is saved.
Operations for Recorder
Page 31

30
Select Menu>Entertainment>Recorder>Option
1. Rename: Rename the current sound clip.
2. My Record: Go to Audio folder and play the sound
record.
3. Settings: Setting Storage location and Record time
limit.
4. Change volume: Change volume by press scroll left
and right key.
3.6.6 Radio
Your device provides to listen to FM radio.
Select Menu>Entertainment>FM radio.
Listen to the Radio
1. You need to connect with earpiece first, then press the
center key to switch on/off the radio.
2. Press volume up and down key can adjust volume
level. Press scroll left and right key to search for your
desired frequency.
Operations for FM Radio
Page 32

31
Select Menu>Entertainment>FM radio>Option
1. Channel list: View all channels you search by auto or
the channels edited by yourself.
2. Set frequency: Input the frequency you desired by
manual.
Tips: The frequency range is 87.50 to 108.00.
3. Speaker/Earphone: Switch the Radio sound between
speaker and earphone.
4. Auto search: Automatically search for and saved
channels in channel list.
5. Change volume: Change volume by press scroll left
and right key.
Tips: The frequency quality and the quantity of channel
by auto-searched depends on the coverage of the radio
station.
3.7 Music
Your device provides to play music or video.
Select Menu>Music or press MP3 key in standby.
Page 33

32
Play songs or video clips
1. The device supports format includes MP3, MID, 3GP,
MP4 etc. You can full screen play videos and play songs
on background.
2. Enter Media player, you must create a playlist first.
Select Menu> Music >Option>Play list, create a new
playlist; to add songs or video files to this playlist, you
should select Add and enter your phone or memory card
choose the files or folder which you desired.
Operations for Music
1. Play mode: While playing media files, you can select
play mode with Loop and Shuffle.
Select loop One to play one files only; or select loop All
to play the playlist with loop.
Select Shuffle On to play the playlist in random order.
2. Equalizer: You can set equalizer to change the sound
effect while playing audios. The equalizer is not suitable
for videos.
3. Change volume: You can change volume by side key
or from option.
Page 34

33
Tips: If the device is low battery or the system memory
full, this module will not work.
3.8 File manager
Manage your files in the phone memory or compatible
memory card (T-Flash card).
Press Menu>File manager.
1. When the memory card is properly loaded, the list will
show the memory card, and the memory card can be
expanded to 32G.
2. The device support connects to computer to download
files with the data cable. It’s the same as a removable
disk. The transmission rate is the standard of USB 2.0.
3.9 Profiles
Customize your ringtones, alert tones for different
environment.
Press Menu>Profiles,
Activate a user profiles
1. There are 6 modes for you select: General (default
Page 35

34
mode), Meeting, Silent, Car, Outdoor and Customize.
2. If you want change the current selected profile, Press
scroll up and down key to the profile you want to activate
and press Select.
Customize profiles
Scroll the desired profile and press the center key.
1. Voice call ring: Select a ringing tone for incoming
voice calls.
2. Video call ring: Select a ringing tone for incoming
video calls.
3. Volume: Set the volume level of the incoming ringing
tone.
4. Message alert: Select a tone for received Messages
(Include SMS and MMS).
5. Vibrating alert: Set the device to vibrate when you
receive a call or message.
6. Key tone: Turn the keypad tones on or off.
7. Warning tone: Turn the warning tones on or off.
Page 36

35
3.10 Settings
Customize several of settings; modifying these settings
will effect operations of your device.
Select Menu>Settings
3.10.1 Phone settings
Select Menu>Settings>Phone settings
Language: Set the language of the device.
Date and time: Set the current date and time, set
the format of the date and time and set Summer
time on or off.
3.10.2 Display settings
Select Menu>Settings>Display settings
Wallpaper: Select picture to show on the home
screen of the device, and set the date and time to
show on or off.
Theme: Set interface display style. There are two
styles to select.
Screen saver: Set the screen state and select
Page 37

36
picture be used for screen saver. If you use clock as
screen saver, you can select digit clock or analog
clock.
Backlight time: Set the backlight time, contains the
keypads light time.
Brightness: Set the brightness level of the screen.
3.10.3 Connection settings
Select Menu>Settings>Connection settings
Data account: Set Access point to you website.
Contact your service provider for detail information.
Bluetooth: Refer to Bluetooth.(Page 39)
3.10.4 Call settings
Select Menu>Settings>Call settings
Phone number: Display your phone number to the
person you are calling or not.
Call waiting: Activate this function; it notifies that
you have an incoming call while you are in a call.
Page 38

37
Call divert: Activate this function, it allows you
forwarding an incoming call when busy, no answer,
not reachable.
Call barring: Restrict outgoing or incoming calls in
vary status. The barring password need to be
supplied by service provider.
Answer mode: Activate any key to answer an
incoming call or not.
Auto redial: Activate this function, your phone will
connect the call after an unsuccessful call attempt.
Minute prompt: Activate to prompt you every
minute when calling.
Answer prompt: Activate to prompt you when
connected with an outgoing call.
Voicemail: Add the number of voicemail center.
Video mail: Add the number of video mail center.
Tips: Some of these functions need network supports.
3.10.5 Network settings
Page 39

38
Select Menu>Settings>Network settings
Network mode: Select the network; Include Auto,
GSM or WCDMA network mode. Select Auto
network mode, the device switches automatically
between networks.
Tips: WCDMA is a network mode of UMTS, it enables
of video calls and faster data transfer.
Search mode: Set network search mode. You can
search network either automatically or manually.
Preferred network: Show a list of all networks that
the provider supplies, and you can set the preferred
network which normally.
3.10.6 Security settings
Select Menu>Settings>Security settings
Automatic key lock: This function is used for avoid
dialing a number by accident. Activate automatic
key lock; the keypad is locked a short time after you
press the last key in standby mode.
1. Lock the keypad manually: In standby mode, press
Page 40

39
RSK key then SPACE key.
2. Unlock the keypad: In standby mode when locked,
press RSK key then SPACE key.
Tips: 1.The international emergency call number 112
can be made when the keypad is locked.
2. You can still answer an incoming call and after the call
keypad is locked again.
Phone lock: This function is used for protect your
device against unauthorized use if it is stolen.
Activate phone lock, you need to input password
when start up the device.
Tips: The default code is 0000.
PIN lock: This function is used for protect your
USIM unauthorized use and is provided with the
USIM. Activate PIN lock, you need to input
password when start up. If you enter your PIN code
incorrect 3 times consecutive, the code is blocked,
and you need to use the PUK code to unblock it
before you can use the USIM again.
Tips: The PIN and PUK is supplied by your network
Page 41

40
provider;
Change phone code: You can change your phone
code. The new code must be 4 to 8 digits.
Warnings
DO REMENBER YOUR PHONE CODE, NOT PERMIT
TO USE WITHOUT PHONE CODE VERIFICATION.
Change PIN: You can change your phone code.
The new code must be 4 to 8 digits.
Change PIN2: Contact with your service provider
for detail information.
3.10.7 Restore factory settings
Select Menu>Settings>Restore factory settings.
To do this, you need your phone code. After do restore
operation, your phone will be restored to out-factory
status, all customized settings and user data will be
removed.
Warnings
FOR REDUCE UNNECESSARY LOSSES, MAKE
Page 42

41
SURE YOU HAVE BACKED YOUR IMPORTANT DATA
BEFORE DO THIS.
3.11 Tools
Your device provides some generic tools.
Press Menu>Organizer.
Calculator: This calculator is used for simple decimal
calculation.
Alarm clock: Set the device to alarm at a special
time.
Calendar: It’s used for Record Anniversary,
Appointment and memo events you need to make.
The alarm tone sounds when the set date and time
of event reached.
The calendar can be viewed as monthly or weekly.
Tips: The device must be switched on when use this
function.
Memo: It’s used for Record something to text
quickly.
World clock: It’s used for view the time in different
Page 43

42
cities of the world. To set a city as locate zone,
scroll to the city and Select Option>Set locate
zone.
Unit converter: It’s used for common measure
conversion. The measure type includes: Length,
Weight, Power, Pressure, Temperature, Time,
Speed, Volume and Currency, Area and Energy.
Stopwatch: It is used for precise calculation of time.
There are two timing type: split timing or laps timing.
Also you can record the time and view the records.
3.12 Bluetooth
With Bluetooth connectivity, you can make a wireless
connection to other compatible devices, such as mobile
phones, computers, headsets, and car kits.
You can use the connection to send images, video clips,
music and sound clips, and transfer files from your
compatible PC.
Warnings: Your device and the Bluetooth device you are
communicating must be within a range of 10 meters, also
Page 44

43
the connection may be subject to interference from
obstructions such as walls or from other electronic
devices.
Select Menu>Bluetooth
Turn on Bluetooth
To communicate with another Bluetooth device, you must
turn on your Bluetooth first.
Select Turn on and press OK or scroll the center key.
Devices
1. Search and Pair
Select Devices>Search, your device will search for all
types of compatible Bluetooth devices. A list of
compatible Bluetooth devices is displayed.
Select a device you want to add, if the device has its own
password, enter this password in your phone; if not,
create a digital password yourself and enter it in both
devices.
2. Send and receive an item
Enter Menu>File manager, and select the item you want
to send, Select Option>Send>Via Bluetooth, Select the
Page 45

44
device you want to send and press the center key.
Make sure your device is visible to other Bluetooth.
When you receive an item, follow the prompt appears on
screen.
Settings
1. Visibility: Decide your device can be found by other
Bluetooth device or not;
2. Device name: Edit a name and the name is shown on
other device when your device is found.
3. Storage: The storage location of received items.
3.13 Browser
Your device provides to connect the internet. And you
can download rings, photos, films or other multimedia
files from websites.
Select Menu>Browser
Enter URL: Input a URL of the website, then press OK to
connect and visit it.
Go to homepage: Visit the homepage, the homepage is
saved in WAP profile which you using now.
Page 46

45
Bookmark: Save the common web address and prompt
a shortcut to visit it. Max to 50 items.
History: List of the last 50 web address you have
accessed
Browser settings: Set the interface or insert way while
visit the website.
Network settings: Set WAP profiles used to connect
with website, includes Homepage, Connection mode,
Data account. Refer to local operators for more details.
3.14 SIM Tool Kit
This is a value-added services supplied by your service
provider.
Tips: You need to insert SIM card to use this function.
Page 47

46
4. FAQS
Please troubleshoot the problems first according to the
following table if an exception occurs. If the problem
persists, please contact the distributor of the phone.
Problem Solution
The battery cannot
be charged
Check whether the charger is
correctly connected to the phone
and the power outlet.
Check whether the charger is
suitable for the phone.
The phone cannot
be powered on
Check whether the battery power
is low.
Check whether the battery is
correctly installed.
The SIM card has
been inserted but
the relevant
information in the
card cannot be
Check whether the SIM card has
been correctly inserted.
Check whether the SIM card is
valid.
Page 48

47
read
Check whether the metal surface
of the card is contaminated, and
clean it with clean cloth.
A message "Input
the PUK" is
prompted on the
phone
Please contact the service
provider to obtain the PUK. Input
the PUK to unlock phone.
Calls cannot be
dialed
Check whether the input phone
number is correct.
Check whether the call barring
function is enabled.
Check whether locates in the
service area.
The conversation
quality is poor
Check whether the phone
normally receives signals.
Rotate the phone or move it to a
place near the window when in a
building.
The other party
cannot local side
Check whether the microphone is
blocked by fittings of the phone or
Page 49

48
voice during the
conversation
other objects.
The sound volume
of the headphone
is too small
Check whether the headphone
has been tuned to the greatest
sound volume.
The received signal
quality is poor or
call drops
frequently occur
Check whether the phone can
detect strong signals.
If there is no signal, move the
phone to a place with strong
signals.
A prompt message
is displayed on the
screen, indicating
that the phone is
not in service area
or the network
connection fails
Check whether phone is in a weak
signal area (e.g. in a tunnel or
surrounded by buildings), move to
another area, and then retry.
Check whether a service option
attempted to be used has not yet
been registered to the service
provider. If such a service option is
needed, please contact the service
provider and learn details.
Page 50

49
5. SAFETY INFORMATION
For your safe and proper use of the mobile phone, please
read the following guidelines carefully:
Switch off the mobile phone when close to chemical
factory, gas station or other explosive objects.
During driving, please use headset for safety purpose;
unless in emergency, always stop the car on roadside
to have a call conversation.
Switch off the mobile phone before boarding.
Because the mobile phone can cause interference in
aircraft. Using the mobile phone is dangerous and
illegal;
Pay special attention to use of the mobile phone near
medical equipment. (E.g.: heart pacemaker, deaf-aid
etc.) The mobile phone can cause interference with
them.
Use only approved accessories and batteries;
None-original factory’s accessories and parts will lose
guarantee.
Page 51

50
Do not dismantle the mobile phone without
permission. In case of failure, please contact the
supplier as soon as possible.
Do not plug the charger into the mobile phone and
charge without battery. Always power off the mobile
phone when taking out the battery; otherwise the
memory of the phone may be damaged.
When charging the mobile phone, always keep it in
the place with good ventilation, heat sink and away
from flammable and explosive objects.
In order to avoid demagnetization, always keep the
mobile phone away from magnetic objects, such as
CD, credit card etc.
Ensure the mobile phone not to contact any liquid;
once such case occurs, remove the battery and
contact the supplier immediately.
Do not use the mobile phone in the environment at
too high or too low temperature, never expose the
mobile phone under strong sunshine or too wet
environment. The suitable temperature for the phone
Page 52

51
and accessories is 0°C-40°C. The height to use the
phone shall be less than 2,000m.
Do not use liquid or wet cloth with strong cleanser to
clean the mobile phone.
This mobile phone has shooting, videoing and audio
recording functions, which shall be used as per the
related laws and regulations.
Always keep the mobile phone out of children’s reach.
Do not throw or vibrate the mobile phone because
violent treatment to the mobile phone may damage
the inner circuits and precise structures.
Please do not discard the waste battery into general
household garbage. Please deal with the waste
battery according to provisions where they are
definitely made.
Tips: This user manual is based on simplified Chinese
operation mode; so it may vary in English operation
mode.
Warnings
We will not be bear any responsibility for any
Page 53

52
incompliance with the above guidelines or improper use
of the mobile phone. Our company keeps the right to
make modifications to any of the content here in this user
guide without public announcement in advance. The
content of this manual may vary from the actual content
displayed in the mobile phone. In such case, the latter
shall govern.
Page 54

53
FCCRegulations:
This mobile phone complies with part 15 of the FCC
Rules. Operation is subject to the following two
conditions: (1) This device may not cause harmful
interference, and (2) this device must accept any
interference received, including interference that may
cause undesired operation.
This mobile phone has been tested and found to
comply with the limits for a Class B digital device,
pursuant to Part 15 of the FCC Rules. These limits are
designed to provide reasonable protection against
harmful interference in a residential installation. This
equipment generates, uses and can radiated radio
frequency energy and, if not installed and used in
accordance with the instructions, may cause harmful
interference to radio communications. However, there is
no guarantee that interference will not occur in a
particular installation If this equipment does cause
harmful interference to radio or television reception,
Page 55

54
which can be determined by turning the equipment off
and on, the user is encouraged to try to correct the
interference by one or more of the following measures:
-Reorient or relocate the receiving antenna.
-Increase the separation between the equipment and
receiver.
-Connect the equipment into an outlet on a circuit
different from that to which the receiver is connected.
-Consult the dealer or an experienced radio/TV
technician for help.
Changes or modifications not expressly approved by the
party responsible for compliance could void the user‘s
authority to operate the equipment.
The antenna(s) used for this transmitter must not be
co-located or operating in conjunction with any other
antenna or transmitter.
Page 56

55
4RF Exposure Information (SAR)
This mobile phone meets the government’s requirements
for exposure to radio waves.
This phone is designed and manufactured not to exceed
the emission limits for exposure to radio frequency (RF)
energy set by the Federal Communications Commission
of the U.S. Government.
The exposure standard for wireless mobile phones
employs a unit of measurement known as the Specific
Absorption Rate, or SAR. The SAR limit set by the FCC
is 1.6W/kg. *Tests for SAR are conducted using
standard operating positions accepted by the FCC with
the phone transmitting at its highest certified power level
in all tested frequency bands. Although the SAR is
determined at the highest certified power level, the actual
SAR level of the phone while operating can be well below
the maximum value. This is because the phone is
designed to operate at multiple power levels so as to use
only the poser required to reach the network. In general,
Page 57

56
the closer you are to a wireless base station antenna, the
lower the power output.
The highest SAR value for the model phone as reported
to the FCC when tested for use at the ear is 0.719 W/kg
and when worn on the body, as described in this user
guide, is 0.575 W/kg (Body-worn measurements differ
among phone models, depending upon available
accessories and FCC requirements.)
While there may be differences between the SAR levels
of various phones and at various positions, they all meet
the government requirement.
The FCC has granted an Equipment Authorization for
this model phone with all reported SAR levels evaluated
as in compliance with the FCC RF exposure guidelines.
SAR information on this model phone is on file with the
FCC and can be found under the Display Grant section of
www.fcc.gov/oet/ea/fccid after searching on FCC ID:
WA6S815.
Page 58

57
For body worn operation, this phone has been tested and
meets the FCC RF exposure guidelines for use with an
accessory that contains no metal and the positions the
handset a minimum of 1.5 cm from the body. Use of
other accessories may not ensure compliance with FCC
RF exposure guidelines. If you do not use a
body-worn accessory and are not holding the phone at
the ear, position the handset a minimum of 1.5 cm from
your body when the phone is switched on.
 Loading...