

Page 1

s700
User Manual
Page 2

Claims
We reserve our right to make changes and improvements
to any of the products described in this manual without
prior notice. Under no circumstances shall we be
responsible for any loss of data, income, or any special,
incidental, consequential or indirect damages howsoever
caused.
The content of this manual is provided “as is”. To the
fullest extent permissible by law, we make no
representations or warranties of any kind, either express
or implied, for, but not limited to, the accuracy,
merchantability, and fitness of this manual for a particular
purpose.
2
Page 3

Contents
For Your Safety ................................................................................................................................... 6
Brief Introduction ............................................................................................................................... 7
Your phone’s label ....................................................................................................................... 7
Phone image ................................................................................................................................ 8
Key definition .............................................................................................................................. 9
Touch screen .............................................................................................................................. 10
Silent mode ................................................................................................................................ 11
Screen sleep ............................................................................................................................... 11
Screen lock ................................................................................................................................ 12
Wireless off .............................................................................................................................. 13
Making phone calls ................................................................................................................... 13
Power on/off .............................................................................................................................. 14
Home screen ...................................................................................................................................... 15
Home screen .............................................................................................................................. 15
Extended Home screen .............................................................................................................. 15
Create Home screen shortcuts and widgets .............................................................................. 15
Remove items from the Home screen ....................................................................................... 16
Move objects on the Home screen ............................................................................................ 16
Create and delete folders on the Home screen .......................................................................... 17
Customize Home screen wallpaper ........................................................................................... 17
Notification and connection status icons .................................................................................. 19
Getting Started ................................................................................................................................... 20
Installing the battery .................................................................................................................. 20
Charging the battery .................................................................................................................. 21
Battery tips ................................................................................................................................ 22
Use and maintenance ................................................................................................................. 23
System settings .................................................................................................................................. 25
Wireless & networks ................................................................................................................. 25
Call settings ............................................................................................................................... 29
Sound ........................................................................................................................................ 29
Display ...................................................................................................................................... 31
Location & Security ................................................................................................................. 31
Applications ............................................................................................................................. 33
Accounts & sync ....................................................................................................................... 34
Privacy ....................................................................................................................................... 35
SD card & phone storage .......................................................................................................... 35
Language & keyboard ............................................................................................................... 36
Voice input & output ................................................................................................................. 36
Accessibility .............................................................................................................................. 37
Date & time ............................................................................................................................... 37
About phone ............................................................................................................................. 38
3
Page 4

Contacts ............................................................................................................................................. 38
Your contact list ......................................................................................................................... 38
Search for a contact ................................................................................................................... 40
Add a contact ............................................................................................................................. 40
Assign favorites ......................................................................................................................... 41
Edit contact details .................................................................................................................... 41
Delete contact ............................................................................................................................ 42
Communicate with a contact ..................................................................................................... 42
Display a contact group ............................................................................................................. 44
Contacts settings ........................................................................................................................ 44
Email and Messaging ........................................................................................................................ 45
Email ......................................................................................................................................... 45
SMS and MMS messaging ........................................................................................................ 50
Browser .............................................................................................................................................. 58
About the Browser .................................................................................................................... 58
Zoom and navigation in Web pages .......................................................................................... 58
The Browser screen ................................................................................................................... 59
Manage bookmarks ................................................................................................................... 59
Set your home page ................................................................................................................... 61
Browser history ......................................................................................................................... 62
View the most visited webs ....................................................................................................... 62
Download Web files and applications ....................................................................................... 62
View your downloads ................................................................................................................ 63
Browser settings ........................................................................................................................ 63
Calendar ............................................................................................................................................. 67
Calendar views .......................................................................................................................... 67
Create an event .......................................................................................................................... 67
Go to today ................................................................................................................................ 67
View an event ............................................................................................................................ 68
Camera, Camcorder & Gallery ......................................................................................................... 68
Before you begin ....................................................................................................................... 68
Camera ....................................................................................................................................... 69
Video Recorder .......................................................................................................................... 69
Settings of Camera, Camcorder and Gallery ............................................................................ 70
Gallery ....................................................................................................................................... 71
Music & Video player ....................................................................................................................... 73
Music ......................................................................................................................................... 73
Tools .................................................................................................................................................. 78
Alarm Clock .............................................................................................................................. 78
Calculator .................................................................................................................................. 81
File Manager ............................................................................................................................. 81
Battery Information ........................................................................................................................... 82
Accessories ........................................................................................................................................ 83
Safety of the battery .................................................................................................................. 83
4
Page 5

Rapid travel charger .................................................................................................................. 84
Data cable .................................................................................................................................. 84
5
Page 6
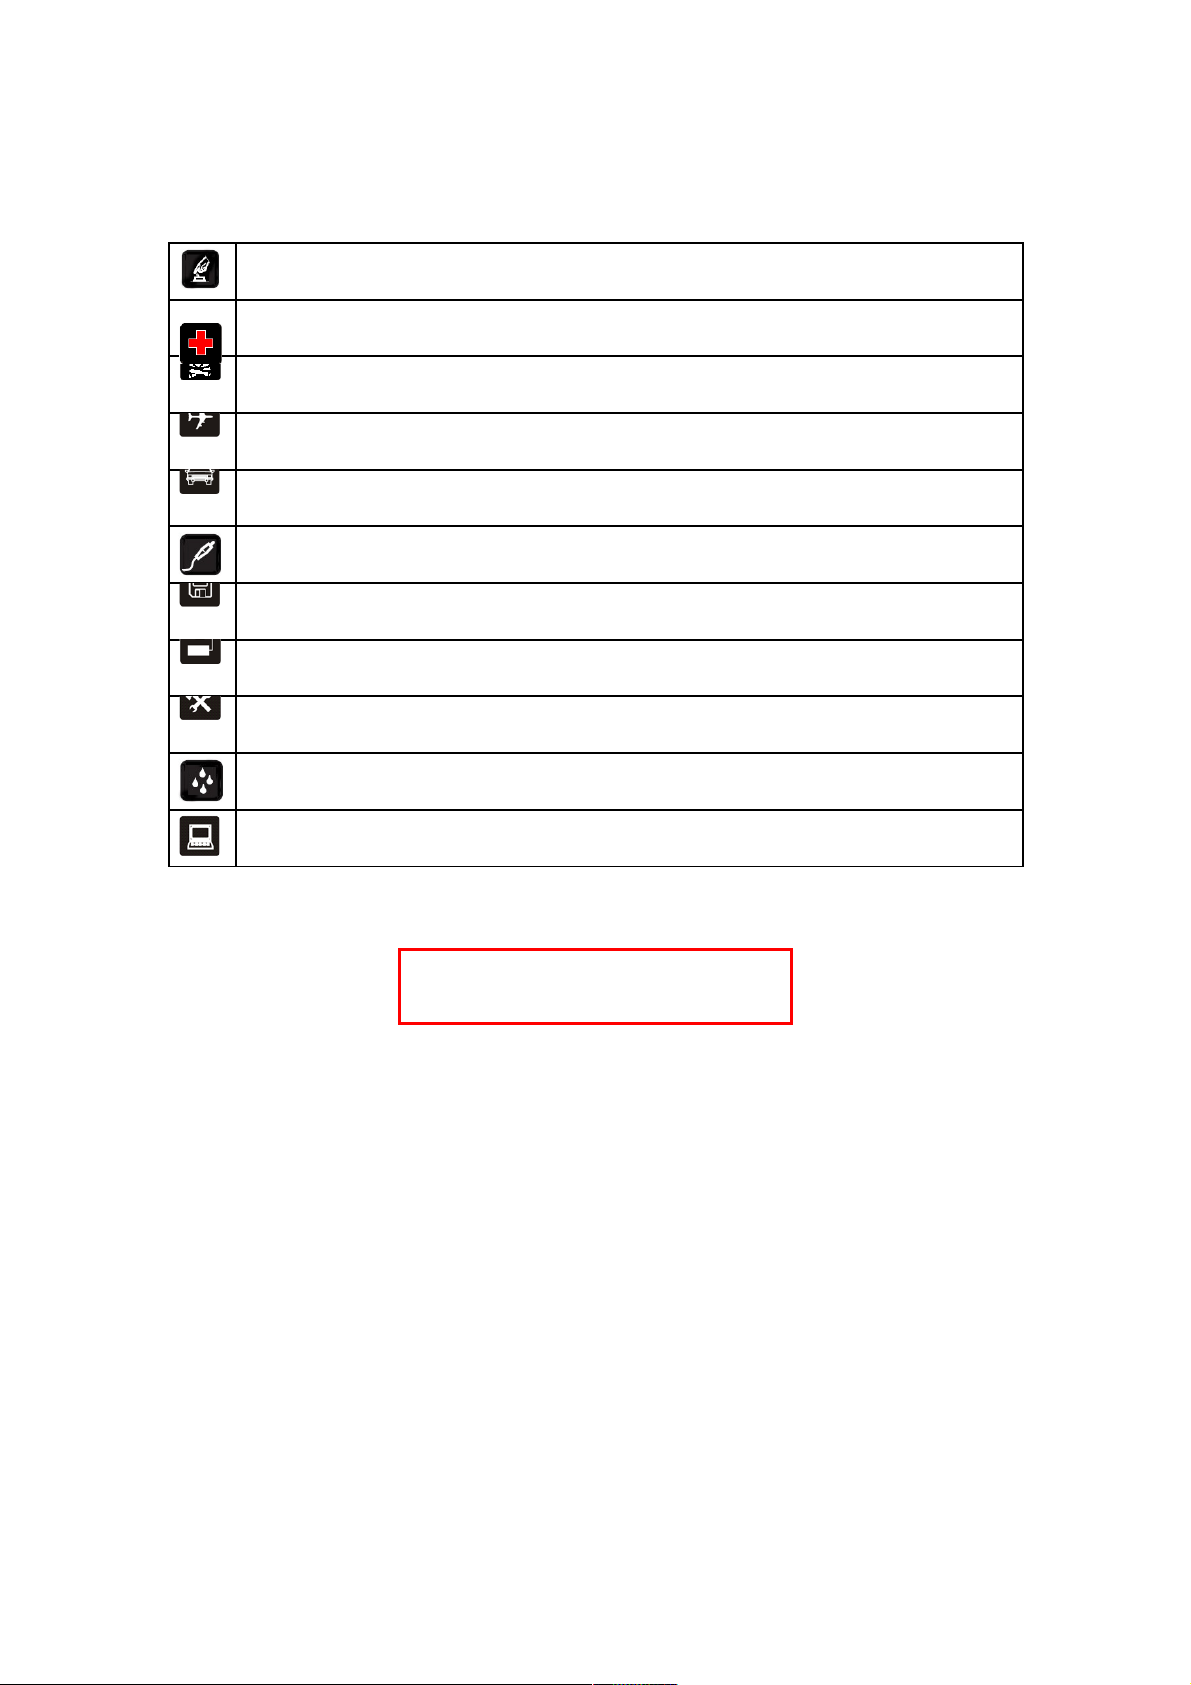
For Your Safety
SWITCH ON SAFELY Do not use in prohibited areas
or when it may cause any interference or danger.
SWITCH OFF IN HOSPITALS Follow any restrictions.
Switch the phone off near medical equipment.
SWITCH OFF WHEN REFUELING Do not use the
phone at a refueling point. Do not use near fuel or
SWITCH OFF IN AIRCRAFT Follow any restrictions.
Switch off the phone during the flight as wireless
ROAD SAFETY Obey all local laws. Please use the
hands-free kit while driving.
ACCESSORIES AND BATTERIES Use only
approved accessories and batteries. Do not attempt
BACKUP IMPORTANT INFORMATION Remember
to make backup copies or keep a written record of all
CONNECTING TO OTHER DEVICES When
connecting to any other device, read its user manual
MAINTENANCE Only authorized and qualified
personnel may repair this product.
WATER RESISTANCE Your phone is not water-
resistant. Keep it dry.
INTERFERENCE All wireless devices may be
susceptible to interference, which could affect its
Damage to the security seal will invalidate the
warranty.
Warning: Improper use will invalidate the warranty.
6
Page 7

Brief Introduction
Your phone’s label
The barcode label includes important information about
services and customer support. Please keep it properly.
7
Page 8
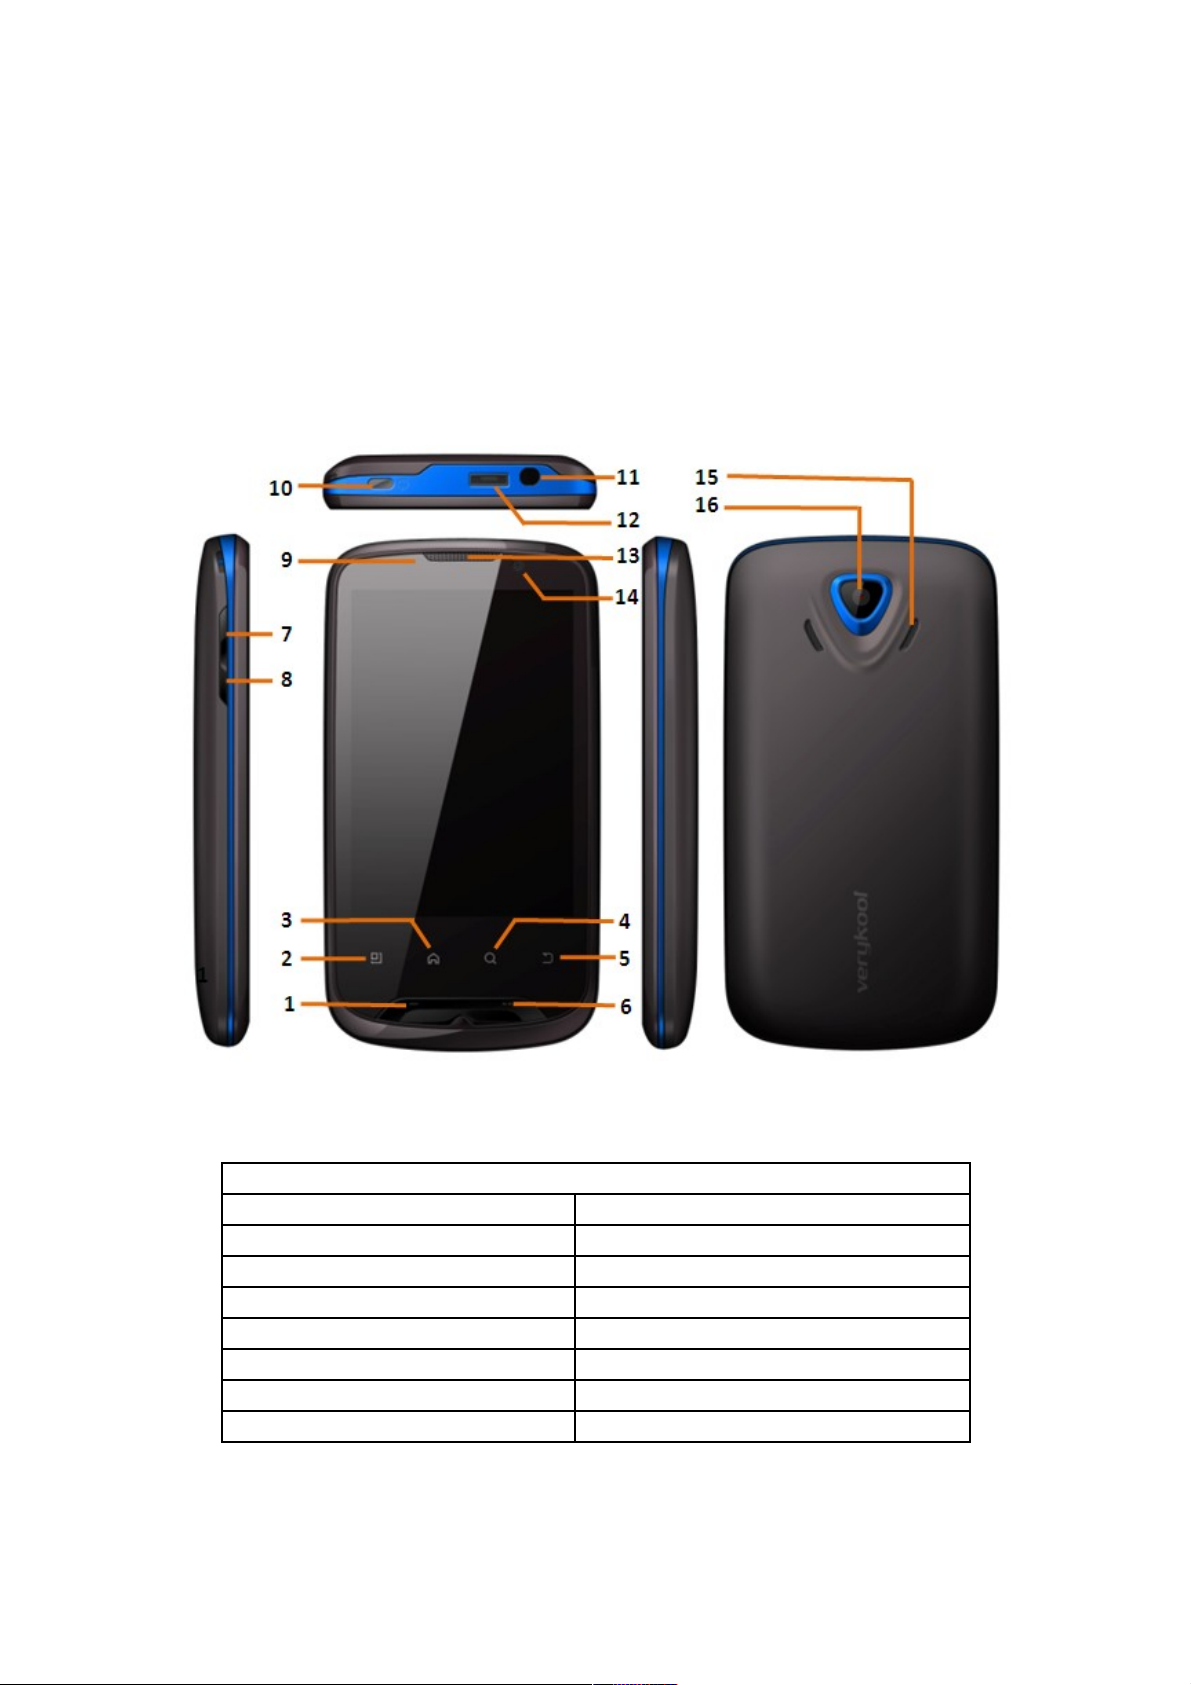
Phone image
Note: All the illustrations, simulated screen and related
images in the manual are for reference to your handset for
actually.
Functions Description
1. Send key 9. Charging indicator light
2. Menu key 10. Power key
3. Home key 11. Earphone port
4. Search key 12. USB port
5. Back key 13. Receiver
6. End key 14. Front Camera
7. Volume Up key 15. Speaker
8. Volume Down key 16. Back Camera
8
Page 9

Key definition
A few simple keys make it easy to operate.
Send key:
Press to answer an incoming call.
Press to enter the call log
interface.
Home key
Press to return to the home screen from anywhere on
your phone.
Long press to pop up the recent applications window.
Press home key on home screen to choose main
interface window.
Back key: Press to go back to previous menu, or to
dismiss a dialog box or menu.
Menu key: Press to open a list of actions you can take on
the current screen.
Volume keys: Press to adjust the volume of the call,
video, FM etc.
End key: When on a call, press to hang up.
9
Page 10

Touch screen
Selection
To select an item or button on the screen, touch the item
directly with your fingertip. You will know which item on the
screen is selected when its color changes.
Context menus
To open the context menu for an item on the screen, touch
& hold the item on the screen with your fingertip.
Scroll
To scroll up or down in a list or page on the screen, you
can slide your finger up/down on the screen.
Crop pictures
When creating wallpaper or an icon from a picture, you
can control how the picture is cropped. Touch & hold an
edge of the cropper to reveal the sizing arrows then drag
the edge in or out to the size you want. Touch & drag the
center of the cropper to reselect the chosen area of the
picture.
Drag items
In some contexts you can drag items on the screen with
your fingertip. Moving the cropper frame within a picture is
10
Page 11

one example.
Screen orientation
Your screen’s orientation will switch automatically when
the phone orientation changes. Press the Menu key, then
select Settings> Display>Auto-rotate screen. Unselect the
check box to let your screen keep the portrait orientation.
Silent mode
Press the Menu key, then select Settings> Sound>Silent
mode.
Other ways to silence your phone:
Press and hold the Volume down key to zero volume.
Long press Power key and select Silent mode in the
Phone options list
Screen sleep
After a period of inactivity, your phone will go to sleep
(display will turn black). In sleep mode, your phone uses
less battery power. You can control this behavior by:
Set screen timeout period
1.
Press the Menu key to select Settings>Display.
2.
Select Screen timeout, then select a time from the menu.
Prevent sleep while charging
11
Page 12

1.
Press the Menu key to select Settings>Applications.
2.
Select Development, and then select the Stay awake
check box.
Lock screen & put phone to sleep (immediately)
Press the Power key, phone will go to sleep mode or lock
screen except on a phone call,
Screen lock
While not in a call, to lock your control buttons and screen
from accidental touch activation, press the Power or End
key.
You can increase the security of your phone by setting a
screen unlock pattern. Once set, in order to unlock your
screen, you’ll have to draw the correct unlock pattern. You
can set your screen unlock pattern as follows:
1.
Press the Menu key and select Settings.
2.
Select location & Security, then scroll down and enter
into the Screen unlock pattern section.
3.
Set or change your unlock pattern by selecting Pattern,
PIN, or Password, as applicable.
4.
Follow the prompts to define your pattern.
Note: You must slide your finger along the screen to
12
Page 13

create the pattern, not select individual dots. Connect at
least four dots.
5.
When you unlock your screen, if you want your pattern to
be hidden as you draw it, clear the Use visible pattern
check box.
Wireless off
If you need to turn off all your phone radios, switch to
“airplane” mode by:
1.
Return to the Home screen, then press the Menu key
and select Settings.
2.
Select Wireless & networks>Mode Settings, then select
the Airplane mode check box. When selected the
airplane mode icon displays on the status bar and all
wireless connections are disabled.
3.
To enable wireless connections again, return to this
settings screen and clear the Airplane mode check box.
Tip: To set your handset as Airplane mode quickly, press
and hold the Power key to open the option menu, and
select Airplane mode.
Making phone calls
Press the icon to dial a number and press the End key
13
Page 14

to end a call.
While in a call, press the Menu key to reveal the in-call
options.
Dialpad: Displays the on-screen dial pad.
Speaker: Turn on the speakerphone.
Mute: Mutes your side of the conversation.
End: end the call
Add call: Add new call.
Bluetooth: The Bluetooth headset is being used via
Bluetooth connection.
Power on/off
To power off your phone, press and hold the Power key.
On release, the phone options menu opens. Then select
Power off.
To power on again, press and hold the Power key. (Tip:
The phone will vibrate after you press and hold the Power
key, and please be patient to wait for the phone to power
on.)
14
Page 15

Home screen
Home screen
The Home screen is your starting point for using all the
applications on your phone. You can customize your
Home screen to display applications, shortcuts and
widgets as you like.
Extended Home screen
The Home screen actually extends beyond the screen
width. Slide your fingertip left and right along the screen to
reveal the full width of the Home screen. This additional
space gives you more room to customize Home with
applications, shortcuts, and widgets.
Create Home screen shortcuts and widgets
1.
Start from the Home screen, then touch & hold the
screen with your fingertip. The Add to Home screen
menu opens.
2.
Select a Shortcuts to applications or some of your saved
information (such as a music playlist, a Web bookmark,
or folder, etc), Widgets (analog clock, calendar, or music,
etc), folders (all contacts, contacts with phone numbers,
or starred contacts), or Wallpapers for your Home
15
Page 16

screen.
3. The application, shortcuts, folders, or widgets appear
on the screen. If you select Wallpaper, you’ll be asked to
select a picture.
Tip: To create an application shortcut quickly, touch the
application tab to reveal all the application icons, then
touch & hold an application icon. Its shortcut is added to
the Home screen.
Remove items from the Home screen
To remove a shortcut or widget from your Home screen,
touch & hold the item. Then click Remove on the dialog
box to delete the item. At the same time, the application
tab turns into a Trash button. Drag the item to the Trash
button and release.
Move objects on the Home screen
1. To move an icon or other item on the Home screen, you
must first touch & hold it to enter move mode. The object
will magnify when it’s ready to be moved.
2. Without lifting your finger (or you’ll drop out of move
mode), drag the object to the new position. To move an
item to a section of the Home screen not in view, move it
16
Page 17

to the edge of the screen and hold it there for a moment.
The screen view will shift; position the object and
release.
Create and delete folders on the Home screen
You can add folders to hold application icons or shortcuts:
1.
Press the Menu key and select Add, or touch & hold the
screen to open the Add to Home screen menu.
2.
Select Folders>New folder. A new folder appears on the
screen.
3. Touch & hold any of the application icons or shortcuts
to enter move mode (the icon will magnify), then drag the
item to the top of the new folder.
4. Touch the folder once to open it; touch the folder’s title
bar to close it.
5.
To rename a folder, first open the folder. Then touch &
hold the folder title bar to open the Rename folder dialog
box. Type your new folder name, then select OK.
6. To delete a folder, touch & hold the folder to enter move
mode. Drag the folder to the Trash button and release.
Customize Home screen wallpaper
Wallpaper your Home screen with pictures you have
17
Page 18

stored on your memory card, or select a picture from the
Wallpaper gallery that comes preinstalled on your phone:
1.
Press the Menu key and select More>Wallpaper.
Alternatively, you can touch & hold the Home screen to
open the Add to Home screen menu.
2.
Select Wallpaper, and then select either Pictures or
Wallpapers
3.
If you select Wallpapers, then scroll through the gallery.
Touch a thumbnail to highlight it and view the larger
version. When you chose one picture as your wallpaper,
make sure it’s highlighted, and then select Set wallpaper.
4.
If you select Pictures, your picture album opens. Note
that if this is the first time you have viewed the pictures
stored on your memory card from your phone, it may
take a while for the pictures to load.
Navigate to find the picture you want to use, and then
select it.
The cropper appears. Touch & hold an edge of the
cropper to reveal the sizing arrows, then drag the edge
in or out to size. Touch & drag the center of the cropper
to move it within the picture.
When you’re happy with the cropped area, select Save
18
Page 19

or press the Back key.
Notification and connection status icons
Along the top of your phone screen is the status bar. On
the left side, icons will appear, notifying you of a new
message, upcoming calendar event or something else you
should notice. On the right side of the status bar, you’ll see
connection status icons.
New SMS or MMS
Alarm is set
Song is playing
Data is syncing
SD card unload
More (undisplayed) notifications
Call in progress
Missed call
Speakerphone is on
Ringer is off (Silent mode)
Ringer on vibrate only
Phone on mute
Content downloaded
Sign-in/sync error
19
Page 20
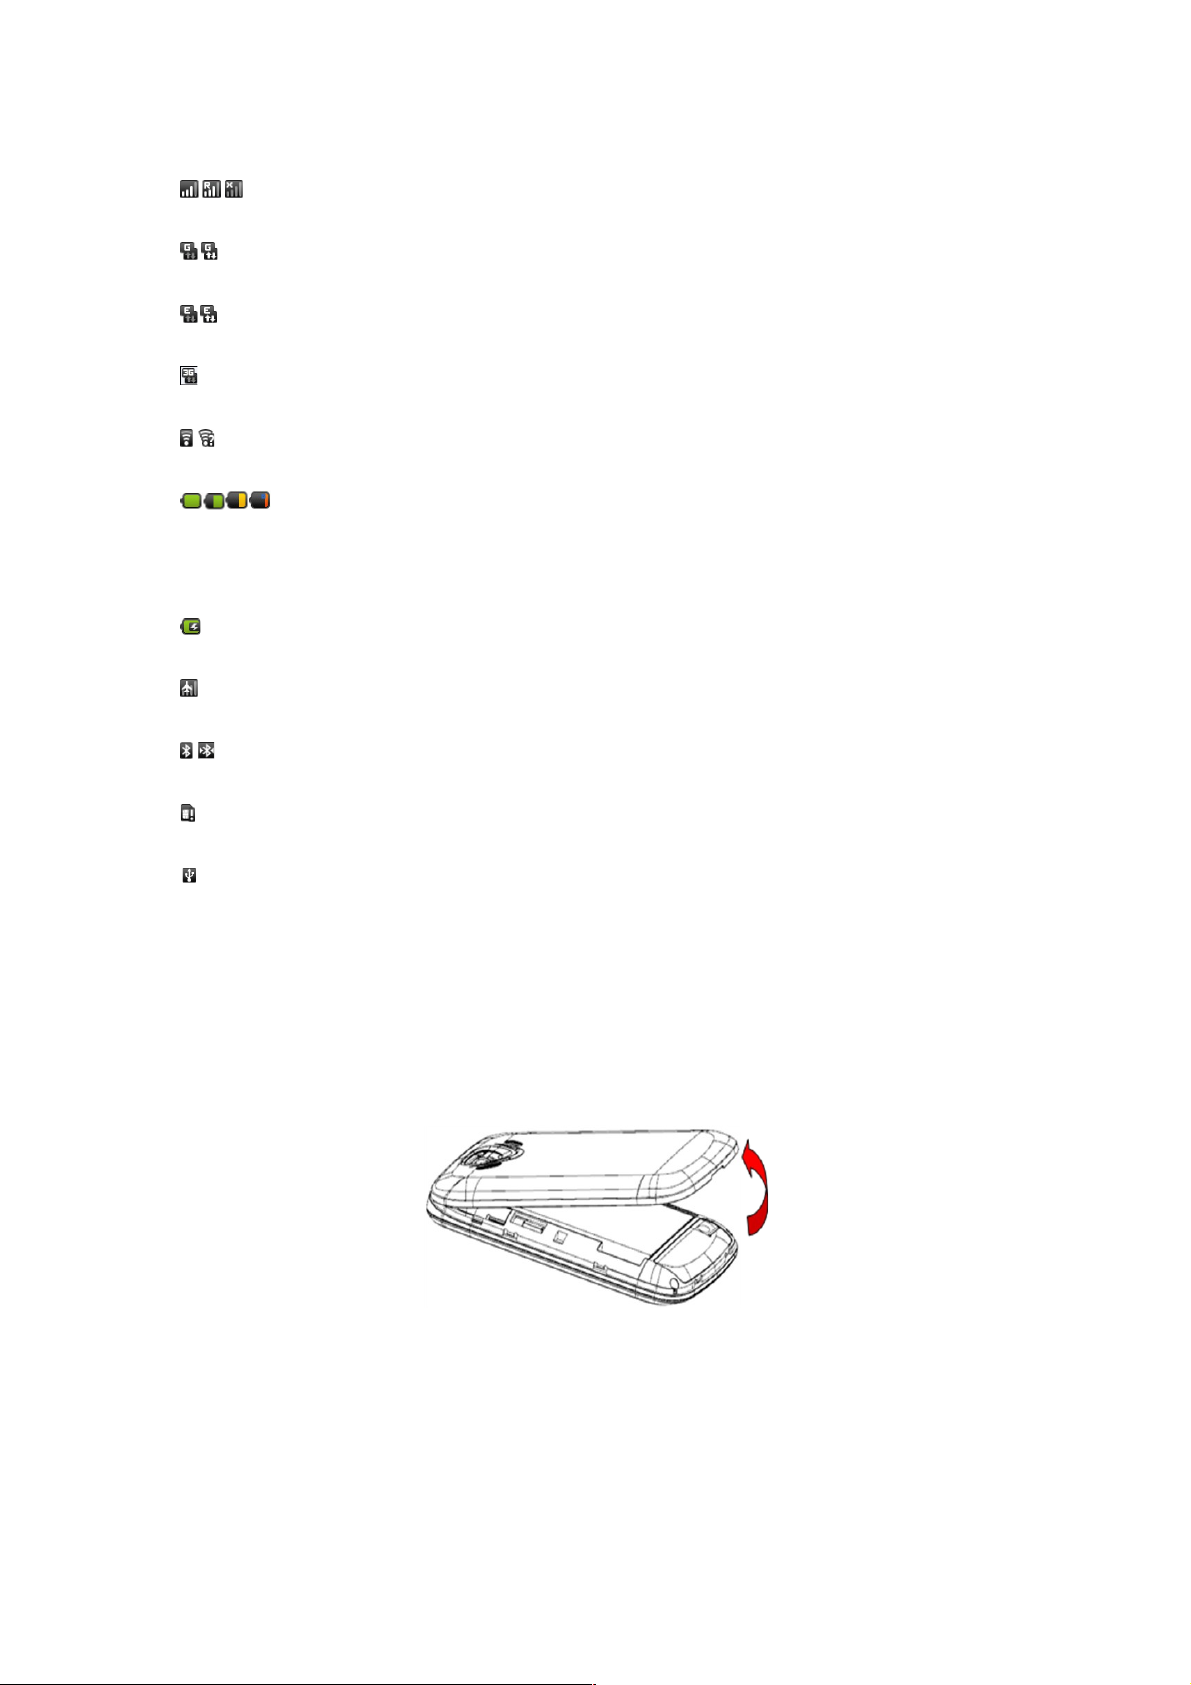
GSM signal, roaming, no signal
GPRS service connected, data flowing
Edge service connected, data flowing
W-CDMA service connected, data flowing
Wi-Fi service connected, network available
Battery charge indicators: full, half-full, low, very
low!
Battery is charging
Wireless services are off (Airplane mode)
Bluetooth® is on, Bluetooth device connected
No SIM card in phone
USB connected
Getting Started
Installing the battery
1.
Take off the battery cover.
2.
Installing a SIM-card
20
Page 21
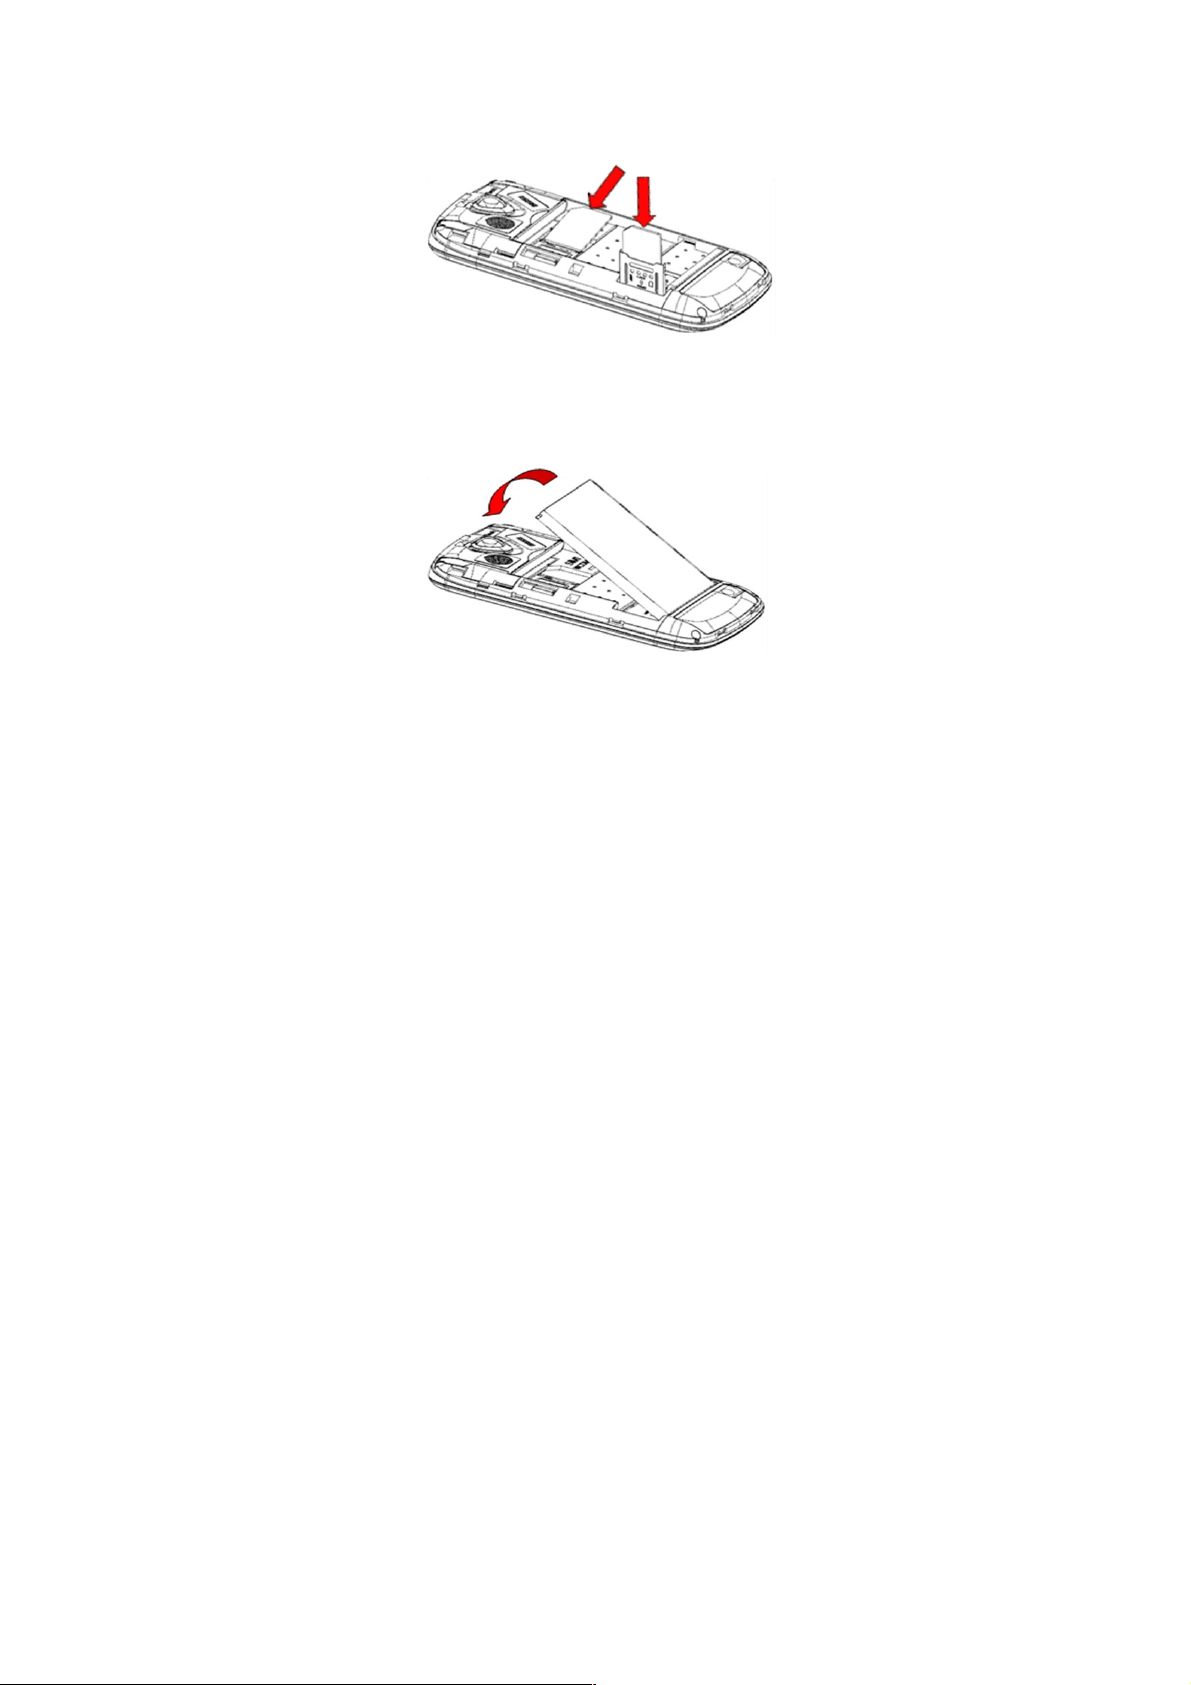
Note: The SIM-card slot is at the downside of the battery.
3.
Installing battery
Charging the battery
Warning: To avoid damaging the phone, please do not
remove the battery when the phone is charging.
To ensure the best performance of your phone’s battery,
please charge the battery fully before using it for the first
time (Approx. 12 hours), using the method described
below. Please note: some batteries require several full
charge/discharge cycles to reach their best performance.
1.
Make sure the battery has been installed properly before
charging.
2.
Plug the travel charger into the USB connector, and then
plug the other end of the travel charger into the electrical
outlet.
21
Page 22

Tips
:
If your phone is off, there will be a blue light at the upper
left corner of the phone’s front side when being charged.
When the phone is fully charged, the blue light will
disappear. It may take 4-5 hours to fully charge.
If your phone is on, there will be a charging indicator
on the status bar while charging.
When your phone is on, try to avoid making or
answering calls while charging.
The phone also can be charged from your PC when it
is connected with the USB cable, but it will take a longer
time to charge if you mount USB storage.
If your batter energy is too low, your phone may be
unable to be switched on. Please charge your phone for
a few minutes before you switch it on.
Battery tips
Use only the batteries, data cable and chargers
approved by the original manufacturer. Do not use a
non-approved data cable or chargers, as it may damage
the battery.
Do not short-circuit the battery. Please store the battery
22
Page 23

inside the battery box to prevent accidental short-
circuiting of the battery contacts.
Do not place or charge the battery in very hot or very
cold locations as extreme temperatures can adversely
affect the battery.
Please keep the charger and handset out of the reach
of young children.
Please ensure that the metal contacts of the battery are
kept clean and free of dirt.
The battery can be charged and discharged hundreds
of times, but it will be eventually worn out. Please
replace the battery when the battery capacity falls to
approximately 50% of its original storage capacity.
Use and maintenance
The following suggestions will help you use and maintain
your mobile.
Please keep dry. Rainwater, humidity, and any kinds of
liquid or moisture might contain minerals which could
corrode the circuit.
Moving parts may be damaged if you put or use the
phone in a dirty or dusty place.
23
Page 24

Please do not use or store the phone in a high
temperature environment, as this may result in damage
to the electronic or plastic parts.
Please do not use or store the phone in a very low
temperature environment.
Please do not use any chemicals, detergent, or caustic
detergents to clean the mobile. If you want to clean it,
please wipe it gently using a soft cloth made damp with
some soapy water.
Please do not paint the phone. Paint might clog the
moving parts and prevent proper operation.
Only use the headset provided, or an approved spare.
If the mobile has gotten wet, please switch it off
immediately and remove the battery. Leave it to dry
thoroughly before using it again.
To get the maximum talk and standby times from your
battery, please turn down the volume and reduce the
backlight and contrast.
Please keep all metal objects away from the charger
port located at the top of the phone to avoid damaging
the electronic circuits.
24
Page 25

System settings
Control phone-wide settings from the Home settings
screen: Press the Menu key to select Settings. You can
also select the Settings icon from the Application screen.
Wireless & networks
Mode Settings
1. Airplane mode: Disable all wireless connections.
2. Only SIM1 on: Turn on or off SIM1 connection.
3. Only SIM 2 on: Turn on or off SIM2 connection.
4. Both SIM on: Turn on both SIM connections.
Wi-Fi
Wi-Fi on/off
Select Wi-Fi check box if you prefer to use Wi-Fi for your
data connection.
Menu Key > Settings > Wireless & networks > Wi-Fi
settings
Note: Please turn off Wi-Fi if you don’t use it to save
battery
Wi-Fi Search and connection
1.
Press Menu Key > Settings > Wireless & networks > Wi-
Fi settings.
25
Page 26

2.
View and scan for available networks - Press the Menu
key and select Scan.
3. Connect to a network - Select it from the network list.
4. Provide your username or password if required.
5.
Press Wi-Fi check box again to turn off.
Manually add Wi-Fi network
1.
Press Menu Key > Settings > Wireless & networks > Wi-
Fi settings.
2.
Click Add WPS network, input SSID and Pin Number,
then click Start.
Bluetooth
Bluetooth on/off
Press Menu Key > Settings > Wireless & networks
>Bluetooth, click this check box again to turn Bluetooth
services off.
Bluetooth settings
You can make the Bluetooth settings as the following:
1.
Rename your device.
2.
Select to be discoverable, or not discoverable.
3.
Click Advanced settings to make Bluetooth advanced
settings.
4.
Rescan for devices –select Scan for devices.
26
Page 27

Send/Receive files
1. Scan for devices.
2. Select the device you want to pair with.
3. Type PIN to pair.
4. After the pair succeeds, you can send/receive files
between two devices via Bluetooth.
Tips: You can send bookmarks in browser, pictures in
gallery, camera and camcorder, or files in File Manager.
Disconnect with cell phone
Click the phone name and choose cancel.
Tethering & portable hotspot
Share your phone’s mobile data connection via USB or as
a portable Wi-Fi hotspot.
USB tethering
You can tether your phone to your computer with a USB
cable, to share your phone’s internet connection with your
computer.
Note: you can’t mount your phone’s micro SD card on
your computer when USB tethered
Portable Wi-Fi hotspot
You can turn your phone into a portable Wi-Fi hotspot, to
share your phone’s internet connection with one or more
27
Page 28

computers or other devices.
1. When your phone is serving as a Wi-Fi hotspot, you
can’t use your phone’s applications to access the internet
via its Wi-Fi connection.
2. You configure the hotspot with the Wi-Fi hotspot
settings.
Mobile network settings
1.
Data Enabled: Enable data access over mobile network.
2.
Data Connection: Default SIM for data connection.
3.
SIM 1 data roaming: Connect to data services when
roaming.
4.
SIM 2 data roaming: Connect to data services when
roaming.
SIM 1 other settings
1.
Access Point Names: Do not change this setting unless
advised to do so by your wireless operator.
2.
Use only 2G networks: Choose 2G network to save
battery.
3.
Network operators: Select a network operator.
SIM 2 other settings
1.
Access Point Names: Do not change this setting unless
advised to do so by your wireless operator.
28
Page 29

2.
Use only 2G networks: Choose 2G network to save
battery.
3.
Network operators: Select a network operator.
Call settings
SIM 1 / SIM 2 Call Settings
Fixed Dialing Numbers
This feature allows you to restrict outgoing calls to a fixed
set of numbers.
To enable this feature you must know the SIM PIN2 code
for your phone.
You can get this number from your wireless operator if this
feature is supported.
Voicemail
Select to set a voicemail number that isn’t being read from
the SIM card.
Other Call Settings
From selecting this, you can choose Call forwarding,
Caller ID and Call waiting.
Sound
Silent mode
Select to open the silent mode. All sounds except media &
29
Page 30

alarms are silenced.
Vibrate
Select to have your phone vibrate for incoming calls.
Volume
Select to open the volume control, then slide your finger
along the volume bar to set incoming call volume and
notification volume.
SIM 1/SIM 2 ringtone
Select to set your default incoming call ringtone.
Notification ringtone
Select to set your default notification ringtone.
Audible touch tones
Select to have a tone sound when you use the onscreen
Dialer.
Audible selection
Select to have a sound play when you select an item on
the screen.
Haptic feedback
Vibrate when pressing soft keys and on certain UI
interactions
30
Page 31

Display
Brightness
Select to open the brightness control, then slide your
finger along the brightness bar to set the level. In sunlight,
increase the level.
Auto-rotate screen
Select to switch orientation automatically when the phone
orientation changes (except the home screen)
Animation
Select to show animation when opening/closing windows.
Screen timeout
Adjust the delay before the screen automatically turns off
Camera
Set camera default values
Enable proximity sensor
Calibrate enable proximity sensor
G-Sensor Calibration
Calibrate the G-Sensor
Location & Security
My location
Use wireless networks
31
Page 32

Select to use wireless networks.
Use GPS satellites
Enable your handset to receive GPS data.
Screen unlock
Create a pattern you will be asked to draw before your
screen is unlocked. You can select to make the pattern
visible or invisible as you draw it.
SIM card lock
Lock your SIM card for extra security. You can also
change your SIM card PIN from this screen. If you don’t
know your SIM PIN, you can obtain it from your wireless
operator.
Passwords
Select Visible passwords to have your password display
as you type it.
Device administration
Select device administrators to add or remove device
administrators.
Credential storage
Allow applications to access secure certificates and other
credentials.
Install from SD card
32
Page 33

Install encrypted certificates from SD card.
Set password
Set or change the credential storage password.
Clear storage
Clear credential storage of all contents and reset its
password.
Applications
Unknown sources
Select this check box if you want the ability to download
applications from the Web. With this check box not
selected, you will only be able to download applications
from Android Market.
To ensure your personal data and phone remain secure, it
is recommended you not select this check box.
Manage applications
View all the applications stored on your phone and how
much space they occupy. If you’ve downloaded an
application from Android Market, you can uninstall it from
this screen.
Select a specific application to:
1.
Clear your user data – Choose one application, press
33
Page 34

Clear data.
2.
Uninstall - If you’ve downloaded an application from
Android Market, you will be able to uninstall it from this
screen by selecting Uninstall.
Running services
View and control currently running services.
Development
If you are an application developer, you may be interested
in these settings:
USB debugging
If you want be able to communicate with your phone
directly via USB, select the USB debugging check box.
Stay awake
To prevent your phone from sleeping while charging (via
power adapter or USB), select the Stay awake check box.
Allow mock location
To allow mock location, select the Allow mock location,
select the Allow mock location check box.
Accounts & sync
Before using this function, please add your e-mail account
firstly. Choose Background data box, your email account
34
Page 35

and related applications will sync automatically.
Privacy
Back up my data
Back up my settings and other application data.
Automatic restore
Reinstall an application, restore backed up settings or
other data.
Factory data reset
You can also select to reset your phone to factory settings.
This will erase all your data and downloaded applications.
SD card & phone storage
View and manage the data storage on your phone
SD card
Monitor and manage the use of your memory card from
this screen:
1. View the total space of your memory card.
2. View how much space you are using on your memory
card.
3.
Mount SD card: Insert an SD card for mounting.
4.
Format SD card: Format(erase) the SD card.
Internal phone storage
35
Page 36

Available space: Report how much internal storage is free.
Language & keyboard
Select language
Choose language area and the language setting.
Android keyboard
Android keyboard settings
Voice input & output
Voice input
Voice recognizer settings
Language
Select local language.
SafeSearch
Moderate-Filter explicit images only apply to Google
search by voice.
Block offensive words
Hide recognized offensive voice results.
Voice output
Listen to an example
Play a short demonstration of speech synthesis.
Always use my settings
Default settings below override application settings.
36
Page 37

Default Engine
Sets the speech synthesis engine to be used for spoken
text.
Install voice data
Install the voice data required for speech synthesis.
Speech rate
Speed at which the text is spoken.
Language
Sets the language-specific voice for the spoken text.
Accessibility
Accessibility service may collect all words you input,
including the number for your credit card but not the code.
Power button
During a call, press the power button to end the call
instead of turning off screen
Date & time
Set time, time zone, and date - Use Automatic unless
you need to override the network values.
Time format - Select from 12- or 24-hour formats.
Date format - Select from a variety of formats.
37
Page 38

About phone
Check Update: update to latest version for your phone.
Status: This screen lists a variety of information, including
your phone number, the network you are currently using,
the type of network, signal strength, whether you are
roaming or not, any Wi-Fi addresses you’re connected to,
and more.
Battery use: what has been using the battery.
Select Legal information for copyright and licensing
information, as well as the Google Terms of Service for the
Google applications on your phone.
System tutorial: learn how to use your phone.
Model number: View the model number.
Android version: view the version information for your
phone.
Baseband version
Kernel version
Build number
Contacts
Your contact list
To view the contacts on your phone, select Contacts in the
38
Page 39

Home screen.
Contacts belonging to a specific group (you can choose
which group) are listed in the Contacts tab.
Only those contacts you star as “favorites” are listed in the
Favorites tab. (Read “Contacts settings” to learn how to
change which contact group displays in Contacts.)
From the Contacts tab, you can:
Take action on a contact
Touch & hold the contact’s name to open the option menu.
From the menu you can select to View contact, call
contact, Text contact, Add to favorites, Edit contact or
Delete Contact.
Go to Contact details screen
Select the contact’s name to open the Contact details
screen, where all the information you’ve saved for this
contact is displayed.
To edit a contact’s details, press the Menu key to select
New contact.
Tip: Only the contacts stored in your phone can been
displayed. You can import the contacts from your SIM card
or SD card. In the Contacts main menu, press the Menu
key to select Import /Export.
39
Page 40

Search for a contact
1. Browse through your contacts by sliding your fingertip
up and down on the screen. A rapid brush movement in
either direction accelerates the scrolling. Touch the
screen to stop the scrolling.
2.
Or press the Menu key to select Search in the Contacts
main menu, type the keywords in the text box, then tap
the magnifier beside the text box to start searching.
Add a contact
1.
Press the Menu key to select New contact in the
Contacts main menu.
2. Add all the information you want to store for this contact
in the appropriate fields. You must add some information
to save a contact.
To add more fields, select +.
3.
Assuming you have a memory card inserted with
pictures in it, you can assign a Caller ID icon to your
contact by selecting the caller ID icon beside the name
text box. The Pictures application opens. Navigate to a
picture and select it, size the cropper with your fingertips.
When finished, select Save. The picture is associated
40
Page 41

with your contact.
4.
To save your contact, press the Back key, or press the
Menu key to select Done.
Assign favorites
Use Favorites as a way to display only those contacts you
contact most frequently. To add a contact to Favorites:
1. From Contacts, touch & hold the contact you want to
add to Favorites. The context menu opens.
2.
Select Add to favorites.
3.
Now your contact will be listed in Favorites and display
with a colored star. Their details screen will also display
the colored star.
Edit contact details
You can always make changes to the information you’ve
stored for a contact:
1. From Contacts, touch & hold the contact whose
information you want to edit. The context menu opens.
2.
Select Edit contact. The Edit contact screen appears.
3.
Make your edits, then select done .To cancel, select
Revert.
41
Page 42

Delete contact
1.
From contacts, touch & hold the contact. To context
menu opens. Select Delete contact to delete the
selected contact.
2.
Or in contact detail menu, press the Menu key to select
Delete contacts.
Communicate with a contact
From Contacts you can quickly call or text a contact’s
default number, as displayed below their name on the
screen. However, to view all the information you’ve stored
for a contact, and to initiate other types of communication
with that contact, open the Contact details screen. To
open a contact’s details screen, simply select their name
from Contacts.
Call a contact
From the contact details
1. In the Call mobile section, select the number you want
to dial.
2. The number is dialed.
Send a text or multimedia message to a contact
To send a text or multimedia message to a contact, you
42
Page 43

must have a mobile number stored for them in contact
details.
From the contact list
1. Touch & hold the contact’s name to open the context
menu.
2.
Select Text contact. A Compose screen opens for your
new message.
From the Contact details screen
1.
In the Text mobile section, select a phone number.
2. A Compose screen opens for your new message.
Send email to a contact
To send an email message to a contact, you must have an
email address stored for them in their contact details.
1. Select the contact you want to email. Their Contact
details screen opens.
2.
In the email section, select the email address. If you are
fetching POP3 or IMAP email accounts to your phone,
then select the account you wish to use to send. A
Compose screen opens for your new message.
3.
Complete your message and select Send.
43
Page 44

Display a contact group
To select which contact group to display in Contacts, press
the Menu key and select Display options to view details.
Contacts settings
To set Contacts preferences, from Contacts or Favorites,
press the Menu key to open the option menu:
SIM contacts import
If you have stored names and phone numbers on your
SIM card, you can add these to the Contacts stored on
your phone by selecting this settings option Import/Export.
Once the list of names and numbers appears you can:
1.
Import all names/numbers in the list – Press the Menu
key and select Import/Export, then select import from
SIM card/SD card.
2.
Import only certain names/numbers in the list - Select the
name/number you want to import, then repeat for others
as you wish. (As soon as you select the name/number, it
is imported.)
SIM contacts export
1. Export all names/numbers in the list – Press the Menu
key and select Import/Export, then select export to
44
Page 45

SD card.
Share visible contacts
Share the contact details via Bluetooth or Gmail
Email and Messaging
POP3 and IMAP email accounts
Add an email account
1.
Open the Application menu to select the Email application.
2. The Set up new account screen appears.
3. Type your account email address and password.
4.
If you want, select the Send email from this account by
default check box. This setting only applies if you have
more than one POP3 or IMAP account set up.
5.
Select Next.
If you have a popular email account, the application will
set everything up for you! Before you go to your Inbox,
you can name the account (if you don’t, your email
address will be used). You are also asked to type your
name as you want it to display on outgoing messages.
You must complete this field before you can select Next
and go to your Inbox.
45
Page 46

For less popular accounts, follow the prompts to type the
email server, protocol, and other account information
yourself. After your account settings have been verified,
select Next to go to your Inbox.
6.To add more accounts (up to five), from your Accounts
screen, press the Menu key and select Add account.
Use your POP3 and IMAP email account
Once you’ve set up an account, you can do the following:
Refresh Inbox
From the Inbox, press the Menu key and then select
Refresh to update your Inbox with any previously-
unfetched email.
Read email
You can display or collapse the messages in your Inbox by
selecting Inbox. Unread messages display with a colored
band. (Each account you add will use a different color.)
To open an email for reading, select it.
Forward, Reply, Reply all, Delete, Mark as unread
You can forward, reply, reply all, delete or mark as unread
to an email message from either the Inbox or the read
view:
1.
From the read view, press the Menu key and select the
46
Page 47

action you want to take.
2. From the Inbox, touch & hold the message to open its
context menu. Select the action you want to take.
Compose new
From the Inbox or your accounts screen:
1.
Press the Menu key and select Compose.
2.
Add recipients by typing a name or address in the To
field, matching contacts will appear. Select the recipient
or continue typing the address. Add as many as you
wish.
3. Type a subject and message.
4.
Select Send, Save as draft, or Discard. Pressing the
Back key will also save as draft unless you have not
typed anything.
Empty Trash
Once you’ve moved a message to the Trash, a Trash
folder will display below your Inbox. To empty messages in
the Trash you must delete each message individually:
1. Expand the Trash folder to display the messages.
2. Touch & hold the message you want to delete to open the
context menu.
3.
Select Delete.
47
Page 48

Note: The message is only deleted from your phone, not
from the account server.
Remove an email account
You can always remove a POP3 or IMAP email account
from your phone by doing the following:
1.Go to your Inbox.
2.
Press the Menu key and select Accounts. Your
Accounts screen opens.
3.Touch & hold the account you want to remove to open
the context menu.
4.
Select Remove account.
5.You will be asked to confirm before the account is
removed.
Edit account settings
To open your Account settings screen, do the following:
1.
From your account Inbox, press the Menu key and
select Account settings.
2.The Account settings screen appears. You can do the
following from this screen:
Account name Select to change the name of your
account as it appears on your Accounts screen.
Your name Select to change your name as it appears in
48
Page 49

outgoing email.
Signature Select to change your signature.
Amount to synchronize Select the time for email
synchronization.
Email check frequency Select this pop-up menu to set
how frequently your email account is checked for new
messages. Note that whenever you open a folder, email
is refreshed, regardless of this setting.
Default account If you have more than one POP3 or
IMAP email account set up on your phone and want to
use this account by default when selecting Compose
from the Accounts screen, select this check box.
Email notifications If you want an icon to appear in the
status bar when a new message arrives, select this
check box.
Select ringtone Select to decide on a ringtone to use for
incoming email.
Vibrate Select to have your phone vibrate when email
arrives.
Incoming settings Select Incoming settings if you need
to edit the username/password, server, port, or option to
delete email from server.
49
Page 50

Sync contacts Select to synchronize contacts from your
account.
Sync calendar Select to synchronize calendar from your
account.
To save your settings, press the Back key.
SMS and MMS messaging
Press the icon to open the SMS & MMS Messaging
application.
About text and multimedia messages
SMS messages are also known as “text” messages and
can each be around 160 characters. If you continue to
type after the limit is reached, your message will be
delivered as one, but count as more than one message.
These are called “concatenated” messages.
MMS messages are also known as “multimedia” or
“picture” messages and can contain text, picture, audio,
and video files.
When you compose a message, the phone will
automatically convert a text message into a multimedia
message as soon as you add a subject or an attachment,
or if you address the message using an email address
50
Page 51

rather than a phone number.
The message list
Text and multimedia messages are grouped with the
replies you receive into conversations or “message
threads” or just “threads”. Message threads are listed in
order of when you received them (newest at the top). To
open a thread for reading, select it. Read more below.
Unread messages appear with a green band on the left.
The Read view
Select a message in the list to open it for reading.
Note: Messages you send are also listed in the Read
view.
Reading multimedia messages
If you have selected to auto-retrieve your multimedia
messages, then both the message header and body will
be downloaded. To view your message, select the “play”
button.
If you are downloading only the headers, then you must
first select the Download button to retrieve the message
body. If you are concerned about the size of your data
downloads, you can check the message size before you
download.
51
Page 52

Once the message has be downloaded, select the “play”
button to view the message.
From a message read view, you can do the following:
Reply to a message
1.
Simply start typing your message in the text
box at the bottom of the screen to reply to a message.
2.
You can always press the Menu key and
select to add a subject or an attachment to convert it to
a multimedia message.
Links in messages
If a message contains a link to a Web page, it will be
selectable. To view the Web page in the Browser, simply
select it.
Forward messages
In the message read view, touch & hold the message to
open the context menu, then select Forward to forward it
to others.
Delete messages
Your messages will be saved until you explicitly delete
them.
1.
Delete one message in a thread: With the message
thread open in Read view, touch & hold the individual
52
Page 53

message you want to delete to open the context menu.
Select Delete message.
2.
Delete all messages in a thread: With the message
thread open in Read view, press the Menu key and
select More>Delete thread. You can also delete an
entire thread from the message list by pressing &
holding the thread to open the context menu, then
selecting Delete thread.
3.
Delete all message threads: From the message list,
press the Menu key and select Delete All.
View message details
To view details about a particular message, in the Read
view, touch & hold the message to open the context menu.
Select View message details.
Compose text and multimedia messages
1.
Press the Menu key and select Compose. The
Compose screen opens.
2.
Add recipients by typing a name, phone number, or
email address in the To field. Matching contacts will
appear. Select the recipient or continue typing. Add as
many recipients as you wish. If you send the message
to an email address, the message will automatically
53
Page 54

convert from a text to a multimedia message.
3.
To add a subject, press the Menu key and select Add
subject. If you add a subject, the message will convert to
a multimedia message.
4.
To add an attachment, press the Menu key and select
Attach. Adding an attachment will always convert the
message to a multimedia message. Select from audio or
picture files. You can select to take a new picture if you
want, or record an audio file. Any recordings you make
will be stored automatically in the Music application in a
playlist named “My recordings”.
To remove an attachment, select the attachment’s
Remove button.
5.Type your message. As you type, you’ll be able to track
how many characters/messages you’re creating.
Remember that text messages have a limit around 160
characters. Once you go over that limit, a new message
is actually created but automatically joined into one
when received.
6.You can also save a draft.
7.As your message sends, progress displays in the title
bar.
54
Page 55

Save message as draft
1.
While composing, press the Back key.
2. Your message automatically saves as a draft.
3. To resume composing, in the message list, touch to open
the message to edit.
Text and multimedia message settings
To set text and multimedia message preferences, from the
message list, press the Menu key and select Settings.
You can set the following from this screen:
Storage settings
Delete old messages: When the box limits are reached,
old messages are removed.
Text message limit: One conversation is limited up to 200
messages.
Multimedia message limit: One conversation is limited up
to 200 messages.
Text message settings
Delivery reports: To receive a report on the delivery status
of your message, select this check box. Status can be:
Successful delivery.
Temporary delivery failure; an attempt to deliver will be
made again.
55
Page 56

Unsuccessful delivery; no attempt to re-deliver will be
made.
Manage SIM card messages: Text messages can also be
stored on your SIM card. The exact number depends on
your card, but it is usually around 25-50. To view
messages on your SIM card, delete them, and copy them
to your phone memory, select this setting.
Multimedia message settings
Delivery reports: To receive a report on the delivery status
of your message, select this check box. Status can be:
Successful delivery
Temporary delivery failure; an attempt to deliver will be
made again
Unsuccessful delivery, where no attempt to re-deliver
will be made
Read reports: To receive a report on whether each
recipient has read or deleted the message without reading
it, select this check box.
Auto-retrieve: To retrieve all your Multimedia messages
automatically (the header plus the message will download
to your phone), select this check box. If you clear this
check box, then only the message headers will be
56
Page 57

retrieved and display in your message list. You can
retrieve the full message by selecting the Download button
that displays in the header. Once the message has
downloaded, select the “play” button to expand the
message.
Roaming auto-retrieve: If you are concerned about data
traffic and just want the message headers to download
while roaming, clear the Roaming auto-retrieve check box.
Otherwise, you can select this check box to have your
messages download even while roaming.
Notifications
Notifications: To display message notifications in status
bar.
Select ringtone
You can set a ringtone from the default ringtone of the
handset for new messages.
Vibrate
If you turn the handset into vibration mode, When a new
notification and message arrive, the handset will remind
you.
57
Page 58

Browser
About the Browser
To open the Browser, select the Browser application in the
Home screen.
The Browser always opens to the last Web page you were
viewing. The first time you enter the Browser after
powering on, your home page will display. You can change
your home page by pressing the Menu key and selecting
More > Settings > Set home page.
Zoom and navigation in Web pages
While viewing a Web page, take advantage of the
following zoom and navigation techniques:
Zoom in
1.
Touch the screen to open the zoom-in and zoom-out
controls .
2.
Touch the + control to zoom in. With each touch you zoom
in closer.
Zoom out
Touch the screen to open the zoom-in and zoom-out
controls .
Touch the – control to zoom out. With each touch you
58
Page 59

zoom out further.
Navigate
Slide your fingertip in any direction to shift your page view.
The Browser screen
From the Browser screen you can do the following:
Add a bookmark
Bookmark the Web page you are currently viewing:
1.
Press the Menu key and select Bookmarks.
2.
From the Bookmarks screen, select Add bookmark.
3.
Confirm the URL and name, then select OK.
To view all your bookmarks, press the Menu key and
select Bookmarks.
Refresh a Web page
To refresh the contents of the current page, press the
Menu key and select Refresh.
Manage bookmarks
You can store as many bookmarks as you want on your
phone.
Bookmark any page
1.
Press the Menu key and select Bookmarks. The
Bookmarks screen opens.
59
Page 60

2.
Select Add bookmark.
3.
Type a name and location (URL) in the dialog box.
4.
Select OK.
Send bookmarked page’s URL
1.
Press the Menu key and select Bookmarks. The
Bookmarks screen opens.
2.
Touch & hold the bookmark you want to send. The
context menu opens.
3.
Select Share link.
4.
Send the link via email or message etc., and then a
Compose screen opens with the URL as the message.
5.
Address your message and finish composing.
View bookmarked page
1.
Press the Menu key and select Bookmarks. The
Bookmarks screen opens.
2.
Touch & hold the bookmark you want to open. The
context menu opens.
3.
Select Open or Open in new window.
Edit bookmark
1.
Press the Menu key and select Bookmarks. The
Bookmarks screen opens.
2.
Touch & hold the bookmark you want to edit. The context
60
Page 61

menu opens.
3.
Select Edit bookmark. The edit bookmark dialog box
opens.
4.
Type your change and select OK.
Add shortcut to Home
1.
Press the Menu key and select Bookmarks. The
Bookmarks screen opens.
2.
Touch & hold the bookmark you want to add. The context
menu opens.
Select Add shortcut to Home. then a shortcut created on
the home screen.
Copy link URL
1.
Press the Menu key and select Bookmarks. The
Bookmarks screen opens.
2.
Touch & hold the bookmark you want to copy. The
context menu opens.
Select Copy link URL.
Set your home page
You set your home page from the Settings screen:
1.
Press the Menu key and select More>Settings. The
Settings screen opens.
61
Page 62

2.
In the Page content settings section, select Set home
page to open the dialog box.
3.
Type the URL of the page you want to set as home, then
select OK.
Browser history
The history screen lists the recent sites you’ve visited on
the Web.
From the Browser screen, press the Menu key to select
Bookmarks, then select the History tab to view your Web
site history.
View the most visited webs
From the Browser screen, press the Menu key to select
Bookmarks, then select the Most visited tab to view the
webs you most visited.
Download Web files and applications
Before you download any files or applications using the
Browser, note the following:
Before you download Web applications, you must
explicitly “allow” downloading from the Settings screen in
Home screen:
1.
Press the Menu key and select Settings.
62
Page 63

2.
Select Applications, then on the Application settings
screen, select the Unknown sources check box.
All items downloaded from the Web are stored on your
memory card, so be sure you have a card installed in
your phone before you download from the Browser.
The Browser will only allow you to download items that
are supported by an application installed on the phone.
Warning: Applications downloaded from the Web can be
from unknown sources. To protect your phone and
personal data, only download applications from sources
you trust, such as Android Market.
View your downloads
To see which files or applications you’ve downloaded:
1.
From the Browse screen, press the Menu key and select
More>Downloads.
2.The Download history screen appears with the list of
downloads. If you have no downloads, nothing will be
shown on this screen.
Browser settings
From the Browser screen, press the Menu key and select
More>Settings to set Browser preferences.
63
Page 64

Page content settings
Text size
Select to open the Set text size menu. Default setting is
Normal, but you can increase the size to Large or Huge,
or decrease to Small or Tiny. Note that this text size
setting only affects pages you view through the Browser.
Default zoom
Select Far, Medium, Close for your browser.
Open pages in overview
Show overview of newly opened pages
Text encoding
Select a text encoding for your web browser.
Block pop-up windows
Select this check box if you want pop-up windows to be
blocked.
Load images
Select this check box if you want images on Web pages to
load. For faster page loading, clear this check box.
Auto-fit pages
Select to size pages to the screen automatically.
Landscape-only display
Display pages only in the wider, landscape screen
64
Page 65

orientation
Enable JavaScript
Select to enable JavaScript on pages. Disabling
JavaScript may cause some Web pages to not work
properly.
Open in background
Select if you want links to new pages to open in a new
window in the background.
Set home page
Your currently-set home page is shown on the Settings
screen. To change your home, select Set home page, type
the URL for your home page, then select OK.
Privacy settings
Select one of the privacy settings to clear the following:
Browser cache
Browser page-visited history
all cookie data
saved form data
Accept cookies
Select this check box if you want the Browser to save
cookies. Some Web sites might not work properly with
cookies disabled.
65
Page 66

Remember form data
Select this check box if you want the Browser to
remember text you have typed in forms, so that you can
select the same text later rather than retyping it.
Enable location
Allow sites to request access to your location
Clear location access
Clear location access for all websites
Security settings
Remember passwords
Select this check box to save usernames and passwords
to various Web sites.
Clear passwords
Select Clear passwords to clear all your saved passwords.
Show security warnings
Select this check box if you want a warning to be
displayed when you are going to an insecure Web site.
Advanced settings
Set search engine
Select a search engine
Website settings
Advanced settings for individual websites
66
Page 67

Reset to default
Select if you want to reset all Browser settings to factory
default values, except for your home page.
Calendar
To open Calendar service, select the Calendar application
in the Application screen. You can view calendar, view
month, edit event, etc.
Register on the Google Market at first, then you can use
the following function.
Calendar views
You can slide the blue-bar at the bottom of the screen to
view the Calendar by Week, Day, List, Month.
Create an event
3.
From any interface of the calendar, select one day and
press “+” at the upper-right corner to create an event.
4.Type the information in blank you are supposed to fill.
5.
After you’ve finished, press save to save the event you
have edited.
Go to today
Press the image at the left bottom of the screen, to view
the calendar of current day.
67
Page 68

View an event
With any event edited, there appears a colored bar in the
date box. Press the date box to view the event.
Camera, Camcorder & Gallery
Before you begin
All the pictures you can capture or view and all the videos
you can record or play on your phone are stored on a
memory card, which must be installed in your phone.
Before you can use the Camera or Camcorder, or view
pictures/videos in Gallery, make sure you have a card
installed.
Load pictures and videos onto your memory card
Read the instructions below to add pictures or videos to
your memory card.
6. Mount your memory card to your computer by doing the
following:
Remove the memory card and insert it into a card reader
attached to your computer.
7. On your computer, find the mounted USB drive and open
it.
8. Copy image or video files into this folder.
68
Page 69

9.When finished, close the USB drive window and
unmount or eject the drive as required by your
computer's operating system.
Camera
Take a picture
Captured pictures are saved to the “sdcard/CDIM/camera”
folder on your memory card.
1.
To open the Camera, select Camera in the Application
screen.
2.
The Camera opens in capture mode. Frame your picture
within the screen and hold the phone steady. Press the
icon at the right bottom to take a picture.
Tip: In capture mode, press the Menu key to select
Switch to video or slide up the button to Switch to video,
the screen switch to video recording mode.
View your pictures
To view the pictures you’ve captured, press the image at
the upper-right corner, or in capture mode, press the
Menu key to select Gallery.
Video Recorder
Record a video
69
Page 70

1.
To open the Camera, select Camera in the Home
screen.
2.
The Camera opens in record mode. Press the Camera
key in the screen to record a video.
Play your videos
To view the videos you’ve captured, go to the Gallery
application, or in record mode, press the Menu key to
select Gallery
The newest video you recorded will display as a small
window on the screen, touch the small window, and select
Play to play the video.
Settings of Camera, Camcorder and Gallery
In capture mode, press the Menu key to select Settings,
Select focus mode
Select focus mode from auto, infinity, macro, fixed.
Select antibanding
Select antibanding from auto, 50HZ, 60HZ, off.
Select scene mode
Select scene from auto, night.
Select picture size
Select picture size from 2M, VGA, QVGA.
70
Page 71

Select picture quality
Select picture quality from Super Fine, Fine, Normal.
Select color effect
Select effect from none, mono, sepia, negative, solarize,
aqua.
Camera settings
Restore to defaults.
Select camera
Select the back or front camera.
Select white balance
Select white balance from auto, incandescent, daylight,
fluorescent, cloudy, twilight.
Gallery
View pictures and videos in Gallery
To view the pictures you’ve captured, the video you’ve
recorded, as well as any you’ve stored on your memory
card, go to the Gallery application.
1.
To open Gallery, select the Gallery in the Home screen.
2. Depending on how many pictures and videos you’ve
stored, they may take a few minutes to load.
3.
If you’ve stored your pictures and videos in folders on
71
Page 72

your memory card, then the folders will display as
separate “albums”. The top album always contains all the
pictures in all the albums, and the second one always
contains all the videos in all the albums. Select an album
to view the pictures and videos.
4. To open a picture in full-screen view, touch the
picture. Once in full-screen, select the arrows to scroll
through the pictures within that album.
Zoom and navigate
When viewing a picture in full-screen view, you can zoom
in and out, and navigate around the picture when it
doesn’t fit within the screen:
Zoom in
1.
Touch the screen to open the zoom-in and zoom-out
controls .
2.
Touch the + control to zoom in. With each touch you
zoom in closer.
Zoom out
7.
Touch the screen to open the zoom-in and zoom-out
controls .
8. Touch the – control to zoom out. With each touch you
zoom out further.
72
Page 73

Music & Video player
Music
Your library of music
Press the Home key and select the Music to open your
music library.
Your music is organized into four categories: Artists,
Albums, Songs, Now and Playlists. Select a category to
view the lists within each. Once in a category, keep
selecting until you reach the music you want to play. For
example, if you select the Artists category, you will see a
list of artists in A-Z order. If you select an artist, the list
opens to display that artist’s albums. Select an album, and
the album’s song list displays.
Supported music formats
Your phone will play the following music file formats:
MP3
MIDI
AAC
AAC+
AMR
Load music onto your memory card
73
Page 74

All the music you can listen to on your phone is stored on
a memory card. Read the instructions below to add music
to your memory card.
1. Mount your memory card to your computer by doing
one of the following:
Remove the memory card and insert it into a card reader
attached to your computer.
2. On your computer, find the mounted USB drive and
open it.
3. Although your phone will find all music files on your
memory card, it’s advisable to keep the number of files
or folders at the root level to a minimum. So, if you wish,
create a folder at the top-level called “music” (or
whatever you want) to store your files.
4. Open this folder and copy music files into it. If you
want, create folders within “music” to organize your
music further.
When finished copying, close the USB drive window and
unmount or eject the drive as required by your computer's
operating system.
Play back music
At any level in your Library, touch & hold a listing (a song,
74
Page 75

artist, album, or playlist) to open the context menu. Select
Play to begin play and go to the Playback screen.
You can do the following using the Playback screen:
Shuffle songs
Shuffle plays songs in random order. Touch to toggle
shuffle on and off. When the con is grey, shuffle is off.
Repeat mode
Touch to step through repeat modes:
Repeat all songs: (green icon)
Repeat current song:
Don’t repeat: (grey icon)
Go to any point in song
Slide fingertip in progress bar to desired point in a song.
Pause/resume play
Touch to pause; to resume play.
Fast forward
Touch & hold .
Go to next song
Touch once .
Rewind
Touch & hold .
Go to beginning of song
75
Page 76

Touch once .
Go to previous song
Touch twice .
Party shuffle
To start “party shuffle” (all the songs in your library are
added to a playlist in random order), press the Menu key
and select Party shuffle. To exit party shuffle, press the
Menu key and select Party shuffle off.
If a song is playing while you are on the Library screen,
you can switch to the Playback screen quickly by selecting
the lower song bar.
Playlists
You can create as many playlists as you wish. Note that
the “Recently added” playlist is a system playlist and
cannot be deleted or renamed. Also, if you make any
voice recordings as part of a MMS message, they will be
stored automatically in a playlist called “My recordings”.
Create a playlist on your phone
1. From the Library, select a category.
2. From the list that appears, touch the artist, album, or
song that you want on a playlist.
3. Touch & hold the song to open the context menu.
76
Page 77

4.
Select Add to playlist.
5.
In the Add to playlist menu that opens, select New to
create a new playlist, or one of the existing playlists.
6. The song(s) are added.
Manage your playlists
1.
Go to the Library screen and select Playlists.
2. All your playlists appear. You can do the following from
this screen:
Play songs in list
Select the playlist.
Delete playlist
Touch & hold the playlist to open the context menu.
Select Delete.
Rename playlist
Touch & hold the playlist to open the context menu.
Select Rename.
Open the keyboard (if not already open) and type the
new name.
Select Save.
Create ringtones from songs
You can set any of your songs as a phone ringtone:
1. From the Library, select a song you want to use as a
77
Page 78

phone ringtone.
2. Touch & hold the song in the list to open the context
menu.
3.
Select Use as phone ringtone. The ringtone is set as
your default incoming call ringtone.
4.
Or in the play mode, Press menu to select Use as
ringtone.
Delete music from memory card
All the music you play on your phone is stored on the
inserted memory card. From your phone, you can delete
music stored on the card:
1.
From the Library screen, select either Artists, Albums, or
Songs category.
2.
Go to the screen that shows the artist, album, or song
that you want to delete.
3.
Touch & hold the item to open the context menu.
4.
Select Delete. You will be asked to confirm that you want
to delete the item from your memory card.
Tools
Alarm Clock
To open alarm clock, select the Clock in Application
78
Page 79

screen. The clock offers as many alarms as you want.
Set an alarm
Three alarms are set up for you, ready to customize. All
two default alarms are turned off by default.
To begin, select one of the default alarms to open Alarm
settings. Set the following options:
Alarm
Select the check box to turn alarm on (checked) or off
(cleared). This is the same check box that appears on the
main Alarm Clock screen.
Time
The time the alarm will go off is shown. To change this
time, select Time to open the time selector. Tap the + or –
buttons and the AM/PM button to set the time you want,
then select Set.
Tip: Touch & hold the + or – buttons to move through the
numbers quickly.
Ringtone
The current ringtone selection is shown. Select Ringtone
to pick another ringtone that will play when the alarm
rings. (When you select a ringtone, it plays briefly.)
Vibrate
79
Page 80

Select this check box to have your phone vibrate when it
goes off.
Repeat
The current repeat selection is shown. To change the
setting, select Repeat and make a selection from the
menu. To have your alarm will only go off once at the set
time, don’t select any of the options. A one-time alarm is
shown on the Alarm Clock screen without any days under
the set time.
Label
To name an alarm, select Label, then touch the textbox to
change the label, then select OK to save it.
Delete alarm
To delete the alarm, press the Menu key and select
Delete alarm.
Once your alarm goes off, you will receive an alert with the
options to Snooze (for 10 minutes) or Dismiss.
Add more alarms
To add more than three alarms, from the main Alarm
Clock screen, press the Menu key and select Add alarm.
80
Page 81

Calculator
To open Calculator, select the Calculator application in
Application screen.
The Calculator offers two panels: basic and advanced.
Switch back and forth between panels by pressing the
Menu key and selecting Advanced panel or Basic panel,
as you wish.
Calculator panels
Two calculator panels are available: basic and advanced.
Use the Basic panel to enter numbers and perform basic
addition, subtraction, multiplication, and division. Use the
Advanced panel to insert advanced operators or
delimiters, such as sine, cosine, tangent, square root,
parentheses, etc.
Switch back and forth between calculator panels by
pressing the Menu key and selecting Advanced panel or
Basic panel, as you wish. As soon as you select an
advanced operator, the panel switches back to Basic,
where your operator appears.
File Manager
Select File Manger in the Application screen to view the
81
Page 82

files in your phone or memory card.
Note: The files in your phone can not be operated.
1.
Touch SD card to open the folder. Touch and hold the
screen to open the context menu, select New Folder to
create a new folder. Or touch and hold a folder to open
the context menu, then you can copy, cut, rename, or
delete the folder.
2.Touch and hold a file to open the context menu, you can
copy, cut, paste, send, rename the file, view the detail or
delete the content in the file.
Search file
The directory of the folder you visited shows on the upper
side of the screen. Touch the rightmost icon to open the
search textbox, input the file name you want to search in
this folder, then press the magnifier to start searching.
Battery Information
Type Capacity
Li-ion 1400mAh
--The battery life depends on many factors, including the
SIM card, network conditions, settings, usage and
enviorenment.
--Making calls, turning on the backlight and multimedia
82
Page 83

player will consume more battery power.
--The standby time is shorter when the network is not
available than in the standard status.
--For power saving, the backlight turns off automatically if
your phone stands idle for an assigned time.
--The performance of battery varies with the charging
status, temperature, local radio wave and backlight status.
Accessories
Safety of the battery
1.
Please use the battery provided by the original
manufacturer. Use of any other battery will invalidate the
warranty and the manufacturer of the phone will take no
responsibility in repairing the phone damaged by the use
of unapproved fittings.
2.
Please keep any metal things (e.g. Keys in your pocket)
away from the contact point of your battery to avoid short
circuits.
3.
Do not bend or open the battery by force.
4.
Please keep the battery away from water or fire.
5.
The battery can not be charged in very hot or very cold
locations as extreme temperatures can adversely affect
83
Page 84

the battery.
Rapid travel charger
The rapid travel charger can help you to quickly charge the
battery. Plug the charger to an AC wall socket and plug the
other end into the charger port of the phone. Please make sure
the battery is correctly inserted on the phone before charging.
Please do not remove the battery while charging.
Data cable
Only use the data cable approved by the phone manufacturer.
The use of any other types would invalidate any approval or
warrant applying to the phone and could be dangerous.
FCC RF Exposure Information and Statement
The SAR limit of USA (FCC) is 1.6 W/kg averaged over
one gram of tissue. Device types s700
(FCC ID: WA6S700) has also been tested against this
SAR limit. The highest SAR value reported under this
standard during product certification for use at the ear is
84
Page 85

0.53 W/kg and when properly worn on the body is 0.54
W/kg. This device was tested for typical body-worn
operations with the back of the handset kept 1.5cm from
the body. To maintain compliance with FCC RF exposure
requirements, use accessories that maintain a 1.5cm
separation distance between the
user's body and the back of the handset. The use of belt
clips, holsters and similar accessories
should not contain metallic components in its assembly.
The use of accessories that do not satisfy these
requirements may not comply with FCC RF exposure
requirements, and should be avoided.
FCC WARNING
This device complies with Part 15 of the FCC Rules.
Operation is subject to the following two conditions:
(1) this device may not cause harmful interference, and
(2) this device must accept any interference received,
including interference that may cause
undesired operation.
NOTE 1: This equipment has been tested and found to
comply with the limits for a Class B digital device,
85
Page 86

pursuant to part 15 of the FCC Rules. These limits are
designed to provide reasonable protection against harmful
interference in a residential installation. This equipment
generates, uses and can radiate radio frequency energy
and, if not installed and used in accordance with the
instructions, may cause harmful interference to radio
communications. However, there is no guarantee that
interference will not occur in a particular installation. If this
equipment does cause harmful interference to radio or
television reception, which can be determined by turning
the equipment off and on, the user is encouraged to try to
correct the interference by one or more of the following
measures:
- Reorient or relocate the receiving antenna.
- Increase the separation between the equipment and
receiver.
-Connect the equipment into an outlet on a circuit different
from that to which the receiver is
connected.
-Consult the dealer or an experienced radio/TV technician
for help.
NOTE 2: Any changes or modifications not expressly
86
Page 87

approved by the manufacturer could void
the user’s authority to operate the equipment.
NOTE 3: The manufacturer is not responsible for any
radio or TV interference caused by
unauthorized modifications to this equipment. Such
modifications could void the user’s authority
to operate the equipment.
87
 Loading...