

Page 1

s350
User Manual
Thank you for purchasing the s350 mobile phone
Page 2

Introduction
Welcome to choose the S350 mobile phone. This user manual
states the outstanding performance of the S350 mobile phone in
detail. In addition to the basic call features, the S350 mobile phone
and the system network also provide you with a variety of useful
features and services to facilitate your work and leisure activities.
The Company reserves the right to make any amendment on the
technical specifications without any advance notice.
Reading Statement for the Manual
In manual, different typesetting styles are used to interpret different
operating details, and the specific interpretation is as follows:
Operation Description of Contents Example
Showing
contents
Show with normal characters 0-9
General
key
All the keys except functional
keys are shown by normal
characters with frames
0-9
Functional
key
Functional key is shown with
bold and frame
OK
Menu
item
Show in bold Edit
Note:
The pictures shown in the manual are only used as function
hint which may be different from the phone, and the ones in
your phone shall prevail.
Page 3

CONTENT
INTRODUCTION.................................................................I
SECURITY AND PERFORMANCE...................................1
1 START USING.................................................................3
1.1!BATTE RY! !!!!!!!!!!!!!!!!!!!!!!!!!!!!!!!!!!!!!!!!!!!!!!!!!!!!!!!!!!!!!!!!!!!!!! !.............................................................! !3!!
1.2!SI M !CARD! !!!!!!!!!!!!!!!!!!!!!!!!!!!!!!!!!!!!!!!!!!!!!!!!!!!!!!!!!!!!!!!!!! !..........................................................! !3!!
1.3!PLU G!THE!MEM ORY!CARD! !!!!!!!!!!!!!!!!!!!!!!!!!!!!!!!!!!!!!!!!!!!!!!! !........................................! !3!!
1.4!PLU G!THE!EARP HONE! !!!!!!!!!!!!!!!!!!!!!!!!!!!!!!!!!!!!!!!!!!!!!!!!!!!!! !..............................................! !3!!
1.5!KEY S! !!!!!!!!!!!!!!!!!!!!!!!!!!!!!!!!!!!!!!!!!!!!!!!!!!!!!!!!!!!!!!!!!!!!!!!!!!! !.................................................................! !4!!
1.6!TEX T!INPUT!A ND!EDIT!W INDOW! !!!!!!!!!!!!!!!!!!!!!!!!!!!!!!!!!!!!!!! !.................................! !5!!
2 HOME SCREEN...............................................................5
1.7!CRE ATE!HO ME!SCRE EN!SHOR TCUTS!AN D!WIDGE TS! !!!!!!!!!!!!!!! !..... ......! !5! !
1.8!REM OVE!ITE MS!FROM!TH E!HOME!S CREE N! !!!!!!!!!!!!!!!!!!!!!!!!! !.....................! !5!!
1.9!MOV E!OBJECT S!ON!THE!HOME!SCR EEN! !!!!!!!!!!!!!!!!!!!!!!!!!!!!! !........................! !5!!
1.10!NOTI FICATIO N!AND!CON NECTI O N!STATUS!ICON S! !!!!!!!!!!!!!!!! !..... .......! !5!!
3 DIAL AND ANSWER THE CALL....................................5
1.11!DIA LING!A!CA LL! !!!!!!!!!!!!!!!!!!!!!!!!!!!!!!!!!!!!!!!!!!!!!!!!!!!!!!!!!! !..................................................! !5!!
1.12!ANS WERIN G!A!CALL! !!!!!!!!!!!!!!!!!!!!!!!!!!!!!!!!!!!!!!!!!!!!!!!!!!!!! !.............................................! !6!!
1.13!EME RGENC Y!CALL! !!!!!!!!!!!!!!!!!!!!!!!!!!!!!!!!!!!!!!!!!!!!!!!!!!!!!!! !................................................! !6!!
4 DIALER............................................................................6
5 MESSAGING & EMAIL....................................................7
1.14!MES SAGING! !!!!!!!!!!!!!!!!!!!!!!!!!!!!!!!!!!!!!!!!!!!!!!!!!!!!!!!!!!!!!! !......................................................! !7!!
1.15!EMA IL! !!!!!!!!!!!!!!!!!!!!!!!!!!!!!!!!!!!!!!!!!!!!!!!!!!!!!!!!!!!!!!!!!!!!!! !.............................................................! !7!!
6 CONTACTS......................................................................8
7 BROWSER.......................................................................9
8 SETTINGS........................................................................9
1.16!DUA L!SIM!SET TING S! !!!!!!!!!!!!!!!!!!!!!!!!!!!!!!!!!!!!!!!!!!!!!!!!!!! !............................................! !9!!
I
Page 4

1.17!WIR ELESS!&!N ETWORK S! !!!!!!!!!!!!!!!!!!!!!!!!!!!!!!!!!!!!!!!!!!!!!! !.......................................! !9!!
<8<@8<!&,9#,! !!!!!!!!!!!!!!!!!!!!!!!!!!!!!!!!!!!!!!!!!!!!!!!!!!!!!!!!!!!!! !888888888888888888888888888888888888888888888 88888888! !A!!
<8<@8=!".6)4004+! !!!!!!!!!!!!!!!!!!!!!!!!!!!!!!!!!!!!!!!!!!!!!!!!!!! !88888888888888888888888888888888888888888888! !<;! !
<8<@8>!%)4+)2,/*!:!1024'(.)!+043104! !!!!!!!!!!!!!!!!! !8888888888888! !<;! !
<8<@8?!$0(,.)!/)4702-!3)5/*3! !!!!!!!!!!!!!!!!!!!!!!!!! !888888888888888888888! !<<! !
1.18!CAL L!SETT I NGS! !!!!!!!!!!!!!!!!!!!!!!!!!!!!!!!!!!!!!!!!!!!!!!!!!!!!!!!!! !.................................................! !11! !
1.19!SOU ND!! !!!!!!!!!!!!!!!!!!!!!!!!!!!!!!!!!!!!!!!!!!!!!!!!!!!!!!!!!!!!!!!!!! !.................. .................................. .....! !12! !
1.20!DIS PLAY!! !!!!!!!!!!!!!!!!!!!!!!!!!!!!!!!!!!!!!!!!!!!!!!!!!!!!!!!!!!!!!!!!! !........................................................! !12! !
1.21!LOC ATION!&!S ECUR ITY!! !!!!!!!!!!!!!!!!!!!!!!!!!!!!!!!!!!!!!!!!!!!! !......................................! !12! !
1.22!APP LICATIO NS!! !!!!!!!!!!!!!!!!!!!!!!!!!!!!!!!!!!!!!!!!!!!!!!!!!!!!!!!!! !.................................................! !13! !
1.23!ACC OUNTS!&!S Y NC! !!!!!!!!!!!!!!!!!!!!!!!!!!!!!!!!!!!!!!!!!!!!!!!!!! !............................................! !14! !
1.24!PRI VACY! !!!!!!!!!!!!!!!!!!!!!!!!!!!!!!!!!!!!!!!!!!!!!!!!!!!!!!!!!!!!!!!!! !.........................................................! !14! !
1.25!SD!C ARD!&!PHO NE!STORA GE! !!!!!!!!!!!!!!!!!!!!!!!!!!!!!!!!!!!!! !...............................! !14! !
1.26!LAN GUAGE!&!KE YBOAR D! !!!!!!!!!!!!!!!!!!!!!!!!!!!!!!!!!!!!!!!!!!! !.....................................! ! 14! !
1.27!VOIC E!INPU T!&!OUTPU T! !!!!!!!!!!!!!!!!!!!!!!!!!!!!!!!!!!!!!!!!!!!! !.....................................! !15! !
1.28!ACC ESSIB ILITY! !!!!!!!!!!!!!!!!!!!!!!!!!!!!!!!!!!!!!!!!!!!!!!!!!!!!!!!!!! !..................................................! !15! !
1.29!DATE!&!TIM E! !!!!!!!!!!!!!!!!!!!!!!!!!!!!!!!!!!!!!!!!!!!!!!!!!!!!!!!!!! !..................................................! !15! !
1.30!ABO UT!PHON E!! !!!!!!!!!!!!!!!!!!!!!!!!!!!!!!!!!!!!!!!!!!!!!!!!!!!!!!!! !................................................! !16! !
9 CAMERA, CAMCORDER & GALLERY........................16
1.31!CAM ERA! !!!!!!!!!!!!!!!!!!!!!!!!!!!!!!!!!!!!!!!!!!!!!!!!!!!!!!!!!!!!!!!!! !.........................................................! !16! !
1.32!VID EO!RECO RDER! !!!!!!!!!!!!!!!!!!!!!!!!!!!!!!!!!!!!!!!!!!!!!!!!!!!! !....... ......................................! !16! !
1.33!GAL LERY! !!!!!!!!!!!!!!!!!!!!!!!!!!!!!!!!!!!!!!!!!!!!!!!!!!!!!!!!!!!!!!!!! !........................................................! !17! !
10 MUSIC & VIDEO PLAYER..........................................17
11 TOOLS.........................................................................18
1.34!CAL ENDAR! !!!!!!!!!!!!!!!!!!!!!!!!!!!!!!!!!!!!!!!!!!!!!!!!!!!!!!!!!!!!!! !......................................................! !18! !
II
Page 5

1.35!ALA RM!CLOC K! !!!!!!!!!!!!!!!!!!!!!!!!!!!!!!!!!!!!!!!!!!!!!!!!!!!!!!!!! !.................................................! !18! !
1.36!CAL CULATOR! !!!!!!!!!!!!!!!!!!!!!!!!!!!!!!!!!!!!!!!!!!!!!!!!!!!!!!!!!!!! !....................................................! !20! !
1.37!FIL E!MANA GER! !!!!!!!!!!!!!!!!!!!!!!!!!!!!!!!!!!!!!!!!!!!!!!!!!!!!!!! !................................................! !20! !
12 COMMON QUESTIONS.............................................21
13 MAINTENANCE GUIDELINE.....................................22
14 FCC RF EXPOSURE INFORMATION AND
STATEMENT.....................................................................22
III
Page 6

Security and performance
In thunder raining days, please do not use the mobile phone◆
when charge it or outdoor, so as to avoid being struck by thunder or
other injuries.
Please do not put the battery in high-temperature environment◆
(high temperature will lead to heat of the battery upgrading), and
keep the phone being charged and the charger away from people
or other flammable and explosive articles in order to avoid fire,
explosion or other dangers!
Please strictly adhered to the rules and do shut down the mobile◆
phone on occasions which use of mobile phone is prohibited!
P◆ lease do not arbitrarily refit or teardown the phone and
accessories. Only the authorized organizations can repair the phone.
Please do not use batteries, charger or accessories of non-◆
standard original models.
Please do not join the two poles of the battery, so as not to result◆
in battery short-circuit.
Please do not use the mobile phone when driving. In case of◆
emergency, please use hand-free devices (which may be bought
separately).
Please do not put the phone on car insurance airbag or region◆
reachable by the airbag after spreading. Otherwise when the airbag
expands or ruptures, the mobile phone is likely to cause serious
damage to the people in the car due to strong external force.
In order to comply with provisions of RF leakage, when you wear◆
a phone or use the data functions, please maintain the distance
between the antenna and the body at least 1 inch (2.5 cm).
Do not use chemical lotion, scrubbing cleanser to wipe the mobile◆
phone or the charger, otherwise it may damage the components or
cause fire. Slightly wet and anti-static soft clean cloth can be used.
Please do not throw the old and abandoned lithium batteries into◆
trash can, send them to the designated locations.
1
Page 7

Please do not use the phone to make bold to camera, video and◆
recording that may infract the rights of the copyright owners. The
company will not be responsible for any losses caused by not
recording, deleting, destructing or damage of the photos, video and
recordings caused by its accessories or software on the use of the
functions including camera, video and audio.
◆In the use of network function, if the users download a file with
virus, which make the mobile phone cannot be used normally; the
company does not undertake any responsibility arising therefore.
Warning: The original manufacturer will not take on any
responsibility for the users who are not in compliance with the
above advices or improperly use the mobile phone.
Note: The application of value-added services of the mobile phone
is provided by relevant service providers. Please refer to the
relevant help or providers’ notes for detailed information.
Statement: The Company reserves the right to improve the product
without making any advance notice, and keeps final interpreting
rights on the product performance. Such changes are not notified
additionally, your understanding is appreciated.
2
Page 8

1 Start Using
1.1 Battery
Battery is attached with the phone. Please recharge it for use after
completely using up the battery for the first three times, which
makes this battery easier to achieve the best using state.
In actual use, the standby time and talk time of the phone varies
with the network status, working environment and different using
manners.
With the back of the mobile phone facing upward, then take off the
rear cover. Lift the battery from the bottom and take the battery out.
1.2 SIM card
The SIM card is the key for accessing to the digital GSM network.
Prior to using the phone, you need to insert effective SIM card
in the phone.
In order to prevent illegal use, SIM card adopts PIN code (personal
identification code) encryption protection.
If this function is selected, PIN code should be input correctly each
time when you power on the phone, thus to unlock the SIM card for
normal use. Users can disarm the SIM card protection but illegal
use of the SIM card cannot be prevented.
If the PIN code input is error for three consecutive times, your SIM
card will be locked by the network. There will enquire the PUK code
which provided by your network operator. If the PUK code input is
wrong for 10 times, the SIM card will be permanently barred.
Note:
Your network operator will set a standard PIN code and you
should change it to private password.
1.3 Plug the memory card
Insert the memory card into the slot according to the sign on the
housing.
1.4 Plug the earphone
3
Page 9
Insert the connector of the earphone to the earphone jack at the top
of the mobile phone. Gently pull out the earphone to remove it.
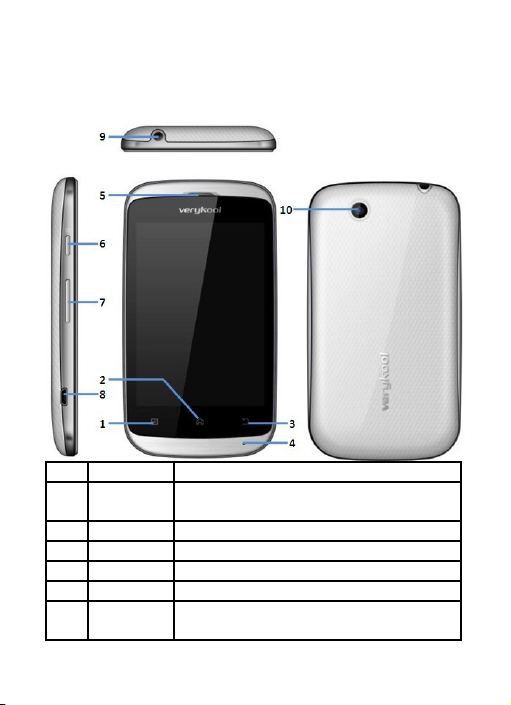
1.5 Keys
Functions of the keys are described as following:
SN Keys Function description
1 Menu key
Touch the key to active menu for the
dedicated application.
2 Home key Go back to the standby screen.
3 Back key Back to previous screen.
4 MIC Do not cover the MIC hole during calling.
5 Back key Go back to previous screen.
6 Receiver/
Speaker
Listen to the voice of the other side when
calling and listen audio in hands-free
4
Page 10

mode.
7
Volume
key
Short press to adjust volume when calling
or on standby screen.
8 USB jack Connecting USB cable or charger.
9
Earphone
jack
Connecting earphone.
10 Camera For finding a view with the camera.
1.6 Text input and edit window
Enter the text input screen, you can choose characters in the virtual
keypad or type by hand.
2 Home screen
1.7 Create Home screen shortcuts and widgets
Start from the Home screen, then touch & hold the screen with your
fingertip until the Add to Home screen menu appears.
Select a Shortcut to applications or some of your saved information,
Widgets, folders, or Wallpapers for your Home screen.
1.8 Remove items from the Home screen
Touch & hold the item, the application tab at the bottom turns into a
Trash button. Drag the item to the Trash button and release.
1.9 Move objects on the Home screen
Touch & hold the objects to enter move mode.
Without lifting your finger (or you’ll drop out of move mode), drag
the object to the new position.
1.10 Notification and connection status icons
Along the top of your phone screen is the status bar. Drag the
status bar down, you will see the notification pages.
3 Dial and answer the call
1.11 Dialing a call
When the network operator’s logo appears on the screen, the
mobile phone enters into the normal standby state in which you can
dial or answer a call. The call quality is relatively largely impacted
by obstacles. Therefore, movement in a small range can effectively
5
Page 11

improve the signal strength.
In the standby screen, press and input the numbers
If the fast call function is activated, in standby screen, long press
the number keys 2-9 to dial the number that has been set up
automatically. If fast call has not been set for the number key you
long pressed, the mobile phone will hint you “fast call phone
number not set”.
1.12 Answering a call
If there is a new incoming call when in call progress, the phone will
pop up caller screen (call waiting is activated). When you answer
the new call, the original call will enter holding status. At this time,
you can select Swap to active the original call, and the new call will
enter holding status.
Note:
When you are in call progress, the new call to another SIM
card can’t be dialed in.
If two calls are connected, you can operate as following:
Conference: when making conference call, you can have a talk
separately with designated conference participant. In conference
call mode, all the others can hear your voice.
1.13 Emergency call
If you are in the network coverage area (you can check the network
signal strength at the top of standby screen), even without the SIM
card, you are also able to make an emergency call.
Note:
The emergency call numbers in different countries or regions
are different. Please refer to the local numbers for specific
emergency service numbers.
4 Dialer
Enter dialer, you can input the number and dial out directly, you
also can use the dialer search function to select the specific contact
from the search list after you input some numbers/letters, then dial
out.
6
Page 12

5 Messaging & Email
1.14 Messaging
Press the icon to open the SMS & MMS Messaging application.
The message list
Text and multimedia messages are grouped with the replies you
receive into conversations or “message threads” or just “threads”.
Message threads are listed in order of when you received them
(newest at the top). To open a thread for reading, select it.
Reply to a message
1. Simply start typing your message in the text box at the bottom of
the screen to reply to a message.
2. You can always press the Menu key and select to add a subject
or an attachment to convert it to a multimedia message.
Compose text and multimedia messages
1. Press Compose new message or press the Menu key and select
Compose. The Compose screen opens.
2. Add recipients by typing a name, phone number, or email
address in the To field, Matching contacts will appear. Select the
recipient or continue typing.
3. To add a subject, press the Menu key and select Add subject.
4. To add an attachment, press the Menu key and select Attach.
5. Type your message. While composing, press the Back key, your
message automatically saves as a draft.
6. Press Send button to send the message.
1.15 Email
POP3 and IMAP email accounts
Add an email account
1. Open the Application menu to select the Email application.
2. The Set up new account screen appears.
3. Type your account email address and password.
4. Select Next, you can name the account. You are also asked to
type your name as you want it to display on outgoing
messages. Then press Done and go to your Inbox.
7
Page 13

For less popular accounts, follow the prompts to type the email
server, protocol, and other account information yourself. After your
account settings have been verified, select Next to go to your
Inbox.
5. To add more accounts (up to five), from your Accounts screen,
press the Menu key and select Add account.
Compose new
From the Inbox or your accounts screen:
1. Press the Menu key and select Compose.
2. Add recipients by typing a name or address in to the field.
Matching contacts will appear. Select the recipient or continue
typing the address. Add as many as you wish.
3. Type a subject and message.
4. Select Send, Save as draft, or Discard. Pressing the Back key
will also save as draft unless you have not typed anything.
6 Contacts
Add a contact
1. Press the Menu key to select New contact in the Contacts main
menu.
2. Add all the information you want to store for this contact in the
appropriate fields. You must add some information to save a
contact.
To add more fields, select +.
3. Assuming you have a memory card inserted with pictures in it,
you can assign a Caller ID icon to your contact by selecting the
caller ID icon beside the name text box. The Pictures
application opens. Navigate to a picture and select it, size the
cropper with your fingertips. When finished, select Save. The
picture is associated with your contact.
4. To save your contact, press the Back key, or press the Menu
key to select Done.
Edit contact details
You can always make changes to the information you’ve stored for
a contact:
8
Page 14

From Contacts, touch & hold the contact whose information you
want to edit. The context menu opens.
Select Edit contact. The Edit contact screen appears.
Make your edits, then select done .To cancel, select Revert.
Delete contact
1. From contacts, touch & hold the contact. To context menu opens.
Select Delete contact to delete the selected contact.
2. Or in contact detail menu, press the Menu key to select Delete
contacts.
7 Browser
To open the Browser, select the Browser application in the menu.
The Browser always opens to the last Web page you were viewing.
The first time you enter the Browser after powering on, your home
page will display. You can change your home page by pressing the
Menu key and selecting More > Settings > Set home page.
8 Settings
Control phone-wide settings from the Home settings screen: Press
the Menu key to select Settings. You can also select the Settings
icon from the Application screen.
1.16 Dual Sim Settings
You can set the SIM selection mode, dual SIM settings In network
settings, you can select appropriate network.
1.17 Wireless & networks
Note:
Please do not register networks inconsistent with the SIM
card, so as to prevent unavailability of normal use. For details,
please consult your service provider.
1.17.1 Wi-Fi
Wi-Fi on/off
Select Wi-Fi check box if you prefer to use Wi-Fi for your data
connection.
Menu Key > Settings > Wireless & networks > Wi-Fi settings
Note: Please turn off Wi-Fi if you don’t use it to save battery
9
Page 15

Wi-Fi Search and connection
Press Menu Key > Settings > Wireless & networks > Wi-Fi
settings.
1. View and scan for available networks - Press the Menu key and
select Scan.
2. Connect to a network - Select it from the network list.
3. Provide your username or password if required.
4. Press Wi-Fi check box again to turn off.
5. Manually add Wi-Fi network
6. Press Menu Key > Settings > Wireless & networks > Wi-Fi
settings.
7. Click Add WPS network, input SSID and Pin Number, then click
Start.
1.17.2 Bluetooth
You can make the Bluetooth settings as the following:
1. Rename your device.
2. Select to be discoverable, or not discoverable.
3. Click Advanced settings to make Bluetooth advanced settings.
4. Rescan for devices –select Scan for devices.
Send/Receive files
1. Scan for devices.
2. Select the device you want to pair with.
3. Type PIN to pair.
4. After the pair succeeds, you can send/receive files between two
devices via Bluetooth.
1.17.3 Tethering & portable hotspot
Share your phone’s mobile data connection via USB or as a
portable Wi-Fi hotspot.
USB tethering
You can tether your phone to your computer with a USB cable, to
share your phone’s internet connection with your computer.
Note:
you can’t mount your phone’s micro SD card on your
10
Page 16

computer when USB tethered
Portable Wi-Fi hotspot
You can turn your phone into a portable Wi-Fi hotspot, to share
your phone’s internet connection with one or more computers or
other devices.
1. When your phone is serving as a Wi-Fi hotspot, you can’t use
your phone’s applications to access the internet via its Wi-Fi
connection.
2. You configure the hotspot with the Wi-Fi hotspot settings.
1.17.4 Mobile network settings
1. Data Enabled: Enable data access over mobile network.
2. Data Connection: Default SIM for data connection.
3. SIM 1 data roaming: Connect to data services when roaming.
4. SIM 2 data roaming: Connect to data services when roaming.
SIM 1&2 other settings
1. Access Point Names: Do not change this setting unless advised
to do so by your wireless operator.
2. Use only 2G networks: Choose 2G network to save battery.
3. Network operators: Select a network operator.
1.18 Call settings
Fixed Dialing Numbers
This feature allows you to restrict outgoing calls to a fixed set of
numbers.
To enable this feature you must know the SIM PIN2 code for your
phone.
You can get this number from your wireless operator if this feature
is supported.
Voicemail
Select to set a voicemail number that isn’t being read from the SIM
card.
Other Call Settings
From selecting this, you can choose Call forwarding, Caller ID and
Call waiting.
11
Page 17

1.19 Sound
profiles
Lets you choose how your phone behaves in different environments
by setting
Volume
Select to open the volume control, then slide your finger along the
volume bar to set incoming call volume and notification volume.
SIM 1/SIM 2 ringtone
Select to set your default incoming call ringtone.
Audible touch tones
Select to have a tone sound when you use the onscreen Dialer.
Audible selection
Select to have a sound play when you select an item on the screen.
Screen lock sounds
Play sounds when making screen selection
Haptic feedback
Vibrate when pressing soft keys and on certain UI interactions
1.20 Display
Brightness
Select to open the brightness control, then slide your finger along
the brightness bar to set the level. In sunlight, increase the level.
Auto-rotate screen
Select to switch orientation automatically when the phone
orientation changes (except the home screen)
Animation
Select to show animation when opening/closing windows.
Screen timeout
Adjust the delay before the screen automatically turns off
Sensor Level Calibration
Calibrate the G-Sensor
1.21 Location & Security
My location
1. Use wireless networks:Select to use wireless networks.
12
Page 18

2. Use GPS satellites:Enable your handset to receive GPS data.
3. Use assisted GPS:Use server to assist GPS
Screen unlock
Create a pattern you will be asked to draw before your screen is
unlocked. You can select to make the pattern visible or invisible as
you draw it.
SIM card lock
Lock your SIM card for extra security. You can also change your
SIM card PIN from this screen. If you don’t know your SIM PIN, you
can obtain it from your wireless operator.
Passwords
Select Visible passwords to have your password display as you
type it.
Device administration
Select device administrators to add or remove device
administrators.
Credential storage
Allow applications to access secure certificates and other
credentials.
Install from SD card
Install encrypted certificates from SD card.
Set password
Set or change the credential storage password.
Clear storage
Clear credential storage of all contents and reset its password.
1.22 Applications
Unknown sources
Select this check box if you want the ability to download
applications from the Web. With this check box not selected, you
will only be able to download applications from Android Market.
To ensure your personal data and phone remain secure, it is
recommended you not select this check box.
Manage applications
View all the applications stored on your phone and how much
13
Page 19

space they occupy. If you’ve downloaded an application from
Android Market, you can uninstall it from this screen.
Select a specific application to:
1. Clear your user data – Choose one application, press Clear data.
2. Uninstall - If you’ve downloaded an application from Android
Market, you will be able to uninstall it from this screen by selecting
Uninstall.
Running services
View and control currently running services.
Storage use
View storage used by applications
Battery use
What has been using the battery
Development
If you are an application developer, you may be interested in these
settings
1.23 Accounts & sync
Before using this function, please add your e-mail account firstly.
Choose Background data box, your email account and related
applications will sync automatically.
1.24 Privacy
Back up my data
Back up my settings and other application data.
Automatic restore
Reinstall an application, restore backed up settings or other data.
Factory data reset
You can also select to reset your phone to factory settings. This will
erase all your data and downloaded applications.
1.25 SD card & phone storage
View and manage the data storage on your phone
1.26 Language & keyboard
Select language
Choose language area and the language setting.
14
Page 20

Android keyboard
Android keyboard settings
1.27 Voice input & output
Voice input
Voice recognizer settings
Language:Select local language.
SafeSearch:Moderate-Filter explicit images only apply to Google
search by voice.
Block offensive words:Hide recognized offensive voice results.
Voice output
Listen to an example:Play a short demonstration of speech
synthesis.
Always use my settings:Default settings below override
application settings.
Default Engine:Sets the speech synthesis engine to be used for
spoken text.
Install voice data:Install the voice data required for speech
synthesis.
Speech rate:Speed at which the text is spoken.
Language:Sets the language-specific voice for the spoken text.
1.28 Accessibility
Accessibility service may collect all words you input, including the
number for your credit card but not the code.
Power button ends call
During a call, press the power button to end the call instead of
turning off screen
1.29 Date & time
Set time, time zone, and date
Use Automatic unless you need to override the network values.
Time format
Select from 12- or 24-hour formats.
Date format
Select from a variety of formats.
15
Page 21

1.30 About phone
Check Update: update to latest version for your phone.
Status: This screen lists a variety of information, including your
phone number, the network you are currently using, the type of
network, signal strength, whether you are roaming or not, any Wi-Fi
addresses you’re connected to, and more.
Battery use: what has been using the battery.
Select Legal information for copyright and licensing information, as
well as the Google Terms of Service for the Google applications on
your phone.
System tutorial: learn how to use your phone.
Model number: View the model number.
Android version: view the version information for your phone.
9 Camera, Camcorder & Gallery
Before you can use the Camera or Camcorder, or view
pictures/videos in Gallery, make sure you have a card installed.
1.31 Camera
Take a picture
Select Camera in the menu, the Camera opens in capture mode.
Frame your picture within the screen and hold the phone steady.
Press the camera icon to take a picture.
Tip: In capture mode, press the video recorder icon to select switch
to video, the screen switch to video recording mode.
View your pictures
To view the pictures you’ve captured, press the T-flash image at the
lower-right corner.
1.32 Video Recorder
Record a video
Select Camera in the menu, if the Camera opens in camera mode,
press the recorder icon to switch to recording mode. Press the red
icon in the screen to record a video.
Play your videos
To view the videos you’ve captured, press the T-flash image at the
16
Page 22

lower-right corner.
1.33 Gallery
View pictures and videos in Gallery
To open Gallery, select the Gallery in the menu. Depending on how
many pictures and videos you’ve stored, they may take a few
minutes to load.
If you’ve stored your pictures and videos in folders on your memory
card, then the folders will display as separate “albums”.
Select an album to view the pictures and videos. To open a picture
in full-screen view, touch the picture. Once in full-screen, select the
arrows to scroll through the pictures within that album.
10 Music & Video player
In the menu, select the Music to open your music library.
Play back music
At any level in your Library, touch & hold a listing (a song, artist,
album, or playlist) to open the context menu. Select Play to begin
play and go to the Playback screen. The key definitions in the
Playback screen are as below:
Key definition in Music
Shuffle Through repeat
Repeat all songs
Repeat current
song
Pause Play
Fast forward (Touch & hold); Go to next song
(Touch once)
Rewind (Touch & hold); Go to beginning of
song (Touch once); Go to previous song
(Touch twice)
Party shuffle
To start “party shuffle” (all the songs in your library are added to a
17
Page 23

playlist in random order), press the Menu key and select Party
shuffle. To exit party shuffle, press the Menu key and select Party
shuffle off.
Playlists
You can create as many playlists as you wish. Note that the
“Recently added” playlist is a system playlist and cannot be deleted
or renamed. Also, if you make any voice recordings as part of a
MMS message, they will be stored automatically in a playlist called
“My recordings”.
11 Tools
1.34 Calendar
To open Calendar service, select the Calendar application in the
Application screen. You can view calendar, view month, edit event,
etc.
Register on the Google Market at first, then you can use the
following function.
Calendar views
You can slide the blue-bar at the bottom of the screen to view the
Calendar by Week, Day, List, Month.
Create an event
1. From any interface of the calendar, select one day and press “+”
at the upper-right corner to create an event.
2. Type the information in blank you are supposed to fill.
3. After you’ve finished, press save to save the event you have
edited.
Go to today
Press the image at the left bottom of the screen, to view the
calendar of current day.
View an event
With any event edited, there appears a colored bar in the date box.
Press the date box to view the event.
1.35 Alarm Clock
To open alarm clock, select the Clock in Application screen. The
18
Page 24

clock offers as many alarms as you want.
Set an alarm
Three alarms are set up for you, ready to customize. All two default
alarms are turned off by default.
To begin, select one of the default alarms to open Alarm settings.
Set the following options:
Alarm
Select the check box to turn alarm on (checked) or off (cleared).
This is the same check box that appears on the main Alarm Clock
screen.
Time
The time the alarm will go off is shown. To change this time, select
Time to open the time selector. Tap the + or – buttons and the
AM/PM button to set the time you want, then select Set.
Tip: Touch & hold the + or – buttons to move through the numbers
quickly.
Ringtone
The current ringtone selection is shown. Select Ringtone to pick
another ringtone that will play when the alarm rings. (When you
select a ringtone, it plays briefly.)
Vibrate
Select this check box to have your phone vibrate when it goes off.
Repeat
The current repeat selection is shown. To change the setting, select
Repeat and make a selection from the menu. To have your alarm
will only go off once at the set time, don’t select any of the options.
A one-time alarm is shown on the Alarm Clock screen without any
days under the set time.
Label
To name an alarm, select Label, then touch the textbox to change
the label, then select OK to save it.
Delete alarm
To delete the alarm, press the Menu key and select Delete alarm.
Once your alarm goes off, you will receive an alert with the options
19
Page 25

to Snooze (for 10 minutes) or Dismiss.
Add more alarms
To add more than three alarms, from the main Alarm Clock screen,
press the Menu key and select Add alarm.
1.36 Calculator
To open Calculator, select the Calculator application in Application
screen.
The Calculator offers two panels: basic and advanced. Switch back
and forth between panels by pressing the Menu key and selecting
Advanced panel or Basic panel, as you wish.
Calculator panels
Two calculator panels are available: basic and advanced. Use the
Basic panel to enter numbers and perform basic addition,
subtraction, multiplication, and division. Use the Advanced panel to
insert advanced operators or delimiters, such as sine, cosine,
tangent, square root, parentheses, etc.
Switch back and forth between calculator panels by pressing the
Menu key and selecting Advanced panel or Basic panel, as you
wish. As soon as you select an advanced operator, the panel
switches back to Basic, where your operator appears.
1.37 File Manager
Select File Manger in the Application screen to view the files in your
phone or memory card.
Note: The files in your phone can not be operated.
1.Touch SD card to open the folder. Touch and hold the screen to
open the context menu, select New Folder to create a new folder.
Or touch and hold a folder to open the context menu, then you can
copy, cut, rename, or delete the folder.
2.Touch and hold a file to open the context menu, you can copy,
cut, paste, send, rename the file, view the detail or delete the
content in the file.
Search file
The directory of the folder you visited shows on the upper side of
the screen. Touch the rightmost icon to open the search textbox,
20
Page 26

input the file name you want to search in this folder, then press the
magnifier to start searching.
12 Common Questions
Unable to make some calls
! Call barring has been set and barred utilization of the mobile
phone. Please check and cancel call barring.
Other person is answering my call
! The mobile phone has been set into divert your calls to another
phone number. Please check and cancel call divert.
The mobile phone cannot search for the network
! The mobile phone is outside of the network coverage area (or
there are physical obstructions between the mobile phone
and the transmitter), and calls cannot be made or answered.
If you are in one room, please move close to the window.
In the operation process, the mobile phone may display the
following operating tips:
“Emergency”
! You are outside the network coverage area of the service
provider. But another network area where you locate allows
you to make emergency call according to the signal strength.
“Invalid SIM”
! The SIM card of the mobile phone is locked and the inserted
SIM card is unable to be accepted. Please insert the correct
SIM card or contact with the vendor.
“Please Enter PUK”
! The SIM card has been locked since the wrong PIN code has been
inputted for three times. You must consult your network provider
for special PUK code with eight numbers to unlock the SIM card
(The PUK code may have been provided with your PIN code at
the same time).
Warning:
The SIM card will be permanently locked if you input the wrong
21
Page 27

PUK code for ten consecutive times and you must apply for a
new SIM card from your network provider.
13 Maintenance Guideline
Welcome to use S350. If there is a problem when you using the
phone, please contact with the vender or consult the local
maintenance center. If your mobile phone is in need of repair, you
can take your phone to local maintenance center, if there is no local
maintenance center, please pass your phone and the purchasing
invoice to the vendor.
14 FCC RF Exposure Information and Statement
The SAR limit of USA (FCC) is 1.6 W/kg averaged over one gram
of tissue. Device types S350 (FCC ID: WA6S350) has also been
tested against this SAR limit. The highest SAR value reported
under this standard during product certification for use at the ear is
0.26W/kg and when properly worn on the body is 0.82W/kg. This
device was tested for typical body-worn operations with the back of
the handset kept 1.5cm from the body. To maintain compliance with
FCC RF exposure requirements, use accessories that maintain a
1.5cm separation distance between the user's body and the back of
the handset. The use of belt clips, holsters and similar accessories
should not contain metallic components in its assembly. The use of
accessories that do not satisfy these requirements may not comply
with FCC RF exposure requirements, and should be avoided.
FCC WARNING
This device complies with Part 15 of the FCC Rules. Operation is
subject to the following two conditions:
(1) This device may not cause harmful interference.
(2) This device must accept any interference received, including
interference that may cause undesired operation.
NOTE 1:
This equipment has been tested and found to comply with the limits
for a Class B digital device, pursuant to part 15 of the FCC Rules.
22
Page 28

These limits are designed to provide reasonable protection against
harmful interference in a residential installation. This equipment
generates uses and can radiate radio frequency energy and, if not
installed and used in accordance with the instructions, may cause
harmful interference to radio communications. However, there is no
guarantee that interference will not occur in a particular installation.
If this equipment does cause harmful interference to radio or
television reception, which can be determined by turning the
equipment off and on, the user is encouraged to try to correct the
interference by one or more of the following measures:
- Reorient or relocate the receiving antenna.
- Increase the separation between the equipment and receiver.
-Connect the equipment into an outlet on a circuit different from that
to which the receiver is connected.
-Consult the dealer or an experienced radio/TV technician for help.
NOTE 2:
Any changes or modifications to this unit not expressly approved by
the party responsible for compliance could void the user's authority
to operate the equipment.
NOTE 3:
The manufacturer is not responsible for any radio or TV
interference caused by unauthorized modifications to this
equipment. Such modifications could void the user’s authority
to operate the equipment.
23
 Loading...