

Page 1

R620
User Manual
Thank you for purchasing the R620 mobile phone
Page 2

Introduction
Operation
Description of Contents
Example
Showing
contents
keys are shown by normal
characters with frames
key
Functional key is shown with
bold and frame
Menu
item
Welcome to choose the R620 mobile phone. This user manual
states the outstandi ng performance of the R620 mobile phone in
detail. In additi on to th e basi c c all f eatu res, th e R620 mobil e p hone
and the system network also provi de you with a variety of useful
features and services to facilitate your work and leisure activities.
The Company reserv es the right to mak e any amendment on the
technical specifica tion s wit hou t an y adv anc e notic e .
Reading Statement for the Manual
In manual, differ ent t ypes etting st yles are used to in terpr et di fferent
operating details, and the specific interpretation is as follows:
Show with normal characte rs 0-9
General
key
All the keys except functional
0-9
Functional
Show in bold italics Edit
Note:
The picture shown in the manual are only used as function hint
pictures whi ch may be different fr om the ones shown in the
mobile phone, and the ones in your mobil e ph o ne shall prevail.
OK
Page 3

CONTENT
Introduction ..................................................................................... I
Security and per f or mance ............................................................. 1
1 Start Using ............................................................................... 4
1.1 Battery ............................................................................. 4
1.1.1 Uninstallation and installation of battery ................ 4
1.1.2 Charging the battery ............................................... 5
1.1.3 Use of battery ......................................................... 6
1.2 SIM card .......................................................................... 6
1.2.1 Insertion of SIM card .............................................. 6
1.2.2 Unlock the SIM card ............................................... 7
1.3 Plug and unplug the memory card .................................. 7
1.4 Plug and unplug the earphone ........................................ 8
1.5 Status bar and content .................................................... 8
1.5.1 Keys ........................................................................ 9
1.5.2 Text input and edit window ................................... 12
2 Dial and answer the call ....................................................... 12
2.1 Making a call ................................................................. 12
2.1.1 Direct dial .............................................................. 12
2.1.2 Making a call from the Phonebook list ................. 13
2.1.3 Speed dial ............................................................. 13
2.2 Answering a call ............................................................ 13
2.2.1 Answering new call ............................................... 13
2.2.2 Connecting two calls at the sam e tim e ................ 13
2.2.3 Conference call..................................................... 14
2.3 Emergency call .............................................................. 14
3 Menu operation ..................................................................... 15
3.1 Selection of main menu ................................................ 15
3.2 Menu Functions Form ................................................... 15
4 Applications .......................................................................... 15
5 Phonebook ............................................................................ 15
6 Call center .............................................................................. 16
6.1 Call history..................................................................... 16
6.2 Call settings ................................................................... 16
6.2.1 SIM1/SIM2 call settings ........................................ 16
I
Page 4

6.2.2 Advanced settings ................................................ 17
7 Connectivity .......................................................................... 17
7.1 Bluetooth ....................................................................... 17
7.2 WLAN ............................................................................ 17
7.3 Conn. Management ....................................................... 18
7.4 Data account ................................................................. 18
8 SNS ......................................................................................... 18
8.1 MSN .............................................................................. 18
8.2 Yahoo ............................................................................ 18
8.3 Facebook ....................................................................... 18
8.4 Twitter ............................................................................ 18
9 Messaging.............................................................................. 18
10 Services ................................................................................. 20
10.1 Internet service .............................................................. 20
10.2 License manager ........................................................... 21
10.2.1 License List ........................................................... 21
10.2.2 Status.................................................................... 21
10.2.3 Advance ................................................................ 21
10.3 STK(SIM Tool Kit) ......................................................... 21
11 File manager .......................................................................... 21
12 Organizer ............................................................................... 22
12.1 Calendar ........................................................................ 22
12.2 Tasks ............................................................................. 22
12.3 Alarm ............................................................................. 22
12.4 World clock .................................................................... 23
12.5 Notes ............................................................................. 23
12.6 Synchronization ............................................................. 23
12.7 Phone sync.................................................................... 23
12.8 Calculator ...................................................................... 24
12.9 Currency converter ........................................................ 24
12.10 Health ............................................................................ 24
12.11 Stopwatch ...................................................................... 24
12.12 Ebook reader ................................................................. 24
II
Page 5

13 Multimedia ............................................................................. 25
13.1 Image viewer ................................................................. 25
13.2 Media player .................................................................. 26
13.3 Sound recorder ............................................................. 26
13.4 Radio FM ....................................................................... 26
13.5 Schedule FM record ...................................................... 27
14 Settings .................................................................................. 27
14.1 Time and date ............................................................... 27
14.2 Personalized setting s .................................................... 27
14.3 User profiles .................................................................. 27
14.4 Phone settings .............................................................. 28
14.5 Network settings ............................................................ 28
14.6 Security settings ............................................................ 29
14.6.1 SIM1/SIM2 security .............................................. 29
14.6.2 Phone security ...................................................... 29
14.6.3 Auto keypad lock .................................................. 29
14.6.4 Certificate manager .............................................. 30
14.6.5 Private security ..................................................... 30
14.6.6 Calls & SMS firewall ............................................. 30
14.6.7 Phone control ....................................................... 30
14.7 Restore factory settings ................................................ 32
14.8 Misc. settings................................................................. 32
14.8.1 Sound effect ......................................................... 32
14.8.2 UART settings ...................................................... 33
15 Camera ................................................................................... 33
15.1 Camera .......................................................................... 33
15.2 Video recorder ............................................................... 33
16 Other Functions .................................................................... 34
16.1 Mass Storage Function ................................................. 34
16.2 Web camera Function ................................................... 34
16.3 COM port ....................................................................... 34
17 Common Questions .............................................................. 34
18 Maintenance Guideline ......................................................... 36
III
Page 6

Security and performance
◆To touch the s creen of the mobile phone with sharp a rticles is
prohibited. Dust p articles and nails ma y scratch the scree n. Please
maintain the scree n clean. Please re move the dust on the s creen
with soft cloth gently, so as not to scratch the screen.
◆In thunder raining days, please do not use the mobile phone when
charge it or outdo or, so a s t o avoid being struck b y thu nder or other
injuries.
◆Please do not put the b attery in high-temperature environm ent
(high temperature w il l lea d to heat of the ba t te r y upg ra di n g), or el se
it may result in fire or explosion.
◆Please keep the mobile phone being charged and the charger
away from people or other flammable and explosive articles in order
to avoid fire, explosion or other dangers!
◆Please strictly adhered to the r ules and do shut down the m obile
phone on occasions which use of mobile phone is prohibited!
Please do not put the mobile phone, battery and charger in the
equipment with strong electromagnetic field, such as induction
cooker and micro wave oven; other wise it will lead to ci rcuit failure,
fire or explosion.
◆Please do not arbitrarily refit the mo bile phone, or teardo wn the
mobile phone and accessories without authorization. Improper refitting
or teardown easily triggers fire and explosion of the mobile phone.
Only the authorized organizations can repair the mobile phone.
◆Please do not use batteries, charger or accessories of
non-standard original models.
◆Please do not join the two p oles of the batter y, so as not to resul t
in battery short-circuit.
◆If the power wire has b een damaged (such as the exposed and
fractured), or the con nec tor has been l oos ened, pl ease d on’t u se it,
so as to avoid electric shock, short circuit of the charger or fire.
1
Page 7

◆The mobile phone s hould be power ed off in the h ospital or oth er
places where use of mobil e phone is prohibited. Mobil e phone will
affect proper work of electronic equipment and medical devices,
such as pacemakers, hearing aids and other medical electronic
equipments. Pacemaker manufacturer proposes to keep the
distance between t he mobi le phon e and th e pacemak er at l east 1 5
cm, in order to avoid pot enti al i nte rference to the p ac em ak er by the
mobile phone.
◆Please do not uses the mobile phone when drive a car. In case of
emergency, pleas e use hand-free devices (which may be bought
separately); otherwise, please park your car on the road side before
making a call.
◆Please do not pu t the mobile phon e on car insuranc e airbag or
region reachable b y the airbag after spr eading. Otherwise wh en t he
airbag expands or ruptures, the mobile phone is likely to cause
serious dama ge to the pe ople i n the car due t o stro ng ex tern al for ce.
◆Please keep the mobile phone, battery and charger at place out of
the reach of children. Please do not let children use the mobile
phone, battery and charger in the absence of adults’ supervision.
◆In order to comply with provisions of RF leakage, whe n you wear
a mobile phone or use the data functions of the mobile phone,
please maintain th e dista nce betw een the a ntenna a nd the b ody at
least 1 inch (2.5 centimeters).
◆Please power off the mobile phone before cleaning and
maintenance. If t he mobile p hone is co nnected to th e charger, you
need to unplug th e charger from the power outle t, and disconne ct
the connection be tween t he charg er and th e mobil e phone i n order
to avoid electric shock, short circuit of battery or charger.
◆Do not use chemical lotion, scrubbing cleanser to wipe the mobile
phone or the charger , otherw ise it ma y damage th e compone nts or
cause fire. Slightly wet and anti-static soft clean cloth can be used.
2
Page 8

◆Please do not thro w the old and abando ned lithium batt eries into
trash can, send them to th e designa ted locatio ns or return them to
our company.
◆Please do not charge the mobile phone in environment with much
dust, humidity, too high, or too low temperature (the permitted
charging temperature range is 0℃~ 40℃), and the power wire
cannot be nearby the heatin g containers.
◆Please do not use the pho ne to mak e bold t o camera , video and
recording that may infract the rights of the copyright owners.
The company wi ll not b e responsi ble for any losse s caused by not
recording, deleting, des tructing or dam age of the photos, vid eo and
recordings caused b y its access ories or soft ware on the us e of the
functions including camera, video and audio.
◆In the use of net work function, if th e users download a file with
virus, which make the m obile phone cann ot be used normally; t he
company does not undertake any responsibility arising therefore.
Warning: The original manufacturer will not take on any
responsibility for the users who are not in compliance with the above
advices or improperly use the mobile phone.
Note: The appli cation o f value -added s ervices o f the mobi le pho ne
is provided by relevant service providers. Please refer to the
relevant help or providers’ no tes f or det ail ed inf orm ation.
Statement: The Company reserves the right to improve the
product without m aking any advance notice, an d keeps final
interpretin g rights on the prod uct performanc e. The compan y
commits to improve the product quality and gradually launches
new versions of products. So if the contents stated in the
manual are slightly d if f er e nt from th e f u nction, spe cification or
design, please refer to the mobile phone. Such changes are not
notified additionally, your under s ta n ding is apprecia ted.
3
Page 9

1 Start Usi n g
1.1 Battery
The battery is att ached with the mobil e phone. The battery is not
charged when the mobile phone is purchased but can support
powering on. Ple ase recharge it for u se after completely using up
the battery for the fi rst three ti mes, which mak es this batt ery easi er
to achieve the best using state.
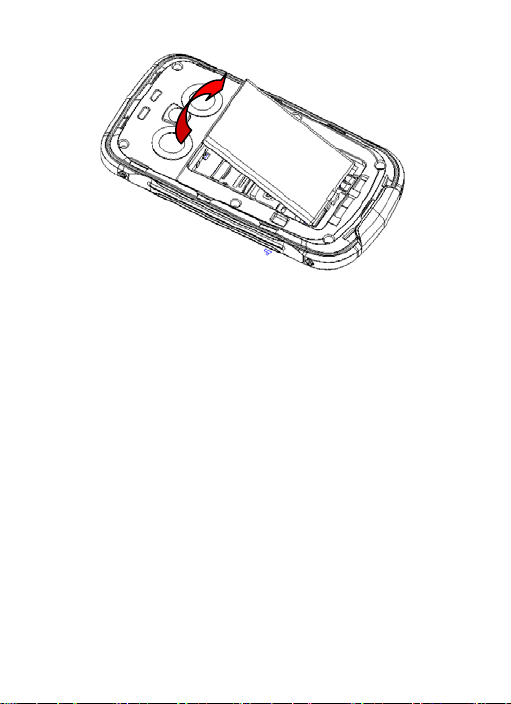
1.1.1 Uninstallation and installation of battery
Put the back of the mobile phone upward, move the cover button
to the right to release the cover, then take off the rear cover
according to the chat below.
Dig out the bottom of the battery and get the battery out.
4
Page 10
When installing the battery, insert the metal teeth at the bottom of
the battery into corresponding slot of the mobile phone, and then
press the batte ry down to install t he battery in place. The battery
must be ensured to be installed before powering on.
Finally install the rear cover of the mobile phone, move the cover
button to the left to lock the cover.
1.1.2 Charging the battery
When the power of t he battery was low er than normal, the ph one
will prompt batter y low. Please recharge for the batte ry, otherwise
you will lose the files which are n ot saved. If you don’t c harge f or a
long time, the phone will be pow er ed off autom ati c al l y.
When charging, t he battery ico n at the right upper corne r of the
screen will appe ar i n a d yn am ic r ol li n g m anne r. During t he charging
period, the battery, mobile phone and charger will become hot,
which is a normal phenomenon.
Warning:
The stated charging temperature ranges from 0℃ to 40℃.
Please do not use charging equipment if the temperature
exceeds the ra nge. Pl ease do use t he char ger pro vided by the
5
Page 11

supplier. Application of unauthorized charger may trigger
danger and breach the mobile phone maintenance warranty.
1.1.3 Use of battery
In actual use, the sta ndby time and talk time of the mobile pho ne
varies with the network status, workin g environment and different
using manners.
1.2 SIM card
Your network operator will provi de you a SIM car d which is the k ey
for your access to the digital GSM network. Prior to using the
phone, you need to insert effective SIM card in the mobile
phone.
All relevant information concerning network connection will be
recorded in the SIM card. SIM card can be removed from your
mobile phone and be used in any other GSM mobile phon e (new
mobile phone automatic al l y rea d SIM c ard ).
In order to prev ent los s and d amage t o the i nformati on in the card ,
you should avoid to uching the metal area and k eep it away from
electricity and magnetic places. SIM card once being damaged, you
will not be registered to the GSM network.
Warning:
You must power off the mobile phone before removing the SIM
card. Inserting or removing the SIM card is absolutely
prohibited when the external power supply is connected,
otherwise SIM card and mobile phone may be damaged.
1.2.1 Insertion of SIM card
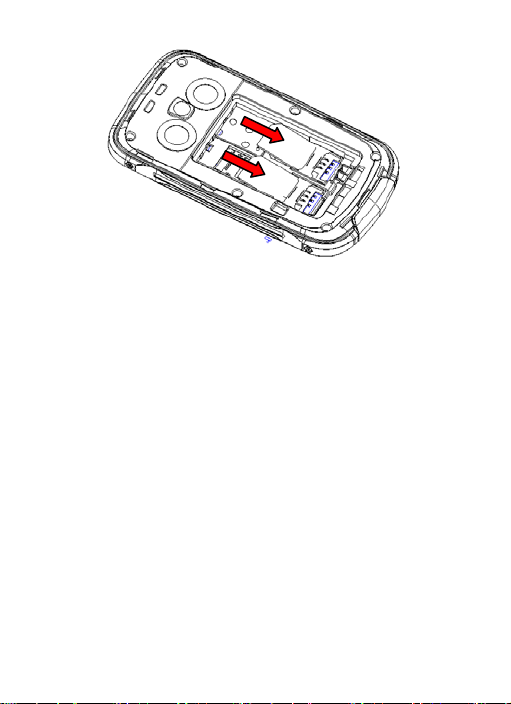
Power off the mobile phone, remove the rear cover and battery.
Insert the SIM card correctly in the card slot; finally install the
battery and rear cover of the mobile phone.
6
Page 12
1.2.2 Unlock the SIM card
In order to preve nt ill egal use, S IM c ard a dopts P IN co de (p ers onal
identification code) encryption protection.
If this function is selecte d, PIN c ode sh ould be i nput cor rectl y each
time when you power on t he mobile ph one, thus to u nlock the SIM
card for normal us e. Users ca n disarm the S IM card pr otection b ut
illegal use of the SIM card cannot be prevented.
If the PIN code input is error for thr ee consecuti ve times, you r SIM
card will be locked by the net work. The mobile phone will en quire
the PUK code which will be provided by your network operator. If the
PUK code input is wrong for 10 times, the SIM card will be
permanently barred.
Note:
Your network operator will set a standard PIN code (4 to 8
numbers) for you and you should change it to private
password as soon as possible.
1.3 Plug and unplug the memory card
Power off the mobile phone, remove the rear cover and battery.
Open the memory ca rd holder, and i nsert the memor y card into
the slot at the bottom according to the chat below, then close th e
7
Page 13

memory card holder.
1.4 Plug and unplug the earphone
Open the USB cover and insert the connector of the earphone to the
earphone jack at the bottom of the mobile phone. Gently pull out the
earphone to remove it.
1.5 Status bar and content
In standby screen you can get the informati on that you need fr om
the indication icons on the screen.
Indicating the current signal strength of SIM1
Indicating that the SIM1 is connecting network currently
Indicating there is text message not read of SIM1
Indicating there is MMS sending or downloading
Indicating there is MMS not read of SIM 1
8
Page 14

Divert all voice calls has been set of SIM1
Indicating missed call of SIM1
The current alert type is ring only
The current alert type is vib. only
The current alert type is vib. and ring
The current alert type is vib. then ring
Indicating that silent mode activated
The mobile phone is locked
Indicating that earpho ne has be en inserted
Indicating that the Bluetooth has been activated
Indicates that Wifi has been connected
Indicating that alarm has been set
T-flash card is inserted and recognized
Indicating current battery capacity
1.5.1 Keys
Functions of the keys are desc ribe d as foll o wi ng:
9
Page 15

SN
Keys
Function description
press the Snd to enter the Call history.
on/off the phone.
Left soft
key (LSK)
OK; pop-up menu; short press in the
standby screen to enter the main menu.
key (RSK)
OK; in idle sc re en, sh ort press to enter the
chosen shortcut menu.
Send key
1
(Snd)
End
2
key(End)
3
Right soft
4
5 OK key
Making a call; in dual SIM mode, press
Snd to select th e SIM car d for diali ng out;
answering a call; in the standby screen
Hang up a call; go back to the standby
screen; short press to light on/off the
screen in idle scre en; long press to power
Clear; back.
10
Page 16

Left navigation key (L): moving to the left.
right.
Up navigation key (U): moving upward.
Down navigation key (D): moving
downward.
writing language.
Listen to the voi ce of the other side when
calling.
interface.
Connecting USB cable, charger or insert
to media files, and so on.
For activating the spe aker, you can listen
audio or calls in hands-free mode.
12
Camera
For capturing pictures or recording videos.
button
the right to release the cover.
Navigation
6
key
7 Keypad
8 Receiver
Volume
9
key
10 USB jack
11 Speaker
Cover
13
Right navigation key (R): moving to the
Input; in the main menu screen short press
the number key to enter corresponding
menu; in standb y screen, long press 2-9
key to speed dial out (need set); long press
OK key to lock the keypad; lon g press #
key to active Silent mode; in the editing
state, short press the Sym key to enter the
symbols selecting sc reen; short press the
Fn key to switch input method; short press
right key to switch detailed input
method; l ong press the Fn key to s witch
Short press to adjust v olume wh en call ing
or listening to Media files/FM or on standby
the earphone to ans wer calls an d to listen
Move to the left to lock the cover; m ove to
11
Page 17

1.5.2 Text input and edit window
Enter the text inp ut screen, you can shor t press the Sym k ey to
enter the symbols selecting screen; long press the Fn key to switch
writing language; s hort press the Fn key t o switch input method;
short press key to switch detailed input method. There are
preset some in put methods i n your ph one; you can s elect the one
which you liked. You can also activate Options, t o select Input
method so as t o switch t he preferred input metho ds. Select Input
method options to change writing language or set Cstar on or off.
2 Dial and answer the call
2.1 Making a call
When the network operator’s logo appears on the screen, the
mobile phone ente rs int o t h e no rm al standby state in whi ch you can
dial or answer a call. The network signal strength indicator at the top
of the screen. The call quality is relatively largely impacted by
obstacles. Therefore, movement in a small range can effectively
improve the signal strength.
2.1.1 Direct dial Making domestic call
In the standby screen, input the call num bers (pl ease ad d the a rea
code for domestic long-distance calls), then press the Snd to select
SIM1 or SIM2 to make the call.
Calling extension of fixed number
When c alling th e extensi on num ber of a fix ed num ber, you need to
dial the host n umber and then dial the e xtensio n num ber accor ding
to the correspondi ng voice hi nts. If you insert “p” between the h ost
number and extensio n number, the mobile phone will automatic ally
dial the extension numb er for you.
Making an internatio nal call
To make an international call, you sim ply need t o input t he symb ol
“+”, then input the co untry code and com plete phone number that
you want to dial.
12
Page 18

2.1.2 Making a call from the Phonebook list
In the Phonebook list, select corresponding contact person and
phone number press Snd, the phone will prompt the screen for
selecting SIM card to dial.
2.1.3 Speed dial
In Speed dial, yo u can separately se t number keys 2-9 to set up
phone numbers.
On the standby screen, long pr ess the number k eys and you can
automatically dial the number that has been set up. If speed dial has
not been set for the number key you long pressed, the mobile phone
will hint you “No speed dial number”.
2.2 Answering a call
2.2.1 Answering new call
If there is a new incom ing call when in call progress, t he mobile
phone will pop up c aller screen (call waiting is activated) and the
mobile phone will give a short prompt to tell you that you have a new
call. At this time, you can pres s Snd or acti vate Options to select
Answer to answer t he new call. W hen you answer a n ew call, the
original call will enter hol ding status. At this tim e, you can activate
Options to sele ct Swap to the origin al call, and the new cal l will
enter holding status.
Note:
When you are in call progress, the new call to another SIM card
can’t be dialed in.
2.2.2 Connecting two calls at the same time
When two telephone numbers are connected, activate Options,
and you can operate as follows:
Swap: switch call.
Conference: when making conference call, you can have a talk
separately with design ated conference parti cipant.
End single call: hang up the current call.
End all calls: hang up all the current calls.
13
Page 19

Transfer (network sup port is required): transfer the current call t o
your designated phone number.
New call: input new phone num b er to di al.
Phonebook: enter the phonebook screen.
Call history: enter call history screen.
Messaging: edit the message to send it.
Sound recorder: record the current call.
DTMF: on/off setti n gs ca n be conducted. If the function is activated,
when calling th e tele phon e e xchan ge, you ca n c all the ext ension in
accordance with voice clews; the aforesaid functions are
unavailable if the function is off.
2.2.3 Conference call
During the conference call, activate Options, and you also can
operate as follows:
Hold conf. call: hold the current call with members of the
conference, the n others cannot hear your voice; and the o ption of
Hold conf. call changed to Retrieve conf. call, select it and you
can recover normal conference call.
Split: separate the selected member from the conference call.
2.3 Emergency call
In any country using the digital GSM network, if you are in the
network coverage a rea (you can c heck the net work signal s trength
at the top of m obi le p hone scree n), even with out t he S IM c ard, you
are also able to make an emergency call.
Inputting the P IN code or unlock the phone unlocking screen, press
SOS and you can make an emergency call.
Note:
The emergenc y call number s in differ ent countrie s or regions
are different. Please refer to the local numbers for specific
emergency service numbers.
14
Page 20

3 Menu operation
Applications
Phonebook
Call center
Connectivity
SNS
Messaging
Services
File manager
Organizer
Multimedia
Settings
Camera
3.1 Selection of main menu
In the standby screen, press LSK to e nter the mai n menu. On the
main menu screen, you can press navigation ke ys to select the
menu you want to enter. You can also enter the menu screen
through pressing corresponding number keys with the function
menu.
3.2 Menu Functions Form
4 Applications
For richness you r entertainment life, Applications provide you the
interesting application. You can install new java games through
Install in Options menu. Please get more information in the
instructions of the phon e.
5 Phonebook
Enter the phonebo ok screen, inp ut the first lett er of name, you can
search the accordant records in Phonebook. Select Add new
contact t o add t he co ntact. W hen th e record is n ot empt y, activate
Options to conduct the following operations:
Send message: send message to current contact.
Edit: edit the current contact.
Delete: delete the information of current contact person.
Send business card: send the information of cu rrent contact as
vCard mode.
Mark several: you can do the copy, move, delete or export
operation for the marked contact.
Advanced: you can set preferred storage, caller groups, speed dial,
my number, extra numbers, import contacts, delete duplicated
contacts, and you can also view memory status.
15
Page 21

6 Call center
6.1 Call history
Enter call history, there displays the records of dialled calls. You can
press left/right n avigation ke y to switch to othe r sheet, such as all
calls, missed calls, received calls and blocked calls.
In every sheet, acti vate Options, yo u can operate as fol low: view,
call, s end message, save to phonebook, add to blacklist, add to
whitelist, edit before call, delete, dele te al l and adv anced.
6.2 Call settings
6.2.1 SIM1/SIM2 call settings
Caller ID: you can set whether to allow your phone number being
displayed or not through selecting set by network, hide ID or send ID.
This funct ion ne eds to b e supp ort ed by th e netw or k serv ice pr ov ider.
Please get in touch with the related network service provider to
open the relevant service.
Call waiting: you can activ ate/de activ ate th e f unction and also can
query the status of call wai ting. A fte r th e funct ion being activ ate d, if
you have a new incomi ng call whil e in calling pro cess, your m obile
phone will display the ne w call screen, and the call can be received
normally. If the function is de activated, new inc oming calls cannot
be displayed.
Call divert: this function is used to transfer the ca l l to you r des igna te d
phone. The success o f call divert setting is related with the net work
and SIM card. The system will give appropriate setting tips.
Note:
If the transfer call you set is a fixed phone, pleas e add the area
code before the fixed phone.
Call barring: this function needs net work support. Please contact
your network provi der to open this b usiness. Network provider will
provide the corr esponding network passw ord for you activate call
barring service.
Line switchi ng: switch the phone current line.
16
Page 22

6.2.2 Advanced settings
You can set the function such as auto redial, background sound, call
time display, call time reminder, auto quick end, reject by SMS,
connect notice, answer mode and so on.
7 Connectivity
7.1 Bluetooth
In connectivity, you can find the connectivity mode of Bluetooth.
Enter into Bluetooth menu list screen, you can operate as follows:
Power: turn on/off th e Bluet ooth fu nction. W hen Blueto oth functi on
is turned off, all Bluetooth c onnection are ended, you can transmit
and receive dat a by using Bluetooth. Please turn off t he Blueto oth
function when your phone is used for other operations, because
Bluetooth connection will consume the battery capacity.
Visibility: set on/off visibility of Bluetooth.
My device: enter into m y device, if has not c onnected with other
device, you can select S earch new d evice to search and comp are
with the mobile phone , else the records of Bluetoo th device s which
has connected with this handset are shown on the screen.
Inquiry audio device: system will automatically search the
hands-free device, and then shows the results after searching.
My name: you can change the phone name.
Advanced: you can set the audio path, storage, sharing permission,
and view my address.
Note:
The received file th at transmitted by Bluetooth ar e stored in
Received folder automatically.
7.2 WLAN
To enter WLAN, enable WLAN from the Options menu. When
WLAN is activated, the WLAN interface shows the available AP
(Access Point) nearby. Select an unconnected AP and several
options (c onnect, add, define access point, WLAN status, disable
WLAN, power save m ode and refresh) will appear in LSK menu.
17
Page 23

Press a connected A P, and several options (disc onnect, add, edi t,
delete, change priorit y, W LAN status, disable W LAN, power sav e
mode and refresh) will appear.
7.3 Conn. Management
You can view the current connection states.
7.4 Data account
With valid SIM card with GPRS function inserted, Data ac co u nt will
show the availa ble accounts for GS M dat a and GPRS, which define
the access p oint to con nect netw ork. Data acc ount auto -matchi ng by
our phone once the SIM card is inserted, it could be edited and
deleted.
8 SNS
8.1 MSN
Enter MSN; you can conduct the following operations:
Start: you can input username and password to sign in.
Update: updated the version to the latest.
8.2 Yahoo
Enter Yahoo; you can conduct the following operations:
Start: you can input username and password to sign in.
Update: updated the version to the latest.
8.3 Facebook
Enter Facebook; you can conduct the following operations:
Start: you can input username and password to sign in.
Update: updated the version to the latest.
8.4 Twitter
Enter Twitter; you can conduct the following operations:
Start: you can input username and password to sign in.
Update: updated the version to the latest.
9 Messaging
In messaging screen, the following operations are available:
Write message: cre ate ne w mes s ag e, you also can swit ch t o MMS
in message editing screen through Options menu.
18
Page 24

Conversations: you can vie w the messages i ncluding SMS and
MMS, each conv ersati on incl udes the sent and recei ved mess ages
with one contact.
Drafts: store the messages that you hav e edited but not to sent
immediately.
Garbage box: when Blacklist state is on, the SMS sent by all
numbers in the bl acklist are sent i nto the garbage box rather than
the inbox while other numbers not; when whitelist state is on, the
SMS sent by all numbe rs in the whitelist are sent into the inbo x
rather than the garbage box while other numbers not.
Delete messages: you can choose to del ete mess ages in defined
folders, such as inbox, drafts, outbox, sent box, garbage box and all
the boxes.
Email:
Enter Email, add Em ail account according to Em ail setup wizard.
you can conduct the following operations:
View: view the current mails.
Write Email: edit the new mail.
Connect: connect network.
Retrieve Email: retrieve new mails.
Settings: set the correlative parameter of the e-mail account.
Templates: store the current templates of the phone.
Note:
Please set cor responding mode in E mail profile before edit Email
and insure your SIM card support GPRS connection. Please consult
with your network service provider.
BBrrooaaddccaasstt mmeessssaaggee:: bbrrooaaddccaasstt mmeessssaaggee iiss aann i
ttoo aallll GGSSMM uusseerrss iinn aa ssppeecciiffiicc llooccaattiioonn sseenntt bbyy
ssuucchh aass tthhee wweeaatthheerr ffoorreeccaasstt,, ttrraannssppoorrttaattiioonn
YYoouu hhaavvee tthhee ffoolllloowwiinngg ooppttiioonnss iinn bbrrooaadd ccaasst
Receive mode: choose whether to enable or disable cell
broadcast.
19
i
nnffoorrmmaattiioonn sseerrvviiccee
tthhee nneettwwoorrkk ooppeerraattoorr,,
ccoonnddiittiioonnss aanndd ssoo oonn..
sseettttiinnggss::
t
Page 25

Channel Settings: set the channel of cell broadcast.
Languages: choose the display language for cell broadcast.
Read Messages: read the received cell broadcast.
TTeemmppllaatteess:: eenntteerr iinnttoo pprreesseett mmeessssaaggee tteemmppllaatteess aanndd vviieeww oorr uussee
tthheemm.. TThheessee pprreesseett tteemmppllaatteess ccaann ssaavvee yyoouurr ttiimmee iiff tthhee tthheemmee ooff
y
oouurr nneeww mmeessssaaggee iiss tthhee ssaammee aass tthhoossee eexxiissttiinngg iinn tthhee tteemmppllaattee..
y
Schedule SMS: you can create a SMS to be sent out later. The
message will b e sent out a utomaticall y at the tim e you schedule it
for.
M
eessssaaggee sseettttiinnggss:: yyoouu ccaann sseett yyoouurr mmeessssaaggee pprreeffeerreenncceess uussiinngg
M
tthhiiss ffe
Text message: define S MS profile, voi ce mail server number,
Multimedia message: define data ac c oun t t o send/receive M MS
Service message: set to w hether to enable push mes sage and
Conversations: set the message display mode in i nbox list or
e
aattuurree..
common settings, and view memory status.
and common settings.
several push settings.
not.
10 Services
10.1 Internet service
Enter Internet service there displays the following options:
Homepage: you can access the preset website directly.
Bookmarks: bo okmark is used to sa ve the websites th at you are
interested.
Input address: enter the website editing screen.
Last web address: browser the web page you opened last time.
Resent pages: list resented viewed web pages.
Stored pages: list stored web pages that you could view offline.
Settings: include several options that you could customize your
browser, such as homepage, sel ect profile, data acco unt, browser
options, preferences, security settings and restore browser settings.
20
Page 26

10.2 License manager
10.2.1 License List
List all the licenses of current phone.
10.2.2 Status
Show the version and time of current license manager.
10.2.3 Advance
Space check: set the space check on/off.
Sweep: choose sweep, the phone will prompt “Remove useless
licenses and reboot? ”, choose yes or no to do the corresponding
operations.
10.3 STK(SIM Tool Kit)
For using the functi on, you have to insert a valid S IM card in yo ur
phone. This function is provi ded by the network operator and the
menu name is decided by operators too, not STK usually. According
to the services provided by the SIM card, there will be different
options appeari ng in this directory. The name and cont ent of the
menu are based enti rely on the services pr ovided by the network
operator. For more information, please contact with the network
operator.
Note:
This function depends on whether the network operator
provides this service and whether you have ordered this
service.
11 File manager
Enter into file m anager, then the sc reen sh ows phone and mem ory
card (memory card is inserted in the phone). At the top of the screen,
the capacity and s urpl us ca paci ty of t he p hone or mem or y car d are
displayed. The following operations are available:
Open: enter the files list under the root directory.
Format: format the phone/memory Card, which will del ete all the
data stored in the current phone/memory card.
Rename: rename the m emor y card . This m enu o nl y displ ays in the
options when select the memory card.
21
Page 27

Details: shows the name, total size, and free size information of the
memory card. This m enu only displays in the o ptions when select
the memory card.
12 Organizer
12.1 Calendar
Enter calendar sc r ee n, th e current mon th c al e nd ar i s displayed and
the current date has a frame around th e number with special color.
Activate Options, and you can operate as follows:
View: you can view the calend ar that effectives in tod ay. You also
can add a new calendar or edit, delete and send the selected
calendar.
View all: you can vie w the ent ire cal e n dar . Y ou also can add a new
calendar or edit, delete and send the selected calendar.
Add event: you can choose one type and add a new calendar.
Delete event: delete cu rrent eve nt.
Jump to date: input th e date need to b e s wit c he d (in a v alid period
of time), there will display the inputted date.
Go to today: go to today directly.
Go to weekly view (G o to mont hl y view): Set the display mode of
calendar as weekly view chart/monthly view chart.
12.2 Tasks
This function is used for add and view task items.
12.3 Alarm
There are 5 alarm s in you r mobile ph one. The functions and using
methods of the 5 alarms are c ompletel y same. You can set to turn
on/off respectively.
Set alarm
Select an alarm, enter the settings screen of this alarm, you can turn
on/off this alarm, and set the time of the alarm , at the sam e time,
you can set this alarm in detail.
Alarm remind
When the alarming time comes, there is alarm hint in handset
22
Page 28

(according to alarm settings).
If the mobile p hone is in power off state, af ter the time of alarm
sound come, pop up the power on confirmation screen, here, you
can select power on or not.
Pay attenti on to t hat the al arm stil l sounds according to the former
setting time after you adjust the date and time. You can reset the
date and time of next alarm according to the changed date and time.
12.4 World c l ock
Enter world cl ock s cr ee n, ac tive Options you can s el ec t th e ci t y by
choosing it and pressing OK key.
12.5 Notes
Enter Notes, you can create a new note through O ptions. The user
can view, edit, and delete each note.
12.6 Synchronization
Enter synchroniz ation screen, select a n account, active Options,
you can operate as follows:
Sync now: after s et the account correctly, select this functi on to
sync the data.
Edit account: you can set the parameters of account, such as
account name, tr ansport type, s erver settin gs, applications to sync
and so on.
Sync log: you can view the log of the synchronization.
Note:
The server you have set should support synchronization.
Please insure your S IM car d s u pp ort GP RS co n ne cti on . Please
consult with your network service provider.
12.7 Phone sync
Enter phone sync screen, you can operate as follows:
Sync: select the paired Bluetooth device to process
synchronization.
Applications to sync: to select the application to transfer the data.
Phones: you can view the paired Bluetooth device, active Options;
23
Page 29

you can do the operation such as sync, rename, delete and so on.
12.8 Calculator
The calculator performs four operations as addition, subtraction,
multiplication an d division. Enter calculator sc reen, you can input
numbers directly an d press navigation key to switch the operation
which you need, then start calculation.
When the calculation of dividing 0 overflows, the result is larger than
999999999999 or les s than -999999999999, the mobile pho ne will
display the wrong hi nt “E”.
12.9 Currency converter
In this function, if you input the rate a nd the amount of mone y in
local, you can get the result of the equivalence money of foreign.
12.10 Health
BMI: in this function , if you i nput t he sex, h eig ht, an d wei ght of on e
person, you can get the result of BMI.
Menstrual: in t his function, pl ease set the phone time to current
time at first (eg.01.01.2011). If you in put the last menstrual date
(eg.01.01.2011), and average period (eg.28), you can get the res ult
of the menstrual: days with red col or is the menstrual time, while
days with blue color is good time for pregnancy.
12.11 Stopwatch
In typical stop watch screen, you ca n select the split t iming or lap
timing and view records that yo u have saved.
In nWay stopwatch screen, press navigation up/down/left/ rig ht ke ys
to record the time of each direction.
12.12 Ebook reader
This function can be used for reading the files with .txt format which
are stored in the Ebook folder in phone or memory card.
Enter the screen of Ebook file list, activate Options and you can
conduct the following operations.
Open ebook: read the file current selected.
Clean up bookshelf: rearrange the files in the folder.
Global settings: set th e font st yle, font siz e, scroll by, auto scroll,
24
Page 30

scroll speed, full screen, Encoding, alignment and select storage for
reading of Ebook.
Book info: display the content of Ebook such as title, size, and file
format.
Delete: delete the selected file.
Delete all files: delete all files displayed in Ebook menu.
Sort b y: arrange all files in sequence which is displayed in Ebook.
Apply global se ttings: renew the rela tive global settings of Ebo ok
as above.
Help: introduce shortcut key of Ebook functions.
13 Multimedia
13.1 Image viewer
Enter the pictures l ist screen, if the list is empty, activate Options,
the following operations are available:
Select folder: set the path of folder to dis play. When im age view er
is empty, you can activate this menu, then sele ct one folder with
pictures. The pictures will be then shown in image viewer.
Settings: set the picture display mode.
Capture: capture new pictures to current storage.
Pictures captured by camera are shown in image viewer by default.
When the list is not empty, activate Options, there are more
operations available as below:
View: view current picture.
Image information: show the detailed information of current
picture.
Mark several: mark several pictures to do operations.
Slide show: you can select play to view the current picture
according to the settings.
Send: send the current picture.
Use as: use the picture as different uses.
Rename: rename the current picture.
Delete: delete the current picture.
25
Page 31

Delete all files: delete all the pictures in the image viewer.
Edit: edit current pictures.
13.2 Med ia player
Enter the media play.er screen; activate Options, then you can
operate as follows:
Now playing: enter into media player screen.
All media files: activate Options, you can choose update
automatically or add from phone storage.
Note:
If you select the update function in all media file s, the entire
media file co ntained in your ph one and memory ca rd will be
updated and added to the play l ist , may b e th e re hav e some f i le s
you don’t want to play. So, you can use add function to add the
appointed media file.
My playlists: you can vie w the media that r ecently pla yed or most
played, you also can view the media t hat have been addin g to my
favorites.
Bookmarks: add new music bookmarks.
13.3 Sound recorder
Enter sound recorder, activate Options, you can conduct the
following operation s:
New record: start the new recording..
List: list the recorded file.
Settings: you can set the p referred storage location, f ile format,
audio quality of the recording file.
13.4 Radio FM
Enter into option list and conduct operations as follows:
Channel list: display all the channels existed in the list.
Manual input: manually input the channels.
Auto search: automatically search channels and update the current
channel list.
Settings: set the correlative parameter of FM radio.
26
Page 32

Record: you can record the current playing content of the radio.
Append: used for storing the recorded f ile wh ile list en to the FM radio.
File list: list the audio file that recorded and stored.
13.5 Schedule FM record
Activate the function, the phone turn on automatically FM radio and
record curren t pro gr a m when ti me out .
14 Settings
14.1 Time and date
Modify the current home city, time, date and time format.
14.2 Personalized settings
Wallpaper: set wallpaper from the system or the memory card.
Screen saver: set screen saver picture and idle time from the
system or the memory card.
Themes: choose different color theme for the mobile phone.
Font: you can add new font from your system, the font file is of .ttf
format.
Font size: set the font si ze displ ayed i n the m obile, s uch as small,
medium or large.
Show date a nd t ime: se t whet her or n ot t o sho w date and tim e on
the idle.
Screen switch effect: set screen switch effect on or off.
Show owner number: show owner number of current SIM card.
LCD backli ght: you can set the b rightness a nd timing of the LCD
backlight respectively.
14.3 User profiles
User P rofiles co ntain pr edefined se ttings for ring to ne and vol ume,
SIM selection, etc. Default profiles include General, Meeting,
Outdoor, Indoor, S il ent , Vibration, H ea ds et, B lu eto ot h and my styl e .
You can change the existing profiles according to your own
preferences. In the standby screen, long p ressing the # key will
quickly activate S ilent mode. The headset profile is automatically
27
Page 33

activated when the earphone is inser ted, and all oth er profiles are
automatically disabled.
After selecting the other profiles e xcept the hea dset and Bluetooth
profile, press OK key to activ e the lig ht ed prof ile. Th en the wo rking
styles of the mobile phone are set according to the selected profile.
Press LSK to enter the customize settings; you can set the
parameters under differ ent profile s uch as tone set up, v olume , alert
type, ring type extra tone and answer mode.
14.4 Phone settings
Language: you can set the language of the mobile phone.
Preferred writing language: there are multipliciti es input met hods
to be selected. You can choose one as the default origi nal input
language for text editing.
Schedule pow er on/off: af ter setting and activating this function,
the mobile phone will be automatically powered on/off at the
corresponding setting time.
Greeting text: set greeting text mode on or off, and you can edit the
text content as you wish.
T-flash the default storage: set whether to use T-flash as default
storage.
14.5 Network settings
SIM selection m ode: select the S IM card manually or have the
phone select it for you autom atical l y.
Dual SIM setting s: in this me nu, you can set dual SIM o pen, only
SIM1 or SIM2 open.
Flight mode: set the phone to normal mode or flight mode.
SIM1/2 net work settings: in S IM1/SIM2 network settings, you can
select appropriate network.
Note:
Please do not register networks inconsistent with the SIM card,
so as to prevent unavailability of normal use. For details,
please consult your ser vice pr o vi der.
28
Page 34

Network selection: search new network according to the
network searchi ng mode or select t he network you need from the
network list.
Preferences: select and set the preferences of network.
Preferred mode: select the prefer red network mode as GS M only,
WLAN only, GSM preferred, or WLAN preferred.
14.6 Security settings
14.6.1 SIM1/SIM2 security
PIN lock: this function can prevent others from using your SIM card
without your pe rmission. Aft er the SIM card PIN cod e is activat ed,
correct PIN code must be input every time when the mobile phone is
powered on; otherwise you can only make emergency call.
Note:
PIN code is the operating pas sword and rela tive with the S IM
card. The SIM card will be locked, if the PIN co d e is wrong for 3
consecutive times. At this time, you need the PUK code to
unlock the SI M card. The PUK code may be provided for you
together with the PIN code and the SIM card. If not, please
contact your network pro vid er.
Change PIN/PIN2: you can change the pass word of SIM1/SIM2
PIN and SIM1/SIM2 PIN2 through the system prompts.
14.6.2 Phone security
This function is to lock the phone an d prevent other people f rom
using the mobile phone without permission (default password is
0000). After enable the phone lock, you must input the correct
password every time powering on the mobile phone, unless the
mobile phone cannot be used normally.
You can change the phone lock through the system prompts.
14.6.3 Auto keypad lock
After this function is activa ted, when t he ph one is in st andby stat us
and without any ope ration, the ke ypad will be lock ed automatical ly
after the set time. Then the standby screen will show keypad locked
29
Page 35

icon. If you need to unlock the mobile phone, you can press any key,
and then operate accordi ng to relev a nt scre en prompts.
14.6.4 Certificate manager
You can view the certificates in Certificate manager.
14.6.5 Private security
Upon entering Private Security, the password input screen appears,
where you can enter the security control menu list if you input the
correct password (default password is 0000). Then you can select
phonebook, messa ges, c all log or file manager to set up the privacy
protection. For example: if you have set up privacy protection for the
phonebook, when you enter the phonebook, the password input
screen appears. You must input the correct password to be able to
enter and use the phonebook.
14.6.6 Calls & SMS firewall
Enter calls & SMS firewall, there dis plays the lists of blackl ist and
whitelist. You can press left/right n avigation ke y to switch between
blacklist and whitelist.
In every sheet, ac tivate Options, you can operate as follo w: add
new, and block set tings. Blocked c alling records are saved in the
blocked calls she et in call hist ory. Blocked messages are saved in
garbage box in messaging.
14.6.7 Phone control
14.6.7.1 SIM binding
In SIM bonding, you can see the menu as below.
Activation: you can set the SIM bonding function on/off. The default
password is “0000”.
The SIM binding function is offered to help end user to find his
phone just in case it has been lost or stolen. In f act, is previously
activated, the SIM binding function shall be able to recognize a
different SIM card i nserted in the phone and i mmediately alert b y
SMS the 5 trusted num bers previously set in the phone ( please
refer to 14.6.7.3).
30
Page 36

If a not bound SIM card is insert ed on SIM1 or SIM2 slot, the phone
shall display the “Input phone password” popup. The default
password is “0000”.
If the password is correctly inserted, the phone shall starts
regularly, but a popup sho uld advise the user the SIM c ard is
changed: “SIM card is changed. Do you want to bind it?”
Choosing “ Yes”, th e cur rent SIM c ards will be b ound re placing
the old ones; Choosing “ No”, the old binding will remai n acti ve.
If the password is wrongly inserted, the phone shall start and
provide the “ne w” user all the functi onalities except the “S IM
binding” menu. I n the m eantim e, o ne a lert S MS (At tenti on: t his
phone number is using your mobile phone IMEI:
XXXXXXXXXXXXXXX) shall be sent to all the trusted numbers
set in the menu.
Every time the po wer on passwor d is wrongly i nserted, the pho ne
shall continue t o send SMS out. I f SIM1 has no mone y or is out of
range, SIM2 shall provide to sen d alert SMS out. If the S MS is not
correctly sent ou t for any reas on, the phone sh all attempt to s end
the SMS out periodically, until the SMS is correctly sent out.
14.6.7.2 Remote control
In Remote control, you can see the menu as below.
Activation: you can set remote control function on/off. The default
password is “0000”.
The remote control function is offered to provide end user the
possibility to mana ge some phon e functions remotel y from another
phone able to send S MS out. Using this fu nction, end user can,
when he has not the phone with him, forward calls, power the phone
off.
Once the remote c ontrol function has been ac tivated and one or
more trusted numbers have been inserted, the phone shall be ready
to accept command from remote authorized phone numbers.
Using the remote control command can achieve the function below:
31
Page 37

“123456789”)
Forward calls
*#CALLFWD*#123456789
power on)
Content of order
Function
Power off the phone (and
activate the phone password at
Note: the SMS text content should be not “case sensitive”. So
the following text shall have exactly the same function:
- *#CALLFWD*#123456789
- *#callfwd*#123456789
- *#Callfwd*#123456789
-*#CallFwd*#123456789
14.6.7.3 Trusted numbers
Here you can set 5 numbers to realize SIM binding, rem ote control
functions. As is said in above paragraphs, when unbinding SIM card is
inserted, the SIM binding message is sent to trusted numbers. You can
also send remote control messages from trusted numbers to control the
phone.
14.7 Restore factory settings
Enter into the rest ore f acto ry setti ngs, the m obi le pho ne will prom pt
you to input pass w or d (de fa ul t p assword is 0000) . You can carr y on
corresponding operation after inputting the correct password.
After running the Re store factory settings, the envi ronment setup
(e.g. user profile) restore to factory default setting.
After running the Restore settings and data, the phone clear up the
messages sa ved in phone while t he envi ronmen t setu p (e.g. c ontact
person and SMS that saved in phone) restore to factory default
setting.
14.8 Misc. settings
14.8.1 Sound effect
(e.g. Receiving number is
*#SHUTDOWN*#
32
Page 38

Audio effect: you can view and set different au di o effect.
Bass enhancement: you can set the effect on or off.
14.8.2 UART settings
This option can be activated for either SIM1 or SIM2. With this
option, you can choose the access of PC soft ware to SIM1 and
SIM2.
15 Camera
Enter into camcorder, you will find the camera preview interface.
Press up/down navigation key to switch modul es between camer a
and video recorder.
15.1 Camera
Enter the screen of finding a vie w, you can operate as foll o ws:
EV: set EV parameter.
Switch to: switch to photo album and video recorder.
Capture mode: set capture mode as normal, continuous shot, burst
shot sel. and smile shot.
Scene mode: set the scene mode of shooting.
Image size: set image size as wallpaper, VGA, 1 MP, and 2 MP.
Highlight: set highlight on or off.
Face detection: set face detection function on or off.
Self-timer: set delay capture.
White balance: set the white balance state.
Effects: set effect style of the pictures taken.
Adv. Settings: set storage, image quality, shutter sound, anti-flicker,
and restore default.
15.2 Video recorder
Enter into video r ecorder, activate Options, and you can c onduct
the following operates:
EV: set EV parameter.
Switch to: switch to camera.
Scene mode: set the scene mode of shooting.
White balance: set the white balance state.
33
Page 39

Effects: set effect style of the pictures taken.
Record limit: set time or size of record limit.
Adv. Settings: set stor age, vi deo qual ity, rec ord audi o, anti-flicker,
and restore default.
16 Other Functions
16.1 Mass Storage Function
The mobile phone supports Mass Storage function. Insert the
Memory Card in the mobi le phone; connec t the mobile phone and
PC with the attached U SB ca bl e, t he n t he m obi l e ph one becomes a
mass storage. If you con nec t USB ca ble t o PC und er t he p ower on
status, according to t ips you can select Mass Storage to enable
USB mass stor ag e fun c t ion or se l ect Back to maintain the power on
status, and charge the mobile phone.
16.2 Web camera Function
In power on st atus, connect the ph one to PC through US B cable
and select Web camera, the Webcam function is activated, you can
do the video chat with other person.
Requirements on PC configuration for use of webcam function:
1. The PC’s operation system is or newer than Windows XP SP2.
2. The tools for video chat need to be installed.
3. Internet network connection is smooth.
Other descriptions:
1. This function supports plug-and-play function.
2. The actual refresh rate of video chat is related with Internet
network speed, instead of the reasons of the mobile phone.
16.3 COM p ort
In power on st atus, connect the ph one to PC through US B cable
and select COM port; you can synchronize your phone with PC.
Details about the related tools, please consult with Customer
Service Center.
17 Common Questions
The mobile phone cannot be powered on
34
Page 40

The mobile phone cannot be powered on since the battery
voltage is too low. Please recharge the battery.
Unable to make some calls
Call barring has been set and barred utilization of the mobile
phone. Please check and cancel call barring.
Other person is answering my call
The mobile pho ne has bee n set into divert your calls to another
phone number. Please check and cancel call divert.
The mobile pho ne cannot search for th e netw ork
The mobile ph one is outside of t he network coverage area (or
there are physic al obstructions between th e mobile pho ne and the
transmitter), and calls cannot be made or answered. If you are in
one room, please move close to the window.
In the operation process, the mobile phone may display the
following operating tips:
“Insert SIM”
You must insert the SIM card before using t he mobile phon e. If
the SIM card h as been inserted, please get it ou t and wipe clean
with a dry cloth on the golden region, and then insert the SIM card.
“Emergency”
You are outside the network coverage area of the service
provider. But anot her netwo rk area wh ere you loc ate allows you to
make emergency call acc ordi ng to th e signal strength.
“Invalid SIM”
The SIM card of the mobile phone is locked and the inserted SIM
card is unable to be acc e pt ed. P le as e i nser t th e cor rec t S IM ca rd or
contact with the vendor.
“Please Enter PUK”
The SIM card has been locked since the wrong PIN code has been
inputted for three times. You must consult your network provider for
special PUK code with eight numbers to unlock the SIM card (The PUK
code may have been pr ov ided w ith your PIN code at the sa me t ime) .
35
Page 41

Warning:
The SIM card will be permanently locked if you input t he w r o ng
PUK code for ten co nsecuti ve times and you must appl y for a
new SIM card from your network provider.
18 Maintenance Guideline
Welcome to use R620. If there is a p ro blem when you are using th e
mobile phone, please contact with the vender or consult the local
maintenance cent er. If your mobi le phone is in n eed of repair, you
can take your mo bile phon e to loc al maint enance ce nter, if there is
no local maintenance center, please pass your phone and the
purchasing invoice to the vendor.
36
Page 42

FCC RF Exposure Information and Statement
The SAR limit of USA (FCC) is 1.6 W/kg averaged over one gram of
tissue. Device types R620 (FCC ID: WA6R620) has also been
tested against this SAR limit. The highest SAR value reported under
this standard during product certification for use at the ear is
1.010W/kg and when pr operl y w o rn on the body is 1.040W/kg. This
device was tested for typical body-worn operatio ns wi th the back of
the handset kept 1.5cm from the body. To maintain compliance with
FCC RF expos ure requirements, use ac cessories that maintain a
1.5cm separation distance between t he user's body and the back of
the handset. The use of belt cl ips, holsters and sim ilar acc essorie s
should not contain metal lic comp onent s in its ass embl y. The u se of
accessories that do not sa tisfy these requi reme nts may no t compl y
with FCC RF exposure requir em en ts , a nd sho ul d be avoi ded.
FCC WARNING
This device complies with Part 15 of the FC C Rules. Operation is
subject to the following two conditions:
1) This device may not cause harmful interference.
2) This device must accept any interference received, including
interference that may cause und esir ed operation.
Note 1:
This equipment h as b ee n tested and found to comply with t he lim i ts
for a Class B digital devi ce, pursuant t o part 15 of the FCC Rul es.
These limits are desi gned to pro vide reas onable protection ag ainst
harmful interference in a residential installation. This equipment
generates, uses and can r adiate radio fre quency energ y and, if not
installed and used in accor dance with the instructions, m ay cause
harmful interfere nce to r adio com muni cati ons. Ho wev er, the re is n o
guarantee that int er ferenc e will not occ ur in a parti cula r ins tallation.
If this equipment does cause harmful interference to radio or
37
Page 43

television reception, which can be determined by turning the
equipment off and on, the user is en couraged to tr y to correct the
interference by one or more of the following measures:
- Reorient or relocate the re cei vi ng antenna.
- Increase the separation between the equipment and receiver.
-Connect the equipment into an outlet on a circuit different from that
to which the receiver is connected.
-Consult the dealer or an experienced radio/TV technician for help.
Note 2:
Any changes or modifications not expressly approved by the
manufacturer could void the user’s authority to operate the
equipment.
Note 3:
The manufacturer is not responsible for any radio or TV interference
caused by unauthorized modifications to this equipment. Such
modifications could void the user’s authority to operate the
equipment.
38
 Loading...