

Page 1

HSPA USB MODEM
User Manual
Page 2

Table of Contents
1 Introduction ...................................................................................................... 4
2 Description for Client Interface ......................................................................... 5
Activate Client ..................... 5
Introduction to Interface . 6
3 Connection ......................................................................................................... 9
Automatically connect to the network
................................................................................. 9
Customized Network Connection
................................................................................. 9
4 Statistics .................................................................................. 11
View traffic statistic ......... 11
Clear up the traffic statistic
............................................................................... 11
............................................................................................................................... 12
5 Phonebook ........................................................................................................ 12
All ............................ 12
Group ...................... 14
6 SMS ..................................................................................................................... 15
New and Send SMS ........... 15
Inbox .................. 16
Outbox, Draft and Favorite ............. 17
2
Page 3

Report and Dustbin ................. 17
View SMS in (U)SIM .............. 18
7 Setting ............................................................................................................... 18
Connection ............... 18
PIN Management ............ 19
Message Setting ........... 19
Language Setting ............ 20
Network Connection ...... 20
Diagnostics ....................... 21
8 FAQ ..................................................................................... 21
3
Page 4

1 Introduction
The product is designed to enable PC users access to the Internet via
GPRS/EDGE/UMTS/HSPA networks. It uses a standard USB interface
for a fast simple connection to your PC.
The modem’s firmware includes the following features:
Wireless Internet connection
!
Statistics
!
Phonebook
!
SMS
!
Setting
!
4
Page 5

2 Description for Client Interface
Activate Client
To activate client, please double-click the shortcut icon of client on the
desktop.
Note:
Operational Instruction for PIN: If the user activates PIN under
!
the setting menu, it shall be required to input the correct PIN
while using the application procedure (totally 3 times to input
PIN, if the number is wrongly-input after 3 times, thus, PUK
should be used to decode the PIN, and the input of PUK is only
10 times, if the number is wrongly-input after 10 times, (U)SIM
will be locked or damaged, Please contact the local operator for
settlement).
(U)SIM is provided by the network operator. Please contact the
!
operator for more information.
5
Page 6
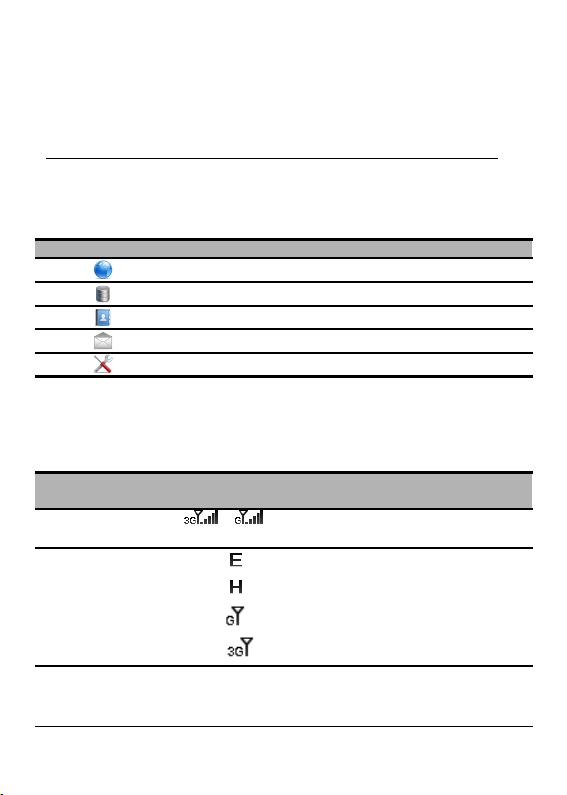
Introduction to Interface
1. Function Icon
The definition of function icon provided by client is as follows:
Shortcut icon Description
2. Status Information
The status information displayed by client is as follows:
Status
Information
Network signal
Network types
Connection
Statistics
Phonebook
SMS
Setting
Description
/ Indicates the signal strength of the
current connected network
! Displays when supporting EDGE
!
!
!
Displays when supporting HSPA
Displays when supporting GSM (GPRS)
Displays when supporting UMTS
! Display “No device” when the device can’t
be found.
6
Page 7
Device and
Network
information
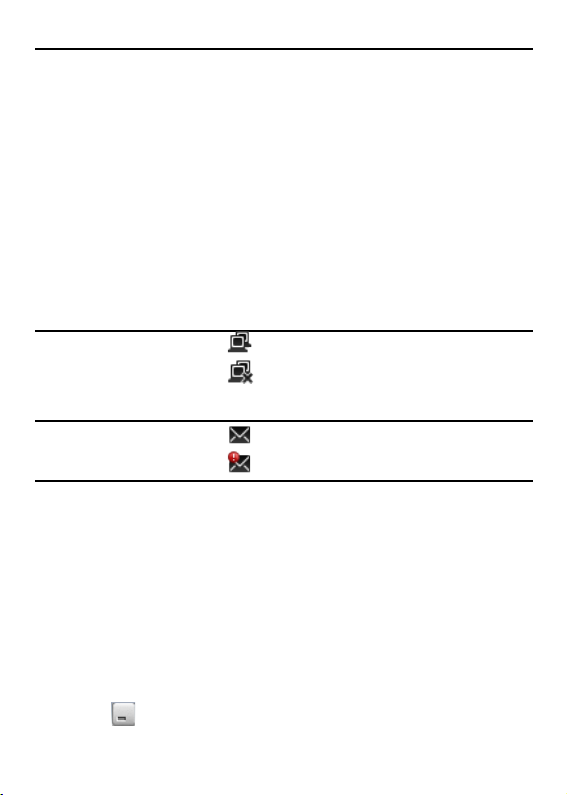
Network
connection
status
SMS status
Display “No (U)SIM ” when the (U)SIM can’t
!
be found.
Display “Invalid” when the (U)SIM is invalid.
!
Display “Searching” when searching the
!
network.
Display “No service” when the network can’t
!
be found.
Display the name of network operator after
!
successful network registration.
! Indicates network has been connected.
!
Indicates network hasn’t been
connected.
! Indicates the unread SMS
!
Indicates SMS is full.
3. Tray Icon
Click on to close the main window, The main window can be
7
Page 8

reopened by double clicking on the tray icon.
The icon context menu in the tray area:
Open: open the main window.
!
About: display the information of software version.
!
Exit: exit from the application software.
!
8
Page 9

3 Connection
Auto-connection and customized-connection modes are provided to
access to the network.
Automatically connect to the network
If using the default connection configuration, you should connect by
dialing according to the default connection profiles.
1. Connect
Select connection mode: click on <Connect> for auto connection.
!
After the completion of connection, under the window status
!
bar will turn into .
2. Disconnect
Click on <Disconnect> to disconnect the connection.
Customized Network Connection
Click on under the main windows, select <Connection setting> to
set up customized-connection.
1. New
Input the value of various parameters in the <New> area box, and the
9
Page 10

profiles file is added into the connection profile list.
Please contact the network operator for profile information.
Note:
2. Predefined List
Select a profile in the predefined list and then add it into the connection
list.
profile
3. Edit
Select one profile in the available list and then to edit.
4. Delete
Select one profile in the available list and then to delete it.
5. Set default
Select one item from the list of available connection profile(s) .
!
Click on <Set default> to set default;
!
Enter into the connection interface to establish corresponding
!
connection.
10
Page 11

4 Statistics
View the network flow information by using the traffic statistic function.
View traffic statistic
1. Currently-connected Information
View the currently connected time, upload/download speed as well as
upload/download traffic.
2. Historical statistic information
View the last clearance time and the upload/download traffic of the
current day/ month/ year.
Note: Data only for reference, please subject to the volume of network
operator.
Clear up the traffic statistic
Right click and select <Reset>.
11
Page 12

5 Phonebook
This function is used to manage the information of contacts. The
Phonebook is managed by two types: All and Group.
All
All contacts that store in PC and (U)SIM can perform the following
operations:
1. New
Click on<New>.
!
Input relevant information.
!
Click on <OK> to save the new contact into the current contact
!
list.
The number of new contact should not be empty. Otherwise, the
Note:
saving for the number will fail.
12
Page 13

2. Search
Input the keyword into the search textbox.
!
Auto search out the contact’s entry list which matches the
!
keyword.
3. View contacts
The steps for viewing contacts are as follows:
Enter into the Phonebook of PC to select the contact you want to view,
and the supported shortcut functions are as follows:
Edit: edit the relevant information of contacts.
!
Delete: delete contact(s).
!
Send: send SMS to the contact.
!
Copy to: copy the contact to the designated storage position.
!
Move to: select to move the Storage location and the record of the
!
contact will be moved into the designated storage location.
Perform the following operations through right-click menu:
Chat: chat with the contact by receiving and sending SMS.
!
Import Vcard file: import the contact records with Vcard file.
!
Import CSV file: import the contact records with CSV file.
!
Import Outlook: import the contact of Outlook into the phone book.
!
Export selected contacts to Vcard: export the record of selected
!
13
Page 14

contact to Vcard by Vcard file.
Export selected contacts to CSV: export the record of selected
!
contact to CSV by CSV file.
Export selected contacts to Outlook: export the record of selected
!
contact to Outlook.
Export all contacts to Vcard: export the record of all contacts to
!
Vcard by Vcard file.
Export all contacts to CSV: export the all contacts record to CSV
!
file.
Export all contacts to Outlook: export the record of all contacts to
!
Outlook.
Select all: select all contacts in the current list.
!
Note:
Press <Shift>/ <Ctrl> to select multiple contacts, or press <Ctrl+ A>
!
to select all contacts in the current list.
The contact records can not be recovery when deleted.
!
Group
Select <Group> to perform the following operations right click:
New group: new groups.
!
Mass SMS: send SMS to the contacts in all groups.
!
14
Page 15

Note:
The name of new group shall not be empty and replicate. Only
support group management in PC.
Select one group, perform the following operations right click;
Rename: rename the group title.
!
Delete group: delete a selected group.
!
Group SMS: send SMS to all contacts in groups.
!
6 SMS
This function is used for managing SMS store in PC and (U)SIM.
New and Send SMS
1. Click on
2. There are two edit mode:
Click “Send to” and enter into the phonebook for selecting numbers.
!
Directly input the number.
!
3. Input the content of SMS.
4. Click “Send” to send SMS.
Note: Support max 100 numbers for mass SMS, and each number
should be separated by
“,”
15
Page 16

Inbox
The Inbox saves the received SMS.
1. SMS Prompt
The prompt box will be displayed when new SMS comes.
The status bar will display the icon of unread SMS when existing
unread SMS.
2. Search SMS
Input the keyword to search SMS.
Note:
This function supports to search proximity.
!
It will display 0 record if the keyword(s) no matching.
!
3. View SMS
Select one SMS to perform the following shortcut functions:
New: new SMS.
!
Delete: delete the current SMS.
!
Reply: edit message to reply to the sender.
!
Forward: forward the selected SMS.
!
Save number: save the sender’s number into the phonebook.
!
16
Page 17

Save to favorite: save the current SMS to the Favorite.
!
Perform the following operations through right-click menu:
Export as text: export the selected message(s) and save as *.txt file.
!
Chat: chat with the contact through dialogue mode.
!
Select all: select all messages.
!
Note:
Press <Shift>/ <Ctrl> to select multi-SMS; or press <Ctrl+ A> to
!
select all-SMS in the current list.
Delete SMS from Inbox will be saved into the dustbin.
!
Outbox, Draft and Favorite
Outbox saves sent SMS, including the successful/unsuccessful SMS.
Draft saves the SMS draft.
Favorite saves the collected SMS.
Note:
Please refer to description of Inbox for specific operations.
!
Report and Dustbin
Report saves the status report after SMS is sent.
Dustbin saves the deleted SMS
Note:
17
Page 18

Dustbin will not save the SMS deleted from (U)SIM.
!
The SMS in dustbin box which will not be resumed when deleted.
!
View SMS in (U)SIM
Refer to the inbox operation of PC for the inbox message operation of
(U)SIM.
7 Setting
Connection
Click on <Connection > to display available connection profile.
1. Sound
Enabled/Disable sound prompts when Internet connection or
disconnecting.
2. Connection Setting
Please refer to “Connection”. For customized-connection network
information
3. Type
Click on <Type>to select, connection Type defaulted is NDIS;
!
Click on <RAS>/< NDIS > to relevant network Type.
!
18
Page 19

PIN Management
1. Enabled PIN
Click on <Enabled PIN> to select Enable/Disable and activate
!
PIN launching or close dialog box;
Input the correct PIN;
!
Click on <Ok> to prompt the launching or closing PIN.
!
2. Modify PIN
Click on <Modify PIN> to enter into the PIN modification window
!
Input the original PIN;
!
Input new PIN and re-input for confirmation, and click on <Ok>.
Note:
It can be allowed only the PIN enabled.
Message Setting
SMS setting
SMS center
The SMS center number is read from (U)SIM, it can be modified.
SMS status report
Select enabled/disable SMS status report, default is disabled.
19
Page 20

New SMS Prompt alert
Enabled/Disable SMS prompt tone;
!
Click on <Browse> to select *.wav file.
!
New SMS storage
Select PC or (U)SIM, default is PC.
Language Setting
Click on <Language setting> to select language, and the window will
display the selected language when restart the client.
Network Connection
1. Network Search
Click on <Auto search>,defaulted is auto search;
!
Select <Manual search> and click on <search> to restart
!
searching network; after completing the search, the network list
will display network information.
Select one available network from the list;
!
Click on <Select> to start network registration.
!
2. Network Mode
Click on <Network mode>to select, network mode defaulted is
!
auto;
20
Page 21

Click on <Auto>/< GPRS/EDGE only >/< UMTS/HSPA only > to
!
relevant network mode.
Diagnostics
Click on < Diagnostics > to launch the window of diagnosis information.
Click on <Export> to export this information which will be saved as*.txt
file.
8 FAQ
1. Q: Which operation systems does the software support?
A: It supports Windows XP, Windows Vista, Windows 7.
2. Q: I cannot install applications
A: The reasons are shown below:
1. If automatic installation unfinished, please check whether
the antivirus and security software is working. If it is, close
the application and reinstall. To those which cannot be
disabled, close the monitor program and do not start it until
installation finished.
?
21
Page 22

2. On some PCs, installation of the driver may take a long
time because of the PC configuration. So please wait and do
not cancel or unplug the device during installation. If it failed,
uninstall the driver first and then reinstall it.
3. Q: The (U)SIM does not register any networks
A: The reasons are shown below:
1. Unstable local signal;
2. The software is an old version;
3. Hardware problem.
You may:
1. Try to logon from another location;
2. Update the software;
3. Check the hardware or use another data card and retry.
4. Q: Why does the prompt “Unavailable connection profile”
appear?
A: Please add a connection profile manually.
5. Q: It failed to connect to the internet
A: Please make sure the connection profile and settings are
correct.
22
Page 23

6. Q: The connection speed and data transfer rates are too slow
A: Please check the local network signal strength.
7. Q: Sending an SMS failed
A: Please make sure the SMS center number is correct.
8. Q: I cannot receive an SMS
A: Please check whether your (U)SIM card’s memory is full.
9. Q: Why can I only save part of the name when adding a
new contact?
A: The inputted character exceed the maximum length of
(U)SIM
10. Q: Does it support roaming?
A: This depends on the local operator. Please check with your
local operator or service provider.
23
 Loading...