

Page 1

verykool
The content of this manual is correct at the time of issuance.
However, Verykool USA, Inc. reserves the right to amend
technology specifications without any prior notification.
Some descriptions in this manual may be different from the actual
mobile phone, depending on differences in software and network
suppliers.
1
Page 2

Safety Information
Please read the following instructions carefully and comply with them to
avoid danger and legal citation. For detailed safety information, please
refer to “Health and Safety Information”onpage 69.
Vehicle Use
Do not use the mobile phone when driving; use it only after parking your
vehicle.
Turn off mobile phone when fueling up
Don’t use the mobile phone at fuel stations or near flammable articles
and chemicals.
Turn off mobile phone on airplanes
Mobile phones can cause signal interference; it is illegal and dangerous
to use mobile phones on airplanes.
Turn off mobile phone in hospitals
Abide by the rules and regulations of hospitals; turn off your mobile
phone when you are near medical devices.
Interference
Wireless signals can interfere with mobile telecommunication and can
affect the functioning of mobile phones.
Observe special regulations
Comply with special regulations and turn off your mobile phone where
mobile phones are prohibited, otherwise it may cause interference or
danger.
Reasonable use
Don’t touch the antenna for any reason; use the phone in the normal
position (near your ears).
Accessories and batteries
Use only verykool™ i800 original batteries, chargers and other related
accessories.
Professional services
The mobile phone must be activated and maintained by qualified
professionals.
2
Page 3

About this Manual
interface
This User Manual provides you with condensed information about how to
use your phone. To quickly learn the basics for your phone, please refer
to the chapter “Quick Start Guide”onpage 19.
Guides for operating the on-screen menus
When describing the on-screen function menu, this guide shows the
menu path in the following way:
Navigate through: Main Menu Message New.
This example means: From standby mode, press the Home key or ;
the phone displays the main menu, then press <Message> to open the
message menu, then press <New>.
Guides to the phone
To describe the phone interface, this Manual uses the following:
[ ] Main Menu interface display. Examples: [Menu] or [Phone]
<> On-screen Button. Examples: <Cancel> or <Done>
“” Otheron-screen options. Example: “Screen Rotation”
About the instruction icons
In this Manual, the following instruction icons indicate special
information:
Information which requires your attention.
A service or feature requiring network service or registered service
support. Contact your network service provider for more
information.
3
Page 4

Contents
Your phone .............................................................................................. 6
Front view............................................................................6
Side view ............................................................................. 6
Top view .............................................................................. 7
What’s in your package.......................................................7
Quick Start Guide .................................................................................... 9
SIM card and battery...........................................................9
Power on and off................................................................11
Display and keys ............................................................... 12
Input method ..................................................................... 14
Access main functions menu ............................................ 15
Customize your phone ......................................................17
Using your Phone..................................................................................20
Calls .................................................................................. 20
Messages.......................................................................... 24
Contacts............................................................................26
Camera.............................................................................. 27
Ideas music .......................................................................28
Downloads......................................................................... 28
Browser.............................................................................29
Connections ...................................................................... 30
Function menu....................................................................................... 33
STK ................................................................................... 33
My pictures........................................................................ 33
Messages.......................................................................... 34
Call logs............................................................................. 40
4
Page 5

Browser.............................................................................41
Downloads......................................................................... 45
Multimedia......................................................................... 46
Tools..................................................................................50
Ideas music .......................................................................53
Ideas video........................................................................ 55
Games............................................................................... 55
Settings ............................................................................. 56
Voice mail..........................................................................62
Contacts............................................................................62
My links ............................................................................. 64
Health and safety...................................................................................68
Declaration of Conformity......................................................................73
WARNINGS:..........................................................................................75
Note:...................................................................................................... 75
5
Page 6
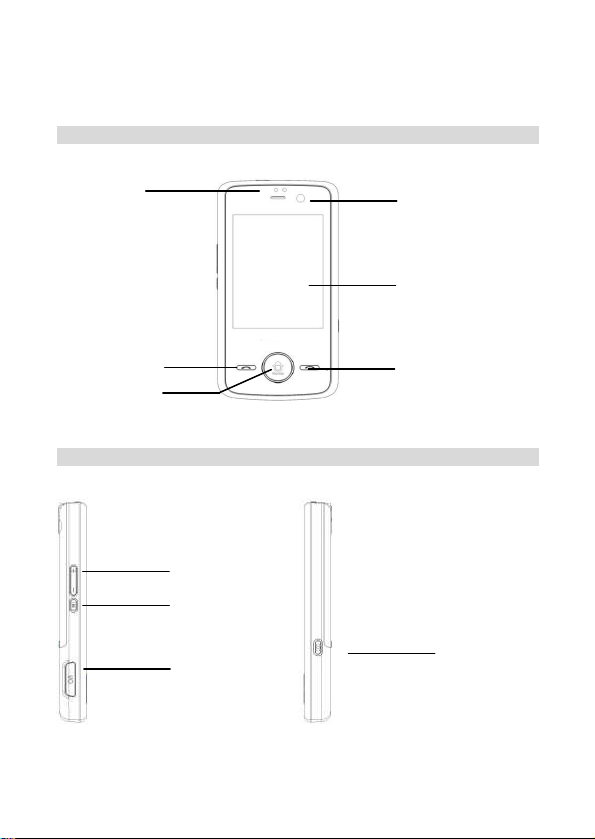
Your phone
Front view
Earpiece
Send key
Home key
Side view
Volume key
Lock key
Charger connector/
USB connection
Secondary
camera lens
Display
End key
Camera key
6
Page 7

Back view
Speaker
Top view
Main camera
lens
Battery cover
Power key
What’s in your package
20pin USB Cable + Interchangeable USB charger: 1pcs
Stereo headset: 1pcs
Battery 1100mAh: 1pcs
User manual: 1pcs
3.5mm jack
7
Page 8

Warranty card: 1pcs
Composite AV cable: 1pcs
8
Page 9

Quick Start Guide
SIM card and battery
When you subscribe to a cellular network, you receive a plug-in
Subscriber Identity Module card (SIM card), loaded with your
subscription details, your Personal Identification Number (PIN), and
available optional services.
For availability and information on using SIM card services, contact your
SIM card vendor or network service provider.
If your phone supports the SIM LOCK function, your phone can not be
registered on the network when you use an unauthorized SIM card.
Please contact your SIM card vendor.
If you need 3G network service, you may purchase a Universal
Subscriber Identity Module card (USIM card).
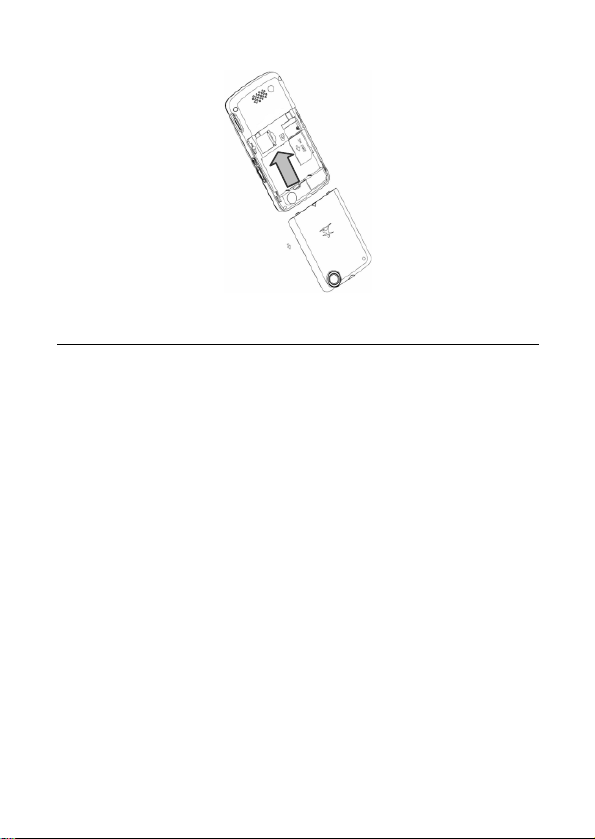
Insert the SIM card and battery
Switch off your phone and ensure the charger is disconnected from the
phone.
1. Place the phone face down and push the battery cover towards the
top of the phone.
2. Slide the battery cover and lift it off.
3. Insert the SIM card into the SIM card slot, making sure that the
gold-colored contacts on the SIM card are face down.
4. Insert the battery with the metal contacts aligned.
5. Push the battery cover back into position.
9
Page 10
Charge the battery
Before using your phone for the first time, please follow the instructions
below to charge your battery completely. Do not overcharge, which will
damage the battery and shorten its life. When not in use, unplug the
charger from both your phone and the electrical outlet.
Battery charging time depends on the remaining battery charge, the type
of battery, and the charger used. The battery can be charged and
discharged hundreds of times, but it will gradually wear out. When the
operation time is noticeably shorter than normal, it is time to buy a new
battery.
When the battery is low, a warning tone sounds, the low battery message
is displayed, the empty battery icon blinks and some features of the
phone may be disabled.
If the battery level becomes too low, the phone automatically turns off.
Your battery must be recharged at this point.
To charge your phone’s battery:
1. Open the rubber cover.
2. Plug the charger into the phone with the metal material facing down.
When charging, the battery icon flashes in the upper right of the
display. When the phone is completely charged, the battery-full
10
Page 11

symbol appears in the upper right of the display. When charging
with the phone switched off, the display shows the charging status
icon. It may take 2.5 hours until the battery icon indicates that the
battery is fully charged.
3. When the phone is completely charged, gently remove the charger
from the phone.
4. Close the rubber cover.
Power on and off
Before switching on the phone, make sure the phone is charged and the
SIM card is installed.
When the phone is switched on without a SIM card present, the display
requests that you insert a SIM card. In this status, the phone only
supports emergency calls. You can input emergency numbers and press
<Voice call> to call.
The phone can be switched on while charging. When the phone displays
start-up information, the phone can be switched on.
If the phone automatically turns off because of low battery level, start-up
information may be displayed again after charging for several minutes.
11
Page 12

Switch on
1. Press and hold the Power key for 2 seconds.
Display
2. If necessary, enter the NCK code, lock code, or PIN code and press
<Done> to verify.
3. When you power on the phone for the first time, the screen displays
the default wallpaper. After customization, the screen displays your
customized wallpaper.
4. To set up your phone, refer to “Main Menu - Settings”.
When you switch on your phone, it may recognize the SIM card
provider and configure the correct text message and network settings
automatically.If not, contact your service provider for the correct settings.
Switch off
1. Press and hold the Power key for 2.5 seconds.
2. After a short animation, the phone switches off.
If the phone is switched off, all features are not available except the
alarm alert and battery charge.
Display and keys
12
Page 13
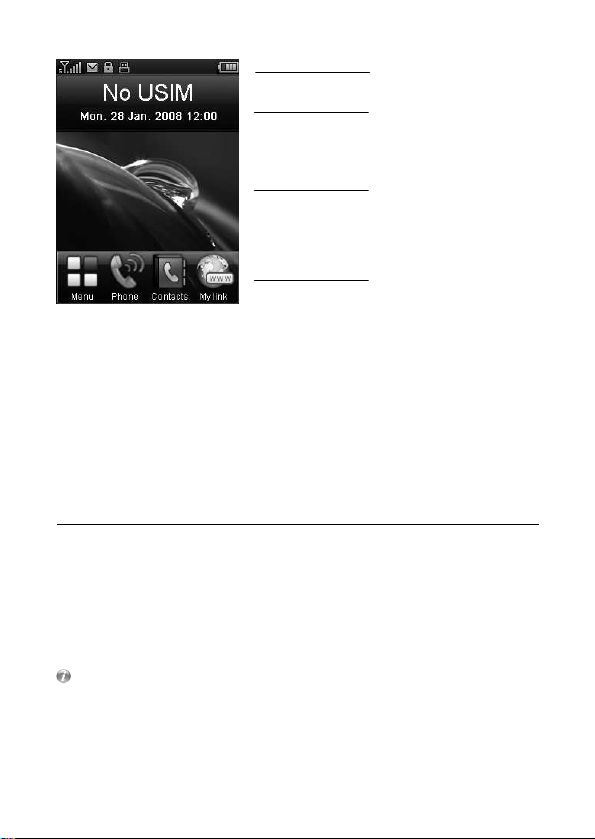
Keys
Status indicator
Standby information
Wallpaper
Function indicator
Status indicator: Displays phone status: signal status, battery
status, message status, call status, profile status, function status
and connected external equipment.
Standby information: Name of service provider, date and day, and
time (24h or 12h format).
Wallpaper: Default wallpaper.
Function indicator: Mainmenu,Phone,Contacts,My link。Press
function key to enter.
Power key: Power on or power off the handset
Volume key: Adjust handset volume
Lock key: Press and hold for 2 seconds to lock screen and key functions
Home key: Display main menu directly
Camera key: Capture view or start camcorder process
Send key: Accept voice/video call
End key: End voice/video call or switch to standby mode
Besides the functions supported by the keys introduced above,
general handset functions are launched by touching one of the on-screen
buttons.
13
Page 14

Input method
input
Your phone has several features that use text input such as SMS, email
and web browsing. When text input is required, your phone provides an
on-screen semi-QWERTY keypad for typing letters and symbols.
Input methods supported include multiple-press input and association
input.
Use multiple-press input
To type a desired letter using multiple-press input, press the letter’s
button multiple times according to the letter’s position on the button. Here
are some points to remember when using multiple-press input, for
example, when creating a new text message:
If you need to enter the word “phone”, please click twice,
twice, once, twice, once.
In multiple-press input mode, the cursor remains in the same
position for 0.5 seconds, so within that time you can repeatedly
press the button until the desired letter appears.
Click to turn on capitals mode for typing capital letters. Press
again to switch back to normal (lowercase) mode.
Click to switch to the symbol keypad; click to switch back to
the normal keypad.
Click to input the letters or symbols displayed on the upper part
of the buttons. Press again to return to normal input mode.
Use association
Association input is a predictive text input mode based on a built-in
dictionary that recognizes commonly used words. As you type words,
each letter can be typed with a single key press without worrying about
the letter’s position on the button. To type text using association input,
please follow these steps:
1. In a text-entry mode the semi-QWERTY keyboard will appear, for
example: creating a new text message.
14
Page 15

2. Press title button to switch to the association input mode.
ain functions menu
3. If you need to enter “phone”, please click , , , , in
sequence.
4. Please select the desired word in the backup bar. If you do not see
the desired word on the current screen, click the <right arrow> key
to see more words.
The following points are important when using association input:
Click to switch to capitals mode for typing capital letters. Press
again to return to normal (lowercase) mode.
Click to switch to the symbol keypad; click to switch back to
the normal keypad.
Click to input the letters or symbols displayed on the upper part
of the buttons. Press again to return to normal input mode.
Access m
In standby mode, press the Home key or select to enter main menu.
Quick menu
Menu Phone
Contacts Mylinks
Mainmenu menu
Messages Games STK
Call logs Browser Tools
15
Page 16

Downloads Multimedia Settings
Ideas videos My pictures Ideas music
Function diagram
Menu
Message
Games
STK
Call log
Browser
Tools
Downloads
Multimedia
New
Inbox
Email
Draftbox
Outbox
Sentbox
Settings
Alarm
Calendar
Calculator
World time
Sounds
Videos
Images
Others
Camera
16
Page 17

Recorder
Radio
Settings
Ideas videos
My pictures
Ideas music
Phone
Contacts
Browser
Customize your phone
You can customize your phone, including display settings, ring tone
settings, language settings, date and time settings, and phone lock
settings.
Display settings
Navigate through: Main menu Settings Display.
After setting, press to save and return to the settings menu.
Select wallpaper
Navigate through: Main menu Settings Display.
Select <wallpaper> and select from My files or Default files. If set the
Profiles
Display
Language
Time and date
Memory status
Contacts
Call settings
Network
Security
Connection
Java
Reset
17
Page 18

wallpaper from My files, open the folder, mark the file you want to use as
Ring tone settings
Language settings
Date and time settings
the wallpaper and press <Done> to save and return to the display setting
interface.
Select your mainmenu style
Navigate through: Main menu Settings Display.
Select the Mainmenu style entry, press to select a style option and
press to save and return to the display settings interface.
Adjust brightness of display
Navigate through: Main menu Settings Display.
Press and slide the block to adjust brightness value.
Navigate through: Main menu Settings Profiles.
Press to enter option settings. Profile settings options include:
Volume, Vibration, Voice call ring tone, Video call ring tone, Message
alert, Calendar alert, Email alert and Key tone.
In the option settings interface, click the option item to set the value. For
ring tone settings, select a default file or mark the file from My files you
want to set as the ring tone and press <Done>. For the switching key
setting, slide to switch on or off.
After setting your desired options, click to save and return to the
profile list. Press to launch the profile.
Navigate through: Main menu Settings Language.
Select the language used on the phone and click to save and return
to standby mode.
Navigate through: Main menu Settings Time and date.
Select the setting option and slide the date or time roller to set time and
date on the phone,
Slide toenable or disable Daylight Savings
18
Page 19

Click to save and return to the setting interface.
Phone lock
You can protect your phone against unauthorized use with a phone lock.
The phone will require a lock code to switch on. The default lock code is
0000.
Change lock code
Navigate through: Main menu Settings Security Change phone
code.
Input the old lock code and click <Done>.
Input the new lock code and click <Done>.
Input the new lock code for confirmation and click <Done>.
Switch on phone lock
Navigate through: Main menu Settings Security Phone lock.
Slide to switch the phone lock on. Input lock code and press
<Done> to enable the phone lock function.
Input the default lock code 0000 when you switch on the lock for the first
time or when the lock code has not yet been changed.
19
Page 20

Using your Phone
Make calls
Calls
When your phone is powered on, it will automatically select the main
network. If the main network is out of reach, you can use other networks
if your network service provider has an agreement with the network that
is available this is also called roaming.
When your network service provider’s logo is displayed in the screen,
you can make or answer calls.
The information icon on the screen’s upper left shows the strength of
your network signal. When the signal is weak, the quality of calls may be
affected. The quality of calls is quite affected by obstacles, so moving a
small distance can effectively improve the signal strength and the quality
of your calls.
Normal dial
1. In standby mode, click to display the dial keypad. Then input the
desired phone number with the keypad.
2. Click <Voice call> or Send key to initiate a voice call. Click <Video
call> to initiate a video call.
3. To end the call, click <End call> or End key.
To make an international call, hold for 2 seconds to input + instead
of international access number, and then input the country code, area
code and phone number. Click to clear incorrect numbers.
To dial an extension number, hold for 2 seconds to input P and then
input the extension number. Click to clear incorrect numbers.
Make calls from the recent call log
1. In standby mode, press the Send key or click on the keypad to
open the recent call log.
2. Select the call history entry to view detailed information.
3. Click <Voice call> to make the call.
20
Page 21

Make calls from contacts
Answer a call
1. Select <Contacts> in standby mode or click on the keypad to
open contacts.
2. Select the contact entry to view detailed information.
3. Select the number to dial then press the <voice call>.key.
Speed dial
Before using speed dialing, you need to assign a phone number to the
speed dialing button.
1. Navigate through: Main menu Settings Contacts Speed dial.
2. Press , select <Keypad> to input the phone number or
select <Contacts> to assign the phone number from contacts for
the speed dialing button.
3. Press and hold the assigned button for a few seconds to make a
call to the phone number set formerly.
Call Barring (Call Blocking)
1. Navigate through: Main menu Settings Call settings Call
barring.
2. Select a type of barring.
3. Select “Enable”.
4. Enter password and click <Done>
This function needs to be supported by the network.
Emergency Calls
The phone supports international emergency calls, such as 112, 911, etc.
If the phone is within range of a UMTS or GSM network, these numbers
can be dialed with a SIM card or without one. Just input the emergency
number and click <Voice call> or Send key to make an emergency call.
Some countries or areas may use other numbers for emergency calls
so the network provider may store other emergency call numbers in your
SIM card.
Normal answer
When your phone receives an incoming call, the phone rings or vibrates;
21
Page 22

the incoming call indicator will be displayed.
1. When you receive an incoming call, click to accept it.
2. To end or reject a call, please click the End key or .
3. Use the volume keys to mute the incoming call ring tone.
4. You can answer the call if the earphone or Bluetooth earphone is
connected to your phone.
5. During the call, you can control the volume with the volume key.
Do not hold the device near your ear when the speaker phone is in
use, because that may damage your hearing.
Missed Calls
1. Missed call information will be displayed in the standby interface.
2. Select “missed call information”to view detailed information. In the
call log, you can select <Voice call> to make a call.
3. To view call logs, press the Send key in standby mode or navigate
through: Phone Recent Missed Calls.
Divert calls
1. Navigate through: Main menu Settings Call settings Call
divert Voice call/Video call.
2. Select the type of call diversion.
3. Select “Enable”
4. Enter password and click <Done>.
5. To cancel the diversion, select “Cancel all divert”or select divert
type which you want cancel and select “Disable”.
This function needs to be supported by the network.
Call waiting
Call waiting requires network service support. You may need to
subscribe to the network service first.
1. Navigate through: Main menu Settings Call settings Call
waiting.
2. Select “Enable”
3. After the call waiting feature is switched on, a new call during the
present call will be indicated by displaying information on the
screen and alerting you with a short tone.
22
Page 23

This function needs to be supported by the network.
Video calls
Multi-party call
Multi-party call requires network service support. You may need to
subscribe to the network service first. For more information, contact your
network service provider.
Making a second call
1. During a call, select <Keypad> on the screen, input another phone
number and click <Voice call> to make a new call. At the same time,
the original call will be automatically placed on hold.
2. To switch between the two calls, select <Swap>.
3. To end the active call, click .
Answering a second call
1. During a call, press the Send key to answer the second call. When
the second call is put through, the first call will be on hold.
2. To end the second call, click the End key.
Conference call
A conference call can be launched by connecting a current call and a
held call. Maximally 6 participants can be put through or added in a
conference call.
1. Start two calls either by making or answering a second call as
described above
2. Click <Merge> to put two calls into a conference call.
3. To end a conference call, click to end the conference call.
4. To talk with a member of the conference separately, click to
display member list, click to talk privately.
5. To end the talk with a member of the conference, press and
press .
Conference calls may be charged extra. Contact your network
provider for more information.
To be able to make a video call, you and the called party need to register
23
Page 24

for 3G services and you must be within 3G network coverage. When the
3G symbol is displayed on the screen, you can make or answer video
calls.
1. Input phone number; click to make a video call.
2. To answer a video call, press or the Send key.
3. To adjust the image, press buttons on the bottom: focus- ,
contrast- , brightness- .
4. To mute the voice, press and select “Mute”; press <Hide> to
return to the video call interface.
5. To turn on the speaker phone press and select “Speaker”;
press <Hide> return to the video call interface.
6. To hide your own image from the other party,press and select
<Hide>; press <Hide> to return to the video call interface.
7. If you do not want to send your video image, press and select
<Block>; press <Hide> to return to the video call interface.
8. If you want to adjust your video quality, press and select
<Quality>; slide the progress bar to set the image quality; press
<Hide> to return to the video call interface.
9. If you want to swap image location, press and select
<Switch>; press <Hide> to return to the video call interface.
Messages
Your phone supports multiple message services. Contact your network
service provider for subscription or consultation of available services.
Text message
Short message service (SMS) supports simple text information.
Set text message options through: Main menu Message Settings
Text message.
The number of the message center, period of validity and network
selection are established by the service provider. They are usually set in
the SIM card and automatically displayed in the settings interface.
24
Page 25

Multimedia messages
Receive and view messages
Multimedia messages require network service support. You and your
contacts must subscribe to an MMS service first.
Multimedia message service (MMS) supports text and other file types
such as images, photos, sound clips and video clips.
Set multimedia message options through: Main menu Message
Settings Multimedia.
Setup relevant options according to the information provided by service
providers for: MMS center life time, Priority, Fetch mode, Sending size,
Receiving size, Delivery report, Read report and Profile settings.
Email
Email requires network service support. You and your contacts must
subscribe to an Email service first.
Email service supports text and file attachments such as images, photos,
sound clips or video clips.
If you want to use the same Email address as your computer, contact
your Email service provider for settings or refer to Email settings in your
computer for relevant information. Through path: Main menu Message
Settings Email you can setup Email account which includes the
options: Account name, Email address, User name, Password, Protocol,
Incoming mail server, Incoming mail port, SMTP server, SMTP port, Data
account, Reply settings, Receiving settings, Send copy, Auto receive,
Receive auto timer and Actual.
When your phone receives a message, it rings or vibrates and a new
message indicator is displayed.
1. When a new message indicator is displayed, press <View> to view
the message content.
2. Or navigate through: Main menu Message Inbox. Slide the
screen and select the message entry to view details.
25
Page 26

3. To delete a message, press <Edit> to mark and then press
Create and send messages
1. For text messages and multimedia messages, navigate through:
2. For Email, navigate through: Main menu Message Email
3. When editing a text message, click “To”field to input receiver’s
4. When editing an MMS, press to add multimedia files to the
5. When editing an Email, press to add an attachment.
6. To select recipients from contacts, click to insert contacts.
7. To send carbon copy or blind carbon copy of MMS or Email, click
You will need to set up an Email account before you use the Email
functions on your phone.
Contacts
You can store contact information either in your phone or USIM card.
Phone contacts can be stored with multiple types of contact information.
USIM card contacts can be stored including contact name and phone
number.
Add a contact
1. In standby mode, click to display the contacts.
2. Click to create a new contact.
3. Click each field to input information.
4. After inputting all information, click <Save> to save the contact’s
The default storage location (either USIM or phone) of the contacts
to confirm deletion.
Main menu Message New Textmessage/ Multimedia.
Other New.
phone number. Press “ENT”to input ‘;’and then input more phone
numbers. Click “Text”field to input message content.
message.
to add recipients.
information.
26
Page 27

can be set via: Main menu Settings Contacts Default storage.
a contact
Record videos
Search for
1. In standby mode, click to display the contacts.
2. Click the search widget.
3. Input the initial part of the contact’s name and then click <Done>.
4. The matched contacts will be listed on the screen.
Camera
Use camera to take photos or record videos.
Take photo
1. Navigate through: Main menu Multimedia Camera.
2. Aim the lens at the subject and click to take a photo of the
subject.
3. Select <Save> to save the picture in the album. Or select <Back> to
abandon the picture.
4. To exit, press the Home key to return to the main menu or press the
End key to return to standby mode.
1. Navigate through: Main menu Multimedia Camera.
2. Click to switch to camcorder mode.
3. Press to start recording video.
4. Press to switch to camera mode.
5. During recording, click to pause recording. Click to end
recording and save the video in the video album.
6. To view videos, click and select the video item.
7. To exit, press the Home key to return to main menu or press the
End key to return to standby mode.
If you try to use the camera in intense light, the screen may display
blank and the image may be distorted.
27
Page 28

Ideas music
Edit playlist
View files
Your media player supports audio files in the following formats: AMR,
AAC, MP3, WAV, IMY,MID, MIDI, MMF.
1. Navigate through: Main menu Ideas music Play list.
2. Click <Edit>, click to input new playlist name and then select
<Save>.
3. In the playlist interface, click <Edit> and to mark music files in
My files and click <Done> to add the files to the playlist.
Play media file
1. Navigate through: Main menu Ideas music.
2. If the playlist is not empty, click playlist to view tracks in the list.
Select “Shuffle”or a media file to play the music with the media
player.
3. In the media player, click to play the previous or next file.
4. In the media player, click to pause or continue playing.
5. In the media player, click to go back to the previous interface
and continue playing the media.
6. Click to view the media player interface.
7. Slide volume or progress bar to change volume or location in file.
Downloads
Manage files stored in the phone or memory card, such as pictures,
videos, music, documents, games and applications.
If all memory is full, you can not save a new file until you first delete some
files.
1. Navigate through: Main menu Downloads.
2. Click tabs on the bottom to select the folder: “Memory”(If a memory
card is inserted in the phone), “Phone>Sounds”, “Phone>Videos”,
28
Page 29

“Phone>Images”or “Phone>Others”.
Set the web connection
3. Select the folder to view the file list.
4. Select the file to view its content.
Delete files
1. Navigate through: Main menu Downloads.
2. Click tab on the bottom to select the folder: “Memory”(If a memory
card is inserted in the phone), “Phone>Sounds”, “Phone>Videos”,
“Phone>Images”or “Phone>Others”.
3. Select the folder to view the file list.
4. Click <Edit>, mark and then click to delete a file.
Browser
Using the browser, you can read news, surf the web, download content
and do other activities.
To surf on the web, you need to consult your service provider about
setting up the access point and the browser.
Data account settings
1. Navigate through: Main menu Settings Connection Data
account.
2. Click <Edit> and mark to create a new data account.
3. Input account name, APN, authorization type, user name, password,
and click <Save> to save the account settings.
Browse the web
1. Click while in standby mode.
2. The default homepage will be displayed when browser is launched.
3. Click address field to input the web address and press <Done> to
view the page.
4. Click and input a name to save the current address as a
bookmark.
29
Page 30

5. Click links on the web to launch corresponding functions.
wireless connection
6. Select to implement relevant operations, including: save items,
save this page, clear cookies and clear cache.
7. Select to view favorites, history, web alert or saved pages.
8. Select to set configuration, preferences, HTTP settings, or
view certificates and about information.
9. Click to view the last or next web page.
Connections
Your phone supports Bluetooth and USB connection to other devices.
Any anonymous messages may damage your phone or PC. To ensure
phone security, please observe the following cautions: Inactivate
Bluetooth when it is not in use; Cautiously receive unrequested Bluetooth
files or MMS; Do not install unrequested programs; Download ring tones
and games only from trusted web sites.
Bluetooth
Through Bluetooth wireless, you can connect your phone wirelessly to
other compatible Bluetooth devices. Compatible devices include: mobile
phones, computers, earphones, and car-stereos, etc.
Verify any local laws or regulations on the use of Bluetooth. If Bluetooth
use is restricted, please deactivate Bluetooth.
Bluetooth technology allows free wireless connections between two
devices within an obstacle-free range of 10 meters.
The tolerable Bluetooth data size will be adjusted by the phone according
to local restrictions; therefore the upper limit of distance between devices
may be different.
Bluetooth connection
1. Navigate through: Main menu Settings Connection
Bluetooth.
2. Slide to to activate Bluetooth.
3. Select <List> to view device list. Select “Search”, the phone will
search for other Bluetooth devices automatically and display them
30
Page 31

in the device list.
ction
4. Select the Bluetooth device you want to connect to.
5. Input the pairing code. If the code matches the pairing code of the
waiting Bluetooth device, the Bluetooth devices will be connected to
each other.
Transmit data via Bluetooth
1. Select the device which is connected to the phone.
2. Select the file from My files and click <Done> to transfer the file via
Bluetooth connection.
3. The phone will display the data transmission status.
Pair devices
To pair devices means identity verification. To pair devices, both parties
supporting Bluetooth should reach agreement on the pass code and
input the identical pass code in respective devices.
1. Before pairing, create your own pass code (1- 16 digits) and agree
with the user of the other device to use the same code.
2. When Bluetooth is active, available devices will be searched for
and listed; select the device you want to connect to; input
compatible pass code; if the pass code is correct, the successfully
paired device’s symbol appears.
USB conne
You can transfer data via USB connection between your phone and a
compatible computer.
When data is transferring, do not disconnect the USB cable from the
phone or computer, otherwise the memory card may be damaged.
USB connection
1. Keep phone in standby mode.
2. Connect the phone and the computer with a USB cable.
3. When the phone requests a selection of the mode of USB
connection, please select among Data transfer, PC synchronization
or Modem.
PC synchronization and modem need PC TOOLS (Drivers) support.
31
Page 32

Please download and install PC TOOLS on your computer. The software
includes help information for synchronization and modem launch.
Launch PC TOOLS or Modem application
1. Download and install PC TOOLS onto your computer using the
phone.
2. Make sure your phone is turned on and connected to the computer
via USB cable.
3. Start your Phone Suite or Modem application on your computer.
When the installation is done, you can synchronize information or
connect to the internet using the phone as a modem.
32
Page 33

Function menu
My pictures
Click while in standby mode or click the Home key to access the Main
Menu. All menu functions are introduced below.
STK
To use STK function, you need a SIM/USIM card supporting SIM applied
tools and providing services such as entertainment, mobile IM, weather
reports, etc.
To enter the STK menu, press the Home key while in standby mode and
select [STK] in the Main menu.
You can view photos or pictures saved on your memory card or phone.
View picture list
1. Navigate through: Main menu My pictures.
2. Picture folders and picture files are displayed in thumbnail view.
3. You can select “Photo album”to view the photos captured by the
phone.
View picture
1. Navigate through: Main menu My pictures.
2. Select picture file to view.
Functions for picture detail:
Picture option: Click to open picture option menu. You
can set the picture as the wallpaper; assign the picture as
contact thumbnail image and rename the picture.
View previous/next: Click to view the previous or
next picture.
View as full screen: Click to view the picture in full
screen. You can slide screen left or right to view previous or
next picture in full screen. Click twice on the screen to return
to normal view.
33
Page 34

Delete picture: Click to delete the picture.
Messages
Use the Message menu to send or receive text messages, multimedia
messages and Emails.
Before sending or receiving messages, you may need to do the
following:
1. Insert a SIM/USIM card.
2. Move to within wireless network service range and verify that your
network service supports messaging features.
3. Define the network access point settings on the phone.
4. Define text message settings on the phone.
5. Define multimedia message settings on the phone.
6. Define Email account settings on the phone.
Your phone may recognize the SIM/USIM card provider and
automatically configure some of the message settings. If not, you may
need to define the settings manually or contact your service
provider/network operator to configure the settings.
The Message menu displays different types of folders as below:
New: Create and edit a new text message/Multimedia message.
Inbox: Received messages are saved in Inbox.
Email: Email management includes creating new Email, Email Inbox,
Email Draftbox, Email Outbox and Email Sentbox.
Draftbox: Draft messages are saved in Draftbox.
Outbox: Messages that are being sent or have failed to send are saved in
Outbox.
Sentbox: Copies of sent messages are saved in Sentbox.
Create and send message
Create and send a text message.
1. Navigate through: Main menu Message New Text
message.
2. Click <To>field to input recipients’number or press to select the
34
Page 35

phone number from Contacts.
3. Click <Text> field to input message content.
4. Click to send message.
5. To save the message in Draftbox, click <Cancel> and select “Save
to drafts”.
6. To abandon the message, click <Cancel> and select “Don’t save”.
Create and send a multimedia message
1. Navigate through: Main menu Message New Multimedia.
2. Click the <To> field to input recipients’number or press to select
the number from Contacts.
3. To change outgoing mode, click and select <Add CC> or <Add
BCC>.
4. Click <Subject> field to input the message subject.
5. To add a file to the message, press and click <Add object>,
then select the file from My files and press <Done>. To delete the
object in the message, press and click <Object list>, select
<Edit> and then delete the object.
6. To add a multimedia message page, press and select <Add
page>.
7. To preview MMS, press and select <Preview>.
8. Click <Text> field to input your message content.
9. After editing your message, click to send the message.
10. To save the created message in Draftbox, click <Cancel> and
select “Save to draft”.
11. To abandon the message, click <Cancel> and select “Don’t save”.
Write and send Email
1. Navigate through: Main menu Message Email Other
New.
2. Click <To> field to input recipients’addresses or press to select
the address from contacts.
3. To change outgoing mode, click and select <Add CC> or <Add
BCC>.
4. Click <Subject> to input the message subject.
35
Page 36

5. To add a file in Email, press to select the file from My files and
press <Done>. To delete the attachment, press to select
<Attachment list>, select <Edit> and delete the attachment.
6. Click <Text> field to input Email content.
7. After editing message, click to send Email.
8. To save the created Email in Draftbox, click <Cancel> and select
“Save to draft”.
9. To abandon the message, click <Cancel> and select “Don’t save”.
Delivery reports
The delivery report shows the status of sent messages.
Delivery reports
1. Navigate through: Main menu Message Settings Text
message/Multimedia.
2. Switch on the status for “Delivery reports”.
3. Press to save the setting and quit.
View received messages
View received text messages
1. Navigate through: Main menu Message Inbox.
2. Messages are listed in time order or subject order. Slide to scroll
the list and search for the message.
3. Select message entry to view message content.
4. While viewing message content, click <Option> to open option
menu. You can forward the message, make a voice call, make a
video call or view detailed information.
5. To delete a message, click <Edit> in the message list interface,
mark it and press to delete it.
Options menu for viewing text message content:
Forward: Forward current text message. The editing
interface contains the original message text.
Voice call: Make a voice call to the message sender.
Video call: Make a video call to the message sender.
36
Page 37

Use details: Extract number, Email address or URL from the
message for other functions including: create new contact,
add to existing contact and make a voice/video call.
Cancel: Exit option menu.
View received multimedia message
1. Navigate through: Main menu Message Inbox.
2. The messages are listed in time order or subject order. Slide to
scroll the list and search for multimedia messages.
3. Select message entry to view the message content.
4. To delete messages, click <Edit> in the message list interface,
mark it and press to delete it.
Options menu for viewing complete multimedia content:
Reply: Reply to the Sender.
Reply all: Reply to the sender and all other recipients.
Forward: Forward current MMS message to other contacts.
Voice call: Make a voice call to the sender’s number.
Video call: Make a video call to the sender’s number.
Use details: Extract number, Email address or URL from the
message for other functions.
Save object: Save objects in the message.
Details: View the relevant information about the message.
Cancel: Exit option menu.
View received Email
1. Navigate through: Main menu Message Email Other
Inbox.
2. The mails are listed in time order or subject order. Slide to scroll the
list and search for the Email.
3. Select Email entry to view the Email content.
4. To delete Email, click <Edit> in the mail list interface, mark and
press to delete it
Options menu for viewing complete Email content:
Reply: Reply to sender of current Email.
Reply all: Reply to the sender and all other recipients.
37
Page 38

Forward: Forward the Email to other contacts.
Use details: Extract number, Email address or URL from the
message for other functions.
Save attachment: Save attachment from the Email.
Cancel: Exit option menu.
View/Edit drafts
View/Edit text/multimedia drafts
1. Navigate through: Main menu Message Draftbox.
2. Slide to scroll the list and search for the message.
3. To continue editing, select the draft entry and edit message directly.
4. After editing, input recipient number and select to send.
5. Click <Edit> in the draft list screen to delete draft messages.
View/Edit Email drafts
1. Navigate through: Main menu Message Email Other
Draftbox.
2. Slide to scroll the list and search for the Email.
3. To continue editing, select the draft entry and edit Email directly.
4. After editing, input recipient number and select to send.
5. Click <Edit> in the draft list screen to delete draft Emails.
View unsent messages
View unsent text/multimedia messages
1. Navigate through: Main menu Message Outbox.
2. Slide to scroll the list and search for the message.
3. Select the unsent message to view content in detail.
4. To delete unsent messages, click <Edit> in the message list screen,
mark and press .
5. To resend message, access message detail screen and click .
View unsent Email
1. Navigate through: Main menu Message Email Other
Outbox.
2. Slide to scroll the list and search for the Email.
38
Page 39

3. Select the unsent Email to view content in detail.
4. To delete unsent Email, click <Edit> in the mail list screen, mark
5. To resend Email, access Email detail screen and click .
View sent messages
View sent text/multimedia messages
1. Navigate through: Main menu Message Sentbox.
2. Slide to scroll the list and search for the message.
3. Select the sent message to view content in detail.
4. To delete sent messages, click <Edit> in the message list screen,
View sent Email
1. Navigate through: Main menu Message Sentbox.
2. Slide to scroll the list and search for the mail.
3. Select the sent mail to view content in detail.
4. To delete sent mail, click <Edit> in the mail list screen, mark
Message settings
Define the settings according to different message types.
Text message settings
1. Navigate through: Main menu Message Settings Text
2. Slide to select setting items, then input the message center number,
Multimedia settings
1. Navigate through: Main menu Message Settings
2. Slide to select setting items, then input MMS center lifetime, priority,
Email settings
and press .
mark and press .
and press .
message.
period of validity, network selection, delivery reports and reply path.
Multimedia settings.
fetch mode, sending size limit, receiving size limit, delivery report,
read report and profile settings.
39
Page 40

1. Navigate through: Main menu Message Settings Email
accounts.
2. Click <Edit> to open edit interface.
3. To add new Email account, click and input account name, email
address, my name, user name, password, protocol, receive server,
receive port, SMTP server, SMTP port, data account, reply content,
receiving settings, send copy, auto receive, receive auto timer and
actual.
Call logs
Use this menu to view the relevant information about calls you have
dialed, received or missed.
All calls: This menu displays all call logs including missed
calls, dialed calls and received calls.
Missed calls: This menu displays the most recent calls you did
not answer.
Dialed calls: This menu displays the most recent calls you
dialed.
Received calls: This menu displays the most recent calls you
View call log
1. Navigate through: Main menu Call logs.
2. Select the icon on the bottom: - All calls; - Missed calls;
3. Slide screen to scroll the log list.
Function for call log view:
View call log details
1. Navigate through: Main menu Call logs.
2. Select the log category.
3. Click to view log details.
Function for call log details:
have received.
- Dialed calls; - Received calls.
Edit: Delete an item or clear the log list
View record details: Click to view log details.
Call: Make a voice/video call to the log number.
40
Page 41

Send message: Send a text message/multimedia message
omepage
to the log number.
Update: For new number, select it to save the number to an
existing contact.
New: For new number, select it to save the number with a
new contact entry.
Browser
The Wireless Application Protocol (WAP) browser on your phone allows
you to access the wireless web. From the wireless web, you can access
up-to-date information and a wide variety of media content, such as
games, wallpapers, ring tones and music files.
Only install and use applications and other software from the sources
that offer adequate security and protection against harmful software.
You can download files that may not be displayed on websites, such as
ring tones, images, operator logos, themes and videos clips. The
downloaded content will be saved in the respective folder in My files.
Before you browse, make sure you have:
1. SIM/USIM card inserted.
2. Wireless service which supports browsing.
3. Data account set.
4. Network connection set.
Web page
Browse h
The default homepage is the homepage of your network provider. You
can access it through the main menu link.
1. Navigate through: Main menu Browser.
2. Click to connect to homepage.
3. Click the Home key or End key to exit browser.
Input a URL address
Enter a URL address manually.
1. Navigate through: Main menu Browser.
41
Page 42

2. Click the address field to enter a URL address.
3. After input, click <Done> to confirm connection.
Save bookmark
1. Navigate through: Main menu Browser.
2. Click to save the current page address as a bookmark.
View website
1. Navigate through: Main menu Browser.
2. Click to view the previous or the next website.
Save items from a web page
1. Navigate through: Main menu Browser.
2. Click to open option menu and select <Save items>.
3. The items which can be downloaded are listed in the list.
4. Click the item to download it to the phone.
5. Click <Cancel> to hide option menu.
Save web pages
1. Navigate through: Main menu Browser.
2. Click to open option menu and select <Save this page>.
3. The page will be saved in the folder <Saved pages> automatically.
4. Click <Cancel> to hide option menu.
Clear data
1. Navigate through: Main menu Browser.
2. Click to open option menu. Select an option: Clear cache,
Clear COOKIES.
3. Click <Cancel> to hide option menu.
Access a bookmarked page
Use this menu to quickly access favorite web pages. You can set the
current page address as a bookmark and you can rename the bookmark
through the list.
1. Navigate through: Main menu Browser.
2. Click to open option menu and select <Favorites>.
3. Click a bookmark to visit the web page.
4. To delete a bookmark, click <Edit>, mark and click .
5. To rename a bookmark, click <Edit>, select the bookmark, input the
42
Page 43

new name and click <Save>.
aved pages
View web page history
You can visit recently viewed web pages. Select the record in the history
list to visit the page.
1. Navigate through: Main menu Browser.
2. Click to open option menu and select <History>.
3. Select a record to view the web page you recently visited.
4. To delete a record in the history list, click <Edit>, mark and click
View web alert
1. Navigate through: Main menu Browser.
2. Click to open option menu and select <Web alert>.
3. Click an alert message to view details.
4. To delete a web alert, click <Edit>, mark and click .
View s
1. Navigate through: Main menu Browser.
2. Click to open option menu and select <Saved pages>.
3. Select a record to view the page saved locally.
4. To delete a saved page, click <Edit>, mark and click .
Browser settings
Set the display, security and authentication value for the browser.
Configuration
1. Navigate through: Main menu Browser.
2. Click to open option menu and select <Configuration>.
3. Click to add a new configuration including the options: profile
4. After setting, click <Save> to save the settings.
Preferences
1. Navigate through: Main menu Browser.
2. Click to open option menu and select <Preferences>.
3. Select a setting entry.
4. Mark to set the value.
.
name, homepage, connection mode and data account.
43
Page 44

5. After setting, click to save and go back to the previous
interface.
Http settings
1. Navigate through: Main menu Browser.
2. Click to open option menu and select <Http settings>.
3. Select a setting entry.
4. Mark to set the value.
5. After setting, click to save and go back to the previous
interface.
View certificate information
1. Navigate through: Main menu Browser.
2. Click to open option menu and select <Certificate>.
3. Select a certificate folder.
4. Select a certificate entry to view the details.
Some Internet services require an authentication certificate saved in
the phone, such as an online bank. Your phone may be preset with some
certificates and you can also download new authentication certificates.
About
1. Navigate through: Main menu Browser.
2. Click to open option menu and select <About>
3. The information about the current page will be displayed.
Browser mode
Page widget mode
In the widget mode, operate widget on the web page by sliding your
finger on the screen.
1. Navigate through: Main menu Browser.
2. Click to switch to page widget mode.
Page mode
In the page mode, you can scroll to different parts of the web page by
sliding your finger on the screen.
1. Navigate through: Main menu Browser.
2. Click to switch to page mode.
44
Page 45

Downloads
“Downloads”supports different types of files including: pictures, videos,
music, documents, games and applications.
View files
1. Navigate through: Main menu Downloads.
2. Click the tab on the bottom to select the folder: “Memory”(If a
memory card is inserted in the phone), “Phone>Sounds”,
“Phone>Videos”, “Phone>Images”or “Phone>Others”.
3. Slide screen to select and open the folder.
4. Slide screen to select and open the file.
5. If the file is in Word, Excel, or PowerPoint format, the phone will
launch the Quickoffice application to support viewing the file.
Functions for office viewer:
Content search: Click to search for content within the file.
Click to find previous or next match. Click to disable
search function.
Full screen view: Click to switch to full screen mode.
Go to page: Click page field to enter page number which you
want to jump to.
Page controller: Click to go to previous or next page.
Click to go to the first or last page.
Office viewer setting: Define view mode and reflow with office
Manage files
1. Navigate through: Main menu Downloads.
2. If memory card is inserted, click to clear all data in the
3. Press <Edit> to open edit screen where you can rename and delete
4. Press to copy, move or send the file via Bluetooth.
5. To rename file, click file entry, input the new name and click
viewer.
memory card.
files.
<Save>.
45
Page 46

6. To delete a file, click to mark for deletion and press to
Install applications
Camera
Take photos
delete file. Tounmark the tag, click to switch to normal mode.
1. Navigate through: Main menu Downloads.
2. Click tab at the bottom of the screen to select the folder
“Phone>Others”.
3. Find JAVAapplication and click the item you want to install.
4. When installing applications, the screen displays the progress
status. If the same version of an application has already been
installed, the phone requests a confirmation.
5. After installing the application, the phone allows you to launch it.
Press ‘Yes’to launch the application.
To later run installed applications or games, you can find them in the
Games menu.
Multimedia
Multimedia includes: Camera, Recorder and Radio. To use multimedia,
press the Home key while in standby mode and select [Multimedia] to
enter the Multimedia functions menu.
You can use the camera to take photos or record videos.
Do not take photo or record video if it is not permitted by the involved
party or if it involves privacy.
Do not take photos where it is forbidden.
Photos taken by the camera are saved in JPG format; video clips are
saved in 3GP format, MP4 format or 3G2 format.
1. Navigate through: Main menu Multimedia Camera.
2. Use the phone screen as viewfinder, press or the camera key
to take a photo of the subject.
46
Page 47

3. Select <Save> to save the picture captured.
4. If you want to view or manage the photos captured, click to
open the photo album.
5. To take a photo of yourself, click to switch to the secondary
camera lens.
6. To use automatic focus, press and hold camera key half way until
the green frame appears and then press the key completely to take
the picture.
7. To use countdown, click and select <Countdown> to set the
countdown value.
8. To zoom in/out, press or while in capture mode.
9. In capture mode, click to set up camera parameters:
countdown, effect, shutter sound, quality, image size, white balance,
anti-banding, brightness, night mode, save location and default
photo name.
10. To exit camera mode, press the Home key or End key.
Functions available in capture mode:
Focus: Zooms in or out.
Photo album: Opens album folder. The default folder where
photos are saved.
To camcorder: Switches to video camera mode.
Capture: Shoots a photo.
Secondary camera lens: Switches between the main
camera lens and secondary camera lens.
Settings: Options for countdown, effect, shutter sound,
quality, image size, white balance, anti-banding, brightness,
night mode, save location and default photo name.
Record videos
1. Navigate through: Main menu Multimedia Camera.
2. Click to switch to camcorder mode.
3. Use the phone screen as viewfinder, press or the camera key
to record video, press to pause, and press to end
47
Page 48

recording. The video will be saved in the default folder.
corder
4. To view or manage the videos recorded, click to open video
album.
5. To record your own image, click to switch to secondary
camera lens.
6. To zoom in/out, press or in camcorder mode.
7. Click to set up video camera parameters such as effect, quality,
image size, white balance, record sound, video type, record time
limit, anti-banding, brightness, night mode, save location and
default video name.
8. To exit camcorder mode, press the Home key or End key.
Functions available in video mode:
Focus: Zooms in or out.
Video album: Opens video folder where recorded video is
saved as default.
To camera: Switches to camera mode.
Record: Start recording video.
Secondary camera lens: Switches the camera lens for
current use, including the main camera lens and secondary
camera lens.
Settings: Options for effect, quality, image size, white
balance, record sound, video type, record time limit,
anti-banding, brightness, night mode, save location and
video default name.
Re
Record voice and save the audio file on the phone.
1. Navigate through: Main menu Multimedia Recorder.
2. To start recording, press in the voice recorder.
3. Press to pause and press to end recording.
4. Click to open recorded clip folder. You can play, rename or
delete the audio files.
5. To set recorder parameters, click <Set> to set record time limit,
48
Page 49

save location and default name.
6. To exit recorder, press the Home key or End key.
Radio
The FM radio depends on an antenna other than the wireless device
antenna. A compatible headset or enhancement needs to be attached to
the device for the FM radio to function properly.
Warning: Always listen to music at a moderate level. Continuous
exposure to high volume may damage your hearing. Do not hold the
device near your ear when the loudspeaker is in use, because the
volume may be extremely loud.
Navigate through: Maine menu Multimedia Radio.
Listen to the radio
1. To search manually: press or to change the radio
frequency in 0.1 MHz steps. Or slide finger on the frequency bar to
change the frequency to a specific value.
2. To search automatically: Click to start searching for the next
valid frequency automatically.
3. To jump to a specific frequency: Click <frequency filed>, enter the
frequency and then click <Done>.
4. If channel list is not empty, click or to play previous or next
channel in the channel list.
Save radio frequencies with channel
1. To save current frequency in the channel list, click , input
channel name and then click <Save>.
Edit channel list
1. Click <Channel> to view channel list.
2. Click channel entry to play the channel.
3. Press <Edit> to rename or delete channels.
Functions in radio mode:
To switch off: Click to turn off the radio.
To add channel: Click to save the current frequency to
the channel list.
49
Page 50

Channel list: View the list of the saved channels.
Search: Search the available frequencies automatically or
manually.
Headset & Speaker: Click or to listen to the radio
using the loudspeaker or headset. Keep the headset
connected to the device. The headset cable functions as the
radio antenna.
RDS: Click to enable or disable RDS. When RDS is
enabled, your phone can display channel name, frequency
and program name on the current radio screen.
TV out
Your phone can output contents to the TV through the included
composite video cable. You can use this function for exhibitions,
business meetings or product presentations.
1. Connect the phone to the TV via cable.
2. Access special applications: My pictures, Media files, My files.
3. View the content in full screen mode, press to output data to
the TV.
4. To stop output, quickly click twice on the screen to switch to the
normal phone mode.
Incoming calls or new messages may interrupt TV output.
When launched from the My picture or “My files”modules, the sound will
be exported via phone speaker. When launched from the Media files
module, sound will be exported to the TV.
Tools
Tools include: Alarm, Calculator and World time. To use Tools, press the
Home key in standby mode and select [Tools].
Alarm
You can set an alarm for one specific time or repeating. The alarm
feature is available in Standbymode, silent profile, and while the phone is
50
Page 51

powered off.
Set new alarm
1. Navigate through: Main menu Tools Alarm.
2. Press to open the new alarm interface.
3. Select the setting entry and set parameters: time, repeat, sound,
snooze and alert type.
4. Press <Save> to confirm the alarm
Switch on alarm
1. Navigate through: Main menu Tools Alarm.
2. When the alarm is turned off, slide to to activate
the alarm.
Calendar
You can save memos in the calendar. The phone reminds you of events
and helps you manage your schedule.
After accessing the calendar, the present date will be distinctly displayed
in the month view. You can click <Month> or <List> to switch view mode.
Calendar Functions
Month view: Click <Month> to view events by month.
List view: Click <List> to view all events in a list.
Today focus: Click <Today> to focus on the current day in
either month view or list view.
Go to: Click <Go to> to focus on a specific day entered in
the month view or list view.
Day view: Click on the specific date in month view to view all
events starting on that date.
New event: Click to add new event on selected date.
Create event entry
1. Navigate through: Main menu Calendar.
2. Select the date in the month view.
3. Click to create new event on that day.
4. Input event title, location, starts date, starts time, ends date, ends
time, repeat, alert, notes etc.
5. Click <Save> to save the new event.
51
Page 52

Delete event
1. Navigate through: Main menu Calendar.
2. Select the date on which the event was created.
3. Press the event item to view event content details.
4. Click <Edit> to edit event information; select <Delete> to delete the
event.
Calculator
Your phone supports simple calculations including addition, subtraction,
multiplication, division, memory calculation and negation.
The calculator supports a 10-digit input space including the decimal point,
operand and result.
Calculation
1. Navigate through: Main menu Tools Calculator.
2. General operation: input first number input operation symbol
(addition, subtraction, multiplication or division) input second
number equal sign.
3. To continue calculating, use the result after equal sign as the first
number and go on to input the next operation symbol and the next
number.
4. The calculator operates in accordance with the input order. The
result is displayed in the input area.
Function menu for calculator:
MS: This button is a memory management tool that works
together with MR and MC. MS saves the current number to
memory. It does not function as an operation so it will not
affect the currently displayed content. Note: You cannot
save multiple data. The previously saved data will be
replaced by the newly saved one. The saved data can be
used repeatedly.
MR: This button is a memory management tool that works
with MS and MC. MR retrieves the saved number and uses
it as the current number. If there already a number, it will be
52
Page 53

replaced by the retrieved data. After retrieval, the data in
Playlist
memory stays the same. You can edit the retrieved number
in the display. Note: If there is no data in memory, this key
does nothing.
MC: This button clears the data in memory.
World time
Your phone supports displaying times in cities with different time zones.
Add new city time
1. Navigate through: Main menu Tools World time.
2. Press to add new city.
3. Input the initial part of the city name to search the city quickly or
scroll the list to search manually.
4. Click the city item to view the city information.
5. Mark the city and press <Save> to confirm the city selected.
6. To set local time, click <Set> to set city time as your phone’s local
time.
Delete city time
1. Navigate through: Main menu Tools World time.
2. Press <Edit>, click to mark tag and then click todelete
the city from the list.
Ideas music
You can edit playlist, play all songs from the phone, and set equalizer
levels.
Create a playlist
1. Navigate through: Main menu Ideas music.
2. Click <Edit> to open editing playlist interface. Click to input new
playlist name and select <Save>.
3. In the track list interface, click <Edit> to open editing track list
interface. Click to mark the audio files and select <Done> to
53
Page 54

add the audios to the track list.
Delete playlist
1. Navigate through: Main menu Ideas music.
2. Click <Edit> and press to mark the playlist you wish to delete.
3. Click to delete playlist.
Rename playlist
1. Navigate through: Main menu Ideas music.
2. Click <Edit> to open editing interface and select playlist item. Input
new name and click <Save> to rename the playlist.
Remove music from track list
1. Navigate through: Main menu Ideas music Playlist.
2. Select playlist and click <Edit> to open editing track list interface.
Press to mark the song you wish to delete. Click to
delete song from the track list.
All songs
1. Navigate through: Main menu Ideas music All songs.
2. The phone will load all music files saved in the phone and memory
card and display them in a list.
3. Click <Shuffle> or an audio file to start playing.
Play audio
1. Navigate through: Main menu Ideas music.
2. In the track list or all songs interfaces, select “Shuffle”or a specific
file to start playing.
3. Click to open the previous interface. And Click to view the
media player.
4. While playing media file, press or to play the previous or
next file, use to pause or continue playing the audio file.
Function for playing mode:
Play in background: Click Home key or End key while
playing media file.
Play mode: Click icon to switch current play mode.
No shuffle
Shuffle
54
Page 55

No loop
Loop
Volume: Slide the volume bar to change the volume.
Seek forward/back: Slide the progress bar to go forward or
Equalizer
1. Navigate through: Main menu Ideas music Equalizer.
2. Mark to activate the equalizer.
3. To edit each equalizer, click <Edit> to open edit screen.
4. Select the equalizer and set the parameter.
5. If you want to reset the equalizer to the default value, click <Reset>.
Ideas video
You can play videos from the phone.
Play video in full screen
1. When playing video, click while playing video, the panel will be
hidden.
2. Click twice on the screen to switch back to the normal mode.
All videos
1. Navigate through: Main menu Ideas video.
2. Click “All videos”,The phone will load all video files saved in the
phone and memory card and display them in a list.
Games
The phone supports multiple JAVA applications. You can download
games from the web and install them on your phone.
To download content or use online applications, consult your network
service provider for relevant information.
Only install and use applications and other software from sources that
offer adequate security and protection against harmful software.
Start applications
Loop once
backward.
55
Page 56

1. Navigate through: Main menu Games.
2. Slide screen to scroll through the application list.
3. Click application to launch.
4. Press the Home key or End key to end the current application.
Delete applications
1. Navigate through: Main menu Game.
2. Click <Edit>, press to mark the application which you want to
delete and then click to delete an application.
Settings
You can define and modify various phone settings.
Do not change the settings preset by your network service provider.
Profile
You can customize ring tones in different profiles.
1. Navigate through: Main menu Settings Profiles.
2. Click to open the settings interface.
3. Slide screen to scroll through the options, select an entry to set.
4. After setting, click to save and go back to profile list.
5. Click to launch the profile.
Standard profile settings:
Volume: Adjust volume level of the ring tone. When volume
is adjusted to level 1, the sound of your phone will be muted
and the vibration will be turned on automatically. When
volume is adjusted to level 0, the sound will be muted and
the vibration will be turned off automatically.
Vibrating alert: Select whether to vibrate when receiving a
call, message or Email.
Voice call ring: Select a ring tone for incoming voice calls.
Video call ring: Select a ring tone for incoming video calls.
Message alert: Set a ring tone for new messages.
Calendar alert: Select a ring tone for calendar event
reminder.
56
Page 57

Email alert: Set whether to alert when receiving an Email.
Display
Key tone: Turn the keypad tone on or off.
1. Navigate through: Main menu Settings Display.
2. Slide screen to select an option.
3. Set the value for the option.
4. After setting, click to save and quit.
Display settings:
Wallpaper: Set the image displayed in standby mode.
Clock display: Set whether the clock is displayed in standby
mode.
Date display: Set whether the date is displayed in standby
mode.
Mainmenu style: Define the style of the Main Menu.
Backlight time: Define how long the screen backlight will
remain on when the phone is not in use.
Brightness: Set the screen brightness.
Language
1. Navigate through: Main menu Settings Language.
2. Scroll through the language list, click to launch the language
you want to use on the phone.
3. After setting, click to save and quit.
Time and date
1. Navigate through: Main menu Settings Time and date.
2. Slide screen to select an option.
3. Set the value for the option.
4. After setting, click to save and quit.
Time and date settings:
Time: Set the system time.
Time format: Display time in 24 hour format or 12 hour
57
Page 58

(am/pm) format.
Date: Set the system date.
Date format: Set the date format.
Daylight Savings: Use Daylight Savings time in the summer.
Time zone: Set the local time zone.
Memory status
1. Navigate through: Main menu Settings Memory status.
2. View the memory used for Text message, Contacts, Calendar,
Phone and memory card.
Contacts
1. Navigate through: Main menu Settings Contacts.
2. Select <Speed dial> to set a phone number to a specific speed dial
button. Then you can press and hold the speed dial button in the
dial pad to make a call directly.
3. Select <Default storage> to set the location where new contacts
are saved.
Call settings
1. Navigate through: Main menu Settings Call settings.
2. Select an option to open the settings interface.
3. Slide screen to scroll through the settings list.
4. Set the value for the option.
5. After setting, click to save and quit.
Call settings:
Call ID: Sending your caller ID or not. Needs to be
supported by the network.
Call waiting: Set whether to be notified about a new
incoming call while you have a call in progress. This
function needs to be supported by the network.
Auto redial: Turn on to automatically redial the number if
dialing fails. Your phone will make a maximum of 10
attempts to connect the call.
58
Page 59

Call divert: Divert the incoming call to another number you
Network
Security
assigned.
Call barring: Set the limits of making and answering calls.
This function needs to be supported by the network.
Call duration: View the information of call duration.
Call cost: View the information of call cost. You can define
unit price and currency for accounting.
Call cost setting needs a verifying PIN2. Please contact network
services to get more information.
Set the network connection parameters.
1. Navigate through: Main menu Settings Network.
2. Slide screen to scroll through the settings list.
3. Select an option to set.
4. After setting, click to save and quit.
Network settings:
Network mode: Select the network connection mode.
Search mode: Select the mode your phone uses to search
for a network.
Set a phone lock password to prevent unauthorized use.
The password supports 4 to 8 digits (numbers only). The default phone
lock code is “0000”.
If you enter an incorrect PIN code three times, your SIM/USIM card will
be blocked.
To unblock it, you need to enter your PUK code. The PUK code is
supplied by your network service provider.
If you enter an incorrect PUK code ten times, your SIM/USIM card will be
permanently blocked.
1. Navigate through: Main menu Settings Security.
2. Slide screen to scroll the settings list.
59
Page 60

3. Select an option to set.
Connection
4. After setting, click to save and quit.
Security settings:
Phone lock: When phone lock is enabled, you must enter
the phone lock code each time the phone is switched on.
PIN lock: When PIN lock is enabled, the phone requires
your PIN code each time it is switched on.
Change phone code: Change your phone lock code.
Change PIN: Change your PIN code.
Change PIN2: Change your PIN2 code.
Navigate through: Main menu Settings Connection.
Connection settings options:
Bluetooth: Switch Bluetooth on or off; search for Bluetooth
devices; and define Bluetooth settings.
Data account: Define the data account settings which are
used for Browser settings, Multimedia Message settings and
Java settings.
Data transfer: Display the information about data
Bluetooth settings
1. Navigate through: Main menu Settings Connection
2. Slide to to activate Bluetooth.
3. Set visibility status or device name.
Bluetooth settings:
Bluetooth connection
1. Navigate through: Main menu Settings Connection
transmission.
Bluetooth
Visibility: Show or hide the phone to other Bluetooth
devices.
Device name: Edit your phone’s name for Bluetooth
connectivity.
60
Page 61

Bluetooth.
Java
2. Slide to to activate Bluetooth.
3. Select <List> to view device list. Select “Search”, the phone will
search for other Bluetooth devices automatically and display them
in the device list.
4. Select the Bluetooth device you want to connect to.
5. Input the paring code. If the paring code matches the pairing code
of the waiting Bluetooth device, the Bluetooth devices will be
connected.
6. To transfer data via Bluetooth, select the device connected; define
the file in My files and then click <Done>.
Data account settings
1. Navigate through: Main menu Settings Connection Data
account.
2. Select a data account to view account information including:
account name, APN, authorization type, user name and password.
3. To create a new data account, click and press <Save> to save
the new data account configuration.
4. To edit the data account, select <Edit> to configure account
settings.
5. To delete an existing data account, click to mark for deletion
and press to delete.
Data transfer
1. Navigate through: Main menu Settings Connection Data
transfer
2. View data transfer information: total quantity of sent and received
data. Click <Reset> to reset all statistical information.
Define JAVAconfiguration to connect network for download.
1. Navigate through: Main menu Settings Java.
2. Click <Edit> and select a settings profile, to view profile name,
connection mode and data account.
61
Page 62

3. To create a new profile, click and press <Save> to save the new
Reset
Contacts
profile configuration.
4. To edit the profile settings, select a profile entry and configure the
settings.
5. To delete an existing profile, click to mark for deletion and press
to delete.
Reset specific: reset settings only. User data e.g. contacts, messages,
my files will not be modified or deleted.
Reset all: reset the phone to the factory settings. User data e.g. contacts,
messages, my files will be deleted.
1. Navigate through: Main menu Settings Reset Reset
specific/Reset all.
2. Enter your phone lock code. The default phone lock code is “0000”.
3. Click <Done> to Confirm.
4. After resetting, your phone returns to standby mode.
You may lose content that was included in the phone at the time of
purchase.
Voice mail
You can receive voice mail alerts from the network. Please contact your
network service provider to set the voice mail number.
Voice mail settings
1. Click in standby mode.
2. Click to open voice mail interface.
3. Click <Voicemail number> to set voice mail number.
4. Slide to to enable voice mail notification.
5. Hold to access to the voice mail.
In Contacts you can manage all of your contact information, such as
62
Page 63

phone numbers and addresses. You can assign a personal ring tone and
a thumbnail image to a contact.
To access the Contacts menu, click in standby mode.
You can save contact information on your phone or USIM card.
Use contact
Add contact
1. Click in standby mode.
2. Click to create a new contact.
3. Contact information includes name, number, ring tone, Email, URL,
image, notes. When storing contact information on the USIM card,
information includes name and number. Click <Save> to save the
contact information.
Find a contact
The contact entries are listed in alphabetical order as default. The phone
supports searching a contact name by inputting the initial part of the
name or the whole name.
1. Click in standby mode.
2. Click search input field.
3. To search for a name, input the initial part of the contact’s name.
Click <Done>.
4. You can find the contacts matched in the contacts list.
Function for contacts in list mode:
View: Click a contact’s entry to view details.
New: Add a new contact entry.
Edit: Delete a contact’s entry or copy between USIM and
View contacts
View the contact’s detailed information. You can make a call or send
messages according to the relevant contact information.
1. Click in standby mode.
2. Select a contact’s entry to view detailed information.
Edit contacts
phone.
63
Page 64

Edit the information of existing contacts.
s
1. Click in standby mode.
2. Slide screen to scroll through the list and select the contact entry.
3. Click <Edit> and select an option to edit information.
4. If contact information is saved on the phone, you can edit image,
name, number, ring tone, Email, URL and notes; if contact
information is saved on the USIM card, you can edit name and
number.
Delete contacts
1. Click in standby mode.
2. Click <Edit>.
3. To delete a contact, click to mark for deletion and press
to confirm deletion.
4. Click <Clear> to delete all contact information. WARNING: By
clicking this option all contact information will be lost.
Copy contacts
Copy contacts between USIM and phone.
1. Click in standby mode.
2. Click <Edit>.
3. To copy a contact between USIM and phone, click and select a
copy mode.
My link
Use My links to bookmark websites on your phone where you can view
streaming video and other entertainment.
1. In standby mode, click to display link list.
2. Select a website logo from the list.
3. Your phone will connect to the website automatically.
64
Page 65

Problems and solutions
switched on
he following messages appear
Network failure
To save the time and expense of an unnecessary service call, perform
the simple checks in this section before contacting a service
professional.
When your phone cannot be
Make sure that you press and hold the power key for more than 1
second.
Make sure that the battery is well connected to your phone.
Remove the battery, re-insert the battery and restart your phone.
If the battery power is exhausted, recharge the battery.
When switching on your phone, t
Enter phone lock code. The automatic locking function has been
enabled. You must enter the phone’s lock code before you can use
the phone.
Enter PIN code. The PIN check feature is enabled. Every time the
phone is switched on, the PIN has to be entered; (If you are using
your phone for the first time, you must enter the PIN code supplied
with the USIM card).
Enter PUK code. The PIN code has been entered incorrectly three
times and the SIM card is now blocked. Enter the PUK supplied by
your network service provider.
USIM card error
USIM card is contaminated. Clean the metal contacts on the USIM
card with a clean cloth.
USIM card is not properly placed. Install the USIM card according
to the user’s guide.
USIM card is damaged. Contact your network service provider.
You may be in a weak signal area. Change location and try again.
65
Page 66

You are out of network service coverage.
have entered a number but it was not dialed
quality of your call is poor
ration is too short
USIM card is invalid. Contact your network service provider.
When you
Make sure that you press the dial key.
Make sure that your account is still active. Make sure your USIM
card is valid.
Make sure that you have not set outgoing call barring.
When the
Check the volume.
You are in a weak signal area, such as near a tall building or in a
basement where radio cannot be efficiently transmitted.
You are using your phone during a busy period, such as during the
morning commuting time when the lines are too busy to go
through.
When calls from other phones cannot reach you
Make sure that your phone is switched on and connected to the
network.
Make sure that your account is still active.
Make sure that your USIM card is valid.
Make sure that you have not set incoming call barring.
When you speak but cannot be heard on other phones
Make sure that you have switched on the microphone.
Make sure that you are holding the phone close enough to your
mouth.
When the standby du
The standby duration is related to the network settings. You may
be in a weak signal area. If your phone cannot receive signals, the
phone will continue to send a signal to search for base station and
66
Page 67

consume power, which shortens the standby duration. Either use
your phone in a stronger signal area or switch it off temporarily.
Your battery may need to be changed.
The battery does not charge properly
Make sure the plug is well connected.
Wipe the charging contacts both on the phone and on the battery
with a clean soft cloth.
When charging in an environment below 0℃(32°F) or above 45℃
(110°F), change your charging environment.
Change the battery or charger which is damaged.
If the above guidelines do not help you to solve the problem, take note of
the model and serial numbers of your phone, your warranty details and a
clear description of the problem. Then contact your local after-sales
service.
67
Page 68

Health and safety
Batteries
Road safety
Never use a charger or battery that is damaged in any way.
Properly use the battery. Do not short-circuit the battery, which may
damage the battery, cause heat or cause fire.
Do not dispose of batteries in high temperature of in a fire as they may
explode.
Return the waste battery to the dealer or designated recycling center. Do
not dispose as household waste.
Battery charging time depends on the remaining battery charge, the type
of battery and the charger used. The battery can be charged and
discharged hundreds of times, but it will gradually wear out. When your
phone’s operating time is noticeably shorter than normal, it is time to buy
a new battery.
Use only original or approved chargers and batteries.
Unplug the charger from the electrical plug and the device when not in
use.
Do not overcharge, which will damage the battery and shorten its life.
Leaving the battery in extremely hot or cold places will reduce the
capacity of the battery. Cool down or heat up the temperature to normal
level (Li-ion batteries are particularly affected by temperatures below 0℃
(32°F)).
Your wireless phone gives you the powerful ability to communicate by
voice, almost anywhere, anytime. Therefore, you must uphold some
important responsibility.
When you are driving, driving is your first responsibility. When using your
wireless phone while driving, be more alert and follow local regulations.
Understand the wireless phone and features, such as speed dial and
redial which can help you make a call more conveniently without
disturbing your driving.
68
Page 69

Use a hands-free set if possible. Hands-free accessories may promote
ment
the convenience and safety of using your wireless phone.
Place your phone where is easy to access and does not require you to
move your eyesight. If receiving a call at an inconvenient moment, let
your voicemail answer for you.
When on the phone, tell your conversation partner that you are driving.
Hang up in traffic jams or bad weather. Rain, rain with snow, snow, ice
and traffic may be dangerous.
Air bags, brakes, speed control systems and fuel injection should not be
influenced by radio transmission. If you have these problems, contact
your car dealer immediately.
Switch off your mobile phone when fueling or anywhere two-way radio
equipment usage is prohibited. Do not put your phone near flammable
and explosive substances. Internal spark may cause fire or explosion.
Switch off the mobile phone prior to airplane take-off. To prevent
interference to communication systems in the plane, never use a phone
during flight. Using a phone before the plane takes off may be allowed by
the crew in accordance with safety regulations.
During flight, make sure that your phone will not be automatically
switched on by an alarm you have set.
Operating environ
Remember to follow any special regulations in force in your area and
always switch off your phone whenever it is forbidden to use it, or it may
cause danger.
When connecting the phone or any accessory to another device, read its
user’s guide for detailed safety instructions. Do not connect incompatible
products.
It is recommended that the equipment only be used in the normal
operating position (held to your ear with the antenna pointing over your
shoulder) for your satisfactory operation of the equipment and for the
safety of personnel.
Do not expose the equipment to temperature below -10℃ (14°F) or
69
Page 70

above 50℃(122°F).
Electronic devices
nt safety information
Most electronic equipment is shielded from radio frequency signals.
Consult the manufacturer for relevant information.
Pacemakers: Maintain a minimum distance of 6 inches (15cm) between
a wireless phone and a pacemaker; do not put your phone in a pocket
near the chest; use your ear furthest from the pacemaker to reduce
possible interference. If you have any reason to suspect that interference
is taking place, switch off your phone immediately.
Hearing aids: Some digital wireless phones may interfere with some
hearing aids. In the event of such interference, you may consult your
hearing aid manufacturer.
Other medical devices: If you use any other personal medical devices,
consult the manufacturer of your device to determine if it is adequately
shielded from external RF energy. Your physician may be able to assist
you in obtaining this information. Switch off your phone in health care
facilities when regulations posted in these areas instruct you to do so.
Vehicles: RF signals may affect improperly installed or inadequately
shielded electronic systems in motor vehicles. Check with the
manufacturer.
Emergency calls
This phone, like any wireless phone, operates using radio signals, which
cannot guarantee connection in all conditions. Therefore, you should
never rely solely on any wireless phone for essential communications like
medical emergencies.
To make or receive calls, the phone must be switched on and in a service
area with adequate signal strength.
To make an emergency call, enter the local emergency number in
standby mode and press <Send> to call.
Other importa
70
Page 71

Use original or approved accessories. Any unapproved accessory
Care and maintenance
may affect the performance of your phone, damage your phone or
even cause personnel injury.
Your wireless phone sends out an electromagnetic field. Do not put
the phone near magnetic storage media such as computer disks.
Neighboring electric appliances such as TVs, phones, radio
receivers and PCs may affect the use of your phone and its
performance.
Do not connect the phone to an incompatible device.
Only qualified personnel should service the phone or install the
phone in a vehicle.
Your phone is a product of superior design and craftsmanship and should
be treated with care. The suggestions below will allow you to enjoy this
product for many years.
Keep your phone out of the hands of small children and pets. They
may accidentally damage the phone or choke on small parts.
Keep the phone dry and avoid liquids that corrode the phone.
Do not use the phone with a wet hand, which may cause an
electric shock.
Do not store the phone in hot areas, which can shorten the life of
electronic devices, damage batteries or melt accessories.
Do not store the phone in cold areas. When the phone warms up
to its normal operating temperature, moisture can form inside the
phone, which may damage the phone’s electronic circuit boards.
Do not expose your phone to hot sun which may overheat your
phone.
Do not place your phone near flammable liquids, gases or
explosive substances.
Do not drop or knock the phone. Rough handling can break
internal circuit boards.
When cleaning your phone, use a slightly damp or anti-static cloth.
71
Page 72

Do not use a dry or static cloth. Do not use chemicals such as
cleaning solvents to clean the surface. Switch off the phone first
and then do the cleaning.
Do not paint the phone. Paint can prevent proper operation.
If your phone has a flash, do not use it too close to the eyes. This
may cause damage to eyes.
If the phone or battery gets wet and the label in the phone is
damaged, phone repairs are no longer guaranteed by the
manufacturer’s warranty, even if the warranty for your phone has
not expired.
72
Page 73

Declaration of Conformity
This equipment has been tested and found to comply with the limits for a
Class B digital device, pursuant to Part 15 of the FCC Rules. These limits
are designed to provide reasonable protection installation. This
equipment generates, uses and can radiate radio frequency energy and,
if not installed and used in accordance with the instructions, may cause
harmful interference to radio communications. However, there is no
guarantee that interference will not occur in a particular installation. If this
equipment does cause harmful interference to radio or television
reception, which can be determined by turning the equipment off and on,
the user is encouraged to try to correct the interference by one or more of
the following measures:
-- Reorient or relocate the receiving antenna.
-- Increase the separation between the equipment and receiver.
-- Connect the equipment into an outlet on a circuit different from that to
which the receiver is connected.
Any changes or modifications not expressly approved by the party
responsible for compliance could void the user’s authority to operate the
equipment.
This device complies with part 15 of the FCC Rules. Operation is subject
to the following two conditions:
(1) This device may not cause harmful interference, and (2) this device
must accept any interference received, including interference that may
cause undesired operation.
THIS MOBILE PHONE MEETS THE INTERNATIONAL
RECOMMENDATIONS FOR EXPOSURE TO
RADIO WAVES
Your mobile phone is a radio transmitter and receiver. It is designed and
manufactured not to exceed the limits for exposure to radio frequency
(RF) energy defined by international standards. These recommendations
73
Page 74

have been established by the International Commission on Non-Ionizing
Radiation Protection (ICNIRP) and, the Institute of Electrical and
Electronics Engineers (IEEE) that forecast a substantial safety margin for
assuring the protection of all persons, regardless of age and health.
The exposure recommendations for mobile phones use a measurement
unit known as the Specific Absorption Rate (SAR). The SAR limit
recommended by the ICNIRP for the mobile phones used by the general
public is 2.0W/kg averaged over ten grams of tissue and, is 1,6W/kg
averaged over one gram of tissue by IEEE Std 1528 for the head.
Tests for SAR have been conducted using recommended operating
positions with the mobile phone transmitting at its highest certified power
level in all tested frequency bands. Although the SAR is determined at
the highest certified power level, the actual SAR levels of the mobile
phone while operating are generally below the maximum SAR value.
This is because the phone is designed to operate at multiple power levels
so as to use only the power required to reach the network. In general, the
closer you are to a base station antenna, the lower the power output.
While there may be differences between the SAR levels of various
phones and at various positions, they all meet the international protection
standards for exposure to radio waves.
The highest SAR value for this model phone when tested was 1.19W/kg
at ear and 0.899 W/kg for use close to the body.
For limiting radio wave exposure, it is recommended to reduce the
mobile phone call duration or to use a headset. The purpose of those
precautions is to take the mobile phone away from the head and the
body.
For body-worn operation, this phone has been tested and meets FCC RF
exposure guidelines when used with an accessory that contains no metal
and that positions the handset a minimum of 1.5cm from the body. Use of
other accessories may not ensure compliance with FCC RF exposure
guidelines.
74
Page 75

WARNINGS:
Our Company is not responsible for your not abiding the advice above or
mishandling the phone.
Our company reserves the right to amend this User Manual at any time
without prior notice.
Check the model number of charger before using it with this phone. This
Phone is intended for use when supplied with Verykool USA, Inc.
Standard charger.
Note:
Use only batteries, chargers and enhancements approved by verykool
USA, Inc. for use with this specific model. The use of any other types
may invalidate any approval or warranty, and may be dangerous. For
availability of approved enhancements, please check your retailer. Your
phone and its enhancements may contain small parts. Keep them out of
reach of small children. A few practical rules about accessories and
enhancements:
• Keep all accessories and enhancements out of the reach of small
children.
•When you disconnect the power cord of any accessory or enhancement,
grasp and pull the plug, not the cord.
75
 Loading...