

Page 1

i725
User Manual
Thank you for purchasing the i725 mobile phone
Page 2

Introduction
Welcome to choose the i725 mobile p hone. This user manual states
the outstanding performance of the i725 mobile phone in detail. In
addition to the basic call features, the i725 mobile phone and the
system network also provide you with a variety of useful features
and services to facilitate your work and leisure activities.
The Company reserves the right to make any amendment on the
technical specifications without any advance notice.
Reading Statement for the Manual
In manual, different typesetting styles are used to interpret different
operating details, and the specific interpretation is as follows:
Operation Description of Contents Example
Showing
contents
General
key
Functional
key
Menu
item
Note:
The picture shown in the manual are only used as function hint
pictures which may be different from the ones shown in the
mobile phone, and the ones in your mobile phone shall prevail.
Show with normal characters 0-9
All the keys except functional
keys are shown by normal
characters with frames
Functional key is shown with
bold and frame
Show in bold italics Hold a call
0-9
OK
Page 3

CONTENT
Introduction.............................................................................I
Security and performance.....................................................1
1 Start Using ....................................................................... 4
1.1 Battery........................................................................4
1.1.1 Uninstallation and installation of battery ..............4
1.1.2 Charging the battery............................................5
1.1.3 Use of battery......................................................5
1.2 Side sliding keypad ....................................................5
1.3 SIM card.....................................................................6
1.3.1 Insertion of SIM card ...........................................7
1.3.2 Unlock the SIM card............................................ 7
1.4 Plug and unplug the Memory card..............................8
1.5 Plug and unplug the earphone...................................8
1.6 Status bar and conte nt...............................................8
1.6.1 Keys.....................................................................9
1.6.2 Text input and edit window.................................11
2 Dial and answer the call ...............................................12
2.1 Making a call ............................................................12
2.1.1 Direct dial...........................................................12
2.1.2 Making a call from the Phonebook list...............13
2.1.3 Speed dial..........................................................13
2.2 Answering a call.......................................................13
2.2.1 Answering new call............................................13
2.2.2 Connecting two calls at the same time ..............14
2.2.3 Conference call..................................................14
2.3 Emergency call.........................................................14
3 Menu operation .............................................................15
4 Characteristic function.................................................16
4.1 Switch pages............................................................16
4.2 Free-style menu .......................................................17
4.3 Change main menu icons’ position...........................18
4.4 Curtain page.............................................................18
I
Page 4

5 Phone.............................................................................18
5.1 Phonebook...............................................................18
5.2 Call log.....................................................................20
5.3 Dialer........................................................................ 20
5.4 Profiles.....................................................................20
5.5 File manager ............................................................21
5.6 Message...................................................................21
5.7 Email........................................................................22
5.8 Setting......................................................................22
5.8.1 Time and date....................................................22
5.8.2 Language & Input method.................................22
5.8.3 Personalized settings ........................................22
5.8.4 LCD backlight....................................................23
5.8.5 Call settings.......................................................23
5.8.6 Network setup....................................................24
5.8.7 Security setup....................................................24
5.8.8 Wireless connect...............................................27
5.8.9 Phone mode settings.........................................28
5.8.10 Misc. settings.....................................................28
5.8.11 Restore factory settings.....................................28
5.9 Image viewer............................................................29
5.10 Camera .................................................................... 29
5.11 Calendar................................................................... 31
5.12 Alarm........................................................................ 31
5.13 Media player .............................................................31
5.14 Video recorder.......................................................... 32
5.15 Notes........................................................................ 33
5.16 FM radio ...................................................................33
5.17 Sound recorder......................................................... 34
5.18 Calculator ................................................................. 34
5.19 Ebook reader............................................................ 34
5.20 STK .......................................................................... 35
5.21 Synchronization........................................................ 35
II
Page 5

5.22 Phone sync...............................................................35
5.23 WAP ......................................................................... 36
5.24 Java.......................................................................... 36
5.25 Task.......................................................................... 36
5.26 Currency converter ...................................................37
5.27 Typical stopwatch .....................................................37
5.28 Unit converter ........................................................... 37
5.29 World clock ...............................................................37
5.30 MSN ......................................................................... 37
5.31 Yahoo ....................................................................... 37
5.32 FaceBook ................................................................. 38
5.33 Twitter....................................................................... 38
6 Other Functions ............................................................38
6.1 Mass Storage Function.............................................38
6.2 Webcam Function ....................................................38
6.3 COM port..................................................................39
7 Common Questions......................................................39
10 Maintenance Guideline...................................................40
III
Page 6

Security and performance
◆To touch the screen of the mobile phone with sharp articles is
prohibited. Dust particles and nails may scratch the screen. Please
maintain the screen clean. Please remove the dust on the screen
with soft cloth gently, so as not to scratch the screen.
◆In thunder raining days, please do not u se the mobile phone w hen
charge it or outdoor, so as to avoid being struck by thunder or other
injuries.
◆Please do not put the battery in high-temperature environment
(high temperature will lead to heat of the battery upgrading), or else
it may result in fire or explosion.
◆Please keep the mobile phone being charged and the charger
away from people or other flammable and explosive articles in order
to avoid fire, explosion or other dangers!
◆Please strictly adhered to the rules and do shut down the mobile
phone on occasions which use of mobile phone is prohibited!
Please do not put the mobile phone, battery and charger in the
equipment with strong electromagnetic field, such as induction
cooker and microwave oven; otherwise it will lead to circuit failure,
fire or explosion.
◆Please do not arbitrarily refit the mobile phone, or teardown the
mobile phone and accessories without authorization. Improper refitting
or teardown easily triggers fire and explosion of the mobile phone.
Only the authorized organizations can repair the mobile phone.
◆Please do not use batteries, charger or accessories of
non-standard original models.
◆Please do not join the two poles of the battery, so as not to result
in battery short-circuit.
◆If the power wire has been damaged (such as the exposed and
fractured), or the connector has been loosened, please don’t use it,
so as to avoid electric shock, short circuit of the charger or fire.
◆The mobile phone should be powered off in the hospital or other
1
Page 7

places where use of mobile phone is prohibited. Mobile phone will
affect proper work of electronic equipment and medical devices,
such as pacemakers, hearing aids and other medical electronic
equipments. Pacemaker manufacturer proposes to keep the
distance between the mobile phone and the pacemaker at least 15
cm, in order to avoid potential interference to the pacemaker by the
mobile phone.
◆Please do not uses the mobile phone when drive a car. In case of
emergency, please use hand-free devices (which may be bought
separately); otherwise, please park your car on the road side before
making a call.
◆Please do not put the mobile phone on car insurance airbag or
region reachable by the airbag after spreading. Otherwise when the
airbag expands or ruptures, the mobile phone is likely to cause
serious damage to the people in the car due to strong exter nal for ce.
◆Please keep the mobile phone, battery and charger at place out of
the reach of children. Please do not let children use the mobile
phone, battery and charger in the absence of adults’ supervision.
◆In order to comply with provisions of RF leakage, when you wear
a mobile phone or use the data functions of the mobile phone,
please maintain the distance between the antenna and the body at
least 1 inch (2.5 centimeters).
◆Please power off the mobile phone before cleaning and
maintenance. If the mobile phone is connected to the charger, you
need to unplug the charger from the power outlet, and disconnect
the connection between the charger and the mobile phone in order
to avoid electric shock, short circuit of battery or charger.
◆Do not use chemical lotion, scrubbing cleanser to w ipe the mobile
phone or the charger, otherwise it may damage the components or
cause fire. Slightly wet and anti-static soft clean cloth can be used.
◆Please do not throw the old and abandoned lithium batteries into
trash can, send them to the designated locations or return them to
2
Page 8

our company.
◆Please do not charge the mobile phone in environment w ith much
dust, humidity, too high, or too low temperature (the permitted
charging temperature range is 0 ~ 40 ), and the power wire ℃℃
cannot be nearby the heating containers.
◆Please do not use the phone to make bold to camera, video and
recording that may infract the rights of the copyright owners.
The company will not be responsible for any losses caused by not
recording, deleting, destructing or damage of the photos, video and
recordings caused by its accessories or software on the use of the
functions including camera, video and audio.
◆In the use of network function, if the users download a file with
virus, which make the mobile phone cannot be used normally; the
company does not undertake any responsibility arising therefore.
Warning: The original manufacturer will not take on any
responsibility for the users who are not in compliance w ith the a bove
advices or improperly use the mobile phone.
Note: The application of value-added services of the mobile phone
is provided by relevant service providers. Please refer to the
relevant help or providers’ notes for detailed information.
Statement: The Company reserves the right to improve the
product without making any advance notice, and keeps final
interpreting rights on the product performance. The company
commits to improve the product quality and gradually launches
new versions of products. So if the contents stated in the
manual are slightly different from the function, specification or
design, please refer to the mobile phone. Such changes are not
notified additionally, your understanding is appreciated.
3
Page 9
1 Start Using
1.1 Battery
The battery is attached with the mobile phone. The battery is not
charged when the mobile phone is purchased but can support
powering on. Please recharge it for use after complete using up the
battery for the first three times, which makes this battery easier to
achieve the best using state.
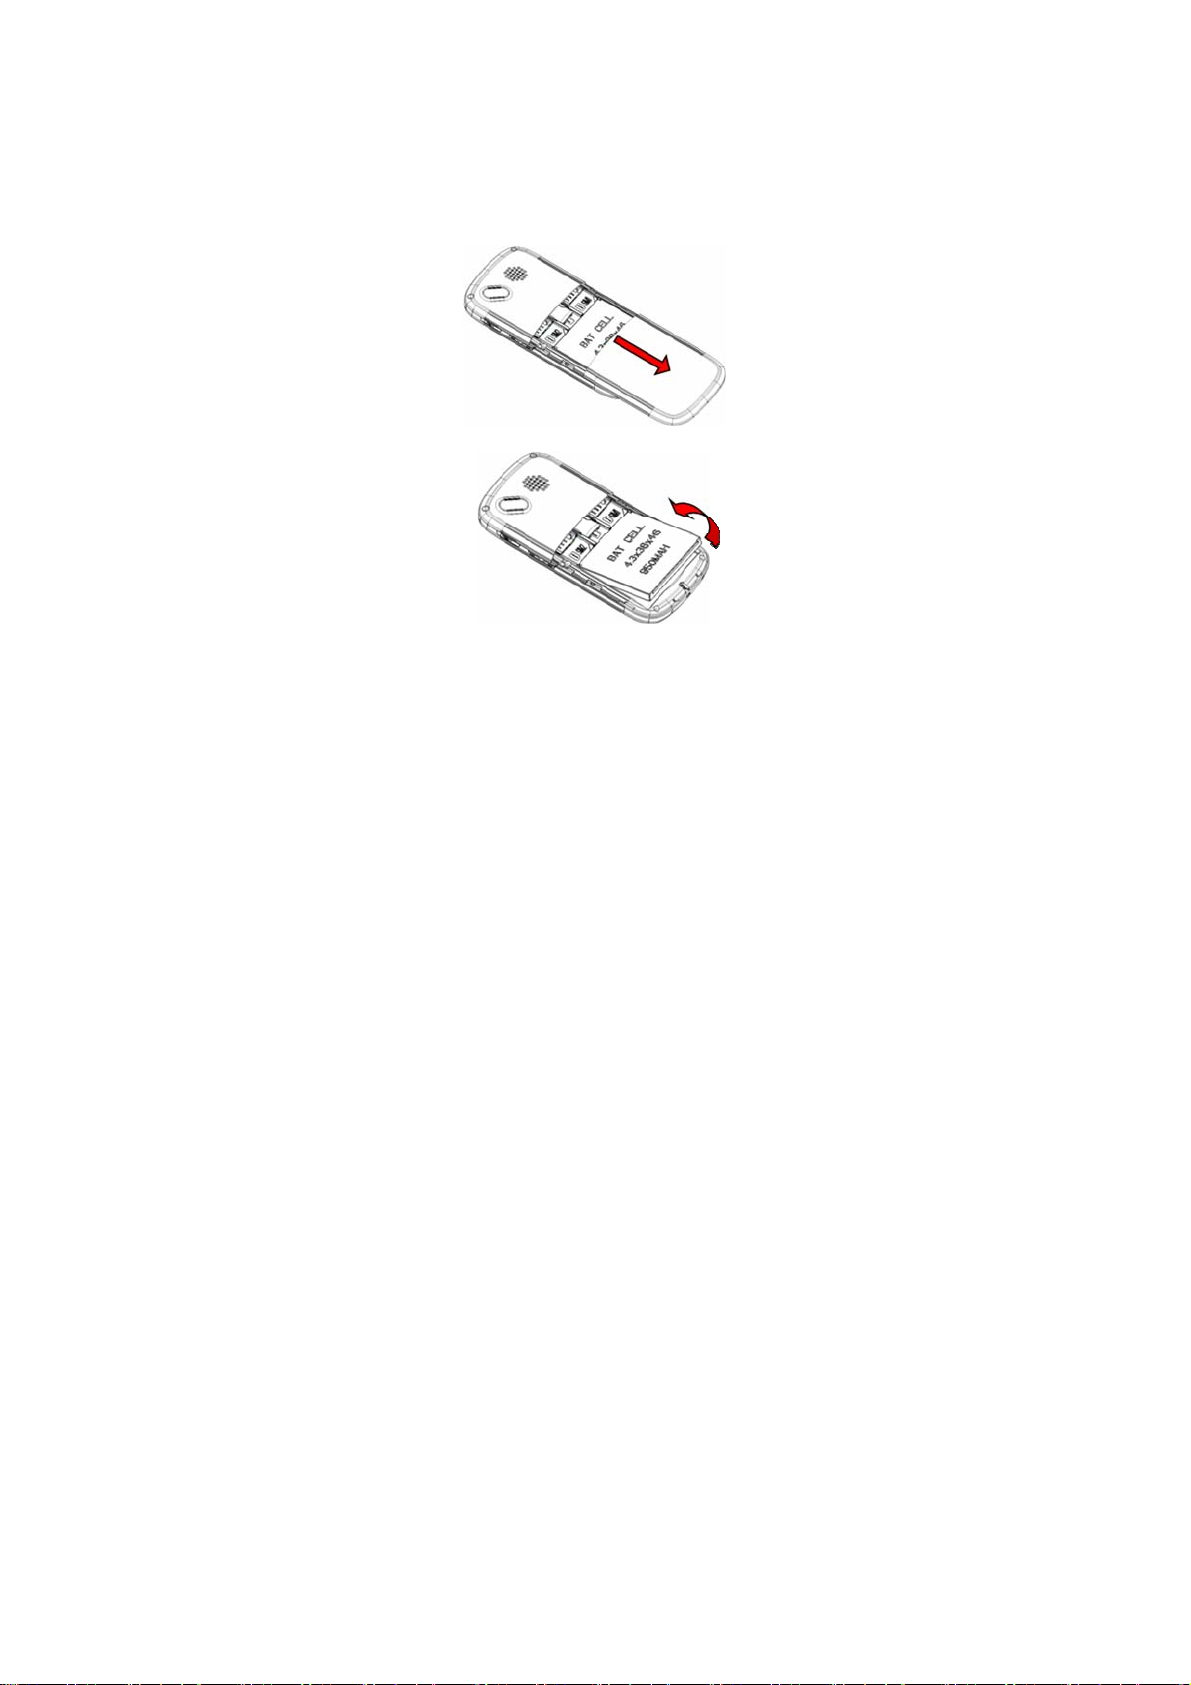
1.1.1 Uninstallation and installation of battery
Put the back of the mobile phone upward; release the bolts first
then take off the rear cover according to the chat below.
Dig out the bottom of the battery and get the battery out.
When installing the battery, insert the metal teeth at the top of the
4
Page 10

battery into corresponding slot of the mobile phone, and then press
the battery down to install the battery in place. The battery must be
ensured to be installed before powering on.
Finally install the rear cover and fix the bolts of th e mobile phone.
1.1.2 Charging the battery
When the power of the battery was lower than normal, the phone
will prompt battery low. Please charge for the battery, otherwise you
will lose the files which not saved. If y ou don’t charge for a long time,
the phone will be powered off automatically.
When charging, the battery icon at the right upper corner of the
screen will appear in a dynamic rolling manner. During the charging
period, the battery, mobile phone and charger will become hot,
which is a normal phenomenon.
Warning:
The stated charging temperature ranges from 0 to 40 . ℃℃
Please do not use charging equipment if the temperature
exceeds the range. Please do use the charger provided by the
supplier. Application of unauthorized charger may trigger
danger and breach the mobile phone maintenance warranty.
1.1.3 Use of battery
In actual use, the standby time and talk time of the mobile phone
varies with the network status, working environment and different
using manners.
1.2 Side sliding keypad
Your mobile is assembled with a side sliding keypad. In order to
open side keypad, you could slide the touch screen forward. When
the side sliding keypad is open, the screen will enter into horizontal
from vertical.
Fn key: The key is used for inputting the special character
impressed on the right upper side of one key. Short press the key
once, and press the key with special character impressed on the
right upper side, the special character will be typed in once. For
5
Page 11

inputting special characters continuously, please press Fn key twice.
Press Fn key then to go back to normal inputting mode.
Fn key: Long press the key to switch between Chinese and English
input method; short press the key to switch the detailed input
method in Chinese or English mode.
1.3 SIM card
Your network operator will provide you a SIM card which is the key
for your access to the digital GSM netw ork. Prior to use the phone,
you need to insert effective SIM card in the mobile phone.
All relevant information concerning network connection will be
recorded in the SIM card. SIM card can be removed from your
mobile phone and be used in any other GSM mobile phone (new
mobile phone automatically read SIM card).
In order to prevent loss and damage to the information in the card,
you should avoid touching the metal area and keep it away from
electricity and magnetic places. SIM card once being damaged, you
will not be registered to the GSM network.
Warning:
You must power off the mobile phone before removing the SIM
card. Inserting or removing the SIM card is absolutely
prohibited when the external power supply is connected,
6
Page 12

otherwise SIM card and mobile phone may be damaged.
1.3.1 Insertion of SIM card
Power off the mobile phone, remove the rear cover and battery.
Insert the SIM card correctly in the card slot; finally inst all the rear
cover and battery of the mobile phone.
1.3.2 Unlock the SIM card
In order to prevent illegal use, SIM card adopts PIN code (personal
identification code) encryption protection.
If this function is selected, PIN code should be input correctly each
time when you power on the mobile phone, thus to unlock the SIM
card for normal use. Users can disarm the SIM card protection but
illegal use of the SIM card cannot be prevented.
If the PIN code input is error for t hree consec utive times, yo ur SIM
card will be locked by the network. The mobile phone will enquire
the PUK code which will be provided by your network operator. If the
PUK code input is wrong for 10 times, the SIM card will be
permanently barred.
Note:
Your network operator will set a standard PIN code (4 to 8
numbers) for you and you should change it to private
password as soon as possible.
7
Page 13
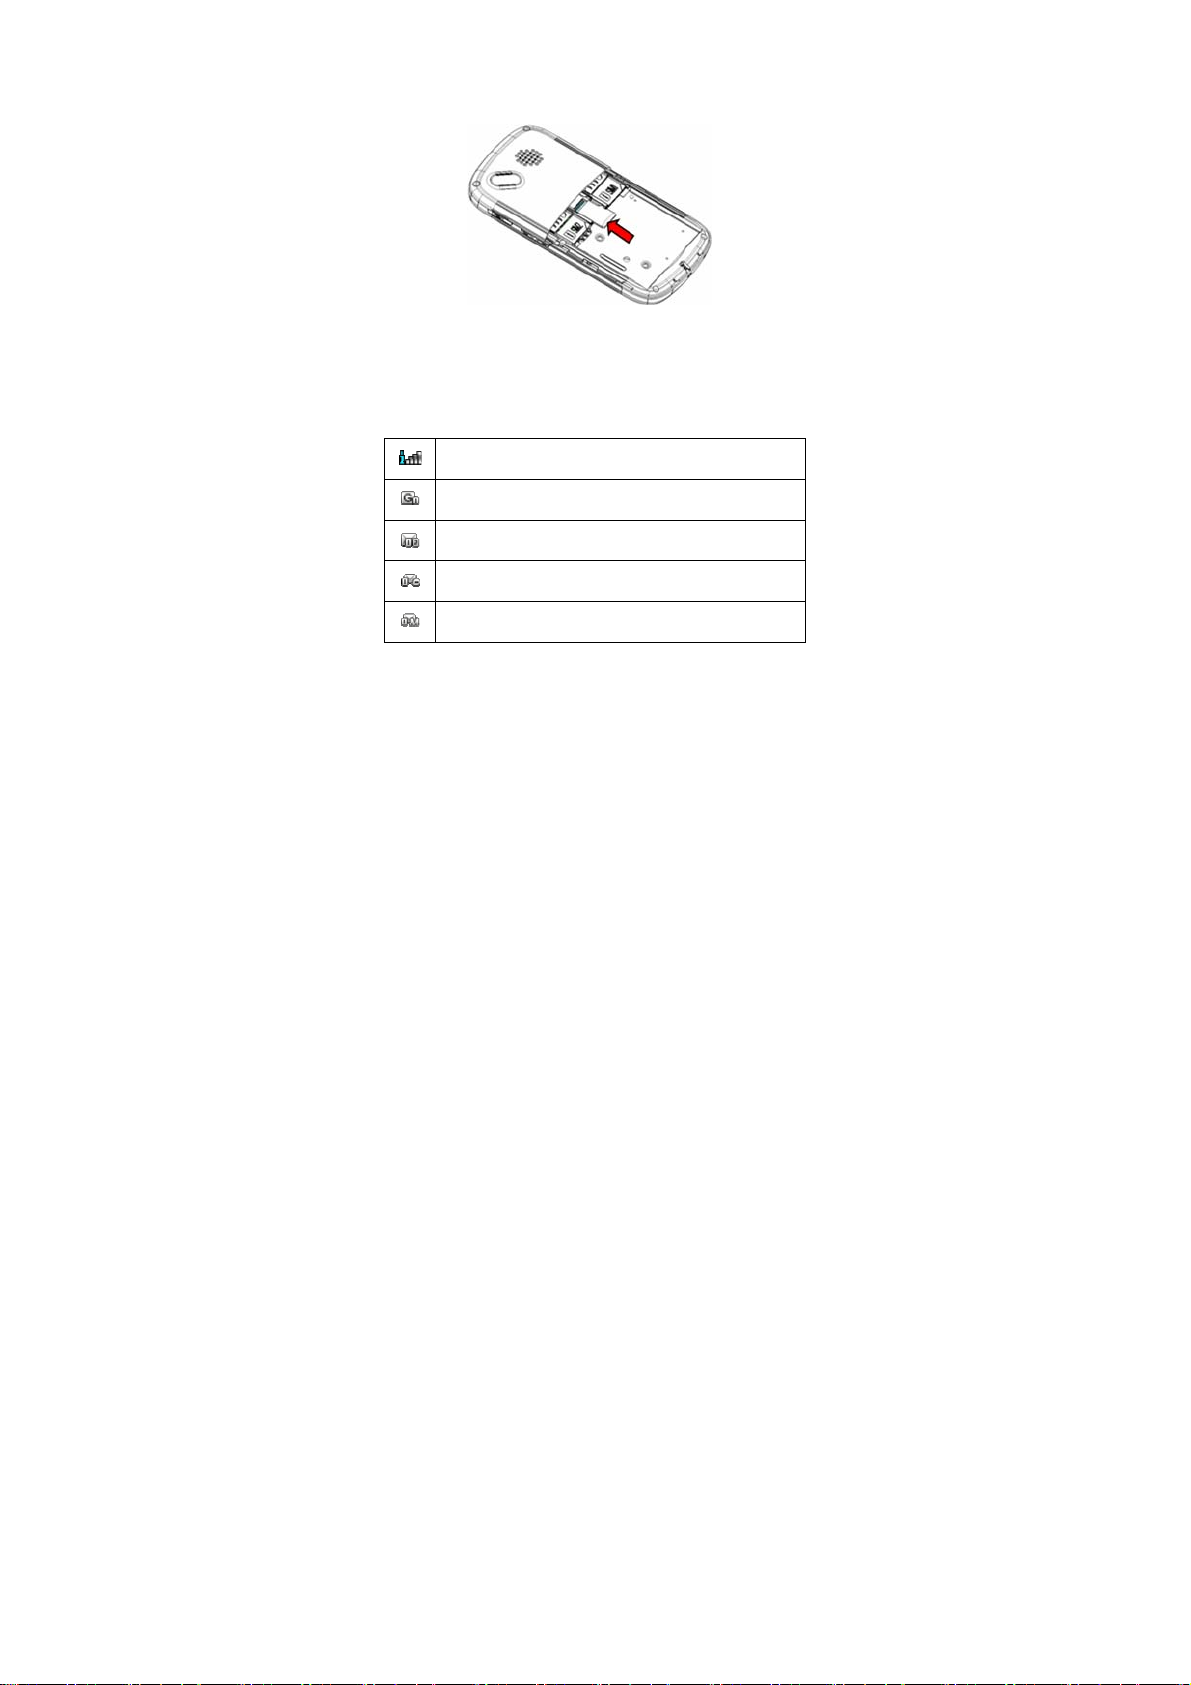
1.4 Plug and unplug the Memory card
Remove the rear cover and battery.
Insert the memory card into the slot at the bottom according to
the chat below.
1.5 Plug and unplug the earphone
Open the USB cover and insert the connector of the earphone to the
earphone jack at the right side of the mobile phone. Gently pull out
the earphone to remove it.
1.6 Status bar and content
In standby screen you can get the information that you need from
the indication icons on the screen.
Indicating the current signal strength of SIM1
Indicating that the SIM1 is connecting network currently
Indicating there is text message not read of SIM1 and
SIM 2
Indicating there is MMS sending or downloading of SIM
1
Indicating there is MMS not read of SIM 1
8
Page 14
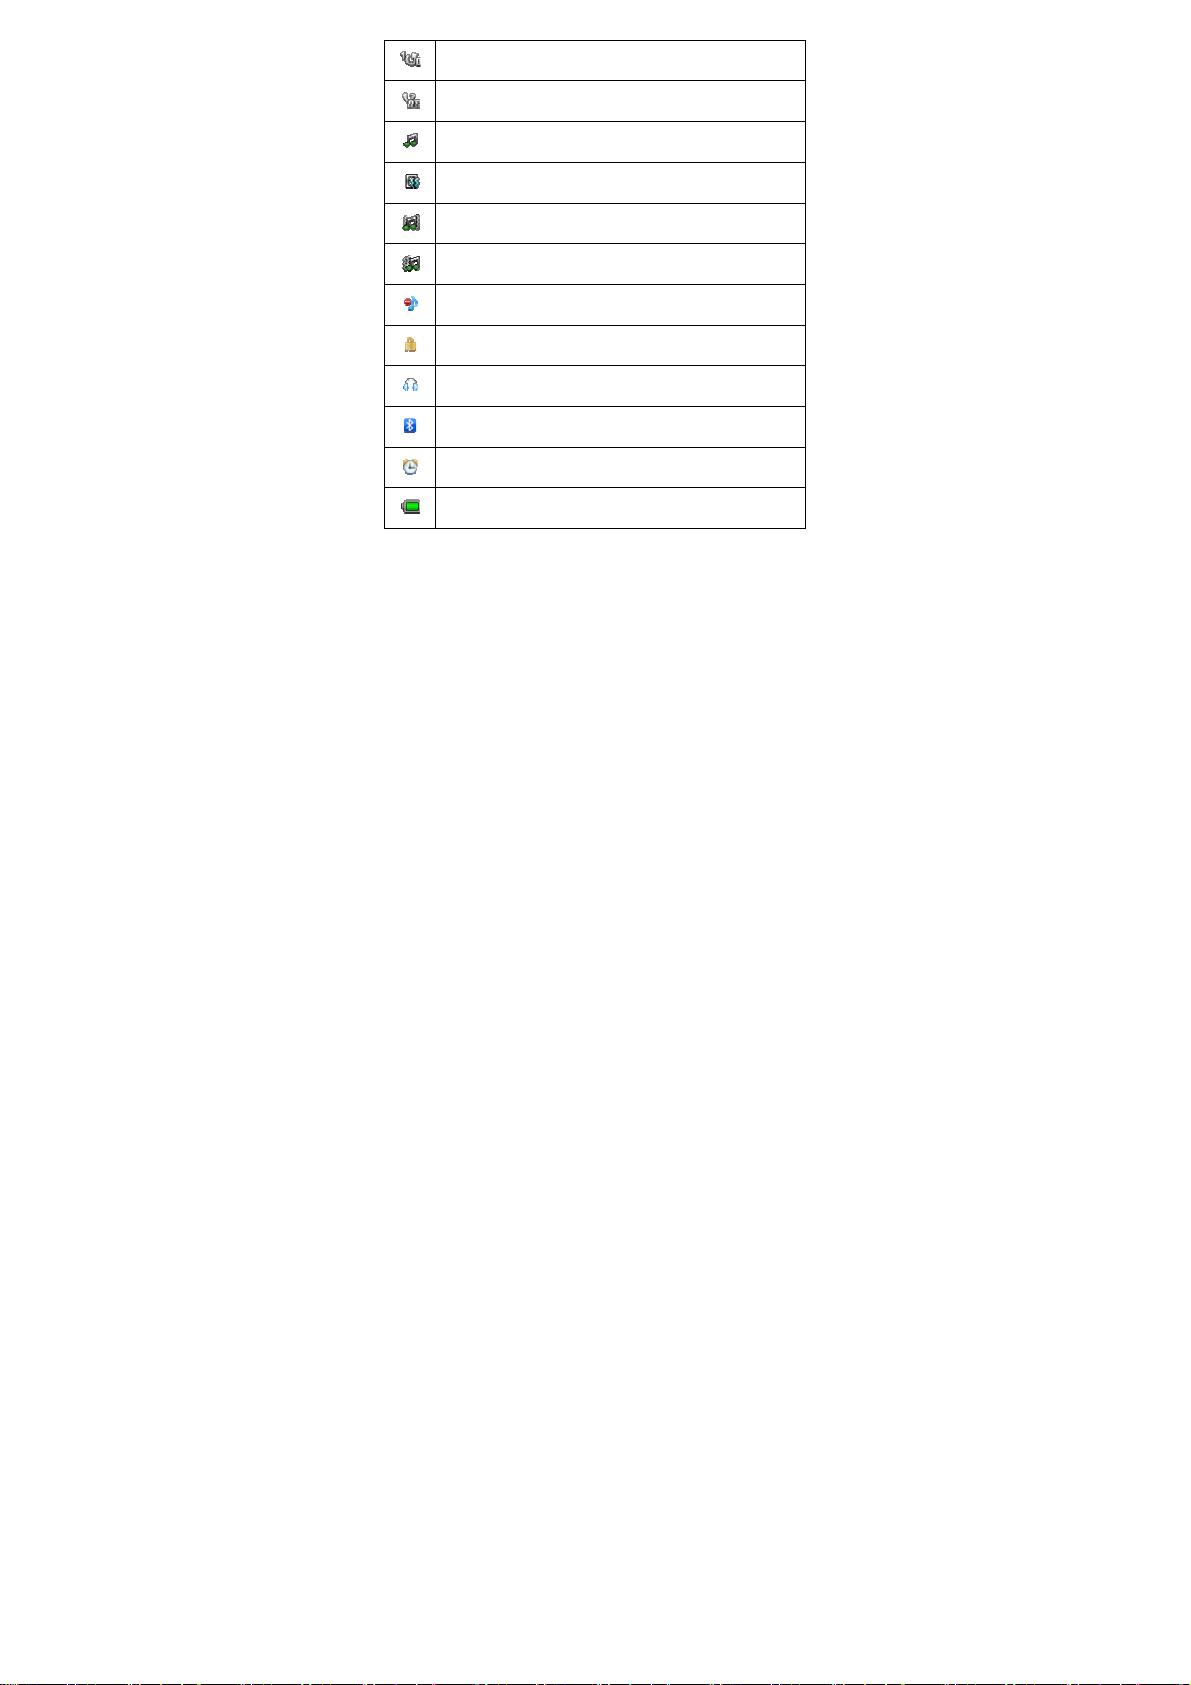
Divert all voice calls has been set of SIM1
Indicating missed call of SIM1 and SIM 2
The current alert type is ring only
The current alert type is vib. only
The current alert type is vib. and ring
The current alert type is vib. then ring
Indicating that silent mode activated
The mobile phone is locked
Indicating that earphone has been inserted
Indicating that the Bluetooth has been activated
Alarm has been set
Indicating current battery capacity
1.6.1 Keys
9
Page 15
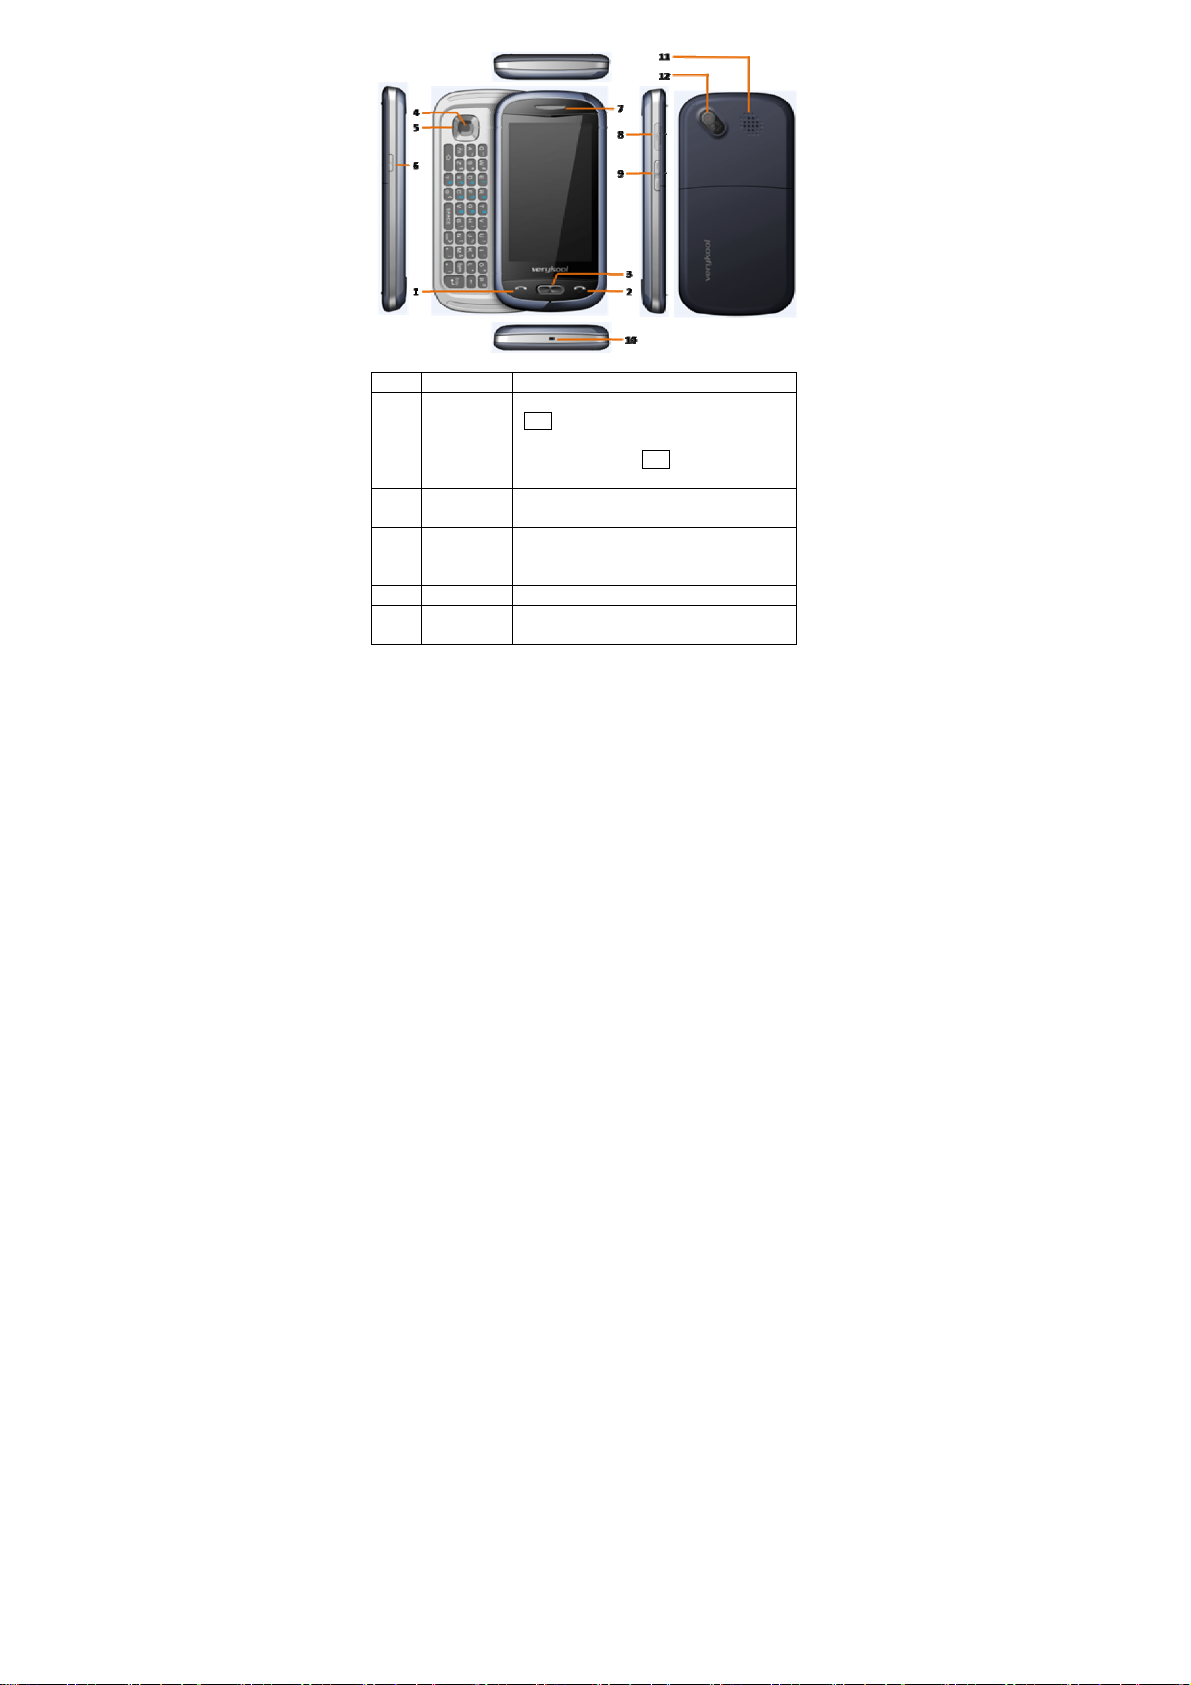
Functions of the keys are described as following:
SN Keys Function description
Send key
1
(Snd)
2 End key
3 Menu key
4 OK key OK; enter the selected menu.
Navigation
5
keys
Making a call; in dual SIM mode, press
Snd key to select the SIM card for dialing
out; answering a call; in the standby
screen press the Snd key to enter the
Dialer screen.
Hang up a call; go back to the standby
screen.
Short press to enter the main menu
screen in standby mode; Active detail
menu in other program screen.
Short press to move to the left, right,
upwards and downwards.
10
Page 16

6 Lock key
7 Receiver
8 USB jack
Volume
9
key
10 MIC
11 Speaker
Camera
12
lens
Short press to lock the screen; long press
to enter camera preview interface.
Listen to the voice of the other side when
calling.
Connecting USB cable, charger, and
earphone.
Short press in the standby screen to turn
up/down the volume.
Please do not cover the MIC hole during
calling.
For activating the speaker, you can listen
audio or calls in hands-free mode.
For finding a view with the camera.
1.6.2 Text input and edit window
Keypad input instructions
Enter the text input screen, you can choose characters in the virtual
keypad or type by hand. The vertical keypad is as the picture below.
During typing, shake the phone to enter horizontal screen mode.
The QWERTY keypad is as the picture below.
11
Page 17

The meanings of icons are described as below.
Switch English/
Enter Symbol interface
Hide the virtual keypad
Switch Capital/Lower-case in
English mode
Hand
Chinese input
method
Delete
Switch to next
line
Numeric
2 Dial and answer the call
2.1 Making a call
When the network operator’s logo appears on the screen, the
mobile phone enters into the normal standby state in which you can
dial or answer a call. The network signal strength indicator shows at
the top of the screen. The call quality is relatively largely impacted
by obstacles. Therefore, movement in a small range can effectively
improve the signal strength.
2.1.1 Direct dial
Making domestic call
In the standby screen, press Snd key or choose “Dialer”, enter into
Dialer screen. Input the call numbers (please add the area code for
domestic long-distance calls).If there are matched contacts, you can
choose the contact directly. Then click “SIM1/2 Call” in the dow nside
menu or press the Snd key to select SIM1 or SIM2 to make the call.
In single SIM mode, click “Call” in the downside menu or press the
Snd key will call out directly.
Calling extension of fixed number
When calling the extension number of a fixed number, you need to
dial the host number and then dial the extension number according
to the corresponding voice hints. If you insert “p” between the host
number and extension number, the mobile phone will automatically
dial the extension number for you.
12
Page 18

Note:
In the dial screen, long press “
input ” + ”; long press“ # ” to input ” W “.
Making an international call
To make an international call, you simply need to input the symbol
“+”, then input the country code and complete phone number that
you want to dial.
2.1.2 Making a call from the Phonebook list
In the Phonebook list, select corresponding contact person and
phone number, press the number directly or press Menu key,
choose SIM to dial. You could also long press the number in contact
detail message interface and then choose “Call” to dial.
2.1.3 Speed dial
In Speed dial, you can separately set number keys 2 -9 to set up
phone numbers.
On the dial screen, long press the number keys and you can
automatically dial the number that has been set u p. If speed dial ha s
not been set for the number key you long pressed, the mobile phone
will hint you “No speed dial number”.
* ”to input ” P ”; long press “ 0 ”to
2.2 Answering a call
2.2.1 Answering new call
If there is a new incoming call when in call progress, the mobile
phone will pop up caller screen (call waiting is activated) and the
mobile phone will give a short prompt to tell you that you have a new
call. At this time, you can press Snd key or act ivate Answer to
answer the new call. When you answer a new call, the original call
will enter holding status. At this time, you can activate Menu to
select Swap to the original call, and the new call will enter holding
status.
Note:
When you are in call progress, the new call to another SIM card
can’t be dialed in.
13
Page 19

2.2.2 Connecting two calls at the same time
When two telephone numbers are connected, you can operate as
follows:
H-Free: switch the call to loud speaker mode.
DialPad: press to enter Dialpad.
End call: hang up the current call.
Call Conference: when making conference call, you can have a
talk separately with designated conference participant.
Swap: switch activated call.
Background sound: enter into call background sound setting
interface.
Mute: mute the current call, the other side could not hear what you
say.
Sound recorder: record the current call.
Note: enter into Note editing interface.
Phonebook: press to enter Phonebook.
Messages: edit the message to send it.
Call log: enter call history screen.
2.2.3 Conference call
During the conference call, you also can operate as follows:
Hold call: hold the current call with members of the conference,
then others cannot hear your voice; and the option of Hold call
changed to Retrieve call, select it and you can recover normal
conference call.
Split: separate the sele cted member from the conference call.
2.3 Emergency call
In any country using the digital GSM network, if you are in the
network coverage area (you can check the network signal strength
at the top of mobile phone screen), even without the SIM card, you
are also able to make an emergency call.
Inputting the PIN code or unlock the phone unlocking screen, press
SOS and you can make an emergency call.
14
Page 20

Note:
The emergency call numbers in different countries or regions
are different. Please refer to the local numbers for specific
emergency service numbers.
3 Menu operation
The function menu is composed of main menu and free-style menu
two modules. The phone will enter free-style menu automatically.
Press Menu key, enter into main menu. In each interface, you can
scroll the screen to the right/left side to switch pages.
Main menu
Phonebook
Call log
Dialer
Profiles
File manager
Message
Email
Setting
Image viewer
Camera
Calendar
Alarm
Media player
Video recorder
Notes
FM radio
Sound recorder
Calculator
Ebook reader
STK
Synchronization
15
Page 21

Phone sync
WAP
Java
Task
Currency converter
Typical stopwatch
Unit converter
World clock
MSN
Yahoo
FaceBook
Twitter
4 Characteristic function
Switch pages
4.1
In the standby mode or main menu interface, scroll the screen to the
right or the left to switch pages.
Notes:
If current page is the first page, user can not scroll the page to the
right any more; if current page the last page, user can not scroll the
page to the left any more.
In the standby mode, long press the horizontal line field, choose
numbers from 1 to 5 in the pop-up interface to switch to the page
you want to enter (Picture 1).
16
Page 22

Picture1
4.2 Free-style menu
In the standby mode, long press the horizontal line field, the mobile
will pop up a choosing interface, which shows Add on the LSK, and
Wallpaper settings on the RSK. Add Widgets(Picture 2) or
Shortcut(Picture 3) through LSK, or finish wallpaper settings
through RSK.
Picture2 Picture3
In the standby mode, long press the widgets or shortcuts icons till a
garbage can displays beside it, and the icon start to rotate, then you
17
Page 23

could press the garbage can to delete the icon or you can drag the
rotating icon to the place you want to settle it to.
4.3 Change main menu icons’ position
In the main menu interface, long press any program icon, the icons
of whole screen enter into shaking mode(Picture 4). At that time,
drag icons anywhere on the screen, press Menu key to quit this
mode.
Picture4
4.4 Curtain page
In the standby mode, press the status bar on the upper side of the
screen until a gray bar displays below the status bar. Drag the gray
bar down to open curtain interface(Picture 5).
The curtain page displays operator name, WLAN status, Bluetooth
status, unread message and missed calls.
5 Phone
5.1 Phonebook
Enter the phonebook screen, input the first letter of name, you can
search the accordant records in Phonebook. Press Add new
contact to add the contact. When the record is not empty, press
18
Page 24

Menu key to conduct the following operations:
Mark several: you can send message, delete, copy, move or export
operation for the marked contact.
Delete duplicated contact: delete duplicated contacts on SIM1/2,
phone or memory.
Import contacts: import the stored contact that of .vcf format to
phone, SIM1/SIM2 or memory.
Caller group: enter into caller group setting interface.
Black list: enter into black list editing interface.
Options: you can set preferred storage, speed dial, also can view
my vCard, extra numbers and memory status.
If you have chosen a contact, long press it,
Picture5
and you can operate
as follows:
Call: call directly the current contact.
Send message: send message to the current contact.
Send vCard: send the information of current contact as vCard
mode.
Edit: edit the current contact.
Delete: delete the information of the current contact person.
19
Page 25

Move: move current contact to phone, SIM1/SIM2 or memory.
Click a contact to enter into the contact detail interfa ce. Press Menu
key, there are options as below: Edit, Call, Send message, Copy,
Delete, Add to Call in Blacklist.
5.2 Call log
Enter SIM1/SIM2 call history, there displays the records of dialed
calls. Y ou can click the title to sw itch to other shee t, su ch as all calls,
received calls and missed calls.
In every detailed call log, press Menu key, you can operate as
follow: call, send text message, save to phonebook, add to call
blacklist, edit before call, delete.
5.3 Dialer
Enter into Dialer, you w ill see the dial p ad in the low er si de of screen .
If there are call logs saved in the phone, the logs will show in the
upper side. User could type in numbers to dial out directly or dial
according to the call log or contact that was matched with the
inputting material.
5.4 Profiles
User Profiles are a group of preset characteristic definition. You can
also change and save other definitions in the profiles according to
your own preferences. The phone provides a set of default profiles
including the General, Meeting, Outdoor, Indoor, Silent, Headset
and Bluetooth. Only when the earphone is inserted the headset
profile can be automatically activated, while all other profiles will be
automatically disabled.
After selecting the other profiles except the headset and bluetooth
Short press the profile, then the working styles of the mobile phone
are set according to the selected profile.
Long press the profile, and choose Customize to enter the
customize settings; you can set the parameters under different
profile such as tone setup, volume, alert type, ring type extra tone
and answer mode.
20
Page 26

5.5 File manager
Enter into file manager, then the screen shows phone and memory
card (memory card is inserted in the phone). At the top of the screen,
the capacity and surplus capacity of the phone or memory card are
displayed. The following operations are available:
enter the files list under the root directory.
Open:
format the phone/memory card, which will delete all the
Format:
data stored in the current phone/memory card.
Rename: rename the memory card. This menu only displays in the
options when select the memory card.
Details: shows the name, total size, and free size information of the
memory card. This menu only displays in the options when select
the memory card.
5.6 Message
Enter message, you can view the received messages including
SMS and MMS. There are four buttons in the bottom of the screen.
you can press New msg button at the bottom of the screen to
create a new message, you also can switch to MMS in message
editing screen by use the menu prompted by pressing Menu key. In
messages screen, the following operations are available:
New msg: create a new message, in message editing screen,
press Menu key, you can choose Send by SIM1, Send by SIM2,
Add recipient, Insert, Switch to MMS, Slide options, Details, Save.
Mark several: mark sever messages to backup or delete marked.
MMS can’t be backup.
Schedule SMS: you can edit a schedule message in advance. The
message will be sent out automatically at the schedule time you set.
Setting: you can set the correlative parameter of text message and
multimedia message, or view the current SMS/MMS templates.
Note:
Please set correct network connections in server profile before
setup and send MMS. Here, insure your SIM card support
21
Page 27

GPRS connection, and turned on the MMS. Please consult with
your network service provider.
5.7 Email
Enter Email, you can conduct the following operations:
Send and receive: send and receive the mail of current account.
Write Email: edit a new mail.
Inbox: store the received mails.
Outbox: store the mails that are not successfully sent out.
Sent: store the sent mails.
Drafts: store the current saved mails.
Clear mailbox: you can delete all the mails in selected mailbox.
Delete marked Emails: delete all marked mails.
Email accounts: set up the Email account according to the
information provided by mail service provider.
Templates: store the current templates of the phone.
Note:
Please set corresponding mode in Email profile before edit
Email and insure your SIM card support GPRS connection.
Please consult with your network service provider.
5.8 Setting
5.8.1 Time and date
Modify the current city, time, date and the format.
5.8.2 Language & Input method
Language: you can set the language of the mobile phone.
Pref. input methods: there are multiplicities input methods to be
selected. You can choose one as the default original input method
for text editing.
5.8.3 Personalized settings
Wallpaper: set wallpaper from system or memory.
Screen saver: set screen saver picture from system or m emory and
screen saver time.
Show owner number: show owner number of current SIM card.
22
Page 28

Screen switch effect: set screen switch effect on or off.
Show operator name: show operator name.
Greeting text: set greeting text status and the greeting tex t content.
Touch screen with vibration: set the vibration e f fe ct on o r o f f when
touching screen.
Screen rotate follow sensor: set whether screen rotates according
to the rotating status of mobile phone.
Schedule power on/off: after setting and activating this function,
the mobile phone will be automatically powered on/off at the
corresponding setting time.
5.8.4 LCD backlight
You can set the Brightness and Time of the LCD backlight
respectively.
5.8.5 Call settings
5.8.5.1 SIM1/SIM2 call settings
Caller ID: you can set whether to allow your phone number being
displayed or not through select set by network, hide ID or send ID.
This function needs to be supported by the netw ork serv ice provider.
Please get in touch with the related network service provider to
open the relevant service.
Call waiting: you can activate/deactivate the function and also can
query the status of call waiting. After the function being activated, if
you have a new incoming call while in calling process, your mobile
phone will display the new call screen, and the call can be received
normally. If the function is deactivated, new incoming calls cannot
be displayed.
Call divert: this function is used to transfer the call to your designated
phone. The success of call divert setting is related with the network
and SIM card. The system will give appropriate setting tips.
Note:
If the transfer call you set is a fixed phone, please add the area
code before the fixed phone.
23
Page 29

Call barring: this function needs network support. Please contact
your network provider to open this business. Network provider will
provide the corresponding network password for you activate call
barring service.
Line switching: switch the phone current line.
5.8.5.2 More
You can set the function such as black list, auto redial, background
sound, call time display, call time reminder, auto quick end, reject by
SMS and so on.
5.8.6 Network setup
5.8.6.1 SIM1/2 network setup
In SIM1/SIM2 network settings, you can select appropriate network.
Note:
Please do not register networks inconsistent with the SIM card,
so as to prevent unavailability of normal use. For details,
please consult your service provider.
Network selecti on: search new network according to the network
searching mode or select the network you need from the network list.
Preferences: select and set the preferences of network.
5.8.6.2 Preferred mode
GSM only: support GSM network only.
WLAN only: support WLAN network only.
GSM preferred: prefer using GSM network.
WLAN preferred: prefer using WLAN network.
5.8.7 Security setup
5.8.7.1 SIM1/SIM2 security settings
SIM1/SIM2 lock: this function can prevent others from using your
SIM card without your permission. After the SIM card PIN code is
activated, correct PIN code must be input every time when the
mobile phone is powered on; otherwise you can only make
emergency call.
Note:
24
Page 30

PIN code is the operating password and relative with the SIM
card. The SIM card will be locked, if the PIN code is wrong for 3
consecutive times. At this time, you need the PUK code to
unlock the SIM card. The PUK code may be provided for you
together with the PIN code and the SIM card. If not, please
contact your network provider.
Fixed dial:
after the function is activated, the mobile phone is only
allowed to be used to dial the telephone numbers existing in the list.
To turn on the function, you need to input your PIN2 code. Please
consult your network service provider for specific situations.
Note:
When the Fixed dial function is active, the function of SIM card
will be restricted, such as dial call, send SMS, and send MMS
and so on.
Barred dial: this function needs to be supported by SIM card.
Please consult your network service provider for speci fic situations.
Change password: you can change the password of SIM1/SIM2
PIN and SIM1/SIM2 PIN2 through the system prompts.
5.8.7.2 Phone lock
This function is to lock the phone and prevent other people from
using the mobile phone without permission (default password is
0000). After enable the phone lock, you must input the correct
password every time powering on the mobile phone, unless the
mobile phone cannot be used normally.
5.8.7.3 Auto keypad lock
After this function is activated, when the phone is in standby status,
the keypad will be locked automatically after the set time. Then the
standby screen will show two small lock icons, sliding lock icon
above to the lock icon below, the phone will unlock.
5.8.7.4 Change password
You can change the phone lock through the system prompts.
25
Page 31

5.8.7.5 Certificate manager
You can view the certificates in Certificate manager.
5.8.7.6 Mobile tracker
Enter the function, the password inp utting screen displays. After you
input the correct password (default pa ssw ord is 0000), an d enter th e
phone guard menu list, you can set the status and receiving number
of phone guard.
The function is activated and receiving number is set, when your
phone is inserted with another SIM card. The receiving number can
receive the current prompt message.
5.8.7.7 Remote control
Enter into the password inputting screen, you can enter the security
control menu list if you input the correct password (default password is
0000).
When the function is open, there will remind the command identi fier,
you can set the private command identifier, but it should contain
Capital and Lowercase, Numbers and Symbols, and should not less
than 8 characters.
If this function is set, you can send editing order in form of SMS to the
phone that you lost with another phone and the lost one will perform
automatically the instruction, thus reaching effect of remote control.
The order format of the security control is:
Command identifier+order(+phone number)
Use security control order can achiev e the function below:
Content of order
Function
(e.g. Command identifier is “123@!abC”;
Receiving number is “13987654321”)
Call divert 123@!abCcall divert to13987654321
Phonebook divert 123@!abCphonebook divert to13987654321
SMS divert 123@!abCsms divert to13987654321
Cancel SMS divert 123@!abCcancel sms divert
26
Page 32

Lock
Format
Power off
123@!abClock
123@!abCformat
123@!abCpower off
5.8.7.8 Privacy Security
Entering Privacy Security and the password inputting screen appears,
you can enter the security control menu list if you input the correct
password (default password is 0000). Then you can select
Phonebook, Messages, Call log, File manager to setup the privacy
protection. For example: If you have setup the privacy protection
operation of Phonebook, when you enter the Phonebook, the
password inputting screen appears. You should input the correct
password for entering the Phonebook and do the corresponding
operation.
5.8.8 Wireless connect
5.8.8.1 Connection management
Connection management interface shows the current connection
status of the mobile, including the network type and speed.
5.8.8.2 Date account
GSM Dat a :
enter into GSM Data, you can add account for GSM data.
GPRS: enter into GPRS, you can add account for GPRS.
Bluetooth
In connectivity, you can find the connectivity mode of Bluetooth.
Enter into Bluetooth menu list screen, you can operate as follows:
Power on: turn on/off the Bluetooth function. When Bluetooth
function is turned off, all Bluetooth connection are ended, you can
transmit and receive data by using Bluetooth. Please turn off the
Bluetooth function when your phone is used for other operations,
because Bluetooth connection will consume the battery capacity.
Close Visibility: set on/off visibility of Bluetooth.
My device: enter into my device, if has not connected with other
device, you can select Search new device to search and compare
27
Page 33

with the mobile phone, else the records of Bluetooth devices which
has connected with this handset are shown on the screen.
Inquiry audio device: system will automatically search the
hands-free device, and then shows the results after searching.
Change device name: you can change the phone name.
Advanced: you can view my address, set the audio path, storage,
sharing permission and remote control.
Note:
The received file that transmitted by bluetooth are stored in
Received folder automatically.
5.8.9 Phone mode settings
Dual SIM switch: You can set the power on SIM status as select
with SIM status or use default mode.
Dual SIM settings: In this function you can select the reception mode
for your phone, such as: Dual SIM active, Only SIM1 open, Only SIM2
open, Flight mode.
5.8.10 Misc. settings
Pen calibration: click the screen according to the hints to calibrate
the touch-screen.
UART setup: set default UART com port.
Sound effects: you can set the audio effect for your phone.
5.8.11 Restore factory settings
Enter into the restore factory settings, the mobile phone will prompt
you to input password (default password is 0000). You can carry on
corresponding operation after inputting the correct password.
After running the Restore factory settings, the environment setup
(e.g. user profile) restore to factory default setting.
After running the Restore settings and data, the phone clear up the
messages saved in phone while the environment setup (e.g. contact
person and SMS that saved in phone) restore to factory default
setting.
28
Page 34

5.9 Image viewer
Enter the pictures list screen, long press a picture and activate
Options, then the following operations are available:
Delete: delete the current picture.
Details: view the current picture detailed information.
Rename: rename the current picture.
Edit: freely cut out the current picture size
Send: send the current picture in forms to MMS, email, Bluetooth.
Use: use the current picture as wallpaper, screen saver or caller
picture.
In the picture list screen, press Menu key, you can operate as
follows:
Select director: set the path of folder to display.
Mark several: mark several pictures to delete or copy.
Camera: enter camera preview interface.
Slide show: you can view the whole pictures by playing
automatically according to the settings.
Settings: set the parameters of slide show.
5.10 Camera
In standby mode, press Cam key or choose Camera in main menu,
you will enter into camera preview interface.
Note:
Camera preview interface shows in horizontal screen; stay in
camera preview interface for several seconds, mobile will quit
Camera for protecting lens; scene and light may affect the picture’s
size.
29
Page 35

Enter into settings
menu to set all the
related parameters
Exposure
compensate
Switch between day
mode and night mode
Switch to video recorder
Switch between sub
Set delay timer
change the focal
distance
resolution ratio
Change white
balance effect
Continuously
taking photos
camera and main
camera
Press to take photos
Enter into Image viewer
Send pictures
Delete pictures
30
Page 36

5.11 Calendar
Enter calendar screen, the current month calendar is displayed and
the current date has a frame around the number with special color.
Press
Add event:
Today:
View all:
calendar or edit, delete and send the selected calendar.
Jump to date:
period of time), there will display the inputted date.
Weekly view (Go to monthly view): Set the display mode of
calendar as weekly view chart/monthly view chart.
key, and you can operate as follows:
Menu
you can choose one type and add a new calendar.
If the current date isn’t today, date will jump to today
you can view the entire calendar. You also can add a new
input the date need to be switched (in a valid
5.12 Alarm
There are 5 alarms in your mobile phone. The functions and using
methods of the 5 alarms are completely same. You can set to turn
on/off respectively.
Set alarm
Select an alarm, enter the settings screen of this ala rm, you can turn
on/off this alarm, and set the time of the alarm, at the same time,
you can set this alarm in detail.
Alarm remind
When the alarming time comes, there is alarm hint in handset
(according to alarm settings).
If the mobile phone is in power off state, after the time of alarm
sound come, pop up the power on confirmation screen, here, you
can select power on or not.
Pay attention to that the alarm still sounds according to the former
setting time after you adjust the date and time. You can reset the
date and time of next alarm according to the changed date and time.
5.13 Media player
Enter the media player screen; activate
operate as follows:
31
Options
, then you can
Page 37

All audio file:
All video file:
Update list:
Current playlist:
Media library:
media files
select add to update the media file in appointed folder.
My playlists:
played, you also can view the media that have been adding to my
favorites.
Settings: set the parameters for player settings, audio settings,
video settings, Bluetooth settings, network settings, update setting.
enter into audio file library.
enter into video file library.
update media library according to update settings.
view the current media list.
there are many sorts for media; you can select
to update all the media file to playlist, you also can
you can view the media that recently played or most
All
5.14 Video recorder
Enter into video recorder, rotate the mobile horizontal mode.
Enter into settings to
set related
parameters
Switch to camera
function
32
Page 38

Exposure
compensate
change the focal
distance
Set the effect of white
balance
Set video quality
Set white balance
effect
Switch between day
mode and night mode
Quit video recorder Send video
Switch between sub
camera and main
camera
Press the key to start
Start media player
Indicate video is
recording
Pause video
recordings
Stop video recordings
5.15 Notes
Enter Notes, press Menu key to create New note. User could View,
Edit, and Delete each note.
5.16 FM radio
Enter into standard screen and conduct operations as follows:
Channel list:
Auto search:
channel list.
Play
Record:
You can press
Settings:
Append:
File list: list the audio file that recorded and stored.
display all the channels existed in the list.
automatically search channels and update the current
: turn on/off FM radio.
you can record the current playing content of the radio.
set the correlative parameter of FM radio.
used for storing the recorded file while listen to the FM radio.
key, activate options below:
Menu
33
Page 39

Schedule FM record: activate the function, the phone turn on
automatically FM radio and record current program when time out.
5.17 Sound recorder
When the recorder list is not empty, select one of the recording files
and long press it to activate options, you can conduct the following
operations:
play the current selected recording file.
Play:
list the entire recorder file.
List:
New record:
Settings:
audio quality of the recording file.
You can also press menu key, popup options below:
Append:
Rename:
Delete:
Use:
Send: send current selected recording file.
start a new recording.
you can set the preferred storage location, file format,
continue to add record on the previously selected recorder file.
rename of the current recording file.
delete the current selected recording file.
use the current selected recording as ring tone or SMS tone.
5.18 Calculator
The calculator performs four operations as addition, subtraction,
multiplication and division. Enter calculator screen, you can input
numbers directly and press navigation key to switch the operation
which you need, then start calculation.
When the calculation of dividing 0 overflows, the re sult is larger than
999999999999 or less than -999999999999, the mobile phone will
display the wrong hint “E”.
5.19 Ebook reader
This function can be used for read the files which are stored in the
phone or memory card (confirm the memory card is inserted).
Enter the screen of Ebook file list, activate Menu and you can
conduct the following operations.
Clean up bookshelf:
Global settings:
rearrange the files in the folder.
set the font style, font size, scroll by, auto scroll,
34
Page 40

scroll speed, full screen, Encoding, Alignment, View mode and
select storage for reading of Ebook.
Book info:
Delete: delete the selected file.
Delete all files: delete all files displayed in Ebook menu.
Sort by: arrange all files in sequence which is displayed in Ebook.
Apply global settings:
You can also long press a file, popup options below:
Open ebook: read the current selected file.
Delete: delete the current file.
Book info: display the content of Ebook such as title, size and
format.
display the content of Ebook such as title, size, and format.
renew the relative settings of Ebook.
5.20 STK
This function is provided by the network operator. According to the
services provided by the SIM card, there will be different options
appearing in this directory. The name and content of the menu are
based entirely on the services provided by the ne tw ork ope rato r. For
more information, please contact with the network operator.
Note:
This function depends on whether the network operator
provides this service and whether you have ordered this
service.
5.21 Synchronization
Entering into Synchronization, there are 3 accounts to choose.
Enter one account, you can see 3 options as below:
Sync now: start to sync according to current account.
Edit account: edit current account’s parameters, such as Account
name, Transport type, Server settings, Applications to sync,
Database settings, Connection settings, Regular sync, Sync report.
Sync log: show sync logs in this menu.
5.22 Phone sync
Sync: choose a connected Bluetooth device and start to sync.
35
Page 41

Applications to sync: choose applications to sync, such as
phonebook.
Phones: shows phones that have been synchronized successfully.
5.23 WAP
Enter WAP there displays the following options:
Homepage: you can access the preset website directly.
Bookmarks: bookmark is used to save the websites that you are
interested.
Recent Pages: look over the recent history that browsed.
Offline pages: look over the pages that saved as offline pages.
Input address: enter the website editing screen.
Service inbox: stored the service message.
Settings: enter the Settings menu list and the following operations
are available:
Select profile:
Edit account:
SIM card. You can surf on the internet only when you set and
activate correctly according to local network.
Browser options:
Service message settings:
Clear cache:
the cache of the mobile phone. Select the operation to erase the
temporary message in the cache. Please erase the temporary files
recording your internet surfing message.
Clear cookies:
cache of the mobile phone.
Trusted certificates: view the trusted certificates.
select the browser mode for WAP browser.
you can edit and activate the selected account for th e
set relevant parameter of browser.
turn on/off receiving service message.
the messages that you have visited will be stored in
remove the browsed website message stored in the
5.24 Java
You can install java file and play in the application, you also can edit
the settings for java.
5.25 Task
In this function, you can create Date, Call, Anniversary task. Set the
36
Page 42

task time, priority and details, when the task time arrives, the task
will alarm to remind user.
5.26 Currency converter
In this function, if you input the rate and the amount of money in
local, you can get the result of the equivalence money of foreign.
5.27 Typical stopwatch
In typical stopwatch screen, you can select the split timing or lap
timing and view records that you have saved.
5.28 Unit converter
Enter into Unit Converter you can select
converter.
In converter screen, select the unit then input the relative data,
press OK in the right upper corner, the result will be displayed
automatically.
Weight
or
Length
to
5.29 World clock
Enter world clock screen, active
press OK key.
, you can select the city by
Menu
5.30 MSN
Enter MSN; you can conduct the following operations:
Start: you can input username and password to sign in.
Settings: you can do the operations of data account and card
choices.
Update: update the version to the latest.
About: display after-sales service information.
5.31 Yahoo
Enter Yahoo; you can conduct the following operations:
Start: you can input username and password to sign in.
Settings: you can do the operations of data account and card
choices.
Update: update the version to the latest.
About: display after-sales service information.
37
Page 43

5.32 FaceBook
Enter FaceBook; you can conduct the following operations:
Start: you can input username and password to sign in.
Settings: you can do the operations of data account and card
choices.
Update: update the version to the latest.
About: display after-sales service information.
5.33 Twitter
Enter Twitter; you can conduct the following operations:
Start: you can input username and password to sign in.
Settings: you can do the operations of data account and card
choices.
Update: update the version to the latest.
About: display after-sales service information.
6 Other Functions
6.1 Mass Storage Function
The mobile phone supports Mass Storage function. Insert the
Memory Card in the mobile phone; connect the mobile phone and
PC with the attached USB cable, then the mobile phone becomes a
mass storage. If you connect USB cable to PC under the power on
status, according to tips you can select
USB mass storage function or select
status, and charge the mobile phone.
Back
Mass Storage
to maintain the power on
to enable
6.2 Webcam Function
In power on status, connect the phone to PC through USB cable
and select
the video chat with other person.
Requirements on PC configuration for use of webcam function:
1. The PC’s operation system is or newer than Windows XP SP2.
2. The tools for video chat need to be installed.
3. Internet network connection is smooth.
Other descriptions:
, the Webcam function is activated, you can do
Webcam
38
Page 44

1. This function supports plug-and-play function.
2. The actual refresh rate of video chat is related with Internet
network speed, instead of the reasons of the mobile phone.
6.3 COM port
In power on status, connect the phone to PC through USB cable
and select COM port; you can synchronize your phone with PC.
Details about the related tools, please consult with Customer
Service Center.
7 Common Questions
The mobile phone cannot be powered on
The mobile phone cannot be powered on since the battery
voltage is too low. Please recharge the battery.
Unable to make some calls
Call barring has been set and barred utilization of the mobile
phone. Please check and cancel call barring.
Other person is answering my call
The mobile phone has been set into divert your calls to another
phone number. Please check and cancel call divert.
The mobile phone cannot search for the network
The mobile phone is outside of the network coverage area (or
there are physical obstructions between the mobile phone and the
transmitter), and calls cannot be made or answered. If you are in
one room, please move close to the window.
In the operation process, the mobile phone may display the
following operating tips:
“Please Insert SIM”
You must insert the SIM card before using the mobile phone. If
the SIM card has been inserted, please get it out and wipe clean
with a dry cloth on the golden region, and then insert the SIM card.
“Emergency”
39
Page 45

You are outside the network coverage area of the service
provider. But another network area where you locate allows you to
make emergency call according to the signal strength.
“Invalid SIM”
The SIM card of the mobile phone is locked and the inserted SIM
card is unable to be accepted. Please insert the correct SIM card or
contact with the vendor.
“Please Enter PUK”
The SIM card has been locked si nce the wron g PIN code has b een
inputted for three times. You must consult your network provider f or
special PUK code with eight numbers to unlock the SIM card (The PUK
code may have been provided with your PIN code a t the same time) .
Warning:
The SIM card will be permanently locked if you input the wrong
PUK code for ten consecutive times and you must apply for a
new SIM card from your network provider.
10 Maintenance Guideline
Welcome to use i725. If there is a problem when you using the
mobile phone, please contact with the vender or consult the local
maintenance center. If your mobile phone is in need of repair, you
can take your mobile phone to local maintenance center, if there is
no local maintenance center, please pass your phone and the
purchasing invoice to the vendor.
Warning
Any Changes or modifications not expressly approved by the
party responsible for compliance could void the user’s
authority to operate the equipment.
This device complies with p art 15 of the FCC Rules. Operation
is subject to the following two conditions: (1) This device may
40
Page 46

not cause harmful interference, and (2) this device must
accept any interference received, including interference that
may cause undesired operation.
Note: This equipment has been test ed an d fou nd to comply
with the limits for a Class B digital device, pursuant to part 15
of the FCC Rules. These limits are designed to provide
reasonable protection against harmful interference in a
residential installation. Th is equipment generates uses and
can radiate radio frequency energy and, if not installed and
used in accordance with the instructions, may cause harmful
interference to radio communications. However, there is no
guarantee that interference will not occur in a particular
installation. If this equipment does cause harmful interference
to radio or television reception, which can be dete rmin ed by
turning the equipment off an d o n, the user is encouraged to try
to correct the interference by one or more of the follow ing
measures:
—Reorient or relocate the receiving antenna.
—Increase the separation between the equi pment and
receiver.
—Connect the equipment into an outlet on a circuit different
from that to which the receiver is connected.
—Consult the dealer or an experi enced radi o/TV tech nici an fo r
help.
41
Page 47

Specific Absorption Rate
(SAR) information
This wireless phone meets the government’s requirements for
exposure to radio waves.
The guidelines are based on standards that were developed
by independent scientific organizations through periodic and
thorough evaluation of scientific studie s. The standards
include a substantial safety margin designed to assure the
safety of all persons regardless of age or health.
The exposure standard for wireless mobile phones employs a
unit of measurement known as the Specific Absorption Rate,
or SAR, The SAR limit set by the FCC is 1.6 W/Kg.
42
 Loading...