

Page 1

i674 / i675
User Manual
Thank you for purchasing the I674 / I675 mobile phone
Page 2

Introduction
Operation
Description of Contents
Example
contents
keys are shown by normal
characters with frames
key
Functional key is shown with
bold and frame
Menu
item
Welcome t o choo s e t he I 67 4 / I67 5 mobile phone. This user manual
states the outst an di ng p erf orm a nc e o f t he I67 4 / I67 5 mobile phone
in detail. In addition t o the bas ic call features, the I674 / I675 mobile
phone and the s ystem network also provide you with a variety of
useful features and services to facilitate your work and leisure
activities.
The Company reserv es the right to mak e any amendment on the
technical specifications without any advance notice.
Reading Statement for the Manual
In manual, differ ent t ypes etting st yles are used to in terpr et di fferent
operating details, and the specific interpretation is as follows:
Showing
General
key
Functional
Note:
The picture s shown i n the manual are only use d as function
hint which may be different from the phone, and the ones in
your phone shall prevail.
Show with normal characte rs 0-9
All the keys except functional
0-9
OK
Show in bold Edit
Page 3

CONTENT
Introduction ..................................................................................... I
Security and per f or mance ............................................................. 1
1 Start Using ............................................................................... 3
1.1 Battery ............................................................................... 3
1.2 SIM card ............................................................................ 3
1.3 Plug the memory card ....................................................... 4
1.4 Plug the earphone ............................................................. 4
1.5 Status bar and content ...................................................... 4
1.5.1 Keys ........................................................................... 5
1.5.2 Text input and edit window ........................................ 7
2 Dial and answer the call ......................................................... 7
2.1 Dialing a call ...................................................................... 7
2.2 Answering a call ................................................................ 7
2.3 Emergency call .................................................................. 8
3 Menu operation ....................................................................... 8
4 Characteristic func ti on ........................................................... 9
4.1 Switch pages ..................................................................... 9
4.2 Free-style menu ................................................................. 9
4.3 Curtain page ...................................................................... 9
5 File manager ............................................................................ 9
6 Phonebook .............................................................................. 9
7 User profiles ............................................................................ 9
8 WLAN ..................................................................................... 10
9 Settings .................................................................................. 10
9.1 Call settings ..................................................................... 10
9.1.1 SIM1/SIM2 call settings ........................................... 10
9.1.2 Advanced settings .................................................... 11
9.2 Network settings .............................................................. 11
9.3 Security settings .............................................................. 11
9.4 Restore factory settings ................................................... 11
10 Call history ............................................................................ 12
11 Dialer ...................................................................................... 12
12 Messaging.............................................................................. 12
I
Page 4

13 Security guard ....................................................................... 12
14 Connectivity .......................................................................... 14
15 Email ....................................................................................... 14
16 Camcorder ............................................................................. 15
17 Image viewer ......................................................................... 15
18 Media player .......................................................................... 15
19 Sound recorder ..................................................................... 16
20 Radio FM ................................................................................ 16
21 Calendar ................................................................................. 16
22 Tasks ...................................................................................... 16
23 Alarm ...................................................................................... 16
24 World clock ............................................................................ 16
25 Notes ...................................................................................... 16
26 Synchronization .................................................................... 17
27 Phone sync ............................................................................ 17
28 Opera ...................................................................................... 17
29 Calculator............................................................................... 17
30 Health ..................................................................................... 17
31 Currency converter ............................................................... 17
32 Stopwatch .............................................................................. 17
33 Ebook reader ......................................................................... 18
34 Answering machine .............................................................. 18
35 Bluetooth ............................................................................... 18
36 Applications .......................................................................... 18
37 STK ......................................................................................... 18
38 FaceBook ............................................................................... 18
39 eBuddy ................................................................................... 19
40 Other Functions .................................................................... 19
41 Common Questions .............................................................. 19
42 Maintenance Guideline ......................................................... 20
II
Page 5

Security and performance
◆In thunder raining days, please do not use the mobile phone when
charge it or outdo or, so a s t o avoid being struck by t hu nde r o r ot he r
injuries.
◆Please do not put the b attery in high-temperature environm ent
(high temperature will lead to hea t of the battery upgrading), and
keep the phone being charged and the charger away from people or
other flammable and explosive articles in order to avoid fire,
explosion or other dangers!
◆Please strictly adhered to the r ules and do shut down the m obile
phone on occasions which use of mobile phone is prohibited!
◆Please do not arbitrarily refit or teardown the phone and
accessories. Only the authorized organizations can repair the phone.
◆Please do not use batteries, charger or accessories of
non-standard original models.
◆Please do not join the two pol es of the battery, so as not to result
in battery short-circuit.
◆Please do not use th e mobile phone when driving. In case of
emergency, pleas e use hand-free devices (which may be bought
separately).
◆Please do not put the phone on car insu rance airbag or regio n
reachable by the ai rba g a f te r sp rea di n g . Oth er wise when the airbag
expands or rupt ures, the mobile phone is likely to cause seriou s
damage to the people in the car due to strong external force.
◆In order to compl y with prov isions of RF leak age, when you we ar
a phone or use th e data functions, please maint ain the distance
between the antenna and the body at least 1 inch (2.5 cm).
◆Do not use chemical lotion, scrubbing cleanser to wipe the mobile
phone or the charger , otherwise it may dam age the c ompone nts or
cause fire. Slightly wet and anti-static soft clean cloth can be used.
◆Please do not thro w the old and abando ned lithium batt eries into
trash can, send them to the designated locations.
1
Page 6

◆Please do not use the p hone to mak e bold t o camera , video and
recording that m ay infract the rights of the copyright o wners. The
company will not be responsible for any losses caused by not
recording, deleting, des tructing or dam age of the phot os, video and
recordings caused b y its access ories or soft ware on the use of the
functions including camera, video and audio.
◆In the use of net work function, if th e users download a file with
virus, which make the m obile phone cann ot be used normally; t he
company does not undertake any responsibility arising therefore.
Warning: The original manufacturer will not take on any
responsibility for the users who are not in compliance with the above
advices or improperly use the mobile phone.
Note: The application o f value -added s ervices o f the mobi le pho ne
is provided by relevant service providers. Please refer to the
relevant help or providers’ notes for detailed information.
Statement: The Company reserves the right to improve the product
without making any advance notice, and keeps final interpreting
rights on the produc t performance. Such chang es are not notified
additionally, your understanding is appreciated.
2
Page 7
1 Start Using
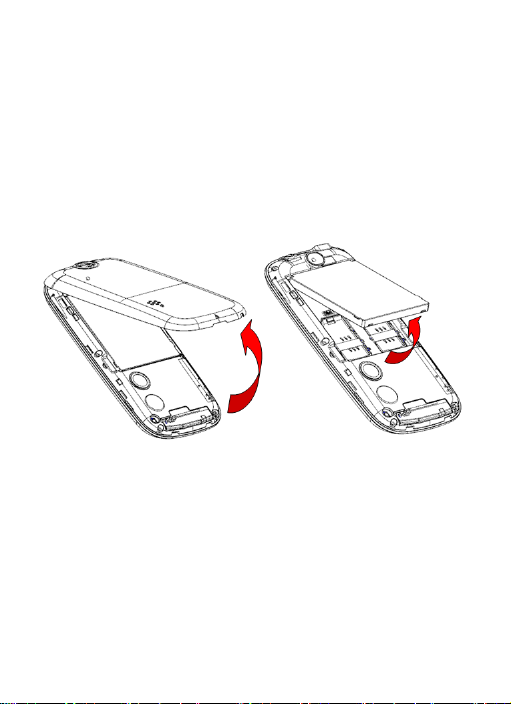
1.1 Battery
Battery is attached with the phon e. Please rech arge it for us e after
completely using up the battery for the first three times, which
makes this battery easier to achieve the best using state.
In actual use, the standby tim e and talk time of th e phone varies
with the network status, working environme nt and different using
manners.
With the back of th e mobil e phone faci ng upward, then take off the
rear cover. Lift the battery from the bottom and take the batt ery out.
When inserting th e battery, insert the metal t eeth at the top of the
battery into corr espon ding s lot of the m obile phon e, and then pres s
the battery down to insert t he batter y in place. T he batte ry must b e
correctly inserted before powering on.
1.2 SIM card
The SIM card is the ke y for accessing to the digital GSM ne twork.
Prior to using the phone, you ne ed t o inser t e ffect ive S IM card
in the phone.
In order to preve nt ill egal use, S IM c ard a dopts P IN co de (p ers onal
identification code) encryption protection.
If this function is selecte d, PIN c ode sh ould be i nput cor rectl y each
3
Page 8

time when you power on the ph one, th us to unlo ck the S IM card for
normal use. User s can disarm the SIM c ard protection but illeg al
use of the SIM card cannot be prevented.
If the PIN c ode input is er ror for three consecutiv e times, you r SIM
card will be locked b y th e net work. There will en qui re th e P UK cod e
which provided b y your network operator. If the PUK co de input is
wrong for 10 times, the SIM card will be permanently barred.
Note:
Your network operator will set a standard PIN code and you
should chang e it to pr ivate passwor d.
1.3 Plug the memory card
Open the memo ry car d hol der, and in sert th e memo ry card into the
slot at the bottom according to the chat below, then close the
memory card holder.
1.4 Plug the earphone
Open the USB cover and insert the connector of the earphone to the
earphone jack at the top of the mobil e phone. Gently pull out the
earphone to remove it.
1.5 Status bar and content
In standby screen you can get the inf ormation that yo u need from
the indication icons on the screen.
4
Page 9

Indicating that the SIM1 is connecting network currently
Divert all voice calls has been set of SIM1
Indicating missed call of SIM1
The current alert type is vib. Only
Indicating that the bluetooth has been a cti vat ed
Indicating that WLAN has been connected
Indicating that alarm has been set
T-flash card is inserted and recognized
Indicating there is text message not read of SIM1
Indicating there is MMS not read of SIM 1
The current alert type is ring only
The current alert type is vib. and ring
The current alert type is vib. then ring
Indicating that silent mode activated
The mobile phone is locked
Indicating that earpho ne has be en inserted
1.5.1 Keys
Functions of the keys are describe d as fol lo wi ng:
5
Page 10

SN
Keys
Function description
1
Send key
(Snd)
Making a call; in standby screen press
the key to enter Call history.
menu screen.
enter the dedicated application.
4
Home key
Go to the standby screen.
5
Back key
Go back to previous screen.
phone.
2 Message key
3 Menu key
6 End key
Enter message mo dule in standby or
Tap to enter t he main menu screen in
standby mode or active detail m enu in
other program scr eens; short press to
Hang up a call; short press to lock t he
phone; long press t o power on/off the
6
Page 11

7 Receiver
when calling.
8
USB jack
Connecting USB cable or charger.
Earphone
jack
10
Camera
For finding a view with the camera.
mode.
Listen to the voice of the other side
9
11 Speaker
Connecting earphon e.
Listen audio or calls in hands-free
1.5.2 Text input and edit window
Enter the text inp ut screen, you can shor t press the Sym key t o
enter the symbols sel ecting screen; short press key to switc h
input method; short press key to switch detailed input method.
2 Dial and answer the call
2.1 Dialing a call
When the network operator’s logo appears on the screen, the
mobile phone ente rs int o t h e no rm al standby state in which you can
dial or answer a call. The call quality is relatively largely impacted by
obstacles. Therefore, movement in a small range can effectivel y
improve the signal strength.
In the standby screen, input the call number s or select contact in
phonebook, and then press the Snd key or us e touch screen to
make the call.
If the speed di al f unction is activated, in standb y sc re en, long press
the number keys 2-9 to dial the number that has been set up
automatically. If speed dial has not been set for the number key you
long pressed, the mobile phone will hint you “No speed dial
number”.
2.2 Answering a call
If there is a n ew incom in g call whe n i n call progr ess, the phone will
pop up caller screen (call waiting i s activated). When you ans wer
the new call, the ori ginal call will enter holding status. At this time,
7
Page 12

you can activate More menu to select Swap to active the ori ginal
File manager
Phonebook
User profiles
WLAN
Settings
Call history
Dialer
Messaging
Security guard
Connectivity
Email
Camcorder
Image viewer
Media player
Sound recorder
Radio FM
Calendar
Tasks
Alarm
World clock
Notes
Synchronization
Phone sync
Opera
Calculator
Health
Currency converter
call, and the new call will enter holding status.
Note:
When you are in call progress, the new call to another SIM card
can’t be dialed in.
If two calls are connected, you can operate as following:
Conference: when making conferenc e call, you can have a talk
separately with designated conference participant. In conference
call mode, all the others can hear your voice.
2.3 Emergency call
If you are in the ne t wo rk cover age area (you ca n ch eck the network
signal strength at the top of standby screen), even without t he S IM
card, you are also able to mak e an emergency call.
Note:
The emergenc y call number s in differ ent countrie s or regions
are different. Please refer to the local numbers for specific
emergency service numbers.
3 Menu operation
In the standby scr een, press icon to ent er the m ain m enu, yo u
can press navigati on keys or correspondi ng number key to select
the function you want to enter .
8
Page 13

Stopwatch
Ebook reader
Answering machine
Bluetooth
Applications
STK
FaceBook
eBuddy
……
4 Characteristic function
4.1 Switch pages
In standby mode or the main menu interface, scroll the screen to the
right or the left to switch pages.
In standby mode, press the Home k ey, ch oose one page in the
pop-up interface to switch to pages.
4.2 Free-style menu
In standby mode, pr ess Menu ke y, choose Edit to enter widge t edit
mode, in which you can add or delete wi dge t.
4.3 Curtain page
Press the status bar on t he top part of the sc reen until a gra y bar
displays below the status bar. Drag the gray bar down to open
curtain interface.
5 File manager
Enter into file m anager, at the top o f the scree n; the capacit y and
surplus capacit y of the phone or mem ory card are displ ayed. You
can open, format, rename or vi e w the det ails b y long press options.
6 Phonebook
In phonebook list, i nput the first let ter of name, you can search t he
accordant records. W hen the recor d is not empty, press Menu key,
there are several menus as mark sev eral, import contacts, del ete
duplicated contac ts, caller groups, blac k list, in advance d screen,
you can set preferred storage, speed dial, my number, extra
numbers, and you can also view memory status. Long pres s one
contact to activate Options, you can conduct the following
operations: send message, call, edit, delete, send business card.
7 User profiles
User Profiles contains pred efined s ettings f or ring to ne and v olume
9
Page 14

for each SIM. You can change the existing profiles according to your
own preferences. In the standby screen, long pressing the
key will quickly activate Vibration mode. The headset profile is
automatically activated when the ea rph one is i ns e rte d, a nd al l ot he r
profiles are automatic ally disabled.
8 WLAN
To enter WLAN, the W LAN interface shows the av ailable Access
Point(AP) nearby. Select an unc onnected AP and several optio ns
(connect, and defi ne access point) will appear. Press a connected
AP, and several options (disconnect, edit, delete, and change
priority) will appear.
9 Settings
Enter Settings, you can modify parameters of the time and d ate,
personalized setti ngs and phone setti ngs. You also can ad d new
font from your system that in .ttf format.
9.1 Call settings
9.1.1 SIM1/SIM2 call settings
Caller ID: you ca n set wheth er to allo w your phone number bei ng
displayed or not. This function needs to be supported by the
network service provider.
Call waiting: If th e function is activate d, when a new cal l incomi ng
in calling process, your phone will display the new call screen. If the
function is deactivated, new incoming calls cannot be reached.
Call divert: this function is used to transfer the ca l l to you r des igna te d
number. The function is related with the network and SIM card. The
system will give appropriate setting tips.
Note:
If the transfer cal l you se t is a fi xe d ph o ne, ple as e a d d t he ar ea
code.
Call barring: this function needs network support. Network provider
will provide the cor responding network passwor d for you activate
call barring service.
10
Page 15

9.1.2 Advanced settings
You can set the function such as auto redial, background sound, call
time display, call time reminder, auto quick end, connect notice,
answer mode and so on.
9.2 Network settings
You can set the SIM sel ection mode, dual SI M settings, flight mode,
network settings and preferred mode. In SIM1/SIM2 network
settings, you can select appropriate network.
Note:
Please do not register networks inconsistent with the SIM card,
so as to prevent unavailability of normal use. For details,
please consult your ser vice pr o vi der.
9.3 Security settings
SIM1/SIM2 security: this function c an prevent others from using
your SIM card without your permission.
You can change the password of SIM1/SIM2 PIN and SIM1/SIM2
PIN2 through the system prompts.
Phone securit y: this function is to lock and prevent other people
from using the phone without permission (default password is 0000).
You can change the phone lock password through the system
prompts.
Auto keypad l ock: activate this function, when th e phone without
any operation in standby screen, the keypad and screen will be
locked automatic ally after the set ti me. If you need to unlock th e
keypad, you can press the lock or other application icon to the
middle of the keypad lock screen.
Certificate manager: store the certificates.
9.4 Restore factory settings
You can carry on cor res po nding operation after i nputting the correct
password (default password is 0000).
After running the Re store factory settings, the envi ronment setup
(e.g. user profile) restore to factory default setting.
11
Page 16

After running the Restore settings and data, the phone clear up the
messages saved in phone (e.g. contacts and SMS that saved in
phone) while the environment setup restore to factory default setting.
10 Call history
Enter call histor y, you can press the tab switc h to ot her she et, long
press to activate Options, you can operate as follow: call, send
message, sav e t o ph onebo ok, add to blacklist, add to whitelist, edit
before call, delet e, and d elete all. Press Menu key to activ e delet e
all or advanced menu.
11 Dialer
Enter dialer, you can press the number keys then dial out directly, or
enter several numbers/letters until proper contact prompt from
phonebook/call history below the number edit field, press the
contact to make a call.
12 Messaging
Enter messaging, the m essages are shown as conversations. You
can view the messages including SMS and MMS, each
conversation includes the sent a nd received messages with one
contact.
Press Menu key, you can see following options, such as:
Garbage box: when Blacklist state is on, the SMS sent by all
numbers in the blacklist are sent into the garbage box; when
whitelist state is on, the SMS sent by all numbers in the whitelist are
sent into the inbox.
Mark several: mark several messages to delete or backup.
Message settings: set message parameters.
13 Security guard
Private secur ity: enter private security, you should input the correct
password (def au lt p assw or d is 0 00 0) . The n y ou can s e lect ph on ebo o k,
messages, call history or file manager to set up the privacy protection.
Calls & SMS firewall: enter calls & SMS firewall, you can press the
tab to s witch between blacklist a nd whitelist. Activate Menu, you
12
Page 17

can add new entity to the list or set the parameter of the block
Function
Content of order
Forward calls
*#CALLFWD*#123456789
Power off the phone (and
activate the phone password)
settings.
Phone contr ol: this functi on is offered to help end user to find hi s
phone just in c ase it has been lost or st olen but need activated
previously (default password is 0000).
The SIM binding functi on shall be able to recogni ze a differ ent SIM
card inserted in th e phone and immediately alert by SMS to the
trusted numbers previousl y set in the phone. If a not bound S IM
card is inserted, the phone need input phone password. If the
password is wrongly inserted, the phone can start without “SIM
binding” menu. In the meantime, one alert SMS (Attention: this
phone number is using your mobile phone IMEI:
XXXXXXXXXXXXXXX) shall be sent to all the trusted numbers.
The remote control function is offered to provide end user the
possibility to manage some operations remotely from trusted
numbers by SMS. Using this function, end user c an, when h e has
not the phone with him , for war d call s, po wer the pho ne off. But this
function is all de pen de d on user ha s got the number of the phone in
using.
The remote c ontrol com mand ca n achieve the func tion belo w (e.g.
Receiving number is “123456789”):
*#SHUTDOWN*#
Note:
The SMS text content should be not “case sensitive”.
Coffer: coffer is a hidden area, accessible only by entering a
password, where you c an inser t and m ana ge you r pri vate c ontac ts.
The contacts ca n be saved with their real names and real phone
number, and simultaneously, with nicknames and fake number.
When receiving call f rom a num ber ins erted in thi s area, th e phone
13
Page 18

will show the nickname of the caller, and his/her fake number. If you
receive text messages, they will be reported in an unobtrusive
manner. All mess ages an d calls made or rec eived i nside th e coffer
will be saved only in this private area.
14 Connectivity
Conn. Management: you can view the current connection states.
Data account: with vali d SIM card with GPRS function inserted,
there will show the available accounts of GSM data and GPRS.
Data account can be edited or del et e.
15 Email
Enter Email, you can select Add Account to create the account . A
wide variety of email services are supported. Select the type of
email account you wan t to con f ig ure , a nd th en enter your username
and password, the account screen will appear the newly added
account. There can create more than one account.
Note:
For the Email netw ork settin g is as same a s Internet services,
please make sure you can brows e in ter n et wel l.
Once the email account has been setu p, select Disable to disable
the current account, you also can custom ize the param eters of t he
account from push settings.
Push Mode: set it on, each mail will be delivered immediately; set it
off, the mail will be delivered at a specific interval.
Fetch Interval: this functi on is used to exchange the mails from
server when the push mode is off. Set it to Manually, the mails only
can be exchanged when sel ect send/receive.
Off-peak frequenc y: s et the frequency to e xchange the mails of
off-peak. Set it to Manually, you must select send/receive to
exchange the mails.
Push while roa m i n g: select Yes to contin ue r ecei ving emails while
roaming.
14
Page 19

16 Camcorder
Edit picture
Stop recording
In standby mode, choose camcorder in the main menu, and you will
enter into camera preview interface. Press Space key as a shortcut
to take pictures or record videos.
Set parameters Enter capturing mode
Adjust EV value Enter recoding mode
Set auto capture time Press to capture
Adjust focal distance Enter image viewer/videos
Change image size Press to record
Adjust white balance Adjust record quality
Delete picture Pause video recording
Forward picture/video Resume video recording
17 Image viewer
Enter the pictures list screen, if the list is empty, activate Menu, you
can Select folder to set the path of folder to display, select Capture
to capture new pictures to current storage. When the list is not
empty, activate Menu you can select Slide show to view the
current picture according to the settings.
18 Media player
Enter media player, the phone will automati cally add all the media
files to the player. You can operate as follows:
Now playing: enter into media player screen.
All songs: li st all the song resource in, press one to s tart playin g.
Activate Menu, you can add from phone storage, or mark several or
search.
All videos: lis t all the video resource in, press one to start playing.
15
Page 20

Activate Menu, you can add from phone storage, or mark several or
search.
Playlists: you can view the media that recently played or most
played, you also c an view the m edia that hav e been adding t o my
favorites, you can press menu key to create new playlist.
19 Sound recorder
Press the buttons in sound reco rder to record. When the record er
list is not empty, activate Menu, select Append to add record on the
selected recorder file continuously.
20 Radio FM
Insert the earphon e first then enter FM radio, press the Magnifier
button to automatically search FM channels. You also can adjust the
pulley icon to change channel. Activate Menu, you will see the
options below:
Schedule FM record: activate the function, the phone turn on the FM
radio automatically and record current program when time out.
21 Calendar
Enter calendar screen, you can check the date. Activate Menu, and
you can do the operations such as view and add event.
22 Tasks
This function is used for adding and viewing task items.
23 Alarm
There are 5 alarm s in your m obile ph one. The functions and using
methods of the 5 alarms are complet ely same. You can set to turn
on/off respectively.
24 W orld clock
Enter world clock screen, ac tivate Menu you can select the cit y by
choosing it and pressing the Confirm b utton.
25 Notes
Enter notes, you can create a new note through menu. The user can
view, edit, and delete each note.
16
Page 21

26 Synchronization
Enter synchronization screen, select an account, choose to Edit
account by se t the parameters such as account name, transpo rt
type, server settin gs, applications to sync and so on. After set the
account correctly, select Sync now to sync the data.
Note:
The server you have set should support synchronization.
27 Phone sync
Enter phone sync screen, you can select Sync to process the
synchronization with paired Bluetooth device.
28 Opera
You can use this function to browsing the website.
Go to previous page Go to next page
Refresh the page Switch web pages
Enter into settings
29 Calculator
The calculator performs four operations as addition, subtraction,
multiplication and division. E nter calculator screen, you can i nput
numbers directl y and press Calcul ate button which you need, the n
start calculation.
30 Health
Enter into healt h; you can select BMI or Menstrual to check the
detail information.
31 Currency converter
In this function, i f you input the rate a nd the amount of mone y in
local, you can get the result of the equivalence money of foreign.
32 Stopwatch
In stopwatch scree n, yo u can selec t th e typic al stop watc h and view
records that you have saved.
17
Page 22

33 Ebook reader
This function can be used for reading the files with .txt format in
phone(memory card)Ebook folder. Activate Menu to change
settings, especially pay attention to the storage.
34 Answering machine
The telephone answering machine is a device desig ned to record
audio messages directly on its loc al memory with c onnecting to a
server to listen to the recordings, thus avoiding the relative charges.
Moreover, you can custom ize your answering machi ne message,
using the phone’s microphone. The answering mac hine will t urn on
after a preset number of rings, or can be operated manually as
answer option.
35 Bluetooth
Enter Bluetooth screen, when powering on the Bluetooth, in My
device you can select Search n ew devic e to search and compar e
with other Bluetooth device. You can select Search audio device to
search the hands-free device.
Note:
The received file th at transmitted by Bluetooth ar e stored in
Received folder automatically.
36 Applications
You can install Java files and play games usi ng the applicatio n. You
also can edit the s et ti ngs f or Java.
37 STK
Enter STK(SIM Tool Kit), the n ame and content of the menu are
based entirely on the services provided by the network operator. For
more information, plea se c on tact with the network operator.
38 FaceBook
For richness your entertainment life, there provide you the
interesting applicati on of FaceBook. Please get m ore i nform atio n in
the instructions of the phone.
18
Page 23

39 eBuddy
For richness your entertainment life, there provide you the
interesting application of eBuddy. Please get more information in the
instructions of the phon e.
40 Other Functions
Mass storage: this function is used to rea d and write files from PC
to the storage.
Webcam: activate this function, you can do the video chat with
other person.
COM port: you can synchroni ze your phone with PC. D etai ls abou t
the related tools, please consult with Customer S ervice Center.
41 Common Questions
Unable to make some calls
Call barring has been set and barred utilization of the mobile
phone. Please check and cancel call barring.
Other person is answering my call
The mobil e phone ha s been s et into di vert your c alls to an other
phone number. Please check and cancel call divert.
The mobile phone cannot search for the network
The mo bile phone is outsi de of the network cov erage area (or
there are physic al obstructions between th e mobile pho ne and the
transmitter), and calls cannot be made or answered. If you are in
one room, please move close to the window.
In the operation process, the mobile phone may display the
following operating tips:
“Emergency”
You are outside the network coverage area of the service
provider. But anot her netwo rk area wh ere you loc ate allows you to
make emergency call acc ordi ng to th e signal strength.
“Invalid SIM”
The SIM card of the mobile phone is locked and the inserted SIM
card is unable to be acc e pt ed. P le as e i nser t th e cor rec t S IM ca rd or
19
Page 24

contact with the vendor.
“Please Enter PUK”
The SIM card has been locked since the wrong PIN code has been
inputted for three times. You must consult your network provider for
special PUK code with eight numbers to unlock the SIM card (The PUK
code may have been pr ov ided w ith your PIN code at the sa me t ime) .
Warning:
The SIM card will be permanently locked if you input the wrong
PUK code for ten co nsecuti ve times and you must apply for a
new SIM card from your network provider.
42 Maintenance Guideline
Welcome to use I6 74 / I675. If there is a probl em when you using
the phone, please contact with the vender or consult the local
maintenance cent er. If your mobi le phone is in n eed of repair, yo u
can take your phone to local maintenance center, if there is no local
maintenance cent er, please pass your pho ne and the purchasing
invoice to the vendor.
FCC RF Exposure Information and Statement
The SAR limit of USA (FCC) is 1.6 W/kg averaged over one gram of
tissue. Device types i674 / i675
(FCC ID: WA6I674 / I675) ha s also been teste d against this SAR
limit. The highest SA R value reported under this st andard during
product certification for use at the ear is 0.59W/kg and when
properly worn o n the body is 0.6W /kg. This device was tested for
typical body-worn operations with the back of the handset kept
1.5cm from the body. To maintain compliance with FCC RF
exposure requirements, use accessories that maintain a 1.5cm
separation distance between the
user's body and the back of th e handset. The use of belt clips,
holsters and similar accessories
20
Page 25

should not contain metal lic comp onent s in its ass embl y. The u se of
accessories that do not sa tisfy the se requi reme nts may no t compl y
with FCC RF exposure requiremen ts, a nd s ho uld be avoided.
FCC WARNING
This device complies with Part 15 of the FCC Rul es. Operation is
subject to the following two conditions:
(1) this device may not cause harmful interference, and
(2) this device must accept any interference received, including
interference that may cause
undesired operatio n.
NOTE 1: This equipment has been tested an d found to com pl y with
the limits for a Class B digital device, pursuant to part 15 of the FCC
Rules. These limits ar e designed to provide rea sonable protectio n
against harmful interference in a residential installation. This
equipment generat es, us es and c an ra diat e radio f reque ncy e nerg y
and, if not instal led and used in acc ordance with the ins tructions,
may cause harmful int erference to radio com m uni ca ti o ns. However,
there is no guarant ee that interfer ence will no t occur in a pa rticular
installation. If this equipment does cause harmful interference to
radio or television reception, which can be determined by turning the
equipment off and on, the user is en couraged to tr y to correct the
interference by one or more of the following measures:
- Reorient or relocate the re cei vi ng antenna.
- Increase the separation between the equipment and receiver.
-Connect the equipment into an outlet on a circuit different from that
to which the receiver is
connected.
-Consult the dealer or an experienced radio/TV tec hnician for help.
NOTE 2: Any cha nges or modif ications not e xpressly appr oved by
the manufacturer could void
the user’s authority to operate the equipment.
21
Page 26

NOTE 3: The manuf acturer is not respon sible for any radio or T V
interference caused by
unauthorized modifications to this equipment. Such modifications
could void the user’s authority
to operate the equipment.
22
 Loading...