

Page 1

I
CONTENT
1. WARNINGS ................................................................... 1
2. GETTING STARTED .................................................... 3
2.1 APPEARANCE ............................................................ 3
2.2 KEYPAD DEFINITION ............................................... 4
2.3 BATTERY INSTALLATION ....................................... 5
2.4 SIM CARD/T-FLASH CARD INSTALLATION ......... 5
2.5 CHARGING THE BATTERY ...................................... 6
2.6 S ECURITY SETTINGS ............................................... 6
2.7 T-FLASH CARD .......................................................... 7
2.8 USB CABLE ................................................................ 7
3. BASIC FUNCTIONS ..................................................... 7
3.1 MAKING A CALL ....................................................... 7
3.2 EM ERGENCY SERVICE ............................................ 8
3.3 ANSWERING A CALL................................................ 8
3.4 REJECTING A CALL .................................................. 8
4. GUIDE TO MENU OPERATIONS ................................ 8
4.1 FILE MANAG ER ........................................................ 8
4.2 P HONEBOOK ............................................................. 8
4.3 FUN ............................................................................. 9
4.3. 1 GAME S ..................................................................... 9
4.4 CALL CENTER ........................................................... 9
4.4.1 CALL HISTORY ....................................................... 9
4.4.2 CALL SETTINGS ................................................... 10
4.5 ME S S AGI N G ............................................................. 10
4.6 MU LTI M E DIA .......................................................... 13
4.6.1 CAMERA ................................................................ 13
4.6.2 IMAGE VIEWER ................................................... 13
4.6.3 VIDEO RECORDER .............................................. 13
4.6.4 VIDEO PLAYER .................................................... 13
Page 2

II
4.6.5 AUDIO PLA YER .................................................... 13
4.6.6 SOUND RECORDER ............................................. 14
4.7 ORG ANIZER ............................................................. 14
4.7.1 CALENDAR ........................................................... 14
4.7.2 ALARM .................................................................. 14
4.7.3 WORLD CLOCK .................................................... 14
4.8 S ETTINGS ................................................................. 14
4.8.1 DUAL SIM SETTINGS .......................................... 14
4.8.2 PHONE SETTINGS ................................................ 15
4.8.3 NETWORK SETTINGS ......................................... 15
4.8.4 SECURITY SETTINGS .......................................... 16
4.8.5 CONNECTIVITY ................................................... 16
4.8.6 RESTORE SETTINGS ............................................ 17
4.9 PROFILES ................................................................. 17
4.10 EXTR AS .................................................................. 17
4.10.1 CALCULATOR ..................................................... 17
4.10.2 EBOOK READER ................................................ 17
4.11 SERVICES ............................................................... 18
4.11.1 INTERNET SERVICE ........................................... 18
4.11.2 STK ....................................................................... 18
4.12 FM R ADIO .............................................................. 18
5. ENTRY MODE ............................................................ 18
6. CARE AND MAINTENANCE .................................... 19
7. TECHNICAL INFORMATION ................................... 21
8. FCC STATEM ENT ...................................................... 22
9. SAR INFORMATION STATEMENT .......................... 23
10. BODY-WORN OPERATION ..................................... 25
Page 3

1
1. Warnings
Not following these simple guidelines may be dangerous or
illegal. Read the complete user guide for further
information.
TURN ON SAFELY
Do not turn on the phone when wireless phone is prohibited
or when it may cause interference or danger.
ROAD SAFETY
Obey all road safety laws. Always use both of your hands to
operate the vehicle while driving.
INTERFERENCE
All wireless phones may be sensitive to interference, which
may affect performance.
TURN OFF IN HOSPITALS
Follow all restrict ions. Turn off the phone near medical
equipment.
TURN OFF ON A IRCRAFTS
Follow all restrictions. W ireless devices can cause
interference on aircrafts.
TURN OFF WHEN REFUELING
Do not use the phone at/near refuelin g stations. Do not use
near fuel or chemicals.
Page 4

2
USE SENSIBLY
Only qualified personnel may install or re pair thi s product.
ENHANCEMENTS AND BATTERIES
Use only appropriate enhancements and batteries. Do not
connect incompatible products.
WATER-RESISTANCE
Your p ho ne is no t water -resistant. Keep it dry.
BACKUP COPIES
Remember to make back-up copies or keep a written record
of all important inform ation stor ed in your phone.
CONNECTIN G T O OTHER DEVIC ES
When connecting to any external device, read its user guide
for detailed safety instructions. Do not connec t with
incompatible products.
Page 5
3
2. Getting Started
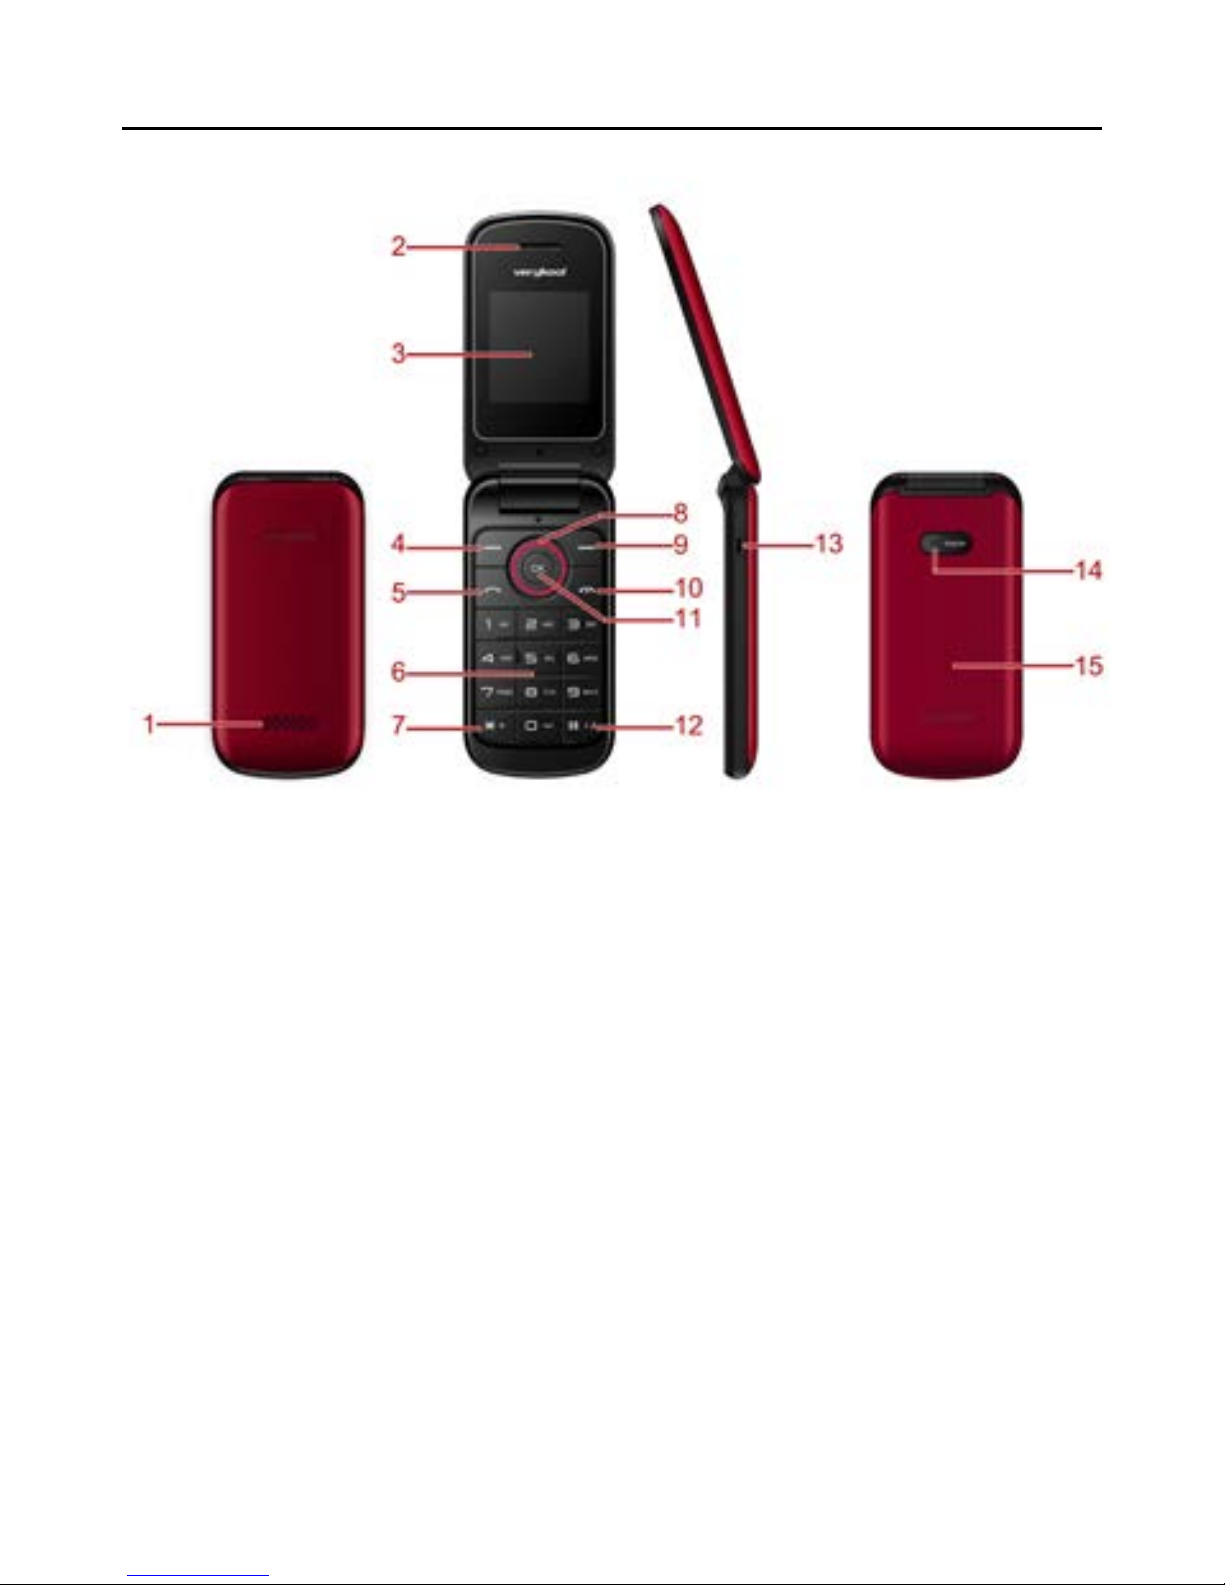
2.1 Appearance
The Symbols above ind icate:
1. Speaker 2. Receiver
3. Display Screen 4. Le ft Soft Key
5. Dial Ke y 6. Number Keys
7. * Key 8. Navigation Keys
9. Right S oft Key 10. End Key/Power Key
11. OK Key 12. # Key
13. USB Interface 14. Camera
15. Battery Cover
Page 6

4
2.2 Keypad Definition
Key
Definitions
Left Soft key/
Right Soft key
1. Execute functions that th e
left-down/right-down corner
indicator shows.
2. In th e standby mode, pre ss left
soft key to access Menu, press
right soft key to access Names.
Navigation Keys
1. Press the keys to select menu
or options.
OK Key
1. In st andby mode, press the
key to enter dial panel.
2. In di al panel, after inputting
num be rs, pre s s t his key to se l e ct
SIM1/2 voice call.
3. In oth er mode, press the key
for confirmation.
End Key/ Power
Key
1. Mainly used as power on/off.
2. Press to return to standby
screen in any interface.
3. End calls or reject inc oming
calls.
4. When the keypad is locked,
press left soft key and End ke y
to unlock.
Dial Key
1. Press this key to dial or
receive an incoming call.
2. In st andby mode, press this
key to access All calls.
Number Keys
1. Use these keys to input
Page 7
5
numbers or letters.
* Key
1. After inputting phone number,
quick press * key thrice, then the
symbol “p” appears and input
the extension number . You c an
make an extension call.
2. In st andby mode, press left
soft key and * key to lock
keypad.
# Key
1. In text editing interface, press
# key to switch the text input
method.
2. Pre ss and ho l d # ke y to
transfer the profile of current
mode and Silent mode.
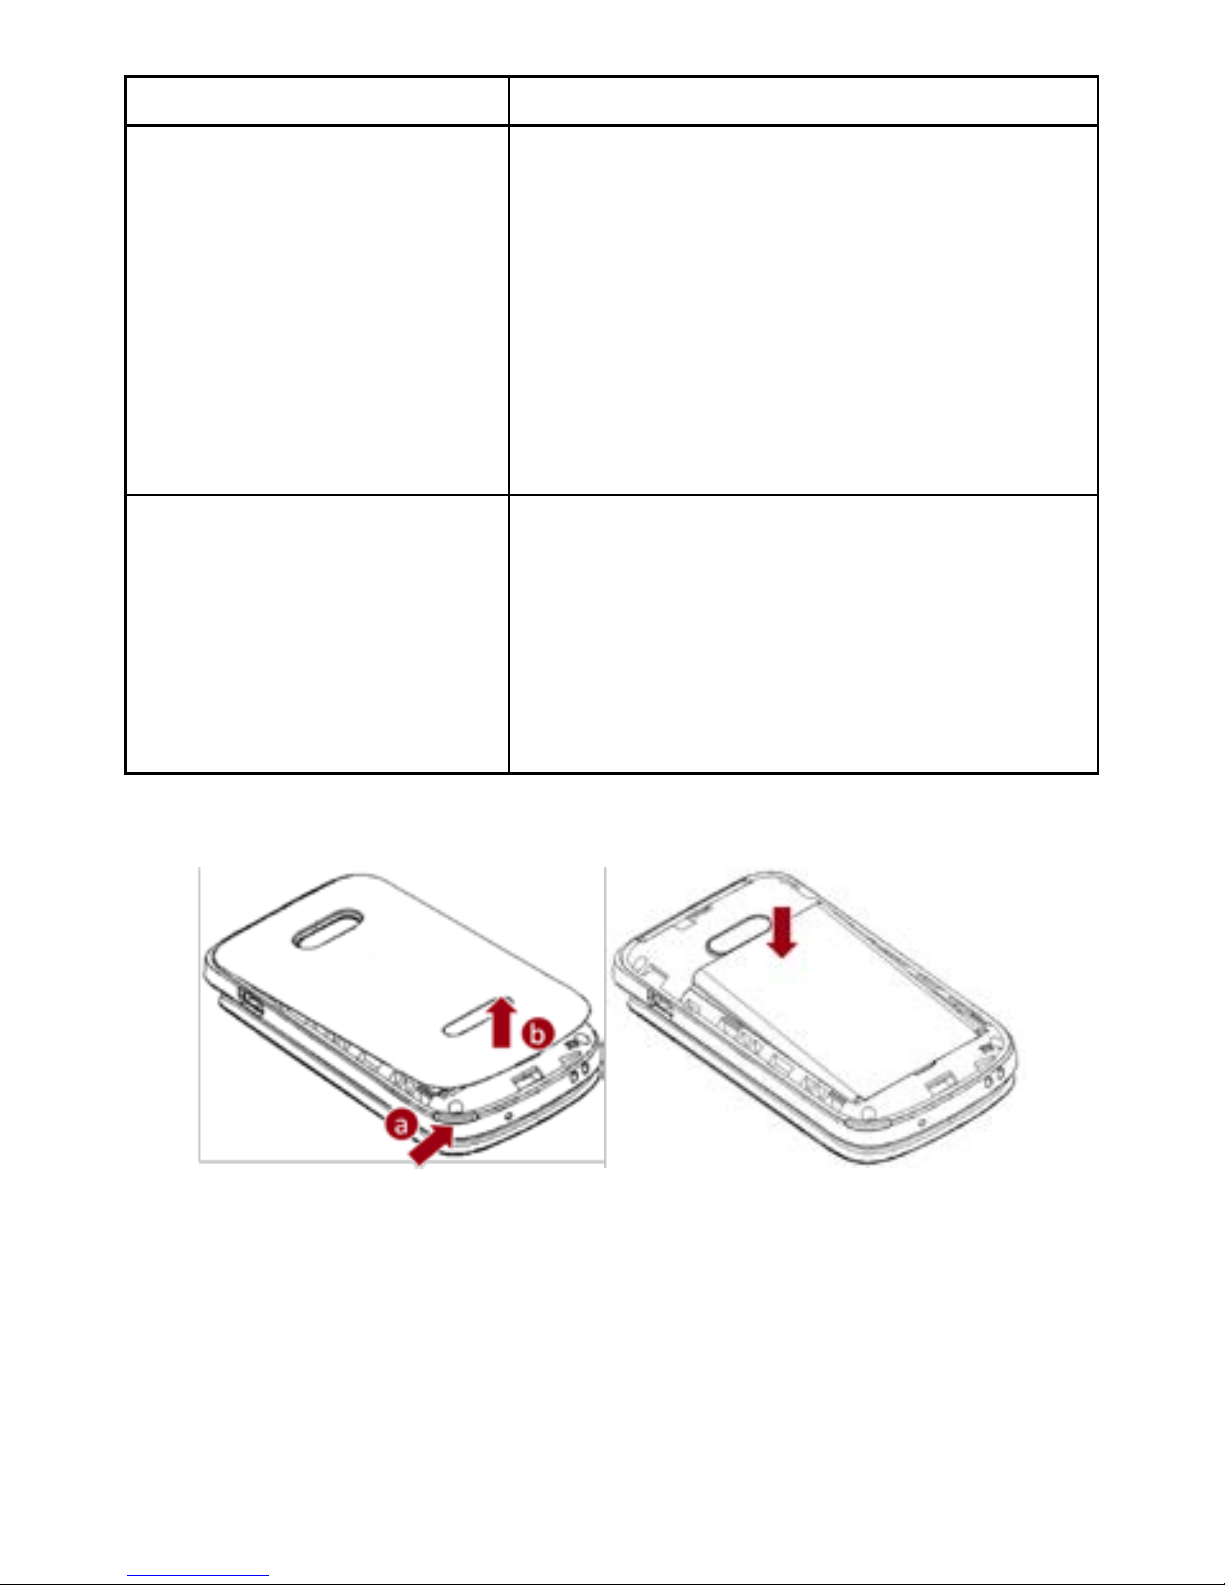
2.3 Batter y Installat ion
Caution: Install a ccording to the i llustration above to avoid
breaking the batte ry connectors.
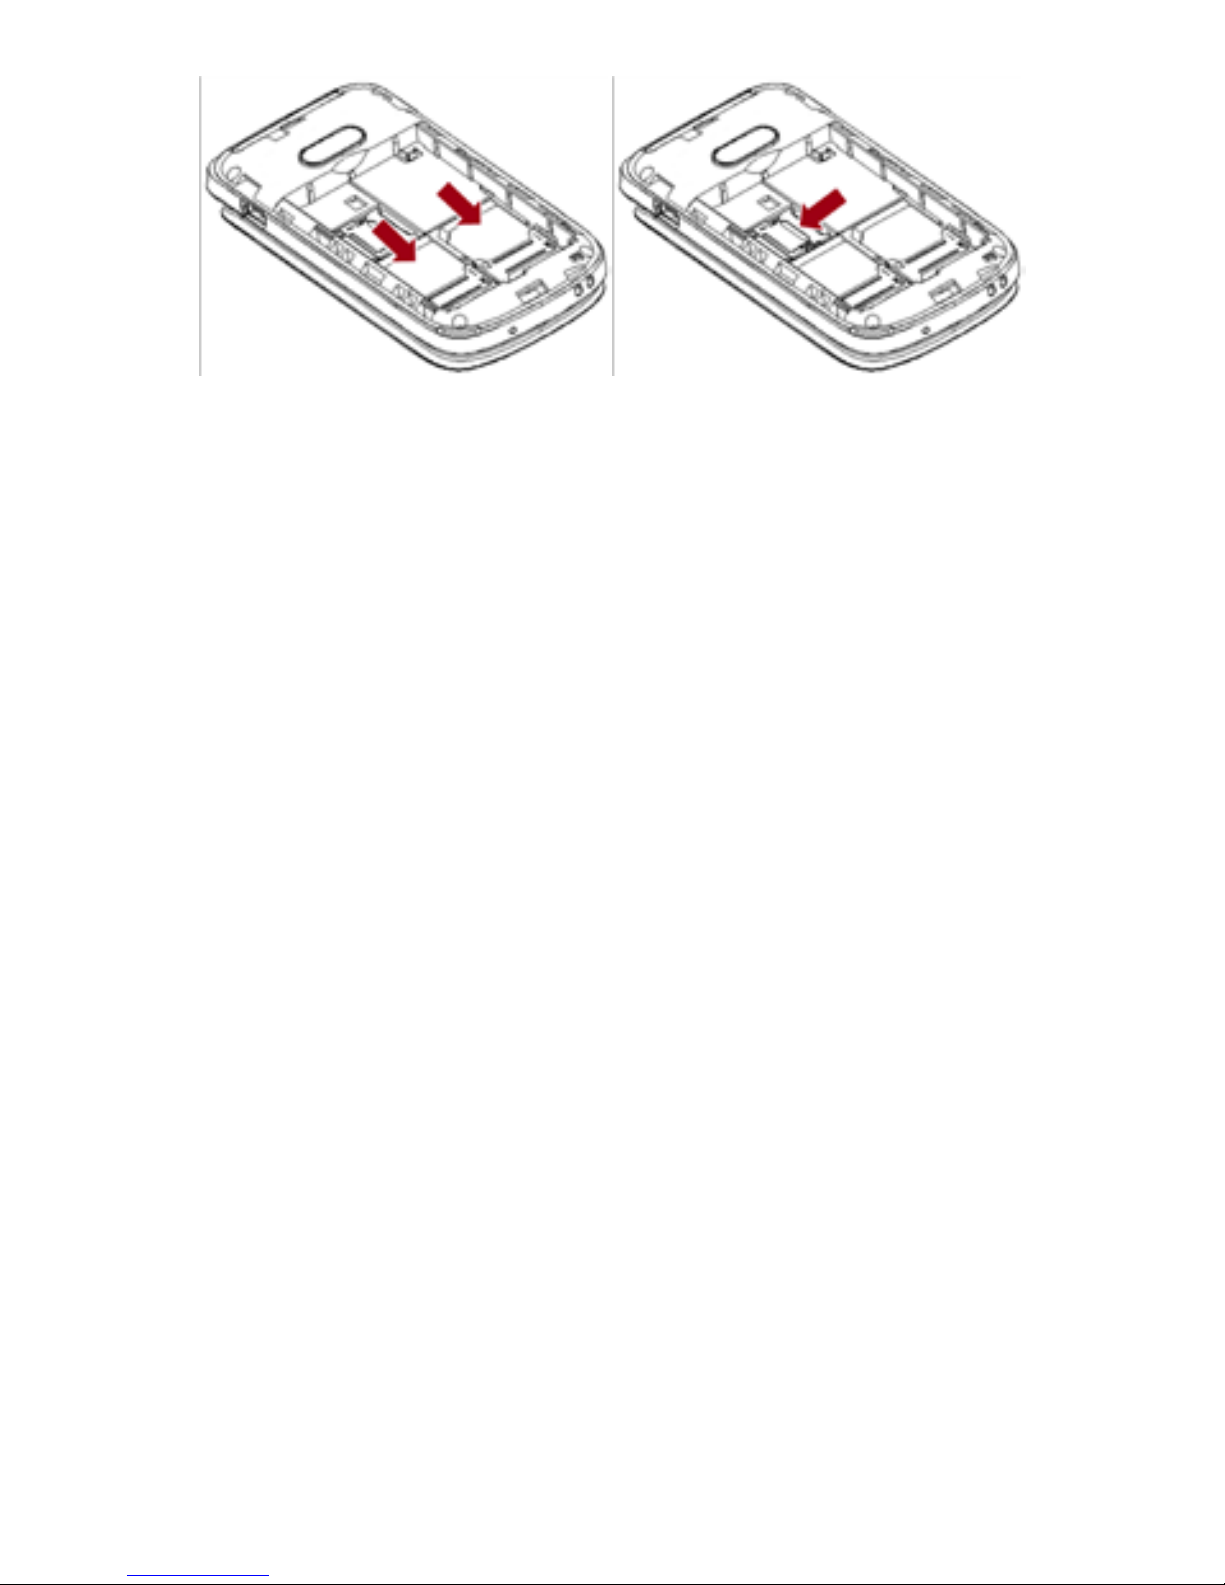
2.4 SIM Card/T-Flash Card Installation
Page 8
6
Caution: Do not bend or sc ratch your SIM card and T-Flash
card. Avoid exposing your SIM card and T-Fla sh ca rd to
static electricity, water , or dirt.
Tips:Face the gold color contact poin t of SIM card towards
the cell phone and push the SIM card into the slot. With the
metal contacts facing down, gently slide the T-Flash c ard
into the slot. Press and pull the cover up to lock it.
2.5 Charging the Battery
Insert the charger into USB interface of the phone; the flash
symbol on the charger plug must face upward.
Con ne ct the charger to a standard wall outle t a n d t he batter y
power icon in the up-right corner of the screen will start
scrolling. When the battery bar stops s crolling, the battery
charge is complete. Press the two sides of th e ch arger plug
and d isc onnect the c harg e r fr o m t he p hone.
When the battery is low, a “low battery” me ssage will
display across the screen and the battery icon will seem
empty. If the battery level is insufficient, the phone will turn
off automatically. Do not use your phone under low battery
state for an extended period of time or it may cause battery
damage.
2.6 Se cu rity S et tings
Page 9

7
― PIN code
PIN code (Personal Identity Number) prevents
unauthorized use of your phone. The PIN code is provided
by your network operat or with the SIM card.
If you enter the wrong code three times in a row, the PIN
code will be blocked. T o unblock the PIN code, you need to
enter your PUK. Your PUK is provided by your network
operator.
― Phone Lock
Activate/Modify/Deactivate power on password (the length
of the password is 4-8 d ig i ta l numbers). If you ac tiv ate the
“Phone lock”, you need to enter the password each time you
turn on the phone. If you want to modify the Startup
password or deacti vate power on password, enter “Change
password” to se t.
2.7 T-flash Card
Insert the T-Flash card into phone. This will expand the
Flash memory of the phone.
2.8 USB Cable
You can transfer a n d sto r e file s , such as M P3, MP4 and
pictures from PC, through USB cable, to the mass storage in
phone or identified SD card that is inserted.
3. Basic Functions
3.1 M aking a C all
In standby mode , pr ess num erical keys to input phone
num be r to dial. If you're ma king a long distance call, add
the area code preceding the teleph one number. After
Page 10

8
inputting phone numb er, quickly press * key thrice until the
symbol “p” appears, then input the extra number . Press left
soft key to access options. During a call, press up/down
navigation keys to adjust the volu me.
3.2 Emergen cy Serv ice
You can di al an emergency call without the SIM card.
Contact your service provider t o get the emergency call
number.
3.3 Answering a Call
When you receive a call, the phone will ring or vibrate and
will display an incomi ng call indicat or. Press dial key, left
soft key, or OK key t o answer. During the calling, you can
press left soft key to access options: Hold, End single call,
Phonebook, Call history, Messaging, Sound recorder, and
Mute.
3.4 Rejecting a Call
You can press en d key or right soft key to reject a call.
4. Guide to Menu Operations
4.1 F il e M anager
Enter th is menu, you can ch eck the files store on m emory
card. Select one file and press left soft key, you can do
options.
4.2 Phonebook
In the phoneb ook, you can store contacts' personal
information and numbers while also search for previously
Page 11

9
stored contacts.
― Select A dd new conta ct:
You can save new contact To SIM1/2 or To Phone.
― Sele ct one contact an d press left s oft key to access
options:
View: Check the detailed information of the contact
Send text message: Edit text message and select SIM1/2
to send message
Send multimedia message : Edit multimedia message and
select SIM1/2 to se nd mes sage
Call: Select SIM1/2 voic e call to call the numbe r
Edit: Edit the contact
Del e te: Confirm w hether to delete the c o ntact
Copy: Copy the contact To Phone, To SIM1, or To SIM2
Add to Blacklist: Add the number to blacklist
Mark several: Mark one or more contacts
Phonebook settings: Set Sp eed dial, Extra numbers, etc
4.3 Fu n
4.3.1 Games
This phone su pplie s b uilt-in ga me and you can select
Game s se t tings to set.
4.4 Call Center
4.4.1 Call History
In the call history menu, you can check dialled calls,
received calls, missed calls, etc.
― Misse d Calls: Disp lay the latest missed calls list.
― Dia lled Calls: Display the latest dialled calls list.
― Recei ved Calls: Display the latest received calls list.
Page 12

10
― Delet e call logs: Delete all records.
4.4.2 Call Settings
-SIM1/2 Call Settings
Call Waiting
Set the mode of call waitin g, this function need to be
activated.
Call Divert
When the call divert is activated, inc oming calls will be
diverted to voice mail or other phone numbers according to
the call divert setti ngs.
Call Barring
When the ca ll barring is activated, some of the calls will be
barred according t o the call barrin g setting condition.
Contact your service provider to sign up for call barring.
Line Switching
Switch the line between Line 1 and Line 2.
― Advanced Settings
Blacklist
Select whether to Reject number in blacklist and edit
Blacklist numbers.
Auto Redial
Set: On/ Off.
Call Time Reminder
Set: Off/ Single/ Periodic.
Answer Mode
Set: Cove r answer, An y key or Auto answer when headset
mode
4.5 M essaging
Page 13

11
4.5. 1 W rit e Messa ge
4.5. 1.1 Text Me s sa g e
This f u nctio n c an begi n a new text message. After
completing the message:
― Pre ss OK key:
Enter number: Input numb er
Add from Phonebook: Select c ontact from phonebook
― Pre ss left soft ke y:
Send to: Enter number or Add from Phonebook to send
message
Input method: Select input method
Advanced: Insert number, name
Save: Save t he me ssag e to draf ts of SIM1/2
4.5. 1.2 Mul t im edia M essag e
This function ca n be g in a new m ultim edia message.
4.5. 2 Inbox
After entering the Inbox, press navigation key to select
messages. Press OK ke y to check the detai ls of message, or
press left soft key to access Options:
― View: Che ck the message
― Reply by SMS: Reply text message to the sender
― Reply by MMS: Reply multim edia message to the
sender
― Call sender: Select SIM1/2 voi ce call to call the send er
― Forward : S end the message to others
― Delete : Confir m w hether to delete the messa g e
― Delete all: Confirm whether to delete all messages
― Save to Phonebook: Save the sender’s number to
phonebook
Page 14

12
4.5.3 Drafts
You can save unsent and edit inc omplete messa ges in draft
box. P ress left soft ke y to access to Option s:
― View: Che ck the message
― Send : Enter number or Add from Ph onebook and select
SIM 1/ 2 to sen d th e m essage
― Edit : Edit the messa ge
― Delete: Confirm whether to delete the message
― Delete all: Confirm whether to delete all messages
4.5. 4 O ut b o x
Check the information of unsuccessfully sent message in
outbox. Press left soft key to access to Options:
― View: Che ck the message
― Resend: Send the message once more
― Edit: Edit the message
― Delete : Confir m w hether to delete the messa g e
― Delete all: Confirm whether to delete all messages
4.5. 5 S en t Mess ages
Check the message in sent box. Select one message to open,
or press left soft key to a cc ess Options:
― View: Che ck the message
― Forward : S end the message to others
― Delete : Confir m w hether to delete the messa g e
― Delete all: Confirm whether to delete all messages
4.5. 6 B road cast Messa ges
Select SIM1/2 to enter, and you can set receive mode,
Page 15

13
channel settings, languages, and read messages.
4.5.7 Message Settings
― Text message: S et para m eters r e l a ted to te x t m e s sa g e
― Multimedia message: Set parameters related to
multimedia message
― Ser vice message : Enable push or set Se rvice loadin g
4.6 Mu ltimedia
4.6.1 Camera
Press left soft key or OK key to enter. The p ho to can be
previewed in the screen; press OK key to shoot and right
soft key to back, left soft key to access Options.
4.6. 2 I mage Viewe r
Enter image viewer, you can choose photos to view or
return. Press left soft key to access to Options: View, Send,
Use as, R ename, Delete, and Image informa tion.
4.6.3 V ideo Recorder
After enter video recorder, press OK key to shoot, press left
soft key to access Options, press right soft key to back.
4.6. 4 V i de o Pla yer
Preview the videos. Press * key and # key to adjust volume.
Press navigation keys and OK key to opera te the video
player. Press left soft ke y to access Options.
4.6.5 Audio Player
This function menu is used to store and play the audio files.
Page 16

14
Press the left soft ke y or OK key to enter and then use the
navigation keys and OK key to operate audio player. P re ss *
key and # key to adjust volume . P ress left soft ke y you can
access List.
4.6.6 Sound Recorder
You can take a r ecorder in this fu nction. Press OK key or
left soft key to enter and se lect New record to r ecord. After
record, press left soft key to access Options. After entering
the record file list, select one fi le, press left soft key to
access Options.
4.7 Organi z e r
4.7.1 Calendar
You can use thi s feature to vie w the year, date and term
easily. Use navigation keys to navig a t e othe r date. Press le ft
soft key, you can enter to submenu to do options.
4.7.2 Alarm
The alarm clock feature sounds an alert or makes a
vibr a t io n aler t a t a time you spec ify. There are 5 alarm
clocks can be e di t a n d set.
4.7.3 World Clock
By pressing left/ri ght navigati on keys to change time zone
on world map, you can check time and date of different
cities and regions. Press left soft ke y or OK key to access
options.
4.8 Settings
4.8.1 Dual SIM Settings
Page 17

15
Select: Dual SIM open, Only SIM 1 open, or Only SIM 2
open
4.8. 2 Ph o ne Set tings
― Time and Dat e
You can selec t Set home city, Set tim e/date, and Set format.
― Schedule Power On/O ff
Set time to power on/off the phone automati cally.
― Language
You can choos e several languages under this function.
― Pref. Input Method
Select one input method as preferred input method.
― Display
Wallpaper
You can set wallpaper under this function.
Power On/Off Display
Select System or User defined to set as power on/off
display.
Show Date and Time
Select On or Off.
― Auto Update Time
Select Off, Firs t confirm, or On.
― Flight Mode
Select Normal mode or Flight mode
― Misc. Se t tings
Select LCD backlight t o set
4.8.3 Network Settings
― SIM1/SIM2
Network Selection
Page 18

16
This function can let you select the network ma nually or
automatically.
― GPRS Transfer Pref.
Select Data prefer or Call prefer.
4.8. 4 S ec urit y Set ting s
― SIM 1/SIM 2 Security
PIN Lock
PIN number setting can avoid unauthor ized usage of SIM
card. If PIN number has been wrongly inputted for 3 times,
the SIM card will be locked . P UK number is needed to
unlock the SIM card. Please contact the network provider if
you don’t know the PUK number.
Change PIN
Input old SIM1/2 PIN, and then input new PIN, input the
PIN code again to confirm . Before change PIN, you need to
turn on PIN lock.
Change PIN2
Input old SIM1/2 PIN2, and then input new PIN2, input the
PIN code again to confirm .
― Phone Security
Phone Lock
Input phone password to turn on/off phone lock. The default
passw o rd is 0000.
Change Pa ssw ord
Input old password, and then input new password, input the
new password again to confirm.
4.8.5 Connectivity
― Bluetooth
Page 19

17
This mobile phone suppor t Bluetooth wireless connection.
You can establish wireless connection between mobile
phone and device to realize voice communication, data
exchange and synchronization.
― Data Connection
Select SIM 1 or SIM 2.
― Data Accounts
You can selec t network account or press left soft key to do
options.
4.8.6 Restore Settings
Input de faul t passw o r d 0000 to restore factory settings.
4.9 Pr ofi les
This p ho ne provide s se v e ra l pr o files, by pre s sing left sof t
key or OK key, you can enter options to set (expect Silent):
Activate, Customize, and Reset.
4.10 E xtras
4.10.1 Calculator
This feature can use your phone as a calcu lator for simple
calculations. Press number keys to enter the numbers. Use
following keys to ca lculate:
Navigation keys: +, -, ×, ÷
OK key: Show the calculation result.
* Key: Input double 0
# Key: Decimal point
4.10.2 Ebook Reader
Read E-Books stored on memory card. Select one txt file
Page 20

18
and press left soft key to do options.
4.11 Serv ice s
4.11.1 Internet Service
You can use the internet service to browse WAP pages.
Before using this application, yo u ne ed to check the GPRS
settings.
4.11.2 STK
If your SIM card supports STK function, the phone can
displa y different fi rst leve l menu accordin g to different STK
card. This function needs the network provider support. If
user finds STK function can't operate normally, please
contact the network provider. If the network provider does
not suppor t this func tion, we d o not claim any respons ibilit y
whatsoever.
4.12 FM Radio
Enter FM radio (insert earph one). Press OK key to tur n
on/off the r adio. Press left/right na vigation keys t o change
channels, press up/down navigation keys to change
frequency manually, press * key and # key to adjust volume.
Press the left soft ke y to access Options .
5. Entry Mode
You can us e several methods for entering tex t and numbers.
By selec ting a Text Entry Mode, the phone provides a few
Text Entry Mode for new adding, editing contact records,
finding contacts, editing SMS and writing memos.
Select Text Entry Mode:
Page 21

19
5.1 Letter entry mode
Press a key once to insert the first letter on the key, twice
for the second letter, etc. If you pause briefly, the last letter
in the display is accepted and the te xt a w a it s t he next en tr y.
For example, press the "2" key continu ously, it will appear
"a"、"b"、"c"、"2"one by one.
5.2 Number entry mode
Number Entry Mode can input the number in the t ext, such
as telephone number . Tap the proper number and input it.
6. Care and Mainten an ce
Battery care
• Your dev ice is powered by a rec hargeable battery. When
the power is weak, please charge the battery. In order to
extend the lifespan of th e battery, use all the battery's power
before recharging.
• Unplug the charger from the electrical plug and the device
when not in use. Do not leave the battery connected to a
charger more than a week. Overcharging may shorten its
lifespan.
• Extre m e temper ature s can affect the ability of your batter y
to charge. Batter y needs t he fit tem p erature. If the
surrounding temperature is over 40°C, the battery canno t be
charged.
• Use the battery only for its intended purpose. Never use
any charger or battery that is da maged.
Do not short-circuit the battery. Accidental short-circuiting
can occur when a metallic object such as a c oin, clip, or pen
Page 22

20
causes dire ct con ne ctio n of the po sitive (+) and negative (-)
terminals of the batte ry. ( These look like metal strip s on the
battery.) Short-circuiting the terminals may damage the
battery or the connecting object.
• Lea v ing the batter y in hot or c o ld places, such as in a
closed car in summer or a free zer i n winter conditions, will
reduce the capacity and lifetime of th e battery. Always try to
keep the battery between 59° F and 77° F (15° C a n d 25°C) . A
hot or cold battery may not function temporarily, even when
the battery is fully charged.
• Batt e r y perf o r mance i s pa rtic ul a r l y limit ed in tempera t ur es
below freezing.
• Do not dispose of batter ies in a fire! Dispose of batteri es
accordin g to local regu lations. P lease recycle wh en possib le.
Cell phones are not considered household waste.
• Caution: T his phone has dual batteries. Ther e is a switch
near ma in batt e ry inside the p ho ne. Push this switch; you
can shift it into dual batteries or single battery.
Mobile phone maintenance
• Keep the device dry. Precipitation, humidity, and all types
of liquids or moistur e can contain minerals that will corrode
electronic circuits. If your device does get wet, remove the
battery and allow the device to dry completely before
replacing it.
• Do not use or store the device in dusty, dirty areas. Its
moving parts and electronic components can be damaged.
• Do not sto r e the de v i c e i n ho t a r eas. Hi gh tempe ratur es
can shorten the life of ele ctronic de vices, damage batteries,
and warp or melt certain plastics.
• Do not store the device in cold areas. When the device
returns to its norma l temperature, moisture can form inside
Page 23

21
the device and damage electronic circuit boards.
• Do not attempt to open the device other th an as instruct ed
in this guide.
• Do not drop, knock, or sha ke the device. R ough handling
can break internal circu it boards and fine m echanics.
• Do not use harsh chemicals, cleaning solvents, or strong
detergents to clean the device.
• Do not paint the device Paint can clog the moving parts
and pre v ent proper o pe ratio n .
• Use only th e supp lied or an appr oved re p la c emen t an te nn a.
Unauthorized antennas, modifications, or attachments could
damage the device and may violate regulations governing
radio devices.
All of the above suggestions apply to your device, battery,
charger, or any enhancement. If any device is not working
properly, take it to the nearest authorized ser vice facility for
service.
7. Technical Information
Weight: 63g (with battery)
Size: 89×44×16.2mm (with the cove r closed)
164×44×35 (with the cover open)
Battery: 800mAh
Networks: GSM
Battery work times refer to the list be low (Will not
announce if the capacity is changed):
The operation time of the battery depends on conditions
such as:
• Transmitting power level
• Signa l ( d istance between the pho ne and t he base statio n)
Page 24

22
• Network parameters def ined by the operato r
• Phone use (WAP, games, SMS)
• Charging procedur e used
Exclusions:
Subject to the exclusions contained below:
1. Damage due to the improper use.
2. User does not follow the manual.
Explanation:
The company has the final right of the explanation for this
document.
Software upgrades will not be a nnounced.
All t he configurations mentioned in this user manual is
only for reference; please refer to t he actual phone.
8. FCC State me nt
1. This de vice complies with Part 15 of the FCC Rules.
Operation is subject to the following two conditions:
(1) This device may not cause harmful interference.
(2) This device must accept any inter ference recei ved,
including interference that may cause undesired operation.
2. Changes or modifications not expressly approved by the
party responsible for compliance could void the user's
authority to operate the equipment .
NOTE:
This equipment has been tested and found to comply with
the limits for a Class B di gital device, pursuant to Part 15 of
the FCC Rules. These limi ts are designed to provi de
reasonable protection agains t ha r m ful in ter fere nc e in a
residential installation.
Page 25

23
This equipment gener ates uses and can radiate radio
fre quency e ne rgy an d, if not in s ta l led a n d u sed in
accordance with the ins tructions, may cause harmful
interference to radi o communications. However, there is no
guarantee that interference will not occur in a particular
installation. If this equipment does cause h armful
interference to radi o or television reception, which can be
determined by turning the equipment off and on, the user is
encouraged to try to cor rect the interference by one or m ore
of the following measu res:
Reorient or relocate the receiving antenna.
Increase the separation between the equipment and receiver.
Connect the equipment into an outlet on a circuit different
from that to which the receiver is connected.
Consult the dealer or an experienced radio/TV technician
for help.
9. SAR Information Statement
Your wireless phone is a radio transmitter and receiver. It is
designed a n d m anufa ctured not to e x c e ed the em i ssion
limits for exposure to radiofrequency (RF) energy set by the
Federal Communications Commission of the U.S.
Government. These limits are part of comprehensive
guidelines and establish permitted levels of RF energy for
the general population. The guidelines are based on
stan dards t hat wer e develo ped by ind e p ende nt scientific
organizations th rough peri odic and thorough e valuation of
scientific studies. The standards include a substantial safety
margin designed to assure the safety of all persons,
regardless of age and he alth. The exposure st andard for
Page 26

24
wireless mobile phone s employs a unit of measurement
known as the Specific Absorption Rate, or SAR. The SAR
limi t set by the F C C is 1.6 W /k g . * Tests for SAR are
conducted with the phone transmitting at its highest
certified power level in all tested frequency bands.
Although the SA R is deter mine d a t t he h ighes t c er t ified
power level, the actual S AR level of the phone whi le
operating can be well below the maximum va lue. This is
because the phone is designed to operate at multiple power
levels so as to use only th e power req uire d to r ea ch the
network. In general, the closer you a re to a wireless base
station antenna, the lower the power output. Before a phone
model is available for sale to the public, it must be tested
and ce r t ified to the FCC that it does no t excee d th e li m i t
established by the gover nment adopte d requirem ent for safe
exposure. The tests are performed in positions and loca tions
(e.g., at the ear and worn on the body) as required by the
FCC for each model. The highest SAR value for thi s model
phone when tested for use at the ear is 0.649 W/Kg and
when worn on the body, as described in th is user g ui de, is
0.817 W/Kg(Body-worn measurements differ among phone
models, depending upon available accessories and FCC
requirements). While there may be diff er e nces between the
SAR levels of various phones and at various positions, they
all meet the government requirement for safe exposure. The
FCC has granted an Equipmen t Authorization for this
model phone with all reported SAR levels e valuated as in
compliance with the FCC R Fexposure guid elines. SAR
information on this model phone is on file with the FCC
and can be found under th e Display Grant sect ion of
http://www.fcc .gov/ oet/fccid after sea rching on
Page 27

25
FCC ID: WA6I316 Additional information on Sp ecific
Absorption Rates (S AR) can be found on the Cellular
Telecommunications Industry Asso-ciation (CTIA) web-site
at http://www.wow-com.com. * In the U nited States a n d
Canada, the SAR limit for mobile phones use d by the public
is 1.6 wat ts/kg (W/kg) averaged over one gra m of tissue.
The standard incorporates a sub-stantia l margin of safety to
give additional pr otection for the public and to account for
any variations in measurements.
10. Body-worn Operation
This device was tested for typical bod y-worn operations. To
comply with RF exposur e requirements, a minimum
separation distance of 15mm mu st be m aintai ned betw e en
the user’s body and the handset, including the antenn a.
Third-party belt-clips, holst ers, and similar accessorie s used
by this devi c e should not co ntain a ny metallic compo nents .
Body-worn accessories that do not meet the se requirements
may not comply with RF exposure requirements and should
be avoided. Use only the supplied or an approved antenn a.
 Loading...