

Page 1

I315
User Manual
Page 2

I315 User Manual
Welcome!
PLEASE READ THIS INFORMATION BEFORE USING THE PHONE TO MAKE A
BETTER USE OF YOUR PHONE. WE ARE NOT RESPONSIBLE FOR ANY
DAMAGE DUE TO YOUR MISUNDERSTANDING OF THIS INFORMATION AND
MISUSE.
The content of this manual is correct at the time of issuance, however Verykool
USA, Inc. reserves the right to amend technology specifications without any prior
notification.
Some descriptions in this manual may differ to some extent from the actual mobile
phone, depending on differences in software and/or network providers.
2
Page 3
I315 User Manual
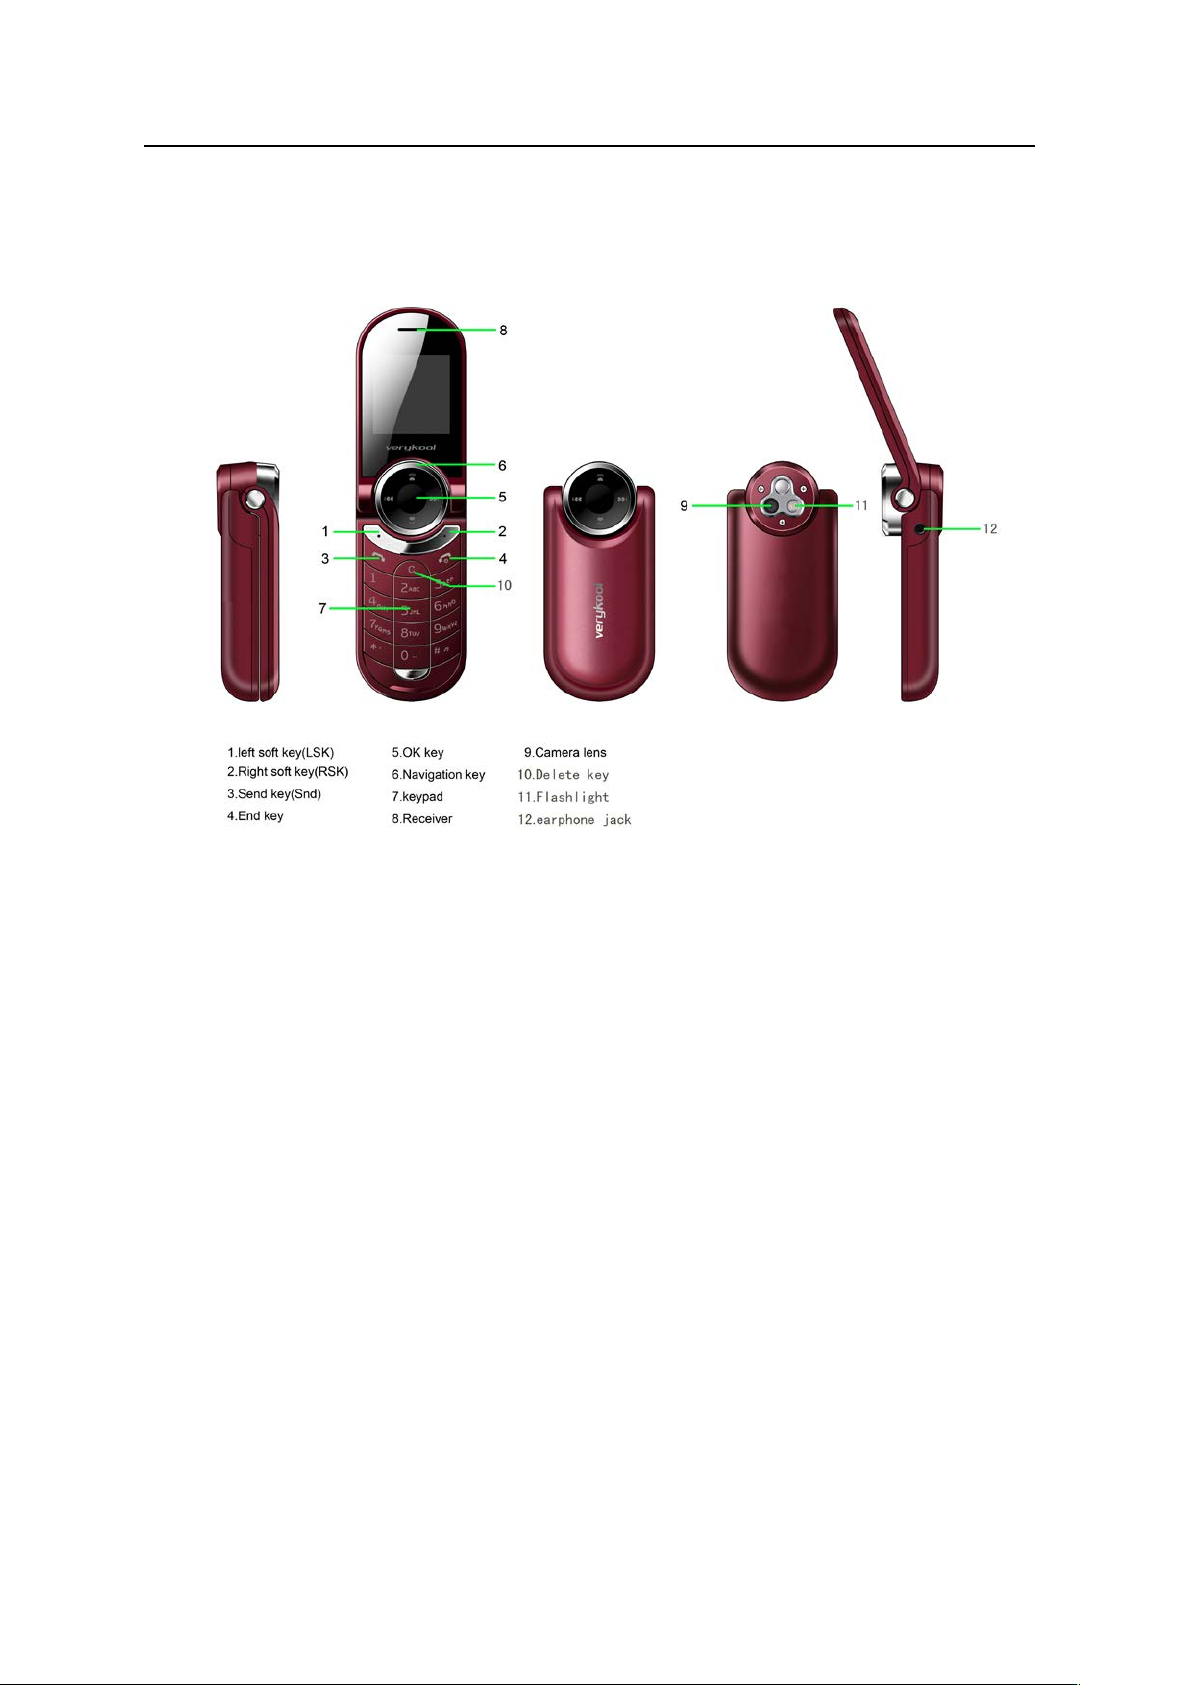
Introduction:
Note: All the illustrations, simulated screen and related images used in this manual are for
reference only. Please refer to your handset for actuality.
3
Page 4

I315 User Manual
Contents
1. Safety Information ................................................................................................................... 6
2. Use and Care .......................................................................... Error! Bookmark not defined.
3. Essentials ................................................................................................................................ 9
3.1 Install the SIM card ........................................................................................................ 9
3.2 Battery Use and Installation ......................................................................................... 10
3.3 Memory Card ............................................................................................................... 11
3.4 Power on/off ................................................................................................................. 11
3.5 Make a call ................................................................................................................... 11
3.6 Answer or Reject a call ................................................................................................ 11
3.7 Operation during a call ................................................................................................. 12
3.8 Insert international access code ................................................................................... 12
3.9 Dial an extension or voicemail number ........................................................................ 12
3.10 Emergency calls ......................................................................................................... 13
4. Basic ...................................................................................................................................... 13
4.1 Display ......................................................................................................................... 13
4.2 Password ..................................................................................................................... 15
5. Functions ............................................................................................................................... 16
6. Message ................................................................................................................................ 18
6.1 Writing Messages ......................................................................................................... 18
6.2 Inbox ............................................................................................................................ 18
6.3 Drafts ............................................................................................................................ 19
6.4 Outbox .......................................................................................................................... 19
6.5 MMS ............................................................................................................................. 20
6.6 Broadcast message ..................................................................................................... 22
6.7 Templates .................................................................................................................... 22
6.8 SMS settings ................................................................................................................ 23
7. Phonebook ............................................................................................................................ 23
8. Call Center ............................................................................................................................ 24
8.1 Call history ................................................................................................................... 24
8.2 Call Settings ................................................................................................................. 26
9. Settings ................................................................................................................................. 26
9.2 Phone Settings ............................................................................................................. 27
9.3 Network Settings .......................................................................................................... 27
9.4 Security Settings .......................................................................................................... 27
9.5 Connectivity .................................................................................................................. 28
9.6 Restore Factory Settings .............................................................................................. 29
9.7 Sound effects ............................................................................................................... 29
10. Multimedia ........................................................................................................................... 29
10.1 Camera .............................................................................................................................. 30
10.2 Image viewer .............................................................................................................. 30
10.3 Video recorder ............................................................................................................ 31
10.4 Video Player ............................................................................................................... 31
10.5 Audio Player ............................................................................................................... 31
10.6 FM Radio .................................................................................................................... 32
10.7 Sound Recorder ......................................................................................................... 33
10. 8 File manager ............................................................................................................. 34
11. Organizer ............................................................................................................................. 35
11.1 Torch .......................................................................................................................... 35
11.2 Calendar ..................................................................................................................... 35
11.3 Tasks .......................................................................................................................... 35
11.4 Alarm .......................................................................................................................... 36
11.5 Calculator ................................................................................................................... 36
4
Page 5

I315 User Manual
11.6 Stopwatch .................................................................................................................. 36
12. Fun & Games ...................................................................................................................... 37
12.1 Games ........................................................................................................................ 37
13. User Profiles ........................................................................................................................ 38
14. Services ............................................................................................................................... 39
14.1 WAP ........................................................................................................................... 39
15. Input Method. ...................................................................................................................... 41
15.1 Text Input Method ...................................................................................................... 41
15.2 Numeric Input Method ................................................................................................ 42
Trouble Shooting………………………………………………………………………………………...3
Specific Absorption Rate Data .................................................................................................. 44
5
Page 6

I315 User Manual
1. Safety Information
Batteries
Never use a charger or battery that is damaged in any way.
Properly use the battery. Do not short-circuit the battery, which may damage the battery, cause
heat or cause fire.
Do not dispose of batteries in high temperature of in a fire as they may explode.
Return the waste battery to the dealer or designated recycling center. Do not dispose as
household waste.
Battery charging time depends on the remaining battery charge, the type of battery and the
charger used. The battery can be charged and discharged hundreds of times, but it will
gradually wear out. When your phone’s operating time is noticeably shorter than normal, it is
time to buy a new battery.
Use only original or approved chargers and batteries.
Unplug the charger from the electrical plug and the device when not in use.
Do not overcharge, which will damage the battery and shorten its life.
Leaving the battery in extremely hot or cold places will reduce the capacity of the battery. Cool
down or heat up the temperature to normal level (Li-ion batteries are particularly affected by
I:BE:G6IJG:H7:ADLP
Road safety
Your wireless phone gives you the powerful ability to communicate by voice, almost anywhere,
anytime. Therefore, you must uphold some important responsibility.
When you are driving, driving is your first responsibility. When using your wireless phone while
driving, be more alert and follow local regulations.
Understand the wireless phone and features, such as speed dial and redial which can help you
make a call more conveniently without disturbing your driving.
Use a hands-free set if possible. Hands-free accessories may promote the convenience and
safety of using your wireless phone.
Place your phone where is easy to access and does not require you to move your eyesight. If
receiving a call at an inconvenient moment, let your voicemail answer for you.
When on the phone, tell your conversation partner that you are driving. Hang up in traffic jams
or bad weather. Rain, rain with snow, snow, ice and traffic may be dangerous.
Air bags, brakes, speed control systems and fuel injection should not be influenced by radio
transmission. If you have these problems, contact your car dealer immediately.
6
Page 7

I315 User Manual
Switch off your mobile phone when fueling or anywhere two-way radio equipment usage is
prohibited. Do not put your phone near flammable and explosive substances. Internal spark
may cause fire or explosion.
Switch off the mobile phone prior to airplane take-off. To prevent interference to
communication systems in the plane, never use a phone during flight. Using a phone before
the plane takes off may be allowed by the crew in accordance with safety regulations.
During flight, make sure that your phone will not be automatically switched on by an alarm you
have set.
Operating environment
Remember to follow any special regulations in force in your area and always switch off your
phone whenever it is forbidden to use it, or it may cause danger.
When connecting the phone or any accessory to another device, read its user’s guide for
detailed safety instructions. Do not connect incompatible products.
It is recommended that the equipment only be used in the normal operating position (held to
your ear with the antenna pointing over your H=DJA9:G ;DG NDJG H6I>H;68IDGNDE:G6I>DCD; I=:
equipment and for the safety of personnel.
Do not expose the equipment to temperature below -P DG67DK:P
Electronic devices
Most electronic equipment is shielded from radio frequency signals. Consult the manufacturer
for relevant information.
*68:B6@:GH'6>CI6>C6B>C>BJB9>HI6C8:D;>C8=:H8B7:IL::C6L>G:A:HHE=DC:6C9
a pacemaker; do not put your phone in a pocket near the chest; use your ear furthest from the
pacemaker to reduce possible interference. If you have any reason to suspect that interference
is taking place, switch off your phone immediately.
Hearing aids: Some digital wireless phones may interfere with some hearing aids. In the event
of such interference, you may consult your hearing aid manufacturer.
Other medical devices: If you use any other personal medical devices, consult the
manufacturer of your device to determine if it is adequately shielded from external RF energy.
Your physician may be able to assist you in obtaining this information. Switch off your phone in
health care facilities when regulations posted in these areas instruct you to do so.
Vehicles: RF signals may affect improperly installed or inadequately shielded electronic
systems in motor vehicles. Check with the manufacturer.
Emergency calls
This phone, like any wireless phone, operates using radio signals, which cannot guarantee
connection in all conditions. Therefore, you should never rely solely on any wireless phone for
essential communications like medical emergencies.
To make or receive calls, the phone must be switched on and in a service area with adequate
7
Page 8

I315 User Manual
signal strength.
To make an emergency call, enter the local emergency number in standby mode and press
Snd to call.
Other important safety information
Use original or approved accessories. Any unapproved accessory may affect the
performance of your phone, damage your phone or even cause personnel injury.
Your wireless phone sends out an electromagnetic field. Do not put the phone near magnetic
storage media such as computer disks. Neighboring electric appliances such as TVs, phones,
radio receivers and PCs may affect the use of your phone and its performance.
Do not connect the phone to an incompatible device.
Only qualified personnel should service the phone or install the phone in a vehicle.
Care and maintenance
Your phone is a product of superior design and craftsmanship and should be treated with care.
The suggestions below will allow you to enjoy this product for many years.
Keep your phone out of the hands of small children and pets. They may accidentally damage
the phone or choke on small parts.
Keep the phone dry and avoid liquids that corrode the phone.
Do not use the phone with a wet hand, which may cause an electric shock.
Do not store the phone in hot areas, which can shorten the life of electronic devices, damage
batteries or melt accessories.
Do not store the phone in cold areas. When the phone warms up to its normal operating
temperature, moisture can form inside the phone, which may damage the phone’s electronic
circuit boards.
Do not expose your phone to hot sun which may overheat your phone.
Do not place your phone near flammable liquids, gases or explosive substances.
Do not drop or knock the phone. Rough handling can break internal circuit boards.
When cleaning your phone, use a slightly damp or anti-static cloth. Do not use a dry or static
cloth. Do not use chemicals such as cleaning solvents to clean the surface. Switch off the
phone first and then do the cleaning.
Do not paint the phone. Paint can prevent proper operation.
If your phone has a flash, do not use it too close to the eyes. This may cause damage to
eyes.
If the phone or battery gets wet and the label in the phone is damaged, phone repairs are no
longer guaranteed by the manufacturer’s warranty, even if the warranty for your phone has
not expired.
Improper use will invalidate the warranty! These safety instructions also apply to original
accessories
.
8
Page 9
I315 User Manual
2. Essential
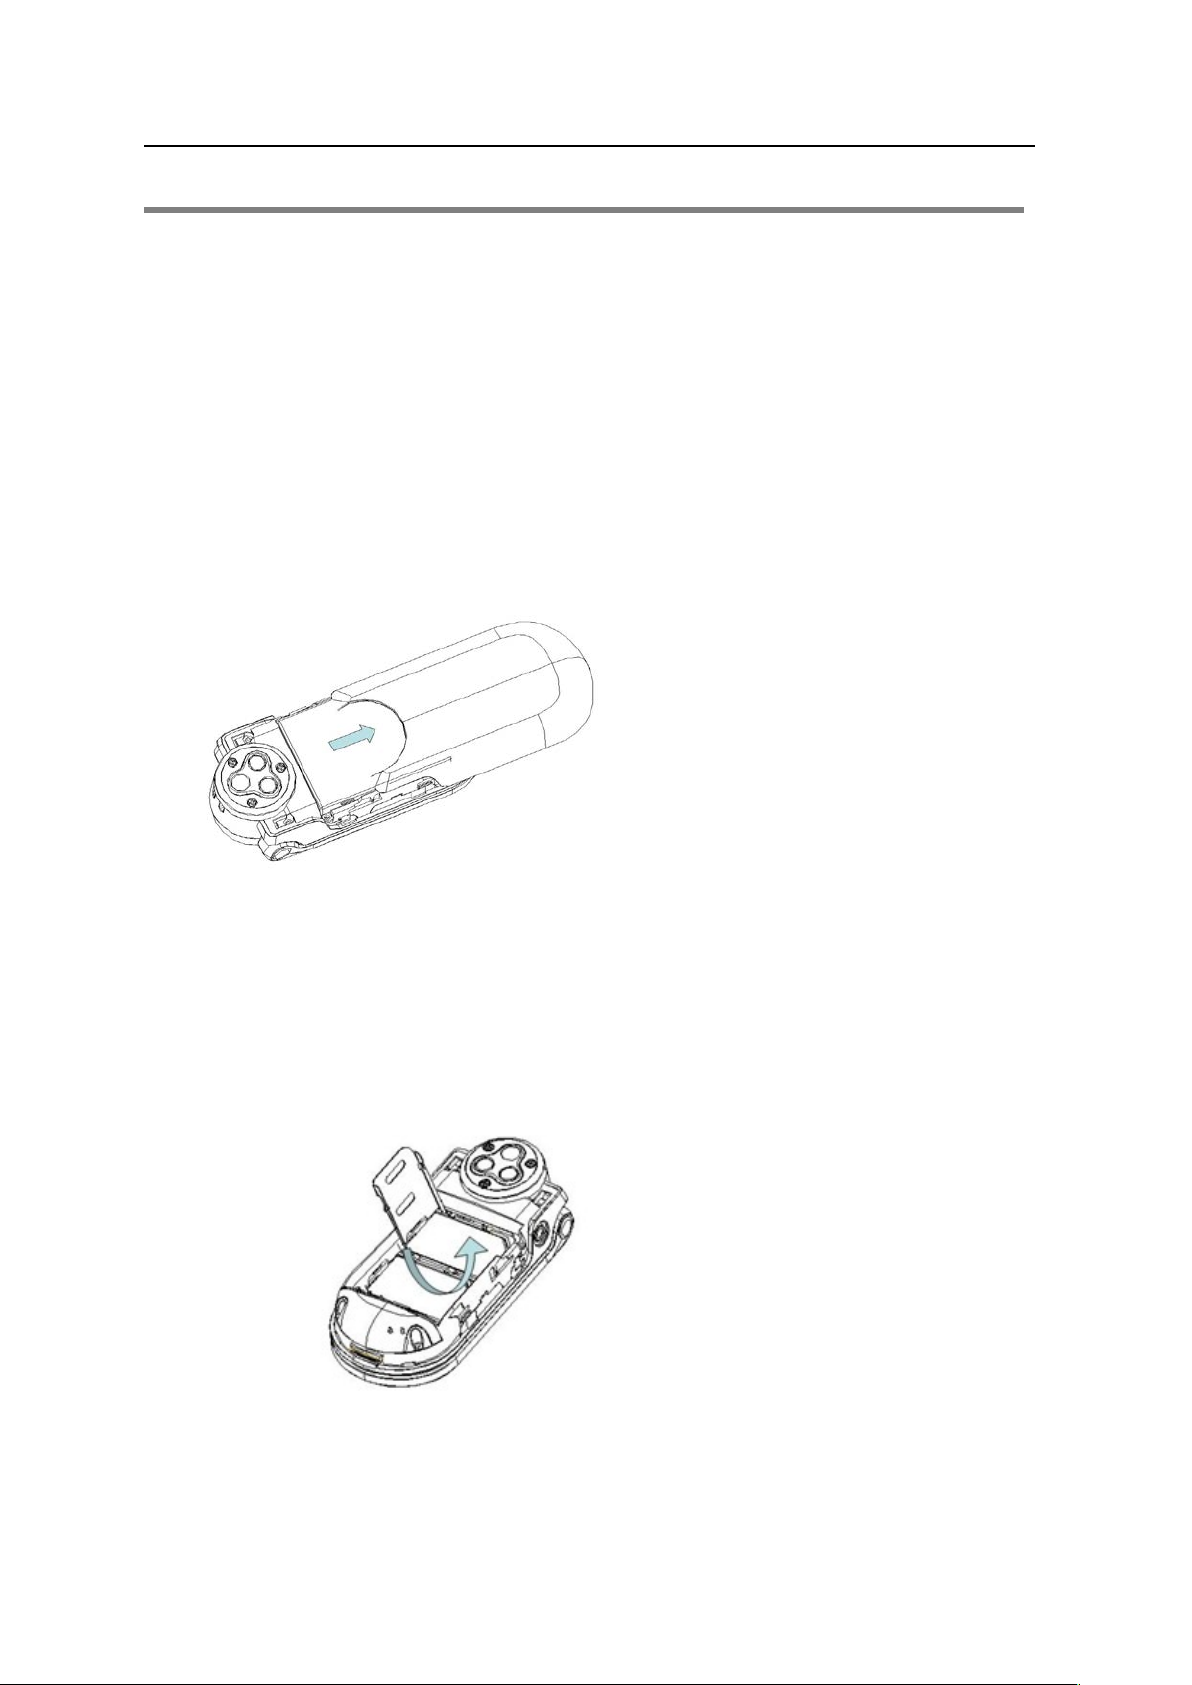
2.1 Install the SIM card
Keep your SIM cards away from the children.
Please consult your SIM card franchiser about the services and usage. SIM franchiser can be
the service provider, network provider or other franchisers.
Please turn off your mobile device and disconnect it with charger before removing the battery.
Note: turn off your mobile device and disconnect it with charger or any other device before
removing the battery door. Place the door on the phone before using your mobile phone.
1, Remove the battery door:
Press and slide the battery door to the top of the phone, then take the battery door off.
2, Insert the SIM card into the card slot:
Now you can see two card slots side by side, please insert the SIM cards with the right
direction as shown.
9
Page 10

I315 User Manual
2.2 Battery Use and Installation
Battery tips
Battery life depends on the network, signal strength, temperature, and accessories you use.
Always use Original batteries and chargers. The warranty does not cover damage caused by
non-original batteries, charger and/or accessories.
New batteries or batteries stored for a long time may take more time to charge
When charging your battery, keep it near room temperature.
When storing your battery, keep it uncharged in a cool, dark, dry place.
Never expose batteries to temperatures below -PP DG67DK:PP
Always take your phone with you when you leave your vehicle.
It is normal for batteries to gradually wear down and require longer charging times. If you
notice a change in your battery life, it is probably time to purchase a new battery.
Never dispose of batteries in a fire because they may explode.
Battery installation
1,Slide the battery door up and then remove the door.
2,Aim the metal terminals of the battery at those in the battery compartment and then push
down and into it.
10
Page 11

I315 User Manual
Battery charging:
New batteries are not fully charged. Open the protective cover on your phone’s accessory
connector port, then insert the battery charger plug into the accessory connector port on the
side of your phone as shown, and plug the other end into an electrical outlet. Your phone might
require several hours to charge fully. When your phone is power off, it might take a few
seconds to show charging display and it shows charge complete when finished. When your
phone is power on, the battery icon flickers when it starting charging and become still with full
bars in battery icon when finished.
3.3 Memory Card
The memory card is built-in the phone and non-removable & unexposed, You can save music
and other files.
3.4 Power on/off
Caution: On power up, the phone may prompt you to enter your SIM card PIN code to unlock
the SIM card. If your phone shows Input PUK code meaning your SIM card is locked, please
contact your service provider.
To turn on your phone, press and hold the power on/off key for two seconds. If prompted, enter
your four-to-eight-digit SIM card PIN code and/or four-digit unlock code.
If you don’t insert a SIM card, your phone shows Insert SIM. None of the functions related to
SIM card can be used and you can make an emergency call only.
To turn off your phone, press and hold the power on/off key for two seconds.
3.5 Make a call
1. Input the telephone number directly.
2. Press the send key to dial calls.
3. After calling, press the power on/off key or end key to end.
3.6 Answer or Reject a call
When there is an incoming call, the phone rings and /or vibrates showing the number or the
corresponding name.
Now the phone provide three mode,
Not any key(set in profiles): Press answer key or enter option and then select answer to
11
Page 12

I315 User Manual
receive a call. If you don’t want to answer, you can press the power on/off key or right soft key.
Any key: Except power on/off key and right soft key, press any key to answer a call.
Earphone/Bluetooth mode: when plugging the earphone (including bluetooth headsets, you
can answer a call by pressing the key on the earphone; when you are not convenient to press
the key, you can turn on the auto-6CHL:GBD9: DCAN >C :6GE=DC:BD9:6C9B6@:HJG:I=:
earphone is plugged, your phone auto-answers a call 5 seconds after it rings and/or vibrates.
3.7 Operation during a call
Press Option to perform following operation during a call:
Hold Single: Hold this call
End Single: Hang up and end this call
New Call*: Enter a new dialing display to make a new call
PhoneBook: Enter the phone book
Messages: Enter messages
Mute: Set mute on or off. When setting mute on, your voice can not be heard
through the line.
Swap*: Switch between the current call and the holding call
Conference*: You can add additional parties to a call.
Note: the menus marked with * must be supported by your SIM card. For details, please
contact your service provider. Only when two or more calls are on can Swap and Conference
show.
3.8 Insert international access code
When you are dialing an international call, keep press * key till the international call prefix “+”
shows and then enter the number in the following order:
+ Country code complete number send key
3.9 Dial a extension or voicemail number
You nee9ID:CI:G*E6JH:DG1L6>IL=:C9>6A>C<6C:MI:CH>DCCJB7:Gkeep press * key
to switch between ‘P’ and ‘W’. You can enter numbers as following:
District code exchange phone number P or W extension number send key
12
Page 13

Signal Strength
New messages
This icon flickers when the inbox is full and you need to delete messages to
I315 User Manual
3.10 Emergency calls
You can make emergency calls as long as your current location is network-covered which you
can know by checking the signal strength bar showing on the top left corner of the screen.
Note: B:G<:C8NCJB7:GHK6GN7N8DJCIGN.=::B:G<:C8NCJB7:GH>CNDJGE=one may not
work in all locations, and sometimes an emergency call cannot be placed due to network,
environmental, or interference issues.
4. Basic
4.1 Display
The idle shows when you turn your phone on:
The idle mainly includes status icons area, Letter area, and Application area.
Clue icon area
Note: For Dual-SIM models, please select SIM1/SIM2 before proceeding to
below steps.
The vertical bars show the network connection strength.
SIM card signal
SIM card is not open
This icon shows when you receive a new message.
The inbox is full.
receive new messages.
13
Page 14

New Media Messages
Turn alarm on
Earphone
Voice will be heard from the
earphone.
Alert Type
Missed calls
Call Divert
GPRS Connection
Roaming
Bluetooth
Stopwatch
Battery Capacity
I315 User Manual
This icon shows when you receive a new media message.
This icon shows when you turn alarm on.
This icon shows when you plug the earphone in.
Your current alert type:
Ring
Vibra
Vibra and ring
Vibra then ring
Silent
This icon shows when you divert all calls unconditionally.
This icon shows when you are viewing the missed call.
This icon shows when you divert all calls unconditionally.
This icon prompts you to the SIM card has connected to the GPRS status
This icon shows when your phone is in roaming state.
This icon shows when the Bluetooth is active.
This icon shows when stopwatch is being used.
This icon’s color shows the status of battery capacity.
14
Page 15

Showing the status of SIM cards respectively, mainly the network
Exceptionally, please carry the correct operation according to the hints.
Song Name
Shows the name of the music playing.
Owner Number
Shows the SIM number in your phone records.
Time and Date
Shows the time and date of your phone.
I315 User Manual
Text Area
In the area, you can see the following contents:
Operator Name
Tips: You can choose whether to show the date and owner number through the menu of
settings.
operator's name and SIM card’s current state etc.
For example, show that the "emergency call", said you can only make an
emergency call.
Functional Key Areas
This area shows you that the corresponding operation of the left and right soft keys. For
example, the standby interface shows: Menu, press the left soft key to enter the main menu to
choose the interface; Names, press the right soft key to check the contact list.
Tips: When you enter the main menu to process, please check the names corresponding to
the left and right keys, and then carry out the corresponding operations.
4.2 Password
The password of your phone is originally set to 0000. You can change it whenever you like.
You can also change your SIM card password or barred dial password but you need to contact
your service provider to change them.
Note: for details please contact your service provider.
15
Page 16

I315 User Manual
5. Functions
1 Phonebook
2 Call Centre
2-1 Call history
2-2 Call Setting
2-2-1 Advance settings
2-2-1-1 Blacklist
2-2-1-2 Auto redial
2-2-1-3 IP dial
2-2-1-4 Call time display
2-2-1-5 Call time reminder
2-2-1-6 Auto quick end
3 Settings
3-1 SIM settings
3-2 Phone settings
3-3 Network settings
3-4 Security settings
3-5 Connectivity
3-6 Restore factory Settings
3-7 Sound effects
4 Messaging
4-1 Write message
4-2 Inbox
4-3 Drafts
4-4 Outbox
4-5 MMS
4-5-1 Write message
4-5-2 Inbox
4-5-3 Outbox
4-5-4 Drafts
4-5-5 MMS settings
16
Page 17

I315 User Manual
4-6 Broadcast message
4-7 Templates
4-8 SMS settings
5 Multimedia
5-1 Camera
5-2 Image Viewer
5-3 Video recorder
5-4 Video Player
5-5 Audio Player
5-6 FM Radio
5-7 Sound recorder
5-8 File manager
6 Organizer
6-1 Torch
6-2 Calendar
6-3 Tasks
6-4 Alarm
6-5 Calculator
6-6 Stopwatch
7 Fun & Game
7-1 Games
8 User profiles
8-1 General
8-2 Meeting
8-3 Outdoor
8-4 Indoor
8-5 Headset
8-6 Bluetooth
9 Services
9-1 STK
9-2 Internet service
9-2-1 Homepage
9-2-2 Bookmarks
17
Page 18

I315 User Manual
9-2-3 Recent pages
9-2-4 Input address
9-2-5 Service inbox
9-2-6 Settings
Note: “STK” may show different contents based on different service providers. For Dual SIM
models, two STK menus may be shown based on the type of the SIM Card.
6. Message
You can receive and send messages,and MMS including Multimedia Information, attach photos,
pictures, music and text. And can also use broadcast message and voice mail box. All service is
web based requiring data service. Please consult the provider before using.
Messages make it possible for you to exchange messages with other wireless phone users.
Enter main menu from idle mode and select Message to enter.
Note: For Dual-SIM models, please select SIM1/SIM2 before proceeding to
below steps.
6.1 Writing Messages
You can write a new text message send to others, and also can insert template in the message.
When finished, you can perform following operations:
Send to Add a recipient address and send this message
Input method Choose the input mode when editing text message
Insert template Commonly used phrases can be inserted into when editing text
Insert number Numbers can be inserted when editing text
Insert name Names can be inserted when editing text
Insert bookmark Bookmarks can be inserted when editing text
Save to drafts Save this provision SMS to Drafts
6.2 Inbox
After entering the inbox menu, Depending on the selected mode, the phone vibrates or rings
when you get a new message with screen showing the new message icon and prompt lights
flickering. After you go back to idle mode,
new message.
18
/shows on the top of the status bar till you read the
Page 19

I315 User Manual
While reading a message, you can perform following operations:
Reply: Reply to a message
Call sender Call the current message sender
Forward: Send the message to somebody else
Delete: Delete the message
Use Number Extract the number from this message and perform operation with it
Delete All: Delete all the messages in the inbox
Mark several Can choose several messages in the current folder at one time to delete,
copy, and other related operations
Details View Message details
Advanced
Note:
receive new messages.
/ keeps flickering in idle when your inbox is full. Please delete some messages to
Can copy, move, address, and other operations
6.3 Drafts
In the draft menu, you can perform following operations.
messages not ready to be sent
You can perform following operation to the SMS stored:
Send Send the SMS again.
Edit Enter the SMS edit interface
Delete Delete the SMS.
Delete All Delete all the SMS in the draft box.
Mark several Can choose multiple messages in the current folder in one time to delete,
Drafts stores incomplete
copy, and other related operations
Advanced Can copy, move, address, and other operations
6.4 Outbox
In the outbox menu, you can perform following operations.
Enter outbox to view the sent messages that you saved to perform the following operations:
Send: Send this message to one contact person
Edit: Edit this message
Delete: Delete this message
Delete all: Delete all the messages in outbox
Mark several Choose multiple messages in the current folder in one time to delete,
copy, and other related operations
Advanced Can copy, move, address, and other operations
19
Page 20

Done
Confirmed the editing completed.
Cancel
Exit without saving edits
Input Method
Input method used when editing the text message.
Send only
Send the multimedia message edited.
Save and Send
Save the multimedia message edited and send.
Save to Drafts
Save the multimedia message edited to the draft box.
Send Options
Setup contents for the edited multimedia message.
Exit
Exit the editing interface without saving the message.
Add Number
Add the number of the multimedia message recipient.
Add Email
Add the E-mail of the multimedia message recipient.
Edit
Edit the recipient selected.
Delete
Delete the number from the recipient list.
Add text
Enter text in the current edited content
Add picture
Adding the selected picture file in the current edited content where
Cursor stopped
Add audio
Adding the selected sound file in the current edited content where
Add attacnment
Add additional files in this MMS section
Add slide before
Add a new page before the current page
Add slide after
Add a new page after the current page
Preview
View the contents of this MMS
Slide time
Set play interval time between the current page and the next
I315 User Manual
6.5 MMS
Write message
Option after editing the MMS:
When editing multimedia messages, you can see the following options: recipient, copied, send
secretly, topic, content etc.
Input the corresponding address in the recipient, copied or send secretly items, t
Done to operate the following operation:
hen press the
Against the recipient, copied or send secretly, can press the options key after editing to
operate the following operations:
Against the content of the multimedia message, press options to do the following operations:
Cursor stopped
Note: If your MMS can not send successfully, please check the corresponding settings of the
20
Page 21

I315 User Manual
MMS. In the Setting-MMS Setting-Profile, please change the connection type to the WAP.
Inbox
The Inbox is for storing received MMS. Depending on the selected mode, the phone vibrates or
rings when you get a new MMS with screen showing the new message icon and prompt lights
flickering. After you go back to idle mode,
/shows on the top of the status bar till you read the
new MMS.
Against the MMS in the inbox, you can operate the following operations:
View View the MMS
Reply Edit MMS to reply the sender or all
Reply by SMS Send a short message to the sender
Reply ALL Edit MMS to reply to the sender or all recipients
Forward Edit the corresponding information including the recipient, address of
the current MMS then send to other
Delete Delete the MMS
Delete All Delete all the MMS in the inbox
Porperties View the details of the MMS
Use details Extract the number or hyperlink from the message to access,
Outbox
Enter outbox to view the MMS that you saved and you can perform following operation:
View View the MMS
Send Edit the current message's To, Cc, recipients and other relevant
information and send to others
Edit Modify the current MMS
Delete Delete the MMS
Delete All Delete all the MMS in the outbox
Properties View the details of the MMS
Use details Extract the number or hyperlink from the message, and you can dial, save
the number; you can connect or add bookmarks for the hyperlink
Draft Box
Store the messages you save when you edit.
you can perform following operation to the MMS stored:
View View the MMS
Send Edit the current message's To, Cc, address and other relevant information
21
Page 22

I315 User Manual
and send to others
Edit Modify the current MMS
Delete Delete the MMS
Delete All Delete all the MMS
Porperties View the details of the MMS
Use details Extract the number or hyperlink from the message, and you can dial, save
the number; you can connect or add bookmarks for the hyperlink
MMS Settings
You can setup your MMS through the menu by your need as following:
Profiles Start or edit the service, when can not send MMS messages, you can
use the current server - option to type online WAP. In thisd menu,
please select the SIM card before you need to operate.
Common settings You can edit, send, receive, filter-related settings; to view the
multimedia content stored.
Note: If you fail to send MMS, please change the connection type to WAP in the server setting.
6.6 Broadcast message
Enter the Broadcast message menu, to perform the following operations.
Cell Broadcast is messages sent from network operator to GSM phone users, such as weather
broadcast, traffic situation, stock updates etc. every kind of Cell Broadcast has a fixed model
number and the phone can automatically store a Cell Broadcast from a new channel. The new
Cell Broadcast message overrides the old one if they are from the same channel.
Receive Mode: Select the statJHD;I=:7GD6986HIB:HH6<:DCDGD;;
Read Message: Read the broadcast messages
Language: Set the language of the broadcast messages
Channel Settings: Set the broadcast messages channel
Note: this function must be supported by the network. For more information about this please
contact your network provider.
6.7 Templates
The phone provides you 10 groups of commonly used phrases, you edit, delete, etc, and also
can choose to create a short message from a template
22
Page 23

I315 User Manual
6.8 SMS settings
Enter the settings menu, to perform following operations.
Profile Settings: Offer you four profiles and you can edit their names, set SC Address
and Valid Period etc.
Voicemail server
Computer response service: it will automatically give response (your
own KD>8: 86C 7: JH:9 H:C9 <G::I>C<H 6C9 G:8DG9>C;DGB6I>DC L=:C
you cannot answer a call
.
Common Setting: Set delivery report on or off
Memory Status: Check the capacity of messages stored.
Preferred Storage: Set the default message storage location, including phone storage and
SIM card.
Note: you need support from the service provider to receive delivery reports.
7. Phonebook
Select Phonebook from main menu to open phone book.
The phone book consists of phone storage and SIM card storage and you can use both of
them.
Note: For Dual-SIM models, please select SIM1/SIM2 before proceeding to
below steps.
Phone Storage: Store the name, default number, family number, company name, email
address, company number, fax number and group/individual ring for contacts.
SIM card Storage: The capacity depends on your SIM card type and there is only a name and
one default number in each item. For details, please contact your service provider.
Choose Add new contact in the Phonebook, entry Option menu you can perform following
operations:
Select In this menu you can add a new contact record, choose save to SIM or
phone
Search contact Quick Find contacts by entering the name
Mark several Select multiple contacts to send text messages, and delete
Caller groups There are 5 caller groups in your phone and you can set the group name,
group incoming call ring and group members.
Phonebook settings In this menu, you can set the speed dial, my number, card version and
23
Page 24

I315 User Manual
other settings, and also can copy, move, delete contacts and other
operations.
Select any contact record, enter the Options menu you can perform following operations:
View View all the information about the name.
Send text message Send messages to the item.
Send multimedia message Send MMS to the item
Call Use the Send key to call the sender
IP dial
Edit Edit the information of the contact.
Delete Delete the record.
Copy Copy the contacts stored in the phone storage into the SIM card or
Move Move the contacts stored in the phone storage into the SIM card or
Send contact Send current contact numbers by SMS, MMS and Bluetooth
Add to blacklist
Mark several
Caller groups There are 5 caller groups in your phone and you can set the group name,
Phonebook settings In this menu, you can set the speed dial, my number, card version and
IP calls on the item
vise-versa..
vise-versa.
Add the selected contact to the blacklist
Select multiple files in a folder
group incoming call ring and group members.
other settings, and also copy, move, delete contacts and other
operations.
8. Call Center
Enter the main menu Call Center, to perform the following operations.
Note: For Dual-SIM models, please select SIM1/SIM2 before proceeding to
below steps.
8.1 Call history
You can view the log, related information and corresponding operations.
View call history
Your phone keeps lists of incoming and outgoing calls, even for calls that didn’t connect. The
most recent calls are listed first.
Tip: the phone keeps only the latest call of the same number.
1, Find the lists of Dialed Calls, Received Calls, Missed Calls
24
Page 25

I315 User Manual
2, Press OK key to view the detail information: date, time and times etc.
3, press Option key to perform following operations:
View View all the information of this record
Call Call the number of this record
Send text message Send SMS to the number of this record
Send multimedia message Send MMS to the number of this record
Save to Phone Book: Save the number of this record to the phone book.
Add to blacklist Add the number in this record to the blacklist.
Edit before call Enter the number edit screen, you can modify, save or
dial the number.
Delete Delete the record.
Delete call history
You can delete all records in missed calls, dialed calls and answered calls, you can also
choose to delete all records of all three parts.
Call time
You can check the duration of calls made..
Last Call Shows the length of the last call.
Dialed Calls Shows the length of dialed calls.
Received Calls Shows the length of answered calls.
Reset All Reset the last call time, total dialed time and total incoming call time
Call cost
You can check the call cost of the phone up to now through the menu.
Last Call Cost Examine the last time call cost.
Total Cost Examine all the calls’ cost.
Reset Cost Input the PIN2 code, to clear all the records.
Max Cost Show the limitation of the currently cost, “0” means no limit.
Price Per Unit Press setting to setup the unit time rates.
Note: The call cost function must be supported by the network service provider. Reset the cost,
setup the maximun cost and rates need to input the PIN2 code, please check with your
network provider to gain the password.
SMS counter
You can examine the number of sent and received SMS.
25
Page 26

Caller ID
Input owner number or setup
Call Waiting
Setups the call waiting function.
Call Divert
Setups the call divert function.
Call Barring
Setups the call barring function.
Line Switching
Switch your current line and there are 2 lines available
I315 User Manual
GPRS Counter
You can examine the transmission flow when using the GPRS web, including the data flow of
last sent, last received, all sent and all received. You can also reset the records through the
Reset Counter menu.
8.2 Call Settings
You can perform following operations through this menu, some should be separated from
settings for SIM card or for other calls.
Note: For Dual-SIM models, please select SIM1/SIM2 before proceeding to
below steps.
Call settings
Advanced settings
This menu includes the call time display, call time reminder and auto quick end setting
Blacklist Can set 20pcs blacklist number. When this function is active, the
incoming calls in the black list will be shielded automatically.
Auto redial When this function is active, dial a phone number if they do not answer
will automatically redial the number
IP dial You can set three IP numbers in the phone, activate a set of IP numbers,
after you choose the IP number, the phone will automatically be added
to this group of IP numbers before the outgoing telephone numbers are
dialed
Call time display Turn on or off the call time display function
Call time reminder Can prompt the user during a call, select Close, remind once or set a
reminder cycle
Auto quick end When this function is active, the call will automatically end.
. Settings
You can set your favorite wallpaper, ring or some other function. According to the main menu -
Settings the configuration of the phone set .
26
Page 27

Time and Date
Set your current time zone, time, date and their display format.
Schedule Power
You can set up to 4 time points to automatically turn the phone on and off.
Language
Set the display language.
Prefer input
Select the preferred input method as you like.
Display
You can find submenus such as wallpaper, screen saver, power on display,
in display
Greeting text
When power on, the screen will show a few words. Switch on/off this function.
Dedicated Key
Set four menus that you can enter directly from idle by press the 4-way
LCD Back Light
Setup the brightness & time of the back light.
Network Selection
New search, Select Network, Selection Mode
Preferences
Set the preferred network during searching.
SIM security
3DJ 86C H:I-#' AD8@ *#(8D9: ;>Med dial, barred dial and change
Phone Lock
Set a password for phone lock and the default password is 0000.
Cover open lock
Set a password for cover open lock and the default password is 0000.
Change Password
Change the Phone Lock Password.
I315 User Manual
9.2 Phone Settings
Enter Settings from main menu, select Phone Settings and then you can set the following:
On/Off
methods
and power off display, show date and time, show owner number
characteristic.
navigation key up, down, left and right.
Note: your choice of time zone does not change the time and date you has setup. The setting
of Schedule Power On/Off won’t be activated if you set the same time for them.
9.3 Network Settings
Enter Settings from main menu, select Network Settings:
9.4 Security Settings
Enter Settings from main menu, select Security Settings and then you can perform following
operation:
settings
password for the SIM Card.
Note: for Pin Password, please contact your service provider; Fixed Dial and Barred Dial must
be supported by your SIM card. For details, please contact your service provider.
27
Page 28

I315 User Manual
9.5 Connectivity
Select the connectivity menu, you can perform the following operations:
9.5.1 Bluetooth
The phone provides Bluetooth function, select Bluetooth to enter, you can operate as follow:
Power
Select to turn on/off the Bluetooth Device, you must turn on the Bluetooth Device of the phone
before using it.
Visibility
Turn on or off the can be searched function.
My Device
The menu will list all the Bluetooth Device that you inquired and you can select the device you
need to perform the operations: Connect, Set as default audio device, Sevice list, Rename,
Delete, Delete all etc.; also can examine the service list of the device selected.
Search Audio Device
Select the menu after turning on the Bluetooth, the phone will inquiry the Bluetooth Device
within the scope automatically. Please sure that the Bluetooth Device that need to be inquired
is power on before inquiring.
My name
Can set the device name of the phone.
Advanced
You can perform the following operations to the phone’s Bluetooth device, such as :set the
audio path, storage location, sharing permission, remote control and the bluetooth device
address and other relevant operations
9.5.2 Data account
GPRS
In the sub-menu will list the current GPRS WAP settings to access account information on file
list, select a setting item, select "Edit" can be as follows
Account name:
APN: Input APN
User name: APN server’s user identity, default is empty
Password: APN server as needed to identify your password, default is null
Auth. Type: Press Left-right key to select normal or secure options, after “done” the set, you
can set the authentication type in the WAP authentication.
Primary DNS: Set the primary DNS address
Secondary DNS: Set the secondary DNS address
Account name can be edited and settings
28
Page 29

I315 User Manual
9.6 Restore Factory Settings
Enter Settings from main menu, select Restore Factory Settings and then you can restore
initialized settings for wallpaper, screen saver, ring etc.
9.7 Sound effects
Select Audio effect menu, you can set the audio effects , after open the Equalizer, you can set
the sound effect as normal, bass, dance, classical, treble, party, pop and rock.
10. Multimedia
Your phone offers multimedia applications and you can use Multimedia from main menu to
open it.
29
Page 30

Photos
Can view the pictures that stored in the folders.
Camera Settings
Set the status of LED highlight, shutter sound, EV, Contrast, Anti-flicker,
Image Settings
Adjust the photo’s size and quality.
White balance
Set the white balance status.
Scene Mode
Select night or auto\ mode
Effect settings
Set special effect to the photo which will be token.
Storage
Set the storage location.
Restore Default
Use the default settings.
View
View the image files supported by the phone.
Browse style
Can setup the browse style as: List style or Matrix style
Send
Send the file by MMS or Bluetooth.
Use as
Send the file to wallpaper to use.
Rename
Rename the file name.
Delete
Delete this picture file.
Sort by
Arrange the files by name, type, time, size or none.
I315 User Manual
10.1 Camera
Your phone has a hi-Mega pixel camera that you can take photos whenever and wherever you
like. After taking photos, store them in the phone memory or memory card (should be Sure the
memory card is inserted
Camera Settings
Press Options in viewfinder display and make detail settings:
delay timer and Cont-shot
Take a Photo
In the camera viewfinder state, there need to take the show in the frame, press the OK key to
take a photo.
After photo graphing, enter Options, Select Send to save and send the photo as multimedia
message or Via Bluetooth. Select Delete to give up saving and back to the view finder state.
Tips: All the photos are stored in the Photos file.
10.2 Image viewer
You can view the photos in this menu. All the photos related will be shown once you perform
this function. You can press left soft key to open option menu:
30
Page 31

Delete All files
Delete all the files in the current folder.
Storage
Set the view photos path: Memory card or phone.
Camcorder setting
Set the status of EV, Night mode and Anti-flicker
Video settings
Set the status of video’s quality, size & time limit
White balance
Set the white balance status.
Effect setting
Set special video effect.
Storage
Set the movie save path: memory card or phone.
Restore Default
Use the default settings.
I315 User Manual
10.3 Video recorder
Enter the video menu, the view-finder will appear on the screen. You can record movie by this
mobile.
Video Settings
Press left soft key to open Option menu:
reach and Record audio.
Record the Video
In the video viewfinder mode, press the OK key to start recording, press the OK key a second
time to pause the video; during the video recording press the right function key to stop
recording and goto the video save interface, option yes to save the video file, otherwise
abandon the current video.
Tips: All the videos are stored in the Videos file
10.4 Video Player
Choose Video Player to open it and view all video files. Press the Option and perform
following operations on the selected video: play, send, rename, delete, delete all files ,sort by
and storage.
During playing, press the up or down key to adjust the volume, press the left or right key to
control playing rate.
10.5 Audio Player
You can use the audio player to broadcast music. Press OK key to play or pause the current
music, press left key to the before, and press right key to the next. You can adjust the volume
of the MP3 press down key / up key.
31
Page 32

Player settings
Can set the Preferred Playlist’s store path, turn on / off the auto
Sound effects
By this menu you can set the sound effects, on / off the Equalizer,
Bluetooth settings
After set this item, you can listen music by Bluetooth headset.
I315 User Manual
Select List-Options-Settings you can perform the following operations:
generated list, set the repeat mode, on / off the shuffle playback and
background play function.
when open the equalizer you can set a variety of sound effects.
Note: Background Play is not available in Sound Recorder, Camera, Video Recorder and
Video Player. If you don’t need
withdraw the player.
Background broadcast, please suspend broadcasting then
10.6 FM Radio
Choose the FM Radio menu, and then turn the broadcasting FM Radio on.
Listen to the FM Radio
-I6GI I=: ' ,69>D ;JC8I>DC I=: >CI:G;68: L>AA H=DL I=: AD86I>DC (D C6B: >; H6K:9 6C9
frequency of the FM Radio channel.
Tips: To the channels saved, while listening, you can choose the location of the FM Radio
channel needed by press the corresponding number.
Press the left key to enter the Option menu, you can perform the following operations:
Channel list: Memory channels, you can manually edit the channel, or by "automatically
search and set" feature automatically generated.
Manual input: You can manually edit the channel, and it will automatically jump to the channel
Auto search: Available channels automatically found and stored in the channel list
Settings: Can set the background play, loudspeaker, record format, audio quality, record
storage location.
Record: Can be recorded on the selected channel.
Append: Adding in the before recorded file.
File list: Enter the file manager to view file.
Tips: This phone has no built-in antenna, if you want to listen to the radio, insert the headset
first.
Basic Usage
The phone offers you with the FM Radio background play function, to turn off the FM Radio,
32
Page 33

I315 User Manual
please press OK key and under the FM Radio interface after it turn gray, then quit.
When you want to adjust the volume, press up /down key to increase/lower volume.
Tips: When listen to the FM Radio, you can make or answer a call normally. While talking, the
volume of the broadcast will into mute automatically.
10.7 Sound Recorder
Press the Options and perform following operations on the sound file:
New record
start recording and during recording, you can press the pause option to pause and press again
to continue. Press the stop option to stop recording and go to save interface, press Yes to
save the sound file. If you prefer not to save it, press No to go back.
Tip: the sound files are stored in the Audio file.
Play
Play the selected sound file.
Append
For files in AMR format, you can add a new sound recording onto the original one and then
save them.
Tip: Append is not available for files in other format.
Rename
Change the name of the current sound file.
Delete
Delete the current sound file.
Delete All files
Delete all the sound files.
Use as
Use the currently selected audio files in profile.
Send
Send the current sound file to user profile, MMS or Bluetooth.
Settings
33
Page 34

Open
List all the folders and files
Format
Format the storage devices, the operation will delete all the data
Details
View memory card name, total size and the free size
Open
Show the file tree in this folder and list all files
Create Folder
Create a new folder and edit its name
Rename
Change the folder’s name
Delete
Delete the folder
Sort by
Arrange the folders or files by name, type, time, size or random
Play
For the multi-media files the phone supports, it show the menu; you
Send
Can send the select file as MMS or via Bluetooth.
Use as
Can send the audio files to user profiles, and use the image files as
New folder
Use this menu to build a new folder.
Rename
Edit the file’s name
Delete
Delete this file
Sort by
Arrange the folders or files by name, type, time, size or random
Copy
Copy this file to any other folder in the same storage device
Move
Move this file to any other folder in the same storage device
Delete All Files
Delete all the files in current folder
Detail
Show the updating time and its size
I315 User Manual
Set the file format and storage location.
10. 8 File manager
Select File manager and you can find the storage devices and the capacity of total space and
free space. On different objects, there are different operations.
Storage devices: press Option to perform following operations:
stored in the storage devices
Folders:press Option to perform following operations:
Files: press Option to perform following operations:
can play the multi-media files by the menu
wallpaper, screen saver and etc.
Tip: the options may differ depending on the object types.
34
Page 35

I315 User Manual
11. Organizer
Your phone provides you more management tool. Enter from main menu Organizer.
11.1 Torch
This phone could also work as an electric torch by opening the main menu Organizer
->Torch. You can choose on to turn the torch on, and choose off when it is on.
11.2 Calendar
The screen shows current date framed by special color box when entering Calendar. Press the
up, down, left or right key to move to different date. Press OK key or left soft key to enter the
corresponding menu and you can select view, view all, add event, delete event, jump to date &
go to weekly view.
11.3 Tasks
Enter Task from Organizer and you can check all tasks. While the task list is empty, press left
soft key to “Add” new tasks , choose Date, Call or Anniversary, different icons represent
different to distinguish your convenience . After choose the sort, enter the editing interface, you
need to edit the following: time, subject, alarm, location, priority. When you complete and save
this, it will be shown in the tasks list. While viewing a task, you can also enter Options by
pressing left key to perform following operation:
View
View the content of selected task
Add
Select Add to create a new task. You can edit its date, time, note, alarm mode and reminding
mode etc.
Edit
Edit the content of selected task
Delete
Delete the content of selected task
Delete overdue
Delete the expiration tasks relative to the current date
Delete All
Delete all the tasks
Jump to date
Set the date you want to jump to.
35
Page 36

I315 User Manual
Send vCalendar
Send the task as SMS, MMS or via Bluetooth.
Save as file
Save the task to file manager.
Note: there is fixed room for storing tasks and when no “Add” shows in “Option”, please delete
some indifferent tasks to save room for important ones.
11.4 Alarm
Your phone has an alarm clock with 5 separate alarms that you can set to alert you at the
I>B:HNDJHE:8>;N. To set an alarm clock, select one alarm and press left soft key to edit its
on/off, time, repeat, alarm tone, snooze and alert type.
11.5 Calculator
Enter calculator menu, you can process simply digital computing. Now the phone becomes
your calculator.
11.6 Stopwatch
Choose stopwatch, there are Typical Stopwatch and nWay Stopwatch for different
occasions and following are ways to use them.
Typical Stopwatch—there are two ways for your timing, that is Split Timing and Lap Timing.
Enter View record to check previous timing records.
nWay Stopwatch—press start you can time 4 courses by pressing the 4-way navigation key
up, down, left and right.
36
Page 37

I315 User Manual
12. Fun & Games
12.1 Games
Enter from menu Fun & Games Games, the phone provides you many games interesting,
which make your life wonderful.
To the rules of the built-in games, you can refer to the notes of the games.
And you can setup the sound and the shock through the game settings.
37
Page 38

I315 User Manual
13. User Profiles
Enter Settings--Profiles from main menu and there are several profiles that you can edit the
contents as you like: General, Meeting, Outdoor, Indoor, Headset and Bluetooth. Once you
pair your phone with an earphone or a Bluetooth device, the Headset and Bluetooth are
automatically activated and meanwhile the profile in use is deactivated.
You can choose any profile as you like and customize the selected one:
Tone Settings: Set the incoming call tone, incoming message tone and keypad tome
Volume: Set the volume of ring tone and key tone
Alert Type: Set ring, vibration only, vibration and ring , vibration then ring and silent
Ring Type: Set single ring, repeat ring or ascending ring
Extra Tone: Set warning ring and error ring on or off
Answer Mode: Set pressing any key to answer except power on/off key and right soft
@:NDGCDI-:I6JID6CHL:GDCDGD;;DCAN>C":69H:I'D9:
38
Page 39

I315 User Manual
14. Services
The phone provides you more application software, and it makes you more convenient.
14.1 WAP
Your phone can connect to the Internet or run web-based applications by using web browser. If
you need, please consult your service provider how to link the network. Enter from the main
menu Services select the WAP menu.
Note: Your phone >H6EEA>867A:IDI=:!*,-!:C:G6A*68@:I ',69>D-:GK>8:C:ILDG@A>C@
Type of the network link depends on your network service provider. This function must be
supported by network. For more information about this please contact your network provider.
Homepage
Selecting the main menu, you can log on the homepage set up to browse. If you do not set up,
you can use the website pre-set by the manufacturer.
Bookmarks
Enter the bookmark menu, the menu list shows all the bookmark exist, Select the options
button, you can do the following operations to the bookmark selected:
Goto Link the website appointed by the bookmark.
Edit Edit the name and address of the current bookmark.
Send Transmit the address of the bookmark by message or MMS.
Delete Delete the bookmark.
Delete All Delete all the information of bookmarks.
Add Bookmark Add new name and address of the bookmark.
Recent pages
The menu lists the website records your recent visit to facilitate your visit to the site.
Input Address
Enter the menu, after inputting the URL address of the WAP service that you want to visit,
select the option button and select complete. The phone automatically logs on the website you
input.
Service Inbox
39
Page 40

Select SIM
Set theSIM card setting
Selcet and start the network configuration file you need, can set up
Browser options
Waiting time of viewing the website and figures shown.
Service Message
Turn on/off the recipition of the service news.
Clear Cache
Use to clear the records in the cache.
Clear Cookies
Use to clear personal writing data.
I315 User Manual
You can check the web service message in this mailbox, and can also process delete etc.
Settings
You can select settings menu, then set up the content relates to the WAP service as following:
Profiles
Settings
homepage, account and login password etc.
40
Page 41

Numeric Key
Character
Numeric Key0
0,space
Numeric Key 1
1or symbols
Numeric Key 2
ABC2;abc2
Numeric Key 3
DEF3;def3
Numeric Key 4
GHI4;ghi4
Numeric Key 5
JKL5;jkl5
Numeric Key 6
MNO6;mno6
Numeric Key 7
PQRS7;pqrs7
Numeric Key 8
TUV8;tuv8
Numeric Key 9
WXYZ9;wxyz9
*Key
Select symbol
#Key
Switch input method
4-way navigation key up
Move up cursor
4-way navigation down
Move down cursor
4-way navigation left
Move left cursor
4-way navigation right
Move right cursor
Right soft key
Back or Clear
I315 User Manual
15. Input Method.
The phonesupports many input methods such as capital letter and small letter, numeric, and so
on:
- Write or edit a message
- Input or edit a name in phone book
- Search for a name
- …
15.1 Text Input Method
Text input method includes capital letter and small letter. Writing and keyboard both can use.
The keys corresponding the uppercase and lowercase input separated by “;”, and no
semicolon separates show that the two input method correspondingly appear the same
characters.
41
Page 42

Numeric Key
Character
Numeric Key0
0,
Numeric Key 1
1
Numeric Key 2
2
Numeric Key 3
3
Numeric Key 4
4
Numeric Key 5
5
Numeric Key 6
6
Numeric Key 7
7
Numeric Key 8
8
Numeric Key 9
9
*Key
Select symbol
#Key
Switch input method
4-way navigation key up
Move up cursor
4-way navigation down
Move down cursor
4-way navigation left
Move left cursor
4-way navigation right
Move right cursor
Right soft key
Back or Clear
I315 User Manual
While using English input method, please follow this order:
Keep tapping one key till the desired character shows.
Press * key to find symbols.
Press # key to switch input method.
Press right soft key to clear the wrong character or go back.
15.2 Numeric Input Method
Handwriting and keyboard can use meanwhile in numeric input method. The definition of keys
while using numeric input method:
While using Numeric input method, please follow this order:
Press numeric key 0-9 to input desired character or the number on the screen directly.
Press *key to find symbols.
Press # key to switch input method.
Press right soft key to clear the wrong character or go back.
42
Page 43

Issue
Solutions
Can not answer or
Make sure that the phone has been switched on.
Make sure the own number function in the call
Make sure the line switch in call setting is the
system preset line. Check whether you have set
fixed dialing or any other safety
Check whether you have set up call diverts.
Low voice
Check if the volume has been set too low.
Check whether you have set up the” Silent”
I315 User Manual
Trouble Shooting
This section lists some problems that you might meet while using your phone. If you feel your
phone is not working properly, please try reset settings first, and then follow the
Troubleshooting Guide. If you are still unable to solve problems, please contact the authorized
service center or the store from where you purchased the phone.
Make sure that the battery is charged.
Make sure that the signal intensity is high enough.
setting is system preset or number sending.
make a call
No ring
up call barring or
function.
Check whether you have inserted the proper SIM
card correctly.
option.
Check whether the ring volume is not too low
Move away from a noisy place to check if you can
hear the phone ringing.
Check whether you have set up call diverts.
43
Page 44

I315 User Manual
Specific Absorption Rate Data
This model meets international guidelines for exposure to FM Radio waves.
Your mobile device is a FM Radio transmitter and receiver. It is designed not to exceed the
limits for exposure to FM Radio waves recommended by international guidelines. These
guidelines were developed by the independent scientific organization ICNIRP and include
safety margins designed to assure the protection of all persons, regardless of age and health.
The guidelines use a unit of measurement known as the Specific Absorption Rate, or SAR. The
ICNIRP SAR limit for mobiles devices used by the general public is 2 W/kg.
As SAR is measured utilizing the device’s highest transmitting power, the actual SAR of this
device while operating is typically below that indicated above. This is due to automatic changes
to the power level of the device to ensure it only uses the minimum level required to reach the
network.
New phones must meet the international guidelines before coming into the market. The highest
SAR value for this device when tested at the ear was 0.85 W/kg and the highest tested SAR
value is 0.44 W/kg.
Information from the World Health Organization
The World Health Organization has stated that present scientific information does not indicate
the need for any special precautions for the use of SAR Data mobile devices. They note that if
you want to reduce your exposure then you can do so by limiting the length of calls or using a
“hands-free” device to keep the mobile phone away from the head and body. Improvement of
this device may cause a little change of the SAR data. However, the device is designed in
accordance with the guidelines in any case.
44
 Loading...