

Page 1

I121C FULL USER MANUAL
VERYKOOL
Page 2

CONTENT
I
Page 3

1. Warnings
Not following these simple guidelines may be dangerous
or illegal. Read the complete user guide for further inform-
ation.
TURN ON SAFELY
Do not turn on the phone when wireless phone is prohib-
ited or when it may cause interference or danger.
ROAD SAFETY
Obey all road safety laws. Always use both of your hands
to operate the vehicle while driving.
INTERFERENCE
All wireless phones may be sensitive to interference, which
may affect performance.
1
Page 4

TURN OFF IN HOSPITALS
Follow all restrictions. Turn off the phone near medical
equipment.
TURN OFF ON AIRCRAFTS
Follow all restrictions. Wireless devices can cause interfer-
ence on aircrafts.
TURN OFF WHEN REFUELING
Do not use the phone at/near refueling stations. Do not use
near fuel or chemicals.
USE SENSIBLY
Only qualified personnel may install or repair this product.
ENHANCEMENTS AND BATTERIES
2
Page 5

Use only appropriate enhancements and batteries. Do not
connect incompatible products.
WATER-RESISTANCE
Your phone is not water-resistant. Keep it dry.
BACKUP COPIES
Remember to make back-up copies or keep a written re-
cord of all important information stored in your phone.
CONNECTING TO OTHER DEVICES
When connecting to any external device, read its user
guide for detailed safety instructions. Do not connect with
incompatible products.
3
Page 6

2. Getting Started
2.1 Appearance
4
Page 7
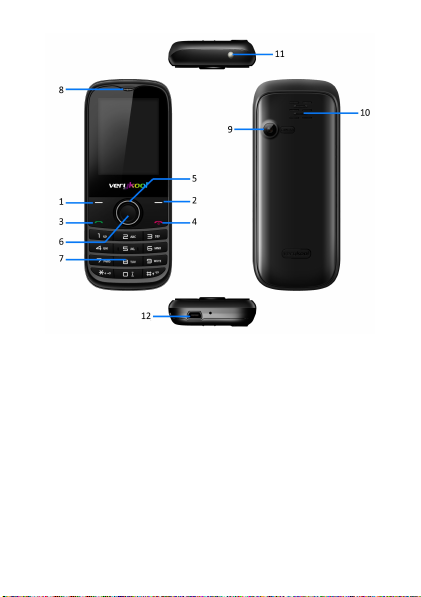
The Symbols above indicate:
1. Left Soft Key
2. Right Soft Key
5
Page 8

3. Dial Key
4. End Key/Power Key
5. Navigation Keys
6. OK Key
7. Number Keys
8. Receiver
9. Camera
6
Page 9

10. Speaker
11. Torch
12. USB
Port
2.2 Keypad Definition
Key Definitions
7
Page 10

Left Soft key/
Right Soft key
1. Execute functions that the leftdown/right-down corner indicator
shows.
2. In standby mode, press left
soft key to access Menu, press
right soft key to access
Names.
3. When keypad is locked,
press left soft key and right
soft key to unlock.
Navigation Keys 1. In other modes, it is used as
the navigation/direction key except for some special functions.
2. In the standby mode, press
navigation keys to enter short-
cuts functions.
OK Key 1. In standby mode, press this key
to enter main menu.
2. In the dial panel, after in-
putting numbers, press this
8
Page 11

key to do option.
3. In other mode, press this
key for confirmation.
End Key/ Power
Key
1. Mainly used as power on/off.
2. Press to return to standby
screen in any interface.
3. End calls or reject incoming
calls.
Dial Key 1. Press this key to dial or receive
an incoming call.
2. In standby mode, press this
key to access Dialed.
Number Keys 1. Use these keys to input num-
bers or letters.
Torch Light Key 1. In standby mode, long press
OK key to turn on/off torch light.
* Key 1. After inputting phone number,
quick press * key thrice, then the
symbol “P” appears and input the
extension number. You can make
an extension call.
2. In standby mode, long press
9
Page 12
* key to lock keypad.
# Key 1. In text editing interface, press
# key to switch the text input
method.
2. Press and hold # key to
transfer the profile of General/
Silent/Meeting in standby
mode.
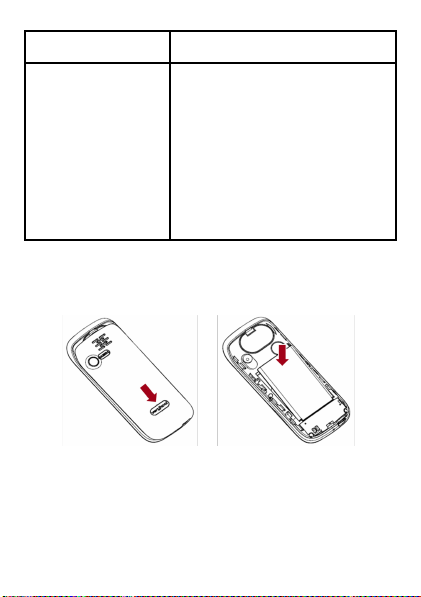
2.3 Battery Installation
Caution: Install according to the illustration above to
avoid breaking the battery connectors.
10
Page 13
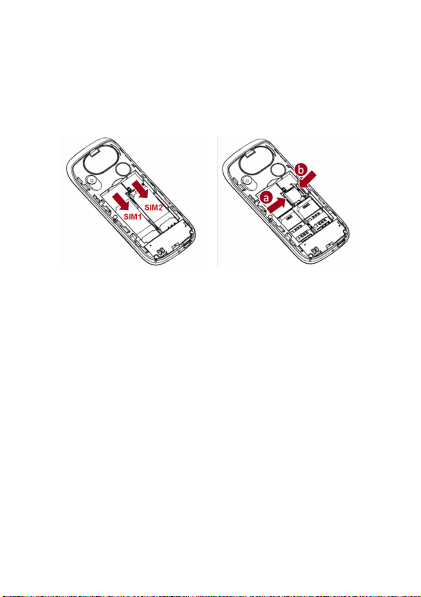
2.4 SIM Card/T-Flash Card Installation
** For Single SIM handset, you will only see one SIM on the
image below. **
To install a T-flash card, please follow the steps:
Step a: Insert the T-flash card into the slot.
Step b: Put down the cover and slide it toward the left side.
Caution: Do not bend or scratch your SIM card and T-
Flash card. Avoid exposing your SIM card and T-Flash
card to static electricity, water, or dirt.
Tips:Face the gold color contact point of SIM card to-
wards the cell phone and push the SIM card into the slot.
With the metal contacts facing down, gently slide the T-
11
Page 14

Flash card into the slot. Press and pull the cover up to lock
it.
2.5 Charging the Battery
Insert the charger into USB interface of the phone.
Connect the charger to a standard wall outlet and the bat-
tery power icon in the up-right corner of the screen will
start scrolling. When the battery bar stops scrolling, the
battery charge is complete. Press the two sides of the char-
ger plug and disconnect the charger from the phone.
!
When the battery is low, a “low battery” message
will display across the screen and the battery icon
will seem empty. If the battery level is insufficient,
the phone will turn off automatically. Do not use
your phone under low battery state for an extended
period of time or it may cause battery damage.
12
Page 15

2.6 Security Settings
―
PIN code
PIN code (Personal Identity Number) prevents unauthor-
ized use of your phone. The PIN code is provided by your
network operator with the SIM card.
If you enter the wrong code three times in a row, the PIN
code will be blocked. To unblock the PIN code, you need
to enter your PUK. Your PUK is provided by your network
operator.
―
Power on Password
Activate/Modify/Deactivate power on password (the length
of the password is 4-8 digital numbers). If you activate the
“Power on pwd”, you need to enter the password each time
you turn on the phone. If you want to modify the Startup
password or deactivate power on password, enter Modify/
Deactivate option to set.
13
Page 16

2.7 T-flash Card
Insert the T-Flash card into phone. This will expand the
Flash memory of the phone.
2.8 USB Cable
You can transfer and store files, such as MP3, MP4 and
pictures from PC, through USB cable, to the mass storage
in phone or identified SD card that is inserted.
3. Basic Functions
3.1 Making a Call
In standby mode, press numerical keys to input phone
number to dial. If you’re making a long distance call, add
the area code preceding the telephone number. After input-
ting phone number, quickly press * key thrice until the
symbol “P” appears, then input the extra number. You can
14
Page 17

also press OK key to access option. During a call, press the
navigation keys to adjust the volume.
3.2 Emergency Service
You can dial an emergency call without the SIM card. Con-
tact your service provider to get the emergency call num-
ber.
3.3 Answering a Call
When you receive a call, the phone will ring or vibrate and
will display an incoming call indicator. Press the Dial
key, left soft key, OK key to answer. During the calling,
you can press left soft key to access Option: Turn on
handfree, Shuttle, Phonebook, Messages, Call history,
Start recording, Mute, and DTMF on/off.
3.4 Rejecting a Call
15
Page 18

You can press end key to reject or end a call.
4. Guide to Menu Operations
4.1 Call History
In the call history menu, you can check dialed calls, re-
ceived calls, missed calls, etc.
―
Dialed: Display the latest dialed calls list.
―
Received: Display the latest received calls list.
―
Missed: Display the latest missed calls list.
―
Rejected: Display the latest rejected calls list.
―
Delete all: Delete all records.
―
Call time: Display the call time record of SIM1 and
SIM2.
4.2 Phone Book
In the phone book, you can store contacts' personal inform-
16
Page 19

ation and numbers while also search for previously stored
contacts. Press left soft key to access Option:
―
Add new: To add a new record into phone book
―
Search: To search record names in the phone book
―
Send SMS: Send SMS to the number.
―
Call: Select SIM1/2 to call the number
―
Delete: To delete the record
―
Mark: Mark the phone number, you can select to
mark one or mark all.
―
Copy: You can copy the record to SIM cards and
phone.
―
Move: Move the contacts between SIM cards and
phone
―
Others: Speed dial setting/ Own number/ Memory
query/ Double (Single) line display
4.3 Alarm
17
Page 20

The alarm clock feature sounds an alert or makes a vibra-
tion alert at a time you specify. There are 3 alarm clocks
can be edit and set.
4.4 Multimedia
4.4.1 Camera
Camera:
Press left soft key or OK key to enter. The photo can be
previewed in the screen; press OK key to shoot and right
soft key to back, left soft key to access Option: Photos,
Settings, Storage, Shoot mode, Size, Scene mode, Light,
Contrast, White balance, Delay, and Effect settings.
Video Recorder:
In Camera interface, press left soft key to access option
and select Shoot mode to change DC into DV. The opera-
tions of video recorder are similar to those of camera.
18
Page 21

4.4.2 Audio Player
This function menu is used to store and play the audio
files. Press the left soft key or OK key to enter and then
use the left/right navigation keys and OK key to operate
audio player. Press * key and # key to adjust volume. Press
left soft key you can access Option.
4.4.3 Video Player
Preview the videos. Press * key and # key to adjust
volume. Press navigation keys to select and OK key con-
firm to enter. Press left soft key to access to “List”, then
press left soft key again to access Option.
4.4.4 FM Radio
Enter FM radio (insert earphone). Press left/right naviga-
tion key to change frequency, press * key and # key to ad -
just volume. Press the left soft key to access Option. Select
19
Page 22

“Off” to turn off the radio.
4.4.5 Sound Recorder
You can take a recorder in this function. From the left to
the right: Play/Pause, Stop, Record/Recording Pause, Re-
cord File list. Use * key and # key to adjust the volume.
Press OK button to record. After record, press left soft key
to access Option: Audition, Record again, Delete, Send,
and Record file list. After entering the record file list, se-
lect one file, press left soft key to access Option.
4.5 Messages
4.5.1 Write Message
This function can begin a new message. After completing
the message, press left soft key to access to option:
―
Send: Input number or press left soft key to access
to “Name”. Select SIM1 or SIM2 to send the mes-
20
Page 23

sage.
―
Writing language: Select writing language.
―
Insert template: Select a template to insert to the
message.
―
Contact info: Insert a number to the message.
―
Add phiz: Select a phiz to insert to the message.
―
Save: Save the edited message to draftbox.
4.5.2 Inbox
After entering the Inbox, press up/down navigation key to
select messages. Press OK key to check the details of mes-
sage, or press left soft key to access Option.
4.5.3 Outbox
Checks the information of unsuccessfully sent message in
outbox. Press left soft key to access to Option.
21
Page 24

4.5.4 Draftbox
You can save unsent and edit incomplete messages in
draftbox. Press left soft key to access to Option.
4.5.5 Sentbox
Check the message in sentbox. Select one message to open,
or press left soft key to access Option.
4.5.6 More
4.5.6.1 Templates
Press up/down navigation key to select a template. You can
edit, send, or turn back to upper menu.
4.5.6.2 Voice Mail
This function needs a network supply. Please contact with
your service provider for more information. Select SIM1 or
SIM2, you can enter Line 1 number, Line 2 number, Fax
number, and Data number.
22
Page 25

4.5.6.3 Broadcast
―
Read: Read broadcast
―
Startup: Select Turnon/Deactivate
―
Channel: Check channel list
―
Language: all language, English, etc
4.5.6.4 SMS Settings
To set parameters related to SMS.
4.5.6.5 Memory Status
Check the message memory of SIM cards and phone.
4.5.6.6 SMS Count
Check amount number of sent and received SMS.
4.6 Organizer
4.6.1 Calendar
You can use this feature to view the year, date easily. Use
navigation keys to navigate other date.
23
Page 26

4.6.2 Bluetooth
This mobile phone support Bluetooth wireless connection.
You can establish wireless connection between mobile
phone and device to realize voice communication, data ex-
change and synchronization. Press left soft key or OK key
to enter: Open/Close bluetooth, Bluetooth visibility, Paired
device, My bluetooth name, and Bluetooth file location.
4.6.3 Calculator
This feature can use your phone as a calculator for simple
calculations. Press number keys to enter the numbers. Use
following keys to calculate
:
Navigation keys: +, -, ×, ÷
OK key: Show the calculation result.
* Key: Decimal point
4.7 Pastime
24
Page 27

4.7.1 Picture Browser
Enter picture browser, you can choose photos to view or
return. Press left soft key to access to Option: Change
folder, Send, Slide play, Delete, Rename, Mark, Detail and
Slide setting.
4.7.2 E-Book Reader
Read E-Book stored in memory card. Select one txt file to
open, and then press left soft key to access Option: Add
bookmark, See bookmark, Jump to start, Jump to end,
Jump to percent, and Turn on/off backlight. Press right soft
key to back to the TXT file list, use up/down navigation
keys to select the TXT files. Then press left soft key to ac-
cess Option.
4.7.3 Snake
Your phone supplies Snake; you can play the game
25
Page 28

whenever you want.
4.8 File Manager
Enter this menu; you can check the files store on memory
card. Select one file and press left soft key, you can do op -
tion.
4.9 Settings
4.9.1 Call
―
Dual SIM Setup
Set the parameters related to dual SIM.
―
Network Select
This function can let you select the network manually or
automatically. Select SIM1/SIM2 and then access:
!
Auto Select: Press the left soft key and confirm, the
mobile phone will search various networks. This
operation will let your phone register the most suit-
26
Page 29

able network.
!
Manual Select: Press the left soft key and confirm,
the mobile phone will search various networks. You
can select the suitable network from the listed net-
works.
―
Call Divert
When the call divert is activated, incoming calls will be di-
verted to voice mail or other phone numbers according to
the call divert settings.
―
Call Barring
When the call barring is activated, some of the calls will be
barred according to the call barring setting condition. Con-
tact your service provider to sign up for call barring.
―
Call Waiting
Set the mode of call waiting, this function need to be activ-
ated.
―
Hide ID
27
Page 30

To set whether hide your ID.
―
Line Switching
To select Line 1 or Line 2.
―
Flight Mode
You can do the settings: Active or Select When Power On.
―
More
!
50 Secs Warning
Set: Activate/ Deactivate.
!
Answer/Reject Mode
Set: SMS reply after reject/ anykey answer
!
Auto Redial
Set: Activate/ Deactivate.
!
Call Limiter
To limit the call duration. When set the function activated,
input time (1-9999s) to set the limiter.
4.9.2 Phone
28
Page 31

―
Time & Date
You can set time, set date, time display type, and date dis-
play type.
―
Language
You can choose several languages under this function.
―
Set Shortcut
You can select different functions for shortcuts.
―
Schedule Power On/Off
You can set Auto Power On and Auto Power Off of: Time,
Mode (Once/Every Day/ Every Week).
―
Power Management
To check battery capacity here
―
Restore Factory
Input default password 1234 to restore factory settings.
―
Torch
Select Activate or Deactivate to turn on/off torch .
29
Page 32

4.9.3 Display
―
Wallpaper
You can set wallpaper under this function.
―
Idle Display
You can choose the items list under this function. This can
be multiple selected.
―
Contrast
Press left/right navigation keys to adjust contrast, and then
press left soft key or OK key to confirm.
―
Backlight
Set Backlightness and Time here.
―
Keypad Light
Set keypad light or deactivate.
―
Animation Effect
You can set animation effect of power on animation, power
off animation.
30
Page 33

4.9.4 Security
―
PIN
!
PIN number setting can avoid unauthorized usage
of SIM card.
!
If PIN number has been wrongly inputted for 3
times, the SIM card will be locked. PUK number is
needed to unlock the SIM card. Please contact the
network provider if you don’t know the PUK num-
ber.
!
The default setting PIN number is provided by the
network operator, please set your own PIN number
as soon as you receive the phone.
―
PIN2
You can modify the PIN2 number here.
―
Privacy Protect
Set a password for your phone to protect some functions.
The default password is 1234.
31
Page 34

―
Auto Key
You can set the time to lock the keypad automatically.
―
Red Key Locks Keypad
After setting for activate, by pressing red key in standby
mode to turn off the screen and lock keypad.
―
Power on Pwd
Set the password for power on.
4.9.5 User Profiles
This phone provides several profiles, by pressing left soft
key or OK key, you can enter option to set: Active, Set -
tings, and Rename.
5. Entry Mode
You can use several methods for entering text and num-
bers. By selecting a Text Entry Mode, the phone provides a
32
Page 35

few Text Entry Mode for new adding, editing contact re-
cords, finding contacts, editing SMS and writing memos.
Select Text Entry Mode:
5.1 Letter entry mode
Press a key once to insert the first letter on the key, twice
for the second letter, etc. If you pause briefly, the last letter
in the display is accepted and the text awaits the next entry.
For example, press the "2" key continuously, it will appear
“a”, “b”, “c”, “2”one by one.
5.2 Number entry mode
Number Entry Mode can input the number in the text, such
as telephone number. Tap the proper number and input it.
6. Care and Maintenance
33
Page 36

Battery care
• Your device is powered by a rechargeable battery. When
the power is weak, please charge the battery. In order to
extend the lifespan of the battery, use all the battery's
power before recharging.
• Unplug the charger from the electrical plug and the
device when not in use. Do not leave the battery connected
to a charger more than a week. Overcharging may shorten
its lifespan.
• Extreme temperatures can affect the ability of your bat-
tery to charge. Battery needs the fit temperature. If the sur-
rounding temperature is over 40°C, the battery cannot be
charged.
• Use the battery only for its intended purpose. Never use
any charger or battery that is damaged.
Do not short-circuit the battery. Accidental short-circuiting
can occur when a metallic object such as a coin, clip, or
34
Page 37

pen causes direct connection of the positive (+) and negat-
ive (-) terminals of the battery. (These look like metal
strips on the battery.) Short-circuiting the terminals may
damage the battery or the connecting object.
• Leaving the battery in hot or cold places, such as in a
closed car in summer or a freezer in winter conditions, will
reduce the capacity and lifetime of the battery. Always try
to keep the battery between 59°F and 77°F (15°C and
25°C). A hot or cold battery may not function temporarily,
even when the battery is fully charged.
• Battery performance is particularly limited in temperat-
ures below freezing.
• Do not dispose of batteries in a fire! Dispose of batteries
according to local regulations. Please recycle when pos-
sible. Cell phones are not considered household waste.
Mobile phone maintenance
• Keep the device dry. Precipitation, humidity, and all types
35
Page 38

of liquids or moisture can contain minerals that will cor-
rode electronic circuits. If your device does get wet, re-
move the battery and allow the device to dry completely
before replacing it.
• Do not use or store the device in dusty, dirty areas. Its
moving parts and electronic components can be damaged.
• Do not store the device in hot areas. High temperatures
can shorten the life of electronic devices, damage batteries,
and warp or melt certain plastics.
• Do not store the device in cold areas. When the device re-
turns to its normal temperature, moisture can form inside
the device and damage electronic circuit boards.
• Do not attempt to open the device other than as instructed
in this guide.
• Do not drop, knock, or shake the device. Rough handling
can break internal circuit boards and fine mechanics.
• Do not use harsh chemicals, cleaning solvents, or strong
36
Page 39

detergents to clean the device.
• Do not paint the device Paint can clog the moving parts
and prevent proper operation.
• Use only the supplied or an approved replacement an-
tenna. Unauthorized antennas, modifications, or attach-
ments could damage the device and may violate regula-
tions governing radio devices.
All of the above suggestions apply to your device, battery,
charger, or any enhancement. If any device is not working
properly, take it to the nearest authorized service facility
for service.
7. Technical Information
Weight: 105g (with battery)
Size: 109 ×44 ×13.2mm
Battery: 1650mAh
37
Page 40

Networks: GSM
Battery work times refer to the list below (Will not an-
nounce if the capacity is changed):
The operation time of the battery depends on conditions
such as:
• Transmitting power level
• Signal (distance between the phone and the base station)
• Network parameters defined by the operator
• Phone use (WAP, games, SMS)
• Charging procedure used
Exclusions:
Subject to the exclusions contained below:
1. Damage due to the improper use.
2. User does not follow the manual.
Explanation:
The company has the final right of the explanation for this
document.
38
Page 41

Software upgrades will not be announced.
All the configurations mentioned in this user manual is
only for reference; please refer to the actual phone.
FCC RF Exposure Information and Statement
The SAR limit of USA (FCC) is 1.6 W/kg averaged over
one gram of tissue. Device types I121C (FCC ID:
WA6I121) has also been tested against this SAR limit. The
highest SAR value reported under this standard during
product certification for use at the ear is 0.296 W/kg and
when properly worn on the body is 0.221 W/kg. This
device was tested for typical body-worn operations with
the back of the handset kept 1.5cm from the body. To
maintain compliance with FCC RF exposure requirements,
use accessories that maintain a 1.5cm separation distance
between the user's body and the back of the handset. The
39
Page 42

use of belt clips, holsters and similar accessories should
not contain metallic components in its assembly. The use
of accessories that do not satisfy these requirements may
not comply with FCC RF exposure requirements, and
should be avoided.
FCC WARNING
This device complies with Part 15 of the FCC Rules. Oper-
ation is subject to the following two conditions:
(1) This device may not cause harmful interference, and
(2) This device must accept any interference received, in-
cluding interference that may cause undesired operation.
NOTE 1: This equipment has been tested and found to
comply with the limits for a Class B digital device, pursu-
ant to part 15 of the FCC Rules. These limits are designed
40
Page 43

to provide reasonable protection against harmful interfer-
ence in a residential installation. This equipment generates,
uses and can radiate radio frequency energy and, if not in-
stalled and used in accordance with the instructions, may
cause harmful interference to radio communications. How-
ever, there is no guarantee that interference will not occur
in a particular installation. If this equipment does cause
harmful interference to radio or television reception, which
can be determined by turning the equipment off and on, the
user is encouraged to try to correct the interference by one
or more of the following measures:
- Reorient or relocate the receiving antenna.
- Increase the separation between the equipment and re-
ceiver.
-Connect the equipment into an outlet on a circuit different
from that to which the receiver is connected.
-Consult the dealer or an experienced radio/TV technician
41
Page 44

for help.
NOTE 2: Any changes or modifications to this unit not ex-
pressly approved by the party responsible for compliance
could void the user's authority to operate the equipment.
NOTE 3: The manufacturer is not responsible for any radio
or TV interference caused by unauthorized modifications
to this equipment. Such modifications could void the user’s
authority to operate the equipment.
42
 Loading...