

Verve navi2coach Quick Start Manual
PAIRING — ANT+ Sensoren verbinden
1
1
2
2
Quickstart
Training
Navigation
Geocache
Waage
Einstellungen
START & STOP Taste
Hauptmenü - Kurzer Tastendruck
Aufrufen des Sportmodus und
starten der Sensorsuche
Sportmodus - Kurzer Tastendruck
Starten bzw. Pausieren einer
Aufzeichnung
Sportmodus - Langer Tastendruck
Beenden und Speichern der
laufenden Aufzeichnung
POWER-Taste
Langer Tastendruck
Gerät ein- bzw. ausschalten
Menü - Kurzer Tastendruck
Aktuelles Menü verlassen
Sportmodus - Kurzer Tastendruck
Pausieren der Aufzeichnung
LAP-Taste
Sportmodus - Kurzer Tastendruck
Speichern einer Zwischenzeit
Sportmodus - Langer Tastendruck
Setzen eines POIs
Obere Taste
Menü
Aufwärts durch die Menüs scrollen
Sportmodus
Trainingsdatenanzeige: Aufrufen weiterer
Datenseiten (vor)
Navigationsansicht: Zoomfunktion (+)
Mittlere Taste
Menü
Auswahl bestätigen
Sportmodus
Wechseln zwischen den
Anzeigekategorien (Daten & Navigation)
Untere Taste
Menü
Abwärts durch die Menüs scrollen
Sportmodus
Trainingsdatenanzeige: Aufrufen weiterer
Datenseiten (zurück)
Navigationsansicht: Zoomfunktion (-)
TASTENFUNKTIONEN
GRUNDEINSTELLUNGEN
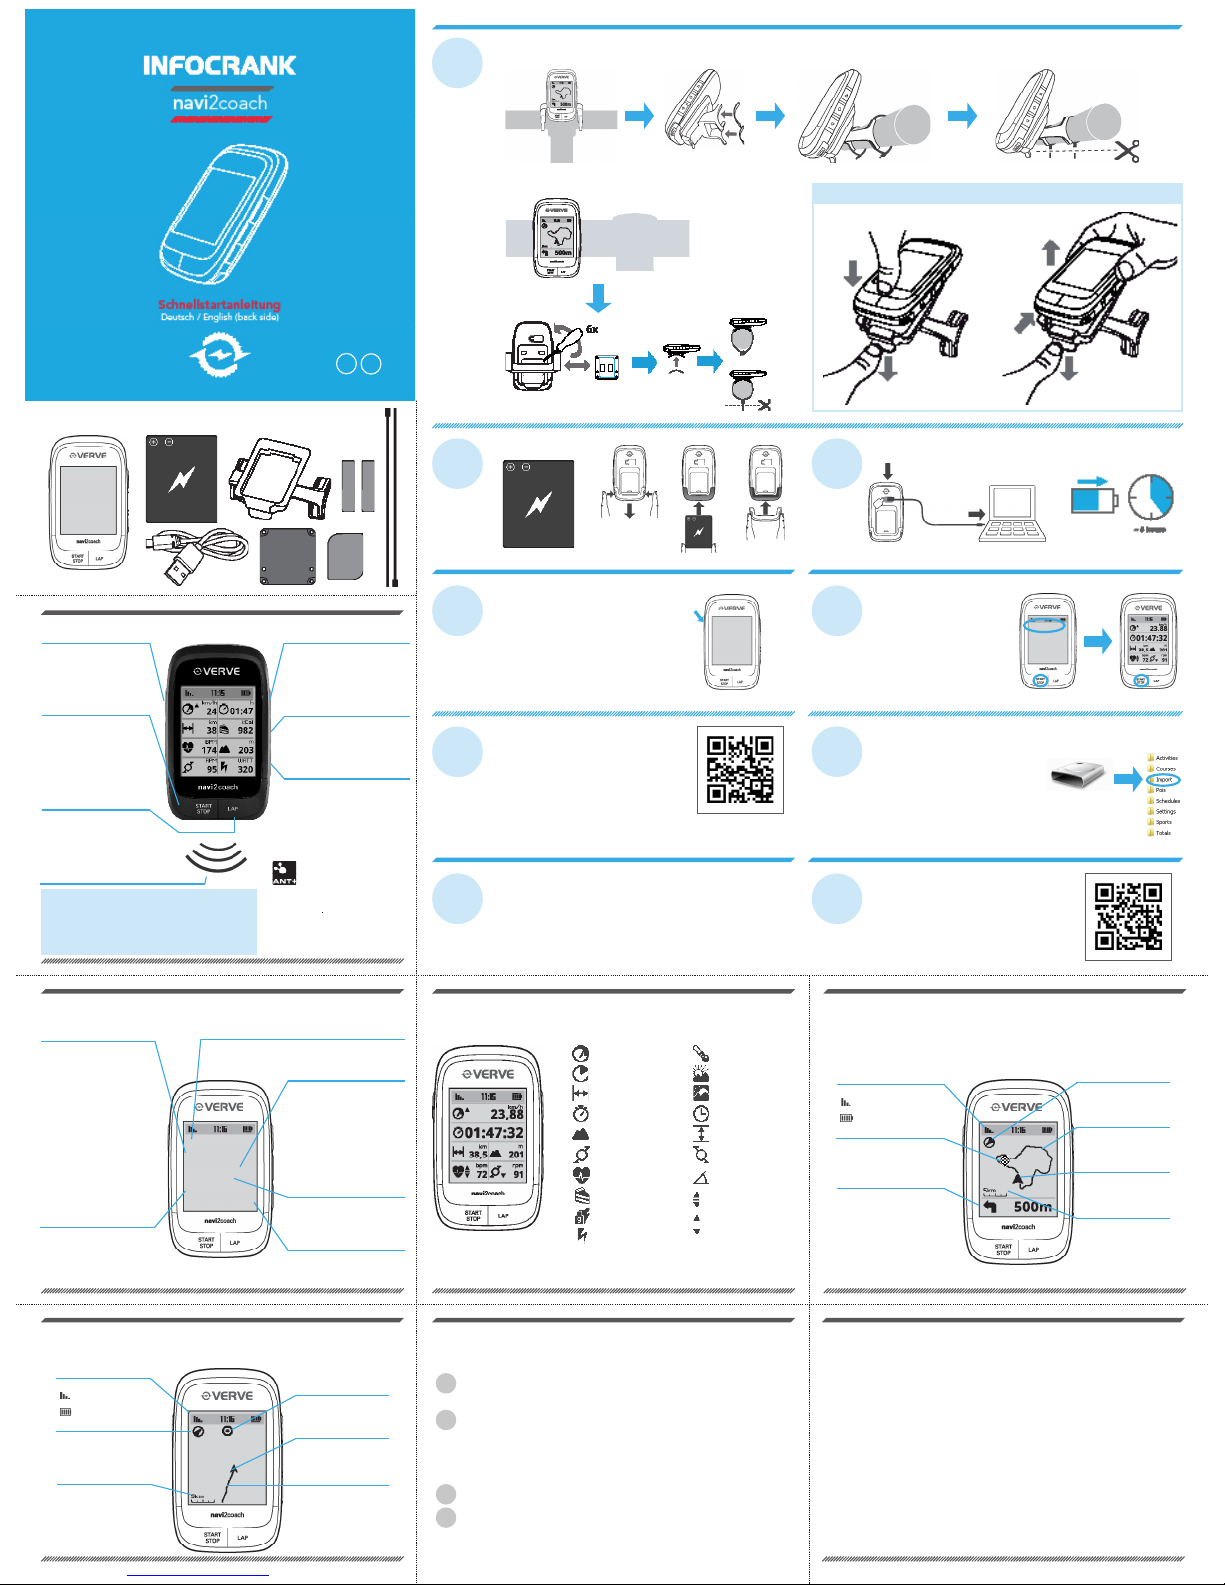
Schalten Sie das navi2coach mit der POWER-Taste an,
indem Sie diese 2 Sekunden lang gedrückt halten. Beim
ersten Einschaltvorgang führt Sie das navi2coach durch
die wichtigsten Grundeinstellungen und ermöglicht Ihnen,
ebenfalls optionale ANT+ Sensoren an das Gerät zu pairen
(anzubinden). Montieren und aktivieren Sie daher vor der
ersten Inbetriebnahme Ihre Sensoren um das Pairing gleich
mit durchführen zu können. Sowohl der Einstelldialog
als auch das Pairen von ANT+ Zubehör können über das
Hauptmenü Einstellungen erneut aufgerufen werden. Im
Einstellungsmenü können später erweiterte Einstellungen
vorgenommen werden.
LADEVORGANG
MONTAGE
Variante A
TRAINING AUFZEICHNEN
Drücken Sie im Hauptmenü die START/STOP-
Taste, oder wählen Sie den Menüpunkt Quickstart
aus. Der Sportmodus wird aufgerufen und das
Gerät sucht nach den gepairten Sensoren. Mit
START/STOP wird die Aufzeichnung begonnen.
Während der Aufzeichnung können Sie mittels
der START/STOP-Taste das Training beenden
oder pausieren.
Variante B
1
2
4
6
8
3
5
7
9
BATTERIE EINLEGEN
2 Sek.
TRAININGSSOFTWARE
Laden Sie sich auf unserer Website die TrainingLab-Software
herunter. Sie ermöglicht Ihnen, die aufgezeichneten
Trainingsdaten auszulesen und auszuwerten. Mit dem integrierten
Workouteditor können Sie schnell und einfach Trainingseinheiten
an Ihrem PC erstellen.
TRAININGSPLÄNE
Das Onlineportal Trainingsplan.com erstellt Ihnen automatisch
und ohne Trainingsvorkentnisse ihrerseits, einen auf Sie
zugeschnittenen Trainingsplan, den Sie auf das navi2coach laden
können.
TRAININGLAB.COM
NAVIGATION STARTEN
Wenn Sie noch keine fertig geplante Route
besitzen, erstellen Sie sich mit einem der gängigen
Planungsportale wie z.B. Gpsies.com eine Route im GPXoder FIT-Format. Alternativ nutzen Sie eine kommerzielle
Planungssoftware wie z.B. MagicMaps. Schließen Sie
anschließend das navi2coach an ihren Computer an
und warten, bis das Gerät als Wechsellaufwerk mit
dem Namen navi2coach erkannt wurde. Öffnen Sie das
Laufwerk und ziehen Sie die erstellte Datei in den Ordner
Import.
Über den Menüpunkt Navigation > Routen können Sie
die geplante Route aufrufen und starten.
TRAININGSFUNKTION NUTZEN
Der navi2coach verwendet das FIT-File Format um Trainingsanweisungen während des Trainings
bereitzustellen. Workout-FIT-Files können sowohl mit unserer Trainingssoftware erstellt werden oder
über diverse Trainingsportale im Internet, die dieses Format ebenfalls unterstützen, heruntergeladen
werden. Übertragen Sie die Workoutdatei via trainigLab auf das Gerät oder ziehen Sie die Datei am
Computer in den Geräteordner Import des angezeigten navi2coach Wechsellaufwerkes (siehe Schritt 7).
Über den Menüpunkt Training > Trainingsplan können Sie das geplante Training aufrufen und
starten.
DETAILLIERTE ANLEITUNG ONLINE
Auf unserer Website www.navi2coach.com erhalten Sie weitere
detaillierte Informationen zum navi2coach. Die ausführliche Anleitung
als PDF können Sie von unserer Homepage herunterladen.
VERPACKUNGSINHALT
DATENANSICHT
Hier können alle trainingsrelevanten Daten angezeigt werden. Über den Menüpunkt Einstellungen > Datenseiten können
Sie die Datenfelder frei kongurieren. Sie haben die Möglichkeit, mehrere Datenseiten zu erstellen und können mit den
Tasten +/- zwischen diesen Seiten hin und her wechseln.
Herzfrequenz
Trittfrequenz
*Leistung (Watt)
Geschwindigkeit
Fahrzeit
Distanz
Höhe
Stoppuhr
Kalorien
verbrannte Fettmasse
In der Zielzone
Unterhalb der Zielzone
Oberhalb der Zielzone
*TSS Bewertung der Trainingsbelastung
*IF Trainingsintensität
AVG Durchschnittswert
MAX Maximalwert
!ACHTUNG PAIRING!
Wenn Sie ANT+ Zubehör mit dem
navi2coach verwenden möchten, muss
dieses vorab mit dem Gerät gepairt/
verbunden werden. Details nden Sie im
unteren Teil der Anleitung.
GEOCACHING
Mit dem navi2coach können Sie auf die beliebte „Geocaching“ – Schatzsuche gehen: Dabei werden die Koordinaten
des „Caches“ einfach ins Gerät eingegeben und angesteuert. Eine Aufzeichnung der Tour und anschließende direkte
Wiedergabe auf dem Gerät sind ebenfalls möglich.
Quickstart
Training
Navigation
Geocache
Waage
Einstellungen
Quickstart
Ruft den Sportmodus auf und ermöglicht das sofortige Starten einer
Aufzeichnung.
Training
Beinhaltet alle Trainingsinformationen
und Funktionen.
Training Heute
Startet das für den aktuellen Tag
geplante Training.
Manuelles Training
Erstellt Schritt für Schritt eine
Trainingseinheit, die anschließend
durchgeführt werden kann.
Trainigsplan
Listet alle geplanten Einheiten.
Trainingsdaten
Zeigt die Zusammenfassungen
gefahrener Trainingseinheiten an
Total
Zeigt eine Datenzusammenfassung
aller Aufzeichnungen (KM, Fahrzeit,
Kalorien, etc.)
Navigation
Beinhaltet alle Navigationsfunktionen.
Routen
Aufrufen und abfahren geplanter
Routen, die auf das Gerät geladen
wurden.
Trackzusammenfassung
Anzeigen bereits gefahrener Routen.
GPS
Aufrufen der aktuellen GPSKoordinaten
Einstellungen
Dieser Bereich enthält alle
Einstellungsmöglichkeiten
Geocache
Diese Funktion ermöglicht Ihnen,
Geocaches manuell einzugeben oder
einen geladenen Geocache aufzurufen.
ÜBERSICHT HAUPTMENÜ
Verwenden Sie die obere und untere Taste, um durch die Menüs zu scrollen,
mit der mittleren Taste bestätigen Sie die Auswahl.
Waage
(Gewichtsmanagement)
Sofern eine ANT+ Waage verbunden
ist können über diese Funktion ihre
Messergebnisse abgespeichert werden
navi2coach
Kompassrose
Die Pfeilspitze zeigt immer
nach Norden
NAVIGATIONSANSICHT
Während des Navigierens wird die Route über eine Track Ansicht mit zusätzlich bewährter Pfeilnavigation angezeigt.
Die Zoomfunktion erlaubt es je nach Bedarf, sich die Strecke im Detail anzuschauen. Weitere Funktionen wie Backtrack-
Navigation, die Inversion von Routen sowie das Speichern und Ansteuern von POIs sind ebenfalls möglich.
Routenführung
Zeigt die gefahrene
bzw. noch zu fahrende
Routenführung an
Abbiegehinweise
Es werden Abbiegehinweise mit
entsprechenden Distanzangaben
angezeigt.
Meine Position
Zeigt ihre aktuelle Position
in Relation zur Route oder
einem POI an
Maßstab
Zeigt den aktuellen
Kartenmaßstab an. Mit den
+/- Tasten verändern Sie die
Zoomstufe.
Statusleiste
Satellitenempfangsstärke
11:16 Uhrzeit
Akkuladezustand
Meine Position
Zeigt ihre aktuelle Position
in Relation zur Route oder
einem POI an
Maßstab
Zeigt den aktuellen
Kartenmaßstab an. Mit den
+/- Tasten verändern Sie die
Zoomstufe.
Track
Zeigt die zurückgelegte
Strecke an.
Kompassrose
Die Pfeilspitze zeigt immer
nach Norden
Geocache
Zeigt die Position des
Geocache an.
Temperatur
Sonnenaufgang
Sonnenuntergang
Uhrzeit
Höhenmeter (+/-)
Links-Rechts
Kraftverteilung
Steigung
Wegpunkt
Ein auf der Route denierter
Wegpunkt
Statusleiste
Satellitenempfangsstärke
11:16 Uhrzeit
Akkuladezustand
*NP Normierte Leistung
*Sonderfunktionen in Verbindung mit
einem ANT+ Kraftleistungsmessgerät
Gerät am Halter befestigen & vom Halter lösen
DE
EN
SUPPORT
Um unsere Kundenbetreuung stets verbessern zu können,
senden Sie uns Kommentare oder Fragen an unsere
E-Mail-Adresse unter www.o-synce.com. Bitte bewahren
Sie den Kaufbeleg oder eine Kopie an einem sicheren
Ort auf.
Phone: +49-6201 980 50-0
Fax: +49-6201 980 50-11
Email: support@o-synce.com
o-synce Europe GmbH
Thaddenstr. 14a
69469 Weinheim
Germany
Damit Sie Ihr ANT+ Zubehör mit dem navi2coach verwenden können müssen diese mit dem Gerät verbunden werden.
Sollte das Pairing bei den Grundeinstellungen im Schritt 4 übersprungen worden sein, können Sie dies wie folgt
nachholen.
Aktivieren Sie alle verwendeten ANT+Sensoren. Dies geschieht indem Sie z.B. den Herzfrequenzgurt anlegen,
einen Magneten an den Geschwindigkeits- und Trittfrequenzsensoren in unmittelbarer nähe vorbeiführen oder
Ihr Kraftleistungsmessgerät in Bewegung versetzten. Vergewissern Sie sich, dass sich alle Sensoren in einem
Umkreis von ca. 2m vom navi2coach benden.
Gehen Sie im navi2coach auf Einstellungen > Sportprole > Prol 1-4 > Sensoren > Neu suchen nun sucht das
Gerät nach allen vorhandenen Sensoren und speichert diese unter Prol 1.
Der navi2coach ermöglicht Ihnen, bis zu vier Sportprole abzuspeichern. Haben Sie ein zweites Fahrrad mit anderen
Sensoren, wiederholen Sie den obigen Vorgang indem Sie eines der Prole 2-4 wählen. Achten Sie darauf, dass Sie
mindestens 8 Meter von den Sensoren, die Sie nicht mit dem gewählten Prol verbinden möchten, entfernt sind. Den
Vorgang können Sie für alle vier Sportprole wiederholen.
Wenn sie einem Prol einen neuen Sensor nachträglich hinzufügen oder einen ändern wollen gehen sie wie folgt vor:
Rufen Sie unter Einstellungen das zu bearbeitende Prol auf: Einstellungen > Sportprole > Prol 1-4
Wählen Sie den Menüpunkt Sensoren und im folgendem Menü den zu ergänzenden oder zu ändernden Sensor
aus. Nun such das Gerät erneut nach dem entsprechenden Sensor und speichert den gefundenen.
Wollen Sie z.B. den Geschwindigkeitssensor im Sportprol 1 ändern/ergänzen, gehen Sie wie folgt vor: Einstellungen >
Sportprole > Prol 1 > Sensoren > Geschwindigkeit. Das Gerät sucht nun nach einem Geschwindigkeitssensor.
Hinweis: Alle vier Sportprole verwenden bei aktivierter Herzfrequenzfunktion den gleichen Herzfrequenzsensor.
GARANTIE
o-synce haftet gegenüber unserem jeweiligen
Vertragspartner für Mängel nach den gesetzlichen
Vorschriften. Batterien sind von der Gewährleistung
ausgenommen. Im Falle der Gewährleistung wenden
Sie sich bitte an den Händler, bei dem Sie Ihren
Fahrradcomputer gekauft haben. Batterien können nach
Gebrauch zurückgegeben werden.
UPDATES
Aktuelle Soft- und Firmwareupdates nden sie kostenlos
unter www.o-synce.com
Optionales Zubehör
Ergänzem Sie optimal
den navi2coach mit dem
ANT+Zubehör von o-synce
um in den vollen Genuss aller
Funktionsumfänge Ihres Trainingcomputers zu kommen
Dieses Produkt ist konform mit der Richtlinie 1999/5/EC. Die zugehörige Konformitätserklärung ist erhältlich unter
http://www.o-synce.com/de/kundenservice.
Geschwindigkeit
& Trittfrequenz
macro2sx com
macro2sx speed
macro2sx cad
Herzfrequenz
heart2feel x
ANT+ Waage
ANT+remote
ANT+ Kraftleistungsmessung
1
1
2
2
Heart rate
Cadence
*Power (Watt)
Speed
Riding time
Distance
Altitude
Stop watch
Calories
Burned fat (g)
Zones
Below high zone setting
Above high zone setting
*TSS Training stress score
*IF Intensity Factor
AVG Average value
MAX Maximum value
Quickstart
Training
Navigation
Geocache
Scales
Setting
Temperature
Sunrise
Sunset
Time
Altitude in meters (+/-)
Pedal power balance
Gradient
*NP Normalised power
*With an ANT+ power meter
Accessories (optional)
You can complement the
navi2coach perfectly with our
range of o-synce ANT+ acces-
sories and enjoy the complete
functionality of your training
computer.
Speed &
Cadence
macro2sx com
macro2sx speed
macro2sx cad
Heart rate
heart2feel x
ANT+ scales
ANT+remote
ANT+power measuring
Quickstart
Training
Navigation
Geocache
Waage
Einstellungen
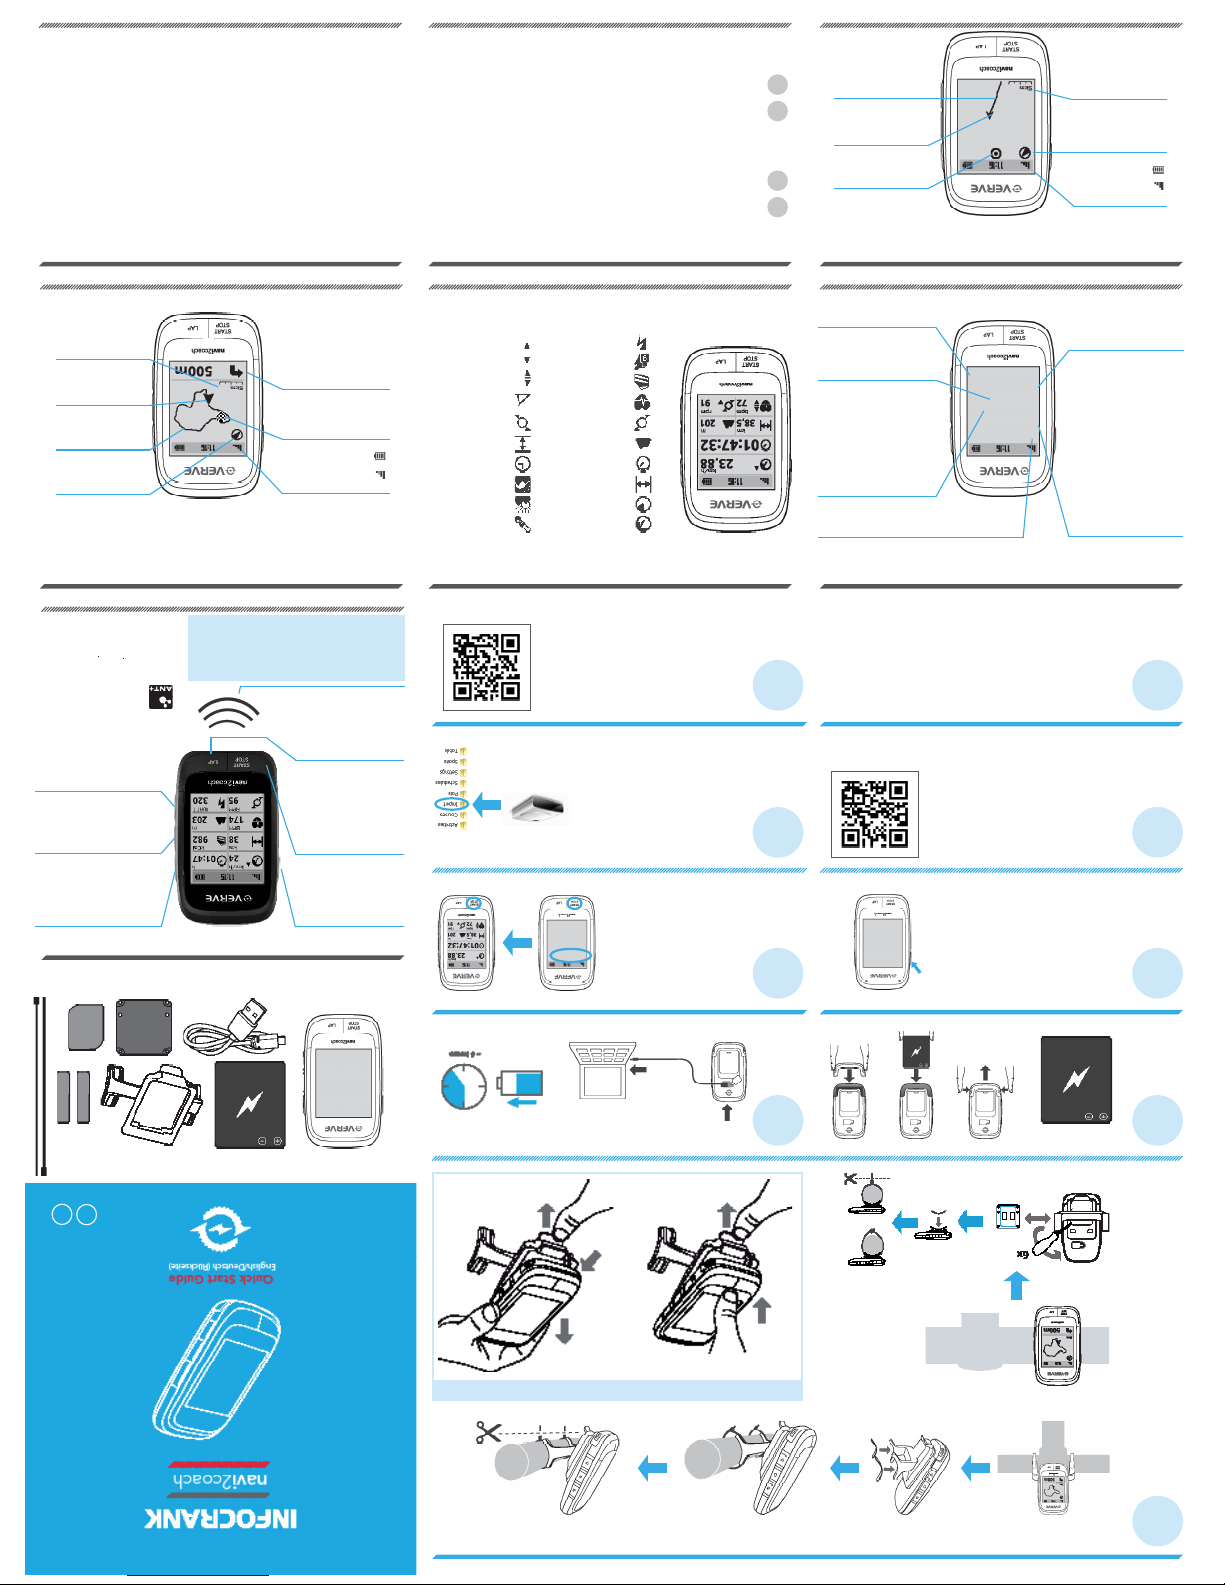
FITTING
Option A
Option B
1
2
4
6
8
3
5
7
9
2 Sec.
TRAININGLAB.COM
navi2coach
PAIRING — ANT+ Sensors combine
To enable the use of your ANT+ accessories with the navi2coach these accessories must be connected to the device. If the
pairing with the default settings in Step 4 did not work or have been skipped, you can catch up on this as follows.
Select all the ANT+ sensors. This occurs for example when you connect the heart rate monitor to the speed and
cadence sensors or move your power meter in motion. Make sure that all sensors are within a radius of 2m from
navi2coach.
Go to Settings > Sports Proles> Prole 1-4 > Sensors > Pair all. Now, the device searches for all available
sensors and stores them in prole 1.
The navi2coach allows you to save up to 4 sport proles. If you want to have a second bike with other sensors, repeat the
above procedure in which you select one of the sections 2-4. Make sure that you are at least 8m from the sensors that you
do not want to connect with the selected prole. You can repeat the process for all 4 sports proles.
If you want to add or change a sensor in a prole, proceed as follows:
Go to Settings under the prole to edit from: Settings> Sports Proles> Prole 1-4
Select the menu Sensors and in the following menu select the existing sensor to be exchanged or edited.
Now the device searches the appropriate sensor and, when found, will save it.
Do you want to for example add/exchange the speed sensor in the sports section 1, proceed as follows:
Settings> Sports Proles> Prole 1> Sensors> Speed> Pair. The navi2coach will now look for a speed sensor,
so make sure that it is turned on.
Note: All 4 sports proles are automatically using the same heart rate sensor.
DATA VI EW
You can view any data relevant to your training here. Using the menu Settings > Display Pages you can freely congure the
data elds. You can create multiple data pages and access them with the +/- buttons.
Quickstart
Access the Sport mode and start a recording straight away.
Training
Contains all training information and
functions.
Training today
Starts the planned training for the
current day.
Manual Training
Creates a workout step-by-step which
can then be carried out.
Training plan
Lists all planned workouts.
Training data
Shows a summary of all workouts
completed.
Total
Shows a summary of all recordings
(distance, time,calories, etc.)
Navigation
Contains all navigation functions.
Routes
Select and follow planned routes which
have been loaded onto the device.
Track summary
Shows routes already ridden.
GPS
Retrieve the current GPS-coordinates.
Settings
This area contains all adjustment
options.
Geocache
This function allows you to manually
enter Geocaches or to retrieve a
loaded Geocache.
OVERVIEW MAIN MENU
Use the upper and lower buttons to scroll through the menus, conrm the selection with the middle button.
Scales
(weight management)
If ANT+ scales are connected you
can use this function to save your
measurements.
Compass rose
The arrow head always shows
towards north.
Route guide
Shows the current route and
the remaining route.
Turning instruction
Turning instructions are shown with
corresponding distance information.
My position
Shows your current position
in relation to the route or
a POI.
Map scale
Shows the current map
scale. You can change the
zoom level using the +/-
buttons.
My position
Shows your current position in
relation to the route or a POI.
Map scale
Shows the current map sca-
le. You can change the zoom
level using the +/- buttons.
Track
Shows the route travelled.
Compass rose
The arrow head always shows
towards north.
Geocache
Shows the position of a
Geocache.
NAVIGATION VIEW
In use the route is displayed as a track view with an additional arrow based navigation. The zoom function allows
you to see the route in detail. Additional functions such as backtrack navigation, route inversion and the saving
and access of POIs are possible too.
Waypoint
A designated waypoint on
the route.
GEOCACHING
The navi2coach allows you to join up with the popular “Geocaching” treasure hunts. Simply enter the cache co-ordinates
and allow the device to pilot the route. You can also plot a ride and play it back on the device.
Status bar
Satellite signal strength
11:16 Time
Battery charge remaining
START & STOP-button
Main menus – short key stroke
Open the Sport mode and
start the Sensor search
Sport mode – short key stroke
Start or pause a recording
Sport mode – long key stroke
End and save the current recording
POWER-button
Long key stroke
Turn device on-or-off
Menus – short key stroke
Leave current menu
Sport mode – short key stroke
Pause the recording
LAP-button
Sport mode – short key stroke
Save an interim time
Sport mode – long key stroke
Set a POI
Upper button
Menus
Scroll up through the menus
Sport mode
Display training data: open further pages
(forwards)
Navigation view: zoom function (+)
Middle button
Menus
Conrm selection
Sport mode
Change between the display categories
(Data & Navigation)
Lower button
Menus
Scroll down through the menus
Sport mode
Display training data: open further pages
(backwards)
Navigation view: zoom function (-)
KEY FUNCTIONS
IN THE BOX
!ATTENTION PAIRING!
If you want to use ANT+ accessories
with the navi2coach you must pair/
connect them rst. The pairing function
is described in Settings >> Pairing.
Fit the device to & release it from the mounting bracket
BASIC ADJUSTMENTS
Switch on the navi2coach by pressing and holding the
POWER-button, for 2 seconds. When switched on for the rst
time the navi2coach takes you through the most important
basic settings and allows you to pair optional ANT+ sensors
with the device.
Fit and switch on your sensors at the same time as switching
on the navi2coach so that you can pair them straight away.
You can access basic adjustments at any time in the main
menu Settings.
In this menu you can also access add-on functions at a later
time.
CHARGING THE BATTERY
RECORD TRAINING
In the main menu press the START/STOP-
button, or select Quickstart. The Sport mode is
selected and the device automatically searches
for paired sensors.
The START/STOP button activates recordings,
whilst recording use the START/STOP button
to end or pause training.
INSERT THE BATTERY
TRAINING SOFTWARE
Download our free trainingLab-Software from the o-synce website.
This program allows you to transfer and analyse training data.
Using the integrated Workout editor you can quickly and easily
create training sessions on your PC.
TRAINING PLANS
The online portal Trainingsplan.com can automatically generate a
customised training plan for you without you requiring specialist
knowledge. You can load the data direct to your navi2coach
device.
START NAVIGATION
If you don’t already have planned routes use one of
the popular planning portals e.g. Gpsies.com to create
a route in either GPX or FIT format. Alternatively you
can use commercially available mapping software e.g.
MagicMaps.
Connect the navi2coach to your computer and wait
until it is recognised as an external drive with the name
navi2coach. Open the drive and copy the le created into
the Import folder.
You can access your data and start a ride from the menu
Navigation > Routes.
USING THE TRAINING FUNCTIONS
The navi2coach utilises the FIT-File Format in order to access instructions during a workout.
You can create workout-FIT-Files using our training software or download one from the many online
training portals which use this le format. Transfer the workout le onto the device using trainingLab
or by copying the le into the device Import folder when the navi2coach is shown as an external hard
drive (see step 7).
In the menu Training > Training plan you can access and begin a workout
DETAILED MANUAL ONLINE
Find more detailed information about your navi2coach at
www.navi2coach.com
You can also download the full instruction manual as a PDF le
from our homepage.
DE
EN
Status bar
Satellite signal strength
11:16 Time
Battery charge remaining
SUPPORT
You can help us improve our customer service by sending
your comments or questions to our email address at
www.o-synce.com. Please keep your purchase receipt or a
copy of it in a safe place.
Phone: +49-6201 980 50-0
Fax: +49-6201 980 50-11
Email: support@o-synce.com
o-synce Europe GmbH
Thaddenstr. 14a
69469 Weinheim
Germany
GUARANTEE
We are only liable for damages in accordance to the
statutory regulations in respect to our contractual partners.
Batteries are excluded from warranties. In case of a
warranty please contact the retailer where you purchased
your device. Batteries can be returned after use.
UPDATES
Current soft- and rmware updates can be found on
www.o-synce.com
This product is compliant with the Directive 1999/5/EC. The relevant Declaration of Conformity is available at
http://www.o-synce.com/en/customer-support
 Loading...