

Page 1

IMO S
User Manual
Page 2

Description of the specification
User manual is for reference only. Descriptions here are based
The actual product, depending on different regions, service
Large files or games that require high CPU and RAM usage will
Software, sound sources, wallpapers and other media provided
This manual describes how to use the phone's concise
information, such as the desire to quickly grasp the basic
practical methods of this phone, please Reference to Getting to
Know Your Phone.
Safety precautions
Before using your device, please thoroughly read the
following safety precautions.
on the default setting.
providers, or model specifications, may vary.
affect the overall performance of the device.
with this device shall not be used for any commercial purpose.
Users who illegally use the media would be completely
responsible for infringing the copyright laws.
Page 3

Data services, such as uploading, downloading and auto-syncing,
incur additional charges. Therefore, it is recommended to use
If you have questions about the pre-installed apps on the device,
Modification of device’s operating system or installation of
Wi-Fi network when coming to large data transfers.
contact a Service Centre. As for user-installed apps, please
contact service providers.
unauthorized third-party software may damage your devices,
cause data loss and even put your personal information in
danger. These actions violate the device license agreement and
will void your warranty.
Page 4
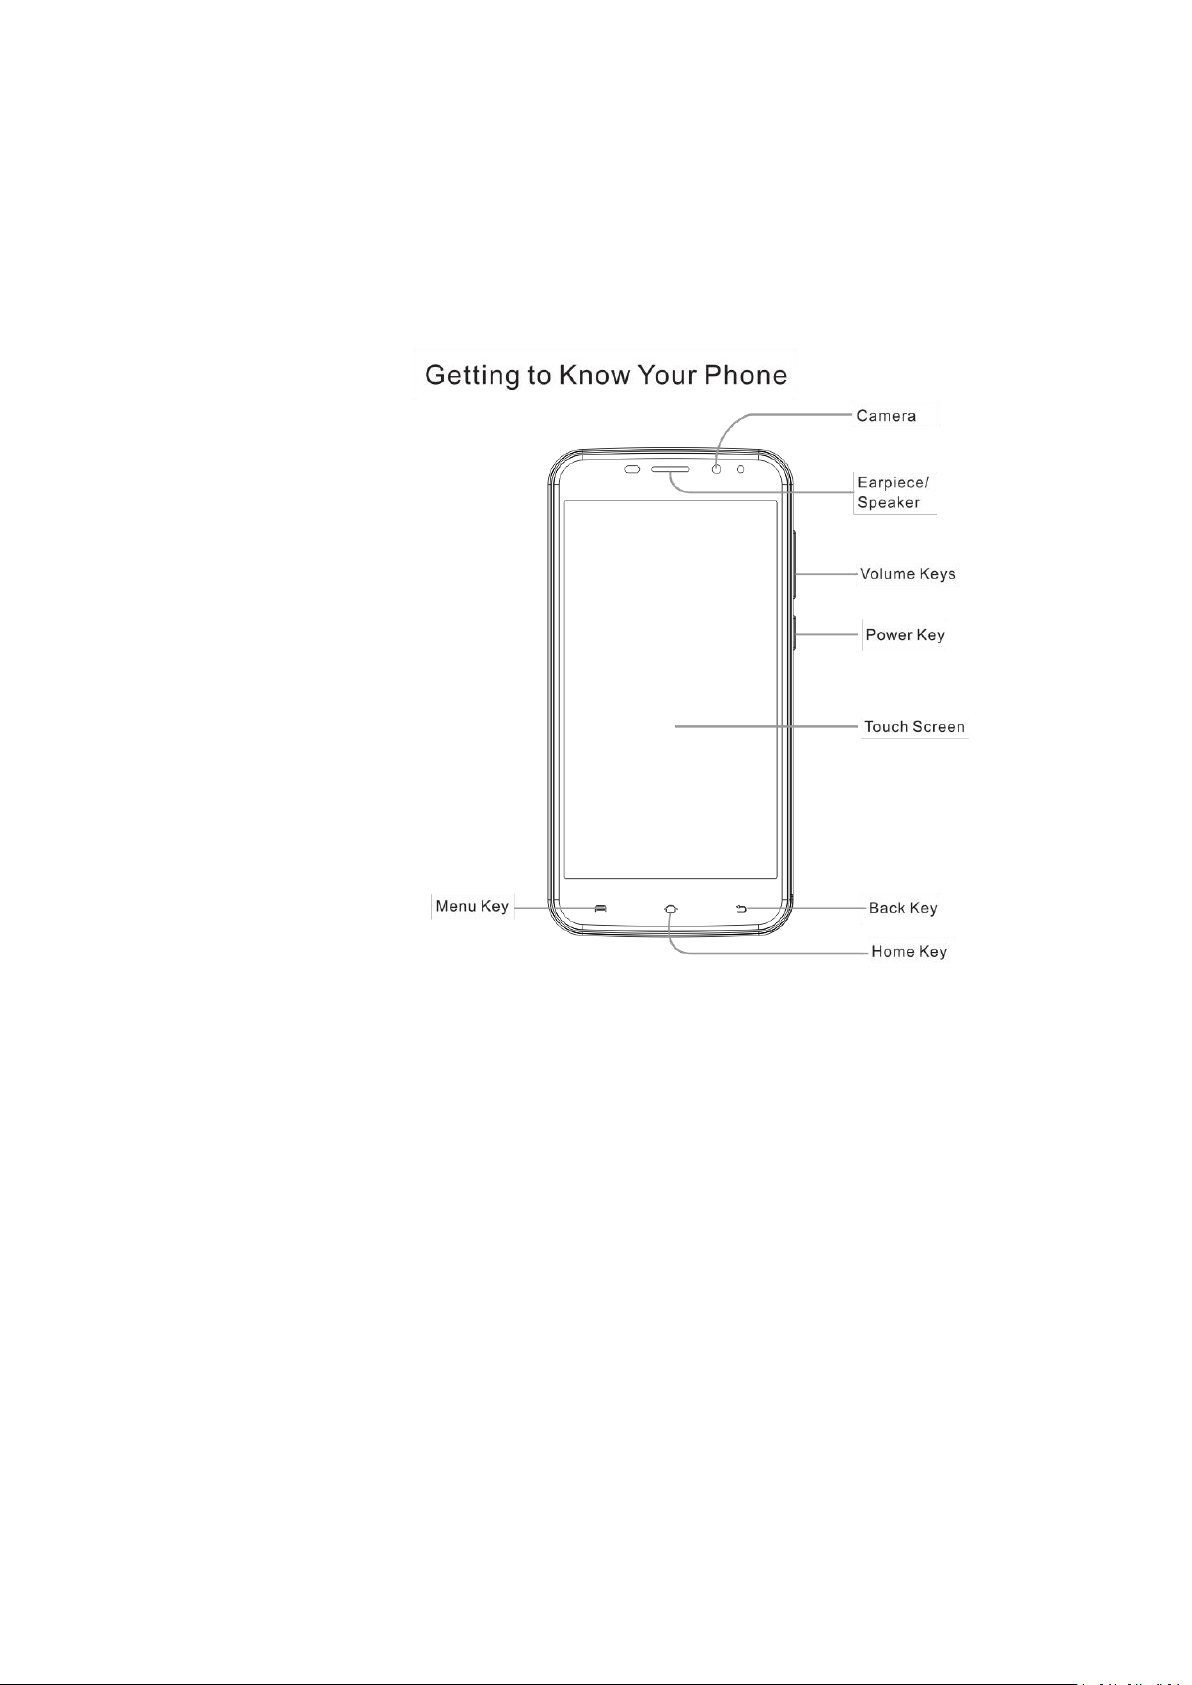
Page 5
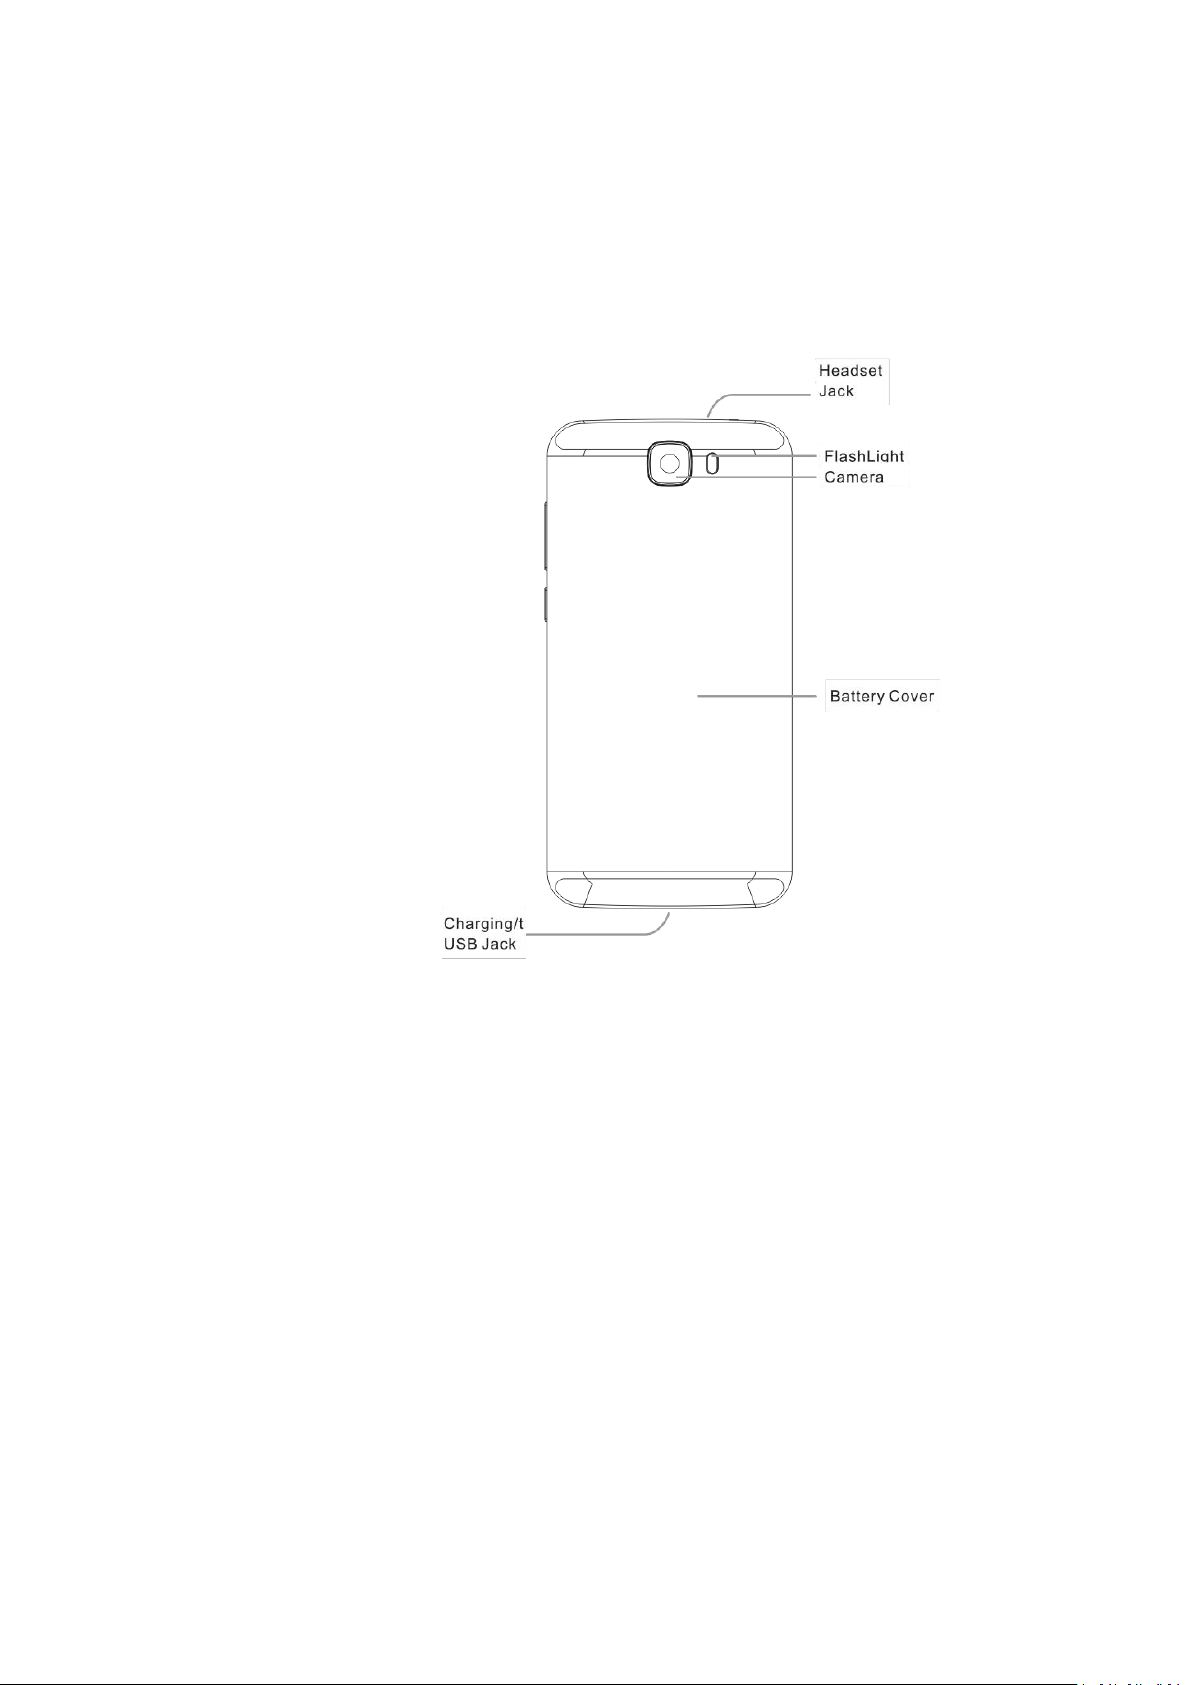
Page 6

Power Key
Press and hold to turn on or off Airplane mode , enable silent
Press to turn off or on the screen display.
Touch to return to the home screen.
Touch and hold to open Google Now.
Touch to view the options for the current screen.
Touch and hold to see recently used applications.
Touch to go to the previous screen.
Press or hold to turn the volume up or down.
mode or silent mode with vibration,disable silent mode,power
off or restart the phone.
Home Key
Menu Key
Back Key
Volume Key
Page 7
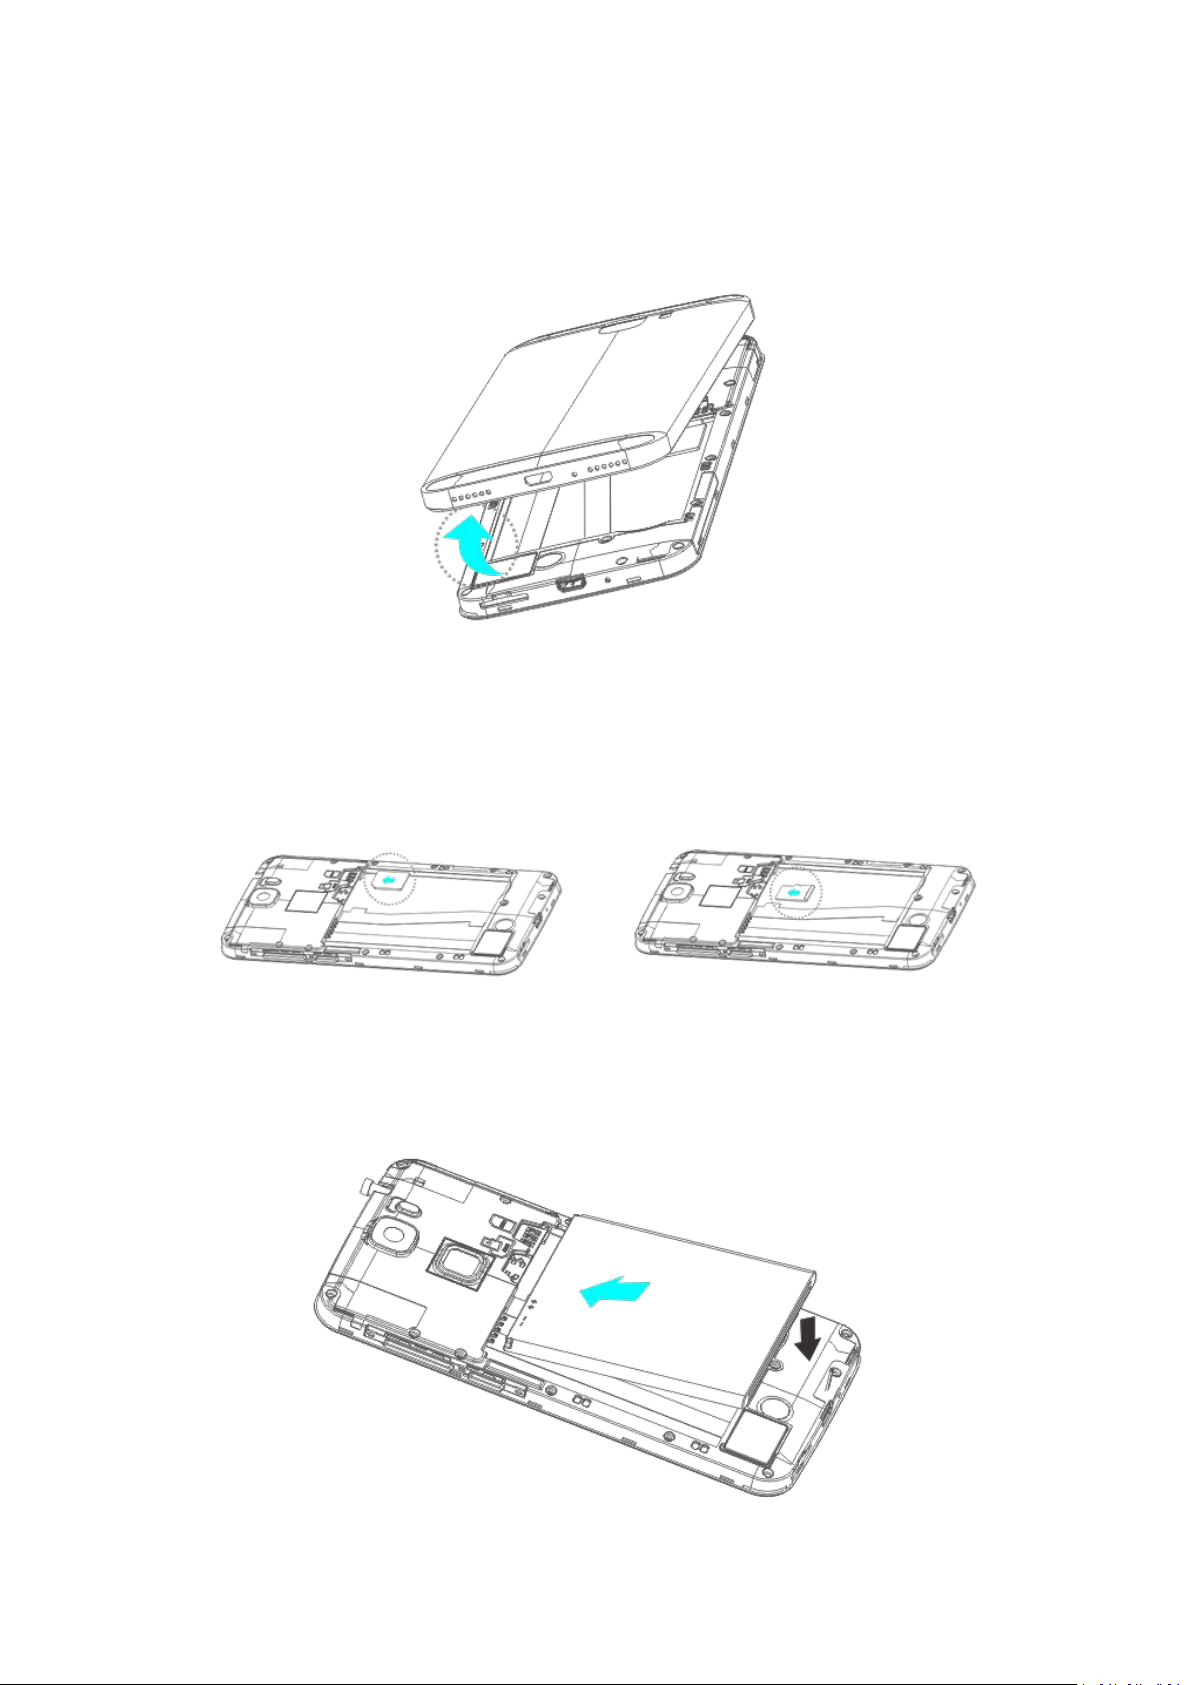
Before Getting Started
Removing the Back Cover
Installing the SIM Card
Installing the Battery
Page 8
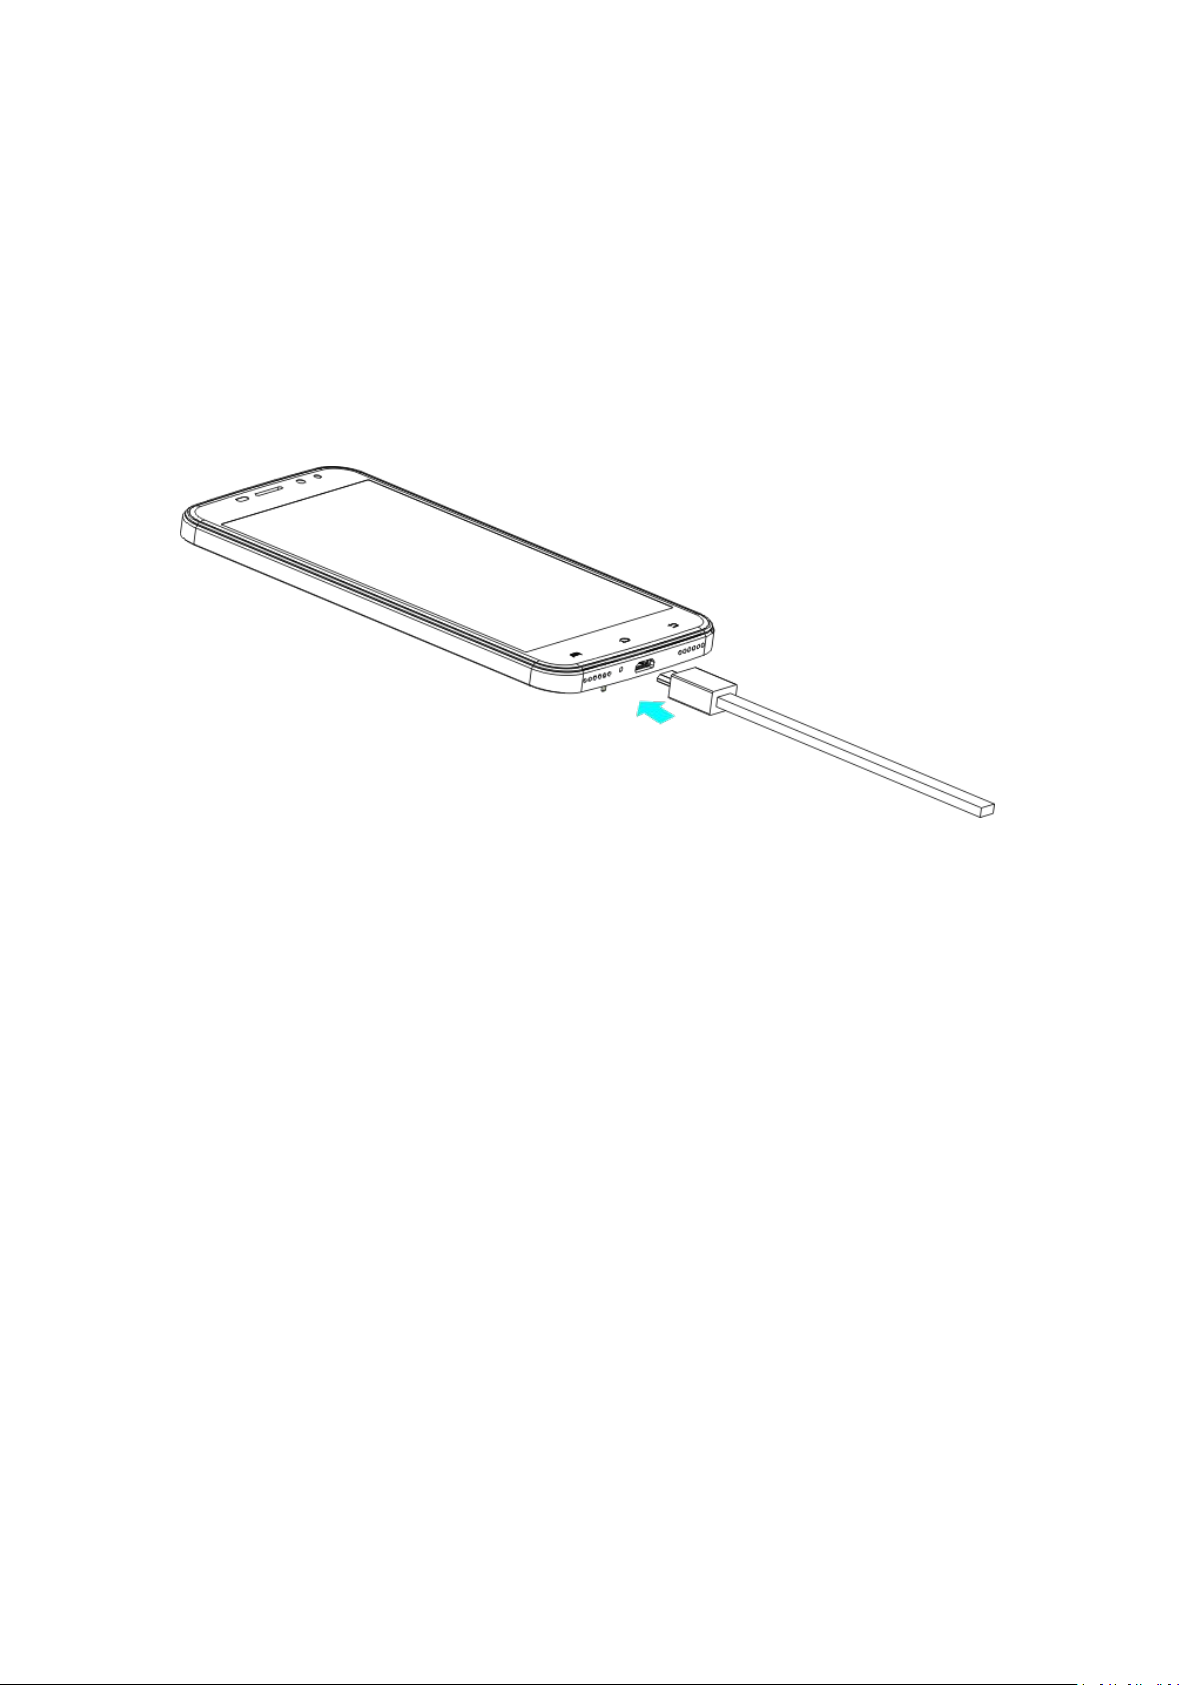
NOTE: Some applications may require a miscroSDHC card to work
1.Connect the adapter to the charge jack.Ensure that the adapter is
2.Connect thecharger to a standard AC wall outlet.
3.Disconnect the charger when the battery is fully charged.
normally or may store certain data on it. Therefore,it is
recommended that you keep a miscroSDHC card installed and not
remove or replace it randomly.
Charging the Battery
inserte with correct orientation.
WARNIMG!Use only IMO-approved chargers and cables.The use of
unapproved accessories could damage your phone or cause the
battery to explode.
Powering On/Off Your Phone
Make sure the battery is charged before powering on.
1.Hold the Power Key to switch on your phone.
2.To switch it off,hold the Power Key to get the phone options.Then
Page 9

Touch Power off.
1.Press the Power Key to activate your screen display.
2.Touch and hold any blank area of the screen to unlock it.
Waking Up Your Phone
NOTE:if you have set an unlock pattern,or a PIN/password for your
phone,you will need to draw the pattern or enter the PIN/password
to unlock your screen.
Touchscreen
Tapping
To open an app, to select a menu item, to press an on-screen button,
or to enter a character using the keyboard on the screen, tap it with
your finger.
Dragging
To move an item, tap and hold it and drag it to the target position.
Tapping and holding
Tap and hold an item or the screen for more than 2 seconds to
access available options.
Double-tapping
Double-tap on a message conversation to zoom in. Double-tap again
Page 10

to return.
Swiping
Swipe to the left or right on the Home screen or the Apps screen to
view other panels. Swipe upwards or downwards to scroll through a
webpage or a list of items, such as contacts.
Spreading and pinching
Spread two fingers apart on a webpage, map, or image to zoom in a
part. Pinch to zoom out.
Home screen
Home screen
The Home screen is the starting point for accessing all of the
device’s features. It displays widgets, shortcuts to apps, and more.
To view other panels, swipe to the left or right, or tap one of the
screen indicators at the bottom of the screen.
Adding items
Tap and hold an app or a folder from the Apps screen, and then
drag it to the Home screen.
To add widgets, tap and hold an empty area on the Home screen,
Page 11

tap Plug in, tap and hold a widget, and then drag it to the Home
1. Tap and hold an item on the Home screen, and then drag it to a
2. To move the item to another panel, drag it to the side of the
3. You can also move frequently used apps to the shortcuts area at
2. A new folder containing the selected apps will be created.
3. Tap Enter folder name and enter a folder name.
screen.
Moving and removing an item
Moving
new location.
screen.
the bottom of the Home screen.
Removing
To remove an item, tap and hold the item. Then, click the delete
icon on the upper left corner of app icon .
Creating folders
1. On the Home screen, tap and hold an app, and then drag it over
another app.
Drop the app when a folder frame appears around the apps.
To add more apps to the folder, tap and hold another app, and then
drag it to the folder.
Page 12

Lock screen
Pressing the Power key turns off the screen and locks it. Also, the
screen turns off and automatically locks if the device is not used for
a specified period.
To unlock the screen, press the Power key and To the left or right
to unlock to enter a specific function
You can change the way that you lock the screen to prevent others
from accessing your personal information.
On the Apps screen, tap Settings → Security → Screen lock , and
then select a screen lock method. The device requires an unlock
code whenever unlocking it.
Notification panel
Using the notification panel
When you receive new notifications, such as messages or missed
calls, indicator icons appear on the status bar. To see more
information about the icons, open the notification panel and view
the details.
To open the notification panel, drag the status bar downwards. To
close the notification panel, swipe upwards on the screen.
Page 13

Using quick setting buttons
Tap quick setting buttons to activate some features. Swipe to the
left or right on the buttons area to view more buttons. To view more
detailed settings, tap and hold a button.
Applications
Phone
Introduction
Make or answer voice calls.
Contacts
Introduction
Create new contacts or manage contacts on the device.
Messaging
Introduction
Send and view messages by conversation.
Page 14

Music
Introduction
Listen to music sorted by category and customise playback settings.
Camera
Introduction
Take photos and record videos using various modes and settings.
Gallery
Introduction
View and manage photos and videos stored in the device.
File management
Introduction
Learn fast and fun to open your all stored in the cell phone store
pictures, movies, music, documents, and other types of files.
Sound Recorder
Introduction
Use different recording modes for various situations, such as in an
Page 15

interview. The device can convert your voice to text and distinguish
between sound sources.
Calculator
Introduction
Mobile phones directly perform mathematical calculations, switch
to a scientific calculator landscape.
Clock
Introduction
Set alarms, check the current time in many cities around the world,
time an event, or set a specific duration.
Settings
Introduction
Customise settings for functions and apps. You can make your
device more personalised by configuring various setting options.
Google apps
Google provides entertainment, social network, and business
Page 16

apps. You may require a Google account to access some apps.
Refer to Accounts for more information.
To view more app information, access each apps in the help
menu.
Tips:Some apps may not be available or may be labelled
differently depending on the
region or service provider.
Chrome
Search for information and browse webpages.
Gmail
Send or receive emails via the Google gmail service.
Maps
Find your location on the map, search for locations, and view
location information for various Places.
Play Music
Discover, listen to, and share music on your device.
Drive
Store your content on the cloud, access it from anywhere, and share
Page 17

it with others.
YouTube
Watch or create videos and share them with others.
Photos
Manage photos, albums, and videos that you have saved on the
device and uploaded to Google+.
Hangouts
Chat with your friends individually or in groups and use images,
emoticons, and video calls while you are chatting.
Google
Search quickly for items on the Internet or your device.
Voice Search
Search quickly for items by saying a keyword or phrase.
Troubleshooting
Page 18

Before contacting the Service Centre, please attempt the
If you are wearing gloves, if your hands are not clean while
The touchscreen may malfunction in humid conditions or when
Restart your device to clear any temporary software bugs.
Ensure that your device software is updated to the latest
If the touchscreen is scratched or damaged, visit a Service
following solutions. Some situations may not apply to your
device.
The touchscreen responds slowly or improperly
If you attach a protective cover or optional accessories to the
touchscreen, the
touchscreen may not function properly.
touching the touchscreen, or if you tap the screen with sharp
objects or your fingertips, the touchscreen may malfunction.
exposed to water.
version.
Centre.
Your device does not turn on
When the battery is completely discharged, your device will not
turn on. Fully charge the battery before turning on the device.
Page 19

Calls are not connected
Ensure that you have accessed the right cellular network.
Ensure that you have not set call barring for the phone number
Ensure that you have not set call barring for the incoming phone
Ensure that you are not covering the built-in microphone.
Ensure that the microphone is close to your mouth.
If using a headset, ensure that it is properly connected.
When you are in areas with weak signals or poor reception, you
You cannot access some options without a subscription. For
you are dialling.
number.
Others cannot hear you speaking on a call
Your device displays network or service error messages
may lose reception. Move to another area and try again. While
moving, error messages may appear repeatedly.
more information, contact your service provider.
A cellular network or the Internet is often disconnected or
Page 20

audio
Ensure that you are not blocking the device’s internal antenna.
When you are in areas with weak signals or poor reception, you
Move to another area and try again.
When using the device while moving, wireless network services
Password: When the device lock feature is enabled, you must
PIN: When using the device for the first time or when the PIN
PUK: Your SIM or USIM card is blocked, usually as a result of
quality is poor
may lose reception. You may have connectivity problems due to
issues with the service provider’s base station.
may be disabled due to issues with the service provider’s
network.
When you turn on your device or while you are using the
device, it prompts you to enter one of the following codes:
enter the password you set for the device.
requirement is enabled, you must enter the PIN supplied with
the SIM or USIM card. You can disable this feature by using the
Lock SIM card menu.
entering your PIN incorrectly several times. You must enter the
Page 21

PUK supplied by your service provider.
PIN2: When you access a menu requiring the PIN2, you must
Ensure that the charger is connected properly.
Visit a Service Centre and have the battery replaced.
enter the PIN2 supplied with the SIM or USIM card. For more
information, contact your service provider.
The battery icon is empty
Your battery is low. Charge the battery.
The battery does not charge properly (For Service-approved
chargers)
 Loading...