

Page 1
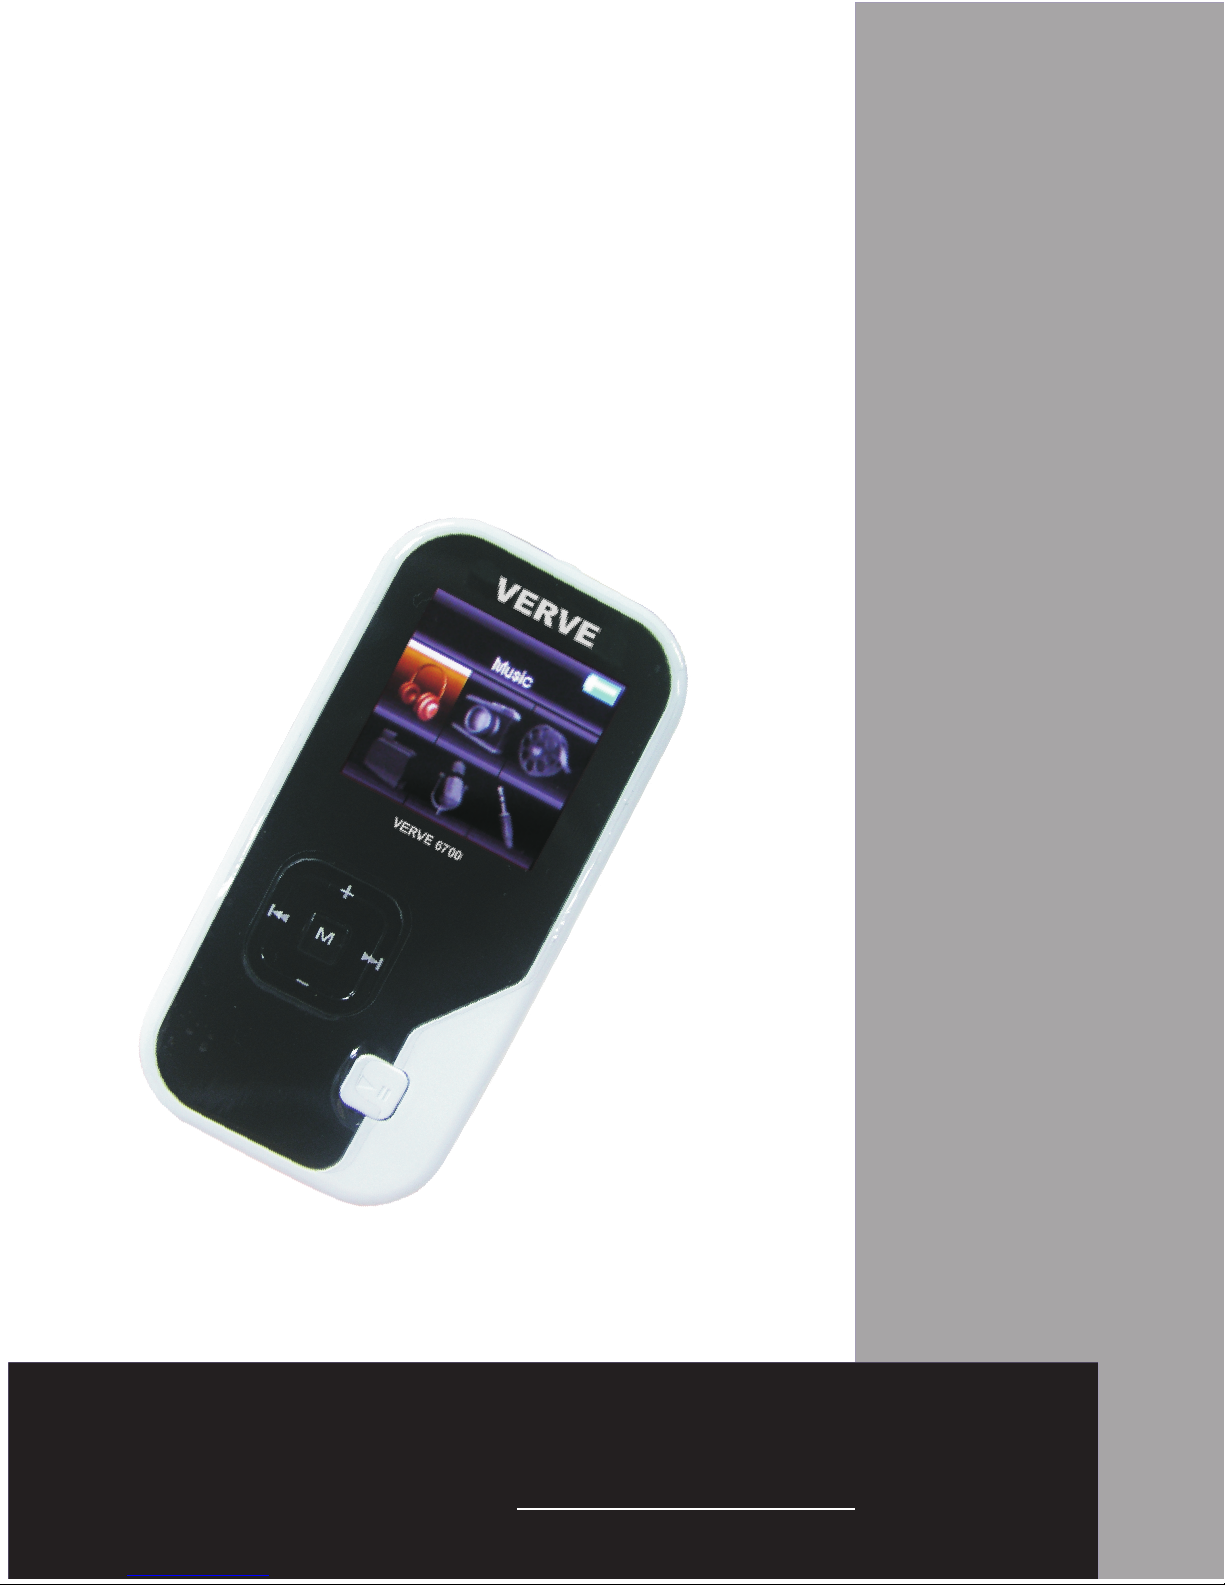
USER MANUAL
VERVE 6700
2GB Multimedia Player
VERVE
Page 2

CONTENTS
Warning .......................................................................
Important Informafion....................................................
Before You Begin..........................................................
Software Setup.............................................................
Overview......................................................................
Player Overview......................................................
Product Features....................................................
Operational Notes...................................................
General Controls..........................................................
Power on/off...........................................................
Main menu.............................................................
Listening and Recording................................................
Music Playing.........................................................
Voice Recording....................................................
Playback Recorded Voice Recording.......................
Line-in Recording..................................................
Playback Recorded Line-in Recording.....................
Deleting Recorded Files.........................................
Picture and Video Viewing............................................
Picture Viewing.....................................................
Video Viewing........................................................
1
2
3
5
6
6
7
7
8
8
8
9
9
13
14
15
17
17
18
18
19
Connection to the Computer.........................................
Charging the Battery..............................................
Important Battery Information.................................
Transferring Files to the Player.....................................
Installation Window 98SE Drive....................................
Conversion Software Install and Using.........................
Disconnecting your player from the Computer................
24
25
25
26
31
32
35
Warranty Card ..................................................................
36
Page 3
1
WARNING
Page 4
2
Important Information
Performance may be slightly affected of
there are more than 50 files in the player.
When exposed to electrostatic discharge,the
MP3 player may malfunction and require user
to reset the MP3 player.
Page 5
Thank you for This product will
play open mp3 and Windows Media audio (WMA)
content as well as content purchased from most online
music download services.
your purchase.
Before You Begin
(Note: Services and applications must be Windows Media
audio-compliant andsupport Digital Rights Management.)
After purchasing and downloading music to your PC,
you are now ready to move content to your player. To
transfer the music, you must use Windows Media
Player or the application recommended by the online
music download service.
TM
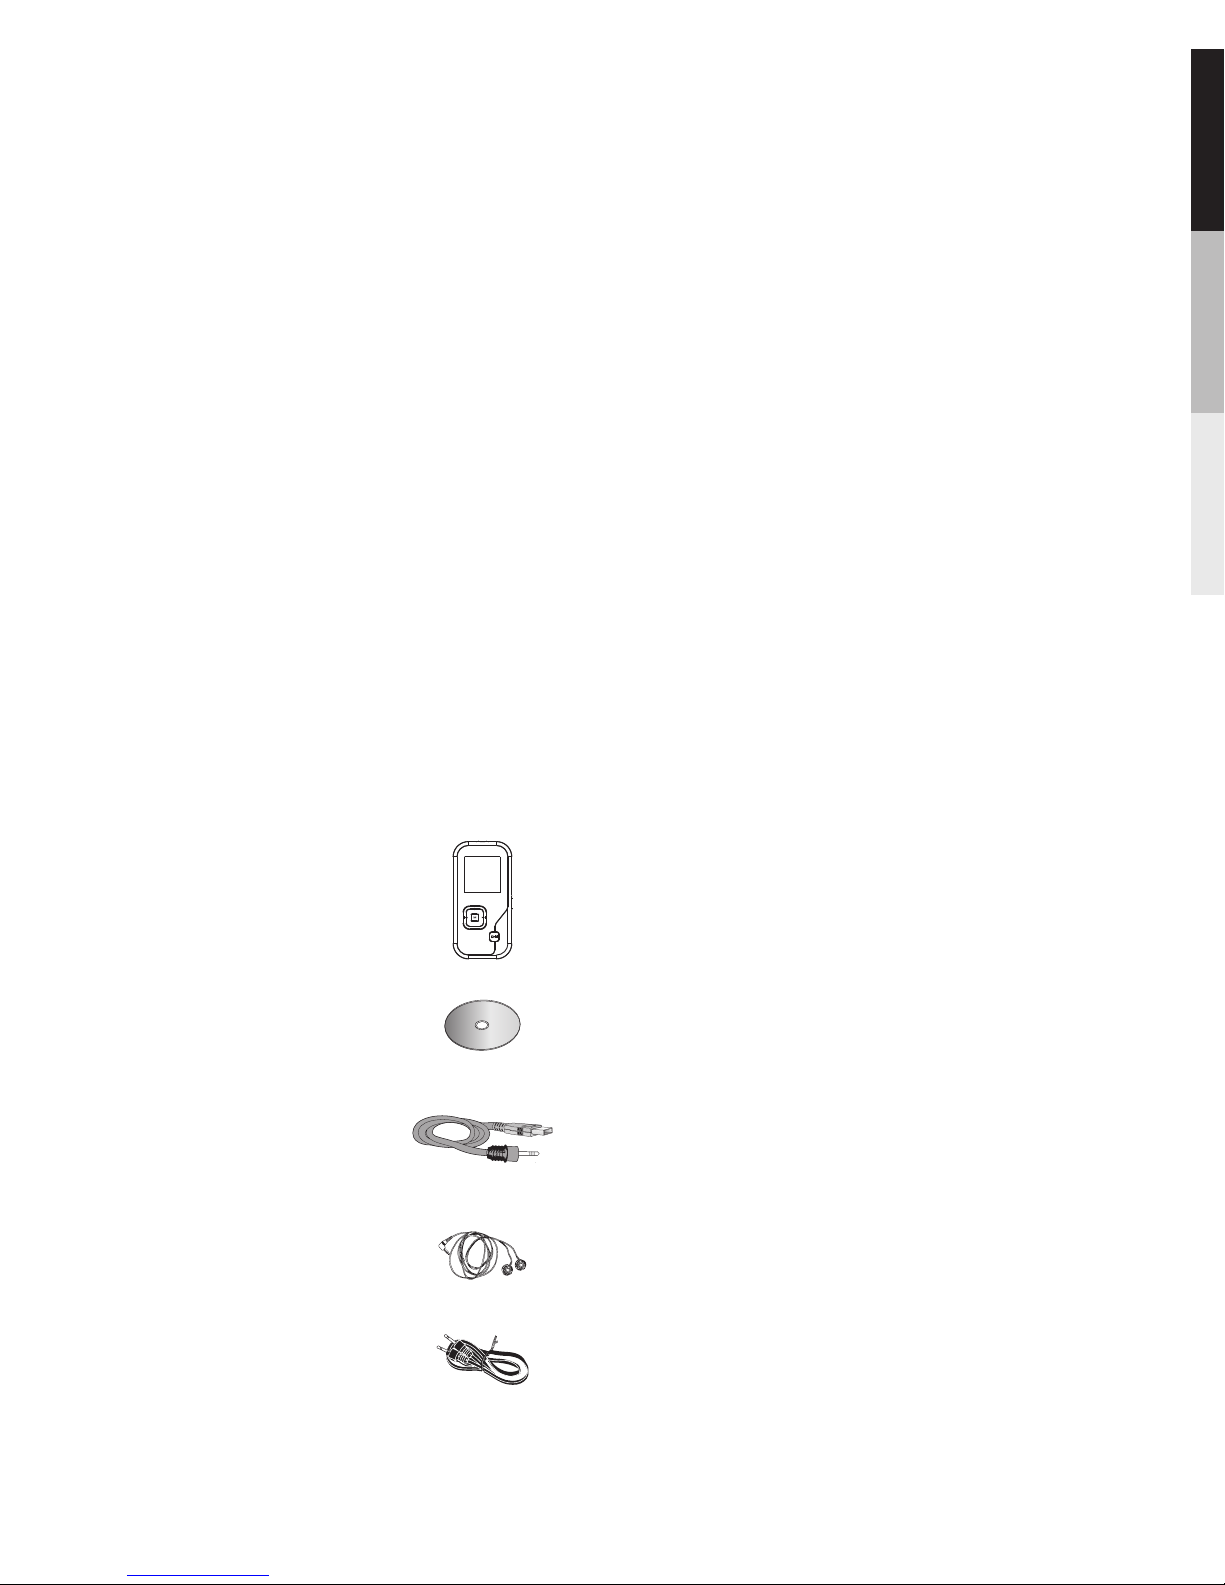
Your player came with everything you need to make music
portable — all of the items shown below should have been
packed in the box with your player.
Unpacking Your Player
VERVE Player
USB cable
Earphones
Line-in cable
3
CD
Page 6

• Pentium III 500MHz or higher recommended
• Windows® 2000 (Service Pack 3) or Windows® XP
(Service Pack 1 or higher) or Windows Vista
• Internet Explorer 6.0 or higher with Internet access
• 250MB or more free hard disk space for the software
• 128MB RAM (256MB recommended)
• CD drive capable of digital audio extraction
• USB port (2.0 recommended)
• Installed sound card
• Installed 16-bit color video card
Computer System Requirements
• Windows® XP (Service Pack 1 or higher) or Windows
Vista
• Internet Explorer 6.0 or higher with Internet access
• Windows Media Player 10 or higher
Secure Music Download Requirements
• Keep player out of direct sunlight. Exposure to direct
sunlight or extreme heat (such as inside a parked car)
may cause damage or malfunction.
• Do not expose to rain or moisture.
Caution
To use a headset safely, please keep the following in mind:
• Do not play your headset at a high volume. Hearing
experts advise against continuous extended play.
• If you experience ringing in your ears, turn down the
volume or stop using the headset.
• Do not use a headset while driving a motorized vehicle or
riding a bike. It may cause a traffic hazard and is illegal in
many areas.
• Even if your headset is an open-air type designed to let
you hear outside sounds, don’t turn up the volume so
high can’t hear sounds around you. that you
Headset safety
TM
TM
4
Page 7

Use of headphones while operating an automobile or
moving vehicle is not recommended and is unlawful in
some states and areas. Be careful and attentive on the
road.
Caution While Driving
As with any portable player, you must back up the drive
regularly.VERVE is not responsible for lost data.
Back up your data
5
Page 8
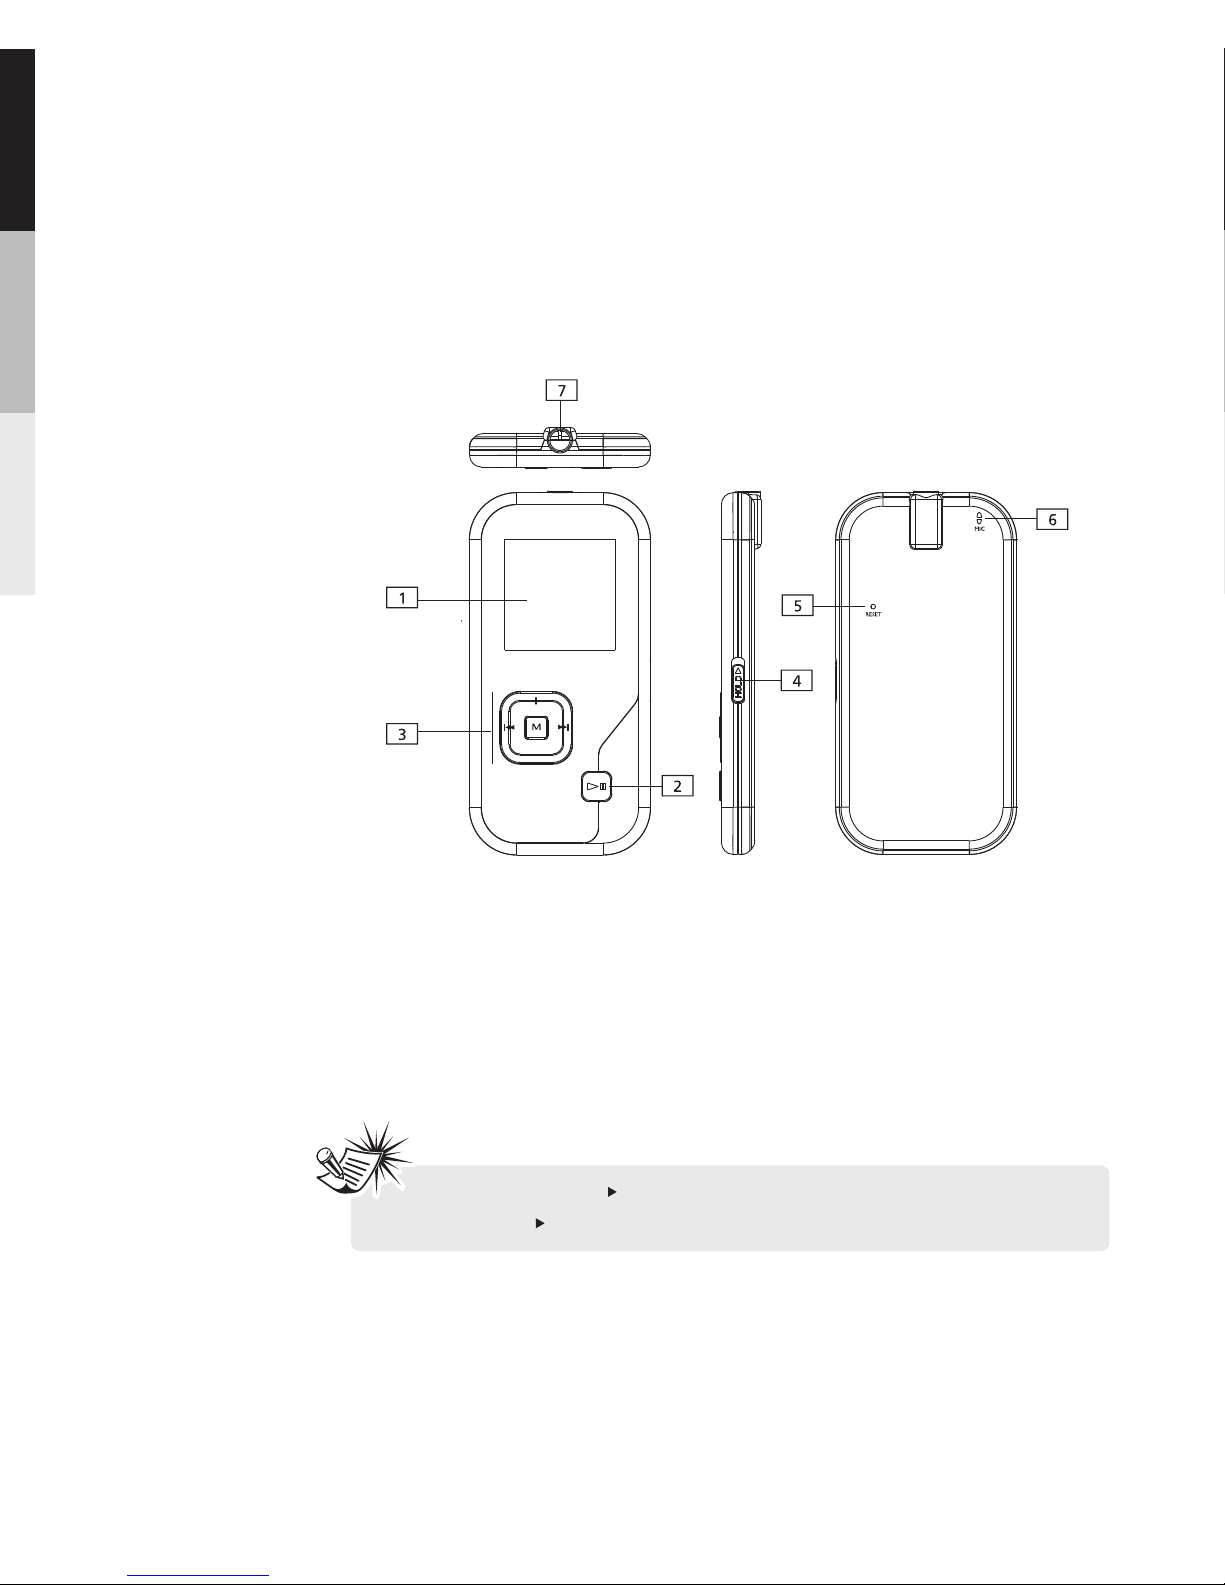
Player Overview
1.Lcd
2.On/Off/Play/Pause/Com
3.Menu
Rew/Volume-/Fwd/Volume+
4.Hold
5.Reset
6.Internal Microphone
7.
Socket
Earphone / Line-in /
Data
Note: Push“ ”to right to , push
“ ”to left to
disable the buttons
re-enable.
HOLD
HOLD
Overview
6
Page 9
Product Features
Operational Notes
Compact, light weight and stylish design
65K color LCD display.
Built in Li battery.
Playback MP3. WMA. WAV multi format file.
Playback SMV format video
.
No driver required for WINDOWS
WINDOWS 98SE.
Viewing JPG format .
7 Equalizer Flat. Bass. Rock. Jazz.
Classic. Pop. Graphic.
.
files (video conversion
software included).
versions newer than
pictures.
modes:
Please release the before performing any
operation
HOLD button
7
to recharge the battery
Page 10
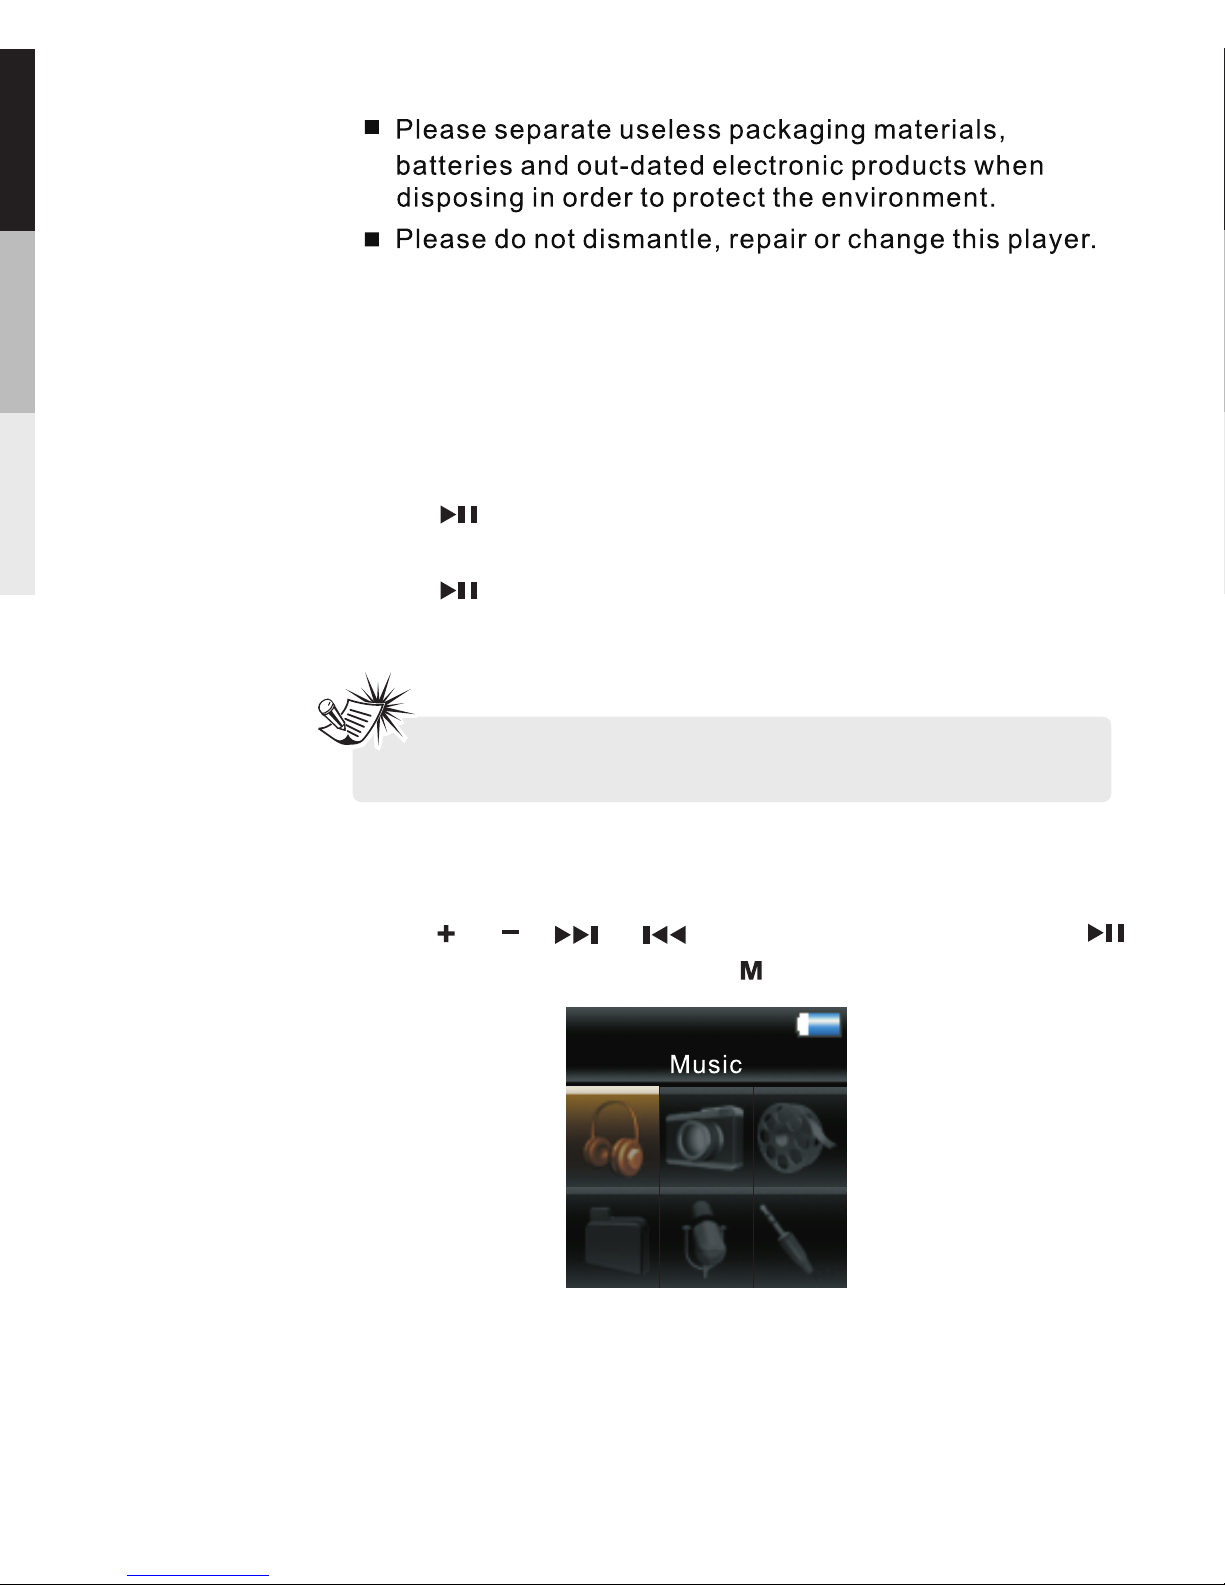
Press or , or to , press“ ”
to confirm selection , press“ ”to return.
make a selection
1.Music
2.Picture
3.Videos
4.My Selections
5.Voice Recording
6.Line-in Recording
Main menu
Power on/off
Press button, the device switches on and
VERVE appears in the LCD.
Press and hold for app 2 second , The device
switches off and “shutting down” appears in the LCD.
8
GENERAL CONTROLS
Note: Remember to release the HOLD switch before
using the player,and lock it when not in use.
Page 11
Music Playing
In home menu ,press or , or to select, press
to confirm or enter playback, press“ ”to re turn to
menu.the previous
Press twice during playback to enter Home menu.
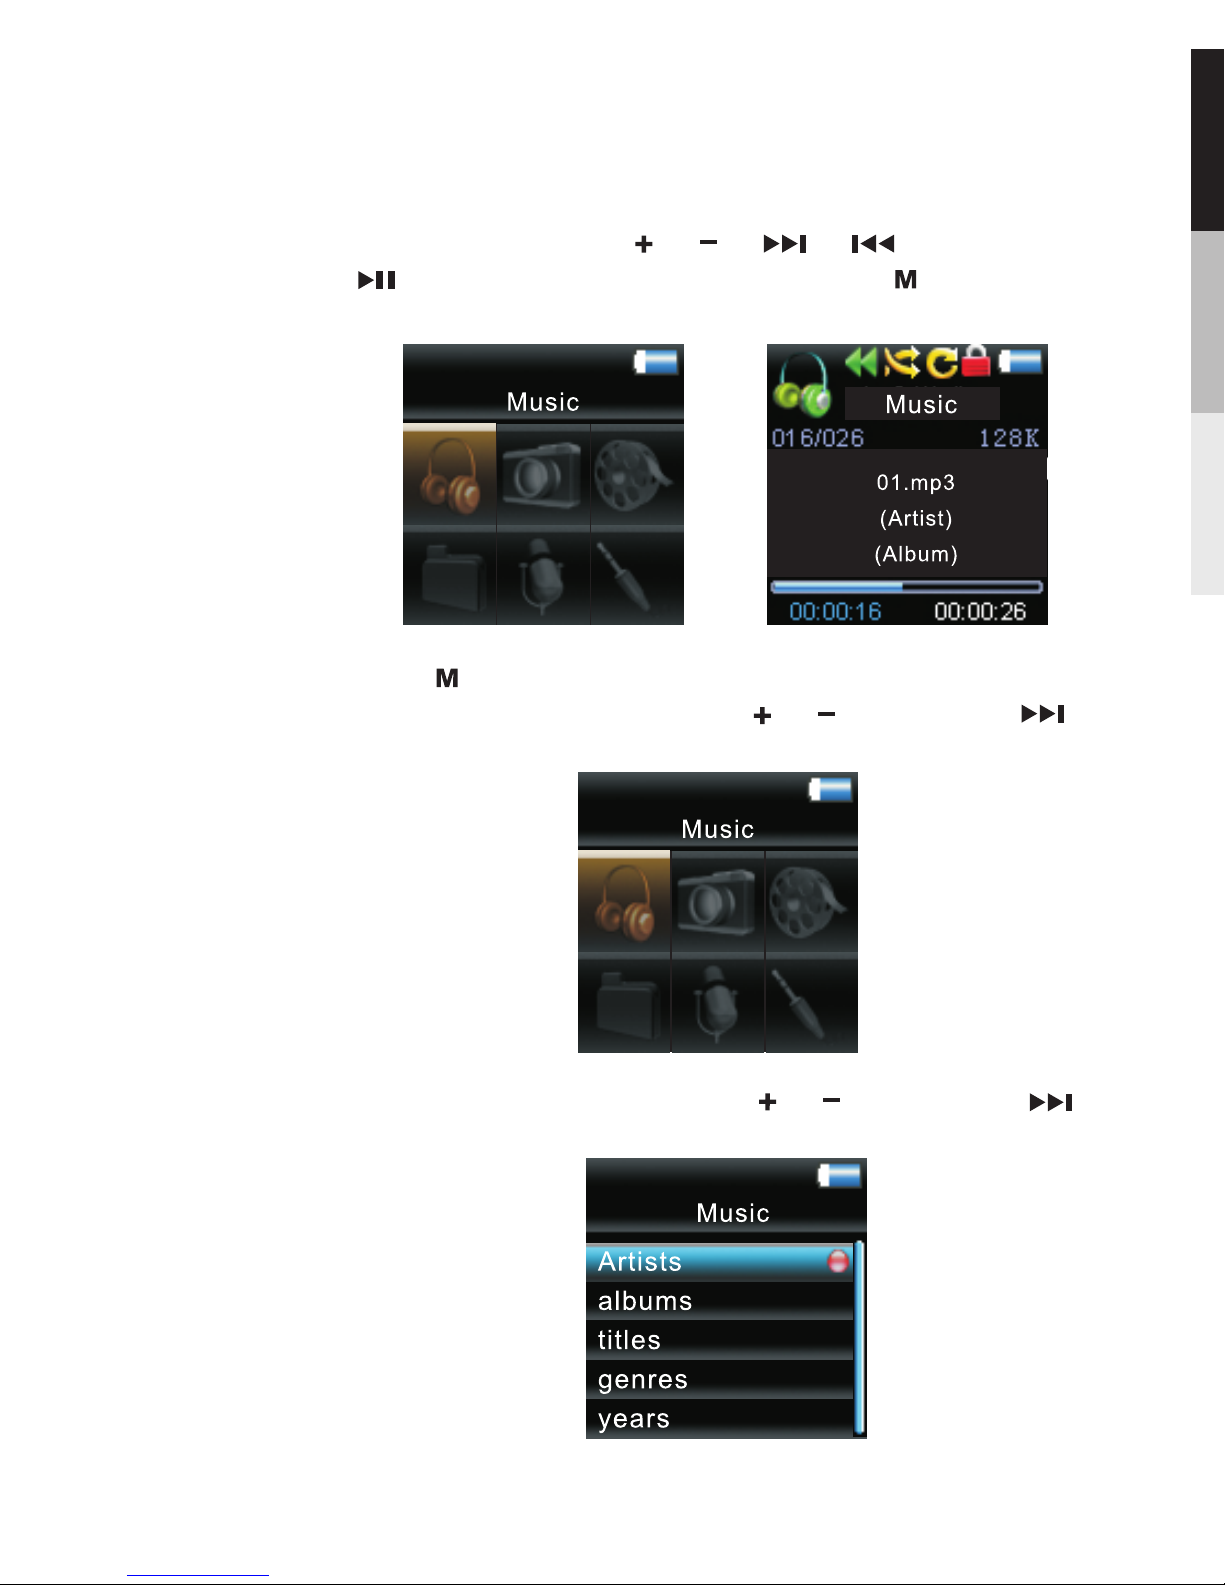
Highlight “ Music ” by pressing or . Then press to
advance.
Highlight “ Artists ” by pressing or . Then press
to advance.
9
Listening and Recording
Page 12
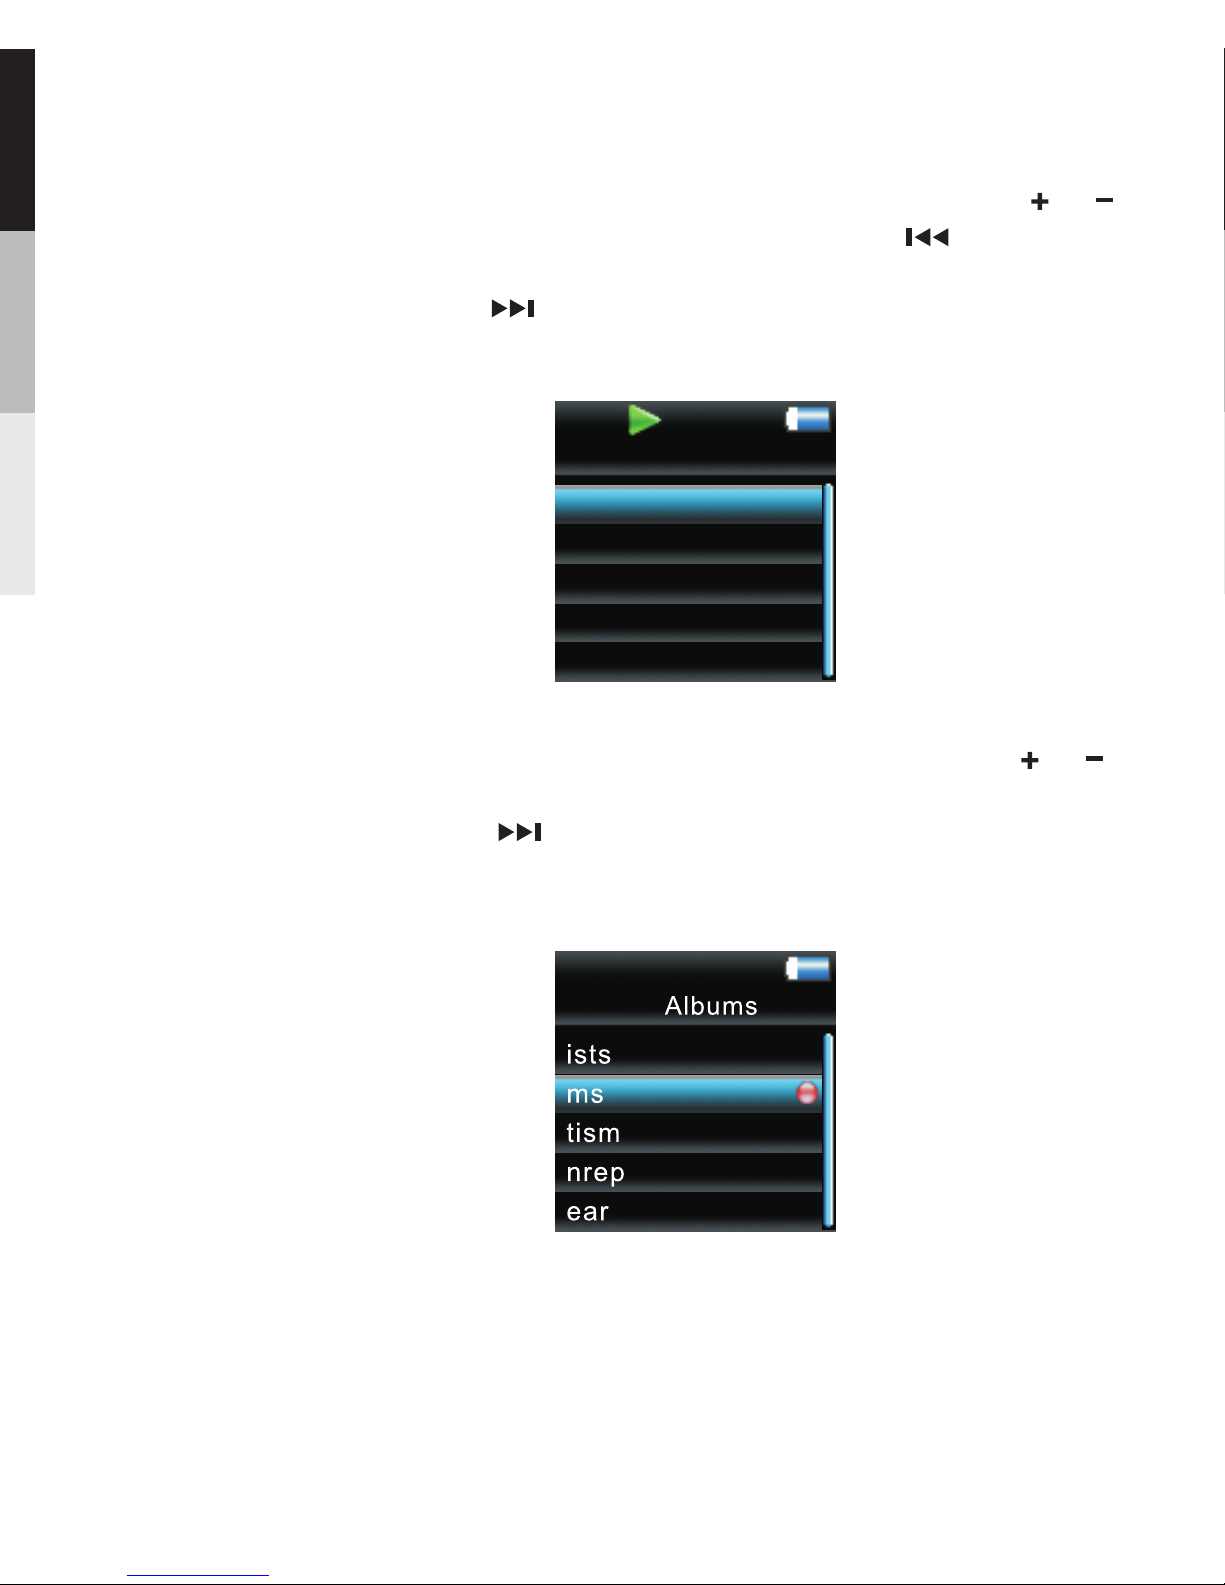
The Artists menu appears with the artists listed in
alphabetical order.
·Scroll up and down the “ Artists ” menu by pressing or .
·Return to the previous menu by pressing .
·View the albums from the artist highlighted by
pressing (the albums of that artist appear in
alphabetical order).
Scroll up and down the “ Albums ” menu by pressing or .
·View the songs from the album highlighted by
pressing (the songs of that album appear in track
order).
Artist
Artist 1
Artist 2
Artist 3
Artist 4
Artist 5
10
Page 13
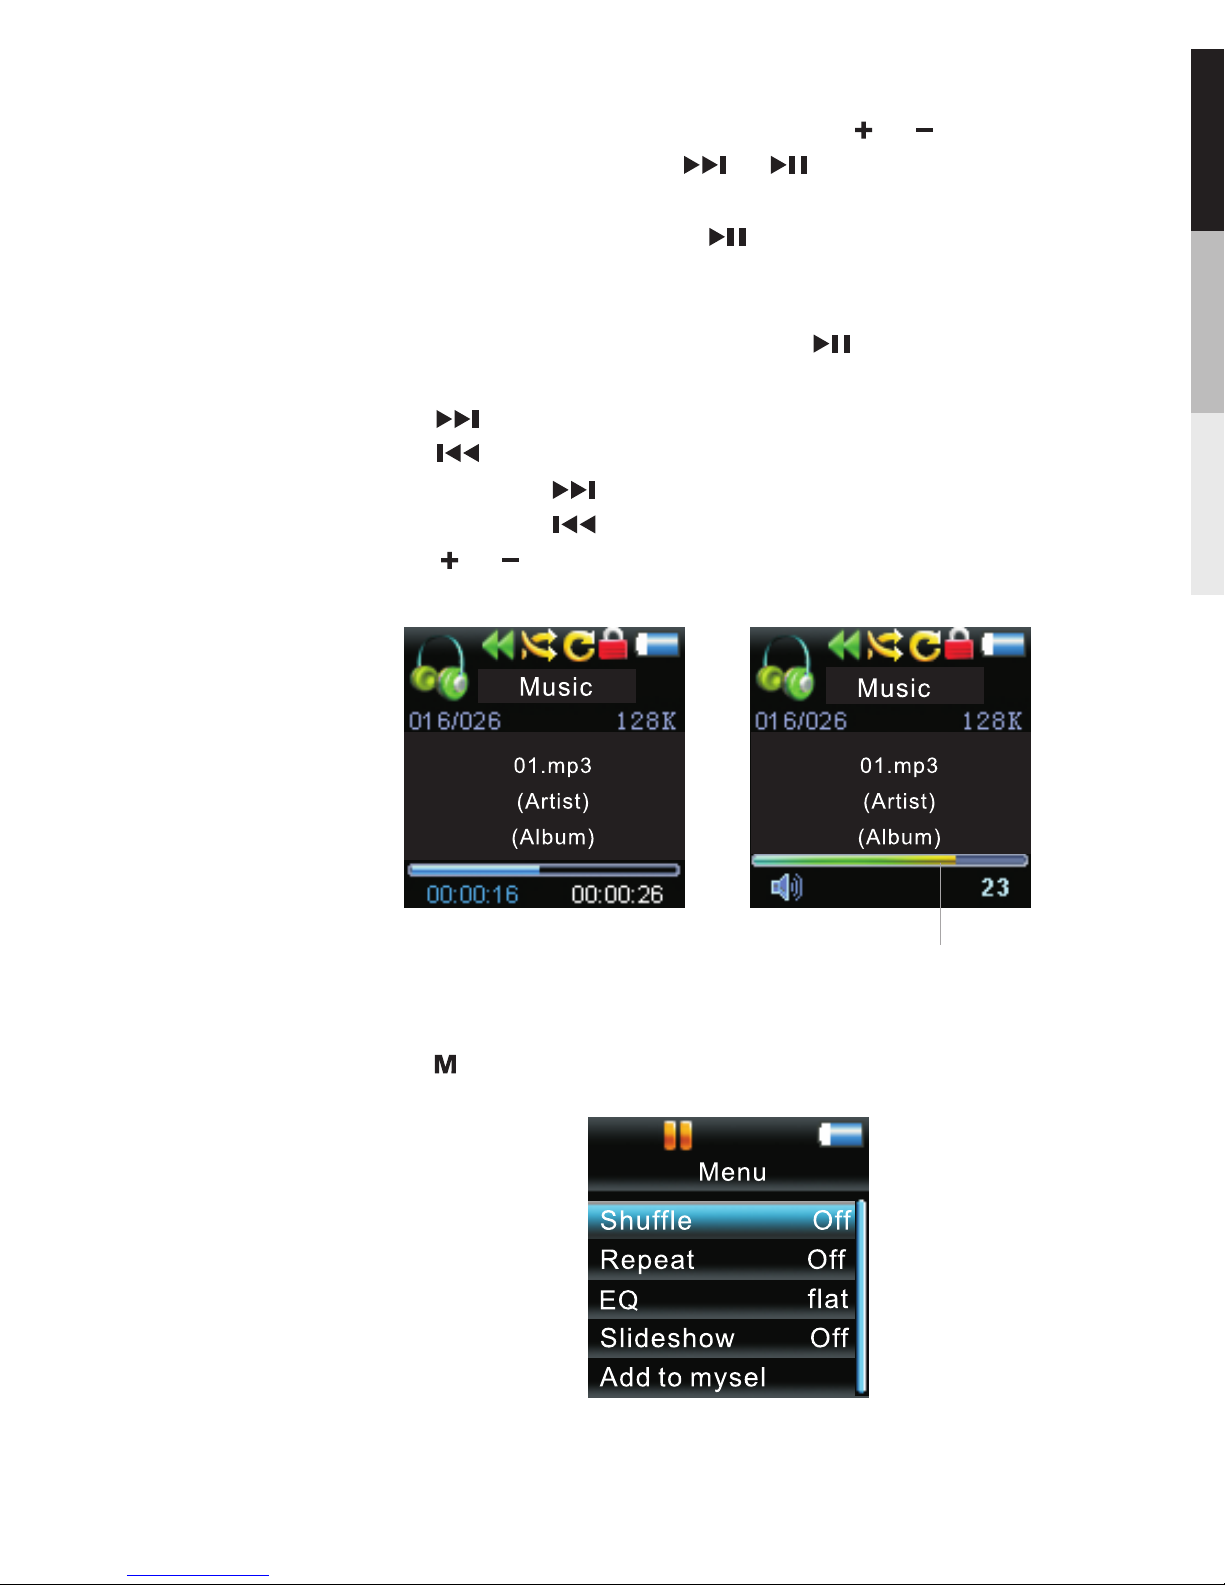
,
Press during playback to access the Player s menu.
Music
In “music play back ” display, press to starts or pauses
playback,
Press to skip to the next file.
Press to skip the previous file.
Press and hold to scan forward within a file.
Press and hold to scan back wards within a file.
Press or to increase or decrease the volume.
Highlight the desired song by pressing or .
·To play the song, press or . The song s
information will show on the display during playback.
·To pause playback, press .
,
Volume
11
Page 14
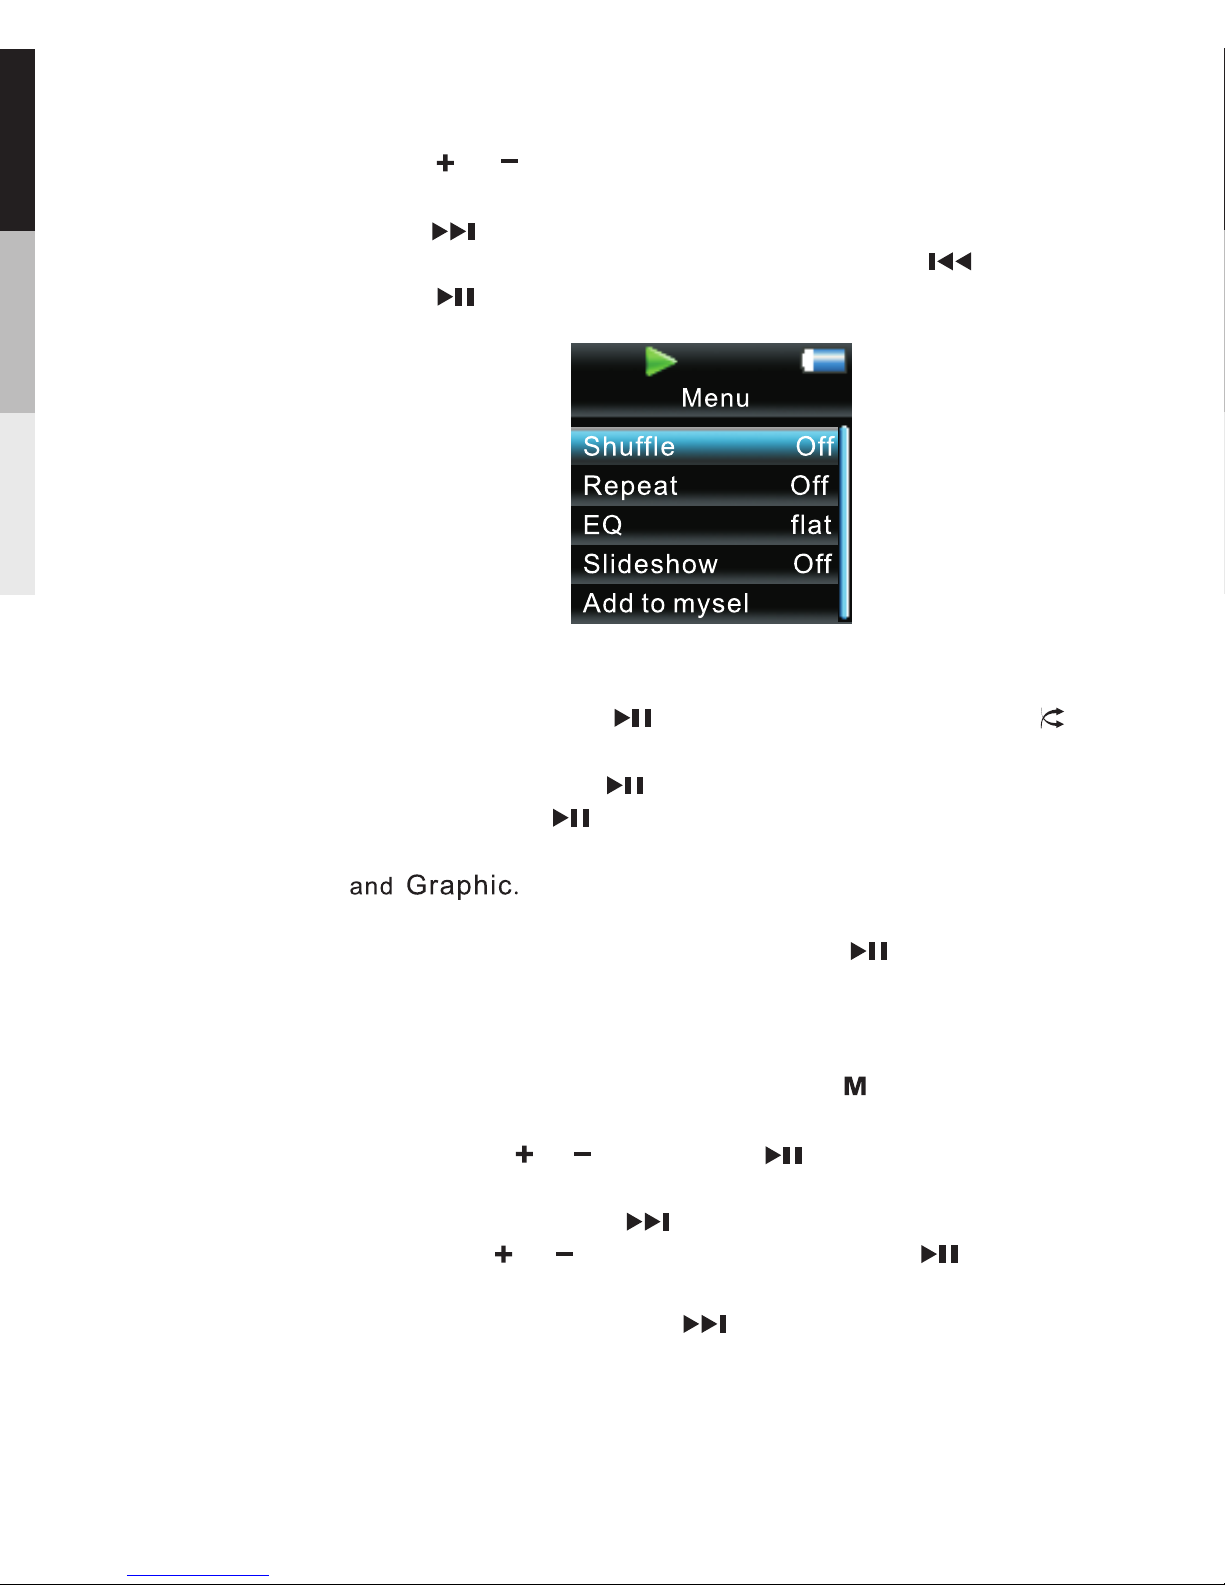
To scroll up or down to highlight items on the screen,
press or .
To confirm your selection or enter and view the submenu,
press .
To go back to the previous menu level, press .
Press repeatedly to select options.
Shuffle …… Press repeatedly to select shuffle on
or off.
Repeat …… Press repeatedly to select a repeat mode.
Slide show …… defines the viewing time for This
each picture during a slideshow. Press repeatedly to
select among:off,3,5,10 and 15 seconds.
Adding Files to My Selections …… You can add your
favorite songs to my Selections.
Clearing My Selections …… Press during playback
to access the Player s menu. Highlight “Clear MySel”.
by pressing or .Then press to confirm deletion
of the selected items.
Settings …… Press to enter the settings menu and
then press or to highlight an item. Press
repeatedly to change settings.
System …… Press to show the amount of free Info
space available and the firmware version.
EQ …… Press to select a EQ mode.repeatedly
Options available: Flat,Bass,Classic,Pop,Rock,Jazz
,
12
Page 15
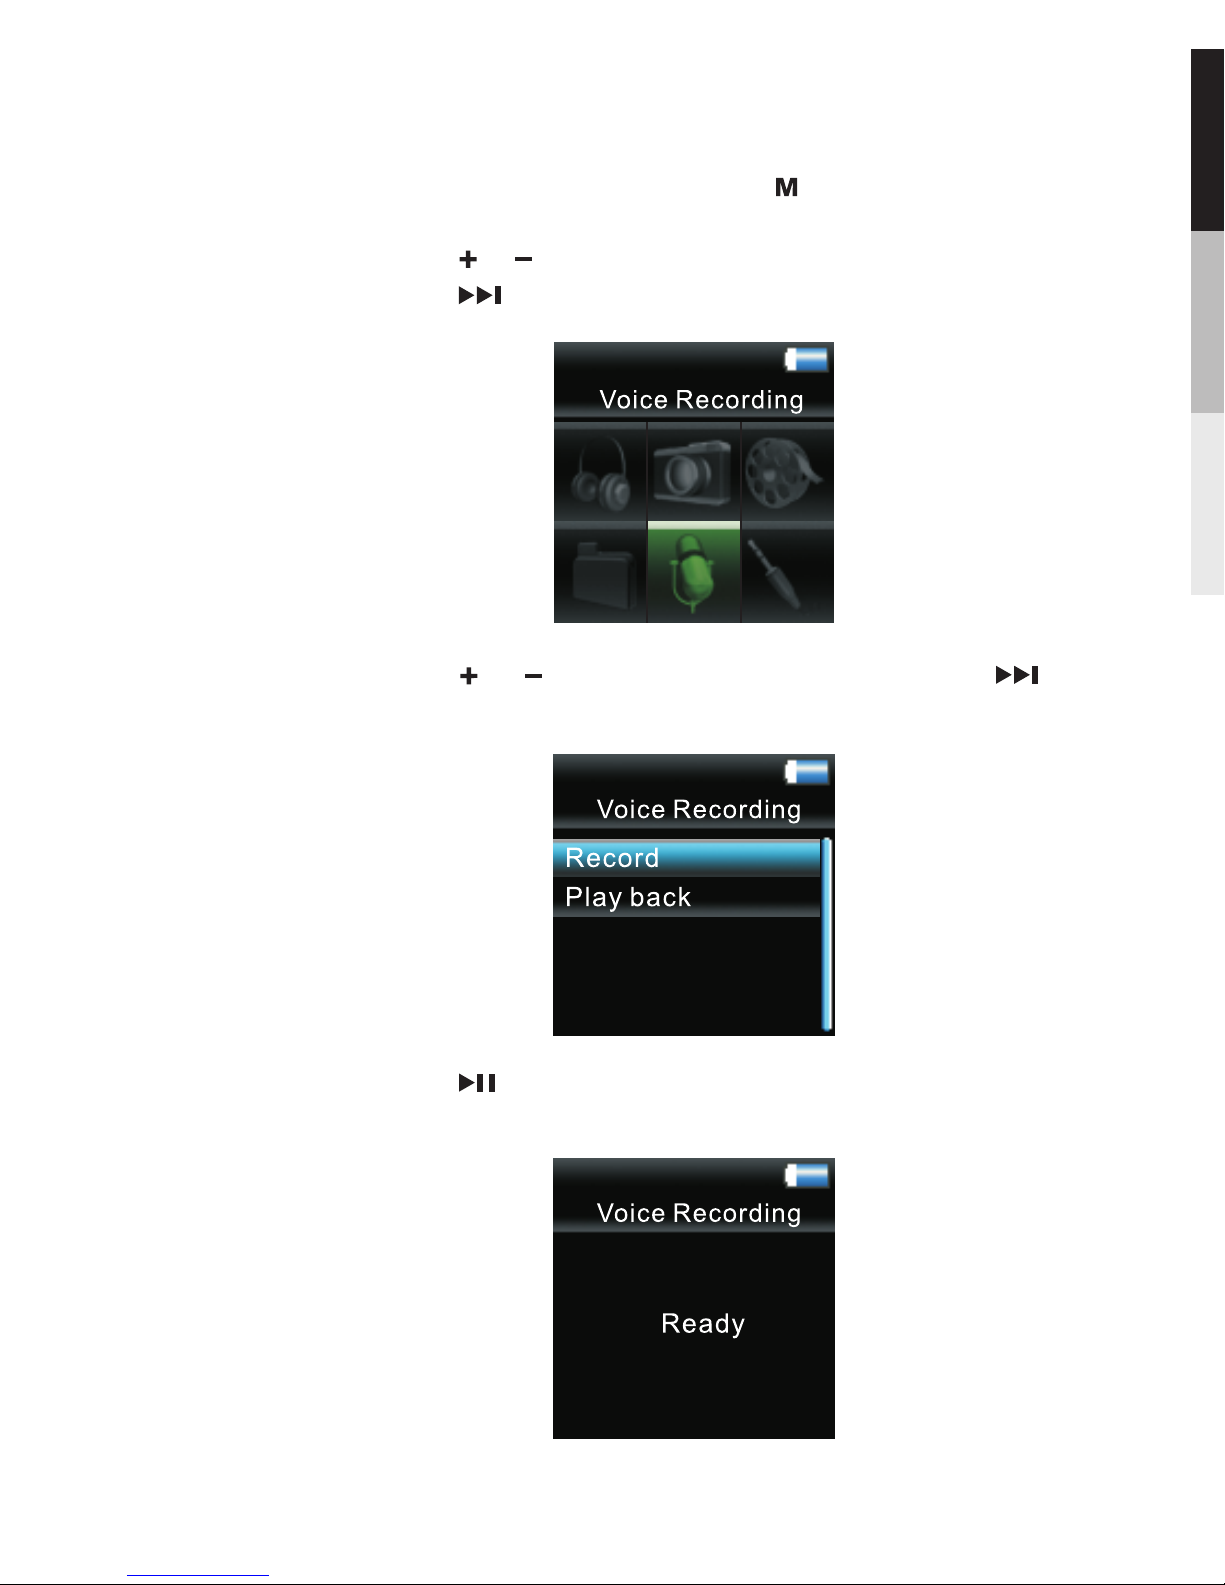
Voice Recording
1.To start voice recording, press twice during playback
to access the Home menu.
2.Press or to highlight “ Voice Recording ”. Then
press to advance.
3.Press or to highlight “ Record ”.Then press to
access “ Voice Recording ” mode.
4.Press when the display shows “ Ready ” to start voice
recording.
Record
Play back
13
Page 16
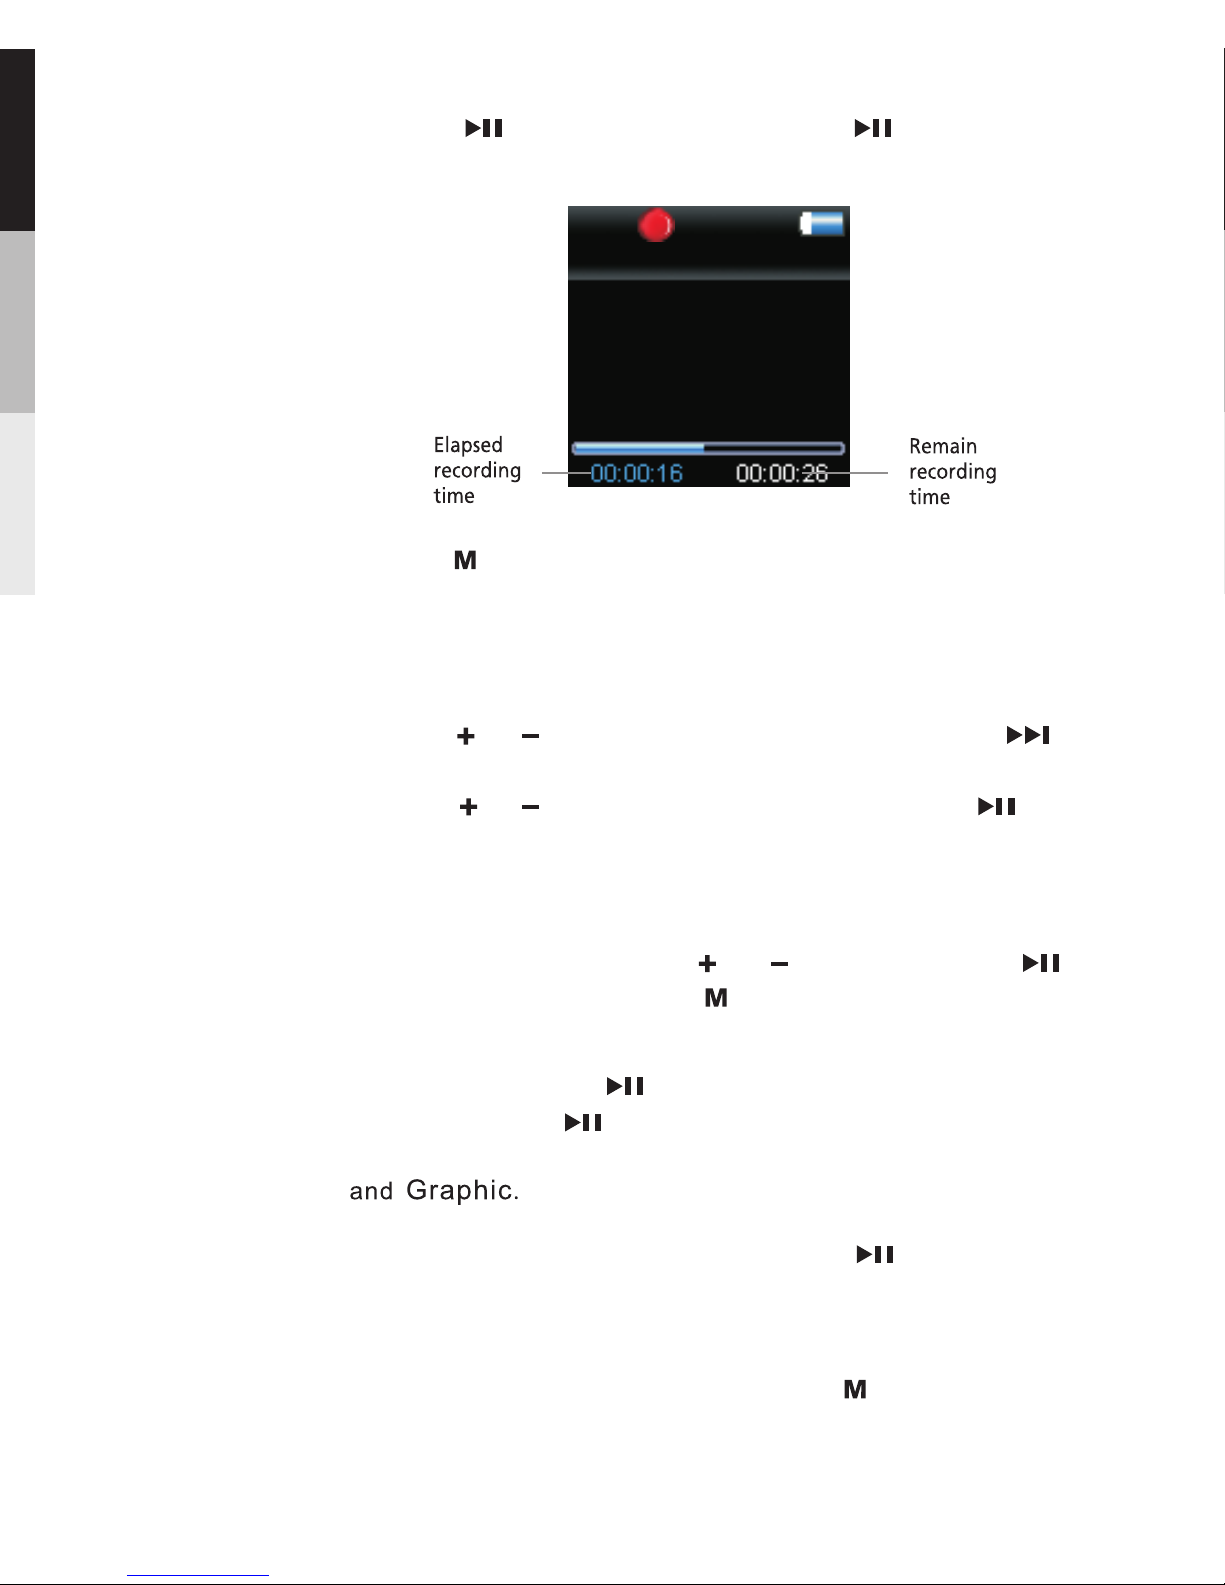
5.Press to pause recording. Press again to resume
recording.
6.press to stop recording.
Playback Recorded Voice Recording
1.Follow steps 1-2 above to enter the Voice Recording
sub-menu.
2.Press or to highlight “ Play Back ” and press to
confirm your selection.
3.Press or to highlight the recorded file and to start
playback.
Voice Recording
wav
VOICE003
Repeat … … Press repeatedly to select a repeat mode.
Slide show …… defines the viewing time for This
each picture during a slideshow. Press repeatedly to
select among:off,3,5,10 and 15 seconds.
Adding Files to My Selections …… You can add your
favorite songs to my Selections.
Clearing My Selections …… Press during playback
to access the Player s menu. Highlight “Clear MySel”.
,
Delete file: You can delete now playing file.
In Playback mode, press or to select; press to
confirm or change; press to return to previous menu.
EQ …… Press to select a EQ mode.repeatedly
Options available: Flat,Bass,Classic,Pop,Rock,Jazz
14
Page 17
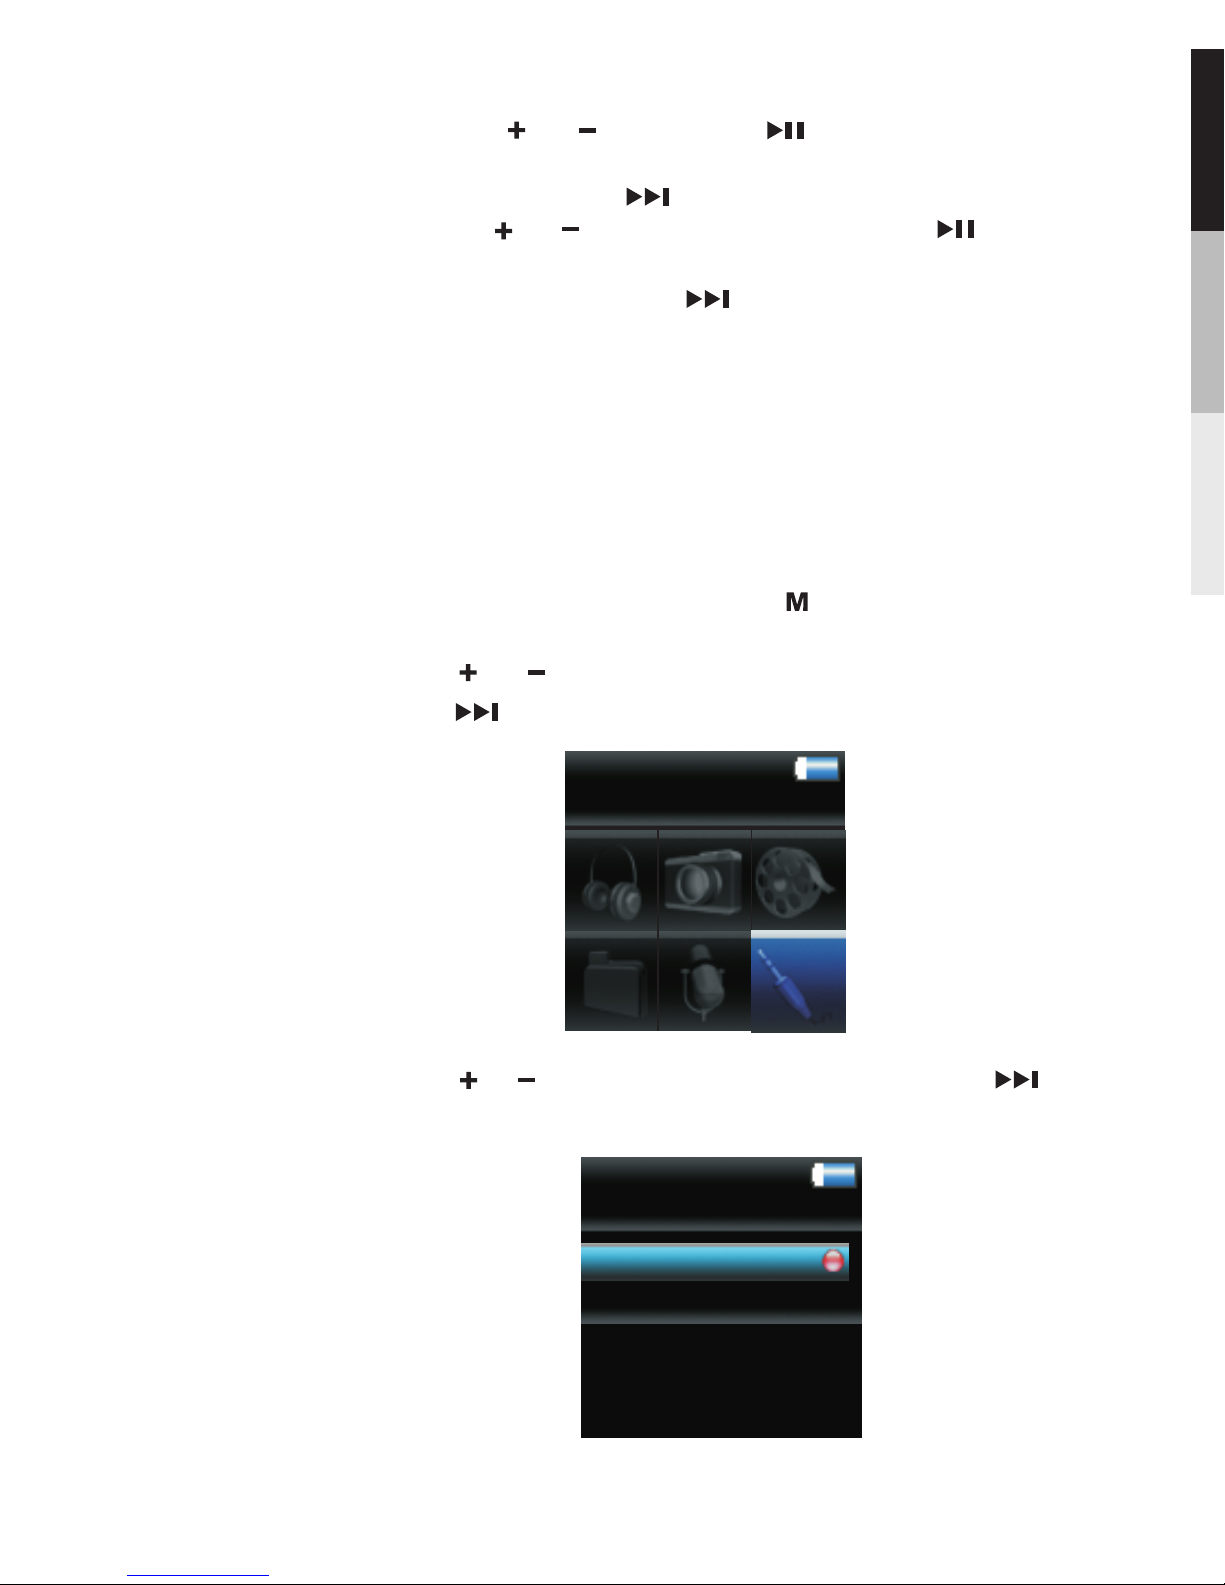
3.Press or to highlight “ Record ”. Then press to
access the line-in recording mode.
Record
Play back
Line-in Recording
1.To start line-in recording, press twice during playback
to access the Home menu.
2.Press o r to highlight “ Line-in Recording ”, Then
press to advance.
Line-in Recording
by pressing or .Then press to confirm deletion
of the selected items.
Settings …… Press to enter the settings menu and
then press or to highlight an item. Press
repeatedly to change settings.
System …… Press to show the amount of free Info
space available and the firmware version.
15
Line-in Recording
Line-in Recording is for recording directly from another
audio device that has a heaphone or Line out port. Connect
one end of the supplied cable into the other audio device's
heaphone or Line out port, and the other end into the
Earphone/Line-in/Data socket on this player.
Page 18
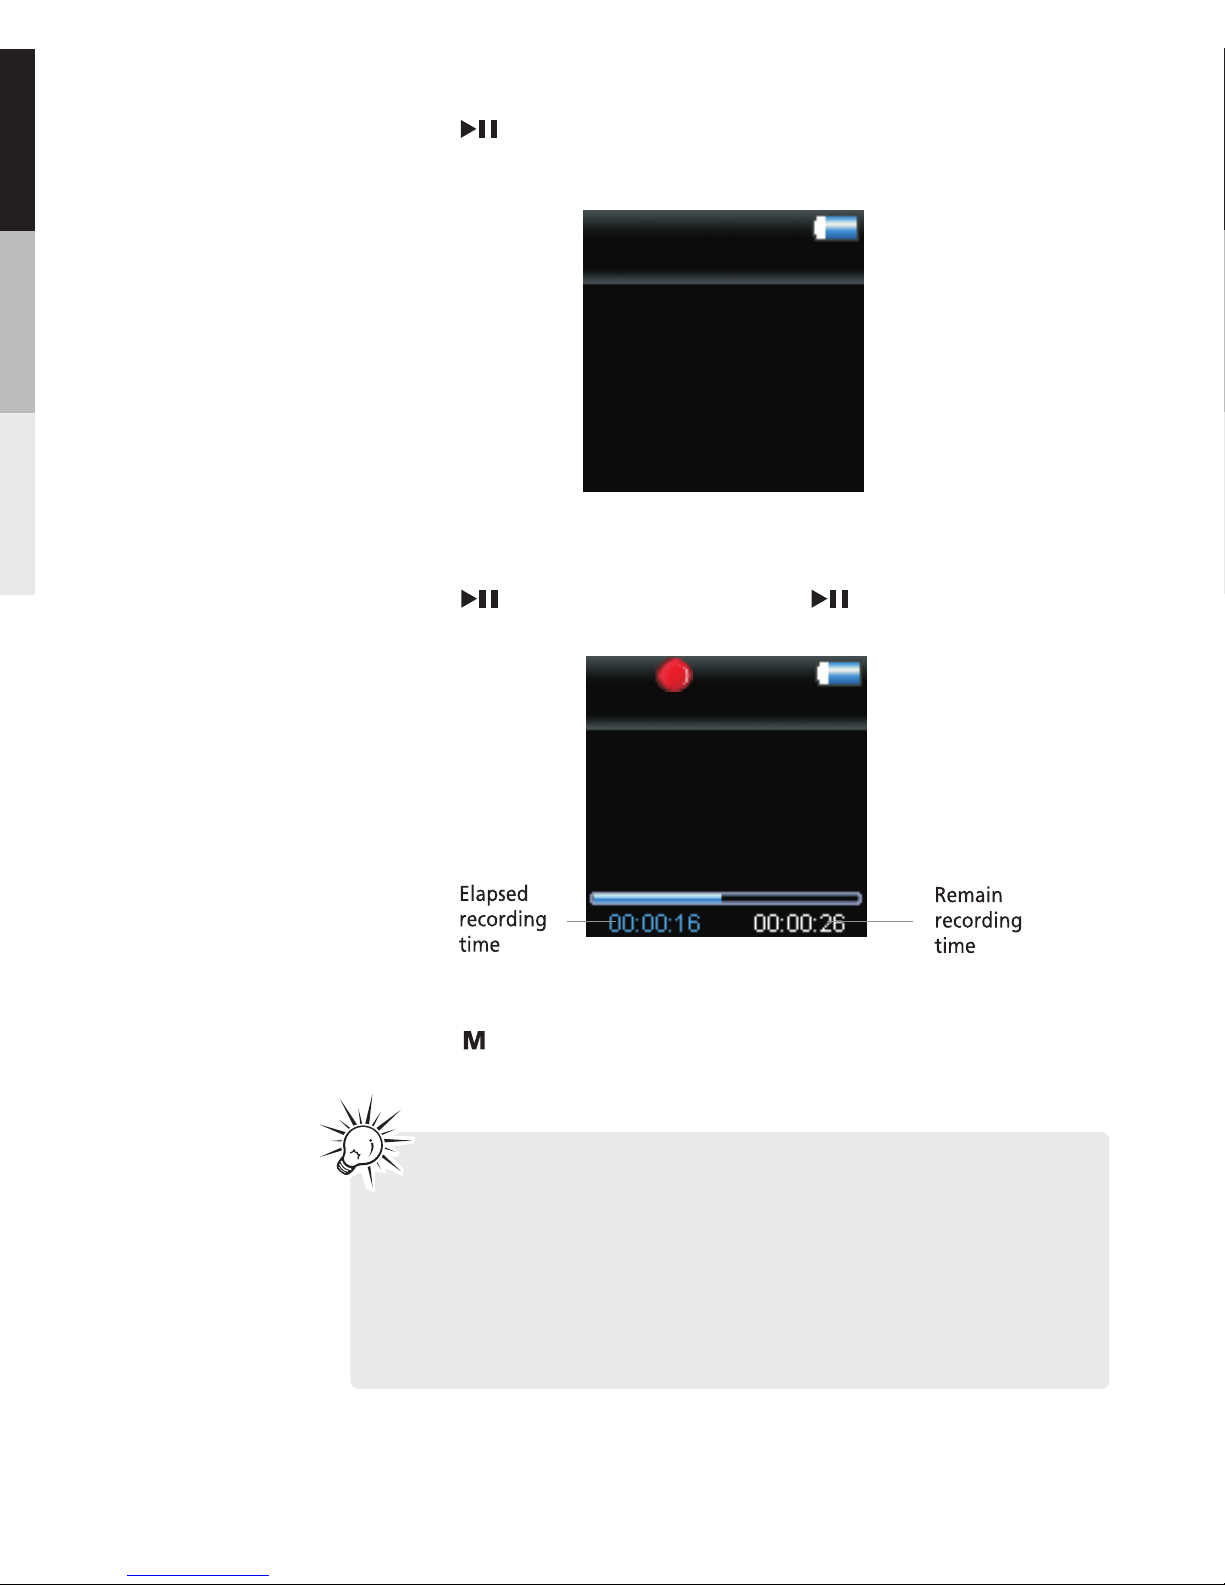
6.Press to stop recording.
5.Press to pause record. Press again to resume
recording.
wav
VOICE003
Line-in Recording
4.Press when the display shows “ Ready ” to start
line-in recording
Line-in Recording
Ready
Tips: Adjust the volume level of the source audio device
in order to achieve the optimum recording quality. The
source output varies from model to model. You might want
to experiment with a few recordings to determine the
proper volume output of the source to get optimum
recording quality from the player. Recommend starting
the source at around the room volume level.
16
Page 19
Deleting Recorded Files
1.While an unwanted recorded voice or line-in recording is
highlighted, press to start the playback.
· Refer to Playback Recorded Voice Recording and
Playback Recorded Line -in Recording for details in
highlighting a recorded file.
2.Press and then or to highlight “ Delete File ” and
press to confirm the deletion.
2.Press or to highlight “ Play Back ” and press to
confirm your selection.
3.Press or to highlight the recorded file and to
start playback.
Playback Recorded Line-in Recording
1.Follow steps 1-2 above to enter the Line-in Recording
sub-menu.
17
Page 20
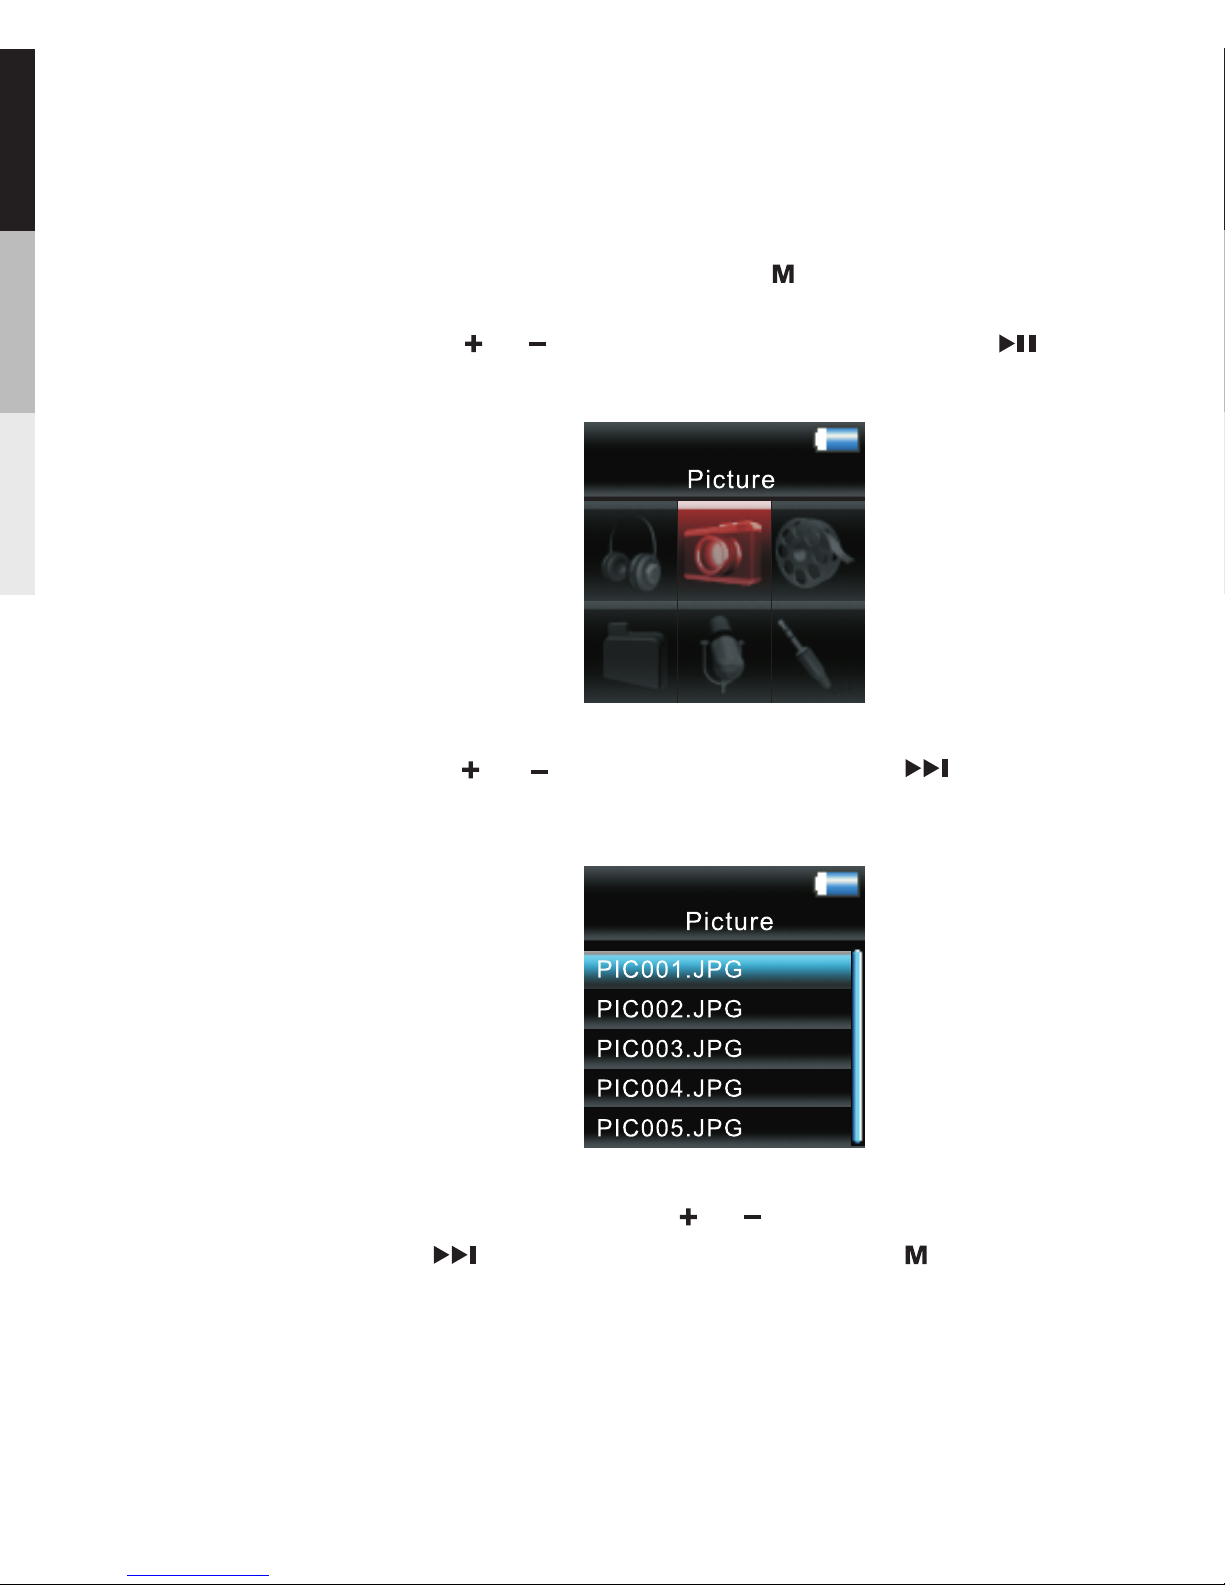
Picture Viewing
1.To start picture viewing, press twice during playback
to access the Home Menu.
2.Press or to highlight “ Picture ”. Then press to
advance.
3 Press or to highlight picture, press to confirm
your selection.
.
In picture viewing, press or to select picture,
press to confirm your selection; press to return to
previous menu level.
18
Picture and Video Viewing
Page 21
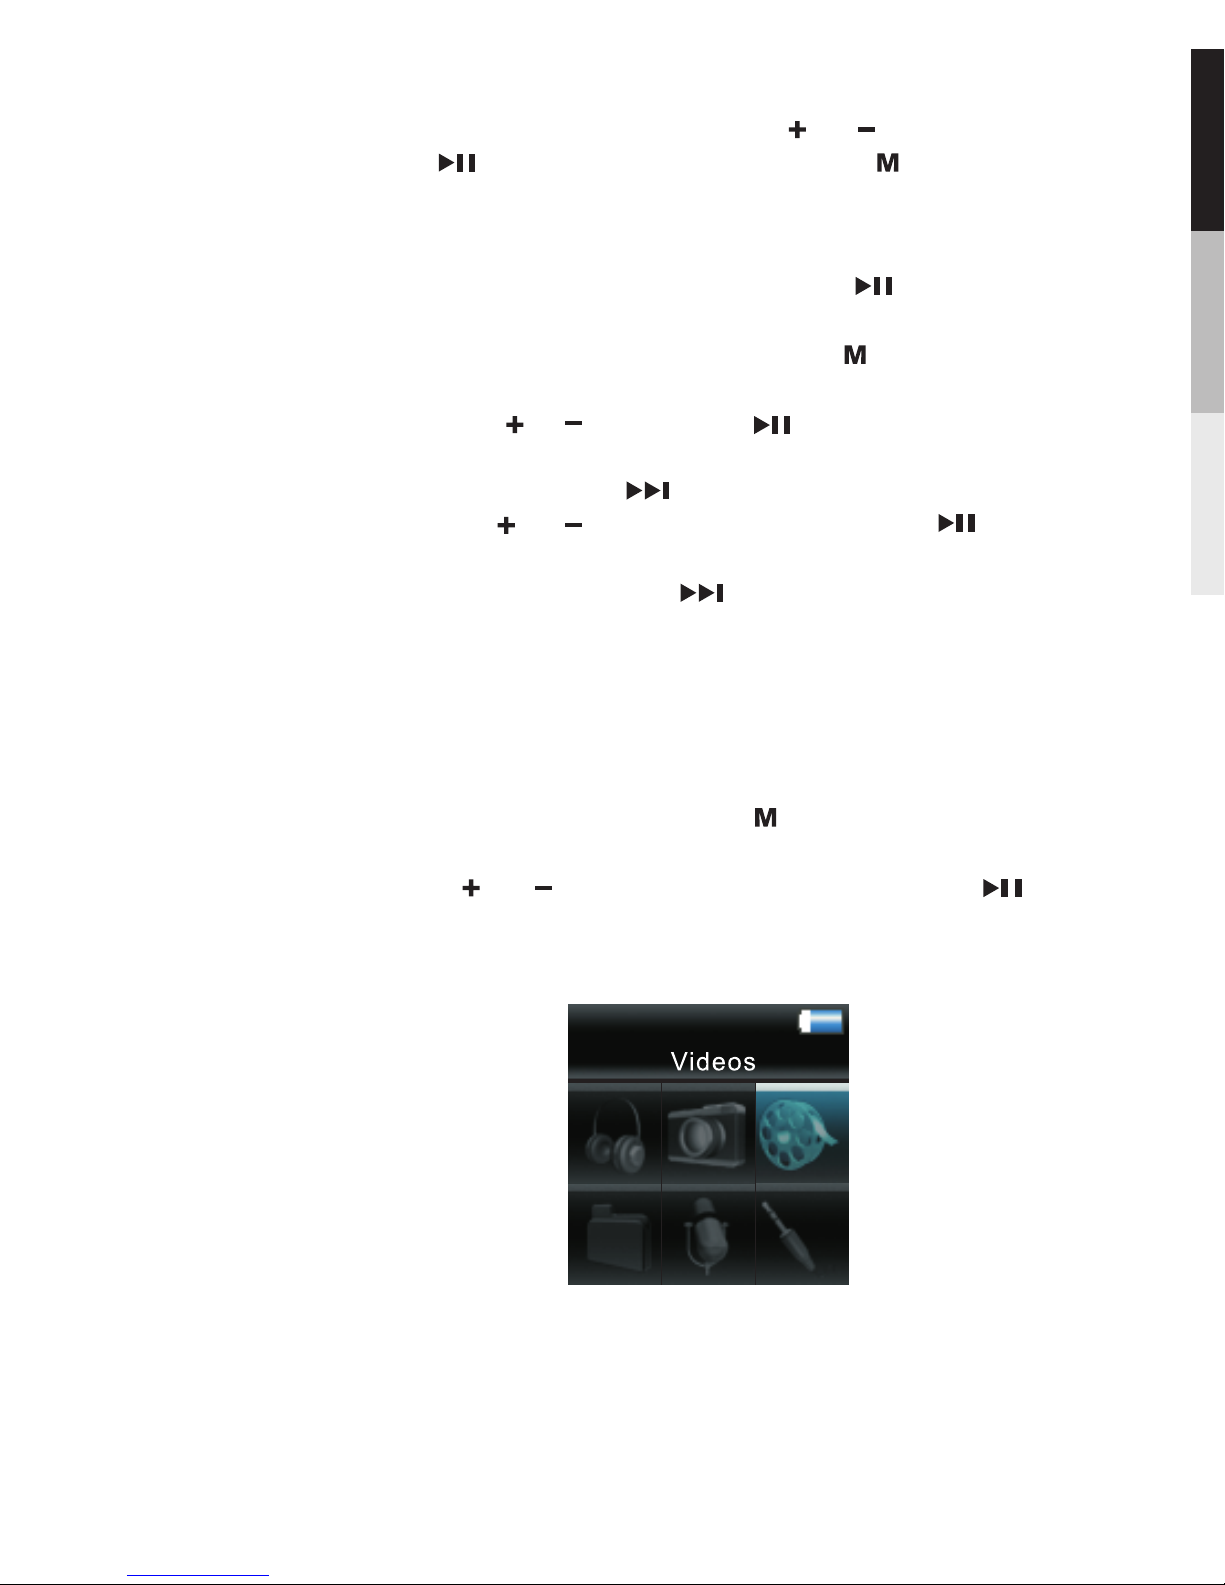
Video Viewing
1.To start video viewing, press twice during playback
to access the Home Menu.
2.Press or to highlight “Video”. Then press to
advance.
Slide show …… This defines the viewing time for
each picture during a slideshow. Press repeatedly to
select among:off,3,5,10 and 15 seconds.
System Into …… Press to show the amount of free
space available and the firmware version.
Settings …… Press to enter the settings menu and
then press or to highlight an item. Press
repeatedly to change settings.
Clearing My Selections …… Press during playback
to access the Player s menu. Highlight “Clear MySel”.
by pressing or .Then press to confirm deletion
of the selected items.
,
In Picture Viewing mode, Press or to select;
press to confirm or change; press to return to
previous menu.
19
Page 22
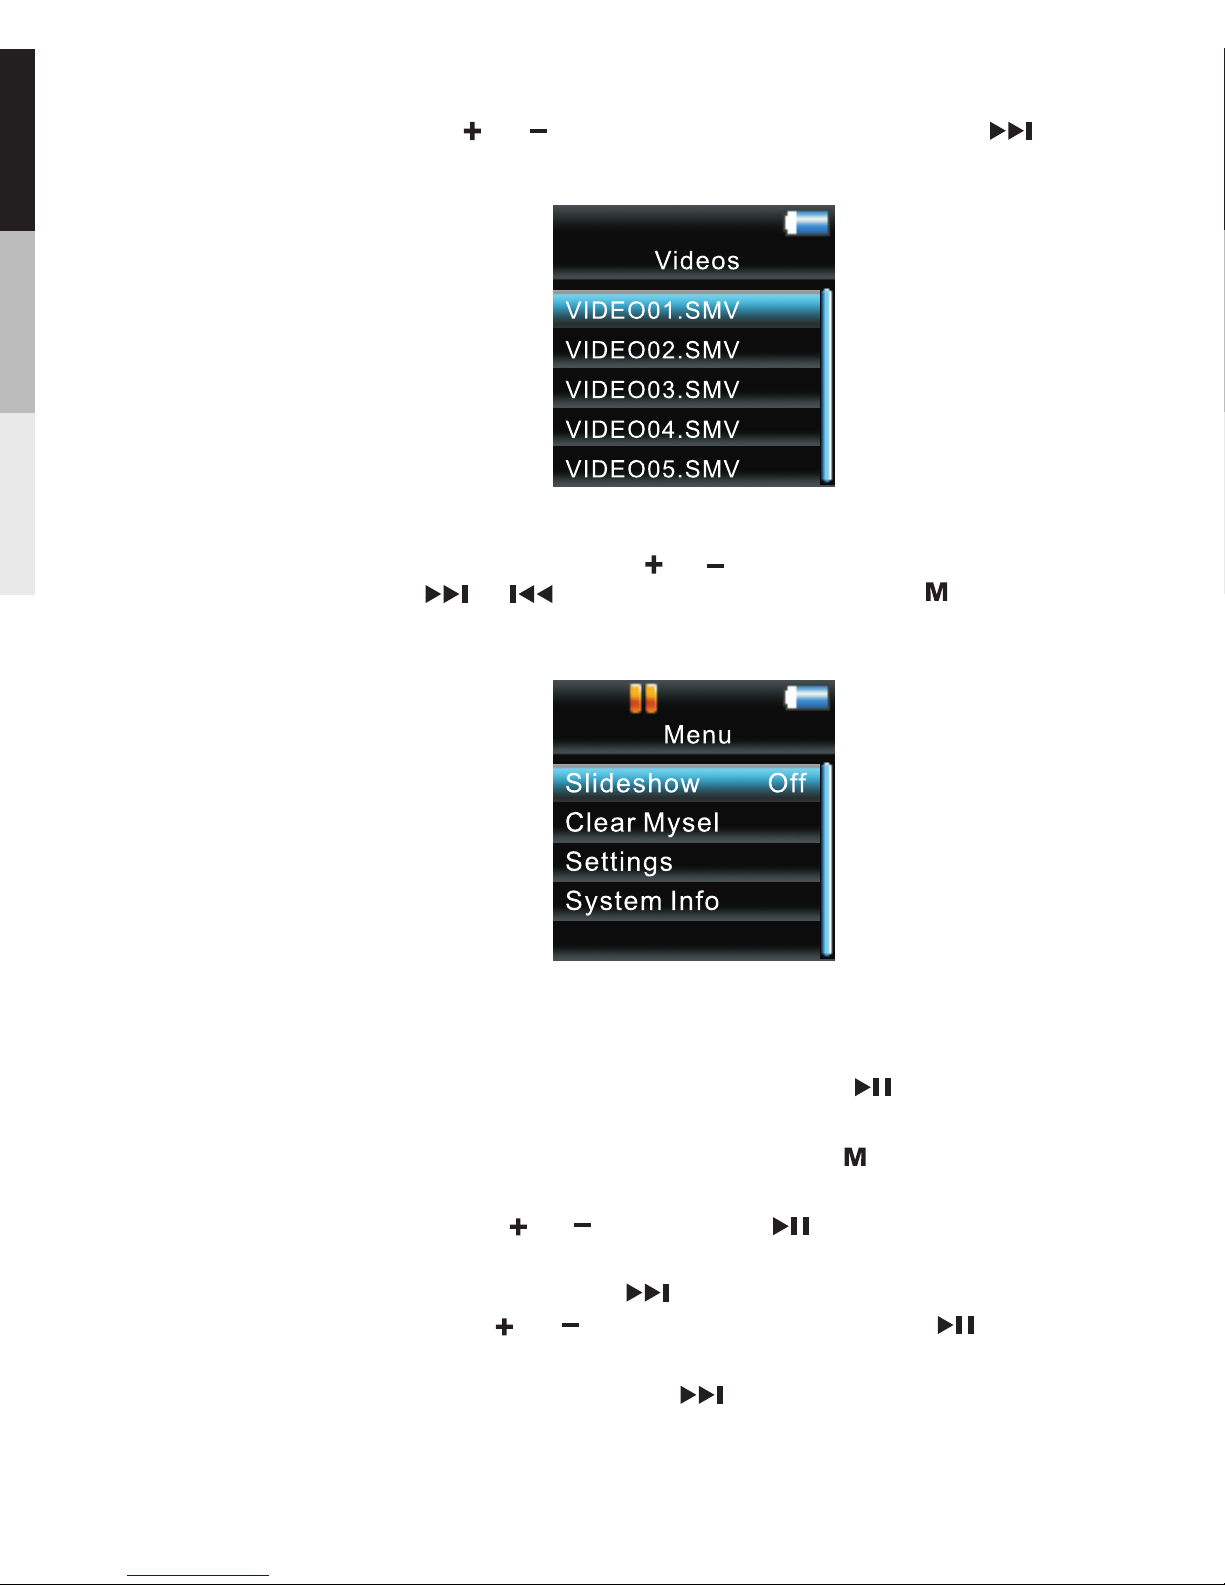
3 Press or to highlight “Video”. Then press to
confirm your selection.
.
Slide show …… This defines the viewing time for
each picture during a slideshow. Press repeatedly to
select among:off,3,5,10 and 15 seconds.
System Into …… Press to show the amount of free
space available and the firmware version.
Settings …… Press to enter the settings menu and
then press or to highlight an item. Press
repeatedly to change settings.
Clearing My Selections …… Press during playback
to access the Player s menu. Highlight “Clear MySel”.
by pressing or .Then press to confirm deletion
of the selected items.
,
20
In video playback,press or to adjust volume,
press or to skip to another video,press to enter
option menu.
Page 23
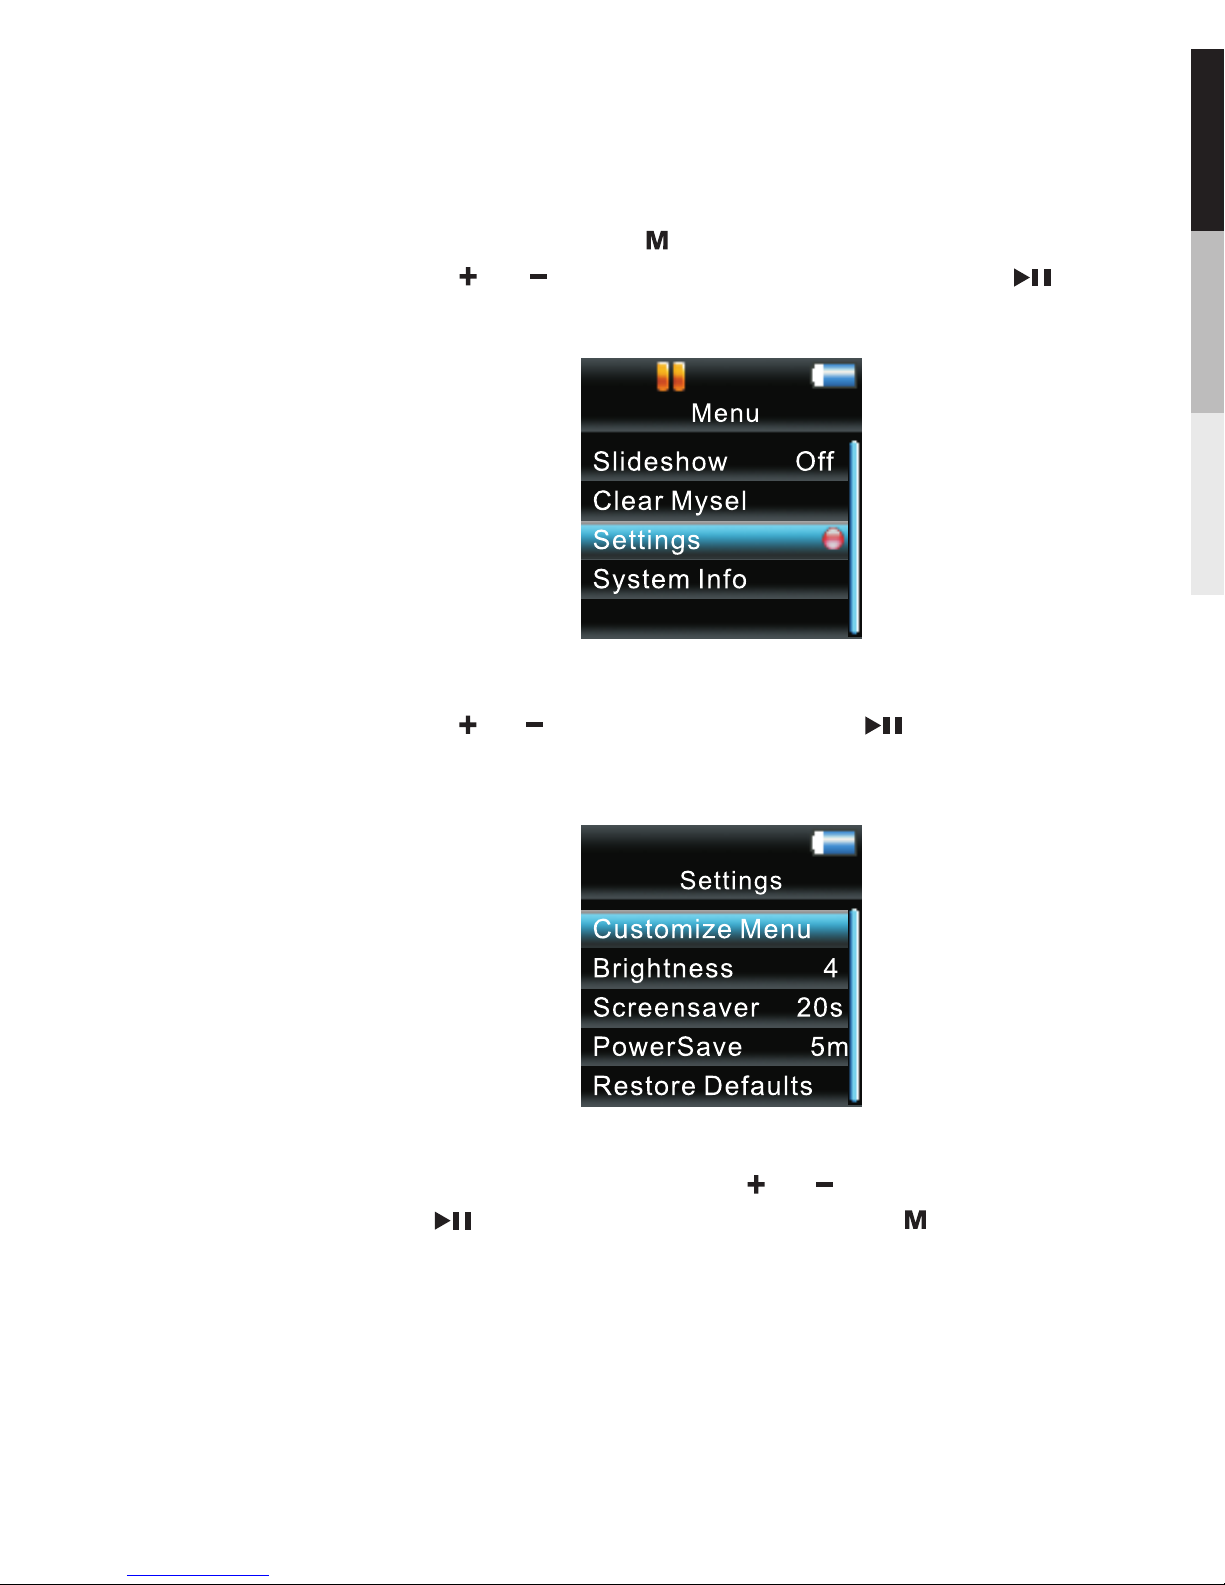
Settings
1 In music playback, voice recording, picture viewing and
video viewing, press to enter Player ’s menu.
2.Press or to highlight “ Setting”. Then press to
advance.
.
3.Press or to highlight item. Press repeatedly to
change setting.
In “ Settings” sub menu, press or to select item,
press to confirm your selection, press to return to
previous menu level.
21
Page 24

Customize Menu …… to select what you wish to display
in the submenu of Music library: Artists, Album, Titles,
Genres, and Years.
Brightness …… (1-8) to adjust the display light
brightness.
Screensaver …… (10s,20s,30s and 1m)to adjust the
duration before the screensaver activates.
Power save …… (Off,1m,2m,5m and 10m) to adjust the
duration for automatic shut down when the player is idle.
Restore defaults …… The unit will be reset to its original
settings
22
Page 25

CONNECTION TO THE COMPUTER
23
Page 26
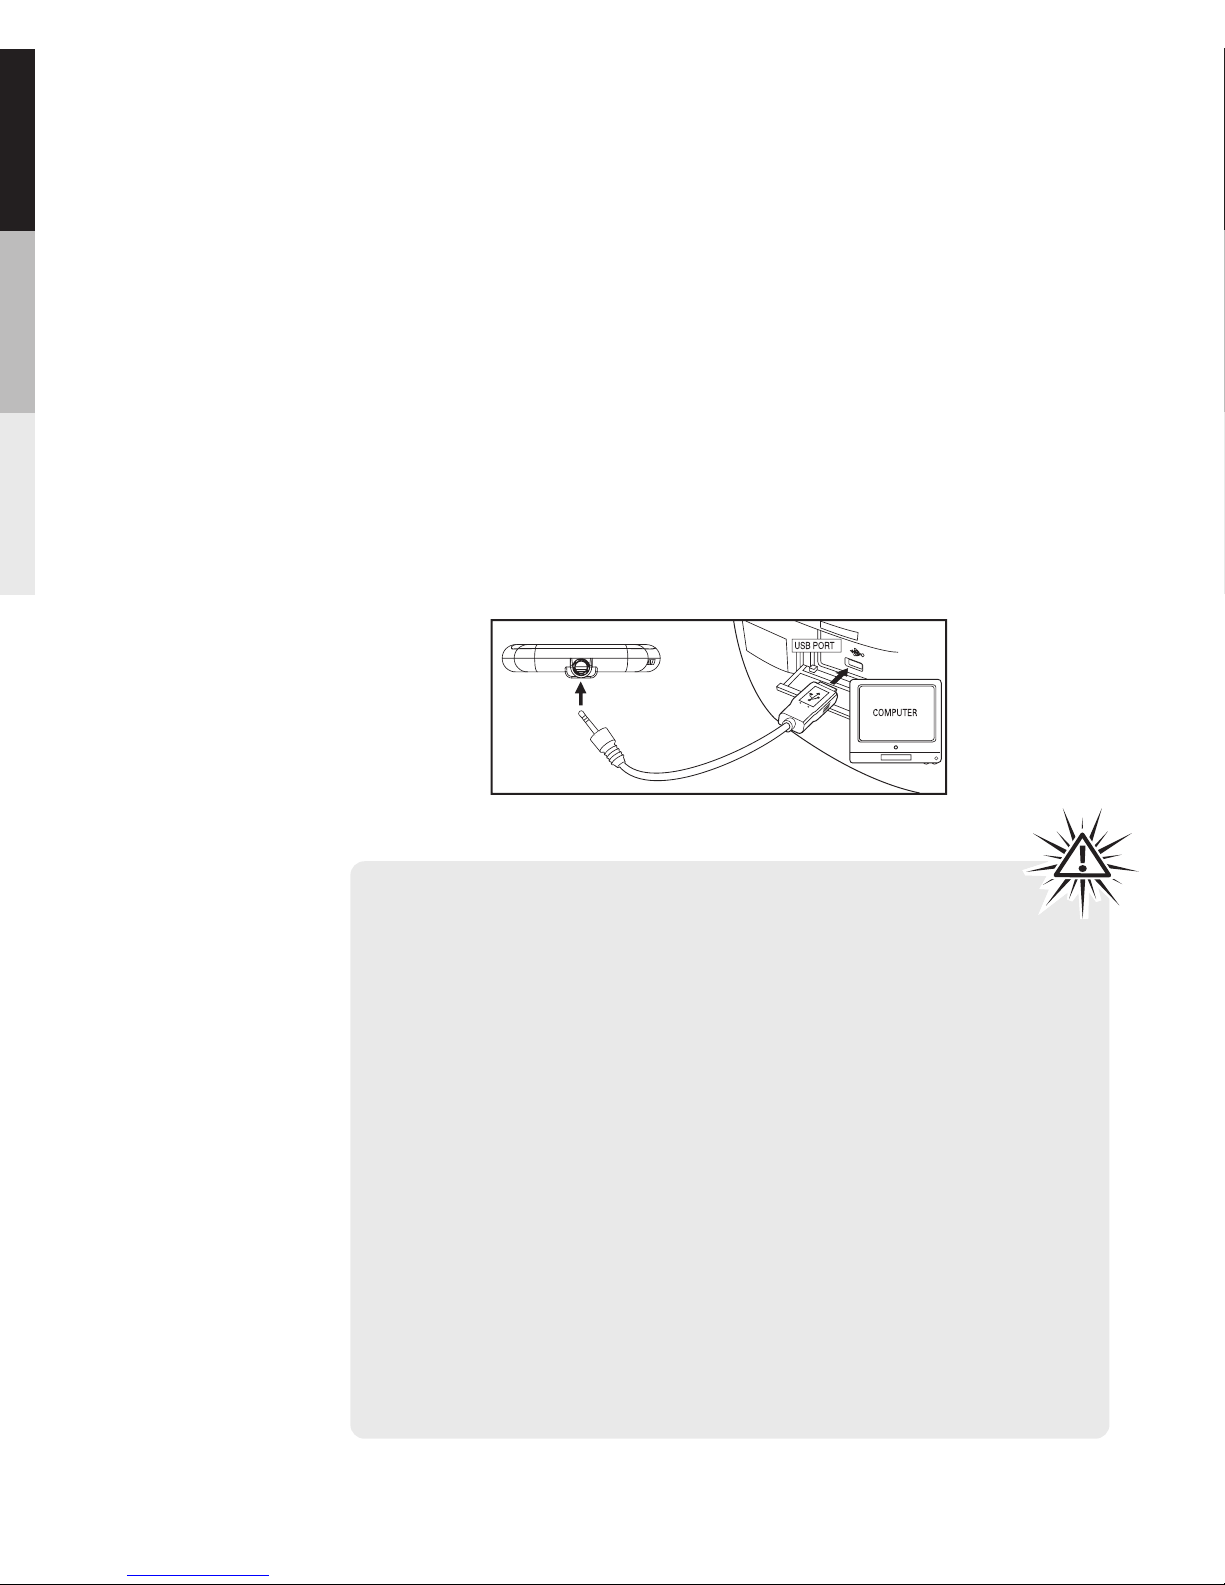
Connecting to the Computer
Connect the player to your computer with the USB cable
provided. The player will turn on automatically. In Windows
Vista or Windows® XP (when Windows Media Player 10
or above is installed),the player will appear as a Windows
portable device using the Media Transfer Protocol (MTP).
If Windows Media Player 10 or above is not installed or if
your computer is running Windows® 2000, the player will
be connected in Mass Storage Class (MSC) mode. It will
appear as a drive letter on your computer and behave as a
detachable drive for file transfer in one or both directions.
Connecting the Player to the Computer
TM
The Pl ay er
Warning:
·The USB cable provided is dedicated for this player only.
DO NOT connect this player to the computer with any
other USB cable. DO NOT plug this USB cable in other
USB devices.
·The USB cable provided may damage other products if
plugged into the earphones jack.
Note:
·It might take several seconds for the player to be
detected. Click Refresh in My Computer or Windows
Explorer to make sure the player has been detected.
·The player is capable of transferring files at USB 2.0. If
USB 2.0 port is available on your computer, use it to
connect to your player. The player is still backward
compatible with the older USB 1.1 ports. However, you
will not be able to take full advantage of the potential
speed increase.
24
Page 27

Charging the Battery
Your player is charging through the USB connection when
it is connected to your computer. To fully charge the player,
make sure your computer is on and the player is connected
for at least 3 hours.
Warning: Your product contains a battery and charging
system which is designed to work in temperatures that do
not exceed 50 C (122 F). Leaving this product in a closed
automobile or the trunk of an automobile where
temperatures may exceed 50 C may result in permanent
battery damage, fire, or explosion. Please remove your
product from the automobile when you exit, do not place
your product in the trunk of your automobile, and do not
leave your product in any location where temperatures
may exceed 50 C.
Important Battery Information
25
·Do not use an unauthorized battery. Use only the
rechargeable battery that came with your product or that
is listed in the user’s guide.
·Do not use unauthorized chargers or power adapters.
Use only chargers that came with your product or that is
listed in the user’s guide.
·Do not attempt to open the rechargeable battery or
battery pack. There are no user serviceable parts inside.
·Do not leave in a hot automobile or in temperatures
exceeding 50 C (122 F).
To minimize the risk of fire, explosion, or chemical
burn, observe the following precautions:
Page 28

You may select one of the following methods to transfer
music content to your player: 1) Windows Media® Player,
2) drag-and-drop via Windows Explorer. For method 1, you
first need to have successfully installed the software . If a
version of Windows Media® Player has already been
installed in your computer, you may skip the installation.
Transferring Files to the Player
Transferring Files to the Player
Caution:
Secure music download files must be transferred to your
player through Windows Media® Player or the application
recommended by your online musicdownload service(Note:
Services and applications must be Windows Media audiocompliant and support Digital Rights Management.) (Apple
iTunes music content is not supported).
26
Page 29
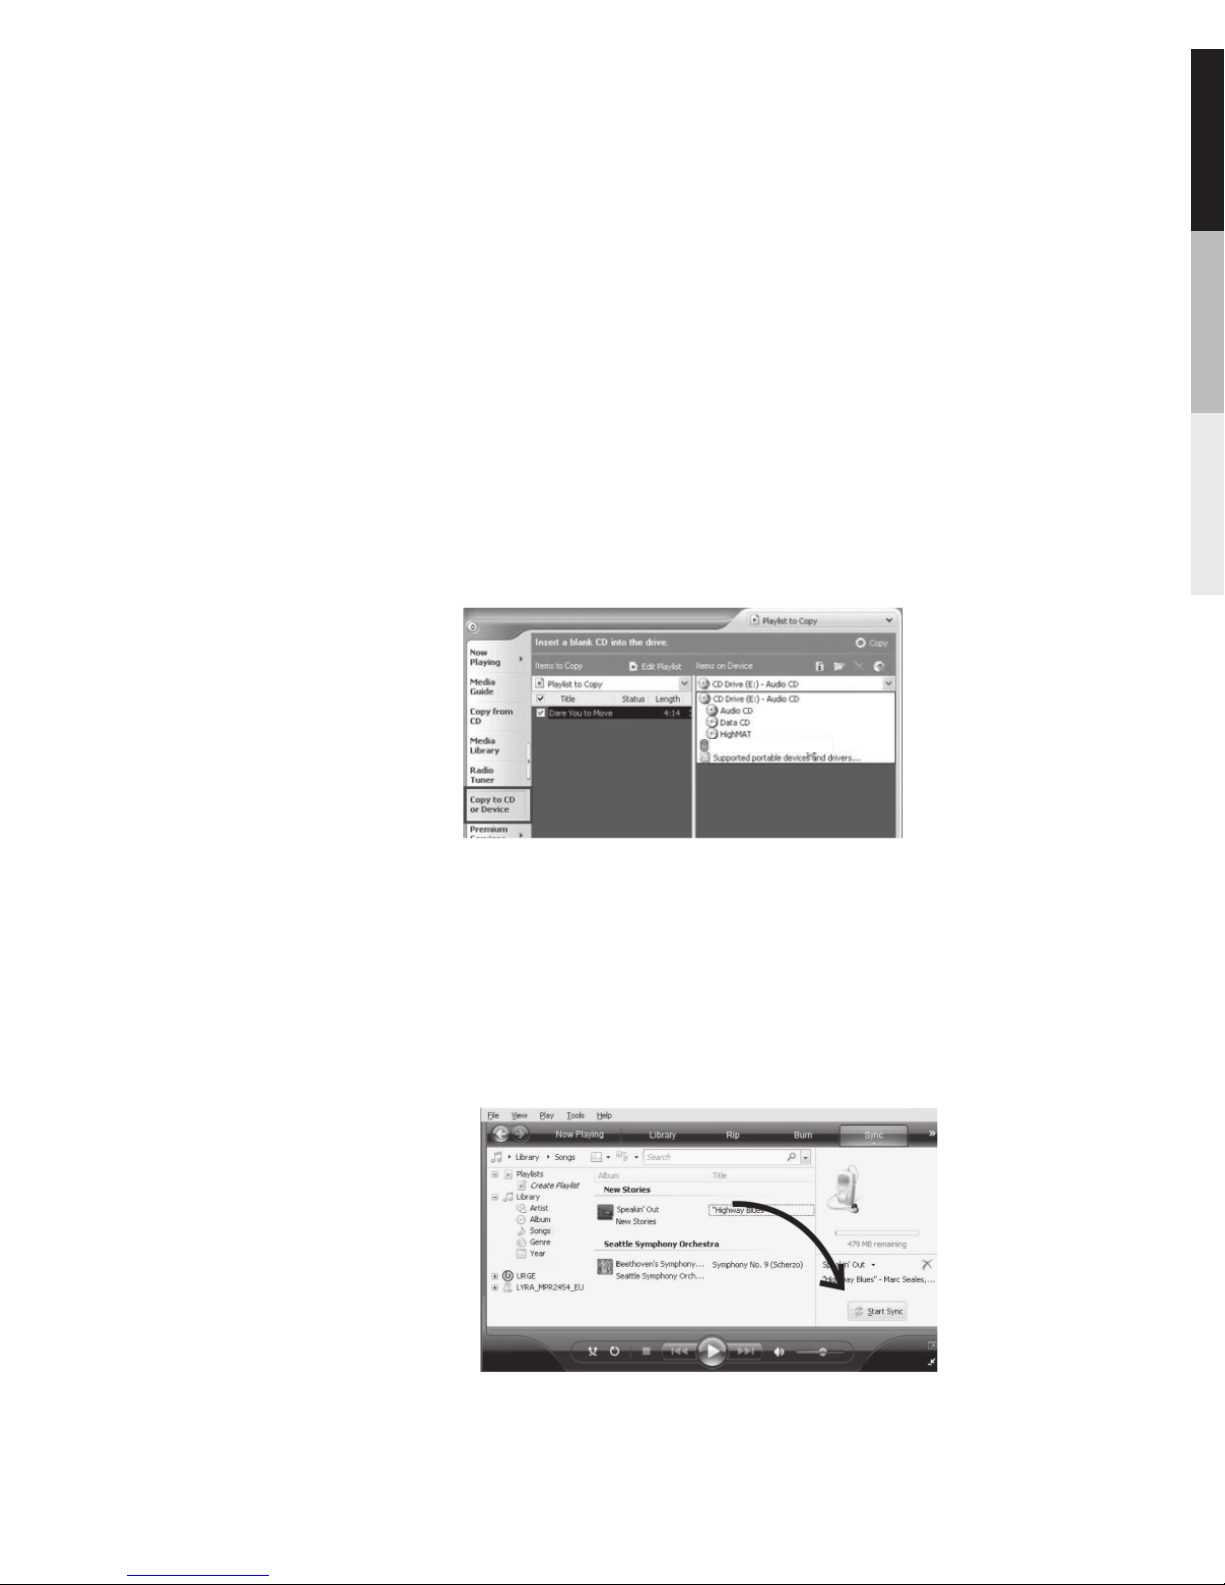
Transferring files via Windows Media® Player
Please refer to the instructions below to learn how to
transfer files to your Player.VERVE
With Windows Media® Player 10
1.In Windows Media® Player, click the Sync tab.
2.Click on Edit Playlist to add the content to be transferred
to your player. Click OK once all the desired content
have been added. The content you wish to transfer to
your player are listed on the left side of the screen
under Sync List.
3. Click Start Sync to transfer the content.
1 In Windows Media® Player, click the Sync tab.
2.Drag content to the List pane to add them to the list of
items to sync.
.
With Windows Media® Player 11
27
6700
Page 30

For further help on using Windows Media® Player, please
refer to the Help section of the program
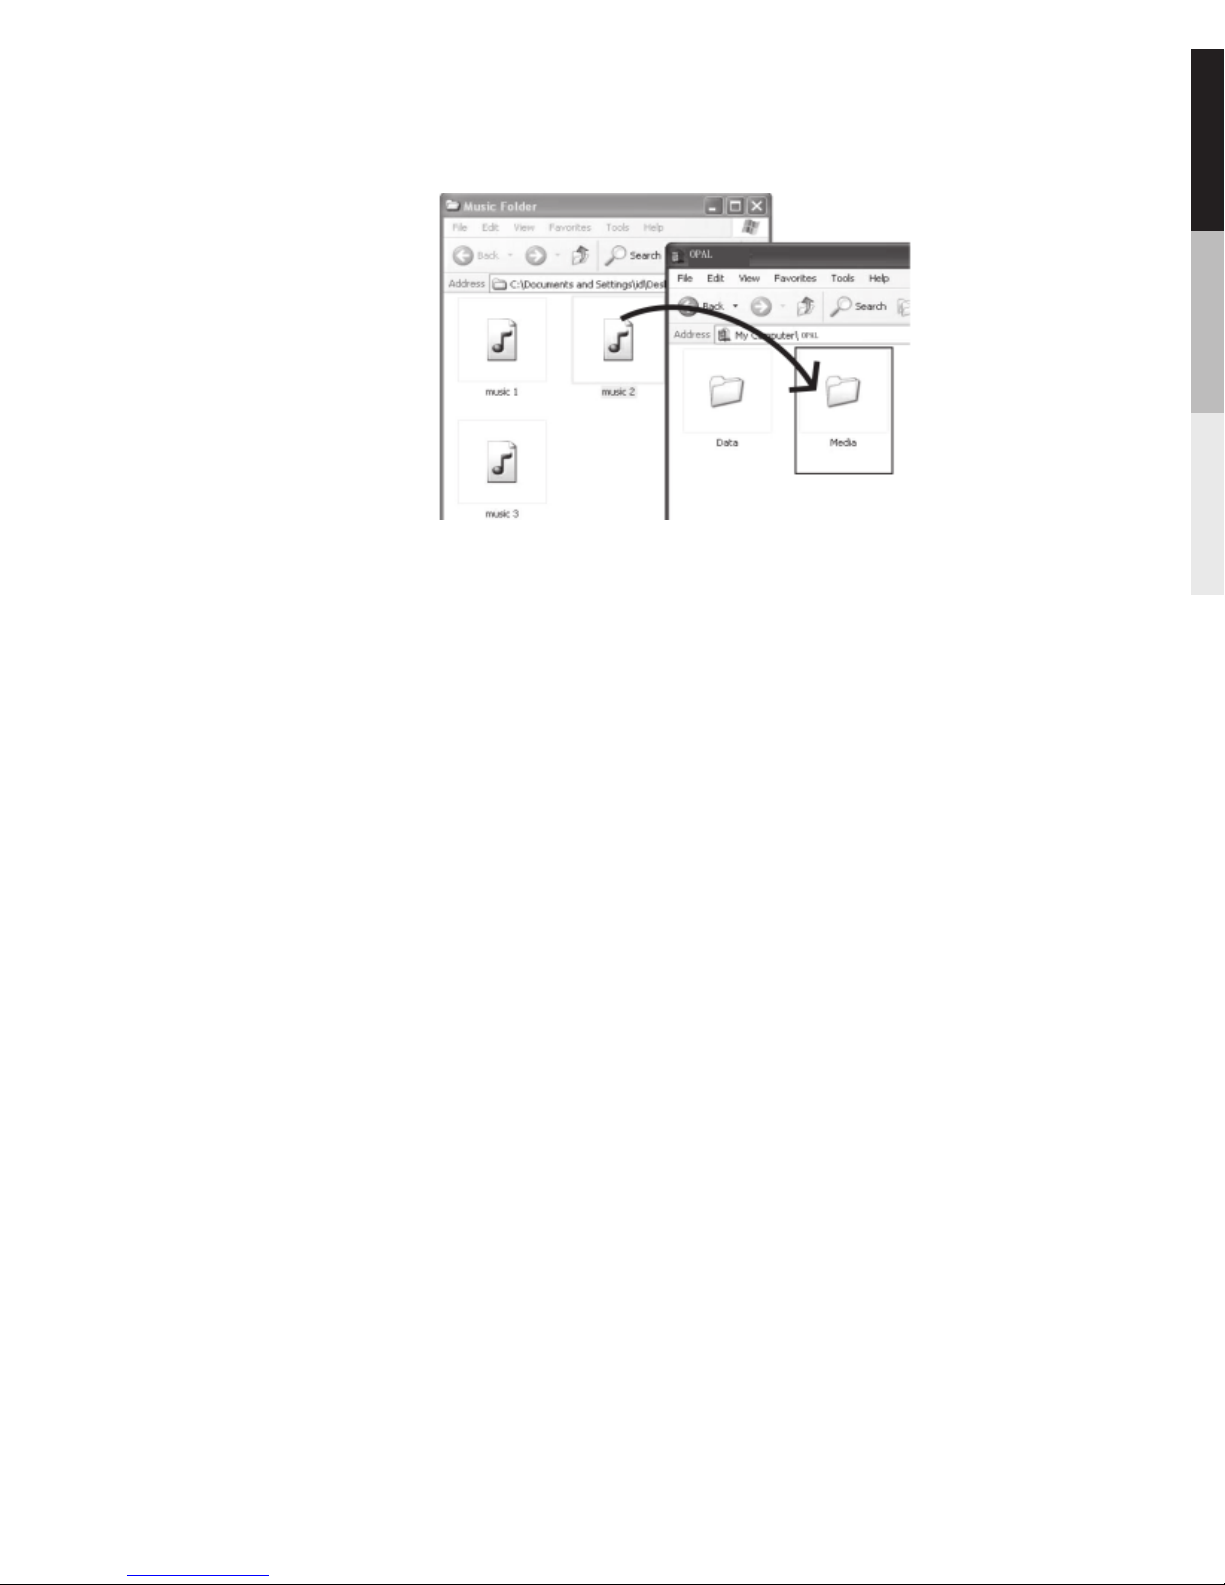
In Windows® XP and when Windows Media Player 10 is
installed, the player is connected to the computer in MTP
mode. In the Windows Explorer, when the player is opened,
the “Data” and “Media” views will be displayed for the
player.
The Data folder is used to manage data contenton the
player, such as text files. The Media folder is used to
manage media content supported by the player for
playback, such as mp3 and wma.
You can copy files to the player through Windows Explorer
(drag-and-drop). Picture files can be copied to either
“Media” or “Data” folder for viewing while video files can
not be dragged and copied to the “Media” folder directly as
only. SMV files are supported. The video files must be
converted and transferred via VERVE Video.
Converter for playback (refer to page 19). Alternatively,
you can transfer the converted video files to the “Data”
folder via the Windows Explorer (drag-and-drop).
You can copy files to / delete files from the player through
Windows Explorer (drag-and-drop), but you cannot open
or edit the files directly from the player. If you want to edit
the files, you will need to copy the files from the player to
Transferring files via Windows Explorer (Drag-and-
Drop)
In Windows® XP (with Windows Media Player 10
installed)
3.Click Start Sync to transfer the content.
28
Page 31
another location (drive) in the system.
If Windows Media Player 10 or above is not installed in
Windows® XP, or your computer is running Windows®
2000, the player is connected to the computer in MSC
mode. You can transfer files via the Windows Explorer
(drag-and-drop). From Windows Explorer, highlight all the
files/folders you want to transfer to your player and drag
them to the drive letter that is associated with it.
Picture files should be copied to the root directory for
viewing while video files can not be dragged and copied to
the player directly as only. SMV files are supported. The
video files must be converted and transferred to the player
via VERVE Video Converter for playback (refer to page 19).
Alternatively, you can transfer the coverted video files to
the root directory.
In Windows® 2000 or Windows® XP(without
Windows Media Player 10 or above installed)
In Windows® XP or Windows Vista (with
Windows Media Player 11 or above installed)
TM
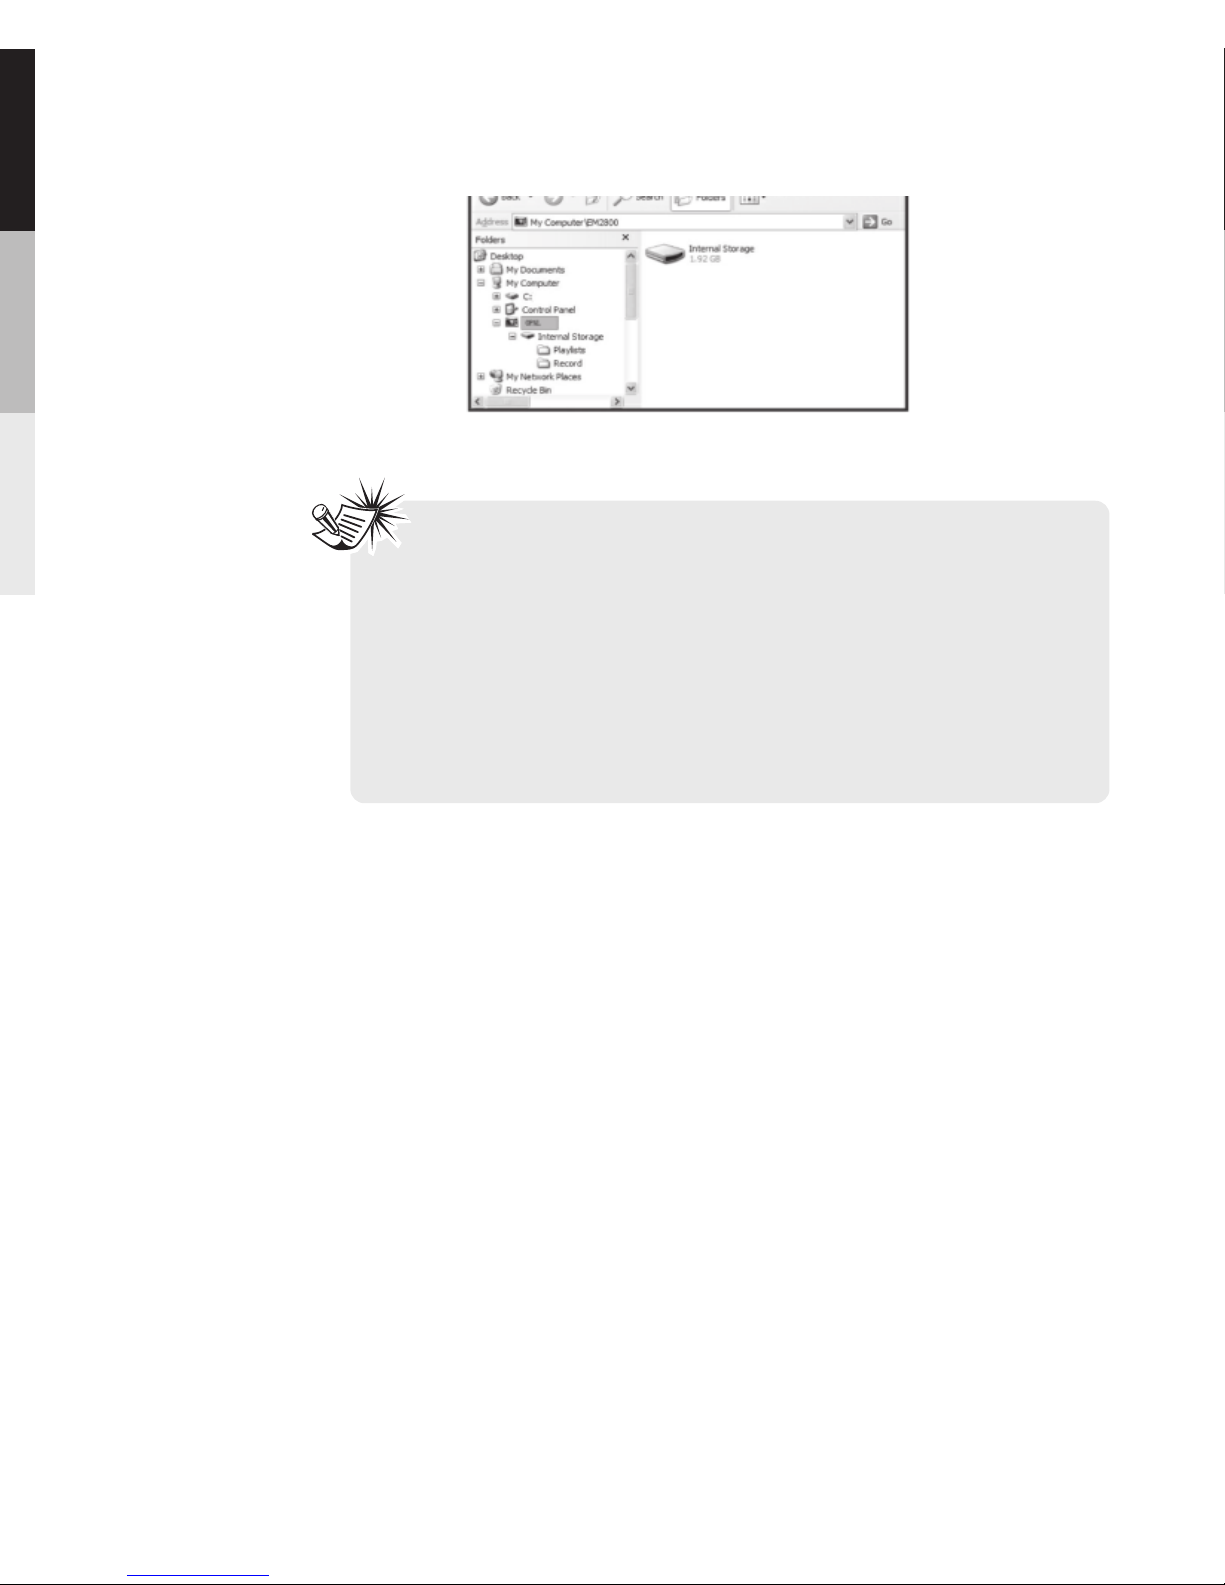
If your computer has installed Windows MediaPlayer 11,
“Internal Storage” shows instead of the folders mentioned
29
Page 32
Note: Windows® XP requires Service Pack 1 or higher.
Caution: Secure music download files must be transferred
to your player through one of the provided music
management software packages or any applications
recommended by the online music download service.
Please visit the online music download service’s website
where you purchased your content from for more details on
transferring secure music to your player.
Deleting files from the player
For any files you have transferred to the player, you may
delete them while you have connected the player with your
computer. Highlight the unwanted file in the player’s file
directory on your computer and press the delete key on
your computer to delete the file. It is best to remove
subscription files from the player by using Windows
Media® Player
above. Copy files inside “Internal Storage”.
30
Page 33
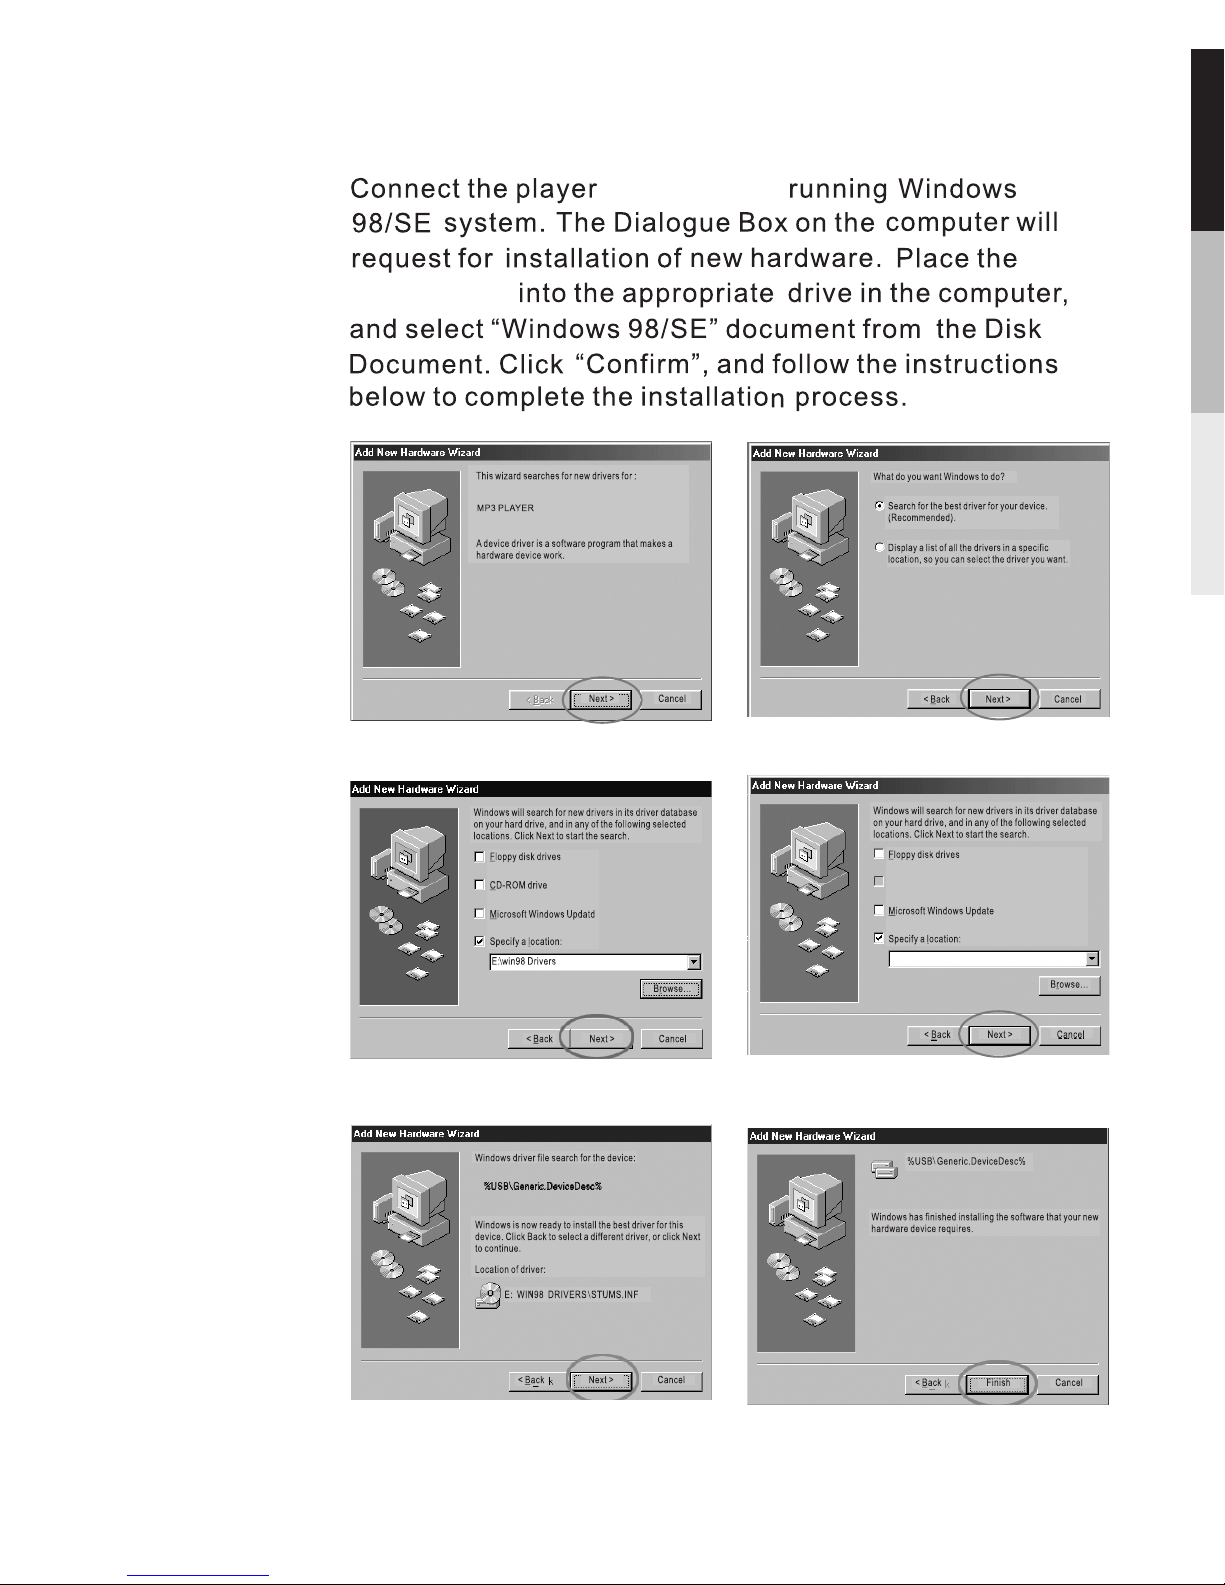
USB 2 .0 ( HS) Fl ash Dis k
USB 2 .0 ( HS) De vice
USB 2 .0 ( HS) De vice
~
E:\ WINDO W 5\AC TDI SK.IN F
~
E:\ WINDO W 5\AC TDI SK.IN F
Installing on a Windows 98SE Computer
1 2
3
4
5
6
31
to a computer
supplied CD
Page 34
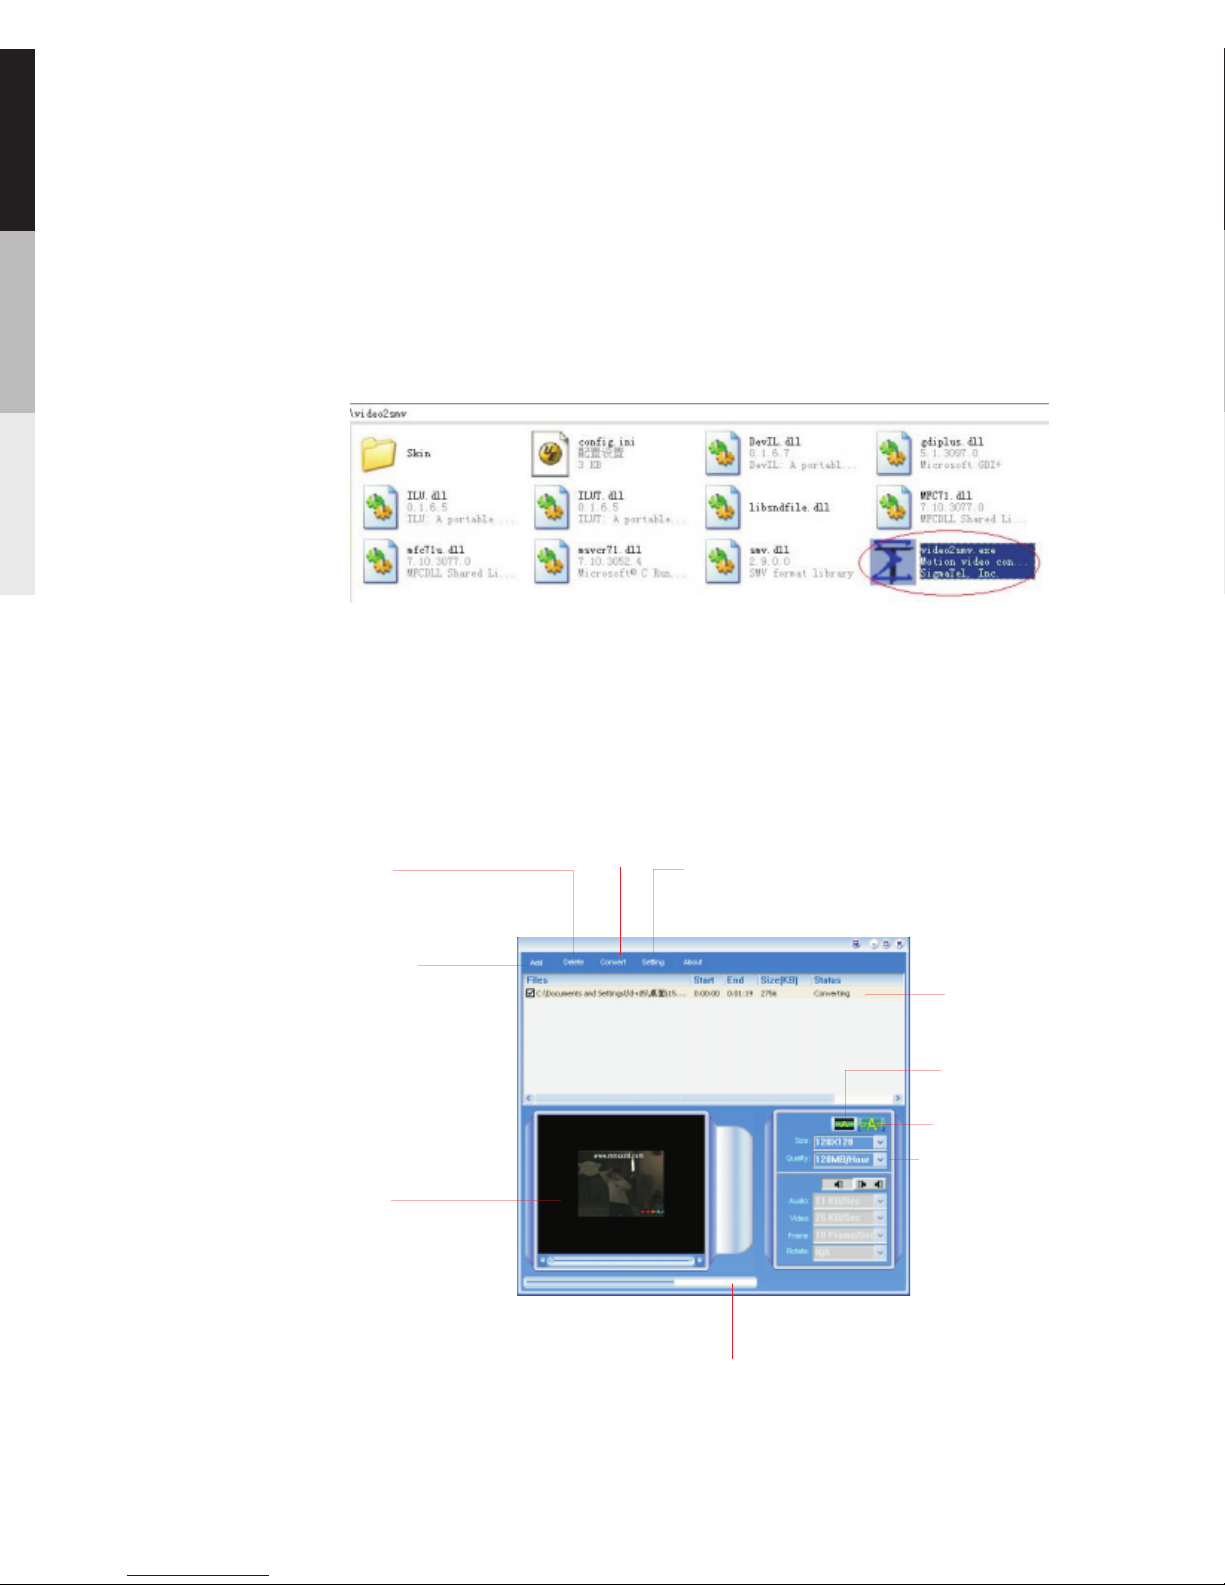
1.
Insert the supplied CD into your computer, and view its
contents via My Computer.
2.Double click “ Video2smv ” to run software
3.Conversion interface
Delete fil e for
conversi on
Start
conversi on
To set the
output pat h
Add file for
conversi on
Full image
Full scree n
Browse
conversi on file
File na me an d
folder for
conve rsi on
Conve rsi on in progress
Output fil e
quali ty
Video Conversion Software - Installation and Use
32
Page 35
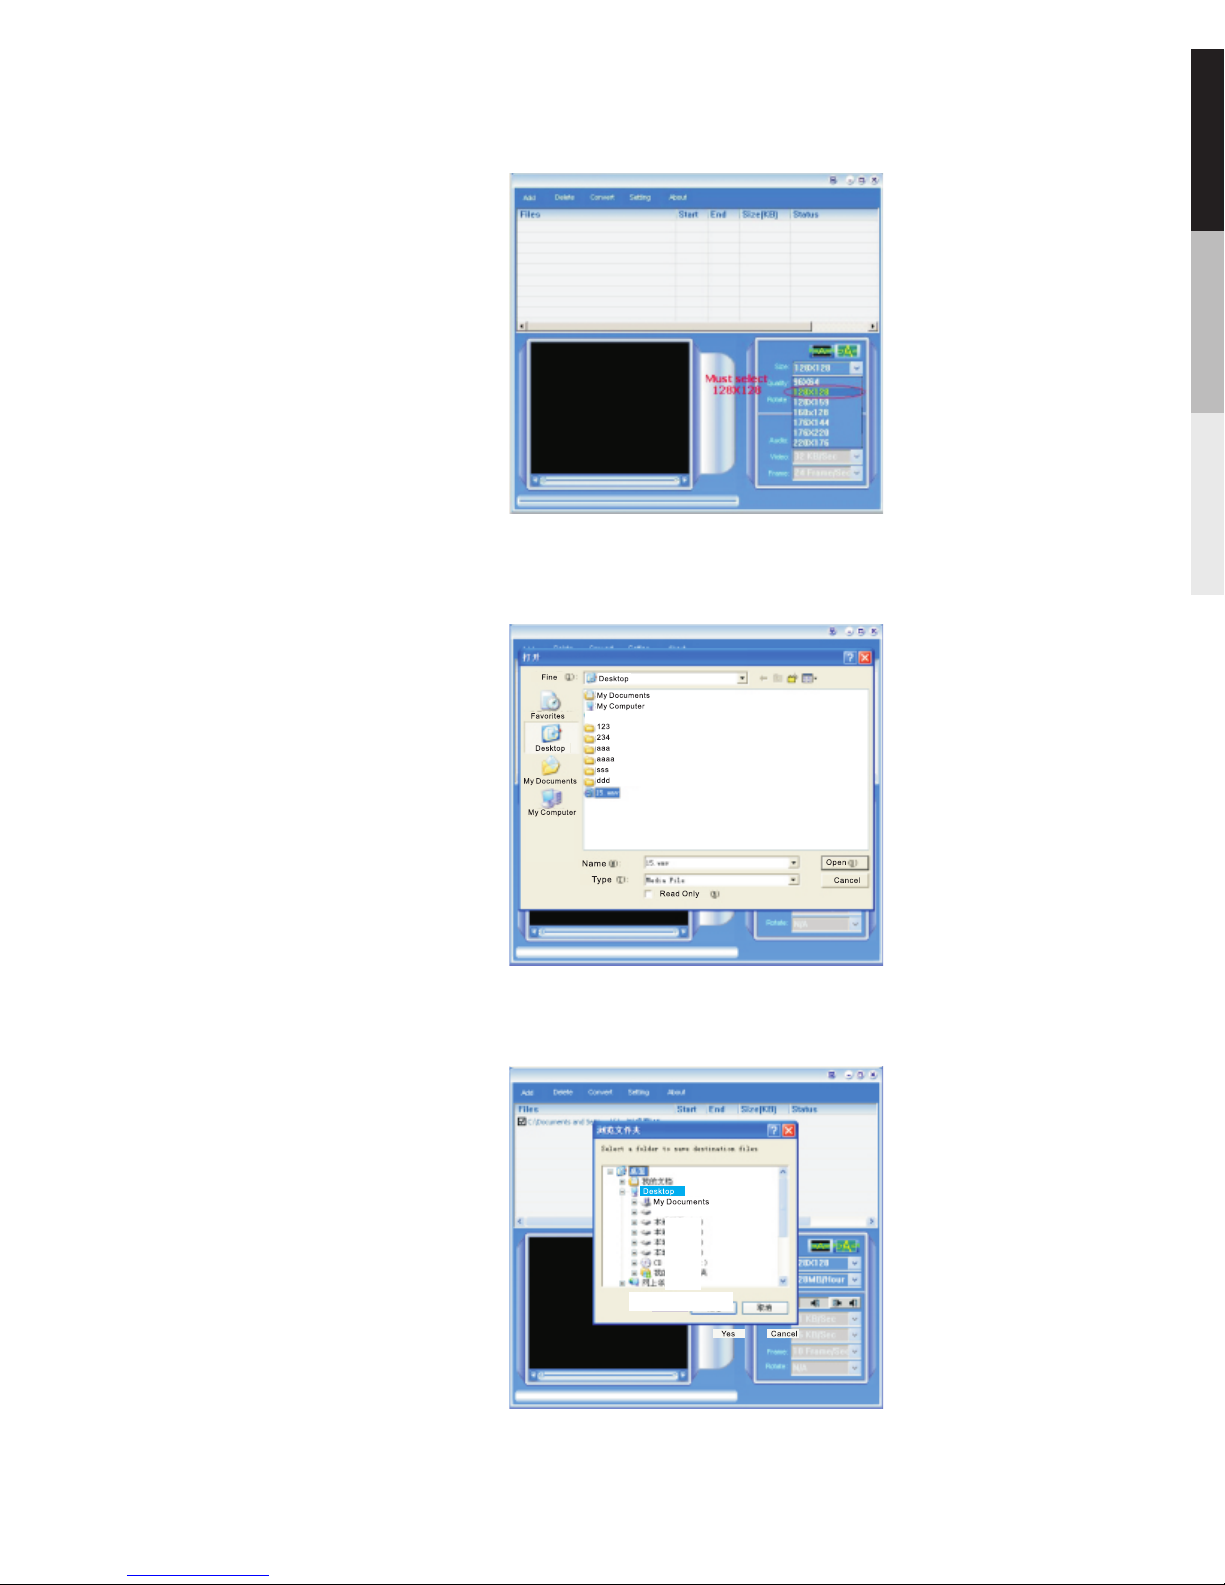
4.Run the conversion software
5.Choose
existing video file for conversion to the player's
format, .smv
6.Set the output path
33
My Com puter
Page 36
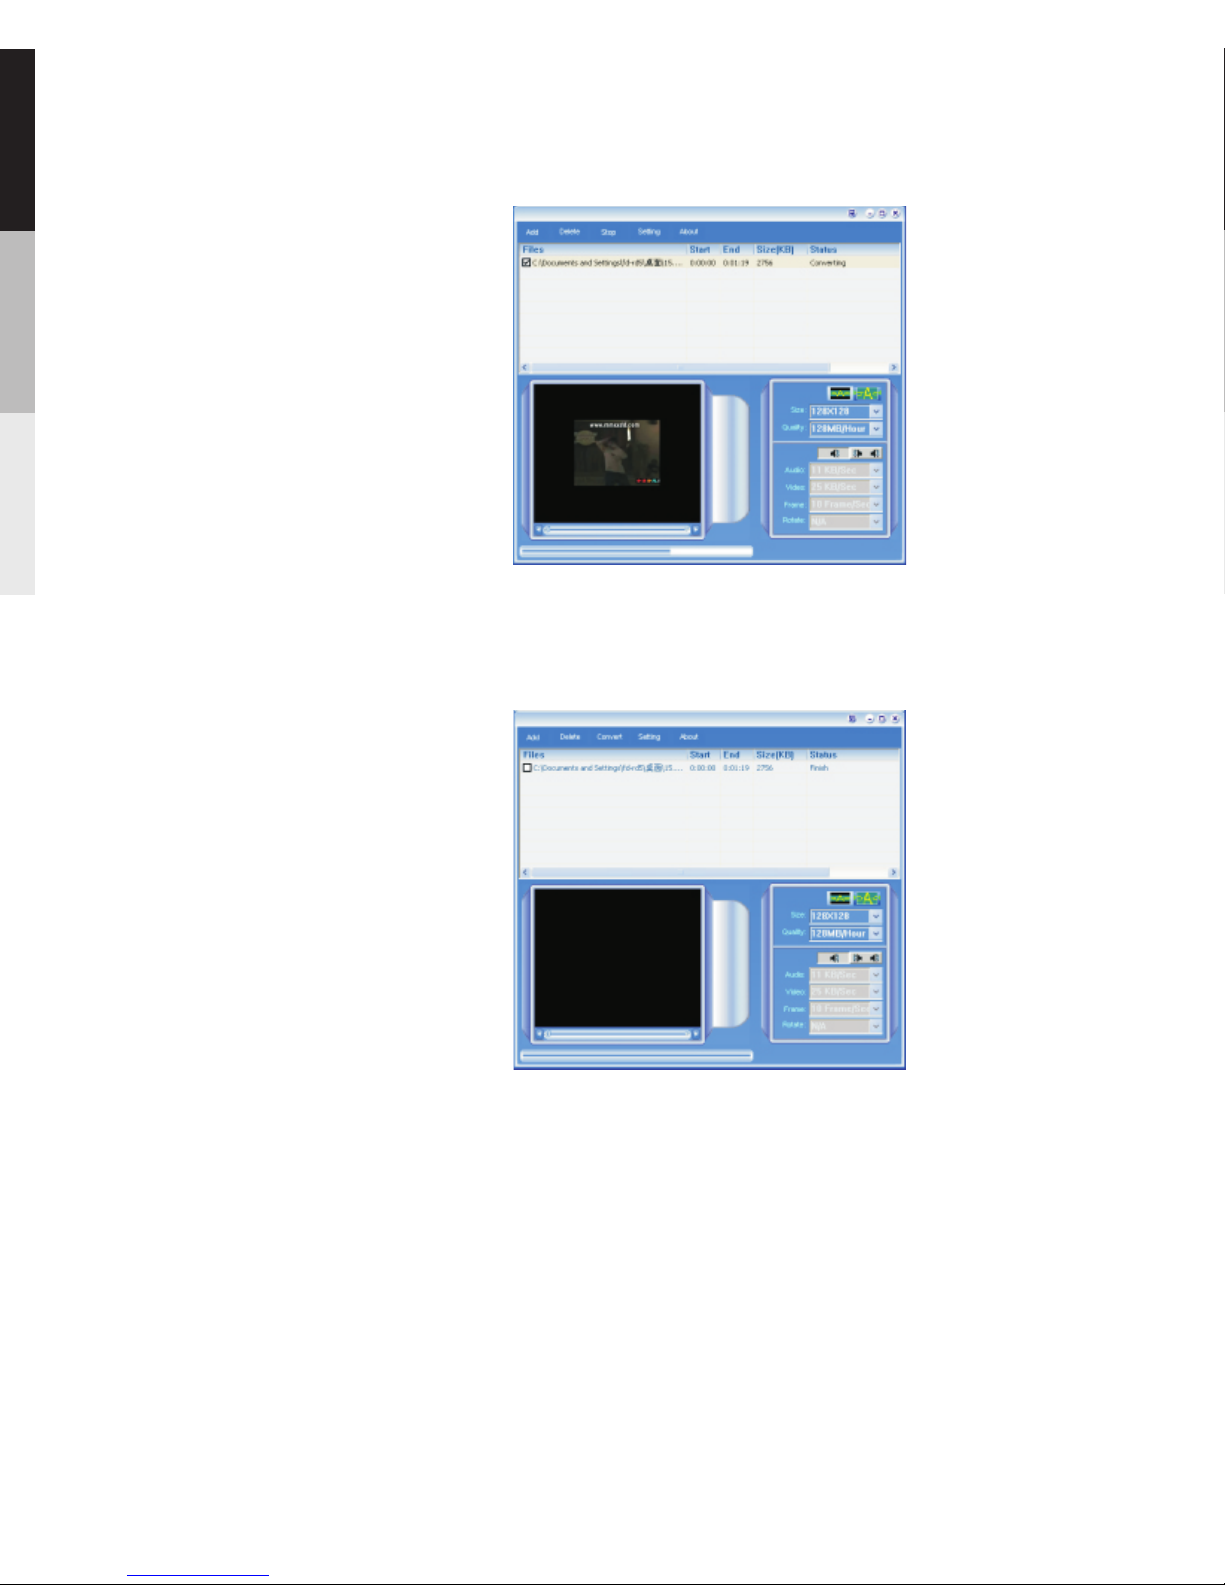
7.Start conversion
8.Ending
34
Page 37
For Windows Vista or Windows® XP users (with Windows
Media Player 10 or above installed), your player is
connected in MTP mode to your computer by default, you
may disconnect the USB cable directly when file download
is completed.
For Windows® XP users without Windows Media Player 10
or above installed, your player is connected in MSC mode.
Your player will appear as a drive letter on your computer.
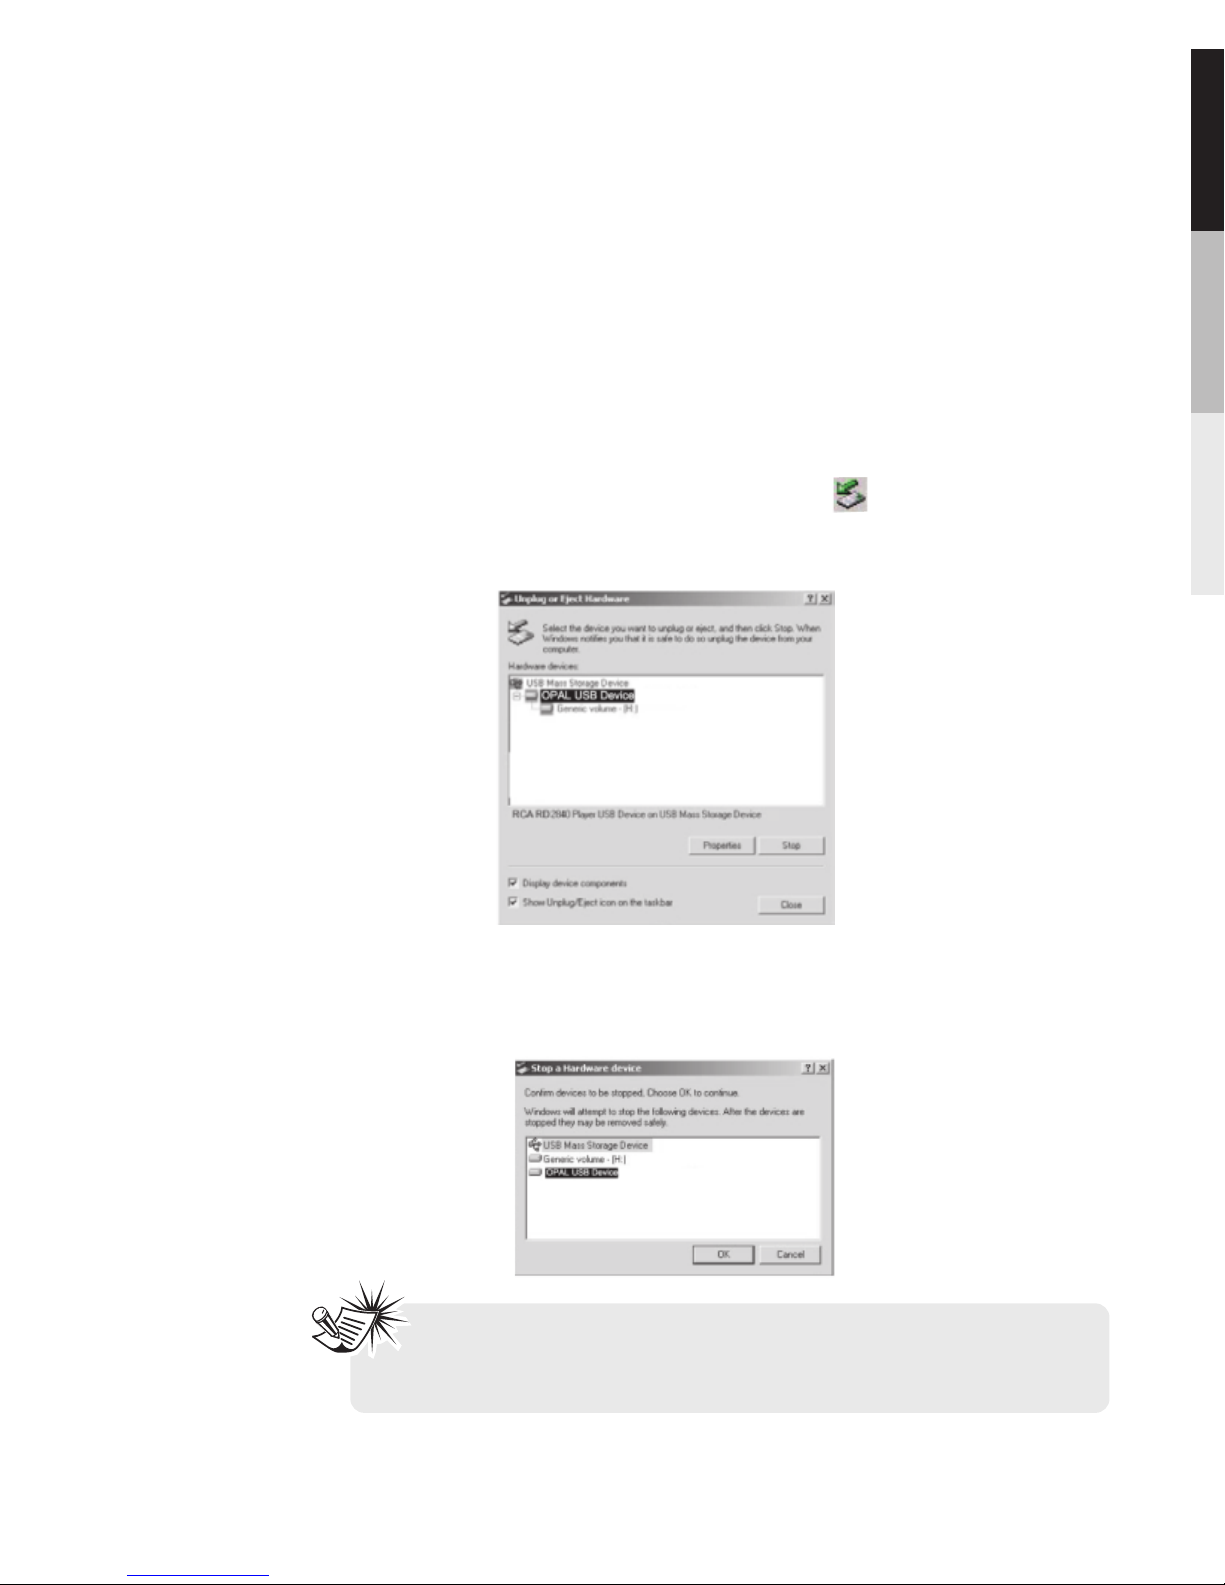
You may disconnect it by clicking the icon from the
System Tray and select Unplug or Eject hardware . “ ”
Select the drive corresponding to your player.
Disconnecting your player from the Computer
TM
The Stop a Hardware player screen will appear. Select
the player to be stopped again for confirmation and click
OK and disconnect your player from the computer.
“ ”
Note:
Do not disconnect the USB connection during file download.
Doing so may corrupt system files or the files being downloaded.
35
Page 38
36
 Loading...