

Vertex Diagnostics UltraTRAK Pro Owner's Manual
BLOOD GLUCOSE
MONITORING SYSTEM
OWNER’S
MANUAL
Version 1.0 Octorber, 2008
311-4255100-001

2
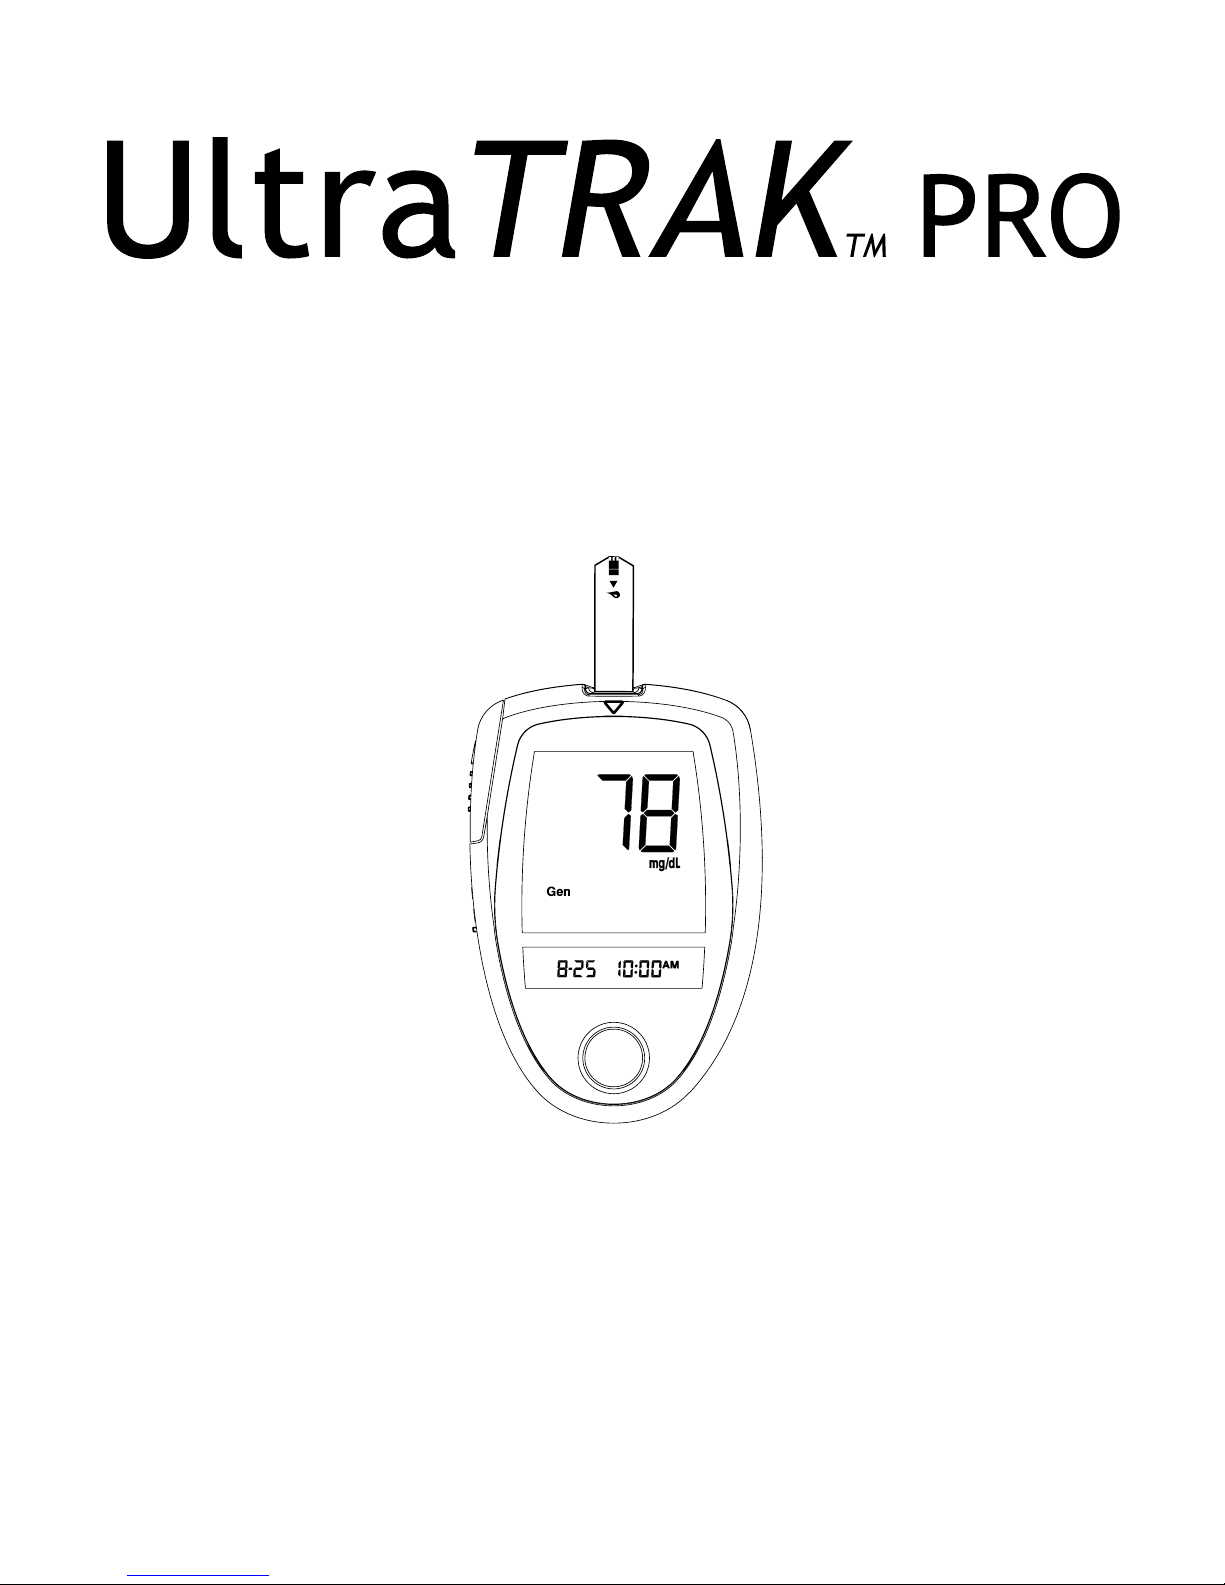
Dear UltraTRAK PRO System Owner:
This manual contains important information you must know
about the system. Please read it thoroughly and carefully.
UltraTRAK PRO boasts Autocode capabilities, requiring no
coding for healthcare professionals and patients. What this
means is fewer steps during the testing process, and no
risk of false readings because of errors related to incorrect
coding.
UltraTRAK PRO also has a top-loading strip port with strip
ejection capabilities, ensuring optimal safety for healthcare
providers and convenience. The strip eject function eliminates any blood contamination dangers associated with
manually releasing a strip, offering the safest disposal possible.
Additionally, UltraTRAK PRO allows you to store your control solution testing results, allowing healthcare providers
to be adept with the recommended control testing process.
The system also has 4 alarm settings – this thoughtful design helps you routinely check your daily blood glucose on
time.

www.vertexdiagnostics.com
vertex
diagnostics
3
IMPORTANT SAFETY INSTRUCTIONS
READ THIS BEFORE USING
The following basic safety precautions should always
be taken.
Close supervision is necessary when the device is 1.
used by, on, or near children, handicapped persons or
invalids.
Use the device only for the intended use described in 2.
this manual.
Do not use accessories which are not supplied by the 3.
manufacturer.
Do not let the equipment or its exible cord come into 4.
contact with surfaces which are too hot to touch.
Do not use the equipment where aerosol sprays are 5.
being used, or where oxygen is being administered.
Do not use device if it is not working properly, or if it 6.
has suffered any damage.
Before using product to test your blood glucose, read 7.
all instructions thoroughly and practice the test. Do all
quality control checks as directed and consult with a
diabetes healthcare professional.
KEEP THESE INSTRUCTIONS

4
TABLE OF CONTENTS
IMPORTANT INFORMATION 06
ABOUT ALTERNATIVE SITE TESTING (AST) 07
GETTING STARTED 09
Intended Use 09
Principle of Measurement 09
Contents of the System 10
Appearance and Key Function of the Meter 11
LCD Display 12
Appearance of the Test Strip 13
PREPARATIONS BEFORE USE 14
Battery Replacement 14
Setting the Meter and Deleting the Memory 16
Alarm Function 25
BEFORE TESTING 28
Checking with UltraTRAK PRO Control Solutions 28
Important Control Solution Information 30
Doing a Control Solution Test 31

www.vertexdiagnostics.com
vertex
diagnostics
5
TESTING YOUR BLOOD 35
Test Procedure 36
Expected Test Results 43
COMPARING METER AND LABORATORY RESULTS 44
USING THE METER MEMORY 46
Viewing Results on the meter 46
Viewing Results on a Personal Computer 51
TAKE CARE OF YOUR METER AND STRIP 53
Cleaning 53
Storage 53
PROBLEM-SOLVING GUIDE 56
Special Message 57
Error Message 58
Problem in operation 59
SPECIFICATIONS 61
SUMMARY OF OPERATION 62

6
IMPORTANT INFORMATION
Severe dehydration and excessive water loss may ¾
cause false low results. If you believe you are suffering
from severe dehydration, consult a healthcare professional immediately.
If you get your blood glucose results lower or higher ¾
than usual, and do not have symptoms, rst repeat the
test. If you have symptoms or continue to get results
higher or lower than usual, follow the treatment advice
of your healthcare professional.
Apply only capillary whole blood sample to test your ¾
blood glucose. Applying other substances will cause
wrong results.
If you are experiencing symptoms that are not consis- ¾
tent with your blood glucose test results and you have
followed all instructions described in this owner’s manual, call your healthcare professional.
Inaccurate results may occur in severely hypotensive ¾
individuals or patients in shock. Inaccurate low results may occur for individuals experiencing a hyperglycemic-hyperosmolar state, with or without ketosis.
Critically ill patients should not be tested with blood
glucose meters.
Please refer to your test strip package insert for ¾
additional important.
www.vertexdiagnostics.com
vertex
diagnostics
7
ABOUT ALTERNATIVE SITE TESTING (AST)
Important: There’re limitations for doing AST.
Please consult your healthcare professional before
you do AST.
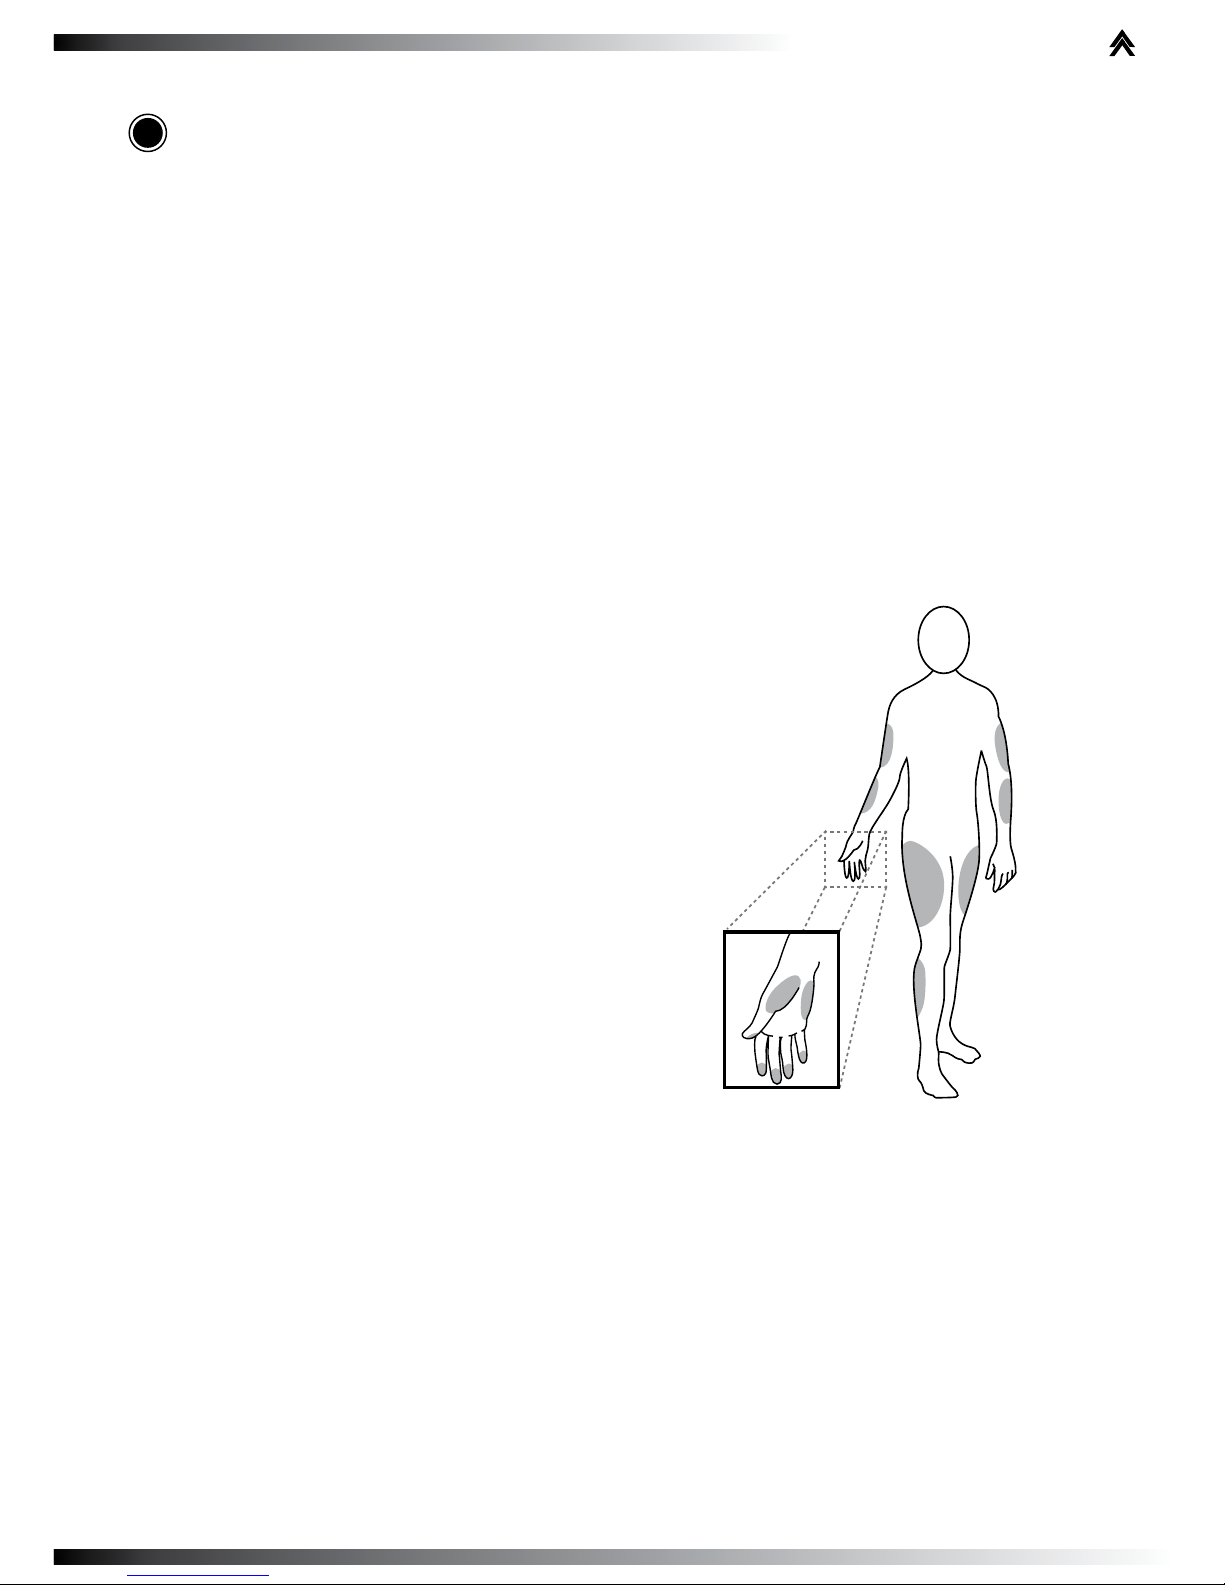
What is AST?
Alternate site testing (AST) means that people use parts of
the body other than ngertips to check their blood glucose
levels. UltraTRAK PRO Test Strips allow you to test on the
palm, the forearm, the upper arm, the calf, and the thigh
with the equivalent results to ngertip testing
What’s the advantage?
Fingertips feel pain more readily because they are full of nerve
endings (receptors). At other body
sites, since nerve endings weren’t
so condensed, you won’t feel as
much pain as at the ngertip.
When to use AST?
Food, medication, illness, stress and exercise can
affect blood glucose levels. Capillary blood at ngertip reects these changes faster than capillary
blood at other sites. Therefore when testing blood
glucose during or immediately after meal, physical exercise, or any other event, take blood sample from your
nger only.

8
We strongly recommend you do AST in the following
intervals:
In a pre-meal or fasting state (more than 2 hours since ¾
the last meal).
Two hours or more after taking insulin. ¾
Two hours or more after exercise. ¾
Do NOT use AST if:
you think your blood glucose is low. ¾
you are unawareness of hypoglycemia. ¾
your AST results do not match the way you feel. ¾
you are testing for hyperglycemia. ¾
your routine glucose results are often uctuating. ¾
you are pregnant. ¾
How to increase the accuracy?
Stimulating blood perfusion by rubbing the puncture site
prior to blood extraction has a signicant inuence on the
glucose value obtained. Blood from the site without rubbing
exhibits a measurably different glucose concentration than
blood from the nger. When the puncture site was rubbed
prior to blood extraction, the difference was signicantly re-
duced.
Please follow suggestions below before getting a
drop of blood:
Rub the puncture site about 20 seconds before pen- ¾
etration.
Use a clear cap (included in the kit) instead while setting ¾
the lancing device.

www.vertexdiagnostics.com
vertex
diagnostics
9
GETTING STARTED
Intended Use
The system is intended for use outside the body (in vitro
diagnostic use). It should be used only for testing glucose
(sugar) and only with fresh capillary whole blood samples
(from the nger, the palm, the forearm, the upper arm, the
calf and the thigh). The system is intended for use in the
home and in clinical settings. It should not be used for the
diagnosis of diabetes or for the testing of newborns.
AST in this system can be used only during steady-state
blood glucose conditions described in the section of “About
AST”.
This system contains a speaking functionality which provides step by step instructions to aid visually impaired persons.
Principle of Measurement
The test is based on the measurement of electrical current
generated by the reaction of glucose with the reagent of
the strip. The meter measures the current and displays the
corresponding blood glucose level. The strength of the current produced by the reaction depends on the amount of
glucose in the blood sample.
10
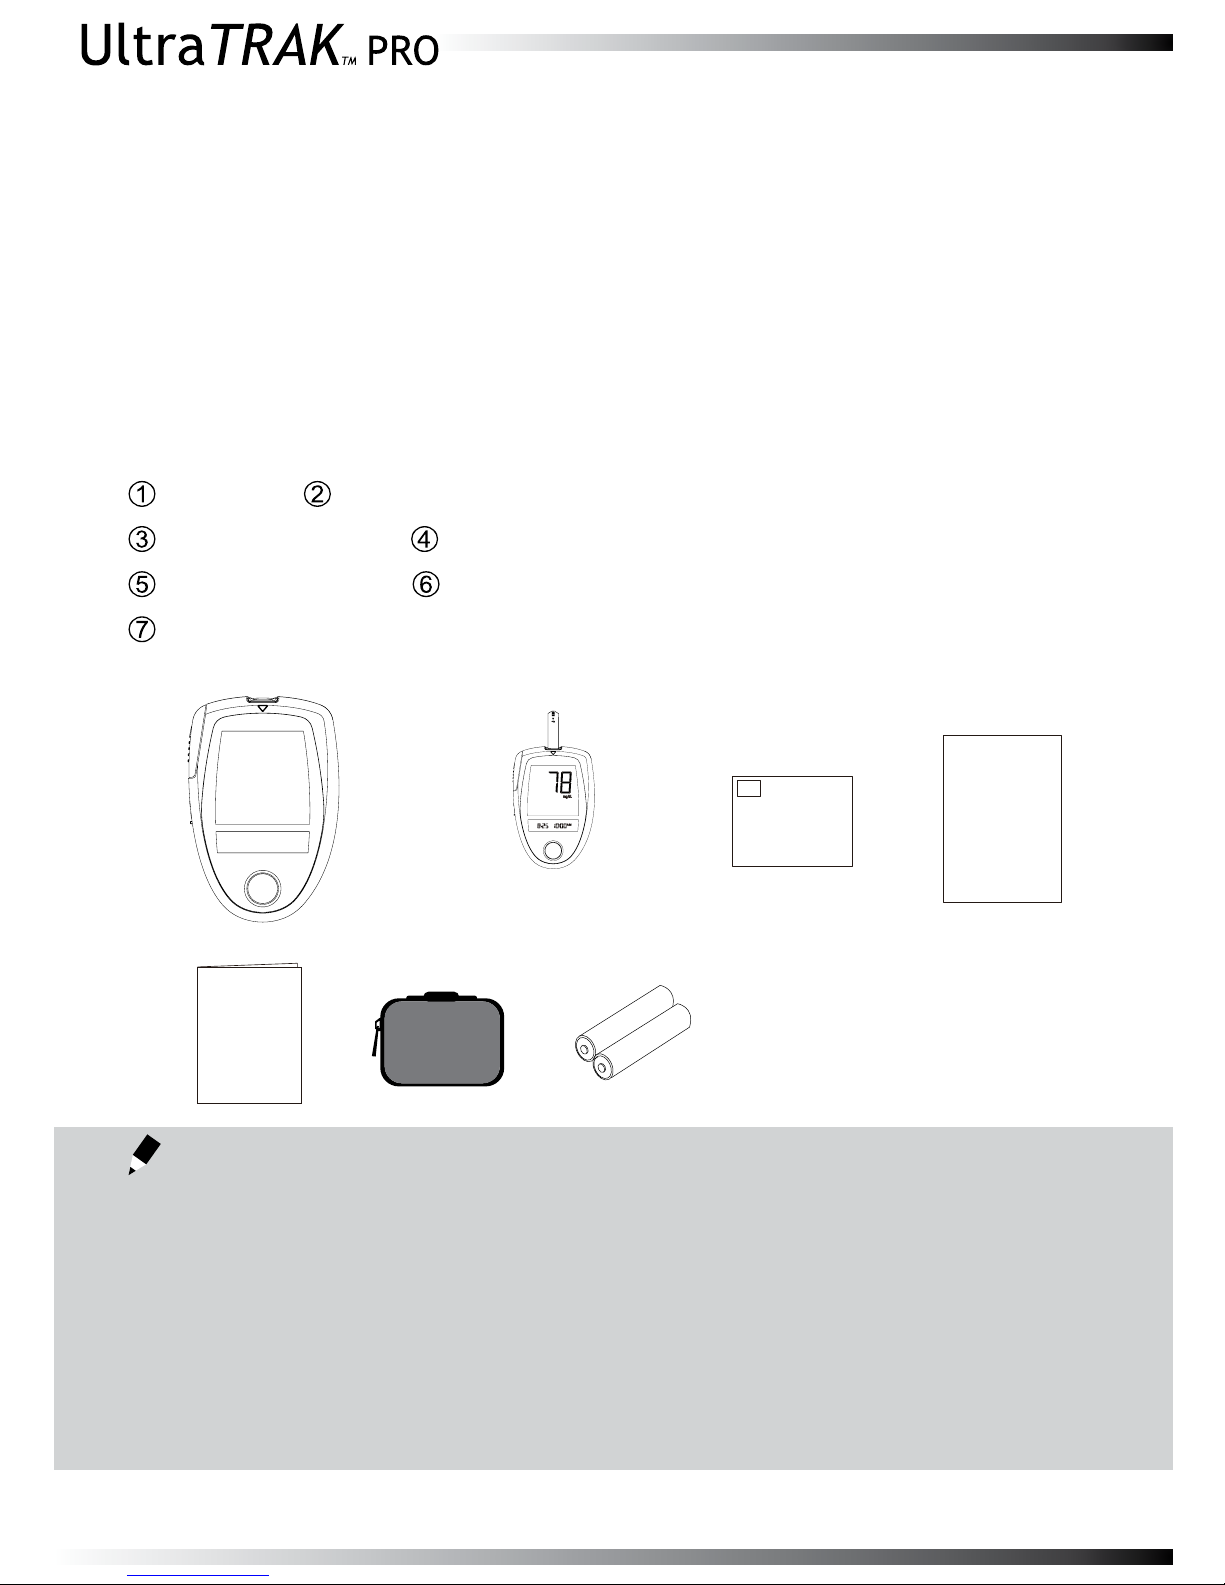
Contents of the System
These products included in the kit have been designed,
tested, and proven to work together as a system to produce accurate blood glucose test results. Use only the
same brand-name test strips and a control solution with
the blood glucose meter.
Your system includes:
A meter Owner’s manual
Warranty card Your rst time using guide
Daily log book Carrying bag
Battery
Please make sure that all products listed above are contained and 1.
sealed in the package before using this system. If you nd any
imperfection in our products, please return the whole system to
the place of purchase.
Please note that strips, two other levels of control solutions (high 2.
and low), lancets, the lancing device and the clear cap for AST use
are optional. Those are not included in the standard kit. Please
contact the Customer Care Line at 1.888.90.VERTEX
PLEASE NOTE!
log book
first time using guide
Warranty card
Owner’s manual
1
5 6 7
2 34

www.vertexdiagnostics.com
vertex
diagnostics
11
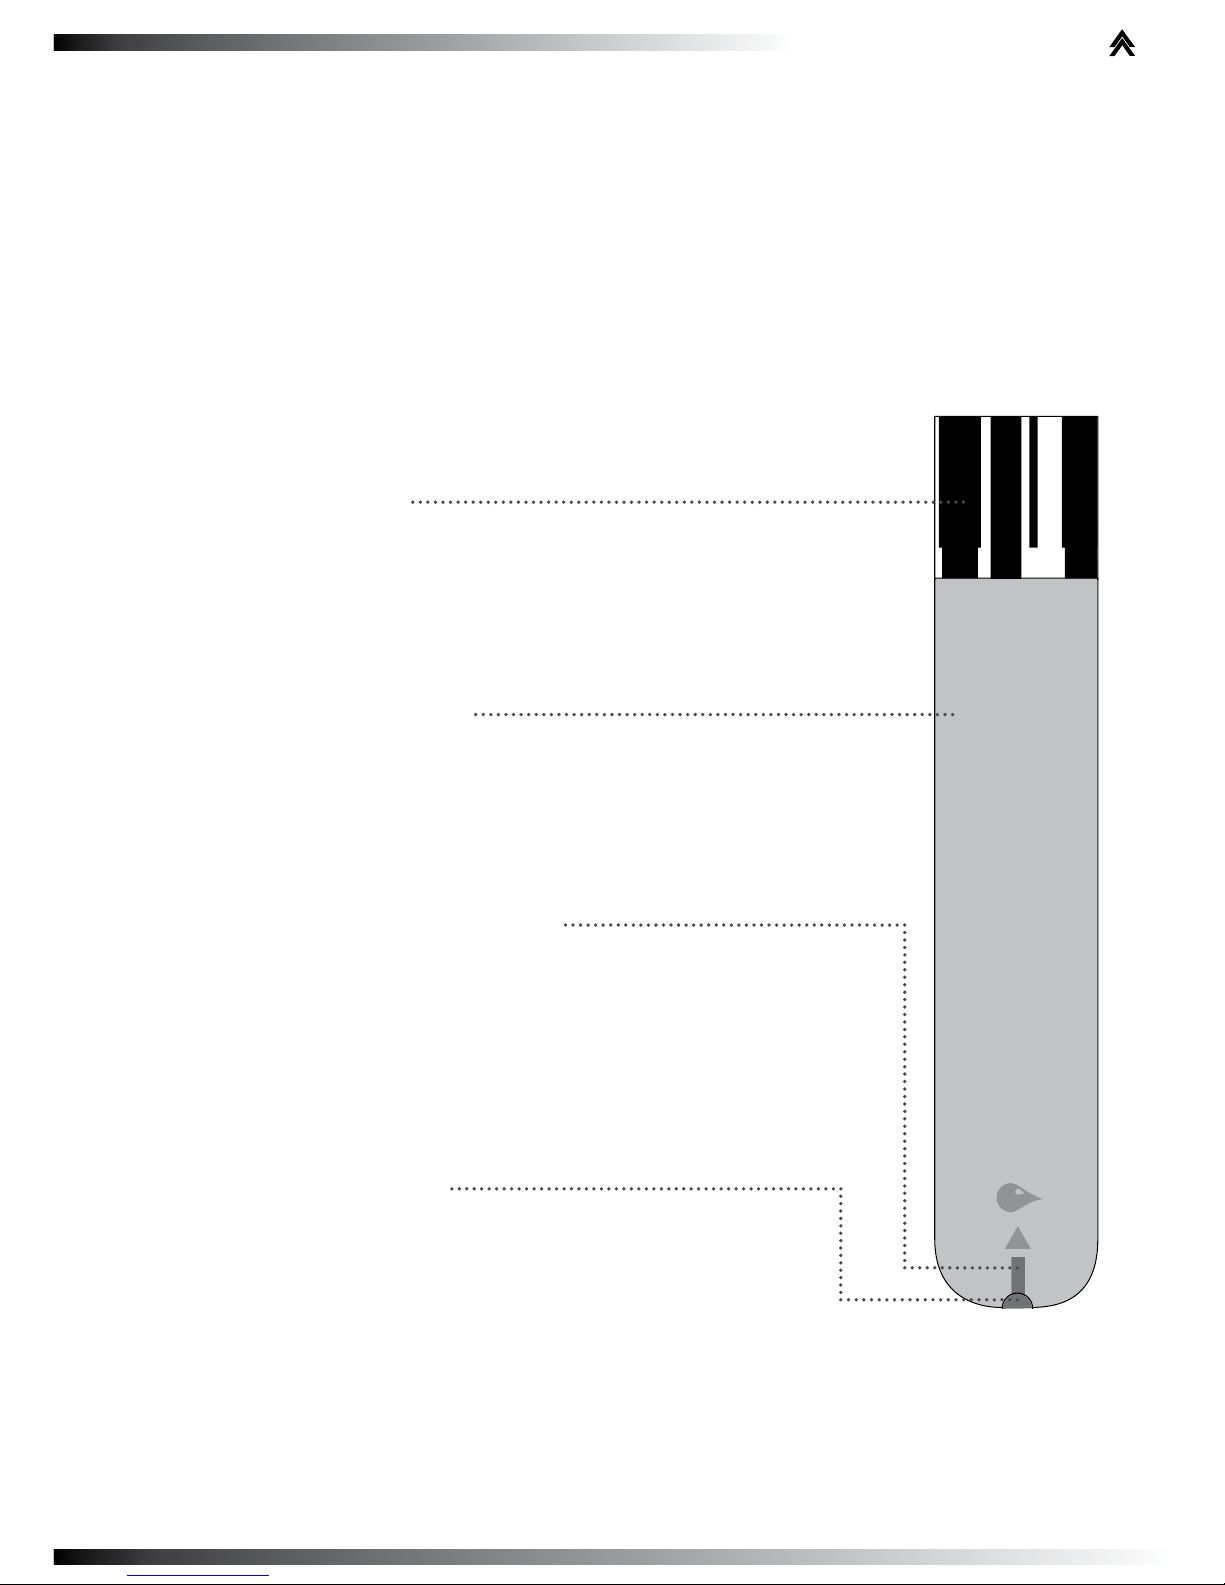
Appearance and Key Function of the Meter
1. TEST SLOT
Is where you insert the test strip. The meter will turn on
automatically after insertion.
2. LCD DISPLAY
Guides you through the test using symbols and simple
messages.
3. STRIP-EJECTION BUTTON
Is where the used strip will be ejected after you push
up the button.
4 MAIN BUTTON
Located in front of the meter, the main white button is
used to turn on the meter, enter the memory or control
steps of setting.
5. SET BUTTON
Located in the battery compartment, is used to set up
the meter.
6. BATTERY COMPARTMENT
1.TEST SLOT
2.LCD DISPLAY
4.MAIN BUTTON
6.BATTERY
COMPARTMENT
3.STRIP-EJECTION BUTTON
5.SET BUTTON
12
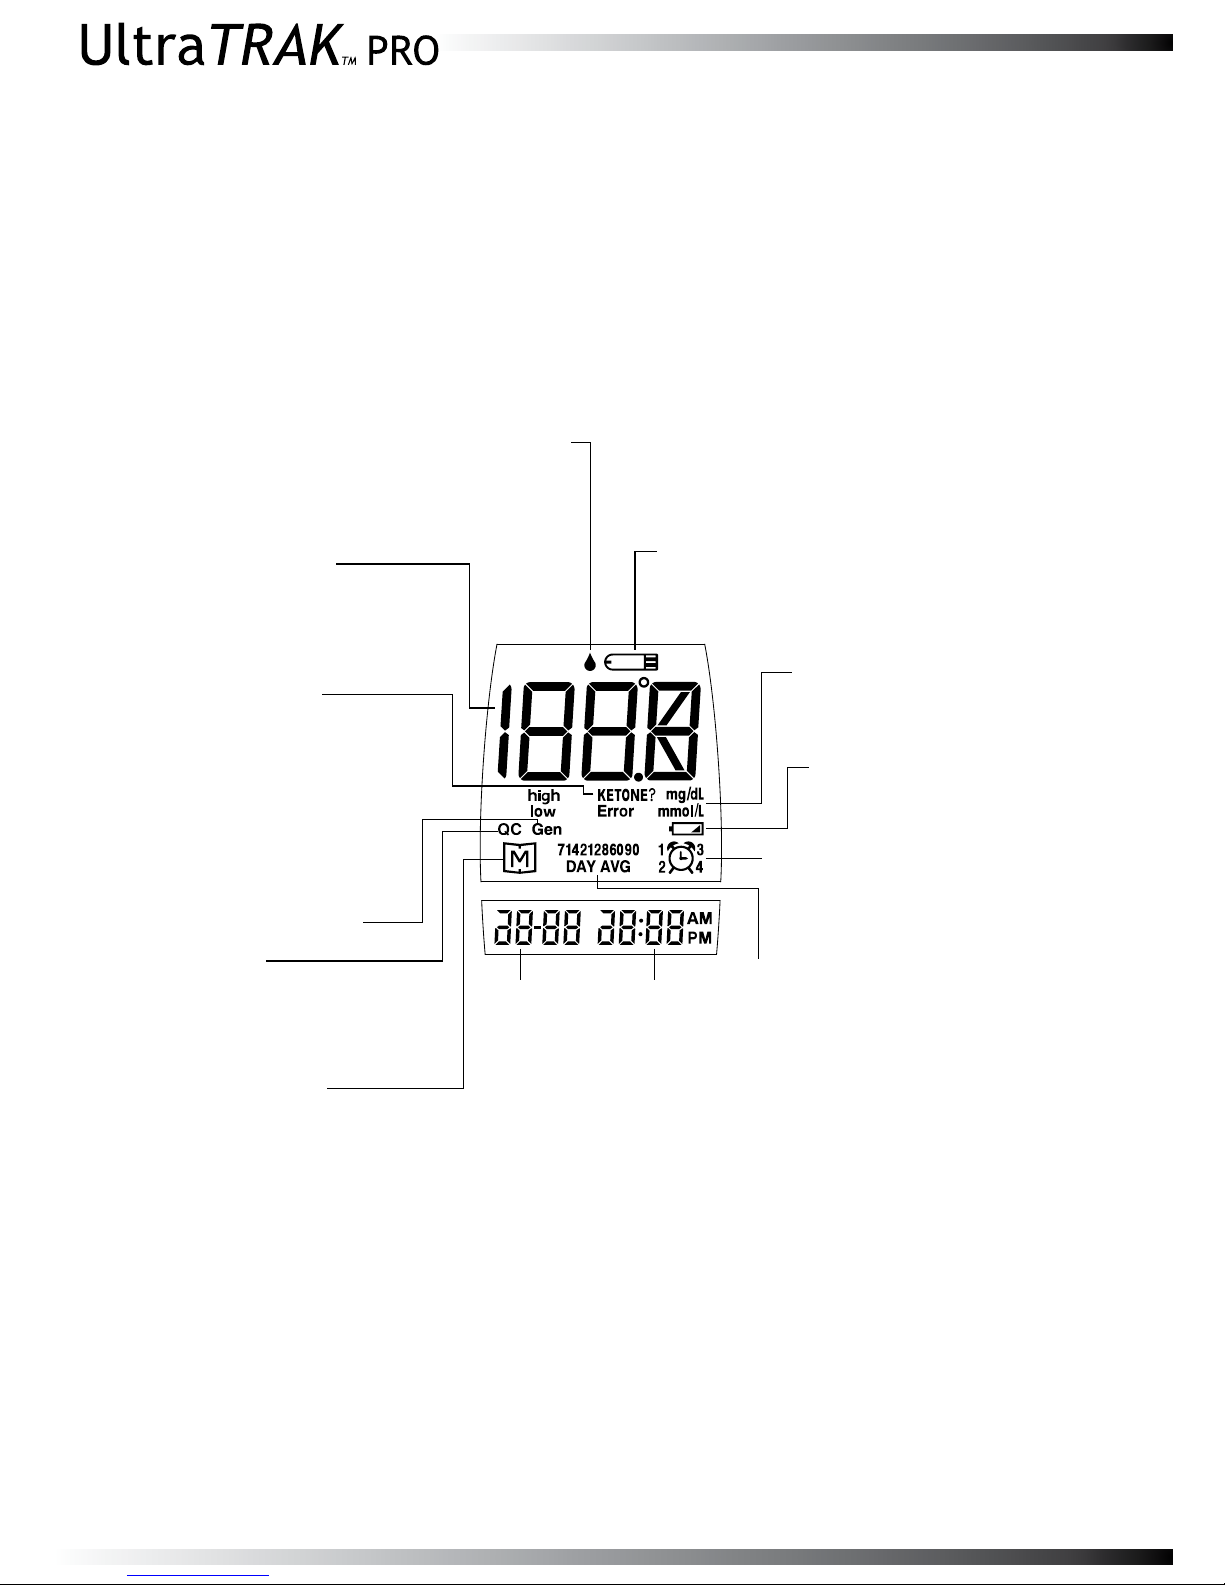
LCD Display
Time
Day Average
Alarm Funtion Indicator
Low Battery Symbol
Test Strip Symbol
Test Result Area
Ketone Warning
Blood Drop Symbol
Measurement Unit
Measurement Mode
Date
Memory Symbol
QC Symbol
Appears when the meter is
turned on.
Flashes when it is
ready to apply the
sample.
Displays glucose results.
A decimal point appears
when the measurement
unit is mmol/L.
Appears when the bat
Appears when alarm are set.
Four alarms can be set in this meter.
-
tery power is low.
Appears with the test
result either in mmol/L
or in mg/dL.
Appears when the test
result is equal or higher
than 13.3mmol/L(240mg/dL).
Appears when you review the
memory.
Indicates that the displayed
test result is an average.
Appears when doing a control
test and indicates that result will
be stored in the memory.
www.vertexdiagnostics.com
vertex
diagnostics
13
Appearance of the Test Strip
This system measures the amount of sugar (glucose) in
whole blood. Blood is applied to the absorbent hole of the
test strip and is automatically drawn into the reaction cell
where the reaction takes place.
Please see pages 35~42, “Testing Your Blood”, for complete instructions.
The test strip consists of the following parts:
Contact Bars
Insert this end of the test strip into the meter.
Push it in rmly until it will go no further.
Test Strip Handle
Hold this part to insert the test strip into the
slot.
Conrmation Window
This is where you conrm if enough blood
has been applied to the absorbent hole of the
strip.
Absorbent Hole
Apply a drop of blood here
the blood will be sucked automatically.

14
PREPARATION BEFORE USE
Battery Replacement
Your meter comes with two 1.5V AAA alkaline batteries.
The meter will alert you when the power is getting low by
displaying two different messages:
When 1.
symbol appears
on the display: the meter is
functional and the result remains accurate, but it is time
to change the battery.
With 2.
symbol, low and
E-b symbols on the displays:
the battery can not provide
enough power for a test. You
must change the battery
immediately.
Replacing the battery within 5 minutes does not affect the set-•
tings. Therefore, the settings do not need to be updated when the
battery is changed.
Batteries might leak chemicals if not used for a long time. Remove •
the battery if you are not going to use the device for an extended
period (i.e., 3 months or more).
Do not use the used battery. Use only the new one in required •
size and type.
PLEASE NOTE!
www.vertexdiagnostics.com
vertex
diagnostics
15
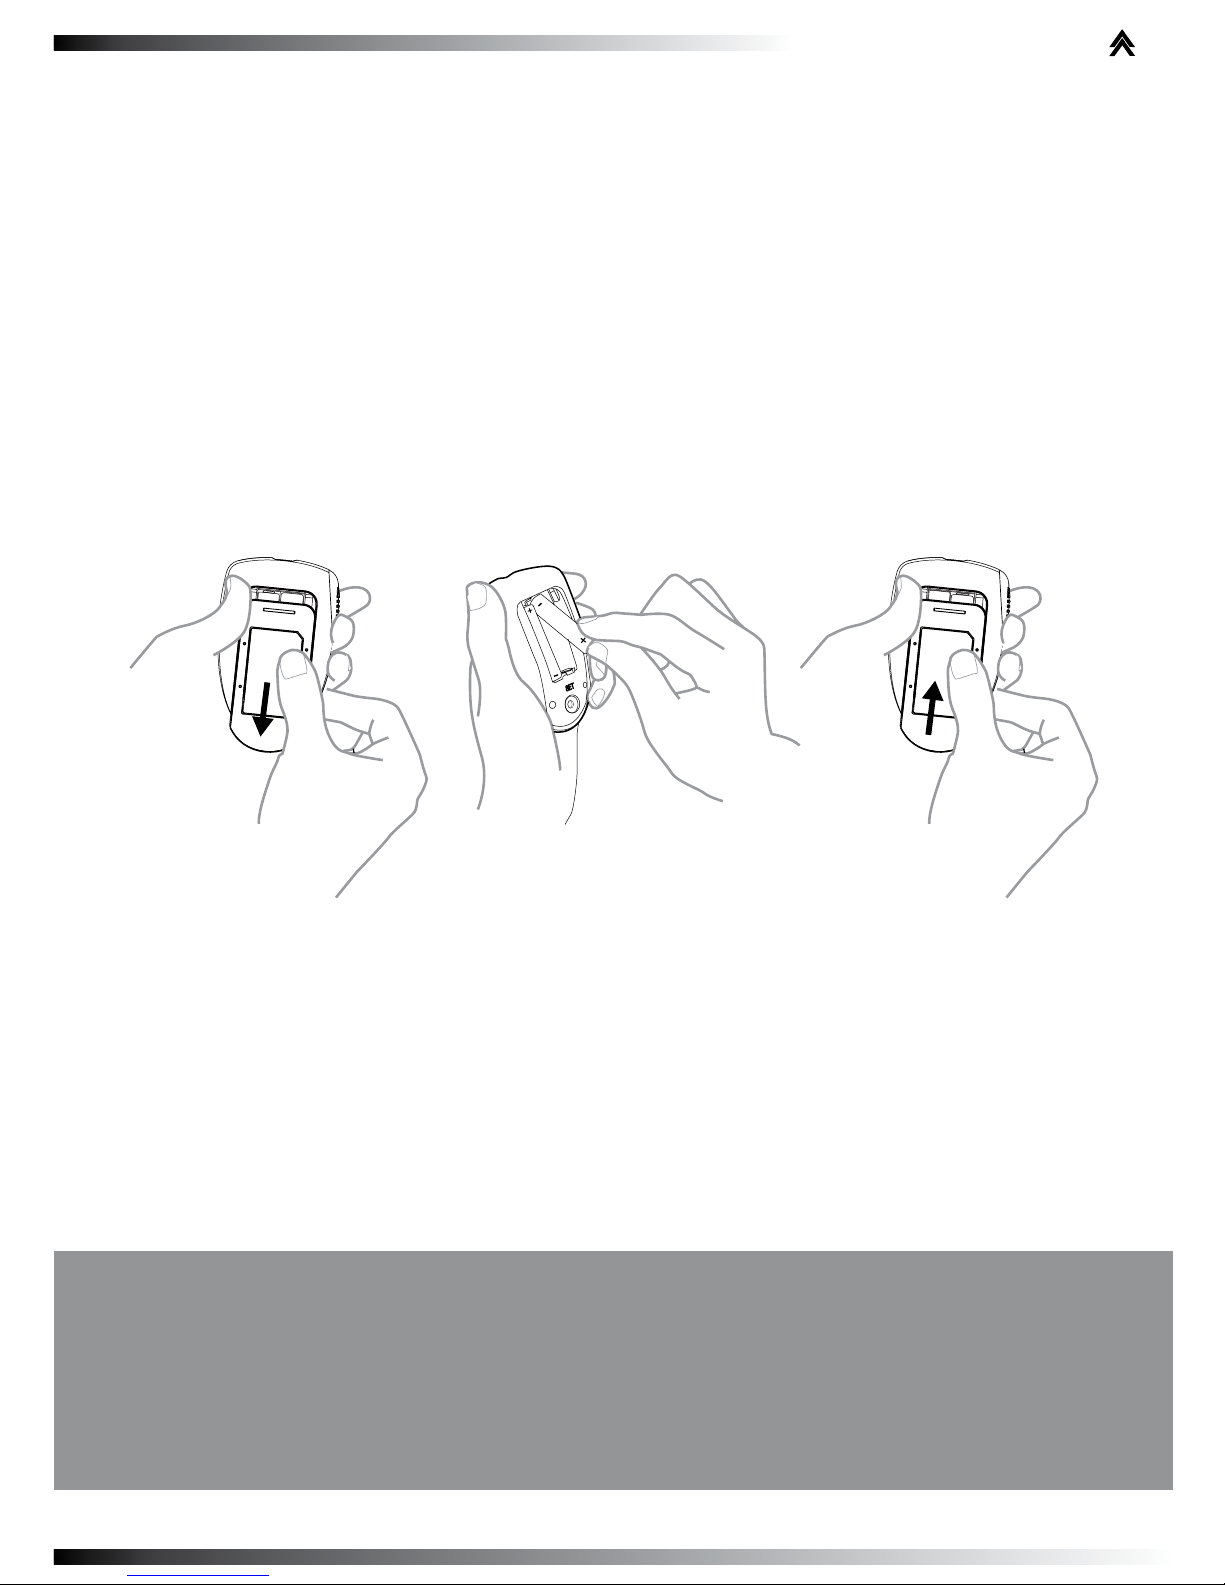
To replace the battery, make sure that the meter is
turned off.
STEP1 Press the buckle on battery cover and lift up to
remove cover.
STEP2 Remove the old battery and replace with two 1.5V
AAA alkaline batteries.
STEP3 Close the battery cover.
WARNING
As with all small batteries, the batteries should be kept away from small
children who still put things in their mouths. If they are swallowed,
promptly see a doctor for help.
16
Setting the Meter and Deleting the Memory
Your meter comes with the time, date, unit of measurement,
memory deletion and alarm function setting. If you need to
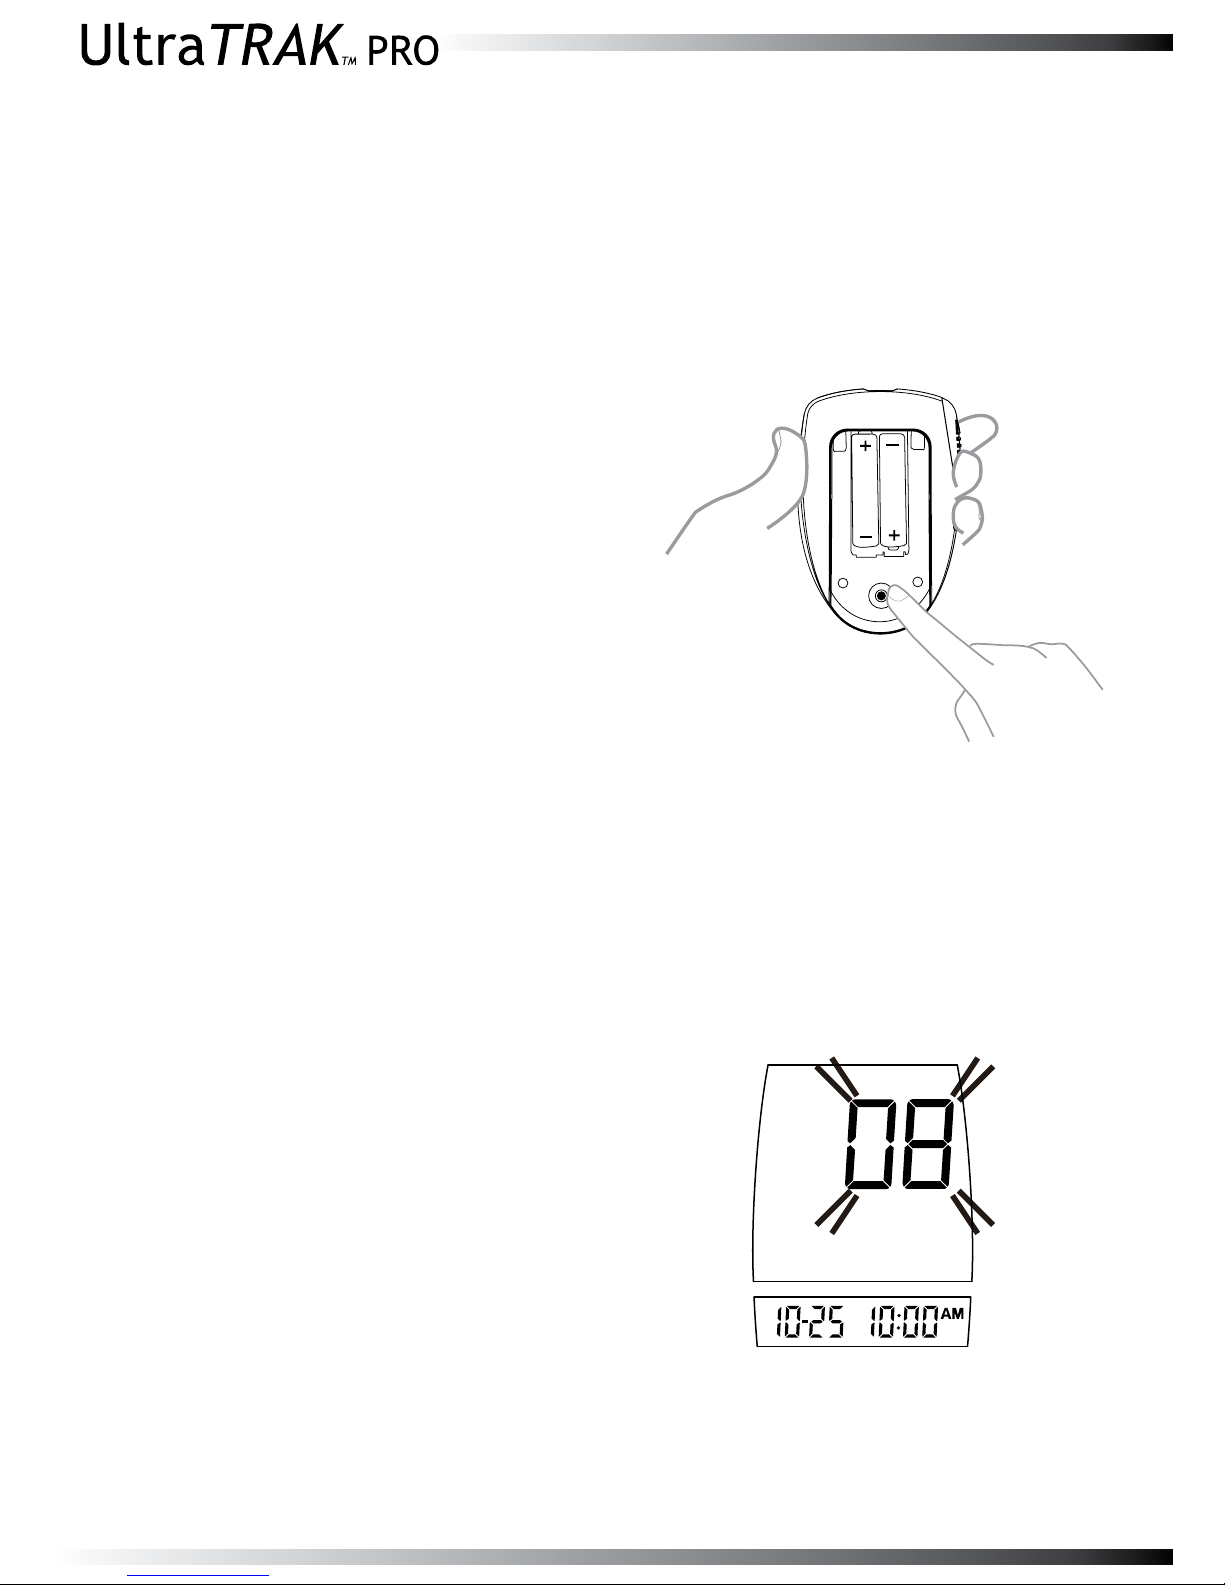
set these parameters, please follow below steps.
Start with the meter off. Then press
the set button located in the battery compartment. The meter is
now in the setting mode.
To set the time, you must rst
enter the setting mode. Start
with the meter off. Then press
the set button located in the battery compartment. The meter is
now in the setting mode.
STEP 1 Set the Year
After pressing the set button,
the year, a blinking number, will
be shown on the screen rstly
Press and release the main
button to plus one year. You
can also keep pushing down
the main button to proceed
faster. When the correct year
is displayed screen, press the
set button and then a ashing
number, which stands for the
month, is shown.
www.vertexdiagnostics.com
vertex
diagnostics
17
STEP 2 Set the Month
Press and release the main button
until you see the correct month.
To move faster, keep pushing the
main button down. When the desired month is displayed, press the
set button and then the day will
ash.
STEP 3 Set the Day
Press and release the main button until you see the correct day.
To move faster, keep pushing the
main button down. When the desired month is displayed, press
the set button and then the hour
will be shown on the screen.
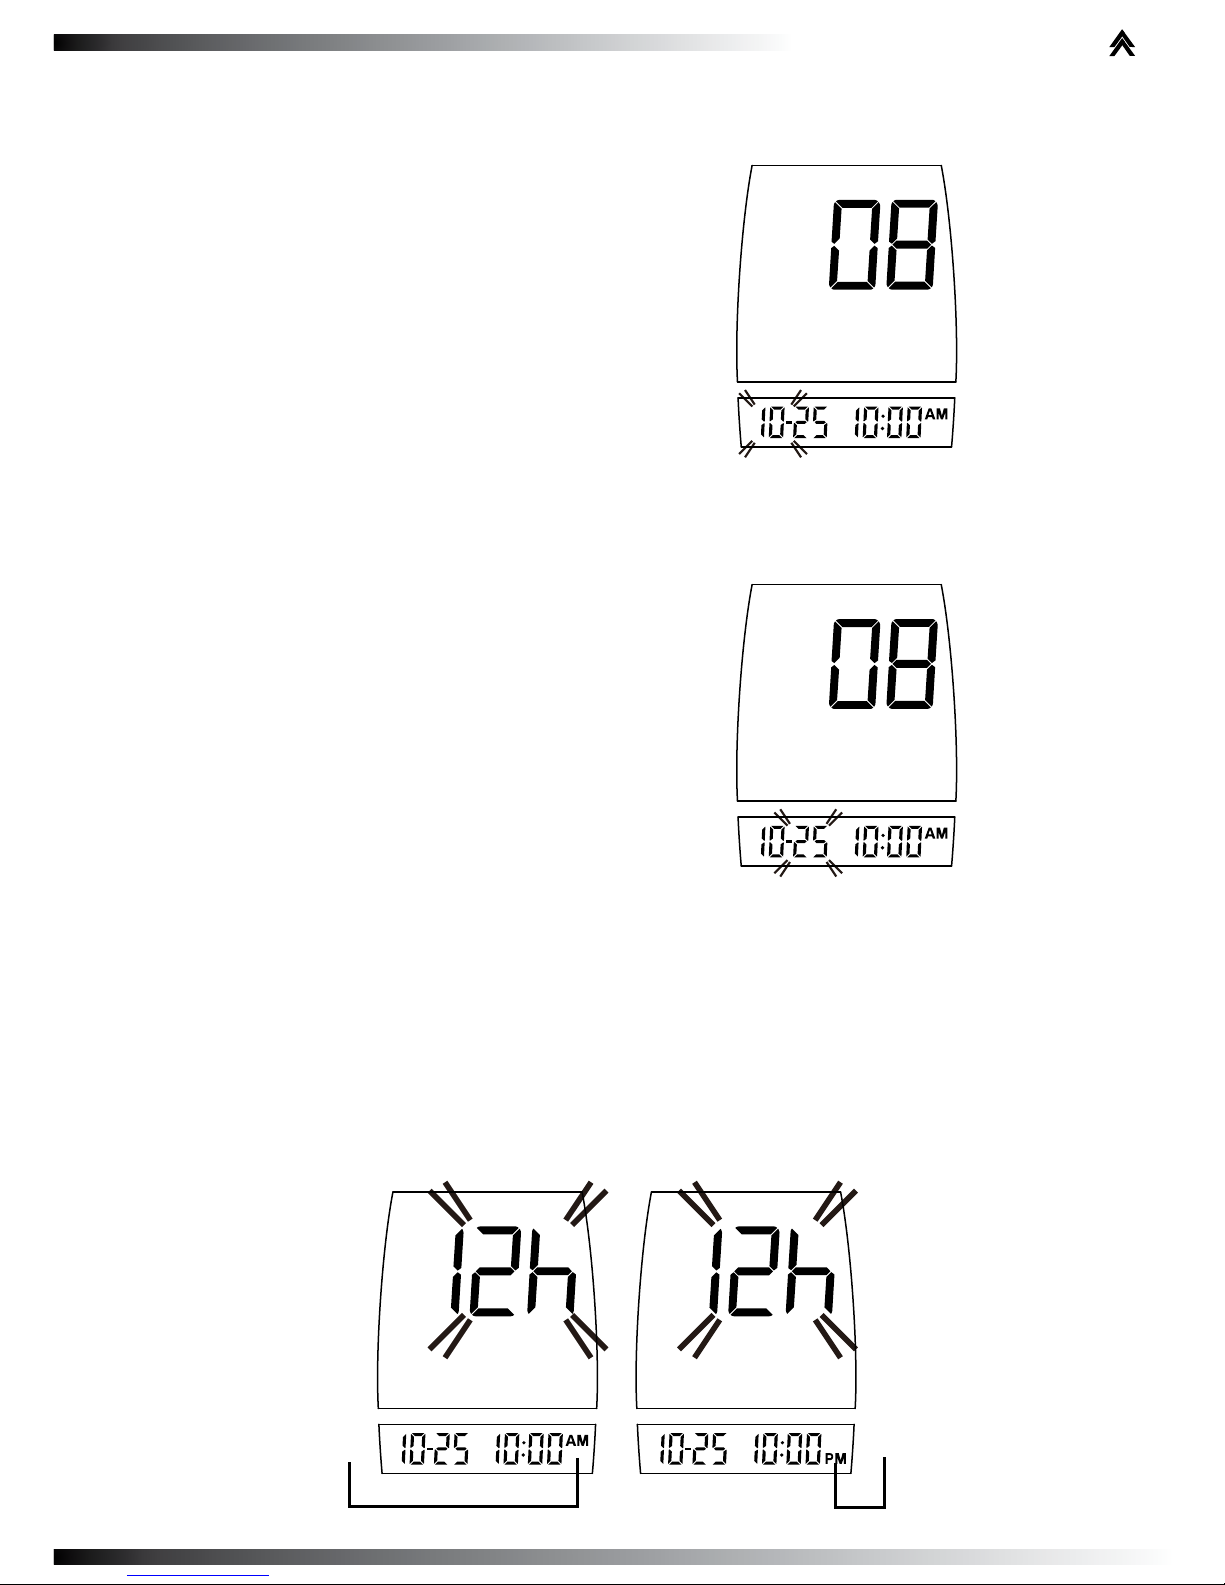
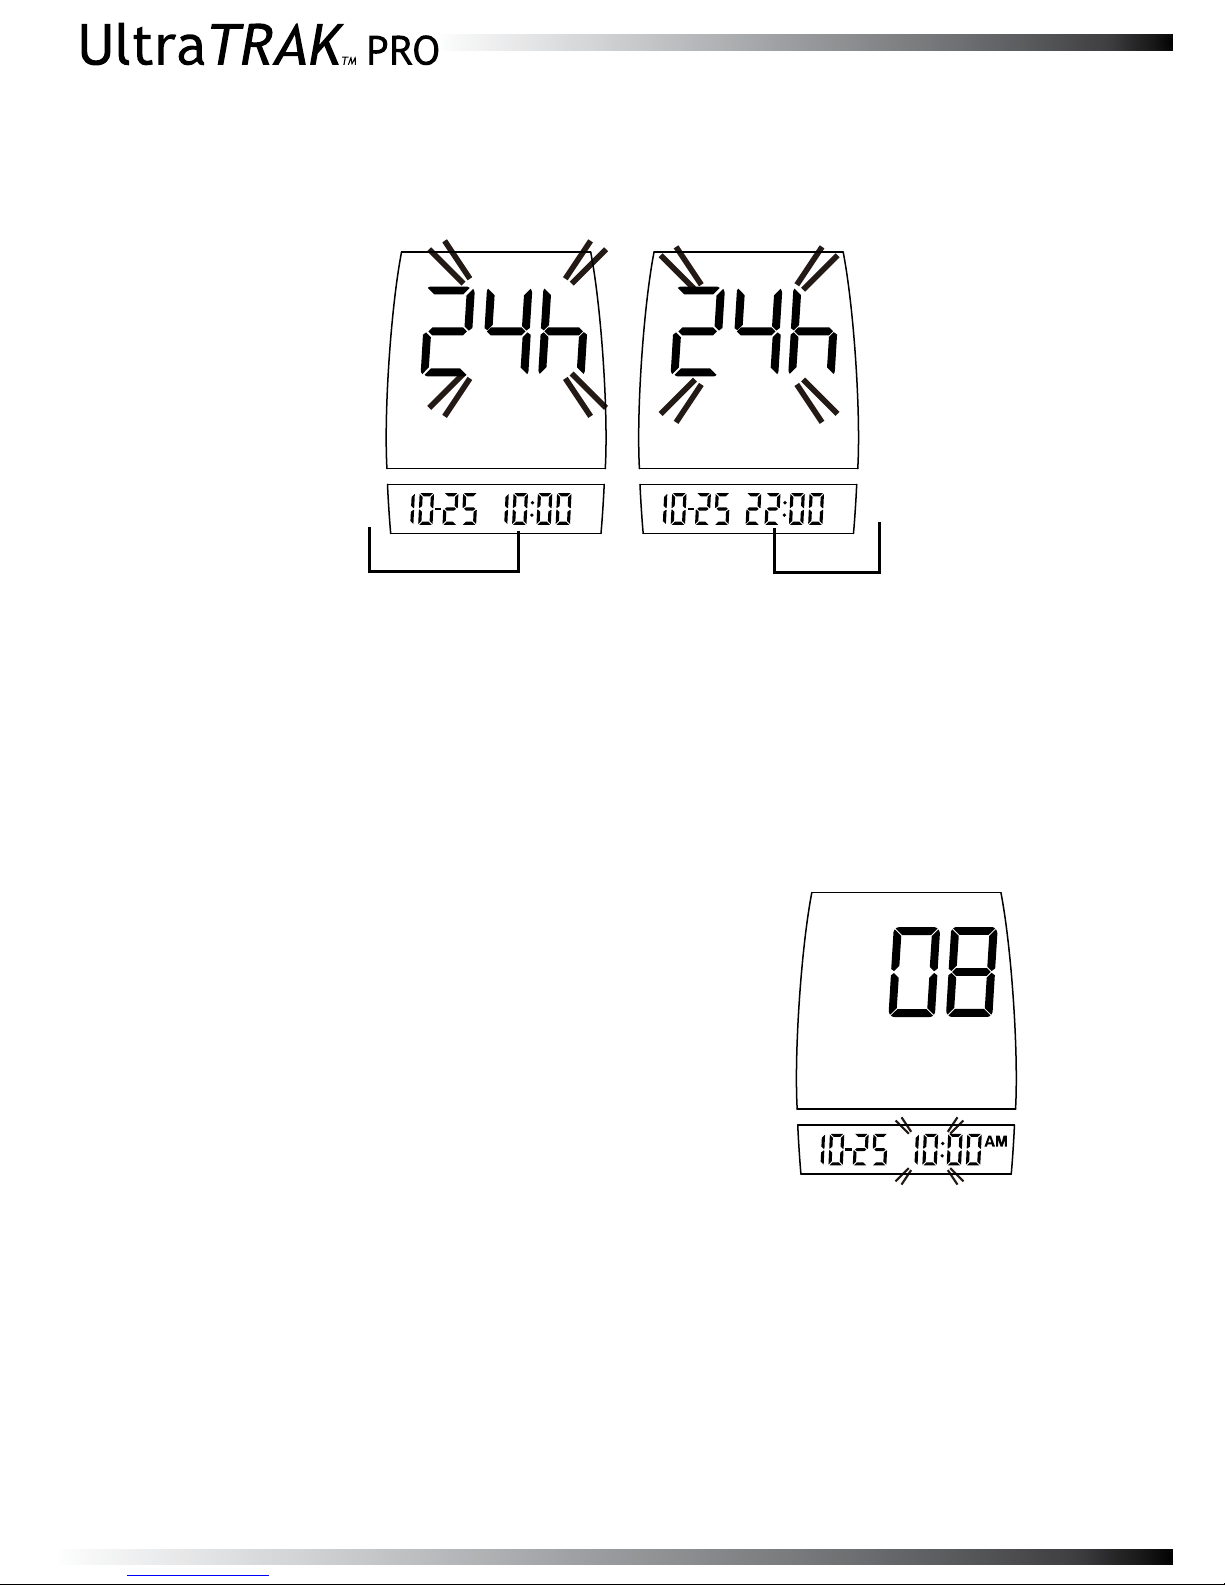
STEP 4 Select the 12h or 24h
Press and release the main button to select 12hor 24h. It
differs in time presentation format.
If you select 12h, AM and PM will be shown together with
time. An example is shown below.
10 o’clock in the moming 10 o’clock in the evening
18
If you select 24h, format of time will be from 00:00 to 23:59
without AM and PM. An example is shown below.
After nishing setting 12h or 24h, press the set button and
then the hour will ash on the screen.
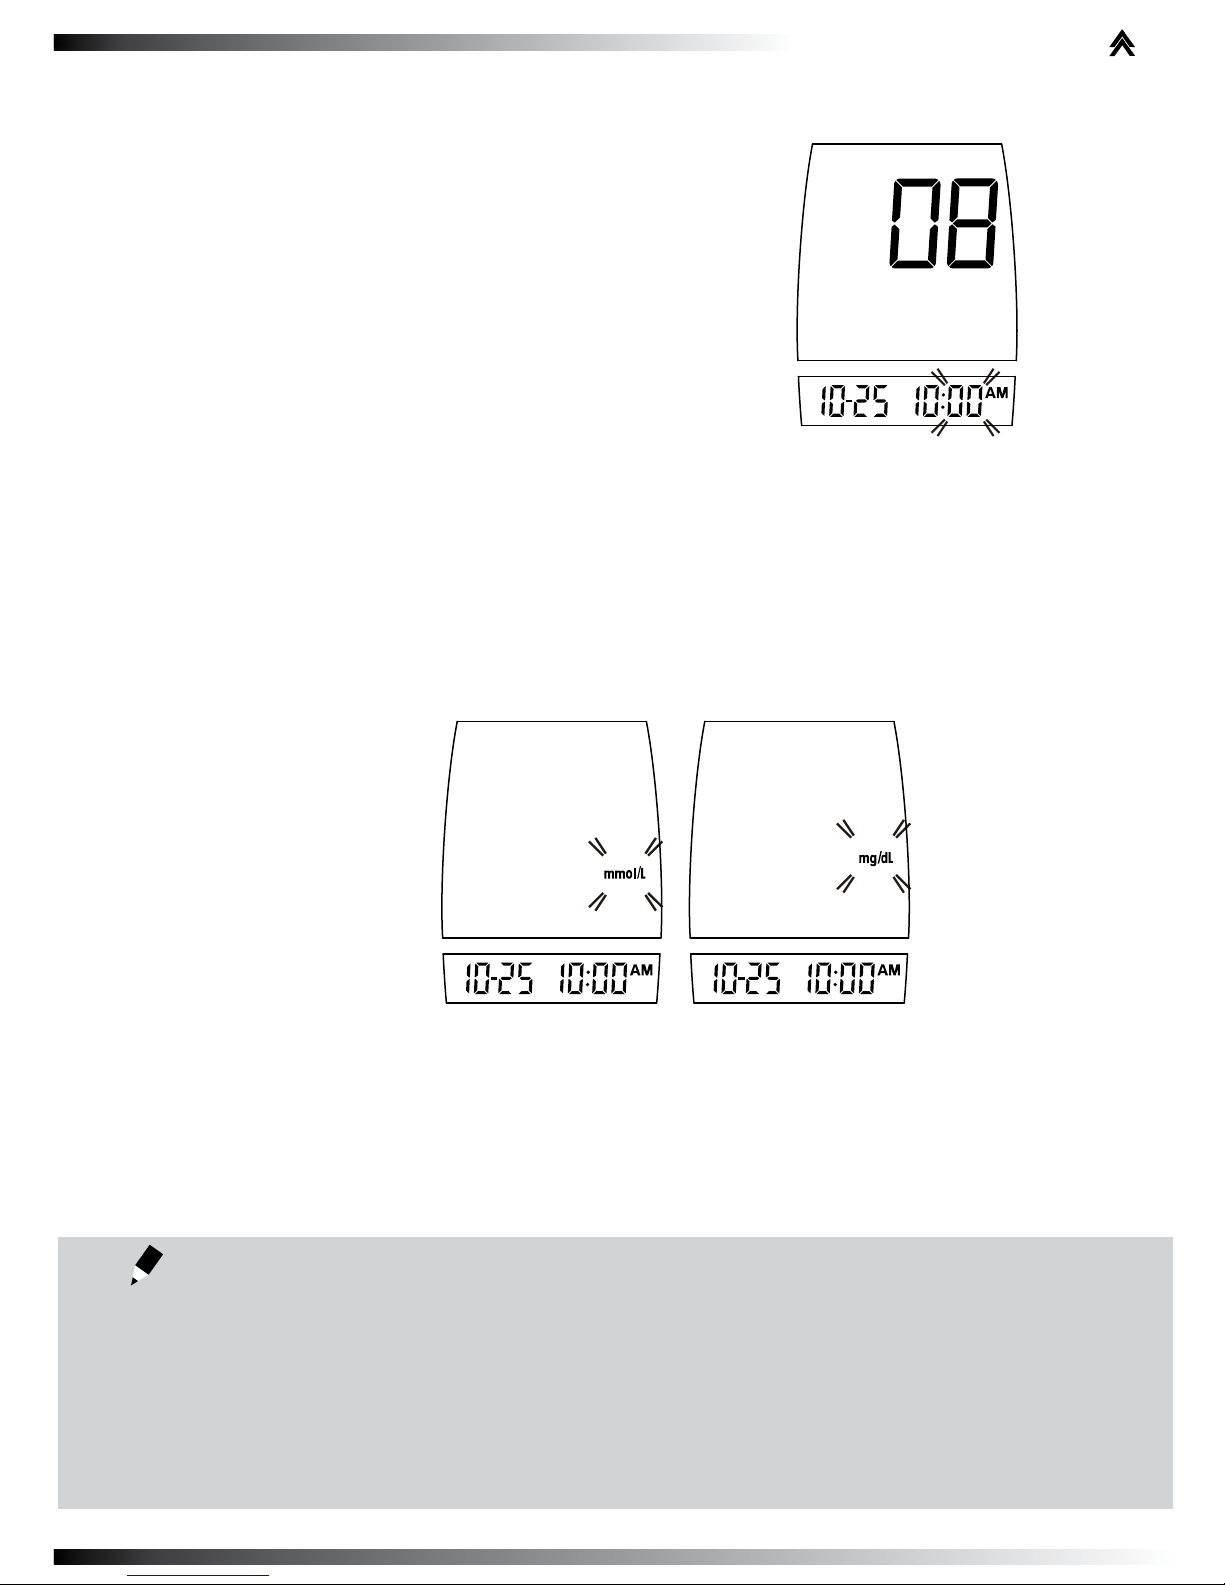
STEP 5 Set the Hour
Press and release the main button
until you see the correct hour
on the screen. To move faster,
keep pushing the main button
down. When the desired hour is
displayed on the screen, press the
set button and then the minute will
ash.
10 o’clock in the moming 10 o’clock in the evening
www.vertexdiagnostics.com
vertex
diagnostics
19
STEP 6 Set the Minutes
Press and release the main button
to advance one minute. To move
faster, keep pushing the main button down. When the desired minute
is displayed, press the set button
and then the current unit of mea-
surement will ash.
STEP 7 Select mg/dL or mmol/L
Press and release the main button to select the unit of
measurement you want to use is shown on the screen.
Press the set button and the current unit of temperature
will ash.
PLEASE NOTE!
The milligram per deciliter (mg/dL) is the standard unit in the United
States. The millimole per liter (mmol/L) is the standard unit in Canada
Use of the wrong unit of measure may cause you to misinterpret your
blood glucose level, and may lead to incorrect treatment.
20
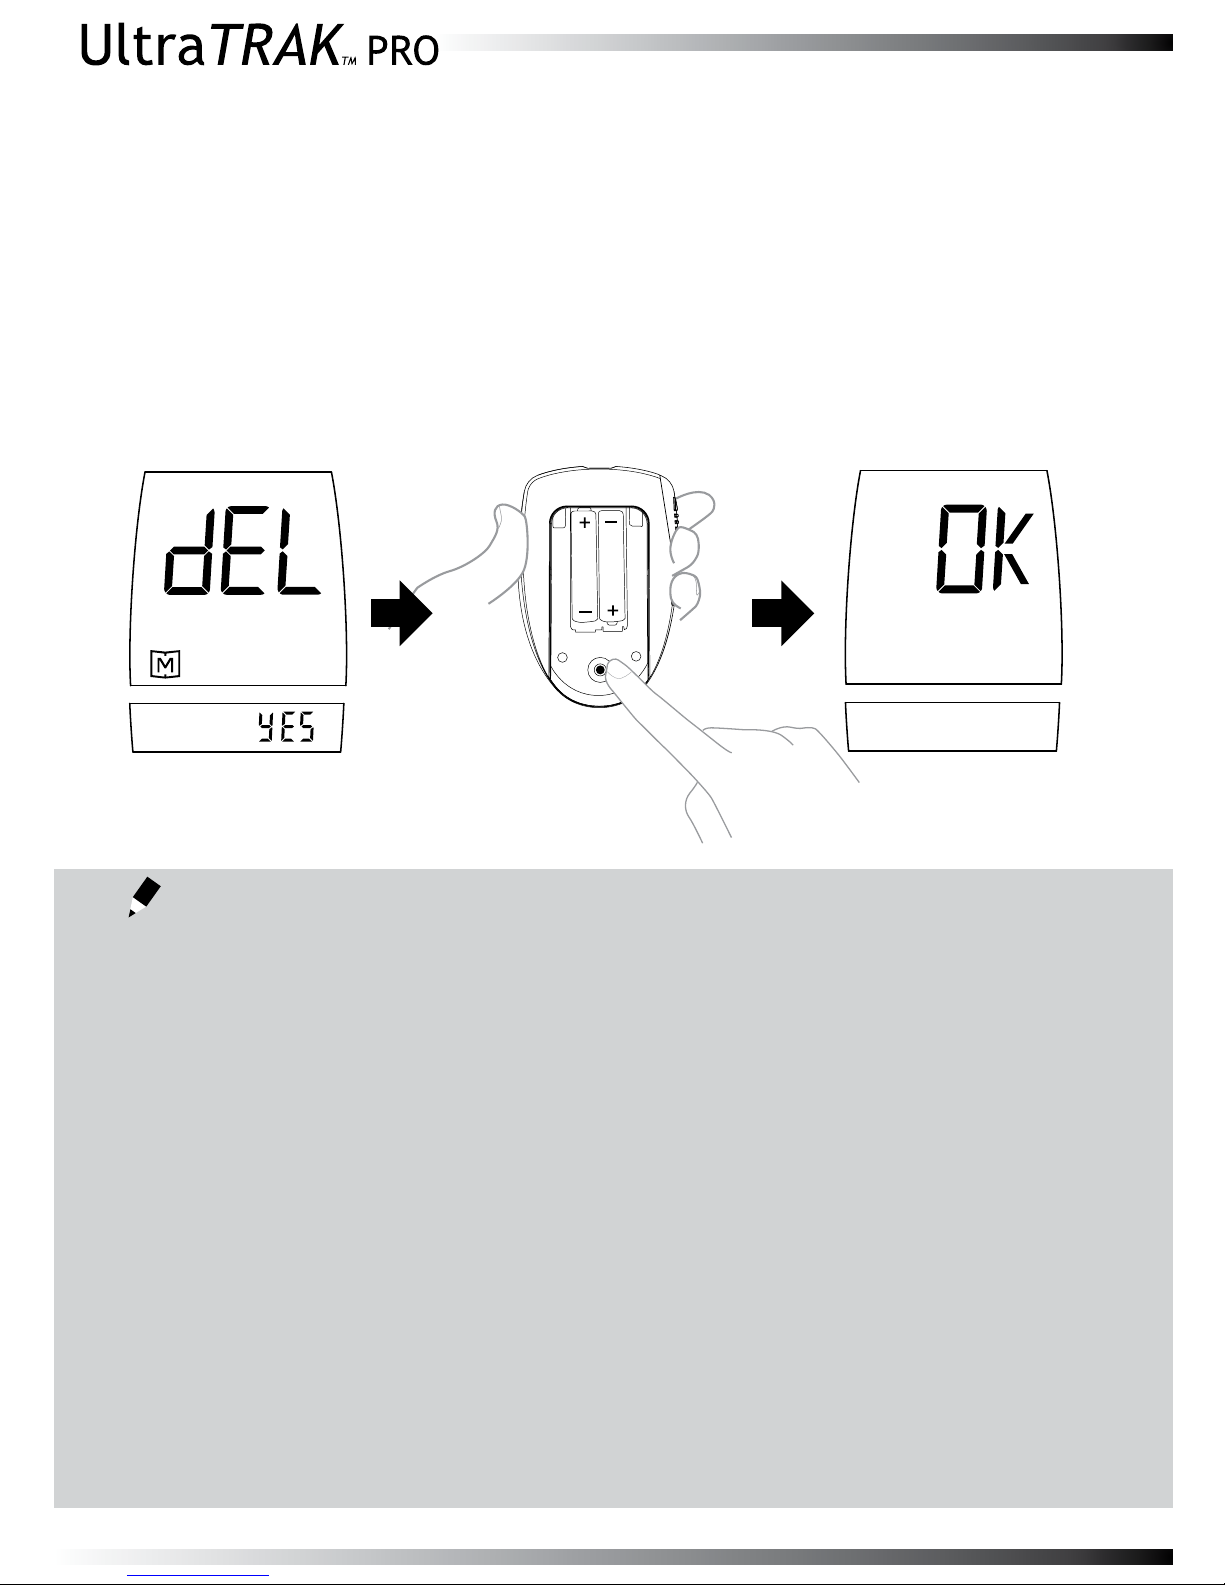
STEP 8 Delete Memory
“dEL” and ashing yes/no is displayed on the screen. If you do
NOT want to delete memory, press the main button to select “no”
and then press set button to go to step 9. If you’d like to delete
ALL memory, press main button to select “yes”. Then press
set button to delete All memory. ”OK” is displayed in the meter,
which means that all data stored is deleted. Go to step 9.
The time, date and unit of measurement can ONLY be changed in •
the setting mode. Therefore, when you perform a glucose testing,
those parameters are not possible to be changed.
The meter cannot automatically update daylight saving time. You •
have to manually adjust the time in the meter according to the
procedures. Please make sure the meter matches the time zone
and adjust the daylight saving time data if required.
Your meter displays 7-, 14-, 21-, 28-, 60- and 90-day averages •
which you can access from the meter memory. These averages
are calculated from results obtained during the 7-, 14-, 21-, 28-,
60- and 90-day preceding the current date and time settings.
When the date and time are changed, the 7-, 14-, 21-, 28-, 60and 90-day averages may change.
While the meter is in the setting mode, it will turn off automatically •
without any action in one minute.
PLEASE NOTE!
www.vertexdiagnostics.com
vertex
diagnostics
21
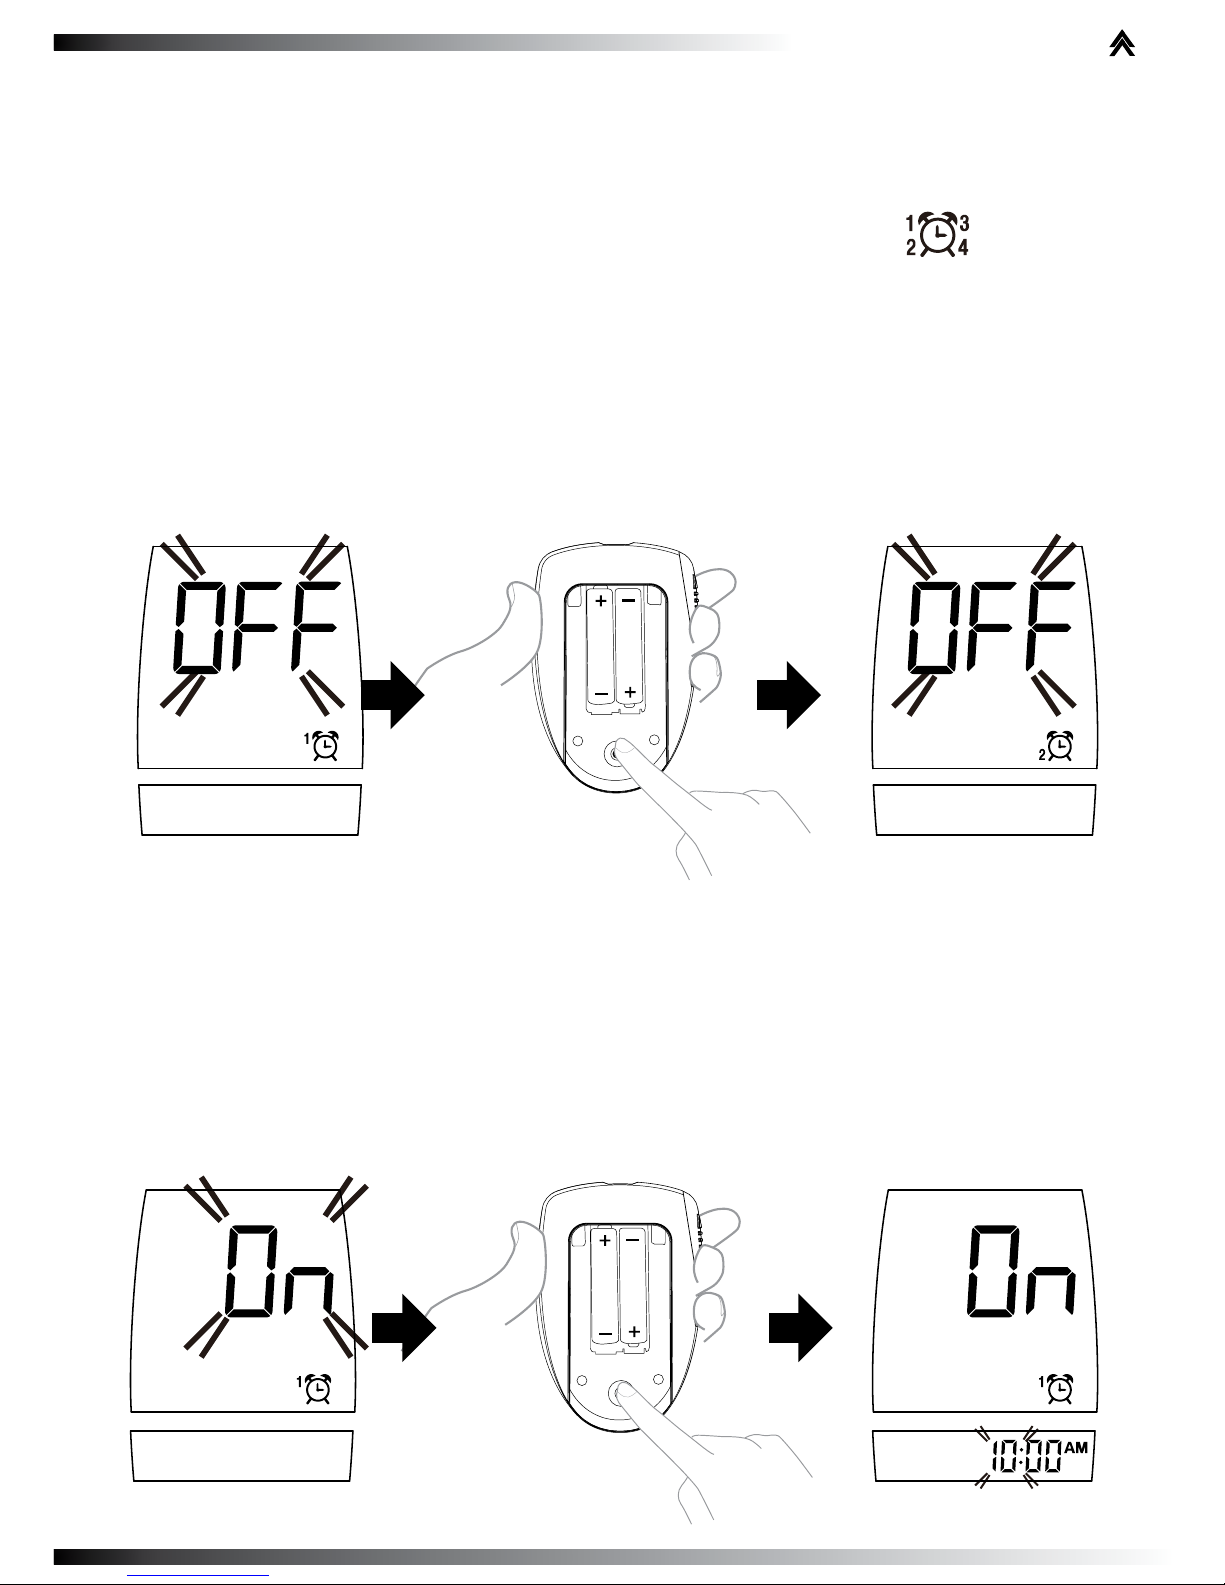
STEP 9 Select and Set Alarm Function
The meter provides four alarms. You are able to set four different
alarming times a day. Flashing “On” or “OFF” and “
” are
displayed on the screen rstly. Press the main button to turn on
or turn off Alarm 1.
Alarm 1 setting
If you press the main button to select “OFF”, then press the set
button to go to set Alarm 2.
If you press the main button to select “On”, then press set button
to set hour. While the hour is ashing, press the main button to
plus an hour, and then press the set button. Blinking minute is
displayed on the screen. Press the main button to advance one
minute. To move faster, keep pushing the main button down.
When the desired minute is displayed, press the set button to
proceed to the next alarm setting.
 Loading...