

Vertex Aquaristik Rx-U+ Series Owner's Manual
Vertex™ Filter Sock Instruction Manual ©Vertex Aquaristik ™ 2018
Page - 1 -
Vertex™ Rx-U+ Series Fluidized Reactor
Thank you for your purchase of the Vertex™ Rx-U Series Universal Fluidized Reactor. Please be sure to
read and follow this brief guide to ensure proper install and operation of your reactor.
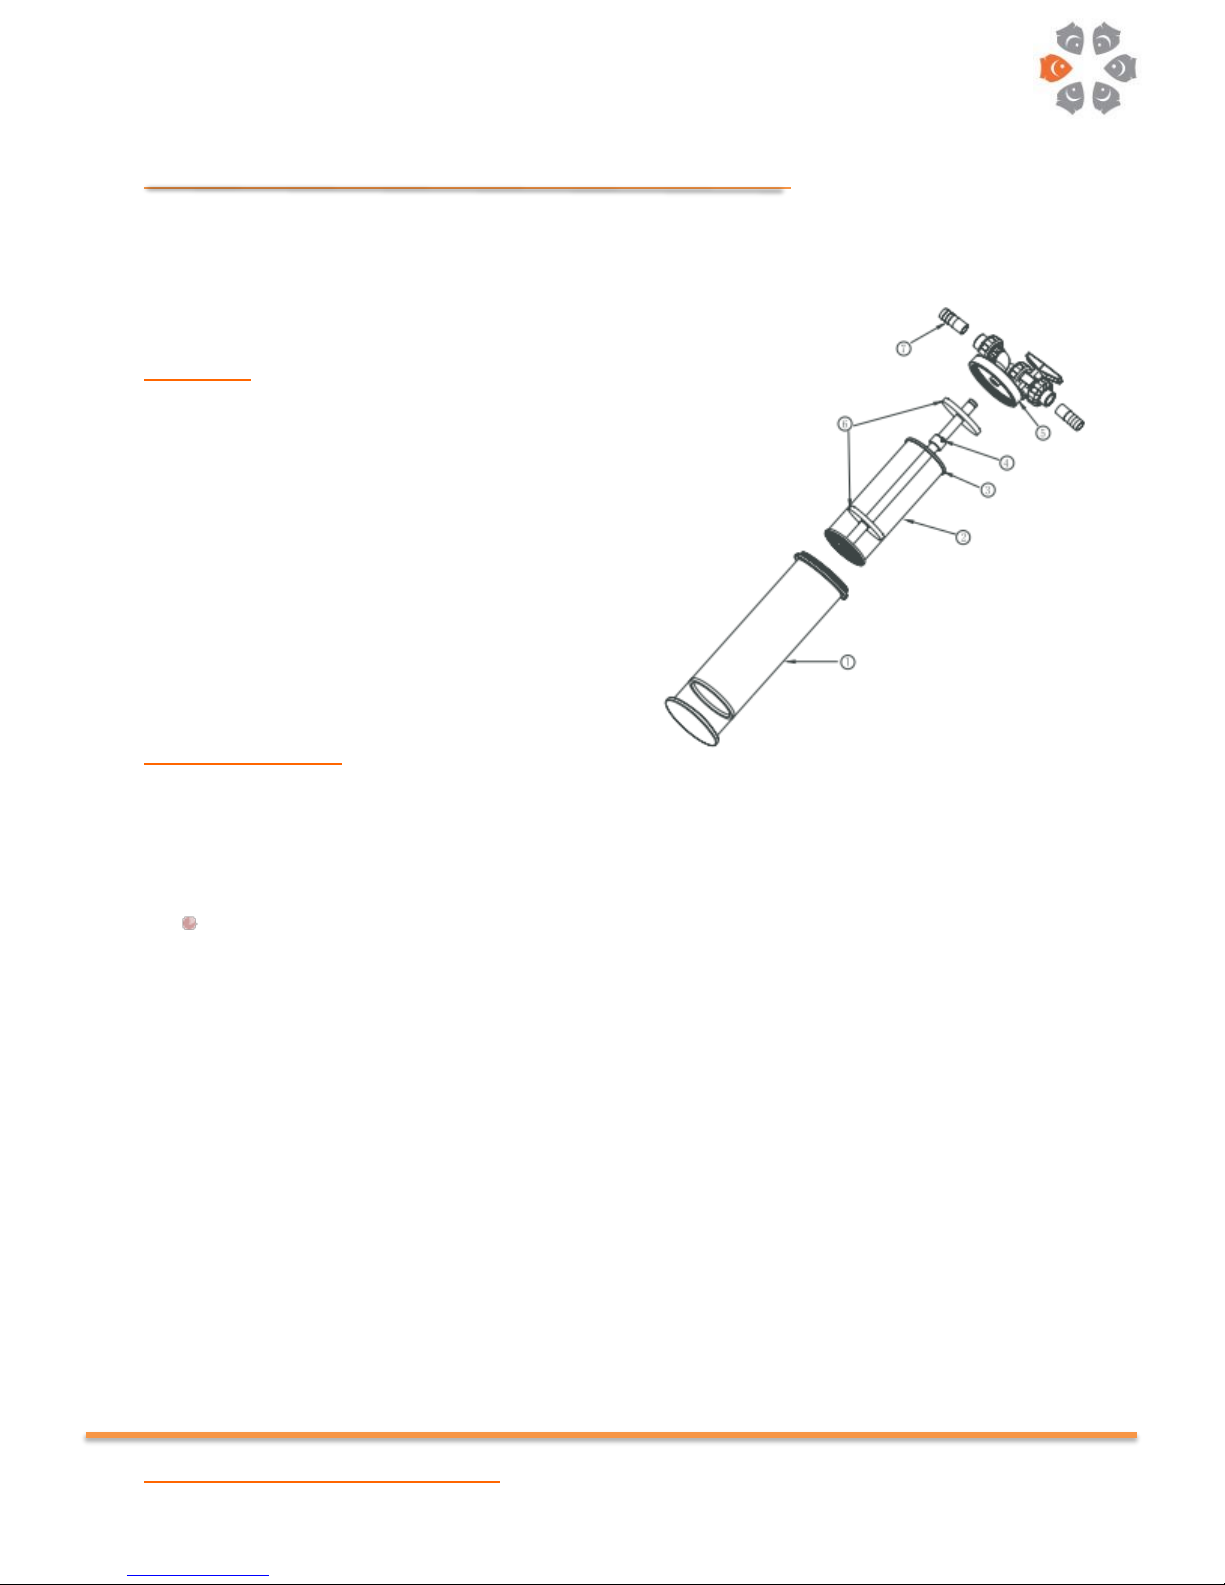
In the box:
1- Rx-U Main Chamber
2- Rx-U Inner Chamber
3- Upper Perforated Plate Assembly
4- M4 * 8mm Titanium Screw
5- Rx-U Lid
6- Foam Disc – 2 Pieces
7- Barbed Hose Connection – 2 Pieces
8- Owner’s Manual
Install and Operate:
1- Remove your reactor and its components from the box and inspect for any possible defects. If
there are any concerns, please contact your dealer within 48 hours of receiving your reactor;
refrain from installing the unit and keep all original packaging as well as proof of purchase.
Any damages to the unit during transport are not covered under warranty and must be claimed
with the forwarder at the time of receiving the product.
2- After proper inspection, clean the unit with a damp cloth using RO water to ensure removal of
any oils and/or chemicals used during the manufacturing process.
3- Rinse media with RO water to remove debris and/or dust.
4- Use proper media based on your application. Different sized media particles will require different
screen and/or foam discs. In many cases, there is either no need for foam disc or a diner mesh
screen is required. This is dependent to the media utilized as well as the flow requirements for
the said media.
Once determined which will serve you best, place the proper screen and/or foam over the
perforated plate inside the inner chamber. Supplied foam discs are by design larger than the

Vertex™ Filter Sock Instruction Manual ©Vertex Aquaristik ™ 2018
Page - 2 -
inner tube diameter to ensure no media particles will get through. Push the foam disc down
using a large rod.
5- Fill the inner chamber assembly with media
6- Assemble the upper perforated plate over the inner chamber and fasten in place using the
onboard Titanium Screw. If the foam dis is required, it is best to place over the inner tube prior
to installing the upper perforated plate. Refrain from over tightening which can possible damage
the threading. Damaged threading, if cause by negligence or improper installation, will not be
covered under warranty.
7- Place the inner chamber assembly back inside the unit.
8- Place the lid over the inner tube assembly and ensure alignment with the middle tube port of
the lid. Once close, the O-ring on the tube will create a sealed connection. Small amount of food
grade silicone lubrication can be used to ensure proper seal.
9- Close the lid turning clockwise. Make sure the middle tube is being properly driven inside the
port.
10- Vertex ™ Rx-U reactors are fit to be utilized both in sump and/or with external applications.
Choose the reactors location carefully and measure the length of tubing required to install your
reactor.
11- Rx-U reactors are designed to be either hard plumbed to your system or used remotely via hose
or soft tubing. A pair of barbed hose connections are supplied to accommodate such installation
and use.
12- If you desire to use the reactor remotely, use PVC cement to permanently glue the barbed
connections to the union and union ball valve. Use proper sized soft tubing or a hose. Inserting
the end of the hose in hot water for a few seconds will make the material softer and installation
easier. Ultimately, small amounts of food grade lubrication can be used to slip the hose over.
Use hose clamps to secure the connections.
13- Check the lid and all the connections to make sure they are properly installed and seated.
14- Attached the feed-line to the ball valve connection to avoid pressurizing the reactor. Excess
pressure can damage our reactor. Such damages are not covered under warranty.
15- Attach the exit line to the union connection. Find an adequate place for the exit line in your sump
or aquarium.
16- Open the valve and let the reactor fill with water. Once filled, close the valve for a few seconds
to let the media settle.
17- Once the media is settled, slowly open the valve and adjust the flow rate according to the
media’s requirement and/or manufacturers guidelines.
Warning: To avoid damage to property, livestock and/or personal injury, please follow all these
instructions and/or consult with a professional. Vertex Aquaristik™ will not be held accountable for any
damaged the misuse and/or improper installation of the unit may cause.
 Loading...