

Page 1
Page
1
Vertex™ Rx-C 6D Calcium Reactor
Thank you for your purchase of the Vertex™ Rx-C 6D Calcium Reactor. Please be sure to read and follow this brief
guide to ensure proper install and operation of your device.
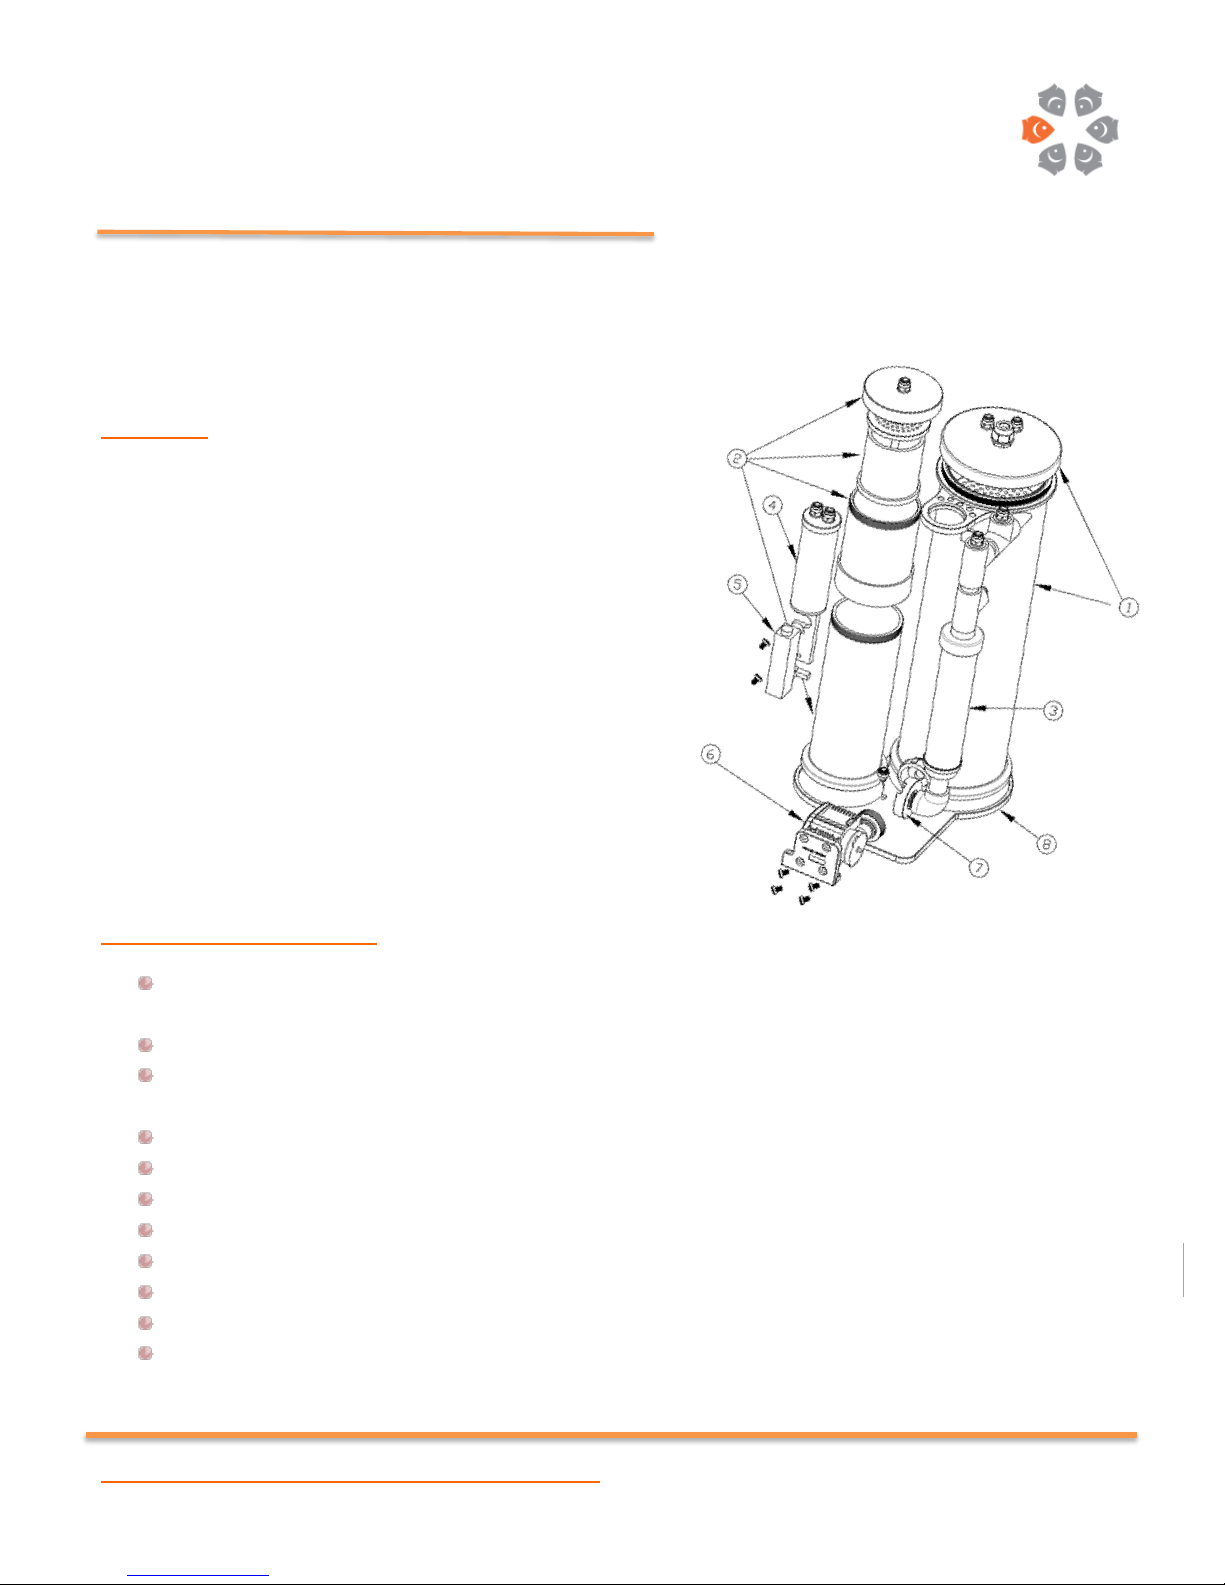
In the box:
1) Primary Chamber
2) Secondary Chamber
3) CO2 Interface Chamber
4) Bubble Counter
5) Flow Meter
6) Sicce™ Syncra 1.5 / Custom Bracket
7) PVC Pump Head
8) Reactor Base
9) Precision Needle Valve
10) Red, White & Black LLPDE tubes / 3m (6’) length each
11) CO2 Chamber Media
12) Sicce™ Syncra 1.5 Instruction Manual
13) Vertex™ Rx-C 6D Instruction Manual
Important Safety Warnings:
This is an electrical device operated in close proximity to water; be cautious, follow instructions and use
common sense.
Do not touch the plug and/ or the electrical outlets with wet hands. Always dry your hands first.
Rx-C 6D and its components are solid heavy objects, impact can cause bodily harm, loss of life and/ or
damage to property.
Do not attempt to service the unit while in operation or connected to electricity.
Unless you are qualified; service only by authorized service professionals.
Do not attempt to alter the product. Do not attempt to alter the Motor-Block or the Impeller Assembly.
Do not touch the impeller and/ or attempt to turn the Impeller when the unit is connected to power.
Ensure the product is free of defect and properly assembled before putting in operation.
Drip-Loop is required where the Power-Cable is connected to the Power-Outlet.
Do not carry, lift or hold the pump or the reactor by its cable.
Do not carry, lift or hold the reactor by its upper manifold. To service or move the reactor; do so one
Vertex™ Rx-C 6D Calcium Reactor / Instruction Manual © Vertex Aquaristik ™GmbH, Deutschland 2014
chamber at a time. Do not lift or carry the reactor while assembled on its base.
Page 2

Page
2
Always think safety first! If you are unsure as how to operate this product; consult with a professional
or contact us directly.
Installation:
1- Remove your Calcium Reactor and its components from the box and inspect for any possible defects. If
there are any concerns please contact your dealer within 48 hours of receiving your reactor, refrain from
installing the unit, keep all original packaging as well as proof of purchase.
Any damages to the unit during transport are not covered under warranty and must be claimed with
the forwarder at the time of receiving the product.
2- After proper inspection, clean the unit with a damp cloth using RO water. This ensures removal of any
oils and/ or chemicals used during the manufacturing process. Each unit has been individually Leak-tested
both through high pressure Air and Water injection. Possible water marks or minimal amount of water
might be present in the reactor.
Tip: Although the unit has been tested for possible leaks and/or any other defects; it is recommended
to assemble the unit and run with water and no media for a few hours. Please follow this guide
without using any media. Once you are satisfied that your reactor is devoid of any defects you can
simply fill it with desired media(s) and put in operation.
3- Rinse your Media with RO water. Only use coarse media.
4- Remove Primary Chamber from the box. Do not lift or hold the chamber by its upper manifold.
5- Gently unscrew the Primary chamber’s lid. It is recommended to seek assistance for this task since the
lid might not be easily unscrewed. Hold the chambers Acrylic body and unscrew the lid pen. Place the lid
carefully on a soft surface to avoid breaking the internal parts.
Warning: Do not attempt to hold the chamber by its manifold or the connections on the lid. Doing so
WILL result in broken manifold or lid-connections. Such damages are not covered under warranty.
6- Place one hand on the top of the chamber’s opening holding it down. Using the other hand gently remove
the upper perforated plate by pulling on the Titanium knob.
7- Fill the Primary chamber with proper media. Do not pack media tightly. Do not fill the chamber full. Small
media particles can go through the bottom perforated plate. Do not be alarmed this will not affect
performance.
8- Once filled, gently push down the upper perforate plate in place. Ensure that the O-Ring is properly
seated.
Vertex™ Rx-C 6D Calcium Reactor / Instruction Manual © Vertex Aquaristik ™GmbH, Deutschland 2014
Page 3

Page
3
9- Inspect the threads on the lid and its matching counterpart on the body to ensure they are free of debris
or media particles. Media particles if present between the threading will not allow achieving a seal and
can cause leaks.
Caution: Debris or any particles present between the lid and the body or the threading can damage
the threads rendering the reactor unusable. Such damages are not covered under warranty.
10- Place the primary chamber on its dedicated spot within the reactor base.
11- Remove the CO2 Interface Chamber and its media from the box.
12- Using RO Water rinse the CO2 chamber media. Place the media inside the chamber.
Tip: The purpose of this media is to create multiples of irregular channels within this chamber to
increase contact time of Co2 with water resulting in higher dissolution rate at the first pass.
Do not pack the chamber tight with media. This will result in significant loss of flow and performance.
13- Inspect the upper union of the Co2 Chamber, there must be two O-rings present; one at the point of
contact of “Acrylic tube and PVC” and a secondary O-ring is placed inside the “Union-Screw”.
14- Place the CO2 Chamber in place and turn the Screw 3 revolutions. Do not tighten this connection yet.
15- Remove the Syncra pump from the packaging. Ensure the metal shaft is properly in place.
16- Gently place the pump on its dedicated spot within the base. To further reduce operation noise; large
rubber dampeners have been utilized. These dampeners (Rubber-Feet) have also dedicated machined
circles within the base that they sit on.
17- Mach the pump with its bearing plate fixed behind the pump head. There are 2 notches within the Bearing
plate that match identical cut-outs on the Motor-Block. Ensure the Shaft is properly placed to be inserted
into the rubber bushing on the Bearing-Plate.
Warning: The Bearing plate is glued in place permanently. Do not attempt to turn or move the bearing
plate. Turning the Bearing plate will render the complete Co2 Chamber unusable. Broken Bearing
plate or Co2 gas chamber due to excessive use of force or improper installations are not covered under
warranty.
18- Once you are completely satisfied that the pump, bearing plate and it’s shaft are all properly matched;
apply very small amount of force to assemble them together.
19- Match the Cut-outs on the pump-head with notches on the Motor-Block’s outer casing. Now turn the
pump-head to position. The pump-head should cover the Motor-Block notches completely.
20- After the pump-head is properly assembled tighten the upper union screw of the CO2 Chamber. To ensure
leak-free operation; small amount of food grade silicone lubrication can be applied to the O-rings at this
time or any future routine maintenance.
Vertex™ Rx-C 6D Calcium Reactor / Instruction Manual © Vertex Aquaristik ™GmbH, Deutschland 2014
Page 4

Page
4
21- Gently match the pump-output’s union to its matching counterpart welded to the primary chamber.
Ensure the O-ring is present prior to tightening this connection. Gently tighten the union.
Warning: The Pump-Output union is glued in place permanently. Do not attempt to turn or move
this union. Turning the union will render the pump assembly useless. Broken pump assembly due to
excessive use of force or improper installation are not covered under warranty.
22- Remove the Bubble-Counter, Flow-Meter and its screws from the box.
23- Fill the Bubble-Counter with RO Water. It might be required to refill the Bubble-Counter with Clean water
periodically.
24- Place the Bubble counter in its dedicated slot located behind the manifold.
25- Place the Flow-Meter against the Acrylic holder. The Acrylic Holder has been machined in a countersunk
fashion to house the Screw-Heads. Ensure the meter is placed on the right (correct) side of the holder.
Using a flathead screw driver tighten the Titanium screws. Do not use excessive force as this will damage
the Screw’s head and the Flow-Meter.
26- Remove the secondary chamber from the box and place it on a hard flat surface. Mind the push to connect
fittings connected to the bottom of the chamber as well as other internal component. If placed on an
angle or applied forced against, this connection can break rendering the secondary chamber unusable.
27- Hold the Bottom sub-chamber’s body with one hand and the upper sub-chamber’s body with the other
hand. Twist in opposite directions and the bottom sub-chamber (Secondary Chamber for Carbonate
Media) will separate.
28- If desired this chamber can be filled with additional Calcium Carbonate media to remove any excess CO2
still present in the effluent at this stage. It can also be utilized for dolomite placement in the reactor.
29- Hold the bottom of Top Sub-Secondary Chamber with one hand and its lid with the other hand. Twist in
the opposite directions and remove the lid.
30- Holding the Titanium knob; remove the basket from the chamber.
31- Using a flathead screwdriver remove the Titanium screw from the top of the basket and remove the
perforated plate lid from the basket.
32- This basket can be utilized for additional Medias such as Dolomite or other desired media. It is best to
reserve the basket for media that would need occasional replacement such as phosphate removers.
Ensure that you are using proper media that will not react with saltwater of lower PH range in a negative
way. While the input saltwater can have PH as high as 9; the effluent PH can drop to lower than 6.
Specially if the reactor is not dialed in properly.
33- Rinse your media with RO water. You can now place your media of choice in the basket.
34- Place the lid back on and match the perforated lid’s screw hole with that of the internal basket’s shaft.
35- Using a flathead screw driver gently screw the perforated lid back to the basket.
Vertex™ Rx-C 6D Calcium Reactor / Instruction Manual © Vertex Aquaristik ™GmbH, Deutschland 2014
Page 5
Page
5
Caution: Do not use excessive force. Do not Cross-Thread the screw into the PVC shaft. Do not over-
tighten. If over-tightened the shaft WILL break rendering the media basket unusable. Such damages
due to use of excessive force or improper assembly are not covered under warranty.
36- Ensure that the O-Ring underneath the TOP Sub-Chamber is properly in place. Now gently screw the top
chamber back onto the bottom chamber.
37- Place the basket back into the TOP Sub-Chamber, make sure the basket is properly seated within the
chamber.
38- Hold the TOP Sub-Chamber Acrylic body and screw the lid closed with the other hand. Ensure that the O-
Ring on the top of the body is seated properly. Inspect the threading both on the lid and its counterpart
on the body to be free of debris and/ or any media particles.
Caution: Debris or any particles present between the lid and the body or the threading can damage
the threads rendering the reactor unusable. Such damages are not covered under warranty.
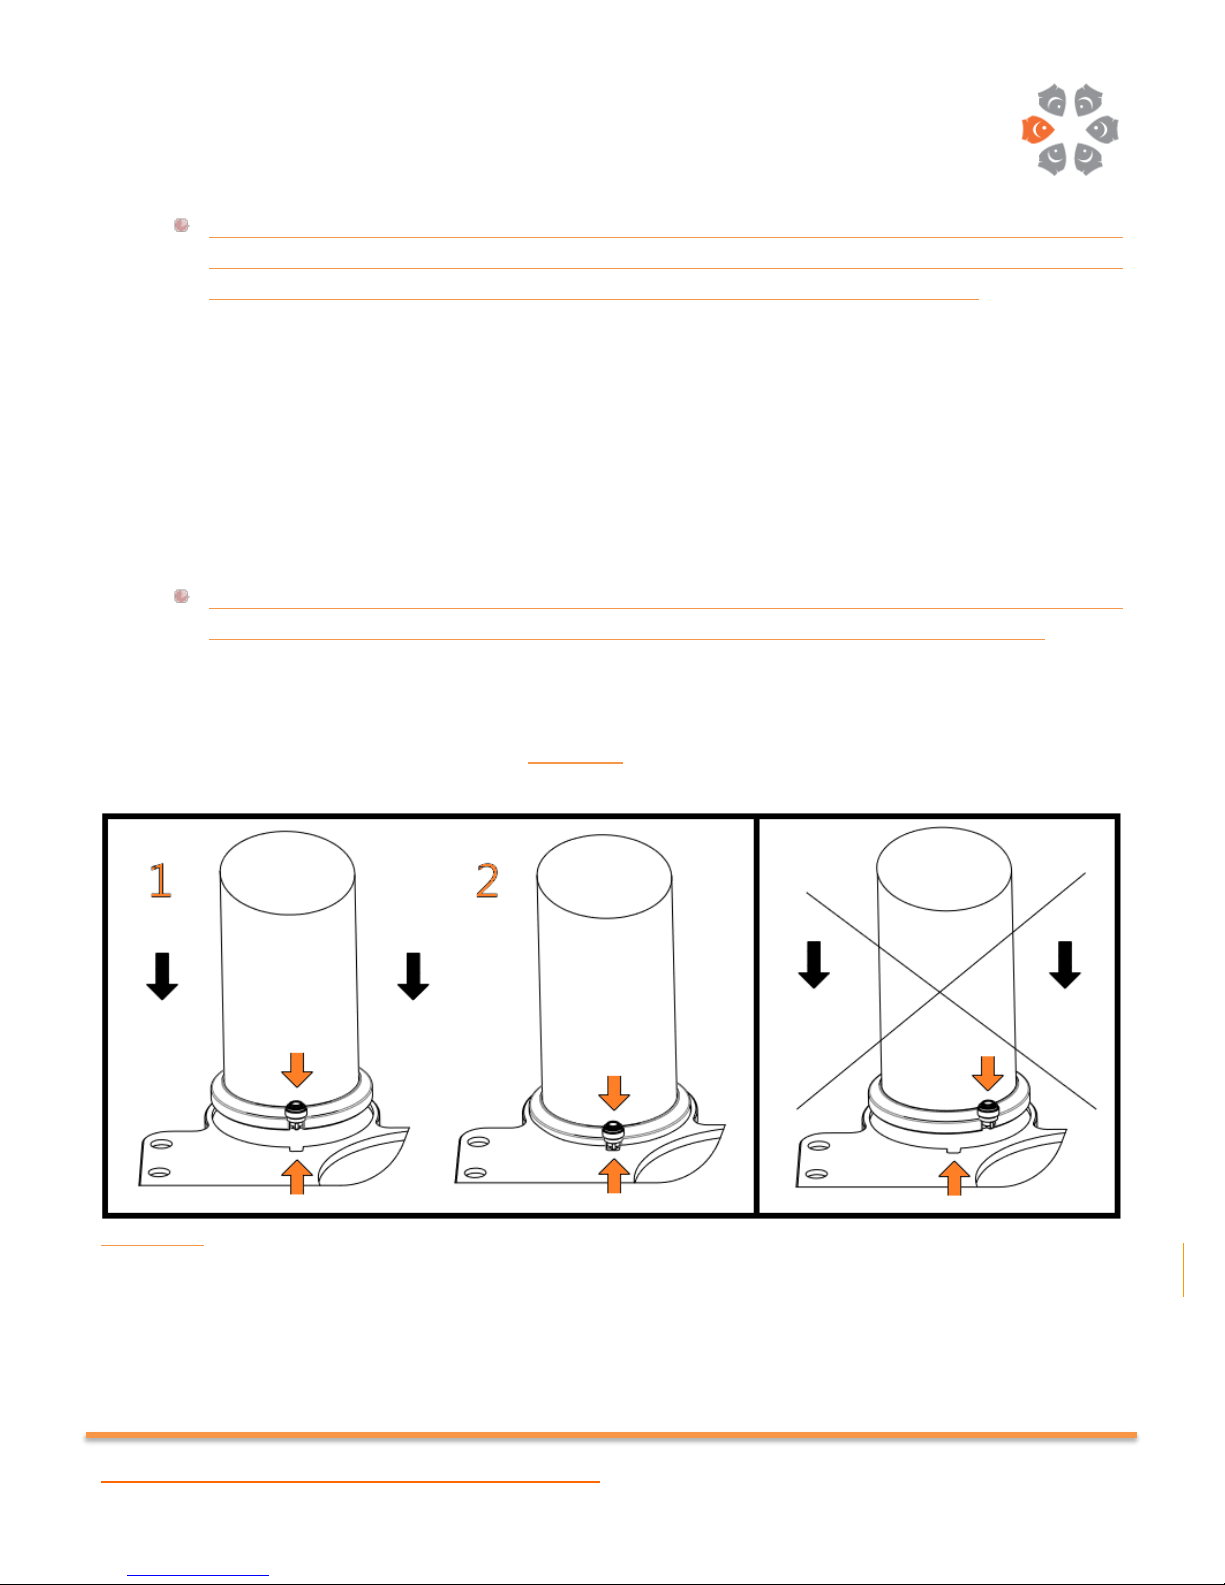
39- Now the Secondary Chamber can be placed on its dedicated slot within the reactor’s base. A dedicated
small rectangular slot has been milled into the reactor’s base to house the Push to Connect fitting located
at the base of the Secondary Chamber. Diagram 1 exhibits how the Chamber must be placed on the base.
Diagram 1: Images in the right box display the correct assembly process of Secondary Media Chamber onto the
reactor’s base. Do not force the chamber down unless the Fitting and its housing-slot are perfectly aligned. Image
in the left box displays improper alignment of Secondary Chamber and reactor base. Do not apply force to the
Push to Connect Fitting. This Fitting can break easily if the force applied is greater than the strength of the fitting’s
stem. Such damages are not covered under warranty.
Vertex™ Rx-C 6D Calcium Reactor / Instruction Manual © Vertex Aquaristik ™GmbH, Deutschland 2014
Page 6
Page
6
40- The assembly process is almost complete. Ensure that all the connections and fittings are properly
tightened and closed. Improper connections and/ or assembly will cause leaks that can result damage to
your system and/ or property. Do not use excessive force.
41- Remove the Needle-Valve from the Box. Insert the Valve into its dedicated slot behind the Primary
Chamber’s manifold.
42- There are 3 sets of LLPDE tubing provided with the unit. Different Colors can be used to code incoming,
internal connections and/ or Effluent tubes.
43- Further to that small holes have been milled into the Bubble-Counter’s holder than can help you achieve
a neat set up assembly. You can simply run any tube through any of the 5 machined holes.
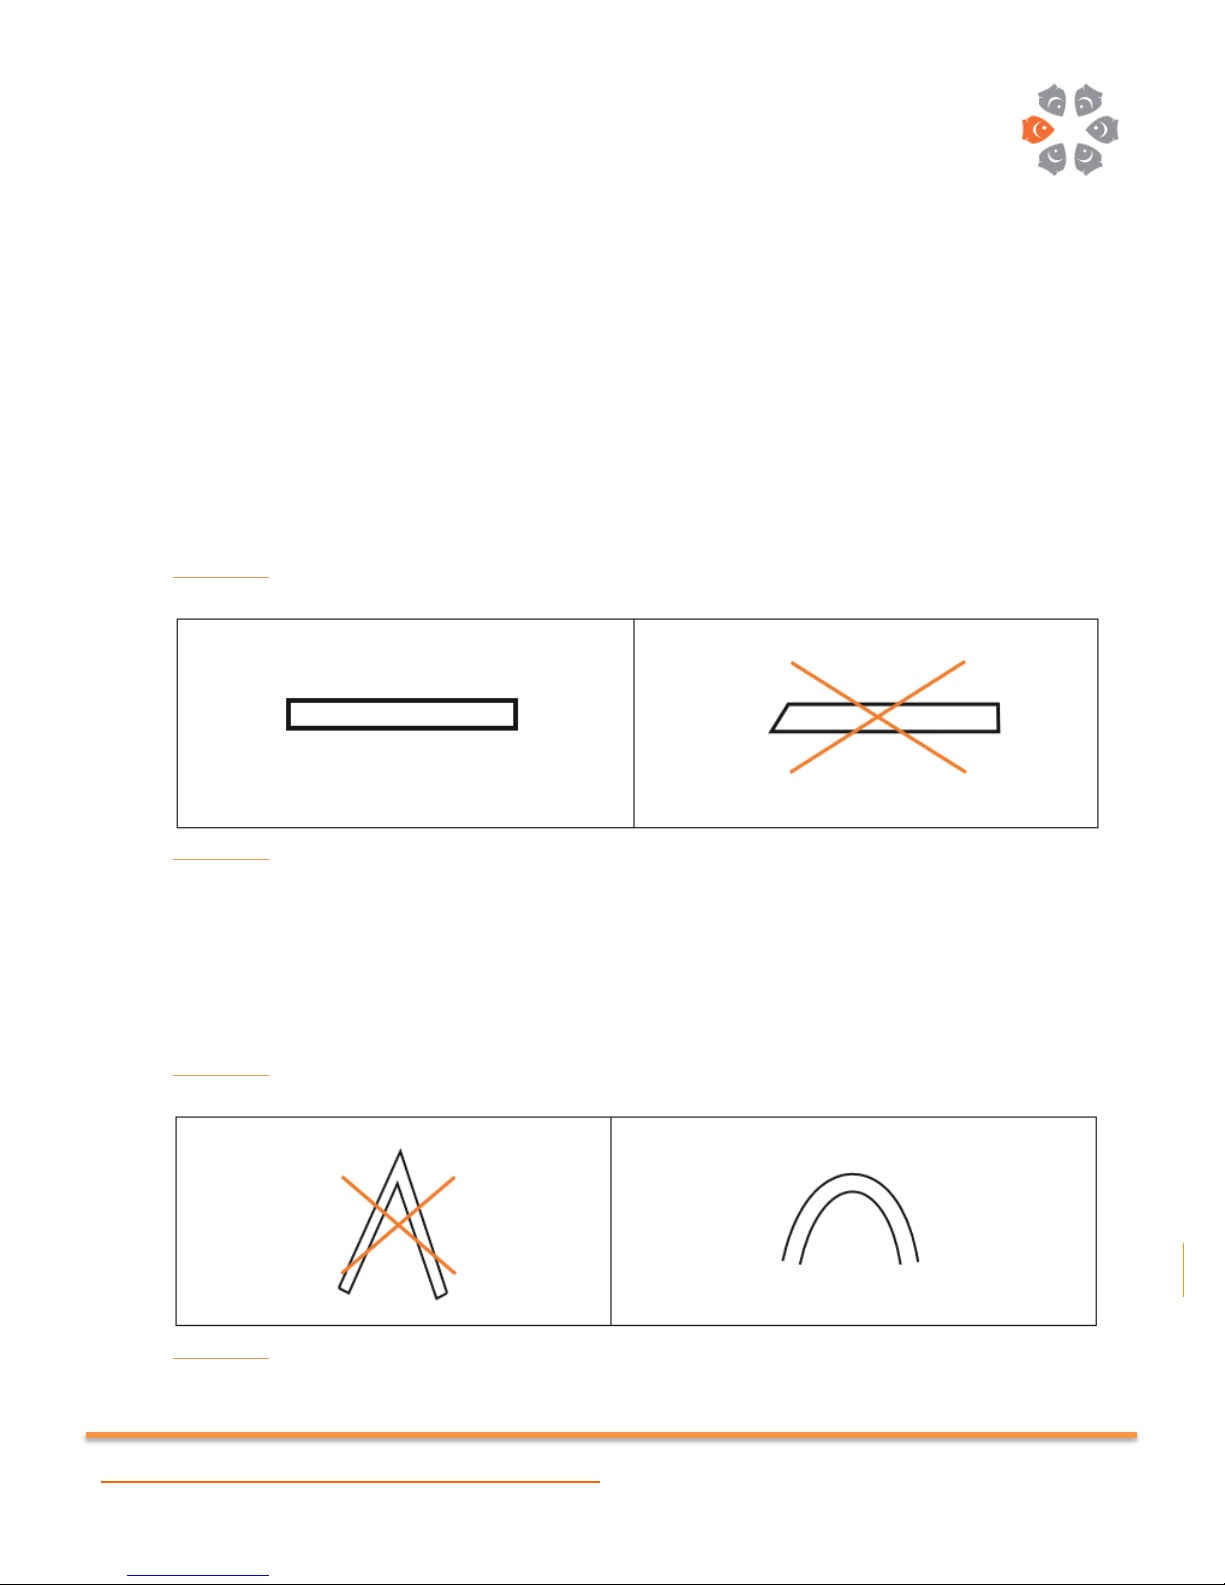
44- Use a sharp knife to cut the tubing in desired lengths. It is Imperative to cut the tubes with clean and
straight ends/ edges. Angled cuts will possibly be the cause of leaks immediately or after some time.
Diagram 2 exhibits how the tubes should be cut.
Diagram 2
45- When connecting the tubes to the fittings; insert the tube in and push firmly to make a tight seal. If not
pushed in properly the connection will leak. If you notice a leak from any Push to connect fittings; remove
the tubing, ensure that the cut is clean and firmly reinsert back into the fitting until the tube stops.
Avoid cutting the tubes too short or fold, tie or close the tubes. Closed tubing can pressurize the
chambers, damage the reactor, cause explosion and/ or significantly reduce performance.
Diagram 3 exhibits how the tubing must be looped in order to avoid blockages.
Diagram 3
Vertex™ Rx-C 6D Calcium Reactor / Instruction Manual © Vertex Aquaristik ™GmbH, Deutschland 2014
Page 7

Page
7
46- Diagram 4 exhibits how different chambers must be connected to each other:
Diagram 4
A- Primary Chamber
B- Top Secondary Chamber / Sub-Chamber
C- Bottom Secondary Chamber / Sub-Chamber
D- Gas Interface Chamber
E- Bubble Counter
F- Flow Meter
G- Needle Valve
H- Effluent Exit / Primary Chamber
I- PH Probe-Port
Vertex™ Rx-C 6D Calcium Reactor / Instruction Manual © Vertex Aquaristik ™GmbH, Deutschland 2014
J- Unused CO2 Recycle / Primary Chamber
K- Unused CO2 Recycle / Manifold
L- Source Water Input
M- CO2 Input / Manifold
N- CO2 Output / Bubble Counter
O- CO2 Input (Source) / Bubble Counter
P- Custom Sicce™ Syncra Pump
Q- Secondary Chamber’s Input
Page 8

Page
8
Operation:
Most Oceanic animals and plants require Calcium and Carbonate ions for many of their vital cellular functions
such as building skeletal mass, cell membrane functions…
Although there are different methods to replenish the said ions in a Marine Aquaria; Calcium Reactors remain to
be one of the easiest and more reliable methods to do so.
A Calcium reactor achieves this goal by injection of Carbon Dioxide into its main chamber and reducing the PH of
the water flowing through it. The reduced PH will dissolve the Media (CaCO3), breaking it into its building blocks
of Calcium and Carbonate Ions. Further to that, use of dolomite in a Calcium reactor can also accommodate your
system with a steady supply of Magnesium ions.
This document can serve as a brief guide as how to install, operate and maintain your reactor. If you are unsure
as how to operate or dial your reactor consult with a professional or other available resources. Improper
assembly, installation and/ or operation can cause serious damage to your system or loss of livestock.
There are 3 components to use and operate a calcium reactor; Media, Source Water and Carbon Dioxide.
A) Media:
I. Calcium Carbonate Media (Primary Media):
Different type of Media can be utilized in a Calcium reactor such as; “Dead Coral Skeleton”,
“Broken shells of different mollusks”…
Vertex Aquaristik™ only recommends the use of coarser media with a minimum Average particle
size of 12mm or larger in diameter. Smaller particle size media do break down much faster and
get compacted inside the reactor chamber which reduces the flow through the reactor
significantly. This in return increases the need for frequent maintenance and flow/ Co2
adjustment.
II. Magnesium Media (Secondary Media):
Magnesium being the third most abundant ion in seawater is required for many biological
processes of Oceanic Fauna and Flora. Most Conventional Calcium Carbonate Medias are devoid
of magnesium. However addition of dolomite to your calcium reactor will increase the
concentration of this ion in the effluent and therefore supply your system with this necessary
element.
Dolomite can be added to any of the reactor’s chambers. However it is imperative to acquire your
dolomite from a reputable source that guarantees purity and cleanliness of the material.
Dolomite is available in many different particle sizes, purity and or grades. We recommend the
highest grade dolomite available to you. DO NOT USE COMMERCIAL CONSTRUCTION GRADE
Vertex™ Rx-C 6D Calcium Reactor / Instruction Manual © Vertex Aquaristik ™GmbH, Deutschland 2014
DOLIMITE AS THE IMPURITIES OR PRESENCE OF HEAVY METALS WILL DAMAGE YOUR SYSTEM.
Page 9

Page
9
III. Phosphate Removers:
Phosphate being the building block of many organic compounds; is present in higher levels within
some Carbonate media, specially with crushed gastropod shells. This is one of the underlying
reasons as why Vertex™ only recommends coral skeleton (Coarse Media) instead of the
conventional smaller particle size media. Further to that it is imperative to acquire your absorber
from a reputable source that guarantees purity and cleanliness of the material.
To reduce the phosphate concentration of your effluent; it is possible to use phosphate absorbers
in your TOP secondary chamber’s Sub-chamber. Ensure that you are using proper media that will
not react with saltwater of lower PH range in a negative way. While the input saltwater can have
PH as high as 9; the effluent PH can drop to lower than 6, specially if the reactor is not dialed in
properly. In most cases Iron-Based absorbers are not suitable.
Tip: Always rinse your media with RO water prior to use. While not always necessary, it is best to soak
your media in RO water overnight. Doing so will reduce the chance of introducing any contaminants
to your system.
B) Carbon Dioxide:
As mentioned previously, Carbon Dioxide is required to dissolve the Calcium Carbonate Media.
Due to the fact that C02 is supplied in a pressurized container; it is imperative that you observe and follow
all safety precautions to allow presence of such equipment in your living, commercial… space.
Only use ¼” CO2-Safe tubing. Respect and follow local, state and Federal rules and guideline as how CO2
tanks and equipment must be handled, used, stored and/ or operated.
1- Connect your CO2 supply to the bubble counter. ( CO2-Safe tubing not Supplied)
2- Use CO2-safe tubing to deliver CO2 from the bubble counter to the reactor manifold.
Warning:
CO2 tanks may leak if improperly stored or handled. Carbon dioxide cannot be detected by the
human senses, as it has no taste, odor or visible appearance. Carbon dioxide replaces oxygen in
air, meaning that as a room fills with carbon dioxide, the air becomes less and less breathable.
Eventually, an undetected carbon dioxide leak can cause suffocation and death.
Another potentially dangerous situation is an overfilled tank. An overly full tank poses a serious
risk to anyone in the area. Depending on the tank size, its safety valve is designed to only handle
a certain amount of gas. When pressure exceeds the valve’s capacity, the valve will burst, causing
a leak and potentially injuring anyone nearby with shrapnel. Refill your CO2 bottle only at an
authorized dealer. The CO2 canister must be checked during each refill to ensure there is no loss
of structural integrity and/ or possible leak that can result in explosion.
Vertex™ Rx-C 6D Calcium Reactor / Instruction Manual © Vertex Aquaristik ™GmbH, Deutschland 2014
Page 10

Page
10
Like almost any pressurized gas, carbon dioxide runs the risk of explosion if the cylinder is pierced
or otherwise ruptured. This explosion may be limited to the immediate area around the cylinder,
but may also produce dangerous, and potentially deadly, metal shrapnel.
The improper use of, or an accident involving, a CO2 Canister can lead to serious physical harm.
Exposure to high pressure CO2 exiting the canister can cause painful burns and blisters on human
skin.
Chose the location of CO2 bottle carefully. Place it securely in a vertical position.
Do not expose the CO2 bottle to direct sunlight and/or any other heat source such as radiators…
Only use CO2-Safe tubing. (Not supplied)
Connect the regulator to your CO2 bottle using Teflon tape. Small amount of “Soap/Water”
mixture can be used on the regulator connections to detect any possible leaks in form of bubbles.
Only use good quality Needle-Valve, regulator and/ or Solenoid. If you are unsure as how to
install, operate, maintain or service your regulator or solenoid consult with the manufacturer.
Vertex Aquaristik™ cannot be held liable for any damages or loss of life that improper installation,
maintenance or operation of such devices can cause.
CO2 tanks, Regulators, Solenoids and/ or any other related devices must be installed, handled,
maintained and/or serviced only by qualified professionals. Improper install, maintenance,
operation or service can cause damage to your system, property, loss of livestock, bodily harm or
loss of life. Vertex Aquaristik™ cannot be held liable for damages caused by the use of a
pressurized gas tank systems with your reactor whether properly or improperly installed.
Consumer or operator accepts full responsibility of using CO2 or any other pressurized gas tanks.
Always think safety first.
C) Source Water:
There are different methods to supply a Calcium Reactor with Aquarium water such as “Gravity Fed” or
a “Pump”.
To gravity feed a calcium reactor simply place it under your tank and start the siphon through the feed
tube. Open the needle valve and prime the reactor. Once it has filled completely with aquarium water;
you can attempt to adjust the valve to desired setting.
Although this method is effective, it is not recommended. Gravity fed systems will require more
monitoring and maintenance due to reduction of flow once the media has been partially dissolved.
Utilizing a pump such as peristaltic dosing pumps, are more reliable. Once you have determined which
type of the metering device will be utilized; connect your pump to the system, open the needle vale and
allow the reactor to fill completely. Once the reactor is full with tank water you can attempt to dial the
flow through the reactor.
Vertex™ Rx-C 6D Calcium Reactor / Instruction Manual © Vertex Aquaristik ™GmbH, Deutschland 2014
Page 11

Page
11
Control:
There are different methods to Control and regulate operations of a Calcium Reactor. Vertex Aquaristik™
recommends the use of an Aquarium Controller or a PH controller. This will allow you to regulate and
monitor the amount of CO2 injected into your system through monitoring the PH in the main chamber.
The onboard Probe-Port on the primary chamber will allow you to place your PH probe in the primary
chamber. Ensure that the connection is properly tightened, do not pressurize the reactor as it can push
out the PH probe resulting in leaks, damage to property and your system’s inhabitants.
Depending to the type of media utilized and the reactor’s settings; the ideal effluent’s PH value could
vary from 6.3 to 7.2 PH.
Diagram 5 exhibits the relation between amount of gas injected, flow and PH value. However these
relations are not always linear and must be monitored and observed on each system individually.
Diagram 5
*Warning: A balanced relation and concentration between Calcium and Alkalinity is required and while
the points above apply, they are all affected if one value is reduced or increased. Explaining as how an
equilibrium can be reached is out of the scope of this document. Further to that concentration of other
ions such as Magnesium will affect the concentration of other said soluble ions such as Calcium and
Carbonate.
Starting your Reactor:
Now you are ready to start your reactor. To do so simply follow the steps below:
I- Chose the reactor’s location carefully. A calcium reactor requires periodical monitoring,
maintenance and media refill.
II- Ensure that all the O-Rings are properly seated.
III- Ensure that all the connections, unions, screws… are properly tightened.
IV- Ensure that your gas tank, regulator, solenoid, needle valve… is properly assembled, safe and
leak free.
Vertex™ Rx-C 6D Calcium Reactor / Instruction Manual © Vertex Aquaristik ™GmbH, Deutschland 2014
Page 12

Page
12
V- Open the Calcium Reactor’s Needle Valve fully and then turn on your metering pump. Supply
the reactor with Aquarium water, once filled reduce the flow-through rate to a minimum by
adjusting the needle valve.
VI- You must now turn on the Calcium Reactor’s pump, this pump will stay on at all times.
Ensure that there is enough length of wire to have a drip-loop. When electrical devices are
operated in close proximity of water, drip-loops become more so important due to the
possibility of splashing, moisture creep… DO NOT IGNORE THIS WARNING! As always your
safety is our number one concern.
VII- Wait until the water inside the reactor clears and the reactor is free of air. Some small
amount of bubbles can be present. Do not be alarmed, in time this will subside.
VIII- Adjust the water flow exiting the reactor. The optimal Effluent flow rate depends to your
system’s Calcium/ Alkalinity consumption. However for initial set up; we recommend to set
the valve to allow about 180ml/min or roughly 30 drops/min of flow. Do not flow too much
water through the reactor to start, this can raise the alkalinity in your aquarium and drop pH
too quickly which could be harmful to the inhabitants.
Caution: Always start at low output and allow a few days to bring the reactor to its maximum desired
output level. The recommended flow guidelines in this document should only be used as a marker.
Every system is different and without considering all the factors such as size, consumption levels… it
is impossible to make a proper assessment of what the optimal flow rate and CO2 Volume for your
system would be. Test your Effluent and Aquarium water frequently and adjust your system to reach
desired levels.
IX- Start the flow of Co2. Start with 30 bubbles per minute or less depending to flow rate, system
size and consumption.
X- Adjust your PH Controller to desired value depending to the media utilized and other involved
factors.
XI- Plug your CO2 Solenoid to your PH or Aquarium Controller.
Tip: Calibrate your PH Probe and controller at least once every 20 days. Refer to the manufacturer’s
guidelines for optimal calibration regiment and use.
XII- Allow the reactor to run for a few hours, test Aquarium pH value to make sure it does not fall
below 8.
XIII- Adjust the flow and CO2 bubble-count to achieve the desired PH Value.
XIV- Measure the effluents Carbonate hardness after 6 hours of operation. This value could be
between 10 to 20 dKH. You must adjust this value to what is desired by your tank inhabitants.
XV- Measure your system’s pH Value, Calcium and Alkalinity.
Vertex™ Rx-C 6D Calcium Reactor / Instruction Manual © Vertex Aquaristik ™GmbH, Deutschland 2014
Page 13

Page
13
XVI- Make proper adjustment to flow and volume of Co2 injected based on your Aquarium’s
consumption rate.
XVII- During the first few days of initial set up; it is imperative to monitor your Aquarium’s pH,
Calcium, Magnesium and Alkalinity values frequently to avoid any possible harm to the
inhabitants due to any sudden parameter swings.
XVIII- After making adjustments to the reactor, it should be left for a few hours to allow the changes
to take effect and the system to reach equilibrium.
XIX- Make any adjustments only in small increments.
Maintenance:
Your Vertex™ Calcium Reactor can be fully disassembled for thorough maintenance. A flathead screw driver is
required to perform this task. In order to disassemble your reactor simply follow these steps:
1- Unplug the reactor; never touch electrical outlets with wet hand. Do not attempt to service or
disassemble an electrical device when connected to electricity and/ or in operation.
2- Unplug your metering pump or gravity fed valve to stop flow of Aquarium water through the reactor.
3- Remove the tubes from the Quick-Connect fittings. Using a small Bucket, drain the tubing to avoid any
spillage.
4- Remove your reactor from its environment one chamber at a time.
5- Follow the assembly guide in reverse to disassemble your reactor fully.
6- Now you can clean, service or refill your reactor.
7- To put back in operation; simply follow the assembly section of this manual.
Disassembling your pump for decalcification, removing any possible debris from pump-head and/ or any other
service can be achieved following the steps below:
1- Remove the pump from the reactor following the instructions provided in this guide in reverse.
2- Hold the shaft using a dry cloth and remove it from the motor block.
Caution: The magnet used in this product is extremely powerful. Ensure that your fingers are not
placed in between the impeller and the pump block. Jumping magnet can pose a pinch hazard. Further
to that allowing the Impeller assembly to jump into the Motor-Block can damage the shaft and/or
Bearing. Insert the Impeller into the Motor-Block gently and assure it is in the right position.
The pump is now fully disassembled and can be cleaned using clean water or a VERY mild solution of Acetic Acid
(Household white vinegar). Ultimately for thorough cleaning; the pump could be placed in this solution overnight.
Using strong Acidic mediums or household cleaning solutions can possibly damage your pump casing, internal
parts and/ or reactor. If an acidic solution is used; it is imperative to clean all parts with Luke warm water before
Vertex™ Rx-C 6D Calcium Reactor / Instruction Manual © Vertex Aquaristik ™GmbH, Deutschland 2014
Page 14

Page
14
assembling and putting the unit back in operation. For any further maintenance of the Sicce™ motor block simply
refer to the Sicce™ manual supplied.
*Useful Tips:
Before reassembling the pump; ensure the inner motor-block’s bearing inside the pump is properly seated.
Further to all the instruction above on how to disassemble the reactor body and pump the following
maintenances are recommended to be performed from time to time or when necessary:
Apply a small amount of food-grade silicone lubrication to O-Rings
Apply a small amount of food-grade silicone lubrication to the Bayonet’s Screw-side
Inspect for any blockage in the tubes or the reactor.
Check your reactor often, the valves, push to connect fittings, tubing, flow meter and other parts can
quickly become blocked with deposits, causing a buildup of CO2 inside the unit.
The size of the drops on each brand of reactor will be different and irregular. For this very reason
Vertex™ utilizes a miniature flow meter allow betting monitoring of Effluent’s flow rate. However
due to the small amount of flow monitored, the meter requires up to 100 seconds to display the
proper flow rate after each adjustment. The flow rate is significantly affected by temperature and
specific gravity of water. (An estimation of accuracy without considering actual water temperature,
specific gravity and other factors is approximately +/- 11%)
Tip: Although the Flow meter can be used continuously; it is recommended to bypass the flow meter
after the initial set up has been completed. Calcium Reactor Effluent can cause rapid calcification.
There are also small particles present in the effluent that can block the meter. If used continuously
the meter WILL require more frequent cleaning/ maintenance regiment. To bypass the Flow meter
simply disconnect it from the system and deliver the effluent to your system right after the onboard
needle valve. For future adjustments you can simply reinstall the meter in seconds. If disconnected
from the system it is best to be placed in clean RO Water or cleaned properly to store.DO NOT
DISSASEMBLE THE METER. To clean the meter; place it in a VERY mild solution of Acetic Acid
(Household white vinegar) overnight and then clean with RO water. DO NOT USE STRONG ACIDS OR
HOUSEHOLD CLEANING CHEMICALS.
Having multiples of failsafe is always the best method to ensure the health of your system. If possible
we recommend monitoring the PH at 3 points:
1- Aquarium water
2- Primary Chamber
3- Last stage Effluent
This ensure proper monitoring and maintenance of PH and other parameters of your tank.
Vertex™ Rx-C 6D Calcium Reactor / Instruction Manual © Vertex Aquaristik ™GmbH, Deutschland 2014
Page 15

Page
15
Warranty, Service and Conditions:
Vertex™ Rx-C reactors carry a two-year limited manufacturer warranty. Parts and/ or components damaged due
to misuse, improper installation or normal wear & tear will not be covered under warranty. Vertex Aquaristik™
deserves the right to warranty products based upon inspection. If any damages occurred were deemed to be
caused due to any of the following reasons (but not limited to), they will not be covered under warranty:
Excessive Calcification
Improper assembly of the reactor
Improper assembly of the CO2 System
Custom modifications
Running the pump dry
Use of impure or improper media
Procedures other than noted in this
guide.
Cutting the pump cable to use other plug
types
Improper dialing of the Reactor
Physical damage or what caused by negligence
Improper electrical voltage and/ or frequency
Using parts and components other than supplied by Vertex and/ or utilized in the original design.
All warranty related issues should be handled at the point of purchase location by trained staff. Please
contact your dealer for warranty and/ or any other service/ maintenance the unit might require.
Pay attention to all the warnings and pointers noted in this guide and use common sense. To avoid
damage to property, livestock and/ or personal injury please follow all these instruction and/or consult
with a professional. Vertex Aquaristik™ will not be held liable for any damages the misuse,
modifications and/ or improper installation of this unit may cause.
Further to all the above, due to the fact that this device requires a pressurized gas tank to operate which
requires scheduled inspections, monitoring and adjustment only by authorized professionals; Vertex
Aquaristik™ cannot be held liable for any damages included but not limited to loss of livestock, damage
to property or loss of life caused by our product used in combination with a pressurized CO2 system. It
is humanly impossible to assess what has been the final cause of a disaster should one occur due to but
not limited to; explosions, leaks, fires, metal shrapnel, CO2 Poisoning, CO2 Burns or any type of CO2
exposure, asphyxiation, exposure to high Alkaline effluent or any other reason perceived or determined
to be caused by our product or the CO2 canister and its related devices used for CO2 injection.
If you cannot agree to the above terms and conditions, do not install or use this device, keep your
original packaging as well as proof of purchase and contact your dealer for a refund. Vertex Aquaristik™
will not issue refunds directly to the consumer and rather issues a credit to the retailer or the wholesaler
who has purchased the said product from Vertex Aquaristik™ for the amount the device was purchased
for. There will be no refund issued for used, installed or inferior than new condition products.
Vertex™ Rx-C 6D Calcium Reactor / Instruction Manual © Vertex Aquaristik ™GmbH, Deutschland 2014
Page 16

Page
16
For additional information regarding this and/ or any other Vertex Aquaristik™ products, please either
consult with your dealer or any of the following resources:
Website: www.vertexaquaristik.com
E-mail: info@vertexaquaristik.com
By Phone:
Global: +49 (0)2234 – 99366-0
Monday-Friday 9am to 5pm UTC
Americas: +1 (604) 278-1474
Monday-Friday / 9am to 5pm PST
By Mail:
Vertex Aquaristik GmbH
#19A Max-Planck Street
Cologne, Germany, 50858
Vertex™ Rx-C 6D Calcium Reactor / Instruction Manual © Vertex Aquaristik ™GmbH, Deutschland 2014
 Loading...