

Page 1

VERTEX
Water Products
™
PureWaterCooler
Water Dispenser
OWNERS INSTALLATION
MANUAL
Countertop Models
PWC-40 F
PWC-4
VERTEX WATER PRODUCTS
Montclair, CA - USA
0
Page 2

Table of Contents
Page
1.0 Introduction 1
2.0 Receiving 1
3.0 Product Description 2
4.0 Installation 5
5.0 Operation 9
6.0 Filter Replacement 12
7.0 Trouble shooting guide 13
8.0 Warranty 14
9.0 Specifications 15
List of Figures
Fig. 1 PWC 450 Assembly 2
Fi
g. 2 Flow Schematic 3
Fig. 3 Back View of Cooler 4
Fig. 4 Installation Precaution 5-6
Fig. 5 Saddle Valve 7
Fig. 6 Quick Connect Fittings 8
Fig. 7 Control Panel 9-10
Fig. 8 Tank Drain 11
Page 3

1.0 Introduction
The Vertex PureWaterCooler™ products are a means to produce
good-tasting, safe water without using bottles of stored water. The model PWC
450 described here is made for counter top use. Its low height permits it to fit
under cabinets.
Please read all the instructions in this manual before operating the PureWater-
Cooler™.
2.0 Receiving the Cooler
2.1 Unpacking
The PureWaterCooler™ is shipped completely assembled in a dou-
ble carton. Remove the top of the box and slide the cooler out. Save the box
and packing materials for use in the event of a return.
2.2 Inspection
Inspect the cooler for obvious shipping damage. Look at the exterior
panels to see if they are dented or damaged.
1
Page 4

3.0 Description
3.1 Assembly
tw
This water is cooled in the holding tank with refrigerant coils. There is a separate hot water tank with an internal heater coil which is fed by water pressure
directly from the line in. The hot water tank is directly beside the cold water
tank. The compressor and expansion valve are inside the cabinet. The controls
for the cooler are on the front panel. See Figure 2 for Flow Schematic.
Screws
The PWC 450 assembly drawing is shown in Figure 1. The cooler has
o tank
s. There is a main holding water tank that hold one gallon of water.
Figure 1. PWC 450 Assembly
2
Page 5
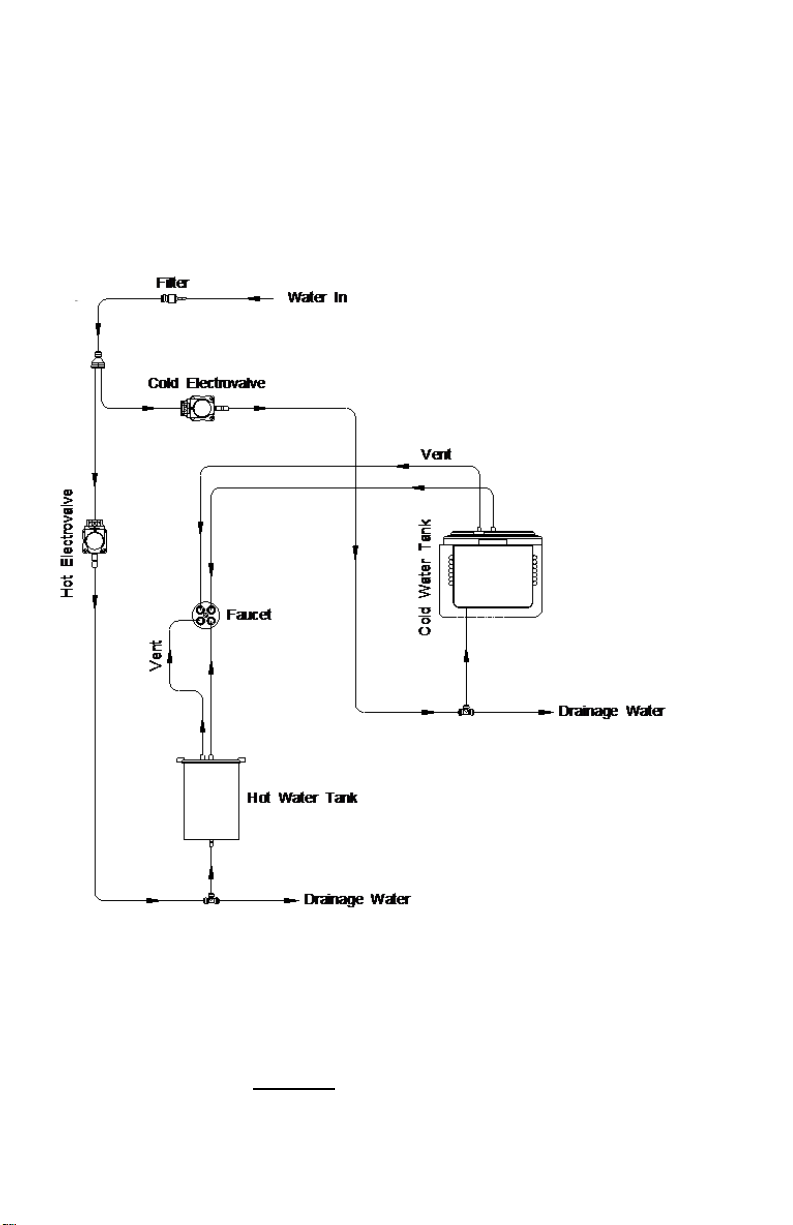
Figure 2.
Flow Schematic
3
Page 6
2 Rear View
3.
On the back of the cooler are the main power switches; one for heating and one for cooling. When heating or cooling is occurring, indicator lights on
the front panel will turn on. The hot temperature is fixed at a nominal 180°F
and is controlled with a thermostat mounted on the outside of the hot tank. The
cold temperature can be adjusted between 36°F and 54°F by a using a screw
driver on the slot on the back. Turn to the left to increase warmth and to the
right to increase cold. DO NOT TURN PAST THE STOPS. There is a cooling
fan which exhausts to the rear, so a clearance of 6-inches from a wall is required.
Hot Power Switch
Col
d Power Switch
C
r
o
l
d
e
r
Cold Water
Tem
perature adjust
W
e
m
r
a
Cooling Fan
Feed Water
et Port
Inl
Drain Line (Cold Tank)
Drain Line (Hot Tank)
Figure 3.
Back View of Cooler
4
Page 7

4.1 Positioning the Cooler
There are some precautions to take when positioning and using the
u
reWaterCooler™. See the items in Figure 4a and 4b. In addition, the
P
cooler must be located near the supply water. Flexible 1/4-inch plastic tubing
may be used for the feed connection. Normally, this connection should be
within 25-feet of the cooler.
Important Note: Do not cover air intake vent as this will prevent proper chilling
from occurring.
4.0 Installation
6
i
n
4
Keep at least a 6 in. distance between the cooler and the wall.
Figure 4a.
Air Intake
Intake
Vent
vent
n
i
Installation Precautions
5
Page 8

Do not place cooler next to
oven or dishwasher. Keep
out of direct sunlight.
Be sure to use correct power
voltage. Plug power cord
directly into electrical socket.
Figure 4b. Installation Precautions
4.2 Cooler Water Connections
When received, the water connections on the back have color coded
ctions with red shipping caps on them. These tube sections must be
tube se
removed before making water connections. To remove the tube sections see
Figure 7. The 1/4” plastic tubing should be used for making the Feed Water. If
hard copper tubing is used for the Feed Water and Drain connections, the bulkhead fittings must be changed to a metal fitting.
4.3 Feed Water Connections
To connect the feed water, used the supplied self-piercing saddle
valve to connect to the cold water supply line under the sink. Attach the 1/4”
tubing to the compression fitting on the side of the valve. Clamp the saddle
valve over the copper or plastic feed line (cold water only). Turn the handle on
the valve until the needle stem pierces the tube. Then retract the needle 1-2
turns to start water flow. See Figure 5.
6
Page 9

Figure 5. Saddle Valve
7
Page 10

4.5 Quick Connect Fittings
The standard tubing connections on the PureWaterCooler™ are of
Quick Connect 0-ring seal design and manufacture. Use the tubing and follow
the instructions below to make the connections. If you cut the tubing make sure
it is a square cut, fits squarely in the fitting, and seals properly.
i
gure 7.
F
Quick Connect Fittings
8
Page 11

5.0 Operation
5.1 Start Up
a. The PWC 450 Cooler is shipped to you complete and ready to operate.
Connect all tubing according to instructions.
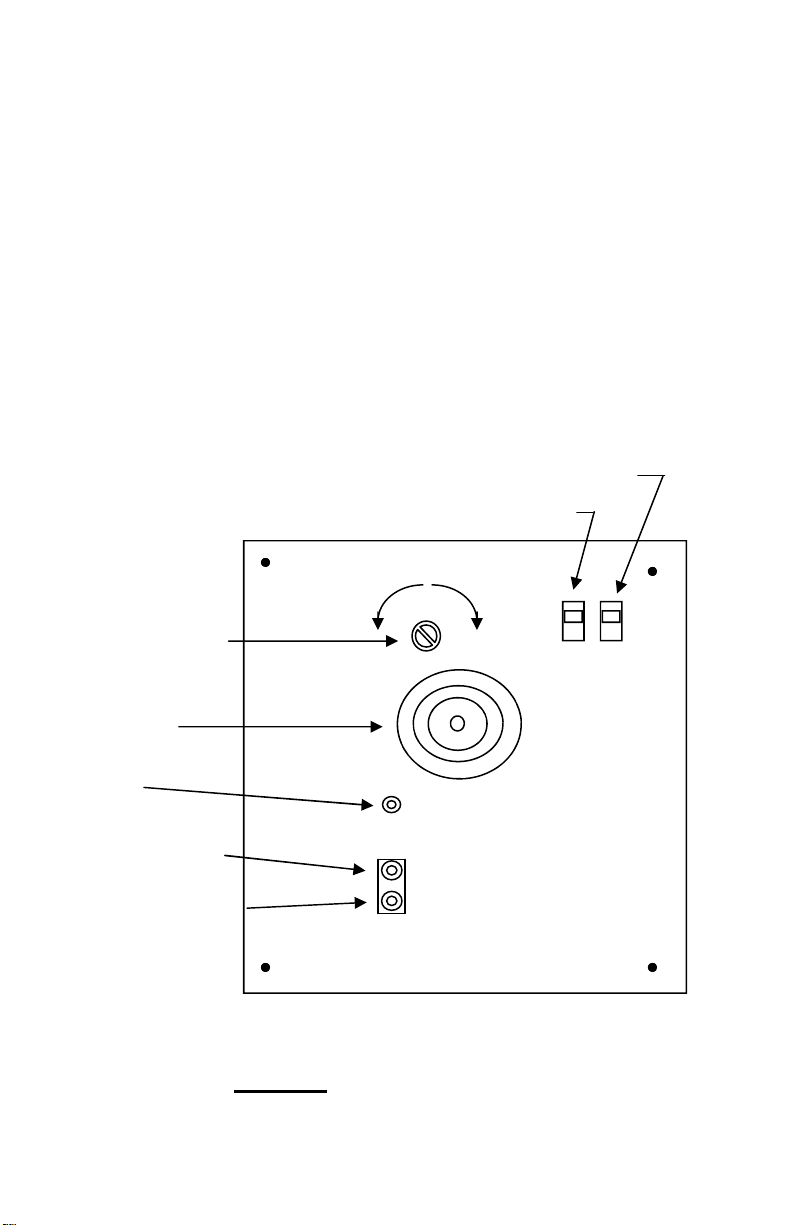
b. Make sure Cold and Hot power switches at back of cooler are OFF before
plugging the cooler into 110-volt wall socket. (See Figure 7a)
Figure 7a. Hot/Cold Power
Switches
c. Plug in power cord. For the “F” model with built in filtration access filter assembly by removing RHS panel (remove 2 the panel screws from back), open blue
handled service ball valve, then press and hold the cold water dispense button on
the front panel of the cooler. Water will dispense after about 3 minutes.– NOTE:
The initial water dispensed may look grey or black : Continue to dispensing
water until flow is clear thus Flushing the unit and filters of any possible
carbon fine residual.
d. To fill the hot tank with water, first press and hold the lock button on the front
panel of the cooler. A beep sound will be heard after 1 second indicating that the
hot button has been unlocked. Within 5 seconds of the beep, press and hold the
hot water dispense button for about 2 minutes until water is dispensed.
e. Turn on hot and cold switches on the back of the cooler. Heating and cooling
will start.
f. The temperature of cold water is set at midpoint at the factory. Using a flat
screwdriver, the temperature can be adjusted by turning the temperature control
slot Clockwise for colder and Counterclockwise for warmer (See Figure 3).
CAUTION: If you turn the COLD POWER button off, wait at least 3 minutes
before turning on again to protect the compressor from damage.
9
Page 12

Figure 7b
. Control Panel
10
Page 13

5.2 Tank Drain
Occasionally, it may be desirable to drain both tanks. There are drain
plugs on the back of the cooler. See Figure 8. First, make sure all power is off.
The cooler must be moved so that the water can be drained into a container to
collect the water (about 1 1/4 gal). Remove the cover on top of the hot and
cold water drain.
Figure 8.
Tank Drain
11
Page 14

.0 Filter Replacement
6
The filter elements must be replaced at regular intervals to maintain the quality of
the water.
The “F” Model 450F has 2-stages of mechanical filtration. A 1st stage 5micron sediment filter and a 2nd stage activated carbon filter. Both stages must
be replaced every 6-12 months.
7.1 Sediment and Carbon Filter Replacement Procedure
a. Unpl
b. To access the filter compartment, remove the two screws that secure the
right side panel.
c. Close Service ball valve (blue handle) by turning valve handle perpendicular
d. Place a pan under the filters to catch water. The filters will have water in
them which will run out when the tubing connections are broken.
e. Disconnect tubing–inlet and outlet for each of the 2-filters. (see sec. 4.5)
f. These filters are disposable, encapsulated filters. Remove and discard en -
tire filter body. Replacement filters are:
1st Stage sediment filter P/N IFA-4035
2nd Stage carbon filter P/N IFA-4034
g. Place new filters in the plastic holding clips. Make the tubing connections into
the fittings. BUT DO NOT CONNECT THE OUTLET TUBING OF THE 2ND
STAGE CARBON FILTER.
h. Open ball valve and let water flow through filters into a bucket or pan to push
out air and any carbon fines. When water runs clear, turn off ball valve and
connect 2nd stage filter to outlet line .
i. After all connections are made, turn on ball valve and water flow to the water
dispenser will resume. Wait a few minutes to assure there are no leaks.
Replace side panel..
ug the cooler from the wall socket.
to flow tubing.
12
Page 15

7.0 Trouble Shooting Guide
Problem Cause Solution
el Not Lit No Power
Pan
l Not Cool
Wil
Cold Water is Not
Cold Enough
No Hot Water
Controls Not Set
Thermostat in rear
Unit is too close to wall so
cooling fan isn’t effective
Refrigerant has leaked
No Power
Temperature control sensor faulty
• Check that power cord is plugged
in.
• Turn on cold power switch on back
• Turn to right about 1/2 turn for
colder water
• Move unit 6 inches away from wall
• Make sure intake vent is not
blocked
• Contact dealer
• First, check that front “Hot” light is
lit. If not, turn hot power switch on
back.
• Thermostatic controller on hot tank
may not be functioning.
• Check with dealer.
t Shut Off
Uni
Panel Not Lit
Water Won’t
Come Out of
Spigot
No Power
No Power
• Check that power plug is in.
• Check hot/cold power switch is on.
• Check that power cord is plugged
in.
13
Page 16

-18-
8.0 Specifications
Conforms to UL STD.399
PWC-450
- 14 -
Model No.
Voltage/Frequency
Dimensions
Weight (empty)
Hot Water Tank Capacity
Cold Water tank Capacity
Power Consumption
Electric Power Cord Length
KWS-450
AC110V
(L) 16 x (W) 13 x (H) 16 1/2
42 lb.
.25 gal.
1.0 gal.
Hot Water: 500W
Cold Water: 100W
6Ft.
Page 17

Vertex Water Products (“Manufacturer”) sell its products through independent retailer dealers (“Dealer”)
- 15 -
LIMITED WARRANTY
who re-sell to the end-user customer. In this limited warranty, “Vertex” refers to Vertex Water Products and
not to the Dealer.
WHO IS COVERED BY THIS WARRANTY
This limited warranty covers only the rst purchaser of the Vertex PureWaterCooler™ from a Dealer for
use by that purchaser, and is not transferrable. “Consumer Use” means personal residential household use
by a consumer or consumers. “Commercial Use” means all other uses, including (but not limited to) use for
commercial, income producing purposes and/or when purchased by a business and/or when purchased for use
in an ofce, business, or industrial setting. “Purchaser” means the end-user customer, and not a Vertex re-seller
Dealer.
PERIOD OF COVERAGE OF THIS WARRANTY
Manufacturer warrants the complete water cooler (“the unit”) against defects in material and workmanship,
subject to the exclusions described below, for a period of ONE YEAR, beginning on the later of either
(a) the date of purchase or (b) the date of manufacture as identied by the Vertex unit’s serial number.
Manufacturer additionally warrants the compressor for a period of THREE YEARS from the above date.
The purchaser must provide the original sales receipt as proof of the date of purchase. If the purchaser is
unable to produce the original sales receipt, the Warranty Period commencement date will be determined
by Manufacturer, in its sole and absolute discretion, based upon the unit’s serial number. This warranty
does not apply if the original serial number afxed by Manufacturer is removed, defaced, altered, obscured,
tampered with, or obliterated. If Manufacturer provides a replacement part or parts, or repairs a part or
parts, under this limited warranty, then the replacement part(s) or repaired part(s) will be covered under this
limited warranty for the time remaining under the original Warranty Period applicable to the part(s) repaired
or replaced.
The duration of ALL OTHER WARRANTIES, INCLUDING ANY AND ALL IMPLIED
WARRANTIES, INCLUDING BUT NOT LIMITED TO MERCHANTABILITY AND
FITNESS FOR A PARTICULAR PURPOSE, ARE RESTRICTED TO THE TWO-YEAR
LIMITED WARRANTY PERIOD. Some states do not allow limitations on how long an implied
warranty lasts, so the above limitation may not apply to purchaser.
WHAT IS COVERED BY THIS WARRANTY
This limited warranty covers defects in materials or workmanship, subject to the exclusions below and for
the time period stated above. Manufacturer promises to repair or to replace, at Manufacturer’s sole and
absolute discretion, any part of this water cooler that proves to be inoperative due to a defect in material or
workmanship under normal use.
WHAT IS NOT COVERED BY THIS WARRANTY
This limited warranty does not extend to and expressly excludes:
• conditions, losses, malfunctions, or damages not resulting from defects in material or workmanship;
• conditions, malfunctions, losses, or damages or the inability to operate the Vertex unit resulting from
conditions beyond Manufacturer’s control, including but not limited to failure of the unit or any of its
parts due to damage caused by: improper installation; accident; re; ood; windstorm; acts of God;
rodent and/or insect infestation; vandalism; modication; alteration; combination with any other device
or machine; abuse and/or misuse of the unit; negligence by purchaser or third parties; any part of the
water system that has become fouled due to liming, dirt, unsatisfactory/unsanitary water conditions,
corrosion, or faulty plumbing; failure to install, maintain, assemble, mount or place the Vertex unit in
accordance with Manufacturer’s instructions and/or local, state, or national plumbing and electrical
codes; wear and tear expected to occur in the normal course of use, including but not limited to cosmetic
rust, scratches, dents or comparable and reasonably expected losses or damages; exposure to extreme
variations in ambient environmental conditions (including but not limited to changes in heat, humidity,
moisture, or exposure to sunlight).
• labor for installation or deinstallation of the unit or any of its parts; shipping of the unit or any of its parts
to Manufacturer for repair/replacement.
In addition to the above exclusions, this limited warranty does not apply if any of the following conditions
of operation are not met: System Pressure 35 - 100 psi, Temperature 40 - 100 degrees F, PH range 4 - 10,
Max TDS 1500 PPM Max., Turbidity <1.0NTU, Hardness <20gpg, R version: <3.5 gpg, F version, Iron
<0.1 mg/l, Manganese <0.1 mg/l, Hydrogen Suld e <0.00 mg/l.
Page 18

NO OTHER EXPRESS OR IMPLIED WARRANTY APPLIES
- 16 -
This limited warranty is the sole and exclusive warranty provided to the purchaser identied above. No
other express warranty, written or verbal, applies. No agent, employee, deal or other person or entity
is authorized to alter this limited warranty or make any other warranty on behalf of Manufacturer. The
terms of this limited warranty shall not be modied by the Manufacturer, the purchaser/end user, or their
respective successors or assigns.
WHAT WE WILL DO TO CORRECT PROBLEMS/ HOW TO GET WARRANTY PARTS
If the Vertex unit does not operate in accordance with the documentation provided to purchaser, or purchaser
have questions concerning purchaserr Vertex unit, please contact the Dealer from whom the unit was
purchased. If the original Dealer is not available or the purchaser does not know who the Dealer is, please
call or email the Manufacturer, Vertex, using the contact information provided below. We will try to nd
a Dealer in purchaserr geographical area to assist purchaser. If a Dealer cannot be conveniently located,
the Manufacturer, in its sole and absolute discretion, may offer two (2) options. First, we will attempt to
troubleshoot the issue with purchaser over the phone. If the purchaser is comfortable making a repair/
replacing a part, once we understand the problem and its solution, we will send the replacement part(s) for
the cooler. This warranty is for the replacement of part(s) ONLY; it does not cover the cost of labor
for either the Dealer or the end user/purchaser. The second option is that the end user/purchaser may,
after notifying Manufacturer and receiving written authorization/approval from Manufacturer to do so,
send the unit back to Manufacturer and we will repair it. The end user purchaser must pay the freight/
shipping costs to return the unit to Manufacturer. Manufacturer will pay the freight/shipping to return
the unit to the end user/purchaser following repair.
If the end user/purchaser contacts the Dealer and the Dealer repairs the unit pursuant to this limited
warranty, Manufacturer will provide parts to the Dealer at no charge; labor is not included in this limited
warranty.
The Dealer may, in his or her sole and absolute discretion, decide to repair the unit on-site or take the unit to
a shop to repair.
This limited warranty covers replacement or repair of parts only. Manufacturer will not replace the entire
unit if a part can be replaced or repaired to restore the unit to full operational function. On the rare occasion
that a unit cannot be restored to full operation by a part or parts, Manufacturer will replace the unit after the
end user/purchaser has shipped the unit to Manufacturer and Manufacturer has determined, in its sole and
absolute discretion, that the unit cannot be repaired and must be replaced. The end user/purchaser must
pay the freight/shipping costs to return the unit to Manufacturer. Manufacturer will pay the freight/
shipping to return the unit to the end user/purchaser following repair or will ship a new unit if repair is not
possible. If Manufacturer does provide a replacement unit, then the Warranty Period (as specied above) for
the replacement unit would begin at the time of its delivery to the end user/purchaser.
LIMITATION OF LIABILITY AND DISCLAIMER OF WARRANTIES
TO THE EXTENT PERMITTED BY LAW, IN NO EVENT SHALL MANUFACTURER BE LIABLE
TO PURCHASER OR ANY THRID PARTIES FOR ANY INCIDENTAL, SPECIAL, INDIRECT,
OR CONSEQUENTIAL DAMAGES, INCLUDING ANY ECONOMIC LOSS, WHETHER
RESULTING FROM NON-PERFORMANCE, USE, MISUSE, OR INABILITY TO USE THE
VERTEX UNIT. MANUFACTURER SHALL NOT BE LIABLE FOR DAMAGES CAUSED BY
DELAY IN PERFORMANCE AND IN NO EVENT, REGARDLESS OF THE FORM OF THE
CLAIM OR CAUSE OF ACTION (WHETHER BASED IN CONTRACT, WARRANTY, TORT,
INFRINGEMENT, NEGLIGENCE, STRICT LIABILTY, OTHER TORT OR ANY OTHER LEGAL
THEORY) SHALL MANUFACTURER’S ENTIRE LIABILTY EXCEED THE PRICE PAID BY THE
ORIGINAL PURCHASER FOR THE VERTEX UNIT. THE TERM “CONSEQUENTIAL DAMAGES”
SHALL INCLUDE, BUT NOT BE LIMITED TO, LOSS OF ANTICIPATED PROFITS, BUSINESS
INTERRUPTION, LOSS OF USE OR REVENUE, COST OF CAPITAL, OR LOSS OR DAMAGE TO
PROPERTY OR EQUIPMENT.
Contact information:
Vertex Water Products 5138 Brooks Street Montclair, California 91763
800-627-2146 www.vertexwater.com email: inquiries@vertexwater.com
Page 19

VERTEX WATER PRODUCTS, Montclair, Calif.
PWCM-2 Rev. F 06/08
Copyright 2008 VERTEX INDUSTRIALS, INC.
PWCM-3 08/09
Copyright 2008 VERTEX INDUSTRIALS, INC.
 Loading...