

Page 1
Vertex™ Omega 150 Instruction Manual ©Vertex Aquaristik ™ 2018
Page - 1 -
Vertex™ Omega 150 Protein Skimmer
Thank you for your purchase of the Vertex™ Omega 150 protein skimmer. Please be sure to read and
follow this brief guide to ensure proper install and operation of your device.
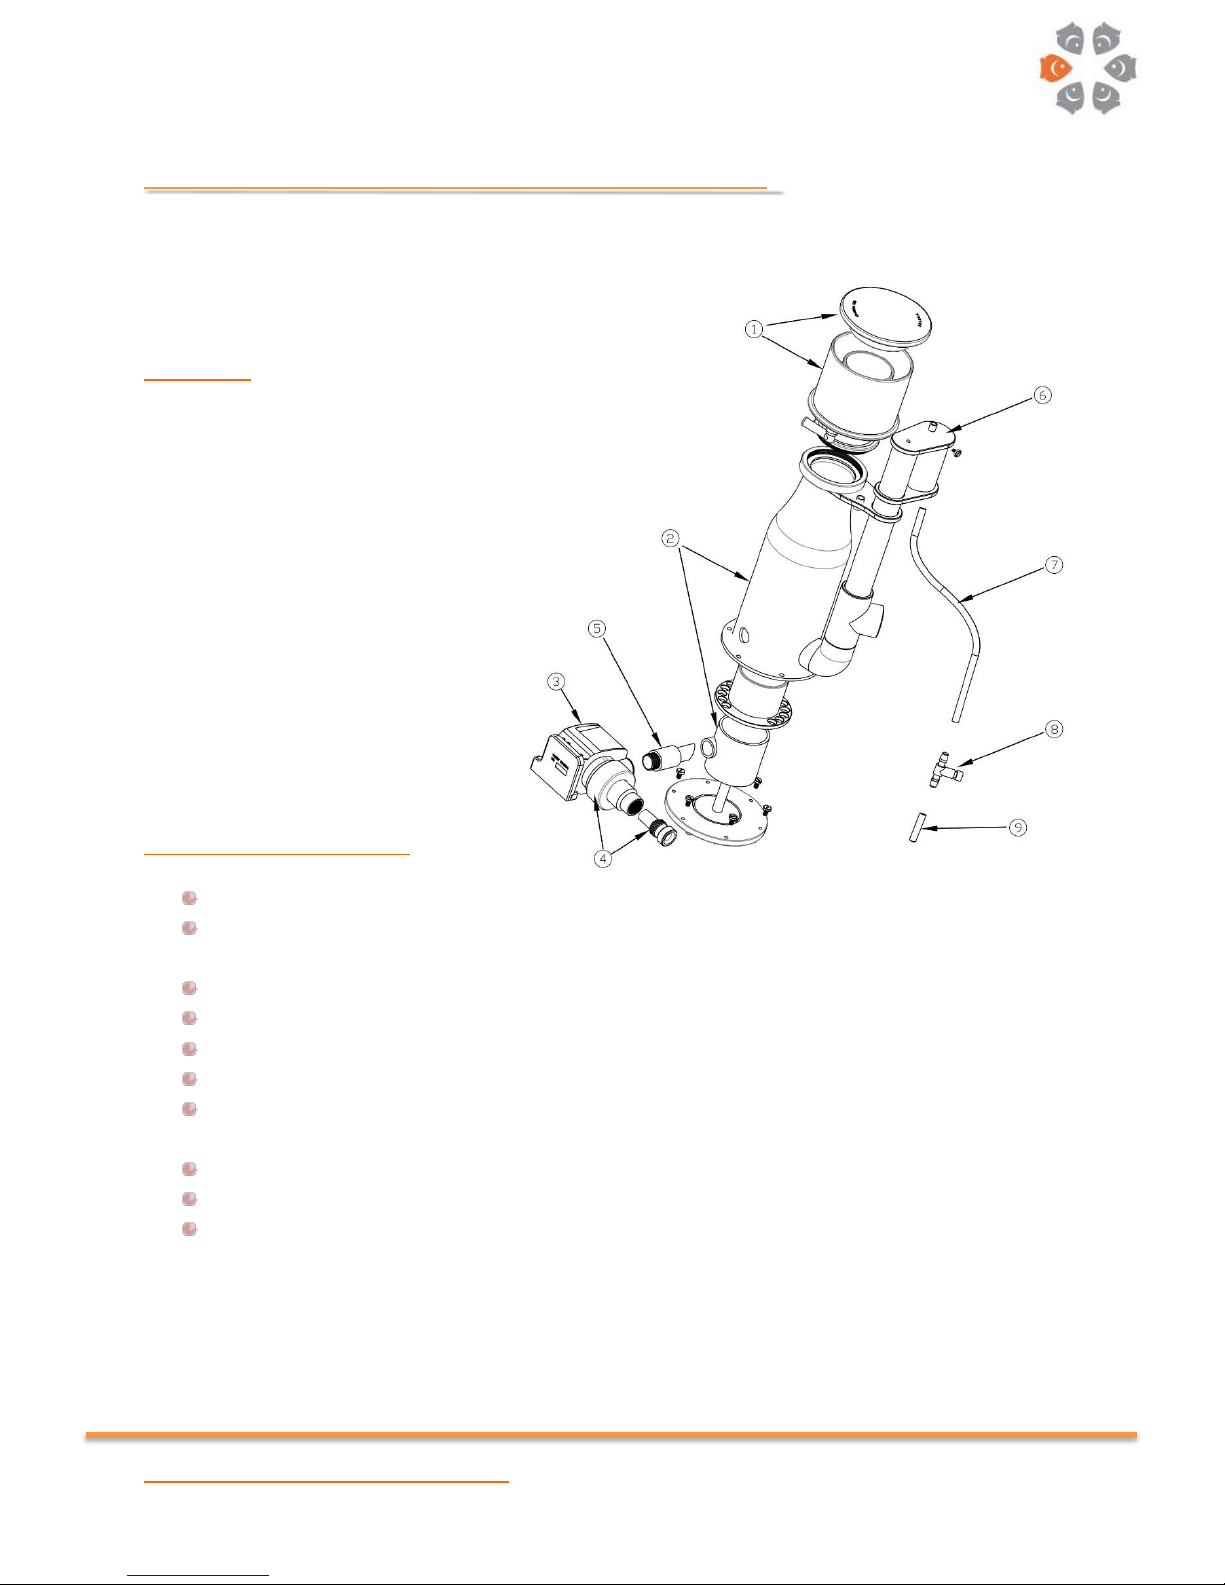
In the box:
1- Omega 150 Collection Cup
2- Omega 150 Skimmer Body
3- Sicce™ Syncra V-150 Pump
4- Pump Head and Adjustable Nozzle
5- Pump to Body Coupler Assembly
6- Silencer
7- Silicone Airline Tubing
8- Air Valve
9- 10mm Drain Outlet Coupler
10- Sicce™ Syncra Owner’s Manual
11- Omega 150 Owner’s Manual
Important Safety Warning:
Water is an excellent conductor of electricity and mixing the two can be dangerous.
This is an electrical device operated close to water; be cautious, follow instructions, and use
common sense.
Always dry your hands before working with plugs or near electrical outlets.
Do not attempt to service the unit while in operation or connected to electricity.
Drip-loop is required where the power-cable is connected to the power-outlet.
Do not carry, lift, or hold the product by its cable.
Do not touch the impeller or attempt to turn the impeller when the unit is connected to
power.
Do not attempt to alter the motor-block or the impeller assembly.
Do not attempt to alter the product.
This product and its components are potentially solid heavy objects. Their impact can cause
bodily harm, loss of life, or damage to property.
Page 2
Vertex™ Omega 150 Instruction Manual ©Vertex Aquaristik ™ 2018
Page - 2 -
Unless you are qualified; service only by authorized service professionals.
Ensure the product is free of defect and properly assembled before putting in operation.
Do not carry, lift, or hold the product by its manifold.
Always think safety first! If you are unsure as how to operate this product; consult with a
professional or contact us directly.
Installation:
1- Remove your skimmer and its components from the box and inspect for any possible defects. If
there are any concerns please contact your dealer within 48 hours of receiving your skimmer,
refrain from installing the unit, keep all original packaging as well as proof of purchase.
Any damages to the unit during transport are not covered under warranty and must be
claimed with the forwarder at the time of receiving the product.
2- After proper inspection, clean the unit with a damp cloth using RO water to ensure removal of
any oils and/ or chemicals used during the manufacturing process.
3- Remove the Collection Cup from the skimmer; simply unscrew counter clockwise holding the
cup.
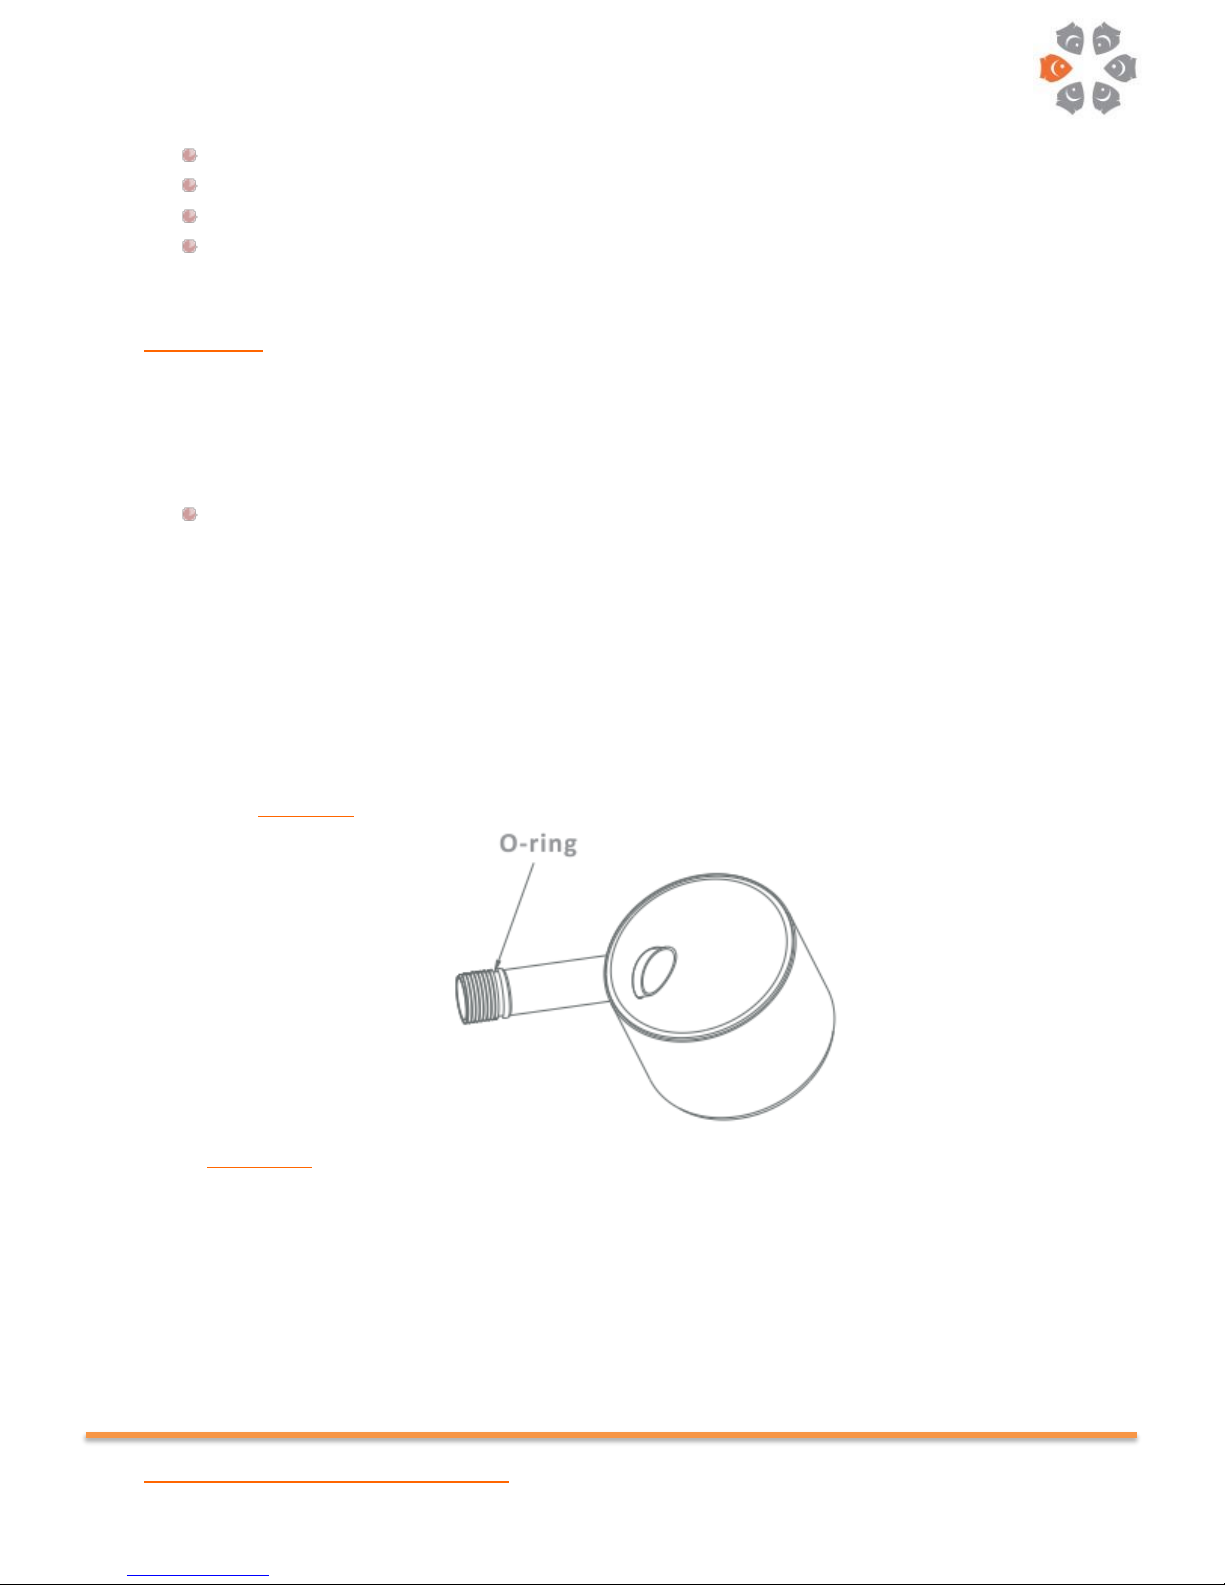
4- Screw the Output Pipe to the pumps output. Do not over tighten. A 2.5 mm O-Ring is seated at
the end of the threading. This will remove the possibility of leaking air as well as providing a
cushion to make sure the pipe can be turned to match the angle of the inner bubble chamber
hole. Diagram 1
Diagram 1: Turn the Output Pipe until its angular end matches the similar angle of the base
chamber hole. The onboard O-Ring will provide a buffer to allow the connection to be sealed as
well as adjust the angle. Turn it enough times until you can see that the O-Ring is under slight
pressure.
Page 3

Vertex™ Omega 150 Instruction Manual ©Vertex Aquaristik ™ 2018
Page - 3 -
5- Insert the Pump’s Output into its dedicated slot on the skimmer body. A slight amount of
pressure can be applied however the tip of the pipe can get damaged if forced against a flat
surface.
6- Align the Pump Output with the bubble chamber hole and insert inside. See Diagram 1.
7- Ensure that the Output Pipe’s end is positioned at the right angle as explained in point 2 of this
manual and clearly displayed in Diagram 1.
8- Make sure there is a small space between the pump body and the skimmer body. Both the
skimmer and pump bracket are supplied with heavy duty rubber feet to reduce vibration.
9- Connect the clear silicone air tubing to the dedicated 10mm air intake nipple on the venturi.
10- Connect the other end of the red PU Ozone Tubing to the dedicated ozone intake nipple on the
pump head. If no ozone is injected, leave the ozone port cap on.
11- For stable performance, the skimmer must be placed in a sump compartment that does not
fluctuate in water level. Leave the nozzle fully closed for the break-in period. Be sure to place
your skimmer in a sump compartment that is free of debris, gravel, sand, shell and other small
objects. These objects could enter the pump, clog the needle wheel and impede functionality or
damage to your pump. Do not place the pump near any calcium or carbonate effluent discharge.
This includes, but is not limited to, calcium reactors, kalkwasser reactors and/or dosing pumps.
12- Place both pump intake and skimmer output at a minimum of 6cm/~2” away from any surfaces
to prevent disruption of operation.
13- Do not place the skimmer where it will be exposed to a lot of air turbulence such as drain from
the display tank. A large influx of air bubbles can cause the pump to cavitate and seize.
14- Place the skimmer in the sump and direct the Output Tee to the direction desired and away from
obstructions.
15- Choose a GFCI outlet to plug your skimmer into. Ensure there is enough length of wire to have a
drip-loop.
16- When electrical devices are operated in close proximity to water, GFCI plugs and drip-loops
becomes more important due to the possibility of splashing, moisture, etc. DO NOT IGNORE THIS
WARNING! As always, your safety is out number one concern.
17- Turn the unit on and close the Riser Pipe. Allow the foam to cascade over the neck into the sump.
18- We recommend running the skimmer in this fashion for a period of 24 hours. This will reduce the
overall break-in period.
19- After 24 hours, turn the skimmer OFF.
20- Open the Riser Pipe 100% and screw the Collection Cup back on.
21- Turn the skimmer ON. Do not touch electrical outlets with wet hands. Dry your hands completely
before handling electrical cords and/or devices.
22- Allow the water to go through the skimmer with the Rise Pipe fully open for another hour or
more.
23- After some time has passed, adjust the skimmer using the Riser-Pipe.
Page 4

Vertex™ Omega 150 Instruction Manual ©Vertex Aquaristik ™ 2018
Page - 4 -
24- A Titanium Screw is threaded into the Riser Pipe holder connected to the skimmer neck. Using
this screw, you can maintain the Riser Pipe’s setting. Tightening this screw will aid in preventing
the possibility of accidentally changing the skimmer’s setting when touching the skimmer and/or
Riser Pipe.
25- Refrain from constantly changing the skimmer’s setting. Allow 30 minutes to an hour before
attempting to readjust the setting.
Warning: To avoid damage to property, livestock and/ or personal injury please follow all these
instructions and/or consult with a professional. Vertex Aquaristik™ will not be held liable for any
damages the misuse and/ or improper installation of this product may cause.
Important Points:
Break-in period can vary dependent of your system’s chemistry, feeding regiment…, in most
cases period of one to 2 weeks is required to have the skimmer fully break in and perform
optimally.
Do not open the nozzle for the first 2 weeks or until the skimmer is fully broken in.
Omega 150 skimmers can operate in water levels from 18 to 24 cm / ~7” to ~9” however they
are best suited for sump levels of 19 to 22 cm / ~7.5” to ~8”. Many factors can affect the optimal
water levels such as bio-load…
To adjust the skimmer at its best setting optimal for your system; simply turn the riser tube to
change the height of the foam-water mix and foam line in the skimmer body.
If the skimmer is placed in higher water level, the riser-tube can be opened more and vice versa.
The higher the water/foam break-level in the skimmer’s body the more water will be taken out
along with DOC (Dissolved Organic solids). This is referred to as “Wet skimming” and opposite
of that as “Dry Skimming”. To skim drier simply open the riser-tube more and vice versa.
Adjustable Venturi Nozzle is only used for final fine-tuning of the skimmer for use in different
sump water levels. Simply start opening at a half revolution, observe the water level and Airdraw. Allow the skimmer to settle for a minimum of 1 hour before attempting to further alter
setting.
It is possible to observe fine micro-bubbles exiting the skimmer during the break-in period. This
is normal, do not be concerned. This will subside once the skimmer is fully broken in.
This product has been cleaned after production. However, it is still recommend cleaning the
skimmer before putting in operation. Run a small amount of Carbon in your filter to remove any
possible oils used during the manufacturing process.
The onboard skimmer drain-outlet can be utilized to empty the skimmer cup and/ or direct the
skimmate into a waste-collector or drain. Remove the drain cap and use the small 10mm pipe
supplied as a coupler between the drain-outlet tube and the tube carrying the skimmate to your
Page 5

Vertex™ Omega 150 Instruction Manual ©Vertex Aquaristik ™ 2018
Page - 5 -
collection station or drain. Before taking advantage of this feature; ensure the carrier tube
utilized grips around the small coupler and there is no possibility of leakage.
Vertex™ screws are fabricated from high quality grade-2 Titanium. While they possess a very
high corrosion resistance index, they can be damaged due to the softness of this alloy. Fasten
gently to avoid damaging the screws and/ or the PVC threading. Damaged threading or screws,
if deemed to be caused by using excessive force, improper alignment and/ or negligence will
not be covered under warranty.
Many parameters can possibly affect skimmer’s performance. These include, but are not limited
to, the use of chemical additives, extremely rich and oily foods, underwater adhesive and/ or
epoxies. If this occurs; run a small amount of carbon in your filter or perform a water change.
Some of the possible effects that can be observed due to the factors noted are:
A) Collapse of foam-head C) Over-flowing
B) Exit of Micro-bubbles from skimmer D) Different color skimmate
When handling the pump for service; be cautious to not damage any components such as pump
head, shaft or bearings. Damages occurred due to negligence will not be covered under
warranty.
Maintenance:
Your Omega skimmer can be fully disassembled for thorough maintenance. A flathead screw driver is
required to perform this task. In order to disassemble your skimmer simply follow these steps:
1- Unplug the skimmer; never touch electrical outlets with wet hand. Do not attempt to service or
disassemble an electrical device when connected to electricity and/ or in operation.
2- Remove the skimmer from the sump. Drain the Collection Cup and skimmer body.
3- Remove the Collection Cup.
4- Unplug the air and ozone lines from the Pump Venturi.
5- Pull the pump away from the skimmer body when removing the pump from the skimmer.
6- Using a flat head screw driver, remove all the screws form the skimmer base.
7- Gently remove the skimmer body from the base.
8- Unscrew the titanium bold holding the bubble plate down to the base chamber.
9- The silencer can also be disassembled for cleaning. Simply remove the silencer tube by tilting
with a back and forth motion.
Your skimmer is now fully disassembled and can be fully cleaned before putting back in operation.
Page 6

Vertex™ Omega 150 Instruction Manual ©Vertex Aquaristik ™ 2018
Page - 6 -
Important Points:
Before assembling the skimmer and putting back in operation; it is imperative to place the outer ring
section of the bubble plate that dos not house any holes (solid section) directly above the skimmer’s
output elbow. This will further reduce the possibility of any bubbles exiting the skimmer. To accomplish
this, connect the bubble-plate to the central holder rod; however, do not fasten in place tightly. Once
the body is placed over the base and the screw holes are aligned, simply turn the bottom chamber tube
to align the hole with that of the skimmer body. Now spin the bubble plate to position its solid part
over the skimmer’s exit elbow and then tighten the screw holding the bubble plate in place.
Disassembling your pump for decalcification, removing any possible debris from pump-head and/ or
any other service can be achieved following these steps below:
1- Remove the Output Pope from the pump by turning it counterclockwise.
2- Gently turn the pump head observing the back of the pump head. When the holder slots from
the motor block are visible, you can remove the pump head. DO NOT ATTEMPT TO FORCE THE
PUMP HEAD OFF THE MOTOR BLOCK! This will damage the pump head and render the pump
head unusable.
3- Gently remove the bearing plate from the motor block.
4- Hold the shaft using a dry cloth and remove it from the motor block.
The pump is now fully disassembled and can be cleaned using clean water or a VERY mild solution of
Acetic Acid (Household white vinegar). Ultimately for thorough cleaning; the pump could be run in this
solution overnight. Using strong Acidic mediums or household cleaning solutions can possibly damage
your pump casing, internal parts and/ or skimmer. If an acidic solution is used; it is imperative to clean
all parts with Luke warm water before assembling and putting the unit back in operation. For any
further maintenance of the Sicce motor block simply refer to the Sicce™ manual supplied.
Page 7

Vertex™ Omega 150 Instruction Manual ©Vertex Aquaristik ™ 2018
Page - 7 -
Important Points:
Before reassembling the pump; ensure the inner motor-block’s bearing inside the pump is properly
seated.
Further to all the instruction above on how to disassemble the skimmer body and pump the following
maintenances are recommended to be performed from time to time or when necessary:
Apply a small amount of food-grade silicone lubrication to Omega’s Bayonet O-ring
Apply a small amount of food-grade silicone lubrication to the Bayonet’s Screw-side
Clean the Air-line Silicone Tubing
Clean the Venturi Air-line and Ozone-Line nipples
Clean the Silencer foam from salt-creep and ensure inner silencer compartment is dry.
Page 8

Vertex™ Omega 150 Instruction Manual ©Vertex Aquaristik ™ 2018
Page - 8 -
Trouble Shooting and Solutions:
Diagnosis
Possible Cause
Solution
Over-flow Upon Adjustment
Clogged Impeller
Clean the Needle-Wheel
Clogged Venturi
Clean the Venturi with water
Skimmer Overflows
Use of Epoxy or water
conditioners
Run Carbon / Perform a waterchange
Clogged Venturi / Silencer
Clean Venturi and/ or Silencer
Blocked Out-put
Remove the impediment
Excessively high water level
Adjust to proper water level
New Skimmer Syndrome
Allow 2 weeks for breaking in
Skimmer Does Not Collect
Skimmate
Oily foods and/ or additives
Allow time for the condition to
subside
Broken Impeller Pins
Replace Impeller, correct placing
Over-sized skimmer
Replace with adequate size
skimmer
New Tank Syndrome
Lack of enough Bio-load
Shallow water
Refer to skimmer placement /
page 2
Higher Than Normal Noise
Level
Clogged Silencer or Venturi
Clean the respected part
thoroughly
Out-put Clogged
Examine the Out-put
Improperly Seated bearings
Readjust bearings position
Micro-Bubble Production
Water level fluctuation
Maintain Constant water level
Use of Epoxy or water
conditioners
Run Carbon / Perform a waterchange
Clogged Venturi
Examine and clean Venturi
Skimmer Body Discoloration
Exposure to UV and/ or Ozone
Expected / Nonperformance
affecting
Exposure to light
Remove lighting source
Pump Not Working
Over-Calcified pump
Service the pump
Seized bearings or Motor-Block
Contact your dealer for Service
Page 9

Vertex™ Omega 150 Instruction Manual ©Vertex Aquaristik ™ 2018
Page - 9 -
Warranty, Service and Conditions:
Vertex™ products carry a two-year limited manufacturer warranty. Parts or components damaged due
to misuse, improper installation, or normal wear and tear will not be covered under warranty. Vertex
Aquaristik™ reserves the right to warranty products based upon inspection. If any damages were
deemed to be caused due to any of the following reasons, they will not be covered under warranty:
Excessive Calcification
Improper Assembly
Improper use or assembly of ancillary products or systems.
Customer Modifications
Using part and components other than what was supplied by Vertex and/or utilized in the
original design
Running the pump dry
Improper electrical voltage and/or frequency
Cutting the pump cable to use other plug types
Procedures other than noted in this guide
Physical damage caused by negligence
Improper routine maintenance or use.
Use of impure or improper media.
All warranty related issues should be handled at the point of purchase location by trained staff.
Please contact your dealer for warranty or any other service or maintenance the unit might require.
Pay attention to all the warnings and pointers noted in this guide and use common sense. To avoid
damage to property, livestock, or personal injury please follow all these instructions or consult with a
professional. Vertex Aquaristik™ will not be held liable for any damages the misuse, modifications, or
improper installation of this unit may cause.
If you cannot agree to the above terms and conditions, do not install or use this device, keep your
original packaging as well as proof of purchase and contact your dealer for a refund. Vertex Aquaristik™
will not issue refunds directly to the consumer and rather issues a credit to the retailer or the wholesaler
who has purchased the said product from Vertex Aquaristik™ for the amount the device was purchased
for. There will be no refund issued for used, installed or inferior than new condition products.
Page 10

Vertex™ Omega 150 Instruction Manual ©Vertex Aquaristik ™ 2018
Page - 10 -
Contact Us:
For additional information regarding this or any other Vertex Aquaristik™ products, please either
consult with your dealer or use any of the following resources:
Website: www.vertexaquaristik.com
E-mail: info@vertextechnologies.net
By Phone:
+1 (844) 254-1776
Monday-Friday / 9am to 6pm PST
By Mail:
5445 Oceanus Dr #107
Huntington Beach, CA 92649
USA
 Loading...