

Page 1

FIF-12 USB PROGRAMMING INTERFACE
The FIF-12 is the Interface Unit which allows cloning of channel data to Vertex Standard transceivers, and/or re-writing of the
firmware on some Vertex Standard transceivers, using the USB port of a personal computer.
: Check with your Vertex Standard Dealer for applicable models.
OPERATING SYSTEM REQUIREMENTS
Microsoft® Windows® 2000, Windows® XP (32 bit Ver. only),
Windows® Vista (32 / 64 bit Ver.), or Windows® 7 (32 / 64 bit
Ver.)
PACKING LIST
FIF-12 Interface Unit
USB Cable
CD-ROM (Includes the Driver File and Operating Manual)
OPERATION
Log on to the computer using the “Administrator”
account. If you do not know how to change the account
to “Administrator,” please consult your computer system
administrator.
Install the FIF-12 driver.
When the driver installation is finished,
plied USB Cable between the
FIF-12
then connect the appropriate Connection Cable (option) between the
FIF-12
and the transceiver.
Confirm the computer’s communication port which detects
the FIF-12.
Execute the cloning/writing software.
If this is the first time you have executed the programming/
writing software on this computer after installing the FIF-12
USB Interface, check the programming/writing software’s
“CONFIGURE” parameter, to be sure that the communication port of the programming/writing software matches that
set for the FIF-12. See page 13.
connect the sup-
and your computer,
NOTE
The FIF-12 is designed to be connected directly to
the computer’s USB port. Devices that are made
to convert a USB device to a 9 pin serial port will
not work and/or may damage the FIF-12.
Connect the Transceiver to this
jack using the appropriate (optional) Connection Cable.
Status Indicator
GREEN: Normal Condition
RED: Uploading/Downloading
ORANGE: Firmware Writing
Connect your Computer to this
jack using the supplied USB Cable.
Pers onal Compute r
OPTIONS
CT-104A Connection Cable with 8-pin Modular Jack
(for the VX-4500/-4600/-2100/-2200/-4100/-4200/
VX-7100/-7200/, VXR-9000/-7000/-1000
etc.)
CT-105 Connection Cable with 14-pin Universal Connector
(for the VX-800/-537/-5500/-6000 etc.)
CT-106 Connection Cable 4-conductor Mini-phone Jack
(for the VX-450/-230/-350/-410/-420/-160/-180 etc.)
CT-108 Connection Cable with 14-pin Universal Connector
(for the VX-820/-920 etc.)
CT-171 Connection Cable for the FRB-6 Tuning Interface Box
E A J 2 3 X 1 0 2
Vertex Standard LMR, Inc.
~ 1 ~
VX-450
Connection Cable
CT-106 (not supplied)
FIF-12
USB Cable
TYPICAL SETUP FOR THE FIF-12
Page 2

INSTALLATION PROCEDURE FOR THE FIF-12 DRIVER (Microsoft® Windows® 2000
)
Note: Please perform this operation after changing user account to an "Administrator". DO NOT INSTALL ANY HARD-
WARE BEFORE INSTALLING FIF-12 DRIVER.
1. Set the supplied CD into your CD-ROM drive, then Click
the left mouse button on the “setup.exe”.
3. Click the left mouse button on the “Install” button.
4. Click the left mouse button on the “Finish” button.
2. T h e f o l l o w i n g w i n d o w ( I n s t a l l S h i e l d
Wizard) will be open. Click the left mouse button on
“Next >” button.
5. Connect the FIF-12 to the USB port on your computer,
the Driver is recognized automatically.
~ 2 ~
Page 3
CONFIRMING THE COMPUTER’s COMMUNICATION PORT (Microsoft® Windows® 2000
)
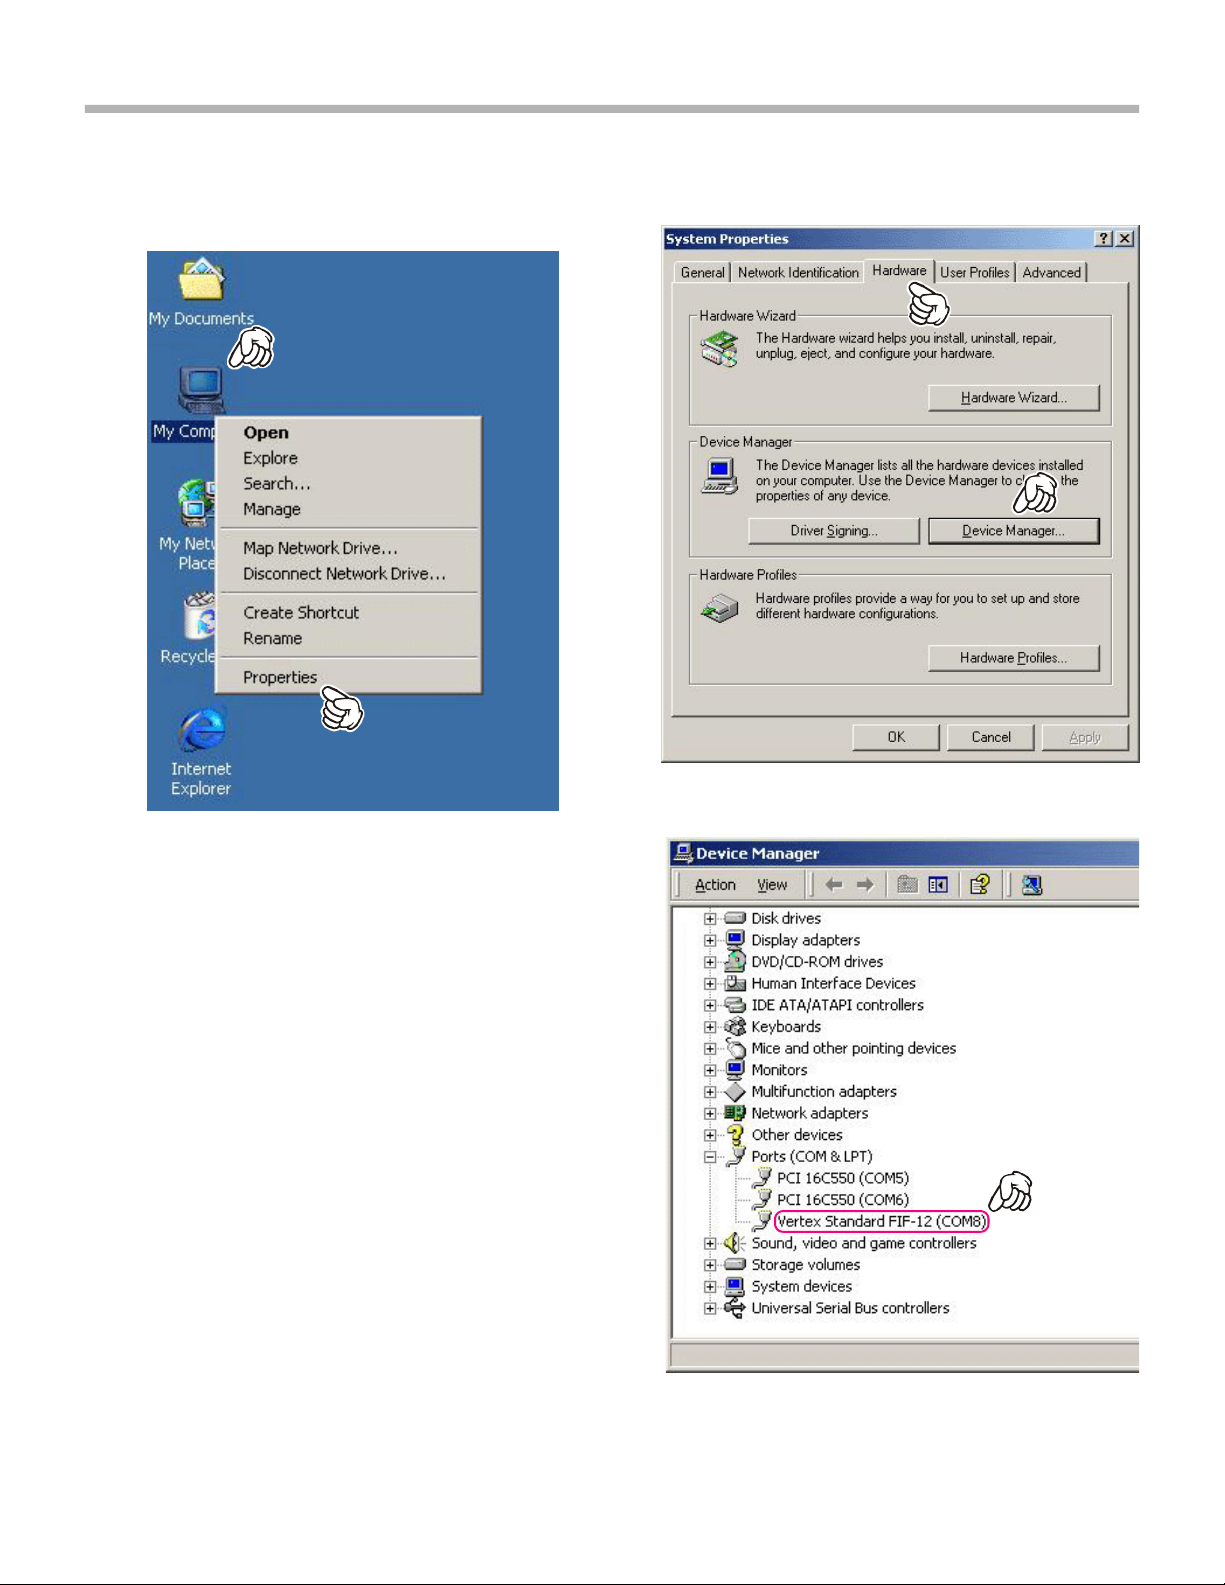
1. Click the right mouse button on the “My Computer” icon
on the desktop, then click the left mouse button on the
“Properties” item to open the “System Properties” win-
dow.
2. Click the left mouse button on the “Hardware” Folder,
then click the left mouse button on the “Device Man-
ager” Button to open the “Device Manager” window.
3. Confirm the computer’s communication port which detects the FIF-12.
~ 3 ~
Page 4
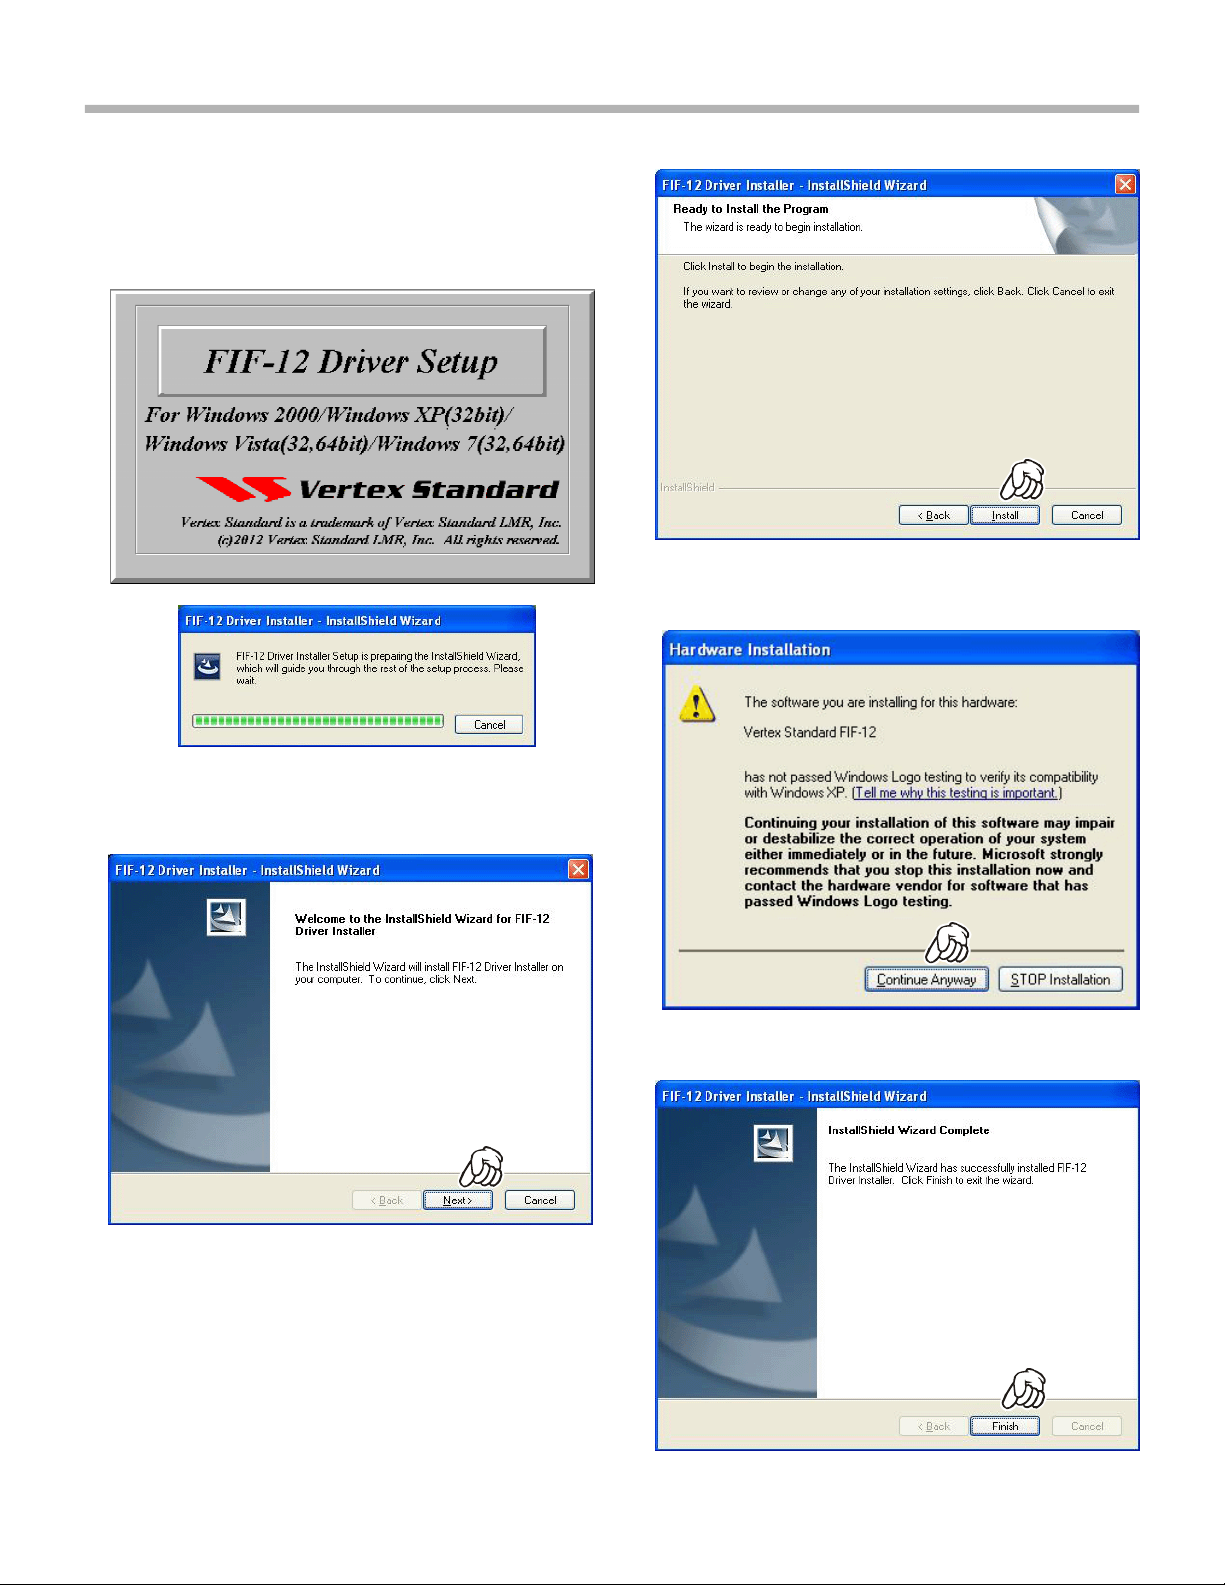
INSTALLATION PROCEDURE FOR THE FIF-12 DRIVER (Microsoft® Windows® XP
)
Note: Please perform this operation after changing user account to an "Administrator". DO NOT INSTALL ANY HARD-
WARE BEFORE INSTALLING FIF-12 DRIVER.
1. Set the supplied CD into your CD-ROM drive, then Click
the left mouse button on the “setup.exe”.
3. Click the left mouse button on the “Install” button.
4. Click the left mouse button on the “Continue Anyway”
button.
2. T h e f o l l o w i n g w i n d o w ( I n s t a l l S h i e l d
Wizard) will be open. Click the left mouse button on
“Next >” button.
5. Click the left mouse button on the “Finish” button.
~ 4 ~
Page 5

INSTALLATION PROCEDURE FOR THE FIF-12 DRIVER (Microsoft® Windows® XP
)
6. Connect the FIF-12 to the USB port on your computer.
7. The following window (Found New Hardware) will be open.
8. The following window (Found New Hardware Wizard) will
be open. Select “Install the software automatically
(Recommended),” then click the left mouse button on
the “Next>” button.
10.Click the left mouse button on the “Continue Anyway”
button.
11. Click the left mouse button on the “Finish” button.
9. The Driver is recognized automatically.
12.Repeat step 7 ~ step 11.
~ 5 ~
Page 6

CONFIRMING THE COMPUTER’s COMMUNICATION PORT (Microsoft® Windows® XP
)
1. Click the left mouse button on the “start” button, then
click the right mouse button on the “My Computer” item.
Click the left mouse button on “Propeties” to open the
“System Properties” window.
2. Click the left mouse button on the “Hardware” Folder,
then click the left mouse button on the “Device Man-
ager” button to open the “Device Manager” window.
3. Confirm the computer’s communication port which detects the FIF-12.
~ 6 ~
Page 7

INSTALLATION PROCEDURE FOR THE FIF-12 DRIVER (Microsoft® Windows® Vista
)
Note: Please perform this operation after changing user account to an "Administrator". DO NOT INSTALL ANY HARD-
WARE BEFORE INSTALLING FIF-12 DRIVER.
1. Set the supplied CD into your CD-ROM drive, then Click
the left mouse button on the “setup.exe”.
2. The following window (User Account Control) will be open.
Click the left mouse button on “Allow”.
4. T h e f o l l o w i n g w i n d o w ( I n s t a l l S h i e l d
Wizard) will be open. Click the left mouse button on
“Next >” button.
5. Click the left mouse button on the “Install” button.
3. The following window (FIF-12 Driver Setup) will be open.
6. Click the left mouse button on the “Finish” button.
~ 7 ~
Page 8

INSTALLATION PROCEDURE FOR THE FIF-12 DRIVER (Microsoft® Windows® Vista
7. Connect the FIF-12 to the USB port on your computer,
the Driver is recognized automatically.
)
~ 8 ~
Page 9

CONFIRMING THE COMPUTER’s COMMUNICATION PORT (Microsoft® Windows® Vista
)
1. Click the left mouse button on the “start” button, then
click the right mouse button on the “Computer” Item.
Click the left mouse button on “Propeties” to open the
“System Properties” window.
3. Click the left mouse button on the “Continue” button to
open the “Device Manager” window.
4. Confirm the computer’s communication port which detects the FIF-12.
2. Click the left mouse button on the “Device Manager”
Item, to open the “Confirmation” window.
~ 9 ~
Page 10

INSTALLATION PROCEDURE FOR THE FIF-12 DRIVER (Microsoft® Windows® 7
)
Note: Please perform this operation after changing user account to an "Administrator". DO NOT INSTALL ANY HARD-
WARE BEFORE INSTALLING FIF-12 DRIVER.
1. Set the supplied CD into your CD-ROM drive, then Click
the left mouse button on the “setup.exe”.
2. The following window (User Account Control) will be open.
Click the left mouse button on “Yes” button.
3. The following window (FIF-12 Driver Setup) will be open.
4. T h e f o l l o w i n g w i n d o w ( I n s t a l l S h i e l d
Wizard) will be open. Click the left mouse button on
“Next >” button.
5. Click the left mouse button on the “Install” button.
6. The “Windows Security” window will be open. Click the
left mouse button on “Install this driver software any-
way”.
~ 10 ~
Page 11

INSTALLATION PROCEDURE FOR THE FIF-12 DRIVER (Microsoft® Windows® 7
7. Click the left mouse button on the “Finish” button.
8. Connect the FIF-12 to the USB port on your computer,
the Driver is recognized automatically.
)
~ 11 ~
Page 12

CONFIRMING THE COMPUTER’s COMMUNICATION PORT (Microsoft® Windows® 7
)
1. Click the left mouse button on the “start” button, then
click the right mouse button on the “Computer” Item.
Click the left mouse button on “Properties” to open the
“System Properties” window.
2. Click the left mouse button on the “Device Manager”
Item, to open the “Device Manager” window.
3. Confirm the computer’s communication port which de-
tects the FIF-12.
~ 12 ~
Page 13

“CONFIGURE” PARAMETER SETTING PROCEDURE (EXAMPLE: “CE115”
)
1. Click the left mouse button on the “File” parameter.
2. Click the left mouse button on the “Configure” item to
open the “Configure” window.
4. Select the Baud Rate for the transceiver’s computer interface circuitry.
5. Click the left mouse button on the “OK” button.
3. Select the communication port which is detecting the
FIF-12.
~ 13 ~
 Loading...