

Page 1
1/3 HP - 1/2 HP AERATION SYSTEM
MAINTENANCE INSTRUCTIONS
WARNING/ATTENTION:
• Disconnect unit from electrical supply circuit at disconnect switch before opening. Débranchez le cabinet du circuit
d'alimentation en utilisant l'interrupteur de déconnexion avant l'ouverture
• Always use parts that are supplied or approved by Vertex. Use of other parts may result in poor performance and could
create a hazardous situation and void the warranty. Toujours utiliser des pièces qui sont fournis ou approuvés par Vertex.
Utilisez d'autres pièces peut entraîner de mauvaises performances et pourrait créer une situation dangereuse et annuler la
garantie.
• Do not use acid or corrosive cleaners. Follow instructions in manual for the appropriate cleaning methods. N'utilisez pas de
nettoyants acides ou corrosifs. Suivez les instructions dans le manuel pour les méthodes de nettoyage approprié.
• Refer servicing to a qualified electrician under the following conditions. Confiez l'entretien à un électricien qualifié dans les
conditions suivantes:
- When the power cord is damaged or frayed. Lorsque le cordon d'alimentation est endommagé ou effiloché.
- When compressor fan, outlet or other electrical components need service. Ventilateur du compresseur, de sortie ou
d'autres composants électriques besoin de service.
- If the cabinet is producing unusual noises or odors. Si le coffret est produisant des bruits ou des odeurs inhabituels.
Vertex aeration systems are designed for low-maintenance and typically only require minimal scheduled maintenance. Periodic cleaning and/or
replacement of the compressor air filter, piston cup, and “Flexing” of the AirStation™ is required. Remember to keep cabinet air inlets and outlets
free of debris and weed growth to allow normal ventilation. If size and appearance of any surface boil has decreased from initial installation,
perform one or both of the following:
GENERAL CABINET CLEANING
1. Disconnect unit from electrical supply circuit at disconnect switch prior to opening
2. Using a portable vacuum or reg, remove debris, grass cippings and dirt from inside cabinet
3. Remove objects blocking the cabinet intake vents
4. Remove objects blocking the fan exhaust vent
5. Lubricate the locking machanism
6. Lubricate cabinet hinges
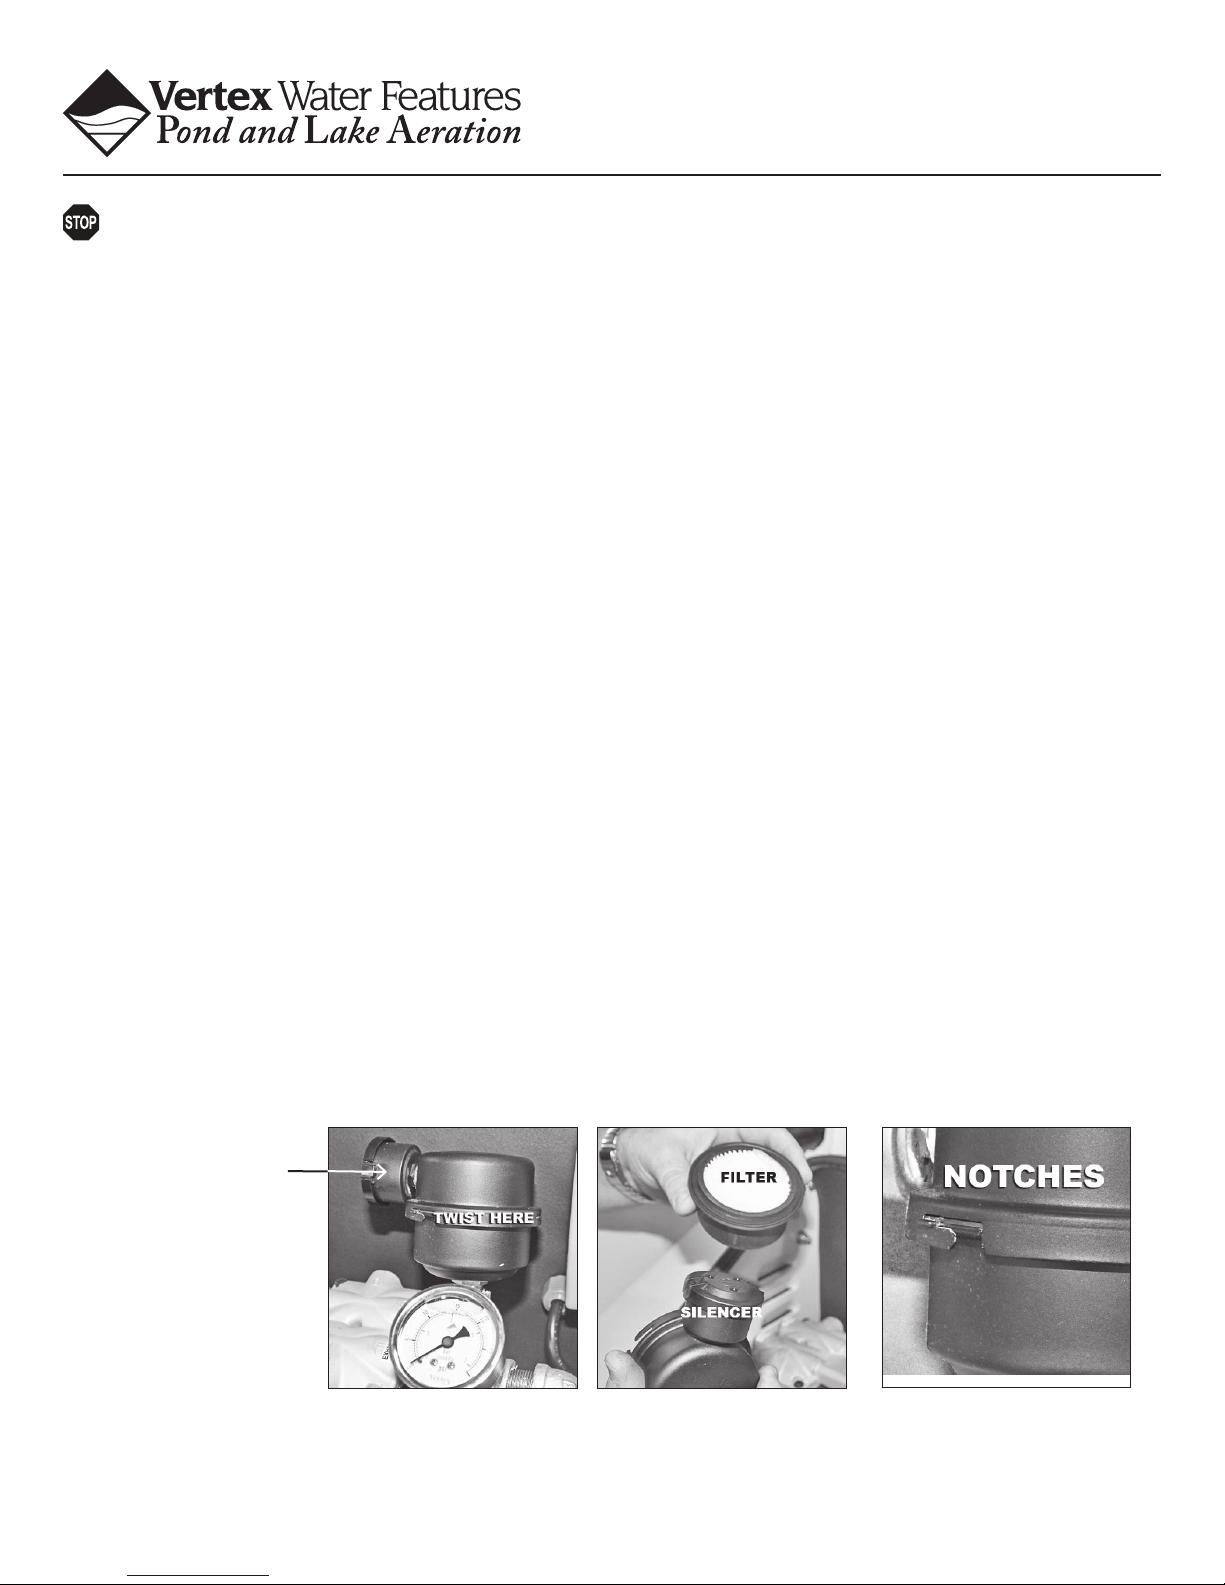
DOUBLE 5 MICRON AIR FILTER CLEANING/REPLACEMENT**
Air filter cleaning or replacement: Remove compressor air intake filter and wash with soap and water or replace. This should be done 2-4
times per year. Never re-install a wet or damp filter, allow sufficient time for it to air dry completely.
No Filter
Twist to unlock
1
air lter
**On the inside of the cabinet lid or the outside back cover of this Owner’s Manual, you will find a Vertex parts list that provides you the necessary parts
information for ordering replacement parts. Call Vertex at 844-432-4303 with your 4 digit system warranty number or serial number off of the silver ETL sticker,
located inside the cabinet. Vertex can also supply you with the necessary replacement parts information.
Remove old air lter
2
Insert new air lter
Line up the notches
3
Twist to lock
Page 2

PISTON CUP REPLACEMENT
Under normal year-round, continuous use, the compressor piston cups typically last 12-36 months depending upon the environmental conditions.
As the piston cups wear out, you’ll notice a drop in air flow (despite air filter replacement) resulting in smaller surface boils.
CABINET COOLING FAN REPLACEMENT
Cooling fans provide critical cooling for the cabinet components. If the cooling fans fail, cabinet temperatures will drastically increase and
damage the compressor system. For systems that run continuously, we recommend replacing the cooling fans every two or three years during
compressor maintenance.
DISK FLEX-CLEANING PROCEDURES
Routine maintenance of the AirStation™ disks is recommended once per year. This procedure is known as disk flexing. Over time organic matter
and algae can settle on the AirStations™ and inhibit the release of micro-bubbles, in turn reducing the effectiveness of the AirStation™. Disk
flexing helps unclog the pores in the membranes, reduces back pressure on the compressor(s), and restores the performance of the AirStation™.
Disk flexing is very easy and is done from the cabinet or valve box location. The control valves for each AirStation™ are located inside the cabinet,
unless a Remote VBS (Valve Box System) was installed. In the instance that a VBS was installed, the control valves will be inside the valve box,
buried to ground level, down by the shoreline.
Open the cabinet and make a line with a permanent marker on each valve body and handle that line up with each other in the valve’s present
position. This will help re-balance the system once you finish flex cleaning the disks.
1. Close half the valves. Open the valves that were previously closed.
2. Close the lid and turn on the system for two minutes
3. Turn off the power and unplug the cabinet and close
the valves that were just flexed.
If you have not yet balanced the AirStations, or cannot read your indicator
marks, see the “AirStation™ Balancing” . The Disk Flex Cleaning procedure is now complete.
4. Open the valves that were previously closed.
5. Close the lid and turn on the system for two minutes
6. Return all valves to their original, balanced positions by aligning the
marks you made on the valve bodies before starting the procedure.
AIRSTATION™ BALANCING
Once the installation of a multiple AirStation system has been completed, proper balancing of the AirStations is required to ensure that they all
get an equal amount of air. The control valves for each AirStation are located inside the cabinet, unless a Remote Valve Box System (VBS) was
installed. In the instance that a VBS was installed, the control valves will be inside the valve box, buried to ground level, down by the shoreline.
Close all blue AirStation valves except the one with the longest (or deepest) run of tubing. With this one valve wide open, partially open the valve
that controls the air flow to the AirStation with the second longest (or second deepest) run of tubing. Continue this process of adjusting the
second valve until a boil is noticed above this AirStation. Leave the valve in this position and move on to the next valve and repeat the process.
Continue working your way from the longest (or deepest) to the shortest (or most shallow) run of tubing. Once there is air to all of the AirStations,
check to be sure all boils are approximately the same size. If they are not, make small adjustments as necessary to even them out. At this point,
we suggest making indicator marks with a permanent marker from the valve handle to the valve body to assist you in rebalancing the system in
the future. The overall goal when adjusting the valves is to balance the AirStation at the lowest possible pressure. The lower the system pressure
the higher the total air flow.
Hours: M-F, 8 am – 5 pm EST • P: 1-844-432-4303
www.vertexwaterfeatures.com • info@vertexwaterfeatures.com
REV.051016
 Loading...