

Page 1
Model:
V SLPC60
Thank you for purchasing Versonel pressure cooker! Please read
the instruction manual thoroughly and keep for future reference.
our
Versonel New Holland, PA
www.versonel.com
(Pictures are for reference only, actual
product may differ from pictures shown.)
Table of Contents
IMPORTANT SAFEGUARDS
Specifications
Product Diagram
Cooking Examples
09
Cautions
12
Troubleshooting
11
Circuit Diagram
11
Cleaning
Notice Prior to Use
04
03
03
Cooking Preparation
05
Function Selection
06
Safe Cover Opening
06
Keep Warm Function
08
07
Care and Maintenance
08
08
Safety Cautions
Page 2

01
When using electrical appliances, basic safety precautions should always be followed including
the following, please read all instructions.
1. This product is for household use only. Do not use outdoors.
2. Do not use pressure cooker for other than intended use.
3. Do not place the unit on or near a hot gas or electric burner, or in a heated oven.
4. Do not operate the unit near water or fire. Do not expose the unit to direct sunlight. Keep out
of reach of children.
5. Do not operate the unit on an unstable surface. Never operate the unit on or near flammable
materials such as newspapers or paper plates.
6. Close supervision is necessary when the pressure cooker is used by or near children.
7. To protect against electrical shock, do not immerse cord, plugs, or appliance in water or other
liquid.
8. Be sure that handles are assembled and fastened properly before each use. Cracked, broken or
charred handles should be replaced.
9. Do not operate any appliance with a damaged cord or plug or after the appliance malfunctions
or has been damaged in any manner. Return appliance to the Service Center for examination,
repair, or adjustment.
10. Do not make unauthorized replacement of any spare part inside the pressure cooker, as this
may cause electric shock, fire or injury.
11. The use of accessory attachment not recommended by the appliance manufacturer may cause
injuries.
12. Do not let cord hang over edge of table or counter, or touch hot surfaces.
13. Caution: to reduce the risk of electric shock, cook only in the provided removable container
(cooking pot).
14. Before each use, be sure to check the anti-block shield, float valve and exhaust valve for
obstruction, wipe the surface of the inner pot and the heating plate to confirm they are free of
any foreign object, make sure the exhaust valve is in sealing location.
15. Always check the pressure release devices for clogging before use. Do not cover the pressure
valves.
IMPORTANT SAFEGUARDS
Page 3

16. Be aware that certain foods, such as applesauce, cranberries, pearl barley, oatmeal or other
cereals, split peas, noodles, macaroni, rhubarb, or spaghetti can foam, froth, and sputter, and
clog the pressure release device. (steam vents). These foods should only be cooked in a
pressure cooker with caution with the inner pot never more than 1/2 full and using natural
release.
17. Never fill the unit over MAX level (2/3 full). When cooking foods that expand during cooking
such as rice or dried vegetables, do not fill the unit above the halfway point. Over filling may
cause a risk of clogging the vent pipe and developing excess pressure. Please see
“Cooking Preparation”.
18. This appliance cooks under pressure. Improper use may result in scalding injury. Make certain
unit is properly closed before operating. Please see “Cooking Preparation”.
19. Never deep fry or pressure fry in the unit with oil. It is dangerous and may cause a fire or
serious damage.
20. Do not move this product or force the lid open when the unit is in operation.
21. Extreme caution must be used when moving the unit containing hot oil or other hot liquids.
22. Do not touch hot surfaces. Use handles or knobs. Do not place your hands or face over the
exhaust valve or float valve to avoid scalding when the unit is in operation.
23. After cooking, use extreme caution when removing the lid. Always open the lid away from you
to avoid skin contact with any heat or steam. Serious burns can result from steam inside the
unit.
24. When opening the lid after cooking, do not touch the inner pot and cover inside with hands
directly to avoid scalding.
25. Do not open the pressure cooker until the unit has cooled and all internal pressure has been
released. If the handles are difficult to push apart, this indicates that the cooker is still
pressurized-do not force it open. Any pressure in the cooker can be hazardous. Please see
“Cooking Preparation”.
26. To disconnect, turn any control to “off ” then remove plug from wall outlet.
27. Always unplug from outlet when not in use, before removing parts and cleaning. Allow to cool
before putting on or taking off parts, and before cleaning.
28. A short power supply cord is provided to reduce the hazards resulting from entanglement and
tripping. An extension cord may be used if care is exercised in its use. If an extension cord is
used, the electrical rating of the cord must be at least 20 amps and 120 volts. The extension
cord must be arranged so that it will not drape over edge of table or counter where it can be
pulled by children or tripped over accidentally. This appliance has a fitted plug. Do not attempt
to modify the plug in any way.
SAVE THESE INSTRUCTIONS
02
IMPORTANT SAFEGUARDS
This appliance has a polarized plug (one blade is wider than the other). As a safety feature,
this plug will fit in a polarized outlet only one way. If the plug does not fit fully in the outlet,
reverse the plug. If it still does not fit, contact a qualified electrician. Do not attempt to defeat
this safety feature.
Page 4
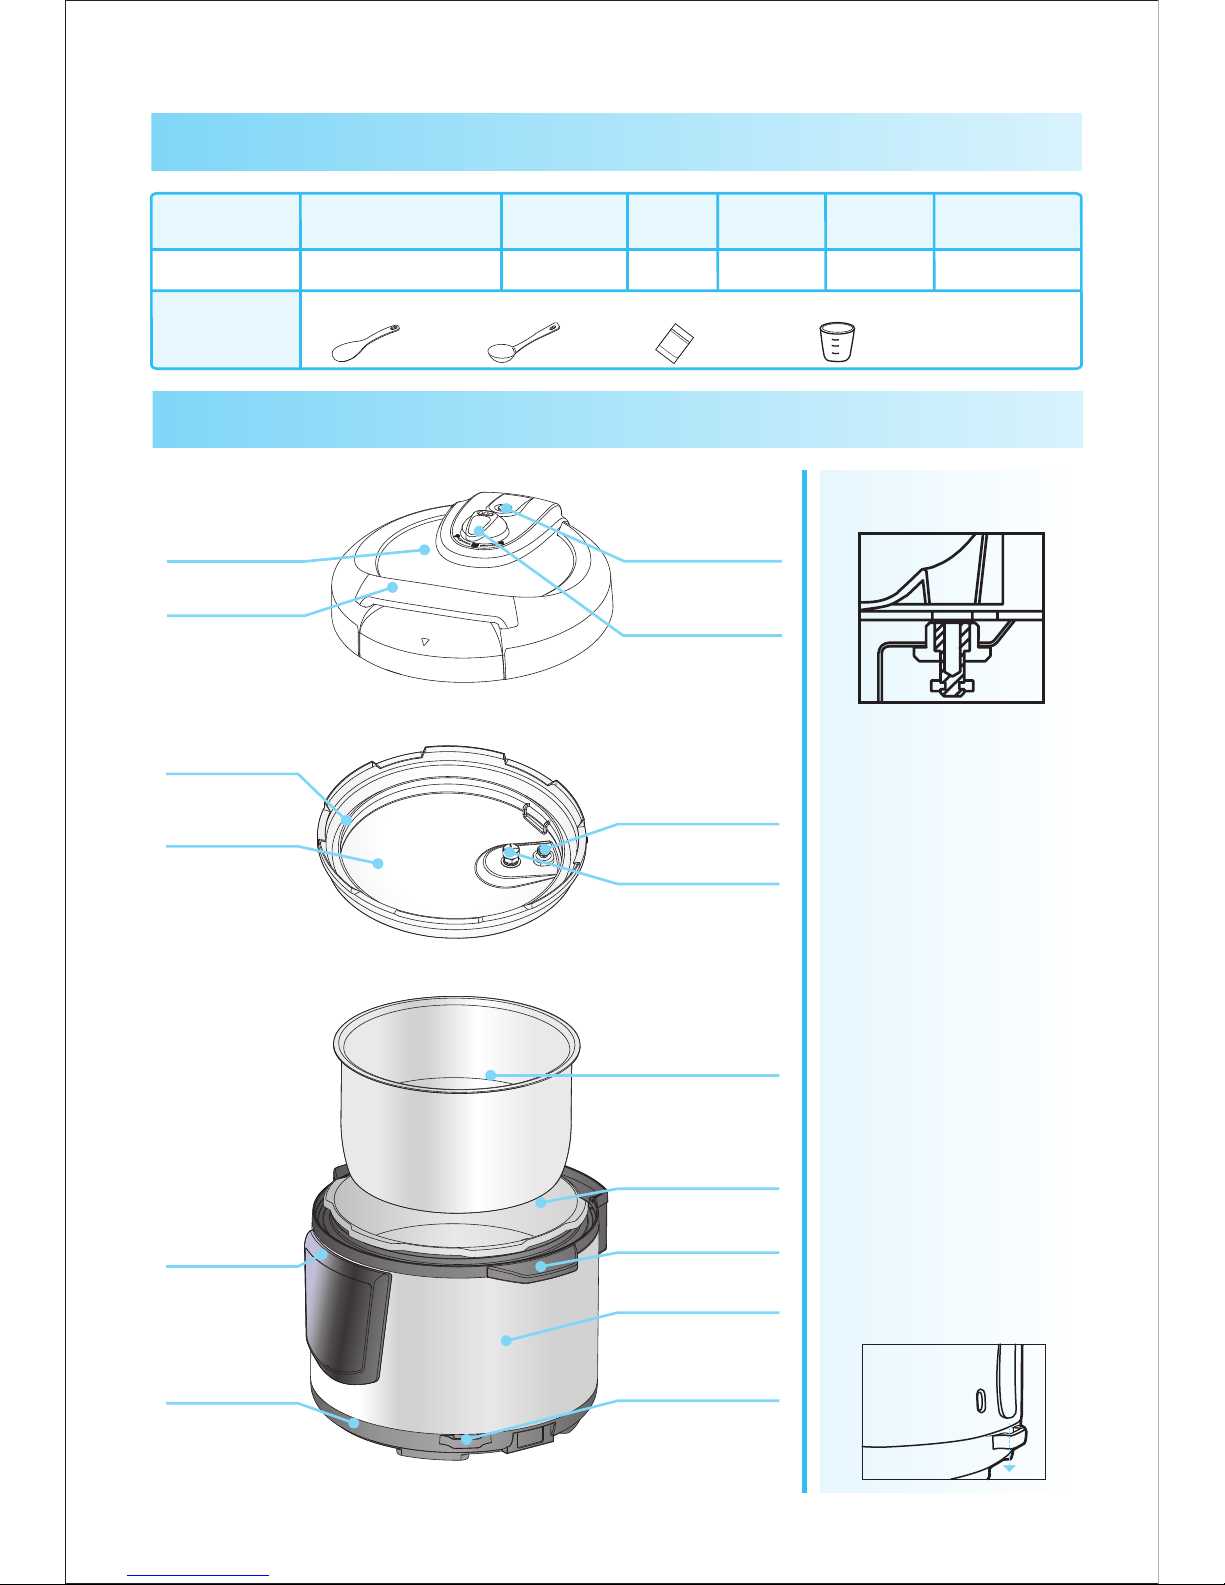
Handle cover
Cover
Exhaust valve
Float valve
03
Anti-block shield
Gasket
Inside of cover
Gasket ring
of float valve
Housing
Base
Rice paddle shelf
Control panel
Exterior pot
Handle
Inner pot
Product Diagram
Structure diagram
of floate valve
Method of using
scoop holder
Warm tip:
1. Before each use, be
sure to inspect the
float valve anti-block
shield and gasket for
mounting
2. Before putting the
inner pot to outer pot,
be sure to remove
debris and water
attached to the
outside of the inner
pot and inside of the
outer pot.
3. When moving the
product, please lift
the cooker handle.
4.The outer casing
having water, please
use cloth wipe.
Power
Working
pressure
Model
Power Supply
Volume
Calibero f
inner pot
Warm
Temperature
Accessories
Specifications
1000W
6L
70kPa
8.7inc h
140~176℉
120V~60Hz
VSLPC60
Manual
Rice Scoop
Soup Scoop
Measuring Cup
Page 5
Operation Section
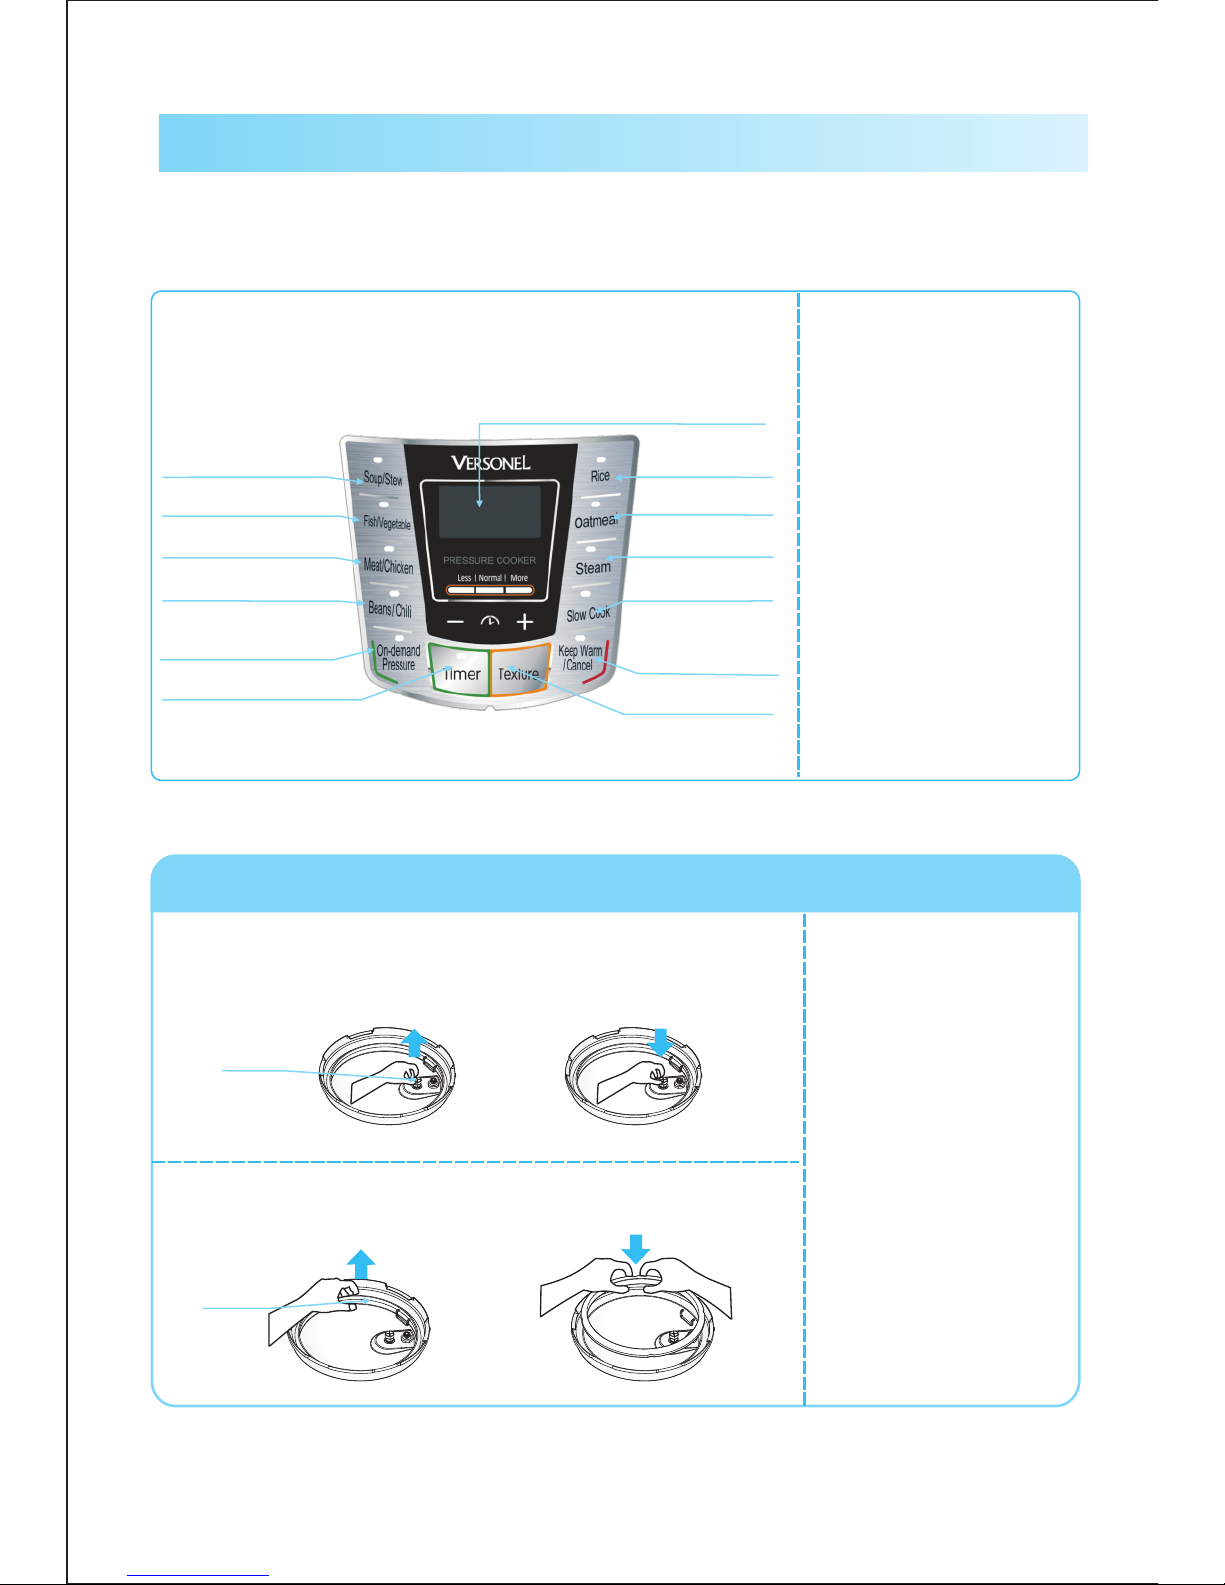
Soup/Stew function, Meat/Chicken
function, Beans/Chili function,
Fish/Vegetable function, Oatmeal
function, Rice function and Steam
function.
The function can choose different
texture by pressing “Texture” key to
select Less, Normal or More taste.
The function can choose the length
of maintenance pressure time
according to personal preference.
Adjust time by pressing “+” “-” key
Set the end of cooking time by
pressing “+” “-” key.
The function to select length of
cooking time according to
personal preference. Adjust time
By pressing “+” “-” key.
On-demand Pressure function
Timer function
Slow Cook function
“Slow Cook” function
“Texture” function
“Steam” function
“Oatmeal” function
“ Rice” function
“Soup/Stew” function
“Fish/Vegetable” function
“Meat/Chicken”function
“Beans/Chili” function
“Timer” function
Display Screen
“Keep Warm/Cancel”
function
Notice Prior to Use
Before first use, please take out all accessories from the cooker body and read the user
manual carefully, special care must be given to use directions and cautions to avoid any
damage to property or human injury.
04
“On-demand Pressure”
function
Disassembly and installation of anti-block shield and gasket
Screw upward
counterclockwise
Screw downward
clockwise
Assembly
Disassembly
Disassembly
Anti-block
shield
Pull up
Gasket
Press down
Assembly
1. Prior to each use, inspect
whether the gasket and
anti-block shield are
mounted to the upper
cover.
2. After use, remove any
foreign object from the
gasket and anti-block
shield. keep clean to
avoid odor.
3. Never pull the gasket, as
pull deformation may
affect sealing and
pressure effect.
4. A damaged gasket should
not be used, and should
be sent to the service
center for replacement.
Disassembly and Installation of Anti-block Shield
Disassembly and Installation of Gasket
Page 6
Cooking Preparation
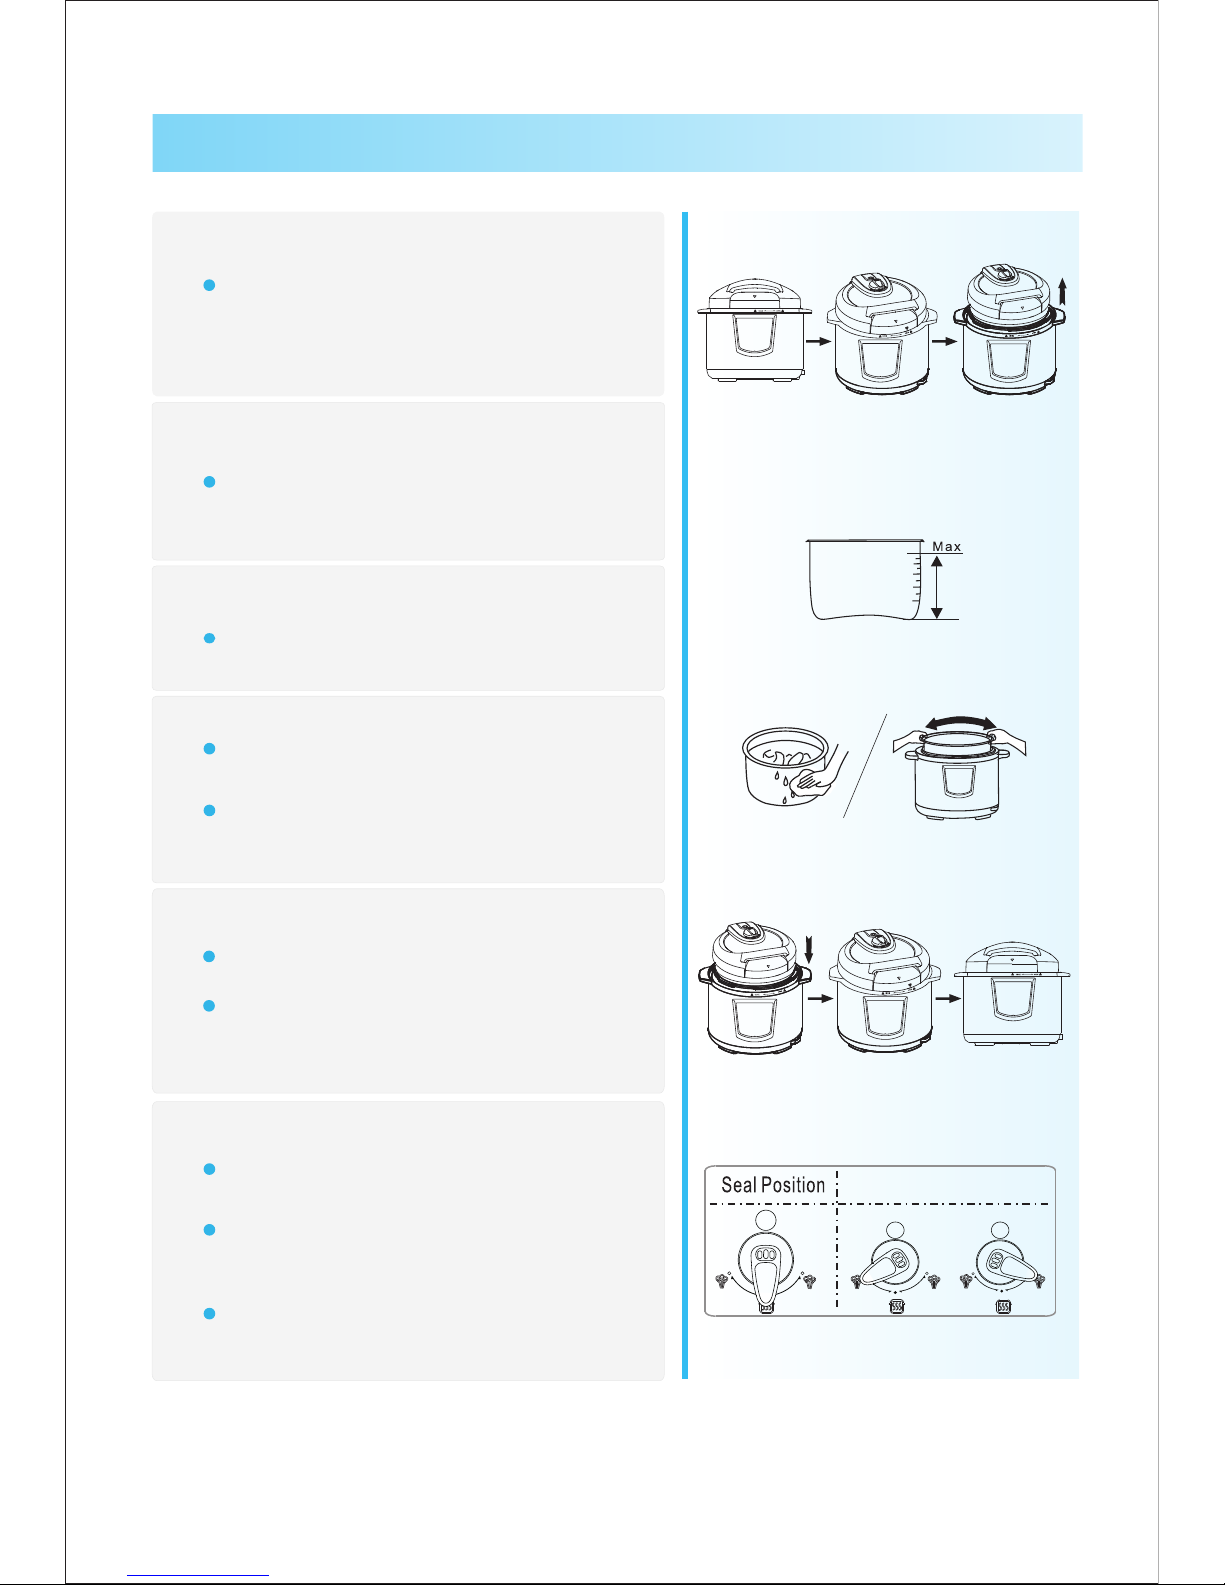
Open the cover correctly
Remove the stainless steel inner pot,
then put food and water in the inner pot
Check whether parts on the cover are
mounted properly
1
Hold th e cover handle w ith one hand, co unter
clock w ise rotate app roximately 3 0 degrees u ntil
the cov er marking “▼ ” ali gn with the oute r
casin g marking “Open” a nd lift the cove r.
2
Check the float valve and exhaust valve for
obstruction, and confirm whether such parts as
gasket and anti-block shield are installed properly.
Before that, be sure to remove foreign objects and
water droplets from the exterior of the inner pot and
inside of the housing;
After putting in, rotate the inner pot slightly left to
right to ensure good contact between the inner pot
and heating plate.
Put the inner pot in the electric pressure cooker
4
3
Total amount of food and water shall not exceed the
MAX level of inner pot height.
Align t he small handl e of the exhaust v alve with
the sea ling small ico n, indicatin g that the
press ure cooker is in a irtight cond ition;
When manual exh austing is needed , ali gn the
small ha ndl e o f e xhaust valve wit h t he exh aust
small icon, i ndi cating that t he pr essure c ooker
is in exh aust conditi on;
Move to t he sealing zon e and inspect wh ether
the flo at valve has fal len (the float v alve fall s
befor e heating);
6
Position the exhaust valve properly
5
Close the cover completely
Before closing, check whether the gasket has been
put in the steel rim inside the cover.
Hold the cover handle with one hand, clockwise
rotate approximately 30 degrees until the cover
marking “▼” align with the outer casing marking
05
Release Position
Page 7
1
.
Di
s
c
onnect th
e powe
r o
r take out t
he pow
e
r pl
ug
.
2
.
E
x
ha
u
st m
e
t
h
od
A. Qu
ick ope
nin
g meth
o
d
S
lid
e the e
xha
ust valv
e t
o t
he exhaust p
osit
i
o
n until t
he fl
oat v
alves fal
l
s. (
for n
on
-flu
i
d fo
od)
P
ut a w
et to
w
el o
n t
he c
ove
r to q
ui
cke
n coo
lin
g un
til the flo
at valv
e f
a
ll
s. (
for non-
fl
ui
d foo
d)
B
. G
eneral o
p
enin
g met
hod
Have the p
r
e
ssure c
o
ok
er to c
oo
l n
a
tu
ra
lly
, un
t
i
l th
e f
loat v
alve f
al
l
s.
3. O
pe
n t
h
e cov
e
r
H
old t
h
e c
ove
r ha
ndl
e fi
rmly, t
ur
n t
h
e cover cl
o
c
k
wi
se t
o the s
p
a
ci
ng edge, a
n
d pu
l
l up th
e c
ov
er.
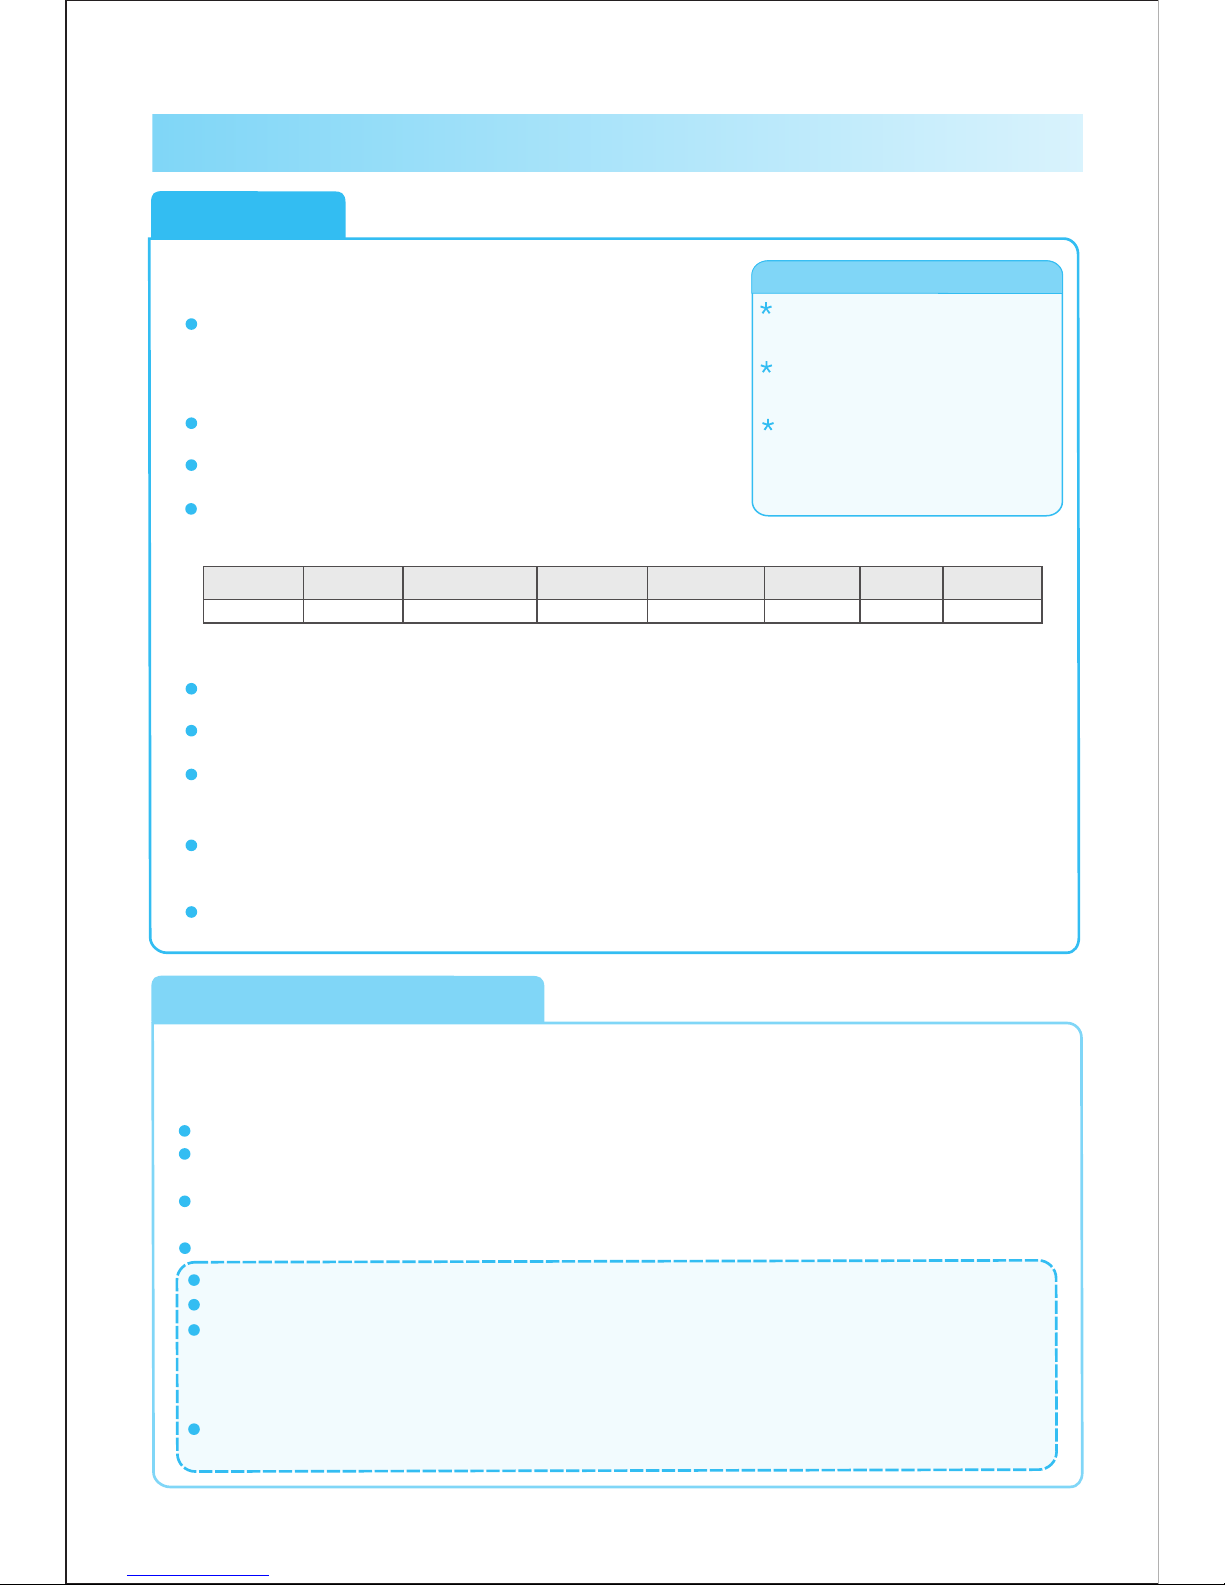
Do not open the cover until pressure inside the spot is released adequately
.
Never pull out the exhaust valve when it is exhausting.
For fluid foods (oatmeal and sticky liquid), do not slide the exhaust valve for exhaust when
cooking has just finished, otherwise the food will eject from the exhaust valve core. Be sure to
disconnect the power supply, have the unit cool naturally or put a wet towel around the cover to
speed up cooling until the float falls, and finally open the cover
.
When a large quantity of food is cooked, do not exhaust immediately after cooking. It is
recommended to open the cover and have the food after some time of keeping warm.
Function Selection
General Functions
1. Finish cooking preparation according to Page 5
2. Switch on
The nixie tube flashes and displays a red horizontal
line “On”, indicating that the electric pressure cooker
has entered preparation state;
3. Select a required function level
5. After cooking, enter the keep- state automaticallywarm
Function key
Soup/Stew
Porridge
Steam
Meat/Chicken
Fish/Vegetable
Bean/Tendons
Brown Rice
Cooking time (min)
About 55 About 30
About 45
About 60
4. Press a function key, and 10s later, the electric pressure cooker will perform a
corresponding function program selected
Within 10s, you can re-select preset time and function level, and finally confirm that the electric pressure
cooker will start working within 10s after selection.
The red horizontal line “On” on the display screen is bright, indicating that the electric pressure cooker has
entered working state.
During the operation, you can cancel current working state and return to standby state by pressing the
“Keep Warm / Cancel” key.
After cooking, a corresponding function indicator goes out, the warm indicator illuminates, the display
screen shows “Hot”, and gives out the prompt sound (10 beeps), with the electric pressure cooker going
into warm state.
In standby mode, press the “Keep Warm / Cancel” key, the warm indicator illuminates, and gives out the
prompt sound (1 beep), indicating that the electric pressure cooker goes into warm state.
Once a function key is pressed, the indicator of a corresponding
function level will illuminate (red);
The rice congee function and cake function are only applicable
to products with such function level;
Cooking time varies with different function level. The bigger the
food amount, the longer the cooking time. The cooking times listed in the table below are only for reference
(e.g. food amount + water = 8 scales): Cooking time = heating time + holdup time
In any mode, you can cancel current
working state and return to standby state by
pressing the “Keep Warm Cancel” key.
During operation, the machine may
sometimes generate the “Cluck” sound,
which is not malfunction.
For cooking of little amount, the inner pot
may be sucked up when the cover is
opened. In this case, shake the inner pot
manually, and r emov e the in ner po t cove r
after the inner pot falls into the cooker body.
Warm Tips:
Safe Cover Opening
About 40
About 45
About 55
06
Page 8
07
Cooking Examples
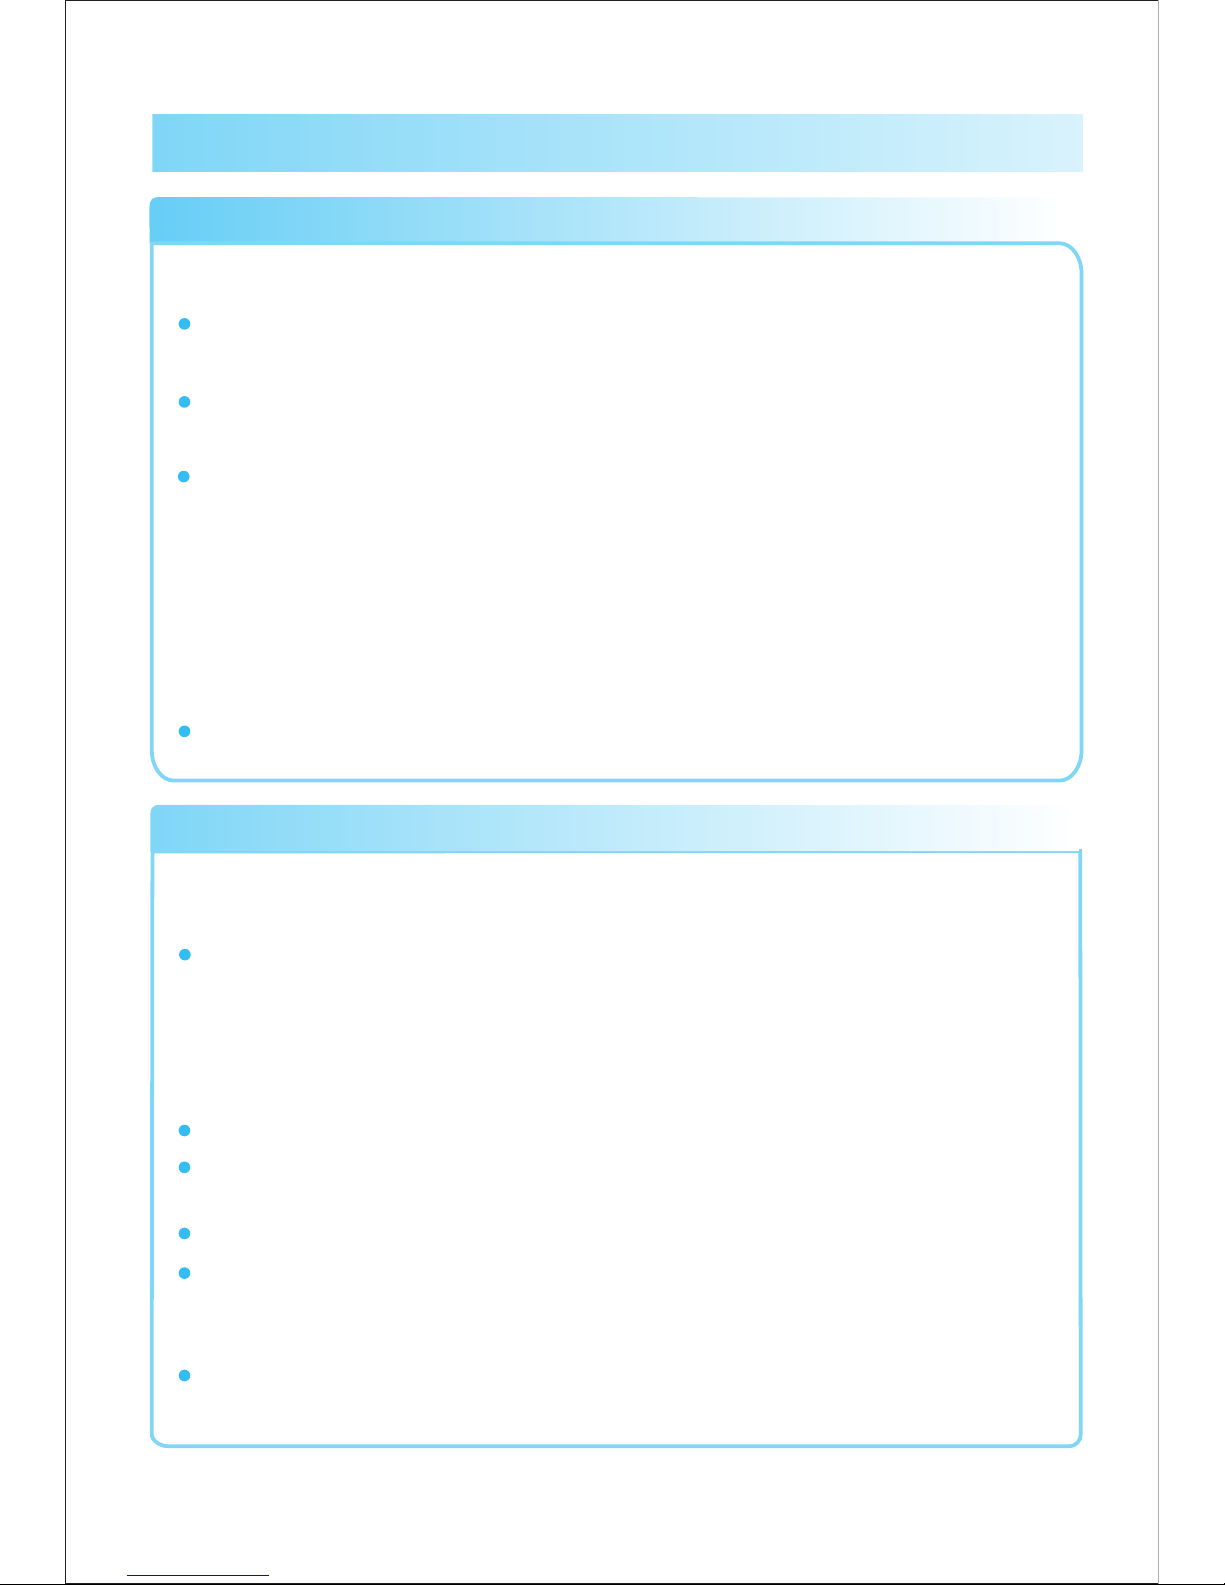
Texture Selection
Timer Function
1. Finish cooking preparation according to Page 5
1. Finish cooking preparation according to Page 5
2. Select a corresponding function level
2. Select a corresponding function level
When any function key is pressed after preparation, a corresponding function indicator
illuminates, and the pressure cooker will perform the cooking procedure of the
corresponding function level. Texture default is “Normal” level.
When any function key is pressed after preparation, a corresponding function indicator
illuminates; you can also select another function level within 10s. (To cancel the
operation, press the “Keep Warm / Cancel” key)
Once a function level is selected, you can also select another function level within 10s,
and the pressure cooker will perform the cooking procedure of the finally selected
function level.
If selection of another function is impossible after the pressure cookers enters working
state, you can cancel the operation by pressing the “Keep Warm / Cancel” key for
selection.
3.Select texture by pressing “Texture” key
3.Press “Timer” key to Set end time of cooking
After the “Texture” key is pressed continuously, the screen displays Less, Normal
and More cyclically. When one texture is selected, corresponding text appears on the
screen.“Soup/Stew” “Fish/Vegetable” “Meat/Chicken” “Beans/Chili” “Rice”
“Oatmeal” “Steam” have Texture function.
This product is equipped with 24 hour default function, it can be used as operation
As follows:
4. After cooking, the unit will go into warm-keeping state automatically
4. After cooking, the unit enters the warm state automatically
After cooking, the warm indicator illuminate and the unit will go into keeping warm state.
Long time keeping warm is not recommended.
Within 10s after function selection, press the “Timer” key to set a cooking end time.
First the key is pressed, the screen displays “Timer End Time 2.0 ”, To press the “+”
or “-” key to adjust the appointment time.
Timer time shall not be more than 24h, if so, it will return to “2” .
After completion of setting, the time displayed on the screen means working end time of
pressure cooker. (to cancel the operation, press the “Keep Warm / Cancel” key)
After preset time elapses, after cooking, the warm indicator illuminate and the unit will
go into keeping warm state. long time keeping warm is not recommended.
Page 9
Care and Maintenance
Safety Cautions
When the following circumstances take place Solutions
Power cord and plug suffer from expansion, deformation,
discoloration, damages, etc.
A portion of the power cord and the plug are hotter than usual.
Electric pressure cooker heats abnormally, emitting a burnt smell.
When power-on, there is an unusual sound or shock.
Stop use immediately, and
contact versonel.
There is dust o r dirt on the plug or socke t.
Remove dust o r dirt with a dry
brush.
Meanings of icons : displayed
Indicates “Prohibition”
Indicates
“Compulsory” Content
General Prohibition
Disassembly Forbidden
Wet Hand Forbidden
Contact Forbidden
Drenching Forbidden
Must Be Carried Out
Unplug
Ignoring these signs can/may cause injuries.
Warning
Caution
Violation of warnings may cause personal death and
serious injuries
Violation of cautions may cause injuries to persons and
properties.
For safety, please observe the following caution signs displayed:
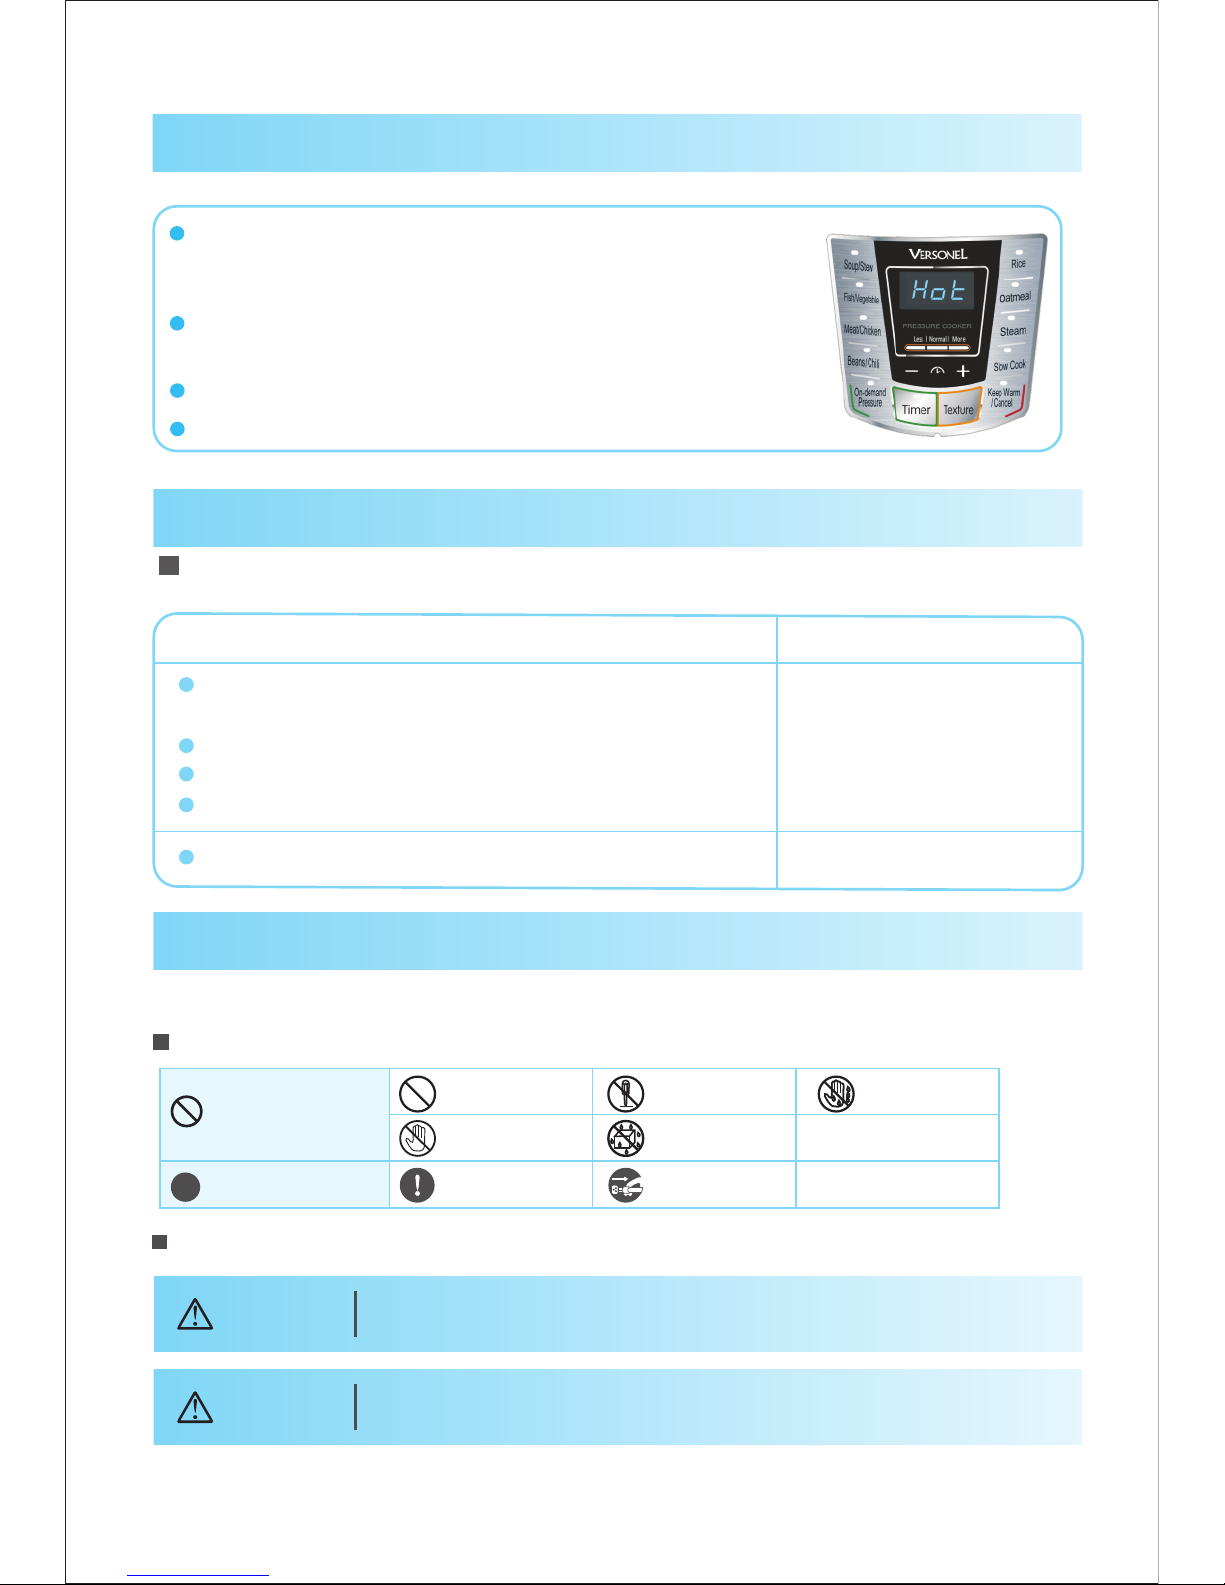
After cooking, the electric pressure cooker goes into the warm
state automatically; in the warm state, the warm indicator is
bright, and “Hot” is shown on the display screen;
You can also in standby perform the warm function by pressing
the “Keep W
arm/Cancel” key;
The keeping warm temperature is 140-176
℉;
Optimal keeping warm time is less than 8 hours.
Keep-Warm Function
Regular care or maintenance is essential in ensuring that this product is safe for
use.
08
Page 10
Cautions
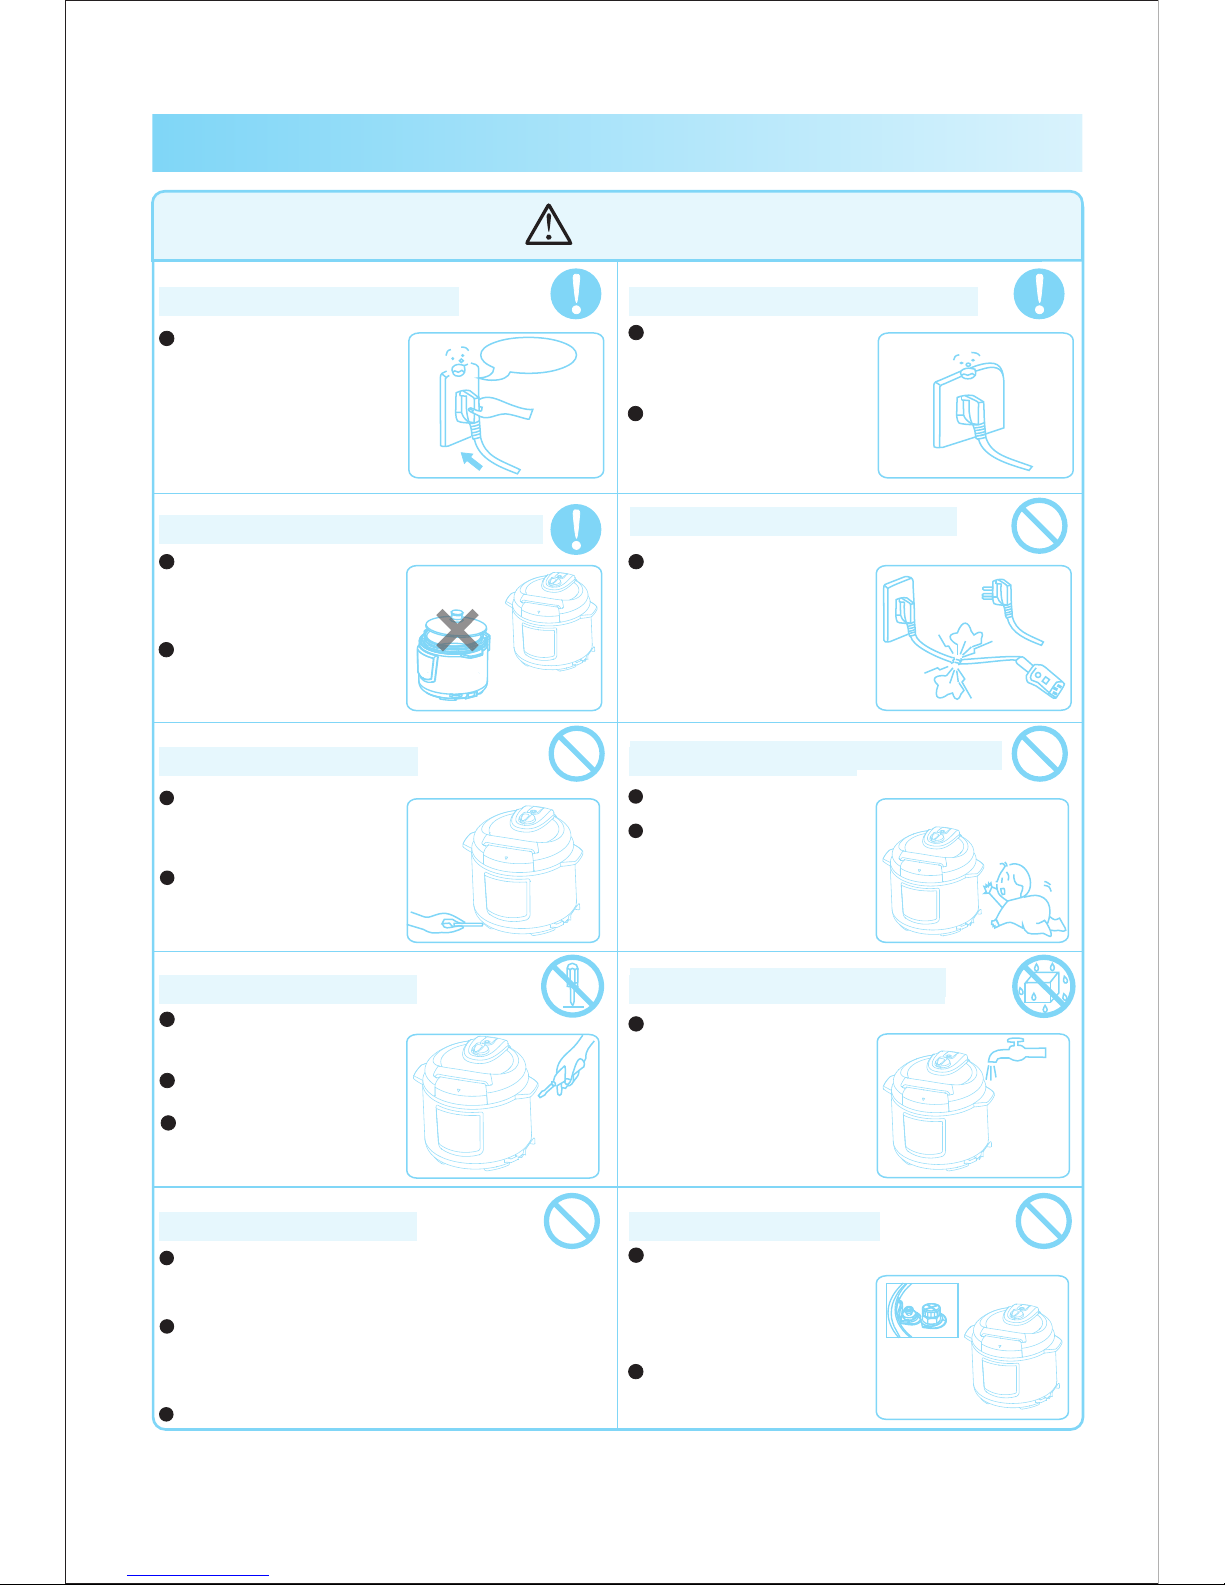
CAUTIONS
A socket shall be used independently.
Using other cover during heating is strictly prohibited
Stop the use of an damaged power cord
Do not insert foreign object
Keep away from children
No modi tic ations
Do not wash or immerse it in water
As this may cause electric
shock and short circuit.
Warning on cover lifting
Regular inspection
Do not insert foreign objects
such as metal scraps and
needles into a gap.
May cause electric shock or
unusual action.
It is strictly prohibited to use
non-brand cover during
heating.
May cause electric shock or
other serious injury.
It is prohibited to modify or
repair the unit by a nontechnician.
As this may cause fire or
electric shock.
Please send it to a
designated service agency
for repair or replacement of
spare parts.
When the electric pressure cooker does not work,
there is no pressure inside the pot and the float
valve falls down;
When the unit works, pressure inside is on the
rise, and so is the float valve. Do not open the
cover forcibly until pressure is completely
discharged;
Otherwise scalding or other injury may be caused.
Please use an individual
socket with grounded wire of
more than 10A rated current;
Joint use of the same socket
with other appliance may
cause unusual heat and fire.
The damaged power cord
must be replaced with a
special flexible cord or a
special component bought
from the manufacturer or
service agency.
Place it away from children.
This may cause burn or
electric shock.
Carry out regular inspection
of the exhaust valve and
anti-block shield to make
sure that they are
unobstructed;
Do not add any heavy object
to the exhaust valve or
replace it with other object.
Please use a 120V-60Hz socket
Fire or electric shock may
occur if 120V AC-60Hz
is not used.
AC
09
12 0V
Page 11
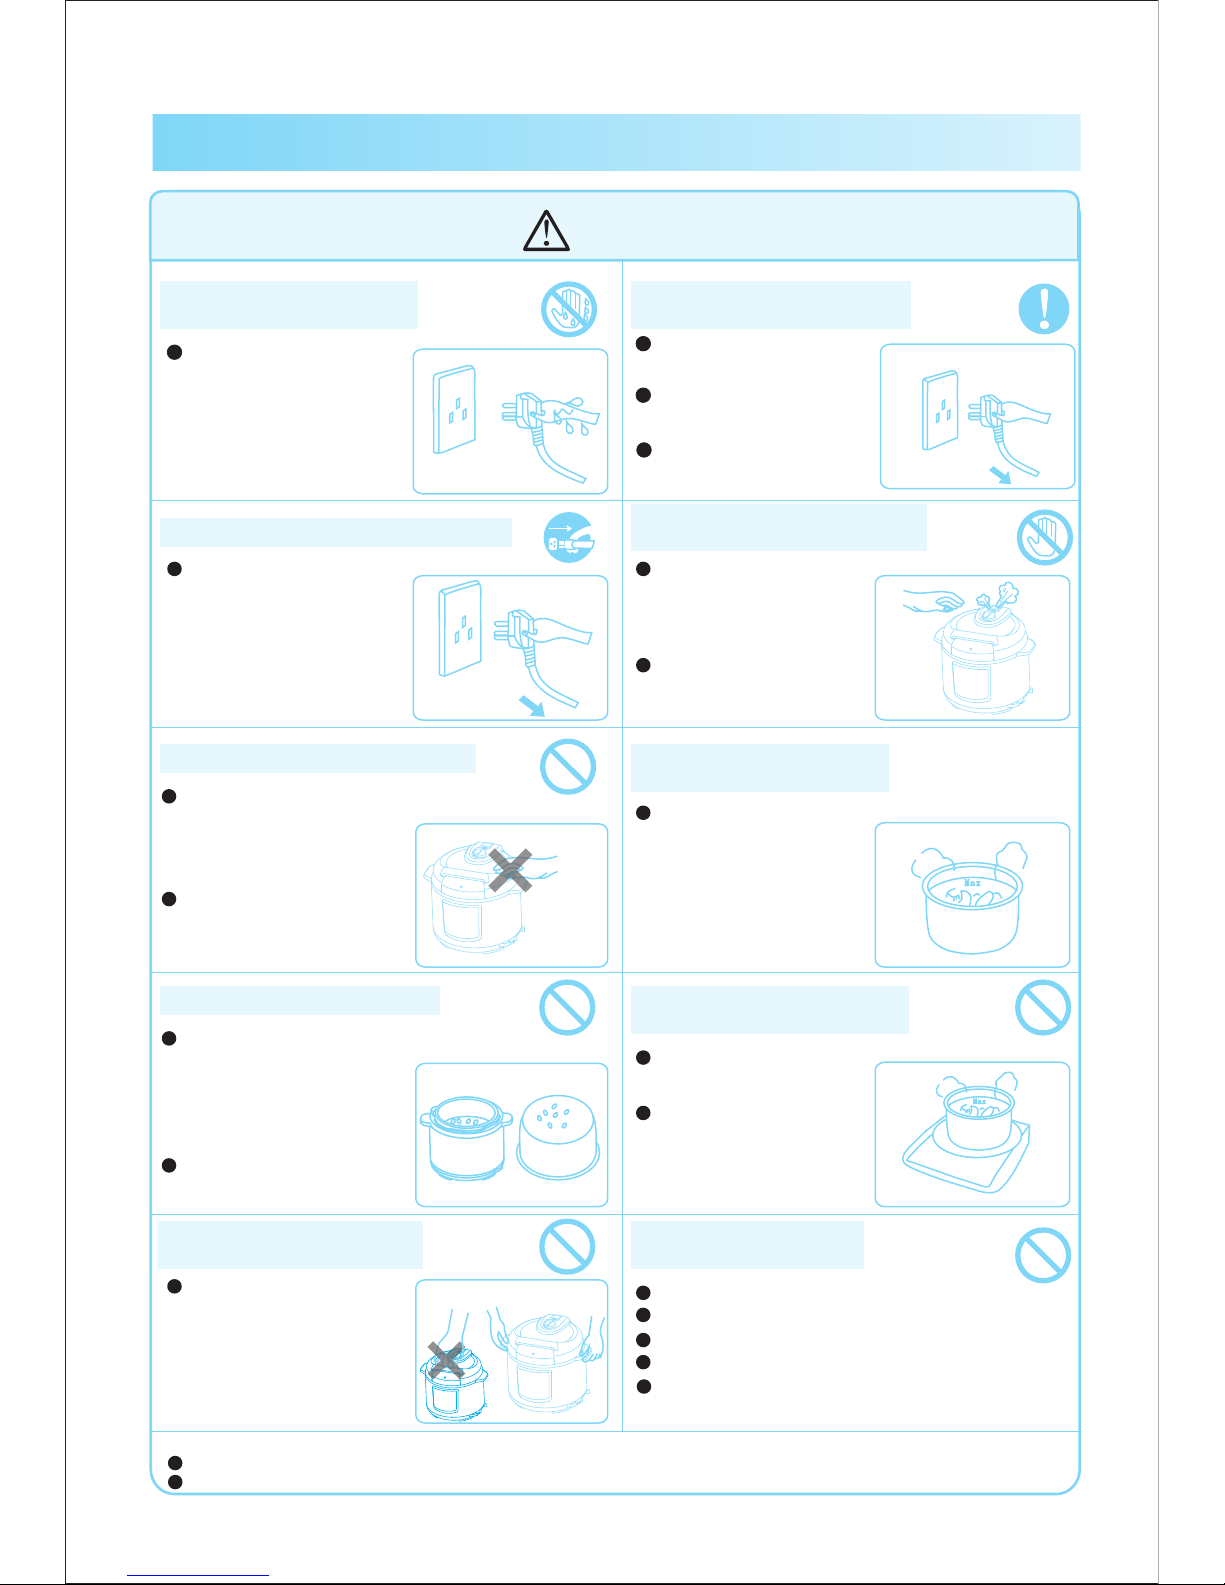
Cautions
CAUTIONS
Do not insert and pull off
the plug with wet hand
May cause electric
shock.
When removing the plug, be
sure to pinch the plug handle
When not in use, remove plug from socket.
May cause creepage,
fire or malfunction.
During operation, never move your
hand to the exhaust valve vent
Never touch the cover during operation
Cooking amount shall not
exceed MAX level
Use only the special inner pot
Do not place the inner pot on
other appliance for heating
When moving the product,
please hold the cooker handle
To move the unit, never
lift the cover handle directly
to prevent the cover from
falling down.
Never use the product in
following places
Unstable place;
Places near water or fire;
Adjacent to walls and furniture;
Places exposed to direct sunshine or oil splash.
In cooking, never move
your hand or face to the
exhaust valve vent to avoid
scalding.
In cooking, do not cover
the exhaust valve vent with
a rag.
Food to be cooked should
not exceed the MAX level,
otherwise the food may be
half-cooked or failure may
happen.
When the unit is operating,
the cover has a higher
temperature, so never
touch it with your hand;
This may cause scalding.
When there is foreign object
between the inner pot
bottom and heating plate,
first remove the foreign
object before using.
May cause overheating or
abnormal operation.
To avoid deformation or
failure of inner pot.
Please use the supplied
special inner pot.
10
Environment for putting the product
Periodically clean the table and remove the dirt from the product when it is put on the table.
The product should be kept12inch away from other kitchen appliances.
Please use an individual
socket with grounded wire of
more than 10A rated current;
Joint use of the same socket
with other appliance may.
cause unusual heat and fire.
It has the danger of causing
fire if socket of bad quality is
used.
Do not approach the stove for avoiding fire.
Page 12
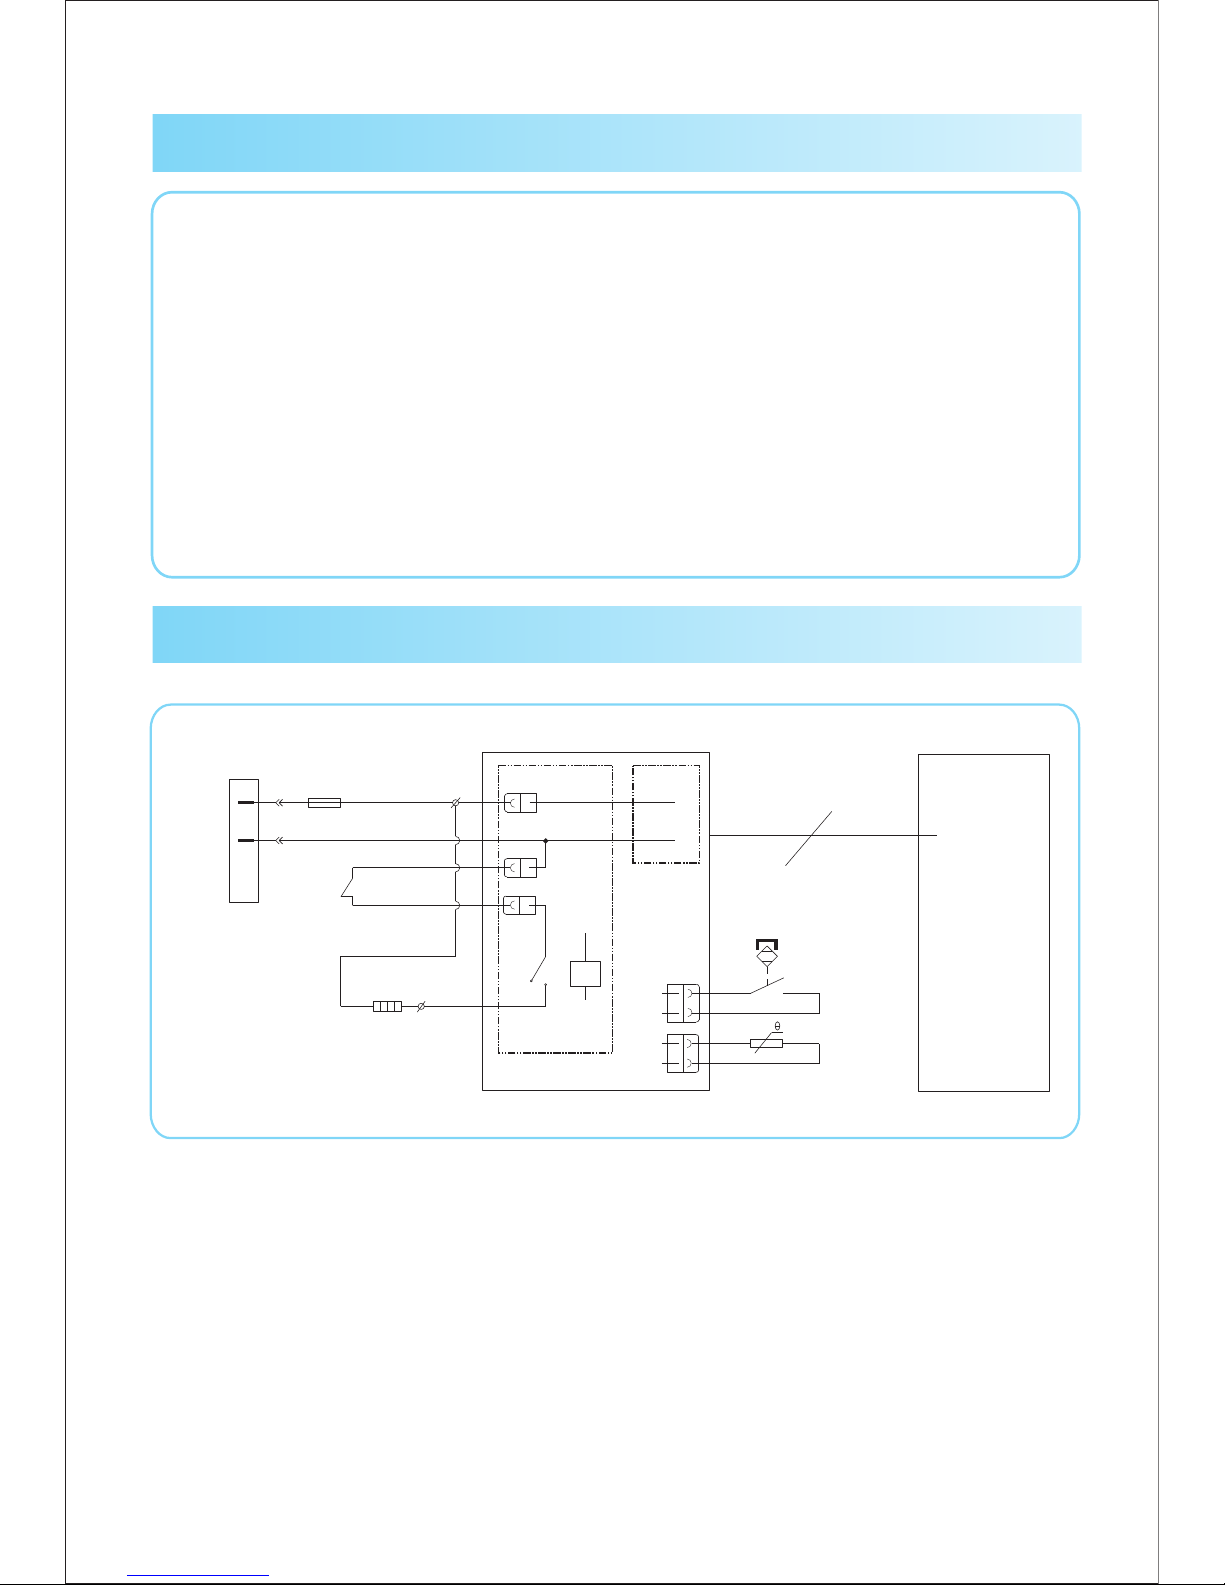
Cleaning
Circuit Diagram
11
1. After each use, thoroughly clean your pressure cooker.
2. Before cleaning, unplug the unit and carry out cleaning and
maintenance after the product cools down completely.
3. Take out the cover and inner pot, wash them with a detergent, rinse
with fresh water and then wipe them dry with a soft cloth.
4. Using clean water, clean the cover, including the gasket, exhaust
valve, anti-block shield, exhaust valve core and float valve, and
wipe it clean with a rag. After cleaning install it on the cover
correctly .
5. Clean the cooker body with a rag. Do not immerse the cooker in
water or wash with splashing water.
Cooking plate
Socket
Connecting line
Display panel
Detective switch
Temperature sensor
Temperature fuse
Power board
Pressure
switch
120V ~60Hz
N
L
N
L
Power panel
power supply
Page 13
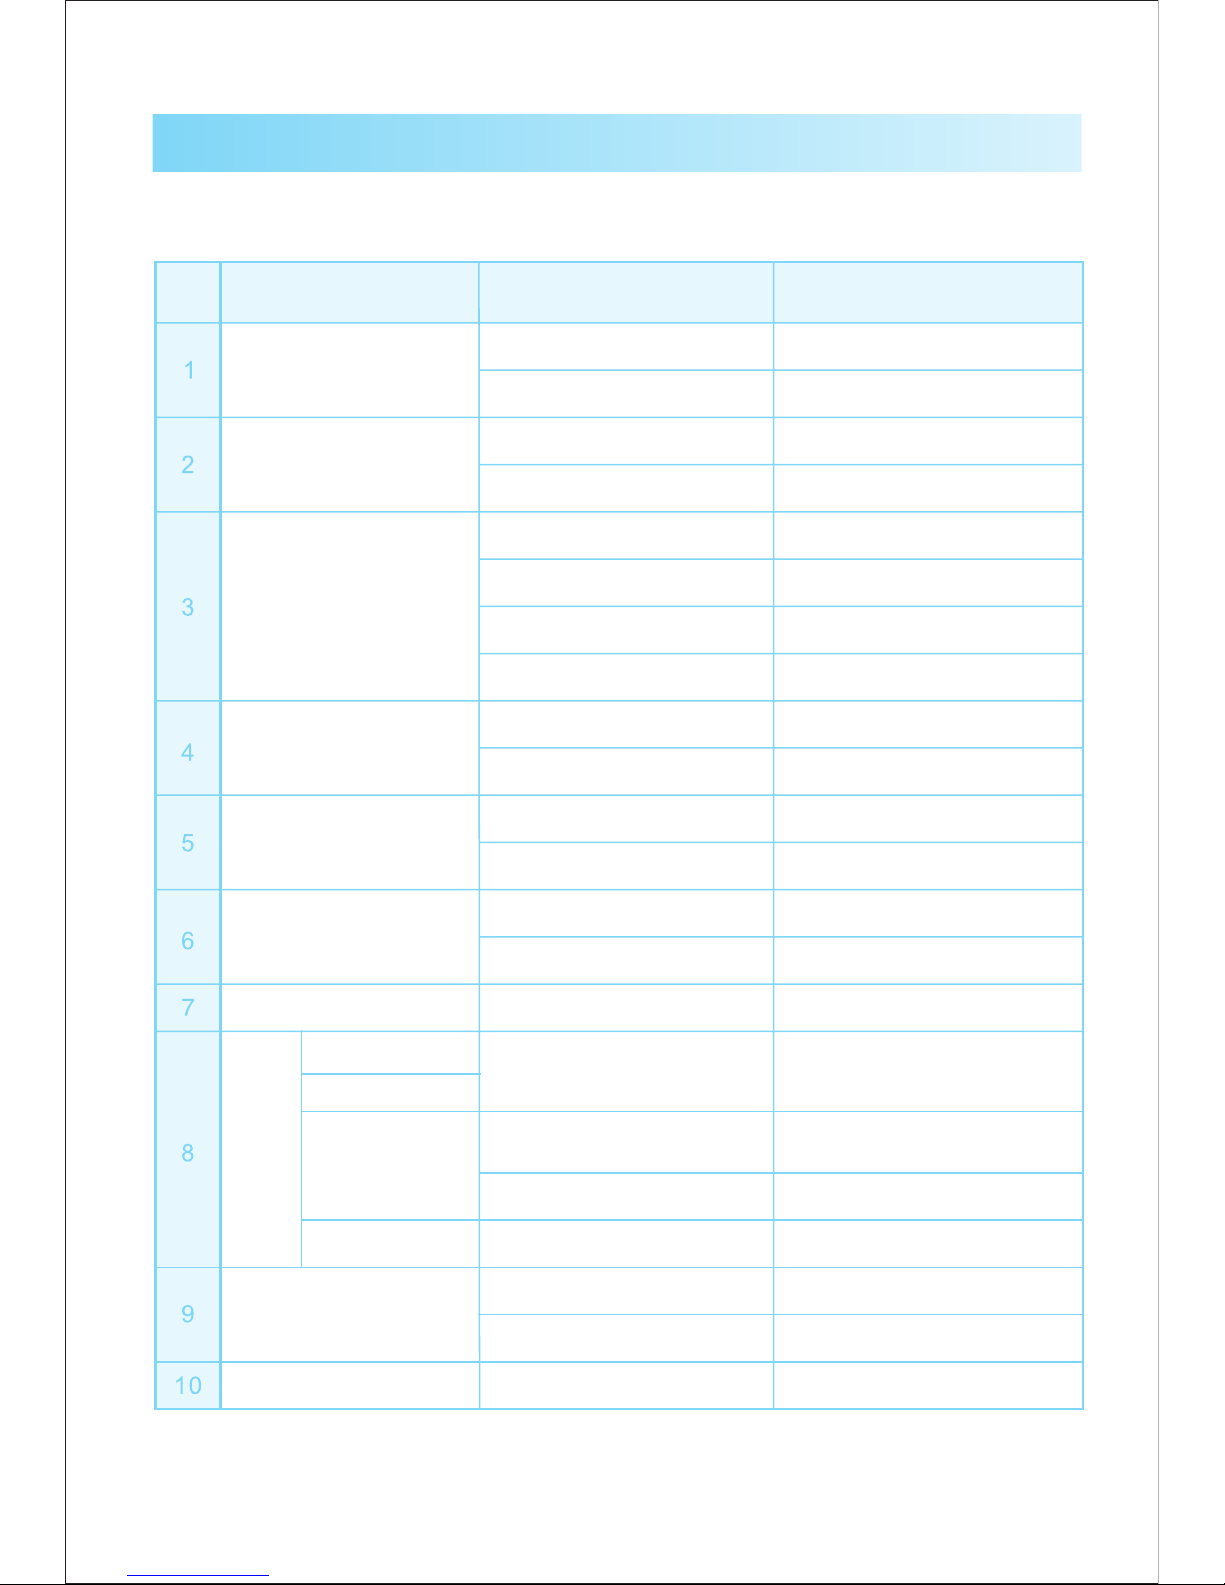
Troubleshooting
The following unusual cases are not completely caused by mechanical failures.
Please carry out a careful examination before sending the unit for repair.
S/N Problem Possible Reason Solution
Difficult to close the cover
Push rod jammed by float valve
Difficult to open the cover
Pressure exists inside the cooker
Float valve fails to fall after steam
release
Press the float valve lightly
Open the cover after the pressure
lowers down
Leakage from cover
No gasket
Put the gasket according to the
requirement
Food excess attached to gasket
Push the push rod lightly with
a hand
Gasket not positioned well Locate the gasket well
Replace the gasket ring
Cover not closed firmly Close the cover again
Gasket worn
Clean the gasket ring
Leakage from float valve
Food excess attached to float
valve gasket ring
Clean the float valve gasket
Float valve gasket ring worn Replace the float valve gasket
Float valve unable to rise
Excessively little food and water
inside pot
Send it to the service agency for
inspection
Put food and water according to
directions
Little leakage from cover or
exhaust valve
Exhaustion from exhaust
valve does not stop
Exhaust valve not in sealing
position
Pressure control fails
Slide the exhaust valve to the
sealing position
Send it to the service agency
for maintenance
Lamp not bright after power on Bad contact with socket Please inspect the socket
All
lamps
flash
C1 appears on nixie tube
C2 appears on nixie tube
C5 appears on nixie tube
C6 appears on nixie tube
Sensor fails
Send it to the service agency
for inspection
Temperature is too high because
there is no water inside the inner pot
Add water as required
Temperature is too high because
inner pot is not placed
Put the inner pot properly
Pressure switch fails
Send it to the service agency
for inspection
Rice half cooked/too hard
Too little water added Add more water
Cover closed prematurely
After the time is up, release steam
and open the cover in 5 minutes
Rice too soft
Too much water added Reduce water level
12
Page 14

9
H
06
E
2
1488
4
 Loading...