

Page 1
Bluetooth Outdoor LED Security Motion Light
Model: VSLBTLW/B
Design and Functionality Patent No: 201630144661.1 & 201630133622.1 & 2016447229.4
Please read these instructions carefully prior to installation and retain them for future reference. Failure to
follow any of these instructions could void product warranties.
For questions regarding this product or warranty, please contact Customer Service at [email protected]
1
Page 2

IMPORTANT SAFETY INSTRUCTIONS
To reduce the risk of death, personal injury or property damage from fire, electric shock, falling
parts, cuts/abrasions and other hazards read all warnings and instructions included with and on the
fixture box and all fixture labels.
Before installing, servicing or performing routine maintenance upon this equipment, follow these
general precautions.
For Commercial Installation: Service and maintenance of this fixture should be performed by a
qualified licensed electrician.
For Residential Installation: If you are unsure about the installation or maintenance of this fixture,
consult a qualified, licensed electrician.
Do not mount the unit against flammable surfaces.
The motion detector will not operate correctly if it is
installed: Near the outlet of a central heating boiler
o Near an air conditioning unit
o Pointing directly at moving vehicles
o Within sight of reflection from moving water
o Where other lamps could shine on the detector
Fixtures can NOT be used with a dimmer switch, motion or occupancy sensor and other electronic
switching devices unless otherwise designated. LED fixtures must be powered directly off a switch circuit.
Do not install more than one motion sensor light on one wall switch.
This fixture should not be used in areas with limited ventilation or high ambient temperatures.
This fixture is intended to be connected to a properly installed and grounded UL listed junction box.
These instructions do not claim to cover all details or variations in equipment or provide every possible
contingency to meet in connection with the installation, operation or maintenance. Should
further information be needed, you may contact Customer Service at: [email protected]
WARNING: RISK OF ELECTRICAL SHOCK
Turn off electrical power at fuse or circuit breaker box before wiring fixture to the power supply.
Verify that the supply voltage is correct. Connect fixture to a 120 volt, 60 Hz power source.
Make sure all electrical and grounded connections are in accordance with the National Electrical Code
and any applicable local code requirements.
All wiring connections should be capped with UL listed wire connectors.
CAUTION: RISK OF PRODUCT DAMAGE
Never connect components under load.
Do not mount or support these fixtures in a manner that can cut the outer jacket or damage wire insulation.
Avoid covering LED fixtures with insulation, foam, or other material that will prevent convection or conduction
cooling.
Never connect an LED product directly to dimmer packs, occupancy sensors, timing devices or other
related control device, unless individual product specifications deem otherwise.
Unless individual product deems otherwise: do not exceed fixtures maximum ambient
temperatures. LED products are Polarity Sensitive. Ensure proper polarity before installation.
Electrostatic Discharge (ESD) can cause damage to LED fixtures. Personal grounding equipment
must be worn during all installation or servicing of the unit.
Do not touch the individual electronic components, it may cause ESD, shorten lamp life or alter performance.
CAUTION: RISK OF INJURY
Wear gloves and safety glasses at all times when removing fixture from carton, installing,
servicing or performing maintenance.
Avoid direct eye exposure to the light source while it is on. LED LAMPS ARE EXTREMELY BRIGHT.
UNDER NO CIRCUMSTANCES SHOULD YOU STARE INTO AN LED BEAM, THIS MAY CAUSE
IRREPARABLE DAMAGE TO THE EYE.
Account for small parts and destroy packaging materials, as these may be hazardous to children
WARNING: RISK OF BURN
Allow fixture to cool before handling. Do not touch enclosure of light
source. Do not exceed the maximum wattage marked on the label.
Keep combustible and other materials that can burn away from the luminaries, fixture and lamp/lens.
2
Page 3
PRE-INSTALLATION
Before beginning assembly of the product, make sure all parts are present. Compare parts with
package contents list and hardware contents. If any part is missing or damaged, do not attempt to
assemble the product. Please contact [email protected] for any missing parts.
Estimated Installation time: 30 minutes.
Note: Fixture should be installed by persons with
experience in household wiring or by a qualified
electrician. The electrical system and the method of
electrically connecting this fixture to must be in
accordance with the National Electrical Code and
local building codes.
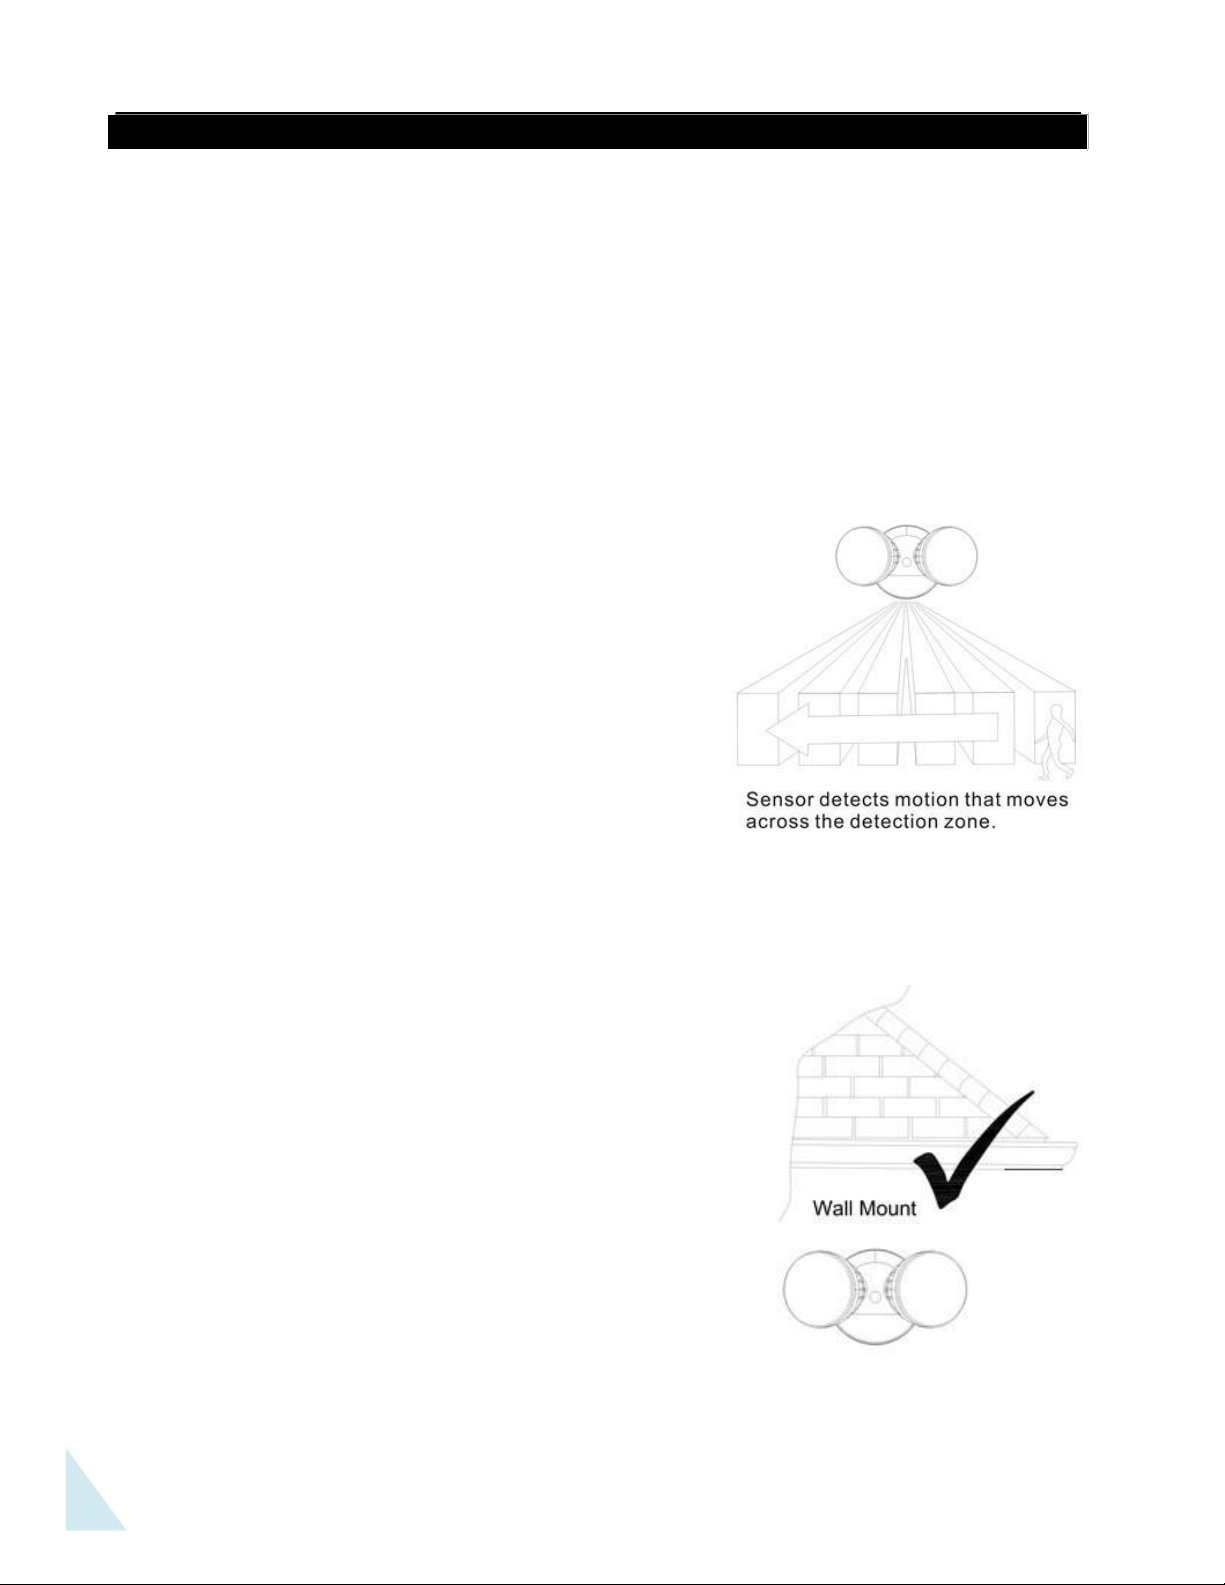
Install the motion sensor 6.5 ft / 1.9 m - 10 ft / 3 m above
the ground. Motion sensor is less sensitive above 10 ft /
3 m. Mount motion sensor so motion moves across
detection zone.
Mount sensor away from heat producing
sources to prevent false triggering. Also be very
careful not to include objects such as windows,
white walls and water in the detection zone.
Mount fixture away from moving objects such
as trees and street traffic.
Do not install more than one motion sensor light
on one wall switch.
Suitable for covered wall or eave mounting.
MOUNTING LOCATIONS
Determine the mounting location – a wall or under an
eave. Position the lamp head in the general direction
of the desired light coverage.
Note: Do not mount this light fixture on the ground.
3
Page 4
PRE-INSTALLATION (Continued)
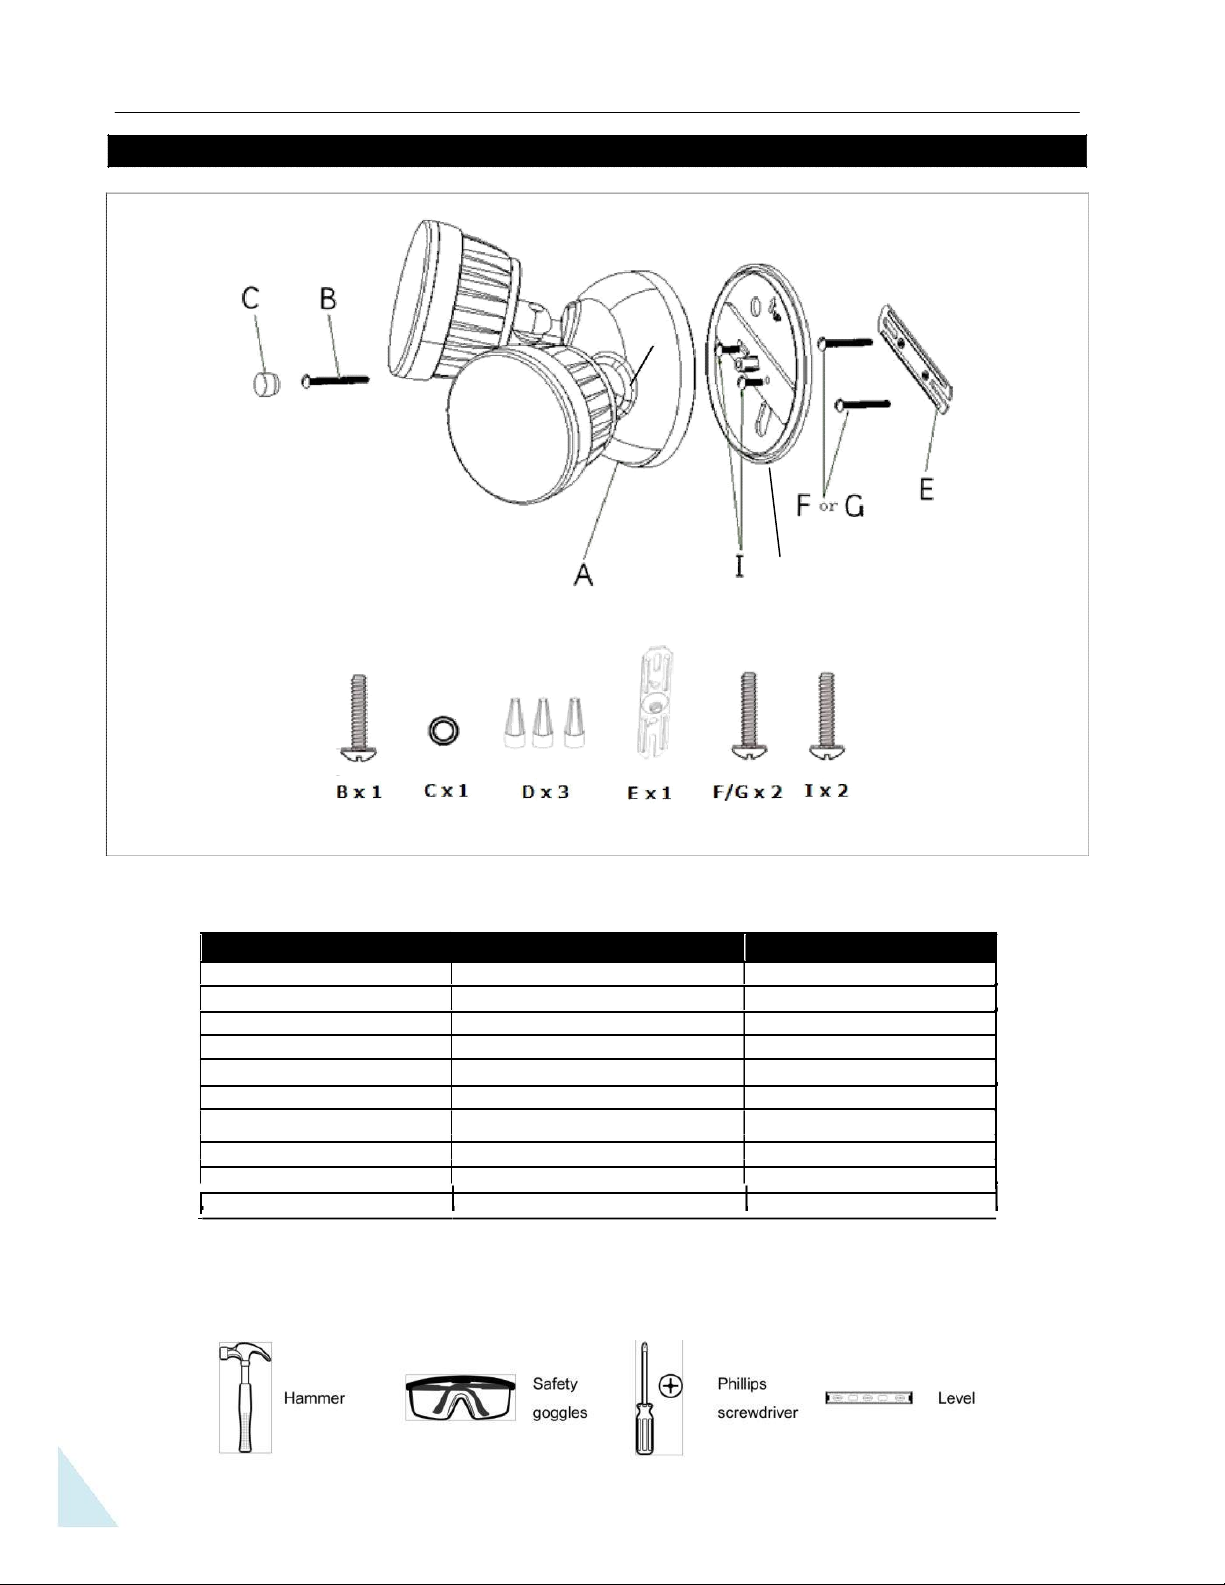
A
Light Fixt
ure
B
M4 X 45mm Center Screw
C
Decorative Cover
E
Mounting Bracket
F
# 6-32 X 3/4” Junction Box Screw
User Manual
H
Part
D
G
H
I
FIXTURE PACKING LIST
Description
Wire Nut
# 8-32 X 3/4” Junction Box Screw
Plastic Bracket
M4 X 20mm Screw
Mounting Hardware included.
Tools Required for Installation (Not included):
Quantity
1
1
1
3
1
2
2
1
2
1
4
Page 5
INSTALLATION
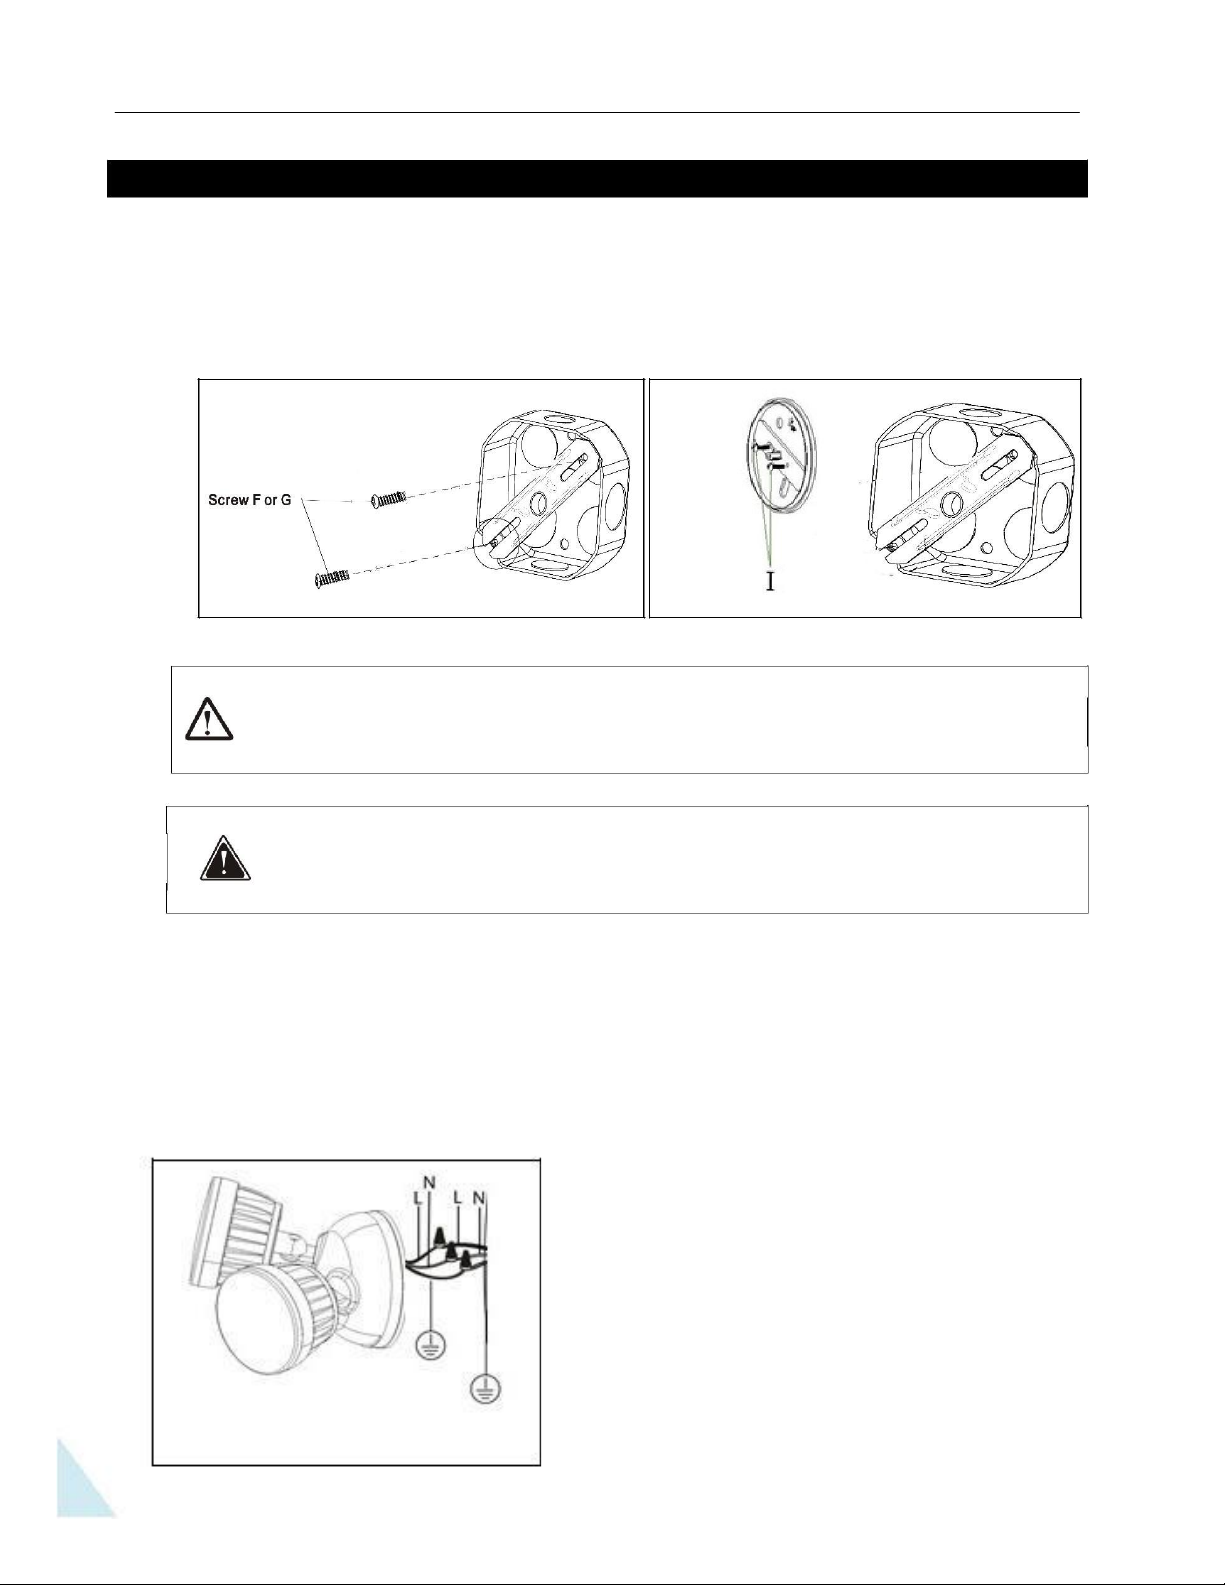
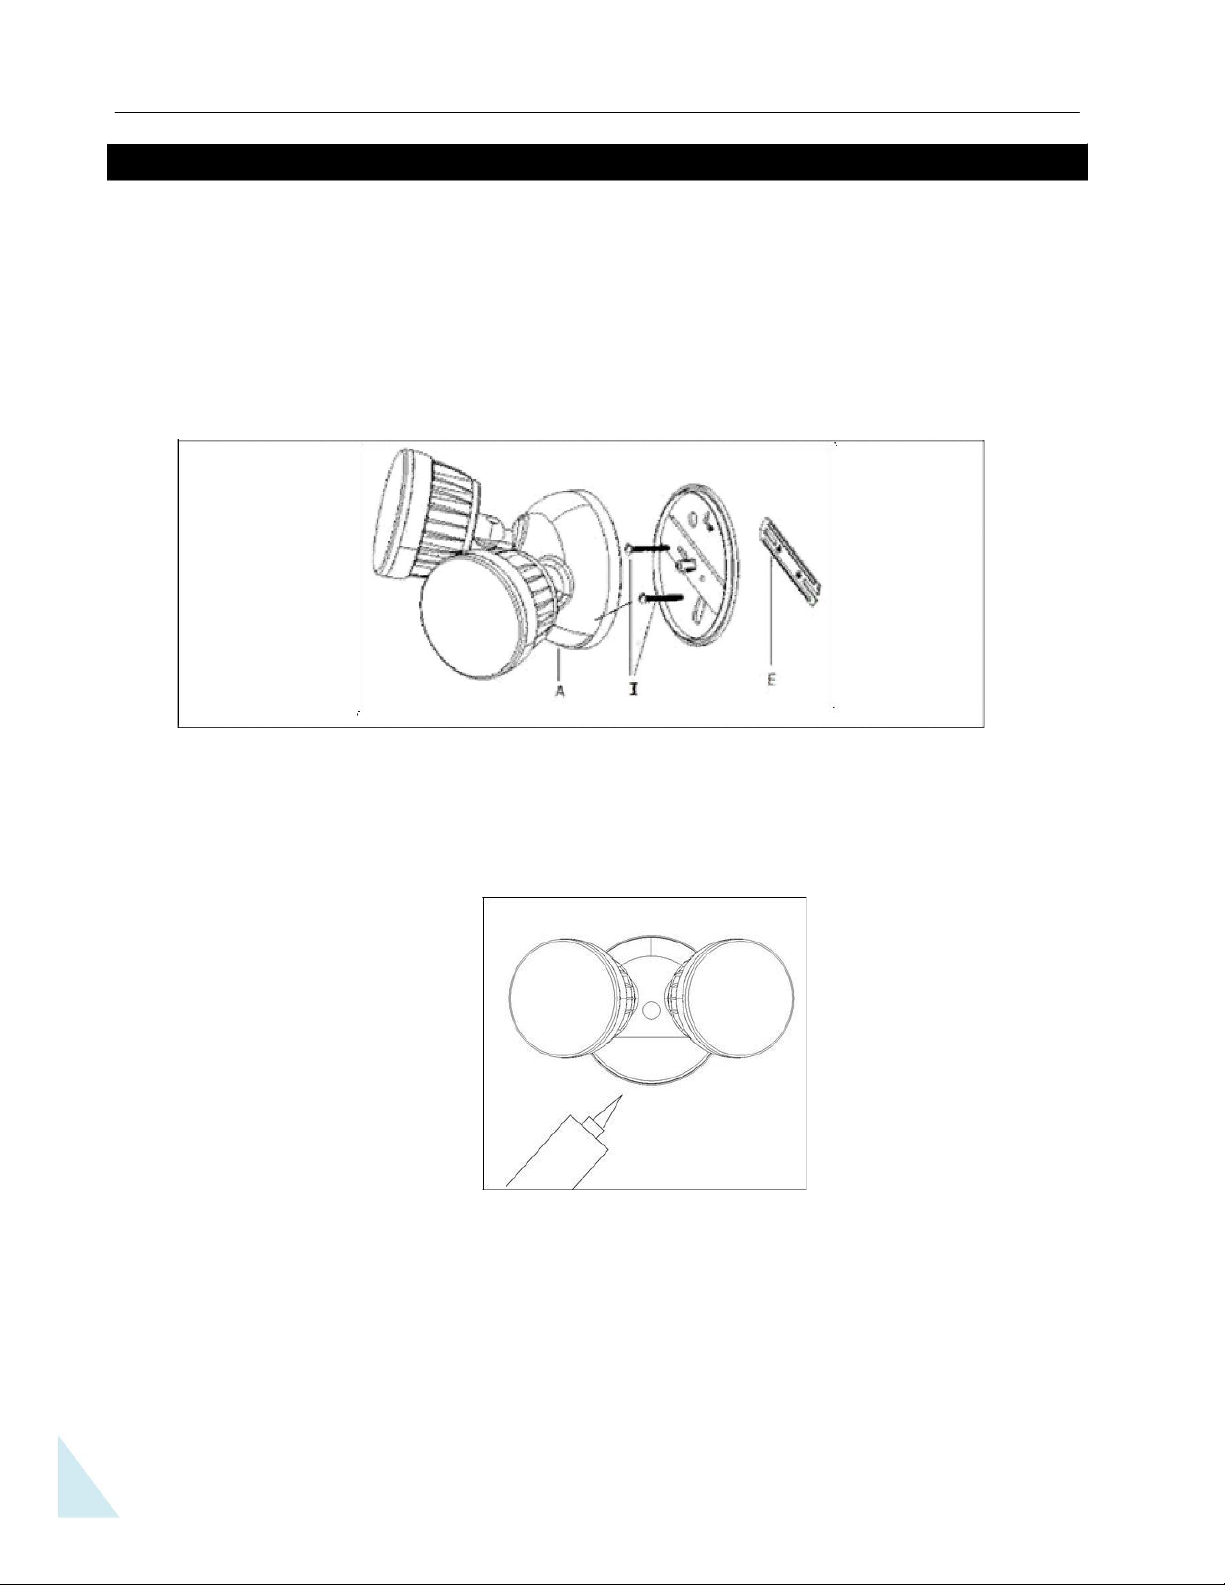
Step 1. Installing the Mounting Bracket
Line up the holes on the Mounting Bracket (E) with the holes on your junction box.
Using the two Mounting Screws (F or G) attach it tightly.
Line up the holes on the Plastic Bracket (H) with the holes on the Mounting
/bracket with the two Mounting Screws (I) attach it tightly.
WARNING: Risk of electric shock. Disconnect power at fuse or circuit
breaker before installing or servicing.
CAUTION: Do not cut any wires with factory installed wire connectors
or remove the wire connectors.
Step 2: Wiring the Light Fixture
Connect the light fixture wires to the junction box wires with a Wire Nut (D). The wire should
pass through the Plastic Cover Bracket (H)
White to white
Black to black
Green ground wire to house ground
Note: Make sure the polarity is correct.
5
Page 6
INSTALLATION (Continued)
Step 3. Mounting the Light Fixture
Install the Light Fixture (A) to the Mounting Bracket (E) with affixed Center Screws
(B). Cover the hole of the Light Fixture (A) with attached Decorative Cover (C).
Note: Make sure all the wires are connected inside the light and junction box before attaching the
light to the junction box.
Step 4. Caulking Around the Light Fixture
Caulk around the canopy and mounting surface with silicone sealant (not included).
Note: If you install this light fixture on the covered wall or eave without junction box, you must use the
appropriate screws (not included) to install this light fixture on the covered wall or eave directly depending on
the surface (replaces (F) or (G).
6
Page 7
OPERATION
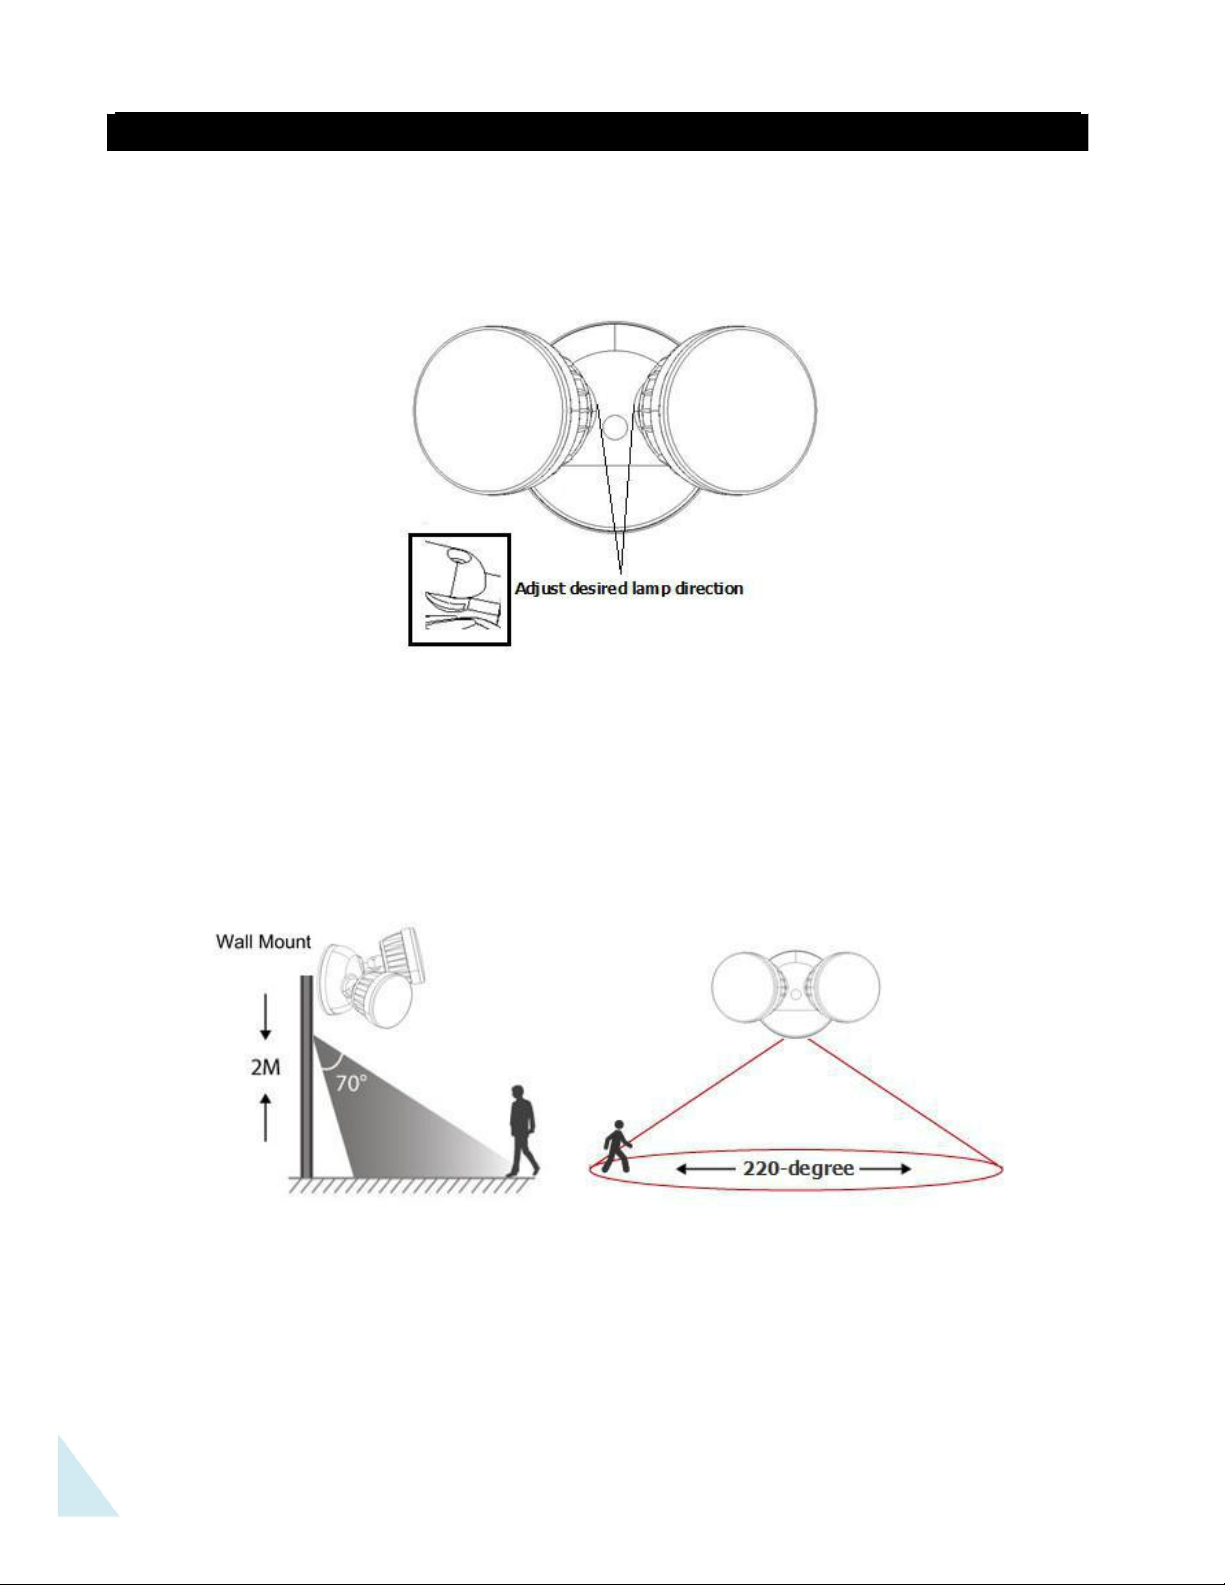
Adjusting the Lamp heads
1 Adjust the lamp heads direction up and down with range of 15 degrees. The lamp heads can be adjusted
around with max 350 degrees to get the desired lamp direction.
Note: LED LAMPS ARE NON-REPLACEABLE. Do not attempt to access / maintain the LEDs;
they are not replaceable and any contact may damage the LEDs and will void the warranty.
2 The Motion Sensor Detector
Detection Range: 65 ft. / 20 m, 220 degrees on an optimum installation height of 2.5 M (8 ft)
Note: When you first install your security light, ensure the PIR detector covers the desired area.
7
Page 8
To Download the App on your Smartphone
Connecting the VSLBTLW/B fixture to your smart phone
Please ensure you are within 10 meters away from the fixture while paring with your smart device.
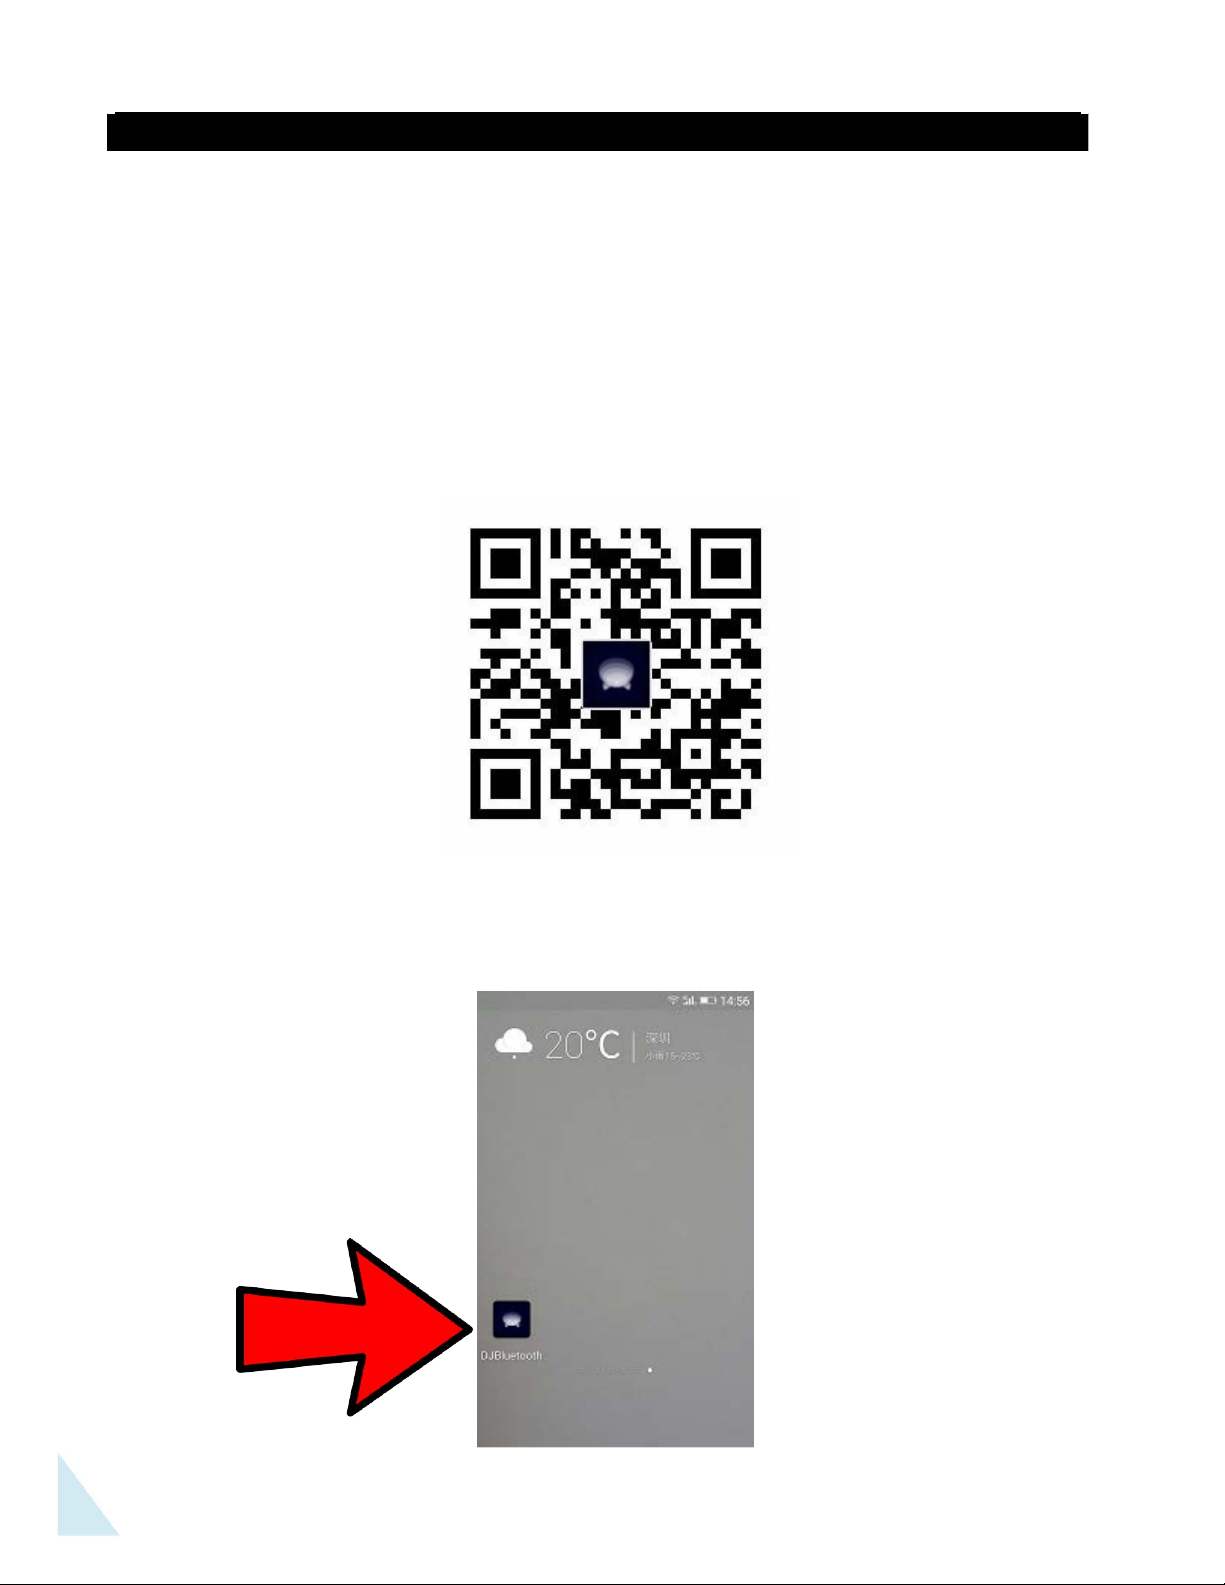
1. Downloading the DJBluetooth App on your smartphone
Scan the QR code appropriate to your phone to download the free “DJBluetooth” app to
an IOS or Android device, OR search for “DJBluetooth” from Google Play store or Apple
Store to download.
IOS or ANDROID
Install the App on your smart phone
2. Tap on the DJ Bluetooth Icon to open the App
8
Page 9
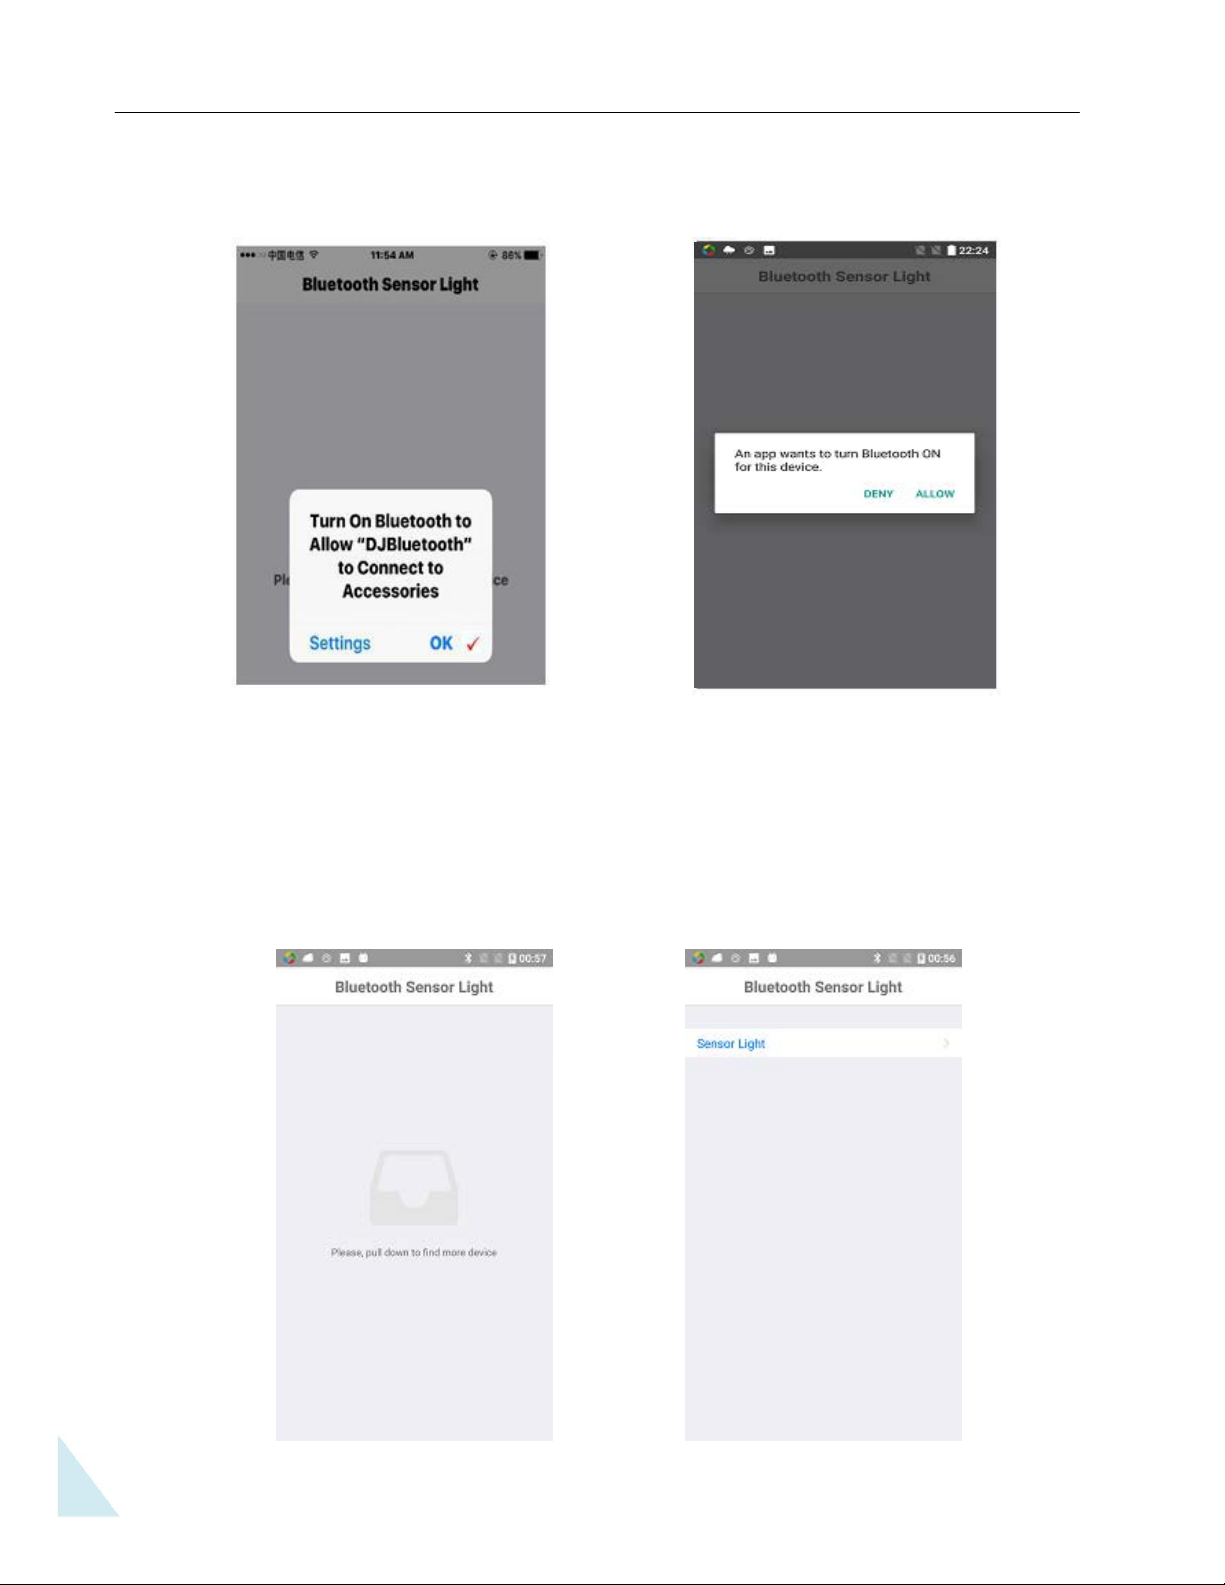
3. Ensure that you turn on the Bluetooth function for your phone
4. Pairing the light to the smart phone app – Operation distance is 10 M (32 Ft) plus.
Ensure the power to the light is turned ON.
The LED light will turn off after 5 sec. then pull down the screen on the IOS App or
Android App. You will find the “Sensor Light” device on your screen.
9
Page 10
5. After the completion of the pairing process
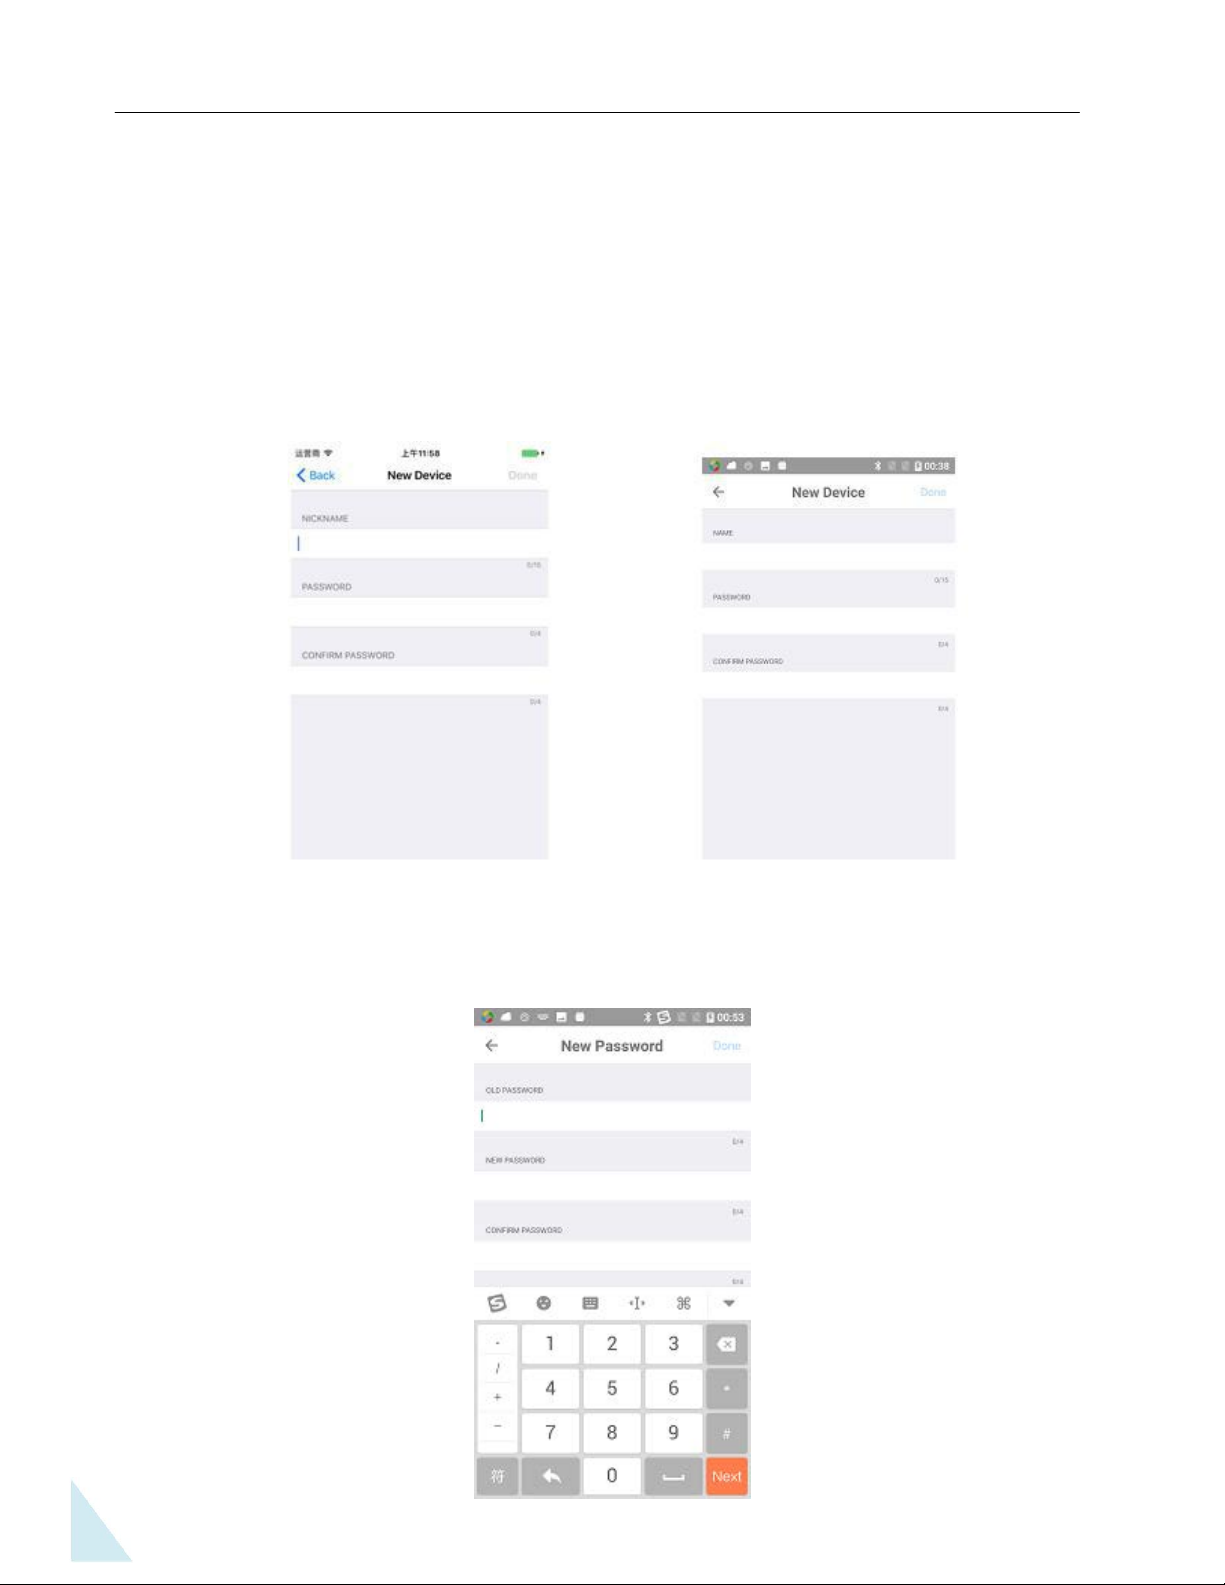
Select and Tap the New Device to start the pairing process.
Tap “Nickname” and enter a name (of your choice) and the password for the light (the
password consist of 4 digits of your choosing.) Then Tap “Done” to save it.
Should you install more than one light fixture it will be recommended to only use one password to
control multiple light fixtures to prevent the smartphone App from requesting you to enter the
password again when using different passwords for multiple installed fixtures.
Please wait about 5 Seconds after you saved the data. You will then see the New Device on your
smartphone App.
Should you want to change the password, you can Tap the “Password” button, then, enter your
“Old Password” and then “New Password”, enter new password to confirm and Tap the “Done”
button to save your Password. Please wait about 5 Seconds after you save your data to resume
activity.
10
Page 11
6. Testing The Light
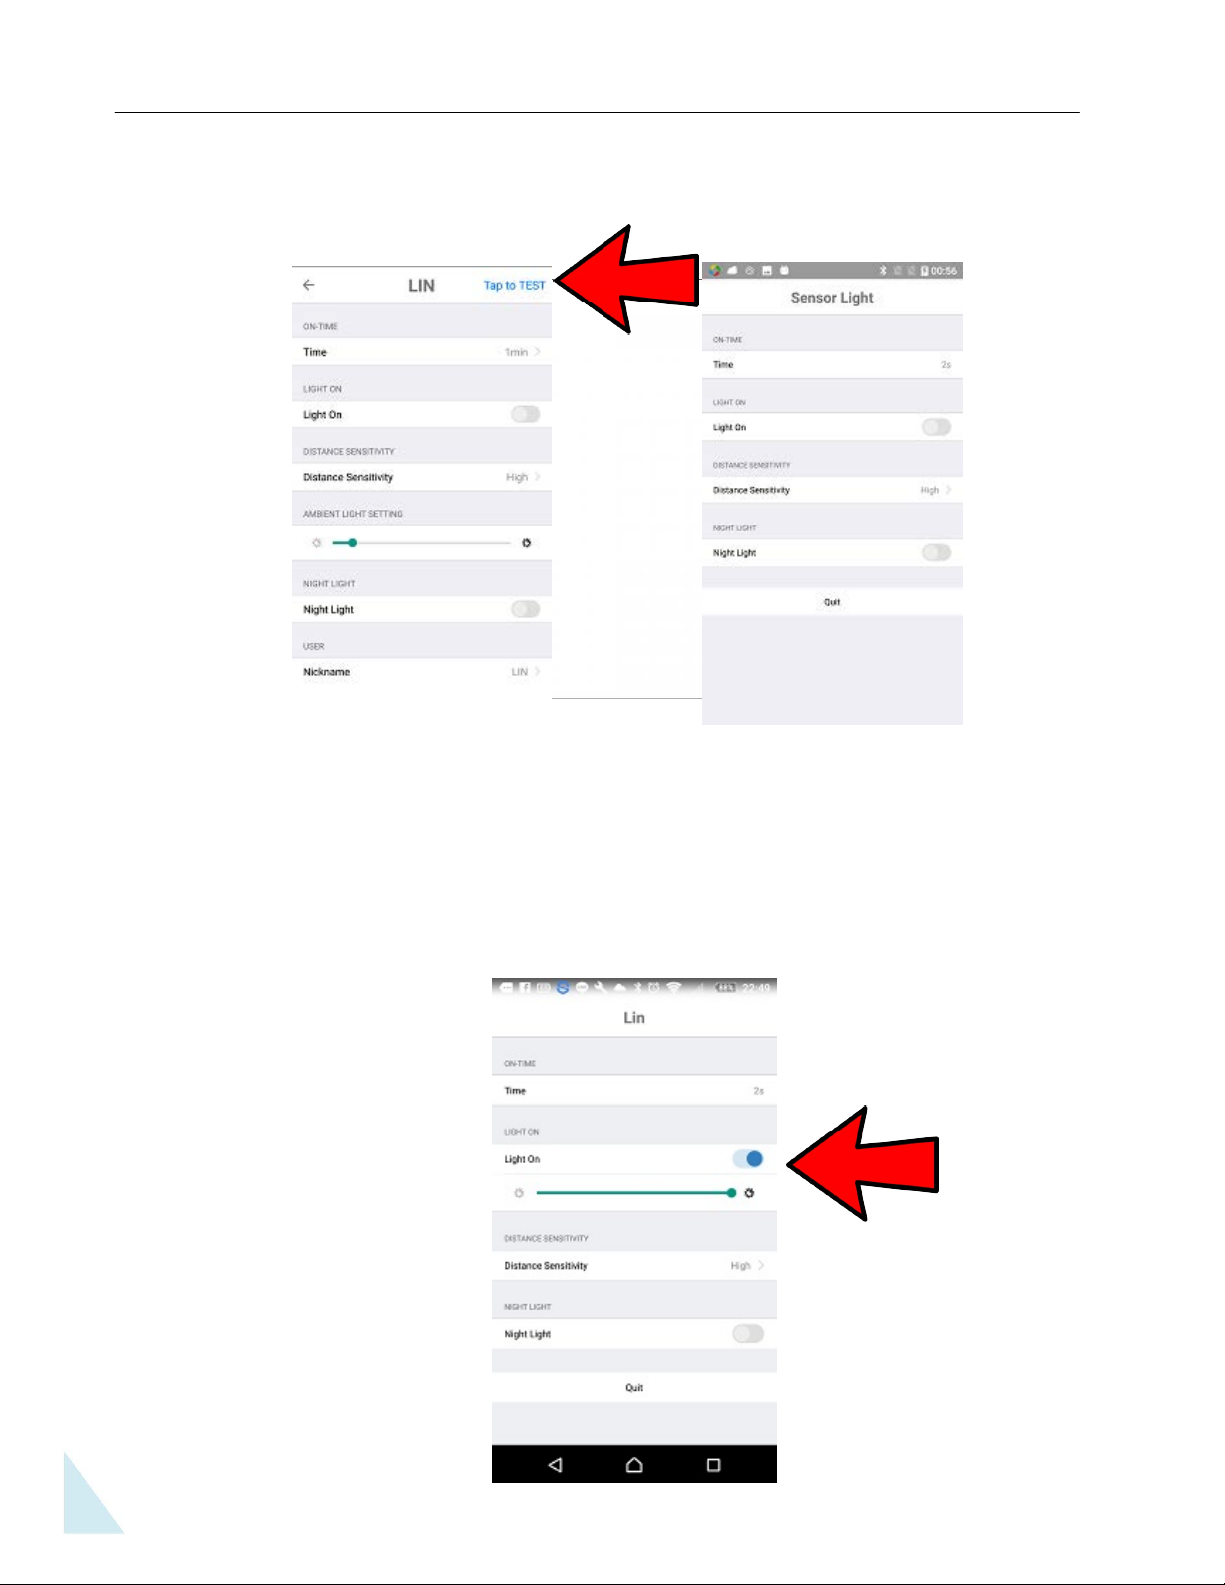
Tap the test button, then go to the App test screen.
Perform the sensor testing by walking in front of the sensor light, the detected area is around 20M (65 ft)
(it might 15M or 10M) and 220 degrees. On motion sensor detection, the light will go on for 2 seconds
and this indication will repeat on detection as a sign the light and motion sensor are functioning
properly.
Turn on the “Light On” by switching the button on the app screen (turn green), and the light will go on,
and the light slider can be used to dim the light level from High to Low. When switching it off, the light
will return to a normal motion sensor light function.
11
Page 12
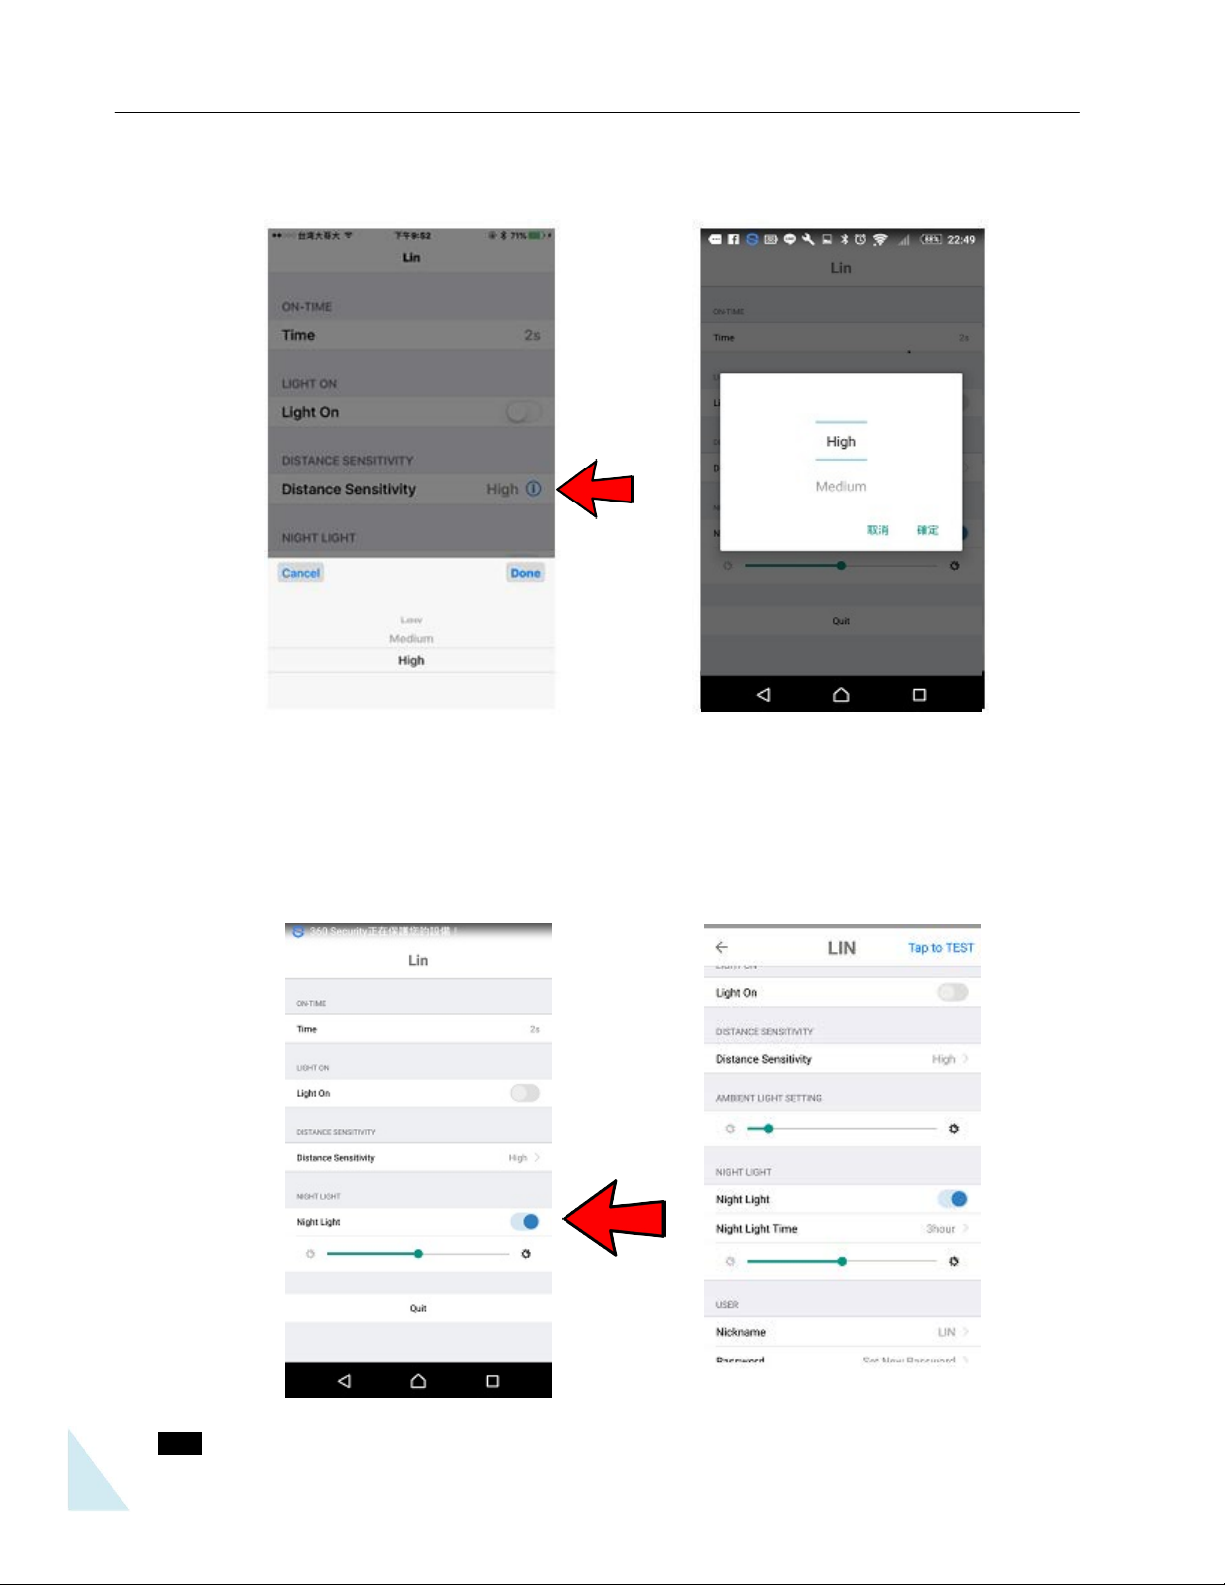
Tap the “Distance Sensitivity” to choose the detection distance level from “Low, Medium, High"
( Low: around 10-12M (32-40 ft), Medium: around 14-16M, (45-52ft), High: around 19-21M (62-68ft)
Turn on the “Night light” switch button (turns green), the light brightness will reduce to 30% of
the total light brightness, then you can dim the light brightness through the slider from High,
Medium to Low.
Please note: When the light sensor detects an object, the light will return to 100% in brightness,
after the detection light on time expires, the light will return to the Night Light (the Night Light
brightness will be according to the setting between Low, Medium or High)
12
Note : After all function testing, please tap the “Quit” button to return to the normal function screen.
Page 13
7. Normal function
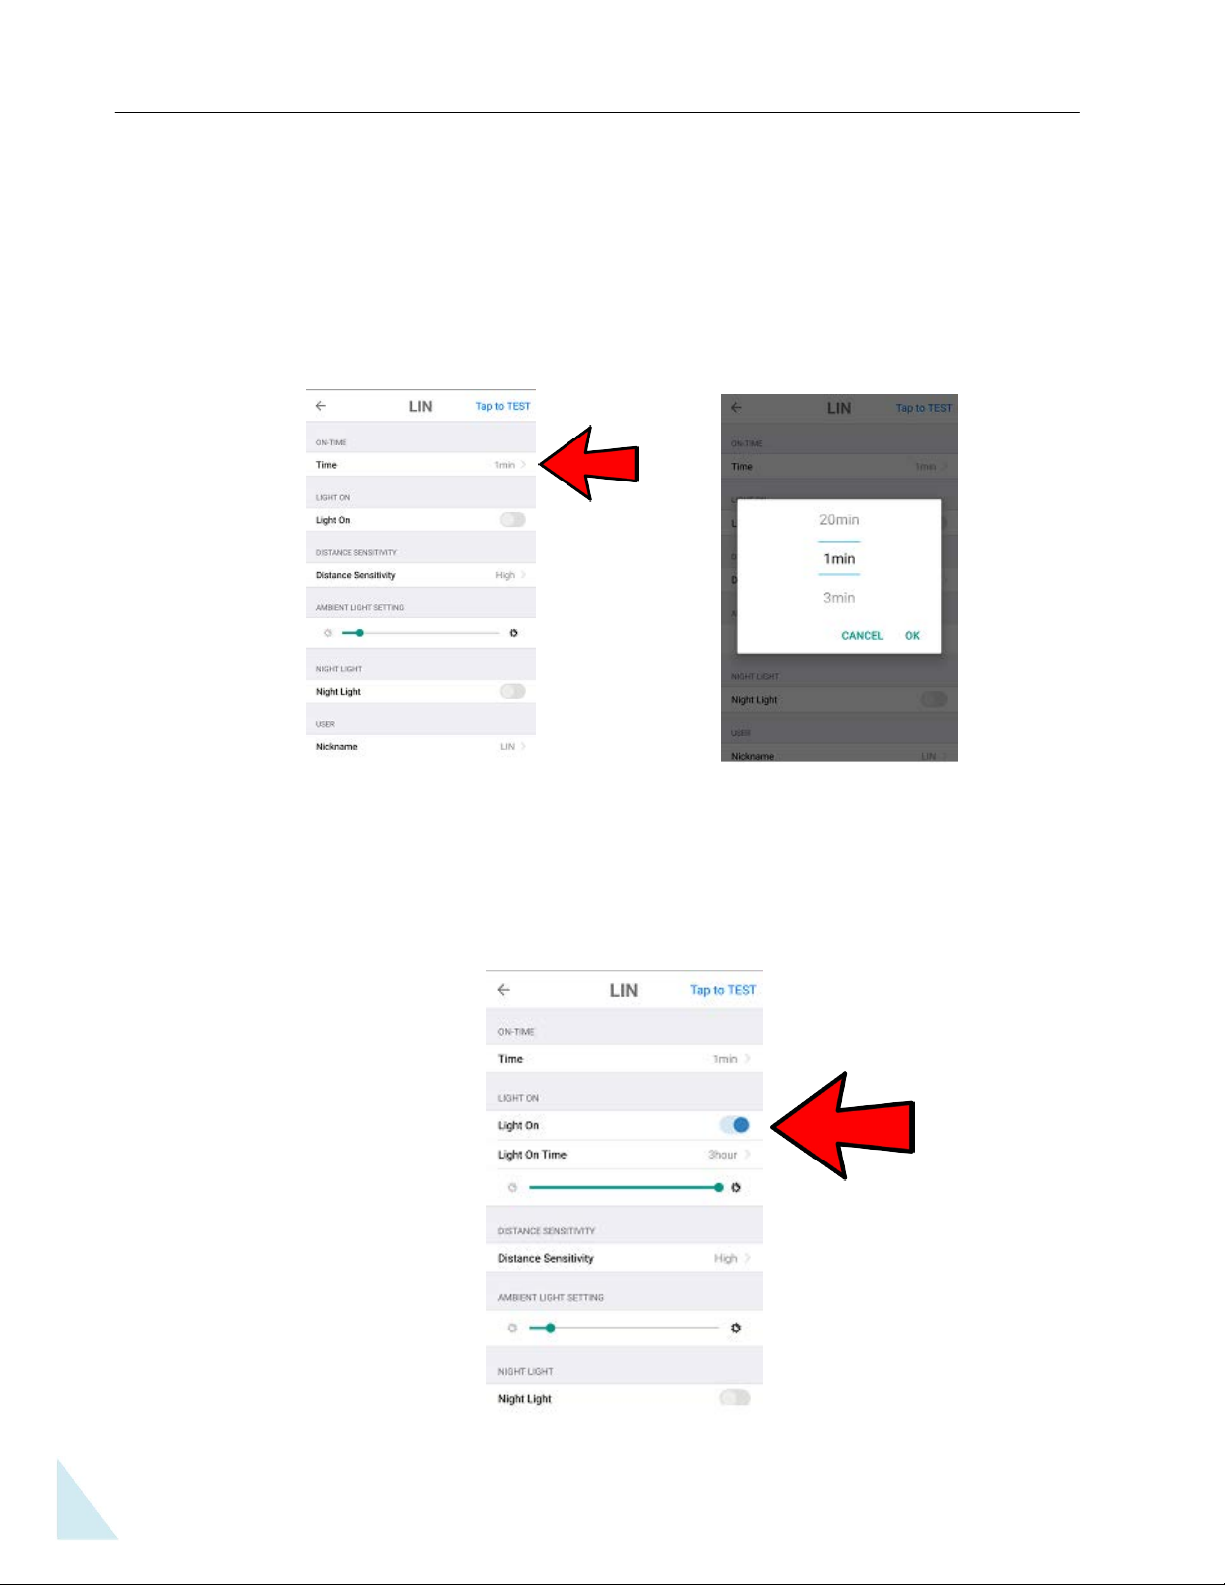
A. "TIME": Adjust the amount of time the light will stay on during motion sensor detection
5 time setting options to choose from (1min, 3min, 5min, 10min, 20min)
For example, when you choose 1min, motion sensor detection the light will go on
for 1 minute, after no detection the light will go off and be on standby for the next
detection and repeated on the time setting choice. Should an object remain in the
detective area, the light will remain on until the object is no longer in the
detection area. Please note that the default setting is 1 minute.
B. “Light On”: To keep your light on for a solid amount of time
Switch the App button to green, then, slide the light slider to dim the light level from High to Low,
Should the selection be in an off selection, the light will turn to a normal sensor light function.
13
Page 14
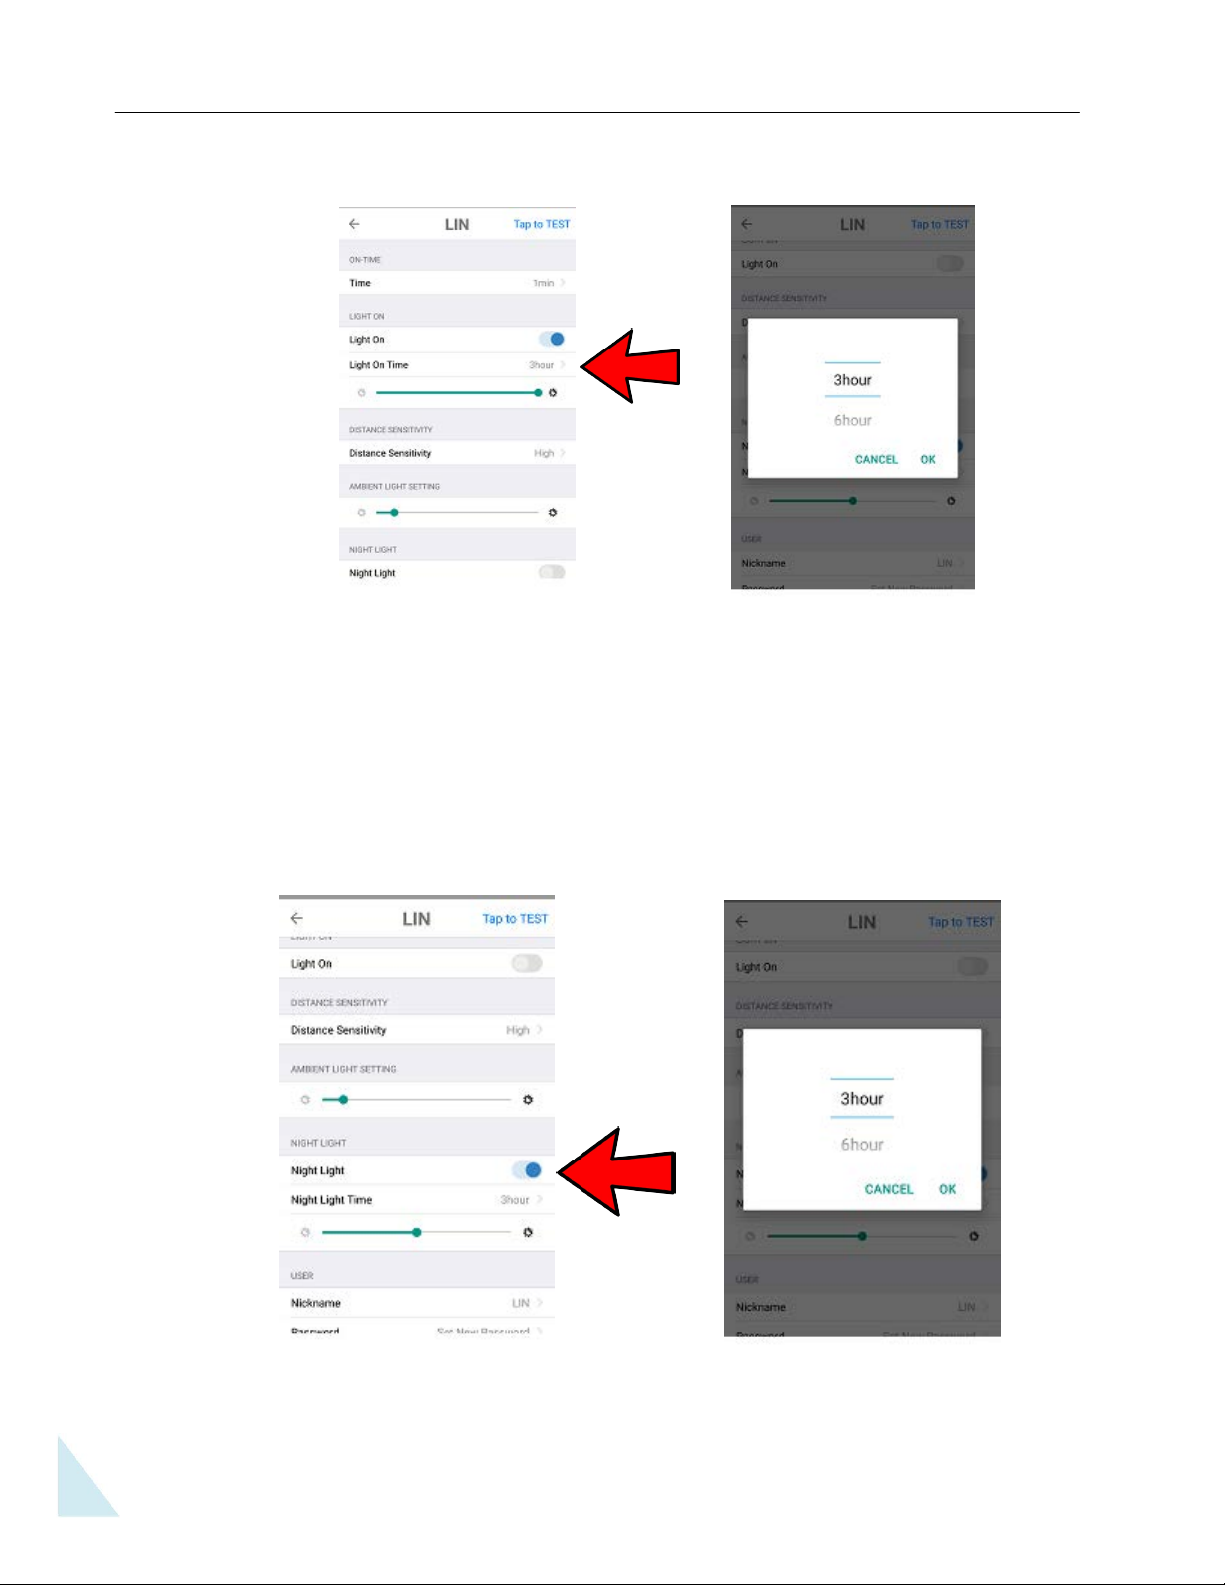
Should you require the light on time for the entire night, you can select “Light On” between
“3 Hours, 6 Hours, to Sunrise/Dawn”. After the time selection the light will return to a
normal sensor light function with your setting time.
C. “Night Light”
Turn on the “Night Light” switch button (Shows Green On The app screen), the light brightness will
be lower and it can be re-adjusted by selecting the desired brightness on the app from Low, Medium
or High and the Night Light time between 3 hours, 6 hours to sunrise.
On the “Night Light” setting the light will go on in with full brightness, and will return to the Night
Light brightness setting after the detection (This brightness can be set and adjusted on the App
screen )
14
Page 15
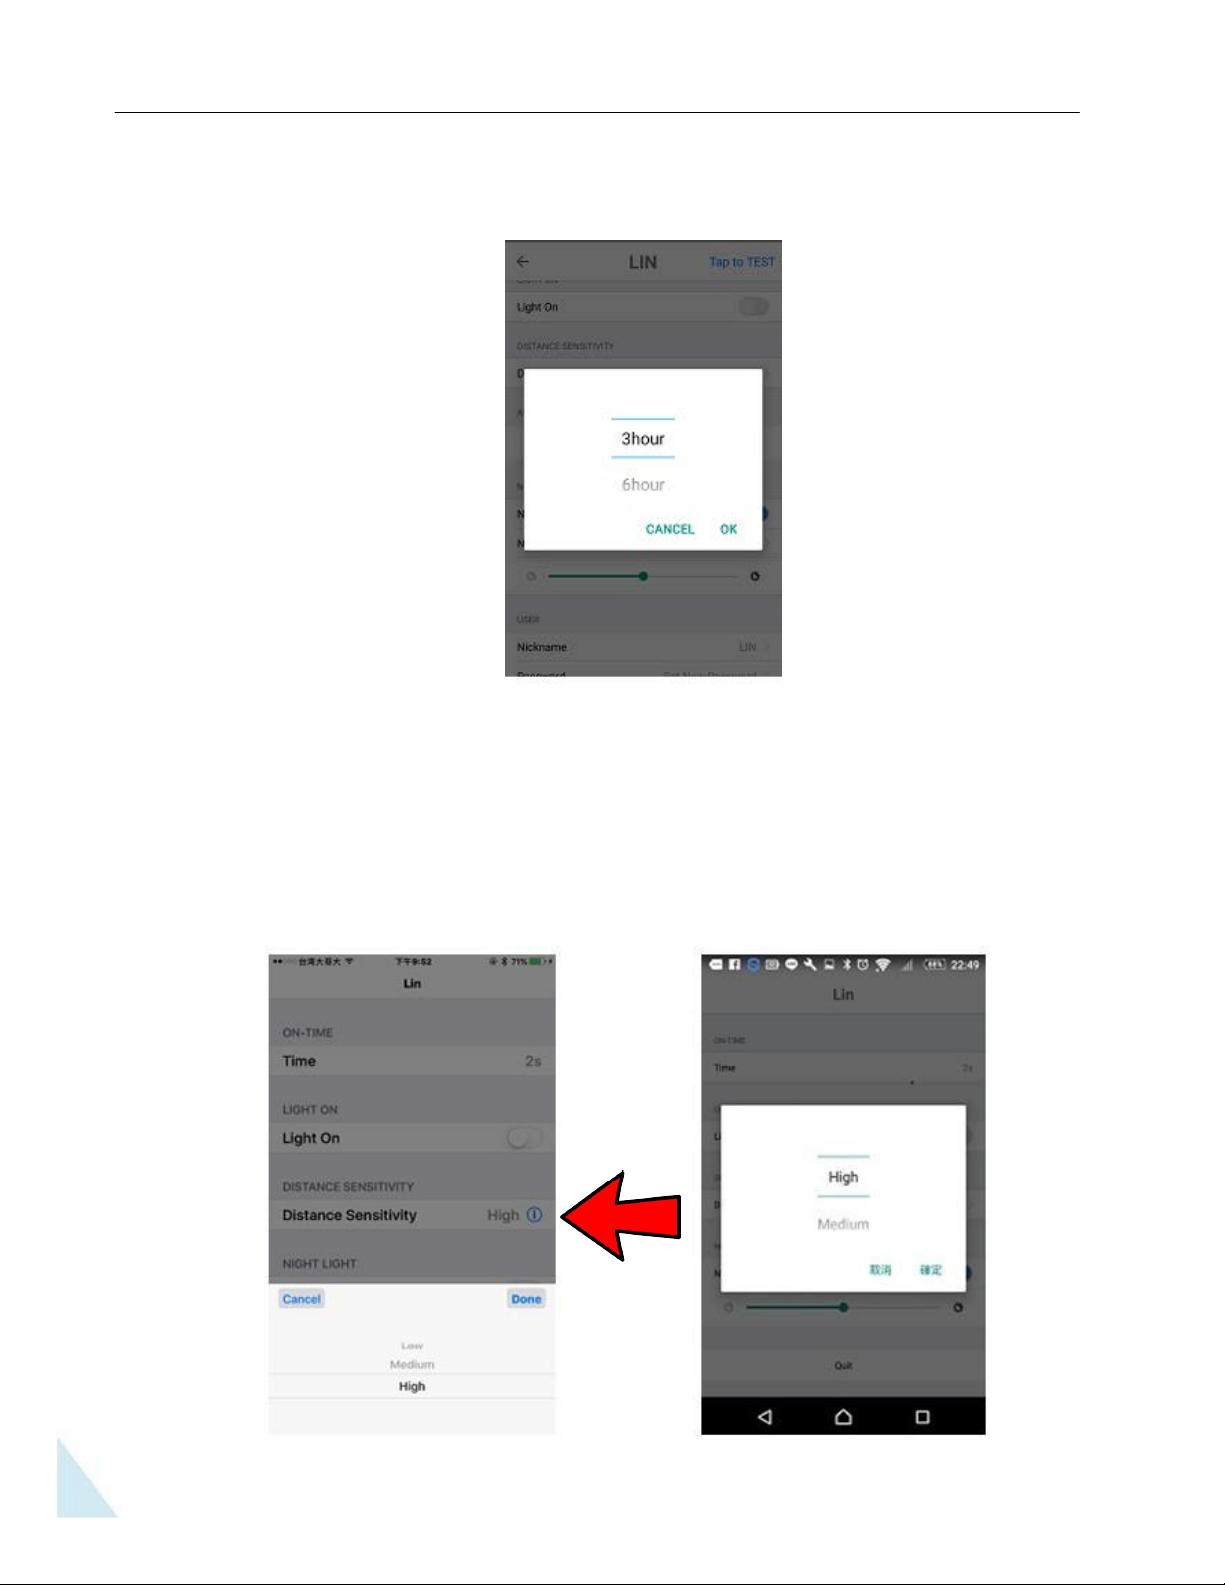
Night Light Time On duration settings can be selected between 3 hours , 6 hours to sunrise – After
selection Tap Done or Ok
D. “Distance Sensitivity”
You can choose the detection distance sensitivity by sliding the “Distance Sensitivity” on the App
with 3 sensitivity choices: Low, Medium, High
Low: around 10-12M (32-40 ft), Medium: around 14-16M, (45-52ft), High: around 19-21M (62-68ft)
15
Page 16
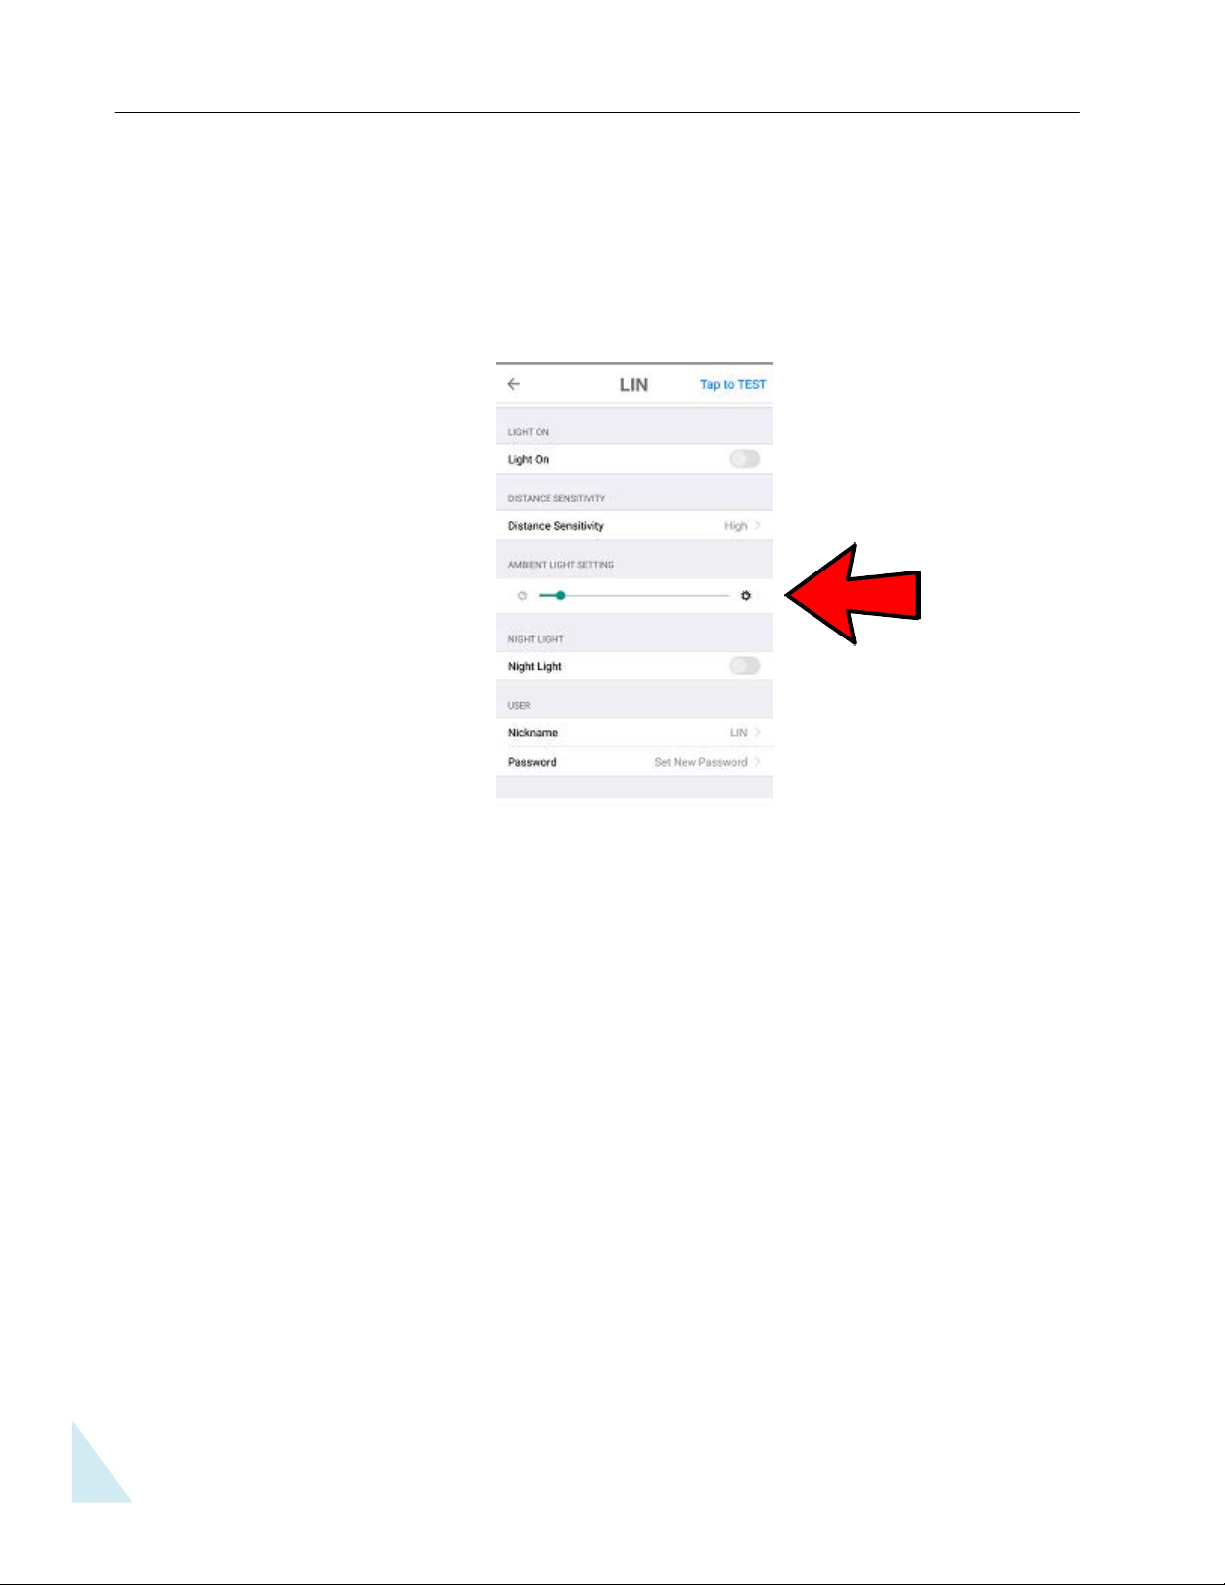
E. “AMBIENT LIGHT SETTING”
This setting choice is for when you desire the light to become active at sunset.
On the App screen "Ambient Light Setting" is a choice whereby using the slider between Low,
Medium or High and choose when you would like the sensor light to become active during sunset /
night time. Example, if you place the slider to the far left, the light will come on at early dusk; If the
slider is to the far right, the light will not activate until night time.
8. To Perform sensor testing after a day time installation,
To test if your motion sensor light is active and operational during day time - Just walk past the light
motion sensor area and on detection and a noticeable LED Red light will flash for 2 seconds through the
motions sensor lens cover. This indication this will be repeated when you walk past the detection area
that shows the light is operations and active.
9. Reset to original default setting
Should you forgot the password, you can switch off the power to the light 4 times (off-on-off-on)
within 3 sec., and the light will reset and a new password can be entered.
16
Page 17

SPECIFICATIONS
1. Detection Method: Passive Infrared Sensor (PIR). PIR measures infrared light radiating from objects in its
field of view. Apparent motion is detected when infrared levels change.
2. Sensor Range: 65Ft / 20m x 220 degree spread
3. Power Source: 120VAC/60Hz, 36.2W
4. With AC COB LED Chip: 2pcs * 16W
5. Load Rating: No extra lights should be added to this unit
ADVANTAGES OF LED’S
1. Energy saving – much lower power consumption and cost savings.
2. Solid State lighting – no filament to break.
3. No forward heat & low fitting heat. Much safer.
CARE AND CLEANING
1. To prolong the original appearance, clean with clear water and a soft, damp cloth only.
2. Do not use paints, solvents, or other chemicals on this light fixture. They could cause a premature
deterioration of the finish and will not be covered by the warranty.
3. Do not spray with a hose or water power washer.
17
 Loading...