

Versiton BAR70-L955 User Manual
ADJUST THE DIRECTION & OPEN/CLOSE CAP
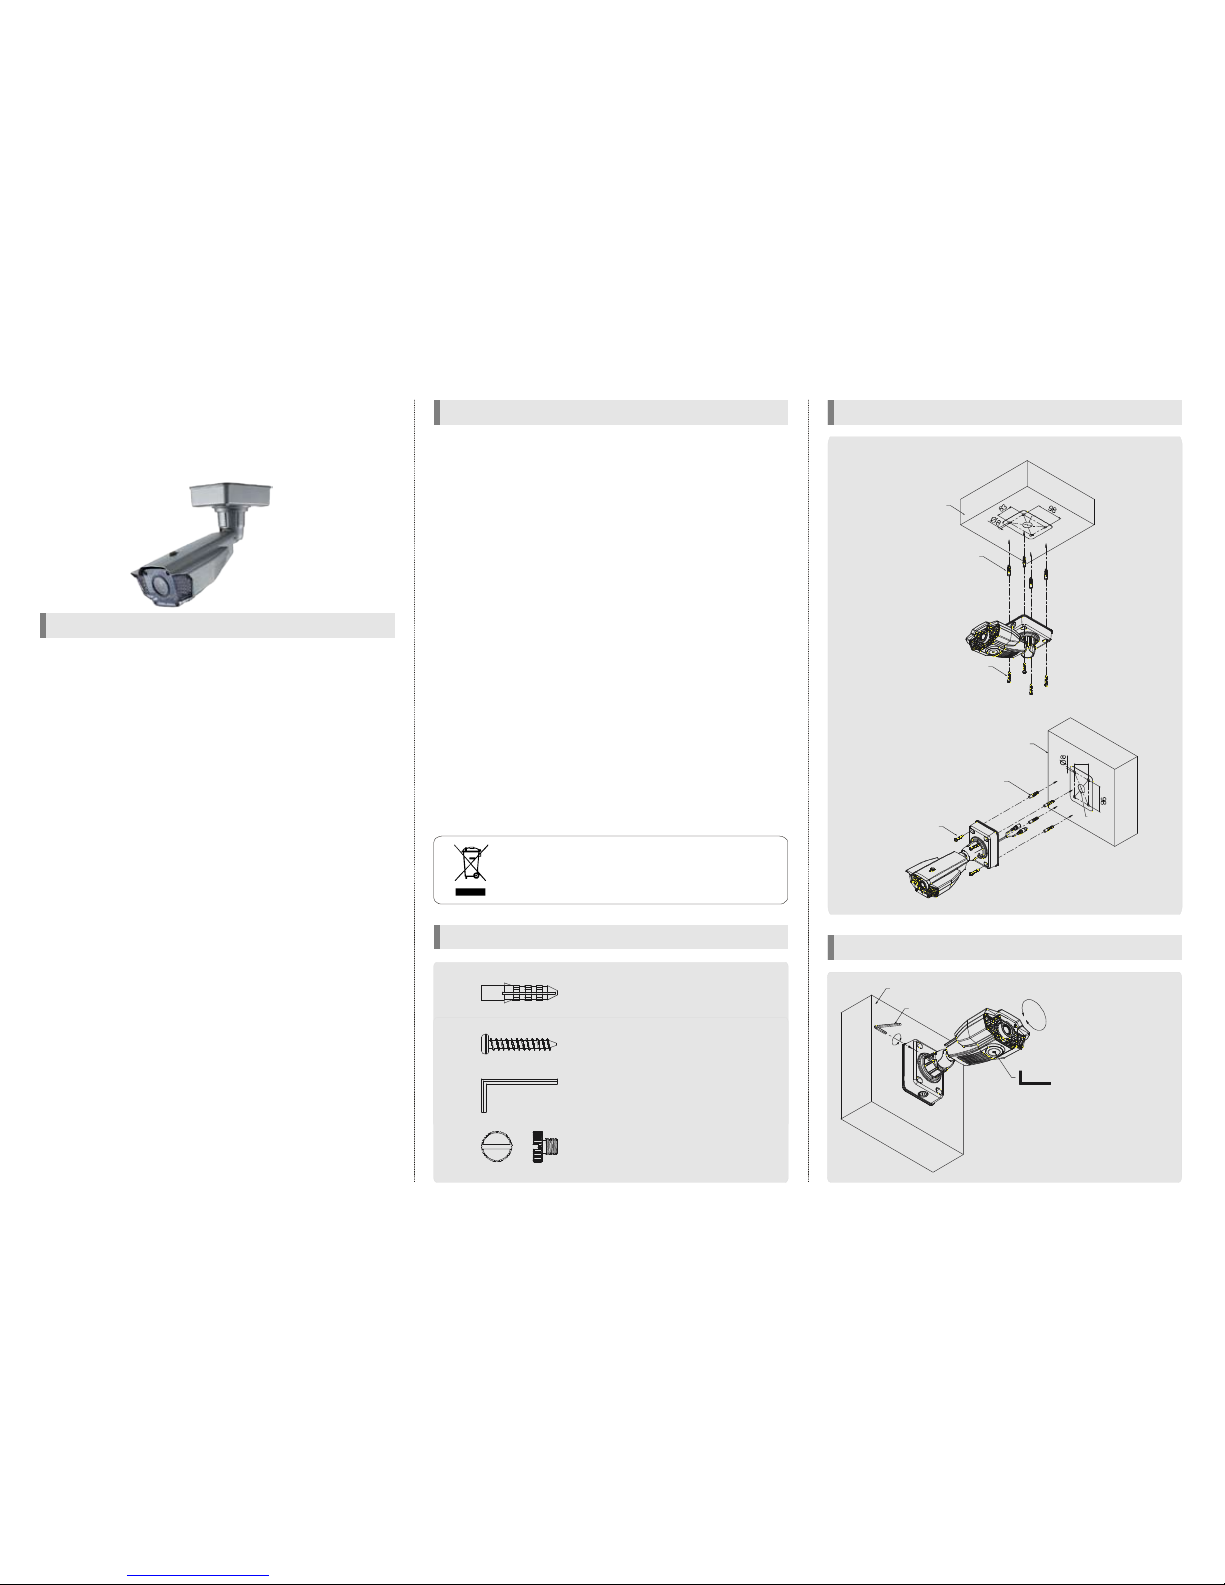
INSTALLATION
IR WATERPROOF D&N CAMERA
MANUAL
<Ceiling mount>
<Wall mount>
WRENCH 5mm
Wall
※After mounting the camera ona wall or ceiling
1. Loosen a bolt by using the wrench included.
2.Face the direction of thecamera tomonitor.
3.Tighten a bolt to completeadjustment.
Unlock
Lock
DIRECTION ADJUSTMENT
Ifyoun eedfunction setting,
open andclose the cap
by using the wrench.
Wall
SCREW Tp16x354EA
ANCHOR 8x35 4E A
63
Ø 30
Ceiling
SCREW Tp16x354EA
ANCHOR8x354EA
Ø 30
1. Please study the instruction manual before your applications and
keep it for your future refere nce.
2. Do notflash LED light directly on the eyeswhen LEDs are on.
3. Donot install the cameraon a unstable surface.
Itwillcause falling or other hazards.
4. Donot use improper power, it could cause fire orelectric shock.
(Use the AC adaptor 12V DC regulated, 2A.
Dual voltage product can use 24V AC adaptor.(option))
5. Do not disassemble or re-model the camera, it could cause f
ire,
electric shock or other hazards.
6. Stop using the camera when you find a malfunction like smoke or
unusualheat, it could cause fireor electric shock.
7. Due to the possibility of water leakage, do not cut or peel offthe
cable. In case you cut or peel off the cable, the warranty will be
void.
8. Donot adhere dangerousarticles to the camera.
9. Donot leave the unit along with an unstable stand or table.
10. DC power cable or video cable should be always loose.
Donot keep the cabl
es tight or twisted.
11. Please use the camera unit within given temperature and elec-
tricity limit.
12. Please make sure that installation should be done by qualified
ser vice person only.
13. Do not disassemble the unit by yourself. When there is problem
with the unit please contact after-sale service center or the shop
where you bought.
1. New generation,new technology DSP adopted
2. This product is suitable for 24 hours survillance with optical multicoating filter ac
cording to IR LED and CCD.
10. This camera hasvari-focal IR lens to prevent defocusing under IR
lighting.
19.You can adjust the level ofIR LED according to thecircumstances.
25. Dynamic IR : When IR LED is turned on in B/W, the objects can be
clearly identified due to the function that decreases screen saturation
ofobjectswithin a shortdistance.
3.Longvisible range at night.(f =5~50mm)
4. Thiscamera adopts splitglass technology to preventIR lightreflection.
5.Day & Night Fun
ction(ICR)at nightto receive maximum available light.
6.This product can match for any circumstancesvery well.
7. This product is "waterproof" to resist rain, snow and oth er weather
factors.(IP67)
8.Sunvisor ofthis productcan help the camera get thepicture clearly.
9. This product is made of corrosion-free surface to resist rust and
corrosion for a long time.
11.RS-485 interface(Pelco-D,Pelco-P protocolsupport)- Option
12. Support 8 differentprivacy zone
13.
Adopted3D DNR technology, It reduces noiseefficiently in lowlight
condition.
14. Multi-language full OSDsupport
15.Power & video cablesare concealable.(Cable through bracket)
16.Thiscamera adopts 3-axisbracket to install on the ceiling and wall.
17. You canconnect24V AC or 12V DC regardless polarity.(Dualp ower
version only)
18.Thiscamera supportsthe supreme resolution.(700 TV-LineColor)
21. A fan enables the camera to keep the proper operation when the
LE
D isON.
22. Provide Max. 10x digital zoom
23.LWDR(Low frame Wide DynamicRange) & DWDR(DigitalWide Dynamic
Range)
24. DIS(Digital Image stabilizer)relievesany picturetremble due toexternal
factor such aswind.
20. A heater enables the camera to keep the proper operation at low
temperature.(ON :23℃,OFF : 28℃)
FEATURE
CAUTION
Ifthe product is tobe put outof operation definitively,
take itto alocal recy cling plant for a disposa l which
is not harmful to the environment.
ACCESSORIES
ANCHOR 8x35 4EA
WRENCH 5mm L TYPE 1EA
SCREW 6x35 TP1 PAN SUS 4EA
BOLT 1/4"-20UNC L=6, 1EA
BAR70-L955
Aurora

※All specificationis subject to change without notice to improve the quality.
SPECIFICATION
ModelNo.
Image Sensor
Effective Pixel
CellSize
Scanning System
Sync.Type
Resolution
S/N
VideoOutput
OSD
Senseup
AGC
DNR(3D)
Gamma
White Balance
ShutterSpeed
Backlight
Motion Detection
Privacy Zone
Mirror
Freeze
Day & Night
LEDBrightness
DIS
Digital Zoom
Blemish Compensation
Impact Detection
Communication(option)
Lens
Power Supply
CurrentConsumption
Fan,Heater
Operation Temp.
Preser vationTemp.
Dimension
Weight
1/3"SONY SUPERHAD CCD
768(H)X 494(V)PIXE
L(NTSC),752(H)X 582(V) PIXEL(PAL)
6.35 (H) X 7.4 (V )(NTSC),6.5 (H) X 6.25 (V)(PAL)
2:1 Interlace
Internal/ Line-Lock(option)
700 TV-LIN E(COLOR),750TV-LINE(B/W)
52dBor More(AGC OFF)
1.0 Vp-p(Sync. Negative) Termination 75
γ
= 0.45 typ.(0.45, 0.6, 1.0, user)
Yes(Multi Language)
ATW(2,500°K ~ 9,500°K)/MANUAL/AWC
1/60(1/50) ~ 1/100,000sec
Auto(Selectable limit2X~256X)/FIXED/OFF
BLC, LWDR,DWDR,HLC(ON/OFF)
LOW/MIDDLE/HIGH/OFF
LOW/MIDDLE/HIGH/OFF
ON/
OFF(240Block)
ON/OFF(8 Zone)
H/V/BOTH/AUTO(option)
ON/OFF
ICR(AUTO, COLOR,B/W)
70pcs(LOW, MIDDLE,HIGH, OFF),Dynamic IR
ON/OFF
ON(10X)/OFF
AUTO/OFF
LOW/MIDDLE/HIGH/OFF
RS-485(Protocol: Pelco D, Pelco P)
Day& Night Vari-focal auto iris lens
12V DC±10%(24VAC :option)
Max.1.3A(at 12V DC, 24V AC): LEDON
Yes
-20℃~ 50℃
-20℃~ 60℃
141.9(W)X 80.2(H)X 183.3(D)mm
Approx. 1.7kg
Ⅱ
㎛ ㎛ ㎛ ㎛
Ω
FUNCTION SETTING
1. OSD menu structure
Zoom & Focus fixing screw
Focal length adjustment direction
1. Unfasten the '+' ty pe screw inside
2.Adjust two trimmers properly
3.Tighten the scew
When you tightenthe screw,
don'tput stressexcessively.
<Caution>
0.01Lux(F/1.2), 0.0003Lux(Sense up),
0Lux(70M Range atLED HIGH) - Indoor
Min.Illumination
①SET :
② ③ :
④ ⑤ :
⑥EXT-VIDEO :
⑦DEBUG PORT :
⑧ZOOM,⑨FOCUS
Used to accessthe menu andconfirmselection.
It is use d for upgrading
the product function and
after-sales services.
:Use a'+'type driver for adjustingzoom and focus.
UP, DOWN
LEFT, RIGHT
Used to move the cursor toup ordown.
Usedto move the cursortoleft or right and change
thevalue.
Extra video output terminal for installation.
Plug your test monitor in hear. The cable is option.
2. OSD menustructure
ㆍThe ' ' icon appeared with desired function,press the set buttonto move submenu.
ㆍThe'- --' icon appeared with function that isunavailable accordingto function setting.
3. How to controlthrough RS-485 communication(option)
4. Cable array(option)
1) Match the camera with controller's ID, baudrate and protocol
2) Up, Down,Leftand right of Jog lever issame as Up, Down, Left and
rightof RS-485 controller
3) Enter of Jog lever is the same asmenu key or IRIS open key of RS485 controller
A :BLUE(MOTION)
B : BLACK(GND)
C :GREEN(IMPACT)
D :BLACK(GND)
E : ORANGE(RX +)
F : WHITE(RX -)
MOTIONALARM
GND
IMPACTALARM
GND
RX +
RX -
A
B
C
D
E
F
FUNCTION
ㆍ If the camera detected motion when using Motion & Impact
function, outside lineofmotion alarm connectwithGND(B).
ㆍIfthe camera detectimpact,outsie line of impact alarm connect
with GND(D).Outputs ofMotion & Impactare 'opencollector'.
ㆍMaxcurrent& voltageare 200mAand 30V DC.
RS-485A
RS-485B
REMA RK
No.
0~99
AUTO
OFF, LOW,
MIDDLE, HIGH
OFF,
X2~X256
OFF, ON
0~20
OFF, ON
OFF, LOW,
MIDDLE, HIGH
OFF, ON
0~60
OFF, ON
0~20
ATW
MANUAL
AWC↓
0~255
0~255
0~255
0~255
AUTO
COLOR
B&W
65~160
30~125
3~12
OFF, ON
OFF, LOW,
MIDDLE, HIGH
OFF,
MODE1,
MODE2
OFF,
VERT,
HORI,
BOTH,
AUTO(option)
0~49
OFF, ON
OFF, ON
0~50
OFF, ON
X1.0~X10
-128~127
-110 ~109
OFF, ON
OFF, ON
NONE
MESSAGE
0~120
1~ 15
OFF, ON
1~ 15
Fixed focal lens or Vari-focal auto iris lens
Adjust the brightness
Shutter speed autoadjustable
Select shutterspeed manually
Determines that use the AGC function or not
and AGC levelselectable(You can not use the
Auto D&Nchangemodewhen AGC is off)
Usingsenseup whenit is lowluminance(OFF,
x2~x256 selectable)
BLCfunction
Adjust BLC level
Select LWDR
Digital Wide DynamicRange
High Light Mask function
According to the threshold value, the camera
will recognizeas H
ighlightor not.
Reducenoisein low illumination
Levelis selectable
Color temperature 2500~ 9500°K
Adjust the Redor Bluevalues
Move the camera lens toward to white paper
then press the set button to find the optimal
whitebalance for currentenvironment
AdjusttheRed value toshiftthecolor of the object
Adjustthe Blue value to shiftthe coloroftheobject
Adjust Red tone oftheimage
Adjust Blue toneof the image
Auto day&nightswitching mode
Fixed atcolor(LEDOFF)
Fixed
atB/W(LED level selectable)
Select brightness of illuminationaboutchanging
the day ↔ nightmode
Select the duration time about changing the
day ↔ night mode
Determines whether totransmittheburstsignal
ornotin B/W mode
IRLED OFF/ONand outputleveladjustable
When IRLED is turned on in B/W,the objects
can be clearly identified due to the function
that decreases screen saturation of objects
within ashortdistance.
VERT: Seta verticalimageinversion
HORI :Set ahori
zontal image inversion
BOTH :seta image rotation
AUTO: Automatically rotate the screenaccording
tothecamera'sposition
Sharpness adjustable
Gamma adjustable
Geta still image
Determines whether to use the brightness
compensationoffourlens'corners(LSC)or not
The LSC level selectable
Max 10x digitalzoom available(Default valueisX3)
Digital zoom adjustable
Zoomed inimagecan be movedto horizontal
Zoomed inimagecan be movedto vertical
This function can be m
itigates image movement
from external factors(This function uses digital
zoom)
Determines whetherto use the motiondetection
function or not
Nodisplay on the screen though movement is
detected
Thewords 'MOTION'appear onthescreen when
movementis detected
Motion detection sensitivity
Setthedurationofalarmout.Ifthewayof display
ismessage,itmeans display timeofmessage
Determines whether to use impact detection
function or not
Sensitivity setting
Setthe
durationof alarm out anddisplay time
of"IMPACT" message
LENS
LEVEL
E.SHUTTER
AGC
SENSEUP
BLC
LEVEL
LWDR
DWDR
HLC
LEVEL
DNR
LEVEL
WBMODE
R-YGAIN
B-YGAIN
D&NMODE
DELAY TIME
BURST
LEDLEVEL
DYNAMICIR
FLIP
SHARPNESS
GAMMA
FREEZE
LSC
LEVEL
DZOOM
ZOOM
PAN
TILT
DIS
MOTION
DISPLAY
SET
WINDOW
ALL SET↓
SENSITIV ITY
HOLD TIME
IMPACT
SENSITIV ITY
HOLD TIME
Fun ction
setting menu
Select menu ContentsSub menu
1/60(1/50)~ 1/100,000
MANUAL , DC
MANUA LBLUE
MANUAL RED
BW COLOR→
COLOR BW→
0.45, 0.6, 1.0,USER
LOW, MIDDLE,HIGH
ALL CLEAR↓
1. EXPOSURE
3.DAY&NIGHT
4.IMAGEA DJ.
2.WHITE
BALANCE
5. ALARM
Press the set buttonto moveintothe motion detectionareasection
toset the 240 blocks. To escape this menu,you shouldpress the
left button atthe far left orpress the right button atthe far right
Press thesetbutton toselect all area
Press thesetbutton toremove allarea
Testsignal.Pressthesetbutton, colorbarappearedonthe screen
andpress any keyto return
tomenu
PATTERN
GENERATOR
Display eachprivacymask or not.
Select mask color(8coloris available)
Select language
Display thecamera ID onthe screen
Defectpixelcorrectionin low illumination
Setup the limitedvalueof white pixel correction
Setup the limited value of black pixel correction
Setup theDPC(DefectPixelCorrection) level
InternalSync with 12V DCpower
Setting the phase is selectable when used
24V AC(Dualpoweronly)
Phase contollableat 24V AC input(L/L mode)
Monitor setting
Se
lectthecamera ID forRS-485 communication
Select baud rate
Select protocol
OFF, ON
BLACK, GRAY…
ENGLISH,…
OFF, ON
OFF, AUTO
0~255
0~255
0~255
INT
L/L
0~255
CRT,LCD
1~ 255
MASK1~ 8
SET
WINDOW
COLOR SET
LANGUAGE
TITLE
EDIT
RESET↓
POSITION
DPC
WHITE THR
BLACK THR
DPCLEVEL
SYNC
VPHASE
MONITOR
COM. ID
BAUDRATE
PROTOCOL
FACTORY
SET↓
EXIT↓
RETURN
Reset your camerato factory default condition andthenrestart
Notice :Lens, communication and language is notchanged
Savethe value and then restart
Escape the menuwithout save
Move back topreviousmenu
Camera ID setting
Camera ID reset
Camera ID position
Communication setting
Press the set button at first time, you can move the mask's
position. After pressthesetbutton again, you canadjust the size
ofmask.If you press the set buttononce more, you can adjust
position
ofedge. After decided position of edgethen pressthe
setbutton,it willbe back topreviousmenu.
7.SPECIAL
6.PRIVACY
ZONE
8. EXIT
2400, 4800, 9600
PELCO-D,PELCO-P
COMMUNICATION
SAV EAND EXIT↓
6 7
8 9
1
2
435
BAR70-L955
 Loading...