

Page 1

Page 2

2
3
www.versaudio.com
Questions? – contact us at [email protected]
CAUTION
TO REDUCE THE RISK OF ELECTRIC SHOCK, DO NOT REMOVE COVER OR
BACK. THERE ARE NO USER-SERVICEABLE PARTS INSIDE. REFER SERVICING
TO QUALIFIED SERVICE PERSONNEL.
TO REDUCE THE RISK OF FIRE OR ELECTRIC SHOCK, DO NOT EXPOSE THIS
UNIT TO RAIN OR MOISTURE.
The lightning fl ash with arrow-head symbol within an equilateral triangle
is intended to alert the user to the presence of uninsulated “dangerous
voltage” within the unit’s enclosure that may be of suffi cient magnitude to
constitute a risk of electric shock.
The exclamation point within an equilateral triangle is intended to alert the
user to the presence of important operating and maintenance (servicing)
instructions in the literature accompanying the unit.
IMPORTANT SAFETY INSTRUCTIONS
Read these instructions.•
Keep these instructions.•
Heed all warnings.•
Follow all instructions.•
Do not use this apparatus near water.•
Clean only with dry cloth.•
Do not block any ventilation openings, Install in accordance with the•
manufacturer’s instructions.
Do not install near any heat sources such as radiators, heat registers, •
stoves, or other apparatus (including amplifi ers) that produce heat.
Do not defeat the safety purpose of the polarized or grounding-type plug. A •
polarized plug has two blades with one wider than the other. A grounding type
plug has two blades and a third grounding prong. The wide blade or the third
prong are provided for your safety. If the provided plug does not fi t into your
outlet, consult an electrician for replacement of the obsolete outlet.
Page 3

4
5
www.versaudio.com
Questions? – contact us at [email protected]
Protect the power cord from being walked on or pinched particularly •
at plugs, convenience receptacles, and the point where they exit from the
apparatus.
Only use attachments/accessories specifi ed by the manufacturer.•
Use only with the cart, stand, tripod, bracket, or table specifi ed by the •
manufacturer, or sold with the apparatus. When a cart is used, use caution when
moving the cart/apparatus combination to avoid injury from tip-over.
Unplug this apparatus during lightning storms or when unused for long •
periods of time.
Refer all servicing to qualifi ed service personnel. Servicing is required •
when the apparatus has been damaged in any way, such as power-supply
cord or plug is damaged, liquid has been spilled or objects have fallen into
the apparatus, the apparatus has been exposed to rain or moisture, does not
operate normally, or has been dropped.
Do not expose the AC/DC Adapter to rain or moisture.•
Rating label is located on the bottom enclosure.•
Disconnect the main plug to shut off the power off completely.•
Place on a level surface. Maintain an adequate air path for•
ventilation by placing on a stand with a height of at least 2 inches.
FOR USA-CALIFORNIA ONLY
This product contains a CR Coin Cell Lithium Battery which contains Perchlorate
Material – special handling may apply.
See www.dtsc.ca.gov/hazardouswaste/perchlorate
Page 4

6
7
www.versaudio.com
Questions? – contact us at [email protected]
DANGER
To reduce the risk of electric shock, burns, fi re or injury:
Always unplug the unit from the electrical outlet immediately after using.•
Do not use while bathing or in a shower.•
Do not place or store unit where it can fall or be pulled into a tub or sink.•
Do not place in or drop into water or other liquid.•
Do not reach for unit that has fallen into water. Unplug it immediately.•
Care should be taken so that objects do not fall and liquids are not spilled •
onto the unit.
ADDITIONAL SAFETY INSTRUCTION
The apparatus shall not be exposed to dripping or splashing and that no objects 1
fi lled with liquids, such as vases, shall be placed on apparatus
The batteries shall not be exposed to excessive heat such as sunshine, fi re or 2
the like.
The AC/DC adapter is used as the disconnect device, the disconnect device shall 3
remain readily operable
Page 5

8
9
www.versaudio.com
Questions? – contact us at [email protected]
This marking indicates that this product should not be disposed with other 4
household wastes throughout the EU. To prevent possible harm to the
environment or human health from uncontrolled waste disposal, recycle it
responsibly to promote the sustainable reuse of material resources. To return your
used device, please use the return and collection systems or contact the retailer
where the product was purchased. They can take this product for environmental
safe recycling
BATTERY PRECAUTIONS
Dispose of the old batteries properly. Do not dispose of the old batteries in a fi re.
Do not leave the batteries where a child or pet could play with or swallow it. If the
battery is swallowed, contact a physician immediately.
The battery may explode if mistreated. Do not attempt to recharge or disassemble
the batteries.
Use only fresh batteries of the required size and type (refer to Installing/Replacing
Back-up Batteries on page 25 and REPLACING THE REMOTE CONTROL BATTERY
on page 44).
Page 6

10
11
www.versaudio.com
Questions? – contact us at [email protected]
FCC INFORMATION
This equipment has been tested and found to comply with the limits for Class
B digital devices, pursuant to part 15 of FCC Rules. These limits are designed
to provide reasonable protection against harmful interference installation. This
equipment generates, uses and can radiate radio frequency energy and, if not
installed and used in accordance with the institutions, may cause harmful interference
to radio communications. However, there is no guarantee that interference will not
occur in a particular installation. If this equipment does cause harmful interference
to radio or television reception, which can be determined by turning the equipment
off and on, the user is encouraged to try to correct the interference by one or more of
the following measures:
Reorient or relocate the receiving antenna.
Increase the separation between the equipment and receiver.
Connect the equipment into an outlet on a circuit different from that to which the
receiver is connected.
Consult the dealer or an experienced radio/TV technician for help.
This equipment complies with Part 15 of the FCC Rules. Operation is subject to the
following two conditions:
This equipment may not cause harmful interference.
This equipment must accept any interference received, including interference that my
cause undesired operation.
Note: The manufacturer is not responsible for any malfunctions caused by
unauthorized modifi cations to this unit. Such modifi cations could void the user’s
authority to operate this unit.
Save these instructions.
Page 7
12
13
www.versaudio.com
Questions? – contact us at [email protected]
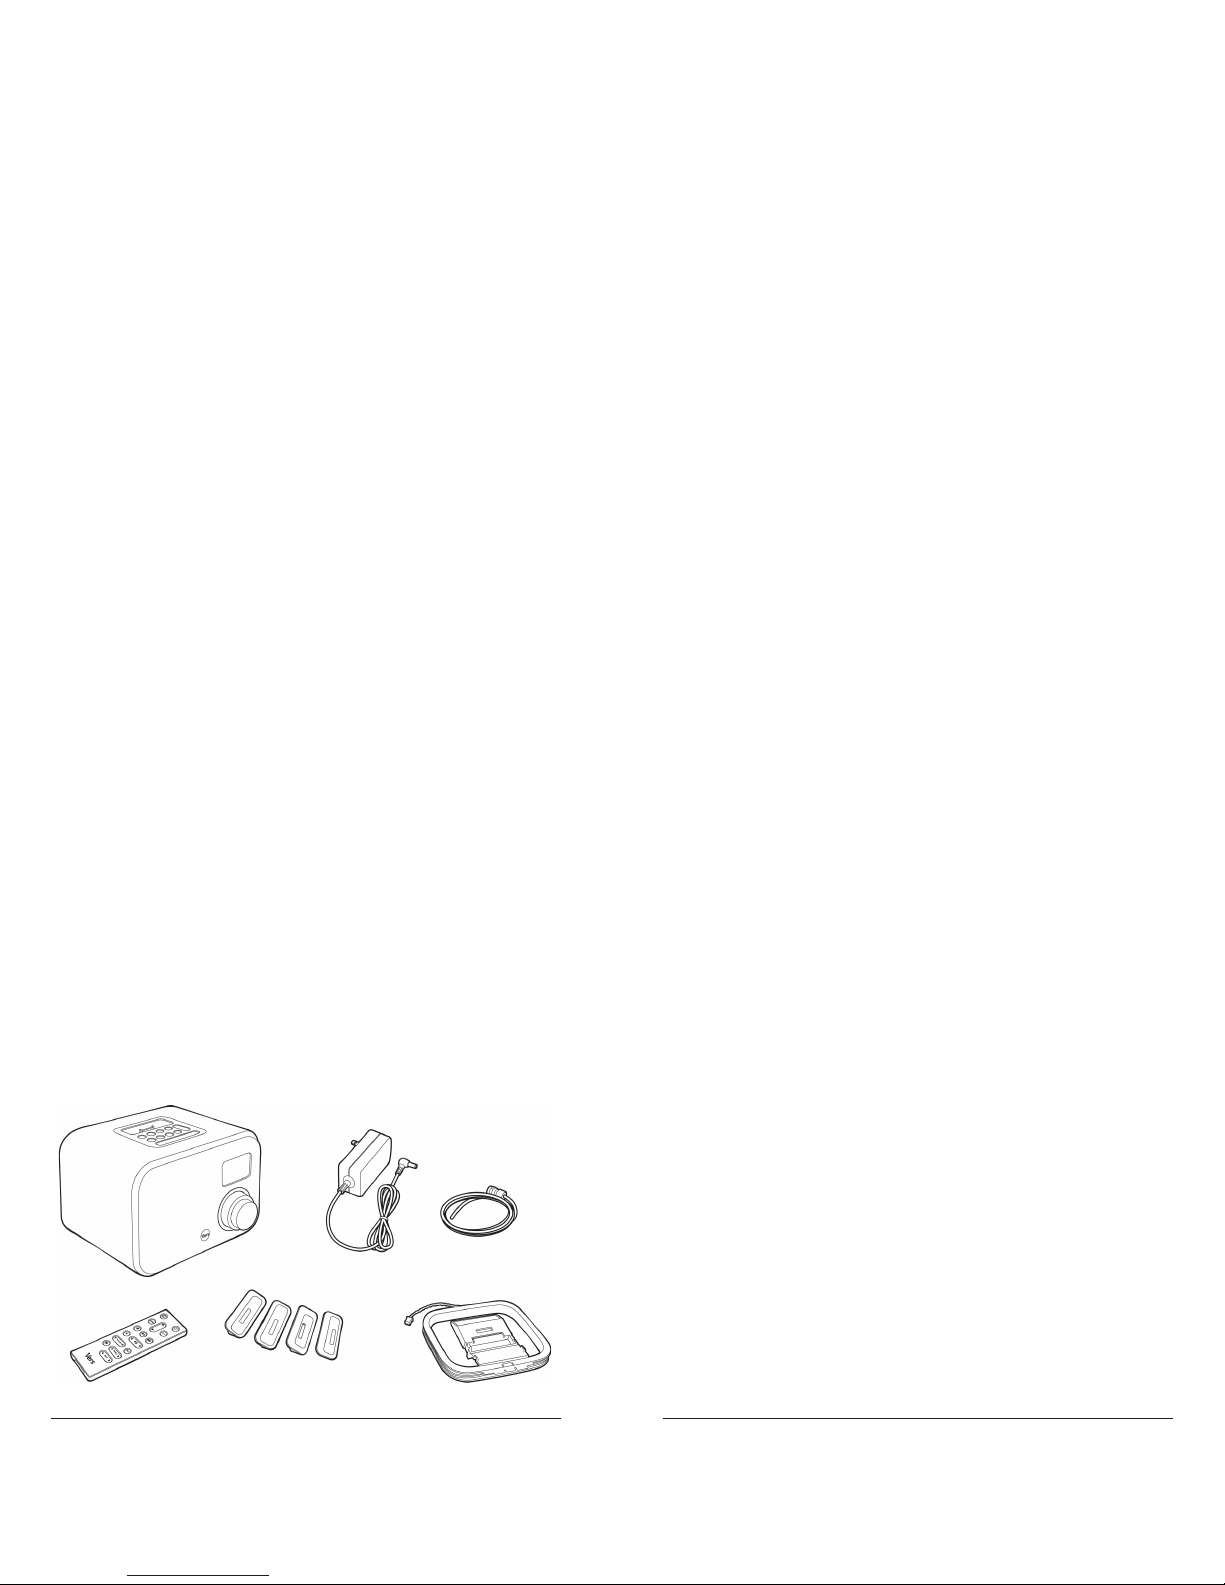
CONTENTS
Main Unit1
Remote Control2
iPod adaptors (#9, #10, #13 & #14)3
15V (1.6A) AC/DC adaptor4
AM external antenna5
FM external antenna6
1
2
3
4
5
6
Page 8
14
15
www.versaudio.com
Questions? – contact us at [email protected]
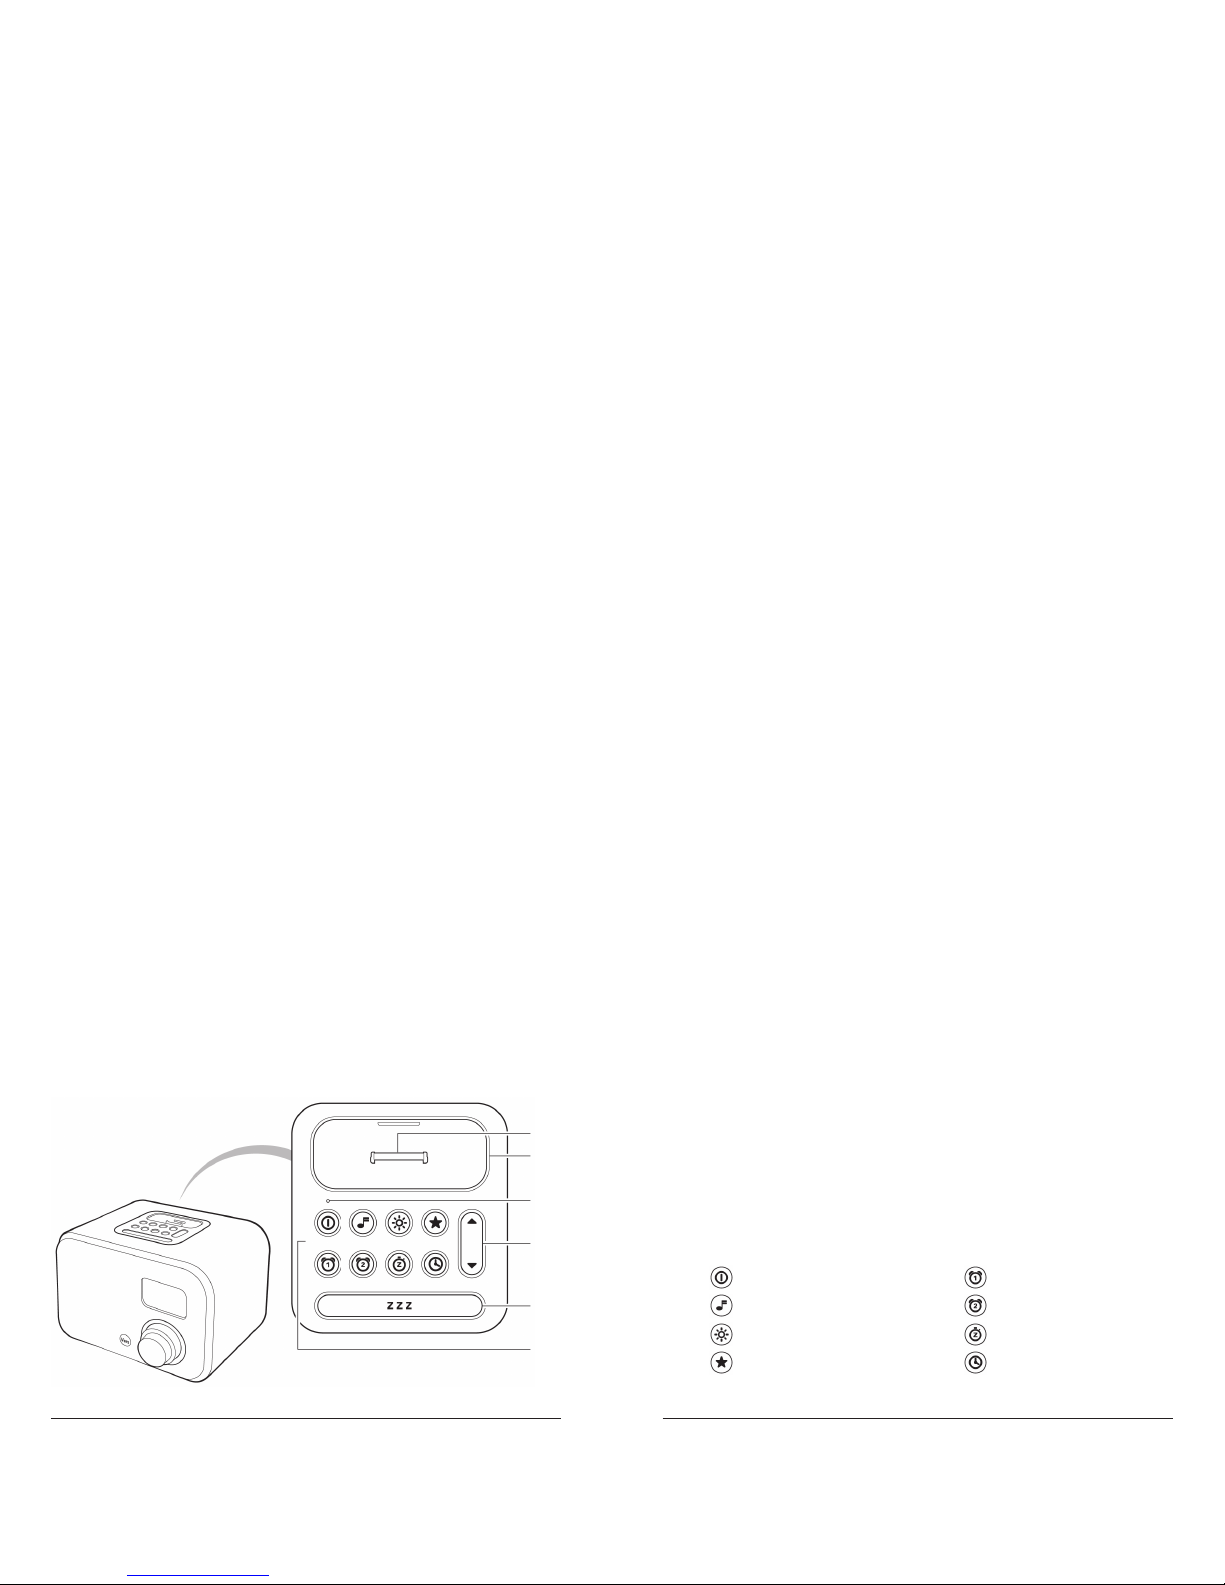
MAIN UNIT, top
iPod connector1
iPod adaptor well2
Power indicator3
Up/Down Selector4
Snooze Bar 5
Function Buttons:6
Power On/Off Alarm 1 Set
Mode Alarm 2 Set
Display Brightness Sleep Timer
Favorites Save/Recall Clock Set
1
2
3
4
5
6
Page 9
16
17
www.versaudio.com
Questions? – contact us at [email protected]
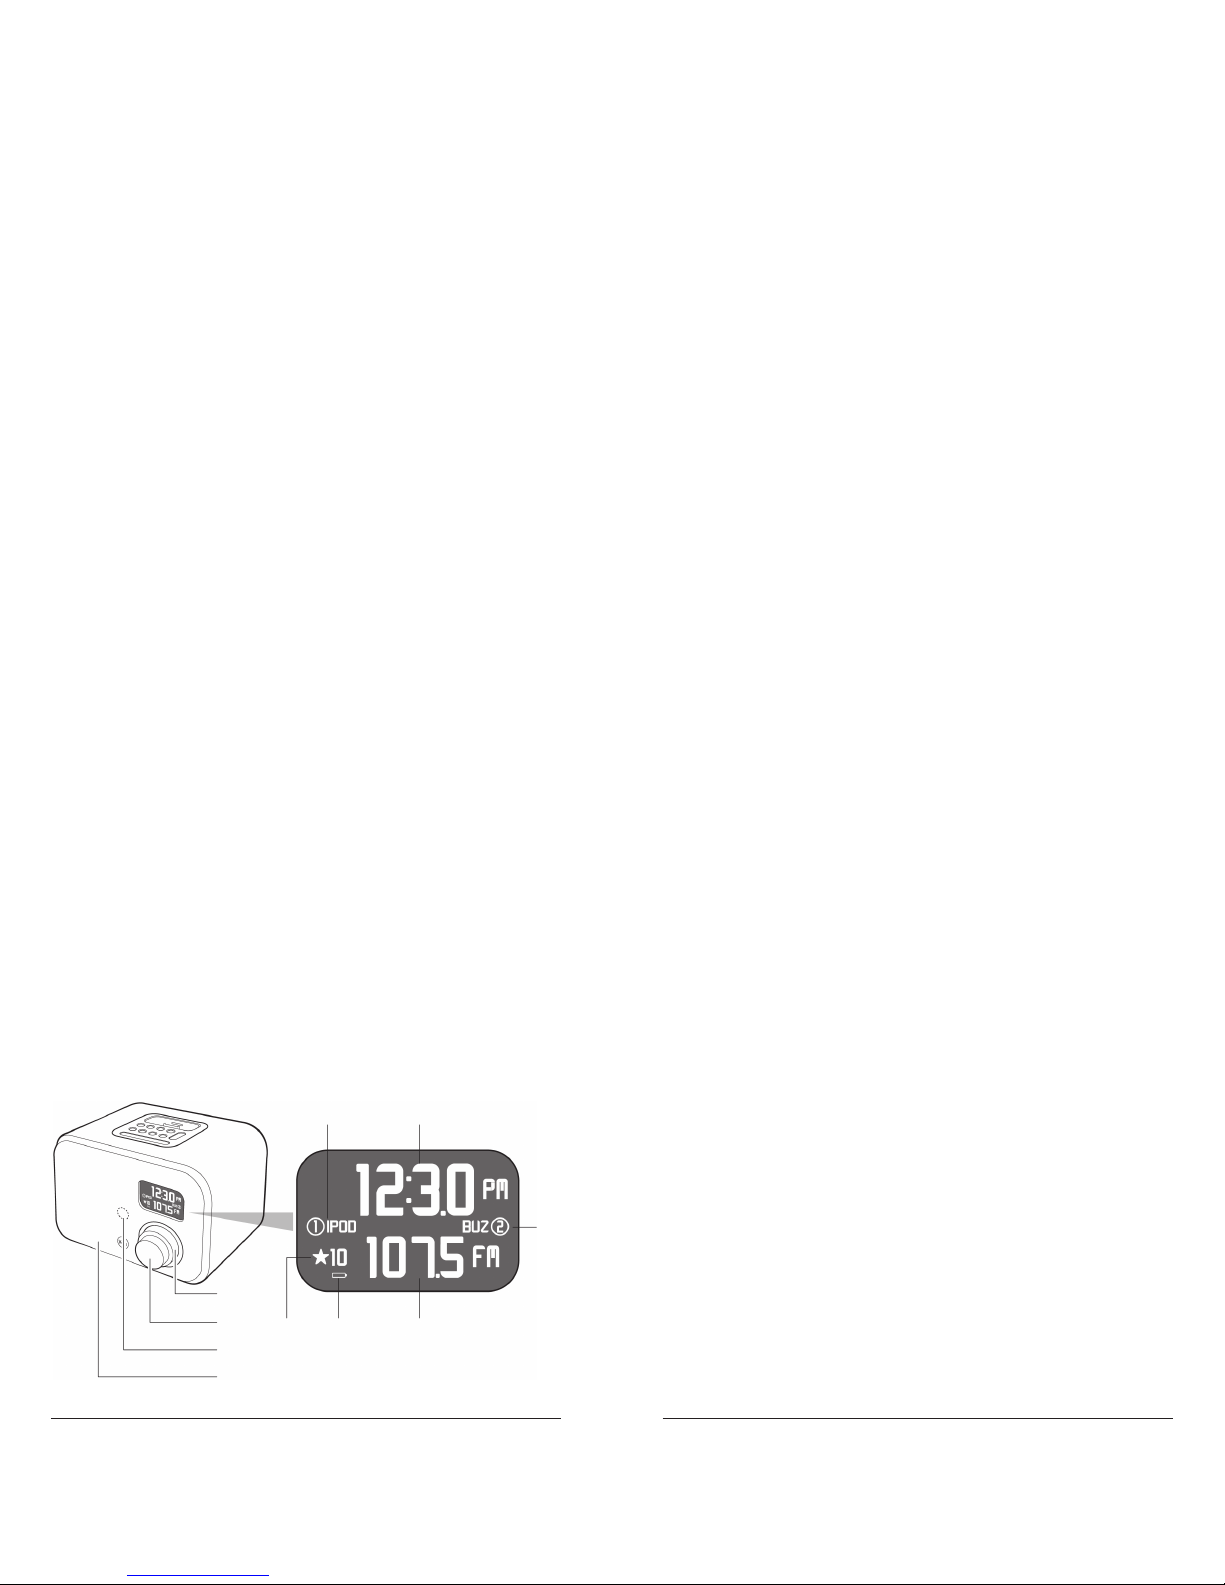
MAIN UNIT, front
Tuner1
Volume2
Remote Control Sensor3
Speaker Grill (not detachable) 4
Alarm 1 on/off and mode indicator5
Time display6
Alarm 2 on/off and mode indicator7
Favorites 1 – 10 display 8
Low battery indicator9
Mode (IPOD, AUX, FM or AM station) & alarm time display10
7
1
2
3
4
89
56
10
Page 10
18
19
www.versaudio.com
Questions? – contact us at [email protected]
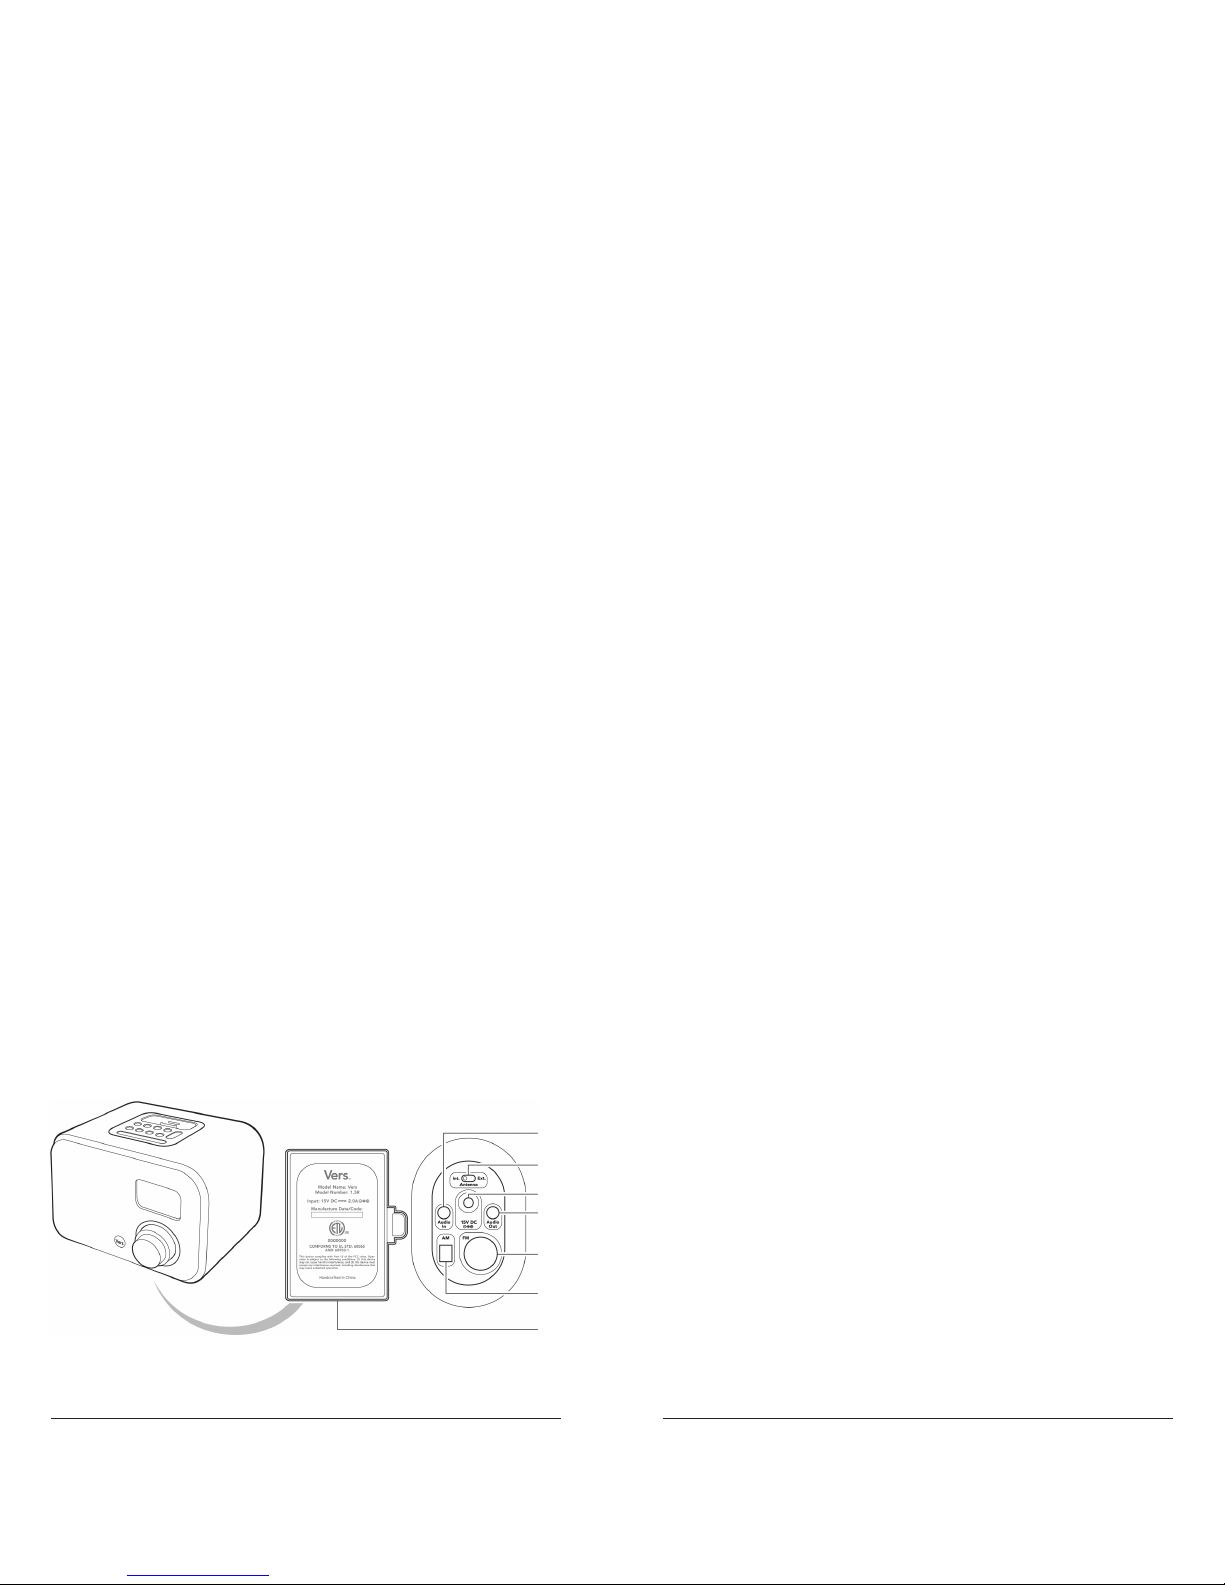
MAIN UNIT, bottom
3.5 mm audio in jack1
Antenna (External/Internal) switch 2
15V DC power Jack 3
3.5 mm audio out jack 4
FM external antenna connector 5
AM external antenna connector 6
Back-up battery compartment for clock 7
(2 AA, not included)
1
2
3
4
5
6
7
Page 11

20
21
www.versaudio.com
Questions? – contact us at [email protected]
REMOTE CONTROL
1 Power 11 Previous/Next Playlist
2 Mode 12 Shuffl e
3 Menu 13 Favorites
4 Menu Up/Down 14 Treble -/+
5 Menu Select 15 Bass -/+
6 Backward 16 Battery compartment (back)
7 Play/Pause
8 Forward
9 Mute
10 Volume
1
2
4
5
7
8
10
12
14
15
16
3
6
9
11
13
Page 12

22
23
www.versaudio.com
Questions? – contact us at [email protected]
IPOD ADAPTORS
Select the appropriate adaptor for your iPod (number on bottom). If
the adaptor for your iPod is not among those supplied, use either the
adaptor that came with your iPod or visit versaudio.com.
Adaptor iPod
9 .............................................iPod Video 30GB/iPod Classic 80GB
10 ...........................................iPod Video 60/80GB/iPod Classic 160GB
13 ...........................................iPod Nano (3rd Gen)
14 ...........................................iPod Touch
iPod Video 30GB
iPod Classic 80GB
iPod Video 60/80GB
iPod Classic 160GB
iPod Nano
(3rd Gen)
iPod Touch
9
10
13
14
Page 13
24
25
www.versaudio.com
Questions? – contact us at [email protected]
OPERATING YOUR RADIO/ALARM CLOCK FOR IPOD
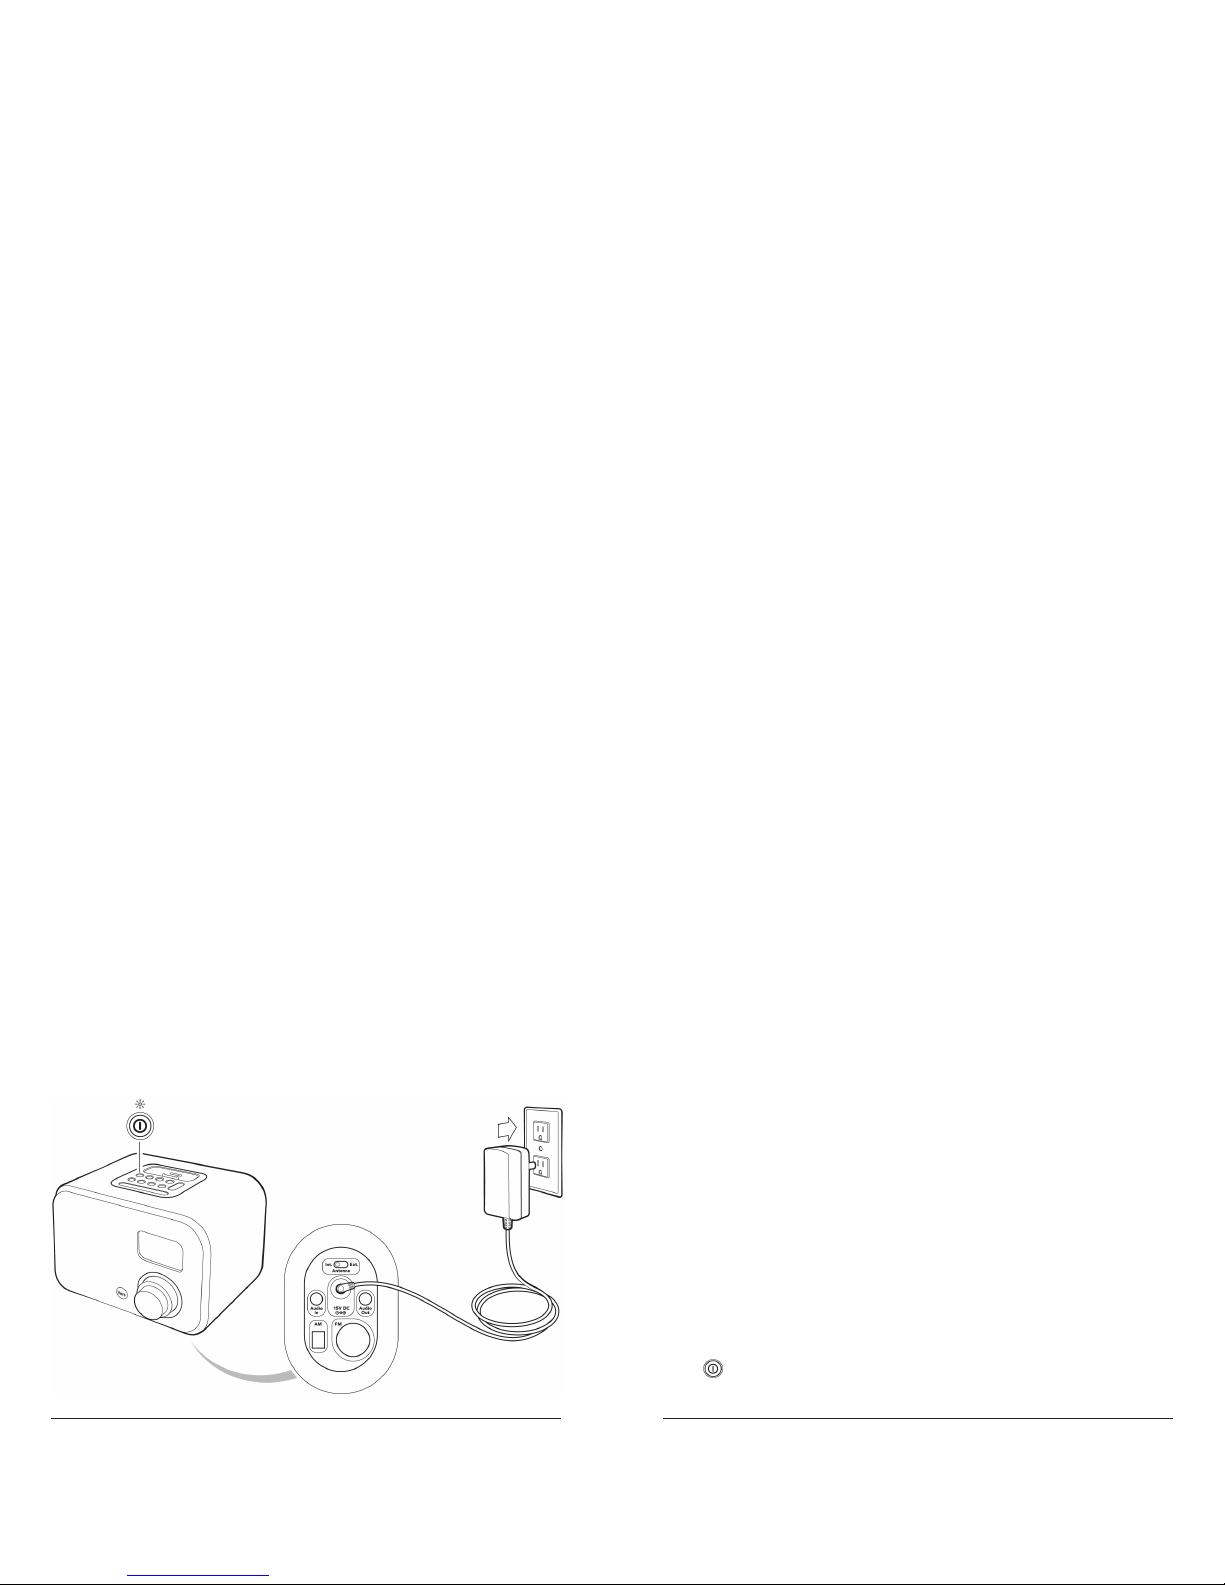
Connecting AC Power
Insert one end of the AC/DC Adapter into 15V DC connector on the
bottom of the unit. Insert the other end into an electrical outlet.
Installing/replacing Back-up Batteries
To maintain settings in the event of power loss, remove the battery
door on the bottom of the unit (24) and in stall 2 AA batteries as
directed (not included). When the back-up battery is low and requires
replacment, the low battery icon will be displayed on the LCD.
Turning Power On and Off
Press on the unit to turn the power on and off. The power indicator
will illuminate when power is on.
Page 14

26
27
www.versaudio.com
Questions? – contact us at [email protected]
To improve reception of distant stations, see Note: Attaching
external AM or FM antennas.
Saving and Recalling Favorite AM or FM Stations
With the power on, press to toggle to either
FM or AM modes. Use the Tuner knob on the
front of the unit to adjust to a desired station.
Press and hold until the Favorites icon &
numbers blink (1) . Use to select the desired
Favorites location 1 – 10.
Press and hold again to store the desired station in that favorites
location. Wait 5 seconds for the system to set. To set other stations,
repeat this process.
Changing the Mode
With the power on, press either on the unit or the remote to cycle
between iPod (1), Aux (2) (external audio source), FM (3), or AM (4)
functions.
Using the FM or FM Radio
With the power on, press to toggle to either FM or AM modes. Use
the Tuner knob on the front of the unit to adjust to a desired station.
12 3 4
1
Page 15
28
29
www.versaudio.com
Questions? – contact us at [email protected]
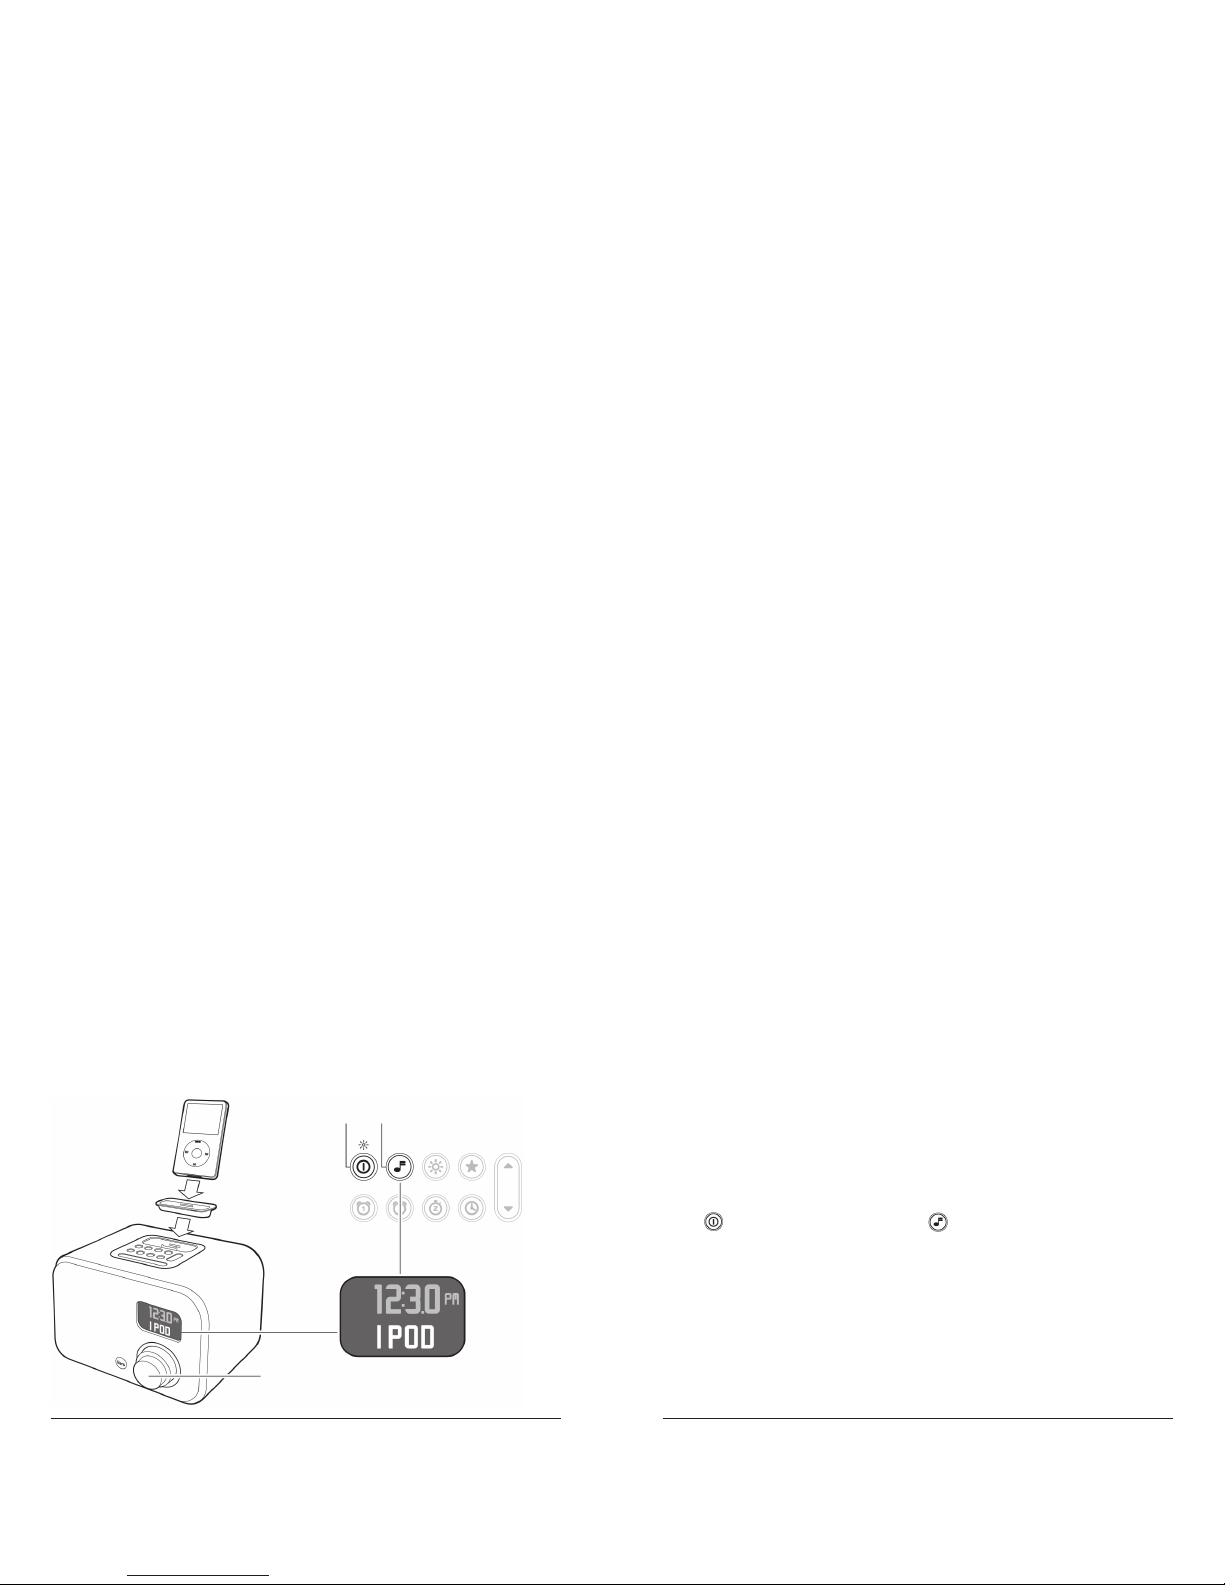
Connecting Your iPod
Select the appropriate iPod Adapter and place it in the iPod dock (1).
(refer to IPOD ADAPTERS on page 22.)
Place your iPod in the iPod dock (2).
Press to turn the unit on (3). Press to select IPOD mode (4) (refer
to Changing the Mode on page 26).
Your iPod will turn on automatically.
Turn the volume knob (5) to adjust the volume.
Your iPod’s volume control is suspended when connected to the
Note:
unit.
2
1
34
5
Page 16

30
31
www.versaudio.com
Questions? – contact us at [email protected]
You can fi ne tune change the equalizer settings either through your
iPod’s EQ menu controls or using the Bass or Treble controls on the
Remote.
Press to turn the unit off. Your iPod will turn off automatically
and go into charging mode.
USING THE REMOTE CONTROL
The fi rst time you use the remote, remove the plastic battery tab on
the back to energize the remote. To use the remote control, point it at
the remote control sensor on the main unit (middle front). Ensure there
are no obstructions between your remote control and the unit.
Playing and Pausing Your Music
Press to pause playback. Press again to resume playback.
Fast-forwarding or Rewinding a Song
Press and hold to fast-forward a song.
Press and hold to rewind a song.
Page 17

32
33
www.versaudio.com
Questions? – contact us at [email protected]
Skipping or Recalling a Song
Press incrementally to skip to a song.
Press incrementally to recall a song.
Adjusting the Volume
Press to adjust the volume to your desired listening level.
The volume control of your iPod is suspended when it is
Note:
connected to the unit.
Muting the Sound
Press mute to suspend the sound. Press mute again or turn the
volume knob on the unit to resume sound playback.
Using the Menu Feature
Press Menu to enter the iPod menu.
Press Menu up or Menu down to scroll through the iPod menu
options.
Press Select to choose desired menu function.
Page 18

34
35
www.versaudio.com
Questions? – contact us at [email protected]
Using the Shuffl e Feature
Press Shuffl e to randomize the order of songs played from your
iPod’s library. Press Shuffl e again to terminate this function.
Choosing a Playlist
You can create and organize your own music playlists through Apple
iTunes, which can be downloaded from www.apple.com/itunes/
Press to skip to previous playlist.
Press to skip to next playlist.
Selecting Play Mode
Press Mode to cycle between iPod, Aux (external audio source),
FM or AM modes.
Selecting Favorites
Press Favorites when in AM or FM mode to cycle between
stored favorite radio stations
Adjusting Treble
Press or to decrease or increase Treble to desired level.
Adjusting Bass
Press or to decrease or increase Bass to desired level.
Page 19

36
37
www.versaudio.com
Questions? – contact us at [email protected]
Attaching External AM or FM Antennas
Vers 1.5R is equipped with internal AM &
FM antennas for normal use. If improved
radio reception is desired, fi rst slide the
Antenna switch on the bottom from
Internal to External (1) and attach the
appropriate antenna cable to the correct
connector; FM (2), AM (3).
Make sure the wire for either antenna is
fully extended for best performance.
Reception may need to be tuned by adjusting the physical position of
the wire.
If no external antennas are attached, slide the antenna switch to
Note:
the Internal position.
Adjusting Brightness of the LCD Display
The brightness of the display adjusted by pressing to toggle
between High-Medium-Low setting.
1
2
3
Page 20
38
39
www.versaudio.com
Questions? – contact us at [email protected]
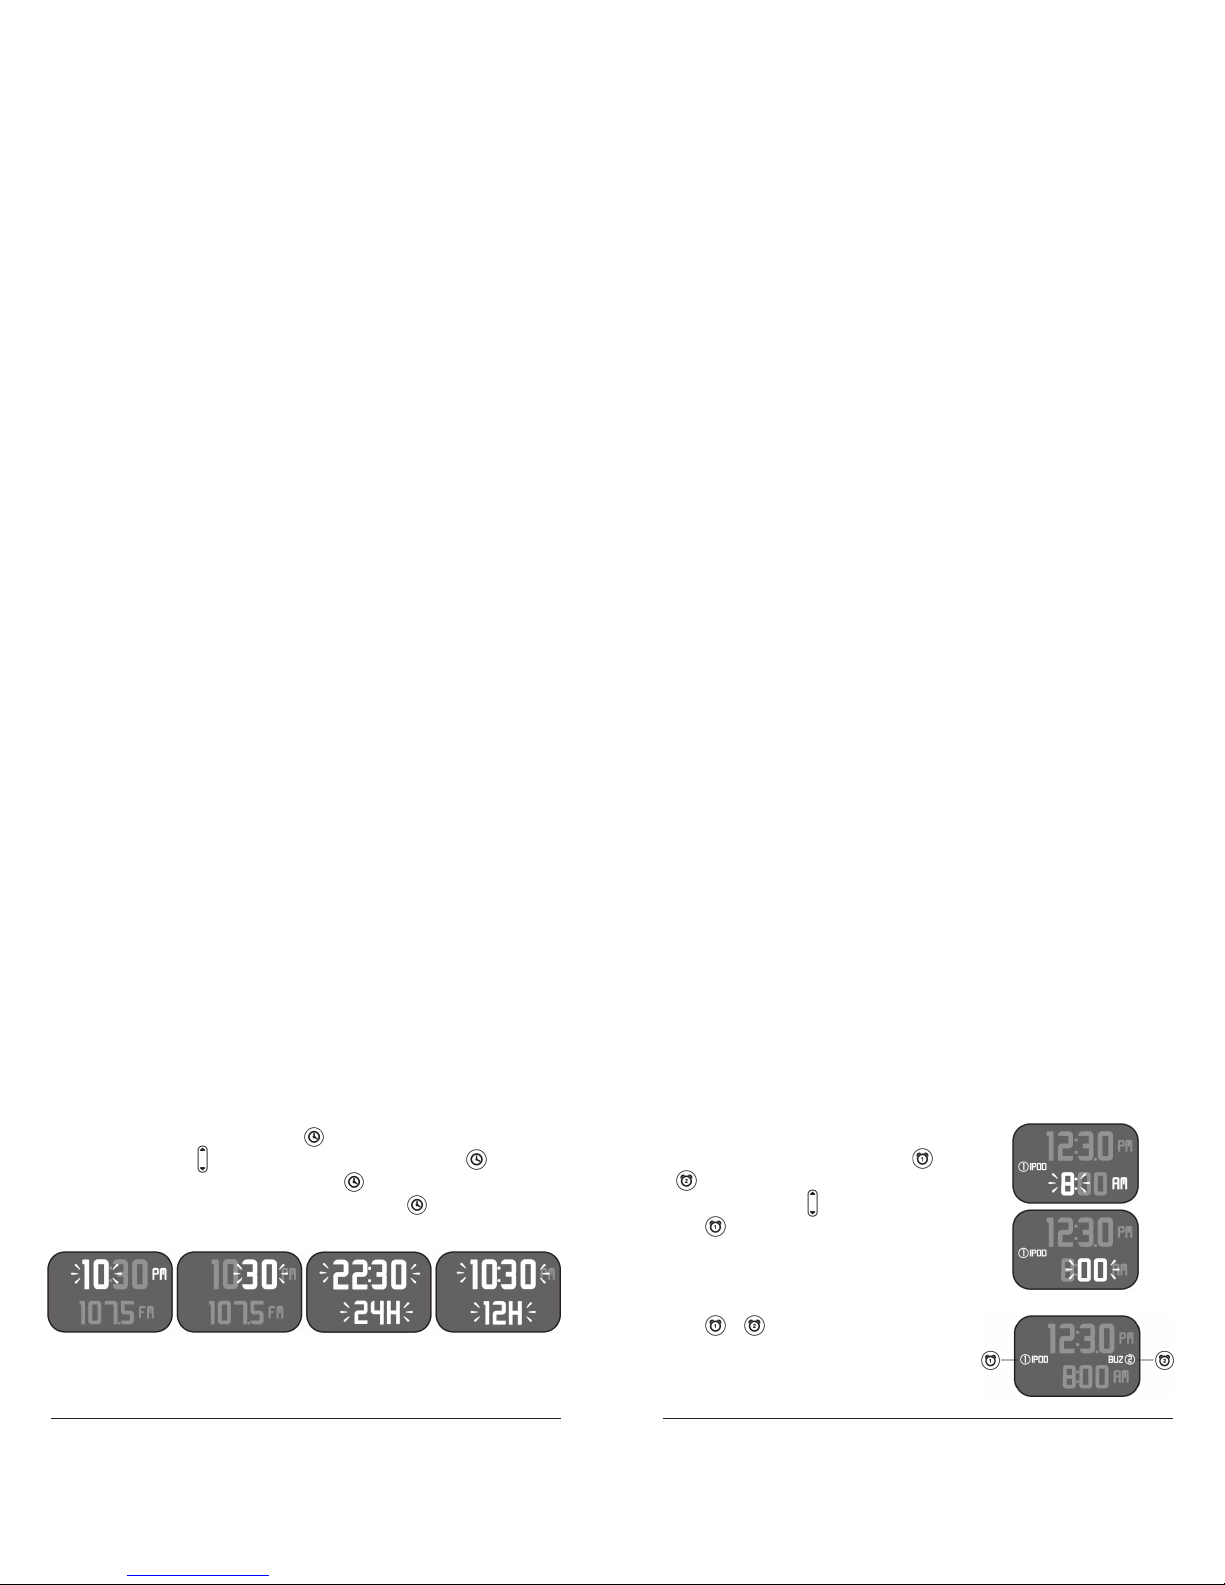
Setting the Clock
To set the time, press and hold the until the hour position begins
to blink (1). Use the to adjust to the correct hour, press again
to adjust to the correct minute (2), press again to adjust between
the 24 hour (3) or 12 hour (4) display mode. Press again or wait 5
seconds for the unit to set.
Setting the Alarm Time and Mode
To set the alarm time for either alarm setting 1
or 2, press and hold either alarm 1 or alarm
2 until the lower clock hour position begins
to blink (5). Use the to adjust the hours,
press again to adjust the minutes (6), wait 5
seconds for the unit to set.
To activate and choose the alarm mode
for either alarm 1 or alarm 2 settings,
press or to activate either alarm,
press again to cycle between IPOD, FM,
AM, Buzzer or off.
1
5
6
234
Page 21

40
41
www.versaudio.com
Questions? – contact us at [email protected]
When the alarm mode is set to either AM or FM, the last AM or FM
radio station used before the unit was turned off will begin to play.
When alarm mode is set to iPod, the last song on the iPod before the
unit was turned off will begin to play.
Turning Alarm Off
To turn alarm off, press either or once to cancel.
If the iPod is removed before the alarm time is reached, the unit
Note:
will default to the buzzer mode.
Setting the Sleep timer
To set the Sleep Timer, turn the unit on
, use to choose desired mode,
then press the to cycle to the desired
duration (90, 75, 60, 45, 30, 15, off). In
the last 5 minutes the volume will decrease
slowly until the unit turns off.
Using the Snooze feature
Once the alarm has activated, you can extend your sleep time by
8 minutes by pressing once. You may do this 5 times
before the alarm shuts itself off.
Page 22

42
43
www.versaudio.com
Questions? – contact us at [email protected]
Using Other Audio Devices with Vers
To use Vers 1.5R with an external audio
source, such as a CD player or an MP3
Player, insert one end of a 3.5mm cable to
the Audio In connector (1) on the bottom
of the unit. Select AUX with to listen
to the external source.
Since clearance from the connector
Note:
to the table surface is minimal, it is
suggested that you use a cable with a
right angle connector. If you do not have
a right angle connector, one may be
purchased on versaudio.com.
Connecting to External Audio Devices or
Using Earphones
You can play music from the Main unit
through auxiliary devices with dedicated
audio inputs such as earphones, a home
audio system, or a transmitter for wireless
speakers. Insert one end of a 3.5mm cable
to the Audio Out connector (2) on the
bottom of the unit and the other to the
audio in of the selected device.
Since clearance from the connector to the table surface is
Note:
minimal, it is suggested that you use a cable with a right angle
connector. If you do not have a right angle connector, one may be
purchased on versaudio.com.
1
2
Page 23

44
45
www.versaudio.com
Questions? – contact us at [email protected]
REPLACING THE REMOTE CONTROL BATTERY
Remove the Battery Compartment Cover.
Remove the old battery and insert a new
CR2032 button cell battery (not included)
according to polarity indicator inside the
compartment.
Replace the Battery Compartment Cover.
CARE AND MAINTENANCE
Vers is made from real wood. Real wood may change color based on
its inherent properties. To maintain a natural fi nish, keep out of direct
sunlight and wipe with a soft, dry cloth. Do not use abrasive cleaning
agents.
Page 24

46
47
www.versaudio.com
Questions? – contact us at [email protected]
VERS 1.5R TECHNICAL SPECIFICATIONS
Power On/Off .......................................................................................... Yes
Digital Volume Control ........................................................................... Yes
Digital AM/FM Tuner .............................................................................. Yes
Speakers ......................................................... One 3-inch Speaker (Mono)
Speaker impedance ......................................................................... 4 Ohm
Peak Wattage ................................................................................. 20 Watts
Nominal Wattage .......................................................................... 15 Watts
Frequency Response ............................................................60 Hz ~20 kHz
Audio Input .................................................................Variable (1 x 3.5mm)
Audio Output .................................................................. Fixed (1 x 3.5mm)
Power Supply
Main Unit ................................ 15V 1.6A (AC/DC adapter, switching type)
Main Unit Back-up ............................................................................. 2X AA
Remote Control ......................................................................CR2032 (1pc)
General
Dimensions ...................................... 210mm(L) x 175mm (W) x 144mm (H)
iPod Compatibility ............All docking iPods (except Generation 3 iPod)
Page 25

48
49
www.versaudio.com
Questions? – contact us at [email protected]
SPROUT CREATION LIMITED ONE-YEAR WARRANTY
Warranty
Vers, a division of Sprout Creation LLC (“Sprout Creation”), warrants this product to be
free from defects in workmanship and materials, under normal use and conditions, for
a period of one (1) year from the date of original purchase (“Warranty Period”). THE
WARRANTY DESCRIBED IN THIS PARAGRAPH SHALL BE IN LIEU OF ANY OTHER
WARRANTY, EXPRESS OR IMPLIED, INCLUDING BUT NOT LIMITED TO, ANY IMPLIED
WARRANTY OF MERCHANTABILITY OR FITNESS FOR A PARTICULAR PURPOSE.
This Warranty does not apply to damage or defects caused by failure to follow the
enclosed instructions, accident, abuse, misuse, misapplication, product modifi cation,
faulty ancillary equipment, improper voltage or current, lightning or other acts of God,
commercial non-home use, normal wear and tear, shipping damage or loss, damage
to digital media players, cracked or split cabinets based on temperature or humidity
changes, products sold on an as-is or fi nal sale basis, use of your Sprout Creation Product
with any equipment for which they were not intended or damage caused by service
performed by anyone other than Sprout Creation.
Sprout Creation will, at is option, repair or replace any product covered by this warranty
that proves to be defective in workmanship or materials. If your product is no longer
being manufactured or is out of stock, at its option, Sprout Creation may replace your
product with a similar or better product. Sprout Creation’s liability is limited to the repair
or replacement, at our option, of any defective product under warranty and shall not
include any incidental or consequential damages. This warranty is valid only in the United
States of America, is not transferable and does not extend to users other than the original
purchaser.
Return Policy / Warranty Service
Proof of Purchase as evidence the unit was purchased from an authorized dealer within the
Warranty Period is required for warranty service. If service is required, do not return the
product without fi rst contacting your dealer or Sprout Creation.
To get this product repaired or replaced, you must contact Sprout Creation during the
Warranty Period by email ([email protected]) or by mail via the address below.
You must include your email address, name, address, telephone number, date and
place of purchase, alternative contact and a detailed description of the problem you
are experiencing. If the problem appears to be based on a defect in workmanship or
Page 26

50
51
www.versaudio.com
Questions? – contact us at [email protected]
materials, Sprout Creation will provide a Return Authorization number and instructions for
return shipment. Return shipments are at the customer’s expense, and the return MUST be
accompanied by the original proof of purchase. Sprout Creation is not responsible for lost
or damaged product during shipment. Any product returned without the original proof of
purchase will be returned at the customer’s expense.
To avoid any charges, all returns and exchanges must include the original packing
materials, product box, all included accessories which may include, without limitation,
power adapter or power cord, connecting cables, remote control, adapters, inserts cards
and instruction manuals. Any replacement units or parts may be new or rebuilt. Sprout
Creation will not be liable for inconvenience, loss of time, loss of use of the product, lost
profi ts or exemplary or consequential damages caused by or relating to this product.
This warranty gives you specifi c legal rights. You may also have other rights that vary
from state to state. Some states do not allow the exclusion or limitations of incidental or
consequential damages or limitations on how long an implied warranty lasts, so the above
may not apply to you.
Purchase or use of the Vers or Sprout Creation product constitutes your acknowledgement
of, and agreement to completely abide by, the forgoing warranty and disclaimers.
“Made for iPod” means that an electronic accessory has been designed to
connect specifi cally to iPod and has been certifi ed by the developer to meet Apple
performance standards.
Apple is not responsible for the operation of this device or its compliance with safety
and regulatory standards.
Manufactured and serviced by
Sprout Creation, LLC
P.O. Box 5265
Wayland, MA 01778
[email protected]
iPod is a trademark of Apple Inc., registered in the U.S. and other countries. ®Vers is a registered trademark of Sprout Creation, LLC.
 Loading...