

Page 1
Installationadvice.com Solutions & Tools for problems that may arise
T-Molding
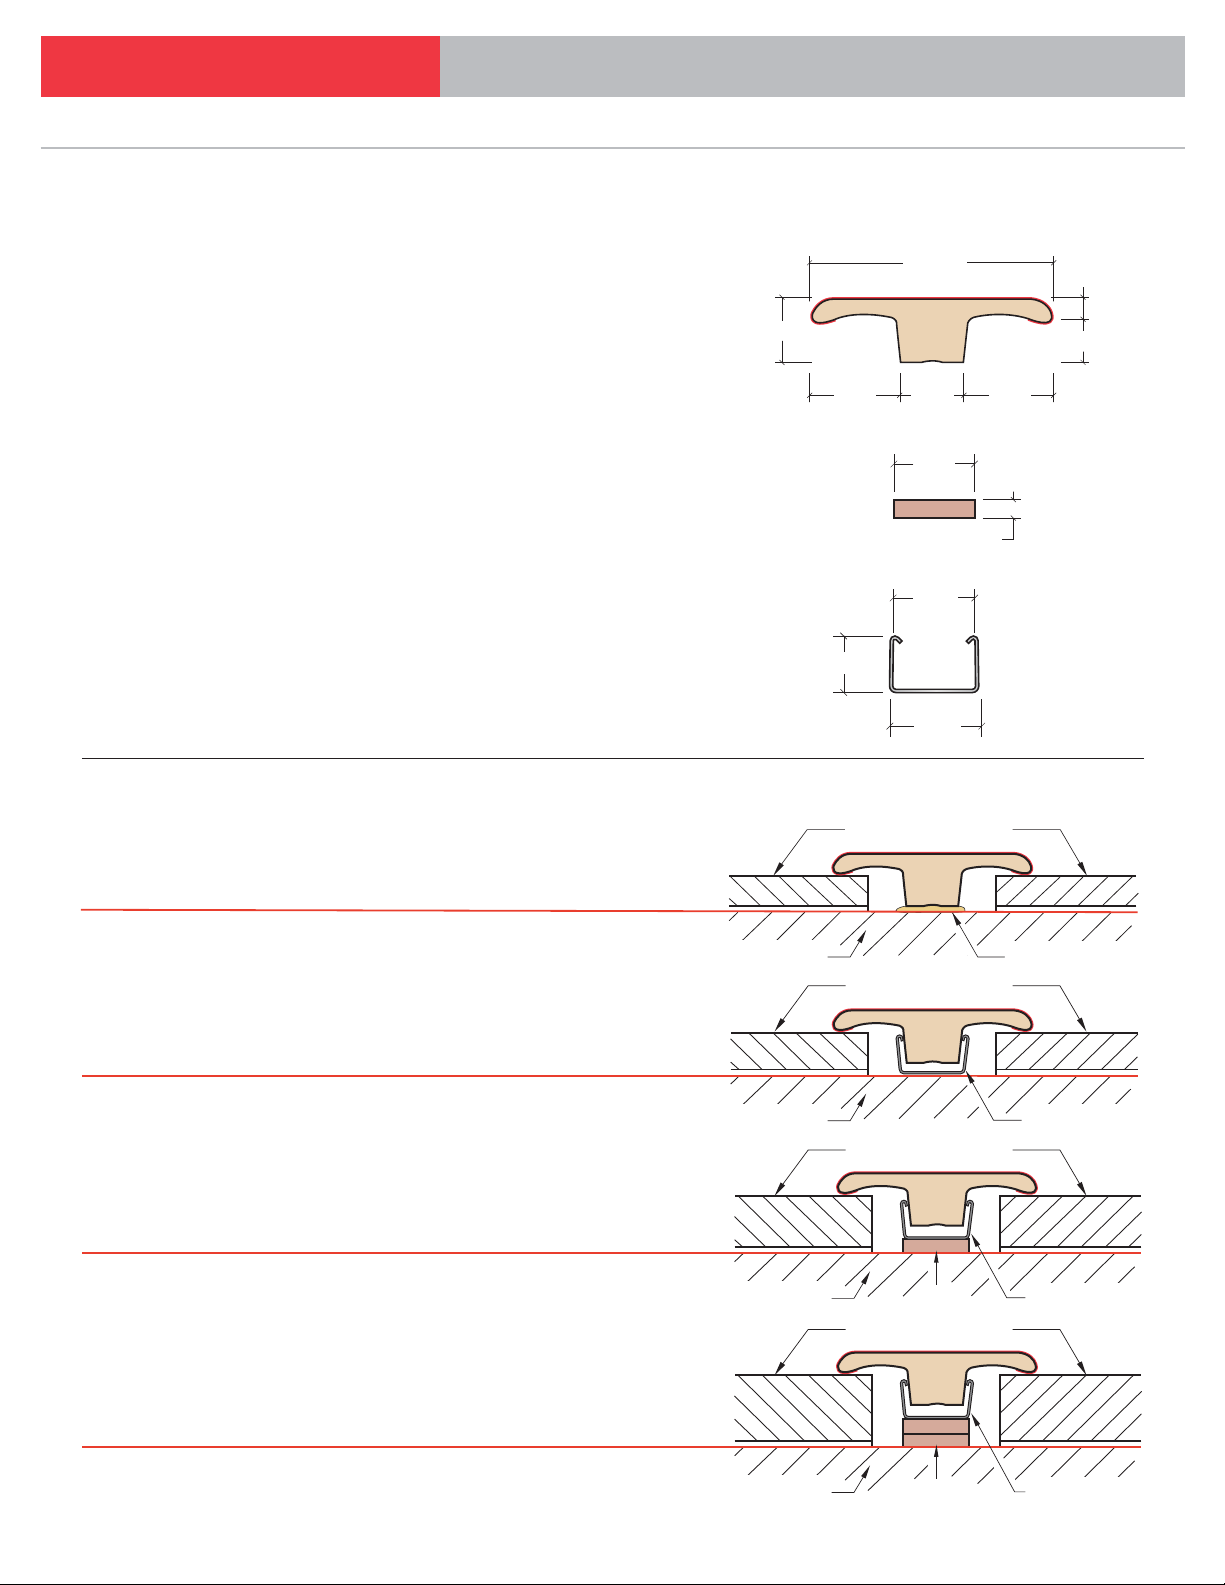
Technical Information — Sizes
T-Molding
T-Moldings are commonly used in doorways to join two laminate floors in adjoining rooms.
Also recommended when making a transition from laminate floor to another floor that is
approximately the same height. Available as Standard or Moisture Resistant.
Surface Material: High Wear Resistant Aluminum Oxide Laminate
Core Material:
Standard T-Molding: Moisture Resistant MDF
Moisture Resistant T-Molding: Exterior Grade Composite Wood Product
Versatrack Shim
To be used with T-Molding, Reducer and End Cap in conjunction with the Versatrack (metal)
for floors from 9.5mm-12.3mm thickness including 3/32nd underlayment.
Material: Standard HDF
Versatrack
To be used with T-Molding, Reducer and End Cap for floors from 6mm-9.5mm thickness
including 3/32nd underlayment. Also, used in conjunction with the Versatrack Shim for
9.5mm-12.3mm* including 3/32nd underlayment.
Material: Cold Roll Steel
* For floors thicker than 12.3mm, please feel free to call one of our sales representatives for
assistance.
Installation
1/2”
1-19/32”
15/32” 9/16”9/16”
9/16”
7/16”
5/16”
9/16”
Laminate Flooring
3/16”
5/16”
1/8”
7.5 mm Floors
Glue Down
for 7.5 mm floors.
6 – 9 mm Floors
Use Versatrack (Metal Track)
for 6 - 9.5 mm floors.
9.5 – 12.3 mm Floors
Use Versatrack & Versatrack Shim
for 9.5 - 12.3 mm floors.
Use the same molding & track,
just add 1 Versatrack Shim.
14 – 15 mm Floors
Use Versatrack & Versatrack Shim
for 9.5 - 12.3 mm floors.
Use the same molding & track,
just add 2 Versatrack Shim.
Sub Floor
Laminate Flooring
Sub Floor
Laminate Flooring
Sub Floor
Laminate Flooring
Sub Floor 2 Shims
Shim
PUR Adhesive
Metal Track
Metal Track
Metal Track
1
Page 2
Installationadvice.com Solutions & Tools for problems that may arise
T-Molding
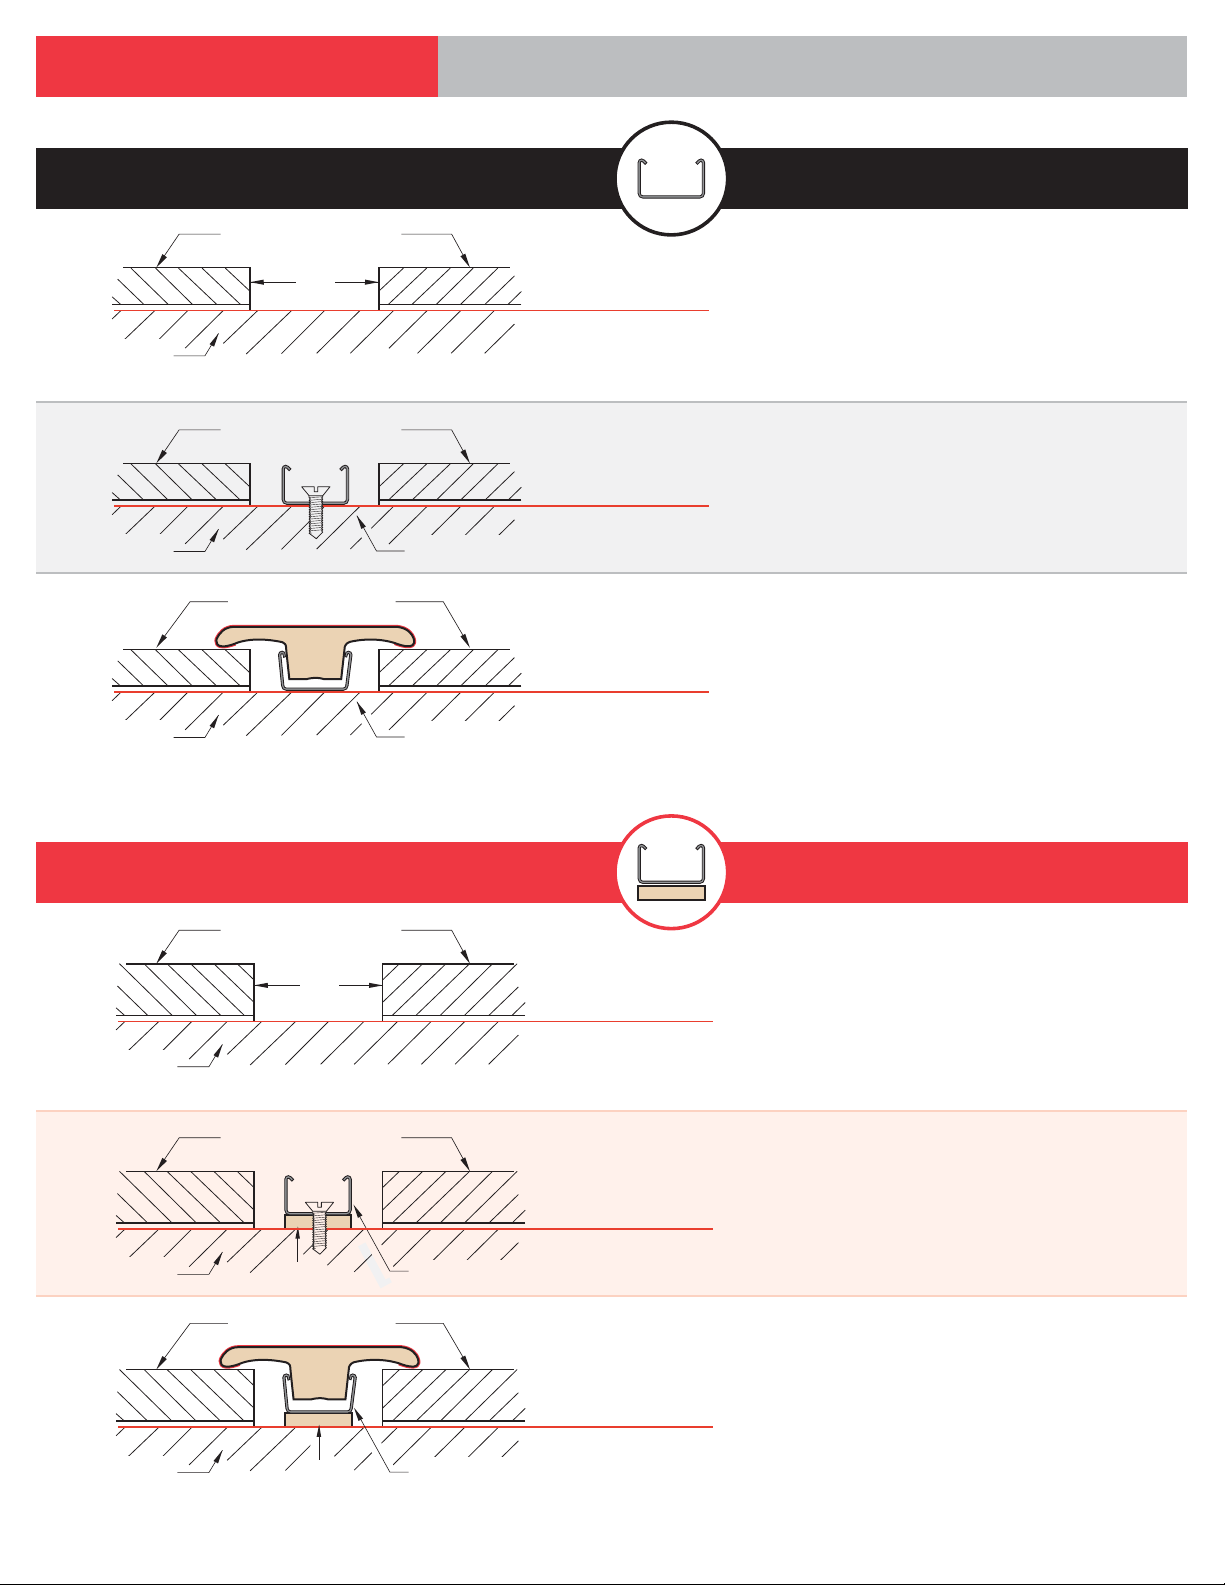
Use Versatrack (Metal Track) for 6 - 9 mm floors.
Laminate Flooring
1”
Sub Floor
Laminate Flooring
Sub Floor
Laminate Flooring
Sub Floor
Metal Track
Metal Track
6 - 9 mm Floors
Step 1
Install the flooring planks including the underlayment by
leaving a 1" inch (25mm) gap for the installation
of the T-molding.
Step 2
Center the U-Track between the two laminate floors and
screw it to the sub floor by using #6x5/8" screws.
Step 3
Gently press the molding into the track starting from one
end to the other just like you would close a Zip-Lock bag.
!!! Do not try to push the entire molding in all at once
by just pressing it in from top !!!
Use Versatrack & Versatrack Shim for 9.5 - 12.3 mm floors.
Use the same molding & track, just add Versatrack Shim.
Laminate Flooring
1”
Sub Floor
Laminate Flooring
Sub Floor
Sub Floor
Shim
Laminate Flooring
Shim
Metal Track
Metal Track
9.5 - 12.3 mm Floors
Step 1
Install the flooring planks including the underlayment by
leaving a 1" inch (25mm) gap for the installation
of the T-molding.
Step 2
Center the U-Track and Shim between the two laminate floors
and screw them to the sub floor by using #6x5/8” screws.
Step 3
Gently press the molding into the track starting from one
end to the other just like you would close a Zip-Lock bag.
!!! Do not try to push the entire molding in all at once
by just pressing it in from top !!!
2
Page 3
Installationadvice.com Solutions & Tools for problems that may arise
T-Molding
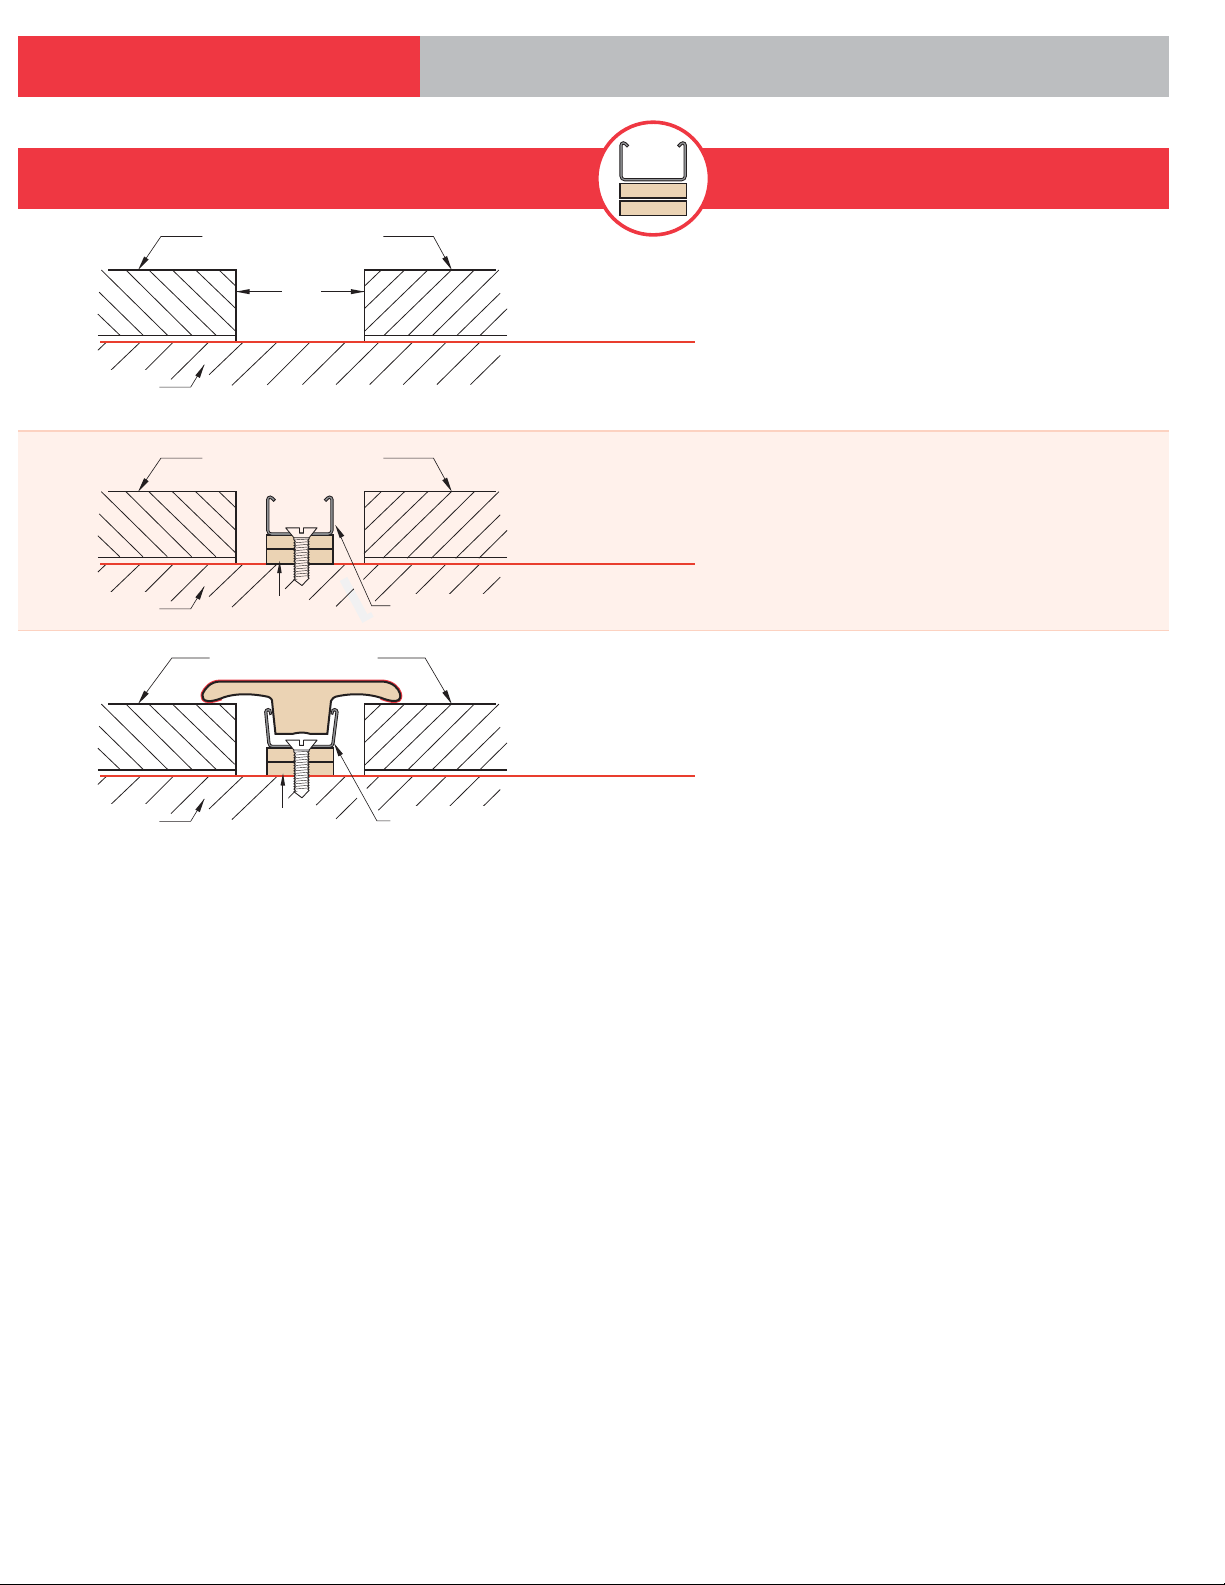
Use Versatrack & Versatrack Shim for 14 - 15 mm floors.
Use the same molding & track, just add Versatrack Shim.
Laminate Flooring
1”
Sub Floor
Laminate Flooring
Sub Floor
2 Shims
Laminate Flooring
Metal Track
14 - 15 mm Floors
Step 1
Install the flooring planks including the underlayment by
leaving a 1" inch (25mm) gap for the installation
of the T-molding.
Step 2
Center the U-Track & 2 Shims between the 2 laminate floors
and screw them to the sub floor by using #6x5/8" screws.
Sub Floor
2 Shims
Metal Track
Step 3
Gently press the molding into the track starting from one
end to the other just like you would close a Zip-Lock bag.
!!! Do not try to push the entire molding in all at once
by just pressing it in from top !!!
3
Page 4
Installationadvice.com Solutions & Tools for problems that may arise
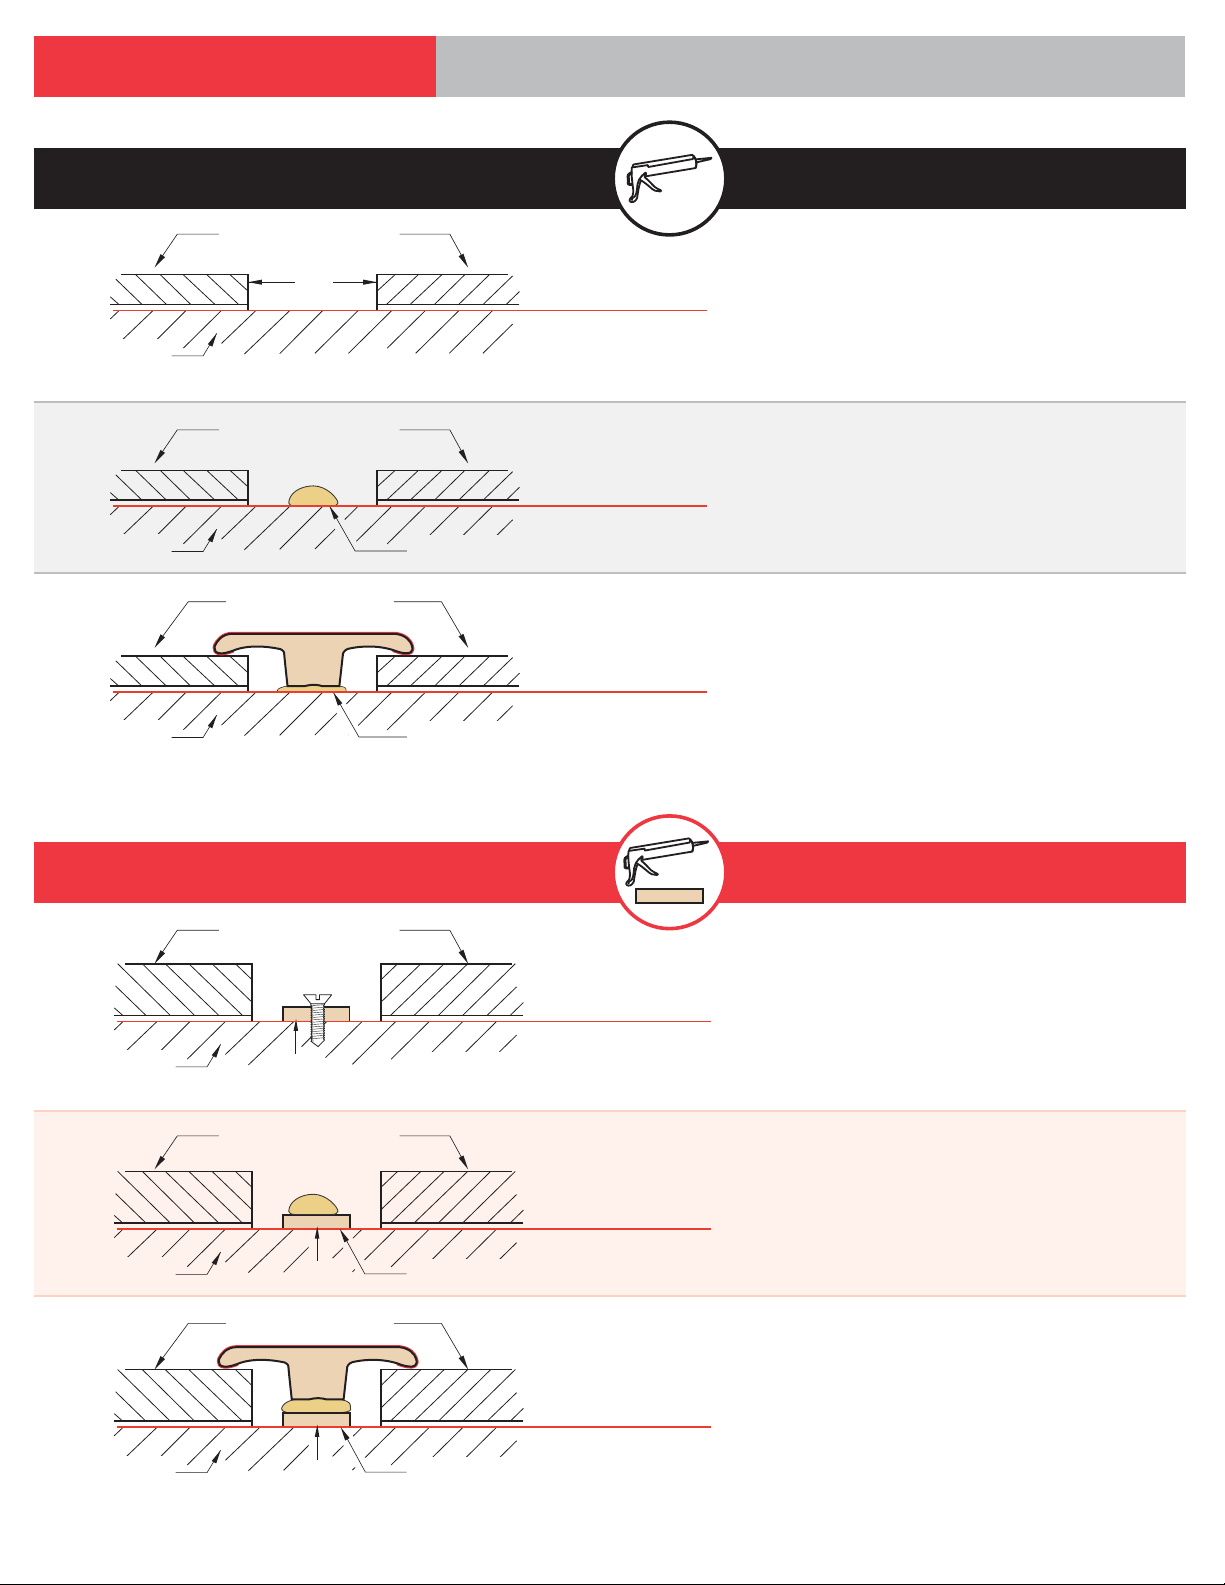
T-Molding - Glue Down on Subfloor or Concrete
Glue Down - 6-9 mm floors
Laminate Flooring
1”
Sub Floor
Laminate Flooring
Sub Floor
Laminate Flooring
Sub Floor
PUR Adhesive
PUR Adhesive
6 - 9 mm Floors
Step 1
Install the flooring planks including the underlayment by
leaving a 1" inch (25mm) gap for the installation
of the T-molding.
Step 2
Run a bead of PUR adhesive between the two planks
Step 3
Gently press the molding into the adhesive and adjust to
make sure it is straight.
Glue Down with shim - 9-12.3 mm floors
Laminate Flooring
Sub Floor
Sub Floor
Sub Floor
Shim
Laminate Flooring
Shim
Laminate Flooring
Shim
PUR Adhesive
PUR Adhesive
9.5 - 12.3 mm Floors
Step 1
Center the Shim between the two laminate floors and staple
them or screw them to the sub floor by using #6x5/8” screws.
Step 2
Run a bead of PUR adhesive along the length of the shim.
Step 3
Gently press the molding into the adhesive and adjust to
make sure it is straight.
4
Page 5
Installationadvice.com Solutions & Tools for problems that may arise
1/2”
Mark Holes
Here
1
2
34
T-Molding - CONCRETE Install
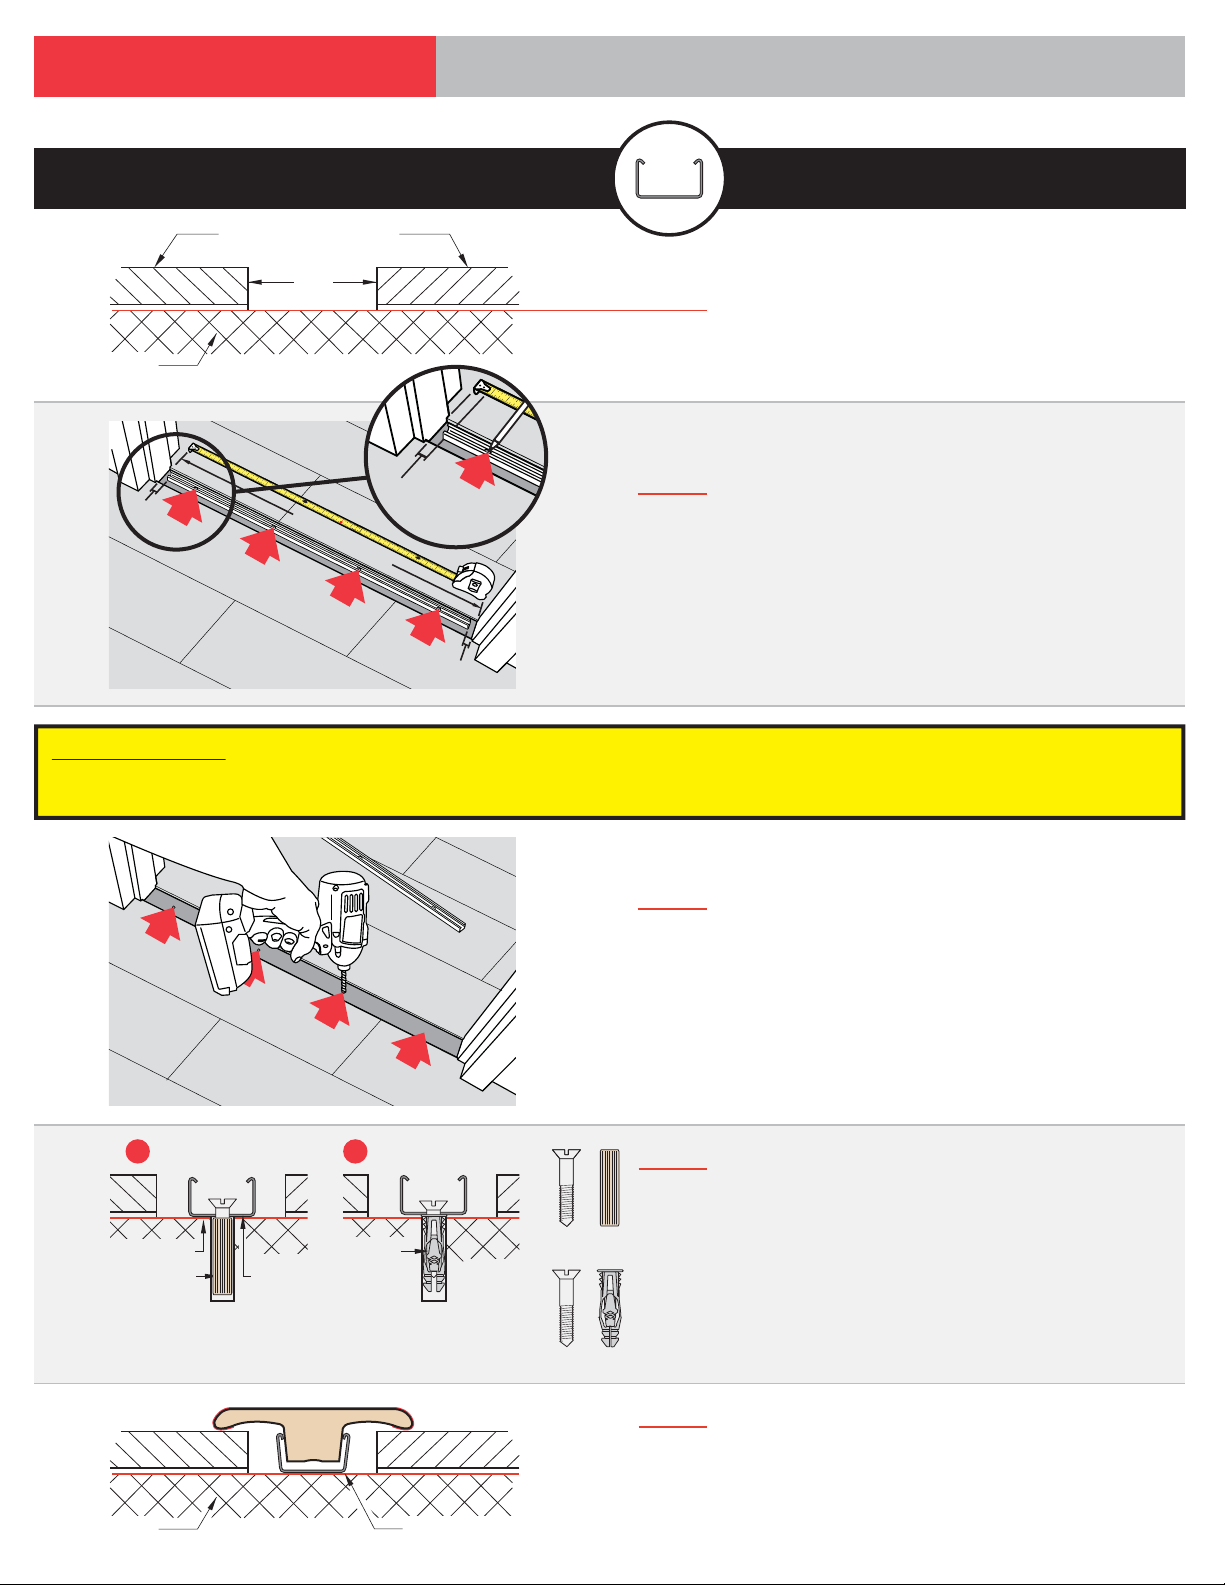
Use Versatrack (Metal Track) for 6 - 12.3 mm floors.
6 - 12.3 mm Floors
Laminate Flooring
1”
Step 1
Install the flooring planks including the underlayment by
Concrete
1/2”
12345 6
7
89
1
0
11
1
F
12
Measurement
1
13
23
1
4
15
45
16
17
6
1
8
789
19 20 21 22
10
11 1 2
23
2
4
2
F
25
26
3
2
7
4
28 29
56
30 31
7
leaving a 1" inch (25mm) gap for the installation
of the T-Molding.
Step 2
Measure the door frame to determine width. Cut the
Versatrack to the appropriate size of the door opening,
leave a 1/2” gap on each side. Lay the Versatrack in the
position to be installed, and mark each of the holes with a
marker/pencil on the concrete floor. Make sure that the
track does not shift while marking each hole.
1/2”
General Disclaimer: Never drill into a slab that has radiant heating installed. Be aware of potential gas, electrical, water or low
voltage lines present in the slab before starting your project. If unsure about these circumstances, we strongly recommend to
use a glue down installation instead (See Page 4). The glue down option would require a high quality construction adhesive.
Concrete
Wooden
Dowel Pin
Concrete
DOWEL/SCREWABANCHOR/SCREW
Plastic
All-Purpose
Anchor
Metal
Track
Metal Track
Step 3
Lay the track aside, and drill into the concrete floor by
means of a 1/4" masonry drill bit. Make sure the drill does
not 'dance' off the mark when starting to drill, as it will
otherwise bend the track when affixing to the floor. Drill
only as deep as your selection of dowel/screw combo
requires. Never drill deeper then 1-1/2" into the concrete!
Step 2
+
A - Screw + 0.375 x 1.25” Wooden Dowel Pin: With
- Use your preferred method of screw dowel combo:
#6 x 1" screws, this option will give you a little bit more flexibility
in case the drill holes are not 100% in line with the trackholes.
Make sure you drive the wooden dowel flush with the concrete,
if it sits a bit high, scrape it flush with a chisel!
B - Screw + Plastic All-Purpose Anchor:
+
Start all screws
in each hole before you tighten one all the way down. This will
ensure that all holes line up properly with the track.
Step 3
Gently press the molding into the track starting from one
end to the other just like you would close a Zip-Lock bag.
!!! Do not try to push the entire molding in all at once
by just pressing it in from top !!!
5
 Loading...