

Page 1

VersaTables.com
14105 Avalon Blvd.
Los Angeles, CA 90061
Sales:
Customer Service:
Call: 800-416-3961 Call: 424-244-2155
Proudly Made in the USA
Call: 310-353-7100
Fax: 310-353-7109
delete and insert product glam shot
VersaTables.com
Edison Electric Table - ELE-TB Assembly Instructions
American Made & Guaranteed for Life
How can we improve our assembly instructions?
Your comments and suggestions are important to us.
Please e-mail us at: [email protected].
Revised: 05-02-14
Page 2
VersaTables.com
14105 Avalon Blvd.
Los Angeles, CA 90061
Sales:
Customer Service:
Call: 800-416-3961 Call: 424-244-2155
Proudly Made in the USA
Call: 310-353-7100
Fax: 310-353-7109
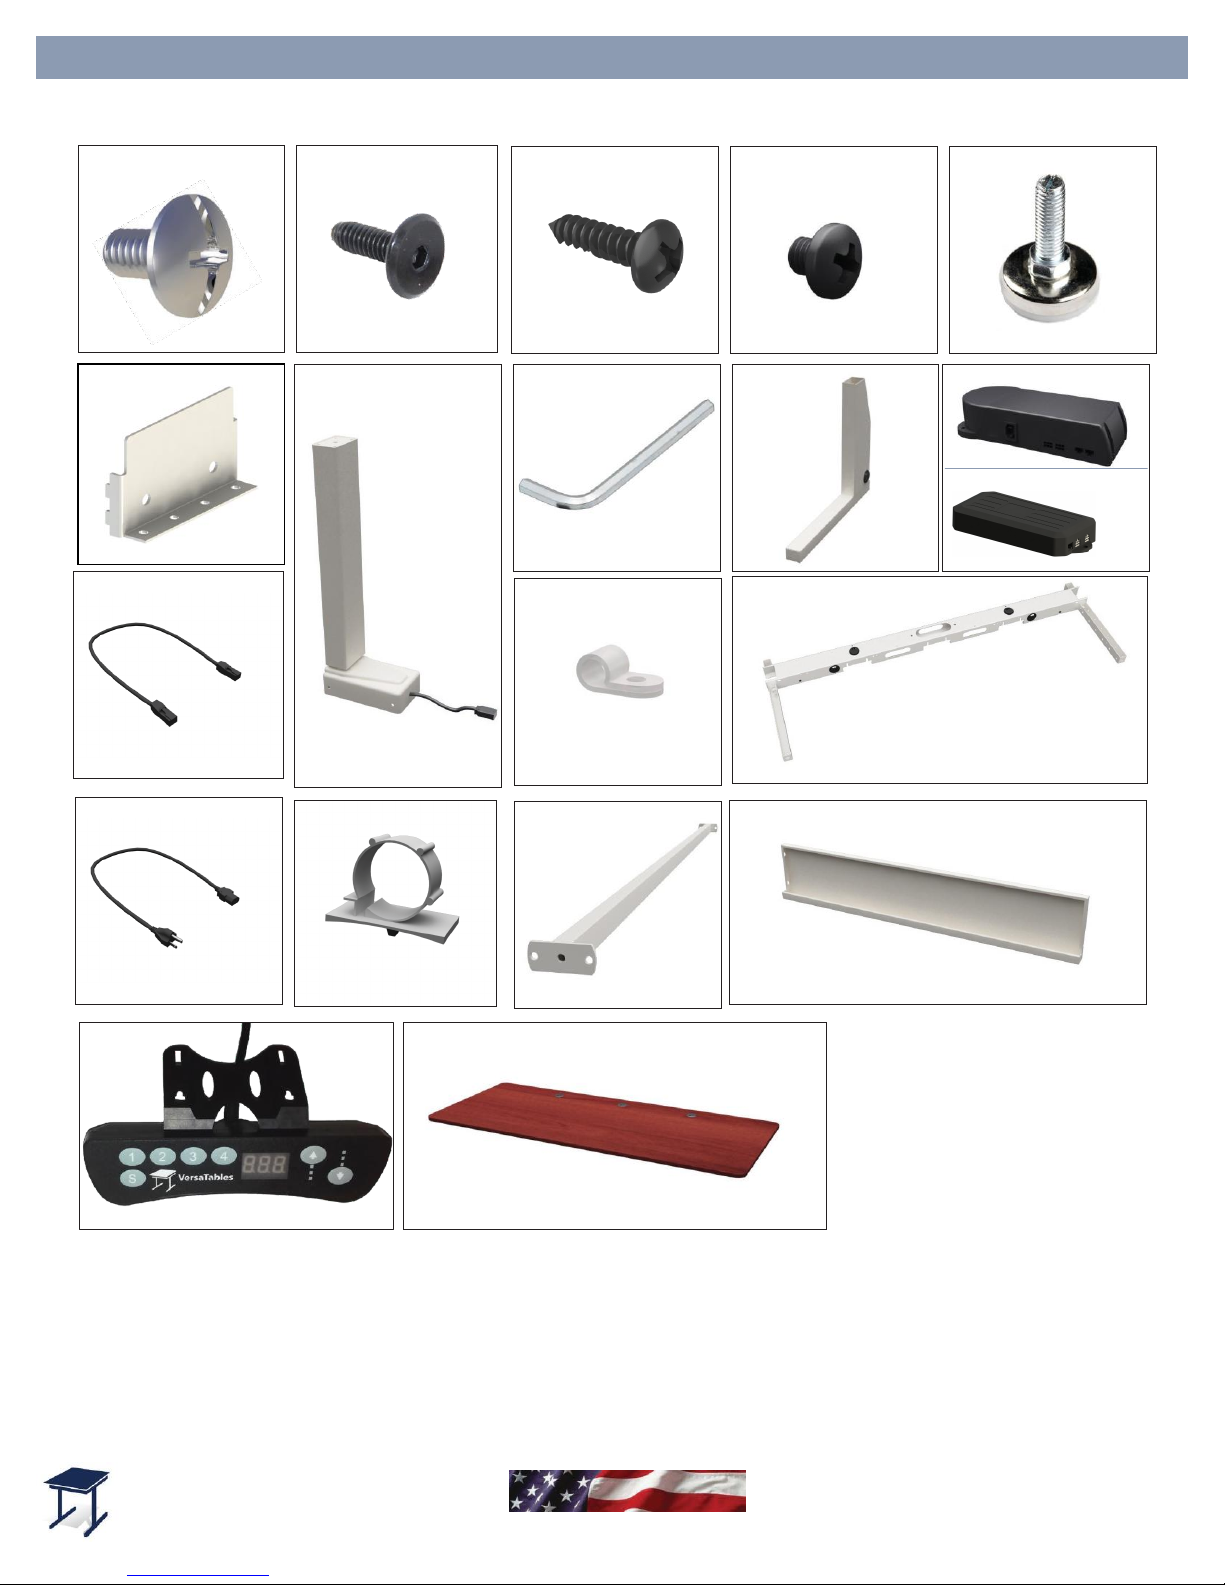
Main Surface
Qty:1
Cross Support
Qty:1
Cable Management Clip
Qty:8
Power Cord
Qty:1
Kick Panel
Qty:1
Wire Clip
Qty:1
Patch Cord
Qty:2
Qty:1
Leg
Qty:2
4mm Allen Wrench
Qty:1
Actuator
Qty:2
Caster
Qty:4
M6 Screw
Qty:16
3/4 Phillips Pan Head
Screw
Qty:20
20mm Furniture Bolt
Qty:8
1/4”- 20 Phillips Head
Bolt
Qty:10
Edison Electric Table Hardware List
Under Frame
Qty:1
Cross End Cap
Qty:2
Qty:1
Control Box A
Control Box B
ELE-TB
Controller
Page 3
VersaTables.com
14105 Avalon Blvd.
Los Angeles, CA 90061
Sales:
Customer Service:
Call: 800-416-3961 Call: 424-244-2155
Proudly Made in the USA
Call: 310-353-7100
Fax: 310-353-7109
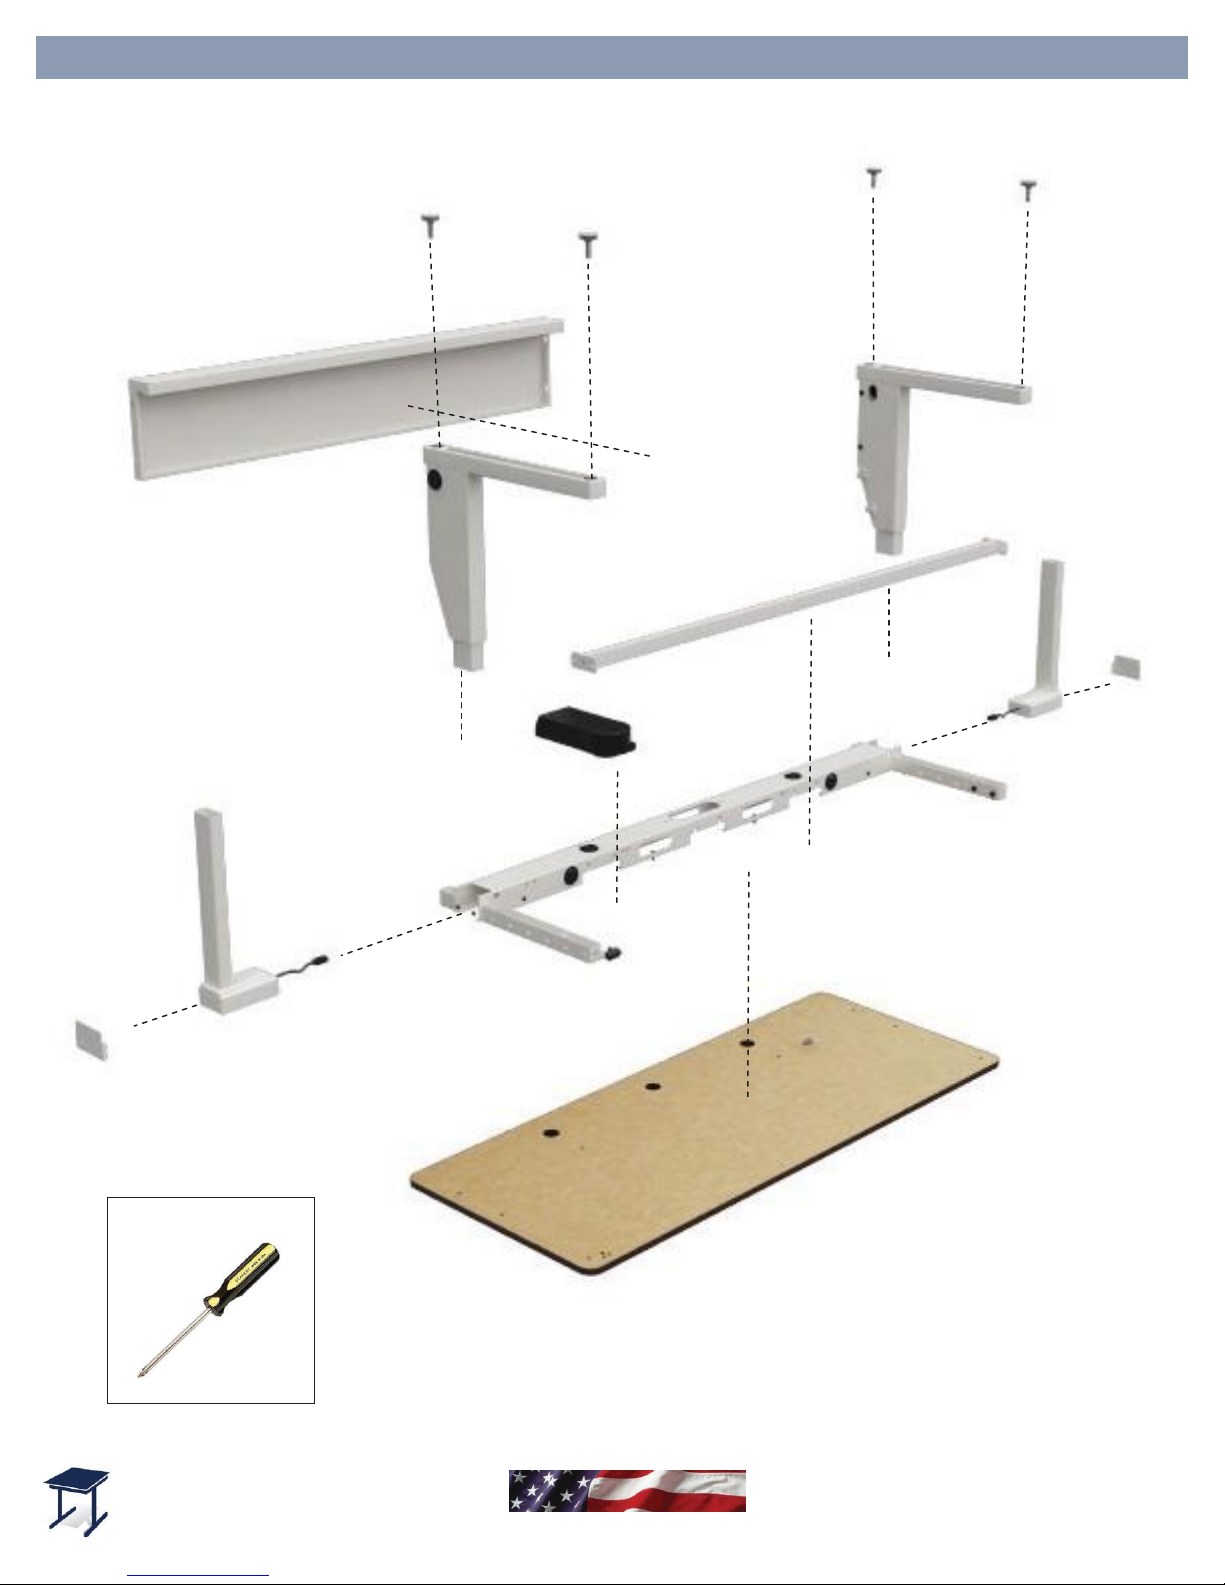
Kick Panel
Edison Electric Table Exploded View
Phillips Screw Driver
Caster
Leg
ELE-TB
Cross End
Cap
Tools Required
Additional
Control Box
Cross Support
Control
Button
Actuator
Under Frame
Main Surface
Page 4
VersaTables.com
14105 Avalon Blvd.
Los Angeles, CA 90061
Sales:
Customer Service:
Call: 800-416-3961 Call: 424-244-2155
Proudly Made in the USA
Call: 310-353-7100
Fax: 310-353-7109
ELE-TB
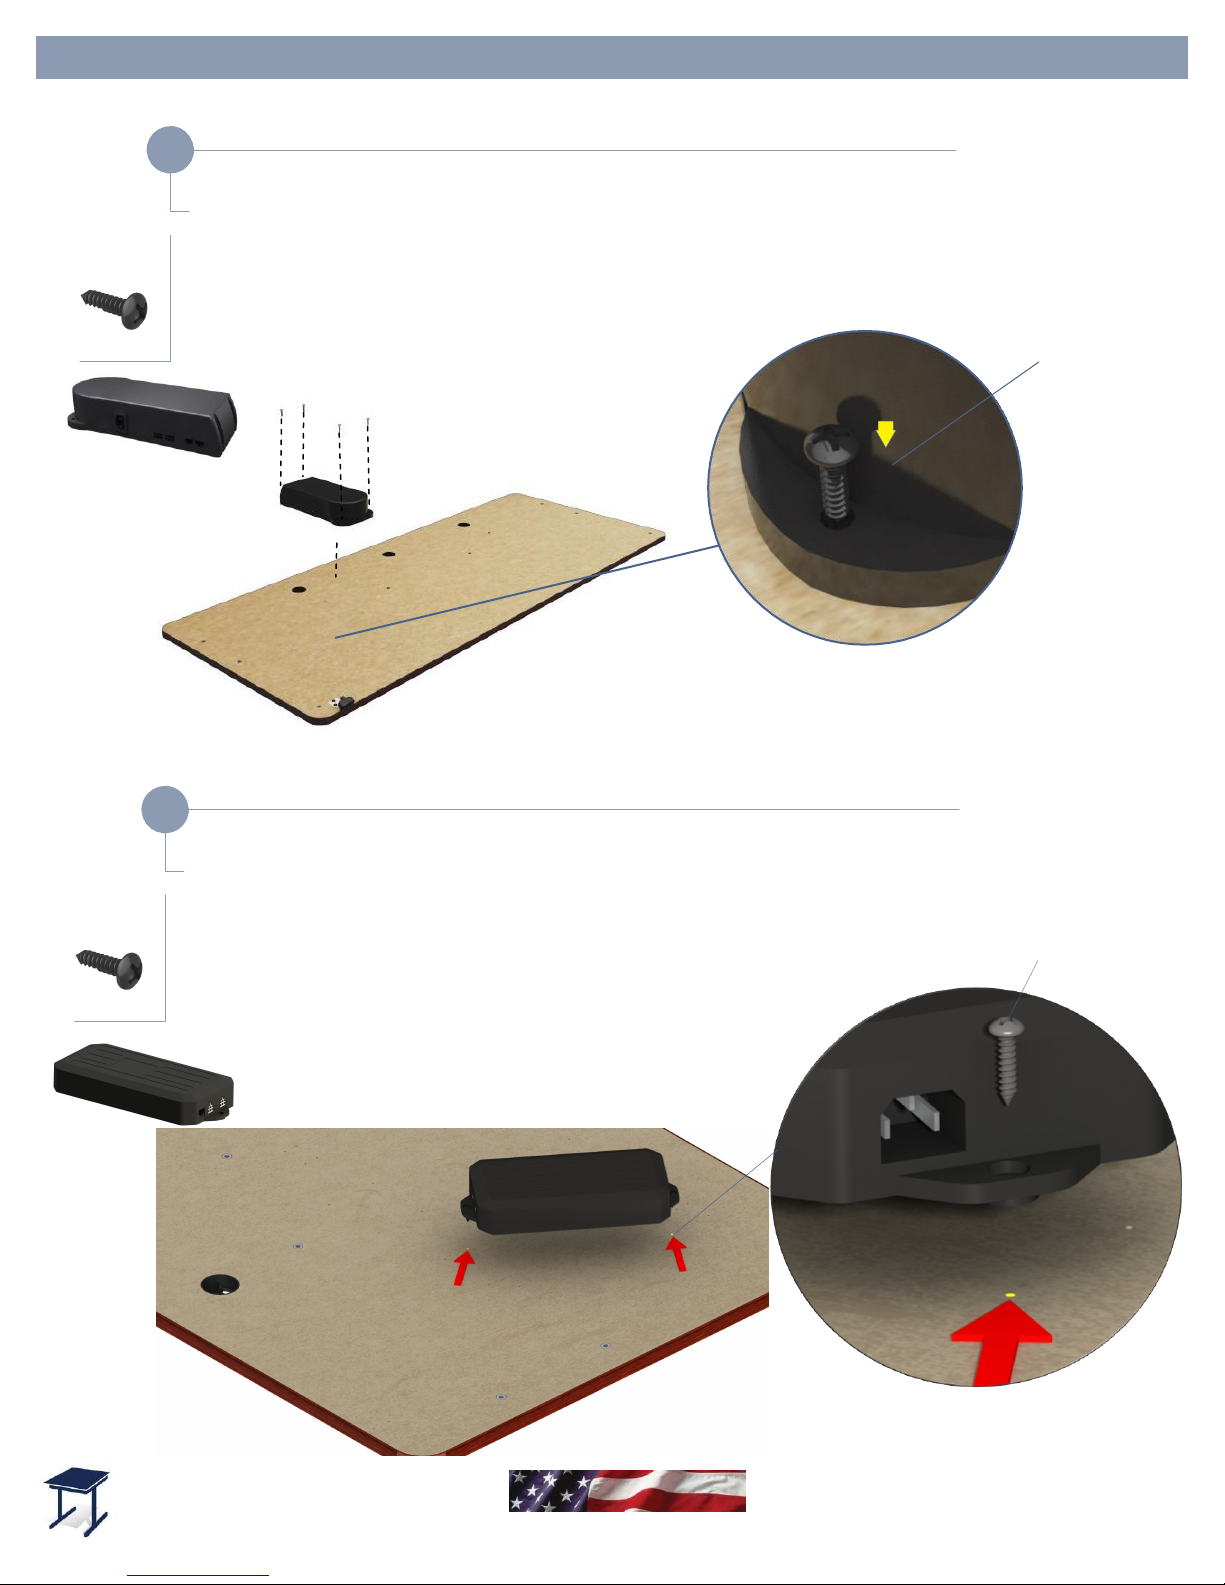
Edison Electric Table Assembly Step-by-Step
Step
3/4 Phillips Pan
Head Screw
Control Box A
1a
Qty:4
Fasten Control Box to the Main Surface using (4) Phillips Pan Head Screws.
Sockets should face towards the front of the table.
Control Box A
3/4 Phillips Pan
Head Screw
Step
3/4 Phillips Pan
Head Screw
Qty:2
Control Box B
1b
Control Box B
Fasten Control Box B diagonally to the Main Surface using (2) Phillips Pan Head Screws.
The power socket should face towards the front of the table.
3/4 Phillips Pan
Head Screw
Page 5
VersaTables.com
14105 Avalon Blvd.
Los Angeles, CA 90061
Sales:
Customer Service:
Call: 800-416-3961 Call: 424-244-2155
Proudly Made in the USA
Call: 310-353-7100
Fax: 310-353-7109
ELE-TB
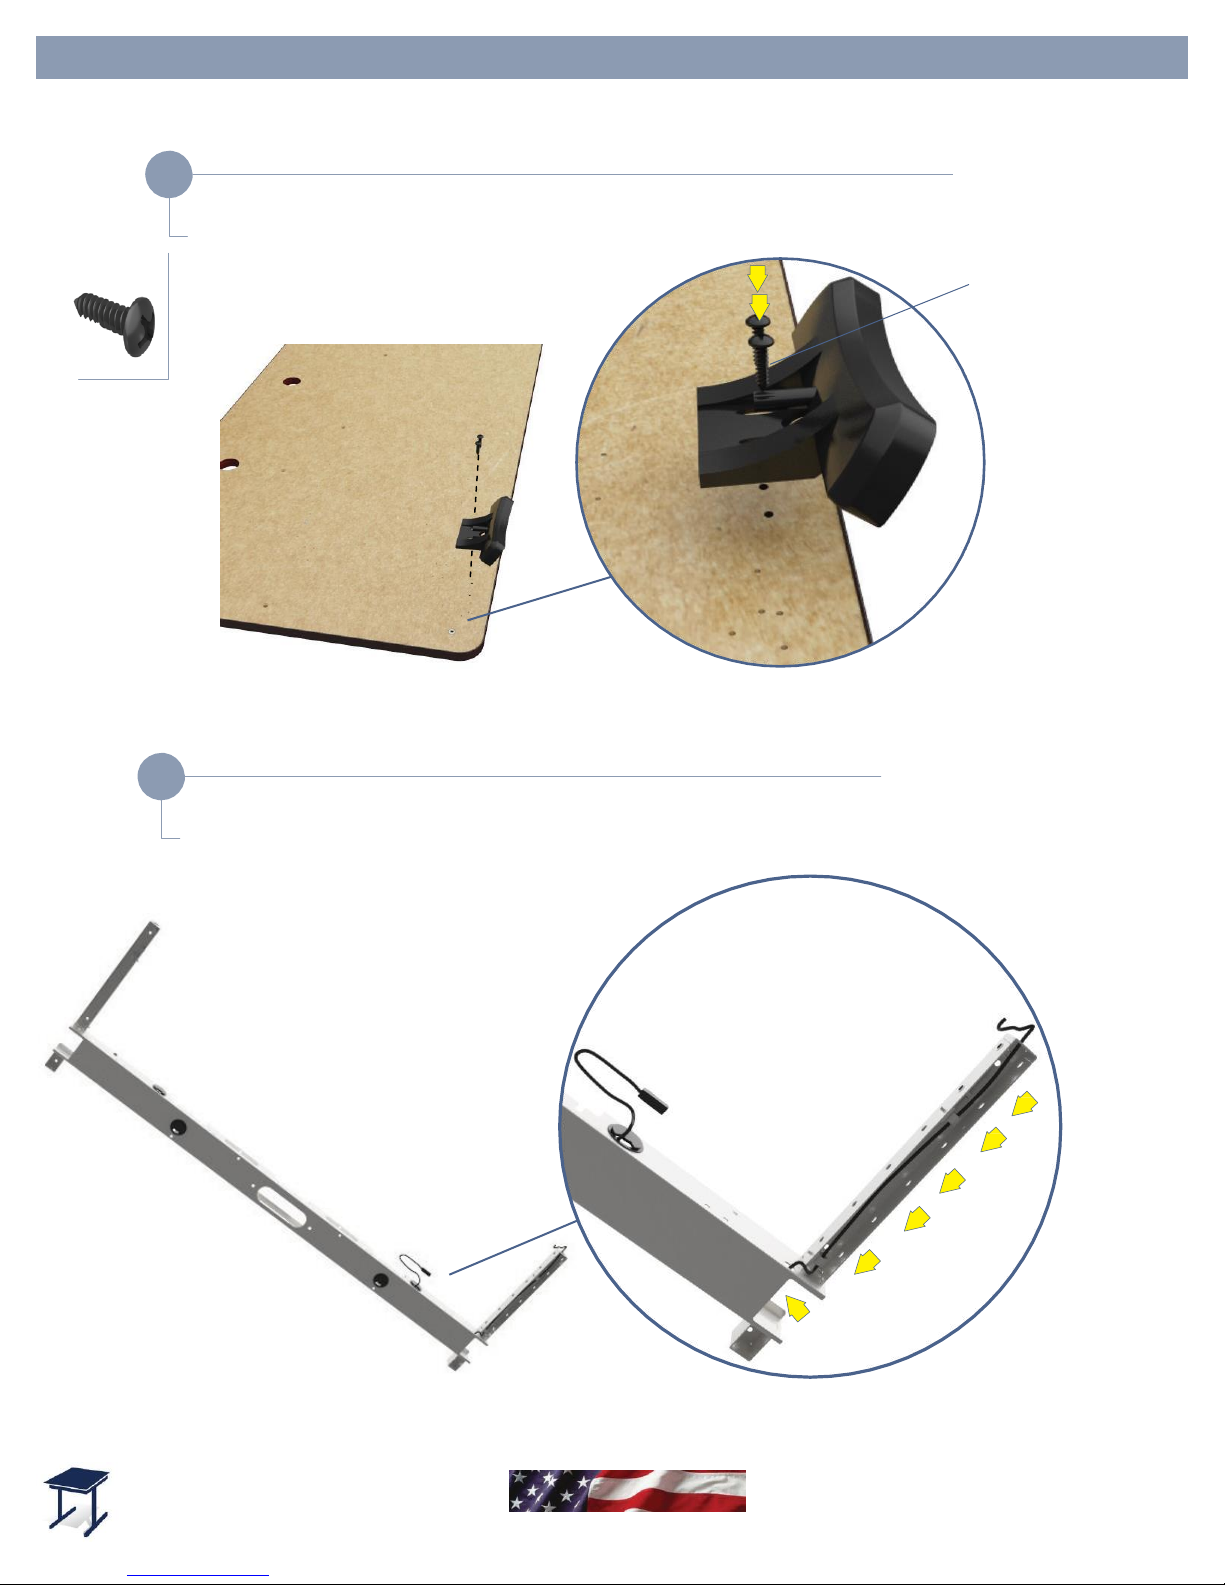
Edison Electric Table Assembly Step-by-Step
Step
3/4 Phillips Pan
Qty:2
3
Attach the Controller to Main Surface using (2) Phillips Pan Head Screws.
Controler
3
/4 Phillips Pan
Head Screw
Step
4
Run Control Button Cable through Under Frame.
Control Button Cable
Page 6
VersaTables.com
14105 Avalon Blvd.
Los Angeles, CA 90061
Sales:
Customer Service:
Call: 800-416-3961 Call: 424-244-2155
Proudly Made in the USA
Call: 310-353-7100
Fax: 310-353-7109
4
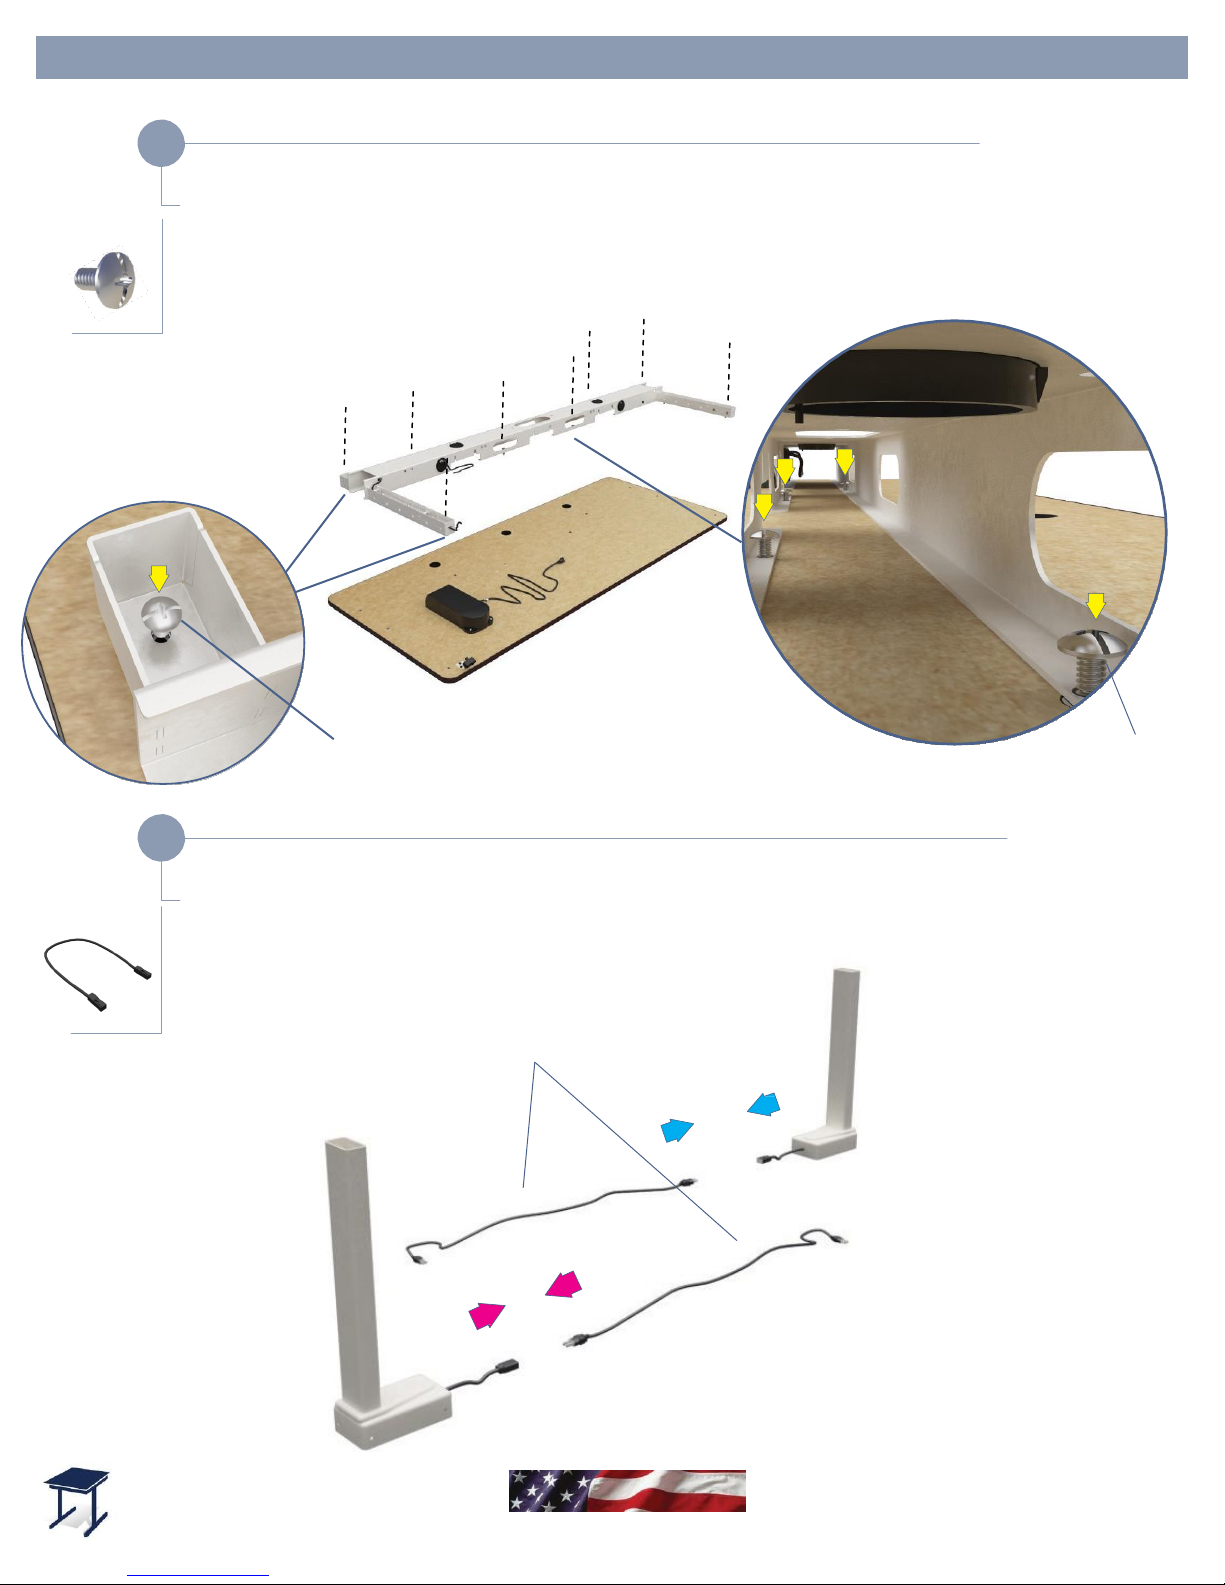
Fasten Under Frame to Main Surface using (8) 1/4-20 Phillips Head Bolts.
ELE-TB
Step
5
Patch Cord
Patch Cord
Connect a Patch Cord to each Actuator.
Qty:2
Patch Cord
1/4-20 Phillips
Head Bolt
Qty:8
1/4 - 20 Phillips
Head Bolts
1/4 - 20 Phillips
Head Bolts
Edison Electric Table Assembly Step-by-Step
Step
Under Frame
Page 7
VersaTables.com
14105 Avalon Blvd.
Los Angeles, CA 90061
Sales:
Customer Service:
Call: 800-416-3961 Call: 424-244-2155
Proudly Made in the USA
Call: 310-353-7100
Fax: 310-353-7109
ELE-TB
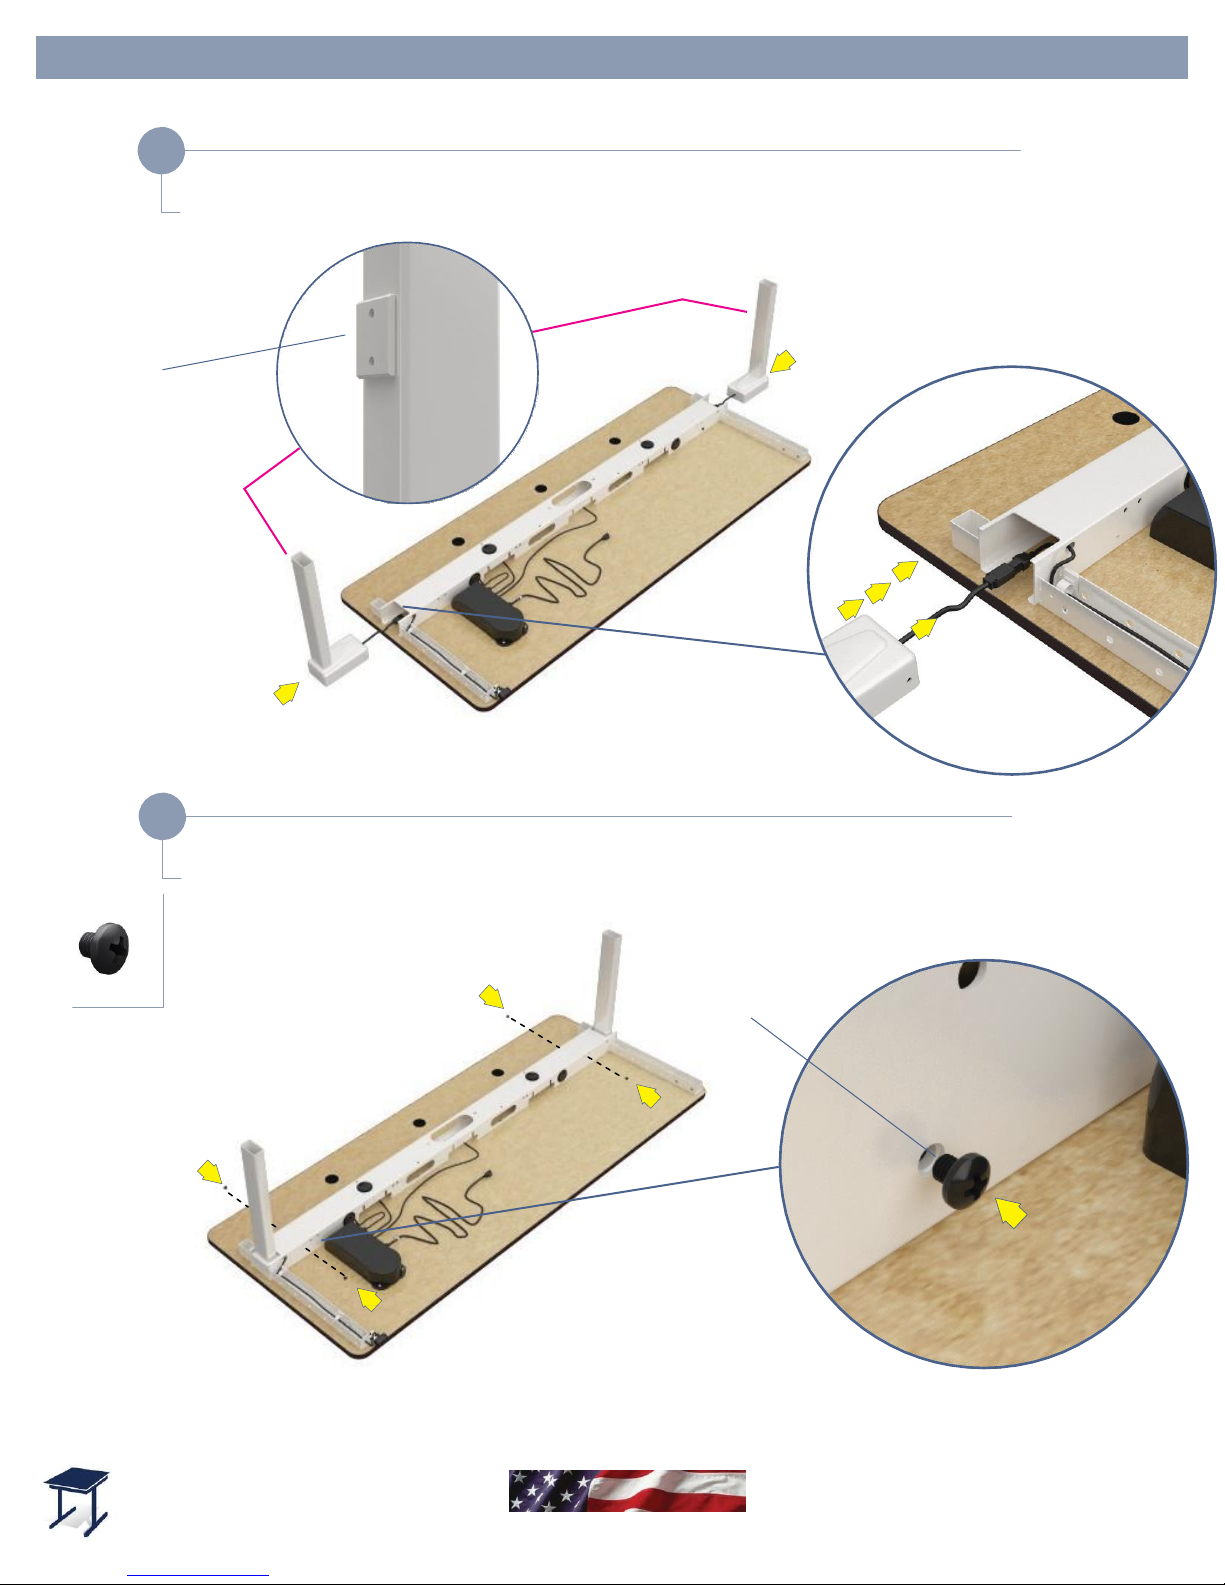
M6 Screw
M6 Screw
Qty:4
Edison Electric Table Assembly Step-by-Step
If Actuators have a block on the
tube, make sure the block facing
the back on both of them.
6
Insert Actuators into sides of Under Frame.
NOTE:
7
Secure Actuators to Under Frame using (2) M6 Screws on each Actuator.
Step
Block
Actuators
Step Actuators
Page 8
VersaTables.com
14105 Avalon Blvd.
Los Angeles, CA 90061
Sales:
Customer Service:
Call: 800-416-3961 Call: 424-244-2155
Proudly Made in the USA
Call: 310-353-7100
Fax: 310-353-7109
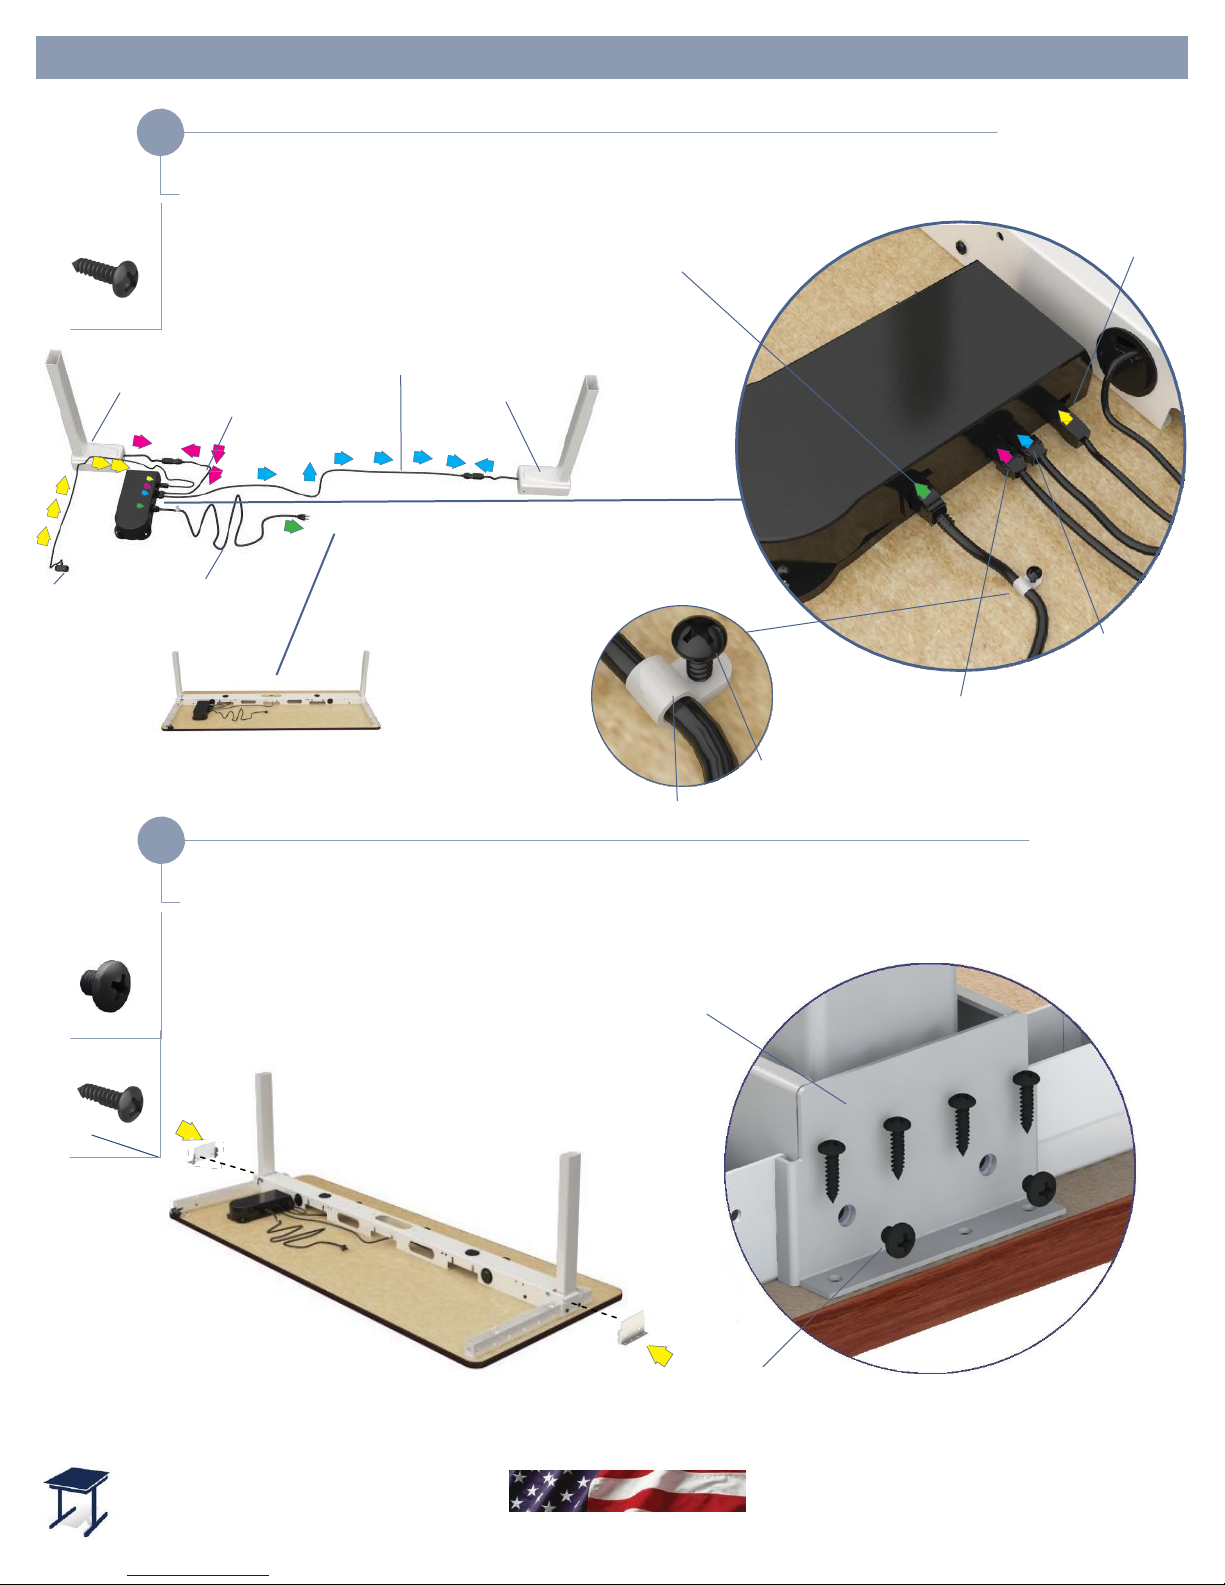
8
Make sure Actuators and Control Button are connected to Control Box.
ELE-TB
Edison Electric Table Assembly Step-by-Step
9
Secure Actuators by attaching the Cross End Caps and using (2) M6 Screws
M6 Screw
Qty:4
3/4 Phillips Pan
Head Screw
3/4 Phillips Pan
Head Screw
Qty:8
Step
3/4 Phillips Pan
Head Screw
Actuator
Control
Button
Qty:1
Patch Cord
Power
Cord
Patch Cord
Actuator
Main Power Plug
Plugging in
Control
Button
Left
Actuator Plug
Step
on each Actuator.
3/4 Phillips
Pan Head
Wire Clip
Screw
Snap Cross End Cap into Under
Frame and then fasten.
Right
Actuator Plug
Actuators
M6 Screw
Page 9
VersaTables.com
14105 Avalon Blvd.
Los Angeles, CA 90061
Sales:
Customer Service:
Call: 800-416-3961 Call: 424-244-2155
Proudly Made in the USA
Call: 310-353-7100
Fax: 310-353-7109
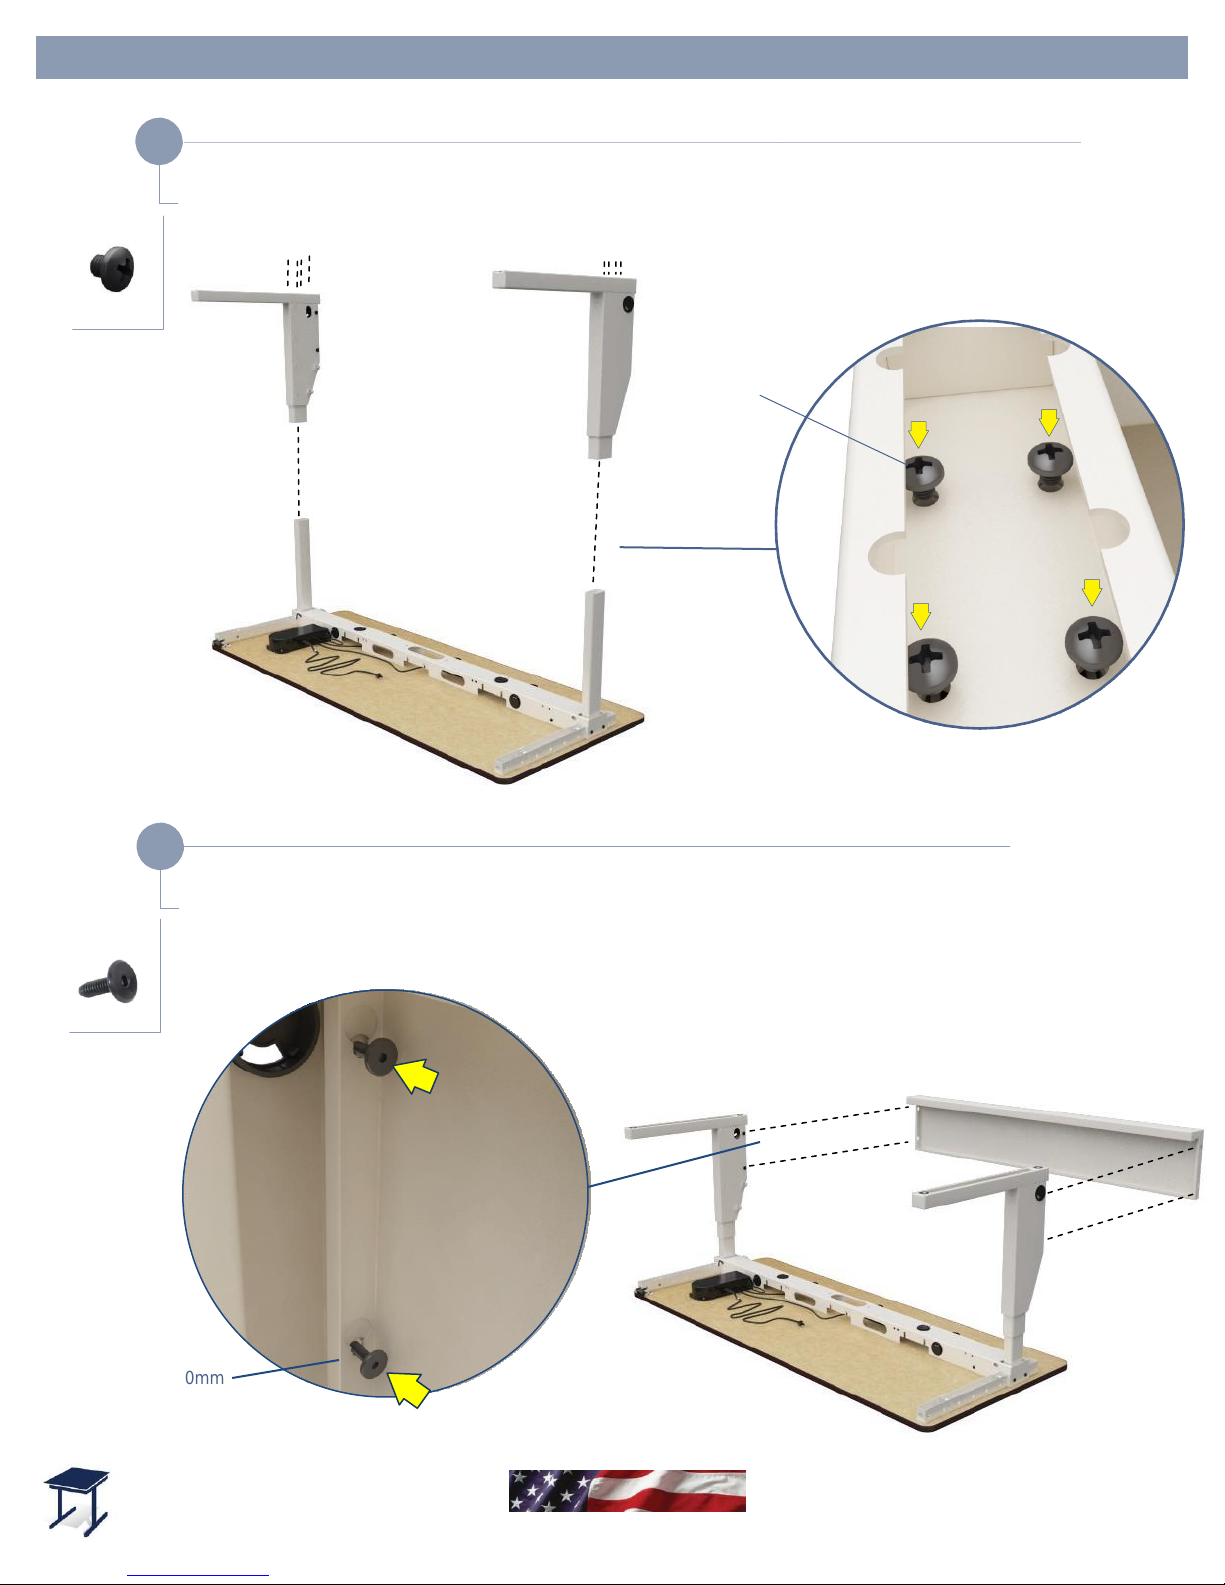
10
Attach Legs to Actuators using (4) M6 Screws on each Leg.
11
Attach Kick Panel to Actuators using
ELE-TB
M6 Screw
Qty:8
M6 Screw
Edison Electric Table Assembly Step-by-Step
Step
Legs
Step Kick Panel
20mm
Furniture Bolt
Qty:4
(2) 20mm Furniture Bolts on each side.
Screw Bolts Half way on one side first to hold up Kick
Panel, then screw in the other side and tighten.
20mm
Furniture Bolts
Page 10
VersaTables.com
14105 Avalon Blvd.
Los Angeles, CA 90061
Sales:
Customer Service:
Call: 800-416-3961 Call: 424-244-2155
Proudly Made in the USA
Call: 310-353-7100
Fax: 310-353-7109
ep
12
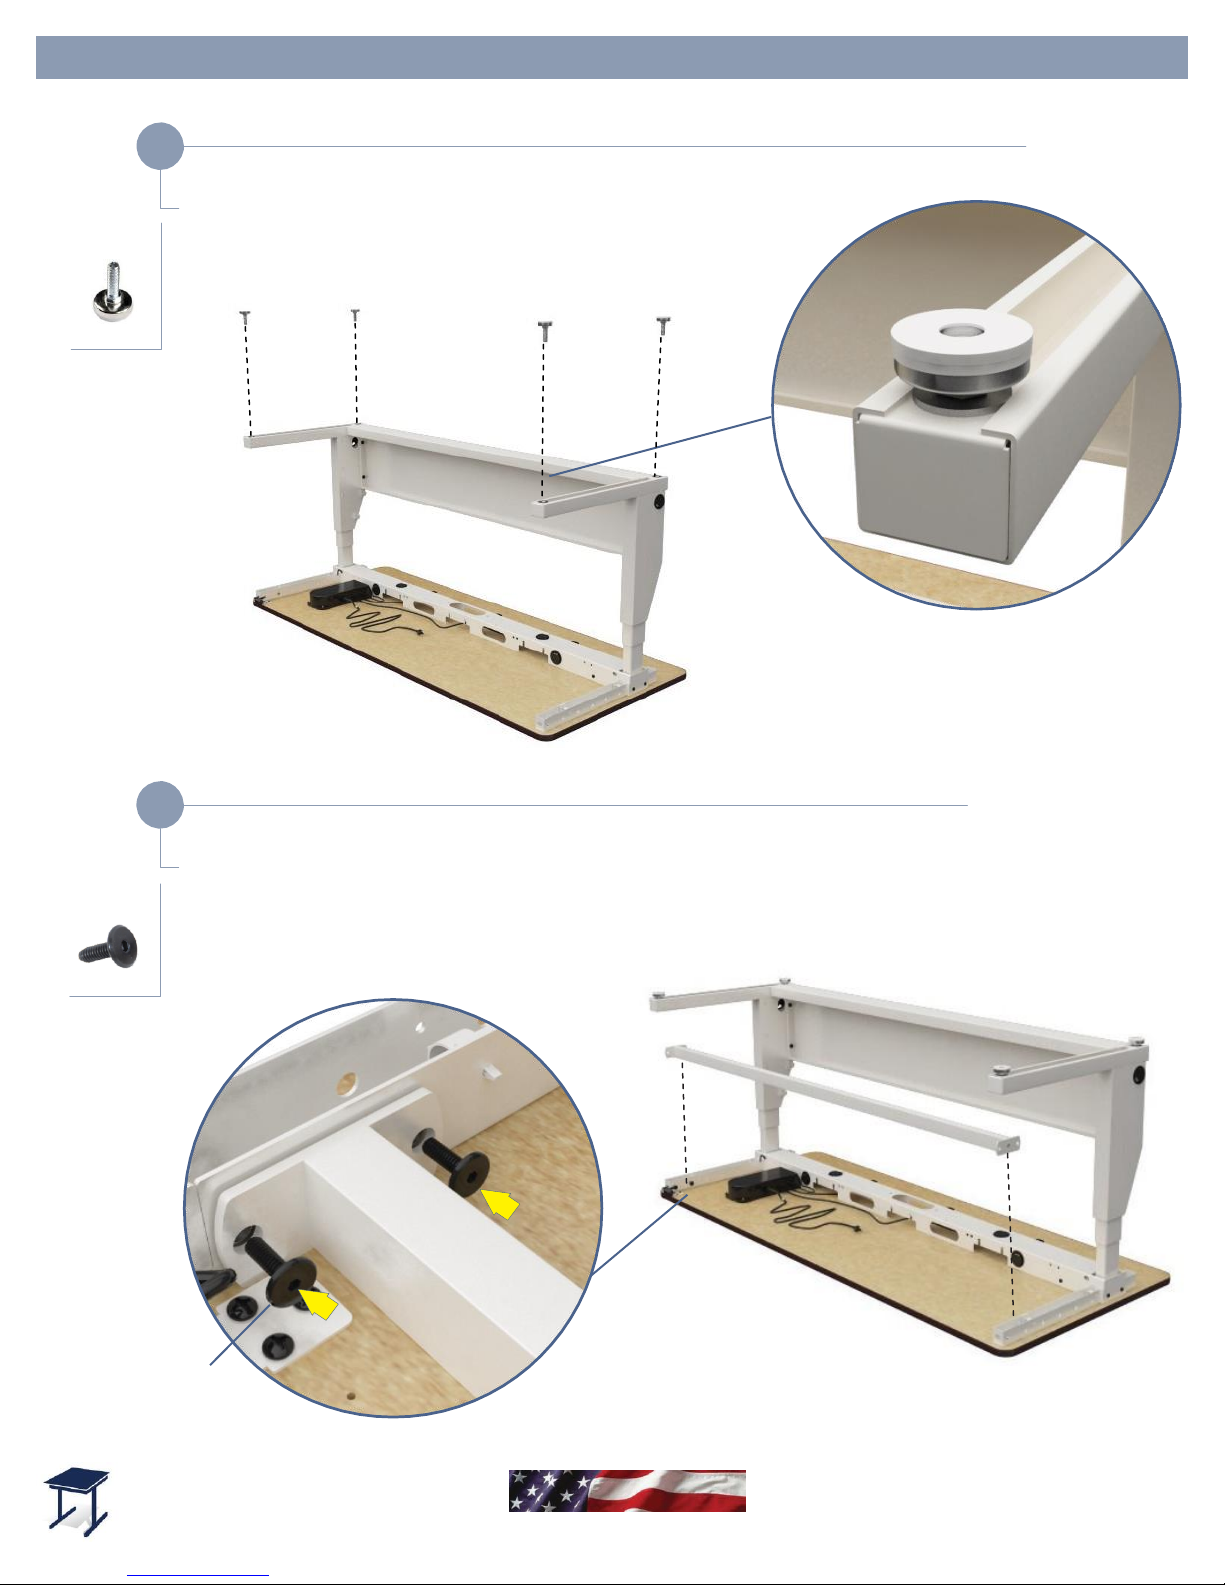
Casters
Attach Casters to Legs.
Caster
Qty:4
St
20mm
Furniture Bolt
Qty:4
Edison Electric Table Assembly Step-by-Step
13
Attach Cross Support using (4) 20mm Furniture Bolts.
ELE-TB
Step Cross Support
20mm
Furniture Bolts
Page 11
VersaTables.com
14105 Avalon Blvd.
Los Angeles, CA 90061
Sales:
Customer Service:
Call: 800-416-3961 Call: 424-244-2155
Proudly Made in the USA
Call: 310-353-7100
Fax: 310-353-7109
ELE-TB
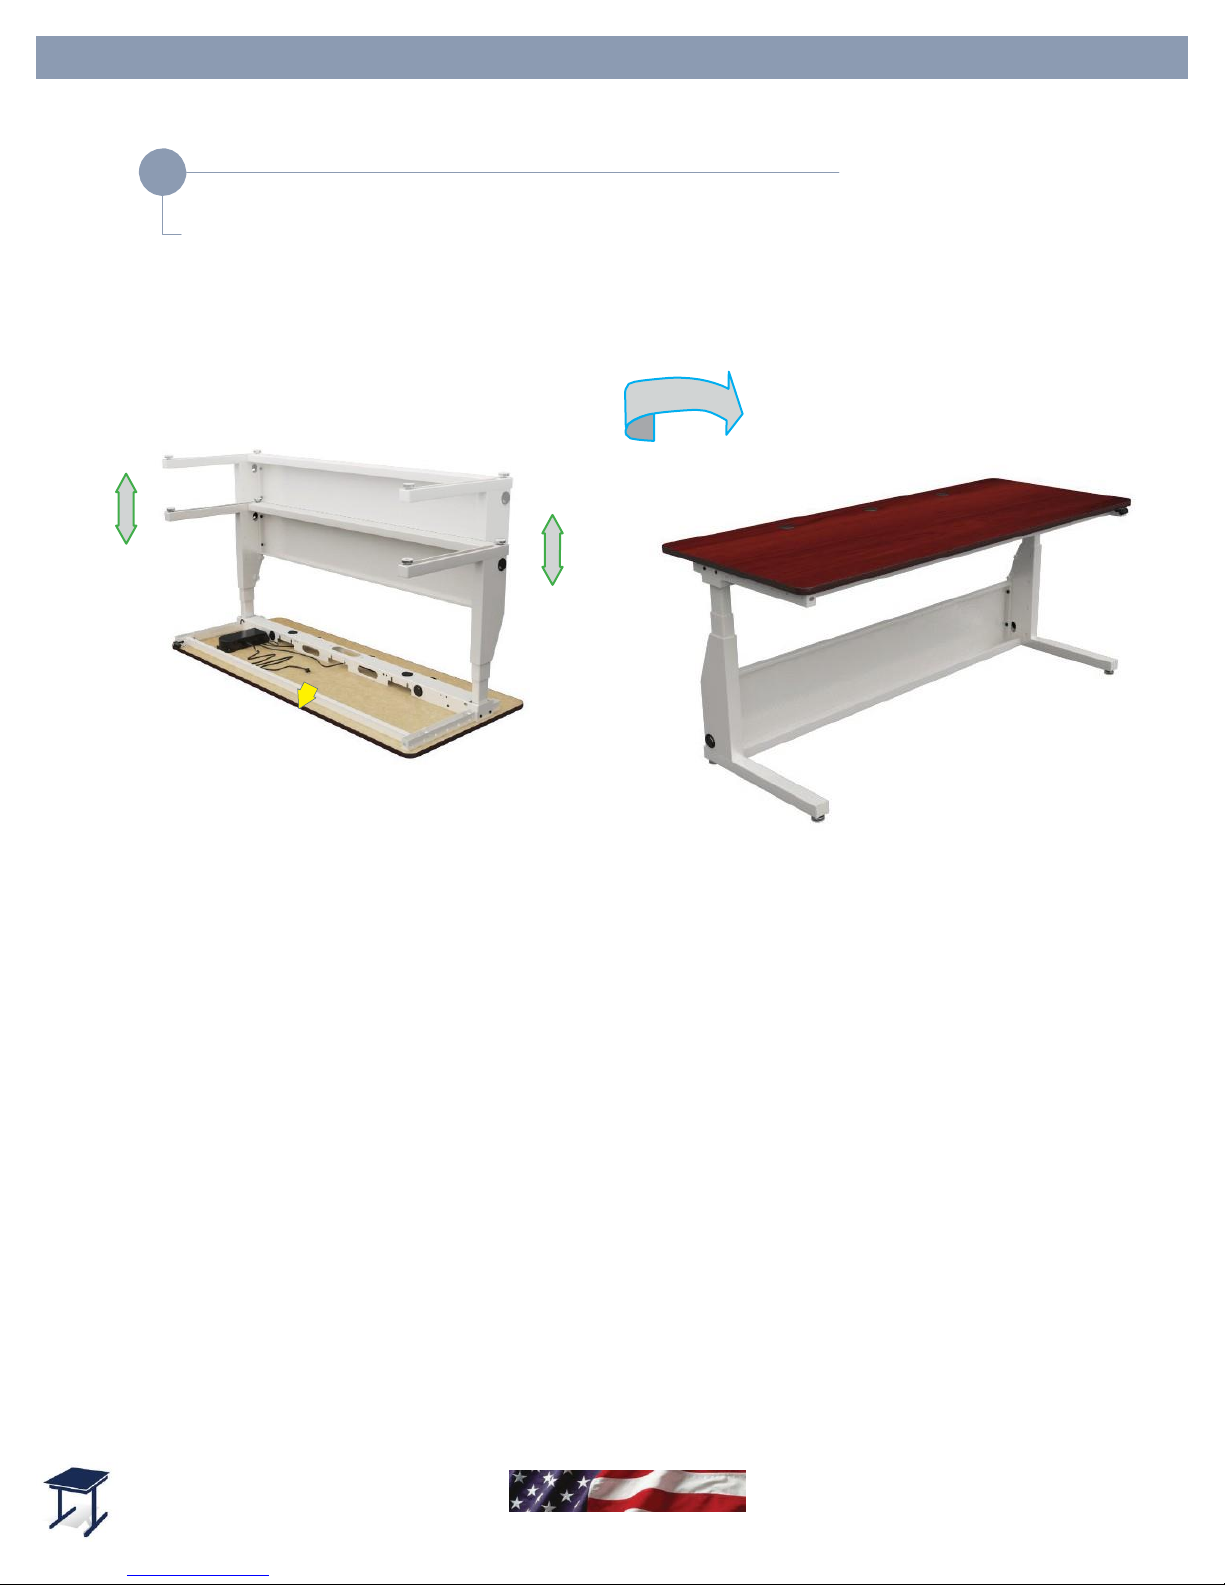
Table can be flipped over
and assembly is complete.
Plug it into a power
source
Edison Electric Table Assembly Step-by-Step
Step
14
Test and Flip Over Table
Once assembled, the table needs to be plugged in and run all the way up and
down three times while upside down to calibrate the Actuators. Make sure all of
the Screws/Bolts are fully tightened and then flip the table over.
Page 12
VersaTables.com
14105 Avalon Blvd.
Los Angeles, CA 90061
Sales:
Customer Service:
Call: 800-416-3961 Call: 424-244-2155
Proudly Made in the USA
Call: 310-353-7100
Fax: 310-353-7109
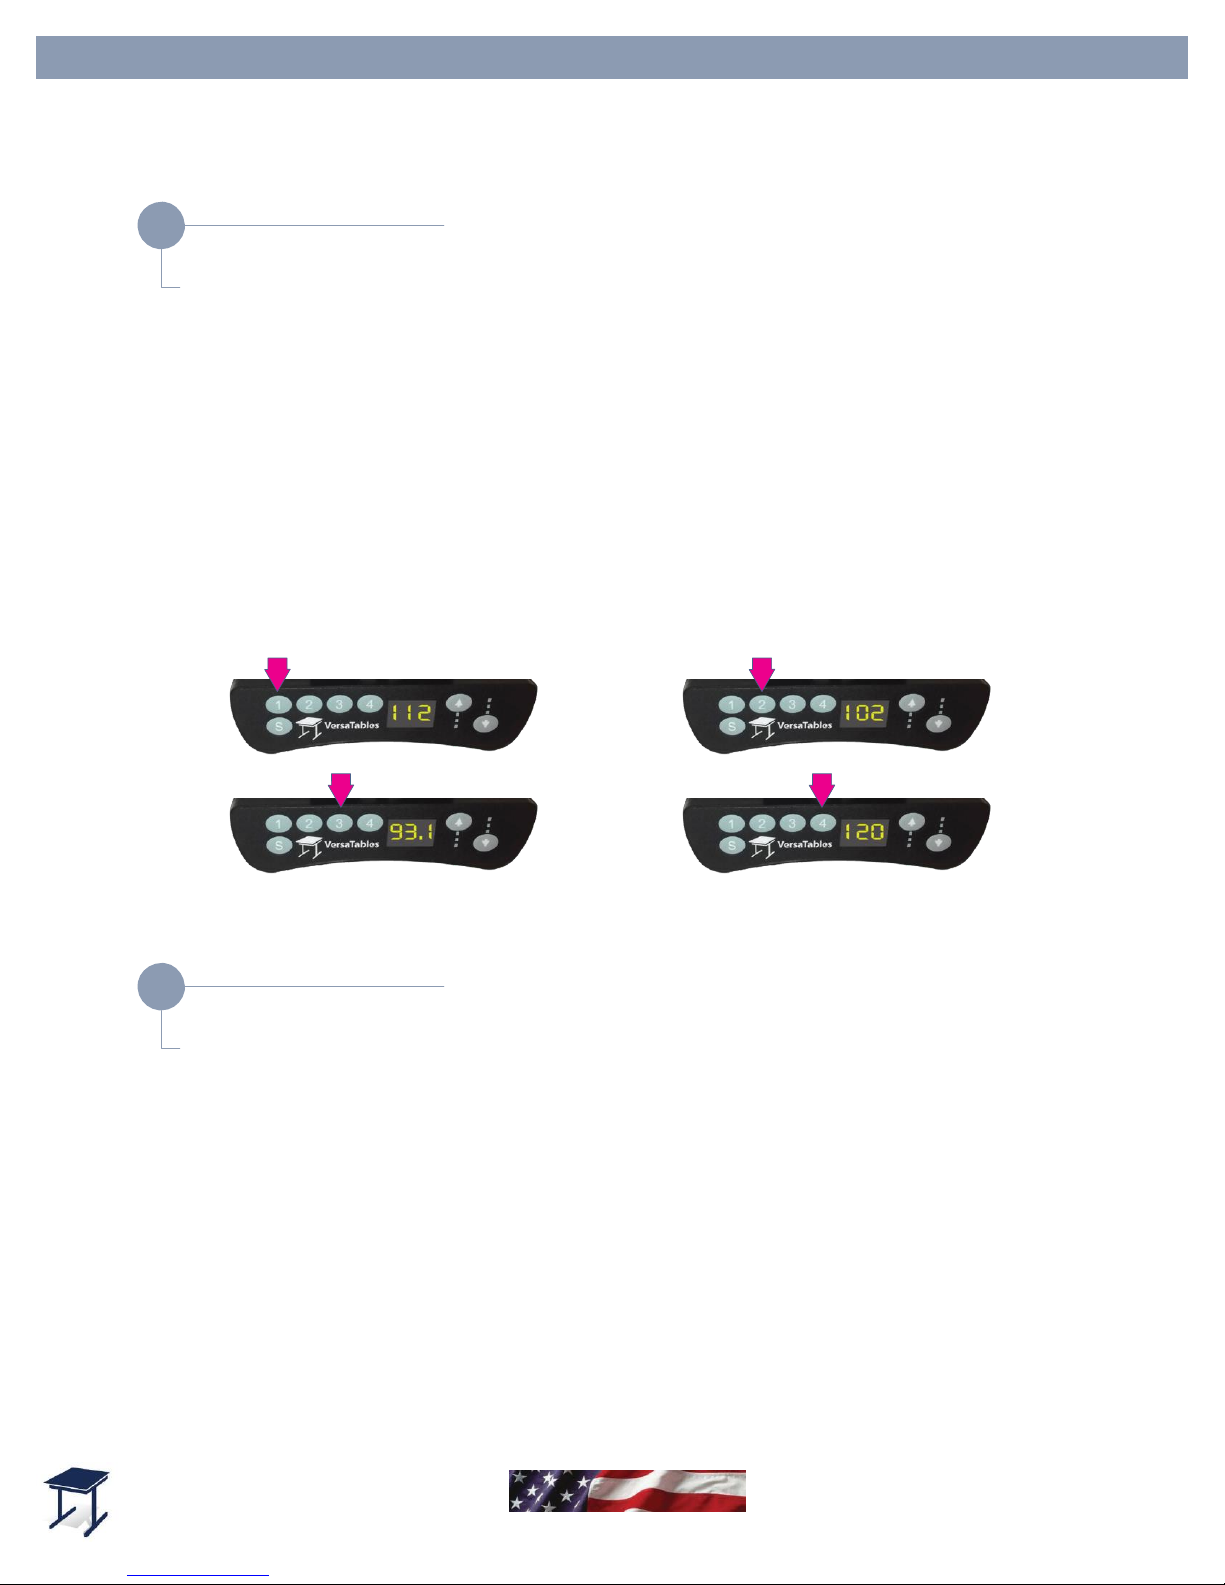
Instructions For Programming Controller With The Presets
Edison Electric Table Assembly Step-by-Step
How to reset your desk
How To Store a Memory Position
Favorite positions e.g. for sitting and/or standing can be stored. Follow the described
procedure.
How to store a position:
1.
Drive Table’s surface to the height you wish to store.
2.
Press ‘S’ and then the memory button you wish to store that height.
Your position has now been stored.
To recall your memory position, press the memory button until you reach the stored
position.
Images show 4 different height parameters stored on buttons. You can set your own.
ELE-TB
Table Will Not Go Up Only Down.
The desk cannot drive up if it has not been initialized.
If display: error code E01
How to Reset:
1.
Press down key and drive to the lowest position.
Hold the key until the desk stops completely.
2.
Reactivate the down key and hold the key until the desk stops completely.
Now the desk can drive up.
How can we improve our assembly instructions?
Your comments and suggestions are important to us.
Please e-mail us at: [email protected].
 Loading...