


Cloud Services Gateway 700
Series

Cloud Services Gateway 700 Series
2
Table of Contents
Cloud Services Gateway 700 Series .......................................................................................... 4
At a Glance ....................................................................................................................................... 4
CSG700 Appliance Models ................................................................................................................................... 4
Chassis Views ....................................................................................................................................................... 5
Components and Specifications ............................................................................................... 6
Chassis Specifications ....................................................................................................................... 6
Regulatory Compliance .................................................................................................................... 8
Certifications .................................................................................................................................... 8
Export Control Information .............................................................................................................. 9
Front and Rear Panel Components ................................................................................................... 9
Front Panel .......................................................................................................................................................... 9
Rear Panel .......................................................................................................................................................... 10
Network Interface Card Modules ................................................................................................... 12
LTE Modem Module ....................................................................................................................... 13
WiFi Access Point Module .............................................................................................................. 15
Interface Numbering ...................................................................................................................... 16
Power Supply and Airflow .............................................................................................................. 16
AC Power Supply for CSG700 Series Appliances ................................................................................................ 16
Airflow Requirements ........................................................................................................................................ 17
Planning and Installation ...................................................................................................... 17
General Safety Guidelines .............................................................................................................. 17
Federal Communication Commission Interference Statement ........................................................ 18
Prepare the Site for Installation ...................................................................................................... 18
Site Preparation Guidelines ............................................................................................................................... 18
Environmental Requirements ............................................................................................................................ 19
Rack Requirements ............................................................................................................................................ 19
Airflow Requirements ........................................................................................................................................ 19
Install a CSG700 Series Appliance ................................................................................................... 20
Unpack a CSG700 Series Appliance ................................................................................................................... 20
Packing List for a CSG700 Series Appliance ....................................................................................................... 22
Mount a CSG700 Series Appliance in a Rack ..................................................................................................... 22
Connect a CSG700 Series Appliance ................................................................................................ 25
Step 1: Connect Earth Ground to a CSG700 Series Appliance ........................................................................... 25
Step 2: Connect AC Power to a CSG700 Series Appliance ................................................................................. 25
Step 3: Connect a CSG700 Series Appliance to a Management Console ........................................................... 25
Return Hardware .................................................................................................................. 26
Locate the Model and Serial Number ............................................................................................. 26
Obtain a Return Material Authorization ......................................................................................... 26
Ó 2019 Versa Networks, Inc.

Cloud Services Gateway 700 Series
3
Repack the Appliance ..................................................................................................................... 27
Ó 2019 Versa Networks, Inc.

Cloud Services Gateway 700 Series
4
Cloud Services Gateway 700 Series
These articles provide an overview of the Cloud Service Gateway (CSG) 700 series appliance,
including chassis specifications and components; general safety standards; and instructions for
installing, connecting, and replacing an appliance.
At a Glance
The Versa Cloud Services Gateway (CSG) 700 series appliances deliver highly secure site-to-site
data connectivity to small- and medium-sized businesses and to home offices. These appliances
provide the following features:
• Unified board design that supports different CPUs and memory sizes
• Up to 10 Ethernet ports including:
o Four built-in 1 Gigabit per second (GB) Ethernet over copper (EoC) ports
o Two 1-GB EoC or SFP ports, available through separate interfaces
o Four 1-GB EoC with Power over Ethernet (PoE) ports, available if a Network
Interface Card (NIC) module is installed
• MDI and MDIX autoswitchable EoC ports
• Two USB ports for plugging in external LTE or WiFi modems
• PoE source support on four Ethernet ports
• Two built-in wireless slots
• GPS connector for geographical location
• External AC power supply
• Kensington security lock to physically lock down the appliance
• Fanless design
• Fixed chassis with no field-replaceable parts
• Desktop mount or rack-mountable in a 19” rack
CSG700 Appliance Models
The CSG700 appliances are available in the following models:
• CSG730
• CSG750
• CSG770
The CSG 700 appliance models differ only in CPU, memory, and storage size. See Table 1.
Ó 2019 Versa Networks, Inc.

Cloud Services Gateway 700 Series
5
CSG Appliance Model
CPU
Memory
Storage
CSG730
Intel Denverton with 2 cores
4 GB DRAM
32 GB
CSG750
Intel Denverton with 4 cores
8 GB DRAM
64 GB
CSG770
Intel Denverton with 8 cores
16 GB DRAM
128 GB
Table 1: CSG700 Appliance Models
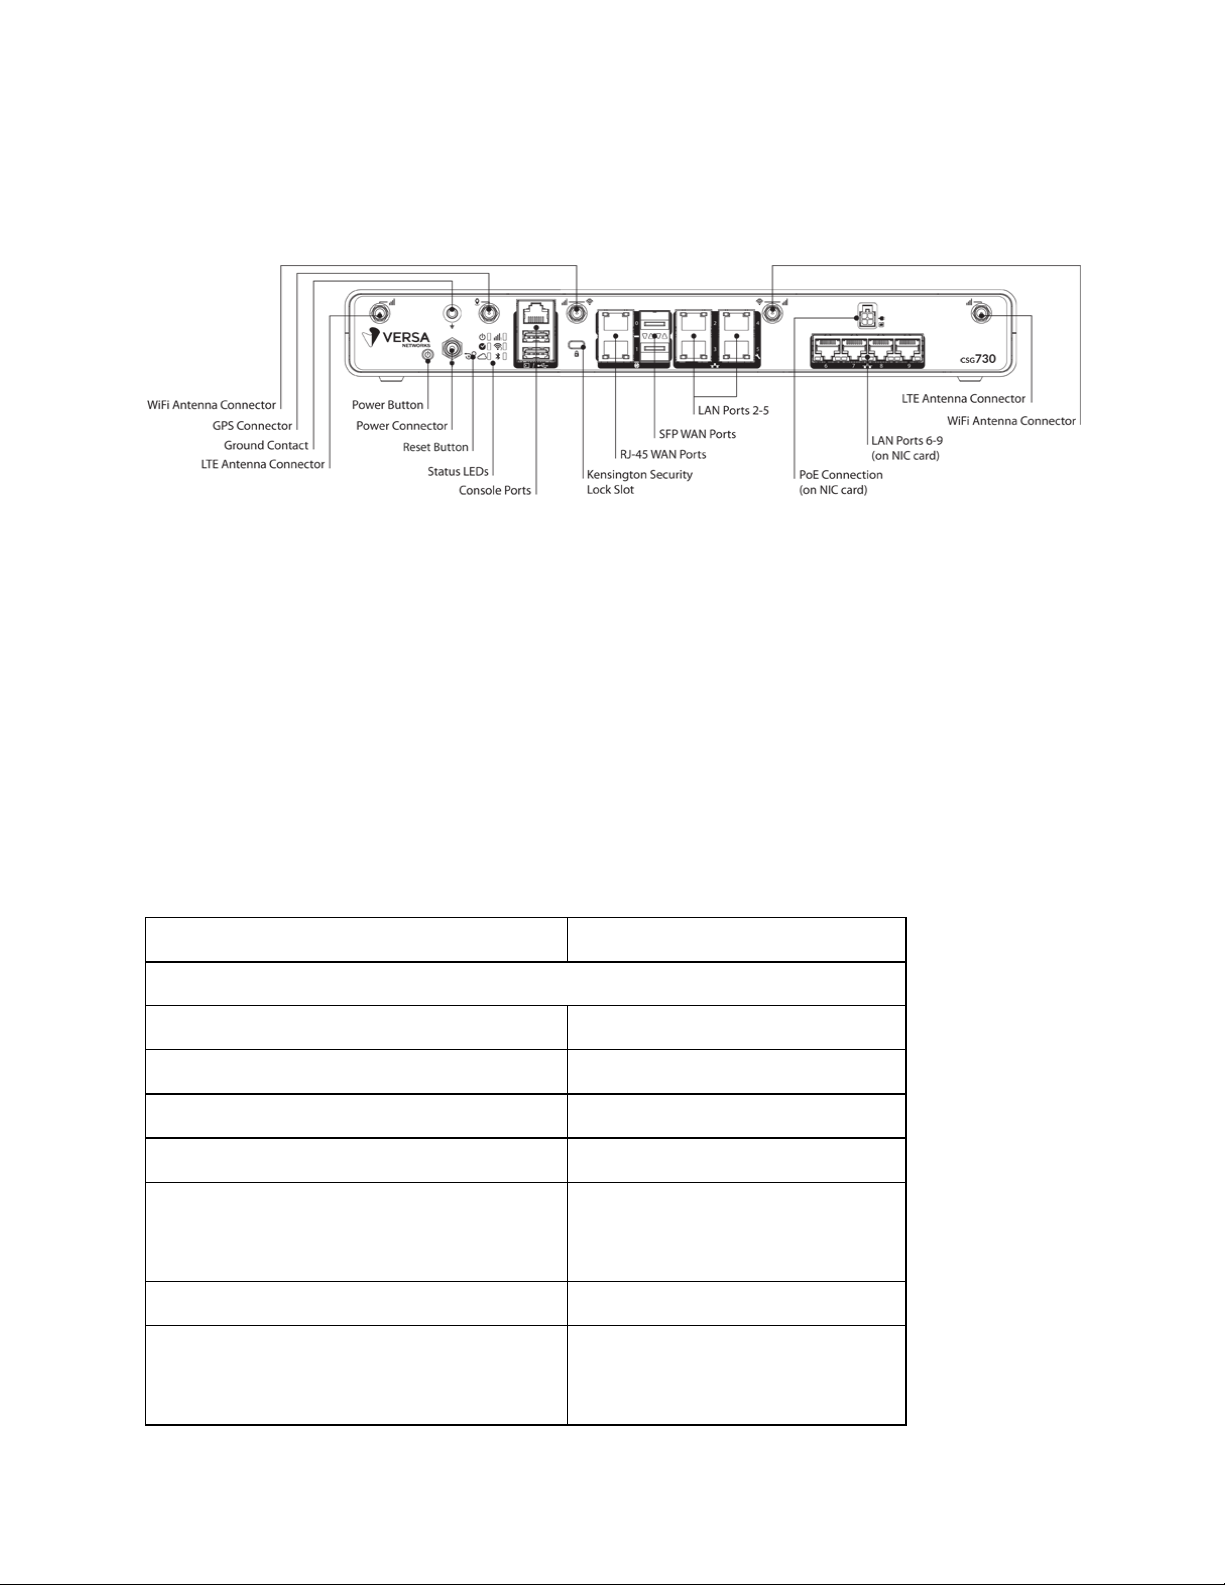
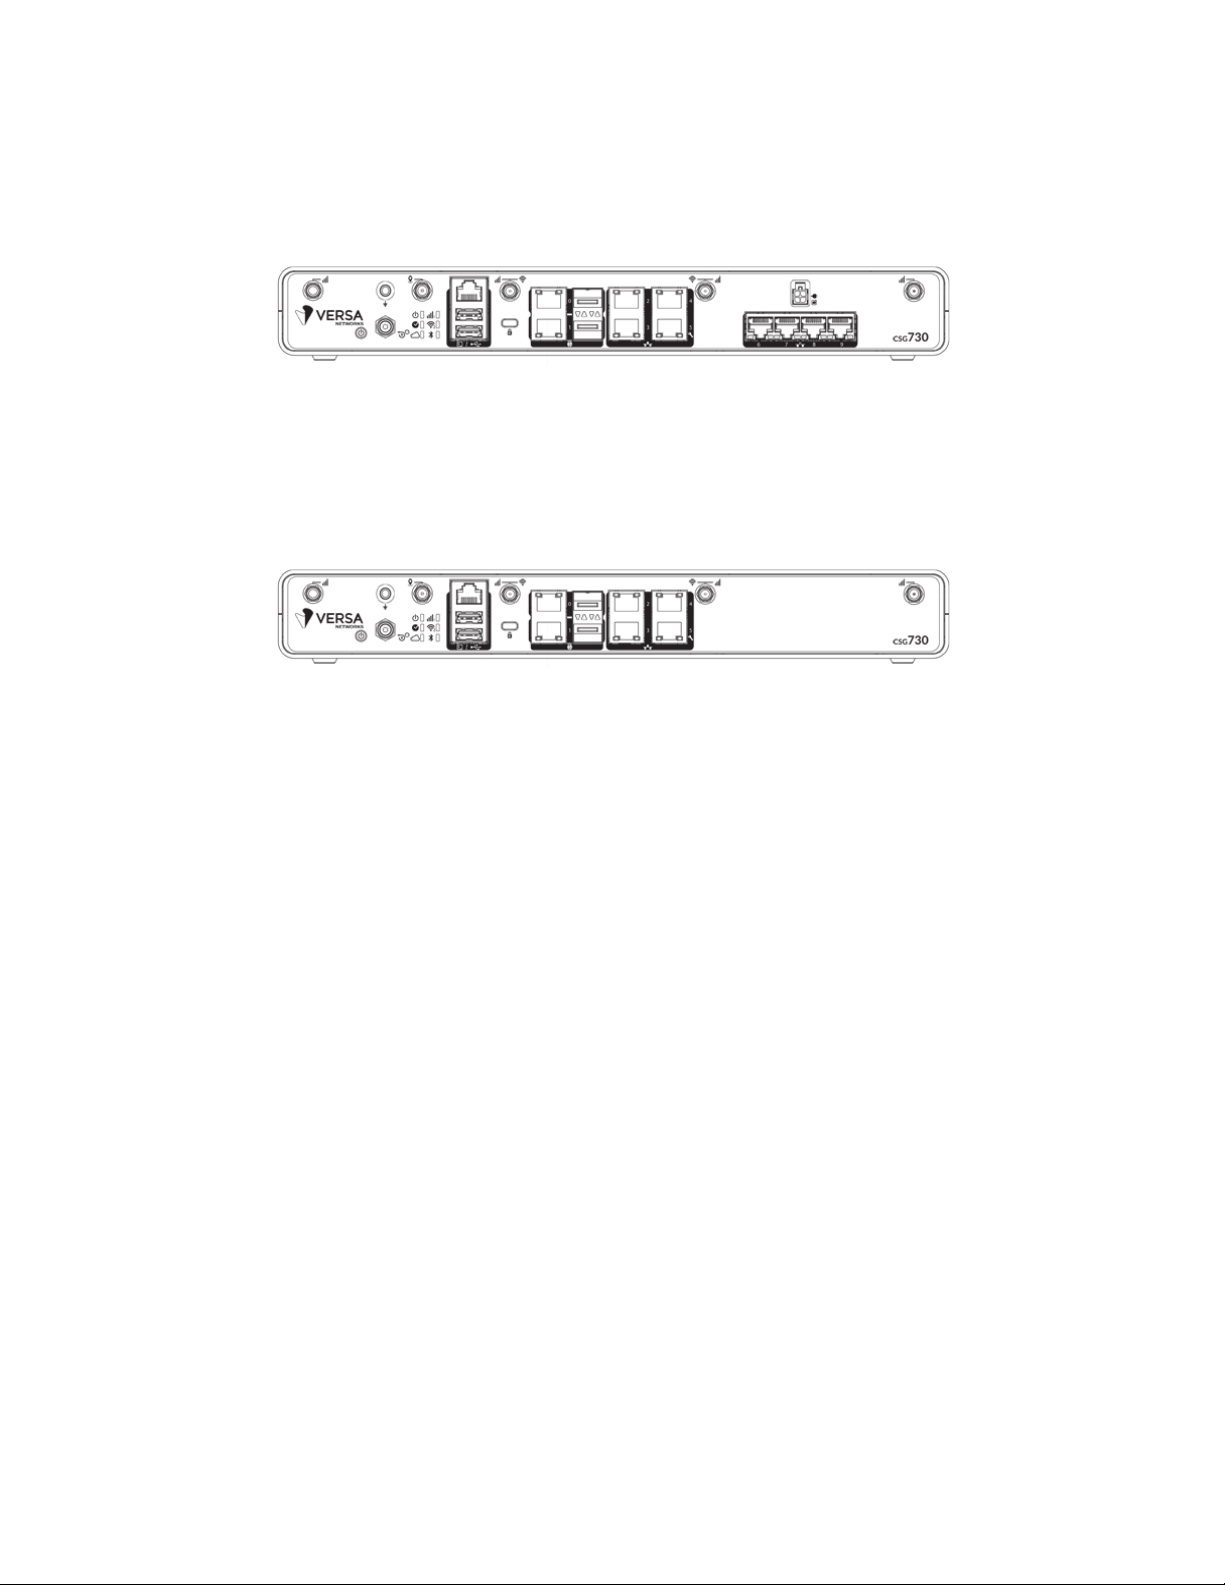
Chassis Views
Figure 1 and Figure 2 show the front and rear panels of the CSG730 appliance. The panels for
the CSG750 and CSG770 appliances are identical to the CSG730 appliance.
Note: The front panel is the side of the appliance with the SIM slots and two LEDs, for status
and power. This is the side that is visible when you install the appliance in an office
environment. The rear panel has the power and reset buttons and various connectors and ports.
This is the side that is visible when you mount the appliance in a 19-inch rack.
Figure 1: Front Panel of the CSG730 Appliance
Ó 2019 Versa Networks, Inc.
Cloud Services Gateway 700 Series
6
Item
Specification
Services and Slot Density
RJ-45 ports 10/100/1000 Mbps
4 + 2
SFP Ethernet ports
2
External USB ports (USB 2.0)
2
RJ-45 serial console port
1
Memory DDR4 ECC DRAM
CSG730: 4 GB
CSG750: 8 GB
CSG770: 16 GB
Disk 1 SSD, M.2 SATA-based
1
Disk 1 SSD default size
CSG730: 32 GB
CSG750: 64 GB
CSG770: 128 GB
Figure 2: Rear Panel of the CSG730 Appliance
Components and Specifications
A CSG700 series appliance chassis is made of aluminum for optimal heat dissipation. This
article lists the chassis and regulatory compliance specifications for a CSG700 series appliance.
It also lists certifications and export control classification numbers (ECCNs) for the appliance.
Chassis Specifications
Table 1 lists the chassis specifications for a CSG700 series chassis.
Table 1: CSG700 Series Chassis Specifications
Ó 2019 Versa Networks, Inc.
Cloud Services Gateway 700 Series
7
Disk 2 and Disk 3, USB-based
Flexible
Power supply
AC input
Power Specifications
AC input voltage
100–240 Volts
AC input line frequency
50–60 Hz
Typical power consumption with PoE
disabled
35 Watts
Typical power consumption with PoE
enabled
60 Watts
Chassis Physical Specifications
Chassis height
1.73" (4.4 cm)
Chassis width
8.75" (22 cm)
Chassis depth
13.25" (33.6 cm)
Rack height
1 RU
Chassis weight
5.84 lb (2.65 kg)
Package Specifications
Package height
7" (17.78 cm)
Package width
16.7" (42.4 cm)
Package depth
12" (30.48 cm)
Package weight
15.4 lb (7 kg)
Operating Conditions
Temperature
0 to 35°C (32 to 95°F) at sea
level
Humidity
10 to 85% relative humidity
Altitude
Maximum 3000 m (10000 ft)
Noise level
0 dBm
Storage Conditions
Temperature
20 to 70°C (68 to 158°F) at sea
level
Humidity
10 to 85% relative humidity
Ó 2019 Versa Networks, Inc.
Cloud Services Gateway 700 Series
8
Reliability
MTBF
Minimum of 200,000 hours
Item
Specification
Safety
CE Marketing
Security
TPM 2.0
Designed to be FIPS 140-2 Level 2 compliant
EMC
FCC Part 15, Class A
Environmental
RoHS
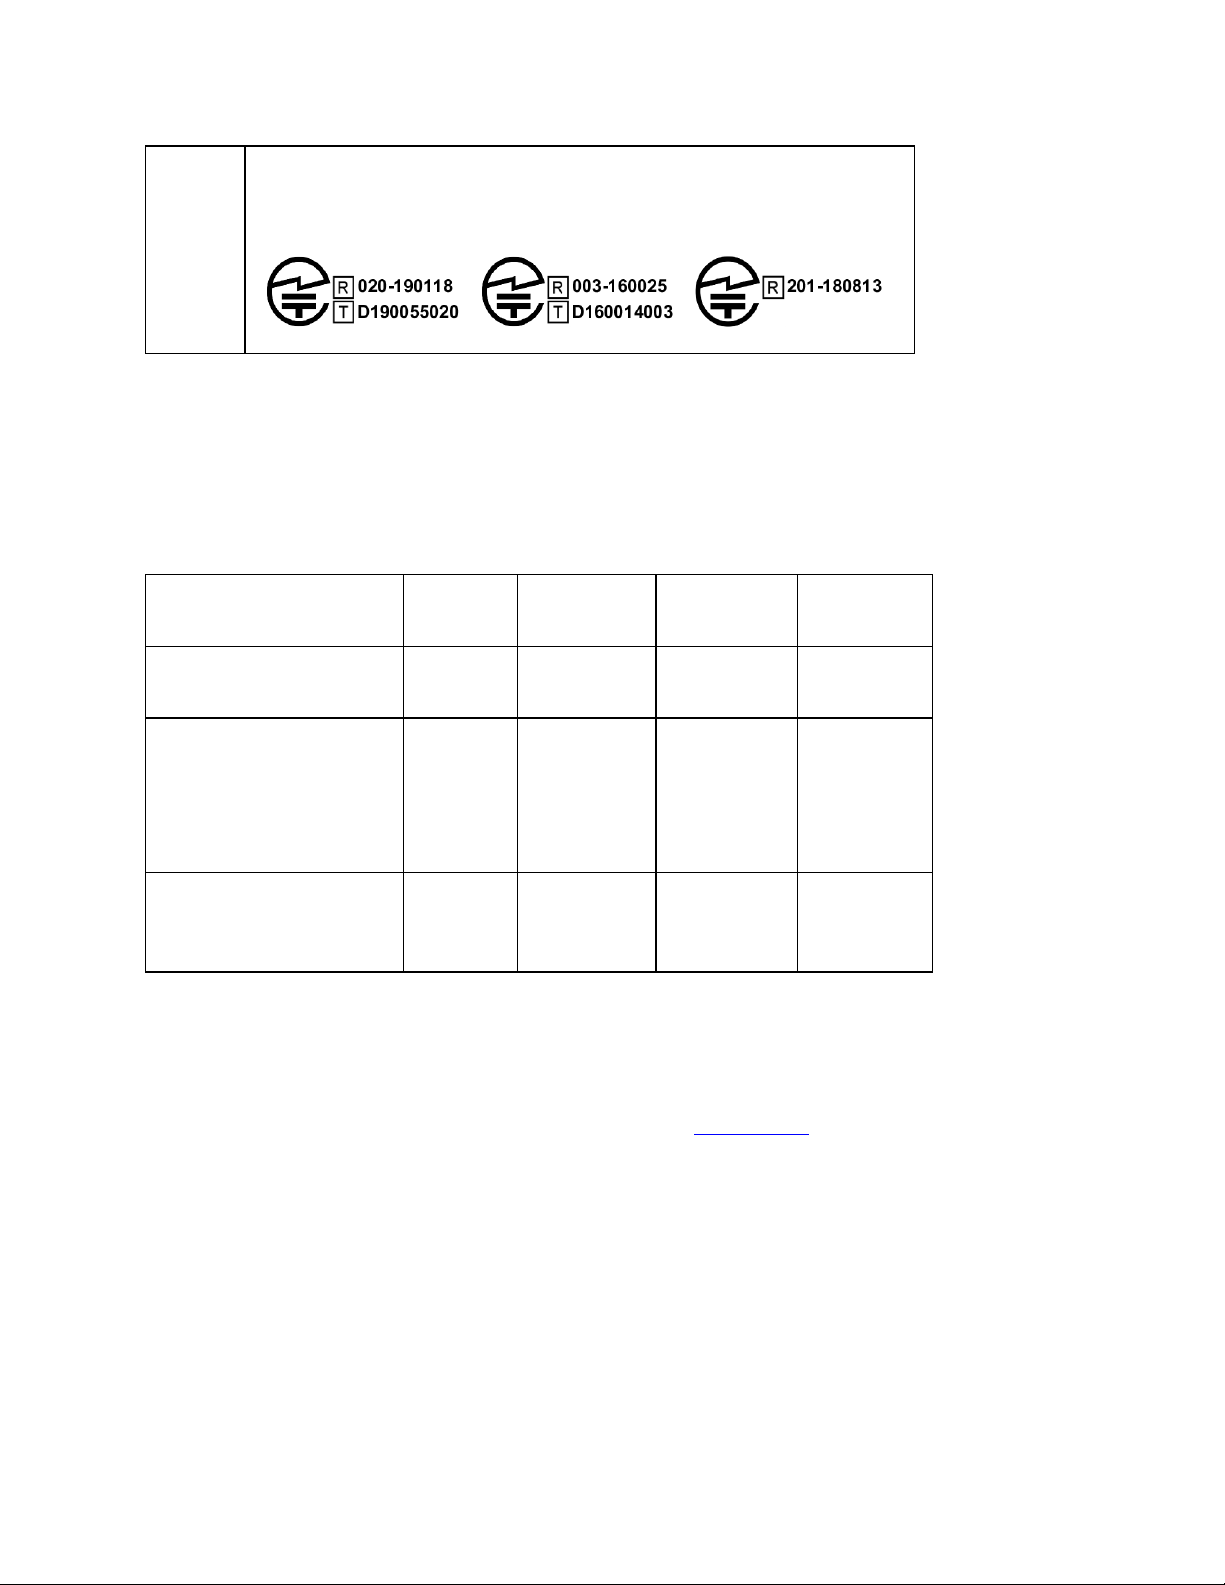
Region
Certifications
Europe
• EN 300 328 Version 2.1.1 (Bluetooth)
• EN 301 489-17 Version 1.0 (Bluetooth)
• EN 301 489-19 Version 1.0 (GPS)
• EN 303 413 (GPS)
• EN 50385 MPE(SAR Evaluation)
• EN 55032
• EN 60950-1 CE(LVD)
America
• FCC 47 CFR Part 15B
• FCC 47 CFR Part 15C, 15.247 (Bluetooth)
• MPE
• FCC ID: 2ARF9CSG-BT
• Contain FCC ID: N7NMC7455
• Contain FCC ID: 2ARF9CSG-W1
Regulatory Compliance
Table 2 lists the regulatory compliance specifications for a CSG700 series chassis.
Table 2: CSG700 Series Regulatory Compliance Specifications
Certifications
A CSG700 series appliance complies with the certificates listed in Table 3.
Table 3: CSG700 Series Certifications
Ó 2019 Versa Networks, Inc.
Cloud Services Gateway 700 Series
9
Japan
• JATE Article 9&34 (Bluetooth & RJ45)
• MIC_STD-T66 (Bluetooth)
Item
ECCN
Number
HTS
Number
CCATS
Number
Use of Item
by Versa
MatrixSSL software
module
5E002
8542310000
G161333
SSL-VPN
Proxy
QuickSec IPsec toolkit
as used by Versa
Analytics, Versa
Director and Versa
FlexVNF
5D002
8542310000
G161333
IPSec
crypto
module
Hardware-based
encryption and
decryption
5A002U
8542310001
G156910L1
CSG700
series
appliance
Export Control Information
Table 4 lists the ECCN, HTS, and CCATS numbers.
Table 4: ECCN, HTS, and CCATS Numbers
Front and Rear Panel Components
This article describes the front and rear panel components of a CSG700 series appliance. For the
exact location of these components on the appliance, see At a Glance.
Front Panel
The front panel of a CSG700 series appliance has two status LEDs and two SIM card slots.
LEDs
Table 1 lists the LEDs, their colors and states, and the status they indicate.
Ó 2019 Versa Networks, Inc.

Cloud Services Gateway 700 Series
10
LED
Color
Status
Power
Green
• Off: Appliance is not powered on.
• Green: Appliance is powered on.
Status
Green,
Red
• Off: Appliance hardware is up, but there is a problem with the
software.
• Solid green: Appliance is up and running.
• Blinking green: Appliance is in the process of booting up.
• Red: Major error condition exists in the system or there is a corrupt
software configuration.
• Blinking red: System crash, overheating, or a persistent error
condition exists.
Table 1: Front Panel LEDs in a CSG700 Series Appliance
SIM Card Slots
The front panel of a CSG700 series appliance has two nano-SIM card slots. If you subscribe to a
single wireless service, use the SIM 1 slot to install the LTE device. If you are subscribing to
dual wireless service, use both the SIM 1 and SIM 2 slots to activate the LTE devices.
Note: It is strongly recommended that you use only preactivated SIMs in the SIM card slots.
Rear Panel
The rear panel of a CSG700 series appliance has six status LEDs, power and reset buttons, a
Kensington security lock slot, and an input for a GPS antenna.
LEDs
The rear panel of a CSG700 series appliance has six LEDs located in two rows.
Table 2 lists the LEDs, their color and states, and the status they indicate.
Ó 2019 Versa Networks, Inc.

Cloud Services Gateway 700 Series
11
LED
Color
Status
Power
Green
• Off: Appliance is not powered on.
• Green: Appliance is powered on.
Status
Green,
Red
• Off: Appliance hardware is up but there is a problem with the
software.
• Solid green: Appliance is up and running.
• Blinking green: Appliance is in the process of booting up.
• Solid red: Major error condition exists in the system or there is a
corrupt software configuration.
• Blinking red: System crash, over heating, or a persistent error
condition exists.
Wireless
White
• Off: Wireless module not installed.
• Solid white: Wireless module is up and running.
• Blinking white: Wireless module is booting up or there is traffic on
the wireless module.
LTE
White
• Off: LTE module not installed, or there is a major hardware
problem.
• Solid white: LTE module is up and running.
• Blinking white: LTE module is booting up or there is traffic on the
LTE module.
Table 2: Rear Panel LEDs in a CSG700 Series Appliance
Power Button
The Power button on the rear panel of a CSG700 series appliance turns the power on and off.
To turn the power on, press and immediately release the Power button when the appliance is off.
To turn the power off, press the Power button when the appliance is on. If you press and
immediately release the button, the appliance shuts down gracefully. If you press and hold the
button for a longer period, it turns off power to the appliance ands shuts it down.
Reset Button
The Reset button on the rear panel of a CSG700 series appliance resets the appliance. The reset
functionality depends on the number of time you press it, as described in Table 3.
Ó 2019 Versa Networks, Inc.

Cloud Services Gateway 700 Series
12
Number of
Presses
Behavior
2
Reset the appliance to the factory-default snapshot.
4
Reset the appliance to the branch prestaging configuration.
6
Reset the appliance to the branch staging configuration.
8
Reset the appliance to branch post-staging configuration.
The Reset button is recessed so that it is not accidentally pressed while the appliance is
operational.
To press the Reset button, use a sharp narrow tool. Each time you press the Reset button, you
hear a buzzer sound.
Table 3: Reset Button Press Behavior
Kensington Security Lock
The Kensington security lock on he rear panel of a CSG700 series appliance is a small metalenforced hole for attaching a Kensington lock to secure the appliance.
GPS Input
The GPS antenna input on the rear panel of a CSG700 series appliance allows you to connect an
external GPS antenna. When you connect a GPS antenna to the appliance, it automatically
identifies the geographical location of the unit, allowing you to detect any theft or movement of
the appliance. Knowing the precise location of the unit also enables Versa Director to provision
devices when the serial number is not mandated for the zero-touch provisioning (ZTP) process.
Network Interface Card Modules
The CSG700 series appliance offers interface modularity, providing four Ethernet ports that
support two types of NICs:
• 1-GB Ethernet over copper (EoC) port
• 1-GB EoC with PoE port
The four Ethernet ports on the NIC module are labeled Port 6 to Port 9.
Figure 1 shows the four RJ-45 connectors for the four Ethernet ports. (1-GB EoC port and for the
1-GB EoC with PoE port.)
Ó 2019 Versa Networks, Inc.
Cloud Services Gateway 700 Series
13
Figure 1: RJ-45 Connectors for 1-GB EoC Port With or Without PoE Port
Figure 2 shows the four RJ-45 connectors/SFP slots for the 1-GB EoC/SFP combination port.
Figure 2: RJ-45 Connectors or SFP Slots for 1-GB EoC/SFP Combination Port
LTE Modem Module
You can order the CSG700 series appliance with single or dual LTE modem modules. If you
order the appliance with a single LTE modem, use the SIM 1 slot on the front panel of the
appliance to install the LTE device. If you order the appliance with dual LTE modems, use both
the SIM 1 and SIM 2 slots to activate the LTE devices.
The CSG700 series LTE modem module is a high-performance Cat-6 LTE Advanced modem
that provides up to 300 Mbps download speeds and 50 Mbps upload speeds. The LTE modem
supports multiple carriers, and it has been certified by major global carriers. The modem has a
single SIM card that is externally accessible.
The LTE firmware-driven modem module provides the following capabilities:
• Externally accessible SIM card that supports dual-LTE modems.
• Connects to most global carrier's network based on the SIM card inserted. For example, if
a SIM card is inserted from carrier A, the modem will auto-detect the SIM card and
connect to carrier A's network. If a SIM card is inserted from carrier B, the modem will
connect to the network of carrier B.
• Global navigation satellite system (GNSS) receiver enables tracking and location-based
services.
• Stores up to three firmware versions, thereby allowing the modem to switch to other
networks.
• Firmware can be upgraded over the air
• Secure boot provides secure connectivity by preventing unauthorized code on target
devices.
Ó 2019 Versa Networks, Inc.

Cloud Services Gateway 700 Series
14
Specification
APAC Modem
Americas and EMEA Modem
Peak
download/upload rate
300/50 Mbps
300/50 Mbps
Frequency bands
4GLTE
1, 3, 5, 7, 8, 18, 19, 21, 28,
38, 39, 40, and 41
1 through 5, 7, 8, 12, 13, 20, 25,
26, 29, 30, and 41
Frequency bands 3G
WCDMA
1, 5, 6, 8, 9, and 19
2, 4, 5
Frequency bands 3G
SCDMA
39
Supported carrier
aggregation
1 + (8, 18, 19 ,21), 3 + (5, 7,
19, 28), 7 + (5, 7, 28), 19 +
21, 38 + 38, 39 + 39, 40 + 40,
and 41 + 41
1 + 8, 2 + 2/5/12/13/29, 3 + 7/20,
4 + 4/5/12/13/29, 5 + 2/4/30, 7 +
3/7/20, 8 + 1, 12 + 2/4/30, 13 +
2/4, 20 + 3/7, 30 + 5/12, 41 + 41
Location Solution
Standalone, Xtra, SUPL 1.0
& 2.0, GLONASS, Galileo,
BeiDou
Standalone, Xtra, SUPL 1.0 &
2.0, GLONASS, Galileo, BeiDou
Approvals
CE, GCF, JRF/JPA, KC,
NCC
CE, FCC, GCF, IC, NCC,
PTCRB
Certified Carriers
NTT Docomo, Telstra,
KDDI, Softbank
AT&T, Bell, Rogers, Sprint,
Telus, Verizon, Vodafone, US
Cellular, Anatel
The LTE modem connections are metered connections, and the Versa software implementation
ensures that the LTE service is charged only when needed. Policies and scenarios that determine
the use of LTE interfaces are set by network operators and implemented by Versa FlexVNF
accordingly.
Table 1 lists the supported LTE specifications .
Table 1: LTE Specifications
Ó 2019 Versa Networks, Inc.

Cloud Services Gateway 700 Series
15
WiFi Access Point Module
You can order the CSG700 series appliance with the WiFi access point (AP) module. If you do
so, the WiFi AP module comes preinstalled in Wireless slot 2.
The WiFi AP module is a dual-band module that simultaneously supports 2.4 GHz, for longer
distances, and 5 GHz, for faster throughput. It provides the following WiFi capabilities:
• WiFi radios preconfigured for 2.4GHz and 5.0-GHz operation
• Supports 802.11ac Wave 2 standard and 2x2:2 Multi User Multiple Input Multiple
Output (MU-MIMO) for more efficient transmission to multiple clients
• Built-in support for WiFi mesh capabilities
• Supports IEEE 802.11a, 802.11b, 802.11g, 802.11n, and 802.11ac protocols
• Supports channel bandwidth of 20 MHz, 40 MHz, and 80 MHz
• Supports channel bonding with channel bandwidths of 5 MHz, 10 MHz, 20 MHz, and 40
MHz
• Background scanning automatically selects the best and cleanest channel
• Supports up to 512 concurrent clients across both frequencies, while each radio supports
up to 256 clients
• Supports up to 8 SSIDs simultaneously
• Supports client steering capabilities across respective frequency bands based on load and
number of clients in each frequency thereby allowing end devices to have optimum
experience
• Certified for FCC and CE
The WiFi AP module has a hardware-based cryptographic engine that includes secure boot. WiFi
security is provided by 802.11i, AES-CCMP, AES-GCMP, PRNG, TKIP, WAPI, WEP, WPA,
WPA2, and WPS based encryption methods.
You can seamlessly integrate the WiFi AP module with Versa FlexVNF features, including overthe-air traffic analysis and other analytics. FlexVNF provides queuing mechanisms, including
weighted round-robin (WRR). In addition, the WiFi AP module has a built-in QoS feature that
prioritizes and manages over-the-air traffic. It also has built-in spectrum analyzer capabilities to
detect rogue frequencies in an environment, if desired.
Ó 2019 Versa Networks, Inc.

Cloud Services Gateway 700 Series
16
Item
Specification
AC input voltage
100–240 Volts
AC input line frequency
50–60 Hz
Typical power consumption with PoE disabled
35 Watts
Typical power consumption with PoE enabled
60 Watts
Interface Numbering
Figure 1 shows the mapping of the Ethernet ports to Virtual Network Interface (VNI) numbering.
Figure 3: Port-to-VNI Mapping
Power Supply and Airflow
This article describes the AC power supply, AC power cord specifications, and airflow
requirements for CSG700 appliances.
AC Power Supply for CSG700 Series Appliances
By default, CSG700 series appliances ship with one AC power supply unit.
If you order the CSG700 series appliance with the power over Ethernet (PoE) NIC module, an
additional power supply unit ships with the appliance.
Table 1 describes the AC power supply specifications for each power supply unit.
Table 1: CSG700 Series Appliance AC Power Supply Specifications
Ó 2019 Versa Networks, Inc.

Cloud Services Gateway 700 Series
17
Airflow Requirements
The CSG700 series appliance is made of aluminum for optimal heat dissipation.
The appliance has no fans, to minimize noise and to maximize the life of the appliance. Cooling
occurs by natural airflow through the vents on the top of the appliance.
When planning your site for installing a CSG700 series appliance in a 19-inch rack, allow a
minimum of 0.5 RU space above the appliance to allow hot air to flow out of the appliance.
However, itt is recommended that you allow 1 RU space above the appliance for cooling.
When placing a CSG700 series appliance on a desk, ensure that the vents on the top of the unit
are never blocked, to allow hot air to flow out of the appliance. Covering the vents prevents heat
from dissipating out of the appliance, which will cause the chassis to overheat and then shut
down.
Planning and Installation
This article provides general safety standards and warnings regarding to installing or connecting
a CSG 700 series appliances.
General Safety Guidelines
Caution: Before installing or removing a CSG700 series appliance, ensure that the appliance
chassis is electrically connected to ground. When you are installing or removing an appliance,
ensure that you wear an ESD grounding wrist strap. To put the ESD grounding strap on properly,
attach it to an ESD point and then place the other end of the strap around your bare wrist, making
good skin contact. Failure to use an ESD grounding strap could damage the appliance.
• Install the CSG700 series appliance in compliance with the following local, national, and
international electrical codes:
o United States—National Fire Protection Association (NFPA 70), United States
National Electrical Code.
o Other countries—International Electromechanical Commission (IEC) 60364, Part
1 through Part 7.
o Evaluated to the TN power system.
o Canada—Canadian Electrical Code, Part 1, CSA C22.1.
• Locate the emergency power-off switch in the installation area. In case of an electrical
accident, turn off the power quickly.
• Disconnect power to the appliance before installing or removing it.
• Disconnect power from the circuit that is being used for the appliance.
• If hazardous conditions exist, do not work alone.
• If you are working under conditions that might be hazardous to the eyes, wear safety
glasses or goggles.
Ó 2019 Versa Networks, Inc.

Cloud Services Gateway 700 Series
18
Federal Communication Commission Interference
Statement
This device complies with Part 15 of the FCC Rules. Operation is subject to the following two
conditions: (1) This device may not cause harmful interference, and (2) this device must accept
any interference received, including interference that may cause undesired operation.
This equipment has been tested and found to comply with the limits for a Class B digital device,
pursuant to Part 15 of the FCC Rules. These limits are designed to provide reasonable protection
against harmful interference in a residential installation. This equipment generates, uses, and can
radiate radio frequency energy and, if not installed and used in accordance with the instructions,
may cause harmful interference to radio communications. However, there is no guarantee that
interference will not occur in a particular installation. If this equipment does cause harmful
interference to radio or television reception, which can be determined by turning the equipment
off and on, the user is encouraged to try to correct the interference by one of the following
measures:
• Reorient or relocate the receiving antenna.
• Increase the separation between the equipment and receiver.
• Connect the equipment into an outlet on a circuit different from that to which the receiver
is connected.
• Consult the dealer or an experienced radio/TV technician for help.
FCC Caution: Any changes or modifications not expressly approved by the party responsible
for compliance could void the user's authority to operate this equipment.
This transmitter must not be collocated or operating in conjunction with any other antenna or
transmitter.
Radiation Exposure Statement:
This equipment complies with FCC radiation exposure limits set forth for an uncontrolled
environment. This equipment should be installed and operated with minimum distance 20cm
between the radiator and your body.
Prepare the Site for Installation
To prepare your site for installing a CSG700 series appliance, follow the guidelines and
requirements listed in this article.
Site Preparation Guidelines
• Install the appliance in an enclosed and secure environment, and allow only authorized
personnel to access the device.
Ó 2019 Versa Networks, Inc.

Cloud Services Gateway 700 Series
19
Requirement
Guidelines
Rack type
Use a 19-inch four-post rack that has bracket holes spaced at 1 U (1.75
in. or 4.45 cm) increments, and that has panels strong enough to
support the weight of the appliance.
Rack size
Comply with the size and strength standards of a 19-inch rack. Ensure
that the rack rails are spaced wide enough to accommodate the external
dimensions of the appliance chassis. Ensure that the spacing of rails
and the adjacent racks allows for proper clearance around the appliance
and the rack.
Rack firmly secured
to building structure
Secure the rack to floor brackets and to ceiling brackets to ensure
maximum stability.
• Keep the area around the appliance free from dust and conductive material.
• Follow ESD prevention procedures to avoid any damage to the appliance.
Environmental Requirements
• Ensure that the area in which you operate the appliance has adequate air circulation so
that the cooling system functions normally. Ambient air temperature may not be
sufficient to cool the chassis to acceptable operating temperatures without adequate
circulation.
• Avoid temperature extremes.
• High humidity conditions can cause moisture to penetrate into the chassis. The appliance
can operate in relative humidity of 10% to 85%, non-condensing.
Rack Requirements
You can mount a CSG700 series appliance in a 19-inch four-post rack using slide rails. Table 1
lists the rack requirements.
Table 1: Rack Requirements for a CSG700 Series Appliance
Airflow Requirements
A CSG700 series appliance has a fanless design and cools by airflow through the vents on the
top of the appliance.
When planning your site for installing a CSG700 series appliance in a 19-inch rack, allow a
minimum of 0.5 RU space above the appliance to allow hot air to flow out of the appliance.
However, itt is recommended that you allow 1 RU space above the appliance for cooling.
Ó 2019 Versa Networks, Inc.

Cloud Services Gateway 700 Series
20
When placing a CSG700 series appliance on a desk, ensure that the vents on the top of the unit
are never blocked, to allow hot air to flow out of the appliance. Covering the vents prevents heat
from dissipating out of the appliance, which will cause the chassis to overheat and then shut
down.
Install a CSG700 Series Appliance
This article provides instructions about how to unpack a CSG700 series appliance and mount it
in a 19-inch rack.
Unpack a CSG700 Series Appliance
The CSG700 series appliance is packed in a plastic box, and it is shipped in a cardboard carton,
secured with foam packing material. The carton also contains an accessory box. It is
recommended that you unpack the appliance only when you are ready to install it.
To unpack a CSG700 series appliance:
1. Open the top flaps of the cardboard carton.
2. Remove from the box the foam packing material holding the appliance and the
accessories in place. See Figure 1.
3. Remove the accessory box and the appliance from the foam packing material.
4. Remove the accessories from the accessories box.
5. Verify the components against the packing list that is included in the box.
Ó 2019 Versa Networks, Inc.

Cloud Services Gateway 700 Series
21
Figure 1: Unpacking a CSG700 Series Appliance
Note: It is recommended that you save the shipping carton and packing material when unpacking
the appliance, in case you need to later move the appliance or return it. See Return Hardware.
Ó 2019 Versa Networks, Inc.

Cloud Services Gateway 700 Series
22
Component
Quantity
CSG700 series appliance chassis
1
AC power adapter
1
Power cable
1
65 Watt PoE power adapter (included with PoE NIC
module only)
1
Cat 6 cable
1
Cat 5e cable
1
LTE antenna (included with LTE module only)
2 for single LTE module
4 for dual LTE module
WiFi antenna (included with WiFi module only)
2
GPS antenna
1
Rack-mounting ears
2
Screws for mounting ears
8
Packing List for a CSG700 Series Appliance
The cardboard carton in which a CSG700 series appliance is shipped contains a packing list.
Check the packing list against the parts that you receive in the shipping carton. Table 1 lists the
parts shipped with a CSG700 series appliance.
Table 1: Parts Shipped with a CSG700 Series Appliance
Mount a CSG700 Series Appliance in a Rack
You can mount a CSG700 series appliance in a four-post 19-inch rack. Two people are required
to mount the appliance.
To mount the appliance, ensure that you have the following tools:
• Number 2 Phillips (+) screwdriver
• Tape measure
To mount a CSG700 series appliance in a four-post 19-inch rack:
1. Place the appliance chassis on a flat, stable surface.
2. Check the internal dimensions of the rack with a tape measure. The appliance is 22 cm
wide (about 8.6 inches wide) and must fit within the mounting posts.
Ó 2019 Versa Networks, Inc.

Cloud Services Gateway 700 Series
23
3. Allow a minimum of 0.5 RU space above the appliance for airflow, to allow hot air to
flow out. However, it is recommended that you allow 1 RU space above the appliance.
Figure 2: Space a CSG700 Series Appliance when Rack Mounting
4. Attach the two mounting ears to each side of the appliance chassis using the eight
mounting ear screws that are shipped with the appliance. Use four screws to attach each
mounting ear.
Figure 3: Attach the Mounting Ears to a CSG700 Series Appliance
5. Grasp both sides of the appliance chassis, making sure that the front of the chassis is
facing you.
6. Stand in front of the rack and lift the chassis. Then, gently insert the chassis into the rack
and slide it as far back as possible.
Ó 2019 Versa Networks, Inc.

Cloud Services Gateway 700 Series
24
7. Figure 4: Inserting a CSG700 Series Appliance into the Rack
8. Have the second person secure the mounting ears to the front of the rack using the rackmount screws that are shipped with the appliance. Insert and then tighten the screws.
Figure 5: Secure the Mounting Ears to the Rack
Ó 2019 Versa Networks, Inc.

Cloud Services Gateway 700 Series
25
Connect a CSG700 Series Appliance
This article describes how to connect a CSG700 series appliance to an AC power source and to a
management console.
Step 1: Connect Earth Ground to a CSG700 Series Appliance
To ensure proper operation of a CSG700 series appliance and to meet safety and electromagnetic
interference (EMI) requirements, you must connect the appliance to earth ground before you
connect power to the appliance.
If you use a three-prong power cable to connect power to a CSG700 series appliance, the power
cable provide the ground connection.
If you use a twoprong power cable to connect power to a CSG700 series appliance, connect the
appliance to earth ground before you connect power to the appliance:
1. Connect one end of the grounding cable to a proper earth ground, such as the rack in
which the CSG700 series appliance is mounted.
2. Secure the grounding lug to the protective grounding terminal with washers and screws.
Step 2: Connect AC Power to a CSG700 Series Appliance
Before you begin connecting AC power to a CSG700 series appliance, ensure that you have:
• Electrostatic discharge (ESD) wrist strap.
• AC power cord shipped with the appliance. The cord has plugs appropriate for your
geographical location.
To connect a CSG700 series appliance to an AC power source:
1. Attach one end of the ESD grounding strap to your bare wrist, and connect the other end
to the ESD point on the rack.
2. Plug one end of the AC power cord into the power supply in the appliance.
3. Plug the other end of the AC power cord into an AC power source outlet.
4. Plug the DC end of the power supply unit into the back of the CSG700 series appliance.
Step 3: Connect a CSG700 Series Appliance to a Management Console
You can configure and manage a CSG700 series appliance using a management console. To
connect a CSG700 series appliance to a management console, use the console port on the
appliance, which accepts a cable with an RJ-45 connector.
To connect a CSG700 series appliance to a management console:
Ó 2019 Versa Networks, Inc.

Cloud Services Gateway 700 Series
26
1. Plug one end of the console cable into the console port located on the rear panel of the
CSG700 series appliance.
2. Plug the other end of the cable into the console server or into a management console.
Return Hardware
This article describes how to return a CSG700 series appliance for return or replacement.
Locate the Model and Serial Number
To return a CSG700 series appliance to Versa Networks, you need the model and serial number
of the appliance. These numbers are printed on the shipping box and on the unit label located on
the bottom of the appliance.
Obtain a Return Material Authorization
If you are returning an appliance to Versa Networks, open a support case with the Versa
Networks Customer Support team and obtain a Return Material Authorization (RMA) number.
Before you open a case and request an RMA number, have the following information ready:
• Your existing case number, if any
• Serial and model numbers of the appliance
• Physical location of the appliance
• Your name, organization name, telephone number, fax number, and shipping address
• Failure or problem description with details
To obtain an RMA number:
1. Open a support case with Versa Networks in one of the following ways:
• Log in to https://support.versa-networks.com/support/login.
• Call toll-free 1-888-498-5810.
2. A customer support representative will validate your case and issue an RMA number for
use to use when returning the appliance to Versa Networks.
Ó 2019 Versa Networks, Inc.

Cloud Services Gateway 700 Series
27
Repack the Appliance
To return a CSG700 series appliance, repack it in its original packing. You need the following
tools to do this:
• Phillips Number 2 (+) screwdriver
• Original cardboard carton in which you received the appliance
To repack the appliance in its original packing:
1. Shut down the CSG700 series appliance.
2. Disconnect power to the appliance and remove all cables.
3. If the appliance is mounted in a 19-inch rack, unscrew the mounting ears and gently slide
the chassis out of the rack.
4. Place the chassis in the plastic packing bag.
5. Secure the chassis in the cardboard carton, placing the side packing foam on both sides of
the appliance chassis and the top packing foam over the top.
6. Close the cardboard carton and seal it with packing tape.
7. Write the RMA number on the shipping label or on the outside of the box for tracking
purposes.
Ó 2019 Versa Networks, Inc.
 Loading...