

Page 1
I2C
Hardware
Reference
Manual
REV. June 2018
Tetra
(VL-EPC-2700)
Arm* i.MX6 Single Board Computer
with Gigabit Ethernet, Video, USB,
SATA, Serial I/O, Digital I/O, CAN
Bus, SPI, Mini PCIe, mSATA and
Page 2

WWW.VERSALOGIC.COM
12100 SW Tualatin Road
Tualatin, OR 97062
-7341
(503) 747-2261
Fax (971) 224-4708
Copyright © 2018
VersaLogic Corp. All rights reserved.
Notice:
Although every effort has been made to ensure this document is error-free, VersaLogic makes no representations or
warranties with respect to this product and specifically disclaims any implied warranties of merchantability or fitness
for any particular purpose.
VersaLogic reserves the right to revise this product and associated documentation at any time without obligation to
notify anyone of such changes.
* Other names and brands may be claimed as the property of others.
ii Tetra (VL-EPC-2700) Reference Manual
Page 3

Product Release Notes
Rev 1.00
Production release for the Rev 1.0 board
Rev 1.10
Added backup battery information
Updated the Block Diagram for clarity. Added PCI Messaging interrupt information
in the Known Issues section.
Rev 1.30
Rev 1.20
Added CBR-0406
Support Page
The Tetra Support Page contains additional information and resources for this product including:
Operating system information and software drivers
Data sheets and manufacturers’ links for chips used in this product
BIOS information and upgrades
VersaTech KnowledgeBase
The VersaTech KnowledgeBase contains useful technical information about VersaLogic products, along
with product advisories.
Customer
Support
If you are unable to solve a problem after reading this manual, visiting the product support page, or
searching the KnowledgeBase, contact VersaLogic Technical Support at (503) 747-2261. VersaLogic
support engineers are also available via e-mail at Support@VersaLogic.com.
Repair Service
If your product requires service, you must obtain a Returned Material Authorization (RMA) number by
calling 503-747-2261. Be ready to provide the following information:
Your name, the name of your company, your phone number, and e-mail address
The name of a technician
The quantity of items being returned
The model and serial number (barcode) of each item
A detailed description of the problem
Steps you have taken to resolve or recreate the problem
The return shipping address
Warranty Repair: All parts and labor charges are
Ground delivery to United States addresses.
or engineer that can be contacted if any questions arise
covered, including return shipping charges for UPS
Non-warranty Repair: All approved non-warranty repairs are subject
charges, parts charges
purchase order number for invoicing the repair.
and return shipping fees. Specify the shipping method you prefer and provide a
Note: Mark the RMA number clearly on the outside of the box before returning.
Tetra (VL-EPC-2700) Reference Manual iii
to diagnosis and labor
Page 4

Contents
Introduction ................................................................................................................... 6
Description .......................................................................................................................... 6
Features and Construction ..................................................................................... 6
Technical Specifications ..................................................................................................... 7
Thermal Considerations ...................................................................................................... 7
Block Diagram .................................................................................................................... 9
Cautions ............................................................................................................................ 10
Electrostatic Discharge ........................................................................................ 10
Handling Care ...................................................................................................... 10
Earth Ground Requirement .................................................................................. 10
Configuration and Setup ............................................................................................. 11
Initial Configuration ......................................................................................................... 11
Basic Setup ....................................................................................................................... 11
Physical Layout ................................................................................................................ 12
Tetra Dimensions ................................................................................................. 12
Hardware Assembly ............................................................................................. 12
External Connectors ......................................................................................................... 13
System Features .......................................................................................................... 16
Power Supply .................................................................................................................... 16
Power Connectors ................................................................................................ 16
Power Requirements ............................................................................................ 16
CPU ................................................................................................................................... 16
System RAM ..................................................................................................................... 16
Interfaces and Connectors ......................................................................................... 17
Connectors and Jumpers ................................................................................................... 17
Storage Interfaces ............................................................................................................. 18
SATA Interface (J2) ............................................................................................ 18
Minicard Interface (J3) ........................................................................................ 18
MicroSD Interface (J4) ........................................................................................ 20
Network Interface ............................................................................................................. 20
Ethernet Interface (J5) ......................................................................................... 20
Video Interfaces ................................................................................................................ 21
HDMI (J6) ........................................................................................................... 21
LVDS (J7) ............................................................................................................ 21
iv Tetra (VL-EPC-2700) Reference Manual
Page 5

LVDS Backlight (J8) ........................................................................................... 22
I/O Interfaces .................................................................................................................... 23
USB Interfaces (J1) ............................................................................................. 23
Serial I/O (J12) .................................................................................................... 23
User I/O (J13) ...................................................................................................... 24
Audio (J10) .......................................................................................................... 25
CAN Interface (J17, J18) ..................................................................................... 25
COM1 Interface (J16) .......................................................................................... 25
Low Cost Camera Interface (J9) .......................................................................... 25
Power Button .................................................................................................................... 26
Appendix A – References............................................................................................ 27
Figures
Figure 1. Major Components and Connectors ................................................................................................. 7
Figure 2. Tetra Board Block Diagram ............................................................................................................. 9
Figure 3. Tetra Board Dimensions and Mounting Holes ............................................................................... 12
Figure 4. Connector Locations (Top Side) .................................................................................................... 13
Tables
Table 1. Environmental Specifications ........................................................................................................... 7
Table 2. Connector Functions and Interface Cables ...................................................................................... 14
Table 3. Jumper Information ......................................................................................................................... 15
Table 4. J15 Main Power Connector Pinout .................................................................................................. 16
Table 5. V1 Pinout ........................................................................................................................................ 17
Table 6. V2 Pinout ........................................................................................................................................ 17
Table 7. J2 SATA Pinout .............................................................................................................................. 18
Table 8. J3 Minicard Pinout .......................................................................................................................... 18
Table 9. J4 microSD Pinout .......................................................................................................................... 20
Table 10. J5 Ethernet RJ45 Pinout ................................................................................................................ 20
Table 11. HDMI Connector Pinout ............................................................................................................... 21
Table 12. LVDS Connector Pinout ............................................................................................................... 21
Table 13. LVDS Backlight Connector Pinout ............................................................................................... 22
Table 14. USBx2 2.0 Connector Pinout ........................................................................................................ 23
Table 15. Serial I/O Pinouts .......................................................................................................................... 23
Table 16. User I/O Pinouts ............................................................................................................................ 24
Table 17. Audio Jack Pinout ......................................................................................................................... 25
Table 18. CAN Pinouts ................................................................................................................................. 25
Table 19. COM1 Pinout ................................................................................................................................ 25
Table 20. Camera Pinouts ............................................................................................................................. 26
Table 21. Power Buttons and Designator ...................................................................................................... 26
Tetra (VL-EPC-2700) Reference Manual v
Page 6

Description
Arm* i.MX6 quad-core processor
Mini PCIe or mSATA socket
1
Features and Construction
The Tetra is a compact embedded computer system featuring very low power consumption.
Designed around an NXP i.MX6 quad-core processor, the entire board typically uses about 4W of
power. Multiple on-board I/O interfaces and soldered-on memory offers system designers a
flexible, reliable, low-power platform. In addition, the Tetra also contains a full complement of onboard I/O interfaces, including USB 2.0, a mini PCIe expansion or mSATA socket, Gigabit
Ethernet, multiple serial interfaces, and 8-bits of digital I/O.
Tetra is designed to operate with no moving parts and is tested to withstand extreme
temperatures, high-impact, and vibration. A built-in power supply permits 8 to 17 volt input, such
as 12 volt automotive systems. This single board computer is an ideal choice for applications that
require moderate performance, low-power, highest quality, and long product life.
Introduction
95 x 125mm size
Low power draw
Fanless Operation
Up to 4 GB soldered-on RAM
Gigabit Ethernet
HDMI and LVDS video
CAN Bus
MIPI camera input
VL-EPC-2700 boards are subjected to complete functional testing and are backed by a limited
five-year warranty. Careful parts sourcing and US-based technical support ensure the highest
possible quality, reliability, service, and product longevity for this exceptional single-board
computer (SBC).
USB 2.0 ports
Serial I/O (RS-232)
SATA II port
MicroSD card socket
128 KB Magnetic RAM
eMMC Flash. Up to 32 GB
SPI
2
I
C
Eight 3.3V GPIO and three PWM
outputs
vi Tetra (VL-EPC-2700) User’s Guide
Page 7
Introduction
Characteristic
Value
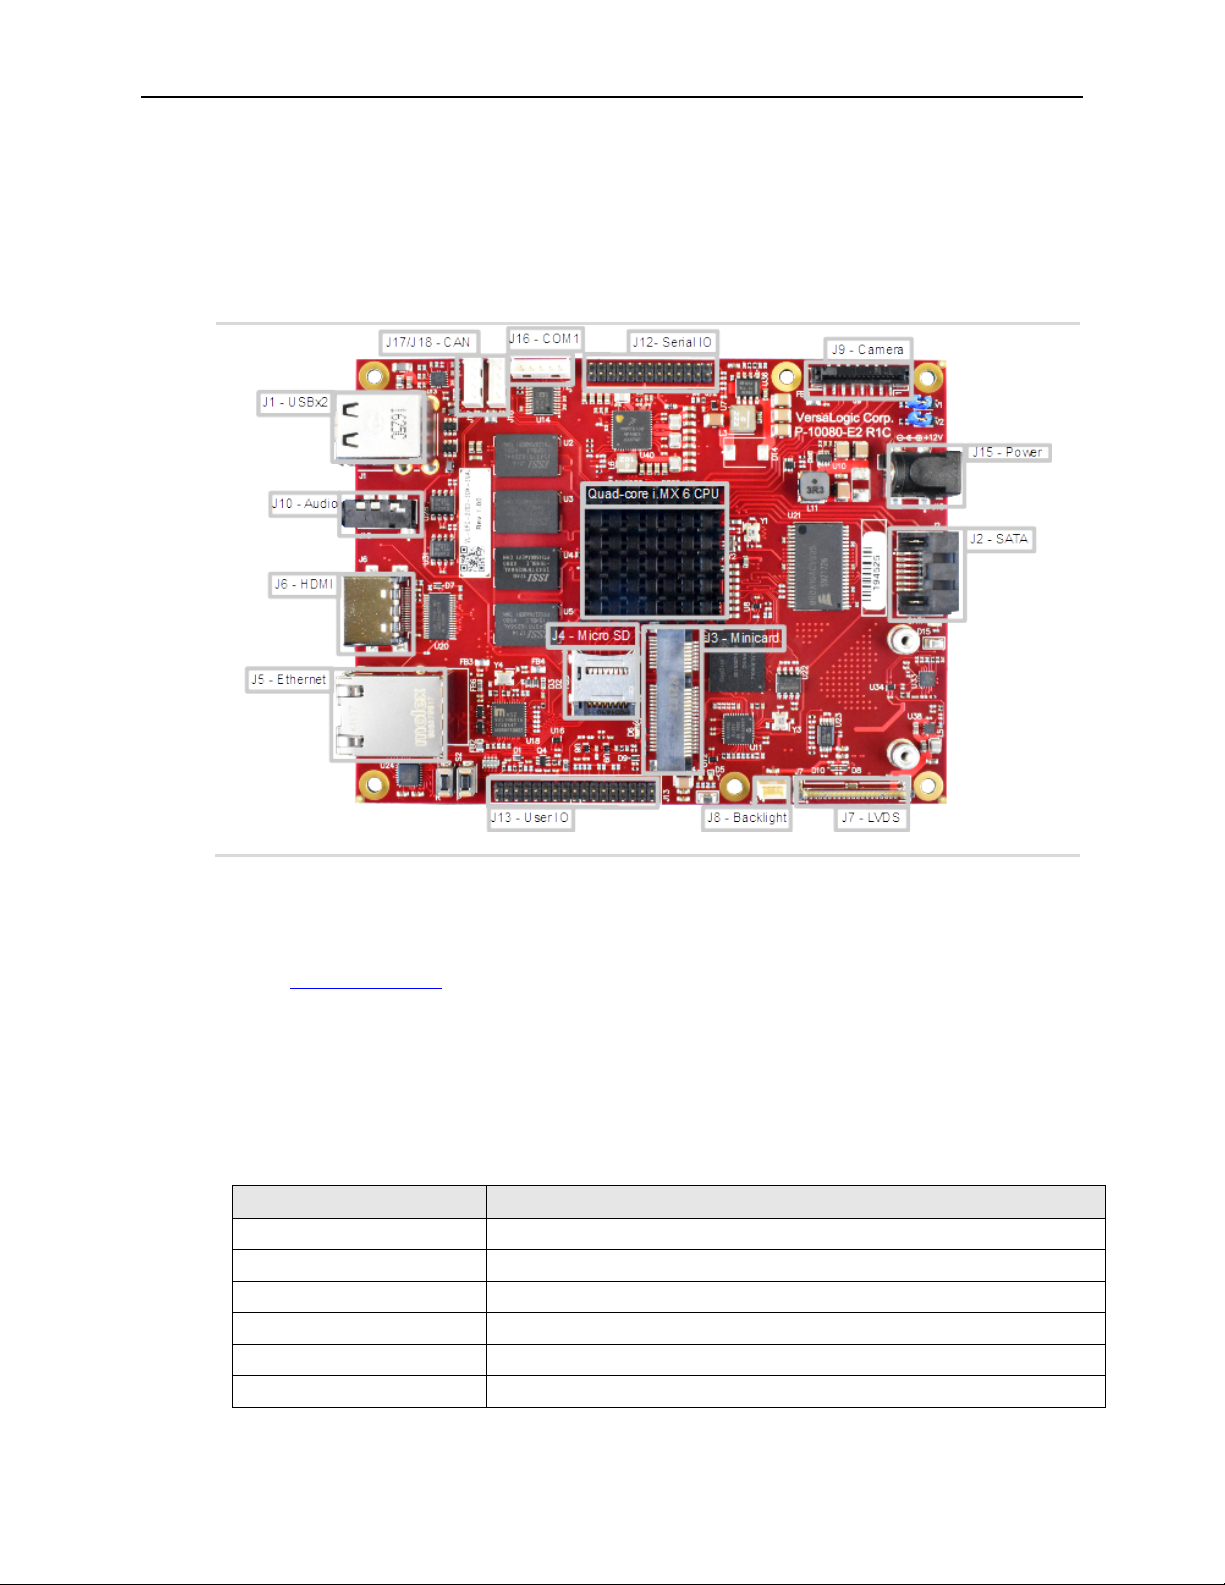
The next figure shows the locations of the Tetra board’s connectors and major components on the
top.
Figure 1. Major Components and Connectors
Technical Specifications
See the Tetra Data Sheet for complete specifications.
Thermal Considerations
The operating temperature for the Tetra is -40°C to +85°C, de-rated -1.1 °C per 305m (1,000 ft.)
above 2,300m (7,500 ft.).
Table 1. Environmental Specifications
Operating Temperature Ext Temp (-40°C to +85°C)
Storage Temperature -40 to +85
Cooling Fanless. Heatsink for SoC
Airflow Requirements 100 Linear Feet per Minute
Thermal Shock 5ºC/min. over operating temperature
Humidity Less than 95%, noncondensing
Tetra (VL-EPC-2700) User’s Guide 7
Page 8
Introduction
Characteristic Value
Vibration, Sinusoidal Sweep MIL-STD-202G
Sinusoidal sweep: Method 204, Modified Condition A, 2g constant
acceleration from 5 to 500 Hz, 20 minutes per axis
Vibration, Random Random vibration: Method 214A, Condition A, 5.35g rms, 5 minutes per
axis
Mechanical Shock Shock: Method 213B, Condition G, 20g half-sine, 11 msec duration per
axis
8 Tetra (VL-EPC-2700) Reference Manual
Page 9
Introduction
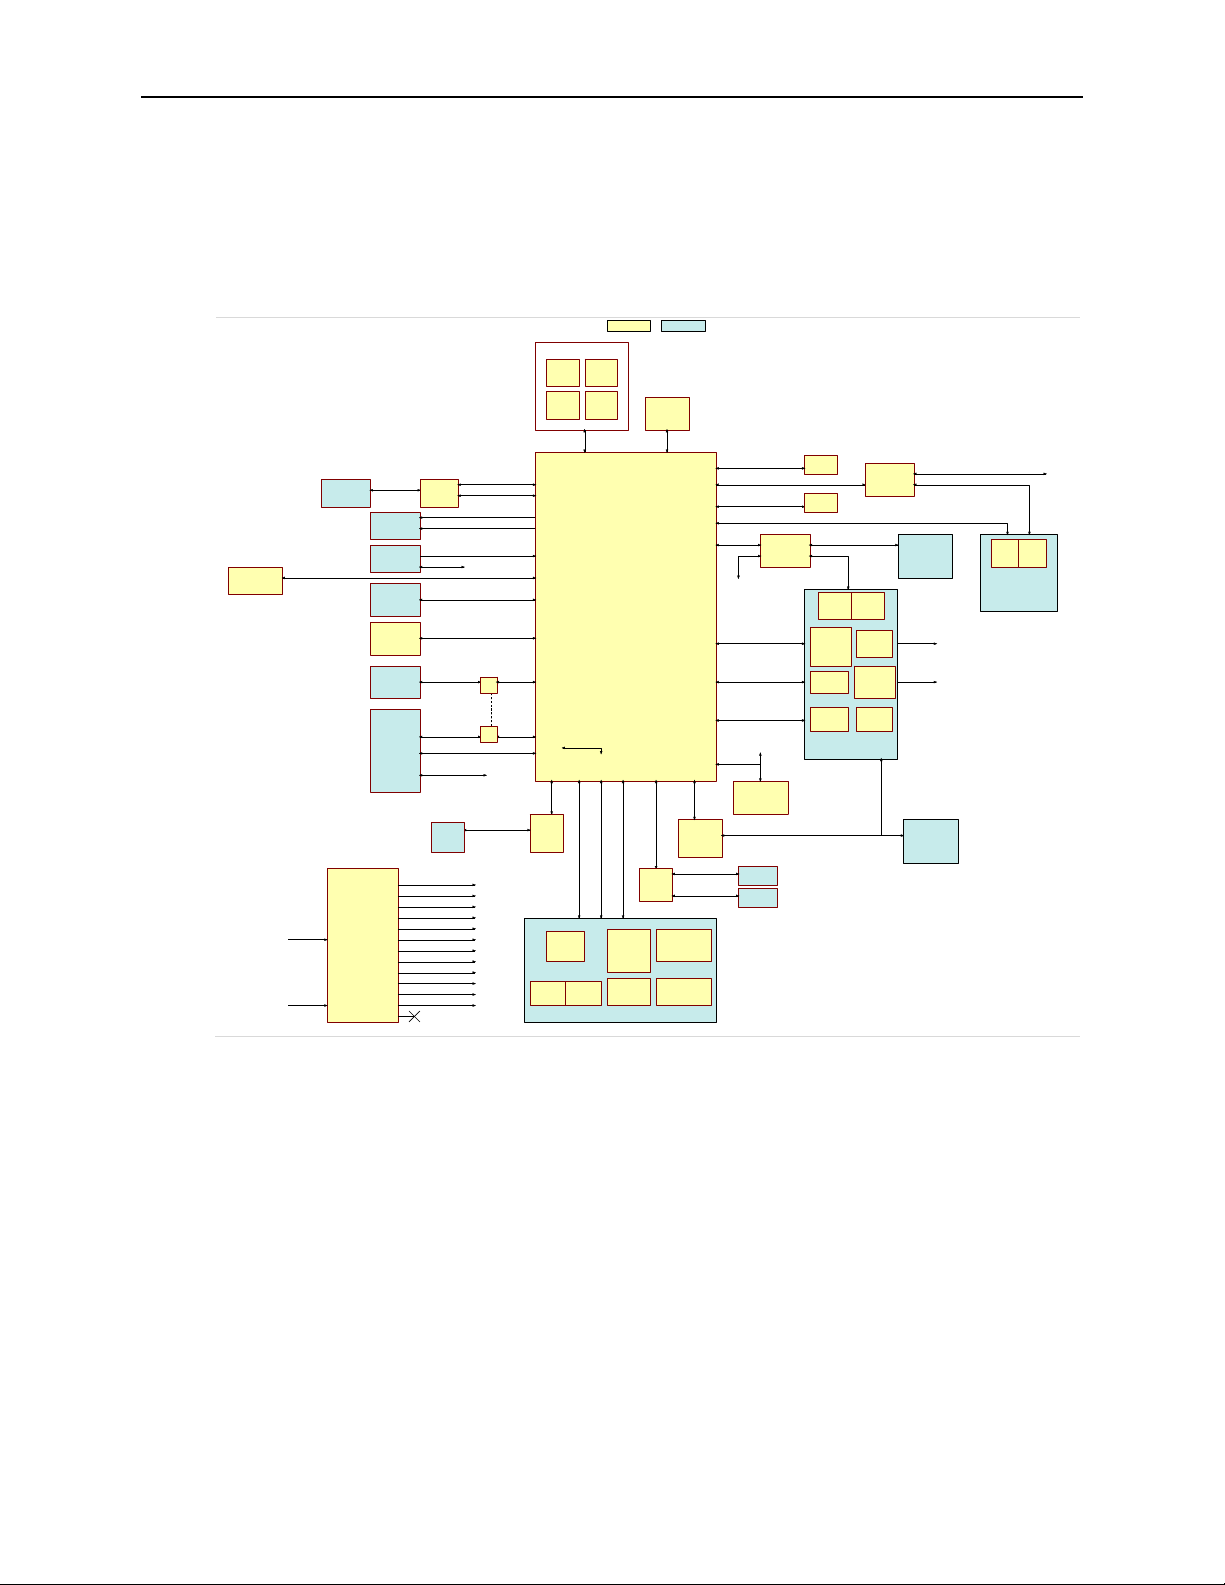
Serial Interfaces Header (CBR-2603)
I2C1 I2C2
NXP
i.MX6
ARM Cortex A-9
SoC
(Quad)
I2S Stereo
Audio
CODEC
Gigabit
Ethernet
PHY
LVDS
Video
Output
MiniPCIe
or
mSATA
User I/O Header
(CBR-3407)
DDR3L
SDRAM
DDR3L Soldered Devices
Audio
Line
In
Audio
Line
Out
RTC
Battery
Program
LED
Type A
Stacked Dual
Port USB
Connectors
USB0
1.1/2.0
USB1
1.1/2.0
HDMI
Video
Output
DDR3L
SDRAM
DDR3L
SDRAM
DDR3L
SDRAM
On-Board
Key:
Interface
GPIO x8
Optional
PWM x2 /
Timer
WDOG#
Ethernet
LED
UART3
2-wire
Headphon e
(stereo) and
Microphon e
Connector
Gigabit
Ethernet
Magjack
RJ45
CSI
Camera
Input
Accelerometer
Magnetometer
SATA
microSD
eMMC
8GB
USB HUB
2-Port
A
A
SD2
SD4
B
B
HDMI TX
ESD/5V
I2C2
HDMI
MRAM
128KB
64K x 16
SPI NOR Flash
U-Boot Device
B
V2
Jumper
LVDS x1 Channel(24-bit)
GPIO x2
MIPI CSI and GPIOx2
SATA
PCIe x1
I2C2
Res
Mux
Res
Mux
AUDIO5
GPIO
GPIO x8
GPIO
I2C3
RGMII
I2C1
I2C2 ECSPI3
CAN1
CAN2
UART1 UART3
ECSPI1
V1
Jumper
BOOT_MODE[0]BOOT_MODE[1] NC (PD internal)
USB Host
USB OTG
GPIO
Alternate
Power
V_MAIN
SPI3
3-Slave Selects
Off-board
Reset
Power/GND
3.3V
General
Purpose IRQ#
CAN1 &
CAN2
XCVRS
COM1
RS232
XCVR
PMIC
PF0100A
VREFDDR
VGEN1
VGEN2
VGEN3
VGEN5
VGEN6
V4P2
V1P375_CORE
SW1AB
SW1C
SW2
SW3AB
SWBST
VGEN4
SW4
LICELL VSNVS
V1P375_SOC
V3P3
V1P35_DDR
V0P675_DDR_VTT
V0P675_DDR_VREF
V1P5_MINI
V1P2_ETH
V1P8_AUDIO
V3_ALWAYS
V2P5_ETH
V3_VSNVSBATT
COM1
4-wire
CAN2
CAN1
Block Diagram
Figure 2. Tetra Board Block Diagram
Tetra (VL-EPC-2700) User’s Guide 9
Page 10

Cautions
Electrostatic discharge (ESD) can damage circuit boards, disk drives, and other
surface.
After removing the board from its protective wrapper, place the board on a grounded,
static-free surface, component side up. Use an antistatic foam pad if available.
Ship and store the board inside a closed metallic antistatic envelope for protection.
Avoid touching the exposed circuitry with your fingers when handling the board. Though
defaults.
All mounting standoffs for EPC boards should be connected to earth ground (chassis
ground). This provides proper grounding for EMI purposes.
Electrostatic Discharge
Note:
battery drain if the bag is in contact with the bottom side of the Tetra.
Introduction
CAUTION:
components. Handle circuit board at an ESD workstation. If an approved station is not
available, wearing a grounded antistatic wrist strap provides some measure of
protection. Keep all plastic away from the board, and do not slide the board over any
The exterior coating on some metallic antistatic bags is sufficiently conductive to cause excessive
Handling Care
CAUTION:
it will not damage the circuitry, it is possible that small amounts of oil or perspiration on
the skin could have enough conductivity to cause the contents of CMOS RAM to
become corrupted through careless handling, resulting in CMOS resetting to factory
Earth Ground Requirement
CAUTION:
10 Tetra (VL-EPC-2700) Reference Manual
Page 11

2
Configuration and Setup
Initial Configuration
Use the following components for a typical development system:
Tetra (VL-EPC-2700) computer
VL-PS-WALL12-24 – 90 ~ 264 VAC to 12VDC @ 2A, 2.1mm ID Plug, International
VL-F41-8SBN-LINUX1 – 8GB microSD card with bootable Linux, standard temp
VL-HDW-108 – M2.5 x 6 mm Metric Nylon Screw kit (10ea) RoHS
USB keyboard and mouse
HDMI monitor and cable
Note: VL-CKR-Tetra includes: VL-F41-8SBN-LINUX1, CBR-0504, 2603, 3407, PS-WALL12-24,
HDW-108
Use the following VersaLogic cables for wiring access points to serial (J12) and user (J13)
interfaces:
VL-CBR-2603 -- 0.5m 26-pin 2mm IDC to Ribbon Cable
VL-CBR-3407 – 0.5m 34-pin 2mm IDC to Ribbon Cable
Basic Setup
1. Attach Cables and Peripherals
Attach a HDMI display to the HDMI connector at J6.Plug a USB keyboard, and a USB
mouse into the USB connectors at J1 (Note if using the top USB port, you must install the
jumper on V2 pins 1-2 for the OTG USB port to be placed in Host mode. Alternatively,
you can use an external powered USB Hub to provide separate mouse and keyboard
connections for the bottom USB port.)
Insert a VL-F41-8SBN-LINUX1 MicroSD card into the MicroSD slot located at J4
2. Attach Power
Plug the power adapter cable VL-PS-WALL12-24 into the power jack J15.
3. Review Configuration
Before you power up the system, double-check all the connections. Make sure all cables
are oriented correctly and that there is adequate power to the VL-EPC-2700 and
peripheral devices.
Tetra (VL-EPC-2700) User’s Guide 11
4. Power On
Turn on the power supply and the video monitor. The presence of a video signal indicates
proper configuration of the system.
Note: Booting and operating the Yocto Linux operating system is covered in the VersaLogic Yocto
Linux User Guide.
Page 12

Physical Layout
Tetra Dimensions
The figure below shows board dimensions to help with pre-production planning and layout.
Figure 3. Tetra Board Dimensions and Mounting Holes
(Not to scale. All dimensions in millimeters.)
Configuration and Setup
Hardware Assembly
The entire assembly can fit on a tabletop. When bolting the unit down, make sure to secure all
standoffs to the mounting surface to prevent circuit board flexing. Standoffs secure the top circuit
board using four pan head screws.
12 Tetra (VL-EPC-2700) Reference Manual
Page 13

Configuration and Setup
External Connectors
Figure 4. Connector Locations (Top Side)
Tetra (VL-EPC-2700) User’s Guide 13
Page 14

Configuration and Setup
Connector
(Note)
Transition
Cable
mode (V2 jumper off).
J2
SATA
Standard SATA
VL-CBR-0702
Latching Cable
J3
Minicard PCIe or
—
Tetra model dependent (-02A:
type Minicard)
J4
MicroSD
8GB microSD card with
—
VL-F41-8SBNLINUX1 (Standard
Temperature)
J5
Ethernet
RJ45 Crimp-on Plug
Cat5e Ethernet Patch Cable
J6
HDMI
Standard HDMI
—
—
J7
LDVS
Hirose DF19G-20P-1H(54)
Hirose 1.25mm 24-bit cable
J8
LDVS Backlight
Molex 5013300400
VL-CBR-0404
20" 12V LED Backlight Control
Cable
J9
MIPI Camera
FFC/FPC, 15-Pos, 1mm
pitch
FFC/FPC
Cable
—
J10
Audio
3.5mm 4-Pole Audio Plug
—
TRRS Male 4-Conductor Audio
Devices like a PC Headset
J12
Serial I/O
26-pin 2mm pitch IDC Male
VL-CBR-2603
J13
User I/O
34-pin 2mm pitch IDC Male
VL-CBR-3407
J15
Power
DC Power Jack, 2.0mm
AC/DC 12V - VL-PS-WALL12-24
VL-CBR-0504
VL-CBR-0405
2 mm 4-pin to 2 mm 4-pin
connector, 0.5m
Tetra Connector Functions and Interface Cables
The table below provides information about the function, mating connectors, and transition cables
for Tetra connectors.
Table 2. Connector Functions and Interface Cables
Function Mating Connector/Device
J1 USB (dual
stacked)
mSATA
Standard USB Type A
MPEe/MPEu/MPEs
Minicards
bootable Linux
2GB microSD card
4GB microSD card
8GB microSD card
—
VL-CBR-0701
VL-CBR-2015
VL-CBR-2016
VL-CBR-2017
Cable/Device Description
Male Type A USB 2.0 to Male
Type B for downstream devices,
Male Type A USB 2.0 to Male
Type A USB 2.0 for top port only
when OTG port is set as Device
Standard Cable
mSATA or USB type Minicard, 02B & -EVAL: MiniPCIe or USB
Temperature)
VL-F41-2EBN
(ExtendedTemperature)
VL-F41-4EBN (Extended
Temperature)
VL-F41-8EBN (Extended
20-pin Hirose 1mm to Hirose
1mm 24-bit cable
20-pin Hirose 1mm to JAE
1.25mm 18-bit cable
20-pin Hirose 1mm to 20-pin
14 Tetra (VL-EPC-2700) Reference Manual
J16 COM1
J17, J18 CAN
positive center pin
VL-CBR-0406
MicroClasp, 1m
2 mm 4-pin MicroClasp to DB9
Page 15

Configuration and Setup
EPC-2700
Designator
Signal Name
Control/Description
V1
BOOT_MODE0
BOOT_MODE0 setting, to allow use
jumper is removed.
V2
USB_OTG_ID
Install jumper to set USB_OTG port to
Device Mode
Table 3. Jumper Information
Reference
EPC-2700
of USB OTG Device communications
using the NXP i.MX6 Serial
Downloader method. When this
jumper is installed V2 should not be
installed! Normal eFuse selected
boot via SPI NOR Flash U-Boot and
microSD card Yocto Linux when the
host mode. No jumper sets port to
Tetra (VL-EPC-2700) User’s Guide 15
Page 16

To prevent severe and possibly irreparable damage to the system, it is critical that the
protected. Proper polarity must be followed otherwise damage will occur.
Ground when no plug,
open otherwise.
VL-EPC-2700-EDK-02A
3.0W
4.2W
6.9W
VL-EPC-2700-EDK-02B
3.1W
4.5W
8.5W
VL-EPC-2700-EDK-EVAL
3.1W
4.5W
8.5W
3
Power Supply
Power Connectors
Main power is applied to the Tetra through a 4-pin connector (J15), with mating connector
VersaLogic VL-PS12-24 (12V). See the table below for connector pinout.
CAUTION:
power connectors are wired correctly. The power connector is not fuse or diode
Table 4. J15 Main Power Connector Pinout
System Features
CPU
Pin Signal Description
1 V_MAIN (first pin) Center Pin Voltage
1 V_MAIN (second pin) Center Pin Voltage
2 Ground Ground
3 Plug Detection
Power Requirements
Model Idle Typical Max.
Note: The VL-EPC-2700 does not come with an on-board RTC backup battery. The VL-CKR-
TETRA Cable kit includes a User Interface breakout cable (VL-CBR-3407) that connects to the
J13 connector. It is an open ended-cable that can connect a backup battery on pins 29 (V_BATT)
and pin 30 (Return_Battery/Ground). A connector and/or external battery is then hardwired.
The Tetra uses a low power Arm i.MX6 quad-core processor featuring:
i.MX 6Quad (quad Arm Cortex-A9 core) - Specifications
System RAM
The Tetra ships with soldered-on DDR3L RAM. 2GB of RAM is on standard products, but custom
options allow memory capacities down to 1GB or up to 4GB.
16 Tetra (VL-EPC-2700) Reference Manual
Page 17

Pin
Signal Name
1
PU_BOOT_MODE0
2
BOOT_MODE0
Pin
Signal Name
1
USB_OTG_ID
2
GND
4
Interfaces and Connectors
Connectors and Jumpers
V1 – BOOT_MODE0 Jumper
The EPC-2700 uses a jumper to provide access to two required boot modes. BOOT_MODE[1:0]
are input pins on the i.MX6 quad-core processor, and when not connected, the signals are held
low by 100k Ohm pull-downs internal to the SoC. By default, the jumper is in the store position
resting on pin 2 (open) and the BOOT_MODE[1:0] settings of “00” select the default mode of
“Boot from fuses.”
Note: When the fuses have not yet been blown (OTP), the boot attempt will automatically switch
to the “Serial downloader” method for the i.MX 6. It then, may accept commands and
programming from a USB Host (provided that the V2 jumper is removed/stored - setting the USB
OTG port in Device mode).
The only time the jumper needs to be placed on pins 1-2 (BOOT_MODE[1:0] settings of “01”) is to
force the boot mode to use the “Serial downloader” instead of the fuses. At that point, a new
image can be loaded to the on-board memory device (like the SPI Flash) or new DDR device
Calibrations and Stress Testing can be run.
Do not hot-plug this jumper. There is no ESD protection employed and the settings are only read
when POR# is tripped.
VersaLogic part number for the jumper header is X2H2S1-R.
Table 5. V1 Pinout
V2 - USB_OTG_ID Jumper
The EPC-2700 uses a jumper to provide control settings for the USB OTG block, allowing it to function
as either an OTG port set to device mode or set to host mode. By default, the jumper is in the store
position resting on pin 2 (open) so that the USB_OTG_ID signal is pulled high (device mode).
When the jumper is placed on pins 1-2, the USB_OTG_ID signal is grounded, which forces the
i.MX6 quad-core processor OTG port to behave as a Host enabling VBUS 5V power switch for the
USB port.
Note: Do not hot-plug this jumper. Host Negotiation Protocol (HNP) is not enabled for the port and
there is no ESD protection employed.
VersaLogic part number for the jumper header is X2H2S1-R.
Table 6. V2 Pinout
Tetra (VL-EPC-2700) User’s Guide 17
Page 18

Storage Interfaces
Pin
Signal
1
GND
2
SATA_TX_P
3
SATA_TX_N
4
5
SATA_RX_N
6
SATA_RX_P
7
GND
Pin
mSATA Signal
Signal
Pin
mSATA Signal
Signal
1
Reserved (NC)
WAKE#
2
+3.3V
+3.3V
3
Reserved (NC)
COEX1
4
GND
GND
5
Reserved (NC)
COEX2
6
+1.5V
+1.5V
7
Reserved (NC)
CLKREQ#
8
Reserved (NC)
UIM_PWR
9
GND
GND
10
Reserved (NC)
UIM_DATA
11
Reserved (NC)
REFCLK_N
12
Reserved (NC)
UIM_CLK
13
Reserved (NC)
REFCLK_P
14
Reserved (NC)
UIM_RESET
15
GND
GND
16
Reserved (NC)
UIM_SPU
17
Reserved (NC)
UIM_IC_DM
18
GND
GND
19
Reserved (NC)
UIM_IC_DP
20
Reserved (NC)
W_DISABLE1#
21
GND
GND
22
Reserved (NC)
PERST#
23
SATA_RX_P
PER0_N
24
+3.3V
+3.3V
25
SATA_RX_N
PER0_P
26
GND
GND
27
GND
GND
28
+1.5V
+1.5V
29
GND
GND
30
SMB_CLK
SMB_CLK
31
SATA_TX_N
PET0_N
32
SMB_DATA
SMB_DATA
33
SATA_TX_P
PET0_P
34
GND
GND
35
GND
GND
36
Reserved (NC)
USB_N
SATA Interface (J2)
The table below lists the pinout of the 7-pin SATA connector.
Table 7. J2 SATA Pinout
GND
Interfaces and Connectors
Minicard Interface (J3)
The table below lists the pinout of the 52-pin Minicard connector.
Table 8. J3 Minicard Pinout
PCIe Minicard
PCIe Minicard
18 Tetra (VL-EPC-2700) Reference Manual
Page 19

Interfaces and Connectors
Pin
mSATA Signal
Signal
Pin
mSATA Signal
Signal
37
GND
GND
38
Reserved (NC)
USB_P
39
+3.3V
+3.3Vaux
40
GND
GND
41
+3.3V
+3.3Vaux
42
Reserved (NC)
LED_WW AN#
43
No Connect (some
GND)
GND
44
Reserved (NC)
LED_WLAN#
45
Vendor Specific
Reserved
46
Reserved (NC)
LED_WPAN#
47
Vendor Specific
Reserved
48
+1.5V
+1.5V
49
DAS/DSS (or NC)
Reserved
50
GND
GND
51
Presence Detect (or
NC)
W_DISABLE2#
52
+3.3V
+3.3V
PCIe Minicard
PCIe Minicard
Tetra (VL-EPC-2700) Reference Manual 19
Page 20

Interfaces and Connectors
Pin
Signal
1
DAT2
2
CD/DAT3
3
CMD
4
VDD (+3.3V)
5
CLK
6
VSS (GND)
7
DAT0
8
DAT1
#
(CAT5E)
10/100 Signals
Signals
1
White/Orange
+ Auto Switch (can be either Tx or Rx)
BI_DA+
2
Orange
- Auto Switch (can be either Tx or Rx)
BI_DA-
3
White/Green
+ Auto Switch (can be either Tx or Rx)
BI_DB+
4
Blue
+ Auto Switch (can be either Tx or Rx)
BI_DC+
5
White/Blue
- Auto Switch (can be either Tx or Rx)
BI_DC-
6
Green
- Auto Switch (can be either Tx or Rx)
BI_DB-
7
White/Brown
+ Auto Switch (can be either Tx or Rx)
BI_DD+
8
Brown
- Auto Switch (can be either Tx or Rx)
BI_DD-
MicroSD Interface (J4)
The table below lists the pinout of the 8-pin MicroSD connector.
Supported VersaLogic SLC extended temperature cards:
• VL-F41-2EBN (2 GB)
• VL-F41-4EBN (4GB)
• VL-F41-8EBN (8 GB)
Note: MicroSD card number VL-F41-8SBN-LINUX1 is an 8 GB MLC MicroSD card with bootable
Linux, standard temperature
Table 9. J4 MicroSD Pinout
Network Interface
Ethernet Interface (J5)
The table below lists the pinout of the Ethernet connector.
Table 10. J5 Ethernet RJ45 Pinout
J5 RJ45 Pin
Wire-Color
10/100/1000
20 Tetra (VL-EPC-2700) Reference Manual
Page 21

Interfaces and Connectors
Pin
Signal
Direction
Description
1
HDMI_D2_P
Out
HDMI Data 2 Differential Pair +
2
DATA2SHIELD
--
Ground
3
HDMI_D2_N
Out
HDMI Data 2 Differential Pair -
4
HDMI_D1_P
Out
HDMI Data 1 Differential Pair +
5
DATA1SHIELD
--
Ground
6
HDMI_D1_N
Out
HDMI Data 1 Differential Pair -
7
HDMI_D0_P
Out
HDMI Data 0 Differential Pair +
8
DATA2SHIELD
--
Ground
9
HDMI_D0_N
Out
HDMI Data 0 Differential Pair -
10
CLK_HDMI_P
Out
HDMI Clock Differential Pair +
11
DATA2SHIELD
--
Ground
12
CLK_HDMI_N
Out
HDMI Clock Differential Pair -
13
HDMI_CEC_CON
I/O
HDMI CEC Line
14
HDMI_NC_CON
N/A
No Connect - Resistor to GND option
15
HDMI_SCL_CON_R
Out
DDC Serial Clock Line (5V signal)
16
17
HDMI_CEC_GND
I/O
CEC_GND - 0 Ohm Resistor to GND
18
V5_HDMI_CON
Out
5V HDMI Cable Power
19
HDMI_HPD_CON
In
HDMI Hot Plug Detection Signal
Pin
Signal
Direction
Description
1
2
3
4
5
6
7
8
9
10
11
Video Interfaces
HDMI (J6)
Table 11. HDMI Connector Pinout
HDMI_SDA_CON_R I/O DDC Serial Data Line (5V signal)
LVDS (J7)
Table 12. LVDS Connector Pinout
GND -- Signal Ground
GND -- Signal Ground
LVDS_TX3_P Output LVDS Data 3 (positive)
LVDS_TX3_N Output LVDS Data 3 (negative)
GND -- Signal Ground
CLK_LVDS_P Output LVDS Clock (positive)
CLK_LVDS_N Output LVDS Clock (negative)
GND -- Signal Ground
LVDS_TX2_P Output LVDS Data 2 (positive)
LVDS_TX2_N Output LVDS Data 2 (negative)
GND -- Signal Ground
Tetra (VL-EPC-2700) Reference Manual 21
Page 22

Pin
Signal
Direction
Description
12
LVDS_TX1_P Output LVDS Data 1 (positive)
13
14
15
16
17
18
19
20
Pin
Signal
Our Product
Description
4
V_LVDS_BKLGT
Input
Voltage for LVDS Backlight control
LVDS_TX1_N Output LVDS Data 1 (negative)
GND -- Signal Ground
LVDS_TX0_P Output LVDS Data 0 (positive)
LVDS_TX0_N Output LVDS Data 0 (negative)
GND -- Power Ground
GND -- Power Ground
V3P3_LVDS_PANEL Output LVDS Panel Power (+3.3V)
V3P3_LVDS_PANEL Output LVDS Panel Power (+3.3V)
LVDS Backlight (J8)
Table 13. LVDS Backlight Connector Pinout
Direction Relative to
Interfaces and Connectors
1 LVDS_BKLT_EN Output Backlight Enable for LVDS panel
2 GND -- Ground
3 LVDS_BLKT_CTRL Output Backlight Control for LVDS panel (PWM)
22 Tetra (VL-EPC-2700) Reference Manual
Page 23

Interfaces and Connectors
Pin
Signal
Description
T1
V5_USB0_OTG
Top Connector Switched USB +5V Power
T2
USB0_OTG_N
USB OTG DN diff pair - (Via SoC)
T3
USB0_OTG_P
USB OTG DP diff pair + (Via SoC)
T4
GND
Top Connector Ground
Bottom Connector Switched USB +5V
Power
Pin
Signal
Description
Pin
Signal
Description
1
3.3V Active Low Reset
Output
2
3
3.3V Active Low Interrupt
Input
4
5
3.3V Slave Select #2 for Bus
CSPI3 (active low)
6
3.3V Slave Select #1 for Bus
CSPI3 (active low)
7
3.3V Slave Select #0 for Bus
CSPI3 (active low)
8
9
3.3V Master Out/Slave In for
Bus CSPI3
10
11
3.3V Master In/Slave Out for
Bus CSPI3
12
13
14
15
16
17
18
19
20
21
22
23
24
3.3V UART3 Receive Data
Input
25
26
3.3V UART3 Transmit Data
Output
I/O Interfaces
USB Interfaces (J1)
Table 14. USBx2 2.0 Connector Pinout
TM1 V5_USB1_H1
TM2 USB1_HUB1_N USB Host1 DN diff pair - (Via USB Hub)
TM3 USB1_HUB1_P USB Host1 DP diff pair + (Via USB Hub)
TM4 GND Bottom Connector Ground
Serial I/O (J12)
Table 15. Serial I/O Pinouts
OFFBRD_RST#
GP_IRQ#
CSPI3_SS2#
CSPI3_SS0#
CSPI3_MOSI
CSPI3_MISO
CLK_CSPI3 3.3V Clock for Bus CSPI3
V3P3 3.3V Power for I/O devices
GND Ground (I2C2)
GND Ground
GND Ground (I2C1)
GND Ground
GND Ground (OFFBRD_RST#)
GND Ground (GP_IRQ#)
CSPI3_SS1#
GND Ground (CSPI3)
GND Ground (CSPI3)
GND Ground (CSPI3)
GND Ground (V3P3)
I2C2_SDA 3.3V Data for Bus I2C2
CLK_I2C2_SCL 3.3V Clock for Bus I2C2
I2C1_SDA 3.3V Data for Bus I2C1
CLK_I2C1_SCL 3.3V Clock for Bus I2C1
UART3_RXD
GND Ground (UART3)
Tetra (VL-EPC-2700) Reference Manual 23
UART3_TXD
Page 24

User I/O (J13)
Pin
Signal
Description
Pin
Signal
Description
Audio Left Line Input (Stereo
Left Input)
Audio Right Line Input (Stereo
Right Input)
Audio Left Line Output (Stereo
Left Output)
Audio Right Line Output
(Stereo Right Output)
Open-Drain Push Button
Control Power Input
Open-Drain Push Button
Control Reset Input
Open-Drain 3.3V max
Programmable LED driver
3.3V power for Programmable
LED
Open-Drain 3.3V max Ethernet
LED driver
Table 16. User I/O Pinouts
Interfaces and Connectors
1 AUD_LIN
3 GND_AUD Analog Audio Ground
5 AUD_ROUT
7 PB_CTL_PWR#
9 PB_CTL_RST#
11 PLED#
13 LED_ETH_GRN#
15 WDOG1# Watch dog 1 Output
17 GPIO1 3.3V General Purpose I/O
19 GND Ground
21 GPIO4 3.3V General Purpose I/O
23 GPIO5 3.3V General Purpose I/O
25 GND Ground
27 GPIO8 3.3V General Purpose I/O
29 V_BATT Battery Input (3.0V Coin Cell)
2 AUD_RIN
4 AUD_LOUT
6 GND_AUD Analog Audio Ground
8 GND Ground (for PB_CTL_PWR#)
10 GND Ground (for PB_CTL_RST#)
12 V3P3
14 V3P3 3.3V power for Ethernet LED
16 GND Ground
18 GPIO2 3.3V General Purpose I/O
20 GPIO3 3.3V General Purpose I/O
22 GND Ground
24 GPIO6 3.3V General Purpose I/O
26 GPIO7 3.3V General Purpose I/O
28 GND Ground
Tied to GND on CPU board and
30 RETURN_BATT/GND
direct to the battery minus
terminal on a paddleboard or
external battery connector.
31 GND Ground
33 V_MAIN
V_MAIN power. Voltage can be
8V to 17V (default 12V).
32 GND Ground
34 V_MAIN
V_MAIN power. Voltage can be
8V to 17V (default 12V).
24 Tetra (VL-EPC-2700) Reference Manual
Page 25

Interfaces and Connectors
Pin Signal
Description
2
3
4
Pin
Signal
Description
Pin
Signal
Description
Audio (J10)
Table 17. Audio Jack Pinout
1
AUD_FIL_MIC_IN Microphone input from sleeve in jack
AUD_FIL_HP_LOUT Headphone output, stereo left
AUD_FIL_HP_ROUT Headphone output, stereo right
GND_AUD Audio Ground
CAN Interface (J17, J18)
Table 18. CAN Pinouts
x = 1 for J17
x = 2 for J18
1 CANx_P CANH signal for CAN bus
2 CANx_N CANL signal for CAN bus
3 GND Ground
4 V5 5V power (for off-board use)
COM1 Interface (J16)
Table 19. COM1 Pinout
Tetra (VL-EPC-2700) Reference Manual 25
1 COM1_RTS COM1 RS-232 Request to Send
2 COM1_TXD# COM1 RS-232 Transmit Data (active low)
3 COM1_CTS COM1 RS-232 Clear to Send
4 COM1_RXD# COM1 RS-232 Receive Data (active low)
5 GND Ground
Low Cost Camera Interface (J9)
The 15-pin input connector is ideal for using low cost MIPI CSI-2, Raspberry Pi* compatible
cameras. The input channel is limited to 8M pixel images and 1080p30 or 720p60 video. For
higher performance imaging, use cameras that connect to Tetra’s USB 2.0 or Ethernet input
channels.
Page 26

Table 20. Camera Pinouts
Pin
Signal
Description
GND
Ground
CSI_D0_N
MIPI CSI-2 Data Lane 0 (negative diff pair)
CSI_D0_P
MIPI CSI-2 Data Lane 0 (positive diff pair)
GND
Ground
CSI_D1_N
MIPI CSI-2 Data Lane 1 (negative diff pair)
CSI_D1_P
MIPI CSI-2 Data Lane 1 (positive diff pair)
GND
Ground
CLK_CSI_N
MIPI CSI-2 Clock (negative diff pair)
CLK_CSI_P
MIPI CSI-2 Clock (positive diff pair)
GND
Ground
Designator
Signal Name
Description
PB_CTL_RST#
PB_CTL_PWR#
1
2
3
4
5
6
7
8
9
10
11 CSI_GPIO0
12 CSI_GPIO1
13 CLK_I2C3_SCL I2C Interface Serial Clock
14 I2C3_SDA I2C Interface Serial Data
15 V_CSI_VDD 3.3V Power for Camera Module
3.3V General Purpose I/O (function depends
on camera)
3.3V General Purpose I/O (function depends
on camera)
Interfaces and Connectors
Power Button
Table 21. Power Buttons and Designator
Reference
S1
S2
Note: The power pushbutton is level sensitive by default, holding the pushbutton in or driving the
signal low (using open-drain driver) from the User I/O connector pin is the only way to turn off the
power to the processor and I/O when the board input power is still being applied.
Push Button Control for Power-On Reset
Push Button Control for PMIC Power Outputs
26 Tetra (VL-EPC-2700) Reference Manual
Page 27

5
Appendix A – References
• Yocto Linux User Guide for the VL-EPC-2700
• i.MX 6Dual/6 Quad Applications Processors for Industrial Products Datasheet
• Hardware Development Guide for i.MX 6 Families of Application Processors
• i.MX 6Dual/6Quad Applications Processor Reference Manual
• Chip Errata for the i.MX 6Dual/6Quad and i.MX 6DualPlus/6QuadPlus
Tetra (VL-EPC-2700 Reference Manual 27
Page 28

KNOWN ISSUES
Hardware
Currently the VersaLogic PCIe card VL-MPEe-U2 does not work with the Tetra board
i.MX 6 SW controlled power-off is unsupported. In order to turn off the PMIC power output while
the power input to the board is still supplied, you must either hold the S2 power pushbutton in or
drive the PB_CTL_PWR# signal on the User IO connector (J13) low (with an open-drain driver)
since the input is level sensitive by default.
To get the U2 working on the EPC-2700, the Kernel config has to have PCI Messaging Signal
Interrupts disabled (CONFIG_PCI_MSI=n). When disabled, the U2 serial ports work in both RS232
or RS422/485 and the MPIOs also work.
28 Tetra (VL-EPC-2700) Reference Manual
 Loading...