

Versa Drives SUPERFAN A1, SUPERFAN X1, SUPERFAN V1 User Manual
INDIA'S FIRST
SUPER EFFICIENT FAN
USER MANUAL
Congratulations for becoming an owner of the
SUPERFAN. You have made an excellent choice and
we hope you enjoy all its capabilities.
This user manual explains how to use SUPERFAN.
Please read this manual before operating your
Superfan and keep it for your future reference.
Thank You.
VERSA DRIVES PRIVATE LIMITED.
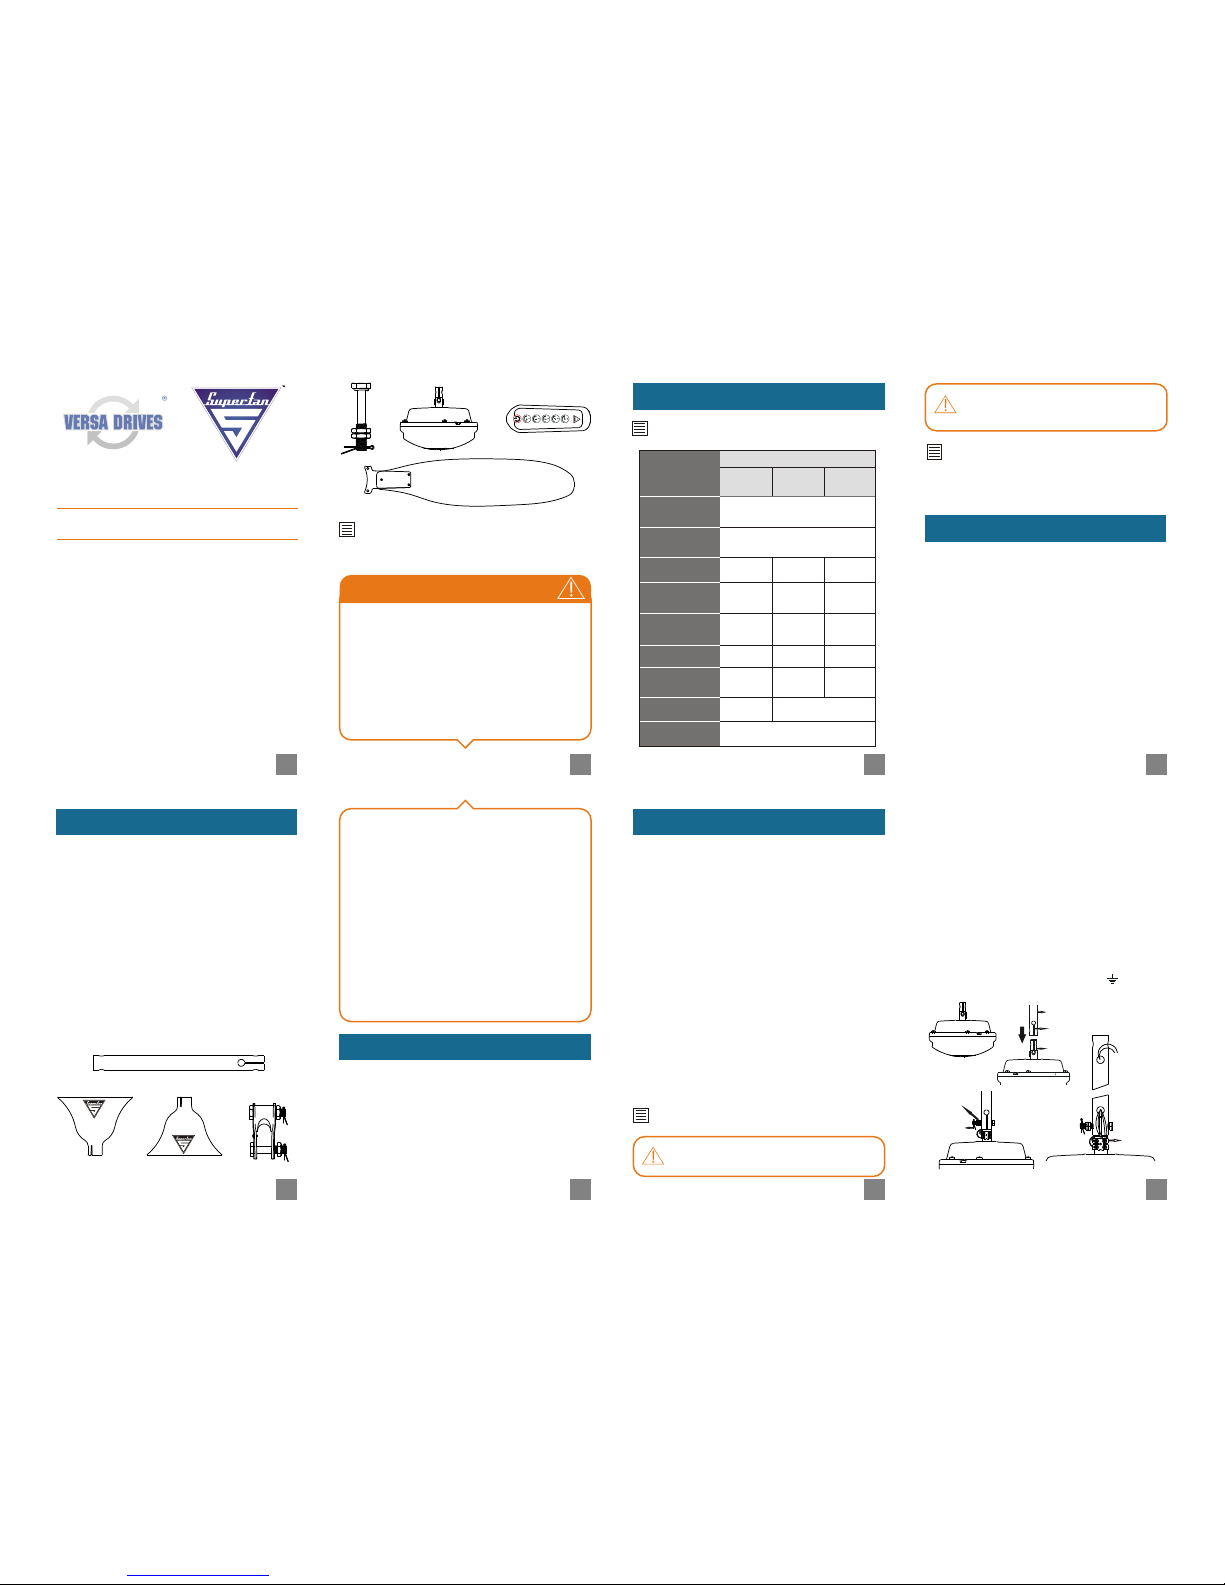
LIST OF FAN PARTS
V1.1 Mar, 2013,
Revision: Air delivery and power specifications changed in
section 1.2 and the mounting height from ceiling is mentioned.
PATENT PENDING.
Unpack the carton of Superfan and check whether
you have the following items.
1. Down rod
2. Top canopy
3. Bottom canopy
4. Shackle kit to fix the down rod with ceiling hook
5. Kit to fix the down rod with fan motor
6. Fan motor with leaf fixing screws
7. Remote (6 key or 9 key remote based on the
model of Superfan)
8. Leaf – 3 No’s.
5
4
1
2
TM
3
TM
8
6
7
TM
BEFORE INSTALLING AND OPERATING YOUR
SUP ERFAN, PLE ASE READ SAF ETY
INSTRUCTIONS CAREFULLY.
• Before installing or cleaning the fan, switch off
the power at the electricity panel and the
associated wall switch location
• Lock the electricity panel or securely fasten a
warning device, such as a tag to prevent power
from being switched on accidentally
• Wirings must be done by qualified electricians
only
SAFETY INSTRUCTIONS
• The fan must be mounted at minimum height
of 1 foot from ceiling and 7 feet from the
floor to prevent accidental contact with the fan
leaves.
• Do not bend the leaves while installing or
cleaning.
• Store the remote battery in a place where
children cannot reach. If a child accidentally
swallow’s the battery consult the doctor
immediately.
• Dispose the battery in a proper manner. Do not
dispose it in fire.
• Do not short or disassemble the remote
battery.
Superfan is India’s first super-efficient fan which is
designed to consume less amount of energy even
at high speed. Hence it will reduce your electricity
bill.
1.1. INTRODUCTION:
1.2. SPECIFICATIONS
SPECIFICATIONS ARE SUBJECT TO CHANGE
WITHOUT NOTICE
1.3. FEATURES
• Energy saving, more than 50% savings, lower
electricity bill.
• Sensor-less design for more reliability.
• Green manufacturing (ROHS electronics, VOC free
paint, Green packing).
• Remote control for speed command, no regulator
needed, save space on switch board.
• Indication of remote operation.
• High speed, high volume of air.
• Consistent speed in low voltage and varying
voltages.
• Power factor better than 0.9 and more air per watt.
• Less heat generated by fan motor, cool operation.
• No extra noise during operation from inverter
supply.
• More hours of operation with inverter.
• 2 years of warranty.
SUPERFAN CAN BE POWERED ON/OFF BY
USING A SIMPLE WALL SWITCH
Please do not connect any regulator to
your Superfan
Phase &
Neutral
wires
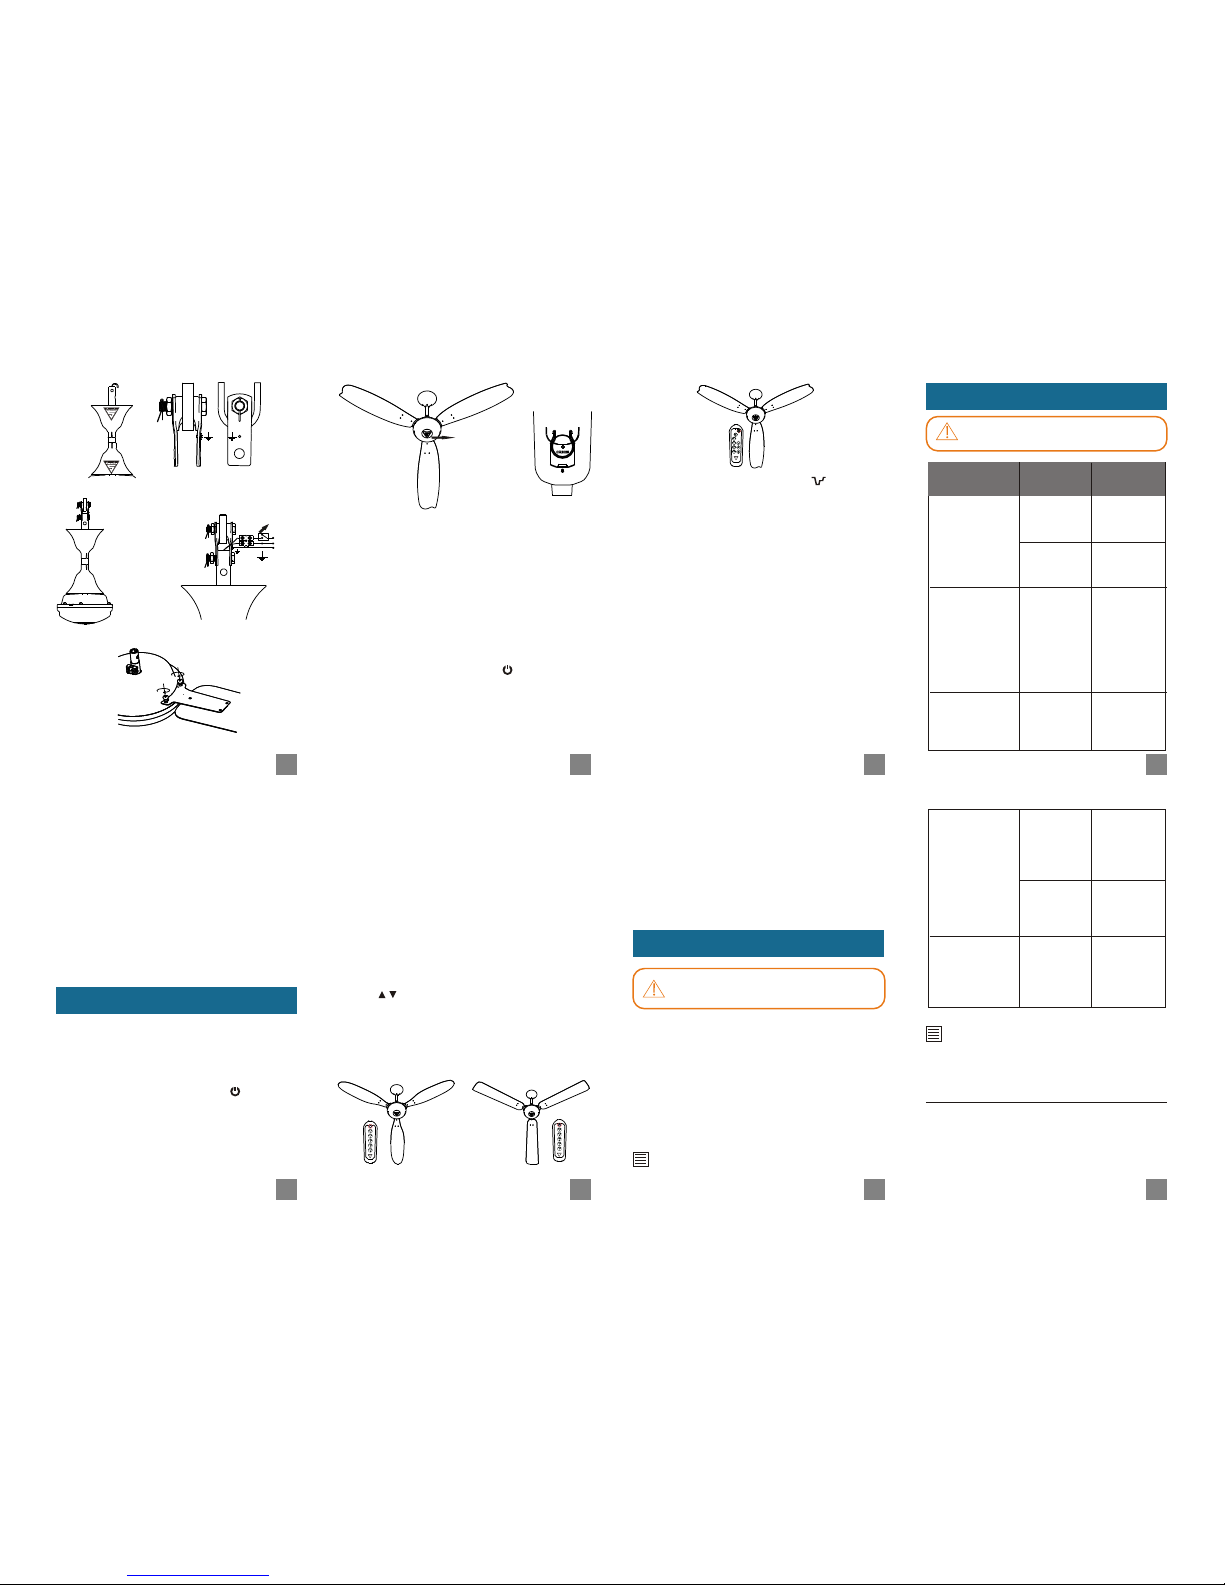
Fig 4
Terminal
Block
Fig 3
Washer
and nut
Cotter pin
Fig 2
Shaft
Slit end
Down rod
Fig 1
1. Take out the fan motor and place it
gently on a clean and soft surface. 2. Fix the slit end
of the downrod onto the shaft using bolt, washer,
spring washer, and nuts. Ensure that it is fully
tightened 3. Then put the cotter pin
into the bolt hole and bend its two ends apart, to
lock 4. Connect two wires (for phase
(red wire) and neutral (black wire) connections) on
the other side of the terminal block. Then insert the
wires from the bottom side of the down rod to the
top side 5. Insert the bottom canopy
(Top and bottom canopies are identified with
[Ref: Fig 1]
[Ref: Fig 2].
[Ref: Fig 3].
[Ref: Fig 4].
1.4. INSTALLATION INSTRUCTION
THERE SHOULD BE NO OBSTRUCTIONS
FOR THE FAN TO ROTATE AND OBJECTS
(LIKE WALL, OR POST) SHOULD BE AT
LEAST 2 FEET (~61 CM) AWAY FROM THE
TIP OF THE FAN LEAVES
Befo r e m a king/ remov i ng t he
connections in the ceiling rose, please
switch off the power.
orientation of Superfan logo) from the topside of
the downrod. Insert the top canopy in an inverted
manner 6. Fix the shackle kit in the
ceiling hook 7. Fix the fan assembly in
the shackle using bolt, washer, spring washer, nuts
8. Then tighten the nuts. Put the
cotter pin into the bolt hole and bend its two ends
apart to lock. 9. Connect the phase and neutral
wires coming out from the downrod to the ceiling
rose as shown in the . Connect (Green/yellow)
earth wire to the screw marked as " " on the
[Ref: Fig 5].
[Ref: Fig 6].
[Ref: Fig 7].
Fig 8
Parameters
Input Voltage
(Vac)
Rated frequency
(Hz)
Span (mm)
Typical
Speed (rpm)
Typical Input
power (Watts)
Power factor
Air delivery
3
(m /min)
Speed control
Remote battery
160 to 265
48 to 52
1200
350
33
0.94
220
Super T2
Lithium coin battery 3V 165mAh
1200
385
33
0.94
230
Super T1
1400
275
38
0.94
270
Values
SuperA1SuperX1Super
V1
1
3
5
7
2
4
6
8
Remote controller keys: On/ Off
Description/ Function: To Switch off the running
fan / To Switch on the fan which was stopped using
remote.
Indication: Glows steadily / Flash depends on
previously set speed.
Noisy operation
1. Bottom
canopy
touching the
top cover of
the fan.
1.Adjust the
canopy so
that it does
not touch the
top cover
2. Fan leaves
are not fixed
tightly
2. Tighten the
mounting
screws of the
leaf
Excessive
shaking
1.Down rod is
not fitted
tightly with
shaft
1. Tighten the
screws and
bolts
connected to
the down rod.
Power is on but
Fan does not
rotate and also
no indications of
Superfan
Problem
Problem
Cause
Solution
1. Circuit
breaker
tripped.
1. Reset the
breaker
2. Loose
connection of
wires
2. Tighten the
wire
connections
Remote does
not work
1. Remote
battery drain
1. Replace the
old remote
battery with
new battery
(lithium coin
cell battery
CR2025 or
equivalent)
Remote does
not work even
with new battery
1. Remote
problem
1. Replace the
old remote
by new
remote.
Fig 5
Top
canopy
Bottom
canopy
TM
TM
Fig 6
FRONT
SIDE VIEW
Ceiling
hook
Fig 7
Fig 8
Wall switch
L
N
Tighten up
the Screws
Fig 9
shackle kit. 10. Remove the Leaf fixing screws from
the motor and then place the leaves on each side
of the motor and fix it by using screws and spring
washers While mounting the leaves
take care not to bend the leaf. 11. Adjust the
canopies such that top canopy covers the shackle
assembly near ceiling and bottom canopy covers
the terminal block connector of the fan. 12.
Bottom canopy should not touch the fan motor.
Otherwise rubbing noise will come.
[Ref: Fig 9].
1. After ensuring that the fan is fixed properly and
there is no obstruction for its rotation, switch on
the fan using the wall switch connected to the fan.
2. Now the indicator on the fan
will glow. 3.Then press On/Off key ( ) of remote.
The fan will run at the speed at which it was
running previously. 4. Please pull out the insulation
sheet before using the remote.
5. Speed can be changed by using the remote.
(shown in Fig 10)
[Ref: Fig 10A]
1.5. OPERATING INSTRUCTION
Fig 10
Indicator for
remote
operation
Fig 10A
Insulation
sheet
6. To operate your Superfan with remote, press the
remote keys while pointing remote towards the
indicator on the fan. 7. If Superfan senses a key
pressed in remote, the indicator will flash to indicate
the speed command. 8. Super X1 and
Super V1 model can be operated using
6 key remote (Super T1) which has one On/Off key
and 5 Speed keys.
[Ref: Fig 11]
[Ref: Fig 12]
Remote controller keys: 1 to 5
Description/ Function: To run the fan at Speed 1,2
to 5 respectively.
Indication: Flash once, twice to five times
respectively.
9. Super A1 model can be operated
using a special 9 key remote (Super T2). 10. In 9 key
remote, three more extra keys are provided for fine
control of speed and to simulate natural breeze of air
depending on the running speed.
Remote controller keys: up / down (Fine tuning of
speed).
Description/ Function: To increase the speed while
running / To decrease the speed while running
Indication: One short flash for each Increase(4 to 5
rpm) / One short flash for each decrease (4 to 5 rpm).
[Ref: Fig 13]
Fig 11: Super X1
TM
TM
TM
IF YOU LOSE THE REMOTE!
Case (1) - If you lose the remote when the fan was
running or after the fan was switched off using the
wall switch, you can operate the fan at same speed by
turning the wall switch off and then on.
Case (2) - If you lose the remote after the fan was
stopped using the remote, you should turn the wall
switch off and on for five times to run the fan at speed
3. After this till you buy a new remote you can
operate the fan as mentioned in case (1).
1.6. MAINTENANCE INSTRUCTION
Before starting any maintenance or service
activity, ensure that the fan is powered off.
1. Clean the fan leaves and motor using a soft wet
cloth at regular intervals. Do not use cleaning
solvent. 2. While cleaning, take care not to bend the
blades. 3. Check the tightness of the bolts / fixing
screws. To replace the remote battery (CR2025) refer
the picture which is shown at the backside
of your Superfan remote.
(Fig 10A)
REPLACE THE BATTERY ONLY WITH THE
SAME OR EQUIVALENT TYPE.
1.7. TROUBLE SHOOTING GUIDELINES
Please turn off the power before
handling your fan.
IF YOU H AVE TRIED T HE ABOVE
MEN T IONE D T ROUB L ESH O OTI NG
INSTRUCTIONS AND IF THE PROBLEM
PERSISTS STILL PLEASE CONTACT US FOR
SERVICING.
Contact details:
Toll free No: 1800 425 78737
Mobile No: 94890 78737
E-mail: superfan@versadrives.com
Web: http://www.superfan.in
Remote controller keys: breeze key
Description/ Function: Simulate natural breeze
depending on the running speed.
Indication : One short flash for receiving command.
11. When you use fine control, at certain speeds you
might hear a humming sound because of resonance.
You can avoid this by increasing or decreasing the
speed. 12. In the 9 key remote the three extra keys (
up , down, breeze) will work only when the fan is
already running and also these keys will work only for
Super A1 model. 13. Indicator will not flash when
input power to the fan is off and also when the fan is
running continuously in same speed.
9 11
13
15
10
12
14
16
Fig 12: Super V1
Fig 13: Super A1
 Loading...