

versa climber 108 LX, 108 LXP, 108 ALX, 108 ALXP Operational Manual
108 LX/LXP(ALX, ALXP) Operational Manual
108 LX/LXP (ALX, ALXP)

108 LX Series VersaClimber
(LXP, ALX, ALXP)
ASSEMBLY AND OPERATIONAL MANUAL
1.800.237.2271 | 714.850.9716 | Fax: 714.755.5749 | www.versaclimber.com | email@heartrateinc.com
Heart Rate Inc. 3190-E Airport Loop, Costa Mesa, California 92626 The VersaClimber is manufactured in the USA by Heart Rate Inc.
© 2007 Heart Rate Inc. All Rights Reserved. Made in USA


ASSEMBLY AND OPERATION MANUAL
FOR ALL LX SERIES VERSACLIMBERS
TABLE OF CONTENTS
GENERAL INTRODUCTION................................................................................................1
CALORIE BURN RATES ....................................................................................................2
STEPPING USER GUIDE ....................................................................................................3
CLIMBING USER GUIDE ....................................................................................................4
MODULE DISPLAY ..............................................................................................................5
HEART RATE MONITORING ........................................................................................6 - 7
PROGRAM LEVEL CHART ................................................................................................8
DETAILED USER GUIDE ............................................................................................9 - 10
SELECTING STEP HEIGHT ..............................................................................................11
SELECTING SPEED/TIME ................................................................................................12
USING VARIBALE CONTROL RESISTANCE ..................................................................13
SEAT/PEDALING USER GUIDE ......................................................................................14
USER GUIDE FOR AEROBIC & POWER CONDITIONING......................................15 - 17
STANDARD VS. CROSS CRAWL PATTERN....................................................................18
INTERVAL SPRINT TRAINING ..................................................................................19 - 21
USING THE VERSACLIMBER WITH MINOR INJURIES ..........................................22 - 23
UNPACKING INSTRUCTIONS ..........................................................................................24
ASSEMBLY INSTRUCTIONS - SINGLE MACHINE ..................................................25 - 29
ASSEMBLY INSTRUCTIONS - HI-TRI AND HIGH FIVE ..................................................30
MAINTENANCE SCHEDULE ....................................................................................31 - 34
TROUBLE SHOOTING GUIDE ..........................................................................................35
VERSACLIMBER SPECIFICATIONS ................................................................................36
SPARE PARTS LIST ..................................................................................................37 - 38
WARRANTY................................................................................................................38 - 39


Baby Steps. Ease into your VersaClimber workout.
Members who use stepping machines for 1/2 hour or more in my club can
only use the Versaclimber for a few minutes. Why is that?
LET’S TALK ABOUT IT!
Most stepping machines have a 12” to 14” maximum step height. The VersaClimber has a
20” maximum step height.
Most people that use stepping machines take a 5” to 8” step height, because taking longer
steps on a stepping machine is PHYSICALLY UNCOMFORTABLE. These same people take
a 15” to 20” step height on the VersaClimber, because it is PHYSICALLY MORE COMFORTABLE.
Most people lean on the hand rails of stepping machines and therefore, reduce their
gravitational body stepping weight resulting in cheating and burning less calories. The same
people cannot “cheat” on the VersaClimber because 100% of their body weight is climbing.
Members who use stepping machines at 1/2 to 1/3 the step height of a VersaClimber are
exerting 1/2 to 2/3 less energy at the same step rate. If they take the same step height and
step rate on the Versaclimber as they take on a stepping machine, they can exercise for the
same length of time on either machine. Or, if they take a longer step on stepping machines
than on the VersaClimber, they will be able to VersaClimb longer than they can step.
Most people exercise at a repetition rate of about 120 steps per minute because it is a
common aerobic music dance beat, cycling and running frequency. Most people climb 120
steps per minute or faster on the Versaclimber. If you VersaClimb at the same rate that you
step on stepping machines, but at DOUBLE or TRIPLE the step height, your workout
intensity is DOUBLED or TRIPLED making it uncomfortable and more demanding.
SO WHAT’S THE ANSWER?
Begin the VersaClimber workout with both feet at the same level. People that can step for
1/2 hour or more can also climb for 1/2 hour or more, IF THEY WORKOUT AT THE SAME
INTENSITY–achieved by simply reducing the step height on the VersaClimber.
DO YOUR MEMBERS A FAVOR!
Teach them to take a slow 5” to 8” step height, like they do on stepping machines. They will
then be able to enjoy a long and satisfying total body exercise on the VersaClimber.


WARNING
BEFORE UNPACKING, ASSEMBLING, OR EXERCISING ON THE VERSACLIMBER, READ
THIS OPERATION MANUAL THOROUGHLY. INSTRUCT OTHERS HOW TO USE THE
MACHINE IN ACCORDANCE WITH THE PROCEDURES OUTLINED IN THIS MANUAL.
ADDITIONAL MANUALS ARE AVAILABLE UPON REQUEST FROM HEART RATE, INC.
BEFORE BEGINNING THIS OR ANY OTHER EXERCISE PROGRAM, CONSULT YOUR
PHYSICIAN. THIS IS ESPECIALLY IMPORTANT FOR THOSE INDIVIDUALS OVER THE
AGE OF 30 AND THOSE WHO HAVE KNOWN HEALTH PROBLEMS. HRI ASSUMES NO
RESPONSIBILITY FOR PERSONAL INJURY OR PROPERTY DAMAGE SUSTAINED BY
OR THROUGH THE USE OF THE VERSACLIMBER.
GENERAL INTRODUCTION
TOTAL BODY CLIMBING
The VersaClimber, introduced in 1981, was the first climbing exercise machine on the market.
It utilized one of the most natural, complete and intensive activities to which the body can be
subjected - continuous, total body, vertical climbing. This total body climbing exercise
machine provides an alternating arm and leg action against gravity with variable stroke length
and speed. All the major muscles of the arms, shoulders, back, chest, hips, buttocks and
legs are used while climbing. The VersaClimber is a proven and widely accepted, injury free,
total body exerciser that is used presently by health clubs, sports training facilities,
rehabilitation clinics, all branches of the armed forces, and professional athletes.
VersaClimber combines, in one exercise machine, the aerobic conditioning found in activities
such as: climbing, stepping, spinning, trail running, roller blading, cardio classes and cross
country skiing. It also provides the isokinetic training effects of resistance training of a pull
up, shoulder press, squat, lat pull down and military press. All of these activities are
symmetrical, recipricol and can be performed rhythmically and without orthopedic trauma.
The upper and lower body major muscle contractions maximize peripheral blood flow,
providing for higher levels of energy expenditure at lower levels of blood pressure and
perceived exertion.
A microcomputer monitors and displays the performance of the pedaling, stepping and
climbing activities. The heart rate monitor is used to guide the intensity of the workout using
heart rate as the speedometer of exercise.
NOTE:
BEGIN WITH FEET LEVEL THEN TAKE SHORT 4-6 INCH STEPS TO BEGIN. FIRST TIME
USERS OF THE VERSACLIMBER HAVE A TENDENCY TO CLIMB TOO FAST AND TO
TAKE TOO LONG A STEP. UNTIL USERS BECOME THOROUGHLY FAMILIAR WITH
THE VERSACLIMBER, IT IS MANDATORY THAT THEY TAKE SHORT, SLOW STEPS.
"LIMIT STOPS" HAVE BEEN PROVIDED TO SET THE RANGE OF MOTION BASED ON
THE ABILITY OF THE USER. FOR EXAMPLE, A MAXIMUM 6" STROKE LIMITATION
MAY BE SET FOR BEGINNERS IN THE SEATED, STEPPING, OR CLIMBING
POSITIONS.
Page 1


TYPICAL CALORIE BURN RATES
Take a moment to review the following activity comparisons. Note the difference in calorie
expenditures and speeds for various exercises. Full body climbing ranks highest in caloric
expenditure over all other activities even though speed is the slowest. Users often try to
maintain the speed that they are used to in other activities and over exert themselves due to
the total body, arm and leg movement involved in climbing at 75 degree angle. Therefore, it
is recommended that first time users of the VersaClimber begin with the feet level in the
stepping positions at a slow comfortable pace and a 4-6 inch step height.
CALORIES
ACTIVITY SPEED BURNED/MINUTE
Walking 3.0 mph 3.8
Bicycling 9.4 mph 6.4
Swimming 2.0 mph 8.1
Running 7.5 mph 13.2
Stepping 1.9 mph 14.4
Climbing 1.5 mph 16.2
1. Find your weight in the weight column
2. Find your climbing speed in feet per minute at the top of the chart
3. Read calories burned per hour in table
Page 2
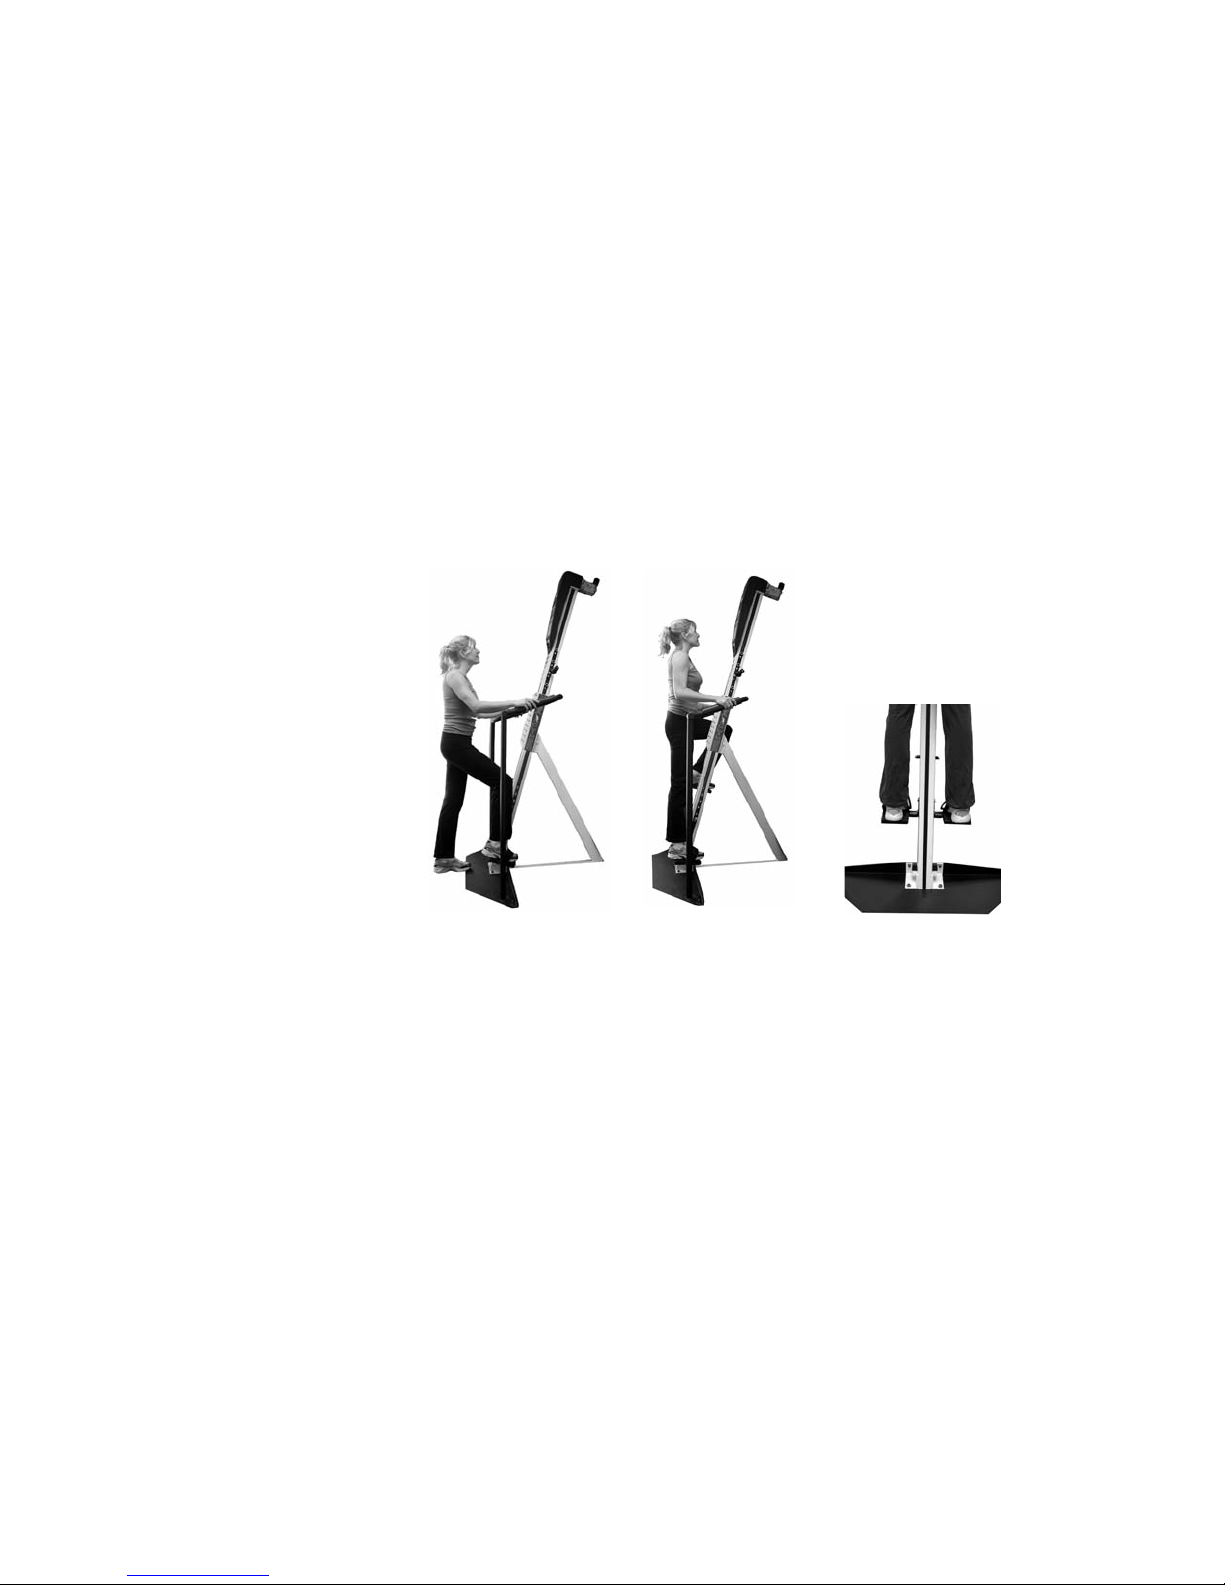
STEPPING USER GUIDE
LEARN TO USE THE VERSACLIMBER AS A STEPPING MACHINE
BEFORE USING IT AS A CLIMBING MACHINE.
The hand rails not only provide support while getting on and off the VersaClimber, but also
the option of another exercise modality - Stair stepping.
1. Hold the stationary hand rails and step on the lower foot pedal.
Then, step on higher foot pedal until feet are level and stop.
2. Switch on display.
3. Turn hydraulic control knob toward "step slower."
4. Hold hand rails and take short, slow 6 inch steps for about ten minutes.
Step onto machine
by placing enough
weight on the lowest
pedal to bring it to
its bottom position.
Support the upper
body by holding
the hand rails.
Step up with
the opposite leg
and level feet.
DECREASE STEP RATE AND STEP HEIGHT FOR EASIER EXERCISE.
By holding the hand rails in the front or to the side of the body and stepping with the legs
only, the gluts, hip flexors, quads, hamstrings, calves and shins can achieve a complete
lower body aerobic and strength exercise. A variable stroke length of 1" to 20" is available.
Unlike other stair stepping machines, the foot pedal velcro straps allow the user to perform
leg lifts in the upward motion of the stroke to achieve a more effective and balanced lower
body workout. By shifting the hands from the stationary hand rails to the moving hand grips,
the machine automatically converts from a stepping machine into a total body climbing
machine or back to a stepping machine simply by changing hand position.
Page 3
NOTE:
TO MAINTAIN TRAUMA FREE MOTION, IT IS MANDATORY THAT YOU DO NOT, UNDER
ANY CIRCUMSTANCES, "BOTTOM OUT" AT THE END OF EACH STROKE. ALSO, DO
NOT HIT THE STEP HEIGHT LIMITERS WHEN THEY ARE IN USE.
CLIMBING USER GUIDE
1. Hold hand rails for support. Put foot on the lowest pedal. Apply enough weight to bring
the pedal to its lowest position. Step up with the other foot onto the higher pedal until
both feet are level.
2. With both feet at the same level, hand grips should be positioned at about shoulder
height. Adjust handles if necessary by depressing the pin at the end of the hand grip.
Remove it from its position and reinsert into hand grip adapter near shoulder height,
and release the pin.
3. Press ON/OFF button to turn on.
In Standard Mode: "Time, Rate and Distance"
10:00
STD.
854
95
information will be displayed.
4. After both feet are level, begin climbing by taking a short stroke length of approxi
mately 4" - 6" for approximately 10 minutes. "Stroke Rate" and length are deter
mined by the activity of the person climbing. After three twenty minute workouts,
the step height can be increased gradually from 4" - 6" up to a maximum of
20."
IDEAL STEP
4-6” Step Height
is the ideal step
range for those
starting out.
WHEN GRASPING THE HAND RAILS OR HAND GRIPS, KEEP FINGERS AND THUMBS
ON THE FOAM PADDING OF THE HAND RAILS OR RUBBER GRIPS OF THE HANDLES.
DO NOT GRASP OR EXTEND ANY PORTION OF THE HAND BEYOND THE FLANGES
OF THE MOVING HAND GRIPS. DO NOT HOLD ONTO THE VERTICAL POST.
WARNING
Page 4
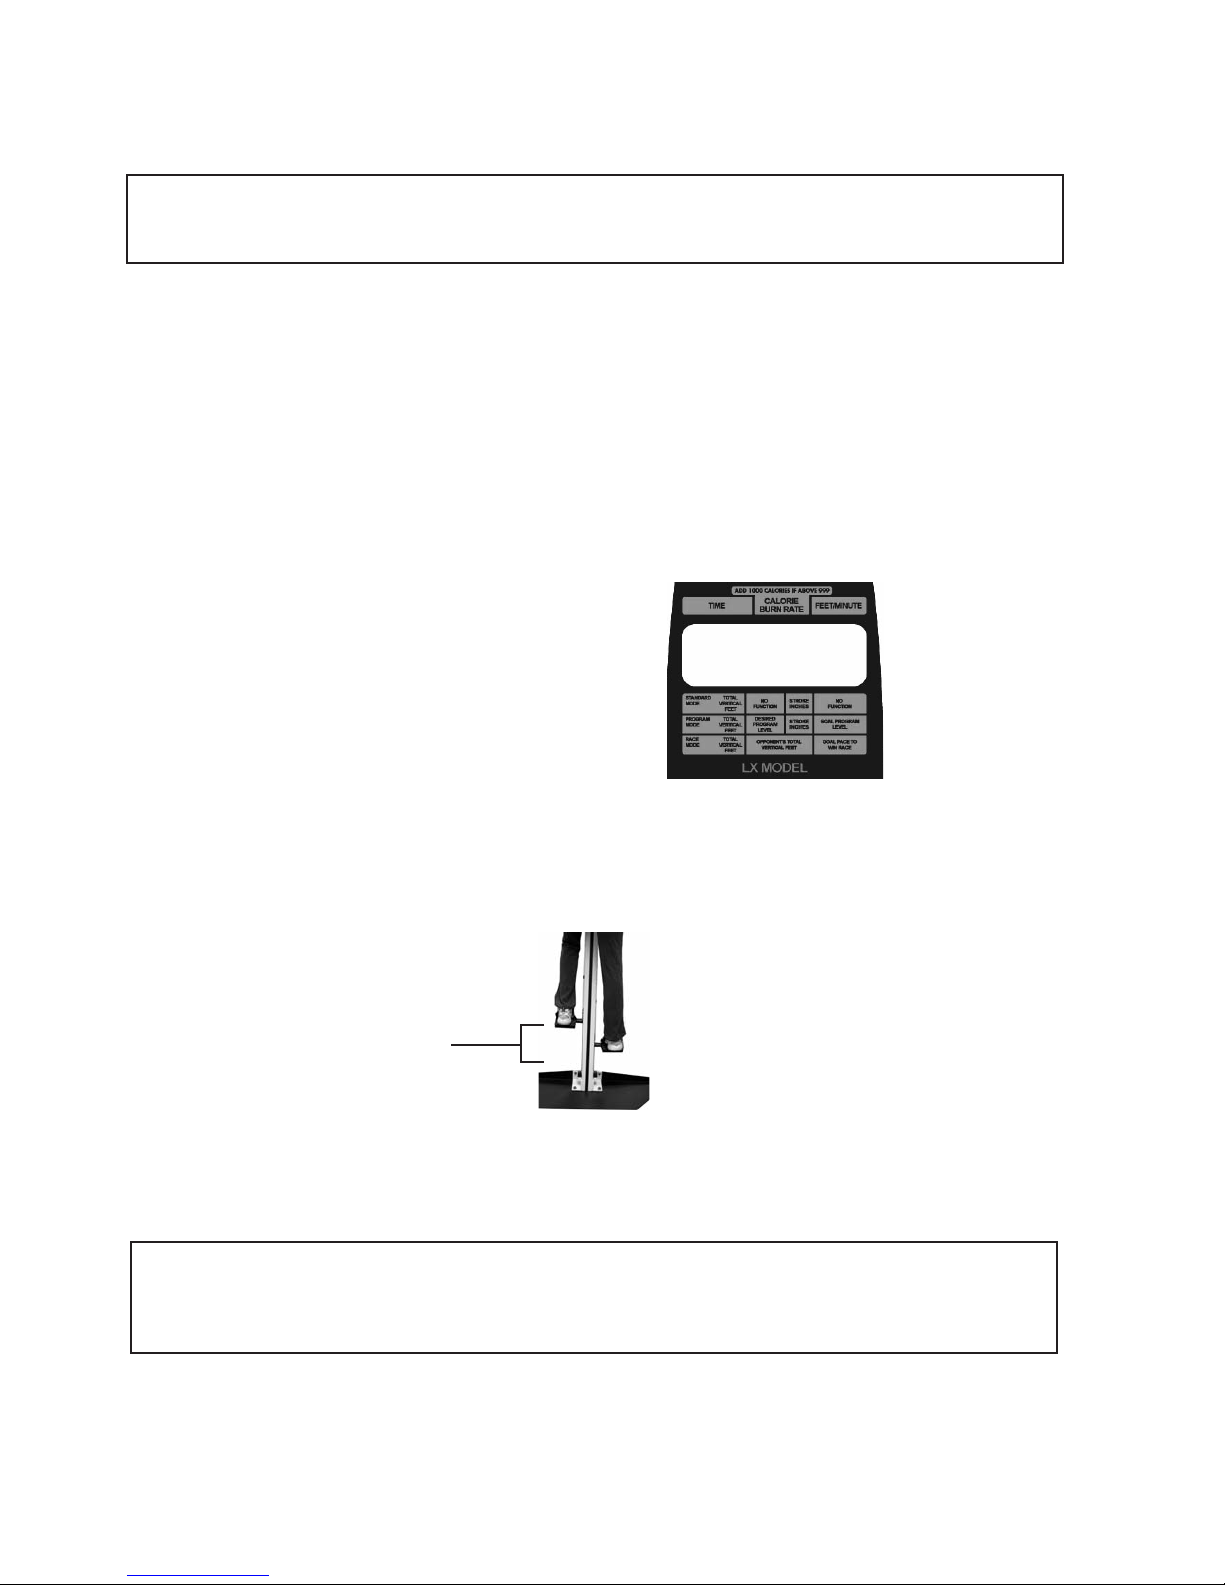
MODULE DISPLAY
Selecting 3 modes of operation.
Standard
Mode
STANDARD MODE
1. Step on the lower pedal first. Then step
on the higher pedal until both feet are even.
2. Adjust handles at approximately shoulder
height. Press the button at end of handle
to reposition.
0:00
STD.
000
000
3. Press "ON/OFF" and the computer
defaults to the standard mode. (STD)
4. Press "ON/OFF" when finished. The display
will turn off after two minutes of inactivity.
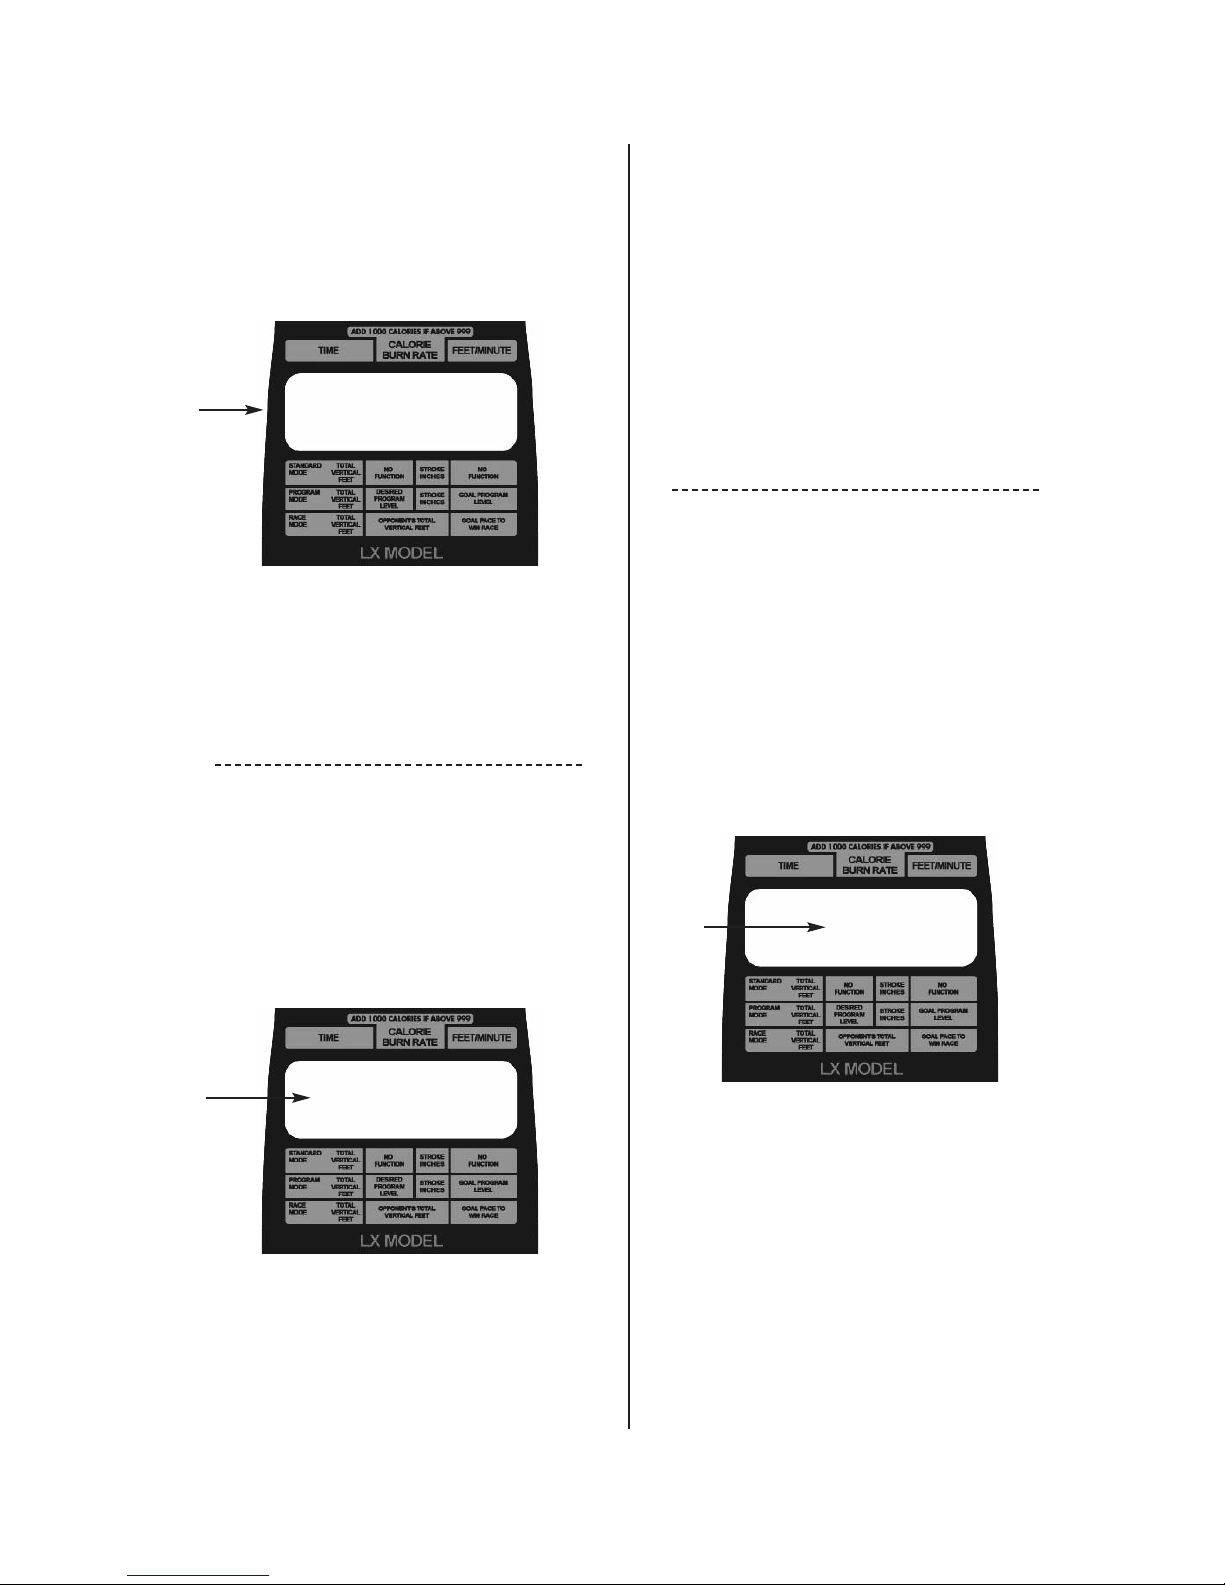
PROGRAM MODE
1. Press "ON/OFF" and press “PROGRAM
MODE”
2. The display will ask you to “ENTER
TIME”. Keypad in a desired exercise
time and press "ENTER".
5. The object is to match your ACTUAL
FEET PER MINUTE displayed in the
upper right hand corner of the display
with the GOAL FEET PER MINUTE
located directly below.
6. You can exit the program at any time by
pressing "RESET".
7. Press "ON/OFF" when finished. The dis
play will turn off after 2 minutes of inactivity.
RACE MODE
1. Press the “RACE MODE” button.
2. The display will ask you to enter exercise
time. Keypad in total minutes and press
"ENTER".
3. The display will then say enter Total Feet
you wish to climb. Keypad in desired
feet from 0 to 9999 and press "ENTER”.
Press "START EXERCISE" and begin
your program.
Race
Mode
ENTER TIME
RACE
Program
Mode
0:00
PROG.
ENTER TIME
3. The display will ask you to enter a pro
gram from 1 through 15. Keypad in a
desired program number and press
"ENTER".
4. Press "START EXERCISE" and begin
your program.
5. The object is to exceed your OPPONENTS
FEET PER MINUTE displayed in the
lower right hand corner of the display.
6. You can exit the program by pressing
"RESET".
7. Press "ON/OFF" when finished. The dis
play will turn off after 2 minutes of inactivity.
Page 5
HEART RATE MONITORING USER GUIDE
FOR HEART RATE MODELS
The Heart Rate Monitoring mode is intended to guide the exerciser through an aerobic
exercise based on their heart rate. It is recommended to select and start with the minimum
70% of maximum age- related heart rate as suggested in this manual.
To use the Heart Rate Monitoring mode, you must wear a chest strap transmitter shown
below. The strap should be snug enough to hold electrodes securely against the skin
to prevent motion of the electrodes but should not feel uncomfortable.
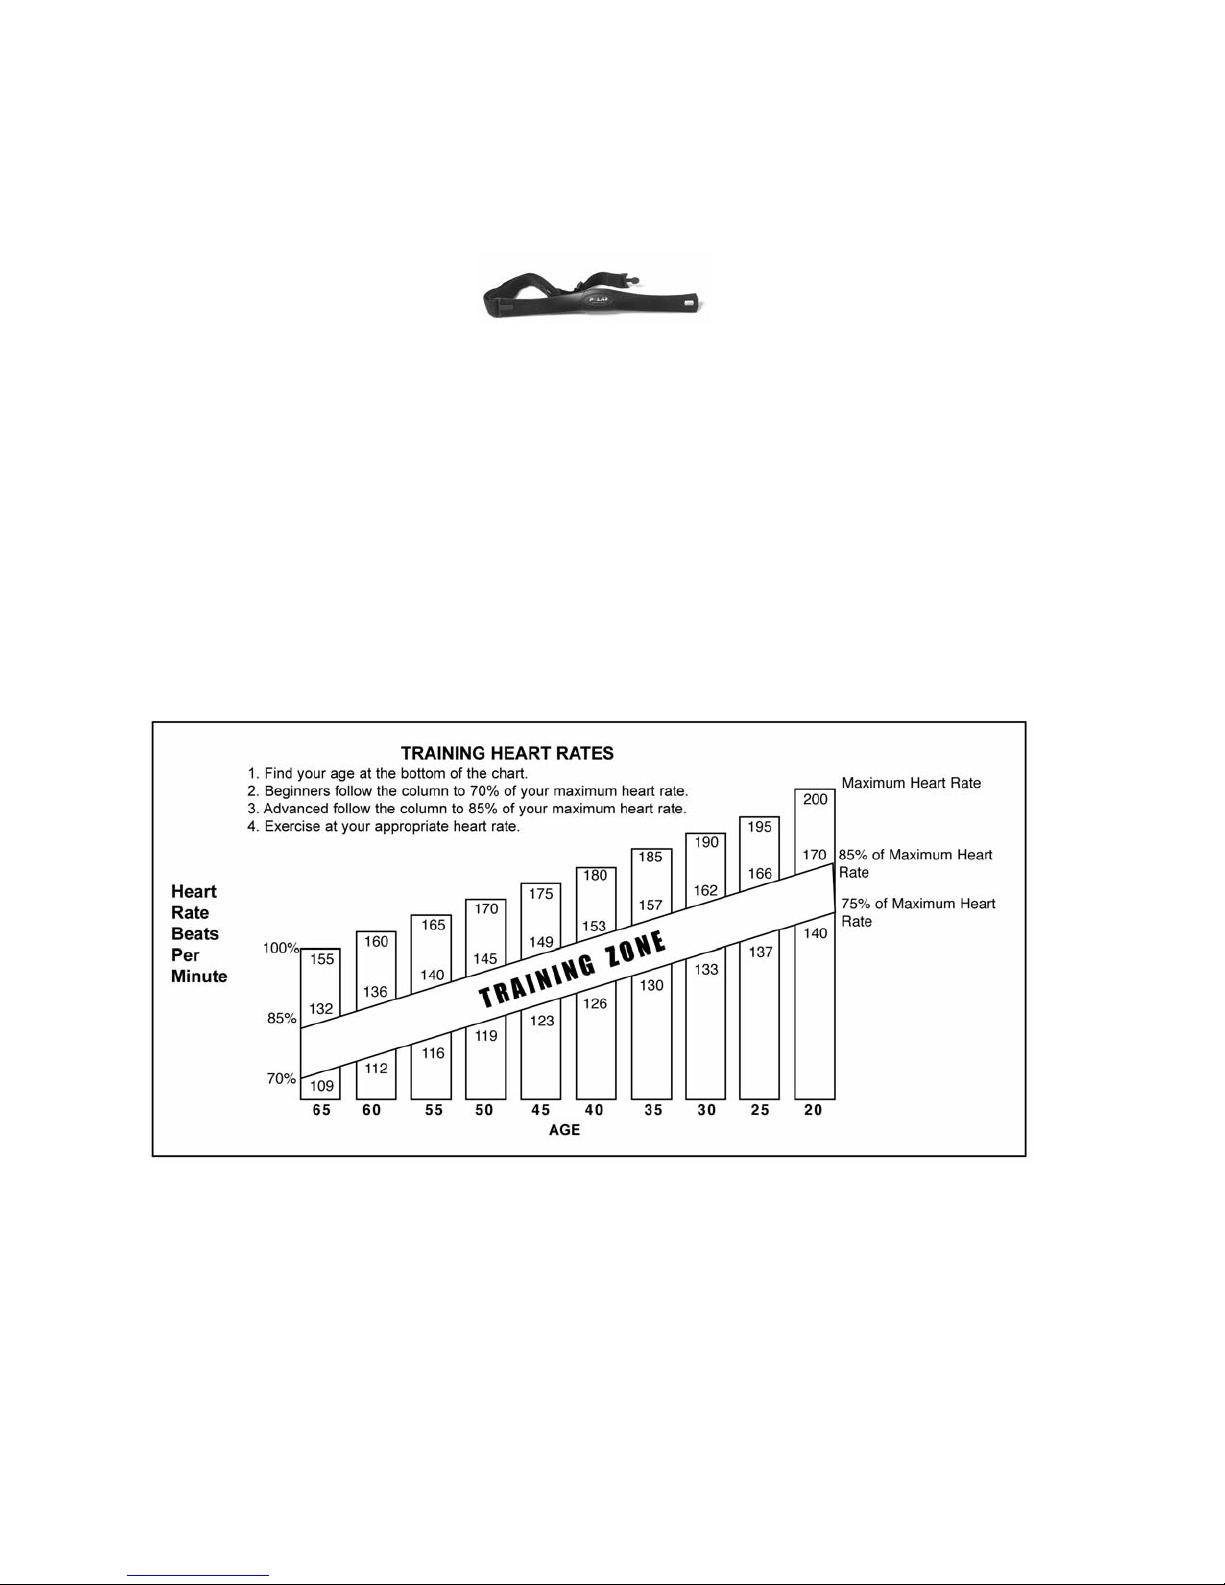
HOW TO FIND YOUR
TARGET HEART RATE
Heart rate is the best indicator of exercise intensity. Use your heart rate and level of perceived
exertion (how you feel) as a guide to determine if you have selected the proper "LEVEL OF
CONDITIONING". The following HEART RATE TRAINING ZONE CHART may be used to
assist you in selecting your appropriate heart rate training zone.
1. Find your age at the bottom of the chart.
2. Beginners follow the column to 70% of
your maximum heart rate.
3. Advanced follow the column to 85% of
your maximum heart rate.
4. Exercise at your appropriate heart rate.
HEART RATE TRAINING GUIDE
Page 6
HEART RATE MODE (for LXP or ALXP models only)
Place
Adjustable
Chest Strap
Here.
Calculated
Max Heart
Rate based
on your age
Read Heart Rate Mode
1. Place the Heart Rate
Polar compatible transmitter
strap on the chest just
below the breast pectoral
muscles. Moisten the skin.
2. The strap can be moved up or down and
left to right to find the best transmission
area on the chest.
3. On the module, press "ON/OFF" and
then press "READ HEART RATE".
NOTE: Heart Rate can be read in each of the
4 modes by simply pushing the “READ
HEART RATE” button at any time.
4. Press "ENTER PERSONAL INFO".
5. Enter your age on number keypad and
press "ENTER".
6. Calculated heart rate max will be displayed.
NOTE: To change HR max number press “0”
three times and then key in a heart rate
goal.
7. Press "ENTER"
8. Press "START EXERCISE".
This number
is the % of
2:87
109
185
87
65
32
6
your Max
heart rate.
As your HR
increases so
does the %.
Ideal training
based on
60-80% of
your HR Max
9. As you begin to workout, the % Max Heart
Rate number will increase as your heart rate
rises. It is recomended to maintain a range of
60-80% of Heart Rate Max.
The module will beep to notify you when
your heart rate max as been exceeded.
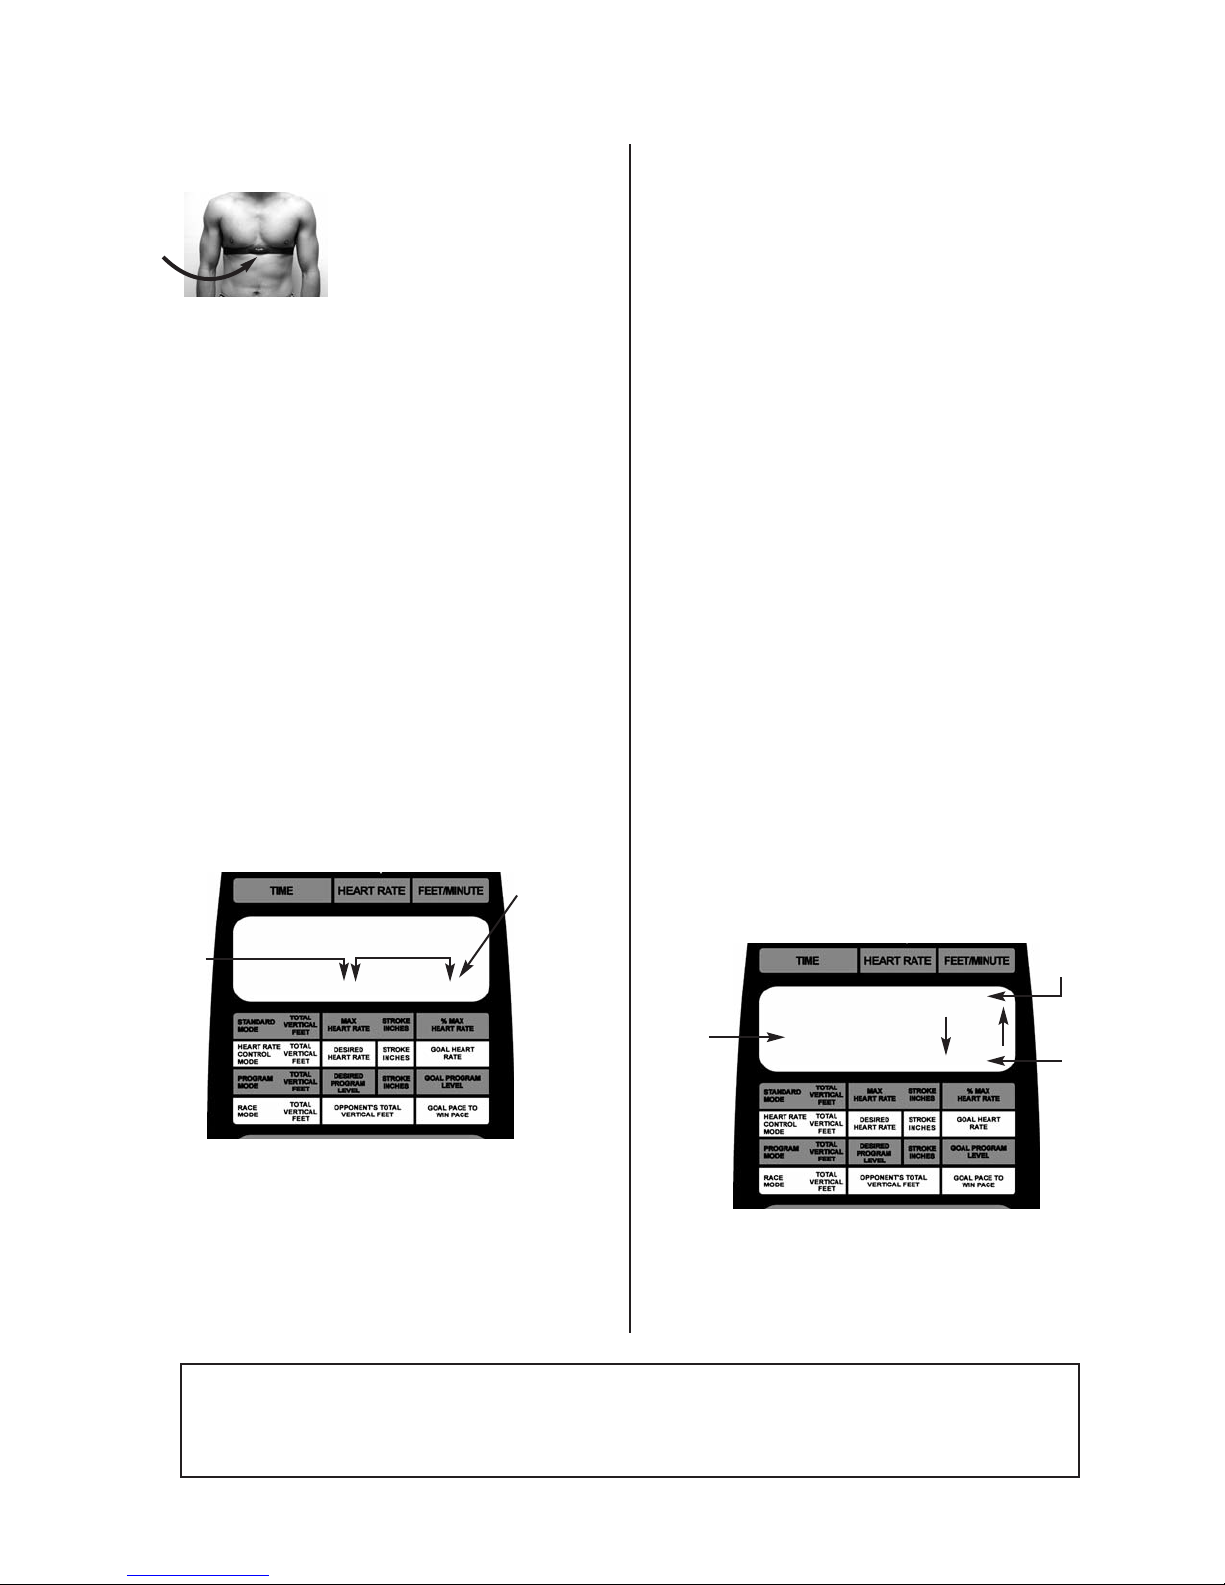
Heart Rate Control Mode
With Polar compatible chest strap in place,
Press "CHANGES MODES” button and
select “HRC”
1. Press "ENTER PERSONEL INFO".
2. Enter age on number keypad and press
"ENTER".
3. Your Calculated heart rate max will be
displayed.
4. Press "ENTER" for 80% of max heart
rate or change by pressing 0 three times
and then key in a heart rate goal.
NOTE: The new Heart Rate goal (num
ber) you input will always default to an
output of 80%
5. Enter in amount of time. Press “ENTER”
6. Press "START EXERCISE".
7. Begin climbing. Match "Actual Feet Per
Minute" to "Goal Feet Per Minute"
indicated by up and down arrows. The
computer will display the proper climb
rate to keep user in the desired target
heart rate range.
8. Match the goal speed that is updated
every 30 seconds.
Your feet
per minute.
Heart Rate
Control
Mode
2:87
HRC
148
87
50
MATCH
6
51
Match this
number by
climbing
faster or
slower. This
number is
determined
by heart rate.
YOUR HEART RATE SHOULD BE USED AS A GENERAL REFERENCE FOR THE INTENSITY
LEVEL OF AN EXERCISE ACTIVITY. CONSULT A PHYSICIAN BEFORE BEGINNING THIS OR
ANY OTHER EXERCISE. IMMEDIATELY DISCONTINUE THIS OR ANY OTHER EXERCISE IF
YOU FEEL FAINT, ANY DISCOMFORT, SHORTNESS OF BREATH, OR DIZZINESS.
WARNING:
Page 7
 Loading...