

Page 1

VECTIM365
VECTIM304
Page 2

Page 3
Use & Care Manual
Table of Contents
Page
WARNINGS FOR ELECTRIC INSTALLATION .......... 3
Safety Instructions ................................................... 4
COOKTOP SAFETY .................................................. 4
PERSONAL SAFETY ................................................. 5
Models and Part Identication ................................ 6
Touch Control details (Full options) ....................... 7
Touch Control Characteristics for every model ..... 8
Advice on cooking ................................................... 9
Setting Recommended Use ....................................... 9
Low Temperature Function ......................................... 9
CONTROL INSTRUCTIONS FOR USE ................... 10
Switching the control on ........................................... 10
Elements setting ....................................................... 10
Using the Low Power Scale ...................................... 10
Switching an element off ........................................... 11
Hot surface indicator light ......................................... 11
Fast Boil (Booster) function ...................................... 11
Key Lock function ..................................................... 11
Setting the timer ....................................................... 11
Rest Heat ................................................................. 12
Features ................................................................... 12
Induction Cooktop Operation ................................ 13
BEFORE USING THE COOKTOP FOR THE FIRST
TIME ........................................................................ 13
Cookware ................................................................ 14
How INDUCTION heating works .............................. 14
Pots and pans and how to use them ......................... 14
Cleaning the Cooktop ............................................ 15
Troubleshooting ..................................................... 16
Failures declarations ................................................ 17
Assistance or Service ............................................ 17
Pay attention to these symbols present in this
manual:
WARNINGS FOR ELECTRIC
ENGLISH
INSTALLATION
WARNING
Installation and service must be performed by
a qualified installer or service agency.
The models may be powered at 240V
or 208V.
CAUTION
Always disconnect the electrical plug from the
wall receptacle before servicing this unit.
For personal safety, this appliance must be
properly grounded.
Do not under any circumstances cut or remove
the third (ground) prong from the power cord plug.
Changes or modications not expressly approved by the
party responsible for compliance could void the user’s
authority to operate the equipment.
NOTE: This equipment has been tested and found to
comply with the limits for a class B digital device, pursuant
to Part 18 of the FCC rules. These limits are designed
to provide reasonable protection against harmful
interference in a residential installation. This equipment
generates, uses and can radiate radio frequency energy
and, if not installed and used in accordance with the
instructions, may cause harmful interference to radio
communications. However, there is no guarantee that
interference will not occur in a particular installation. If
this equipment does cause harmful interference to radio
or television reception, which can be determined by
turning the equipment off and on, the user is encouraged
to try to correct the interference by one or more of the
following measures:
• Reorient or relocate the receiving antennae.
• Increase the distance between the equipment and
receiver.
• Connect the equipment into an outlet or a circuit
different from that to which the receiver is connected.
• Consult the dealer or an experienced radio/TV
technician for help.
WARNING
This is the safety alert symbol. This symbol
alerts you to potential hazards that can kill or
hurt you and others.
You can be killed or seriously injured if you
don't follow these instructions.
READ AND SAVE THESE INSTRUCTIONS.
Persons with a pacemaker or similar medical
device should exercise caution when using or
standing near an induction unit while it is in
operation. The electromagnetic eld may affect
the working of the pacemaker or similar medical
device. It is advisable to consult your doctor
or the pacemaker manufacturer about your
particular situation.
3
Page 4
Safety Instructions
Please read all instructions before using this appliance.
COOKTOP SAFETY
WARNING
Proper Installation
Be sure your appliance is properly installed
and grounded by a qualified technician.
Never Use Your Appliance for Warming or
Heating the Room
Do Not Leave Children Alone
Children should not be left alone or
unattended in area where appliance is in use.
They should never be allowed to sit or stand
on any part of the appliance.
Wear Proper Apparel
Loose-fitting or hanging garments should
never be worn while using the appliance.
User Servicing
Do not repair or replace any part of the
appliance unless specifically recommended in
the manual. All other servicing should be
referred to a qualified technician.
Storage in or on Appliance
Flammable materials should not be stored in
an oven or near surface units.
Do Not Use Water on Grease Fires
Smother fire or flame or use dry chemical or
foam-type extinguisher.
Use Only Dry Potholders
Moist or damp potholders on hot surfaces may
result in burns from steam. Do not let
potholder touch hot heating elements. Do not
use a towel or other bulky cloth.
Use Proper Pan Size
This appliance is equipped with one or more
surface units of different size. Select utensils
having flat bottoms large enough to cover the
surface unit heating element. The use of
undersized utensils will expose a portion of
the heating element to direct contact and may
result in ignition of clothing. Proper
relationship of utensil to burner will also
improve efficiency.
Never Leave Surface Units Unattended at High
Heat Settings
Boil over causes smoking and greasy
spillovers that may ignite.
Make Sure Reflector Pans or Drip Bowls Are in
Place
Absence of these pans or bowls during
cooking may subject wiring or components
underneath to damage.
Use & Care Manual
ENGLISH
IMPORTANT
Protective Liners
Do not use aluminum foil to line surface unit
drip bowls or oven bottoms, except as
suggested in the manual. Improper installation
of these liners may result in a risk of electric
shock, or fire.
Glazed Cooking Utensils
Only certain types of glass, glass/ceramic,
ceramic, earthenware, or other glazed utensils
are suitable for range-top service without
breaking due to the sudden change in
temperature.
Utensil Handles Should Be Turned Inward and
Not Extend Over Adjacent Surface Units
To reduce the risk of burns, ignition of
flammable materials, and spillage due to
unintentional contact with the utensil, the
handle of a utensil should be positioned so
that it is turned inward, and does not extend
over adjacent surface units.
Do Not Soak Removable Heating Elements
Heating elements should never be immersed
in water.
Do Not Cook on Broken Cook-Top
If cook-top should break, cleaning solutions
and spillovers may penetrate the broken cooktop and create a risk of electric shock. Contact
a qualified technician immediately.
Clean Cook-Top With Caution
If a wet sponge or cloth is used to wipe spills on
a hot cooking area, be careful to avoid steam
burn. Some cleaners can produce noxious
fumes if applied to a hot surface.
4
Page 5
PERSONAL SAFETY
Use & Care Manual
ENGLISH
WARNING
To reduce the risk of injury to persons, in the
event of a grease fire, observe the following:
Grease is flammable and should be handled
carefully.
Do not use water on grease fires.
Never pick up a flaming pan. Smother sheet or
flat tray.
Flaming grease outside of utensil can be
extinguished with baking soda or, if available, a
multipurpose dry chemical or foam type
extinguisher.
Let fat cool before attempting to handle it.
Wipe up spill over immediately.
If you are "flaming" liquors or other spirits under
an exhaust, turn the fan off. The draft could
cause the flames to spread out of control.
Never leave the surface area unattended at
high heat setting. Boil over cause smoking and
greasy spill over, which may ignite.
CAUTION
Do not allow aluminum foil, plastic, paper or cloth to
come in contact with a hot Surface. Do not allow pans
to boil dry.
Be careful to prevent burns. If the flames do
not go out immediately, evacuate and call the
fire department.
Always have a working smoke detector near the
kitchen.
Leave the hood ventilator on when flambéing
food only if there is smoke without flames.
Use an extinguisher only if
You know you have a Class ABC extinguisher,
and you already know how to operate it.
The fire is small and contained in the area
where it started.
The fire department is being called.
You can fight the fire with your back to an exit.
Never use water on cooking fires.
In the event that personal clothing catches fire,
drop and roll immediately to extinguish
flames.
WARNING
To reduce the risk of burn injuries during
cooktop use, observe the following:
Never use the cooktop to warm or heat a room.
Children or pets should not be left alone or
unattended in an area where appliances are in
use. They should never be allowed to sit or stand
on any part of the appliance.
CAUTION
Do not store items of interest to children in cabinets
above a range or on the backguard of a range;
children climbing on the range to reach items could be
seriously injured.
When using the cooktop
Do not touch surface units or areas near
units. Surface areas may become hot enough
to cause burns. Surface elements may be hot
even though they are dark in color. During and
after use, do not touch or let flammable
materials contact heating elements until they
have had time to cool.
When using the cooktop installed over oven
Do not touch heating elements or interior
surfaces of oven. Heating elements may be
hot even though they are dark in color. Interior
surfaces of an oven become hot enough to
cause burns. During and after use, do not
touch, or let clothing or other flammable
materials contact heating elements or interior
surfaces of oven until they have had sufficient
time to cool. Other surfaces of the appliance
may become hot enough to cause burns –
among these surfaces are (identification of
surfaces – for example, oven vent openings
and surfaces near these openings, oven
doors, and windows of oven doors).
To minimize the possibility of burns, ignition of
flammable materials and spillage, the handle
of a container should be turned toward the
center of the cooktop without extending over
any nearby surface units.
Use only certain types of glass, heatproof
glass ceramic, ceramic, earthenware, or other
glazed utensils that are suitable for cooktop
use
5
Page 6

30” Models
Use & Care Manual
ENGLISH
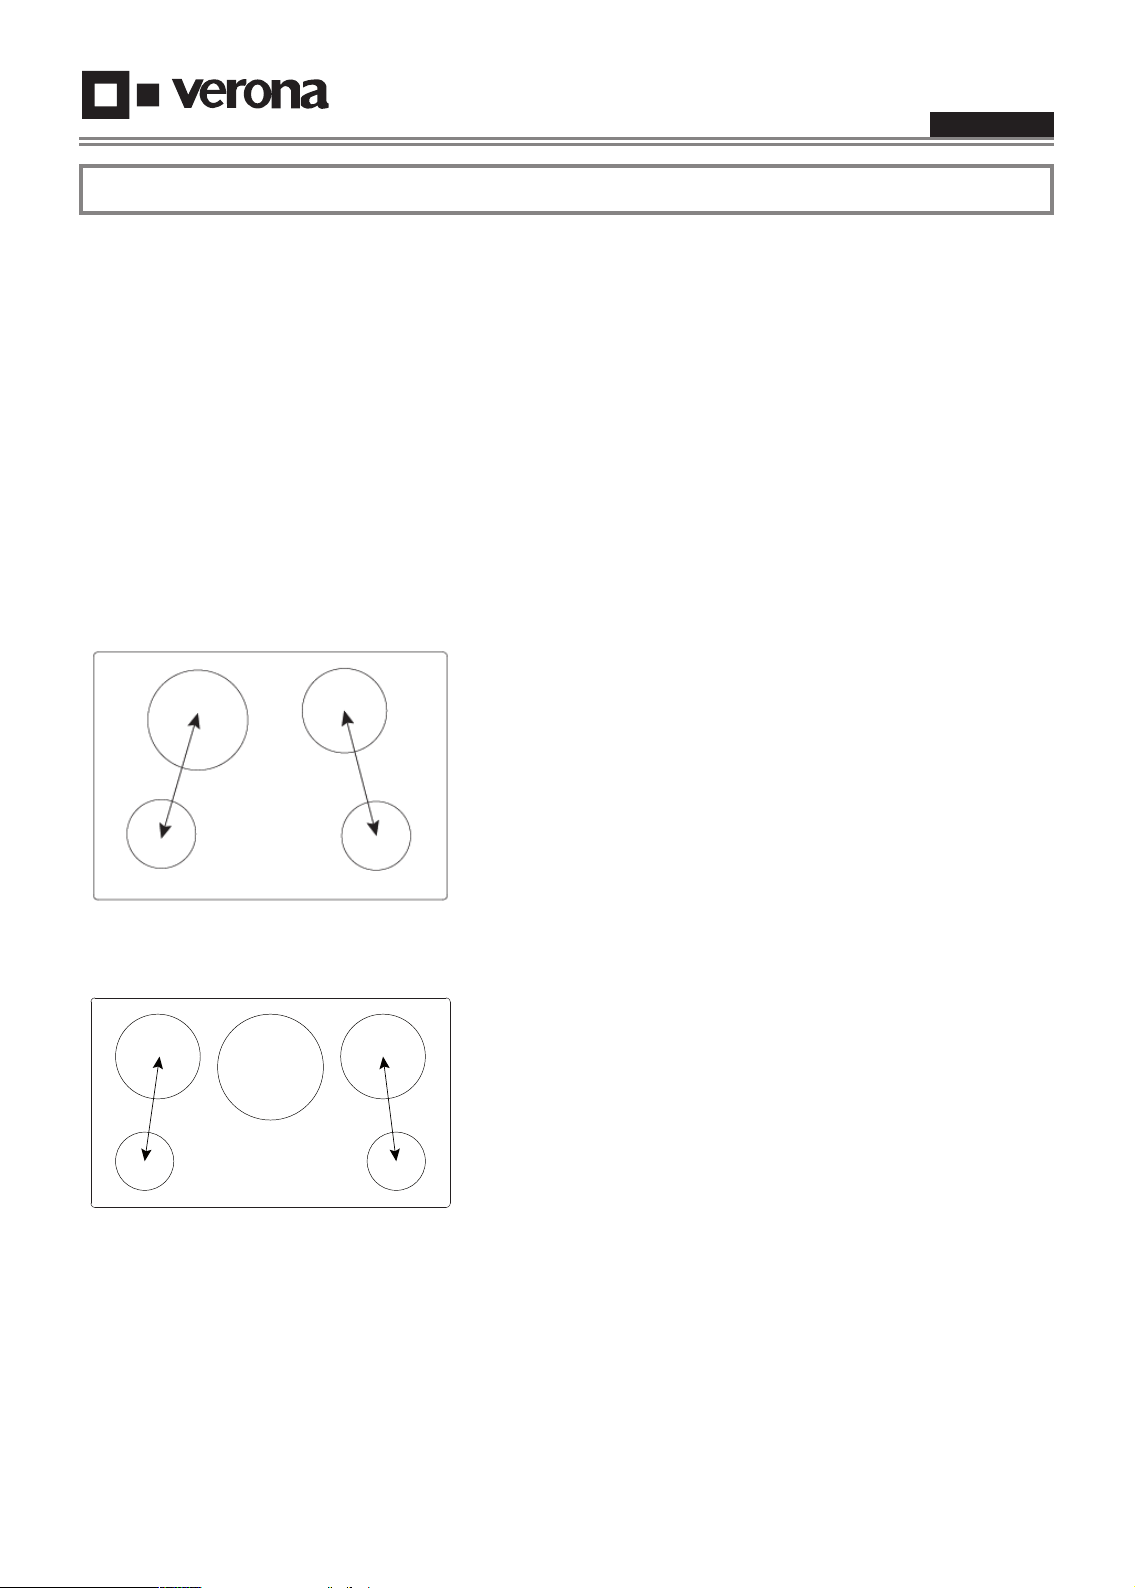
Models and Part Identication
3
5
2
VECTIM304 (Approval code 812T40IP or 812T40NP)
Position 1 - 1200W 6” single circuit element (Booster 1400W)
Position 2 - 1200W 6” single circuit element (Booster 1400W)
Position 3 - 2200W 8” single circuit element (Booster 3000W)
Position 4 - 1800W 7” single circuit element (Booster 2800W)
Position 5 - touch control
36” Models
4b
4
1
3
4
VECTIM365 (Approval code 812V50IQ or 812V50NQ)
Position 1 - 1200W 6” single circuit element (Booster 1400W)
Position 2 - 1200W 6” single circuit element (Booster 1400W)
Position 3 - 2200W 8” single circuit element (Booster 3000W)
Position 4 - 1800W 7” dual circuit element (Booster 2800W)
Position 4b - 2640W11” dual circuit element (Booster 3600W)
Position 5 - 2200W 8” single circuit element (Booster 3000W)
Position 6 - touch control
6
6
5
12
Page 7
6
4
2
3
1
2
4
5
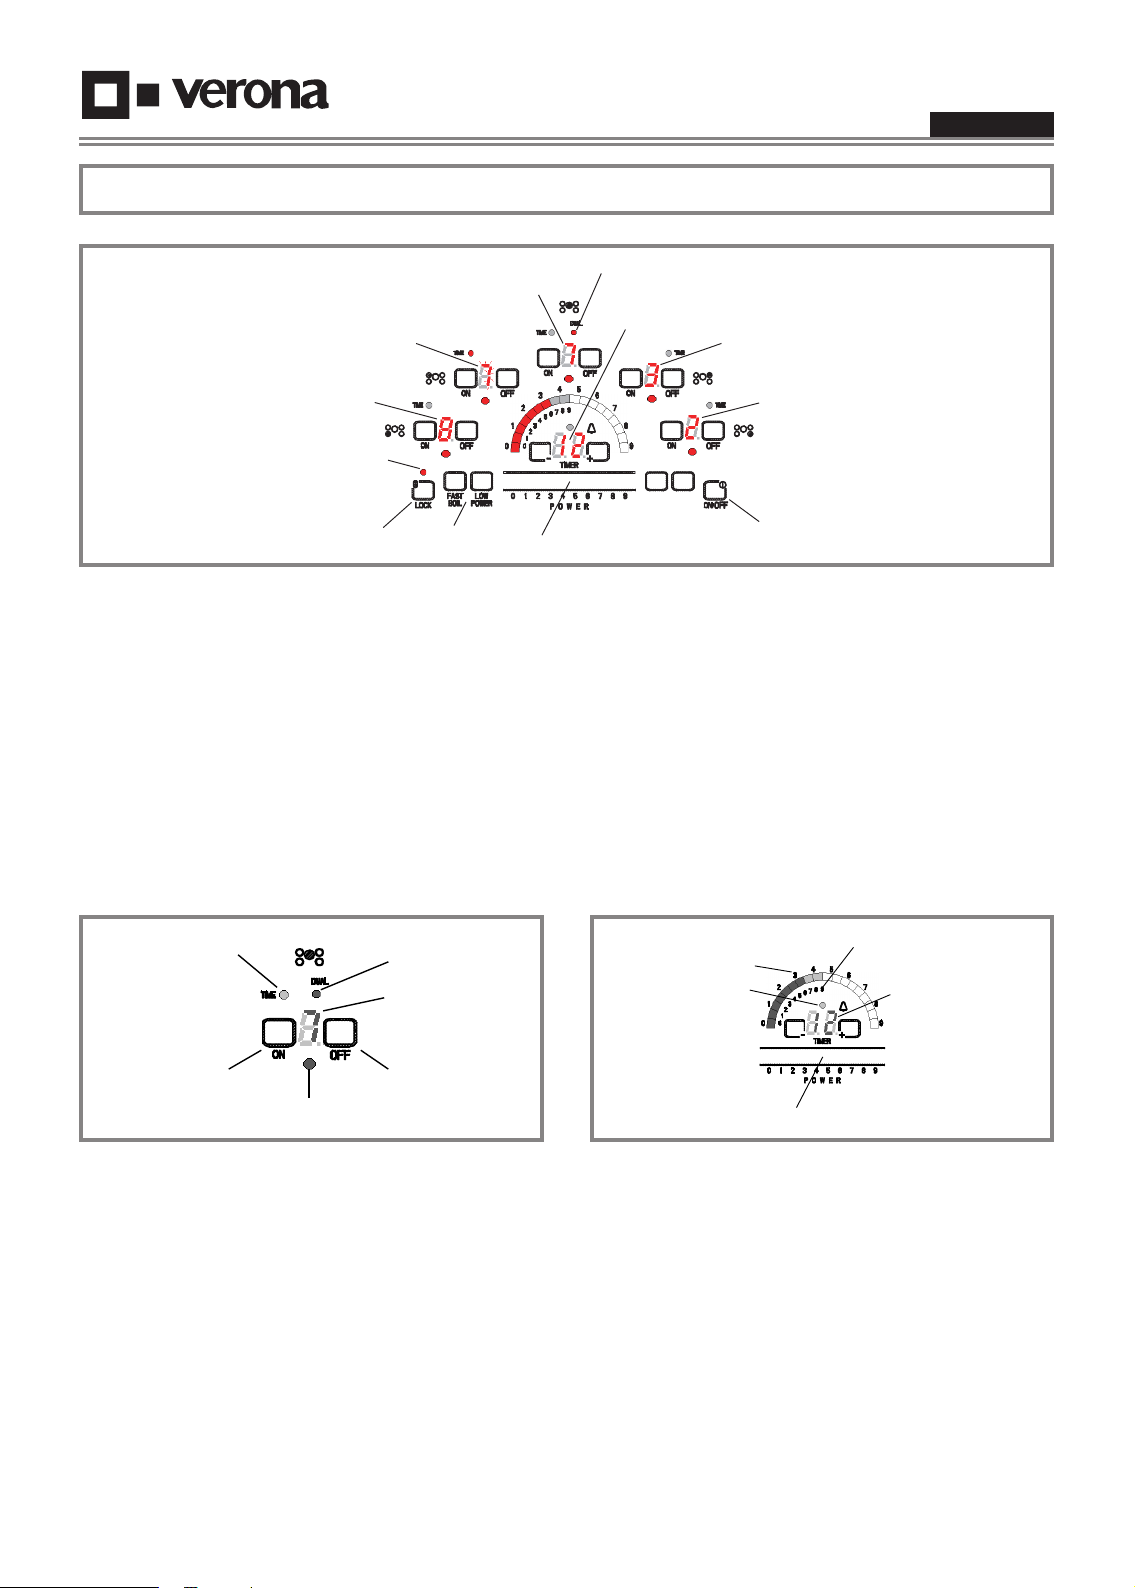
Touch Control details (Full options)
4
8
12
6b
6
Use & Care Manual
ENGLISH
5
3
2
Figure. 2
Position 1 - Main ON/OFF cooktop key.
Position 2 - Command lock key - child proof.
Position 3 - Commands lock indicator.
Position 4 - ON/OFF keys and power level display, for
front left cooking zone.
Position 5 - ON/OFF keys and power level display, for
rear left cooking zone.
Position 6 - ON/OFF keys and power level display, for
central dual cooking zone.
Position 6b - Dual element enable indication.
10
9
11
7
1
Position 7 - ON/OFF keys and power level display, for
rear right cooking zone.
Position 8 - ON/OFF keys and power level display, for
front right cooking zone.
Position 9 - Special functions keys.
Position 10 - “Peacock Tail” for dual range power level.
Position 11 - Timer.
Position 12 - Slide bar for power level setting.
5
1
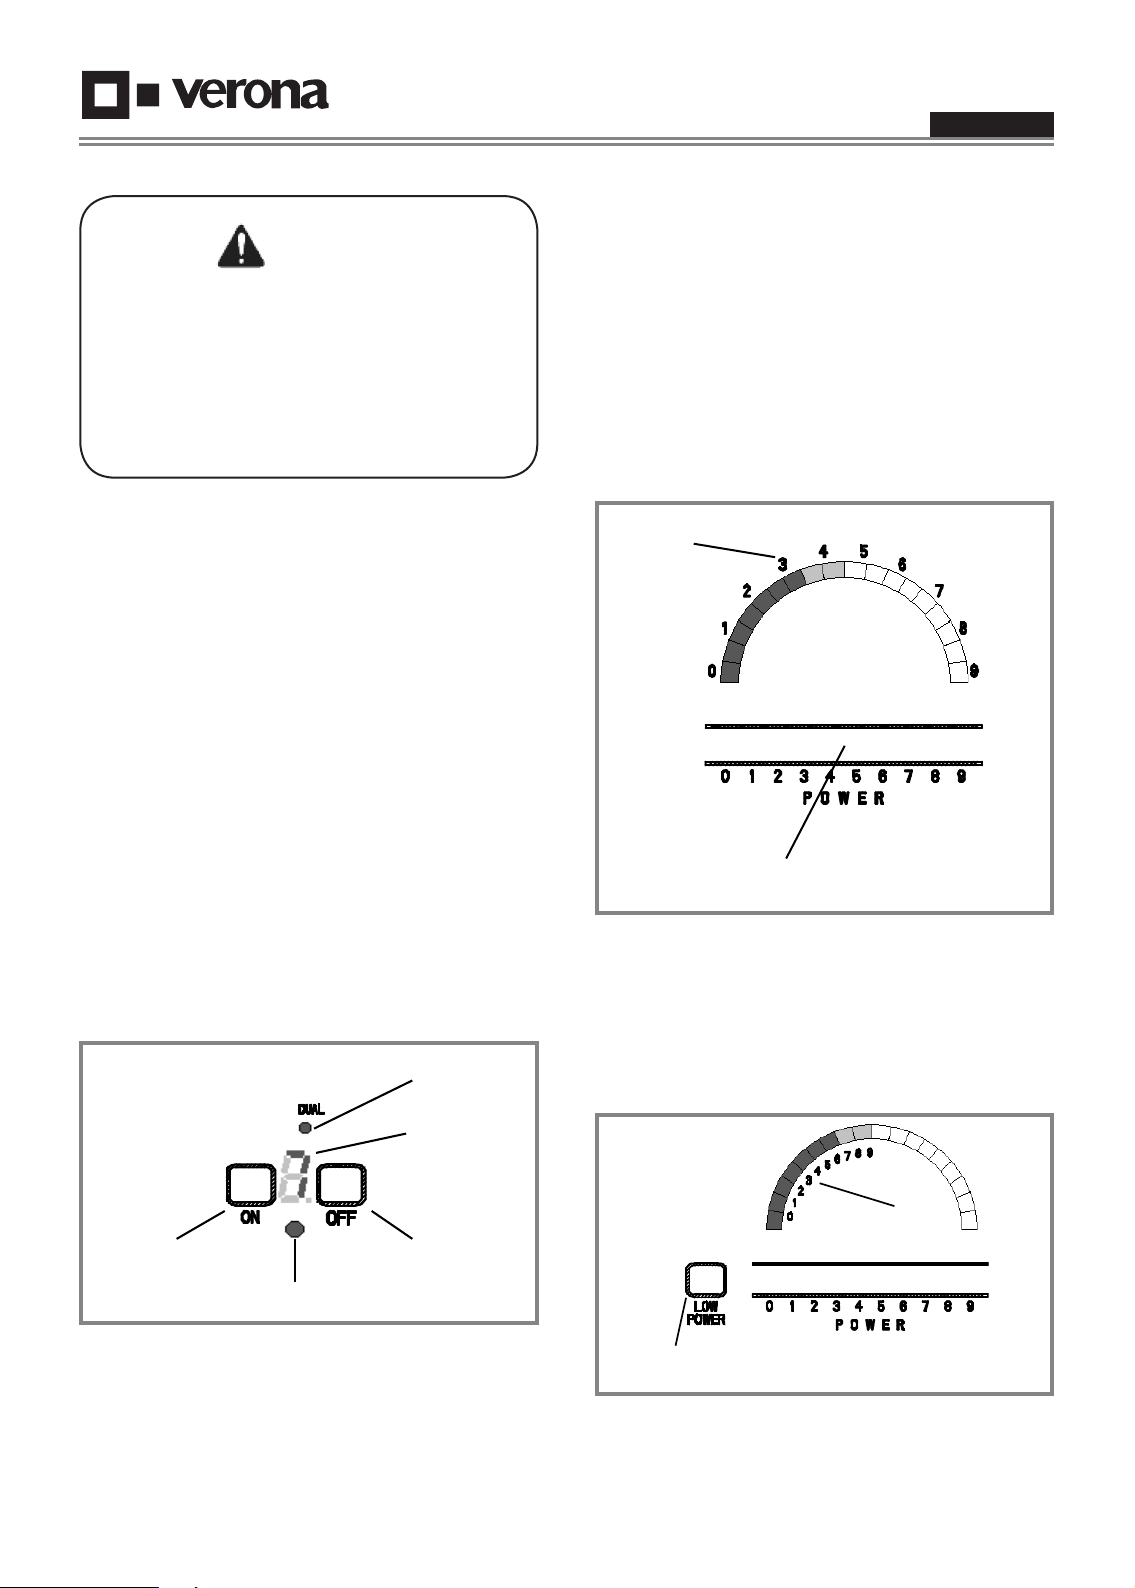
Figure. 3
Position 1 - OFF key for the related zone.
Position 2 - ON/SELECTION key for the related zone.
Position 3 - HOT indication (zone active or residual
heat).
Position 4 - Power level display.
Position 5 - Extension enabled (dual circuit).
Position 6 - Active timer on the related.
3
Figure. 4
Position 1 - Slide Bar to set the power level.
Position 2 - Low range power scale (0 to 15%),
internal.
Position 3 - Full range power scale (0 to 100%),
external.
Position 4 - Egg Timer (minute minder) active.
Position 5 - Timer display and keys.
7
Page 8

Touch Control Characteristics for every model
VECTIM365 (Approval code 812V50IQ or 812V50NQ)
● Slide bar for power level setting.
● Dual range power scale (Full & Low Temperature).
● Egg timer (independent from any zone).
● 5 independent timers, one per cooking zone.
● Fast Boiling function.
● N°5 cooking zone.
● Main ON/OFF key and LOCK key.
Use & Care Manual
ENGLISH
VECTIM304 (Approval code 812T40IP or 812T40NP)
● Slide bar for power level setting.
● Dual range power scale (Full & Low Temperature).
● Egg timer (independent from any zone).
● 4 independent timers, one per cooking zone.
● Fast Boiling function.
● N°4 cooking zone.
● Main ON/OFF key and LOCK key.
8
Page 9
Advice on cooking
Use & Care Manual
ENGLISH
Some traditional methods of cooking, such as double
boiler (bain-marie) for creams, sauces, chocolate, etc.
are no longer necessary, because now you can cook
these directly in the
pan, thanks to perfect power regulation and even
temperature distribution of the induction system.
You can use the “Booster” function with water and
soups until they boil, then use a lower level immediately
to avoid too much steam and to save energy.
When frying heat the oil to the highest power level, then
turn down if needed to a medium level when adding
food to the pan.
Always use pots and pans with a proper lid.
Reduce the selected power in the cooking area in time,
in the case of water do not let it boil unnecessarily for
too long.
Always choose containers of an adequate size for the
amount of food to be cooked. A large pot which is not
completely full consumes a lot of energy.
For the best cooking results, metal pots and pans with
a at bottom are recommended. Make sure the bottom
of the pan corresponds with the cooking area indicated
on the glass.
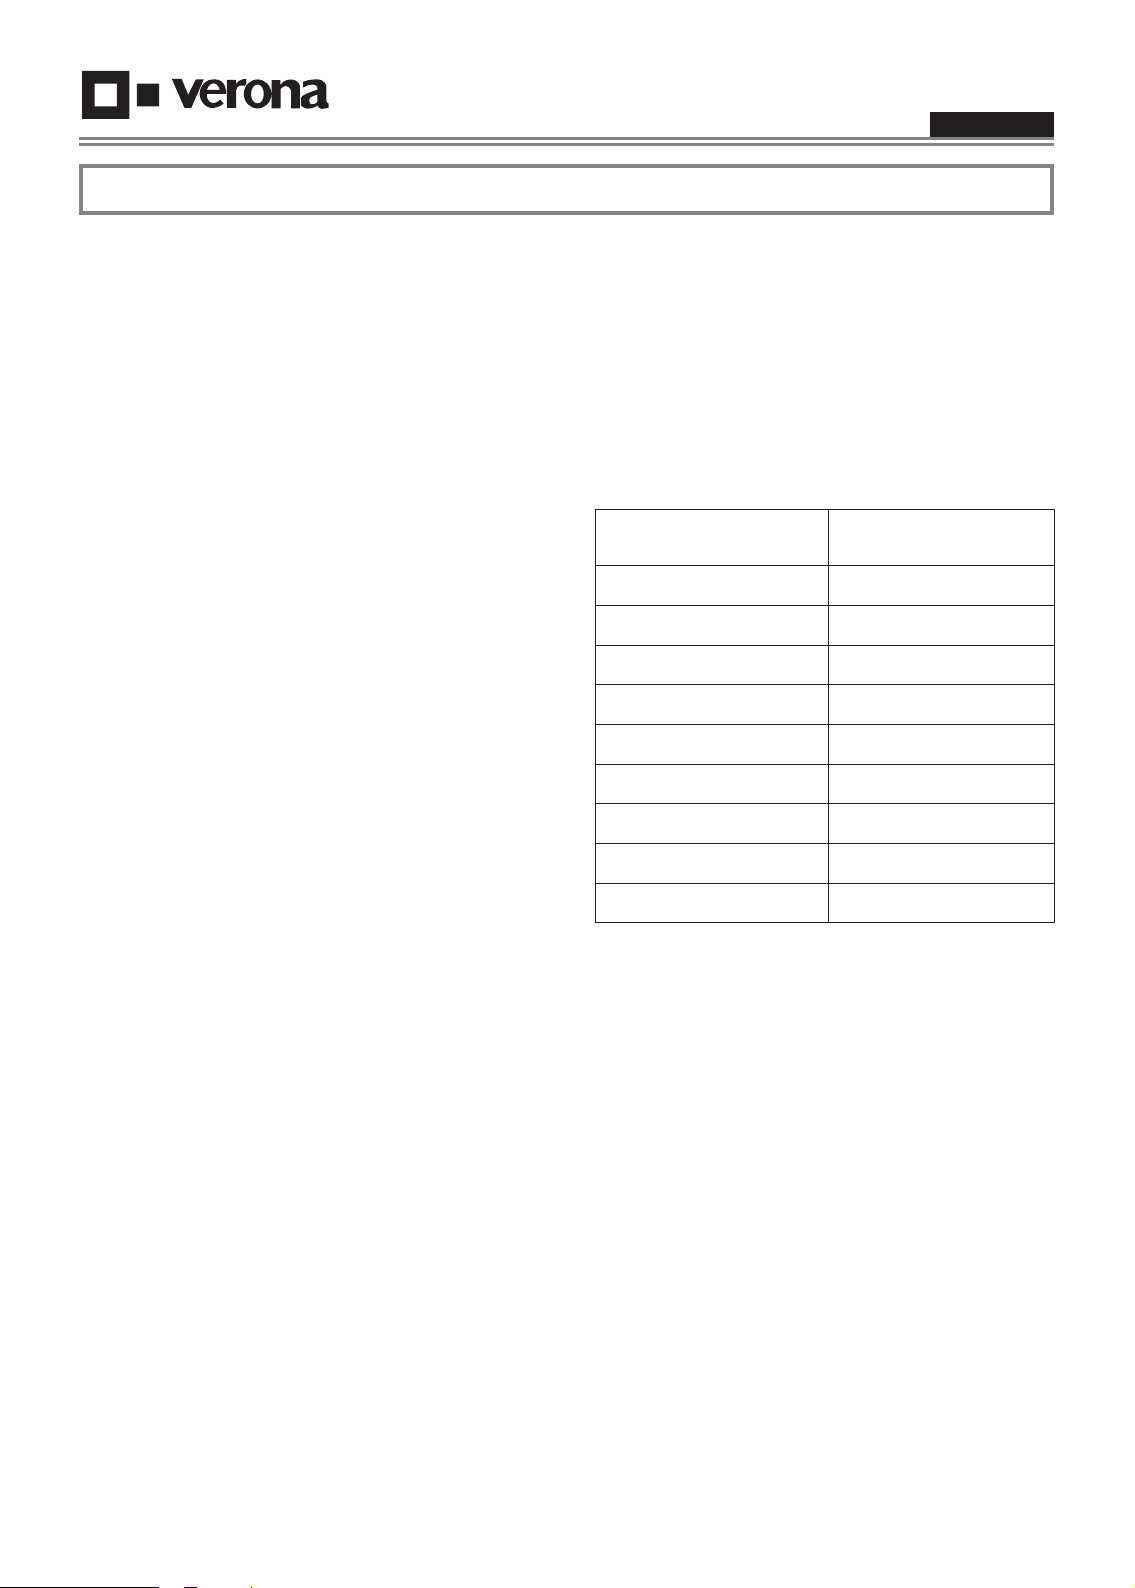
Low Temperature Function
Low temperature function allows a low-temperature
cooking, such as melting butter or chocolate, making
sauces or long slow simmers. This function consists of
nine power levels that provides a range of temperatures
for melting or even boiling. Working in this mode,
cooktop provides a temperature control that can keep
the heater above the glass at any of the temperature
shown in table below.
Power Level Temperature °F (°C)
1 120 (50)
2 140 60)
3 160 (70)
4 175 (80)
5 195 (90)
6 210 (100)
7 230 (110)
8 250 (120)
9 265 (130)
To save energy cook vegetables and potatoes in a small
amount of water. Do not heat empty pans otherwise
they may be damaged and can also ruin the glass
cooking area.
The following table gives you some examples of
cooking methods, these levels may vary depending on
the type of container, weight or food.
Setting Recommended Use
All the settings described in the following table are
recommended. The values in the table represent
indicative settings, given that the actual values may
depend on:
• Type and quality of the pan.
• Type, quantity and temperature of the food.
• Element used and individual preferences.
9
Page 10
Use & Care Manual
5a
2
3
7
6
8
ENGLISH
CONTROL INSTRUCTIONS FOR USE
WARNING
This touch control works using optical light sensing
technology. When rst connecting electrically or
after a power failure, any direct strong light over the
sensor area may affect the touch control functionality.
When powering on the unit make sure that no strong
light is shining direct over the touch control zone,
it can compromise the start-up sensor calibration
resulting in an unresponsive touch control.
When the cooktop is connected to the electrical voltage
supply all lights and digits turn on to indicate a proper
activation. This operation will be completed after few
seconds, the control turns off automatically. Now the
cooktop is ready for operations.
Switching the control on
Eventually hold the [LOCK] key in case the commands
are locked (see that the lock led is on and turns off after
a few seconds).
The display (ref.4) and the “Peacock Tail” (ref.6) show
the power level, updated in real time.
After a 5 seconds time-out the value is accepted, the
HOT SURFACE led (ref.3) stops ashing and gets
steady. The “Peacock Tail” disappears after some
seconds more.
Touch [ON] key to conrm the value before the time-out
expires.
The following picture represents the Full Power Scale
whereas the control uses all the available power range,
from 0% up to the 100% corresponding to level 9.
Level 4 corresponds to 15% of the available power.
Touch the main [ON/OFF] key in order to make each
single zone available for selection.
All the displays show power level “0”, if no actions are
performed the control shuts down again after about 10
seconds.
Elements setting
Touch the proper [ON] key (ref.2) in order to select the
desired zone: the HOT SURFACE (ref.3) indication
starts ashing, waiting for a user input.
4
1
Figure. 6
Figure. 7
Using the Low Power Scale
Once a cooking zone has been selected, touch the
[LOW TEMP] key (ref.8) in order to enable the Low
Power Scale (ref.9) then set the power level in the
usual way.
9
Touch the slide bar to set the power level (levels 0 to
9 are available), moving the nger along it or directly
touching the desired value.
10
Figure. 8
Page 11
Use & Care Manual
1
2
3
ENGLISH
The control uses only the 15% of the available power,
divided in 0 to 9 steps with a better accuracy.
Keep in mind that power level 9 in this special mode
correspond exactly to level 4 in the standard range.
Select the zone and touch the [LOW TEMP] key again
in order to disable the Low Power Scale and restore the
standard one, without switching off the zone.
Pay attention: the level remains the same but the
power increases.
Switching off a cooking zone as described below
disables the Low Power mode. When the zone will be
selected again it will start to work in the standard power
mode.
Switching an element off
Touch the related [OFF] key (ref.1) in order to stop a
heating element.
You may turn off all active elements at the same time by
touching the main [ON/OFF] key.
Dual element activation (36” only)
Select a double heating area touching the related
[ON] key, the HOT SURFACE led (ref.3) begins to
ash.
The external element is automatically actuated only
if the diameter of the pan is a little bit larger than the
inner circle.
The dual element enabling indication (ref.5a) is on
when the element is enabled, is off when the element
is disabled.
only for some minutes then it gets back to the selected
power level.
This option is available for all the cooking zones, both
standard, both special ones (multiple zones).
Key Lock function
The key lock function is activated or deactivated holding
the [LOCK] key for 2 seconds. The lock indication turns
on, the keyboard is locked. Of course, the [LOCK] key
itself is always enabled.
The keys are automatically locked at start-up.
The locking function can be activated regardless of the
heaters condition (working or not). The key lock function
locks all the keys but the [OFF] ones. Also the general
[ON/OFF] key remains active for the off function.
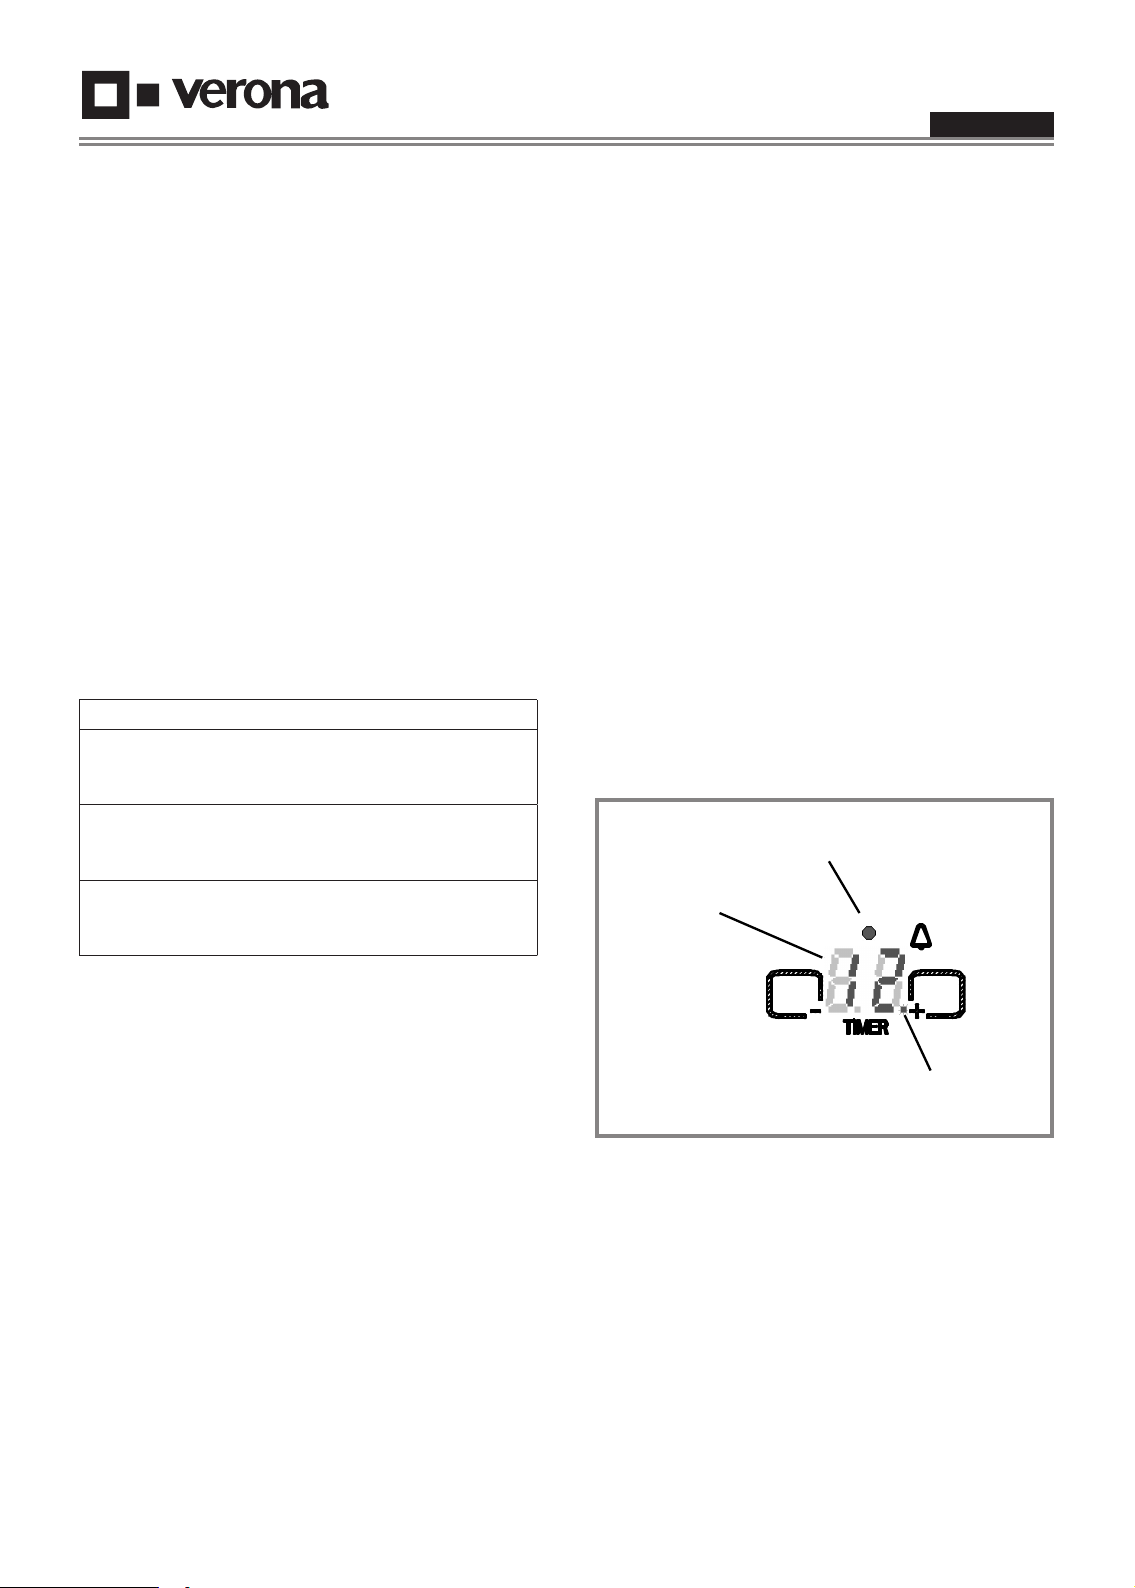
Setting the timer
It works as a minute minder and it doesn’t stop any
heating element.
The timer is available in some models only. It can be set
independently from the heating element, even if there
aren’t any working zones. If the cooktop is not working,
touch rst the main [ON/OFF] key to enter stand-by
mode, with all displays showing “0”.
Hot surface indicator light
Each element has a HOT SURFACE indicator light
(ref.3) to show when the cooking area is hot.
This indication turns on when the zone is activated and
remains ON until the cooking area has cooled down to
a “safe to touch” temperature (approximately 150°F).
If a hot surface light is ON use caution when working
around the cooktop as it is still hot.
Fast Boil (Booster) function
Once a heating element has been selected, touch the
[FAST BOIL] key to enable/disable this function, before
or after setting the power level.
A beep sounds and the heater display shows the
selected power level and a “P” alternatively. The
“Peacock Tail” shows the selected power level.
The heater works using some extra power available
Figure. 9
Touch [T-] or [T+] keys to set the timer: the initial value
starts from “00” or “45” respectively on the timer display
(ref.1). Hold the key in order to fasten the increase/
decrease speed. The maximum value is “99”.
The timer led (ref.2) indicates whether the timer is
running.
The dot in the lower right corner of the display (ref.3) is
ashing when the timer has been selected in order to
change its value. After 5 seconds since the last touch
the new value is accepted and the dot disappears.
11
Page 12
Use & Care Manual
4
ENGLISH
A beep conrms that the new value was accepted
correctly.
To cancel the timer, hold [T-] key until the value decrease
to “00” or touch both [T-] and [T+] simultaneously in
order to reset the value to “00” rapidly.
In some models the timer can be set in relation with a
cooking zone:
• Select the cooking zone you want to time.
• Touch [T-] or [T+], the timer led related to the zone
starts ashing.
• Set the timer value.
• The timer led gets steady, the value is accepted and
the countdown begins.
If more than one timer is set, the display shows the
lowest value, the one that will expire rst. The timer led
(ref.4) related to the zone which the displayed value is
referring to, is ashing. If the displayed value refers to
the independent timer, the timer led (ref.2) ashes.
WARNING: the timer is only intended as an acoustic
advisor that recalls the attention of the user.
Timers have no effect on the heating elements. The
cooking zone must always be stopped manually by
touching the related [OFF] key.
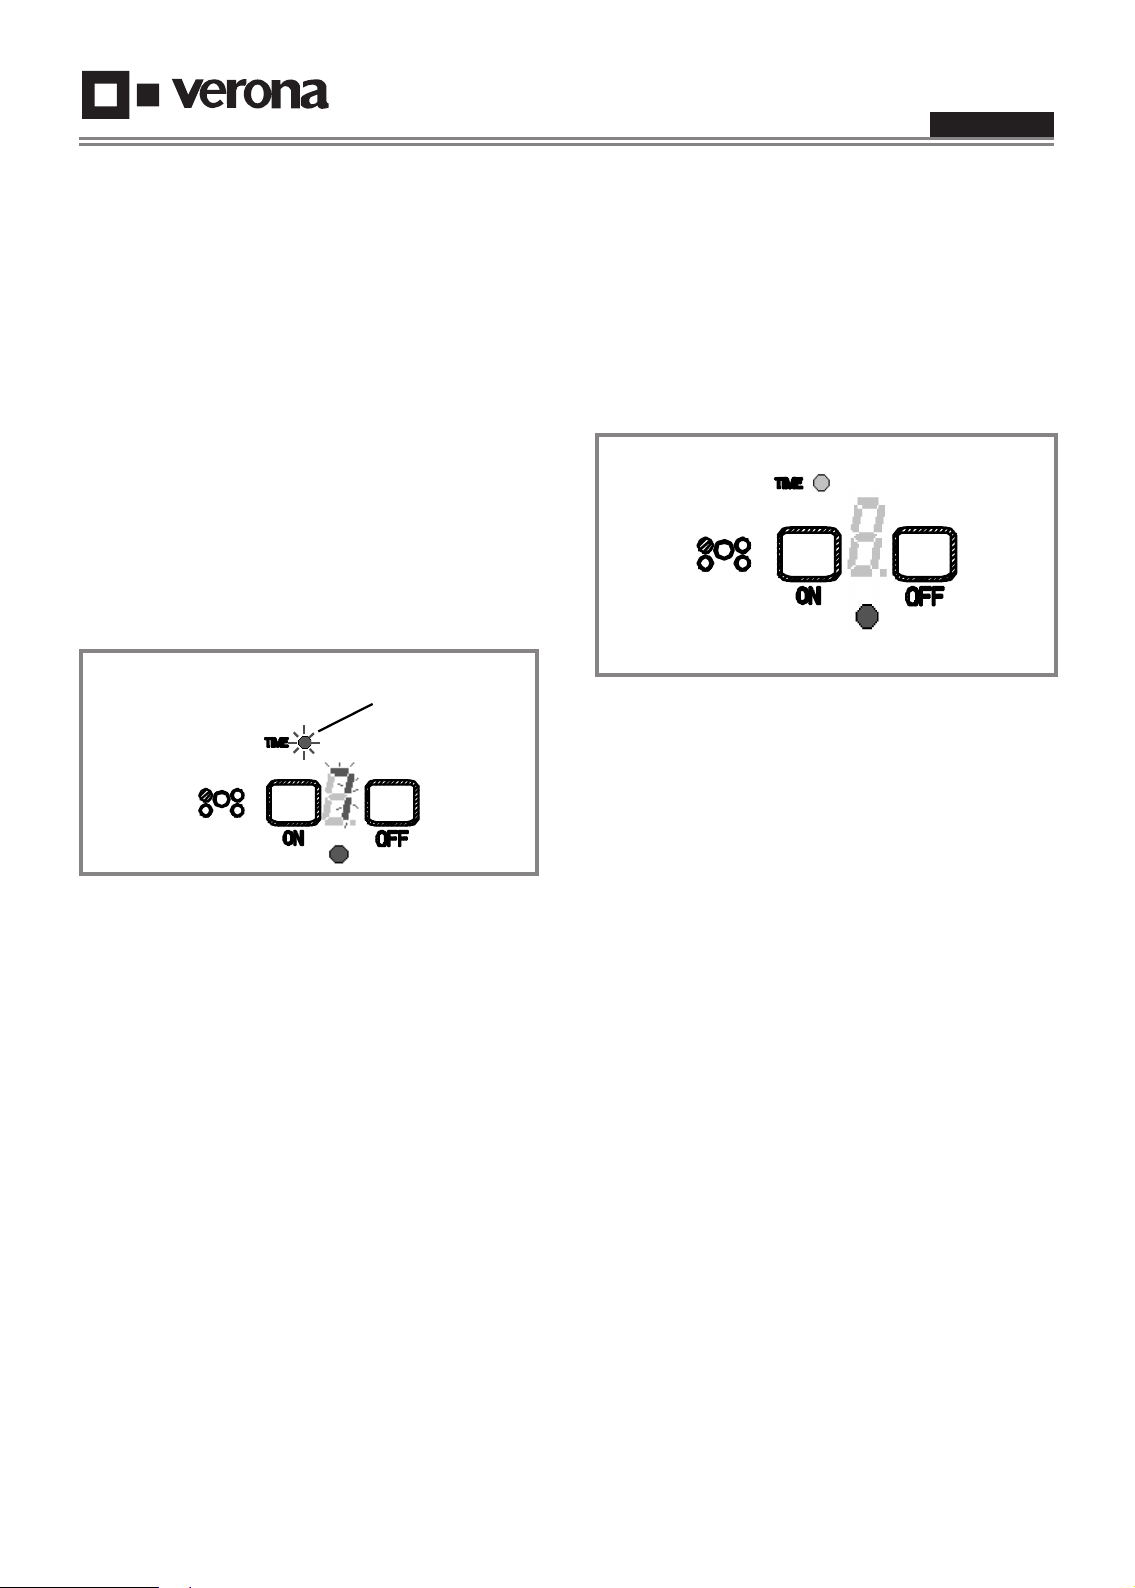
Rest Heat
The HOT SURFACE indicators remain on even after
the end of the cooking activity, just the necessary time
to let the surface cool down below a safety value.
Figure. 11
The residual heat time depends on the power level that
was set on the cooking zone and the time the heating
element has been working for.
Figure. 10
To check the remaining time for any one of the timed
zone, touch the [ON] key related to the zone: the
corresponding timer led will begin to ash and the value
on the timer display will switch for some seconds to the
new value. After a time-out, it will switch back to the
shortest one.
To check the independent timer value when it’s not
displayed with the highest priority, touch [T-] or [T+] when
no zones are selected. The timer led (ref.4) ashes and
the displayed value switches to the independent timer.
When the timer value elapses:
• An end of activity beep sequence sounds: three short
beeps followed by a long interval are repeated for 1
minute.
• The led indicator related to the elapsed timer ashes.
• The timer value “00” ashes too and will continue to
ash waiting for a user conrmation.
• Touch [T-] or [T+] to cancel the expired timer, the
display switches to the next shortest timer or gets
blank if there aren’t any other timer set.
For example, a cooking zone that has been working for
more than 5 minutes at full power will take half an hour
to cool down before the Residual Heat indication fades
away. At level 1 it will take about 10 minutes.
Features
The control is checking its own ambient temperature
and stops any activity in case of overheating of inner
parts. Let the appliance cool down.
12
Page 13
Use & Care Manual
ENGLISH
Induction Cooktop Operation
BEFORE USING THE COOKTOP FOR
THE FIRST TIME
All products are wiped clean with solvents at the
factory to remove any visible signs of dirt, oil, and
grease which may have remained from the
manufacturing process.
If present, remove all packing and literature from
the cooktop surface.
Clean your glass top before the first time you use
it. A thorough cleaning with a glass top cleaner is
recommended. It only takes a minute and puts a
clean, shiny coating on the glass top before its
initial use.
There may be a slight odour during the first
several uses: this is normal and will disappear.
Fig. 12a
4 burner cooktops with right and left side (2) induction
generators.
Optimum cooking result depends on the proper
cookware being selected and used.
The cooking surface will hold the heat and
remain hot over 20 minutes after the elements
have been turned off.
The glass ceramic cooking surface is a durable
material resistant to impact but not unbreakable if
a pan or other object is dropped on it.
Do nor allow pans to boil dry. This can damage
the pan, element and /or cooktop.
Do not slide cookware across cooking surface it
may scratch the glass
Using cast iron cookware on the glass cooktop Is
not recommended. Cast iron retains heat and
may result in cooktop damage.
Power Sharing
Four burner cooktops are divided into two separate
heating zones.
Five burner cooktops are divided into 3 zones.
One generator controls 2 elements, or two cooking zones
within a heating section share the power of one generator.
Power Sharing is activated when both elements in the
same cooking zone are activated and one element is set for
Boost (P). The element that is not set for Boost will change
to a lower power level. This is called Power Sharing.
Fig. 12b
5 burner cooktops with right, left and center (3) induction
generators.
Cookware “noise”
When using adjacent elements that are set at certain power level settings, magnetic fields may interact and produce a low whistle
or intermitted “hum”. Pans that completely cover the element ring will produce less noise. A low “humming” noise is normal
particularly on high settings. These noises can be reduced or eliminated by lowering or raising the power level settings of one or
both of the elements.
13
Page 14
Cookware
Use & Care Manual
ENGLISH
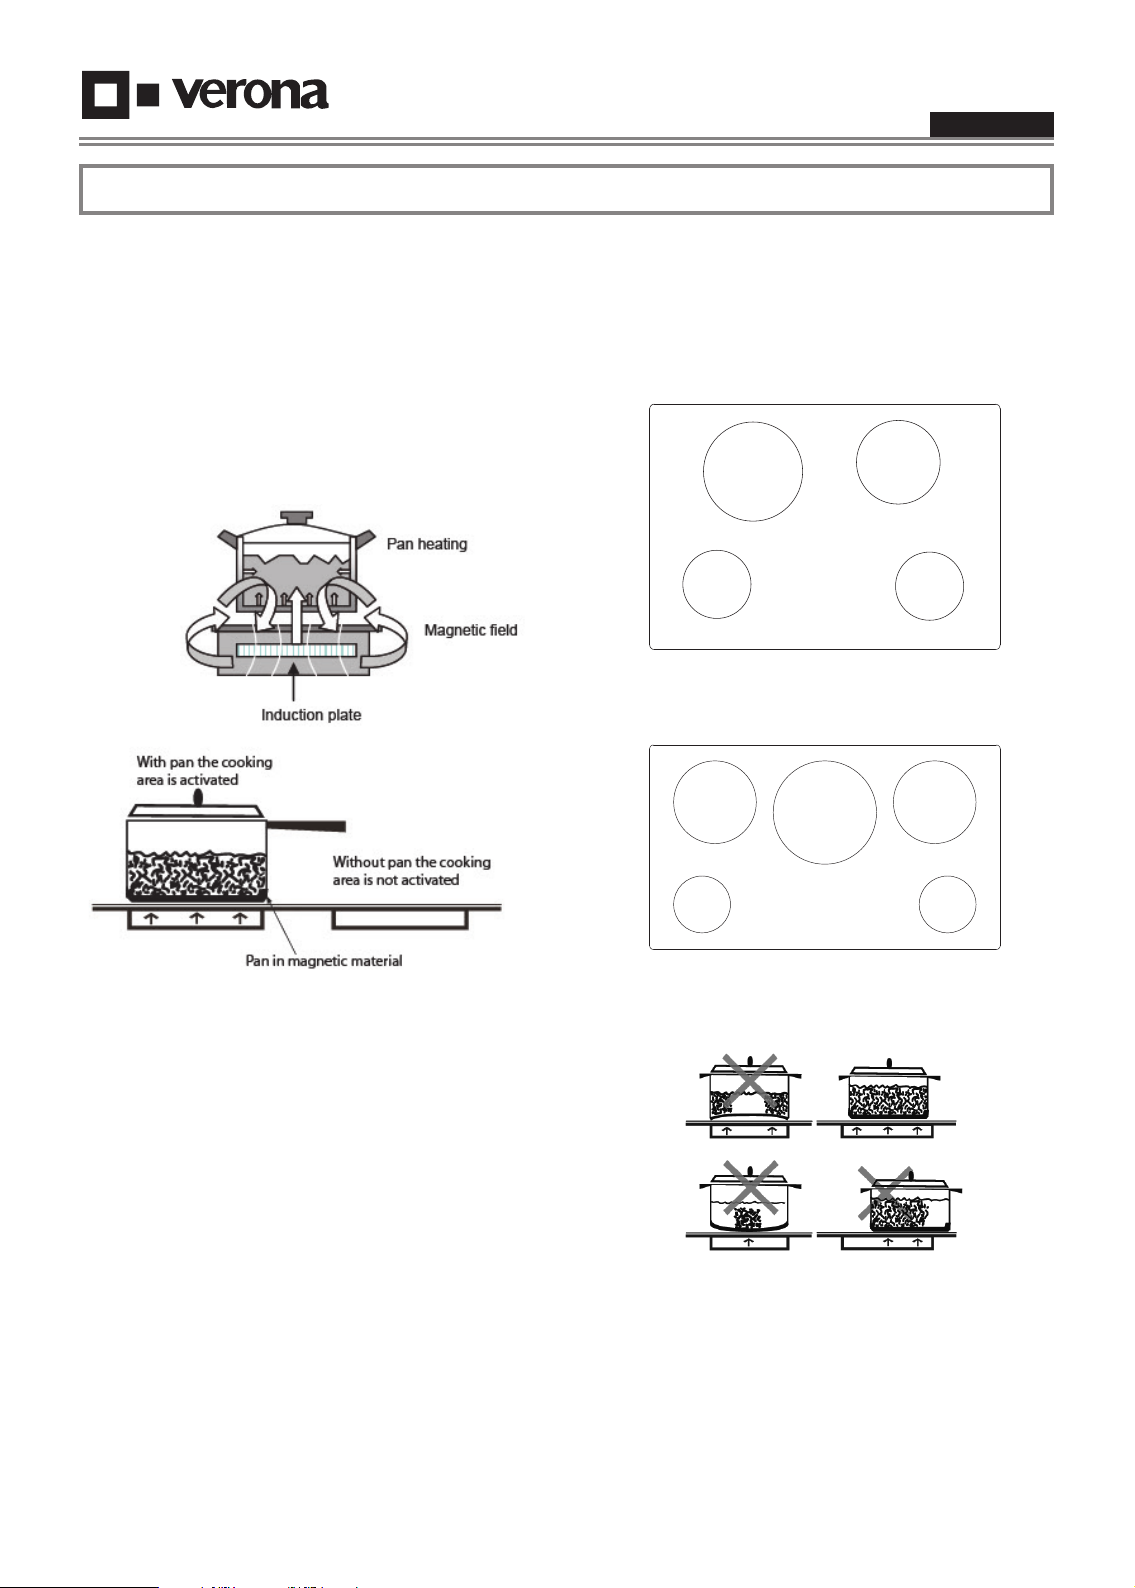
How INDUCTION heating works
There is an electronic circuit inside the induction hob
which powers and commands a coil. This creates
a magnetic eld which activates when it comes
into contact with suitable pots and pans (magnetic
material).
The pan on the hob warms up instantly, while the hob
remains cold.
There is no loss of heat. The heat generated in the pan
lets you cook quickly, saving time and energy..
Some models of hob have a double area: automatic
recognition of the pan will determine whether the
external area is used or not.
In some cooking areas an internal diameter is indicated,
with a lighter outline.
5 1/8”(13 cm)
3 1/8”(8 cm)
minimum
diameter
pan size
minimum
diameter
pan size
4”(10 cm)
minimum
diameter
pan size
3 1/8”(8 cm)
minimum
diameter
pan size
Figure 14a
30” Wide Cooktop. Use the minimum size pan shown
for each cooking element.
8-1/4”(21 cm)
minimum
diameter
pan size
4-1/4”(11 cm)
minimum
diameter
pan size
8-1/4”(21 cm)
minimum
diameter
pan size
Figure 13
Pots and pans and how to use them.
Attention!
The pots and pans that can be used on this hob must
be made of ferromagnetic material. They can be made
of enameled steel, cast iron or special pans of stainless
steel for
induction.
To make sure a pan is suitable, try using a magnet
to see if it sticks to the bottom of the pan. Never use
normal thin steel nor anything containing even just an
amount of glass, terracotta, copper or aluminium.
The display of the cooking area will show if the pan is
suitable, if the power Indicator ashes the pan is not
suitable or the diameter of the bottom is too small for
the diameter of the cooking area.
The pots and pans must be placed precisely in the
middle of the cooking area.
4-1/4”(11 cm)
minimum
diameter
pan size
4-1/4”(11 cm)
minimum
diameter
pan size
Fig 14b
36” Wide Cooktop. Use the minimum size pan shown
for each cooking element.
Figure 15
14
Page 15
Cleaning the Cooktop
CAUTION
Be sure electrical power is off and all surfaces are
cool before cleaning any part of the cooktop.
Apply a small amount of cooktop cleaning specific
ceramic crème on a daily basis. this provides a
protective film that makes it easy to remove water
spots or food spatters. The temperature of the cooking
surface reduces the protective qualities of this
cleaner.
It must be reapplied before each use. Use a clean
cloth and apply cooktop cleaning crème before each
use to remove dust or metal marks that can occur on
the counter level surface between uses.
Use & Care Manual
ENGLISH
USE DAILY
Wipe off spatters with a clean, damp cloth; use white
vinegar if smudge remains; rinse.
Apply a small amount of the Cooktop Cleaning
Crème.
When dry, buff surface with a clean paper towel or
cloth.
CAUTION
Do not use any kind of cleaner on the glass while the
surface is hot; use only the razor blade scraper. The
resulting fumes can be hazardous to your health.
Heating the cleaner can chemically attack and
damage the surface.
FRAME
(Stainless steel models)
Always wipe with the grain when cleaning. For
moderate/ heavy soil, use BonAmi
®
or Soft Scrub® (no
bleach).
Wipe using a damp sponge or cloth, rinse and dry.
DAILY CLEANING TECHNIQUES
Clean the surface when it is completely cool with the
following exception.
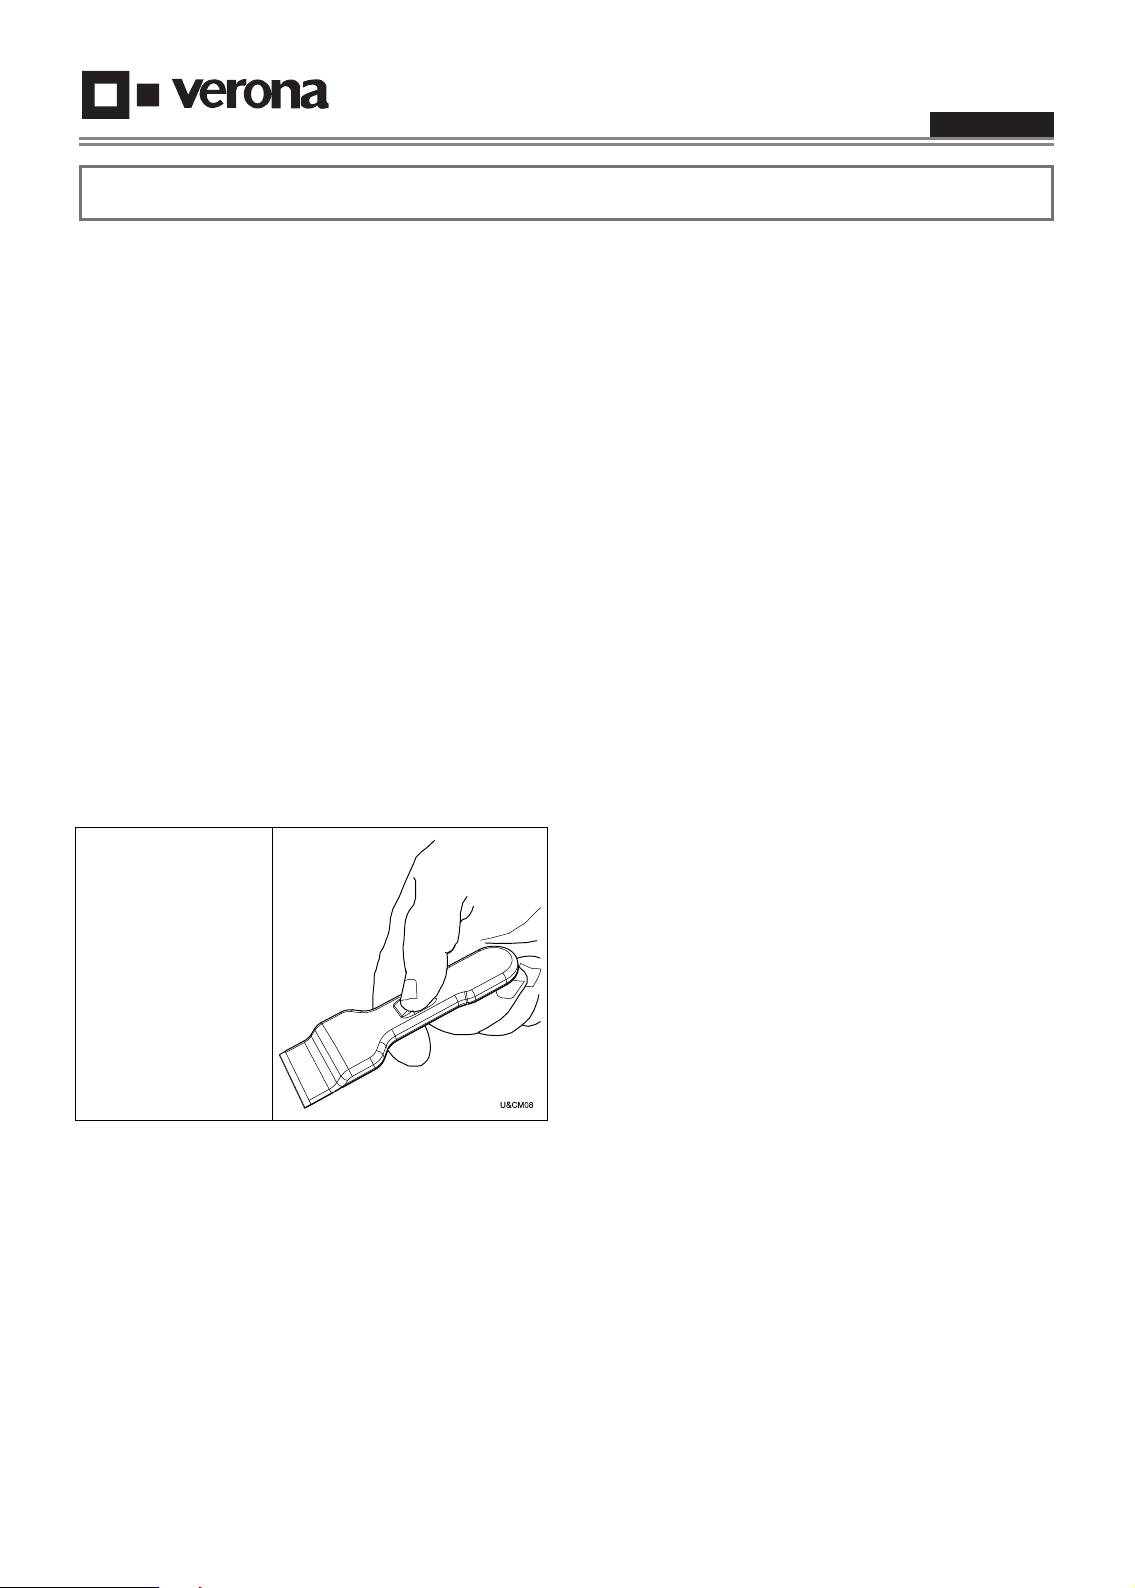
Remove these soils
immediately with the
razor blade scraper:
Dry Sugar
Sugar Syrup
Tomato Products
Milk
RECOMMENDED CLEANERS
Cooktop Cleaning Crème:
Use only a small amount; apply to a clean paper towel
or cloth. Wipe on the surface and buff with a clean dry
towel.
BonAmi
Rinse and dry.
Soft Scrub
®
:
®
(without bleach):
Rinse and dry.
White Vinegar:
Rinse and dry.
Razor blade scraper
Packaged with cooktop.
Note: The recommended cleaners indicate a type of
cleaner and do not constitute an endorsement.
AVOID THESE CLEANERS
Glass cleaners which contain ammoniac or
chlorine bleach
These ingredients may permanently etch or stain the
cooktop.
Caustic Cleaners
Oven cleaners such as Easy Off
cooktop surface.
Abrasive Cleaners
Metal scouring pads and scrub sponges such as
Scotch Brite® can scratch and / or leave metal marks.
Soap-filled scouring pads such as SOS
the surface.
Powdery cleaners
Containing chlorine bleach can permanently stain the
cooktop.
Flammable cleaners
Such as lighter fluid or WD-40.
®
may etch the
®
can scratch
15
Page 16

Use & Care Manual
ENGLISH
Troubleshooting
Problem
Cause
Possible Remedy
Nothing works
Heating elements do not heat
properly
Glass ceramic surface is seethrough or appears to be red
in color.
Lock Key blocked after rst
connecting or unresponsive
touch control.
Cooktop not connected to proper
electrical circuit.
Fuse is blown or circuit breaker is tripped.
No electricity to the cooktop.
Cooktop is in lockout mode.
Improper cookware is being used.
Under direct or bright lighting, you will
sometimes be able to see through the
glass and into the chassis due to its
transparent quality. You may also notice a
red tint under these conditions
When rst connecting electrically or
after a power failure, any direct strong
light over the sensor area may affect the
touch control functionality.
Have electrician verify that the proper
rated cooktop voltage is being supplied
to the cooktop. Have electrician replace
fuse or reset circuit breaker.
Have electrician check your power
supply.
Unlock cooktop.
Select proper cookware as outlined in
the Cooktop Operation section of this
manual.
These are normal properties of black
ceramic glass panels.
When powering on the unit make sure
that no strong light is shining
direct over the touch control zone, it
can compromise the start-up sensor
calibration resulting in an unresponsive
touch control.
16
Page 17

Use & Care Manual
ENGLISH
Failures declarations
The control is managing an error detection system, mainly the checking the functionality of the electronics itself
(keyboard functionality, ambient light conditions, communication between the two boards and the working temperature
of the control).
As soon as a failure is detected, the control stops all the heating elements and declares the error code, showing on
the proper display “F” and a second letter alternatively in order to identify the fault cause (see the table below).
FA, FC
FE, Ft
Fc
Fr
FH
FJ
F0
FL
FU
Fd
Fb
F5
FP
“Fc” Allow the cooktop cool down.
“FA,FC,FJ,FL,FU,Fb” In case of keyboard or key errors, be sure that no objects, dirt or uids are overlapping
the commands. Try to remove the power and the restore it. If the problem persist call service.
In case of other control errors, remove and the restore the mains power. If the problem persist call service.
Key Error
Temperature sensor failure
Over temperature
Relay Error
Control error (EEPROM)
Key Error
Software Error
Keyboard Error (Ambient Light)
Key Error
Led On/Off Test Error
Keyboard Error
Communication Error
Cooling fan Error
F1
F2
F7
F3
F4
F8
F6
F9
Induction Heater Ntc Error
Induction Heater Ntc Error
Induction Heater Ntc Error
Induction Ntc Error
Induction Ntc Error
Induction Ntc Error
Induction Error
Induction Error
Assistance or Service
Before calling for assistance or service, please check
"Troubleshooting." It may save you the cost of a
service call.
If you still need help, follow the instructions below.
When calling, please know the purchase date and the
complete model and serial number of your appliance.
This information will help us to better respond to your
request.
Service Data Record
The location of the serial tag is below the cooktop
box. Now is a good time to write this information in
the space provided below. Keep your invoice for
warranty validation.
Model Number _____________________
Serial Number ______________________
Date of Installation or Occupancy ______________
17
Page 18

Manuel d’utilisation et d’entretien
BIEN LIRE CES INSTRUCTIONS ET LES
CONSERVER.
AVERTISSEMENTS POUR
L’INSTALLATION ELECTRIQUE
AVERTISSEMENT
L’installation et l’entretien de l’appareil doivent
être exécutés par un installateur qualifié ou un
bureau technique.
Les modèles peuvent être actionnés
à 240V ou à 208V.
ATTENTION
Toujours débrancher la prise électrique de
l’appareil avant de commencer les opérations
d’entretien.
Pour des raisons de sécurité personnelle, cet
appareil doit être mis à la terre correctement.
Il ne faut en aucun cas couper ou enlever le
troisième fil (terre) du câble électrique.
BIEN LIRE CES INSTRUCTIONS ET LES
Table des matieres
AVERTISSEMENTS POUR L’INSTALLATION
ELECTRIQUE ......................................................... 18
Précaution de Sécurité .......................................... 19
SECURITE DE LA TABLE DE CUISSON ................. 19
SECURITE PERSONNELLE ................................... 20
Modèles et nomenclature des pièces ................... 21
Boutons de commande par efeurement
Vue détaillée (toutes options) ................................ 22
Boutons de commande/Caractéristiques
des différents modèles .......................................... 23
Conseils pour la cuisson ....................................... 24
Valeurs de réglage recommandées .......................... 24
Fonction basses températures ................................. 24
MODE D’EMPLOI ................................................... 25
Allumer le panneau de commande ........................... 25
Réglage des éléments .............................................. 25
Utilisation de la gamme de puissance réduite .......... 25
Éteindre un élément ................................................. 26
Voyant indicateur surface très chaude ...................... 26
Fonction cuisson rapide (booster) ............................ 26
Fonction de verrouillage des touches ....................... 26
Réglage de la minuterie ............................................ 26
Chaleur de veille ....................................................... 27
Caractéristiques ...................................................... 27
Fonctionnement de la table de cuisson à induction
AVANT D’UTILISER LA TABLE DE CUISSON POUR
LA PREMIERE FOIS ................................................ 28
Cookware ................................................................ 29
Comment fonctionne le chauffage à induction .......... 29
Utilisation des casseroles ......................................... 29
Nettoyage de la Table de Cuisson ......................... 30
PANNES .................................................................. 31
Indications d’erreur ................................................... 32
Assistance ou Service Après-Vente ..................... 32
Veuillez prêter attention à ces symboles que vous
rencontrerez dans ce manuel:
Page
28
CONSERVER.
AVERTISSEMENTS POUR
L’INSTALLATION ELECTRIQUE
FRANÇAIS
AVERTISSEMENT
L’installation et l’entretien de l’appareil doivent
être exécutés par un installateur qualifié ou un
bureau technique.
Les modèles peuvent être actionnés
à 240V ou à 208V.
ATTENTION
Toujours débrancher la prise électrique de
l’appareil avant de commencer les opérations
d’entretien.
Pour des raisons de sécurité personnelle, cet
appareil doit être mis à la terre correctement.
Il ne faut en aucun cas couper ou enlever le
troisième fil (terre) du câble électrique.
Les changements ou les modications non explicitement
approuvés par la partie garante de la conformité risquerait
d’annuler le droit de l’utilisateur à employer l’équipement.
NOTE: Cet appareil a été testé et il est conforme aux limites
d’un dispositif numérique de classe B, conformément à la partie
18 des règles FCC. Ces limites sont conçues pour fournir une
protection raisonnable contre les interférences nocives dans
une installation domestique. Cet appareil génère, utilise et peut
émettre de l’énergie sous la forme de fréquence radio et, s’il n’est
pas installé et utilisé en conformité avec les instructions, il peut
provoquer des interférences nocives sur les communications
radio. Cependant, il n’existe aucune garantie que des
interférences se produiront dans une installation particulière. Si
cet appareil provoque des interférences nocives sur la réception
radio ou télévision, ce qui peut être détecté en mettant l’appareil
sous et hors tension, l’utilisateur est encouragé à essayer de
corriger ces interférences en appliquant l’une ou plusieurs des
measures suivantes :
• Réorientez ou déplacez l’antenne réceptrice.
• Augmentez la distance entre l’appareil et le récepteur.
• Branchez l’appareil dans une prise ou un circuit différent de
celui sur lequel est branché le récepteur.
• S’adresser au revendeur ou à un technicien radio/TV
expérimenté.
AVERTISSEMENT
Ce symbole signifie que la sécurité est en
danger. Il signale les risques potentiels qui
peuvent entraîner la mort ou des blessures à
l’opérateur ou aux autres.
Si vous ne suivez pas ces instructions à la
lettre, vous courez le risque de mourir ou
d’être sérieusement blessé.
18
Les personnes avec un stimulateur cardiaque ou
un dispositif médical similaire doivent redoubler de
prudence lors de l’utilisation d’une unité à induction ou
à proximité de l’appareil en fonctionnement. Le champ
électromagnétique peut affecter la bonne marche du
stimulateur cardiaque ou du dispositif médical similaire.
Il est conseillé de consulter votre médecin ou le fabricant
du stimulateur sur votre situation particulière.
Page 19

Précaution de Sécurité
Veuillez lire les instructions avant toute utilisation.
SECURITE DE LA TABLE DE CUISSON
AVERTISSEMENT
Installation correcte
Assurez-vous que votre appareil est
correctement installé et mis à la masse par un
technicien qualifié.
N’utilisez jamais votre appareil pour réchauffer
ou chauffer la pièce
Ne laissez pas des enfants sans surveillance
Il ne faut pas laisser des enfants seuls ou
sans surveillance dans la pièce où l’appareil
est utilisé. Il ne faut jamais les laisser
s’asseoir ou s’appuyer sur l’appareil.
Portez des vêtements corrects
Il ne faut pas porter de vêtements larges ou
avec de grandes manches lorsque vous
utilisez l’appareil.
Utilisation du service après-vente
Ne réparez pas ou ne remplacez pas des
pièces de l’appareil à moins que le manuel ne
le recommande spécifiquement. Tous les
services après-vente doivent être effectués
par un technicien qualifié.
Entreposage dans ou sur l’appareil
Les matériaux inflammables ne doivent pas
être entreposés dans le four ou à côté.
N’utilisez pas d’eau ou sur les feux de friture
Sur un début de feu, utilisez des extincteurs à
poudre ou à mousse.
Utilisez uniquement des poignées sèches
Les poignées humides ou mouillées sur des
surfaces chaudes peuvent brûler en se
transformant e vapeur. Ne laissez pas les
poignées en contact avec des éléments
chauds. N’utilisez pas de serviettes ou
d’autres torchons volumineux.
Utilisez des casseroles dont la taille est
appropriée
L’appareil est équipé d’une ou plusieurs
surfaces de différentes tailles. Choisissez des
ustensiles dont le fond est plat et qui sont
assez larges pour couvrir la surface de
chauffage. L’utilisation d’ustensiles sousdimensionnés expose une partie de l’élément
de chauffage en contact direct et peut
enflammer des vêtements. Un bon rapport
entre l’ustensile et le brûleur améliorera
l’efficacité.
Manuel d’utilisation et d’entretien
IMPORTANT
Ne laissez jamais des surfaces de l’appareil
lorsque les réglages sont élevés
Les débordements peuvent provoquer des
fumées et les déversements graisseux
peuvent s’enflammer.
Vérifiez que les casseroles à réflexion ou les
cuvettes de propreté sont en place
L’absence des casseroles ou de ces cuvettes
pendant la cuisson peuvent endommager les
câbles ou les composants inférieurs.
Protections
N’utilisez pas de feuilles d’aluminium pour
protéger les cuvettes de propreté ou les
boutons, sauf comme le suggère le manuel.
Une installation incorrecte des ces protections
peut provoquer des risques d’électrochocs ou
d’incendie.
Les ustensiles de cuisson vitrifiés
Uniquement certains types de verre,
verre/céramique, céramique, la faïence, ou
d’autres ustensiles vitrifiés sont adaptés à la
table de cuisson sans se casser à cause du
changement soudain de température.
Les poignées des ustensiles doivent être
tournées vers l’intérieur et ne dépassées sur
une autre surface de chauffage
Pour réduire le risque de brûlures, l’allumage
de matériaux inflammables, et le déversement
dû à un contact accidentel avec l’ustensile, la
poignée de l’ustensile doit être positionnée
vers l’intérieur et ne pas dépassée au-dessus
des surfaces adjacentes.
Ne mouillez pas les éléments de chauffages
démontables
Les éléments de chauffage ne doivent jamais
être immergés dans l’eau.
Ne cuisinez pas sur une table de cuisson fêlée
Si la table de cuisson était fêlée, les
nettoyants et les déversements peuvent
pénétrer dans la fêlure de la table de cuisson
et provoquer un risqué d’électrochoc.
Contactez un technicien qualifié.
Nettoyez la table de cuisson avec attention
Si une éponge ou un chiffon humide est utilisé
pour essuyer les déversements sur une surface
chaude, évitez les brûlures de vapeur. Certains
nettoyants peuvent entraîner des fumées
nocive
chaudes.
FRANÇAIS
s s’ils sont appliqués sur des surfaces
19
Page 20

SECURITE PERSONNELLE
Manuel d’utilisation et d’entretien
FRANÇAIS
AVERTISSEMENT
Afin de réduire le risque de blessures à
personne au cas où la graisse de cuisson
prendrait feu, veuillez vous comporter de la
sorte:
La graisse est inflammable et il faut la manier
avec précaution.
N’utilisez pas d’eau sur les feux de friture.
Ne prenez jamais en main une casserole en
feu.
La graisse en feu peut être éteinte en dehors
de la casserole avec du bicarbonate de sodium,
ou si vous en avez, un extincteur polyvalent à
produit chimique sec ou à mousse.
Laissez la graisse refroidir avant d’essayer de
l’enlever.
Essuyez les éclaboussures immédiatement.
Si vous faites une flambée avec des liqueurs ou
d’autres alcools sous une hotte, coupez la
ventilation. Les flammes peuvent devenir hors
de contrôle à cause de l’aspiration.
Ne laissez jamais l’endroit sans surveillance
lorsque le réglage est sur une chaleur élevée.
Le débordement peut entraîner des fumées et
des éclaboussures qui peuvent prendre feu.
ATTENTION
Ne laissez jamais en contact avec la surface chaude
des feuilles d’aluminium, le plastique, le papier ou
chiffon. Ne laissez pas une casserole chauffée à sec.
Prévenir les brûlures. Si les flammes ne
s’étendent pas immédiatement, évacuez et
appelez immédiatement les pompiers
Ayez toujours un détecteur de fume près de la
cuisine.
Laissez le ventilateur de la hotte allume lorsque
vous flambez de la nourriture (seulement en
cas de fumée sans flammes).
Utilisez un extincteur uniquement si:
Vous savez que vous avez un extincteur Class
ABC, et que vous savez déjà vous en servir.
Le feu est petit et qu’il est contenu dans la zone
ou il a démarré.
Les pompiers sont prévenus.
Vous pouvez combattre le feu avec le dos près
d’une sortie.
N’utilisez jamais d’eau sur les incendies de
cuisine.
Si vos vêtements prennent feu, allongez -vous
et roulez-vous immédiatement pour éteindre
les flammes.
AVERTISSEMENT
Afin de réduire le risque de brûlures lorsque
vous utilisez la table de cuisson, observez ce
qui suit:
N’utilisez jamais la table de cuisson pour
chauffer ou réchauffer la pièce.
Les enfants et les animaux ne doivent pas être
laissés seuls ou sans surveillance dans la pièce
où l’appareil est utilisé. Il ne faut jamais les laisser
s’asseoir ou se mettre debout sur cet appareil.
ATTENTION
Ne pas conserver des objets qui pourraient intéresser
les enfants au-dessus ou à l’arrière de la table de
cuisson.
Lorsque vous utilisez la table de cuisson
Ne touchez jamais la surface en verre. La
surface peut devenir assez chaude pour
entraîner des brûlures. Les éléments en
surface peuvent être assez chauds pour
devenir sombres. Pendant et après utilisation,
ne touchez pas ou ne laissez pas de
matériaux inflammables en contact avec les
éléments de chauffage jusqu’à ce qu’ils
refroidissent
Lorsque vous utilisez la table de cuisson
Ne touchez pas d’éléments de chauffage ou
les surfaces intérieures du four. les éléments
de chauffage peuvent être assez chauds pour
devenir foncés. Les surfaces intérieures d’un
four peuvent devenir assez chaudes pour
provoquer des brûlures. Pendant l’utilisation et
après, ne touchez pas éléments chauffants, les
vêtements ou les matériaux inflammables ne
doivent pas être en contact avec ces surfaces
ou celles intérieures avant un certain temps de
refroidissement. D’autres surfaces de l’appareil
peuvent être assez chaudes pour provoquer
des brûlures– (identification des surfaces – par
exemple, ouvertures d’aération du four et
surfaces près de ces ouvertures, portes de four,
et fenêtres sur les portes de four).
Afin de réduire le risque de brûlures,
l’inflammation de matériaux inflammables et
les écoulements accidentels, la poignée du
contenant doit être tournée vers le centre de
la table de cuisson pour qu’elle ne dépasse
pas de la surface de l’unité.
Utilisez uniquement certains types de verre,
en vitrocéramique résistant à la chaleur, en
céramique, en faïence ou d’autres récipients
émaillés qui sont adaptés à la table de
cuisson.
20
Page 21

Modèles 30”
Manuel d’utilisation et d’entretien
FRANÇAIS
Modèles et nomenclature des pièces
3
5
2
VECTIM304 (Code d’approbation 812T40IP ou 812T40NP)
Position
Position
Position
Position
Position
Modèles 36”
1 - Élément à circuit simple 6” 1200W (Booster 1400W)
2 - Élément à circuit simple 6” 1200W (Booster 1400W)
3 - Élément à circuit simple 8” 2200W (Booster 3000W)
4 - Élément à circuit simple 7” 1800W (Booster 2800W)
5 - Boutons de commande par efeurement
4b
4
1
3
4
VECTIM365 (Code d’approbation 812V50IQ or 812V50NQ)
Position 1 - Élément circuit simple 6” 1200W (Booster 1400W)
Position 2 - Élément circuit simple 6” 1200W (Booster 1400W)
Position 3 - Élément circuit simple 8” 2200W (Booster 3000W)
Position 4 - Élément double circuit 7” 1800W (Booster 2800W)
Position 4b - Élément double circuit11” 2640W (Booster 3600W)
Position 5 - Élément circuit simple 8” 2200W (Booster 3000W)
Position 6 - Boutons de commande par efeurement
6
5
12
21
Page 22

Manuel d’utilisation et d’entretien
6
4
2
3
1
2
4
5
4
8
12
6b
FRANÇAIS
Boutons de commande par efeurement - Vue détaillée (toutes options)
6
5
3
2
Figure. 2
Position 1 - Touche générale ON/OFF de la table de cuisson
Position 2 - Touche de verrouillage des commandes -
sécurité enfants.
Position 3 - Indicateur de verrouillages des commandes.
Position 4 - Touches ON/OFF et afchage de niveau de
puissance pour zone de cuisson avant gauche.
Position 5 - Touches ON/OFF et afchage de niveau de
puissance pour zone de cuisson arrière gauche.
Position 6 - Touches ON/OFF et afchage de niveau de
puissance pour zone de cuisson centrale
double.
Position 6b - Indication élément double autorisé.
10
9
11
7
1
Position 7 - Touches ON/OFF et afchage de niveau de
puissance pour zone de cuisson arrière droite.
Position 8 - Touches ON/OFF et afchage de niveau de
puissance pour zone de cuisson avant droite.
Position 9 - Touches fonctions spéciales.
Position 10 - “Queue de paon” pour niveau de puissance
plage double.
Position 11 - Minuterie.
Position 12 - Indicateur à barre pour réglage du niveau de
puissance..
5
1
Figure. 3
Position 1 - Touche OFF pour la zone associée.
Position 2 - Touche ON/SÉLECTION pour la zone
Position 3 - Indication TRÈS CHAUD (chaleur active
Position 4 - Afchage du niveau de puissance.
Position 5 - Extension autorisée (circuit double).
Position 6 - Minuterie active dans la zone associée.
22
associée.
ou résiduelle de la zone).
3
Figure. 4
Position 1 - Indicateur à barre pour régler le niveau de
puissance.
Position 2 - Échelle de puissance gamme réduite (0 à
15%), interne.
Position 3 - Échelle de puissance pleine gamme (0 à
100%), externe.
Position 4 - Sablier (compte-minutes) actif.
Position 5 - Afchage et touches minuterie.
Page 23

Manuel d’utilisation et d’entretien
Boutons de commande/Caractéristiques des différents modèles
VECTIM365 (Code d’approbation 812V50IQ or 812V50NQ)
● Indicateur à barre pour le réglage du niveau de puissance.
● Échelle de puissance double gamme (plage de température complète et réduite).
● Sablier (indépendant pour chaque zone).
● 5 minuteries indépendantes, une par zone de cuisson.
● Fonction de cuisson rapide
● Zone de cuisson n°5
● Touche générale ON/OFF et touche de VERROUILLAGE.
FRANÇAIS
VECTIM304 (Code d’approbation 812T40IP ou 812T40NP)
● Glissière de réglage de niveau de puissance.
● Échelle d’alimentation double (Températures complètes et basses).
● Sablier (indépendant de toute zone).
● 4 minuteries indépendantes, une par zone de cuisson.
●. Fonction Ébullition rapide.
●. 4 zones de cuisson.
●. Interrupteur principal ON/OFF et touche LOCK.
23
Page 24

Manuel d’utilisation et d’entretien
Conseils pour la cuisson
FRANÇAIS
Les cuissons qui traditionnellement étaient au bainmarie, par exemple les crèmes, les sauces, le chocolat
etc. peuvent être éliminées en cuisinant directement
dans le récipient, grâce au réglage parfait de la
puissance et à la distribution uniforme de la température
du système à induction.
Il est possible d’utiliser la fonction de “Booster” avec de
l’eau et des soups jusqu’à avant qu’elles ne soient sur
le point de bouillir, tout de suite après, il faut passer à
un niveau plus bas pour éviter d’avoir trop de vapeur et
en plus pour épargner de l’énergie.
Lorsque vous cuisinez des fritures, il faut réchauffer
l’huile au niveau de puissance maximale, en passant
ensuite à un niveau intermédiaire au moment
d’introduire les aliments dans la casserole.
Utilisez toujours des poêles et des casseroles toujours
équipées de leur couvercle correspondant.
Réduisez un temps la puissance sélectionnée dans la
zone de cuisson, dans le cas de l’eau, elle ne doit pas
bouillir trop longtemps inutilement.
Choisissez toujours des contenants de dimensions
appropriées à la quantité de nourriture à cuisiner. Un
contenant de grandes dimensions et qui n’est pas
complètement plein consomme
beaucoup d’énergie.
plusieurs facteurs :
• Type et qualité du récipient de cuisson
• Type, quantité et température des aliments
• Élément utilisé et préférences personnelles.
Fonction basses températures
La fonction basses températures permet une cuisson à
ce genre de températures pour faire fondre du beurre
ou du chocolat, préparer des sauces ou mettre à mijoter
longtemps à basses températures. Cette fonction
compte neuf niveaux de puissance offrant une plage de
températures pour faire fondre des aliments, ou même
les mettre à bouillir. Dans ce mode de cuisson, la table
de cuisson dispose d’une commande de température
à même de maintenir la chaleur au-dessus du verre à
n’importe quelle température indiquée dans le tableau
ci-dessous.
Niveau de puissance Température °F (°C)
1 120 (50)
2 140 60)
3 160 (70)
4 175 (80)
5 195 (90)
Pour obtenir les meilleurs résultats de cuisson, il
est conseillé d’utiliser des casseroles et des poêles
métalliques à fond plat, assurez-vous que le fond de la
casserole corresponde à la zone de
cuisson indiquée sur le verre.
Pour gagner de l’énergie, cuisinez vos légumes et
vos pommes de terre avec peu d’eau. Évitez de
réchauffer à vide les casseroles sinon elles pourraient
s’endommager et abîmer également la zone de cuisson
en verre.
Le tableau qui suit fournit certains exemples de cuisson,
ces niveaux, peuvent varier en fonction du type de
récipient, du poids et et du type d’aliment.
Valeurs de réglage recommandées
Toutes les valeurs de réglage indiquées au tableau cidessous sont recommandées. Les valeurs du tableau
sont indicatives ; les valeurs réelles dépendent de
24
6 210 (100)
7 230 (110)
8 250 (120)
9 265 (130)
Page 25

Manuel d’utilisation et d’entretien
5a
2
3
7
6
8
FRANÇAIS
Mode d’emploi
ATTENTION
Cette commande par efeurement fonctionne selon
la technologie du captage optique de la lumière.
Lors du premier branchement électrique ou après
une coupure de courant, toute lumière forte
atteignant directement la surface du capteur peut
affecter le fonctionnement de la commande par
efeurement.
Au moment de la mise sous tension de l’unité, veiller
à ce qu’aucune lumière forte n’atteigne directement
la surface de commande par efeurement, parce que
cela risque de compromettre le calibrage du capteur
de démarrage et d’insensibiliser la commande.
Lorsque vous mettez la table de cuisson sous tension,
tous les voyants et les caractères lumineux s’allument
pour indiquer que l’appareil est bien activé. Cette
opération dure quelques secondes, après quoi ils
s’éteignent automatiquement. La table de cuisson est
alors prête à fonctionner.
Allumer le panneau de commande
Si les commandes ont été verrouillées, exercez une
pression maintenue sur la touche [LOCK] ; le voyant de
verrouillage est allumé, il s’éteint au bout de quelques
secondes.
puissance (niveaux disponibles : 0 à 9) : vous pouvez
déplacer votre doigt sur la barre ou toucher directement
la valeur souhaitée.
L’afchage (ref.4) et la « queue de paon » (ref.6) montrent
le niveau de puissance actualisé en temps réel.
Après un délai d’attente de 5 secondes, la valeur est
acceptée ; le voyant SURFACE TRÈS CHAUDE (ref.3)
cesse de clignoter et devient xe. La « queue de paon
» disparaît après quelques secondes supplémentaires.
Efeurez la touche [ON] pour valider la valeur avant que
la n du délai d’attente.
La gure ci-dessous représente l’échelle de pleine
gamme, c’est-à-dire toute la plage de puissance
disponible pour le système de commande, de 0% à
100% (qui correspond au niveau 9).
Le niveau 4 correspond à 15% de la puissance
disponible.
Efeurez la touche générale [ON/OFF] ; toutes les zones
peuvent maintenant être sélectionnées.
Tous les afchages montrent un niveau de puissance 0 ;
si vous n’exécutez aucune action dans les 10 secondes,
le système s’éteint.
Réglage des éléments
Efeurez la touche [ON] correspondante (ref.2) pour
sélectionner la zone souhaitée : l’indication SURFACE
TRÈS CHAUDE (ref.3) se met à clignoter dans l’attente
d’une action de la part de l’utilisateur.
4
1
Figure. 6
Touchez l’indicateur à barre pour dénir le niveau de
Figure. 7
Utilisation de la gamme de puissance
réduite
Une fois que la zone de cuisson a été sélectionnée,
efeurez la touche [LOW TEMP] (ref.8) pour activer la
gamme de puissance réduite (ref.9) ; réglez ensuite le
niveau de puissance comme d’habitude.
9
Figure. 8
25
Page 26

Manuel d’utilisation et d’entretien
1
2
3
FRANÇAIS
Le système de commande n’utilisera que 15% de la
puissance disponible, divisée en échelons de 0 à 9 pour
une plus grande précision.
Souvenez-vous que dans cette modalité spéciale, le
niveau 9 correspond exactement au niveau 4 de la
gamme standard.
Pour rétablir la gamme standard sans éteindre la zone,
sélectionnez cette dernière et efeurez à nouveau
la touche [LOW TEMP] pour désactiver la gamme de
puissance réduite.
Attention : le niveau reste le même mais la puissance
augmente.
En éteignant la zone de cuisson suivant les instructions
ci-dessous, vous désactivez aussi le mode puissance
réduite. Quand vous sélectionnerez à nouveau cette
zone, elle commencera à travailler au mode de
puissance standard.
Éteindre un élément
Pour éteindre un élément chauffant, efeurez la touche
[OFF] (ref.1) correspondante.
Vous pouvez éteindre tous les éléments actifs en même
temps en efeurant la touche [ON/OFF] générale.
Enclenchement d’élément double (36’’ seulement)
Sélectionner une double surface de cuisson en efeurant
la touche [ON] correspondante. La diode SURFACE
CHAUDE (réf. 3) se met à clignoter.
L’élément extérieur n’est automatiquement actionné que si
le diamètre de la poêle est légèrement plus grand que le
cercle intérieur.
L’indication d’activation d’élément double (ref.5a) s’allume
quand l'élément est actif et s’éteint quand l'élément est
inactif.
Voyant indicateur surface très chaude
Chaque élément possède un voyant indicateur
SURFACE TRÈS CHAUDE (ref.3) qui prévient quand la
surface de cuisson est très chaude.
Un bip sonore se déclenche et vous voyez apparaître
en alternance sur l’afchage le niveau de puissance
sélectionné et la lettre P. La « queue de paon » montre
le niveau de puissance sélectionné.
Le réchaud fonctionne en utilisant de la puissance
supplémentaire disponible pendant quelques minutes
seulement, puis il revient au niveau de puissance
sélectionné.
Cette option est disponible pour toutes les zones de
cuisson, aussi bien standard que spéciales (zones
multiples ou pont).
Fonction de verrouillage des touches
Pour activer et désactiver la fonction de verrouillage des
touches, exercez une pression maintenue sur la touche
[LOCK] pendant 2 secondes. L’indication de verrouillage
s’allume et le clavier est verrouillé. Bien sûr, la touche
[LOCK] est, quant à elle, toujours active.
Lors du démarrage, les touches sont verrouillées
automatiquement.
Vous pouvez activer la fonction de verrouillage aussi
bien si les éléments chauffants sont en service que
s’ils ne le sont pas. La fonction de verrouillage bloque
toutes les touches à l’exception des touches [OFF]. La
fonction off de la touche générale [ON/OFF] reste active
elle aussi.
Réglage de la minuterie
Ce dispositif a la fonction d’un compte-minutes
mais il n’arrête pas les éléments chauffants.
La minuterie n’est disponible que sur certains modèles.
Vous pouvez la régler indépendamment de l’élément
chauffant et même s’il n’y a aucune zone en service.
Si la table de cuisson n’est pas en service, efeurez
d’abord la touche générale [ON/OFF] pour accéder au
mode de veille ; tous les afchages doivent être à “0”.
L’indication s’allume quand vous activez la zone et reste
allumée jusqu’au moment où la zone de cuisson se
sera refroidie jusqu’à une température garantissant la
sécurité au toucher (environ 65°C).
Quand un voyant surface très chaude est allumé, faites
très attention si vous travaillez dans le voisinage de la
table de cuisson car elle est encore très chaude.
Fonction cuisson rapide (booster)
Après avoir sélectionné l’élément chauffant, efeurez la
touche [CUISSON RAPIDE] pour activer et désactiver
cette fonction avant ou après le réglage du niveau de
puissance.
26
Figure. 9
Efeurez les touches [T-] ou [T+] pour régler la
minuterie : la valeur initiale commence à “00” ou “45”
respectivement sur l’afchage de la minuterie (ref.1).
Maintenez la touche pressée pour que les valeurs
augmentent/diminuent plus rapidement. La valeur
Page 27

Manuel d’utilisation et d’entretien
4
FRANÇAIS
maximum est “99”.
La led de la minuterie (ref.2) indique quand la minuterie
est en service.
Le point qui apparaît dans le coin en bas à droite de
l’afchage (ref. 3) clignote quand la minuterie a été
sélectionnée an de modier la valeur. Cinq secondes
après la dernière pression, la nouvelle valeur est
acceptée et le point disparaît. Un bip sonore conrme
que la nouvelle valeur a bien été acceptée.
Pour annuler la minuterie, exercez une pression
maintenue sur la touche [T-] jusqu’à ce que la
valeur descende à “00” ou bien touchez [T-] et [T+]
simultanément pour reporter rapidement la valeur à “00”.
Dans certains modèles, il est possible d’associer la
minuterie à une zone de cuisson.
• Sélectionnez la zone de cuisson que vous voulez
chronométrer.
• Efeurez [T-] ou [T+]: la minuterie associée à la zone
se met à clignoter. ,
• Réglez la valeur de la minuterie.
• Le voyant lumineux de la minuterie devient xe ; la
valeur est acceptée et le compte à rebours commence.
S’il y a plus d’une minuterie programmée, l’afchage
montre la valeur la plus basse, c’est-à-dire le temps qui
va expirer le premier. Vous verrez clignoter le voyant
lumineux de la minuterie (ref.4) associée à la zone à
laquelle se réfère la valeur afchée. Si la valeur afchée
se réfère à la minuterie indépendante, le voyant lumineux
de la minuterie (ref. 2) clignote.
Quand le temps de la minuterie expire :
• Une séquence sonore indique la n de l’activité : trois
sons brefs suivis d’un silence long se répètent pendant
1 minute.
• Le voyant lumineux associé à la minuterie qui a expiré
clignote.
• La valeur “00” de la minuterie clignote elle aussi; elle
attend un acquittement de la part de l’utilisateur pour
s’arrêter.
• Efeurez [T-] ou [T+] pour annuler la minuterie qui a
expiré; l’afchage commute à la minuterie au temps
résiduel le plus bref ou reste vide si aucune autre
minuterie n’est programmée.
MISE EN GARDE : La minuterie est un simple
avertisseur sonore qui attire l’attention de
l’utilisateur.
Elle n’a aucun effet sur les éléments chauffants. Vous
devez toujours éteindre manuellement la zone de
cuisson à l’aide de la touche [OFF] correspondante.
Chaleur de veille
Les indicateurs SURFACE TRÈS CHAUDE restent
allumés, même après la n de l’activité de cuisson,
tout le temps nécessaire pour que la température de la
surface s’abaisse à une valeur sûre au toucher.
Figure. 10
Pour vérier le temps résiduel d’une zone temporisée,
efeurez la touche [ON] associée à la zone en question
: le voyant lumineux de la minuterie correspondant se
met à clignoter et la valeur présente sur l’afchage de la
minuterie commutera pendant quelques secondes à la
nouvelle valeur. Après un délai temporisé, la valeur du
temps le plus court s’afche à nouveau.
Pour vérier la valeur de la minuterie indépendante
quand elle n’est pas afchée en priorité, efeurez [T-] ou
[T+] sans sélectionner aucune zone. Le voyant lumineux
de la minuterie (ref. 4) clignote et la valeur afchée
commute à la minuterie indépendante.
Figura. 11
La durée de la chaleur résiduelle dépend du niveau
de puissance qui avait été programmé pour la zone de
cuisson et du temps pendant lequel l’élément chauffant
a été en service.
Par exemple, une zone de cuisson qui a travaillé plus
de 5 minutes à pleine puissance mettra une demi-
heure à refroidir sufsamment pour que l’indicateur de
chaleur résiduelle s’éteigne. Au niveau 1, elle y mettra
10 minutes environ.
Caractéristiques
Le système de commande vérie sa propre température
ambiante et interrompt toute activité en cas de surface
de ses parties internes. Laissez refroidir l’appareil.
27
Page 28

Fonctionnement de la Table de Cuisson
AVANT D’UTILISER LA TABLE DE
CUISSON POUR LA PREMIERE FOIS
Tous les produits sont essuyés avec des
solvants à l’usine pour enlever tous les signes
visibles de saleté, d’huile ou de graisse qui
peuvent être restés après la fabrication
Si vous en avez, enlevez tous les emballages et
les manuels de la surface de la table de cuisson
Nettoyez le verre avant de l’utiliser pour la
première fois. Un nettoyage soigné sur le verre
supérieur avec un nettoyant est recommandé.
Cela ne prend qu’une minute et le verre est
propre, brillant et enduit avant la première
utilisation.
Il peut se dégager une légère odeur pendant les
premières utilisations: c’est normal et l’odeur
disparaîtra.
Manuel d’utilisation et d’entretien
FRANÇAIS
Les meilleures cuissons dépendront de la
cuisson correcte sélectionnée.
La surface de cuisson va garder la chaleur et
rester chaude pendant plus de 20 minutes après
avoir éteint les éléments.
La surface de cuisson vitrocéramique est un
matériau durable résistant aux chocs mais
cassable si une casserole ou un autre objet
tombe dessus.
Ne laissez pas les récipients vides chauffer. Cela
peut endommager le récipient, l’élément et /ou la
table de cuisson.
Ne faites pas glisser des casseroles sur la
surface de cuisson, cela peut rayer le verre.
L’utilisation de récipient en fonte sur le verre de
la table de cuisson n’est pas recommandée. La
fonte retient la chaleur et elle peut endommager
la table de cuisson.
Fig. 12a
Table de cuisson à 4 brûleurs avec 2 générateurs
d’induction côté gauche et côté droit
Fig. 12b
Table de cuisson à 5 brûleurs avec 3 générateurs
d’induction côté gauche, centre et côté droit.
Partage de puissance
Les tables de cuisson à quatre brûleurs sont divisées en
deux zones de chauffe séparées.
Les tables de cuisson à cinq brûleurs sont divisées en
trois zones.
Un générateur pilote 2 éléments ou les deux zones de
cuisson d’une section de chauffe partagent la puissance
d’un générateur.
Le partage de puissance est actif lorsque tous les éléments
de la même zone de cuisson sont activés et qu’un élément
est réglé sur le niveau de puissance renforcée (P). Le
niveau de l’élément qui n’est pas réglé sur le niveau de
puissance renforcée bascule alors sur une puissance plus
faible. Cela s’appelle le partage de puissance.
Batterie de cuisine « bruyante »
Lors de l’utilisation d’éléments adjacents avec un certain niveau de puissance, les champs magnétiques peuvent interagir entre
eux et produire un faible sifflement ou un « bourdonnement » intermittent. Les récipients qui recouvrent entièrement le cercle de
l’élément produiront moins de bruit. Un faible bruit de « bourdonnement » est normal, notamment avec une puissance élevée.
Ces bruits peuvent être réduits ou éliminés en diminuant ou en augmentant le niveau de puissance de l’un ou de l’ensemble des
éléments
28
Page 29

Cookware
Manuel d’utilisation et d’entretien
FRANÇAIS
Comment fonctionne le chauffage à
induction
A l’intérieur d’une table à induction, se trouve un circuit
électrique qui alimente et qui commande une bobine.
Elle créée un champ magnétique qui s’active au
contact des récipients de cuisson adaptés (matériau
magnétique).
La casserole posée se réchauffe instantanément,
tandis que la table reste froide. Il n’y aucune dispersion
de chaleur. La chaleur générée dans la casserole
même permet de cuisiner rapidement en gagnant du
temps et de l’énergie.
Les casseroles doivent être le plus possible centrées
sur la zone de cuisson.
Certains modèles de table ont une double zone:
la reconnaissance automatique de la casserole
déterminera l’utilisation ou non de la zone externe.
Sur certaines zones de cuisson, un diamètre interne
est indiqué.
Diamètre
minimal
du récipient
10 cm (4”)
Diamètre
du récipient
8 cm (3-1/8”)
minimal
du récipient
13 cm (5-1/8”)
Diamètre
minimal
du récipient
8 cm (3-1/8”)
Diamètre
minimal
Figure 14a
Table de cuisson d’une largeur de 76,2 cm (30”).
Utilisez un récipient de la taille minimale indiquée pour
chaque élément de cuisson.
Figure 13
Utilisation des casseroles
Attention !
Les casseroles que vous pouvez utiliser pour cette table
de cuisson doivent être de matière ferromagnétique.
Vous pouvez utiliser des casseroles en acier émaillé, en
fonte ou des casseroles spéciales en acier inoxydable
pour induction.
Pour vérier si une casserole est adaptée, essayez
avec un aimant s’il s’attache au fond de celle-ci. Il ne
faut jamais utiliser des récipients en acier n normal, ou
contenant uniquement une petite quantité de verre, de
terre cuite, de cuivre ou d’aluminium.
L’afchage de la zone de cuisson indiquera si la
casserole est adaptée, si l’indicateur de puissance
clignote la casserole n’est pas adaptée ou le diamètre
du fond est trop inférieur à celui qui délimite la zone de
cuisson.
Diamètre
minimal
du récipient
21 cm (8-1/4”)
Diamètre
minimal
du récipient
11 cm (4-1/4”)
Diamètre
minimal
du récipient
11 cm (4-1/4”)
Diamètre
minimal
du récipient
21 cm (8-1/4”)
Diamètre
minimal
du récipient
11 cm (4-1/4”)
Fig 14b
Table de cuisson d’une largeur de 91,4 cm (36”).
Utilisez un récipient de la taille minimale indiquée pour
chaque élément de cuisson.
Figure 15
29
Page 30

Nettoyage de la Table de Cuisson
ATTENTION
Assurez-vous que l’alimentation électrique est
débranchée et que toutes les surfaces sont refroidies
avant de nettoyer la table de cuisson.
Appliquez une petite quantité du nettoyant crème
céramique spécifique pour table de cuisson tous les
jours. Cela lui apporte un film protecteur qui facilite le
nettoyage des éclaboussures d’eau et projections de
nourriture. La température de la surface de cuisson
réduit les qualités de protection de ce nettoyant.
Il faut la ré-appliquer avant chaque utilisation. Utilisez
un chiffon propre et appliquez la crème nettoyante de
table de cuisson avant chaque utilisation pour enlever
la saleté ou les traces métalliques que l’on peut voir
sur la surface entre les utilisations.
Manuel d’utilisation et d’entretien
FRANÇAIS
Utilisation quotidienne
Essuyez les éclaboussures avec un chiffon propre et
humide.
Utilisez du vinaigre blanc s’il reste des salissures;
rincez.
Appliquez une petite quantité de crème nettoyante de
table de cuisson.
Lorsque c’est sec, polissez la surface avec un chiffon
ou du papier propre.
ATTENTION
N’utilisez aucun nettoyant sur le verre tant que la
surface est chaude; Utilisez uniquement le racloir à
lame de rasoir. Les fumées pourraient être nocives
pour votre santé. Un nettoyant chaud peut dégager
des fumées chimiques en endommage la surface.
CADRE
(Modèles acier inoxydable)
Nettoyez toujours avec le grain. Pour les résidus
modérés/abondants, utilisez BonAmi
®
ou Soft Scrub®
(pas de javel).
Essuyez en utilisant une éponge humide ou un
chiffon, rincez et séchez
TECHNIQUES DE NETTOYAGE QUOTIDIEN
Nettoyez la surface lorsqu’elle est complètement
froide à l’exception de ce qui suit.
Enlevez
immédiatement avec
le racloir à lame de
rasoir ces résidus de
sucres séchés
sucre de sirop
produits à la
tomate
lait
NETTOYANTS RECOMMANDES
Crème nettoyant de table de cuisson:
Utilisez uniquement une petite quantité; appliquez sur
du papier ou chiffon propre. Essuyez et polissez la
surface avec une serviette propre et sèche.
BonAmi
Rincez et séchez.
Soft Scrub
®
®
(sans javel)
Rincez et séchez.
Vinaigre blanc
Rincez et séchez.
Racloir à lame de rasoir
Emballé avec la table de cuisson.
Note: les nettoyants recommandés indiquent un type
de nettoyant et ils ne constituent pas une liste
exhaustive.
EVITEZ CES NETTOYANTS
Les nettoyants pour vitre qui contiennent de
l’ammoniaque ou de l’eau de Javel chlorée.
Ces ingrédients peuvent teindre ou attaquer la table
de cuisson.
Les nettoyants caustiques
comme les nettoyants pour four comme Easy Off
peuvent attaquer la table de cuisson.
Les éponges nettoyantes abrasives avec du
métal
Les éponges abrasives comme Scotch Brite
rayer et / ou laisser des traces de métal.
Les nettoyants à poudre contenant de l’eau de
Javel chlorée
Peuvent teindre de façon permanente la table de
cuisson.
Les nettoyants inflammables
Comme les essences à briquet ou WD-40.
®
®
peuvent
30
Page 31

Problème
Rien ne fonctionne
Manuel d’utilisation et d’entretien
PANNES
Cause Remèdes possibles
La table de cuisson n’est pas
branchée correctement au circuit
électrique.
Le fusible ou le disjoncteur ont
sauté.
Il n’y a pas d’électricité dans la
table de cuisson.
FRANÇAIS
Inspectez que la bonne tension
alimente la table de cuisson.
Remplacez le fusible ou réenclenchez le disjoncteur.
Inspectez l’alimentation électrique.
Les éléments chauffants ne
chauffent pas correctement.
Le surface vitrocéramique est
transparente ou semble devenir
rouge.
Touche de verrouillage bloquée
après le premier branchement
ou commande par efeurement
insensible.
La table de cuisson est en mode
verrouillage.
La casserole utilisée est incorrecte.
Sous des lumières fortes ou
directes, vous pouvez parfois voir à
travers le verre et dans le châssis à
cause de sa qualité transparente.
Dans ces conditions, vous pouvez
voir également une teinte rouge.
Lors du premier branchement
électrique ou après une coupure
de courant, toute lumière forte
atteignant directement la surface
du capteur peut affecter le fon
ctionnement de la commande par
efeurement.
-
Déverrouillez la table de cuisson.
Choisissez une casserole correcte
comme dans la section de
fonctionnement de la Table de
cuisson dans ce manuel.
Ces sont les propriétés normales des
panneaux en vitrocéramique noir.
Au moment de la mise sous tension
de l’unité, veiller à ce qu’aucune
lumière forte n’atteigne directe
ment la surface de commande par
efeurement, parce que cela risque
de compromettre le calibrage du
capteur de démarrage et d’insensibi
liser la commande.
-
-
31
Page 32

Manuel d’utilisation et d’entretien
Preste la debida atención a los siguientes
símbolos que encontrará en el manual:
ADVERTENCIA
Este es el símbolo de los avisos relacionados
con la seguridad: alerta sobre potenciales
peligros que pueden derivar en muerte o
daños a las personas.
Si no sigue estas instrucciones, puede correr
peligro de muerte o de resultar gravemente
herido.
LEA Y CONSERVE ESTAS INSTRUCCIONES
ADVERTENCIAS PARA LA INSTALACIÓN
ELÉCTRICA
ADVERTENCIA
La instalación y el mantenimiento de este
electrodoméstico deben ser efectuados por un
instalador cualificado o una agencia técnica.
Los modelos de se pueden accionar
en 240V o 208V.
ATENCIÓN
Desenchufe siempre el aparato de la toma de
red de la pared antes de comenzar la revisión
o las operaciones de mantenimiento.
Estos dispositivos deben contar con una toma
de tierra para su seguridad.
No corte ni retire el tercer cable (el cable de tierra)
del cable del aparato, bajo ninguna circunstancia.
Indications d’erreur
Le dispositif de commande compte un système de détection des erreurs qui agit principalement à travers la vérication
de la fonctionnalité de l’électronique (fonctionnalité du clavier, conditions de lumière ambiante, communication entre
les deux tableaux et température de travail du système de commande).
Dès qu’il détecte une défaillance, le système éteint tous les éléments chauffants et afche un code d’erreur formé par
un F suivi d’une seconde lettre, chaque combinaison identiant la cause de l’erreur selon les indications du tableau
ci-dessous.
FA, FC
FE, Ft
Fc
Fr
FH
FJ
F0
FL
FU
Fd
Fb
F5
FP
Erreur touche
Défaillance du capteur de température
Température excessive
Erreur relais
Erreur système de commande
(EEPROM)
Erreur touche
Erreur logiciel
Erreur clavier (lumière d’ambiance)
Erreur touche
Erreur test voyant lumineux On/Off
Erreur clavier
Erreur de communication
Erreur du ventilateur de
refroidissement
F1
F2
F7
F3
F4
F8
F6
F9
Chauffage induction d'erreur Ntc
Chauffage induction d'erreur Ntc
Chauffage induction d'erreur Ntc
Induction d'erreur Ntc
Induction d'erreur Ntc
Induction d'erreur Ntc
Induction d'erreur
Induction d'erreur
FRANÇAIS
“Fc” Laisser refroidir la table de cuisson.
“FA,FC,FJ,FL,FU,Fb” En cas d’erreur du clavier ou des touches, assurez-vous qu’il n’y a sur les commandes
aucun objet, trace de saleté ou uide. Éteignez l’appareil puis rallumez-le. Si le problème persiste, contactez
le service après-vente.
Si d’autres erreurs du système de commande apparaissent, mettez l’appareil hors tension puis rallumez-le. Si le
problème persiste, contactez le service après-vente.
Assistance ou Service Après-Vente
Avant d’appeler l’assistance ou le service aprèsvente, veuillez bien vérifier la section « Solution aux
problèmes ». Ceci peut vous faire économiser le coût
d’un appel à un centre de service. Si vous avez
cependant besoin d’aide, suivre les indications cidessous. Lorsque vous appelez, soyez prêt à indiquer
la date d’achat, le modèle complet ainsi que le
numéro de série de votre appareil. Ces informations
nous permettront de mieux répondre à vos questions.
Données de Service
Pour un centre de service autorisé ou de
l’information sur les pièces, voir le paragraphe
"GARANTIE pour l’électroménager".
L’emplacement du numéro de série sur le produit il est
situé sur la base de la table de cuisson. Notez cette
information dans l’espace prévu à cet effet cidessous. Gardez votre facture pour la validation de
votre garantie.
Numéro de modèle _________________
Numéro de série ___________________
Date d’installation ou Occupancy ________________
32
Page 33

Manual de uso & Mantenimiento
Table of Contents
Page
ADVERTENCIAS PARA LA
INSTALACIÓN ELÉCTRICA .................................... 33
Instrucciones de Seguridad .................................. 34
SEGURIDAD DE LA PLACA DE COCCION ............. 34
SEGURIDAD PERSONAL ....................................... 35
Modelos y nomenclatura de piezas ...................... 36
Mandos táctiles - Vista detallada
(con todas las opciones) ....................................... 35
Teclas de mando/Características de
los diferentes modelos .......................................... 36
Consejos de uso ..................................................... 37
Valores de regulación recomendados ...................... 37
Función Baja Temperatura ....................................... 37
MODO DE USO ...................................................... 38
Encender el cuadro de mandos ................................ 38
Regulación de los elementos ................................... 38
Utilización de la gama de potencia reducida ............ 38
Apagar un elemento ................................................. 39
Led indicador de supercie muy caliente .................. 39
Función booster ....................................................... 39
Función de bloqueo de seguridad de las teclas ........ 39
Ajuste del contador de tiempo .................................. 39
Calor de reposo ........................................................ 40
Características ......................................................... 40
Funcionamiento de la Encimera de Inducción ..... 41
ANTES DE UTILIZAR LA PLACA POR PRIMERA VEZ
.................................................................................. 41
Cookware ................................................................ 42
Funcionamiento del calentamiento por INDUCCIÓN .... 42
Tipos de recipientes y su uso ................................... 42
Limpieza de la Placa de Cocción .......................... 43
Solución de Problemas .......................................... 44
Indicaciones de error ................................................ 45
Servicio de Asistencia Técnica ............................. 45
Preste la debida atención a los siguientes
símbolos que encontrará en el manual:
LEA Y CONSERVE ESTAS INSTRUCCIONES
ADVERTENCIAS PARA LA INSTALACIÓN
ESPAÑOL
ELÉCTRICA
ADVERTENCIA
La instalación y el mantenimiento de este
electrodoméstico deben ser efectuados por un
instalador cualificado o una agencia técnica.
Los modelos de se pueden accionar
en 240V o 208V.
ATENCIÓN
Desenchufe siempre el aparato de la toma de
red de la pared antes de comenzar la revisión
o las operaciones de mantenimiento.
Estos dispositivos deben contar con una toma
de tierra para su seguridad.
No corte ni retire el tercer cable (el cable de tierra)
del cable del aparato, bajo ninguna circunstancia.
Cualquier cambio o modicación que no hayan sido
autorizados expresamente por la parte responsable de la
conformidad podrá anular la autorización al usuario para
hacer funcionar el equipo.
NOTA: Esta unidad se ha puesto a prueba y se ha determinado
que cumple con los límites de un dispositivo digital de
clase B, de conformidad con la Parte 18 de las normas de
la FCC. Estos límites están diseñados para brindar una
protección razonable contra interferencia dañina dentro de
una instalación residencial. Esta unidad genera, utiliza y
puede irradiar energía de frecuencia de radio y, si no se instala
y usa de acuerdo con las instrucciones, puede provocar una
interferencia dañina a las comunicaciones de radio. Sin
embargo, no hay garantía de que no haya interferencia en una
instalación determinada. Si la unidad provoca interferencia
nociva a la recepción de radio y televisión, lo que puede
determinarse encendiendo y apagando la unidad, el usuario
puede corregir la interferencia a través de una o más de las
siguientes medidas:
• Reoriente o cambie la posición de las antenas receptoras.
• Incremente la distancia entre la unidad y el receptor.
• Conecte la unidad a un tomacorriente o un circuito diferente
del que está usando el receptor.
• Para cualquier ayuda, diríjase al vendedor o a un técnico
radio/TV competente.
ADVERTENCIA
Este es el símbolo de los avisos relacionados
con la seguridad: alerta sobre potenciales
peligros que pueden derivar en muerte o
daños a las personas.
Si no sigue estas instrucciones, puede correr
peligro de muerte o de resultar gravemente
herido.
Las personas que utilicen un marcapasos o un
dispositivo médico similar deben tener cui dado
cuando utilicen y se encuentren cerca de una
unidad por inducción. El campo electromagnético
puede afectar el funcionamiento del marcapasos
o del dispositivo médico similar. Es recomendable
consultar a su médico o al fabricante del
marcapasos sobre su situación particular.
33
Page 34

IMPORTANTE
Instrucciones de Seguridad
Por favor, lea todas las instrucciones antes de utilizar este aparato.
SEGURIDAD DE LA PLACA DE COCCION
ADVERTENCIA
Instalación adecuada
El electrodoméstico debe ser instalado y
conectado a tierra por un electricista cualificado.
No utilice jamás el electrodoméstico para
calentar una habitación.
No deje a los niños solos
No deje a niños solos o sin supervisión en una
habitación en la que haya electrodomésticos en
funcionamiento. No permita que se suban o se
sienten en ninguna parte del electrodoméstico.
Lleve ropa adecuada
No lleve nunca ropa demasiado amplia o con
mangas o complementos que cuelguen mientras
use el electrodoméstico.
Mantenimiento
No repare ni sustituya ningún componente del
electrodoméstico si no se recomienda
explícitamente en este manual. Cualquier otra
operación debe ser efectuada por un técnico
cualificado.
Almacenamiento en el interior y encima del
electrodoméstico
No almacene materiales inflamables dentro de
un horno ni cerca de las unidades de superficie.
No utilice agua para sofocar los incendios
provocados por grasa
Sofoque las llamas con una tapa, bandeja o un
extintor de polvo químico o de espuma.
No utilice agarradores húmedos
Si los agarradores entran en contacto con una
superficie caliente, el vapor resultante podría
provocar quemaduras. Los agarradores no
deben entrar en contacto con elementos
térmicos calientes. No utilice toallas o trapos
gruesos o doblados.
Utilice sartenes del tamaño adecuado
El electrodoméstico está equipado con una o
más unidades de superficie de diferentes
dimensiones. Seleccione utensilios con bases
llanas y con tamaños que cubran la superficie
del fuego. Si utiliza sartenes o pucheros de
diámetro inferior al del fuego, dejará una parte
de este expuesto al contacto directo, lo que
podría provocar un incendio si entrara en
contacto con alguna prenda o paño. Si respeta
la proporción entre los utensilios y los fuegos
aumentará también la eficiencia del
funcionamiento del electrodoméstico.
Manual de uso & Mantenimiento
ESPAÑOL
No deje el electrodoméstico desatendido si está
utilizando temperaturas elevadas
Las salpicaduras provocan humo y, si se
derrama grasa, puede prender fuego.
Asegúrese de que las placas reflectoras o
bandejas de goteo estén bien colocadas
Si estos elementos no están colocados durante
el uso del electrodoméstico, el cableado y los
componentes inferiores podrían resultar
dañados.
Cubiertas protectoras
No utilice papel de aluminio para cubrir la
superficie, las bandejas o la parte inferior del
electrodoméstico, excepto si lo hace siguiendo
las instrucciones de este manual. Una
colocación inadecuada de los elementos de
protección podría provocar peligro de descarga
eléctrica o de incendio.
Utensilios de cocina vitrificados
Utilice sartenes y ollas vidriadas (de cristal,
cerámica, cerámica vidriada, barro...). Estos
materiales no se rompen cuando son expuestos
a cambios repentinos de temperatura.
Gire los mangos de los utensilios hacia el
interior y no los sitúe sobre las unidades de
superficie adyacentes
Para reducir el riesgo de quemaduras o de
ignición de materiales inflamables o de
derramamientos provocados por un contacto no
intencionado con el utensilio, coloque los
mangos de los utensilios hacia dentro evitando
situarlos sobre las unidades de superficie
adyacentes.
No moje los elementos térmicos extraíbles
Los elementos térmicos no deben sumergirse en
agua.
No utilice la placa de cocción si tiene fisuras
Si la placa de cocción se rompiera, los
limpiadores y los derrames de alimentos podrían
filtrarse por las fisuras y provocar un riesgo de
descarga eléctrica. Si detecta alguna fisura,
póngase de inmediato en contacto con un
técnico cualificado.
Limpie la placa con cuidado
Si utiliza una esponja o un trapo mojados para
limpiar salpicaduras de la placa en caliente,
hágalo con cuidado: podría quemarse con el
vapor. Algunos productos de limpieza emanan
vapores tóxicos si se aplican a una superficie
caliente.
34
Page 35

SEGURIDAD PERSONAL
Manual de uso & Mantenimiento
ESPAÑOL
ADVERTENCIA
Para reducir el riesgo de daños a las
personas, en caso de que el aceite con el que
cocina prenda fuego, siga los pasos
siguientes:
La grasa es un material inflamable y debe
manipularse con cuidado.
No utilice agua para sofocar los incendios
provocados por grasa.
No toque nunca una sartén en llamas.
Si prende fuego algo de grasa que se
encuentre fuera de la sartén, puede sofocarlo
con bicarbonato sódico o con un extintor de
polvo químico seco o de espuma.
No toque la grasa hasta que se haya enfriado.
Limpie cualquier derrame de inmediato.
Si va a flambear un alimento sobre la placa,
apague el extractor de la campana. La
corriente de aire podría extender y descontrolar
la llama.
No deje nunca la superficie desatendida si está
cocinando con temperaturas altas. Las
salpicaduras provocan humo y, si se derrama
grasa, puede prender y provocar un incendio.
ATENCIÓN
Evite que la placa entre en contacto con papel de
aluminio, plástico, papel o tela cuando esté caliente.
No coloque sartenes o recipientes vacíos sobre el
fuego encendido.
Si tiene cuidado, evitará quemaduras. Si las
llamas no se apagan inmediatamente, salga de
la habitación y llame a los bomberos.
Tenga siempre un detector de incendios que
funcione correctamente cerca de la cocina.
Deje siempre la campana extractora de humos
encendida cuando flambee alimentos
(solamemte en caso de humo sin llamas).
Utilice un extintor solo si
Dispone de un extintor ABC y sabe cómo
utilizarlo.
El fuego es pequeño y está limitado a la zona
en la que se inició.
Ya ha llamado a los bomberos.
Tiene una salida a su espalda mientras
combate el fuego.
No utilice jamás agua para extinguir fuegos en
la cocina.
Si su ropa prende fuego, tírese al suelo de
inmediato y gire sobre sí mismo para
extinguir las llamas.
ADVERTENCIA
Para reducir el riesgo de quemaduras en el
uso de la placa siga estos consejos:
No utilice jamás la placa de cocción para calentar
una habitación.
No deje a niños o mascotas solos en una
habitación en la que haya electrodomésticos en
funcionamiento. No permita que se sienten o
apoyen en ninguna parte del electrodoméstico.
ATENCIÓN
No almacene objetos que puedan llamar la atención
de los niños ni en los armarios que se encuentren
sobre el electrodoméstico ni en la parte posterior: los
niños podrían resultar gravemente heridos si
intentaran alcanzarlos.
Cuando utilice la placa de cocción
No toque la superficie de los fuegos ni la
zona de alrededor. La superficie puede emitir
calor suficiente para causar quemaduras. Los
elementos de la superficie pueden estar
calientes incluso cuando están de color
oscuro. No toque la superficie de la placa ni
permita que ningún material inflamable entre
en contacto con ella mientras esté caliente.
Cuando utilice la placa de cocción sobra el
horno
No toque los elementos térmicos o las
superficies interiores del horno. Los
elementos térmicos pueden estar calientes
aunque estén de color oscuro. Las superficies
interiores de un horno emiten y retienen calor
suficiente para provocar quemaduras. No
toque los elementos térmicos ni las
superficies interiores del horno, ni permita que
ningún material inflamabe o tejido entre en
contacto con ellos durante el uso del
electrodoméstico o mientras este esté
caliente. Hay otras superficies del
electrodoméstico que pueden calentarse lo
suficiente como para provocar quemaduras;
entre estas se encuentran, por ejemplo, las
aberturas de ventilación del horno y las
superficies de alrededor, las puertas del horno
y los cristales de las puertas del horno).
Para minimizar el riesgo de quemaduras,
salpicaduras y de incendio, mantenga el
mango de la sartén o recipiente que esté
utilizando en el centro de la placa de cocción,
pero no encima de un fuego.
Utilice únicamente recipientes adecuados
para la placa de cocción, como determinados
tipos de cristal, cerámica vidriada refractaria,
barro u otros recipientes vitrificados.
35
Page 36

Modelos 30”
Manual de uso & Mantenimiento
ESPAÑOL
Modelos y nomenclatura de piezas
3
5
2
VECTIM304 (Código de aprobación 812T40IP ó 812T40NP)
Position 1 - Elemento de circuito simple 6” 1200W (Booster 1400W)
Position 2 - Elemento de circuito simple 6” 1200W (Booster 1400W)
Position 3 - Elemento de circuito simple 8” 2200W (Booster 3000W)
Position 4 - Elemento de circuito simple 7” 1800W (Booster 2800W)
Position 5 - Mandos táctiles
Modelos 36”
4b
4
1
3
4
VECTIM365 (Código de aprobación 812V50IQ ó 812CV50NQ)
Position 1 - Elemento de circuito simple 6” 1200W (Booster 1400W)
Position 2 - Elemento de circuito simple 6” 1200W (Booster 1400W)
Position 3 - Elemento de circuito simple 8” 2200W (Booster 3000W)
Position 4 - Elemento de doble circuito 7” 1800W (Booster 2800W)
Position 4b - Elemento de doble circuito 11” 2640W (Booster 3600W)
Position 5 - Elemento de circuito simple 8” 2200W (Booster 3000W)
Position 6 - Mandos táctiles
36
6
5
12
Page 37

Manual de uso & Mantenimiento
6
4
2
3
1
2
4
5
4
8
12
6b
Mandos táctiles - Vista detallada (con todas las opciones)
6
ESPAÑOL
5
3
2
Figura. 2
Position 1 - Tecla general ON/OFF de la placa de cocina
Position 2 - Tecla de bloqueo de mandos - seguridad
niños
Position 3 - Indicador de mandos bloqueados.
Position 4 - Teclas ON/OFF y visualizador de nivel
de potencia del foco de cocción anterior
izquierdo.
Position 5 - Teclas ON/OFF y visualizador de nivel de
potencia del foco de cocción posterior
izquierdo
Position 6 - Teclas ON/OFF y visualizador de nivel de
potencia del foco doble de cocción central.
Position 6b - Indicator de habilitación de elemento
doble.
10
9
11
7
1
Position 7 - Teclas ON/OFF y visualizador de nivel de
potencia del foco de cocción posterior
derecho.
Position 8 - Teclas ON/OFF y visualizador de nivel
de potencia del foco de cocción anterior
derecho.
Position 9 - Teclas de funciones especiales.
Position 10 - Semicírculo para indicación del nivel de
potencia rango dual
Position 11 - Contador de tiempo.
Position 12 - Indicador de termómetro para regulación
del nivel de potencia.
5
1
Figura. 3
Position 1 - Tecla OFF para el foco asociado.
Position 2 - Tecla ON/SELECCIÓN para el foco
Position 3 - Indicación MUY CALIENTE (calor activo o
Position 4 - Visualizador del nivel de potencia.
Position 5 - Ampliación autorizada (circuito doble).
Position 6 - Contador de tiempo activo en el foco
asociado.
residual del foco).
asociado.
3
Figura. 4
Position 1 - Indicador de termómetro para regulación del
nivel de potencia.
Position 2 - Escala de potencia gama reducida (de 0 a
15%), interior.
Position 3 - Escala de potencia gama completa (de 0 a
100%), exterior.
Position 4 - Cuentaminutos activo.
Position 5 - Visualizador y teclas contador de tiempo.
37
Page 38

Teclas de mando/Características de los diferentes modelos
VECTIM365 (Código de aprobación 812V50IQ ó 812CV50NQ)
●
Barra de ajuste nivel de potencia.
●
Escala de potencia de doble rango (Plena y Baja Temperatura).
●
Temporizador (independiente para cada zona).
●
5 temporizadores independientes, uno para cada zona.
●
Función de Hervor rápido.
●
5 zonas de cocción.
●
Interruptor principal ON/OFF y botón de bloqueo.
Manual de uso & Mantenimiento
ESPAÑOL
VECTIM304 (Código de aprobación 812T40IP ó 812T40NP)
● Barra de ajuste nivel de potencia.
● Escala de potencia de doble rango (Plena y Baja Temperatura).
● Temporizador (independiente para cada zona).
● 4 temporizadores independientes, uno para cada zona.
●. Función de Hervor rápido.
●. 4 zonas de cocción.
●. Interruptor principal ON/OFF y botón de bloqueo.
38
Page 39

Manual de uso & Mantenimiento
Consejos de uso
ESPAÑOL
Puede olvidarse de los preparados que tradicionalmente
se cocinaban al baño María, como cremas, salsas,
chocolate, etc. Con la placa de inducción puede
prepararlos directamente en un solo recipiente, gracias
a la perfecta regulación de la potencia y a la distribución
uniforme de la temperatura del sistema de inducción.
También puede utilizar la función “Booster” para hervir
agua en poco tiempo. Cuando esta llega a su punto de
ebullición, pase a un nivel de cocción más bajo para
evitar la generación excesiva de vapor y para reducir el
consumo energético.
Cuando se fríen alimentos conviene calentar el aceite
utilizando el nivel máximo de potencia, y pasar a un
nivel intermedio en el momento de introducir los
alimentos en el recipiente.
Utilice los recipientes con sus tapas correspondientes.
Reduzca con tiempo la potencia seleccionada para el
foco de cocción si está calentando agua: esta no debe
hervir demasiado tiempo inútilmente.
Utilice siempre recipientes con dimensiones adecuadas
a la cantidad de alimento que va a preparar. Un
recipiente grande que no se llena completamente
consume mucha energía.
Función Baja Temperatura
La función “baja temperatura” permite cocinar a baja
temperatura, por ejemplo para derretir mantequilla o
chocolate, preparar salsas o cocer a fuego lento.
Esta función incluye nueve niveles de potencia que
suministran una gama de temperaturas que permiten
desde derretir hasta hervir alimentos.
Trabajando según esta modalidad, la temperatura
presente encima del vidrio está controlada y puede
mantenerse a cualquiera de los niveles que se indican
en la tabla a continuación.
Nivel de potencia Temperatura °F (°C)
1 120 (50)
2 140 60)
3 160 (70)
4 175 (80)
5 195 (90)
6 210 (100)
7 230 (110)
Para obtener mejores resultados es aconsejable utilizar
recipientes metálicos con fondo plano y asegurarse
de que la base del recipiente encaja con la zona de
cocción indicada sobre el cristal.
Si desea ahorrar energía, cocine las verduras y las
patatas con poca agua. No ponga a calentar recipientes
vacíos: podrían dañarse y dañar también la supercie
de la placa de cocción.
En la siguiente tabla encontrará algunos ejemplos de
cocción. Los niveles de potencia que indica pueden
variar en función del tipo de recipiente y del peso y el
tipo de alimento.
Valores de regulación recomendados
Todos los valores de regulación que se indican en
la tabla a continuación son valores recomendados.
Los valores indicados en la tabla son indicativos; los
valores reales dependen de varios factores:
• Tipo y calidad del recipiente de cocción
• Tipo, cantidad y temperatura de los alimentos
• Elemento utilizado y preferencias personales.
8 250 (120)
9 265 (130)
39
Page 40

Manual de uso & Mantenimiento
5a
2
3
7
6
8
ESPAÑOL
Modo de uso
ATENCIÓN
Este control táctil funciona según la tecnología del
sensor óptico de la luz.
Durante la primera conexión eléctrica o después
de un corte de energía, cualquier luz intensa que
llegue directamente hasta la supercie del sensor
puede modicar el funcionamiento del control táctil.
Cuando se enciende la unidad, es necesario
asegurarse de que ninguna luz intensa llegue
directamente hasta la supercie del control táctil, ya
que podría comprometer la calibración del sensor
de puesta en marcha e insensibilizar el control.
Cuando se conecta la placa al suministro eléctrico,
todos los indicadores y los dígitos luminosos se
encienden, indicando que el equipo está activado. Esta
operación dura unos segundos; a continuación, las
luces se apagan automáticamente. La placa de cocina
está lista para funcionar.
Encender el cuadro de mandos
Si los mandos han sido bloqueados, ejercer una presión
mantenida sobre la tecla [LOCK]; el led de seguridad
está encendido, se apaga al cabo de unos segundos.
El visualizador (ref.4) y el semicírculo (ref.6) muestran
el nivel de potencia actualizado en tiempo real.
Transcurrido un tiempo límite de 5 segundos, el valor es
aceptado; el led SUPERFICIE MUY CALIENTE (ref.3)
deja de parpadear y pasa a luz ja. El semicírculo
desaparece al cabo de algunos segundos más.
Tocar la tecla [ON] para convalidar el valor antes de que
se agote el tiempo límite.
La gura a continuación representa la escala de plena
potencia, es decir la gama completa de potencia a
disposición del sistema de mando, de 0% a 100% (que
corresponde a un nivel 9).
El nivel 4 corresponde a un 15% de potencia disponible.
Tocar la tecla general [ON/OFF]; ahora pueden
seleccionarse todos los focos.
Todos los visualizadores indican un nivel de potencia
0; si no se ejecuta acción alguna dentro de los 10
segundos siguientes, el sistema se apaga.
Regulación de los elementos
Tocar la tecla [ON] correspondiente (ref.2) para
seleccionar el foco deseado: la indicación SUPERFICIE
MUY CALIENTE (ref.3) se pone a parpadear en espera
de una acción por parte del usuario.
4
1
Figura. 6
Tocar el indicador de termómetro para ajustar el
nivel de potencia (niveles disponibles: de 0 a 9): se
puede desplazar el dedo sobre la barra o bien tocar
directamente el valor deseado.
Figura. 7
Utilización de la gama de potencia
reducida
Una vez que el foco de cocción ha sido seleccionado,
tocar la tecla [LOW TEMP] (ref.8) para activar la gama
de potencia reducida (ref.9); ajustar después el nivel de
potencia como de costumbre.
9
Figura. 8
El sistema de mando utilizará sólo un 15% de la
potencia disponible, dividido en escalones de 0 a 9 para
mayor precisión.
Recordar que en esta modalidad especial, el nivel
40
Page 41

Manual de uso & Mantenimiento
1
2
3
ESPAÑOL
9 corresponde exactamente al nivel 4 de la gama
estándar.
Para restablecer la gama estándar sin apagar el foco,
seleccionar este último y tocar nuevamente la tecla
[LOW TEMP] para desactivar la gama de potencia
reducida.
Atención: el nivel sigue siendo el mismo, pero la
potencia aumenta.
Apagando el foco de cocción siguiendo las instrucciones
a continuación, se desactiva también el modo de
potencia reducida. Cuando se seleccione nuevamente
este foco, empezará a trabajar en el modo de potencia
estándar.
Apagar un elemento
Para apagar un elemento calentador, tocar le tecla
[OFF] (ref.1) correspondiente.
Se pueden apagar simultáneamente todos los
elementos activos tocando la tecla [ON/OFF] general.
Activación doble del elemento (solo 36”)
Seleccionar una zona de calentamiento doble
tocando para ello la tecla [ON] correspondiente;
empieza a parpadear el indicador luminoso
SUPERFICIE CALIENTE (n°3).
El elemento externo solamente se activará
automáticamente si el diámetro de la cacerola es
ligeramente superior al del círculo interno.
El Señalador que indica cuando el Elemento de
Doble Zona está activado es el indicador ON (ref.
5a), y cuando el Elemento no esta activado es el
indicador OFF.
Led indicador de supercie muy caliente
Cada elemento posee un led indicador SUPERFICIE
MUY CALIENTE (ref.3) que avisa cuando la supercie
de cocción está muy caliente.
Suena una señal acústica, y el nivel de potencia
seleccionado y la letra P aparecen de forma alterna
en el visualizador. El semicírculo muestra el nivel de
potencia seleccionado.
La resistencia funciona con cierta potencia adicional
disponible unos minutos, después de lo cual vuelve al
nivel de potencia seleccionado.
Esta opción está disponible en todos los focos de
cocción, tanto estándar como especiales (zonas
múltiples).
Función de bloqueo de seguridad de las
teclas
Para activar y desactivar la función de bloqueo de
las teclas, ejercer una presión mantenida sobre la
tecla [LOCK] durante 2 segundos. La indicación de
bloqueo se enciende y el teclado queda bloqueado. Por
supuesto, la tecla [LOCK] siempre está activa.
Cuando se pone en marcha el equipo, las teclas quedan
bloqueadas automáticamente.
Se puede activar la función de bloqueo tanto si los
elementos calentadores están en función como si no lo
están. La función de seguridad bloquea todas las teclas
excepto las [OFF]. La función off de la tecla general
[ON/OFF] también permanece activa.
Ajuste del contador de tiempo
Este dispositivo tiene la función de un cuentaminutos
pero no desactiva los elementos calentadores.
El contador de tiempo solamente está disponible en
algunos modelos. Se puede ajustar independientemente
del elemento calentador e incluso si no hay ningún foco
encendido. Si la placa de cocina no está encendida,
se puede activar tocando previamente la tecla general
[ON/OFF] para acceder al modo de stand-by; todos los
visualizadores tienen que estar a “0”.
El indicador se enciende cuando se activa el foco, y
permanece encendido hasta que el foco de cocción se
enfríe hasta una temperatura que garantice la seguridad
al tacto (aproximadamente 65°C).
Cuando un indicador luminoso SUPERFICIE MUY
CALIENTE está encendido, hay que tener mucho
cuidado cuando se trabaja a proximidad de la placa de
cocina ya que todavía está muy caliente.
Función booster
Después de seleccionar el elemento calentador, tocar la
tecla [BOOSTER] para activar y desactivar esta función
antes o después del ajuste del nivel de potencia.
Figura. 9
Tocar las teclas [T-] o [T+] para ajustar el contador
de tiempo: el valor inicial empieza en “00” o en “45”
respectivamente en el visualizador del contador de
tiempo (ref.1). Mantener la tecla pulsada para que los
41
Page 42

Manual de uso & Mantenimiento
4
ESPAÑOL
valores se incrementen/disminuyan más rápidamente.
El valor máximo es “99”.
El led del contador de tiempo (ref.2) indica cuando este
dispositivo está en servicio.
El punto que aparece en la esquina inferior derecha
del visualizador (ref. 3) parpadea cuando el contador
de tiempo ha sido seleccionado para permitir modicar
su valor. Transcurridos cinco segundos desde la
última presión, el nuevo valor es aceptado y el punto
desaparece. Una señal acústica conrma que el nuevo
valor ha sido aceptado.
Para anular el contador de tiempo, ejercer una presión
mantenido sobre la tecla [T-] hasta que el valor descienda
a “00”, o bien tocar [T-] y [T+] simultáneamente para
volver a poner rápidamente el valor a “00”.
En algunos modelos existe la posibilidad de asociar el
contador de tiempo a un foco de cocción.
• Seleccionar el foco de cocción que se desea
cronometrar.
• Tocar [T-] o [T+]: el contador de tiempo asociado al
foco en cuestión parpadea.
• Ajustar el valor del contador de tiempo.
• El led luminoso del contador de tiempo pasa a luz ja;
el valor es aceptado y arranca la cuenta atrás.
Si hay más de un contador de tiempo programado,
el visualizador muestra el valor más bajo, es decir el
tiempo que vencerá primero. Se ve parpadear el led
del contador de tiempo (ref.4) asociado al foco al que
se reere el valor visualizado. Si el valor visualizado
se reere al contador de tiempo independiente, el led
luminoso del contador de tiempo (ref. 2) parpadea.
4) parpadea y el valor visualizado conmuta al contador
de tiempo independiente.
Cuando el tiempo del contador se acaba:
• Una secuencia sonora indica el nal de la actividad:
durante 1 minuto se repiten tres tonos cortos seguidos
de un silencio largo.
• El indicador luminoso asociado al contador caducado
parpadea.
• El valor “00” del contador de tiempo también
parpadea, esperando el reconocimiento del usuario
para detenerse.
• Tocar [T-] o [T+] para anular el contador de tiempo
caducado; el visualizador conmuta al contador que
tenga el tiempo residual más corto, o permanece
vacío si no hay otro contador de tiempo programado.
ADVERTENCIA: El contador de tiempo es un simple
avisador acústico que llama la atención del usuario.
No tiene efecto alguno sobre los elementos
calentadores. Siempre habrá que apagar
manualmente el foco de cocción utilizando la tecla
[OFF] correspondiente.
Calor de reposo
Los leds SUPERFICIE MUY CALIENTE permanecen
encendidos, incluso después de la actividad de cocción,
todo el tiempo necesario para que la temperatura de la
supercie descienda a un valor seguro al tacto.
Figura. 10
Para comprobar el tiempo residual de una zona
temporizada, tocar la tecla [ON] asociada al foco
en cuestión: el led luminoso del contador de tiempo
correspondiente parpadea, y el valor presente en
el visualizador del contador conmutará al nuevo
valor durante unos segundos. Al cabo de un plazo
temporizado, el valor del tiempo más corto aparece
nuevamente.
Para comprobar el valor del contador de tiempo
independiente cuando no está visualizado de forma
prioritaria, tocar [T-] o [T+] sin seleccionar ninguna
zona. El indicador luminoso del contador de tiempo (ref.
42
Figura. 11
La duración del calor residual depende del nivel
de potencia que se había programado para el foco
correspondiente y del tiempo durante el cual el elemento
calentador ha estado en servicio.
Por ejemplo, un foco de cocción que ha trabajado más
de 5 minutos a plena potencia tardará media hora
para enfriarse sucientemente para que el indicador
de calor residuo se apague. En el nivel 1, tardará
aproximadamente 10 minutos.
Características
El sistema de mando comprueba su propia temperatura
ambiente e interrumpe cualquier actividad en caso
de sobrecalentamiento de sus partes internas. Dejar
enfriar el aparato.
Page 43

Manual de uso & Mantenimiento
ESPAÑOL
Funcionamiento de la Encimera de Inducción
ANTES DE UTILIZAR LA PLACA POR
PRIMERA VEZ
Todos los productos se limpian en fábrica con
solventes que eliminan cualquier signo visible de
suciedad, aceite y grasa que haya podido fijarse
en la placa durante el proceso de producción.
Retire el embalaje de la placa y la
documentación que haya sobre ella.
Limpie la superficie de cristal antes de utilizarla
por vez primera. Se recomienda efectuar una
limpieza exhaustiva con un limpiador específico.
No le llevará más de un minuto y dejará una
película protectora limpia y brillante sobre el
cristal antes de su primer uso.
Las primeras veces que utilice la placa, podría
percibir un ligero olor: es perfectamente normal y
desaparecerá con el tiempo.
Para obtener buenos resultados en la cocina,
deberá elegir los recipientes adecuados.
La superficie de cocción conservará calor y
permanecerá caliente aproximadamente 20
minutos después de haber apagado los fuegos.
La superficie vitrocerámica de la placa es muy
duradera y resistente a los impactos, pero se
puede romper si algún objeto cae sobre ella.
No coloque sartenes o recipientes vacíos sobre
el fuego encendido. Podría dañar el recipiente, el
fuego o la placa de cocción.
No deslice ningún recipiente sobre la superficie:
podría rayar el cristal
No es recomendable utilizar sartenes o
recipientes de hierro fundido en esta placa de
cocción. El hierro fundido retiene el calor y podría
provocar daños en la placa.
Distribución de energía
Los anafes de cuatro quemadores están divididos en
dos zonas de calentamiento individuales.
Los anafes de cinco quemadores están divididos en 3
zonas.
Un generador controla 2 elementos, o dos zonas de cocción
dentro de una sección de calentamiento comparten la
energía de un generador.
Fig. 12a
Anafe de 4 quemadores con generadores de inducción de
lados derecho e izquierdo (2).
Fig. 12b
Los anafes de cinco quemadores están divididos en 3
zonas.
La distribución de energía se activa cuando ambos
elementos de la misma zona de cocción se activan y un
elemento se configura para Impulso (P). El elemento que
no esté configurado para Impulso cambiará a un nivel
de energía más bajo. Esto se denomina distribución de
energía
“Ruidos” de recipientes de cocción
Cuando se usan elementos cercanos que están programados en configuraciones de energía determinadas, los campos magnéticos
pueden interactuar y producir un silbido bajo o un “zumbido” intermitente. Los recipientes que cubren por completo el anillo del
elemento producen menos ruido. Un “zumbido” bajo resulta normal particularmente en configuraciones altas. Estos ruidos pueden
reducirse o eliminarse bajando o subiendo las configuraciones de nivel de energía de uno o ambos elementos.
43
Page 44

Cookware
Manual de uso & Mantenimiento
ESPAÑOL
Funcionamiento del calentamiento por
INDUCCIÓN
En el interior de la placa de inducción hay un circuito
electrónico que alimenta y acciona una bobina que,
a su vez, crea un campo magnético que se activa
cuando entra en contacto con un recipiente de cocina
adecuado (de material magnético).
Cuando se apoya una olla o sartén sobre la placa,
el recipiente se calienta de forma instantánea, pero
la placa permanece fría. No hay dispersión de calor.
El calor generado en el recipiente permite cocinar
rápidamente ahorrando así tiempo y energía.
válido o bien el diámetro de su fondo es demasiado
pequeño para el foco de cocción elegido.
Es importante intentar centrar todo lo posible los
recipientes sobre el foco de cocción.
Algunos modelos de placas tienen focos dobles: el
reconocimiento automático del recipiente determinará
el uso de la zona exterior.
Algunos focos de cocción presentan un diámetro
interno delimitado con una línea na que sugiere al
usuario.
5-1/8” (13 cm)
Tamaño del
3-1/8” (8 cm)
Min. Dia.
Tamaño del
recipiente
Min. Dia.
recipiente
4” (10 cm)
Min. Dia.
Tamaño del
recipiente
3-1/8” (8 cm)
Tamaño del
Min. Dia.
recipiente
Figure 14a
Anafe de 30” de ancho. Utilice el recipiente de tamaño
mínimo ilustrado para cada elemento de cocción.
Figure 13
Tipos de recipientes y su uso
Atención!
Este tipo de placa de cocción debe utilizarse con
recipientes de material ferromagnético. Puede utilizar
recipientes de acero esmaltado, de fundición o
recipientes de acero inoxidable con fondo especial
para inducción.
Utilice un imán para saber si un recipiente es adecuado.
Acérquelo al fondo del recipiente: si se adhiere a este,
quiere decir que es válido para la placa de inducción.
No utilice los recipientes convencionales de acero
delgado, ni recipientes que tengan componentes de
vidrio, barro, cobre o aluminio.
El propio visualizador del foco de cocción le indicará
si el recipiente es válido: si el indicador de potencia
parpadea quiere decir que, o bien el recipiente no es
44
8-1/4” (21 cm)
Min. Dia.
Tamaño del
recipiente
4-1/4” (11 cm)
Min. Dia.
Tamaño del
recipiente
4-1/4” (11 cm)
Min. Dia.
Tamaño del
recipiente
8-1/4” (21 cm)
Min. Dia.
Tamaño del
recipiente
4-1/4” (11 cm)
Min. Dia.
Tamaño del
recipiente
Fig 14b
Anafe de 36” de ancho. Utilice el recipiente de tamaño
mínimo ilustrado para cada elemento de cocción.
Figure 15
Page 45

Limpieza de la Placa de Cocción
ATENCIÓN
Antes de limpiar la placa, asegúrese de que está
apagada y de que su superficie está fría.
Aplique a diario una pequeña cantidad de un producto
específico para la limpieza de vitrocerámicas. Así
creará una película protectora que facilitará la
limpieza de salpicaduras de agua o alimentos. Si la
superficie de la placa está caliente, el producto de
limpieza será menos efectivo.
Debe aplicarse antes de cada uso. Utilice un paño
limpio y aplique el producto para eliminar polvo o
marcas de metal que hayan podido aparecer en la
placa desde su último uso.
Manual de uso & Mantenimiento
ESPAÑOL
Limpieza diaria
Elimine las manchas con un paño limpio y húmedo.
Utilice vinagre blanco si quedan manchas.
Aclare y seque.
Aplique una pequeña cantidad de un producto de
limpieza específico. Cuando esté seco, saque brillo a
la superficie con un paño limpio,
ATENCIÓN
No utilice ningún tipo de detergente mientras la
superficie esté caliente: utilice únicamente el
rascador. Cuando los limpiadores se calientan,
pueden emitir vapores nocivos para su salud. Y
también pueden dañar la superficie de la placa.
CONTORNO
(Modelos de acero inoxidable)
Límpielo siguiendo el veteado. Para una limpieza
intensiva, utilice BonAmi
®
o Soft Scrub® (nunca lejía).
Frote con una esponja o un paño húmedos y con
jabón. Aclare y seque.
TÉCNICAS DE LIMPIEZA DIARIA
Limpie la superficie en frío excepto en los casos
siguientes.
Las salpicaduras de
azúcar, siropes,
productos a base de
tomate y leche deben
retirarse de
inmediato con el
rascador.
PRODUCTOS DE LIMPIEZA
RECOMENDADOS
Crema limpiadora para placas
Utilice solo una pequeña cantidad. Aplíquela con un
paño o papel de cocina. Frote la superficie y sáquele
brillo con un paño seco.
BonAmi
Aclarar y secar.
Soft Scrub
®
®
(sin lejía)
Aclarar y secar.
White Vinegar
Aclarar y secar.
Rascador
Incluido en el embalaje.
Nota: Los productos recomendados son orientativos,
no se recogen en este manual por motivos
publicitarios.
EVITE LOS SIGUIENTES PRODUCTOS
Limpiadores para cristal con amoníaco o
blanqueadores con cloro
Sus ingredientes pueden corroer o manchar la placa
de forma permanente.
Detergentes cáusticos
Limpiadores de horno pueden corroer la superficie de
la placa.
Detergentes abrasivos y estropajos
Detergentes abrasivos y estropajos como Scotch
®
pueden rayar la superficie o dejar marcas de
Brite
metal.
Detergentes en polvo con blanqueadores con
cloro
Pueden dejar manchas permanentes en la placa.
Detergentes inflamables
Como el líquido para encendedores o WD-40.
45
Page 46

Problema Causa Posible solución
La placa no funciona
Manual de uso & Mantenimiento
Solución de Problemas
La placa no está conectada a una red
eléctrica adecuada
El fusible o el diferencial han saltado.
La placa no está conectada a la red.
La placa está bloqueada. Desbloquee la placa.
Llame a un electricista para que
compruebe si la placa está conectada al
voltaje apropiado. Llame a un electricista
para que sustituya el fusible o el
diferencial.
Llame a un electricista para que analice
la red eléctrica.
ESPAÑOL
Los fuegos no se calientan como
deberían.
La superficie vitrocerámica es
transparente o aparece de color
rojo.
Tecla de bloqueo bloqueada
tras la primera conexión o
control táctil insensible.
No está utilizando recipientes
adecuados.
Bajo una luz fuerte y directa se puede
ver a través del cristal. El color rojo
también es efecto de una luz fuerte.
Durante la primera conexión eléctrica
o después de un corte de energía,
cualquier luz intensa que llegue
directamente hasta la supercie
del sensor puede modicar el
funcionamiento del control táctil.
Utilice los recipientes adecuados
(encontrará indicaciones en este
manual).
Son características normales de las
placas de vitrocerámica negras.
Cuando se enciende la unidad, es
necesario asegurarse de que ninguna
luz intensa llegue directamente hasta
la supercie del control táctil, ya que
podría comprometer la calibración
del sensor de puesta en marcha e
insensibilizar el control.
46
Page 47

Manual de uso & Mantenimiento
ESPAÑOL
Indicaciones de error
El dispositivo de mando cuenta con un sistema de detección de errores que actúa principalmente comprobando la
funcionalidad de la electrónica (funcionalidad del teclado, condiciones de iluminación ambiente, comunicación entre
los dos cuadros y temperatura de trabajo del sistema de mando).
Tan pronto como detecta un fallo, el sistema apaga todos los elementos calentadores y visualiza un código de error
formado por una F y por otra letra; cada combinación identica la causa del error según las indicaciones de la tabla
siguiente:
FA, FC
FE, Ft
Fc
Fr
FH
FJ
F0
FL
FU
Fd
Fb
F5
FP
“Fc” Dejar enfriar la placa de cocina.
“FA,FC,FJ,FL,FU,Fb” En caso de error del teclado o de las teclas, comprobar que no hay encima de los
mandos ningún objeto, rastro de suciedad o uido. Apagar el equipo y volver a encenderlo. Si el problema
persiste, contactar con el servicio de posventa.
Si aparecen otros errores del sistema de mando, poner el equipo fuera de tensión y volver a encenderlo. Si el
problema persiste, contactar con el servicio de posventa.
Error tecla
Fallo del detector de temperatura
Temperatura excesiva.
Error relé
Error sistema de mando (EEPROM)
Error tecla
Error software
Error teclado (iluminación ambiente)
Error tecla
Error test indicador luminoso On/Off
Error teclado
Error de comunicación
Error Ventilador de refrigeración
F1
F2
F7
F3
F4
F8
F6
F9
Error NTC Calentador inducción
Error NTC Calentador inducción
Error NTC Calentador inducción
Error NTC Inducción
Error NTC Inducción
Error NTC Inducción
Error Inducción
Error Inducción
Servicio de Asistencia Técnica
Antes de ponerse en contacto con el servicio de
asistencia técnica, lea la sección “Solución de
problemas”. Puede que hacerlo le ahorre la llamada.
Si no encuentra la solución a su problema en esta
sección, siga las instrucciones que encontrará más
abajo. Cuando llame al servicio de asistencia, tenga
a mano los siguientes datos: fecha de compra,
referencia completa del modelo y número de serie de
su placa de cocción. Esa información nos ayudará a
atenderle.
Registro de datos para el servicio
Cómo obtener servicio Para información sobre
servicio autorizado o refacciones, ver el pàrrafo
"GARANTÍA para electrodomésticos".
A la base de la placa de cocción se puede ver la
etiqueta con el número de serie del producto. Ahora
es un buen momento para anotar esta información
en el espacio proporcionado abajo. Guarde su
factura para validar la garantía.
Número del Modelo _________________
Número de Serie ___________________
Fecha de instalación y ocupación
________________
47
Page 48

EuroChef USA, Inc.
41 Mercedes Way - Suite 25
Edgewood, NY 11717
Phone (866) 844-6566 09VR6640 ed 10-13
 Loading...