

Page 1

Water Sampler
Purpose:
For the collection of water samples at varying depths or distances away from a shoreline.
Contents:
One (1) Assembled Water Sampler
One (1) Cord (15 meter length)
Site Selection:
If you are serious about collecting data on water quality in your area, several collection sites
must be carefully chosen. The site should be accessible year round and under all weather
conditions. You must be able to return to these sites each time you test. Be sure to get the land
owner's permission to use the site. Keep the site clean.
A meaningful collection site will allow you to collect samples from an open stream, river, or
lake. Sites located in shallows, behind dams, or other relatively sheltered areas may not represent
the stream as a whole.
Once a site is chosen, place a marker at the site, and record its location in your notebook
along with a site number. When collecting data, always record your data along with the site
number.
Water Sampling:
Make sure the retrieving line is securely fastened to the eye bolt in the side of the
water sampler. The line should be neatly coiled and free from tangles and knots. Fasten the free
end of the line to some permanent fixture of the dock, bridge or boat you are on; this will prevent
the water sampler from being lost overboard if the free end of the line accidentally slips through
your hands. Some users have found that a Lobsterman’s Toggle (float) is sufficient to prevent loss
of the sampler. When tied to the free end, the toggle will float on the surface of salt water while
supporting the sampler. This has not been documented in fresh water.
Arm the water sampler by pulling both balls directly outward at the same time, then folding
them up over the top of the sampler body. Slip the two metal tubes together (one inside the other)
and align the holes that have been drilled through their sides. When these holes have been aligned,
# 15010
OPERATING INSTRUCTIONS
© 2006 The Science Source · P.O. Box 727 · Waldoboro, Maine 04572 ·Tel. 1-800-299-5469
e-mail us: info@thesciencesource.com visit our web site: www.thesciencesource.com
O:\_VST PAPERWORK\SENSOR PAPERWORK\SENSOR BOOKLETS\WDS\150101.DOC November 27, 2006
1
Page 2
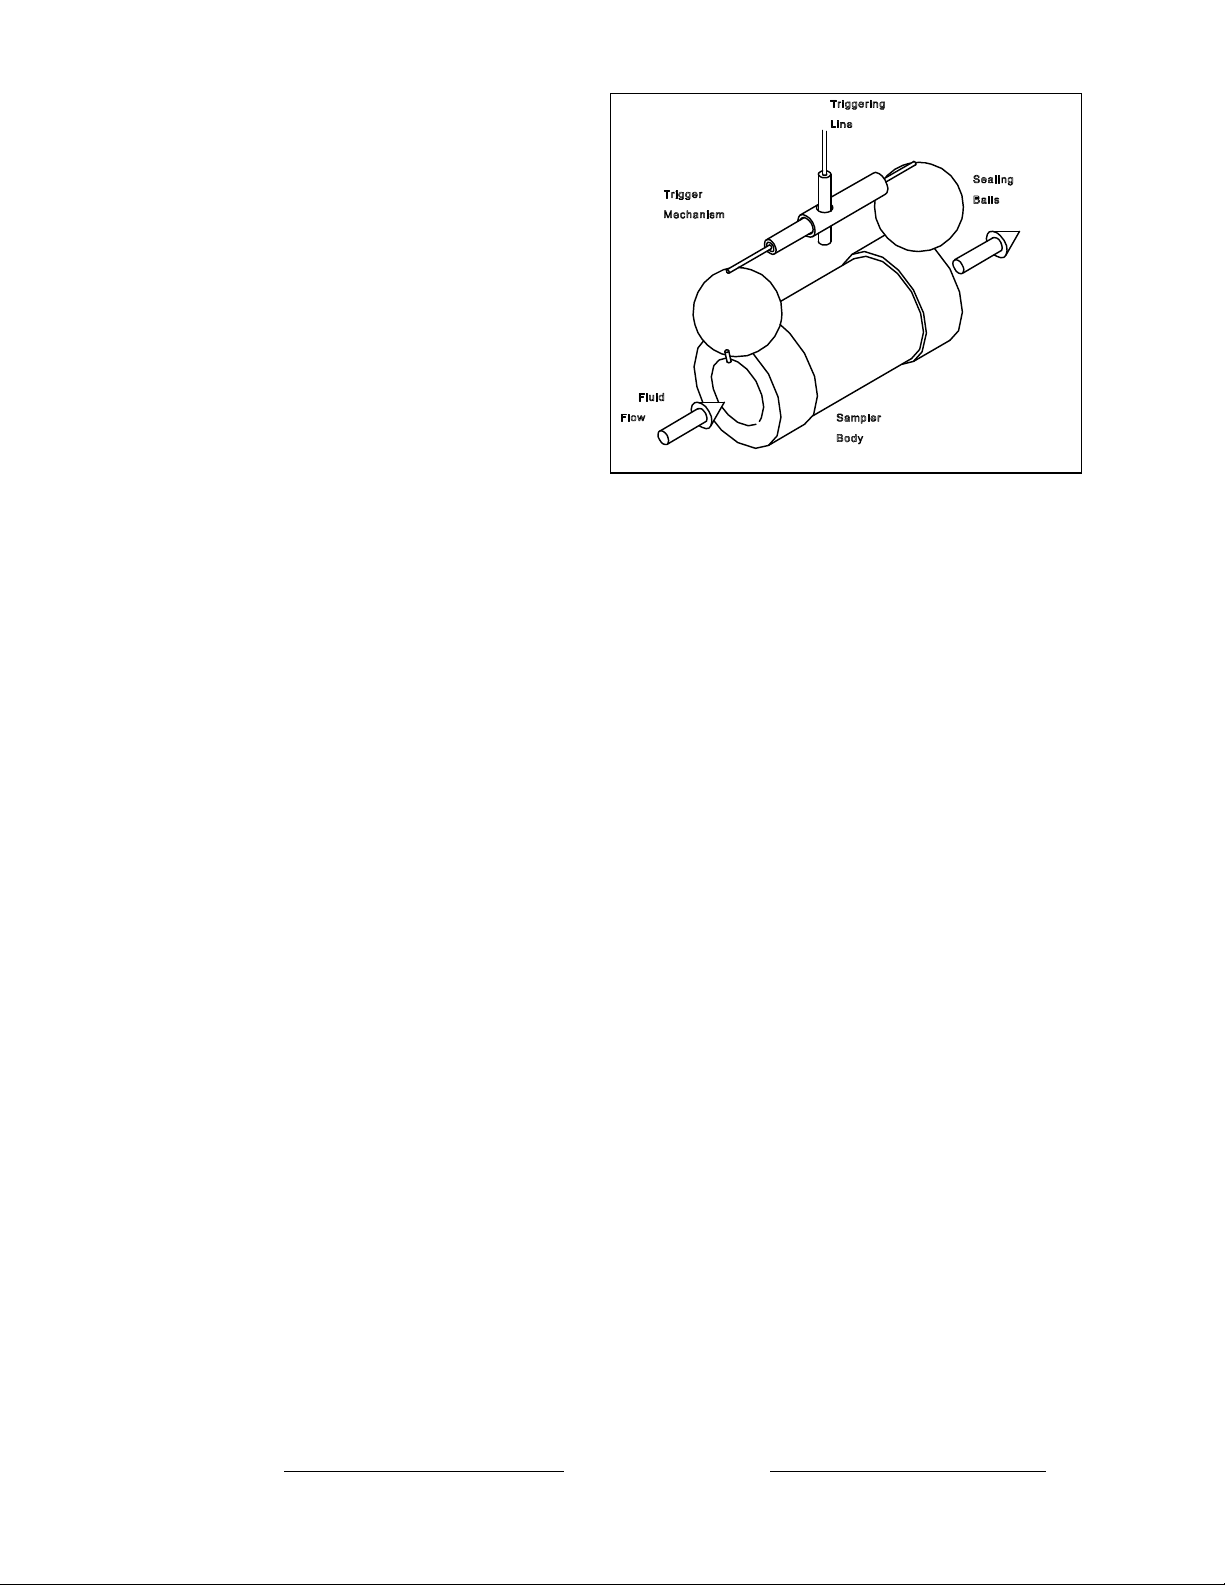
insert the trigger pin through both metal tubes. You can now release the balls. Pull the trigger pin
out slightly until it extends 1 cm beyond the
side of the metal tube.
A sharp tug on the retrieving line is all
that is required to trigger and seal the water
sampler. If you try triggering the sampler out
of the water, be sure that no one is standing
near by because the closing action is very
quick and the trigger mechanism will swing
wildly. The sampler is designed to properly
trigger under water.
To obtain a sample from a desired
depth, mark the retrieving line by wrapping
tape around the cord at the desired distance
from the sampler body. Arm the sampler, and
slowly lower it over the side of the boat or
dock until the mark you've made is touching the water. If the sampler tends to float instead of
sink, drop the sampler from a small height into the water. The white balls must flood if the
sampler is to sink. To capture the sample, take a firm grip on the line then pull sharply upward.
A quick tug of only a few inches is preferable. Slowly pull the sampler back out of the water.
To use your water sample, hold the water sampler vertically and gently pull the top ball up
and to the side. Be careful not to agitate the water because this will introduce additional oxygen
into the sample and affect any measurements of dissolved oxygen that you may make. The sample
may be withdrawn by opening the pinch cock.
When the sampling is completed, rinse your equipment with fresh water then dry.
Caution: Do Not Store the Water Sampler in the Armed Position.
Applications:
Dissolved Oxygen and Biological Oxygen Demand (BOD):
Oxygen can get into the water by a variety of methods; diffusion through the water's
surface, aeration by waves breaking or rapids splashing over rocks or water falls, and
photosynthesis from aquatic plants. Three fourths of the earths oxygen is produced by oceanic
algae. Animals living in the water require oxygen to live. If there are too many microscopic
animals in the water then the oxygen supply will be depleted. For example, if the water contains a
large amount of biodegradable material, bacteria will try to reduce this material into simpler
forms. This process uses up large quantities of oxygen. The Biological Oxygen Demand (BOD) is
a measure of the amount of oxygen used by living organisms in the water. Testing for BOD shows
the long term effects of biodegradable wastes in a given area whereas oxygen content tests report
on the conditions at the moment the test was made.
Procedure:
© 2006 The Science Source · P.O. Box 727 · Waldoboro, Maine 04572 ·Tel. 1-800-299-5469
e-mail us: info@thesciencesource.com visit our web site: www.thesciencesource.com
O:\_VST PAPERWORK\SENSOR PAPERWORK\SENSOR BOOKLETS\WDS\150101.DOC November 27, 2006
2
Page 3

Obtain a water sample from a lake or stream. To measure the dissolved oxygen content,
fill a small glass bottle with the water sample. Be careful not to agitate the water or get any air
bubbles trapped in the bottle. Fill the bottle to overflowing. Make your determination of the
dissolved oxygen content using the water in this glass bottle. There are many standard chemical
tests available to make this determination. Follow the procedure presented with the test kit you
have. Remember to record the kit name on your data sheet so that others will know the test
method used.
To measure the 5 day BOD, fill a clean large jar about 3/4 full with the sample water,
cover, and shake vigorously for about one minute. Determine the amount of dissolved oxygen in
this water using standard oxygen testing procedures. Record this value on your data sheet.
Pour this aerated sample water into a smaller stoppered bottle that has been completely
wrapped in foil or painted black to keep the light out. Make sure the bottle is filled to overflowing
and that there are no trapped air bubbles present before sealing the bottle with the cap. Place the
bottle in a warm dark place for about 5 days. At the end of this time determine the dissolved
oxygen content. Subtract this value from the value recorded when the sample was new and just
shaken. This difference in dissolved oxygen levels is the 5 day BOD for the site where the sample
was taken. Record this value on your data sheet.
The following are some rough limits to compare your data with:
1 to 2 ppm BOD Little biodegradable waste
3 to 5 ppm BOD Relatively clean water
6 to 9 ppm BOD High levels of waste, many bacteria
10 + ppm BOD Extremely polluted water
pH Testing:
The pH of the water can be tested using standard pH test paper. Tear off approximately 3
inches of test paper and immerse it in the water sample. Let it stand for a few seconds then
remove it from the water and immediately compare it with the color chart found on the test paper
dispenser. Record the pH value on your data sheet. Liquid pH tests may be used to provide more
accurate results.
pH scale numbers range from 0 to 14. Pure distilled water was given the neutral pH value
of 7. The strongest acids approach 0 and the strongest bases approach 14. Pure rain has a slightly
acidic pH of 5.6. Rain and snow can pick up particles that are suspended in the air. If the rain
picks up sulfur and nitrous oxides it will be more acidic. Most fish can tolerate pH ranges from 5
to 9 but the best range falls between 6.5 and 8.2. If water that is more acidic than normal comes in
contact with certain chemicals and metals, the acid may cause these substances to become more
soluble or more toxic than normal. For instance, a fish that can stand a pH as low as 4.8 may die
at a pH of 5.5 if low concentrations of iron, aluminum, lead, or mercury are present.
Phosphates:
3
© 2006 The Science Source · P.O. Box 727 · Waldoboro, Maine 04572
·Tel. 1-800-299-5469 e-mail us: info@thesciencesource.com visit our
web site: www.thesciencesource.com
O:\_VST PAPERWORK\SENSOR PAPERWORK\SENSOR BOOKLETS\WDS\150101.DOC November 27, 2006
Page 4

All plants and animals need phosphates to grow. If the phosphate level in the water is too
high, excessive plant growth is the result. The Phytoplankton will grow out of control until their
own death rate becomes so large that the decay process uses up the available oxygen in the water
and other organisms die from this lack of oxygen. Ideally, rivers and streams have phosphate
concentrations of 0.1 ppm.
Nitrates and Nitrites:
Nitrates also promote the growth of Phytoplankton and when the concentration is too
high, their growth is uncontrolled. The decay of the dying plankton uses up the available oxygen
causing other animals to die.
Nitrites can cause fish to become ill because it reacts directly with the hemoglobin in their
blood, destroying its ability to carry oxygen. Concentrations below 0.06 ppm appear to have little
affect on cold water fish. Since nitrites rapidly become nitrates, they must be considered when
determining the nitrate concentration.
Sample Data Sheet
Experimenter's Name ___________________________________________________________
Date _____________________ Site # _______________________________________
Time _____________________
Weather conditions _____________________________________________________________
Air Temp _________________ Water Temp _____________________
Dissolved Oxygen _______________
pH Reading _______________
5 Day BOD _______________
Phosphate _______________
Nitrate _______________
Other _______________
Trouble Shooting:
Important! Always inspect the connections at each end of the shock cord (latex tubing) before each
use. These connections are fastened with nylon cable ties (available at most electronics hobby shops) and
should be replaced if evidence of wear is observed.
The trigger pin is designed to fit snugly in the hole through the side of the trigger assembly. Once the
sampler is armed, this pin may resist being pulled out of this hole. After several uses, this pin will wear
4
© 2006 The Science Source · P.O. Box 727 · Waldoboro, Maine 04572
·Tel. 1-800-299-5469 e-mail us: info@thesciencesource.com visit our
web site: www.thesciencesource.com
O:\_VST PAPERWORK\SENSOR PAPERWORK\SENSOR BOOKLETS\WDS\150101.DOC November 27, 2006
Page 5

slightly and the trigger will trip more smoothly. If you are still experiencing trouble pulling the trigger pin,
use a fine grade sandpaper and lightly sand the sides of the trigger pin until it can be pulled easily from the
hole.
If the trigger pin slips easily through one side of the trigger tube but will not go completely through;
the holes may not be properly aligned. In this case, remove the trigger pin and rotate one of the trigger tubes
by 180 degrees. When the holes line up again, reinsert the trigger pin. This time the trigger pin should pass
through both holes.
Store your water sampler away from direct sunlight and excessive heat. If your sampler requires
cleaning, use only water and mild detergents. DO NOT use solvents such as acetone or alcohol.
Caution: Do Not Store the Water Sampler in the Armed Position.
Time Allocation:
The only prior assembly required for this product is to attach the cord to serve as a retrieving line. Individual
experiment times will vary depending on methods of instruction and distance to the water sampling site.
Feedback:
If you have a question, a comment, or a suggestion that would improve this product, you may call our toll free
number 1-800-299-5469, or e-mail us: info@thesciencesource.com. Our FAX number is: 1-207-832-7281.
5
© 2006 The Science Source · P.O. Box 727 · Waldoboro, Maine 04572
·Tel. 1-800-299-5469 e-mail us: info@thesciencesource.com visit our
web site: www.thesciencesource.com
O:\_VST PAPERWORK\SENSOR PAPERWORK\SENSOR BOOKLETS\WDS\150101.DOC November 27, 2006
 Loading...