


Vernier Mini GC Plus
Gas Chromatograph
(Order Code: GC2-MINI)
Introduction
The Vernier Mini GC Plus is an instrument for separating, analyzing, and identifying
substances contained in a volatile liquid or gaseous sample. The Mini GC Plus can
detect and distinguish between families of compounds, including alcohols,
aldehydes, ketones, polar-substituted aromatic hydrocarbons, carboxylic acids,
esters, ethers, and nitriles (see Appendix A for more details). It has all of the key
components of a traditional gas chromatograph, including an injection port,
temperature and pressure controls, a capillary column through which different
substances pass at different rates depending on various chemical and physical
properties, and a sensor for detecting the arrival of compounds. It has a patented
MEMS chip sensor that allows for room air to be used as a carrier gas.
The column of the Mini GC Plus can be operated at temperatures ranging from 30°C
to 160°C. The MEMS chip sensor can be operated at two levels of sensitivity,
allowing for a greater range of compounds and injection volumes to be used.
The Mini GC Plus connects to the USB port on a computer, the LabQuest 2, or the
LabQuest. Both Vernier Logger Pro and LabQuest App software allow students to
easily control data-collection parameters, then collect data in real time. After the
peaks are detected, the software allows you to determine retention times and/or
integrate peaks to help quantify the relative amount of each compound present in the
sample.
What is included with the Mini GC Plus?
Mini GC Plus unit
AC Power Adapter
Hamilton Syringe (1.0 μL volume)
Two extra septa (a third septum is already installed in your Mini GC Plus)
USB cable
Carrying case
Gas Chromatography: Investigations with the Mini GC, an electronic lab book
with five investigations, available as a free download when you sign in to your
account at www.vernier.com/gc-book
What are the features of the Mini GC Plus?
The Mini GC Plus can detect more compounds than the original Mini GC. The new
features that make this possible include:
The maximum temperature of the column is 160°C, offering more flexibility in
designing temperature profiles.
The MEMS chip sensor can be set at either of two levels of sensitivity. Standard
2
sensitivity mode works well for polar compounds such as: ketones, alcohols,
and esters. High sensitivity mode works well for compounds such as
halogenated alkanes and substituted aromatics, as well as mixtures with one or
more compound of low concentration.
Details can be viewed online at: www.vernier.com/gc2-mini
Important: We strongly recommend that you read the entire manual thoroughly
before using the Mini GC Plus for the first time. There are precautions and usage
suggestions throughout this manual that are important to know, prior to doing your
first data collection. Please wear the appropriate personal safety equipment and use
the instrument in accordance with the instructions in this manual to prevent injury.
Caution: The Vernier Mini GC Plus gas chromatograph is designed to
analyze volatile compounds. These compounds may be toxic or highly flammable;
therefore, follow the manufacturer’s instructions when operating this instrument.
Serious personal injury may result from improper use of this instrument. Due to the
small amounts of analytes, there is no hazard that exhaust from the chromatograph
could cause a fire when used according to the instructions. To minimize exposure to
vapors, use this instrument in well-ventilated areas. Refer to the Material Safety Data
Sheet for each compound to be injected into the chromatograph. For personal
protection, we recommend that open reagent containers be handled in a hood or
well-ventilated area.
Logger Pro 3 or LabQuest App Software Requirements
Logger Pro 3 (version 3.8.6 or newer)
software is required if you are using a
computer. LabQuest App version 1.7
or newer is required if you are using
an original LabQuest. (You can check
the LabQuest version by tapping the
Home icon, tapping Control Panel,
and then tapping System Information).
If you are using a LabQuest 2, then
you will need App version 2.1.
If you own an earlier version of Logger Pro 3 software or LabQuest App, you can
upgrade to the current version at no cost by visiting our web site for updates:
www.vernier.com/downloads/
Note: Information on the use of the Mini GC Plus with National Instruments
LabVIEW software can be found at: www.vernier.com/labview/
Using the Mini GC Plus with a Computer or with LabQuest
1. If you will be collecting data on a computer, be sure you are using
Logger Pro software, version 3.8.6 or newer.
If you will be collecting data on an original LabQuest, make sure the LabQuest
unit has been updated to version 1.7 or newer. If you are using a LabQuest 2,
3
make sure the unit has been updated to App version 2.1 or newer.
2. Obtain a glass syringe and a vial of one or more of the following substances:
methanol, ethanol, ethyl acetate, acetone, or 2-butanone. Note: You may also
try any of the experiments in the lab book, Gas Chromatography:
Investigations with the Mini GC™, available for free from your Vernier
account.
Important: The glass syringe is fragile and can be easily damaged. Be careful not to
bend the needle or bend the plunger. If the plunger is accidentally pulled out of the
glass barrel, reinserting it is extremely difficult, sometimes impossible. Do not
remove the plastic spacer on the needle.
3. Prepare the Vernier Mini GC Plus for data collection.
a. Plug in the AC Adapter and turn on the Mini GC Plus, using its on-off
switch on the left side (see Figure 5).
b. Connect the USB cable of the Mini GC Plus to the USB port on your
computer, LabQuest, or LabQuest 2.
c. Start the data-collection program, and then choose New from the File menu
(to ensure software settings are set to default values).
d. Click Collect in Logger Pro or tap ► in LabQuest 2 or LabQuest, to bring
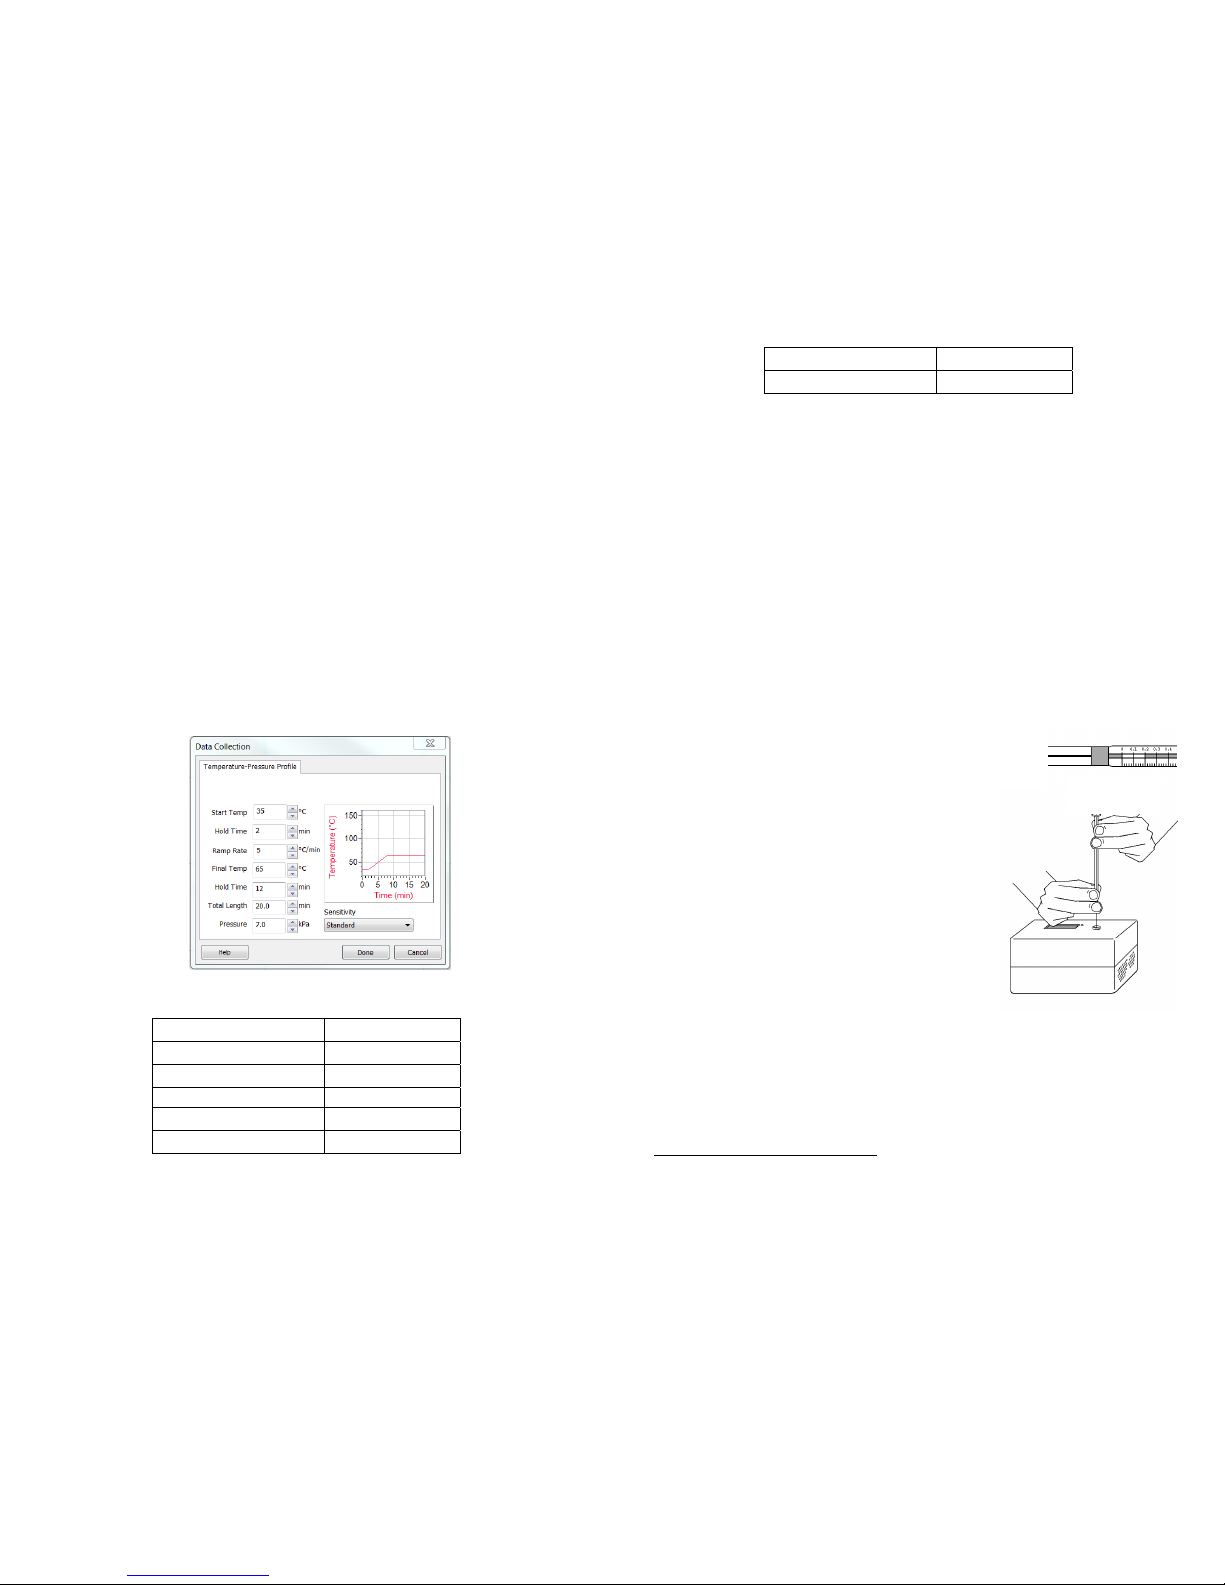
up the Temperature-Pressure profile, similar to Figure 1.
Figure 1 Temperature-Pressure
e. Set the Temperature-Pressure values to:
Start temperature
35C
Hold time 1 min
Ramp rate
10C/min
Final temperature
65C
Hold time 6 min
Total length 10.0 min
4
Pressure1 7.0 kPa
Sensitivity Standard
f. Select Done to initiate the Mini GC Plus warm up. Note: A new message
will appear, “Do not inject until GC is ready,” and the LED on the Mini GC
Plus will be red. The Mini GC Plus will take a few minutes to warm up and
stabilize. When the Mini GC Plus is ready for injection in Step 6, the
message will read, “Inject and select Collect simultaneously”, and the LED
will turn to green. Continue with Step 4 during warm up.
4. Follow the steps below to clean and flush the syringe with acetone. Important:
The glass syringe is fragile. Be careful not to bend the needle or bend the
plunger. Never pull the plunger back more than 50% of its total volume. Be
careful not to bend the plunger as you press it down.
a. Depress the plunger fully.
b. Submerge the tip of the syringe needle into the vial of acetone.
c. Pull back the plunger to fill the barrel about 1/3 full of acetone.
d. Expel the liquid onto a Kimwipe
or a paper towel.
e. Repeat Steps a–d at least two times. Use a Kimwipe or a paper towel to
carefully pat around the tip of the syringe needle.
5. Collect a volume of acetone for injection.
a. Submerge the needle into the vial of
acetone one last time.
b. Draw up approximately 0.2 L of liquid.
c. After collecting your sample, gently wipe
the needle from barrel to tip, with a
Kimwipe
.
6. Prepare for injection and the start of data
collection. When the Mini GC Plus has reached
the correct start temperature and pressure, the
message reads, “Inject and select Collect
simultaneously,” and the LED on the Mini GC
Plus is green.
a. To insert the needle of the syringe into the
injection port of the Mini GC Plus, hold the
syringe with one hand and steady the needle
with your other hand.
Important: Supporting the needle guard
and the lower part of the needle with two fingers, as shown in Figure 3, can
prevent the possible bending of the needle. Insert the needle into the
injection port until the needle stop is fully seated. If the needle sticks, rotate
it slightly while inserting. Do not move the plunger yet.
1
Pressure values entered here represent the pressure above ambient air pressure.
Figure 3
Figure 2

5
b. Simultaneously, depress the syringe plunger and select Collect to begin data
collection. Pull the needle out of the injection port immediately.
7. While the data collection proceeds, repeat Step 4 to thoroughly clean the
syringe and needle. It may take more than three flushes to feel the syringe
plunger move smoothly again, which is your indicator that the syringe and
needle are both suitably clean.
8. Data collection will end after 10 minutes.
9. Analyze your chromatogram.
a. Choose Peak Integration from the Analyze menu.
b. To select and integrate the peak, drag across the graph from a little before
the peak to a point far enough to the right so that the entire peak is included.
Choose Add.
Figure 4 Peak integration in Logger Pro
c. Select OK to return to the graph.
10. Using Logger Pro or LabQuest App, you can do any of the following.
You can choose to Store a run. (In Logger Pro, choose Store Latest Run
from the Experiment menu. In LabQuest App, tap the File Cabinet icon.)
You can choose to save this chromatogram and peak analysis for later use,
with a unique file name, by choosing Save from the File menu.
Print your chromatogram and peak analysis table.
You can rename run names, or peak names.
6
1.0 Product Description and Principles of Operation
Figure 5 Side view of Vernier Mini GC Plus
Figure 5 shows a side view of the Vernier Mini GC Plus. The power input jack,
power switch, USB connection to the computer or LabQuest, and column ventilation
grill are shown in this view.
Principles of Operation: The Vernier Mini GC Plus is designed to separate mixtures
of gases or volatile liquids and identify components of the mixtures by their specific
retention times. The chromatograph uses ambient air supplied from a pump to carry
a small sample of vapor through a stainless steel column.
The column is a nonpolar, general purpose capillary column made by Restek
(product code: MXT
®
–1). The column is heated using an electric current.
Temperature of the column is monitored by a built-in resistance temperature detector
(RTD) for accurate temperature measurement. The column assembly also has an
independent thermistor to protect against overheating.
At the end of the column is a Seacoast Science chemicapacitor sensor. The sensor is
a micromachined sensor chip coated with a chemoselective polymer. The polymer
absorbs analytes exiting the column. Analyte absorption by the polymer coating is
measured by the detector circuitry.
2.0 Specifications
The Vernier Mini GC Plus is designed for use in an educational laboratory. Ambient
temperature range for safe operation is 5°C to 40°C, and safe range of ambient
relative humidity of 0 to 95%. The Mini GC Plus should not be immersed or sprayed
with liquids. Power for the instrument is supplied by an external power supply. The
Mini GC Plus has a back-lit liquid-crystal display that advises the user of current
status.
 Loading...