

Page 1

LabQuest Viewer® Software
LabQuest Viewer is computer software that is used to display and control the screen of a
LabQuest using a computer. When used in conjunction with a projector, this software can be
used to demonstrate the functions of a LabQuest and enhance group presentations. This
software can also be used to monitor and control a LabQuest remotely as well as easily capture
LabQuest screen images for use in creating lab instructions or assessment questions.
Purchase of the LabQuest Viewer software entitles you to install it on every computer in your
school or, for post-secondary institutions, department. Installation to local machines over a
network is allowed. The license is limited to a single campus if your institution has multiple
campuses.
Rev. 10/10/14
© Vernier Software & Technology 1
Page 2
Set up LabQuest in LabQuest Viewer
Set Up LabQuest 2 to Communicate with LabQuest Viewer Over Wi-Fi
In order to view LabQuest 2 from LabQuest Viewer wirelessly, LabQuest must be on the same
Wi-Fi network as the computer running LabQuest Viewer software.
Note: For instructions on setting up Wi-Fi on LabQuest 2, see our website at
www.vernier.com/wireless
Once LabQuest is connected to Wi-Fi, follow these instructions to set up sharing to LabQuest
Viewer.
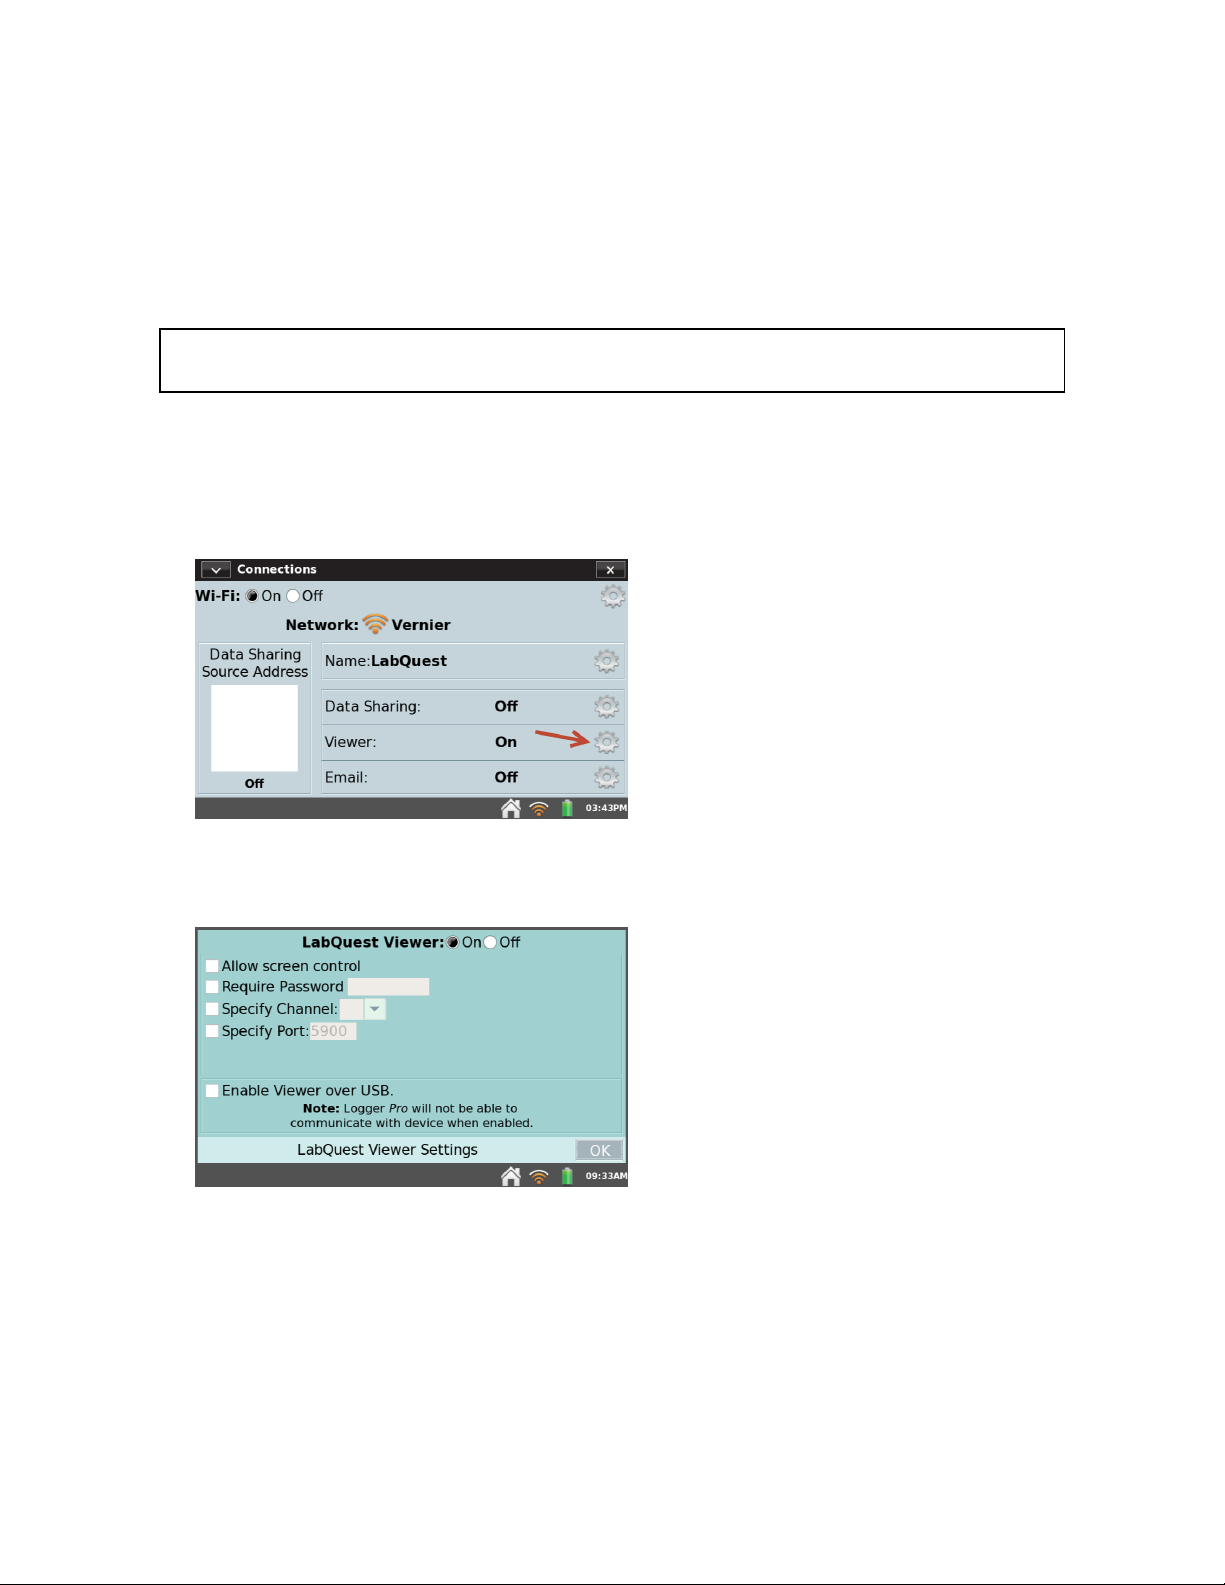
1. On LabQuest, launch the Connections app from the Home screen.
2. Tap the Viewer gear.
3. In the LabQuest Viewer Settings dialog, enable LabQuest Viewer (On). You can also
enable optional settings.
2
Page 3
Optional Settings
l To allow the LabQuest to be controlled remotely via LabQuest Viewer, select the
Allow screen control check box.
l To require a password from LabQuest Viewer in order to connect, select the
Require Password check box, tap the password entry field, and enter the desired
password.
l Ignore the option to specify a channel. This feature is no longer used.
l Ignore the option to specify a port. In most cases, the default port of 5900 works fine.
If you are unable to connect to LabQuest using the default port, contact your network
administrator to determine if a different port is required.
l Use Enable Viewer over USB when connecting via Wi-Fi is not an option. See Set up
LabQuest 2 to Communicate with LabQuest Viewer Software Over USB.
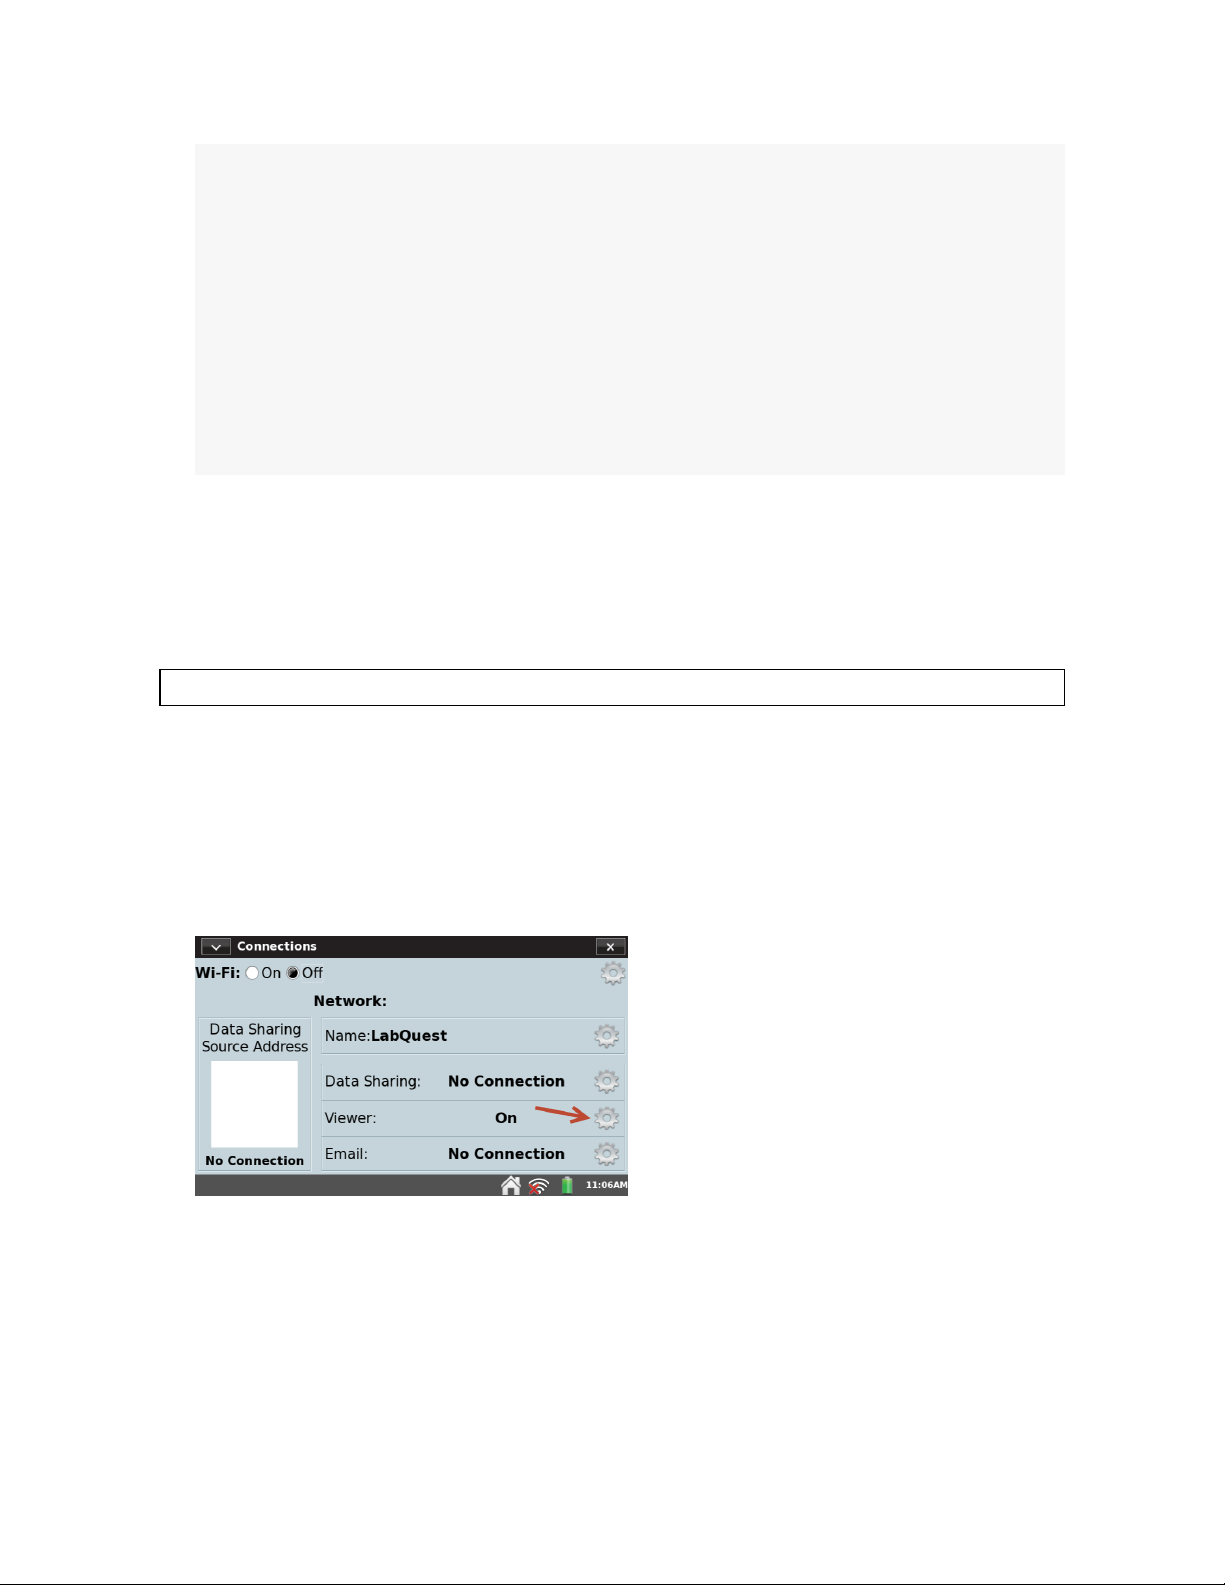
Set up LabQuest 2 to Communicate with LabQuest Viewer Software Over USB
If you are using LabQuest Viewer software on a computer, you have the option to connect
directly to a LabQuest 2 over USB instead of Wi-Fi.
Note: This option is not available for iPad® or original LabQuest.
To set up the USB connection on LabQuest 2, follow these instructions.
1. Connect your computer running LabQuest Viewer software to the LabQuest 2 using the
cable included with LabQuest 2.
2. On LabQuest, launch the Connections app from the Home screen.
3.
Tap the Viewer gear.
4. In the LabQuest Viewer Settings dialog, enable LabQuest Viewer (On). You can also
enable optional settings.
3
Page 4

5.
Select Enable Viewer over USB.
Set Up Original LabQuest to Communicate with LabQuest Viewer Over Wi-Fi
In order to view original LabQuest from LabQuest Viewer, LabQuest must be on the same WiFi network as the computer running LabQuest Viewer software.
Note: For instructions on setting up Wi-Fi on original LabQuest with a Vernier Wi-Fi USB
Adapter, see our website at www.vernier.com/til/2479
Once LabQuest is connected to Wi-Fi, follow these instructions to set up sharing to LabQuest
Viewer.
1. On LabQuest, tap the Home icon.
2. Select Control Panel ▶ Viewer Setup.
3.
In the LabQuest Viewer Setup dialog, enable LabQuest Viewer (On). You can also enable
optional settings.
Connect to LabQuest from LabQuest Viewer software
In order to use LabQuest Viewer software with LabQuest 2 or original LabQuest, LabQuest
must be configured.
Once you have set up LabQuest 2 or original LabQuest to share data with LabQuest Viewer,
follow these instructions to connect from LabQuest Viewer.
1. Tap the list icon.
2.
Select the desired LabQuest from the list provided. If the LabQuest requires a password,
enter the password. If your LabQuest is not listed, connect to LabQuest manually.
4
Page 5

Connecting to LabQuest Manually
a. Click the plus icon.
b. Enter either the name of the LabQuest unit or its IP address.
l How do I determine my LabQuest name?
l How do I determine my LabQuest IP address?
c. Click Connect.
Note: If you are unable to connect to LabQuest, see Troubleshooting.
5
Page 6

Capture a LabQuest Screen Image
Click the Share tool to copy an image of the LabQuest screen to a computer clipboard for use in
lab instructions and assessment documents.
6
Page 7

Troubleshooting
LabQuest is listed, but LabQuest Viewer fails to connect.
1. Verify the LabQuest and/or computer Wi-Fi signal strength is good. Relocate devices if
necessary.
2. Connect your computer and LabQuest to a different network.
3. If using LabQuest 2, try connecting over USB instead of Wi-Fi. For more information, see
Set up LabQuest 2 to Communicate with LabQuest Viewer Software Over USB
LabQuest is not shown in the LabQuest Viewer list.
1. Verify LabQuest has power and is turned on.
2. Verify Wi-Fi and LabQuest Viewer are enabled on LabQuest.
LabQuest 2
l Set Up LabQuest 2 to Communicate with LabQuest Viewer Over Wi-Fi
l Set up LabQuest 2 to Communicate with LabQuest Viewer Software Over USB
Original LabQuest
l Set Up Original LabQuest to Communicate with LabQuest Viewer Over Wi-Fi
3.
Verify the computer running LabQuest Viewer software is connected to the same network
(and subnet) as your LabQuest.
4. Refresh the list.
5. If necessary, manually connect to LabQuest. For more information, Connect to LabQuest
from LabQuest Viewer software.
LabQuest password does not let me connect to LabQuest.
1. Verify you are entering the correct, case-sensitive password. To find the password
LabQuest 2
Launch the Connections app from the Home screen, and then tap the Viewer gear.
Original LabQuest
2. Tap the Home icon, and then select Control Panel▶ Viewer Setup.
3. Verify you are connected to the correct LabQuest by checking the name and IP address of
the LabQuest. For more information, see
l How do I determine my LabQuest name?
l How do I determine my LabQuest IP address?
7
Page 8

4. If necessary, disable the Require Password feature, and then connect again.
I frequently lose connection with LabQuest when using Wi-Fi.
1. Verify the Wi-Fi signal strength is strong on the LabQuest and/or the computer running
LabQuest Viewer software. Relocate devices if necessary.
2. Have your Network Administrator troubleshoot possible network issues.
3. Connect both the LabQuest and the computer running LabQuest Viewer software to a
network that you know is working.
4.
If using a LabQuest 2 and a computer, try connecting over USB instead of Wi-Fi. For more
information, see Set up LabQuest 2 to Communicate with LabQuest Viewer Software Over
USB
Where can I get more information about troubleshooting network issues?
View additional articles in our online Technical Information Library at
www.vernier.com/networking
Note: For more help, contact Vernier Technical Support at support@vernier.com
How do I determine my LabQuest IP address?
LabQuest 2 Connected via Wi-Fi
1. Launch the Connections app from the Home screen.
2. The IP address is displayed in the lower-left corner of the screen.
LabQuest 2 Connected via USB
1. Launch the Connections app from the Home screen.
2. Tap the Network gear (top-right corner of the screen).
3. The IP address is displayed below the list of available networks and is labeled "usb0".
Original LabQuest
1. Tap the Home icon and select Control Panel▶Viewer Setup.
2. The IP address displayed in the Network Status box.
How do I determine my LabQuest name?
LabQuest 2
Launch the Connections app from the Home screen. The name is displayed in the Name field.
8
Page 9

Original LabQuest
1. Tap the Home icon and then select Control Panel▶System Information.
2. Tap the Device tab. The name is displayed in the Device name field.
I can see the LabQuest screen from LabQuest Viewer, but cannot control it.
1. Verify the Allow screen control option is enabled in LabQuest.
LabQuest 2
1. Launch the Connections app from the Home screen.
2. Tap the Viewer gear.
3. In the LabQuest Viewer Settings dialog, select the Allow screen control check box.
Original LabQuest
1. Tap the Home icon.
2. Select Control Panel▶ Viewer Setup.
3. In the LabQuest Viewer Setup dialog, select the Allow screen control check box.
2. Verify you are connected to the correct LabQuest by checking the name and IP address of
the LabQuest. For more information, see
l How do I determine my LabQuest name?
l How do I determine my LabQuest IP address?
3. Reconnect to your LabQuest (required if screen control is enabled while you are
connected).
What I am seeing on LabQuest Viewer does not match my LabQuest screen.
Verify you are connected to the correct LabQuest by checking the name and IP address of the
LabQuest. For more information, see
l How do I determine my LabQuest name?
l How do I determine my LabQuest IP address?
9
Page 10

Acknowledgments
Portions of this LabQuest Viewer are powered by the following:
l BonjourSDKforWindows
l JsonCpp
l libc++
l .NETFramework4.0
l TinyVNC
l WPFAnimatedGIF
License information is available by contacting us at support@vernier.com.
© 2012–2014 Vernier Software & Technology
Vernier Software & Technology
13979 S. W. Millikan Way • Beaverton, OR 97005-2886
Toll Free (888) 837-6437 • (503) 277-2299 • FAX (503) 277-2440
info@vernier.com • www.vernier.com
10
 Loading...