

Page 1
LabQuest Stream
(Order Code: LQ-STREAM)
LabQuest Stream®is a multi-channel, datacollection interface that can be used to collect data
from Vernier sensors on various platforms, such as
iOS
®
and Android™ devices, Windows®and Mac
®
computers, and Chromebooks™. LabQuest Stream
supports both wired (USB) and wireless
(Bluetooth
®
) connections. The type of connection you can use depends on the
data-collection platform.
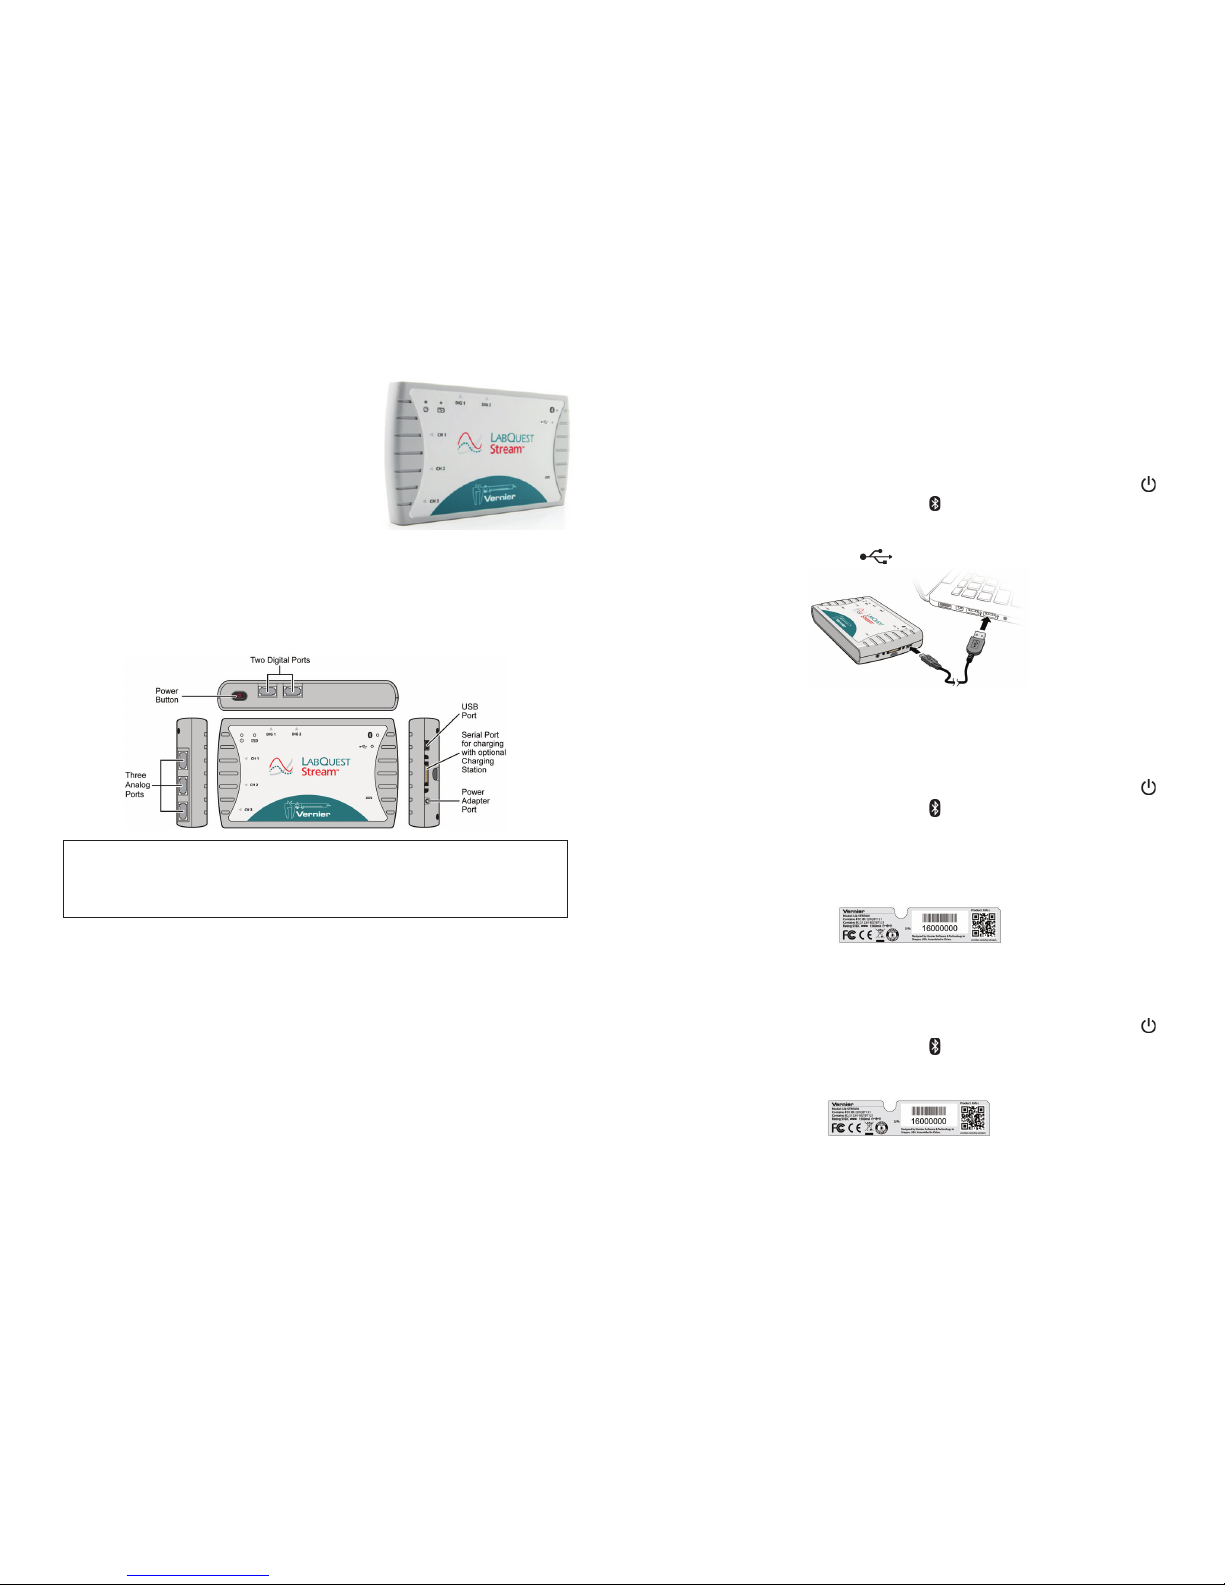
The LabQuest Stream interface contains three analog ports (CH 1–CH 3), two
digital ports (DIG 1 and DIG 2), a mini-USB connection, a power adapter port,
and a serial power port (for use with the optional Charging Station).
Note: Vernier products are designed for educational use. Our products are not
designed, nor are they recommended, for any industrial, medical, or commercial
process such as life support, patient diagnosis, control of a manufacturing
process, or industrial testing of any kind.
What's Included
Lab Qu est Stream int erface
Rechargeable battery (in unit)
Power adapter
USB cable
Before Using the Interface
1. Remove the protective pull tab, which protects the battery, from the backof
the unit.
2. Connect the power adapter.
3. Charge for at least 8 hours.
Compatible Platforms, Software, and Sensors
See www.vern ier.co m/manu als/lq -stre am for a list of platforms, software, and sensors
compatible with LabQuest Stream.
Getting Started
Follow these general procedures when using LabQuest Stream. For instructions on
getting started with a specific sensor, see
www.vern ier.co m/st art/lq -strea m
Wired Data Collection(via USB)
Computers and Chromebooks
1. Install software appropriate for the data-collection platform you are using.
2.
Turn on LabQuest Stream and connect a supported sensor. The Power LED,
,
will glow green and the Bluetooth LED,
, will flash blue.
3. Connect the small end of the USB cable to the USB port on LabQuest Stream.
4. Connect the other end of the cable to a USB port on your computer or
Chromebook. The USB LED,
will glow orange.
5. Start the software. The USB LED will change to green and the Bluetooth LED
will be off. You are now ready to continue your experiment.
Wireless Data Collection(via Bluetooth)
iOS and Android devices
1. Install software appropriate for the data-collection platform you are using.
2.
Turn on LabQuest Stream and connect a supported sensor. The Power LED,
,
will glow green and the Bluetooth LED,
, will flash blue.
3. Launch Graphical Analysis app and tap New Experiment, +, to display the
Experiments dialog.
4. Choose LabQuest Stream, then select your device from the list of discovered
devices. The LabQuest Stream serial number, shown on the back label, is the
device name.
5. When connected, the Bluetooth LED will glow blue (no longer flashing). You
are now ready to continue your experiment.
Computers Running Logger Pro
1. Install Logger Pro software on your computer.
2.
Turn on LabQuest Stream and connect a supported sensor. The Power LED,
,
will glow green and the Bluetooth LED,
, will flash blue.
3. Pair LabQuest Stream with your computer. The LabQuest Stream serial number,
shown on the back label, is the device name.
macOS: Open System Settings, navigate to the Bluetooth settings, and pair
with LabQuest Stream.
2
Page 2
Windo ws: Open the Settings dialog for Windows, navigate to the Bluetooth
settings, and pair with LabQuest Stream.
4. Launch Logger Pro, then from the Experiment menu, choose Connect Interface
> Wireless LabQuest Stream > Scan for Wireless LabQuest Stream.
5. Select your device from the list of discovered devices. When connected, the
Bluetooth LED will glow blue (no longer flashing). You are now ready to
continue your experiment.
Computers and Chromebooks Running Graphical Analysis™ 4
Wireless data collection with computers and Chromebooks running Graphical
Analysis 4 is not yet available. Future software updates to Graphical Analysis 4
will support wireless data collection on these platforms.
Providing Power
Power for LabQuest Stream is supplied by the rechargeable lithium-ion battery
included with the unit. LabQuest Stream can also be powered without the battery
by the following methods:
Using the AC power adapter
Using the USB port of a computer or Chromebook
Using a USB power outlet or power adapter
Note: There may be configurations that limit how much power is available from
the USB port on a computer or Chromebook. Such configurations may include
having other devices that require USB power connected to the computer or
Chromebook at the same time. In these situations, we recommend you use the
battery or AC power adapter to provide power to LabQuest Stream.
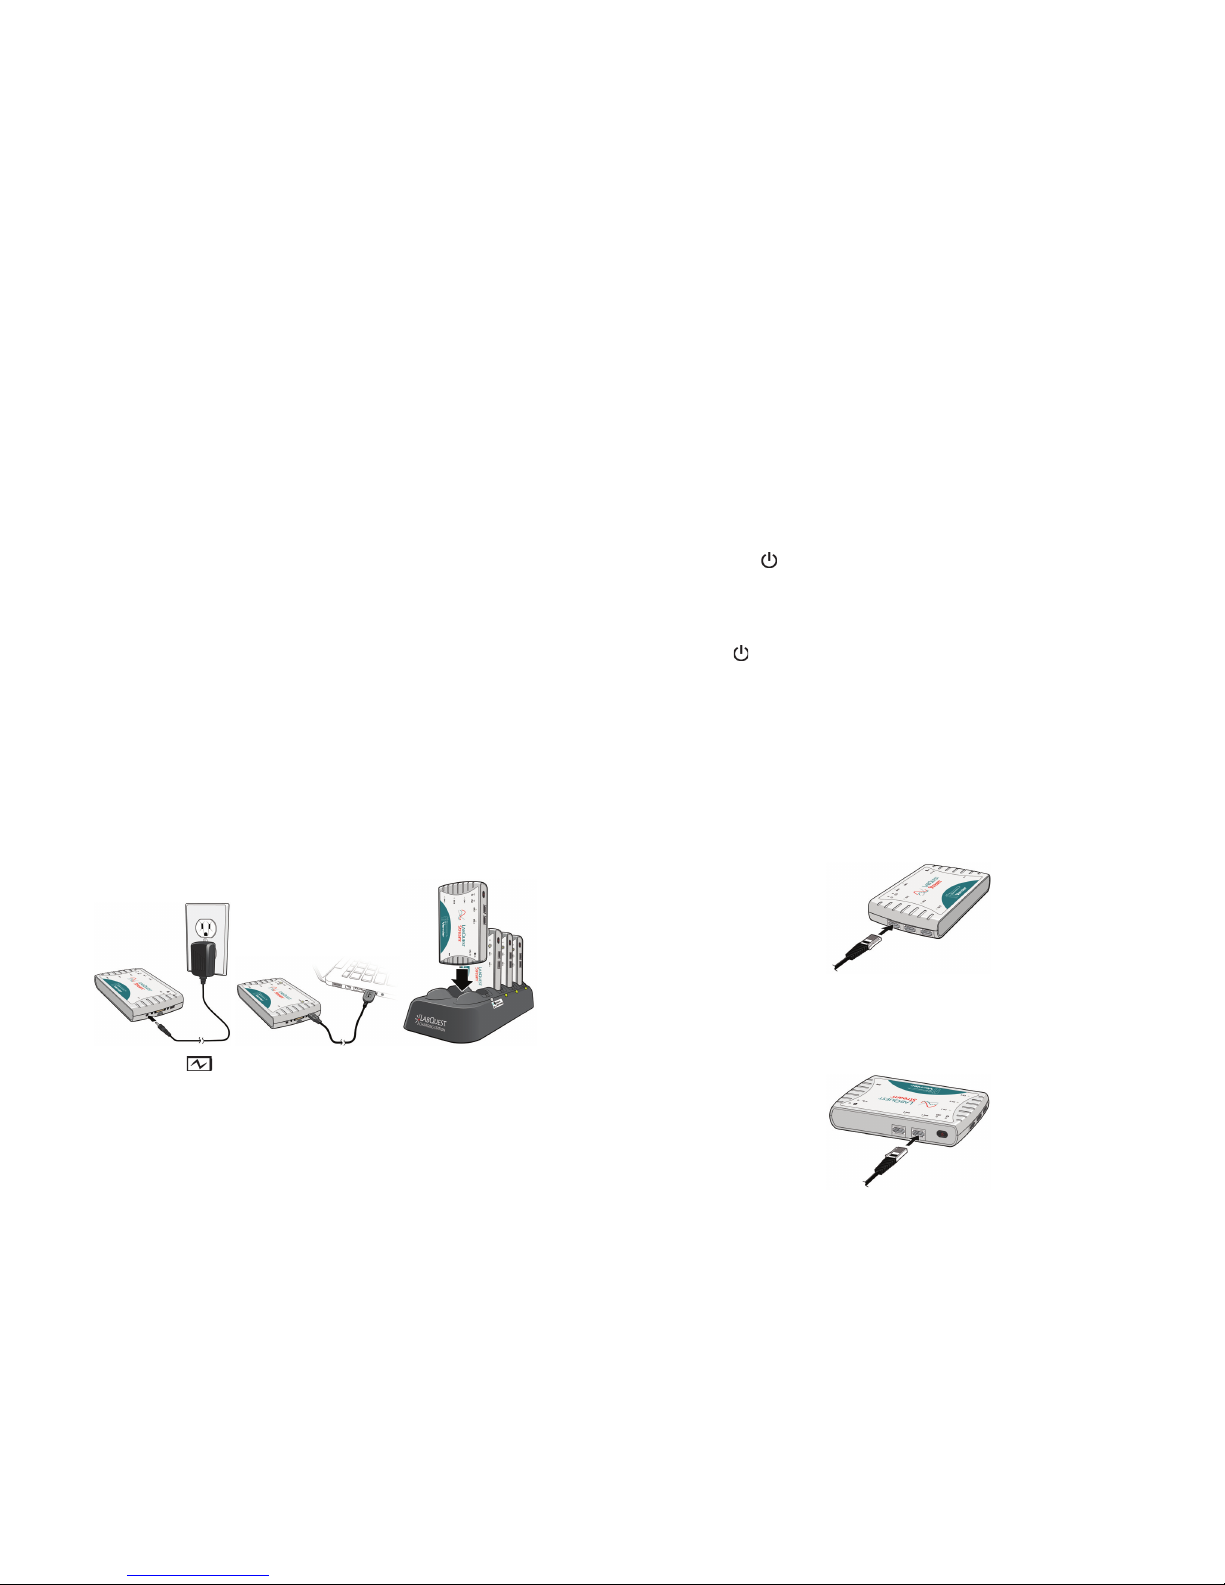
Charging the LabQuest Stream battery
Use the supplied AC adapter, USB cable, or optional Charging Station
(order code LQ2-CRG) to charge the battery. The battery cannot be overcharged
and can be safely recharged after a partial discharge.
The Charging LED, , flashes red when the battery level is low. The LED is
orange when the battery is charging and green when the battery is fully charged.
For safety reasons, the charging circuitry on LabQuest Stream will turn offafter
about 10 hours, even if the battery is not fully charged. When this happens, the
charging LED will glow red. To continue charging the battery, disconnect then
immediately reconnect the power source.
3
The following are approximate time durations required to fully charge a dead
battery:
AC adapter: ~8 hours
Charging Station: ~8 hours
USB port: ~10 hours
Note: LabQuest Stream will not charge while connected via USB to a computer or
Chromebook that is in a suspended state.
Turning the unit on
Press the power button located on the top of LabQuest Stream to turn the unit on.
The Power LED,
, will be green when the unit is on. Note that the unit will
automatically turn on when it is connected to the USB port on a computer or
Chromebook.
Turning the unit off
Press and hold the power button for 3 seconds to turn the unit off. The
Power LED,
, will be off when the unit is off. LabQuest Stream will
automatically turn off after 10 minutes when not connected to a Bluetooth orUSB
host.
Connecting Sensors
LabQuest Stream supports two types of sensors—analog and digital. Connect
sensors to the appropriate port on LabQuest Stream.
Analog Sens ors
Analog sensor examples include temperature probes, pH sensors, and force sensors.
Up to three analog sensors can be connected to LabQuest Stream. The three ports
for analog sensors (CH 1–CH 3) are located on the left side of the unit. These
ports accept British Telecom-style plugs with a right-hand connector.
DigitalSensors
Digital sensor examples include motion detectors, photogates, and rotary motion
sensors. Up to two digital sensors can be connected to LabQuest Stream. The two
ports for digital sensors (DIG 1 and DIG 2) are located on the top side of the unit.
These ports accept British Telecom-style plugs with a left-hand connector.
4
Page 3

Note: Most sensors will automatically identify allowing the software to set up a
default experiment. If you are using a sensor that does not auto-ID, you will need
to manually identify the sensor in the software.
LED B ehavior
Power LED
State Meaning
Off Unit is off
Green Unit is on
Charging LED
State Meaning
Off Sufficient battery charge for normal use or unit is not charging
Orange Unit is charging
Green Charging is complete; battery is fully charged
Red (Flashing) Battery level is low
Red (Solid) Charging circuit timeout (~10 hr), battery fault, or no battery
found
Bluetooth LED
State Meaning
Off Blueooth connection not available
Blue (Flashing) Available for Bluetooth connection
Blue (Solid) Connected to host via Bluetooth; ready for data collection
Red Bluetooth system failed
USB LED
State Meaning
Off Not connected to USB host or no power from USB host
Orange USB connected; not communicating with software
Green Connected to host via USB; ready for data collection
Red USB host failed to enumerate or USB port underpowered
5
Specifications
Resolution 12 bit
Battery High-capacity, lithium-ion rechargeable
battery
Battery life
(single full charge)
~24 hours
(varies depending on sensors used)
Battery life
(long te rm)
~500 full charge cycles
(several years depending on usage)
USB specification 2.0 full speed
Wireless specification Bluetooth®v4.1
Maximum wireless range 30 m (unobstructed)
Maximum sample rate (Computers via
USB)
100,000 samples per second (one
sensor)
10,000 samples per second (two or
more sensors)
Maximum sample rate (Wireless or
Chromebooks via USB)
10,000 samples per second
Minimum sample rate
(USB or wire less)
0.00125 samples per second
(800 seconds/sample)
Dimensions 8.8 cm × 15.4 cm × 2.5 cm
Weight 220 g
Safe-use temperatures (operating) 0°C to 45°C (32°F to 113°F)
Safe-use temperatures (storage) –30°C to 60°C (–22°F to 140°F)
Care and Maintenance
Battery
LabQuest Stream uses a high-quality lithium-ion battery. This is the same
chemistry used in premium laptop and cell phone batteries, and you can expect
similar performance.
Use the supplied AC adapter, USB cable, or optional Charging Station
(order code LQ2-CRG) to charge the battery. The battery takes 8 to 10 hoursto
fully charge. The battery cannot be overcharged, and it can be safely recharged
after a partial discharge. It is safe to leave the battery charging indefinitely, and
there is no need to fully discharge the battery before needing to charge it.
The discharge time for a fully charged battery will depend on the sensors used. In
most cases, you can obtain 24 or more hours of use before recharging. We
recommend charging LabQuest Stream overnight to start the next day with a full
charge.
6
Page 4

The long-term life of the battery will vary, but you can expect about 500 full
charge/discharge cycles before the battery will need to be replaced. In this count, a
charge from half charged to a full charge counts as half of a charge cycle. In
typical school use, the battery can last three years or more. Exposure to
temperatures over 35°C (95°F) will significantly reduce battery life.
As a battery reaches the end of its functional life, the discharge time for a fully
charged battery will become shorter. Eventually the discharge time will betoo
short for your application, and you will want to replace the battery. Rechargeable
batteries are considered a consumable, and as such, are warranted for one year. A
replacement battery can be ordered from our website (order code LQ2-BAT).
Recycling information is available at
www.cal l2recycle.o rg
Use only the supplied battery for this device. Do not puncture or expose the
battery to excessive heat or flame.
Temperatur e c onside rations
Safe operating temperatures for LabQuest Stream are from 0°C to 45°C
(32°F to 113°F). Storage temperatures are –30°C to 60°C (–22°F to 140°F).
Exposures to low or high extreme temperatures will temporarily reduce the
discharge time for a fully charged battery. Exposure to temperatures over 35°C
(95°F) will significantly reduce long-term battery life.
Avoid rapid temperature changes as condensation may form inside the device. Do
not leave it in a car, as temperatures can exceed the maximum storage range.
Water Resistance
LabQuest Stream is not water resistant and should never be immersed in water. If
water gets in the device, immediately remove the USB cable and turn the unit off
by holding down the power button for at least 3 seconds. Disconnect all sensors
and cables and remove the battery. Allow the unit to dry thoroughly before
restarting it. Do not attempt to dry it using an external heat source.
Storage
Do not store LabQuest Stream in a chemical closet or in areas of concentrated
chemical gases.
Safe storage temperatures are –30°C to 60°C (–22°F to 140°F). Exposing the
battery to temperatures above 35°C (95°F) will reduce its lifespan. If possible, store
LabQuest Stream in an area that is not exposed to temperature extremes.
To store LabQuest Stream for extended periods of time, turn the unit off and
remove the battery. Over several months, the battery will discharge but will not be
damaged. After such storage, charge LabQuest Stream (a full charge can take
10 hours), and the unit will be ready for use.
How the Interface Works
The LabQuest Stream interface is more than just a physical adapter between two
differen t con ne ctors. It is hardware that al lows Verni er senso rs to interact with
computers, Chromebooks, and mobile devices. LabQuest Stream contains
dedicated electronics for precise sampling of sensor events. LabQuest Stream
timestamps these events so measurements from multiple sensors can be analyzed
7
simultaneously. To allow data to flow smoothly, LabQuest Stream manages the
communication link between the sensors and the computing platform.
Troubleshooting
For troubleshooting tips and frequently asked questions regarding
LabQuest Stream, see
www.vern ier.co m/til/3656
Repair Information
If you have followed the troubleshooting steps and are still having trouble with
your LabQuest Stream, contact Vernier Technical Support at support@vernier.com
or call 888-837-6437. Support specialists will work with you to determine if the
unit needs to be sent in for repair. At that time, a Return Merchandise
Authorization (RMA) number will be issued and instructions will be
communicated on how to return the unit for repair.
Accessories/Replacements
Item Order Code
Charging Station
(Charge up to four LabQuest Stream units)
LQ2-CRG
Vernier Lanyard
LQ-LAN
Battery
LQ2-BAT
Power Adapter
LQ-PS
USB Cable
LQ-CB-USB
Warranty
LabQuest Stream
Vernier warrants this product to be free from defects in materials and workmanship
for a period of five years from the date of shipment to the customer.
LabQuest Stream Battery
Vernier warrants this product to be free from defects in materials and workmanship
for a period of one year from the date of shipment to the customer.
This warranty does not cover damage to the products caused by abuse or improper
use. This warranty covers educational institutions only.
Disposal
When disposing of this electronic product, do not treat it as household waste. Its
disposal is subject to regulations that vary by country and region. This item
should be given to an applicable collection point for the recycling of electrical
and electronic equipment. By ensuring that this product is disposed of correctly,
you help prevent potential negative consequences on human health or on the
environment. The recycling of materials will help to conserve natural resources.
For more detailed information about recycling this product, contact your local city
office or your disposal service.
Battery recycling information is available at
www.cal l2recycle.o rg
Do not puncture or expose the battery to excessive heat or flame.
8
Page 5

The symbol, shown here, indicates that this product must not be disposed of in
a standard waste container.
Federal Communication Commission Interference Statement
This equi pment has been tes ted and found to c omply with the limi ts for a Class B digital devic e, pursuant to Part 15 of the FCCrules . These
limi ts are designed to provide reasonable protecti on agai nst harmful interference i n a residential ins tallati on. This equipment generates, uses
and can radiate radio frequency energy and, i f not install ed and used i n acc ordance with the i nstructions , may cause harmful int erference to
radio communi cations . However, there is no guarantee that interference wil l not occur in a particular i nstall ation. If this equipment does c ause
harmful i nterference to radio or telev isi on reception, which can be determined by turning the equipment off and on, the user is enc ouraged to
try to correct the interference by one or more of the fol lowing measures:
Reorient or reloc ate the receiving antenna.
Increase the separation between the equi pment and receiver.
Connect the equipment i nto an outlet on a ci rcuit different from that to whic h the receiver i s c onnected.
Consult the dealer or an experienc ed radio/TV t echnici an for hel p.
FCC Caution
This dev ice compli es wi th Part 15 of the FCCRul es. O peration i s s ubject to the following two condi tions:
(1) this device may not cause harmful i nterference and
(2) this device must ac cept any i nterference received, incl uding interference that may caus e undes ired operation
RF Exposure Warning
The equipment complies with RF exposure l imits set forth for an uncontrolled environment. The antenna(s ) used for this transmitter must not be
co-located or operating i n conj unction with any other antenna or transmitter. You are caut ioned that changes or modific ations not ex pressly
approved by the party responsibl e for c omplianc e coul d voi d y our authority to operate the equipment.
IC Statement
This dev ice compli es wi th Industry Canada li cense-exempt RSS s tandard(s). Operation i s subject to the following two condi tions:
(1) this device may not cause interference, and
(2) this device must ac cept any i nterference, incl uding interference that may c ause undes ired operation of the device.
IndustryCanada- ClassB This digital apparatus does not exceed the Class B limits for radio noise emissi ons from digital apparatus as
set out in the interference-causi ng equipment standard enti tled “Digital A pparatus,” ICES-003 of Industry Canada. Operation i s subject to the
following two condi tions: (1) this devic e may not caus e interference, and
(2) this device must ac cept any i nterference, incl uding interference that may caus e undes ired operation of the dev ice.
To reduce potenti al radi o interference to other us ers, the antenna type and its gain should be so chosen that the equi valent isotropic ally
radiated power (e.i.r.p.) i s not more than that permitted f or succ essful communi cation.
RF exposurewarning: The equipment compli es wi th RF expos ure li mits set forth for an uncontrol led env ironment. The antenna(s) used for
this transmitter mus t not be co-locat ed or operating in c onjuncti on with any other antenna or transmi tter.
Le présent appareil es t conforme aux CNR d’ Industrie Canada applic ables aux appareil s radi o exempts de l icenc e. L’ exploit ation es t
autorisée aux deux conditi ons s uivantes :
(1) l’appareil ne doi t pas produire de brouillage, et
(2) l’appareil doit accepter tout interférence radioél ectrique, même si cel a résulte à un brouillage suscepti ble d’en c ompromettre le
fonctionnement.
Cet appareil numérique respec te les li mites de bruits radioélectriques appli cables aux appareils numériques de Classe B presc rites dans la
norme sur l e matériel interférant-brouilleur: “Appareil s Numériques,” NMB-003 édic tée par i ndustrie Canada. L’utilisationest soumiseaux deux
conditi ons s uivantes :
(1) cet appareil ne peut causer d’interférences, et
(2) cet appareil doit accepter toutes int erférences, y comprises cel les suscepti bles de provoquer un disfonc tionnement du dispos itif.
Afin de réduire les interférences radio potenti elles pour l es autres utili sateurs, le type d’antenne et son gain doi vent être choisi e de telle façon
que l’ équival ent de puissanc e i sotrope émis (e.i.r.p) n’es t pas plus grand que c elui permis pour une communi cation établie.
Avert issement d ’exposi tion R F: L’ équipement est c onforme aux limites d’ex positi on aux RF établies pour un environnement non
supervis é. L’antenne (s) utilisée pour ce transmetteur ne doi t pas être jumel és ou fonctionner en conj onction avec toute autre antenne ou
transmetteur.
Japanese Technical Regulations Conformity Certification
当該機器には電波法に基づく、技術基準適合証明等を受けた特定無線設備を装着している。
This equi pment c ontains specifi ed radio equipment t hat has been certif ied to the Technic al Regulations Conformity Certifi cation under the
Radio Law.
9
Acknowledgments
“Made for iP od,” “Made for i Phone,” and “Made for iPad” mean that an electronic acces sory has been des igned to connec t spec ific ally to i Pod,
iPhone, or iPad, respectivel y, and has been certifi ed by the devel oper to meet Apple performance standards. Apple i s not responsi ble for the
operation of this device or its compli ance with safety and regul atory standards. Please note that the use of thi s ac cess ory with iPod, iPhone,
or iPad may affec t wireles s performance. iPad, iPhone, and iPod touch, are trademarks of Appl e Inc ., regis tered in the U.S. and other
countries. iPad Air, and iPad mi ni, a re trademarks of Apple Inc. The trademark “iPhone” is used with a licens e from Ai phone K.K .
The Bluetooth®word mark and logos are registered trademarks owned by Bluetooth S IG, Inc . and any us e of such mark s by Vernier Software
& Technol ogy i s under licens e. O ther trademarks and trade names are those of their respec tive owners.
Vernier Softwar e & T echnology
139 79 SW M illikan Way • Beaver to n, OR 97005-2886
Toll Free (888) 837-6437 • (503) 277-2299 • Fax (503) 277-2440
info@vernier.com • www.vernier.com
Rev. 2/17/17
Logger Pro, Graphical Analysis, LabQuest Stream, and other marks shown are our trademarks or registered
trademarks in the United States.
iPad is a trademark of Apple Inc., registered in the U.S. and other count ries.
All other marks not owned by us that appear herein are the property of their respecti ve ow ners, wh o may o r may
not be affiliated with, connected to, or sponsored by us.
10
 Loading...