

Vermont Castings Warming Shelf #0200, Warming Shelf #0210, 200, 210 Installation Instructions Manual

Mittenracks
Front of
Stove
Warming Shelf #0200,
#0210
Installation Instructions
for the
Encore NC Model 1450
Defiant NC Model 1610
Contents:
1, Warming Shelf (#0210) .......... 30002823, Defiant NC
or
1, Warming Shelf (#0200) ........... 30002477, Encore NC
2, Mittenracks ...................................................1601705
1, Bracket, Right .............................................30002479
1, Bracket, Left ...............................................30002478
1, Bracket, Dragon ...........................................1302220
2, Cap Screw 1/4-20 x 1/2” hex head ...............1201338
3, Cap Screw 1/4-20 x 5/8” hex head ...............1201372
3, Washers .......................................................1202473
4, SS,Soc 1/4-20 x 7/16 ...................................1200422
1, 1/8” Allen Wrench
Tool Required:
7/16” open-end wrench
Warming Shelves add versatility to your stove; they
keep foods warm at mealtime, and provide a convenient
spot to store a kettle or pan when you top-load your
stove.
The Warming Shelf is designed to hold up to 30
pounds. However, always place objects on a shelf
carefully to avoid sudden impact. Containers left on the
shelves or on the stove for long periods of time should
have water in them to prevent damage from overheating.
Take special care with stoves and shelves that are
enamelled, to avoid chipping the finish.
Each Shelf includes a pair of nickel-plated mittenracks
that are ideal for drying damp mittens, socks, dish towels, etc. Do not leave combustible items unattended on
the shelves or mittenracks for extended periods of time,
however, as they may overheat.
Warming
Shelf
Left Flat
Bracket
Levelling
Set Screw
Right Flat Bracket
Levelling Set Screw
Fig. 1 Warming shelf parts.
The Shelf installation is completed in three stages. Attach the two brackets loosely to the stove, leaving the
screws loose enough to allow final adjustments. Then,
position the shelf and adjust the brackets so the shelf
fits correctly. Finally, tighten the screws.
Dragon Bracket
KT186
Part 1. Attach the Brackets and the Shelf
1. Screw the levelling set screws into the bottom of the
flat brackets as shown in Figure 1.
2. Screw the flat brackets to the stove. Pass a 1/4”-20
x 1/2” hex-head cap screw up through each bracket
and into the threaded hole in the stove’s top plate.
(Fig. 2) Tighten the screws enough to secure the
brackets, but keep them loose enough for the brackets to move slightly.
KT187
Fig. 2 Attach brackets to threaded holes in top plate.
3. Attach the dragon bracket to the flat bracket at the
front of the stove using a flat washer under the head
of a 1/4”-20 x 5/8” screw. (Fig. 3) Tighten the screw
only finger-tight.
30002488 8/08 Rev. 6
KT188
Fig. 3 Attach dragon bracket to front flat bracket.
There is a groove on the underside of the flat bracket.
Position the flat bracket so the top of the dragon
bracket will fit in the groove. (Fig. 4)
Groove
KT189
Fig. 4 Groove on underside of flat bracket.
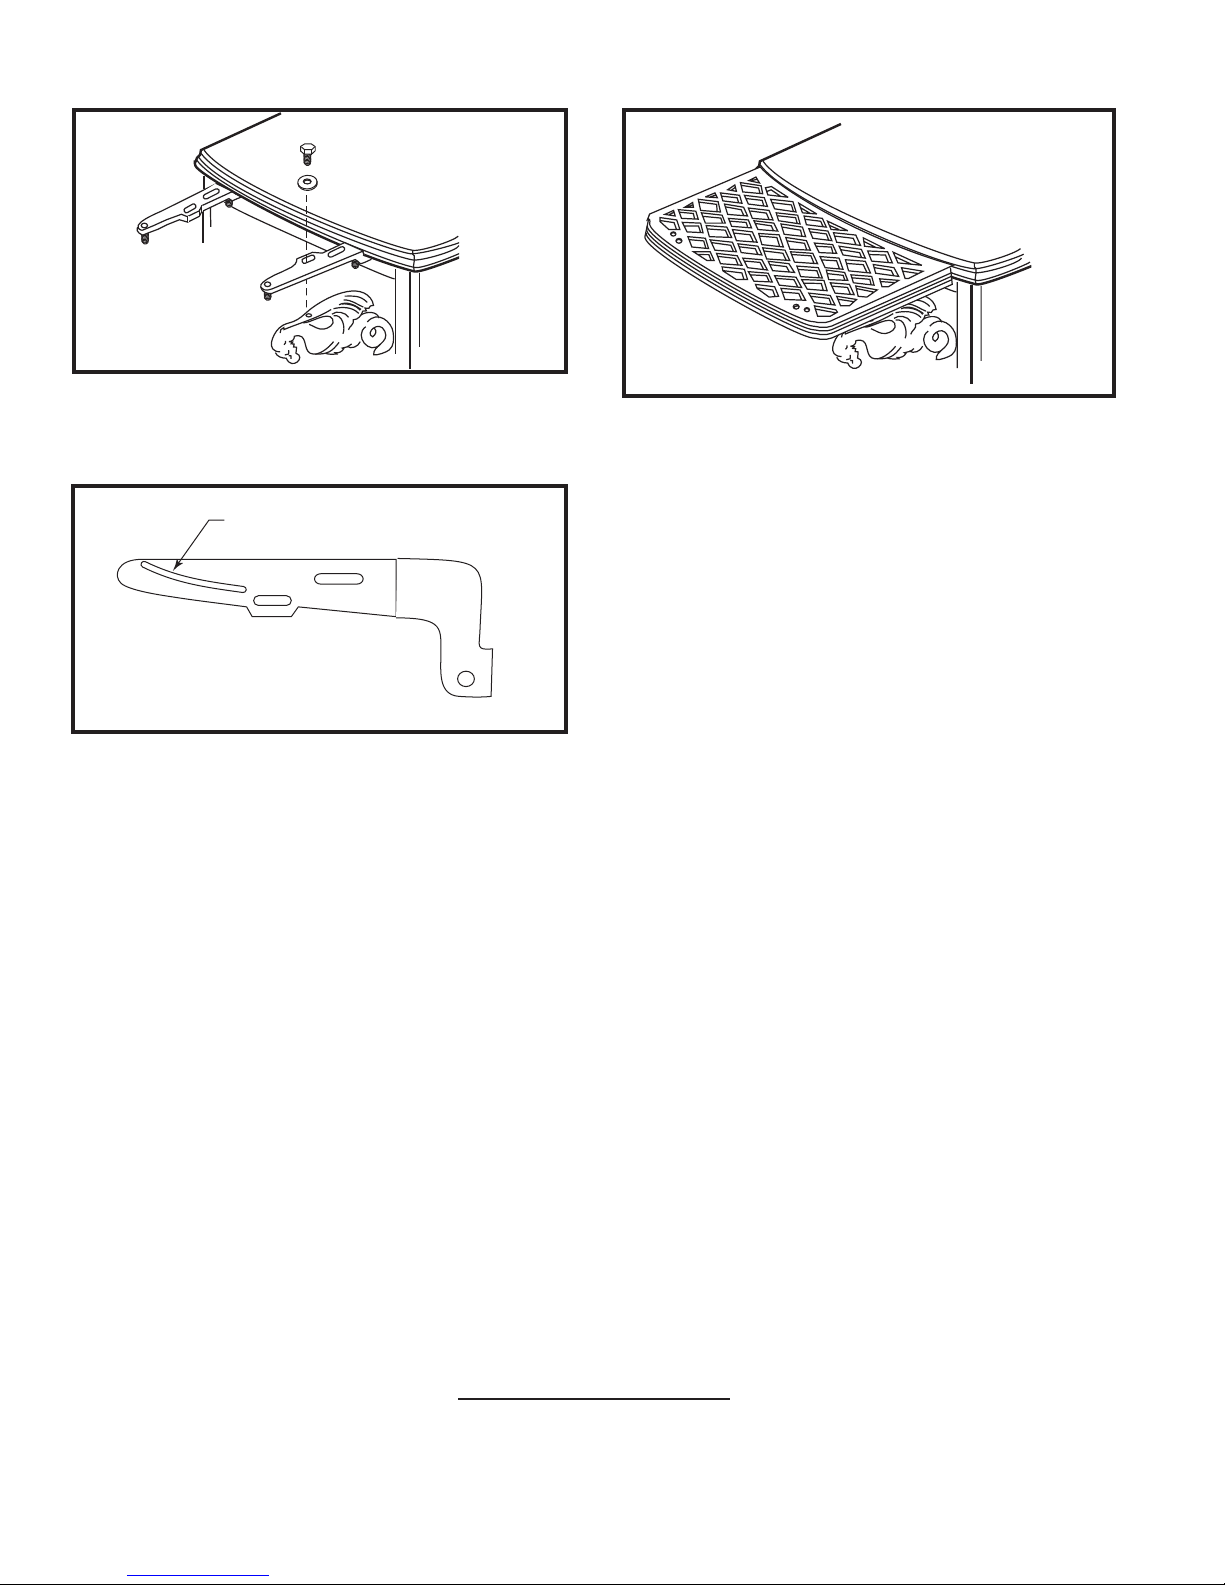
4. Secure the shelf to the flat brackets with 1/4-20 x
5/8” screws, with a flat washer under the head of
each screw. Finger tight is tight enough.
Part 2. Position the Shelf and Tighten the
Screws
1. Adjust the shelf so there is a small, even gap
between the edge of the stove top and the shelf.
Especially with enamelled stoves, leave a gap to
avoid chipping the finish.
KT190
Fig. 5 Warming shelf in place.
2. Level the shelf by raising or lowering the outside
edge gently. Move the dragon bracket toward the
stove until it just touches the side of the stove. The
dragon bracket will hold the shelf level. Tighten the
screws holding the shelf to the flat brackets. Adjust
set screws as necessary to further level the shelf.
Be sure the top of the dragon bracket is in the groove
on the underside of the flat bracket. (Fig. 4)
Encore NC: The dragon’s tail should be to the rear
of the raised molding on the side plate of the stove.
Tighten the screw while holding the shelf level.
Defiant NC: The dragon’s tail should rest on the flat
surface between the raised molding and the front edge
of the stove. Tighten the screw while holding the shelf
level.
3. Position the shelf so the indentation on its bottom
fits on the raised bead on the top of the flat bracket.
Tighten the screws holding the flat brackets to the
stove with a 7/16” wrench. If the shelf does not stay
in position while you tighten the screws, remove it
from the stove and start over.
Insert the mitten racks by passing their crooked ends
downward through the holes in the outside edge of the
shelf. The mitten racks will hang vertically until you are
ready to use them. For use, slide them upward until
their crooked ends meet the underside of the shelf and
then position the racks horizontally.
NOTE: Check the installation occasionally by gently striking the outside edge of the shelf with the
heel of your hand. If the shelf is loose, tighten the
screws a little. Check all screws for tightness every
six months or any time the shelf feels loose.
MHSC
149 Cleveland Drive • Paris, Kentucky 40361
www.mhsc.com
 Loading...