

Vermont Castings VCT323SSN/P Assembly Procedures
VCT323SSN/P Assembly Procedures
Tools Required: Knife or scissors, #2 & #3 Phillips screwdriver, 7/16” & 11/32” wrench or ratchet. Refer to
the parts list for hardware details. The use of a manual screwdriver is strongly recommended. A power drill
may cause damage to the unit or stripping of the protective coating.
CAUTION: This grill is intended ONLY to be used as a cart model, this grill cannot be built into an
enclosure.
CAUTION: The assembly of this grill requires two (2) people.
CAUTION: Some parts may have sharp edges; to avoid injury, wearing gloves during assembly, lifting
or moving the grill is recommended. Protective eyewear and long sleeves are also strongly recommended.
NOTE: Remove the protective plastic coating from the stainless steel, failure to do so will void the warranty.
30006291 3/13 Rev. 2 En

VCT323SSN/P Assembly
Step 1: Unpack Carton and Verify Contents
Use a sharp cutting tool to remove the packaging. Remove layers of reinforced cardboard. Be careful not to
scratch or damage the nish of the metal parts when removing the sleeves and protective plastic. Open grill
lid and remove the parts. Unpack all parts and compare all contents to the parts list. Refer to the parts list for
fastener detail.
CAUTION: Some parts may have sharp edges; to avoid injury, wearing gloves during assembly is strongly
recommended.
Carton Contents
C.I. Cart Base
Cart Bottom Panel
Back Panel
Cart Right Side
Cart Left Side
Cart Door
Grease Shield
Inside Grill
Cooking Grates (2)
Heat Plates (3)
Grease Tray
Grease Cup
Grease Cup Holder
Swivel Caster (1)
Swivel Caster w/Brake (1)
Stationary Wheels (2)
Cart Mounting Brackets (2)
Upper Cart Brace
Cylinder Retainer
Left Side Shelf
Right Side Shelf
Shelf Spacer (2)
Shelf Support Brackets (4)
Manual Bag w/Hardware, Match
Holder
CAUTION: Some parts may have sharp edges; to avoid injury, wearing gloves during assembly, lifting or moving
the grill is recommended.
2
30006291
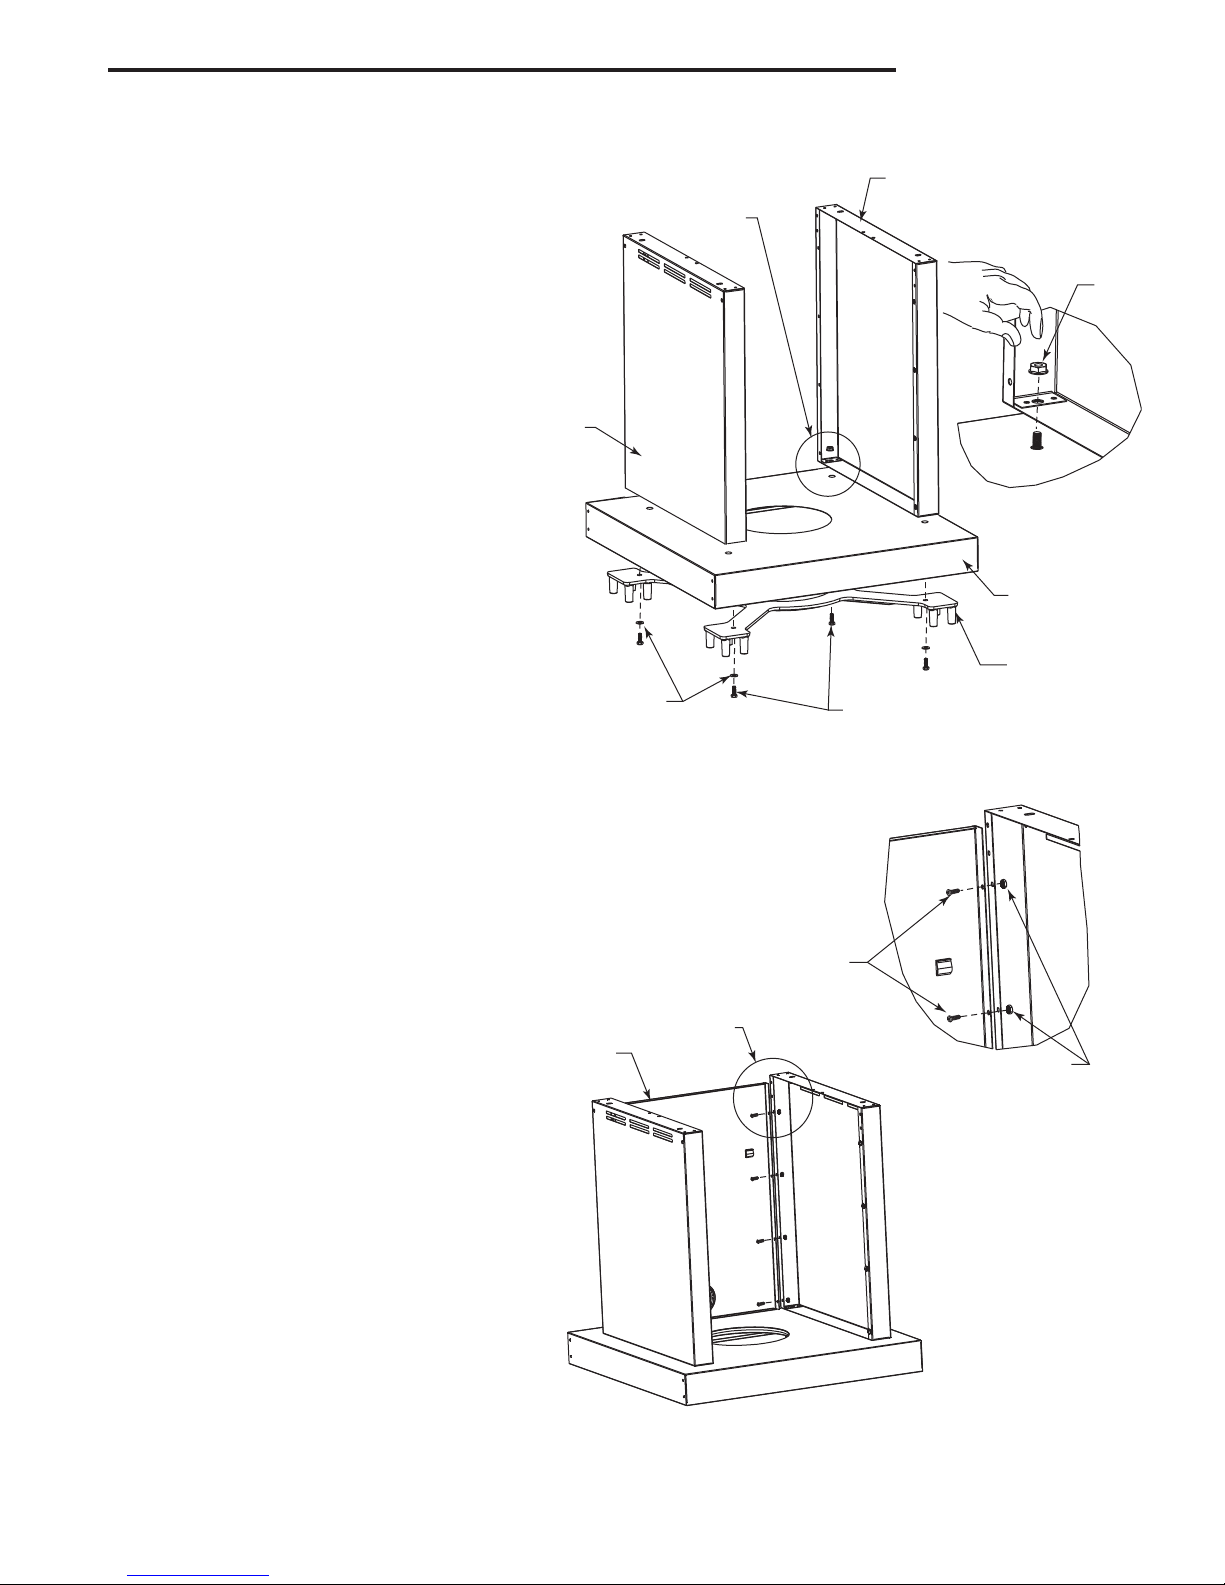
Step 2: Attach Cart Sides, Bottom and Base
VCT323SSN/P Assembly
Parts Required:
(1) C.I. Cart Base
(1) Cart Bottom Panel
(1) Cart Left Side
(1) Cart Right Side
(4) 1/4-20 x 3/4” Hex Head Bolts (1201381)
(4) 1/4-20 Hex Nuts (30005406)
(4) 1/4 Washer (1202471)
Figure 1
Assemble as shown - nger tight.
Figure 1
Left Side
B448
Washer
Right Side
Detail ‘A’
Hex Nut
Detail ‘A’ Four (4) Corners
Bottom
Panel
C.I. Cart Base
Hex Head
bolts
Step 3: Attach Back Panel
Parts Required:
(1) Back Panel
(8) #10-24 x 1/2” Screws (50000337)
(8) #10-14 Lock Nuts (50000182)
Figure 2
Assemble as shown and tighten fasteners.
Figure 2
Back Panel
Screws
Detail ‘A’
Lock Nuts
Detail ‘A’
CAUTION: Some parts may have sharp edges; to avoid injury, wearing gloves during assembly, lifting or moving
the grill is recommended.
30006291
B453
3

VCT323SSN/P Assembly
Step 4: Attach Upper Cart Brace and Tank Retainer
Parts Required:
(1) Upper Cart Brace
(4) #10-24 x 1/2” Screws (50000337)
(4) #10-24 Lock Nuts (50000182)
(1) Tank Retainer
Figure 3
Assemble as shown and tighten screws.
Left Side Panel
Screws
Upper Cart
Brace
Retainer Clip
LP Tank Retainer
Figure 3
Lock Nuts
Rear View
B454
Front View
CAUTION: Some parts may have sharp edges; to avoid injury, wearing gloves during assembly, lifting or moving
the grill is recommended.
4
30006291
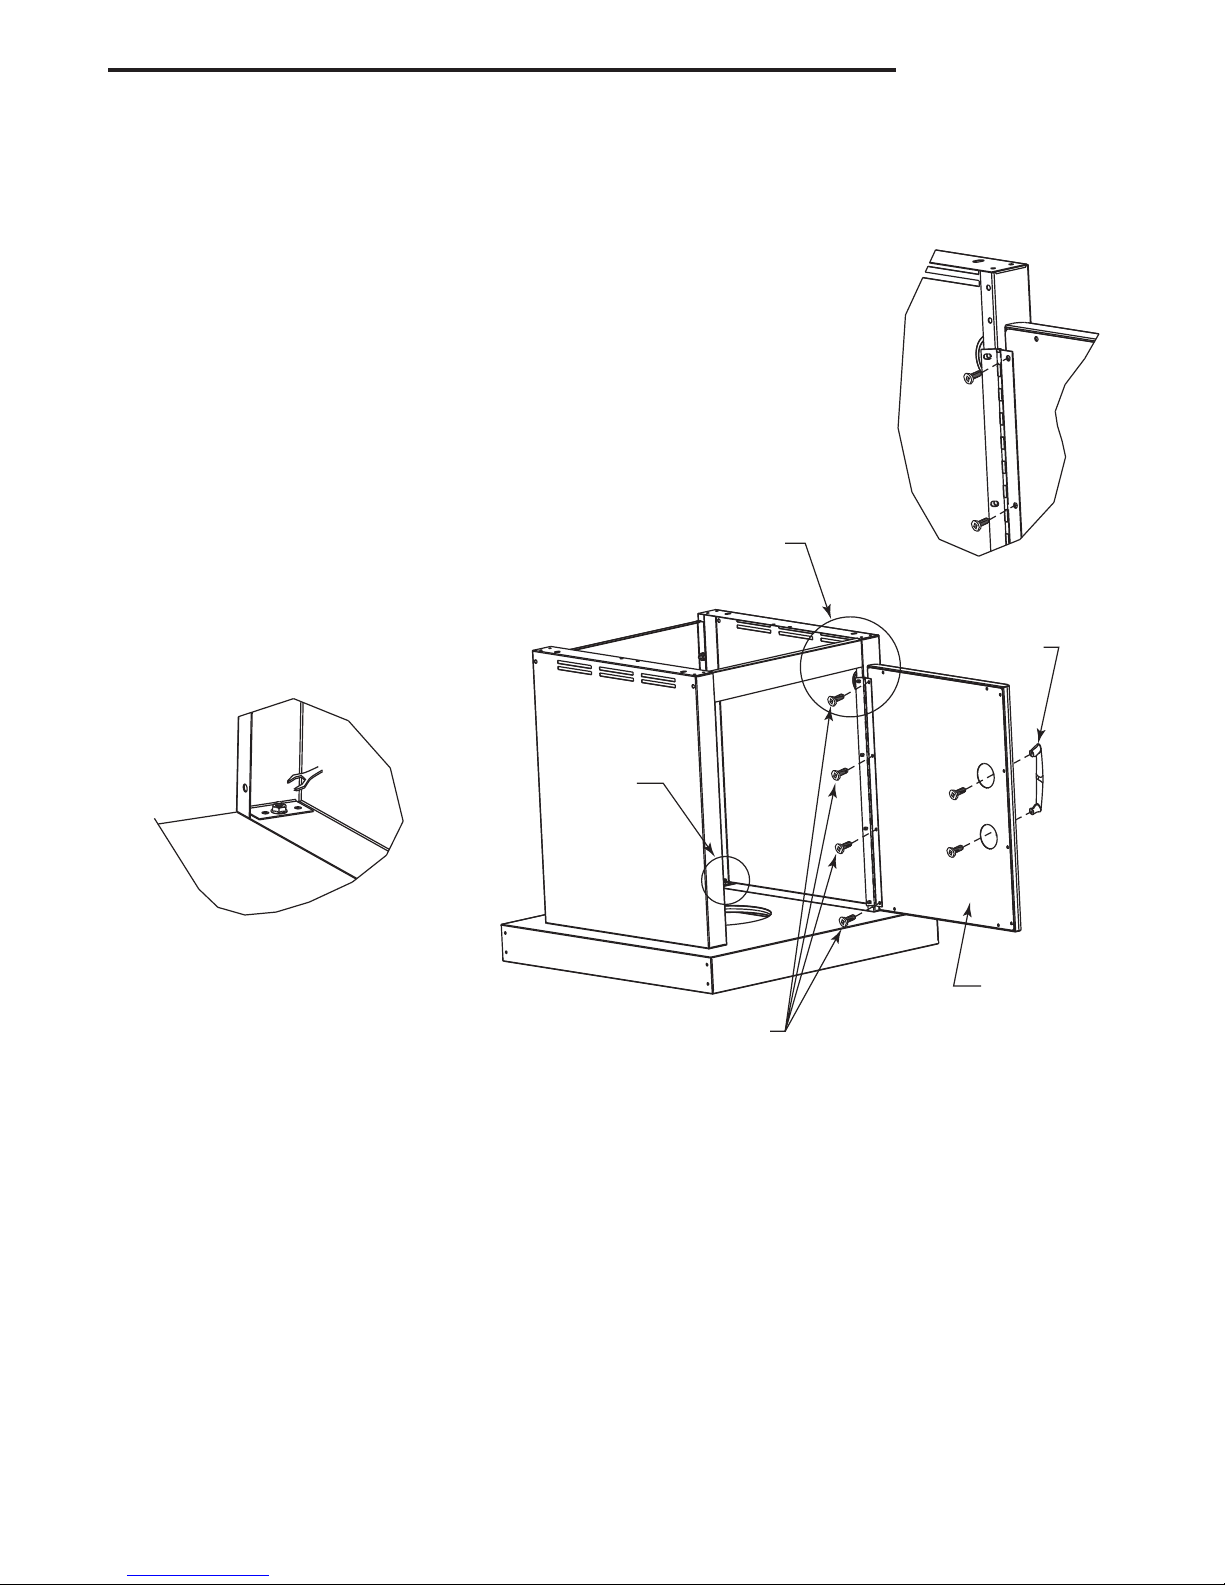
Step 5: Attach Door and Complete Cart
Parts Required:
(1) Door
(1) Door Handle
(2) #10-24 x 1/2” Screws (with handle)
(4) #10-24 x 1/2” Screws (50000337)
Figure 4
Assemble as shown and tighten fasteners. Completely
tighten fasteners from Step 2.
VCT323SSN/P Assembly
Detail ‘B’
Detail ‘B’
Detail ‘A’ Four Places
Figure 4
B455
Handle
Detail ‘A’
Door
Screws
CAUTION: Some parts may have sharp edges; to avoid injury, wearing gloves during assembly, lifting or moving
the grill is recommended.
30006291
5
VCT323SSN/P Assembly
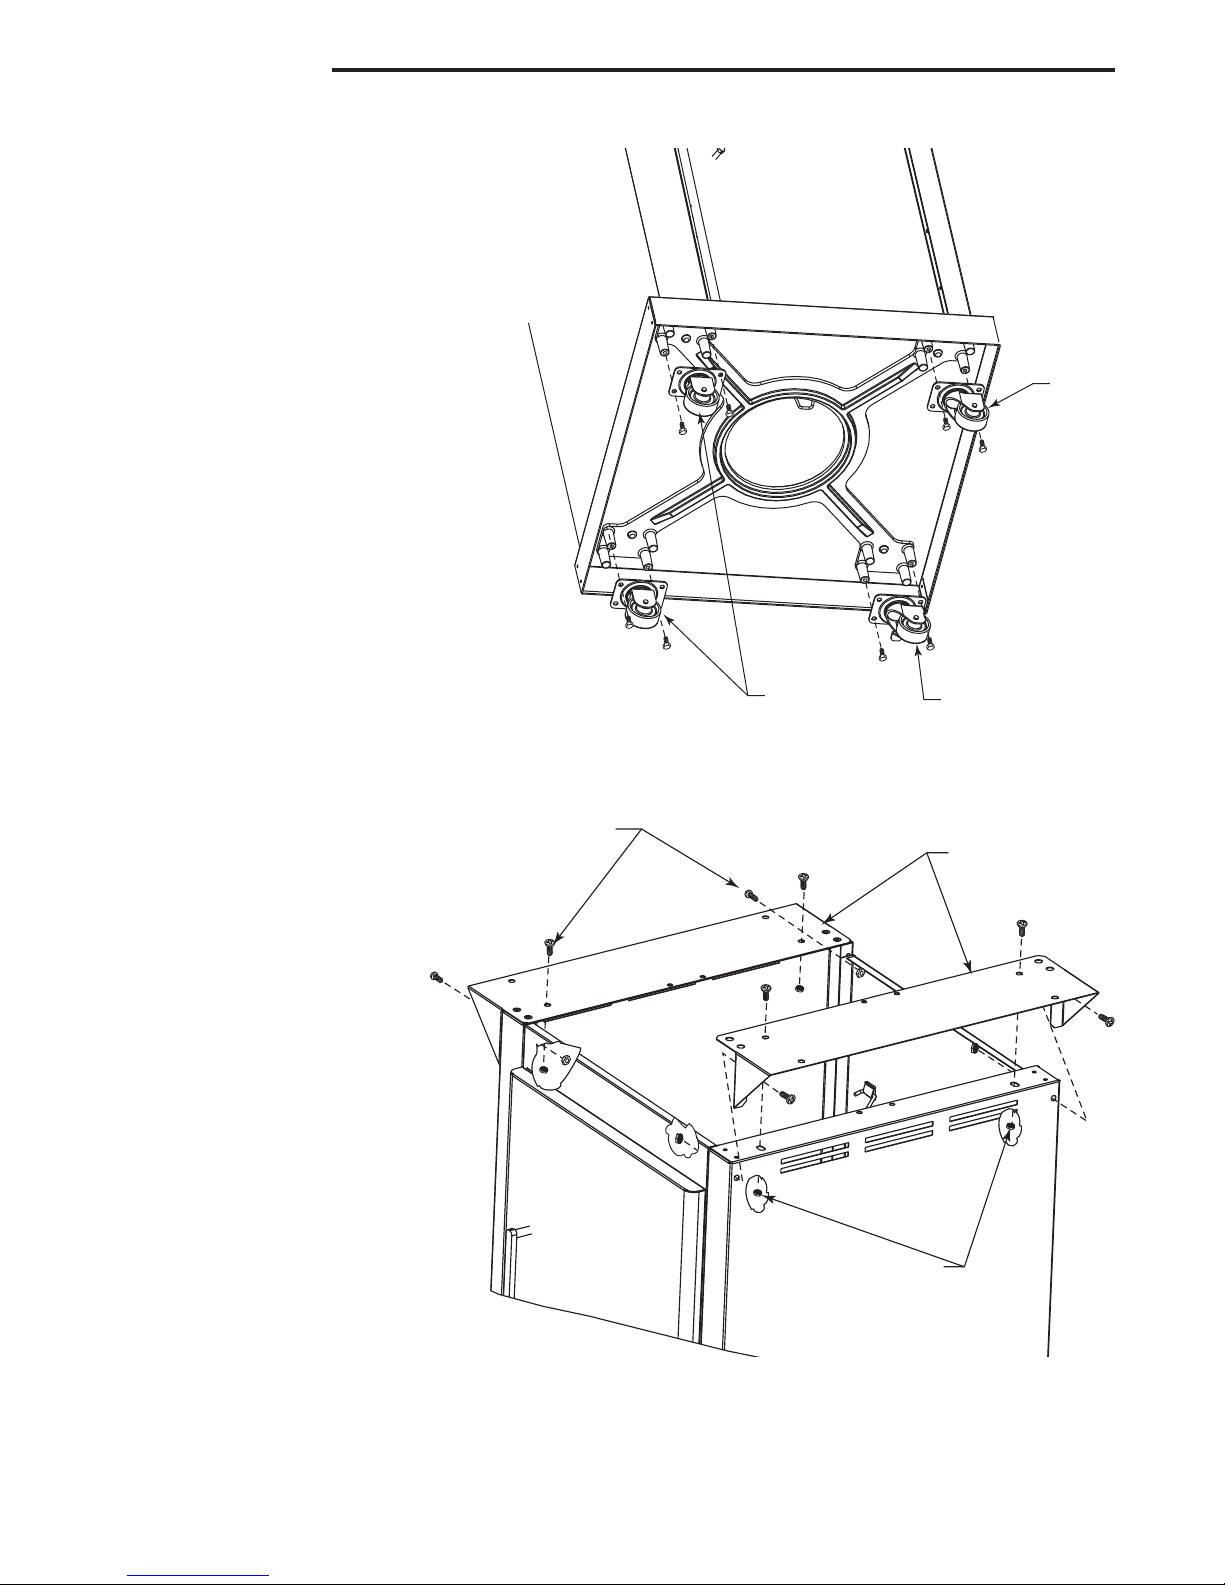
Step 6: Attach Casters to Cart Base
Parts Required:
(1) Upper Cart Assembly
(2) Stationary Wheels
(1) Swivel Caster
(1) Swivel Caster w/Brake
(8) 1/4-20 x 1/2” Screws (30005405)
Figure 5
Assemble as shown and tighten fasteners.
Figure 5
B456
Swivel
Caster
Step 7: Attach Cart Mounting Brackets
Parts Required:
(2) Cart Mounting Brackets
(8) #10-24 x 1/2” Screws (50000337)
(8) #10-24 Lock Nuts (50000182)
Figure 6
Assemble as shown and tighten fasteners.
Figure 6
Screws
Stationary
Wheels
Swivel Caster
w/Brake
Cart Mounting
Brackets
Lock Nuts
CAUTION: Some parts may have sharp edges; to avoid injury, wearing gloves during assembly, lifting or moving
the grill is recommended.
6
B457
30006291
 Loading...