

Page 1
VERMONT CASTINGS
INBUILT GAS BARBEQUE GRILL
USER MANUAL VCS5005BI
OWNERS INSTALLATION & OPERATING INSTRUCTIONS.
KEEP THESE INSTRUCTIONS FOR FUTURE REFERENCE.
1
Page 2

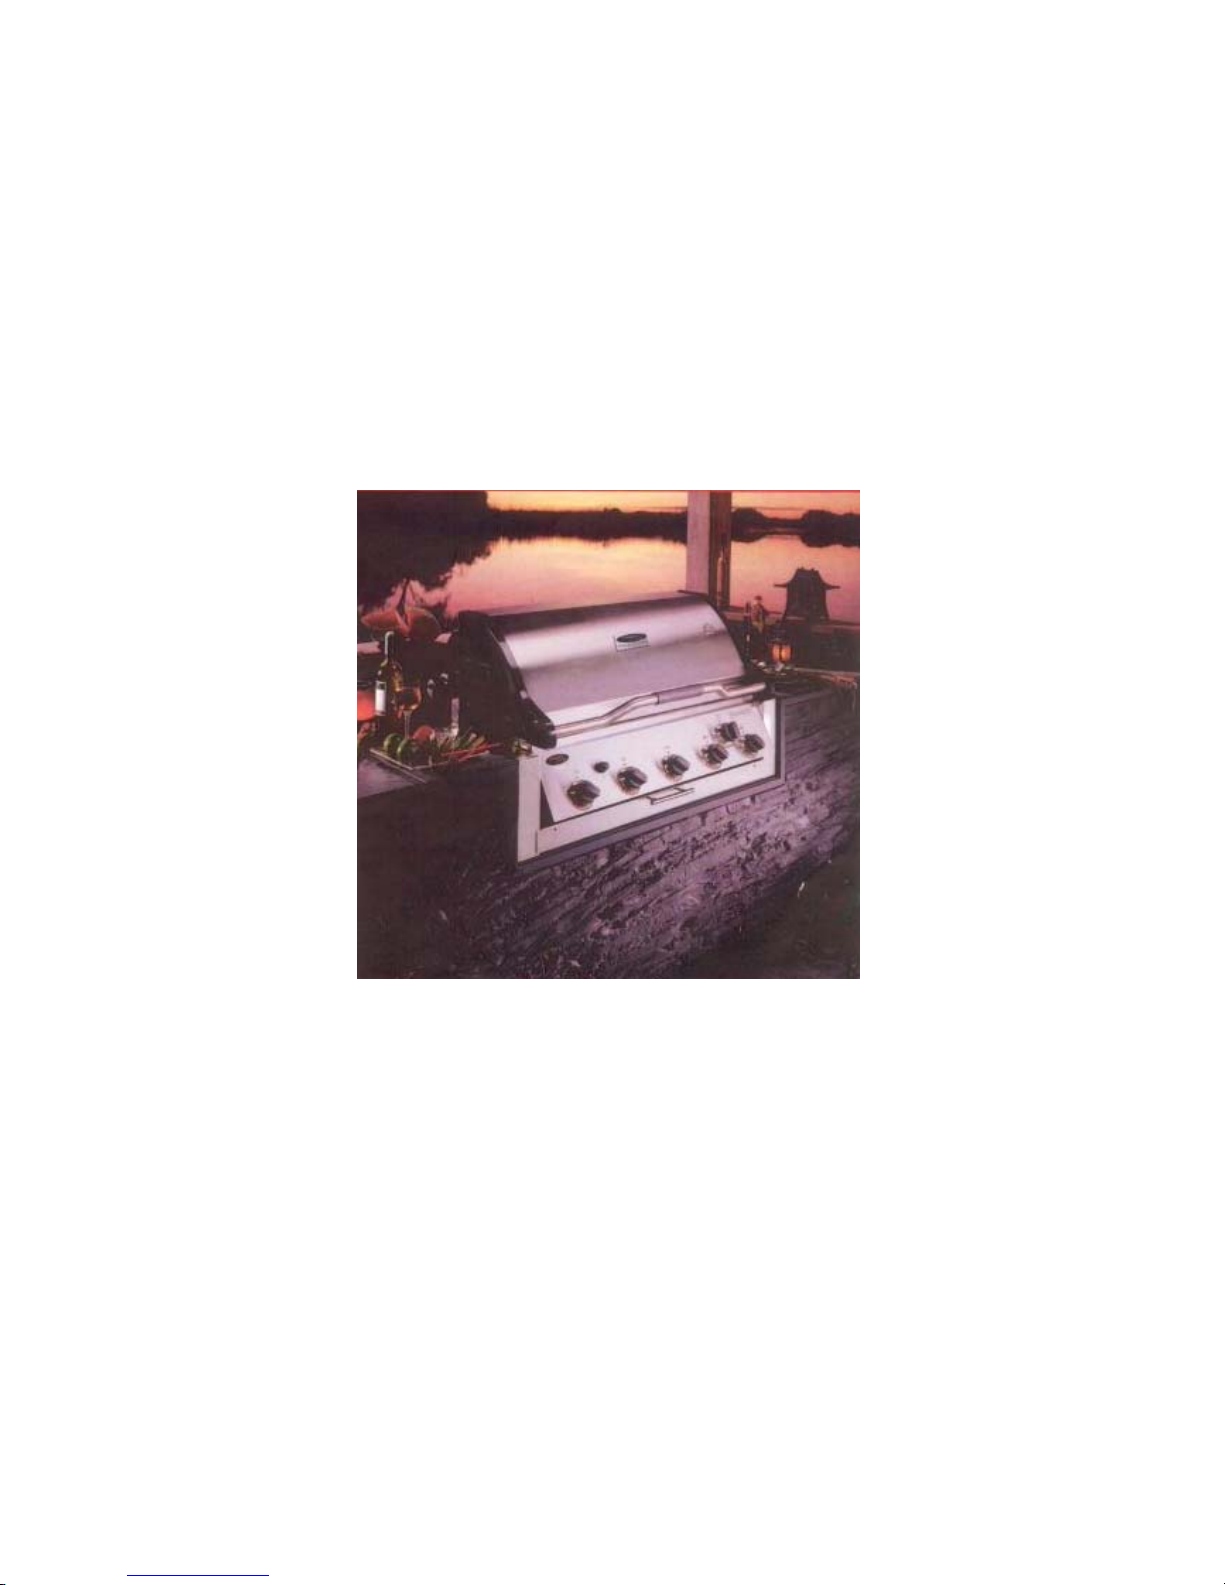
Congratulations on your purchase of this new Inbuilt Majestic barbeque. The
following information is designed to assist you in the assembly, installation,
operation, maintenance tips and trouble shooting and as well as some very
important safety information. We are sure that you will have many years of
enjoyable outdoor entertainment.
CONTENTS
Part 1: For Your Safety
Part 2: Installation Instructions
• Installation Warnings
• Clearances
• Gas Connections
• Safe Use of LPG Gas
• Safe Use of Natural
• Test for Leaks
Part 3: Operating Instructions
• Control Functions
• Lighting the Main Burners
• Turning Off the Burners
• Flare Ups
• Match Lighting the Main Burners
• Lighting the Rotisserie Burner
Part 4: Care & Maintenance
• Main Burners
• Rotisserie Burners
• Cooking Grids
• Drip Tray
• Stainless Panels
• Porcelain Ceramic Castings
• Burner Adjustments
Part 5: Troubleshooting
Part 6: Warranty
2
Page 3

Part 1: For Your Safety
For your safety do not operate this appliance before reading this
instruction book.
WARNING: Improper installation, adjustment, alteration, service or
maintenance can cause injury or property damage. For assistance or
additional information consult with Raypak Australia, your Raypak
distributor, qualified installer or accredited Rheem Australia Service
agency
WHAT TO DO IF YOU SMELL GAS?
DO NOT try to light any gas appliance.
DO NOT touch any electrical switch.
Turn off gas supply at meter.
Immediately call Rheem Service or your gas supplier or licensed gas fitter.
Note: Some gases are heavier than air and it maybe necessary to check for
gas leaks at floor level.
CAUTION!
DO NOT operate this appliance before reading this instruction booklet.
DO NOT place articles or objects on or against the appliance.
DO NOT store chemicals or flammable materials near this appliance.
DO NOT spray aerosols in the vicinity of this appliance whilst it is in
operation.
WARNING
An LP gas cylinder not connected for use shall not be stored in the
vicinity of this or any other appliance.
Always keep this Manual near the grill, for convenient future reference.
3
Page 4

WARNING
Barbeques must be used in accordance with the installation requirements of
your local gas supply authority, or the appropriate installation code issued by
the Australian Gas Association and the Australian Liquefied Petroleum Gas
Association.
Barbeques for use with bottled gas are labelled “Propane Gas” Barbeques for
use with natural gas are labelled “Natural Gas” and must be installed by an
authorised person. Check the gas type sticker attached to the barbeque.
Check that the label matches the gas type for the area in which it is to be
installed.
• Read the instructions before using the appliance.
• Accessible parts may be very hot.
• Keep young children away.
• Any modification of this appliance may be dangerous.
• Turn of the gas supply at the gas cylinder (LPG) after use.
• Parts sealed by the manufacture or their agents must not be
manipulated the user.
PREVENTION OF BURNS
Always keep children and pets under close supervision when using the
grill, and never permit them to come near the grill while in use, as the
exterior surfaces will be very hot.
Always wear insulated protective mitts when working at the grill, or
when attempting to close off the gas supply valve after cooking has
been completed, to prevent possible burns. Always use insulated pot
holders when handling containers of hot food.
Always use an insulated mitt when adding a smoking agent to the
smoke box.
Never store or use petrol or other flammable or volatile substances in
the vicinity of this grill or in the vicinity of any other heat generating
appliance.
VCS5005BINAU VCS5005BIPAU
4
Page 5

Natural Gas Propane
Gas Consumption 66 MJ/h 80 MJ/h
Test Point Pressure 1 kPa 2.75 kPa
Injector Diameters –
Main Burners
1.50 mm 1.02 mm
Injector Diameters –
Rotisserie Burner
2.10 1.10mm
Main Burner Aeration 4.5mm 6.35mm
Rotisserie Burner
Aeration
16mm 10mm
Number of Injectors 5 x Hot Plate 1 x Rotisserie 5 x Hot Plate 1 x Rotisserie
Weight Kg 90 90
Dimensions mm L 980 x D 620 x H 580 L 980 x D 620 x H 580
COMBUSTION AIR OPENINGS
There are 31 25mm x 7mm oblong combustion air openings
on the underside of the upper front panel and 1 x 26mm
diameter combustion air opening on the right hand lower panel and 1 x 26mm diameter
combustion air opening on the left hand lower panel.
Part 2: Installation Instructions
Installation Warnings
A safe location for use of this outdoor BBQ
DANGER: This appliance shall only be used in an above ground, open air
situation with natural ventilation without stagnant areas, where gas leakage
and products of combustion are rapidly dispersed by wind or natural
convection. This grill has been designed for outdoors only
Never install this grill inside any building, garage, shed or breezeway or inside
any boat, trailer or recreational vehicle to prevent a possible fire and to
prevent the possibility of carbon monoxide poisoning or asphyxiation.
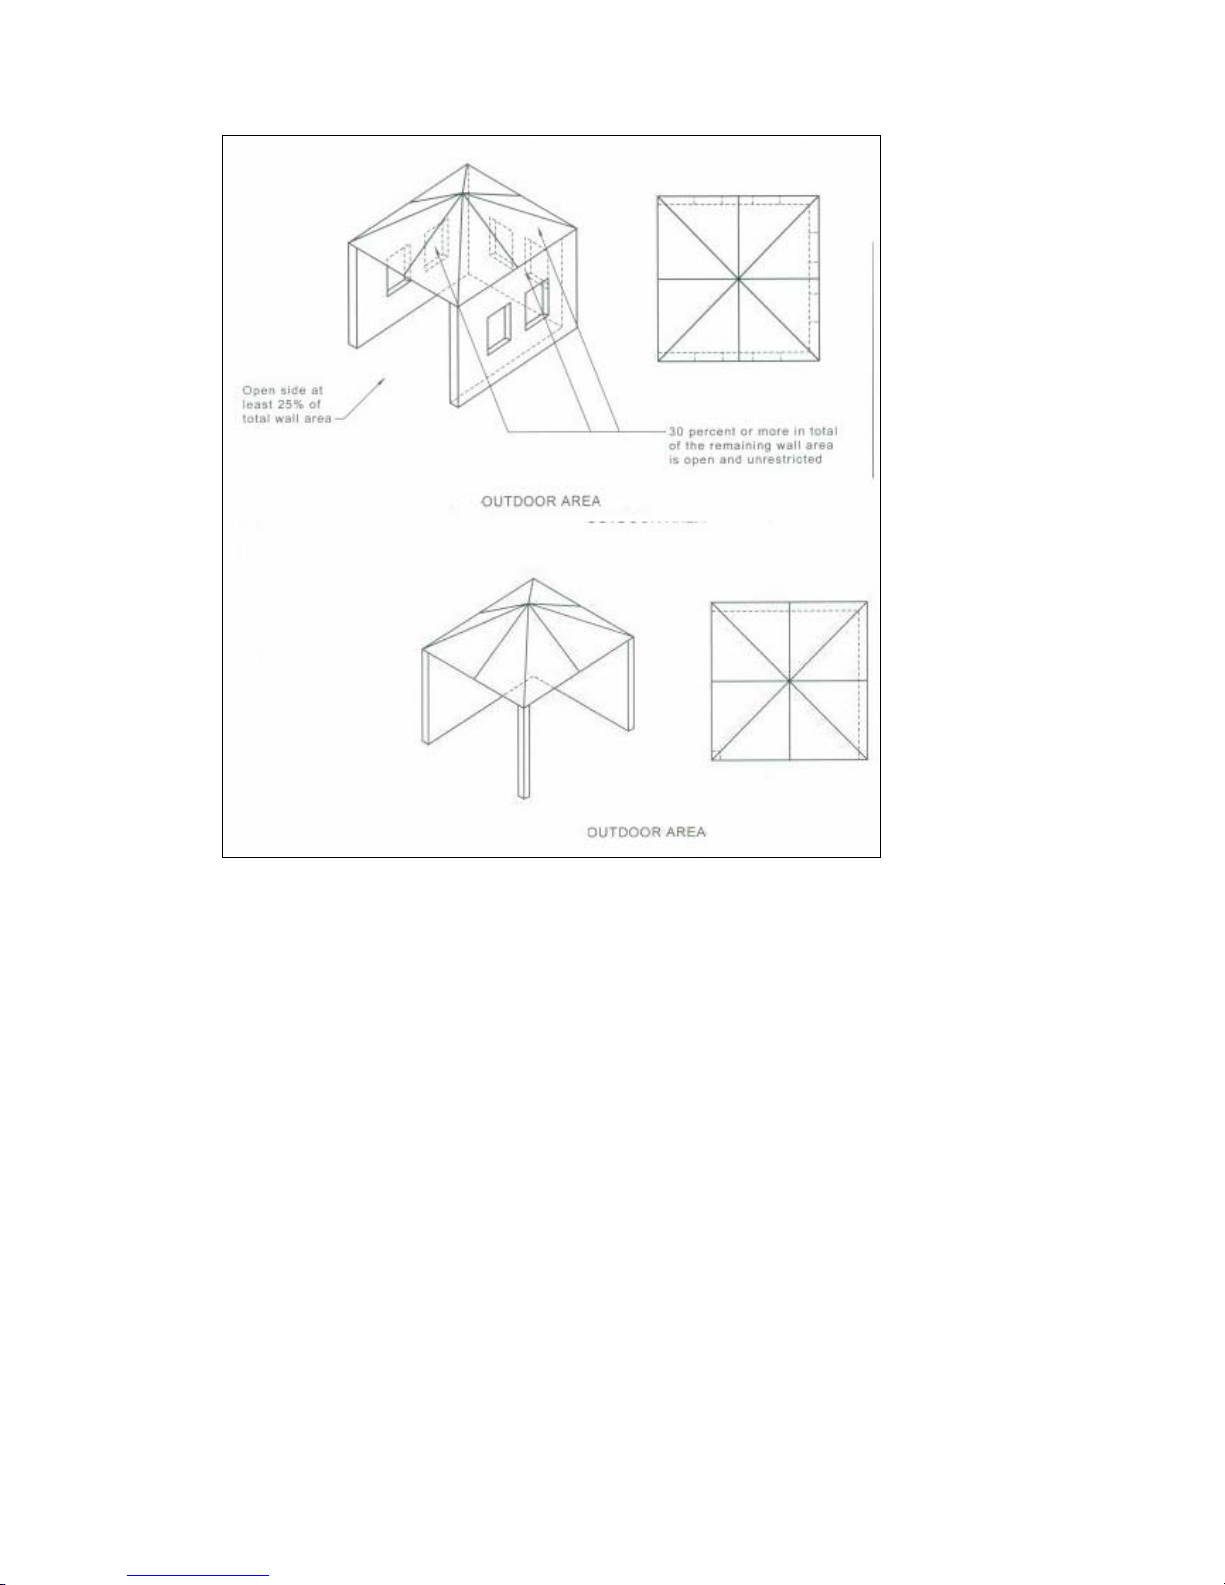
Any enclosure in which this appliance is installed shall comply with one of the
following:
• An enclosure with walls on all sides, but at least one permanent
opening at the ground level and no over head cover.
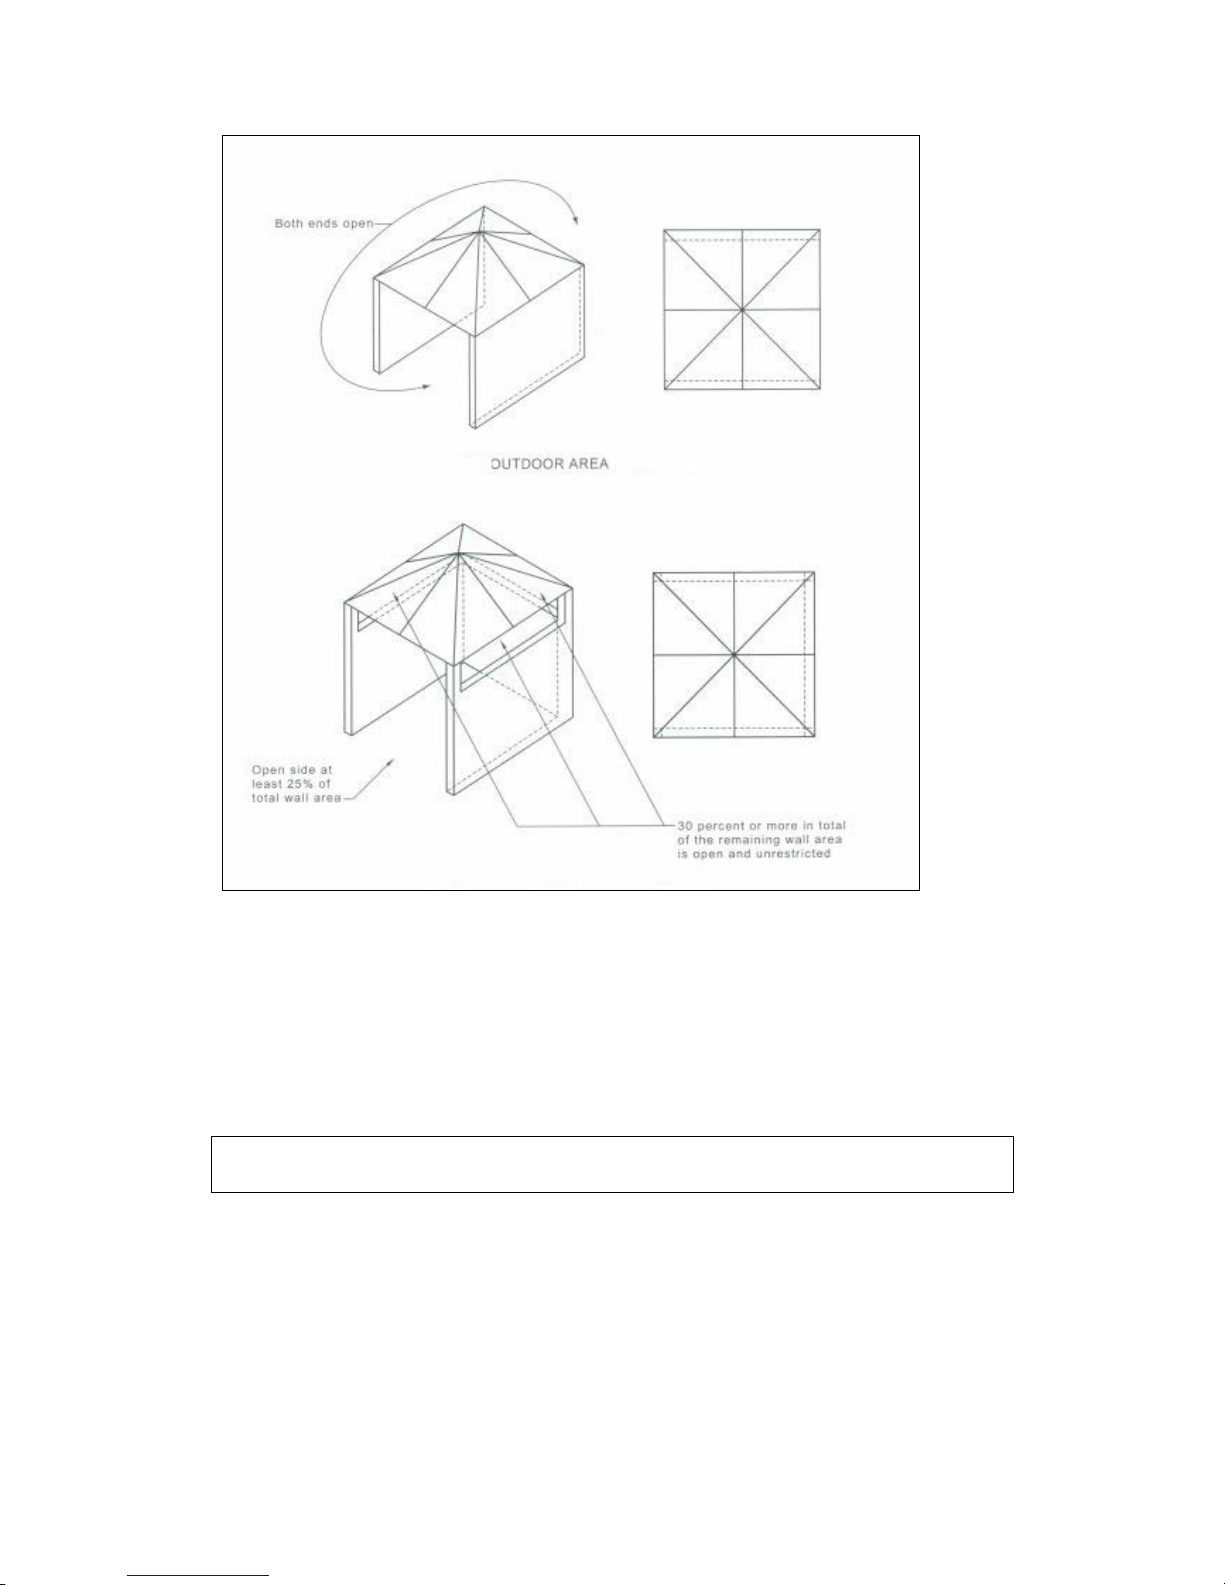
• Within a partial enclosure that includes an over head cover and no
more than two walls.
• Within a partial enclosure that includes an over head cover and more
than two walls, the following shall apply:
a) at least 25 % of the total wall area is completely open; and
b) at least 30 % of the remaining wall area is open and
unrestricted.
5
Page 6
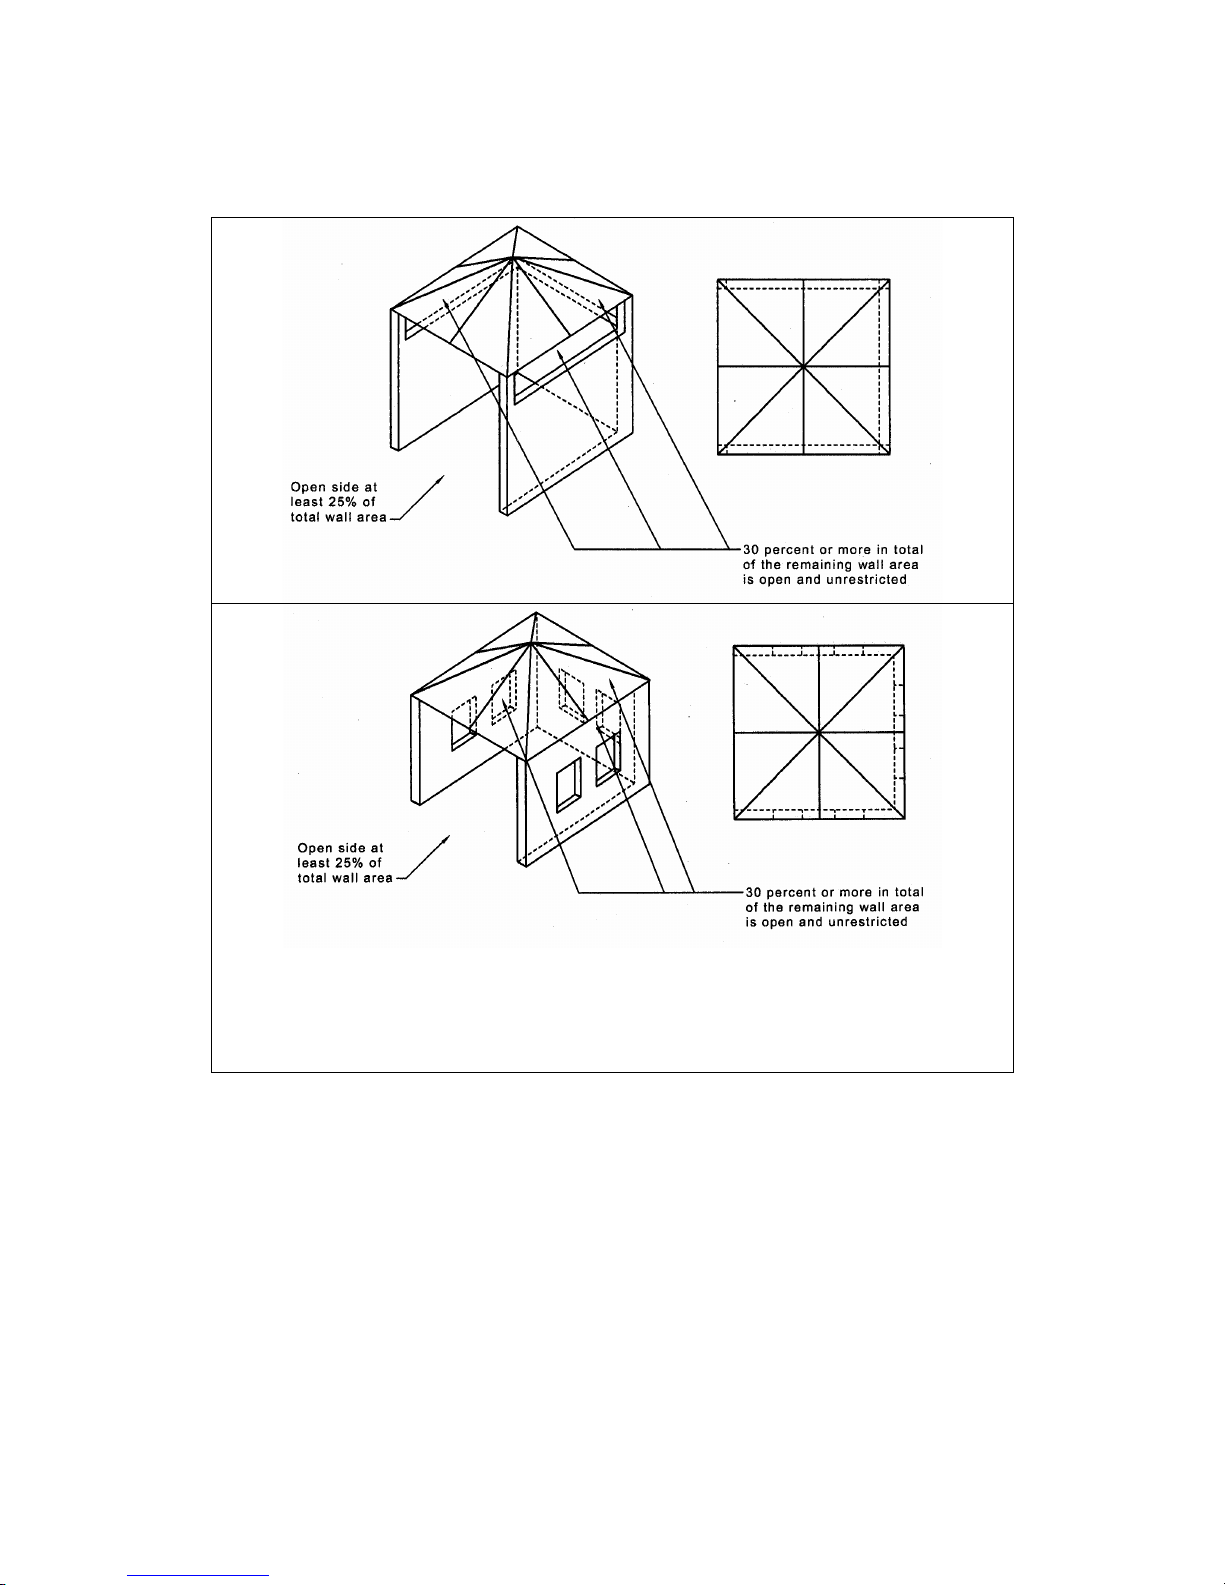
c) In case of balconies, at least 20% of the total of the side,
back and front wall areas shall be remain open and
unrestricted.
6
Page 7
7
Page 8
CLEARANCES
This appliance must be installed on non combustible materials. This outdoor
Barbeque must be installed in accordance with AS5601.
Safe Use of LPG (Propane) Gas
DANGER:
Never install a propane cylinder that is more than 80 % full, as the
contents may lack the adequate room for expansion when exposed to
heat. Propane vapour may then vent through the pressure relief valve,
which could accumulate in a pool and later cause an explosion or fire.
Never store a spare propane cylinder in or near this grill.
8
Page 9

Exposing a disconnected cylinder to heat could result in the venting of
the propane vapour through the pressure relief valve, and the pooled
vapour could result in a violent fire.
Always confirm that all the openings in the cylinder compartment are
free from any obstructions that would restrict the circulation of
ventilation air. Good ventilation will prevent the pooling of leaked
propane vapour, which is heavier than air, and which could explode if
ignited.
WARNINGS:
Always consult the rating label prior to the installation of this barbeque
to confirm which fuel the unit has been configured for and will be
suited for the gas that you have available.
Always check that there are no gas leaks before lighting this grill. Apply
a 50/50 solution of liquid soap and water to the gas supply connections
with a brush or spray bottle, and watch for bubbles.
(tighten connections and check again) Never use a match or naked
flame to test for gas leaks.
Always visually inspect the gas supply line for fraying, cracking or
rodent damage before each use of this grill and if necessary replace
the defective part.
Always store your spare propane cylinder in an outdoor area that is
well ventilated, shady cool and removed from any heat source. Always
store in an upright position. Never store
a spare cylinder in the vicinity
of this grill, or in the vicinity of any other heat source.
Safe Use of Natural Gas
DANGER:
Always consult the rating label prior to the installation of this barbeque
to confirm which fuel the unit has been configured for and will be suited
for the gas that you have available.
The size of the gas line to the appliance (ref AS5601) & connection to
the natural gas supply must be carried out by a licensed plumber for
safety and to assure compliance with the applicable codes.
9
Page 10

Note: This unit is supplied with a gas regulator, securing bracket and
screws which must be fitted during installation. Fig. 1
Fig. 1
Always promptly shut off the gas supply and immediately extinguish all
flames if you smell gas. Contact your licensed plumber to rectify the gas
leak.
Always check that there are no gas leaks before lighting this grill. Apply a
50 / 50 solution of liquid soap and water to the gas supply connections
with a brush or spray bottle, and watch for bubbles.
Always visually check that there is no damage to the gas connections prior
to being used.
Never permit a gas supply line to come in contact with any heated surface
of this grill.
Test for Leaks
Always promptly shut off the gas supply and immediately extinguish all
flames if you smell gas. Contact your licensed plumber to rectify the gas
leak.
Always check that there are no gas leaks before lighting this grill. Apply a
50 / 50 solution of liquid soap and water to the gas supply connections
with a brush or spray bottle, and watch for bubbles.
Always visually check that there is no damage to the gas connections prior
to being used.
Never permit a gas supply line to come in contact with any heated surface
of this grill
Part 3: Operating Instructions
CONTROL FUNCTIONS
Propane Tank Valve
10
Page 11

Warning: Never open the tank valve unless the grill is being prepared for
use. This will prevent the pooling of Propane vapour.
Always open the valve immediately before lighting the grill and always close it
immediately after cooking has been completed.
Burner Control Valve
On the model VCS5005 Barbeque there are 5 independent control valves for
the main burners and a separate control for the rotisserie burner. (see Fig.7)
The OFF position is indicated by the dot above each knob. A full range of
flame adjustment is available from High to Low by turning the knob anticlockwise.
Electronic Ignition System
As you push the Ignitor Button, you will hear a series of clicks as the ignitor
module generates an ignition spark to the burners. The burner should light
within 4 seconds. The system is powered by a single “AA” battery. To remove
or replace the battery, turn the push button knob anti-clockwise and carefully
pull out the spring and battery. Ensure that the positive end of the battery is
in the down (bottom) position before replacing the knob.
11
Page 12

Note Aeration Settings: Natural gas model; Main burner aeration to be set
at 4.5 mm open .Rotisserie burner aeration to be set at 16 mm open Propane
model main burner aeration to be set a 6.35 mm Rotisserie burner to be set
at 10 mm open.
Turning the burners off
1. Always turn the burner control knob(s) to the OFF position when cooking
has been completed.
2. Promptly turn OFF the gas supply valve at the propane cylinder or the
isolation valve on the natural gas supply line.
3. Close the hood of the grill.
FLARE UPS
Flare ups sometimes occur when food droppings fall into the hot sear plates
or burners and ignite .Some flaring is normal and desirable, as it helps impart
the unique flavours associated with grilled foods. Controlling the intensity of
the flare ups is also desirable, however in order to avoid burned or unevenly
cooked foods and prevent the possibility of an accidental fire.
12
Page 13

WARNING Always monitor the grill carefully while cooking and turn down
the flame level down (LOW) or (OFF) if flare ups intensify.
13
Page 14

14
Page 15

Part 4: Care & Maintenance
15
Page 16

16
Page 17

Part 5: Troubleshooting
PROBLEM POTENTIAL CAUSE ACTION REQUIRED
Burner will not
light
Gas supply turned off
Out of Propane
Blockage in the gas system
Misalignment of the gas valve to the venturi
tubes of the burner
Improper attachment of the propane hose and
regulator
Turn on gas supply and re-try
Confirm the flow of gas by smell
or listening for the sound of the
gas being emitted. Allow gas to
clear before attempting to
relight.
Check that there is gas in the
cylinder
WARNING: Never take a
propane cylinder indoors for any
purpose
Confirm that the venturi tubes
are not blocked by insects of
other debris. Use a special
venturi brush to clean (Fig 16)
Use a pin or needle to carefully
probe the orifice in the gas
valve. Never enlarge the orifice.
(Fig 18)
Look under the control panel
and reinsert the gas injector into
the venturi tube if required (Fig
22)
Tighten the regulator connection
fitting into the cylinder valve.
This will be a left hand thread –
do not over tighten.
Unit will not heat
up (LPG)
Control knob left open at start up
Or
Turning gas on too quickly
For safety, the regulator
coupling on your barbeque is
equipped with a flow control
mechanism. This device limits
the flow of gas in the event of a
sudden change in demand for
gas. This may be engaged
inadvertently, if a burner control
knob should be left ON when
you open the gas cylinder valve.
Rapidly opening the valve can
also engage flow control. To
17
Page 18

resolve the problem, close your
cylinder valve. Confirm that all
burner control knobs are in the
OFF position. Open the cylinder
valve slowly (about 1 to 2 turns)
and wait 5 seconds. Finally, turn
a single burner ON and try
relighting it.
Unit won’t stay lit Wind
Running out of gas
Always shelter your barbeque
from strong winds.
Confirm the flow of gas by smell
or by listing for the sound of the
gas being emitted.
Weigh you propane cylinder. A
standard 9 Kg bottle will weigh
approximately 8 Kg when empty
and approximately 17 Kg when
it is 80% full.
Warning: Never take a propane
cylinder indoors for any purpose.
Uneven burn
pattern
or
Flash back fire
Blockage in the burner of gas system
Corroded burner
Confirm that the venturi tubes
are not blocked by insects of
other debris. Use a special
venturi brush to clean (Fig 16)
Use a pin or needle to carefully
probe the orifice in the gas
valve. Never enlarge the orifice.
(Fig 18)
Use a small nail or toothpick to
clean the burner ports (Fig 18)
Corrosion of a gas burner can
cause the solid material between
the gas ports to deteriorate,
resulting in uneven burning.
Contact Rheem spare parts for
the appropriate replacement
burner.
Excessive yellow
flame
Improper air shutter opening Your grill should burn with a
predominantly blue flame. If the
flame is mostly yellow, check the
venturi tubes for obstruction and
clean as shown on page 15. If
yellow flame still persist contact
Rheem Service on 131 031.
Flare Up Excessively fatty foods
Grease build up
Trim all excess fat from meat
before cooking.
Confirm that the sear plate is
clean and properly installed.
Remove excess grease from the
burner chamber.
Ignitor does not
spark
Electrode fouled
Wipe the electrode with a soft
clean cloth.
18
Page 19

Electrode cracked
Lead wire is disconnected
Lead wire is cracked
Battery dead or installed incorrectly
The electrode should be located
3 to 4 mm from the burner and
positioned to spark to the edge
of the gas port. If the spark gap
is incorrect or the unit is not
sparking properly call Rheem
Service on 131 031.
Replace electrode. Call Rheem
Service on 131 031.
Confirm that the lead wire from
the ignitor module to the
electrode is well seated on the
termination of the module.
Replace lead wire. Contact
Rheem Service on 131 031 for
lead wire replacement.
The battery in the Ignitor Button
maybe dead or installed
incorrectly. Correct position is
positive end down.
19
Page 20

Part 6: Warranty
RAYPAK/VERMONT CASTINGS BARBEQUE WARRANTY
AUSTRALIA ONLY
Rheem* will:
a) Repair or, if necessary replace any Raypak barbeque model VCS5005BI
or
b) Replace any component (or, if necessary, arrange the installation of a
barbeque which falls within the warranty periods specified below, in
accordance with and subject to the following table, conditions and
exclusions
Installation Model Period Warranty
From date of installation
Outdoor
Barbeque
Inbuilt
VCS5005BI Year 5 parts This warranty covers all parts
for 5 years and 12 months
labour, excluding grill plates,
flame tamer and ignition
system which are provided
with a 12 months warranty.
Notes:
*Rheem provides warranty service on behalf of Raypak Australia Pty Ltd.
**Refer to item 5 of warranty conditions.
Rheem reserves the right to transfer fully functional components from the
defective barbeque to the replacement barbeque if required.
In addition to this warranty, the Trade Practices Act 1974 and similar laws in
each state and territory provide the owner under certain circumstances with
minimum statutory rights in relation to your Raypak barbeque. This warranty
must be read subject to that legislation and nothing in this warranty has the
effect of excluding, restricting or modifying those rights.
RHEEM AUSTRALIA PTY LTD
A.B.N 21 098 823 511
RAYPAK AUSTRALIA PTY LTD
A.B.N 65 078 743 414
FOR SERVICE TELEPHONE
131 031 AUSTRALIA
0800 657 335 NEW ZEALAND
or refer to local Yellow Pages
20
Page 21

RAYPAK/VERMONT CASTINGS BARBEQUE WARRANTY
AUSTRALIA ONLY
WARRANTY CONDITIONS
1. This warranty is applicable only to this barbeque manufactured
from 1
st
May 2005.
2. This barbeque must be installed in accordance with the Raypak
barbeque installation instructions, supplied with the barbeque and
in accordance with all relevant statutory and local requirements of
the State in which the barbeque is installed.
3. This barbeque must be correctly commissioned by a licensed and
authorised person and the installation certified by the relevant Gas
Authority of the State in which the barbeque is installed.
4. Where a failed component or barbeque is replaced under warranty,
the balance of the original warranty period will remain effective.
The replaced part or barbeque does not carry a new warranty.
5. Where the barbeque is installed outside the boundaries of a
metropolitan area as defined by Rheem or further than 25 km from
a regional Rheem branch office or Accredited Service Agent, the
cost of transport, insurance and travelling costs between the
nearest Rheem Accredited Service Agent’s premises and the
installed site shall be the owner’s responsibility.
6. The warranty only applies to the barbeque and original or genuine
(company) component replacement parts and therefore does not
cover and plumbing or electrical parts supplied by the installer and
not an integral part of the barbeque.
WARRANTY EXCLUSIONS
1. REPAIR AND REPLACEMENT WORK WILL BE CARRIED OUT AS SET
OUT IN THE RAYPAK BARBEQUE WARRANTY, HOWEVER, THE
FOLLOWING EXCLUSIONS MAY CAUSE THE BARBEQUE WARRANTY TO
BECOME VOID AND MAY INCUR A SERVICE CHARGE AND/OR COST OF
PARTS.
a) Accidental damage to the barbeque or any component, including: Acts
of God, failure due to misuse, incorrect installation, attempts to repair
the barbeque other than by a Rheem Accredited Service Agent or the
Rheem Service Department.
b) Where it is found there is nothing wrong with the barbeque; where the
complaint is related to faulty plumbing; and not the barbeque or
barbeque components; where there is a failure of gas, electricity
supplies; where the supply of gas, electricity does not comply with the
relevant codes or acts.
c) Where the barbeque or barbeque component has failed directly or
indirectly as a result of: misuse or neglect.
21
Page 22

d) Where the barbeque is located in a position that does not comply with
the Raypak barbeque installation instructions or relevant statutory
requirements, causing the need for major dismantling or removal of
cupboards, doors, walls or use special equipment to bring the
barbeque to floor or ground level or to a serviceable position.
2. SUBJECT TO ANY STATUTORY PROVISIONS TO THE CONTRARY, THIS
WARRANTY EXCLUDES ANY AND ALL CLAIMS FOR DAMAGE TO
FURNITURE, CARPETS, WALLS, FOUNDATIONS OR ANY OTHER
CONSEQUENTIAL LOSS EITHER DIRECTLY OR INDIRECTLY DUE TO
MISUSE OF THE BARBEQUE, OR DUE TO LEAKAGE FROM FITTINGS
AND/OR PIPEWORK OF METAL. OTHER MATERIALS CAUSED BY
TEMPERATURE, WORKMANSHIP OR OTHER MODES OF FAILURE.
22
Page 23

MAJESTIC
VCS5005 ASSEMBLY PROCEEDURES
23
Page 24

GENERAL INFORMATION
FRAMING DIMENSIONS
24
Page 25

Fig 1
Non Combustible Clearances
Reference mm
A 604
B 101
C 50 dia
D 229
E 54
F 77
I 228
J 1110
N 478
O 102
Fig 2
NOTE: This BBQ must be installed in an enclosure
constructed from non-combustible material.
Clearances
See Fig 1 and Fig 2.
Specifications
Appliance specifications can be found on the data plate attached to the unit.
25
Page 26

26
Page 27

27
Page 28

28
Page 29

VCS5005 ASSEMBLY DRAWING
29
Page 30

VCS5005 PARTS LIST
Distributed by
Raypak Australia
(Division of Rheem Australia Pty Ltd)
39 Koornang Rd
Scoresby Vic 3179
Ph 03 9757 3333
Fax 03 9757 3350
ABN 65078 743 414
30
 Loading...