

Vermont Castings 1601, 1602, 1600, 1603 Homeowner's Installation And Operation Manual
The Seville Insert
Models 1600, 1601
Surround Models 1602, 1603
Homeowner’s
f i r e - p a r t s . c o m
Installation and
Operating
Manual
1586
SAFETY NOTICE: IF THIS APPLIANCE IS NOT PROPERLY INSTALLED,
OPERA TED AND MAINTAINED, A HOUSE FIRE MAY RESULT.
TO REDUCE THE RISK OF FIRE, FOLLOW THE INST ALLATION INSTRUCTIONS.
FAILURE TO FOLLOW INSTRUCTIONS MAY RESULT IN PROPERTY DAMAGE,
BODILY INJURY OR EVEN DEATH. CONTACT LOCAL BUILDING OFFICIALS
ABOUT RESTRICTIONS AND INSTALLATION INSPECTION REQUIREMENTS IN
YOUR AREA.
For use in the
United States and Canada
Do Not Discard This Manual: Retain for Future Use
30001586 10/03 Rev. 4
Vermont Castings Seville Insert
Introduction
Thank you for choosing a Vermont Castings Seville Insert to meet your heating needs.
We're confident you will find the Seville Insert to be an effective wood-burning heater
incorporating modern, non-catalytic combustion technology with the classic aesthetic appeal
of its Vermont Castings lineage.
The Seville Insert achieves high-efficiency through precisely calibrated delivery of primary and
secondary air into a refractory-insulated firebox. Properly operated and maintained according
to the guidelines in this manual, your Seville Insert will provide safe, dependable, and
economical heating for years to come.
The Seville Insert Model 1600 series has been tested and is listed by CSA. The test
standards are ANSI/UL-1482 for the United States and ULC-S628 for Canada.
The Seville Insert Model 1600 is listed for burning wood fuel only. Do not burn other fuels.
The Seville Insert Model 1600 complies with the standards set forth by the Federal
Environmental Protection Agency, 40 CFR Part 60.532(b)(2), as stated on the permanent
label attached to each stove.
We recommend that you hire a professional, solid-fuel stove technician to install your Seville
Insert, or to advise you on the installation should you attempt to install it yourself. Consult the
authority having local jurisdiction (such as a municipal building department, fire department,
fire prevention bureau, etc.) before installation to determine the need for a building permit.
Also, consult your insurance agent to be sure your installation complies with specific
requirements that may vary locally.
In addition to directions on installation and operation, this manual includes directions on
f i r e - p a r t s . c o m
maintenance and assembly. Please read this entire manual before you install or operate your
new room heater.
Save These Instructions For Future Reference.
Table of Contents
Specifications ................................................. 3
Installation ...................................................... 4
Operation........................................................ 9
Maintenance ................................................. 13
Parts List....................................................... 18
2
Accessories
#1604 Fan Kit, Side Mount
30001586
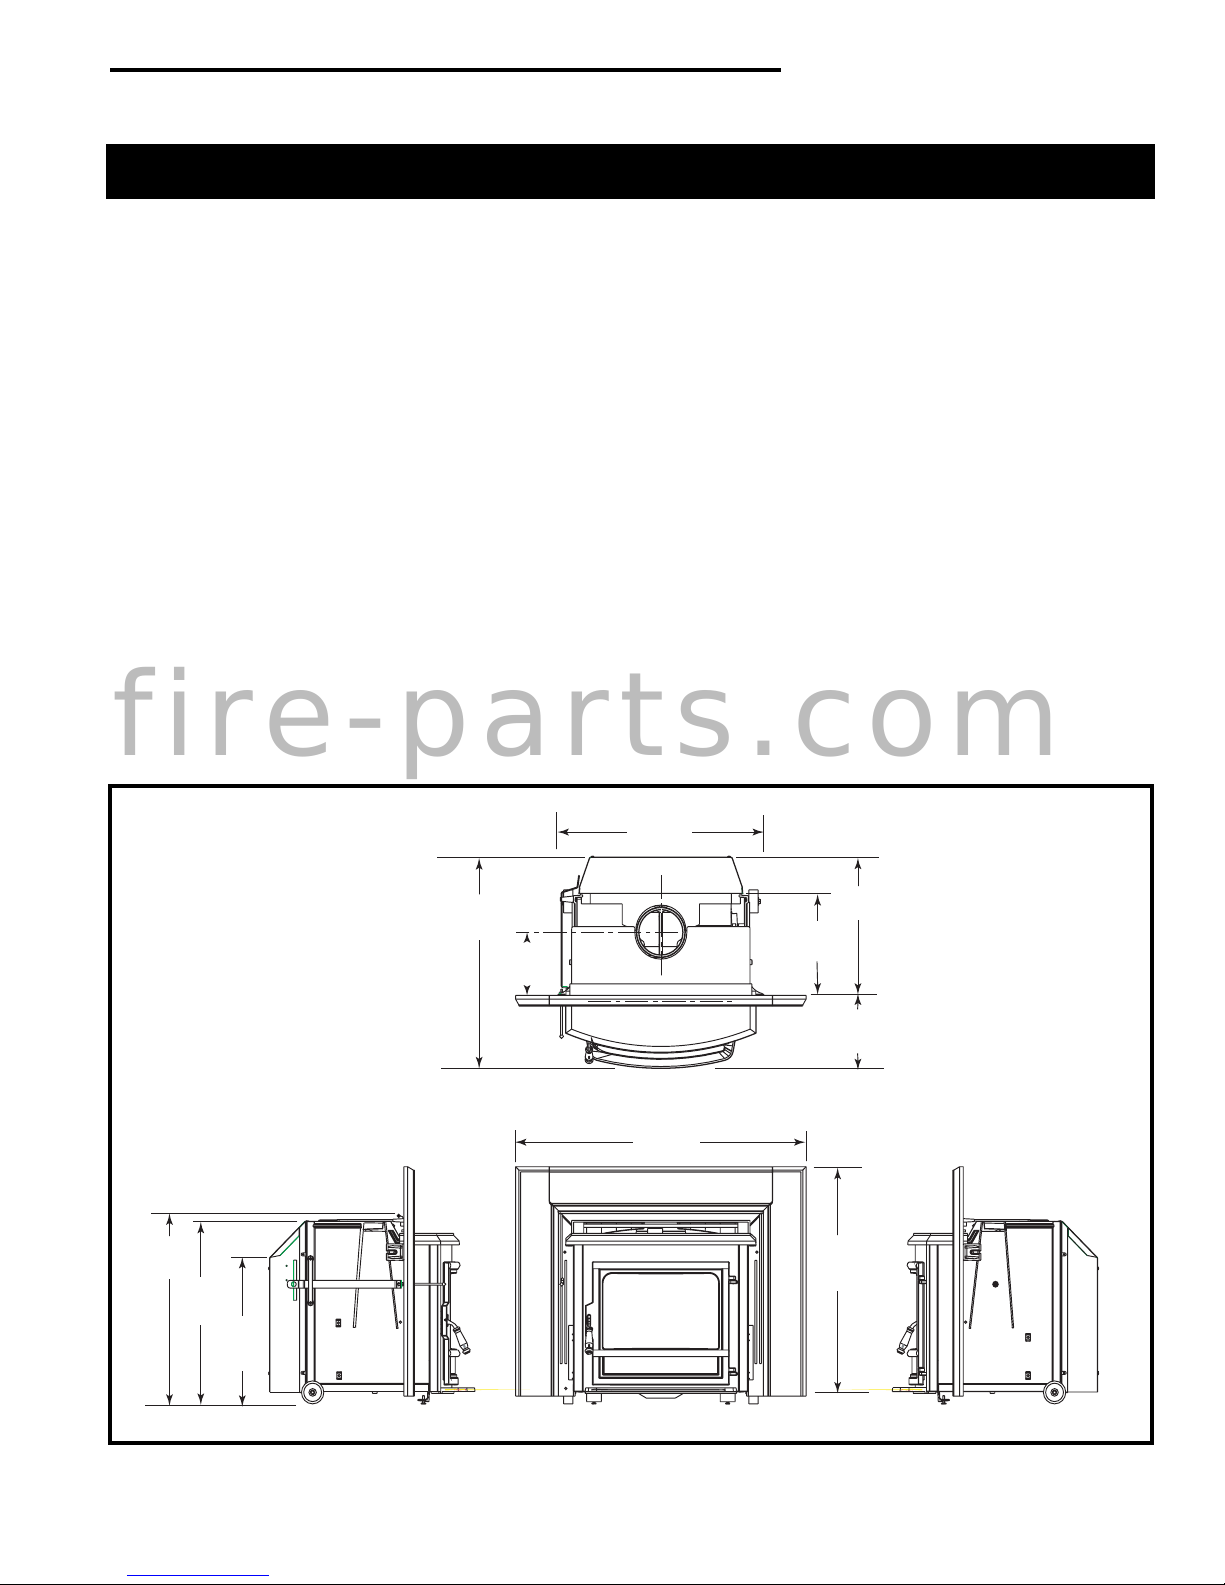
Specifications
Seville Insert, Model 1600
Vermont Castings Seville Insert
Range of heat output............... 10,200 - 27,400 Btu/Hr
Maximum heat output......................... 30,000 Btu’s/hr.
Area heated...................................... Up to 1320 sq. ft.
Fuel size/type ......................................18” (46 cm) logs
Loading ................................................................ Front
Chimney connector ..................... 6” (152mm) diameter
Chimney flue size....................... 6” (152mm) minimum
Flue exit position .....................................................Top
Primary air...Manually set, thermostatically maintained
Ash handling system .....................Removable ash pan
Glass panel ........................ High-temperature Infra-red
Weight ............................................................... 420lbs.
Width ..................................................... 29¹⁄₂” (749mm)
Depth (Front of Ash Lip - Rear Shroud) 29¹⁄₄” (743mm)
Height....................................................24⁵⁄₈” (626mm)
3
1
2
1
This value can vary depending on how the stove is
operated, the type and moisture content of the fuel
used, as well as the design, construction and climatic
location of your home. Figures shown are based on
maximum fuel consumption obtained under laboratory
conditions and on average efficiencies.
2
These values are based on operation in building codeconforming homes under typical winter climate conditions in New England. If your home is of nonstandard
construction (i.e., unusually well insulated, not insulated, built under ground, etc.) or if you live in a more
severe or more temperate climate, these figures may
not apply. Since so many variables affect performance,
consult your Vermont Castings authorized dealer to
determine realistic expectations for your home.
3
Under specific conditions used during EPA emissions
testing.
f i r e - p a r t s . c o m
Drawings not to scale.
29¹⁄₂"
(749mm)
24⁵⁄₈"
(626mm)
22¹⁄₂"
(572mm)
19"
(483mm)
Fig. 1 Seville Insert dimensions.
29¹⁄₄"
(743mm)
9"
(229mm)
19¹⁄₄"
(489mm)
14"
(356mm)
10"
(254mm)
39¹⁄₂"
(1003mm)
31"
(787mm)
1586
30001586
3

Vermont Castings Seville Insert
Installation
SAFETY NOTICE: IF YOUR INSERT IS NOT PROPERLY INSTALLED, OPERATED AND MAINTAINED,
A HOUSE FIRE MAY RESULT. FOR SAFETY,
FOLLOW ALL INSTALLATION, OPERATION AND
MAINTENANCE DIRECTIONS. CONTACT LOCAL
BUILDING OFFICIALS ABOUT RESTRICTIONS AND
INSTALLATION INSPECTION REQUIREMENTS IN
YOUR AREA.
NOTE: CANADIAN INSTALLATIONS
In accordance with CAN/CSA B365-M01, you must
permanently secure the Fireplace Modification Tag
to the rear of the fireplace cavity if you have modified the fireplace in any way to accommodate
installation of a fireplace insert. This tag (1601246)
is in the hardware bag included with the Seville
Insert.
Before you begin an installation, review your plans to
be certain that:
• Your insert will be far enough from combustible
material to meet all clearance requirements.
• The floor protector is large enough and is con-
f i r e - p a r t s . c o m
structed properly to meet all requirements.
• You have all necessary permits from local authorities.
Your local building official is the final authority for
approving your installation as safe and determining
that it meets local and state codes.
The metal label permanently attached to the back of
the insert indicates that the Seville Insert has been
tested to current UL and ULC standards by CSA.
Clearance and installation information is also printed
on the label. Local authorities generally will accept the
label as evidence that, when the stove is installed
according to the information on the label and in this
manual, the installation meets codes and can be
approved. Codes, however, vary in different areas.
Before starting the installation, review your plans with
the local building authority. Your local dealer can
provide any additional information needed.
For any unresolved questions about installation, refer
to the National Fire Protection Association’s publication
ANSI/NFPA 211–1988 Standard for Chimneys, Fireplaces, Vents and Solid Fuel Burning Appliances
Canada, the equivalent publication is
Installation Code for Solid Fuel Burning Appliances and
Equipment.
national codes. They are nationally recognized and
are accepted by most local authorities. Your local
dealer or your local building official may have a copy of
these regulations.
These standards are the bases for many
CSA CAN-B365,
. In
IMPORTANT: FAILURE TO FOLLOW THESE
INSTALLATION INSTRUCTIONS MAY RESULT IN A
DANGEROUS SITUATION, INCLUDING A CHIMNEY
OR HOUSE FIRE. FOLLOW ALL INSTRUCTIONS
EXACTLY AND DO NOT ALLOW MAKESHIFT
COMPROMISES TO ENDANGER PROPERTY AND
PERSONAL SAFETY.
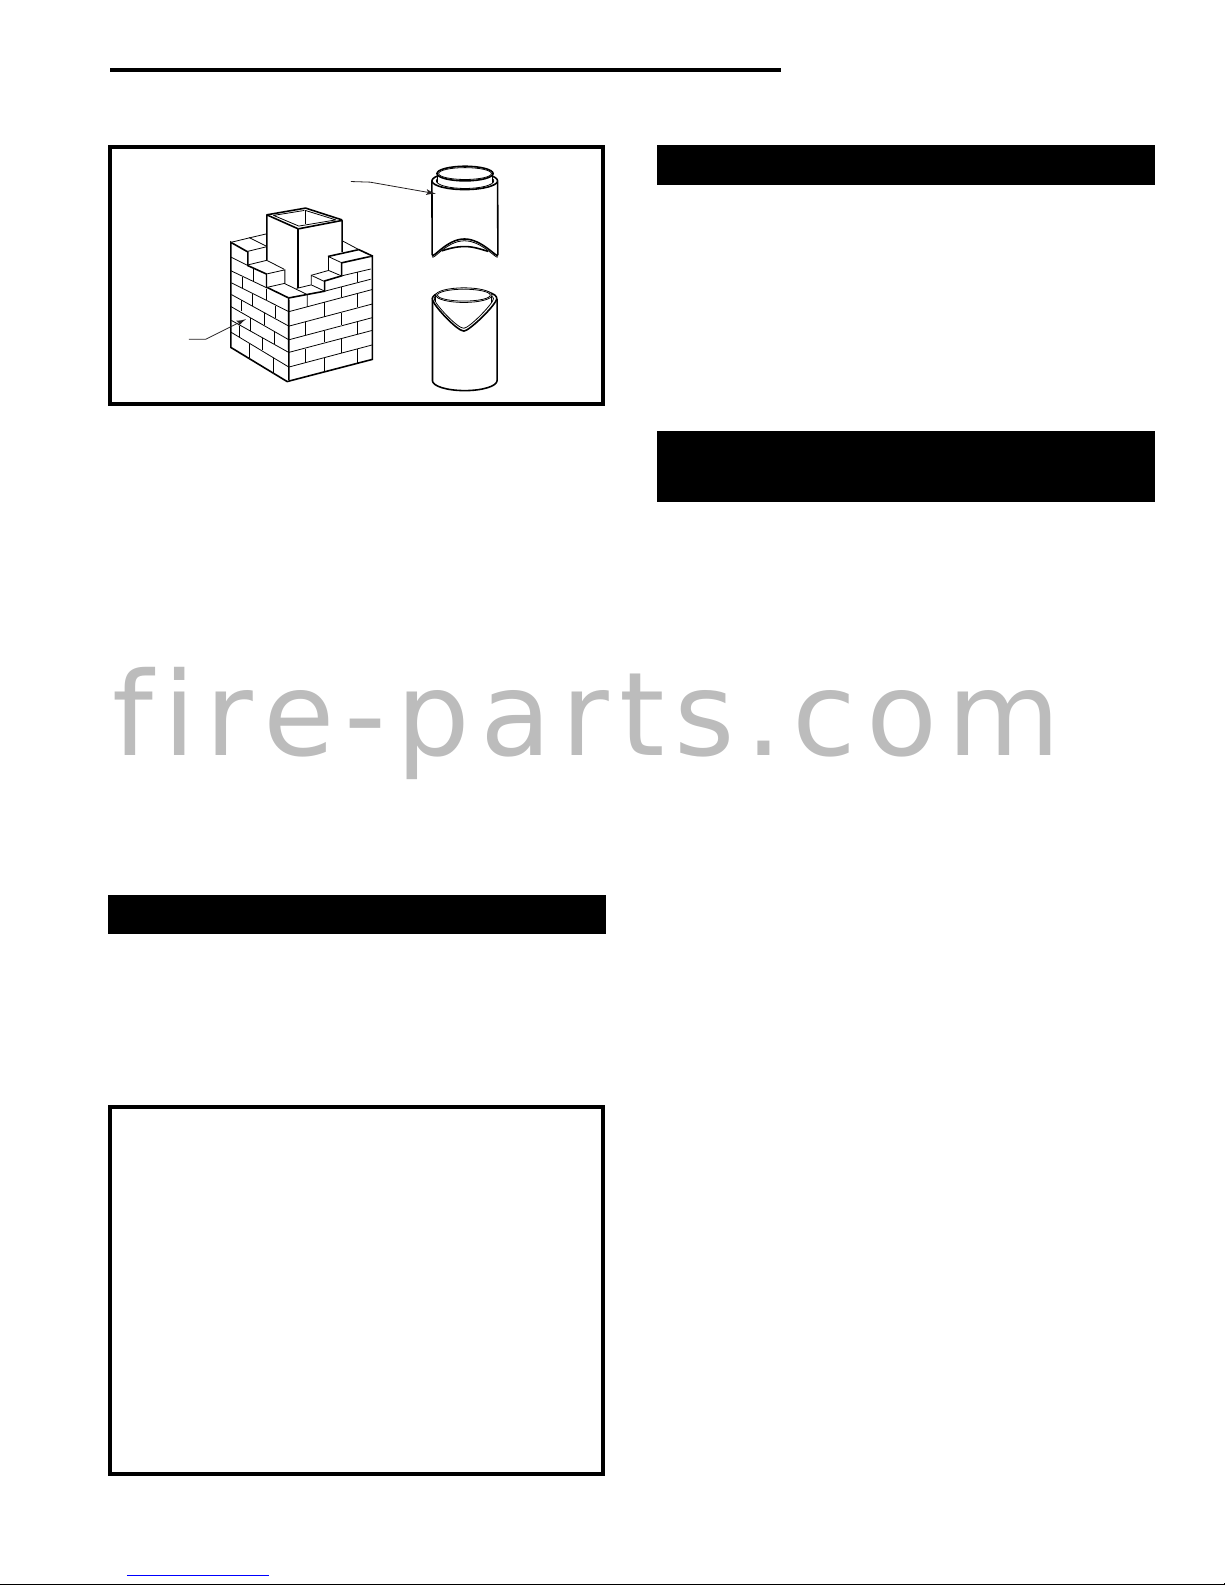
Chimneys
Your insert must be connected either to a sound
masonry chimney that meets local codes, to a relined
masonry chimney that meets local codes, or to an
approved prefabricated metal chimney. Whichever of
those types you use, the chimney and chimney connector must be in good condition and kept clean.
If you use an existing masonry chimney, it must be
inspected to ensure safe condition before the stove is
installed. Your local professional chimney sweep,
building inspector, or fire department official will be
able to make the inspection or direct you to someone
who can.
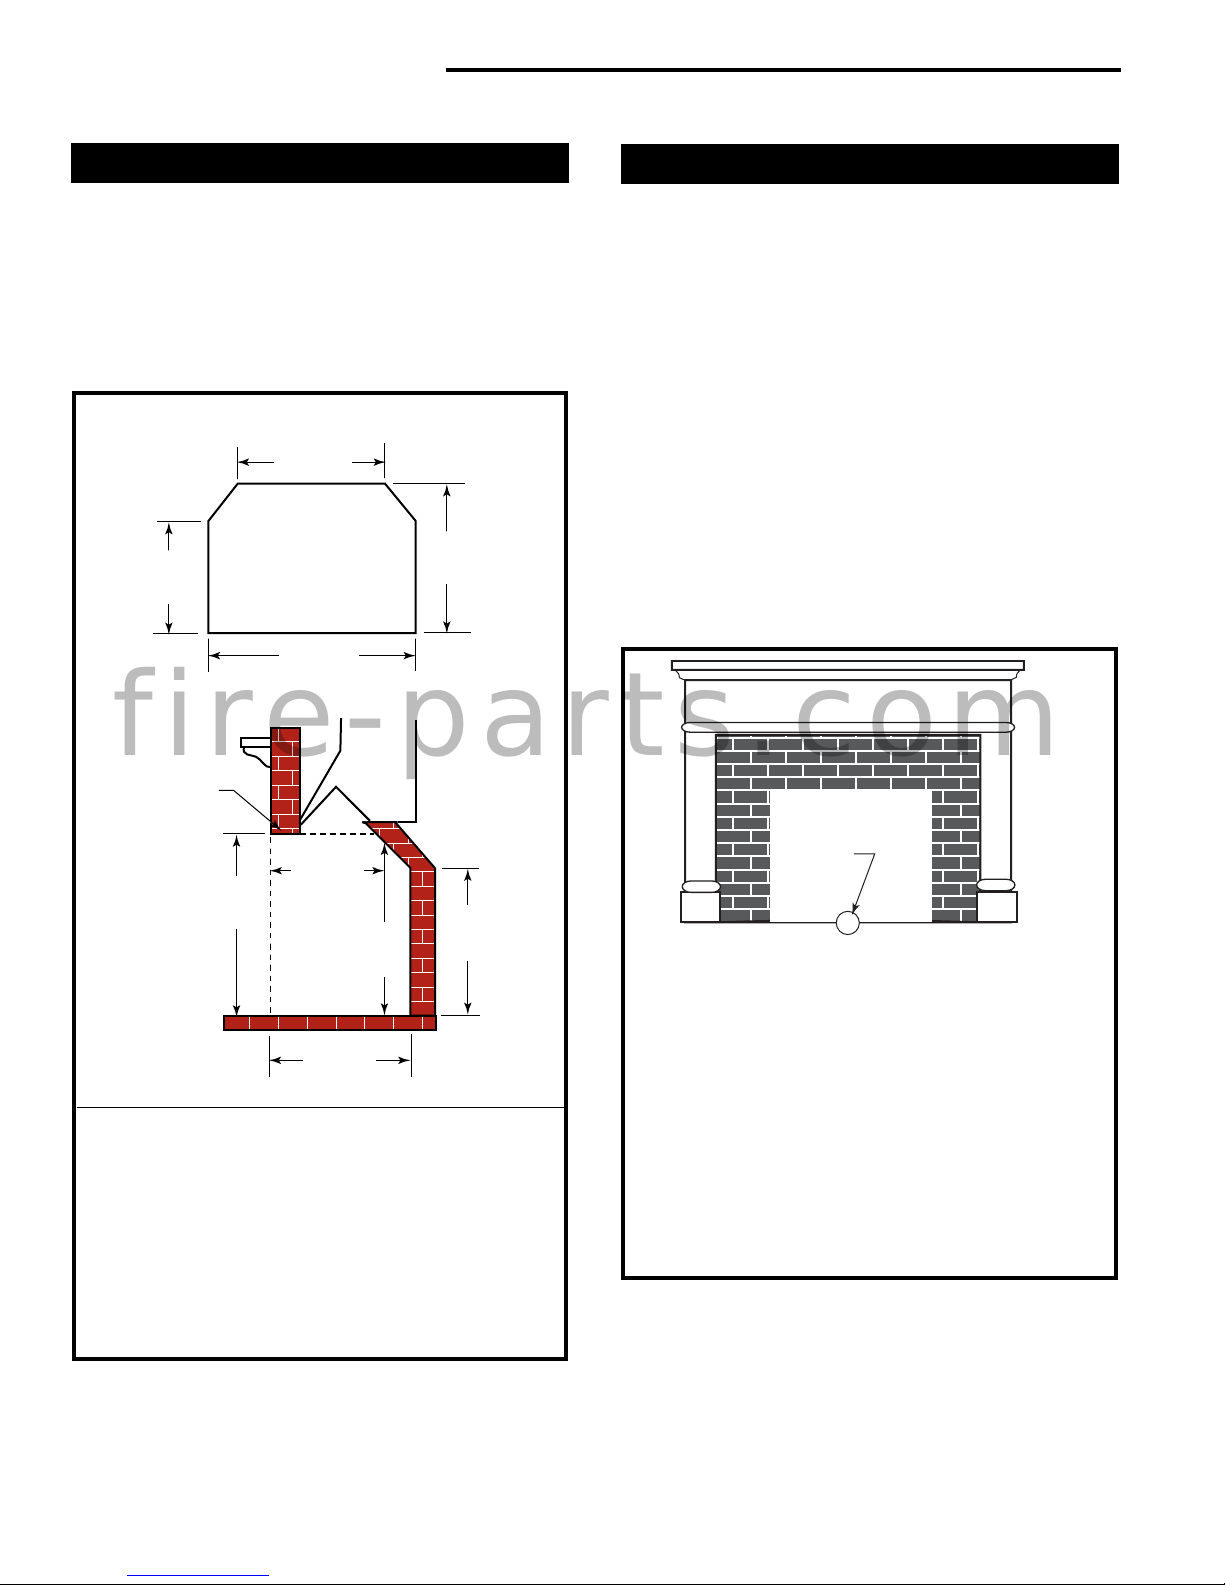
The chimney should extend at least 3' (914mm) above
the highest point where it passes through a roof, and at
least 2' (610mm) higher than any portion of a building
within 10' (3m).
To assure proper draft and good performance, any
chimney used with this stove should extend at least 16'
(5m) above the flue collar of the stove.
0 To 10’
2’ Min.
3’
Min.
Reference Point
Fig. 2 The 2'-3'-10' Chimney Rule.
0 To 10’
2’ Min.
3’
Min.
Masonry Chimneys
An existing masonry chimney must be inspected to
confirm that it has a lining. Do not use an unlined
chimney. The chimney also should be examined for
cracks, loose mortar, other signs of deterioration, and
blockage. Repair any defects before the chimney is
used with your stove.
AC617
4
30001586
Vermont Castings Seville Insert
A prefabricated doublewall insulated chimney
A tile-lined
masonry
chimney
ST241
Fig. 3 Standard Chimney Types
Masonry Chimneys, cont'd.
• Unused openings in an existing masonry chimney
must be sealed with masonry to the thickness of the
chimney wall, and the chimney liner should be
repaired. Openings sealed with pie plates or
wallpaper are a hazard and should be sealed with
mortar or refractory cement. In the event of a
chimney fire, flames and smoke may be forced out
of these unused thimbles.
• The chimney should be thoroughly cleaned before use.
• A newly-built masonry chimney must conform to the
standards of local building code, or, in the absence
f i r e - p a r t s . c o m
of a local code, to a recognized national code.
Masonry chimneys must be lined, either with codeapproved masonry or precast refractory tiles,
stainless steel pipe, or a code-approved, "poured-inplace" liner. The chimney clean-out door must seal
tightly to ensure a good draft.
Prefabricated Chimneys
A prefabricated metal chimney must be one that is
tested and listed for use with solid-fuel burning appliances to the High-Temperature (H.T.) Chimney Standard UL-103-1985 (2100°F.) for the United States, and
High Temperature (650°C) Standard ULC S-629 for
Canada.
This Seville Insert is approved for venting into a masonry
chimney with a nominal flue size of 8" x 8" (203 x
203mm), and into a round flue size of 8" (203mm) or 6"
(152mm). It may be vented into larger chimneys as
well, however, chimneys with liners larger than 8" x
12" (203 x 305mm) may experience rapid cooling of
smoke and reduction in draft, especially if they are
located outside the home. Such large chimneys may
need to be insulated or relined for proper stove performance.
Existing Masonry Fireplace
The Seville Insert is listed only for installation within a
properly built masonry or heat circulating, masonrytype fireplace that is constructed in accordance with
the requirements of recognized building codes. A
heat-circulating masonry-type fireplace must conform
to building code standards for masonry fireplaces, and
must consist of a factory-built metal firebox with air
circulation pathways that are surrounded by masonry
materials.
The Vermont Castings' Seville Insert is not listed
for use in “zero-clearance” prefabricated fireplaces.
The fireplace and chimney must be clean and structurally sound. Have it inspected by a qualified professional chimney sweep, a mason, or your Vermont
Castings’ Authorized Dealer before the insert is
installed. Any deterioration (cracks, loose mortar or
loose bricks) must be repaired.
The fireplace should not be modified to install the
insert without first checking with your local building
inspector or fire marshal. Do not remove bricks or
mortar that may jeopardize the compliance of the
fireplace with local building codes.
Chimney Size
Requirements for an
DO NOT CONNECT THIS UNIT TO A CHIMNEY
FLUE SERVING ANOTHER APPLIANCE.
NOTE: DO NOT VENT THIS STOVE INTO A
FACTORY-BUILT (ZERO-CLEARANCE) FIREPLACE. THIS STOVE HAS NOT BEEN TESTED
AND LISTED FOR THAT TYPE OF INSTALLATION. FACTORY-BUILT FIREPLACES AND
THEIR CHIMNEYS ARE SPECIFICALLY DESIGNED AS A UNIT FOR USE AS FIREPLACES.
IT MAY VOID THE LISTING OR BE HAZARDOUS
TO ADAPT THEM FOR ANY OTHER USE.
DO NOT CONNECT THE STOVE TO ANY AIR
DISTRIBUTION DUCT OR SYSTEM.
30001586
5
Vermont Castings Seville Insert
Minimum Fireplace Dimensions
The Seville Insert will fit most masonry fireplaces. To
confirm that it will fit yours, measure the lintel depth,
plus the height, width, and depth of your fireplace and
your hearth. Compare them to the measurements in
the accompanying chart. (Fig. 4) If you choose to
install a new hearth over an existing fireplace hearth,
be sure to take its thickness into consideration when
measuring both front and back height of the fireplace.
After confirming that your fireplace is the right size,
check the clearances to combustibles. First mark with
tape the exact center of your fireplace opening on the
hearth. Measure the side clearance from this point.
Measure the top trim and/or mantel clearances from
the finished hearth surface. Measure the front clearance (to furnishings, etc.) from the door glass.
NOTE: The clearance between the insert and the
Clearance Requirements
mantel, top trim and side trim cannot be reduced by
Minimum Fireplace Dimensions
23"
(584mm)
installing shields.
Another clearance requirement to consider is that for
movable items such as tables, bookcases, rugs,
furnishings, and your woodbox. All combustible
materials of this type should be a minimum of 48"
15"
(381mm)
Minimum Fireplace
Floor
20"
(508mm)
(1220 mm) from the front surface of the insert. Be sure
that family members are aware of this requirement as
well, so they too will keep objects a safe distance from
the insert.
30"
(762mm)
B
Lintel 5¹⁄₂”
f i r e - p a r t s . c o m
Max. for
Straight Flue
Connector
A
15"
24³⁄₄"
(629mm)
(381mm)
20"
(508mm)
24"
(610mm)
20"
(508mm)
FP1165
Fireplace Maximum Opening
Opening Width 39” (991mm)
Opening Height 30¹⁄₂” (775mm)
1. The minimum depth must be maintained from the floor of
the fireplace to a height of 20” (508mm).
2. Though the Seville Insert will fit into larger fireplaces, the
decorative surround panels will not completely cover the
fireplace opening if these dimensions are exceeded. Custom
made trim may be used.
Fig. 4 Use these measurements to confirm that the Seville
Insert will fit into your masonry fireplace.
Fireplace
Opening
Center
C
X
Fireplace Clearances
Masonry Fireplace
A. Mantel* 39” (991mm)
B. Top Trim* 39” (991mm)
C. Side Trim** 21” (533mm)
*The mantel and/or top trim must be 9” (230mm) in depth or less.
For the Seville System, measure from the supplied trim panel
forward.
**Where side trim extends more than 2” (50mm) from the fireplace
facing, the side clearance must be no less than 32¹⁄₂” (825mm).
Measure the side clearance (C) from the exact center of your
fireplace opening on the hearth (X). Measure the top trim (B) and/
or mantel clearances (A) from the finished hearth surface. Measure
the front clearance (to furnishings, etc.) from the glass door.
Fig. 5 Observe these clearances to combustible trim.
FP1085
6
30001586
 Loading...