

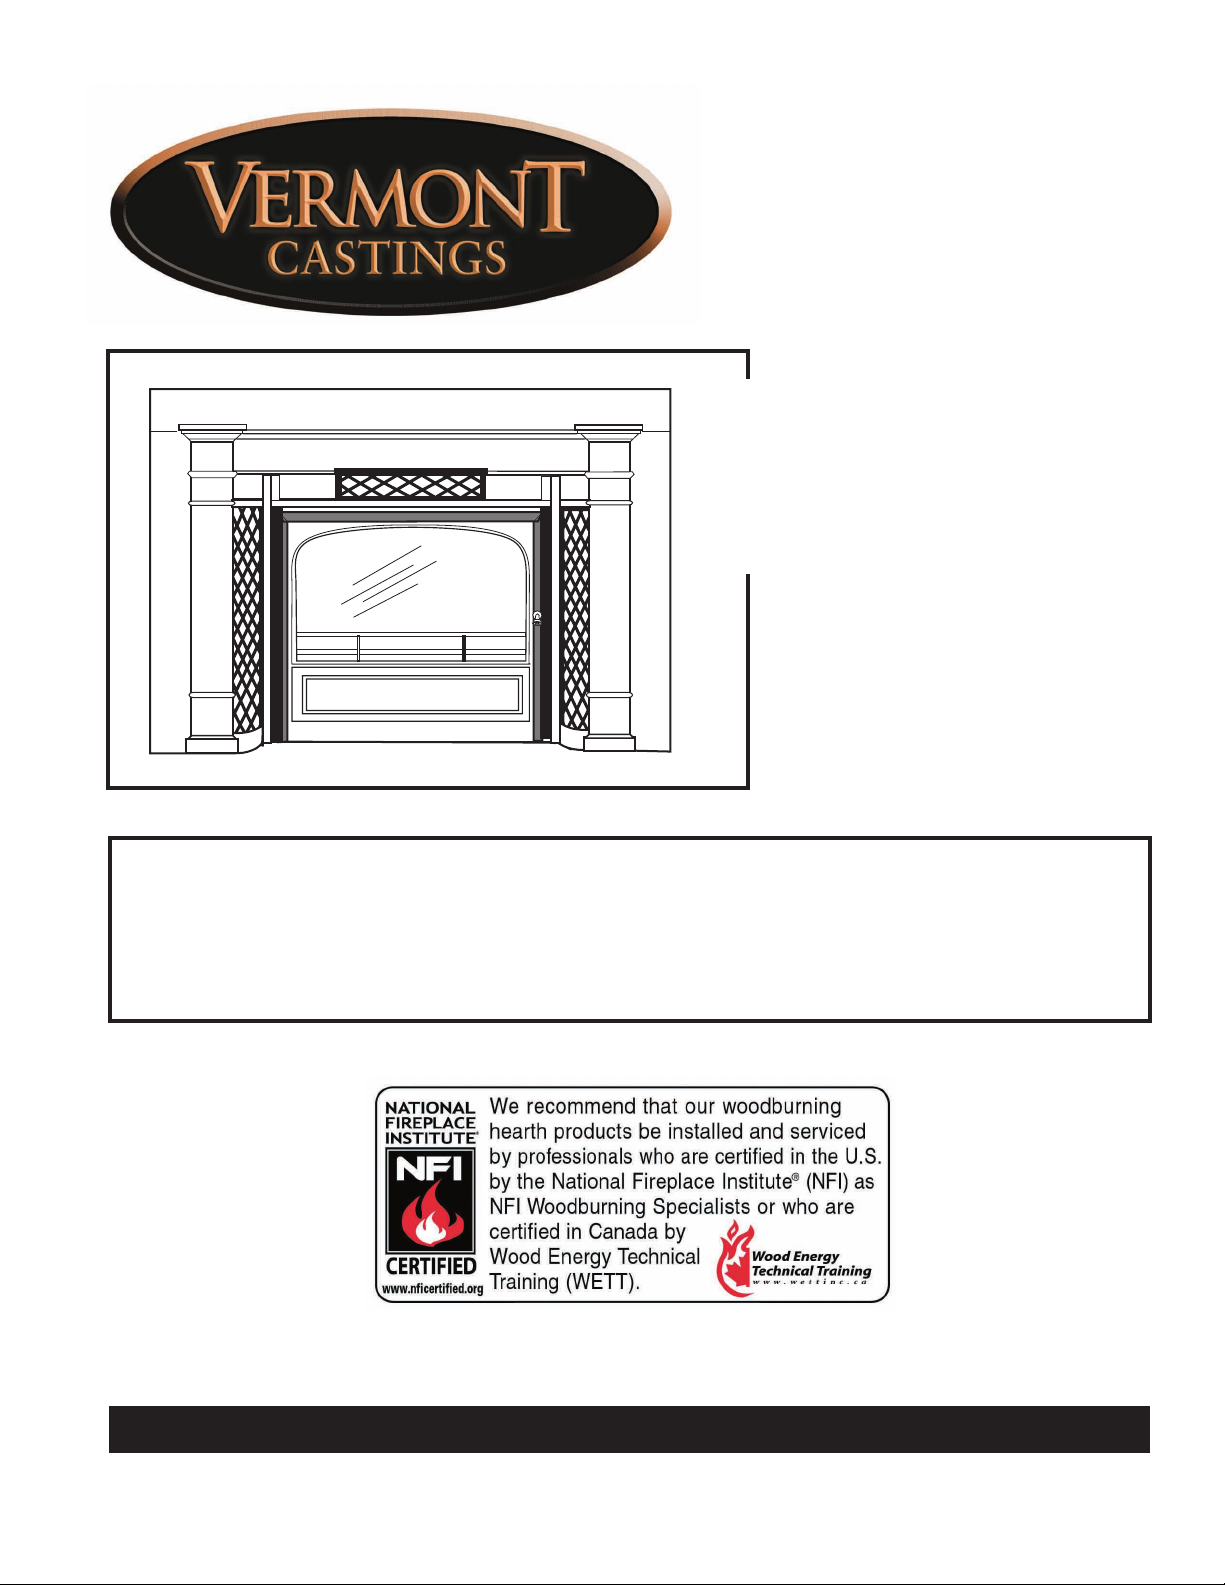
WinterWarm
Fireplace Insert
or System
Homeowner’s
Installation and
Operating Manual
For Use in North America
SAFETY NOTICE: IF THIS APPLIANCE IS NOT PROPERLY INSTALLED, OPERATED AND MAINTAINED, A HOUSE FIRE MAY RESULT.
TO REDUCE THE RISK OF FIRE, FOLLOW THE INSTALLATION INSTRUCTIONS. FAILURE TO
FOLLOW INSTRUCTIONS MAY RESULT IN PROPERTY DAMAGE, BODILY INJURY OR EVEN
DEATH. CONTACT LOCAL BUILDING OFFICIALS ABOUT RESTRICTIONS AND INSTALLATION
INSPECTION REQUIREMENTS IN YOUR AREA.
Do Not Discard This Manual: Retain for Future Use
2000941 1/06 Rev. 15

WinterWarm Fireplace Insert or System
Introduction
Thank you for purchasing a Vermont Castings’ WinterWarm, an efficient fireplace carefully engineered to bring you the
latest in wood combustion principles and modern foundry technology.
The WinterWarm masonry Fireplace Insert turns a traditional masonry fireplace into a powerful heater; the WinterWarm Fireplace System combines an insulated metal cabinet with the Fireplace Insert so that it may be installed in
close-clearance situations where no masonry fireplace and chimney exists.
Whichever you have purchased, you can count on years of comfortable heating and pleasureable fire viewing if you
treat it properly and operate it according to the directions in this owner’s guide.
The WinterWarm Fireplace Insert, and the WinterWarm Fireplace System that utilizes the WinterWarm Fireplace
Insert, are listed by Underwriter’s Laboratories of Canada, and are in compliance with the standards set forth by the
Federal Environmental Protection Agency, 40 CFR Part 60.532(b), as stated on the permanent label attached to each
appliance.
This manual describes the installation and operation of the WinterWarm catalytic-equipped wood heater. This heater
meets the U.S. Environmental Protection Agency’s emission limits for wood heaters sold after July 1, 1990. Under
specific test conditions this heater has been shown to deliver heat at a rate ranging from 10,300 to 30,000 Btu’s/hr.
For more complete details on WinterWarm performance and specifications, please refer to page 3.
The WinterWarm is designed, tested and listed for burning wood. Do not burn other fuels.
We recommend that you hire a professional installer certified by Wood Energy Technical Training (WETT) to install
your WinterWarm, or to advise you on the installation should you attempt to install it yourself.
Please read the appropriate sections of this manual before you install and use your WinterWarm. For information on
the installation of a WinterWarm into a masonry fireplace, read Sections III and V. To learn how to install the WinterWarm and its Cabinet that make up the fireplace system, read Sections IV and V. For information on Operation and
Maintenance of the WinterWarm, read Sections I and II.
Failure to follow instructions may result in property damage, bodily injury or even death.
Save These Instructions For Future Reference
Table of Contents
Introduction ....................................................2
Specifications ................................................
Operation .......................................................
Maintenance ..................................................
Preparing a Masonry Chimney ....................
Installing the Fireplace System Cabinet ......
Appendices ..................................................
16
21
38
Before you begin, here’s a timesaving tip
on using this manual.
3
4
9
• To learn how to operate and maintain the Winter-
Warm, read Sections I and II.
• To install a WinterWarm Fireplace Insert into a
masonry fireplace, read Sections III and V.
• To install a WinterWarm Fireplace System, read
Sections IV and V.
Proposition 65 Warning: Fuels used in gas, woodburning or oil fired appliances, and the products of
combustion of such fuels, contain chemicals known
to the State of California to cause cancer, birth defects and other reproductive harm.
California Health & Safety Code Sec. 25249.6
2
2000941
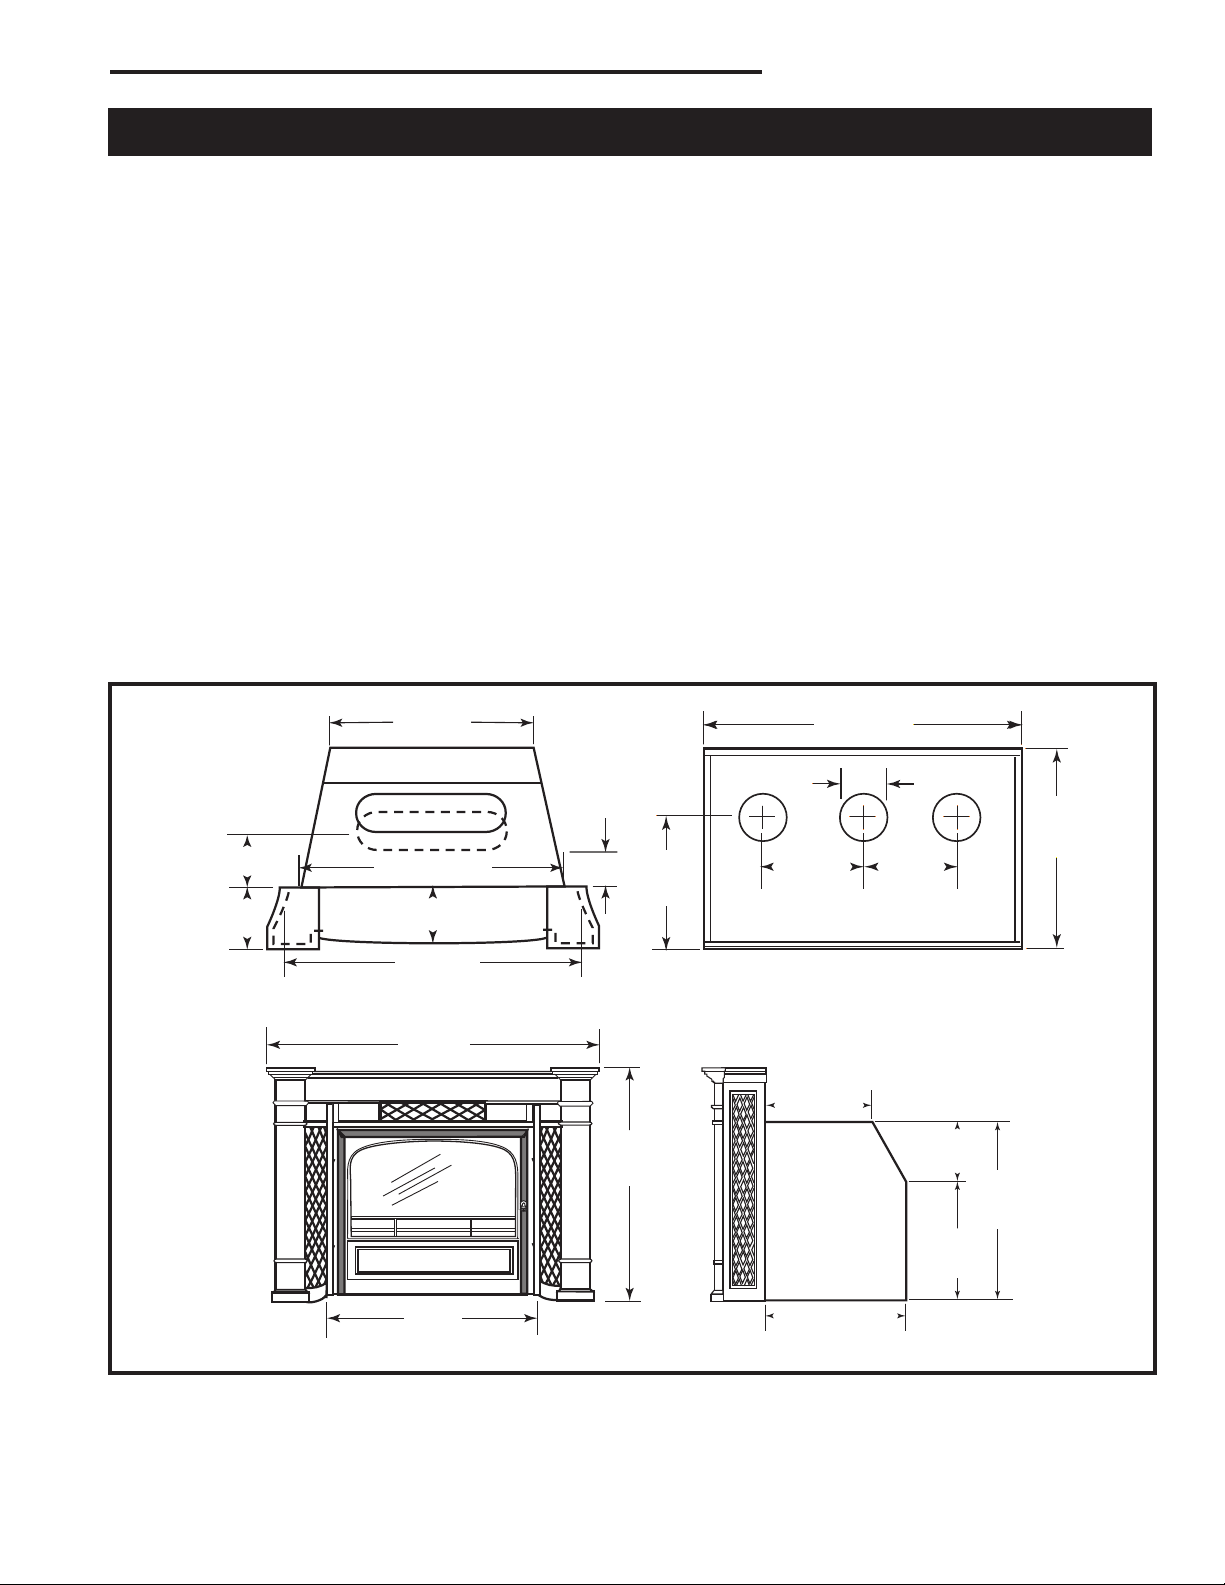
WinterWarm
37"
(959 mm)
26"
(676 mm)
8" (203 mm)
12
"
(327 mm)
12
"
(327 mm)
15"
(394 mm)
4"
(121 mm)
21
"
(553 mm)
6"
(172 mm)
7"
(200 mm)
36"
(914 mm)
7" (191 mm)
29
"
(759 mm)
25"
(648 mm)
41"
(1041 mm)
13"
(349 mm)
7"
(200 mm)
15"
(403 mm)
23"
(603 mm)
18" (470 mm)
33” (838 mm)
WinterWarm Fireplace Insert or System
Specifications
Range of heat output* ............. 10,300 - 30,000 BTU/hr
Maximum heat output** ..........................50,000 BTU/hr
Area heated*** ................ Up to 1500 sq. ft. (140sq. m)
Size of wood splits ....................... 20-24” (508-610 mm)
Fuel Capacity .......................................... 40lbs. (18 kg)
Loading ..................................................................Front
Flue size .................................................... 8” (203 mm)
Fireplace Insert weight ........................ 475lbs. (216 kg)
Fireplace System weight ..................... 840lbs. (380 kg)
Primary Air Control ........................Manual/thermostatic
Secondary Air Control ............................Self-regulating
Glass panel ......................... High-temperature ceramic
Flue exit position ..................................................... Top
Blower rating ...............................106cfm. (115V, 60Hz)
*Under specific test conditions used during EPA emis
-
sions standard testing.
**This value can vary depending on how the unit is
operated, and the type and moisture content of the fuel
used. Figure shown is based on maximum fuel consumption obtained under laboratory conditions and on
average efficiencies.
***These values are based on operation in buildingcode conforming homes under typical winter climate
conditions in New England. If your home is of nonstandard construction (e.g. unusually well insulated, not insulated, built under ground, etc.) or if you live in a more
severe or more temperate climate, these figures may
not apply. Since so many variables affect performance,
consult your Vermont Castings’ Authorized Dealer to
determine realistic expectations for your home.
Fig. 1 WinterWarm dimensions.
2000941
Top View / System Cabinet
3
WinterWarm Fireplace Insert or System
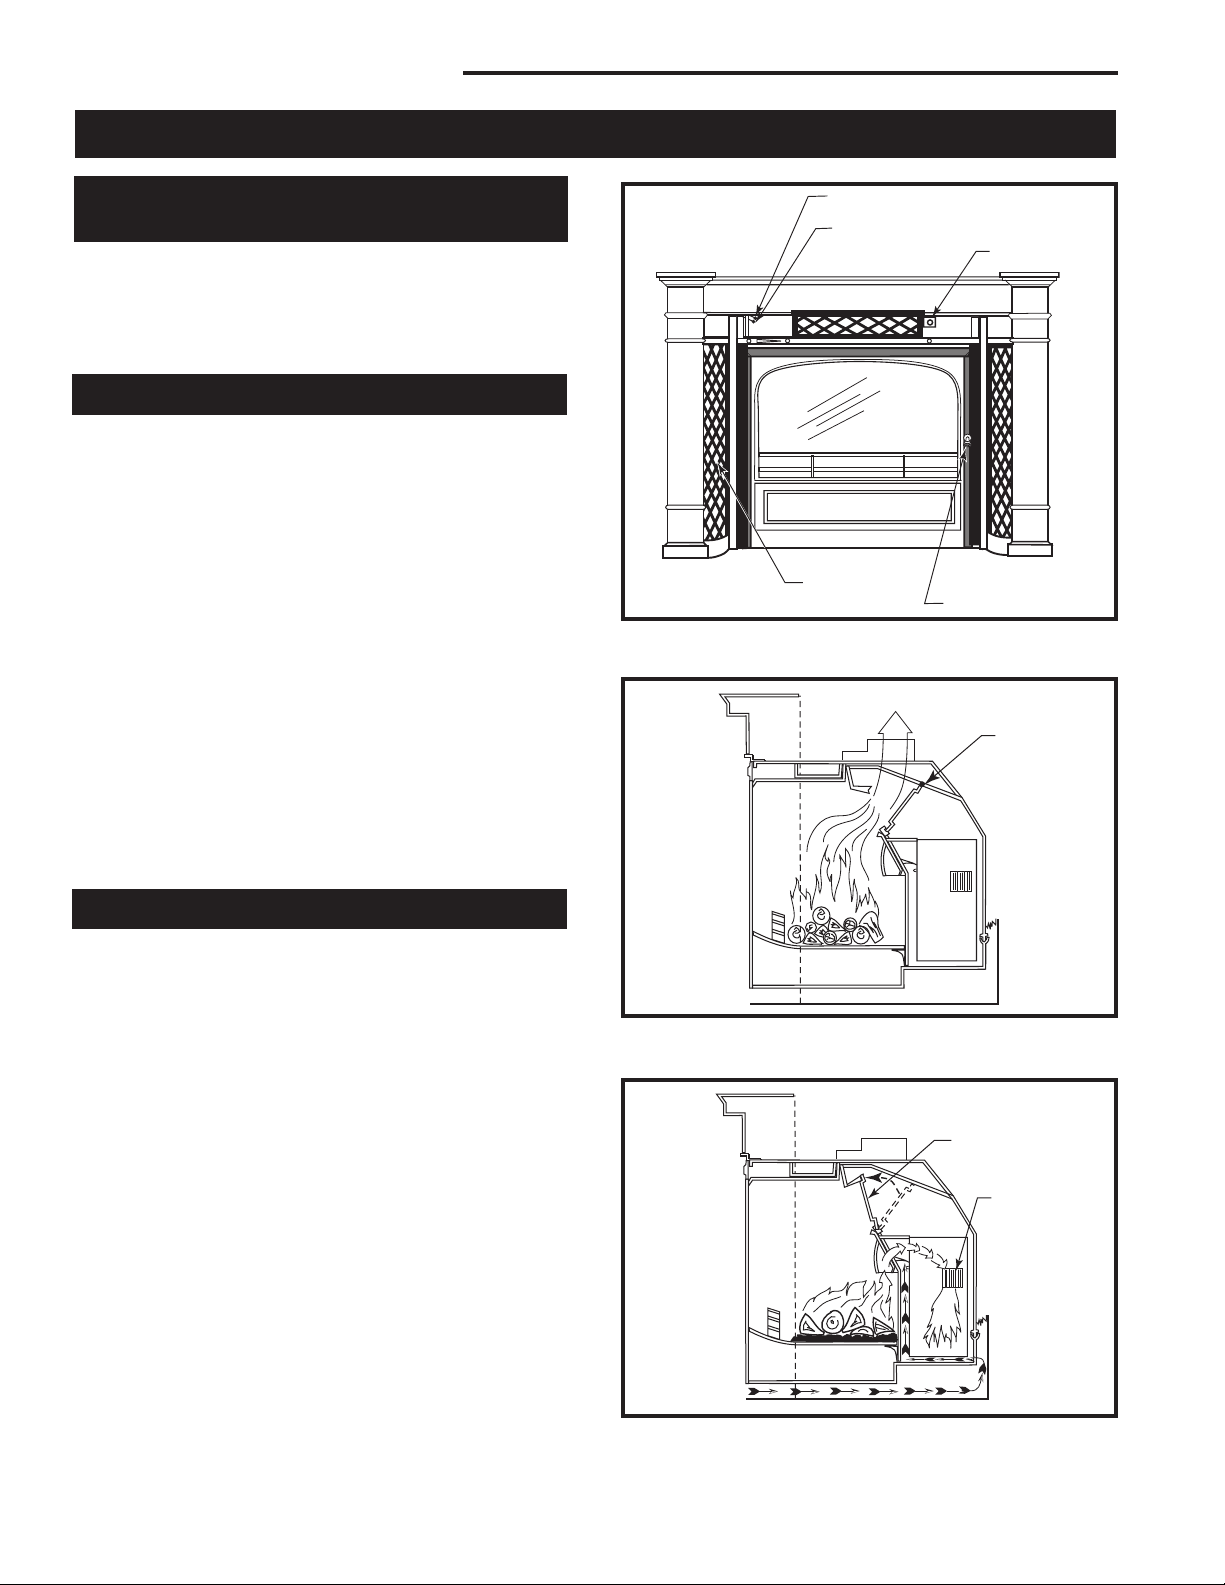
Section I Operation
Your WinterWarm’s Controls
and What They Do
Three controls regulate the performance of your WinterWarm: A primary air control supplies oxygen for the
fire, a damper directs air flow within the fireplace, and
a variable-speed fan control, or rheostat, regulates the
warm air flow into the room. (Fig. 2)
Primary Air Control
A single air control regulates the amount of heat the fire
will produce and how long it will burn.
The primary air control is located above the upper left
corner of the door. It is the top-most of the two brasscapped controls located there (the brass knob on the
bottom regulates the fan), and is the primary source of
air for starting, maintaining, and reviving the fire.
Generally, more air entering the stove makes the fire
burn hotter and faster, while less air prolongs the burn.
The WinterWarm’s air supply is open to the maximum
when the control lever is moved to the left, and closed
when moved to the far right. It may be set anywhere
between the two extremes, however, depending on the
amount of heat desired.
To complement the manual setting of the air control, the
WinterWarm has an internal automatic thermostat that
ensures an even delivery of heat at the manual setting
you select.
Primary Air Control (Top Lever)
Fan Speed Control
(Rheostat) (Bottom
Lever)
Optional Outside
FP1070
Fig. 2 All WinterWarm controls are located conveniently on
the front.
Air Control
Damper Control
Door Handle
Damper
Open
The Damper
The damper directs air flow within the fireplace.
The damper is operated by moving the lever located
above the upper right corner of the door. It has two
positions: Open, to start or revive the fire (Fig. 3); and
closed (Fig. 4), for normal operation. The damper is
open when the lever is to the far left, and closed when
to the far right. There are no intermediate settings for
damper position.
When the damper is closed, the front door automatically
locks to prevent the door being inadvertently opened
when the fireplace is in its catalytic mode. This could
cause smoke to spill into the room.
To open the damper, lift up on the lever and move it
to the far left. The lock will disengage, allowing you to
open the front door.
To close the damper, move the lever to the right,
continuing past the resistance to lock the damper in
position. (The door handle must be positioned vertically
before the lock mechanism will engage.)
4
FP1071
Fig. 3 The damper is open; Smoke is vented directly to the
chimney.
Damper Closed
Catalytic
Combustor
FP1072
Fig. 4 Damper is closed: Smoke is channelled through the
catalytic combustor where much of it can be burned.
2000941
WinterWarm Fireplace Insert or System
The Fans
Two fans deliver a steady stream of warm air.
Heated air from your WinterWarm is forced into the
room by two internal fans. The control for the fans is
below the brass primary air control knob, just above the
upper left corner of the door. (Fig. 5)
“Off” is to the far left.
“High” is just to the right of “Off.”
“Low” is to the far right.
Variable adjustment of the fans is possible with any setting between “high” and “low.”
For best results, coordinate fan speed with the setting
of your thermostat. For example, when the thermostat
lever is set at “low,” also set the fans at “low.” With the
thermostat set for maximum heat, set the fans at “high.”
Air Control Lever,
Medium
High Air Setting
Fan Control
Lever (Fan Off)
Fig. 5 Variable settings for both the fans and the air control
are possible between the two extreme settings.
Low Air Setting
Fan On
FP1073
Burn Only High-Quality Wood
The WinterWarm is designed to burn natural wood
only; do not burn fuels other than that for which it was
designed.
You’ll enjoy the best results when burning wood that
has been adequately air-dried. Avoid burning “green”
wood that has not been properly seasoned.
The best hardwood fuels include oak, maple, beech,
ash, and hickory that has been split, stacked, and airdried outside under cover for at least one year.
For areas that do not have a supply of hardwood, commonly burned softwoods include tamarack, yellow pine,
white pine, Eastern red cedar, fir, and redwood. These
too should be properly dried. Your WinterWarm will
accept wood up to 24” (610mm). Longer wood pieces
work better than short ones.
Wood should be stored under cover to maintain dry
ness, and should be dried at least six months for
optimum heating and fire-viewing performance. Even
for short-term storage, however, keep wood a safe
distance from the heater and keep it out of the areas
around the heater used for refueling and ash removal.
Use the Air Control Settings
that Work Best for You
No single air control setting will fit every situation. Each
installation will differ depending on the quality of the
fuel, the amount of heat desired, and how long you wish
the fire to burn.
The control setting also depends on your particular
installation’s “draft,” or the force that moves air from the
stove up through the chimney. Draft is affected by such
things as the length, type, and location of the chimney,
local geography, nearby obstructions, and other factors.
Too much draft may cause excessive temperatures in
the WinterWarm, and could even damage the combustor. On the other hand, too little draft can cause
backpuffing into the room and/or the “plugging” of the
chimney or combustor.
How do you know if your draft is excessively high or
low? Symptoms of too much draft include an uncontrollable burn or a glowing-red part of the WinterWarm
front. A sign of inadequate draft is smoke leaking into
the room through the stove or chimney connector joints,
low heat, and dirty glass.
In some newer homes that are well-insulated and
weather-tight, poor draft may result from insufficient air
in the house. In such instances, an open window near
the stove on the windward side of the house will provide
the fresh air needed.
Another option for getting more combustion air to the
stove is to duct air directly from the outside to the stove.
In fact, in some areas provisions for outside combustion
air are required in all new construction.
Your WinterWarm is designed so that it is possible to
incorporate outside air for combustion. Directions for
installing the optional outside air duct may be found
beginning with Step 4 on Page 31.
When first using the stove, keep track of the settings
of the air controls. You will quickly find that a specific
setting will give you a fixed amount of heat. It may take
a week or two to determine the amount of heat and the
length of burn you should expect from various settings.
Most installations do not require a large amount of
combustion air, especially if adequate draft is available.
Do not for any reason attempt to increase the firing
of your heater by altering the air control adjustment
range outlined in these directions.
2000941
5

WinterWarm Fireplace Insert or System
Use the following air control settings as a starting point
to help determine the best settings for your installation.
Each is described as a fraction of the total distance the
lever may be moved from right to left.
WinterWarm Control Settings
Burn Rate Primary Air Control
Low From far right to 1/3
the distance to left
Medium From 1/3 to 2/3 the distance
to left
High From 2/3 the distance
to left to far left
How To Build a Wood Fire and
Keep It Going
A WinterWarm leaves the factory with the combustor
installed.
In the United States, it is against the law to operate this
wood heater in a manner inconsistent with operating
instructions in this manual, or if the catalytic combustor
is deactivated or removed.
High-Efficiency Wood Burning
with Catalytic Combustion
The components of the catalytic combustion system in
your WinterWarm work together to produce optimum
conditions for secondary combustion.
When the damper is closed, smoke is directed through
the catalytic element, which causes ignition of smoke
at temperatures of 500-600°F (260-315°C), half the
temperature normally required for unaided secondary
combustion.
The catalytic element is a ceramic “honeycomb” coated
with the catalytic material. The element is located in
the secondary combustion chamber, molded from a
special high-temperature insulating refractory material. The design of the chamber provides the correct
environment necessary for secondary combustion of
the fuel (smoke).
Catalytic combustion is activated by closing the damper, thereby exposing the smoke to the combustor.
Closing the stove damper may also reduce the draft, so
to avoid putting out the fire or deactivating the combustor, close the damper only when a fire is well-established. When starting a fire, wait until the fire is well
established and there is an ember bed of at least 3-4”
(76 - 102mm) before closing the damper.
Never kindle a fire with colored paper or paper that
has colored ink or a glossy surface, and never burn
treated wood, garbage, solvents, or trash. All of these
may poison the catalyst and prevent it from operating
properly. Never burn cardboard or loose paper except
for kindling purposes. Never burn coal; doing so can
produce soot or large flakes of char or fly ash that can
coat the combustor and cause smoke to spill into the
room. Coal smoke also can poison the catalyst so that it
won’t operate properly.
In general, the fire must be sufficiently well-established
to ensure that catalytic activity is initiated. When first
starting a fire, a medium- to high- firing rate must be
maintained for at least twenty minutes. This ensures
that the stove, catalyst, and fuel are all stabilized at the
proper operating temperatures.
Even though it is possible for the fire to get quite hot
within a few minutes after a fire is started, the combus
tor may stop working or the fire may go out if the fire
is allowed to die down immediately as a result of the
damper being closed. Once the combustor starts working, heat generated by burning the smoke will keep it
working.
To determine whether the combustor is operating, ob
serve the amount of smoke leaving the chimney when
the damper is activated and when it is not. This procedure is described on Page 12.
-
-
Starting and Maintaining a Wood Fire
Burn solid wood fuel only in the WinterWarm, and
burn it directly on the grate. Do not elevate the fuel.
Do not burn coal or other fuels.
Cast iron is a superior material for solid fuel stoves but
it must be treated with respect. It is extremely strong,
but can be broken with a sharp blow from a hammer or
from the thermal shock of rapid and extreme temperature changes.
The cast plates expand and contract with changes in
temperature. Minimize thermal stress by allowing the
plates to adjust gradually during an initial break-in fire
by following Steps 1-3 below.
Always be certain that the damper is open when starting a fire or when refueling. This rule is easy to remember, as the WinterWarm’s integrated door/damper
interlock design does not permit opening the door unless
the damper is already open. To open the damper, lift up
on the lever and move it to the left. (Fig. 6)
WARNING: Operate your WinterWarm only with
the door fully closed and either the glass panel or
spark screen in place. If the door is left partially
open, gas and flame may be drawn out of the
fireplace opening, creating risks of both fire and
smoke.
6
2000941
Open
Fig. 10 When the damper is closed, the front door automati-
cally locks to prevent opening while a fire is burning.
Closed
Damper Control Lever
FP1074
1. Open the stove damper, and open the primary air
control fully.
2. Lay some crumpled newspapers on the bottom
grate. Place on the paper six or eight pieces of dry,
finely-split kindling. On the kindling lay two or three
larger sticks of split dry wood approximately 1-2”
(25-51mm).
Do not use chemicals or fluids to start the fire. Do
not burn garbage or flammable fluids such as gasoline, naptha, or engine oil.
Also, never use gasoline-type lantern fuel, kerosene,
charcoal lighter fluid, or similar liquids to start or “freshen up” a fire in this heater. Keep all such liquids well
away from the heater while it is in use.
3. Light the newspaper and close the door. Gradually
build up the fire by adding a few 3-5” (76 - 127mm)
diameter splits.
If this is your initial break-in fire, let the fire burn brightly,
but not to excess. Control the fire’s intensity by adjusting the air control lever. After an hour or so stop adding
wood so that the fire dies out gradually.
For ongoing operation after the initial break-in, continue
to add a few sticks at a time of a progressively larger
size. Be sure to keep the fuel load behind the front
grate bar at all times. Continue until you have a live
ember bed at least 3-4” (76 - 102mm) deep. This may
take an hour or longer, particularly when the WinterWarm is vented to an exterior masonry chimney or
when you are just starting a fire.
You’ll soon find out that the WinterWarm is HOT WHILE
IN OPERATION! KEEP CHILDREN, CLOTHING, AND
FURNITURE AWAY. CONTACT MAY CAUSE SKIN
BURNS.
WinterWarm Fireplace Insert or System
NOTE: Some chimneys need to be “primed,” or
warmed up, before they will draw sufficiently to start
a fire. To correct this situation, roll up a couple pieces
of newspaper, place them on top of the kindling and
toward the back of the stove, light them, and close the
doors. This should heat the chimney enough to initiate
a draft.
Once the draft is established, open the front door and
light the rest of the fuel from the bottom. Do not light the
main bed of fuel until the chimney begins drawing, and
repeat the procedure as often as necessary if the initial
attempt is unsuccessful.
4. Once a good ember bed of at least 3-4” (76 102mm) has formed, close the damper to activate
the combustor. To ensure continued operation of the
combustor, let the fire burn hot for an additional ten
to fifteen minutes after the damper is closed.
5. Close the primary air control to a medium-low set
ting, or about 1/3 the distance from right to left in
its travel range as described on Page 4. The fire
volume will diminish immediately, but the WinterWarm will continue to heat up. Maintain control of
the fire using the primary air control, and remember:
reduce the setting for less heat, increase the setting
for more heat. Refer back to the air control settings
chart on Page 4 for recommended settings at different burn rates.
DO NOT OVERFIRE THIS HEATER. Overfiring may
cause a house fire, or can result in permanent damage
to the stove and to the catalytic combustor. If an exterior part of the WinterWarm glows, you are overfiring.
Reloading and Reviving a Wood Fire
Open the stove damper, set the air control on “High,”
and wait at least fifteen seconds for the draft to increase. Open the door slowly.
Check the ash level, and empty the ash pan if necessary. Replace the pan.
Add the fuel, smaller pieces first. If it is necessary to
use wood smaller than the 24” (610mm) optimum size,
be sure to fill the firebox as completely as possible
by loading the wood pieces alternately on the left and
right. Split wood will fill the firebox more completely and
reduce the frequency of reloading.
If you have an ember bed of at least 3 - 4” (76 102mm), leave the damper open and the thermostat
set on “high” for 10-15 minutes, then close the damper.
If the ember bed is less than 3 - 4” (76 - 102mm), you
may have to let it burn longer.
Finally, adjust the air control and fan speed for your
desired heat level.
2000941
7

WinterWarm Fireplace Insert or System
NOTE: If the charcoal bed is relatively thick and your
fuel is well-seasoned, it is possible to add fresh fuel
(smaller pieces first), close the door and damper, and
reset the air control within five minutes.
Special Tactics for Cold-Climate Heating
The WinterWarm is capable of producing up to 50,000
Btu’s/hour and heating an area of up to 1,500 ft.2 (140
m2) However, many factors affect heating performance
and can influence the extent to which the WinterWarm
can heat a given area.
A well-insulated home, located in a moderate climate
and with the WinterWarm Fireplace Insert or Fireplace
System located centrally in an open floor plan, will be
easier to heat than a drafty home in the far north in
which a WinterWarm is installed on an exterior wall at
the end of a long house.
In Fireplace Insert installations, over-sized chimneys
can produce less effective results than those that are
properly sized, and interior chimneys usually perform
better than those located outside the house.
Different results may be experienced even in the same
installation if you switch from burning good, dry wood to
wood that is partially rotted or inadequately seasoned.
To compensate for these factors in cold climates, it may
be necessary to operate the WinterWarm for longer
periods of time than described above before closing the
damper, or to leave the air control set to a higher level
more of the time.
Open-Fire Viewing
with the Screen Cassette
The cassette screen that was included with your WinterWarm is interchangeable with the glass cassette, enabling you to convert from closed-door wood burning to
protected open-fire viewing. Always leave the damper
open when operating the WinterWarm with the screen
in the open-fire mode.
To change cassettes, use this procedure:
Let the WinterWarm cool completely
• Examine the gasket that seals the cassette to the
perimeter of the door frame. Contact your local
dealer if you need a replacement gasket.
• Check the bottom channel of the door frame for
debris, and clean if necessary.
• Insert the new cassette, bottom edge first, then
the top edge.
IMPORTANT: The glass used in your WinterWarm is
coated with a special material on one side that reflects
heat back into the fire chamber. Before replacing a
glass cassette that has been removed, examine the
metal frame. One side has smooth, mitered corner
joints; the other side has rough weld marks.
To install the glass correctly, the smooth mitered
corners must be facing the gasket and the rough weld
marks must be positioned toward the fire chamber.
• Replace the two retainer clips, applying just
enough pressure to secure the cassette evenly
against the gasket.
Remove and Store Ash Safely
Check the ash pan before reloading the stove, and
empty if necessary using the following procedure:
• Open the damper
• Open the load door (Fig. 7)
• Pull open the ash chamber door with the hooked
end of the fall-away handle.
• If the ash level is nearing the top, place the
removable cover over the pan and make sure it is
completely engaged. Ash may contain hot coals
and must be treated with extreme care.
• Take the pan outdoors and empty the ash into
your ash container.
• Open the door
• Loosen the two short retainer clips, one at each
top corner of the cassette frame, and turn them to
clear the frame.
• Tilt the top edge of the cassette away from the
door frame.
• Carefully remove the cassette, being especially
careful with the glass cassette. Store the unused
cassette for future use.
8
FP1075
Fig. 7 Carefully remove ash pan.
2000941

WinterWarm Fireplace Insert or System
• Before replacing the ash pan, clear away any ash
that has spilled over the sides and back of the
pan.
• Replace the ash pan and close the ash door and
front door.
Empty the ash pan regularly, typically every one to
three days. The frequency will vary depending on how
you operate your WinterWarm: You burn more wood
at higher heat output settings, and ash will accumulate
faster.
Ash should be removed frequently and placed outdoors
in a metal container with a tight-fitting lid. The closed
container of ash should be placed on a noncombustible
floor or on the ground, well away from all combustible
materials, pending final disposal. If the ash is disposed
of by burial in soil or otherwise locally dispersed, it
should be retained in the closed container until all cinders have thoroughly cooled. -Wood ash may be used
as a garden fertilizer.
CAUTION: Never use your household or shop vacuum
cleaner to remove ash from the fireplace; always remove and dispose of the ash properly.
Section II Maintenance
Keep your WinterWarm Looking New
and Working Its Best
Care of the Cast Iron Surface
An occasional dusting with a dry rag will keep the
painted cast iron of your WinterWarm looking new.
If the paint needs retouching, first allow the surface
to cool completely. Wire-brush areas needing to be
painted. Touch-up with high temperature stove paint
available from your local dealer. Apply the paint spar
ingly. Two light coats are better than one heavy one.
Care of the Porcelain Enamel Surface
Use a soft brush as necessary. Do not use water or
other liquids on your WinterWarm. Fingerprints usually
can be buffed off porcelain enamel with a dry, soft cloth.
If marks remain, allow the WinterWarm to cool completely, then buff with a slightly damp, soft cloth. Dry
completely before starting a fire to avoid streaking.
Never use abrasives or harsh chemical cleaners on the
porcelain enamel finish. The enamel may scratch and
expose the cast iron, which can then stain or rust. If
you must remove spills or stains from porcelain surfaces, make sure that the fire is out and that the WinterWarm has cooled completely before cleaning. Use a
kitchen appliance cleaner and polish especially formulated for enamel surfaces. Apply the cleaner sparingly
with a soft cloth, and buff away all traces.
-
Cleaning the Glass
The WinterWarm glass system requires a minimum
amount of cleaning. Most carbon deposits that accumulate will burn off during hot fires.
Ash residue that accumulates on the glass should be
removed periodically to prevent etching. To clean the
glass, follow this procedure:
• Be sure the glass is completely cool.
• Cleaning with water will work in most cases. Use
a glass cleaner especially made for this purpose
only if deposits are especially heavy. (If heavy
deposits are a frequent occurrence, however,
evaluate your operating techniques.)
• Rinse the glass thoroughly.
• Dry the glass completely.
NOTE: The WinterWarm glass is coated with a
special material on one side that helps reflect heat
back into the fire chamber. Do not attempt to remove this coating.
2000941
9
WinterWarm Fireplace Insert or System
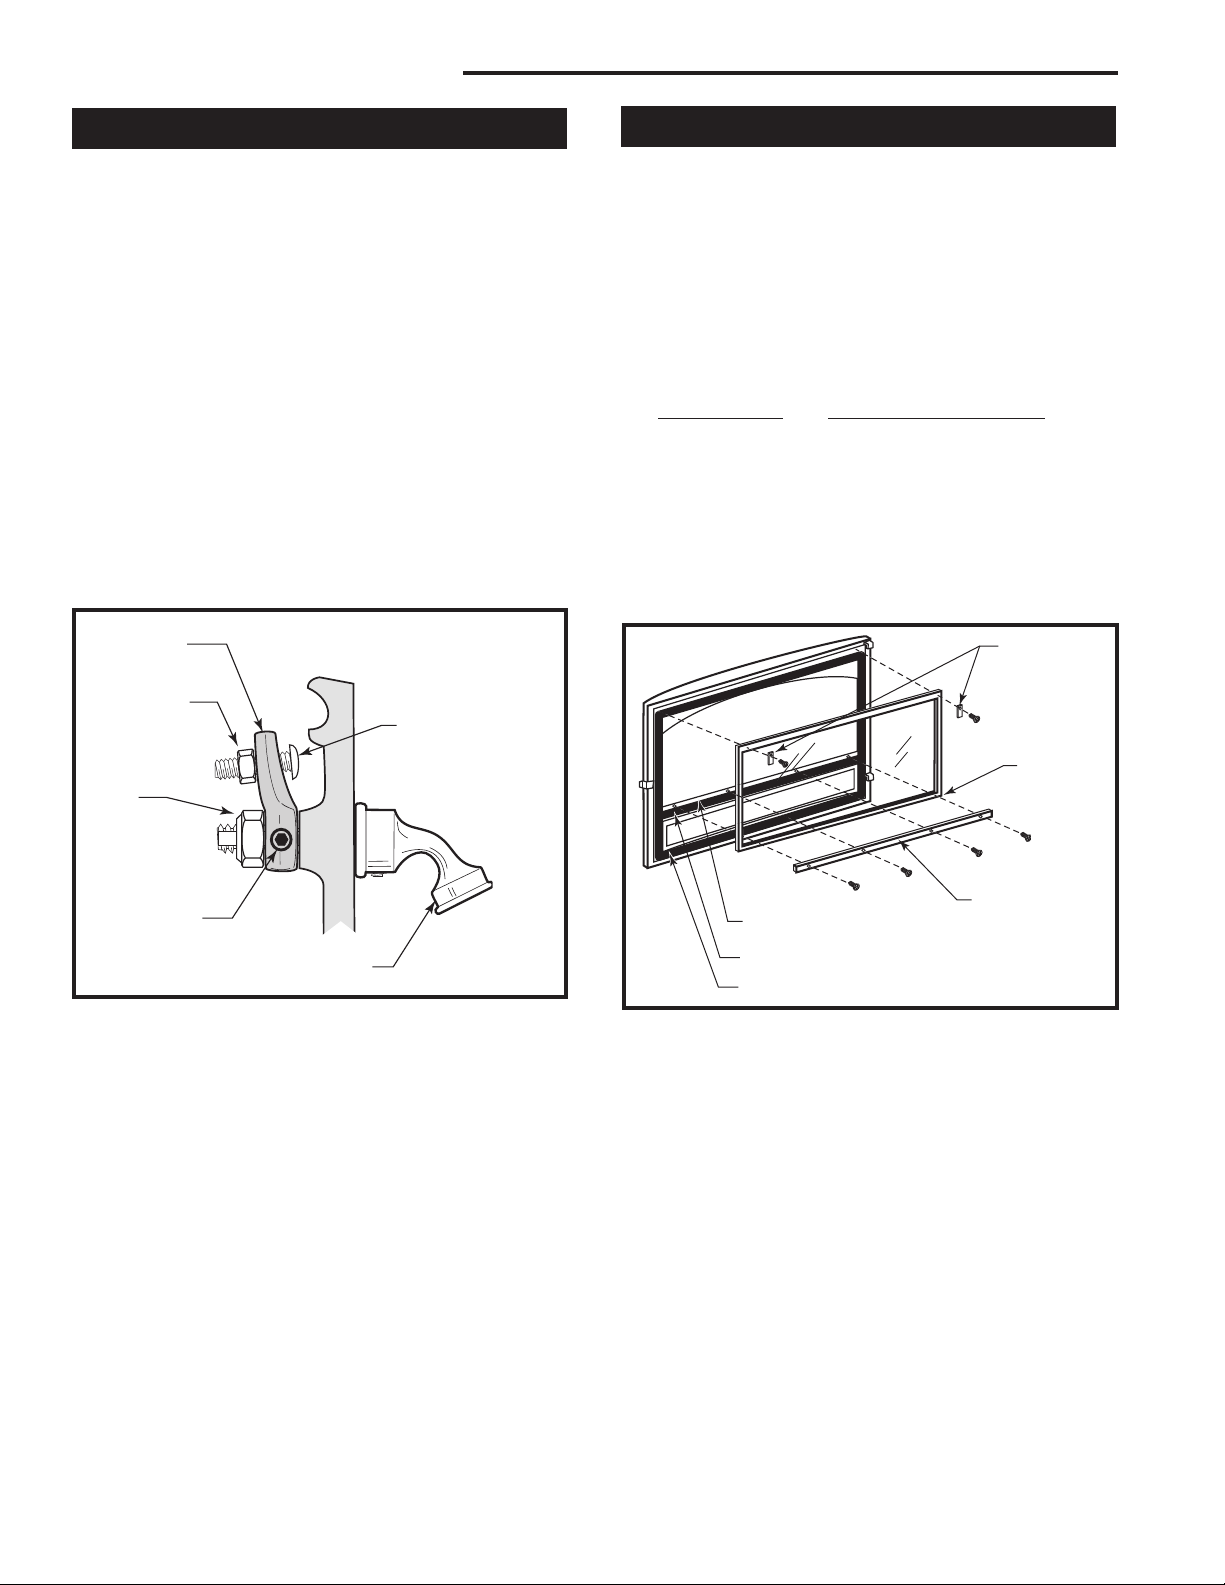
Adjust the Door Latch Periodically
The front door of the WinterWarm should close securely
to prevent accidental opening and should close tightly
to prevent air from leaking into the fire chamber. The
door handle will be positioned vertically when the door
is closed.
Over a period of time, the gasket around the door will
compress and the latch may need adjustment. To adjust
the handle, follow this procedure (Fig. 8):
1. Loosen the small lock nut with a wrench.
2. Extend the striker screw one turn by turning it with
an Allen wrench.
3. Re-tighten the lock nut, while at the same time hold
ing the striker screw with the Allen wrench to prevent
its turning.
Test the door seal. Close the door on a dollar bill and
attempt to pull it free. If the bill is freed with little resistance, the gasket isn’t snug enough at that spot. Contin-
Pawl
Small
Locking Nut
Striker Screw
-
How to Replace Gaskets
Your WinterWarm uses rope-type fiberglass gaskets
to make a tight seal between some parts. With use, particularly on those parts that move, gaskets can become
brittle and compressed and can begin to lose their effectiveness. These will need periodic replacement.
All of the gaskets used are made of fiberglass. The
three sizes of replaceable gasket are listed below,
along with their application.
Replaceable WinterWarm Fiberglass Gaskets
Gasket Size... ...And The Parts It Seals
1/2” The door to the front (#1)
1/2” The door to the front edge of
the grate (#2)
3/16” The cassette glass seal to
the door (#3)
3/8” The damper to the upper
fireback (#4)
Short Retainer Clips
Large
Locking
Nut
Set Screw
Handle Stub
Fig. 8 An adjustable latch lets you restore a tight seal to the
WinterWarm’s door.
ST531
ue to make small adjustments until the setting is right.
If additional adjusting of the latch does not enable the
door to seal sufficiently in one area, try “adjusting” the
gasket in that area. Pack more cement or a smaller
diameter gasket into the channel beneath the gasket so
the main gasket is raised and makes contact with the
door frame. This procedure should solve the problem.
If it doesn’t, replace the gasket following the directions
below.
10
Welded
Corner
Toward
Firebox
Long Retainer
#3 Gasket
#2 Gasket
#1 Gasket
Fig. 9 Front door components allow replacement of the
glass, gaskets or both.
Clips
FP1076
Should you need to change a replaceable gasket, wait
until the fire is out and the stove has cooled. Be sure to
follow the standard safety procedure for working with
dusty materials: Wear safety goggles and a dust mask.
The procedure for replacing gaskets is the same,
regardless of the gasket location. Four easily-accomplished steps are involved:
1. Remove the existing fiberglass gasket by grasping
an end and pulling firmly.
2. Use a wire brush or the tip of a screwdriver to clean
the channel of any remaining cement or bits of gasket.
3. Apply a thin bead of stove cement to the newlycleaned groove.
4. Pack a new gasket into the groove. Wait until you
have placed all but a couple inches from the end
before you trim the end to an exact fit.
2000941
WinterWarm Fireplace Insert or System
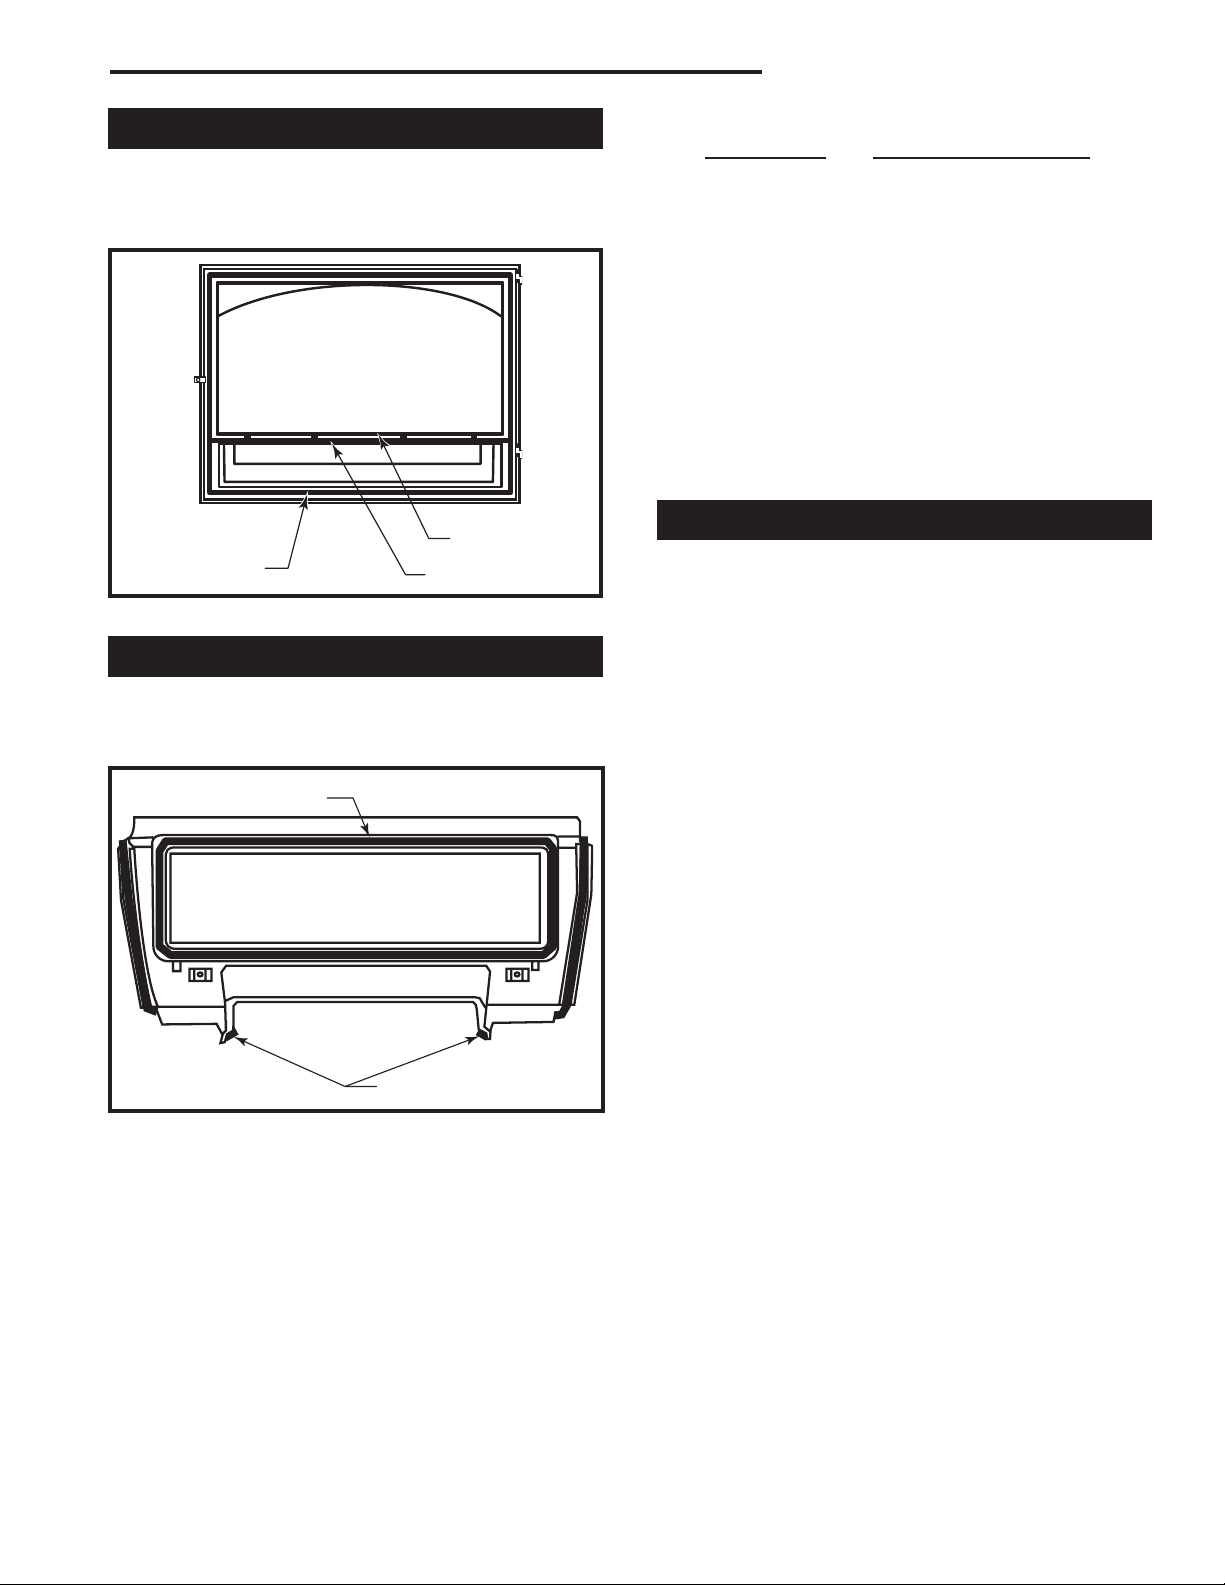
Replacing the Door Gaskets
Remove the door by lifting it straight up off its hinge
pins. Lay it face down on a padded surface.
Follow steps 1-4 as described above.
#3 Gasket
#1 Gasket
Fig. 10 Location of door gaskets.
#2 Gasket
FP1077
Replacing the Damper Gasket
Remove the front grate, bottom grate, ash pan, and ash
pan frame.
Follow steps 1-4 as described above.
#4 Gasket
3/8” (10mm) Tail
Fig. 11 Location of damper gaskets.
Other gaskets form seals between non-moving parts,
but these are not subject to the same wear and deterioration as gaskets on moving parts. It is unlikely that
you will ever need to replace these gaskets unless the
involved parts are disassembled and then put back
together. In any event, this is a job that should be done
only by qualified service personnel.
FP1078
Permanent WinterWarm Gaskets
Gasket size... ...And The Parts It Seals
1/2” The underside of the top plate to
the top edge of the air manifold
5/16” The flue collar to the top plate
5/16” The right end of the air
manifold to the right side plate
5/16” The left end of the firechamber to
the left end of the air manifold
5/16” The bottom edge of the lower
firebackto the bottom plate
5/16” and 3/8” The ends of the upper fireback to
the lower fireback and to the ribs
of the right and left side plates
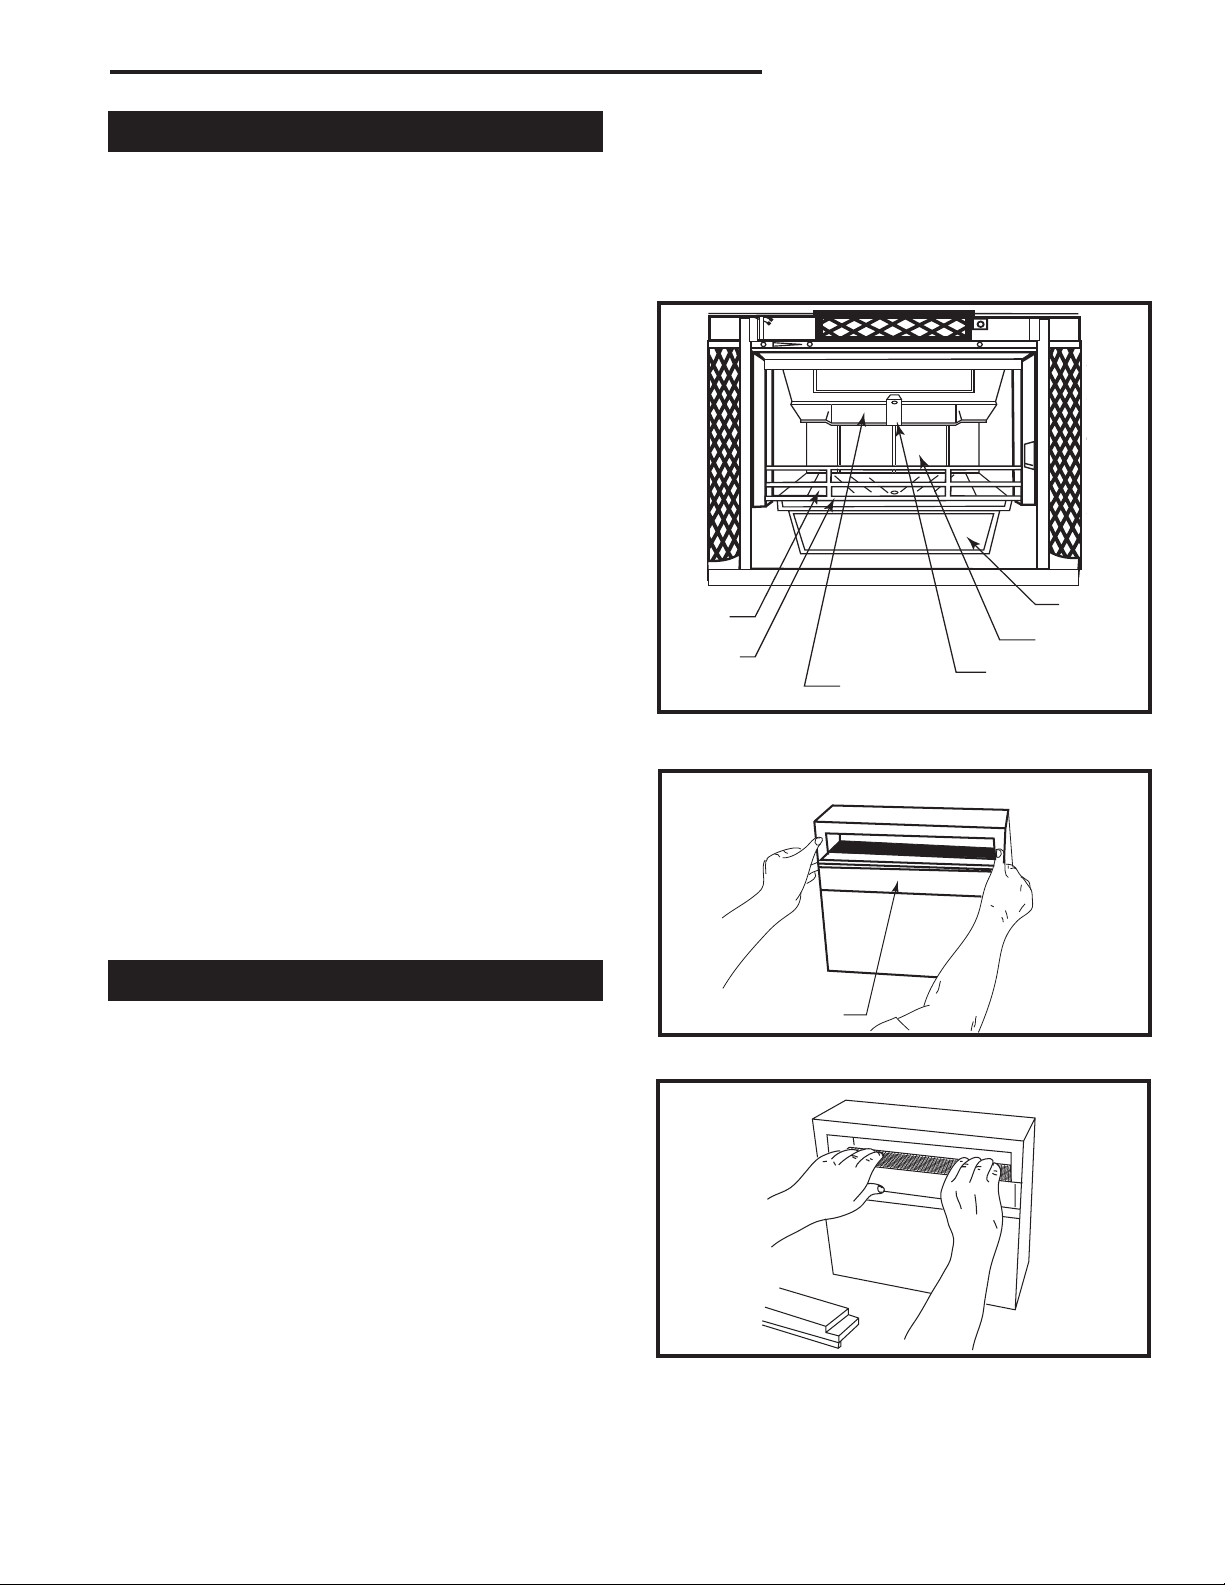
Replace Damaged Door Glass Immediately
Do not operate the WinterWarm with a damaged glass
(or screen) cassette. Use the following procedure for
cassette replacement.
NOTE: Replace glass only with CFM Corporation high
temperature ceramic glass, available from your Vermont Castings’ Authorized Dealer.
• Open the door and loosen the two retaining clips, one
at each upper corner, which hold the cassette to the
door frame. Swing the clips out of the way. Tilt the cassette away from the door frame and lift up. Use caution
when handling a cassette that contains broken glass.
• Examine the gasket that seals the cassette to the
door frame. Replace if necessary with gasket obtained
from your local Vermont Castings’ Authorized Dealer.
See the directions for gasket replacement on page 9.
• Check the channel at the bottom of the door frame,
and clear away debris if necessary.
IMPORTANT: The glass used in your WinterWarm is
coated with a special material on one side that reflects
heat back into the fire chamber. Before replacing a
glass cassette that has been removed, examine the
metal frame. One side has smooth, mitered corner
joints; the other side has rough weld marks.
To install the glass correctly, the smooth mitered
corners must be facing the gasket and the rough weld
marks must be positioned toward the fire chamber.
• Secure the clips, being careful not to over-tighten. Be
sure the cassette is firmly seated against the gasket.
Close the door gently to confirm that the clips have
been properly positioned. It is possible for the glass to
be damaged if the clips have been installed incorrectly
and the door is closed with force.
2000941
11
WinterWarm Fireplace Insert or System
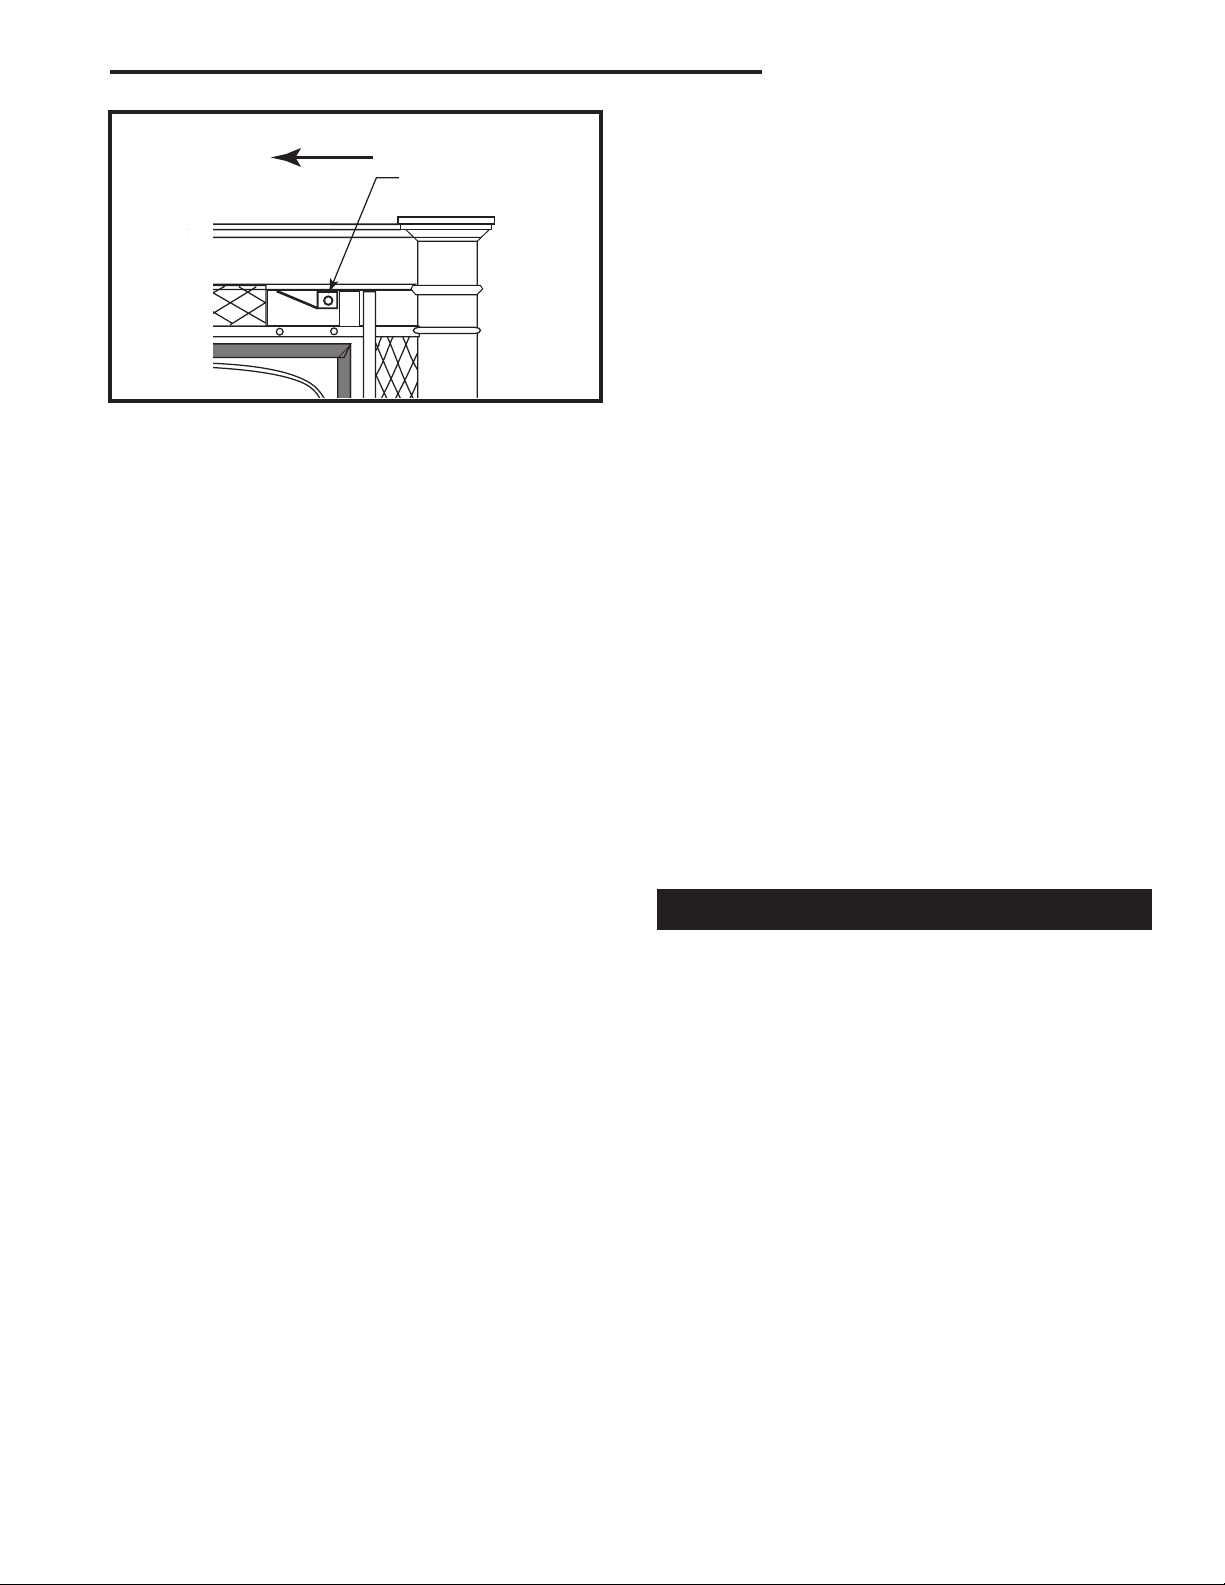
Adjust the Damper as Needed
Examine your WinterWarm’s damper after the first 50
hours of use and adjust it if necessary. Thereafter,
check the damper at least once a year and adjust as
needed.
Both fine and coarse adjustments to the damper are
possible. Begin with the fine adjustment, which modifies
the pressure on the damper plate directly; it will take
care of most sealing problems. Proceed to the coarse
adjustment, which adjusts the pressure at the damper
latch, only if you cannot achieve a satisfactory seal with
the fine adjustment.
To inspect how well the damper seals, first make sure
that the fire is out and that the WinterWarm is cool.
Open the front door, and close and lock the damper.
Visually inspect the seal between the damper plate and
the damper frame; there should be no gaps. Now, push
gently on the damper — there should be some give, but
no rattle. If there is a gap in the seal or a rattle, adjust
the damper.
Damper Adjustment Screw
Lock Nut
Damper
3. With the damper open, loosen the latch retaining
screw.
4. Move the latch approximately 1/8” (3mm) to the
right, and retighten the retaining screw.
5. Close and lock the damper, and check for gap and
rattle. Adjust the set screw as described under “Fine
Adjustment.”
Repeat the coarse adjustment if necessary.
For further assistnce, contact your Vermont Castings’
Dealer.
Damper Latch
Latch Retaining Screw
Damper
Control
Rod
Shroud
FP1081
Left
Throat Half
Throat Retainer Clip
Fig. 12 A view of the damper as seen through the front door.
Right Throat
Half
FP1080
Try the Fine Adjustment First
1. Open the door.
2. Close and lock the damper.
3. Locate the damper adjustment set-screw in the cen
ter of the damper plate, and loosen its lock nut.
4. Turn the set-screw 1/4 to 1/2 turn clockwise.
5. Check the damper seal for gap or rattle.
6. When the set screw position provides a good seal,
tighten the lock nut. Be careful not to overtighten the
set screw.
Use the Coarse Adjustment Only If Necessary
Follow Steps 1-3 of the fine adjustment procedure,
then;
1. Turn the set screw counter-clockwise several full
turns.
2. Lift off the mantel piece to expose the damper latch.
12
Fig. 13 With the mantel removed, the damper latch is exposed for adjustment.
Care of the Catalytic Combustor
This wood heater contains a catalytic combustor, which
needs regular inspection and periodic replacement
for proper operation. It is against the law in the United
States to operate this wood heater in a manner inconsistent with operating instructions in this manual, or if
the catalytic element is deactivated or removed.
Under normal operating conditions, the catalytic combustor should remain active for two to six years (depending on the amount of wood burned). However, it
is important to monitor the combustor periodically to
ensure that it is functioning properly, as well as to de-
-
termine when it needs to be replaced. A non-functioning
combustor will result in a loss of heating efficiency, and
an increase in creosote and emissions.
The combustor should be visually inspected “in place”
for fly ash accumulation and physical damage three
times per year. Actual removal of the combustor is not
recommended unless a more detailed inspection is warranted because of diminished performance as outlined
below.
The refractory package that houses the catalytic combustor should be inspected annually for a build-up of fly
ash and cleaned if necessary. This may be done during
examination of the catalytic combustor.
The catalytic combustion system includes an air supply
for secondary combustion. The probe which controls
the supply should also be inspected annually.
2000941
WinterWarm Fireplace Insert or System
When to Suspect a Combustor Problem
The best way to evaluate the performance of your
WinterWarm’s combustor is to observe the amount of
smoke leaving the chimney — both when the combustor has achieved “light-off” and when it has not. Follow
this simple two-step procedure:
• With a fire going and the combustor properly acti-
vated with the damper closed to route smoke through
it as described in the Operation Section, go outside and
observe the smoke leaving the chimney.
• Then, open the stove damper and once again ob-
serve the smoke leaving the chimney.
Significantly more smoke should be observed after
the second step when the stove damper is open and
exhaust is not routed through the combustor. Be careful
not to confuse smoke with steam from wet wood.
If this test indicates a problem, consider other possible
factors as well, such as the time of year or a change
in the quality of your fuel. In spring and fall, draft is
weaker than it is in colder winter weather, and fires can
burn sluggishly. Small, hot fires are a good solution
under these conditions.
Burning “green” (insufficiently seasoned) wood will result in poorer performance than when burning properly
seasoned fuel. You may have to run your stove hotter
(more air) to achieve good performance if you are burning green or wet wood.
Also, consider any changes in your operating routine as
well.
Once you have ruled out any other possible causes
for a decline in performance, you may proceed with an
inspection of the combustor.
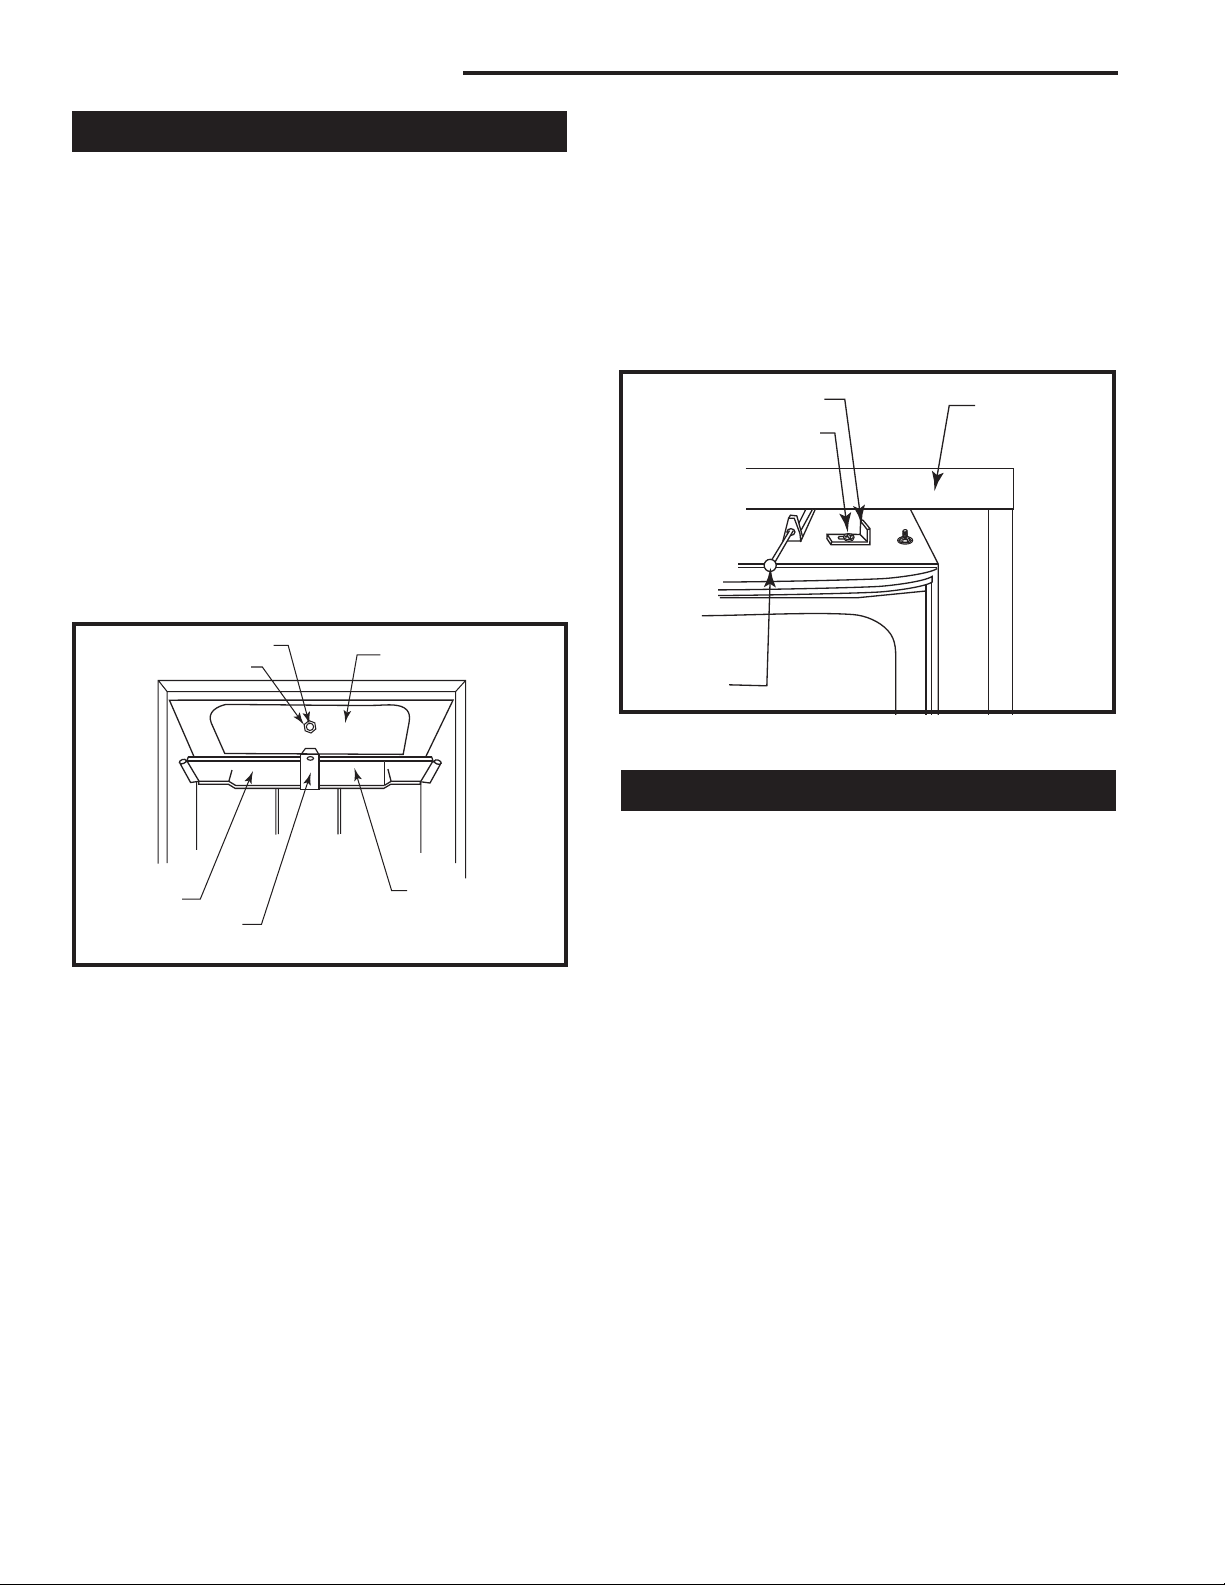
4. Tip the lower fireback forward, and remove it by lifting it up and toward you.
5. Carefully remove the access panel. (Fig. 15) It is
extremely delicate and should be handled as little as
possible.
6. Slide the catalytic element out. (Fig. 16) Handle it
carefully, as the element is fragile.
Grate
Front
Grate Bar
Throat Pieces
Fig. 14 To reach the catalytic combustor, remove front grate
bar, grate, throat pieces and lower fireback.
Retainer
Ash Door
Lower
Fireback
FP1079
Inspection and Removal of the Combustor
Before you begin, observe the basic safety precautions
for working with dusty materials: always wear safety
glasses, a recommended dust mask, and gloves. To
expose the combustor, first remove the throat pieces by
tapping upward at the far left and right corners with a
soft-faced hammer. Leave the bolt in the retainer loose,
and leave the retainer in place.
Examine the top surface of the catalytic element, which
will be visible. A small mirror and flashlight may provide
a better view. Unless the element shows a heavy fly
ash accumulation or major damage, do not remove it.
If combustor removal is necessary for cleaning or closer
inspection, follow these steps (Fig. 14):
1. Remove the front grate bar.
2. Remove the grate.
3. Remove the throat pieces as described above
2000941
Access Panel
Fig. 15 Remove the access panel.
Fig. 16 Removing the catalytic element.
FP1082
FP1083
13

WinterWarm Fireplace Insert or System
1"
• Check the combustor and the bottom of the refractory
chamber for a build-up of fly ash, and remove any ash
by taking the combustor outside and gently blowing air
through the element. Do not brush the surface, as this
could damage the element. Carefully vacuum ash from
the refractory chamber.
• Refer to the “Catalytic Combustor Appendix” on Page
37 for information on what kinds of damage or deterioration to look for. Although small hairline cracks will not
affect performance, the combustor should be essentially intact. If the combustor is broken in pieces or has
sections missing, it should be replaced. Call your local
Vermont Castings’ dealer for a replacement combustor,
item #30001152. Consult the warranty section at the
back of this manual for further information on catalytic
combustor replacement.
• While the catalytic element is removed, check the
condition of the secondary air probe. Use an inspection mirror to locate the probe within the combustion
chamber. (Fig. 17) The probe should extend 1 to 1¹⁄₂"
(25 - 38mm) into the chamber and show no signs of
deterioration, (warping, short length). Refer to the next
illustration. A damaged secondary air probe could affect
catalytic performance. If the probe needs to be replaced, call your local dealer.
5. Reinstall the throat pieces, center edges first, then
outer edges. Tap the throat pieces downward firmly
to seat the lower fireback.
6. Replace the grate.
7. Replace the front grate bar. With the horizontal bars
pointing down and away from you, angle the bar
inside the firebox to seat the right end. Then, bring
the left end forward and lower it into position.
Watch for Better Results
Finish up by cleaning the chimney and chimney connector. Then, use your WinterWarm in a typical manner for two weeks and observe its performance, taking
particular note of the smoke observation test described
on Page 11.
If a problem persists, contact your local dealer for further advice about your particular situation.
The Chimney System
A Clean Chimney System is
Safer and Works Better
Although the catalytic combustion system in your WinterWarm can reduce creosote formation dramatically, it
is not a substitute for regular inspection and cleaning of
the chimney and chimney connector.
ST559
Fig. 17 Use an inspection mirror to check the secondary
probe.
If the combustor is in good condition and clean, re-install it following this procedure:
1. Slide the element carefully back into the refractory
chamber, seating it securely. The element must be
fully to the rear of the support slot.
2. Install the access panel, making sure that it is flush
with the outer surface of the main refractory package.
3. Check the slot in the rear bottom plate for debris,
and clean if necessary.
4. Reinstall the lower fireback by inserting the base
of the fireback in the slot. Tip the fireback up into
place.
Learn to Recognize —
and Avoid — Creosote
Your WinterWarm has been designed to reduce creosote build-up significantly. However, regular chimney
inspection and maintenance must still be performed.
For safety, good stove performance, and to protect your
chimney and chimney connector, inspect your chimney
and chimney connector on a regular schedule. Clean
the system if necessary. Failure to keep the chimney
and connector system clean can result in a serious
chimney fire.
When wood is burned slowly, it produces tar, organic
vapors and moisture which combine to form creosote.
The creosote vapors condense in the relatively cool
chimney flue of a slow-burning fire. As a result, creosote
residue accumulates on the flue lining. When ignited,
this creosote makes an extremely hot fire within the
flue system that can damage the chimney and overheat
adjacent combustible material. If a significant layer of
creosote has accumulated —1/8” (3mm) or more — it
should be removed to reduce the risk of a chimney fire.
If you do experience a chimney fire, act promptly to:
• Close the damper and thermostat lever.
• Get everyone out of the house.
• Call the Fire Department.
14
2000941

WinterWarm Fireplace Insert or System
You should inspect the system every two weeks during
the heating season as part of a regular maintenance
schedule. To inspect the chimney, let the WinterWarm
cool completely. Then, using a strong light, sight up
through the flue collar into the chimney flue. If it is not
possible to inspect the flue system in this fashion, the
firechamber must be removed to provide better viewing
access.
If it is necessary to remove the firechamber to inspect
or clean the chimney, this is how to do it:
• Let the WinterWarm cool.
• Disconnect the fan power cord.
• Remove the load door, grate bar, grate and ash
door.
• Retract all four levelling screws until they bear no
weight.
• If you installed the CFM Corporation Flex Connector
System, bend the four retaining tabs on the Starter
Piece until they are straight. Push the Starter Piece
upward until it is clear of the shroud.
• Slide the firechamber forward until you have access
to the fireplace opening.
• Remove any sealing plates and the chimney con-
nector from the fireplace damper frame area.
You can now inspect the smoke shelf area and the
chimney. Before replacing the WinterWarm, this area
should be inspected for signs of deterioration and
cleaned thoroughly with a chimney brush.
Clean the chimney using a specially designed brush the
same size and shape as the flue liner. Flexible fiberglass rods are used to run the brush up and down the
liner, causing any deposits to fall to the bottom of the
chimney where they can be removed through the cleanout door.
The chimney connector should be cleaned by disconnecting the sections, taking them outside, and removing
any deposits with a stiff wire brush. Reinstall the connector sections after cleaning, being sure to secure the
individual sections with sheet metal screws.
If you can’t do the chimney inspection yourself, contact your local Vermont Castings’ Authorized Dealer, or
engage a professional chimney sweep to perform the
inspection and cleaning of the chimney.
If you are the owner of a WinterWarm Fireplace System, the prefabricated chimney used with your fireplace
should be cleaned from above using an 8” round brush
and the appropriate number of extension rods for complete access.
The chimney cap first must be removed following the
procedure recommended by the manufacturer. After
thoroughly cleaning the chimney, reinstall the chimney
cap according to the manufacturer’s directions.
WinterWarm Maintenance Schedule
Fireplace:
Daily:
• Ash should be removed before the level reaches the
top of the pan. Check each time you re-load, or at
least once a day.
• Keep the area around the fireplace clear of any com-
bustible material.
Yearly Spring Cleaning:
• Remove ash from the fire box and replace with a
moisture-absorbing material (such as Kitty Litter) to
keep the interior of the fireplace dry.
• Touch up painted surfaces with black paint.
Flex Connector:
Two Weeks:
• Inspect the chimney and flex connector. Clean the
system if necessary.
YEARLY SPRING CLEANING:
• Disassemble the flex connector and take it outdoors
for inspection and cleaning. Replace weak sections
of connector.
• Inspect the chimney for signs of deterioration.
Repairs to a masonry chimney should be made by
a professional mason. Replace damaged sections
of prefabricated chimney. Your local Vermont Castings’ dealer or a chimney sweep can help determine
when replacement is necessary.
2000941
15

WinterWarm Fireplace Insert or System
2 4 1 3
2 1
LEFT
FAN
11
6
8
3 1 4 2
1 2
RIGHT
FAN
24
9
SH2
SH4
SH4 SH2
On Body Assembly
Field Cover
Wireway
13
21
17
17
21
8
13
2 4 1 3
2 1
PH2 PH4
RHEOSTAT
N
G I
H
N
H
15
Left Receptacle
B A
1
10
5
7
12
20
16
3 1 4 2
1 2
PH4 P H2
N
G I
H
N
H
Right
Receptacle
19
23
14
22
18
On Front Assembly
Legend
Black Wire (Hot)
White Wire (Neutral)
Green Wire (Ground)
Female Terminal
Loop Terminal
Wirenut
Wire Number
Ground Screw (Green)
SH Socket Housing
PH Pin Housing
S Socket
P Pin
Large WinterWarm Wiring Diagram
16
2000941

WinterWarm Fireplace Insert or System
2' Min.
2' Min.
3'
Min.
0 To 10'
3'
Min.
0 To 10'
Section III: Preparing a Masonry Chimney
Installing the WinterWarm into a masonry fireplace is an
effective way to add an efficient heater to your home.
Requirements for the
Existing Masonry Fireplace
The WinterWarm Fireplace Insert is listed only for
installation within a properly built masonry or heat
circulating, masonry-type fireplace that is constructed in
accordance with the requirements of recognized building codes. A heat-circulating masonry-type fireplace
must conform to building code standards for masonry
fireplaces, and must consist of a factory-built metal
firebox with air circulation pathways that are surrounded
by masonry materials.
NOTE: The WinterWarm is not listed for use in
“zero-clearance” prefabricated fireplaces, except
when used as part of the Vermont Castings’ Winter
Warm Fireplace system, including the WinterWarm
Fireplace Energy Cabinet, item #2110 (referred to on
the WinterWarm safety label as Fireplace Cabinet
Model 1283).
The fireplace and chimney must be clean and structurally sound. Have it inspected by a qualified professional
chimney sweep, a mason, or your Vermont Castings’
Authorized Dealer before the WinterWarm is installed.
Any deterioration (cracks, loose mortar or loose bricks)
must be repaired.
The fireplace should not be modified to install the WinterWarm without first checking with your local building
inspector or fire marshal. Do not remove bricks or mortar that may jeopardize the compliance of the fireplace
with local building codes.
Requirements of your
Existing Masonry Chimney
Your fireplace chimney must be well-constructed and
must meet minimum code requirements. The chimney
flue should have a code-approved liner made of masonry or pre-cast refractory tiles, straight or flexible stainless steel pipe, or a poured-in-place liner. An unlined
chimney must be relined professionally. Chimney height
should be no less than 15’ (4.6m) above the hearth and
no more than 35’ (10.7m).
The chimney must have a nominal flue size of 8” x 8”
(203 x 203mm) or larger, with a maximum size of 12”
x 12” (305 x 305mm). Some chimneys originally designed for fireplace use may perform differently when
used to vent an air-controlled appliance such as your
WinterWarm. A chimney on an outside wall with a large
2000941
flue, for example, may not heat up enough to sustain
an adequate draft. Such a flue can often be improved if
it is relined to reduce its size and/or insulated to keep it
warmer.
The chimney should extend at least 3’ (914mm) above
the highest point where it passes through a roof, and at
least 2’ (610mm) higher than any portion of a building
within 10’ (3m). (Fig. 18)
-
Reference
Point
Fig. 18 The 2’3’10’ rule for chimneys.
AC617
Existing masonry fireplace chimneys, especially older
ones, may have one or more openings used at an
earlier time to connect stoves in different rooms to the
fireplace chimney. These openings must be sealed with
masonry to the thickness of the chimney wall. Unused
openings sealed with pie plates or wallpaper are a hazard. In the event of a chimney fire, flames and smoke
may be forced out of these unused openings.
Do not connect your WinterWarm fireplace insert to
a chimney flue serving another appliance.
Minimum Fireplace Dimensions
The WinterWarm Fireplace Insert will fit most masonry
fireplaces. To confirm that it will fit yours, measure the
lintel depth, plus the height, width, and depth of your
fireplace and your hearth. Compare them to the measurements in the accompanying chart. If you choose to
install a new hearth over an existing fireplace hearth,
be sure to take its thickness into consideration when
measuring both front and back height of the fireplace.
17

WinterWarm Fireplace Insert or System
A,I
B
C
D,J
E
D,J
H
F,
G
C
E
X
C
A
B
Fireplace Minimums
A. Width at Face 34” (864 mm)
B. Width at
¹⁄₂” depth 22” (559 mm)
18
C. Depth1 19” (483 mm)
D. Height at Face 24” (610 mm)
E. Height at
19¹⁄₂” depth 16” (406 mm)
F. Damper Width
G. Damper Length2 14” (356 mm)
2
5” (127 mm)
Fireplace Maximums
H. Lintel depth 6³⁄₄” (172 mm)
FP1084
I. Width3 51” (1295 mm)
J. Height3 36” (914 mm)
1. The minimum depth must be maintained from the floor of the
fireplace to a height of 16” (416 mm).
2. These are the minimum damper dimensions required for use of
the Vermotn Castings Flex Connector System.
3. Though the WinterWarm Fireplace Insert will fit into larger fireplaces, the decorative surround panels will not completely cover the
fireplace opening if these dimensions are exceeded. Custom made
trim may be used.
Fig. 19 Use thes measurements to confirm that the WinterWarm will fit into your masonry fireplace.
Clearance Requirements
After confirming that your fireplace is the right size,
check the clearances to combustibles. First mark with
tape the exact center of your fireplace opening on the
hearth. Measure the side clearance from this point.
Measure the top trim and/or mantel clearances from the
finished hearth surface. Measure the front clearance (to
furnishings, etc.) from the fireplace face.
NOTE: The clearance between the WinterWarm Fireplace Insert and the mantel, top trim and side trim cannot be reduced by installing shields.
Another clearance requirement to consider is that
for movable items such as tables, bookcases, rugs,
furnishings, and your woodbox. All combustible materials of this type should be a minimum of 48” (1219 mm)
from the front surface of the WinterWarm. Be sure that
family members are aware of this requirement as well,
so they too will keep objects a safe distance from the
WinterWarm.
18
Measure side
trim clearance
from here
FP1085
Fireplace Clearances
Masonry Fireplace System
Fireplace Cabinet
A. Mantel* 38¹⁄₂” (978 mm) 43” (1092 mm)
B. Top Trim* 38¹⁄₂” (978 mm) 43” (1092 mm)
C. Side Trim** 24” (610 mm) 24” (610 mm)
*The mantel and/or top trim must be 9” (229 mm) in depth or less.
For the WinterWarm System, measure from the supplied trim
panel forward.
**Where side trim extends more than 2” (52mm) from the fireplace
facing, the side clearance must be no less than 42” (1067 mm).
Measure the side clearance (C) from the exact center of your fire
place opening on the hearth (X). Measure the top trim (B) and/or
mantel clearances (A) from the finished hearth surface. Measure
the front clearance (to furnishings, etc.) from the fireplace face.
Fig. 20 Observe these clearances to combustible trim.
-
Hearth Requirements
In some fireplaces, the hearth in front of the fireplace
opening is brick, stone, slate, or some other non-combustible material that is in direct contact with concrete
poured over earth. These are the only hearths that are
considered noncombustible.
In other fireplaces, the brick or concrete hearth in front
of the fireplace opening is supported by heavy wooden
framing. Because neither brick nor concrete has good
insulating properties, heat radiated by the fire will pass
downward through the hearth to the wooden framing.
Such hearths are considered combustible.
Unless the fireplace and hearth are constructed over a
completely noncombustible surface (such as unpainted
concrete over dirt), a floor protector must be used in
WinterWarm Fireplace Insert installations in front of and
to the sides of the door as protection against spilled
coals and embers.
Floor protectors must extend at least 8” (203 mm) from
the side of the door opening, making the protector 40”
(1016 mm) wide. In addition, the floor protector must
extend from the front door opening a minimum of 16”
(410 mm) in the United States and 18”(457 mm) in
Canada.
2000941

K of new material (per inch)
K of listed material (per inch)
thickness
of listed
material
= x
IWF291
MBUF
6/19/96
(K factor
of alternate
material)
(0.84)
X (7/16" [11mm]) =
(Required thickness of
alternate material)
(5.0)
(0.84)
X (7/16" [11mm]) = 2.6" (65mm)
A
B
B
C
Flue
Collar
United States Canada
A. 16“ (410 mm) 18” (457 mm)
B. 8” (203 mm) 8” (203 mm)
C. 40” (1016 mm) 40” (1016 mm)
NOTE: Measuring from the door opening of the insert to the fireplace opening adds 3¹⁄₂” (90mm) to the total depth of the hearth
protector.
Fig. 21 Unless your fireplace and hearth are constructed
over a dirt floor (or unpainted concrete over dirt), you must
use a floor protector that satisfies the above requirements.
The approved construction of a floor protector calls for
24 gauge galvanized sheet metal covered with a listed
floor protector material that is at least 7/16” (11 mm)
thick (such as Wonderboard® or Durock®). The floor
protector may be covered with a noncombustible decorative material if desired. (Fig. 21)
Custom-made floor protectors may be used if they offer
the same protection as the approved floor protector
described in the preceding paragraph, which in testing
was found to have a standard K value of 0.84. Custombuilt floor protectors must have a K value equal to, or
less than, 0.84, meaning that heat will transfer at the
same rate or more slowly than the tested standard.
To calculate the thickness required for an alternate
material to result in a K value of 0.84, first determine
the alternate material’s K factor. This information should
be available from your local building supply yard. Then,
calculate the following formula:
Let’s use brick as an example, since it is a commonly
used hearth material. Its K factor is 5.0.
Glass
Door
FP1086
WinterWarm Fireplace Insert or System
That is, when using brick for the hearth extension, the
brick must be a minimum of 2.6” (65 mm) thick.
Once you know the K factor of a given material, you
can use this same formula to calculate its required
thickness for approved hearth protection.
NOTE: Any floor protector thicker than 9/16” (14mm)
will require elevating the firechamber on a solid, approved floor protector to provide enough clearance for
the door to open. This in turn will require a higher fireplace opening to permit installation of the fire chamber.
The Chimney Connector
Connect your WinterWarm Fireplace Insert to the
chimney flue with a “positive flue connection.” Such a
connection provides a direct passageway for smoke
and exhaust gases leading from the flue collar of the
WinterWarm to the first chimney lining tile. Positive
flue connections are required in many areas before an
installation can be approved.
The chimney connector itself should have a minimum
cross-sectional area of 50 square inches (320 square
centimeters), equivalent to an 8” (203 mm) diameter
opening, and must be 24 gauge or heavier.
Sealing Requirements
It is important to seal off the flue completely from the
room air for proper operation of your WinterWarm.
There are three ways to accomplish this:
1. Install a CFM Corporation Flex Connector system;
2. Install a customized seal at the damper level;
3. Have your chimney professionally re-lined and connect the liner directly to the WinterWarm.
Of these three choices, the Flex Connector not only
provides an effective seal but usually is the easiest to
install.
The Flex Connector System
The Flex Connector bends the chimney connector
through angled smoke chambers and narrow damper
frames, and its Block-off plate makes a tight seal at the
damper frame. (Fig. 22)
To determine the suitability of the Flex Connector for
your fireplace, carefully examine the fireplace damper
area. The damper opening must be unobstructed
and must measure at least 5” x 14” (127 x 356 mm) to
accommodate the Flex Connector and the Block-off
Plates. An undersized opening, or an opening obstructed by heat exchanger tubes or damper components,
may prevent the Flex Connector from extending up to
the flue or may be possible only after special work has
been done.
2000941
19

WinterWarm Fireplace Insert or System
1/4” (6mm) Bolt
1/4” (6mm)
Nut
Pipe
Support
Block-Off
Plate
1/4”
(6mm)
Screw
1/4” (6mm)
Washer
1/4” (6mm)
Wing Nut
Fig. 22 Components of the Flex Connector System.
Flex Connector
1/4” (6mm)
Nut
Pipe
Support
Starter Piece
(Optional)
FP1087
Consult a Vermont Castings’ Authorized Dealer for installation suggestions. It may be possible to enlarge the
opening by removing or modifying the damper frame,
but do this only if it won’t weaken the fireplace. Check
with your local building inspector to be sure modifications comply with local codes.
Although the Flex Connector is designed to be installed
by any mechanically competent person, wide variations
in fireplace and damper construction can complicate
the installation. You may wish to have the job done
by a professional installer. Complete detailed installation instructions are included with the Flex Connector
components.
A Relined Chimney
There are a number of fittings available from your Vermont Castings’ Authorized Dealer that are designed to
form the connection between your WinterWarm and an
8” (203mm) diameter chimney liner. Your dealer as well
as your local chimney sweep can advise you on the
types of lining systems currently available.
Preliminary Steps for Installing the
WinterWarm into a Masonry Fireplace
1. Remove the Masonry Fireplace Damper
The existing damper plate within your fireplace must
be removed or, if that is not possible, must be fastened
securely in a fully-open position. Many dampers can
be removed simply by removing a cotter pin and/or set
screw.
2. Install the Flex Connector
Following the installation instructions that are packed
with the Flex Connector, unfold the template that came
with the WinterWarm. (Fig. 23) Carefully glue the template onto a large piece of sturdy cardboard or plywood,
making sure that the fold lines have been flattened. Cut
along the edges of the template and use it to place the
Flex Connector components correctly in your fireplace.
Custom Fabrication:
Be sure any chimney connector or adapter is properly
installed and secured in place. There should be a slip
joint near the WinterWarm so that the connection can
be easily disengaged for removal and cleaning of the
unit.
A Custom Damper Seal
If the design of your fireplace damper prohibits the use
of the CFM Corporation Sealing Package, an alternative is to fabricate a custom sealing plate at or below
the fireplace damper frame. The plate can be fastened
securely to the lintel (the structural piece spanning the
fireplace opening) and to the surrounding masonry, or
be securely fastened to the damper frame. A section
of chimney connector, attached to the WinterWarm
flue collar, must make a positive flue connection where
required by code.
20
Template
FP1088
Fig. 23 Using the template that came with the WinterWarm
will help you position Flex Connector.
2000941

WinterWarm Fireplace Insert or System
51¹⁄₂" (1308mm)
43⁷⁄₈" (1114mm)
35⁹⁄₁₆"
(903mm)
31³⁄₄"
(806mm)
3. Reverse the Flue Collar (If Necessary)
The flue collar of the WinterWarm is reversible to allow
for installation into fireplaces with different lintel depths
and different damper orientations. It is shipped in the
rear-most position (the deep lintel position), which accommodates lintel depths up to 6³⁄₄” (172 mm). The
fore-most flue collar position will accomodate lintels as
shallow as 4³⁄₄” (121 mm) in depth.
Taking into account the location of the damper frame,
choose the flue collar position that enables the chimney
connector to be installed using the most gradual bend
possible.
To reverse the flue collar, remove the flue collar in
sert panel located on top of the shroud by removing
the sheetmetal screws around the panel’s perimeter.
Remove the two fasteners that attach the flue collar to
the insert panel, then remove the panel. You then have
access to the top plate and to the flue collar.
Remove the four fasteners that attach the flue collar
to the top plate of the WinterWarm. Lift the flue collar away from the top plate. Position the flue collar in
the desired orientation, and reinstall the four fasteners.
Make sure the flue collar is seated firmly against the
gasket material.
Replace the flue collar insert panel. Fasten the flue
collar to the panel, and re-install the sheet metal screws
around the panel’s perimeter.
4. Install the Floor Protector
Make sure the floor protector satisfies the requirements
discussed on Pages 17 and 18.
5. Assemble the Optional Surround Panel and Lean
it against the Front of the Fireplace
If your installation will include the optional surround
panels, assemble them according to the instructions
packed with the panels. Lean the finished assembly
against the chase front.
The CFM Specialist Home Products modular Surround
Panels cover gaps up to 4⁵⁄₈" (116 mm) using a single
panel, and up to 9¹⁄₄" (231 mm) using double panels.
Surround Panel kit #3014 has outside measurements of
31³⁄₄" tall by 43⁷⁄₈" wide (806mm tall x 1114 mm wide);
by combining Kit #3014 with extension kit #3015, the
resulting surround is 35⁹⁄₁₆" tall by 51¹⁄₂" wide (903 mm
tall by 1308 mm wide).
Custom-made surround panels may be made from any
noncombustible material, with the following restrictions:
The maximum suggested thickness of the surround
material is determined by both flue collar position and
lintel depth. For installations using the front flue collar
position, the maximum suggested surround thickness
is 4" (102 mm) minus the lintel depth. For example, a
3" (75 mm) lintel would result in a maximum surround
thickness of 1" (25 mm) .
There is no need to attach the surround panels to the
insert or to the fireplace. The modular surrounds are
sized to stand without additional support or attachment;
they are simply trapped between the fireplace insert's
cast-iron front, and the face of the fireplace.
For rear exit flue positions, the suggested position
would allow a surround thickness of 3¹⁄₂" (88 mm).
With these preliminary steps completed, you can now
proceed to install the WinterWarm firechamber and
front. That information is located in Section V, “Completing the WinterWarm Installation,” and begins on
Page 29.
Kit #3014
Kit #3015
Fig. 24 CFM Corporation #3014 and #3015 Optional Surround Trim Kits.
FP1089
2000941
21

WinterWarm Fireplace Insert or System
28¹⁄₂"
(724mm)
39¹⁄₂" (1003mm)
Trim 48" (1219mm)
Section IV: Installing the Fireplace System Cabinet
The insulated metal cabinet included with the WinterWarm Fireplace System enables the WinterWarm
Fireplace Insert to be installed in minimum-clearance
situations and where no masonry fireplace or chimney
exists, such as in new home construction or in renovation.
Use only CFM Corporation WinterWarm firecham
ber Model #2100 in this fireplace cabinet. Do not
use other products not specified for use with this
fireplace. The two (2) vent ducts supplied with the
energy cabinet must be installed as described in
this manual. Never install the energy cabinet without installing the vent ducts.
-
Carefully Observe Local Building Codes
Meeting the requirements of your local building codes is
an important part of planning your WinterWarm installation. Because the final approval for an installation is
always granted by local officials, and because codes
vary in different areas, involving your local officials
in the planning stage can help facilitate the approval
process. Review your plans with them before beginning
the installation.
Ask your Vermont Castings’ Authorized Dealer for help
in providing the necessary information to local officials.
In the pages that follow you’ll find information on plan
ning, construction, and clearance for almost all installations. If you need further assistance, refer to the National Fire Protection Association ANSI/NFPA 211-1988
Standard for Chimneys, Fireplaces, Vents and Solid
Fuel Burning Appliances, or, in Canada, CSA B365.
Your local Vermont Castings’ Authorized Dealer or your
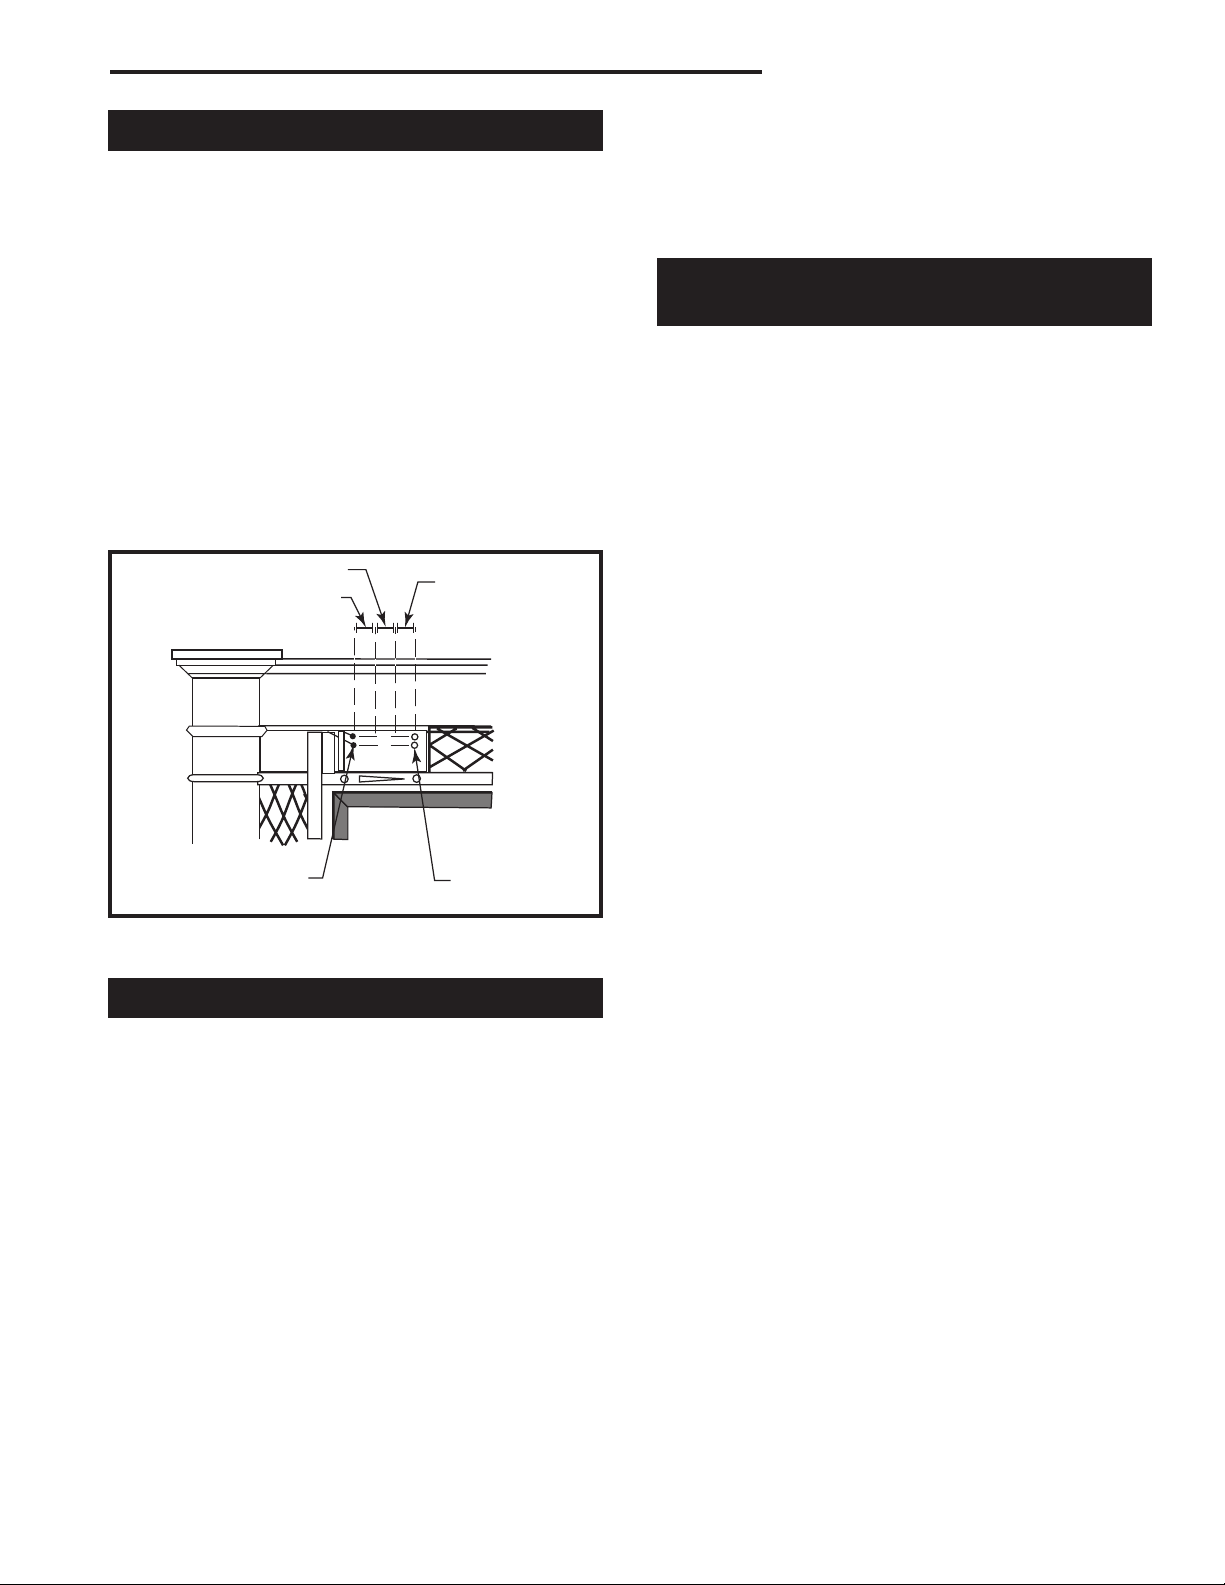
local building official may have a copy.
-
Selecting a Location for Your Fireplace
Centrally located installations circulate the heat most
effectively and take full advantage of the WinterWarm’s
powerful heating capability. (Fig. 25)
An interior chimney is preferred, as it stays warmer
and provides a more reliable draft than a chimney on
the outside of the building. Locating the chase on an
exterior wall has the advantage of reducing the existing
floor space required by the installation, however, and
an exterior chimney can be enclosed in a chase built to
resemble a traditional fireplace and insulated to keep it
warmer.
LU584-1a
Fig. 25 The WinterWarm Fireplace System offers a variety of
siting options.
Structural Considerations
of the Installation
Chase Dimensions
The WinterWarm Fireplace System installs in an opening just 28¹⁄₂" (724 mm) deep, 39¹⁄₂" (1003 mm) wide,
and as little as 89" (226 cm) high. (Fig. 26) The enclosing chase will be wider by the thickness of studding and
drywall, or other wall finish material. The basic trim
package requires an overall enclosure width of at least
48" (1219 mm), plus the width of any edge molding to
be applied. The chase must be at least 89" (226 cm)
high.
FP1090
Fig. 26 Minimum dimensions for framing the WinterWarm
Fireplace System when the chase is oriented perpendicular
to wall.
22
2000941

66" (1683mm)
66" (1683mm)
27"
(686mm)
27"
(686mm)
39¹⁄₂"
(1003mm)
93¹⁄₂" (237cm)
FP1091
I
B
D
E
C
B
A
C
E
G
F F
I
B
D
E
F G
H
C
B
A
C
Fig. 22 Minimum dimensions required for framing a corner
installation of the chase.
2” x 4” or Smaller
WinterWarm Fireplace Insert or System
Chase Front
A 39¹⁄₂” (1003 mm) E 12” (305 mm)
B 62” (1575 mm) F 9³⁄₄” (248 mm)
C 89” (2260 mm) G 12¹⁄₈” (308 mm)
D 28” (711 mm) I 28
Fig. 29 Suggested framing and dimensions for venting the air
ducts through the chase front.
Chase Side
¹⁄₂” (724 mm)
FP1093
Chase Front
Chase Side
A 39¹⁄₂” (1003 mm) F 9³⁄₄” (248 mm)
B 62” (1575 mm) G 12¹⁄₈” (308 mm)
C 89” (2260 mm) H 9³⁄₄” (248 mm)
D 28” (711 mm) I 28
¹⁄₂” (724 mm)
E 12” (305 mm)
Fig. 28 Suggested dimensions and framing for side-venting
the air ducts of the chase.
Duct and Vent Placement
The WinterWarm offers great flexibility in positioning
the hot air ducts. The ducts can vent through the side of
the chase, through its front, or one each through both
the side and the front. Either or both ducts also may be
vented into a room behind, beside or above the room
in which the WinterWarm is installed. Both ducts must
be installed in order to properly vent the hot air inside the energy cabinet. Failure to connect the vent
ducts could result in overheating of the cabinet
and surrounding construction. The ducts must be
installed at least 12” (305 mm) from the ceiling and
no lower than the cabinet top.
2000941
FP1092
Figures 28 and 29 show construction dimensions for
some of the common duct placements.
Chimney Requirements
For proper draft and best performance, the chimney
should extend at least 15’ (4.6 m), and not more than
35’ (10.6 m), above the hearth surface. If the chimney
above the roof line is enclosed in a chase, the chimney
must extend at least 3’ (914 mm) above the top of the
chase. The chimney must be supported either from
the roof or from the floor joists above the WinterWarm.
The cabinet is not intended to be the sole support of
the chimney. Support systems are available from the
chimney manufacturer.
An installation with a straight, vertical chimney will have
the best draft and is the easiest to clean.
If structural components such as floor joists or roof raf
ters are obstacles to the chosen location, however, up
to four 30° elbows may be connected directly to each
other. Used in pairs, the elbows will return the chimney
pipe to vertical after it has passed the obstacle. (In
some instances floor joists can be cut and boxed in for
reinfor
cement, but engineered roof trusses should never
be cut.) The first offset must be at least 8’ (2.5 m) above
the hearth. Elbows may not be used within the chase.
The WinterWarm Fireplace System is listed for use in
the United States with seven 8” (203 mm) diameter
chimney systems that have been listed to High Temperature (H.T.) Chimney Standard UL-103-1985 (2100°F).
-
23

WinterWarm Fireplace Insert or System
89"
(2260mm)
A
B
B
C
Chimney Cap
Flashing
Firestops
Chimney Section
Anchor Plate
Front
Cabinet
Storm Collar
Roof Support Package
Wall Band
Offset
Firestop
cut-out panel on the WinterWarm shroud, and it should
terminate at an outside air source. It may not terminate
in a garage or basement, nor near another fuel-fed appliance. The air inlet must be covered by a wire mesh
screen (not included) with openings not larger than 1/4”
x 1/4” (6 x 6 mm) to prevent rodents from entering from
the outside. The optional duct kit includes a valve to
close off incoming air when the WinterWarm is not in
use.
Hearth Requirements
Unless the Fireplace System Cabinet will be installed
on a completely noncombustible surface such as
unpainted concrete over earth, a floor protector must
be used in the installation for protection against radiated heat as well as protection against spilled coals and
embers.
Floor protectors must extend at least 8” (203 mm) from
the side of the door opening, making a total width of 40”
(1016 mm). In addition, the floor protector must extend
from the front door opening a minimum of 16” (410 mm) in
the United States and 18”(460 mm) in Canada. (Fig. 31)
FP1094
Fig. 30 Typical chimney components used in the installation
of a WinterWarm Fireplace System.
The listed chimneys and their manufacturers are:
American Metal Products Ameri-Tec Model HS
Condensation
Engineering Corp. Model HS
GSW Building Product Co. Model SC
Metal Fab, Inc. Model TG
Security Chimneys Ltd. Model ASHT
Selkirk Metalbestos Model SSII
Simpson Dura-Vent Model SDP
In the United States, do not use any other chimney
system with the WinterWarm Fireplace System.
In Canada, the WinterWarm Fireplace System is listed
for use with any 200 mm diameter prefabricated chimney tested and listed to the High Temperature (650°C)
Chimney Standard, ULC S-629.
Guidelines for an Outside Air Supply
Outside air may be introduced to the WinterWarm at
either of two available ports: at the lower left corner of
the back of the cabinet (as viewed from the front), or at
the lower left corner of the left side panel.
An outside air duct must be 3” (75 mm) in diameter,
must be no longer than 20’ (6 m), and must not have
more than three elbows. No part of the outside air duct
(including the outside air inlet) may be higher than the
Flue
Collar
Glass
Door
FP1086
United States Canada
A. 16“ (406 mm) 18” (457 mm)
B. 8” (203 mm) 8” (203 mm)
C. 40” (1016 mm) 40” (1016 mm)
NOTE: Measuring from the door opening of the insert to the fireplace opening adds 3¹⁄₂” (90mm) to the total depth of the hearth
protector.
Fig. 31 A floor protector must satisfy these requirements.
The approved construction of a floor protector calls for
24 gauge galvanized sheet metal covered with a listed
floor protector material that is at least 7/16” (11 mm)
thick (such as Wonderboard® or Durock®). The floor
protector may be covered with a noncombustible decorative material if desired.
24
2000941

Custom-made floor protectors may be used if they offer
the same protection as the approved floor protector
described in the preceding paragraph, which in testing
was found to have a standard K value of 0.84. Custombuilt floor protectors must have a K value equal to, or
less than, 0.84, meaning that heat will transfer at the
same rate or more slowly than the tested standard.
To calculate the thickness required for an alternate material to result in a K value of 0.84, first determine the
alternate material’s K factor. This information should be
available from your local building supply yard. Then,
calculate the following formula:
(K factor
of alternate
material)
(K factor of
Wonderboard)
(Thickness of
Wonderboard
X =
required)
(Required thickness
of alternate material)
Let’s use brick as an example, since it is a commonly
used hearth material. Its K factor is 5.0.
(5.0)
(0.84)
X (7/16” [11 mm]) = 2.6” (65 mm)
That is, when using brick for the hearth extension, the
brick must be a minimum of 2.6” (65 mm) thick.
Once you know the K factor of a given material, you
can use this same formula to calculate its required
thickness for approved hearth protection.
Flush with the Floor or Laid Over It?
WinterWarm Fireplace Insert or System
Over-laid Floor
Protector
24ga. Galvanized Sheet
Metal
Finished
Floor
Sub-floor
Plywood Shim
Fig. 32 The components of a raised hearth. The floor protector is placed over the finished floor and extends completely
under the ventilated plinth.
Inlaid Floor
Protector
24ga. Galvanized Sheet
Metal
Finished
Floor
Ventilated
Plinth
Spark
Protector
Strip
Cabinet
Base
FP1109
Ventilated
Plinth
Spark
Protector
Strip
Cabinet
Base
Generally, it is easier to lay floor protectors over the finished floor in existing homes. In new construction, flush
installations are a popular alternative.
When placed over a finished floor, the floor protector
extends completely under the ventilated plinth. (Fig.
32) The cabinet is elevated by an amount equal to the
thickness of the floor protector so that the plinth and
cabinet are at the same level. This is necessary for a
proper fit between the WinterWarm front and the plinth.
If you raise the cabinet more than 1” (25 mm), a corresponding increase in the height of the framed chase is
required to retain adequate clearance.
When the floor protector is installed flush, the WinterWarm cabinet rests on plywood shimming that brings it
level with the finished floor. (Fig. 33)
Whichever method you choose, the floor protector must
satisfy the requirements outlined above, and the 3” x
38” (76 x 965 mm) sheet metal spark protector strip
(included) must be laid under the junction of the cabinet
and the ventilated plinth.
Sub-floor
Plywood Shim
Fig. 33 The components of a flush hearth. The floor protector
is inlaid flush with the finished floor.
FP1110
Important Reminders:
1. INSTALL ONLY AS ILLUSTRATED.
2. Elevating the cabinet requires a corresponding in
crease in the height of the chase to retain adequate
clearances. Refer to the chase specifications on
Page 20 and double-check that all clearances will be
satisfied.
3. The air inlet through the ventilated plinth must not be
blocked.
4. A 3” x 38” (76 mm x 965 mm) strip of sheet metal
(included in your Fireplace System) must be placed
as a spark protector painted-side up underneath the
joint between the front of the cabinet and the ventilated plinth.
-
2000941
25

WinterWarm Fireplace Insert or System
37³⁄₈"
(949mm)
40³⁄₈" (1025mm)
29"
(737mm)
33" (845mm)
33"
(845mm)
35" (895mm)
Electrical Requirements
The WinterWarm Cabinet has a removable junction box
located on the bottom front corner of the left side. This
enables the wiring to be completed before the cabinet is
installed if desired.
The junction box houses two receptacles, one for the
WinterWarm column fans and the other for the optional
cabinet blower. The cabinet blower is especially recommended when the WinterWarm will be installed in a
confined area that requires additional heat circulation.
A 115V, 15 or 20A electric service line is required. If installing the optional cabinet blower, decide on the location for the blower control switch and mount a standard
single-switch box to the chase framing.
Customizing the Finished Appearance
The Trim Panels supplied with the WinterWarm System
fasten the cabinet to the chase framing and give a finished appearance to the gap between the WinterWarm
and the cabinet. They also provide a noncombustible
transition surface to join with the combustible wall finish
material, which must not extend inside the combustible
limits.
The trim panels may be used without additional facing
material, or with a surface to complement a specific
decor.
Many attractive, noncombustible finish materials can be
applied over the trim panels, including veneer brick, tile,
stone and plaster. The limitations are:
• The materials must be noncombustible.
• Their maximum thickness, including noncombustible
backing and adhesive, should not exceed 13/16”
(20 mm).
• Combustible edge molding must not protrude into
the room more than 2” (51 mm) from the panel surface.
• To allow insertion of the fire box, the opening must
be at least 33¹⁄₄" (845 mm) wide, and 29" (737 mm)
high. To ensure coverage of the trim inner edges by
the installed WinterWarm fire chamber, the opening
must be not more than 35¹⁄₄" (895 mm) wide, and
33¹⁄₄" (845 mm) high. Figure 25 demonstrates these
dimensions.
Combustible
Limits
Notch for
Power Cord
FP1111
Fig. 34 Keep combustible wall finish materials outside these
limits.
FP1112
Fig. 25 The fireplace opening must conceal the inner edges
of the trim as well as accomodate the insert.
• Plaster. A finish skim coat of plaster may be applied
over tile backer board or Wonderboard®, or over
expanded metal lath and a scratch coat.
• Stone. Marble, granite, soapstone, slate, or other
cut stone may be used. (Fig. 38) Stone may be ce-
WinterWarm
Trim Piece
“J”
Bead
Cabinet
Choosing a Facing Material
A variety of alternative facing materials can be used to
enhance the fireplace. Bear in mind, however, that the
total maximum thickness of any trim material, including
backing materials and adhesive is 13/16”. Here are a
few possibilities: (Refer to Figures 34-39 for detail.)
• Basic. The trim pieces, painted as desired, but other-
wise unadorned.
26
FP1113
Fig. 36 Top view of basic metal trim.
2000941

WinterWarm Fireplace Insert or System
Finish Coat
Backer Board
or Metal Lath
Fig. 37 Top view of plaster flush-finished trim.
mented directly to the trim panels, or over noncombustible backing to shim it out relative to the finished
wall surface. Be sure the height of the side pieces
is between 29” (740 mm) and 33¹⁄₄" (845 mm), and
that the thickness of backing, adhesive, and stone
combined is not more than 13/16" (20 mm).
• Tile. There are many tile options from which to
choose. Here is one method of determining a satisfactory arrangement:
Total thickness less
than 13/16” (20mm)
Observe
Combustible
Limits
FP1114
it is entirely permissible to extend noncombustible
facing materials beyond those limits to achieve a
particular decorative effect.
5. Despite the most careful planning and the latitude
provided by the maximum and minimum opening
dimensions, it still may be necessary to cut some
tiles to achieve a balanced appearance. Your tile
supplier or local tool rental outlet should be able
to supply the necessary equipment and explain
how to use it properly.
Consult your Vermont Castings dealer for advice and
suggestions for this process.
Observe
combustible
limits 2” (51mm)
maximum
Fig. 39 Top view of tile and wooden (combustible) trim installed over backer board.
Tile
Backer Board
FP1117
FP1115
Fig. 38 Top view of stone facing material and wooden (combustible) trim cemented directly to a noncombustible backing.
The trim must protrude no more than 2” (51mm).
1. Draw the maximum and minimum fireplace opening dimensions on a large sheet of cardboard.
2. Place it on the floor and experiment with laying
the tiles around the opening, varying within the
limits to determine the best arrangement.
3. Trace and cut out a silhouette of the insert. Lay it
over the tiles to show how the insert will cover the
tiles when it is installed.
4. On another large piece of cardboard, cut an
opening to represent the limits for combustible
material, and position that on top of the tile layout. Keep in mind that while combustible material
must not be brought inside the combustible limits,
Use the Right Adhesives
The adhesive must be suitable to the chosen material and have a temperature rating of at least 400°F
(204°C). High temperature silicone is an example.
Maintain a Safe Clearance to the Mantel
The clearance to the mantel and/or top trim must be at
least 43” (1090mm), measured from the finished hearth
surface. This clearance cannot be reduced by adding
shields.
2000941
27

WinterWarm Fireplace Insert or System
2" (50mm)
Prepare and Install WinterWarm Cabinet
1. Unpack the carton.
2. Install the flex connector. Install the flex connector
and attached flue flange to the underside of the cabinet
top using eight #10-1/2” hex head sheet metal screws.
The connector should point forward with the long axis of
the oval running from side to side. (Fig. 40)
Anchor Plate
Flexible Chimney
Connector
20° Offset Piece
Flue Collar
FP1118
Fig. 40 Proper position of the chimney connector, offset slip
piece and anchor plate.
3. Mark and drill the anchor plate. Fit the chimney
system anchor plate appropriate to your chosen prefabricated chimney over the flue outlet at the top of the
cabinet and mark the attaching hole centers; remove
the anchor plate and drill the fastener holes. (Fig. 41)
Do not install the plate at this time.
Convection
Air Outlets
4. Install the spark protector strip. To install the 3” x
38” (76mm x 965mm) spark protector strip, first draw a
line on the hearth parallel and 2” (51mm) in front of the
chase opening. Center the spark protector strip in the
chase opening, with the outside edge on the line. Nail
or screw the strip down, painted side up, so that the
fastener heads are flush with the surface of the spark
protector strip. (Fig. 42)
Chase
FP1120
Fig. 42 Install spark protector.
Spark Protector
5. Attach the trim pieces to the cabinet. (Fig. 43)
The parts supplied for this procedure include 16 sheet
metal screws and one each of the following: an upper trim panel, a left trim panel and a right trim panel.
You will also need an electric drill equipped with a 1/8”
(3mm) bit and a 5/16” (8mm) head driver, and a felt tip
pen for marking.
a. Align the 5 holes in the left trim panel with the cor-
responding holes in the left edge of the fireplace
opening on the cabinet. The notch in the flange
should align with the notch in the cabinet front, approximately 4” (102mm) from the bottom.
b. With the electric drill and the hex head driver, secure
the trim panel using 5 of the hex head sheet metal
screws provided.
c. Repeat this procedure to install the right panel.
d. Position the upper trim panel on top of the side pan-
els and centered on the face of the cabinet.
e. With the felt tip pen, mark through the 3 holes on
each flange of the upper trim panel on the cabinet,
and drill 1/8” (3mm) holes. Secure the panel to the
cabinet with 6 sheet metal screws.
Flue Opening
FP1119
Fig. 41 The anchor plate mounts on top of the cabinet and
secures the chimney to the chimney connector.
Front
Anchor Plate
28
2000941

37³⁄₈"
(950mm)
40³⁄₈" (1026mm)
Cabinet
WinterWarm Fireplace Insert or System
In addition, combustible edge molding must not protrude into the room more than 2” (51mm) from the panel
surface.
Combustible
Limits
Notch
Base
Fig. 43 The trim panels fasten the cabinet to the chase framing and give the installation a finished appearance.
FP1121
6. Move the cabinet into the chase and fasten the
trim panels to the chase framing.
NOTE: The chase floor must be the same height as the
hearth and must provide uninterrupted support. Push
the cabinet carefully into the chase opening until the
ends of the upper trim panel and the outer edges of the
side panels rest against the studs forming the front of
the chase. IMPORTANT: If the cabinet does not slide
easily into position, DO NOT force it; doing so could
damage the “standoffs” that ensure adequate clearance
from combustibles. Instead, double-check your framed
chase dimensions before proceeding to make sure you
have allowed enough clearance.
WARNING: DO NOT PACK REQUIRED AIR SPACES
WITH INSULATION OR OTHER MATERIALS.
a. Attach the upper trim panel. Refer to the combustible
limits illustration and the required dimensions, and
locate one hole through each end of the upper panel
into the studding behind. Make sure the holes are
located outside the combustible limits where they
will be hidden by wall covering or additional facing
material. Drill the holes, check carefully for square
one last time, and secure the panels with drywall
screws driven home to make flush with surface.
b. Attach the side panels. Drill 2 holes in each side
panel, also outside the combustible limit, and secure
the panels to the studding with additional drywall
screws.
NOTE: Drywall or other combustible wall covering applied to overlap the outer edge of the trim panels MUST
NOT extend inside the combustible limits. These limits
also apply to any combustible edge molding used to
trim the raw edge of the drywall.
Notch for
Power Cord
FP1122
Fig. 44 Make sure you secure the ends of the upper trim
panels to studding located outside the combustible limits.
c. After the cabinet has been installed to its proper
depth, check all standoffs once again for proper
clearance. Screw the cabinet to the floor through the
eight drilled holes with eight of the #10 Phillips pan
head sheet metal screws provided.
d. Connect the electric service cable to the cabinet’s
junction box if the wiring has not previously been
completed. (NOTE: Since the cabinet’s junction box
is removable, the wiring can be done outside the
cabinet either before the cabinet arrives or after it
has been installed.)
Remove the cover plate from the junction box in the
cabinet. Pull the electric service cable (and the switch
cable if installing the optional Cabinet Convection
Blower Kit) into the cabinet junction box and wire the
junction box as shown in the illustration below.
Figure 45 shows the required wiring for an installation
using the optional cabinet convection blower kit. If your
installation does not use the optional blower, ONLY the
upper receptacle will be live.
Secure and tighten the strain relief.
e. Install the required chimney anchor plate to the top
of the cabinet. Use a 1/8” (4mm) bead of gasket cement
to seal the flange to the cabinet. Install the chimney
according to the manufacturer’s instructions; follow the
instructions exactly.
7. Install the air ducts.
Before installing the air duct
boxes, you may wish to paint the inner surfaces with
high temperature stove paint (or other high temperature
paint) to reduce the glare from reflected light.
2000941
29

WinterWarm Fireplace Insert or System
12" (300mm)
Min.
To switch for optional cabinet blower
Ground
Service
Cable
Duct
Box
Duct Box
Ducting
Duct work
may not be
routed below
cabinet level
Cabinet
Lower receptacle
for cabinet blower
power cord only
Electrical
bridge
removed
Fig. 45 Wiring for an installation using the optional cabinet
convection blower kit. When the kit is not used, only the upper
receptacle is live.
Upper Receptacle for Insert
Firebox Fan
Electrical
Bridge
FP1123/24
Install the two air duct boxes in their framed openings.
(Fig. 46)
If desired, paint the inner surface of each air duct tube
for about 6” (152mm) to eliminate reflected glare; attach
this end to the air duct box flange.
Cut and fit the air duct tubing between the air duct
boxes and the top of the cabinet. NOTE: The ducting used to connect the duct outlets on the enclosure
cabinet to the remote duct boxes is Class O/Class I.
Use no other class of ducting for this application. In
certain areas, local building codes may prohibit the use
of flexible ducting in enclosed spaces. In such cases it
is acceptable to use solid cutting that meets local code
requirements.
Cut the tubing a few inches too long with a serrated
kitchen knife - it can be compressed during installation.
The duct tubing must fit onto both the duct box and the
cabinet flanges the full length of the flanges 2” (51mm)all the way around.
Secure each end of the ducting to the appropriate
flange with three of the sheet metal screws provided.
30
FP1125
Fig. 46 In addition to installation on the front, duct boxes may
be mounted on the sides of the chase or vented into adjacent
rooms, but in no case below the top of the cabinet.
Base
Trim Panel
Holes for the screws must be drilled first around the
perimeter through both the duct tubing and the flange
with a 1/8” (3mm) drill bit. Space the holes as evenly as
possible around the flange.
8. Install the elevated base. Slide the base into the
cabinet until it contacts the rear wall.
9. Install the optional cabinet convection blower kit.
The blower kit is an integrated unit housed in a metal
shell. ON the front side there is a flange perpendicular
to the housing. When properly installed, this flange
rests on the elevated platform and is fastened to it with
screws.
The back side of the blower housing has a flange that
rises parallel to the back side panel. This flange is fastened with screws to the rear panel of the cabinet.
The power cord is routed to the left where it can be con
nected to the lower receptacle of the cabinet junction
box.
10. Finish the wall surface surrounding the chase.
Cover the room’s wall area surrounding the chase with
a material of your choice, but carefully observe the
noncombustible limits as described in Step 6b - drywall
or other combustible wall covering applied to overlap
the outer edge of the trim panels must not extend inside
the combustible limits. These limits also apply to any
combustible edge molding used to trim the raw edge of
the drywall.
In addition, combustible edge molding must not protrude into the room more than 2” (51mm) from the panel
surface.
2000941
-

Optional
Blower
Elevated Base
Junction Box
Fig. 47 Slide the elevated base platform into the cabinet until
it contacts the back panel.
FP1126
WinterWarm Fireplace Insert or System
Use drywall screws to fasten the wall covering to the
metal standoff and drywall stops at the cabinet. Drill
pilot holes through the wall covering material and one
thickness of the sheet metal with a #40 (.098”) drill bit.
Tape and fill holes and/or seams and decorate your
chase wall at this time.
11. Install the vent grilles.
the duct box openings, and mark for the four screw
holes in each. Using a 5/32” (4mm) bit, drill through the
drywall and duct box flanges, and install the grilles with
the slot head black oxide screws.
Once the vent grilles have been installed, you are ready
to complete the installation by installing the fire cham
ber and the front.
Position the cast grilles over
-
Flange attaches
to cabinet rear
wall
Flange
attaches to
base
Convectiion
Blower Power
Cord
Elevated Base
Fig. 48 The cabinet convection blower in place behind the
base.
Cabinet Convection
Blower Housing
FP1127
2000941
31

WinterWarm Fireplace Insert or System
Section V: Completing the WinterWarm Installation
Prepare and Install the
WinterWarm Firechamber
1. Uncrate the WinterWarm Fire Chamber. Uncrate
the WinterWarm Firechamber and place it mounted on
its shipping pallet about 24” (610mm) in front of its final
destination — a masonry fireplace if you’re installing the
Fireplace Insert, or the cabinet if you’re installing it as a
part of the Fireplace System. (If the pallet height does
not place the Fire Chamber slightly above the level of
the cabinet’s elevated platform in a Fireplace System
installation, the pallet itself must be raised.)
The WinterWarm firechamber is shipped with the
reversible flue collar in the rearmost position. The flue
collar MUST be in this position for use in the Fireplace
System.
DO NOT REVERSE THE FLUE COLLAR ON THE
FIRE CHAMBER IF YOU ARE INSTALLING IT INTO
THE CABINET OF THE WINTERWARM FIREPLACE
SYSTEM.
Locate the damper control handle in the parts bag on
top of the firechamber — it’s the biggest of the three
rods at 3/8” (9mm) — and screw it into place (refer to
Page 3, Fig. 27). Lift up on the handle and move it to
the left to open the damper. Open the fuel loading door.
NOTE: The door will not open unless the damper is
open.
Expose the levelling bolts (and lighten the Fire Chamber for easier handling) by removing the load door, the
front grate bars, the ash grate, the ash pan, and the ash
door. (Fig. 49)
Front
Grate Bar
Ash Grate
Ash Pan
Ash Door
2. Install the Levelling Bolts. Remove the two 5/16”
(8mm) lag bolts that secure the WinterWarm to the pal
let. Slide the WinterWarm forward on the pallet until the
front levelling screw holes are accessible; screw in the
missing front levelling screws (located in the finish bag).
All four levelling screws should be positioned so they do
not protrude below the plane of the shroud bottom.
3. Install an Optional Probe Thermometer. The
WinterWarm is designed to accept a catalytic probe that
monitors the temperature in the secondary combustion
chamber. Your dealer can provide details on the probes
that are available.
If you have purchased a probe, install it at this time.
Remove the twelve hex head sheet metal screws that
secure the WinterWarm shroud to its bottom panel and
the two 1/4-20 hex head cap screws on the flue collar.
Remove the probe plug from the upper center of the
cast WinterWarm back. Select a drill bit corresponding to the size of the probe you have purchased; spin
the drill bit gently by hand through the exposed refractory material. Insert the probe carefully into the hole all
the way to the probe’s end. Route the probe lead right
or left, but on top of the rib cast into the WinterWarm
side, until the lead protrudes out the front. Replace and
refasten the shroud and the flue collar.
4. Install the Air Box of the Outside Air Kit. The
Outside Air Kit may be used with either the WinterWarm
Fireplace Insert or the WinterWarm Fireplace System,
and introduces outside air to the fire chamber for combustion. Outside air for combustion is especially desirable in some modern, super-insulated homes that have
little air infiltration.
The kit consists of an air box, a 3” x 24” (76 x 610mm)
air tube for Fireplace System installations, and a flange
for connecting the pipe to the cabinet. The air box
mounts on the left side of the fire chamber, and may be
vented either from the rear or from the side.
IMPORTANT: When using the Outside Air Kit in a masonry fireplace installation, modifications to the fireplace
may be necessary. Be sure to meet with your local
building code inspector before beginning the installation
to determine whether your plans meet code requirements. Contact your local Vermont Castings’ Authorized
Dealer for advice.
Adhere to the following guidelines when installing the
outside air kit:
-
Door
Fig. 49 Expose the levelling bolts by removing these parts.
32
FP1128
• Do not terminate the duct in a garage, attic, base-
ment, or near another fuel-fed appliance.
• No portion of the outside air duct may be higher than
the primary air inlet of the firechamber.
2000941

WinterWarm Fireplace Insert or System
• The outside air duct’s inlet must be lower than the
primary air inlet of the firebox, to prevent air infiltration.
• The air inlet must be covered by a wire mesh screen
with openings not larger than 1/4” x 1/4” (6 x 6mm) to
prevent rodents entering from the outside.
a. With the WinterWarm fire chamber on its shipping
pallet in front of either the fireplace or the installed
Fireplace System Cabinet, remove the four (4) screws
holding the outside air cover plate to the left side of the
WinterWarm shroud. You may discard the cover plate,
but save the four screws.
b. (Fireplace System only) Remove from the cabinet
the cover plates over the air supply port you will be using; leave the other port sealed.
There is an inner and an outer plate for each port, each
held in place by four sheet metal screws. The rear port
is located on the lower left section of the cabinet’s rear
panel, while the side port is on the left panel of the cabinet. Cut the insulation out of the uncovered hole with a
sharp utility knife. You may discard the plates, but save
the screws.
c. The outside air duct is shipped with a cover plate
over its access port for side venting. If your installation
will be side venting, remove the cover plate from the
side of the air duct and re-fasten it over the rear-venting
access port. (Fig. 50)
e. Loosely fasten the air duct to the shroud with two
screws (one upper front and one lower rear). Place a
level on the Outside Air Duct and level it before tightening these two screws.
f. Mark on the shroud the locations where you will drill
the four remaining holes to fasten the Outside Air Duct
(two upper and two lower holes). Remove the duct
from the shroud and drill holes in the shroud with a
1/8” (3 mm) drill bit. Install the Outside Air Duct on the
shroud using a total of eight screws. Check the level of
the Duct once more before tightening the screws.
5. Move the Fire Chamber all but a few inches into
its installed position.
FIREPLACE SYSTEM ONLY:
Push the Fire Chamber into the cabinet, leaving about
2”-3” (51 - 76mm) between the upper shroud flange and
the front face of the cabinet. Remove the pallet.
6. Connect the Outside Air Duct to the Air Box.
FIREPLACE SYSTEM ONLY:
After final installation of the WinterWarm into the cabinet, slide the outside air duct into the 4” (102mm) diameter access port either in the rear or on the side of the
cabinet (depending on your preferred location for the
outside air delivery system), orienting the duct parallel
to the floor. (Fig. 51) Continue to insert the duct until its
crimped end plugs into the corresponding port in either
the rear or the side of the air box. Attach the air duct
flange to either the rear or the side of the cabinet with
the four remaining screws.
Complete the outside air adapter installation by securing the flange to the pipe. Drill 1/8” (3mm) holes in the
pipe through at least two of the four flange holes and
secure with sheet metal screws.
Air Box
Flange
3” (75mm) Air
Tube
Fig. 50 The outside air duct box may be vented to the rear,
as shown here, or from the side.
Side-vent Cover Plate
KT227
d. Position the Outside Air Duct against the left side of
the shroud so that its control rod extends to the front.
The rod must be passed throught the latticework panel
when you install the front. (Refer to Page 32, Step 7)
2000941
Flue Collar
Shroud
Air Box
Air Tube
KT228
Fig. 51 The final connection of the outside air duct to the air
box is made once the fire chamber is in its final position.
Flange
33

WinterWarm Fireplace Insert or System
1
2
3
4
5
Prepare and Install the WinterWarm Front
Do not remove the WinterWarm Front from its shipping container until the directions indicate to do so. The
installation of the front is much easier if you partially
assemble some of the components before removing it
from the container.
Refer to the Figure 52 for the location in the shipping
container of the various parts. Also clear a “grab-space”
nearby where you can keep handy the tools you’ll be
using (Phillips-head screwdriver, 11/32” (9mm) wrench,
7/16” (11mm) wrench, 9/16” (14mm) wrench and utility
knife) as well as the various parts you’ll be removing.
Top Grille
Spandrel
Steelband
Packing
Strap
Fig. 52 The WinterWarm front and its related parts are shown
here after three separate boxes containing the mantel and
latticework panels have been removed. For easiest assembly
and installation, follow the sequence of the directions exactly.
WinterWarm Front
1. Open the Shipping Container.
securing the shipping container and then remove
its top. Among the parts you’ll see in the box is the
WinterWarm front (lying face down) a bubble-pack of
parts, and boxes containing the mantel and latticework
panels. To orient yourself for the following directions,
stand so that the bubble pack is nearest your feet and
the solid top cross-piece of the front (the “spandrel”) is
farthest away.
2. Unpack the Mantel, Latticework Panels, and Air
Dividers. Remove the large box on top containing the
mantel, and the two boxes beneath it containing the
latticework panels, and set them aside. Also remove
the two air dividers that are packed in the edge of the
carton next to the top of the front.
Air Dividers (Do
not overlook
them!)
Mantel End
Cap
Electric Cable
Hardware Pack
Mantel End Cap
FP1130
Remove the straps
3. Loosen the Bolts in the Spandrel and the Top
Grille. The solid top cross-piece of the front (the “span-
drel”) is attached to the column sides with four bolts,
two per side. Also, the top grille of the front is secured
to the spandrel with two bolts. These fasteners should
be loosened (not removed) while installing the front so
that it will be easier to align the sides. These bolts must
be re-tightened once the sides are in their permanent
position.
4. Remove the Packing Straps and Discard Them.
These flat steel bars are secured by one bolt on each
side to the base of the column. Once you have removed the bolts, lift the top of the WinterWarm front
and drag it slightly forward until it rests on the edge of
the shipping carton. This will create enough room in the
carton to slide the packing straps off the bottom of the
front column. The packing straps will not be used again
and may be discarded.
5. Unpack the Remaining Parts.
Slice open the bubble pack with your utility knife and
remove the electric cord, the hardware package, and
the two mantel end caps.
Open the boxes containing the mantel and latticework
panels and remove the contents. Set all of these items
aside.
6. Empty the Contents of the Hardware Package
onto your Grab Space.
7. Attach the Front to the Fire Chamber.
With assistance, lift the front into position against the
Fire Chamber, starting with the left side. Move it behind
the protruding load door hinge halves. Swing the right
side into position.
It may be necessary to adjust one of the levelling
screws to align the clevis of the front to the fire chamber.
Control
Rod
Correct
slot is
5th from
bottom
KT226
Fig. 53 To find the correct space in the latticework panel for
the outside air control rod, locate the second vertical row of
“diamonds” from the left and count five spaces up from the
bottom.
Latticework Panel
34
2000941

WinterWarm Fireplace Insert or System
If you have installed the optional outside air kit, pass
the control rod through the latticework at this time. (Fig.
53)
Seat the front against the Fire Chamber assembly, and
attach with the six 1/4-20 X 3/4” (19mm) hex head cap
screws and washers that are provided. There are two
for each side and two for the top.
Make sure the front seats properly before tightening
the cap screws; the edge of the front should be almost
even with the side and top plates, protruding no more
than 1/16” (2mm).
Tighten the left and right sides before tightening the top
screws. Tighten the cap screws that attach the upper
grille. NOTE: If the front has been installed too far forward, the door gasket may not make the required seal
and the fire may be difficult to control.
Step 8. Attach the Rheostat Rod Linkages
Untape the rheostat linkage rod from the left side of the
firechamber. Remove the nut from the threaded end.
Insert the rod end into the drilled hole in the rheostat lever. The rheostat box is located on the inside of the left
front column. Thread the rod nut back on and tighten.
NOTE: The rheostat lever must be tilted towards the
outside of the left column in order to attach the nut.
After connecting the linkage, the lever must be tilted
towards the inside of the column before installing the
left column air divider. It remains in this inside position
during operation. (Fig. 54)
9. Connect the Wiring.
The two-pronged cable for column fans and the fourpronged wireway cable connect to the metal wire boxes
on each side of the front with snap connector plugs, two
on each side. The power cord must be plugged in as
well.
First expose the receptacle for the power cord by removing the metal plate on the wire box. It is secured by
two Phillips pan head machine screws. Also remove the
nylon cord set clamp from the top of the spacer on the
left wire box, and lay it aside for completing this step.
NOTE: The power cord always connects to the wire
box on the left side in Fireplace System installations.
For Fireplace Insert installations, it may connect to the
wire box on either the right side or the left.
Next, plug the power cord into the wire box receptacle.
Secure the cord by slipping the nylon cord set-clamp
over the cord and fastening it to the top of the spacer
with a 1/2” (13mm) Phillips pan head machine screw.
For Fireplace Insert installations that have the power
cord connected to the right side, mount the nylon cord
clamp and spacer on the right wire box rather than the
left.
Connect the two-pronged column fans plug and the
four-pronged wireway plug to the wire boxes on both
the right and left sides. (Fig. 55)
2-Prong
Fan Plug
Rheostat Rod
Linkage
Rheostat Lever
Rheostat Rod
Nut
Rheostat Box Shaft
Power Cord
4-Prong “Wireway” Plug
2-Prong Column Fan Plug
Spacer
FP1131
Fig. 54 The rheostat lever must be tilted first toward the outside of the left column to attach the nut, and then tilted toward
the inside of the column before installing the left column air
divider.
Nylon Clamp
2000941
4-Prong Wireway Plug
Fig. 55 The snap connectors only fit their respective sockets.
FP1132
Plug the power cord into its electric service receptacle,
either a wall outlet in Fireplace Insert installations, or
into the cabinet junction box in Fireplace System installations. FIREPLACE SYSTEM NOTE: Remember,
connect the power cord to the UPPER receptacle in the
cabinet junction box. The lower receptacle will not be
live unless you are using the optional Cabinet Convection Blower Kit.
If you are unsure of how to make any of these connections contact your local Vermont Castings’ Authorized
Dealer.
35

WinterWarm Fireplace Insert or System
10. Install and Adjust the Controls.
The rods that operate the WinterWarm’s primary air,
fan, and damper should be installed before mounting
the column capitals and mantel. Two of the rods are
1/4” (6mm) and are controls for the fan and the primary
air. The third rod is 3/8” (9mm) and controls the damper.
Install the rods by following this procedure: (Fig. 56)
Blind-Tapped Hole
Control Lever
Brass
Knob
1/2” (13mm)
Through-Tapped Hole
L-Bracket
Fig. 56 Adjsut the controls so the primary air control rod, on
the top, overhangs the fan control rod by 1/2” (13mm)
FP1133
• Tighten the two hex nuts against the levers. The pri-
mary air and fan controls will be offset 1/2” (13mm)
to allow for smooth adjustment.
11. Install the Air Divider.
Install the two vertical
sheet metal air dividers
which guide the incoming
and outgoing convection
air. (Fig. 57) They are not
interchangeable: the curved
flange goes downward and
faces the firebox. The two
punchouts go toward the
front.
Angle the front edge into
position in the notch at the
top of the column, while
guiding the curved flange at
the bottom so that it slides in
on top of the curved horizontal flange that is cast into the
firebox side.
The top edge of the air
Fig. 57 Seat the entire
length of the air divider
in the notch between the
bosses shown here as a
dotted line.
Air
Divider
FP1134
• Check for proper position of the hex nuts on the
threaded rods. The larger hex nut on the 3/8” (9mm)
diameter rod should be positioned all the way to the
end of the thread on the longer of the two threaded
ends. The two smaller hex nuts on the 1/4” (6mm)
rods should be positioned as follows: One should
be positioned as far up the thread as possible; the
other should stop approximately 1/2” (13mm) from
the end.
• Install the fan control rod by inserting the 1/4” (6
mm) diameter rod with the nut all the way at the end
of the thread into the bottom control lever on the
WinterWarm’s left side. Install the rod all the way up
to the nut.
• Tighten the hex nut against the lever.
• Thread the two remaining control rods into the re-
maining two control levers. The lever above the fan
control accepts the remaining 1/4” (6mm) rod; this is
the primary air control. The lever on the right side of
the WinterWarm accepts the 3/8” (9mm) rod; this is
the damper control.
When installing the damper rod, look from above at the
damper linkage. Note that the linkage should be flexed
towards the rear. Make sure the linkage is in this orientation. The damper will not operated properly with the
linkage flexed to the front.
Cast WinterWarm Flange
3. Push in
Air Divider
Flange
2. Adjust
Bottom
Here
Boss
Fig. 58 1. Seat entire length of air divider in notch. 2. Adjust
the seated air divider so its bottom flange is just above cast
flange of WinterWarm. 3. Push the opposite side of the air
divider so it snaps into place.
Here
1. Seat Here
Notch
FP1135
divider must be flush with the top of the boss in the cast
column, as shown in the circled area in Figure 58.
Push the rear edge in until the air divider is perpendicular to the column.
• Thread each rod into the lever until it reaches the nut.
36
2000941

WinterWarm Fireplace Insert or System
12. Move the Entire Unit the final few inches into
the Cabinet.
Move the WinterWarm the final few inches into the
cabinet, making sure the surround panels are properly
aligned. If you are using the CFM Corporation Flex
Connector System, reach up into the flue collar area
to grasp the Starter Piece and pull it down into the flue
collar. Bend the retaining tabs 90° against the bottom of
the flue collar.
13. Install the Latticework Panels.
The two panels are not interchangeable. Each is labeled with a designating letter cast into the iron next to
the tab — “L” for left and “R” for right. The corner cutouts must be positioned on the back edge. The panels
are anchored at the bottom by a single tab that is
bolted on. (Fig. 59) At the top, the panels are retained
by the overhang of the mantel.
Latticework
Panel
15. (Fireplace Systems only) Install the Plinth.
The plinth assembly consists of a pre-assembled plinth
center and front, two plinth end caps, two plinth connectors, and six hex head screws (1/4-20 x 1/2” (13mm).
Invert the plinth center and front assembly on a flat
surface. Unpack the two end caps and invert them also,
placing one at each end. Make sure the decorative
fronts of the end caps are in line with the front of the
plinth. (Fig. 60)
Place the stem end of the plinth connector on the plinth
Preassembled
Plinth Center/
Front
Preassembled
Plinth Center/
Rear
Plinth Connector
Hex
Head
Screws
Plinth End
Cap
Corner Cut-out
Bolted-on Tab
Fig. 59 A single tab at the bottom anchors the latticework
panel, while the top of the panel is held in place by the mantel
overhang.
FP1136
Lower the panel and seat it on the base so the anchor
tab locks behind the rib cast in the base plate. Secure
it in place temporarily by holding it or with tape until the
mantel is installed.
14. Install the Mantel.
Place the mantel flat side down on the floor. Lift the
mantel slightly and slip the drilled and tapped ends
of the column capitals under each end of the mantel.
Align the two tapped holes in each capital with the two
holes in each end of the mantel, and thread in two 3/4”
(19mm) hex head cap screws and two washers. Do not
tighten these cap screws with a wrench; leave them
finger tight. Use care during this assembly process,
especially with enamelled parts. Forcing the mantel or
capitals into position may cause chipping or cracking.
Install the mantel and capital assembly by raising it
into position and tilting it to the rear against the upper
shroud flange, with the flange on the shroud in front
of the back rib on the mantel. Push against the flange
slightly before lowering the front edge of the assembly
onto the upper trim piece.
FP1137
Fig. 60 Before attaching the end caps, make sure their
decorative fronts line up with the front of the plinth.
with the connector hole centered over the tapped hole
in the plinth. The other two holes in the plinth connector should line up with the two tapped holes in the end
caps. (If they do not line up, remove the plinth connector and flip it over.)
Repeat this process for the other side. Attach the plinth
connectors with the six (6) hex head cap screws provided.
Set the assembled plinth in the upright position, in front
of and centered on the WinterWarm. Adjust the levelling
bolts on the bottom front of the fire chamber so that the
plinth will fit, slide the plinth into its final position, and
center it. Adjust the levelling bolts downward to lower
the WinterWarm onto the plinth.
Step 16. Replace the Ashpan and Ash Door, Front
Grate Bars, Bottom Grate and Load Door.
2000941
37

WinterWarm Fireplace Insert or System
119
119
124
119
120
50
49
46
45
47
47
46
57
66
31
40
30
7
34
127
39
17
32
33
32
18
17
27
22
26
28
25
128
24
29
140
11
41
8
23
19a
21
19
104
57
96
98
97
102
99
88
13
88
56
99
101
81
103
105 36
90
92
94
93
89
94
67
68
69
65
140
125
59
6
3
59
12
5
54
36
12
1
111
113
112
75
105
14
106
54
7
34
34
15
40
57
2
76
2
73
85
66
2
62
2
63
72
71
34
34
79
135
33
133
60
61
60
37
55
35
38
126
38
53
52
52
53
51
57a
54
58
59
84
134
135
52
83
56
117
118
129
109
108
107
121 Assembled
(120 + 117 + 124)
123
4
115
114
110
7
54
54
86
131
13
64
54
2
10
9
141
CFM Corporation reserves the right to make changes in design, materials, specifications, prices and discontinue colors and products at any time,
without notice.
WinterWarm Large Insert
Model 2100
38
0941
2000941

WinterWarm Fireplace Insert or System
WinterWarm Large Insert
Model 2100 (continued)
Item Description Part Number
1. Bottom Only 1301150
2. 5/16 Fiberglass Medium Density (sold by the foot)
1203588
3. 3/8-16 x 2” Hex Head Leveller Bolt 1201742
4. 1/4-20 x 5/8” Phillips Flat Head Screw 1200865
5. Left Fan Heat Shield 1301151
6. Right Fan Heat Shield 1301152
7. 1/4-20 x 1/2” Hex Head Cap Screw 1201338
8. 1/4-20 x 1/2” Phillips Round Head Screw 1200894
9. Ash Grate 1301256
10. Bar Grate 1301275
11. Left Side Firebox 1301280
12. Half Hinge, Body Upper 1604281
13. 1/4-20 x 1/2” Hex Head Leveller Bolt 1201347
14. Right Side Firebox 1301264
15. Damper Door Interlock 1301299
16. Interlock Door/Damper Wire 1601568
17. 1/4-20 x 1³⁄₄” Phillips Flat Head
Screw Black 1200830
Primary Air Box Assembly
(Includes Item #’s 7,8, and 18 thru 34) 5000343
18. Primary Air Box 1301281
19. Thermostat Assembly 5005470
19a. Friction Spring 1201846
20. Jump Ring 1201985
21. Thermostat Disc 1301269
22. 1/4-20 x 5/8” Phillips Round Head Screw 1200896
23. Washer, Flat 1/4 #304 SS
.294 id x .63 od x .047 Thick 1202471
24. Ball Chain Fitting 1201972
25. #6 Nickel Ball Chain, 21 Balls,
Attach Chain @ 19 Balls (sold by the foot) 1201960
26. Thermostat Valve 1301268
27. Thermostat Flap 1301265
28. 7/16 x 5/8” Cotter Pin 1203027
29. Thermostat Flat Wire 1604503
30. Thermostat Acutator 1301258
31. 1/4-20 x 1/4” Socket Set Screw 1200417
32. Bell Crank 1301263
33. Crank Pin 1600524
34. Damper Tab 1601488
35. Thermostat Control Arm 1301284
36. 1/4-20 Plain Hex Nut 1203210
37. 3/8-16 Threaded Should Bolt,
1/2 x 1¹⁄₄” Body 1201319
38. Washer, Flat 1/2 SAE 1202491
39. Lower Thermostat Wire Link 1604501
40. #8-32 Hex Top Lock Nut 1203275
41. Upper Thermostat Wire Link 1604502
42. 5/16” Hole Plug 1201899
43. Firebox Back 1301251
2000941
Item Description Part Number
44. Secondary Thermostat 1601489
45. 10-24 x 1/4” Phillips Pan Head Screw 1200980
46. Secondary Air Flap 1601490
47. Shim Ring, 18 Ga Nickel 1201986
48. Secondary Air Link 1601486
49. Secondary Air Coverplate 1604505
50. 1/4-20 x 3/8” Phillips Pan Head Screw 1200993
51. Firebox top 1301253
52. Control Shim 1604338
53. Control Spacer 1201781
54. Washer, Standard Flat 1/4 - Z
.313 od x .742 od x .06 Thick 1202474
55. 1/4-20 x 1” Hex Head Cap Screw 1201326
56. Gasket, 1/2” Low Density Black
(sold by the foot) 1203564
57. Tie Rod Set (includes 4 of 1601640
Tie Rods & 4 of 1203210 Plain Hex Nuts) 5007499
57a. 1/4-20 Top Lock Hex Nut 1203213
58. Flue Collar 1301276
59. 1/4-20 x 3/4” Hex Head Cap Screw 1201374
60. Refractory Assembly
(Includes #1602511 Access Panel) 1602510
61. Catalyst (Old PN 1602505 in a carton) 30001152
62. Lower Fireback 1301252
63. Upper Fireback 1301260
Upper Fireback & Damper Assy
(Includes Items #7, 34, 36, 63, 65,
69 to 72, 79 to 82) 5000044
64. 1/4-20 x 1” Hex Head Cap Screw - Black 1201376
65. 1/4-20 x 1¹⁄₂” Hex Head Cap Screw 1201386
66. 1/4-20 Nut Plate 1203105
67. Left Throat 1301296
68. Right Throat 1301297
69. Throat Clamp 1301298
70. 1/4-20 Square Nut 1203329
71. Damper 1301259
72. Gasket, 3/6” Low Density 6ND
(sold by the foot) 1203589
73. Damper Operating Rod 1604522
74. Washer, Thick Flat
.52 id x .875 od x .085 Thick 1202492
75. Damper Swing Arm 1301282
76. 3/16 x 1” Stainless Steel Damper Rod Pin 1201839
78. Washer, Flat 3/8 - Z
.442 id x 1 od x .074 Thick 1202488
79. Damper Swing Arm Retainer 1301270
80. Washer, Narrow Flat 1/4
.275 id x .5 od x .063 Thick 1202475
81. 1/4-20 x 3/4” Socket Head Cap Screw 1200461
82. 1/4-20 x 1
83. Damper Actuator Link Stop 1604507
84. Damper Actuator Link 1301283
85. Damper Rod Retainer 1301271
86. Door Air Manifold 1301274
Door Assembly (Includes Item #’s 13, 56,
87 to 92, 94 to 99, 101, 102, 103, 105) 5006079
¹⁄₄” Socket Set Screw 1200446
39

WinterWarm Fireplace Insert or System
WinterWarm Large Insert
Model 2100 (continued)
Item Description Part Number
87. Door 1301257
88. Half Hinge, Door (No pin) Upper 1604280
89. Glass Cassette (Approx. 22” x 13”) 5002617
90. Gasket, 3/16 Fiberglass 4ND Black 1203556
91. Glass Retainer, Lower 1601403
92. Glass Retainer, Upper (2 required) 1601409
94. 10-24 x 3/8” Phillips Pan Head Screw 1200985
95. Brass Trim, Top 1402504
96. Brass Trim, Left 1402505
97. Brass Trim, Upper Right 1402507
98. Brass Trim, Lower Right 1402508
99. 8-32 x 1/2” Phillips Flat Head Screw 1202041
101. 8-32 x 1
(Upper Brass Trim -Center Screw) 1202045
102. Handle Stub Assembly w/Shaft, Gold 5004273
103. Pawl Assembly Short Adjustment 30002362
104. 1/4-20 x 3/16” Socket Set Screw 1200415
105. 3/8-16 Top Lock Hex Jam Nut 1203290
106. Striker Plate 1301273
107. Ash Pan Assembly
(Includes Item #’s 108, 109) 5005746
108. Ash Pan Only 1601025
109. Ash Pan Cover with Handle 1601027
110. Ash Pan Bracket 1601039
111. Ash Pan Swing Pin, 3/8” od 1600523
112. 3/8-16 Hex Jam Nut 1203157
113. Washer, Narrow Flat 3/8 1202560
¹⁄₄” Phillips Flat Had Screw
Item Description Part Number
114. Ash Pan Door Clamp 1301272
115. Decorative Ash Door 1301277
116. 1/4-20 x 5/8” Hex Head Cap Screw 1201372
117. Shroud Top 1402445
118. Shroud Flue Connector Plate 1403363
119. #10 x 1/2 Phillips Pan Head
Sheet Metal Screw - Black 1202058
120. Shroud Sides and Back Assembly 1402450
121. Shroud Assembly
(Includes Item #’s 117, 120, 124, 119) 5000043
123. Shroud Bottom 1402448
124. Outside Air Cover 1402453
125. Wireway Assembly 5002779
126. Rheostat Contol 1301255
127. Lower Rheostat Wire Link 1604511
128. Upper Rheostat Wire Link 1604512
129. Spark Screen (Inserted in Door
after removing glass cassette) 1206343
131. Listing Label, UL, ULC, EPA, Safety N/A
133. Wire Handle 1/4” Diameter
(Fans & Thermostat) 1604504
134. Wire Handle 3/8” Diameter (Damper) 1604514
135. Gold Ball for Wire Handles 1602470
140. Fan Assembly 5002771
Fan Mounting Bracket 1601244
Silicone Suspension Tubes
for Mounting Fans 1601245
Washer, Flat #10 SAE 1202423
8-32 Hex Nut 1203273
8-32 x 2” Round Head Slotted Screw - Z 1201243
141. Handle Package Fallaway 0004349
Shell Enamel Parts - WinterWarm Large Insert
Model 2100
Part Name Classic Sand Midnight
Mantel 1301278 1321278 1341278
Left Cap 1301289 1321289 1341289
Right Cap 1301290 1321290 1341290
Outer Trim 1301303 1321303 1341303
Spandrell II 30001401 30001403 30001405
Column II 30001402 30001404 30001406
40
2000941

WinterWarm Fireplace Insert or System
Appendix:Approved Chimney Components
Security Chimneys,
Ltd.
American Metal Products
Ameri-Tec Model HS
Condensation Engineering
Corp.
Vitroliner HS-2100
GSW Building Product Co.
Model SC
Metal Fab, Inc.
Model TG
Model ASHT
Selkirk Metalbestos
Model SSII
Simpson Dura-vent
Dura-Plus
Anchor/base plate
Starter
Chimney sections
Elbows
Firestops/shields
Storm collar
Caps
Wall band
Flashings
Supports
8HS-AP
NA
8HS-6
8HS-12
8HS-18
8HS-24
8HS-36
8HS-015
8HS-030
8HS-AIS
8HS-FSA
8SC
8HS-RES
8HS-SBA
8F
8FT
8HS-CSA
8HS-RSA
8H-SP
NA
8H-SCS36
8H-SCS24
8H-SCS18
8H-SCS12
8H-SCS6
8H-SEL15
8H-SEL30
8H-AJS
8H-RJS
8H-FJS
8H-WS
8H-CSC
8H-CRCA
8H-CGR
8H-CFF
8H-CFLC
8H-CFM
8H-CFH
8H-CFS
8H-SSL9
8H-SRL9
JSC 8 AP
NA
JSC 8 SA3
JSC 8 SA2
JSC 8 SA1
JSC 8 SE
JSC 8 AIS
JSC 8 FRS
JSC 8 FAIS
JSC 8 ASC
JSC 8 DRC
JSC 8 RC
JSC 8 WB
JSC 8 ATC
JSC 8 AAF
JSC 8 AF2
JSC 8 AF3
JSC 8 DCS
8TG AP
NA
8TG 36
8TG 24
8TG 18
8TG 12
8TG 6
8TG A15
8TG A30
8TG IS
8TG RSH
8TG FSA
8TG SC
8TG C
8TG RC
8TG WB
8TG F
8TG 15
8TG F24
8TG FT
8TG RS
8TG SB
8 SP
NA
8 L3
8 L2
8 L18
8 L1
8 L8
8 E15
8 E30
8 RSA
8 FC
8 CPR
8 CC
8 CPE
8BM
8F
8FPA
8FPB
8FA
8FB
8FBB
8ST
8S
8T-AP
NA
8T-36
8T-18
8T- 9
8T- 6
8T- 3
8T-EL15
8T-EL30
8T-AIS
8T-JS
8T-WS
8T-TCS
8T-SC
8T-CT
8T-WB
8T-TF
8T-AF6
8T-AF12
8T-AF24
8T-AF36
8T-RSP
8T-FSP
9201
9216
9206
9219
9214
9221/9221SS
9217/9217SS
9264
9266
9244
9946
9980A
9980B
9980C
9959
9284
9268/9268SS
9251
9249
9250
9281
9252
9262*
9260*
*Can only
accept
chimney
above it, not
below.
2000941
41

WinterWarm Fireplace Insert or System
Appendix: Catalytic Combustor
In any chemical reaction, including the combustion
process, there are certain conditions which must be
met before the reaction can take place. For example, a
reaction may require a certain temperature, or a certain
concentration of the reactants (the combustion gases
and oxygen), or a certain amount of time. Catalysts,
though not changed themselves during the reaction,
have the ability to act at a molecular level to change
these requirements. In the secondary combustion
chamber of the WinterWarm, the catalyst reduces the
temperature at which secondary combustion can start
from the 1000 - 1200°F (540 - 650°C) range to the 500
- 600°F (260 - 315°C) range, increasing efficiency, and
reducing creosote and emissions.
The catalytic reaction, though advantageous, does
have some limitations of its own. Primary among these
is that the reactants (the gases) come into close physical contact with the catalyst itself.
To ensure the necessary contact, the catalytic element
in your WinterWarm is composed of a ceramic base
in the shape of a honeycomb. On each of the honeycomb’s many surfaces a coating of the catalyst (usually
a noble metal such as platinum or palladium) is applied.
The large surface area exposed in this configuration
ensures the combustion gases have the greatest opportunity to come in contact with the catalyst.
Loss of catalytic activity will be apparent in several
ways. First you may notice an increase in fuel consumption. Second, there will be a visible increase
in the rate at which creosote builds up in your chimney connector system. You may also notice a heavy
discharge of smoke from the chimney. There are a
number of catalytic problems which can cause loss of
activity:
Blockage
While the honeycomb pattern ensures good contact, it
also increases the resistance to flow of the combustion
gases, and, because of the many surfaces, provides
more places for creosote and fly ash to deposit. It is
important to follow the operating instructions in order
to minimize these deposits, and to periodically inspect
your catalyst for signs of blockage.
Masking and Poisoning
While the catalyst itself does not enter into the combustion process, it is possible for certain elements, such
as lead and sulfur, to attach to the active sites on the
surface of the honeycomb. Though the catalyst is still
there, it is covered, or masked, by the contaminant,
and cannot function. To avoid this situation, it is important not to burn anything in your WinterWarm that
is a source of these contaminants. Particularly avoid
painted or treated wood, coal, household trash, colored papers, metal foils, or plastics. Chemical chimney
cleaners may also contain harmful elements. The safest
approach is to burn only untreated, natural wood.
Flame Impingement
The catalytic element is not designed for exposure to
direct flame. If you continually overfire your WinterWarm, the chemistry of the catalyst coating may be
altered, inhibiting the combustion process.
Thermal degradation of the ceramic base may also occur, causing the element to disintegrate. Stay within the
recommended guidelines of the Operation section.
Mechanical Damage
If the element is mishandled, damage may occur.
Always treat the element carefully. Remember the catalyst is made of a ceramic material; treat it as you would
fine china. Hairline cracks will not affect the performance of the catalyst, as long as the steel sleeve holds
the element in the proper position.
Peeling
Peeling of the surface coat may occur if the catalytic
element is frequently subjected to excessive temperatures. Follow the operating instructions carefully to
avoid this type of damage.
Every Vermont Castings’ product is equipped with either
a Corning “Long-Life”® or a Technical Glass Products
“Honeycomb”®. The products are equivalent. If for any
reason you must ship your catalytic element, remember its fragile nature. Place the element in a plastic
bag, and package it with a generous amount of shock
absorbing material.
42
2000941

Warranty
Limited 3 Year Warranty
CFM Corporation warrants that this woodburning stove will
be free of defects in material and workmanship for a period
of three years from the date you receive it, except that the
catalyst, thermostat assembly, handles, glass door panels,
cement, and gasketing shall be warranted as described
below.
Products will repair or replace, at its option, any part
found to be defective upon inspection by a CFM Corporation
Authorized Dealer. The customer must return the defective
part or the stove, with shipping prepaid, to the Authorized Deal
er or pay for any Authorized Dealer in-home travel fees or service charges for in-home repair work. It is the dealer’s option
whether the repair work will be done in the customer’s home or
in the dealer’s shop. If, upon inspection, the damage is found to
be the fault of the manufacturer, repairs will be authorized at no
charge to the customer for parts and/or labor.
Any woodburning stove or part thereof that is repaired or
replaced during the limited warranty period will be warranted
under the terms of the limited warranty for a period not to
exceed the remaining term of the original limited warranty or six
(6) months, whichever is longer.
Limited 1 Year Warranty
The following parts of the woodburning stove are warranted to
be free of defects in material and workmanship for a period of
one year from the date you receive it: The thermostat assem
bly, handles, glass door panels, cement, and gasketing. Any of
these items found to be defective will be repaired or replaced at
no charge, upon the return of the part with postage prepaid to a
CFM Corporation Authorized Dealer.
Any part repaired or replaced during the limited warranty
period will be warranted under the terms of the limited warranty
for a period not to exceed the remaining term of the original
limited warranty or six (6) months, whichever is longer.
Exclusions & Limitations
1. This warranty is transferable; however, proof of original
retail purchase is required.
2. This warranty does not cover misuse of the this stove.
Misuse includes overfiring which will result if the stove is used
in such a manner as to cause one or more of the plates to glow
red. Overfiring can be identified later by warped plates and
areas where the paint pigment has burned off. Overfiring in
enamel fireplaces is identified by bubbling, cracking, chipping
and discoloration of the porcelain enamel finish. CFM Corporation offers no warranty on chipping of enamel surfaces. Inspect
your woodburning stove prior to accepting it for any damage to
the enamel.
3. This warranty does not cover misuse of the stove as described in the Owner’s Guide, nor does it cover any stove which
has been modified unless authorized by a CFM Corporation
representative in writing. This warranty does not cover damage
to the stove caused by burning salt saturated wood, chemically
treated wood, or any fuel not recommended in the Owner’s
Guide.
-
-
WinterWarm Fireplace Insert or System
4. This warranty does not cover a stove repaired by some
one other than a CFM Corporation Authorized Dealer.
5. Damage to the unit while in transit is not covered by this
warranty but is subject to a claim against the common carrier.
Contact CFM Corporation Authorized Dealer from whom you
purchased your stove or CFM Corporation if the purchase was
direct. (Do not operate the stove as this may negate the ability
to process the claim with the carrier.)
6. Claims are not valid where the installation does not conform to local building and fire codes or, in their absence, to the
recommendations in our Owner’s Guide.
7. The salt air environment of coastal areas, or a high-hu
midity environment, can be corrosive to the porcelain enamel
finish. These conditions can cause rusting of the cast iron
beneath the porcelain enamel finish, which will cause the porcelain enamel finish to flake off. This warranty does not cover
damage caused by a salt air or high-humidity environment.
8. CFM Corporation shall have no obligation to enhance or
update any unit once manufactured.
IN NO EVENT SHALL CFM CORPORATION BE LIABLE
FOR INCIDENTAL AND CONSEQUENTIAL DAMAGES. ALL
IMPLIED WARRANTIES, INCLUDING THE IMPLIED WAR
RANTIES OF MERCHANTABILITY AND FITNESS, ARE LIM
ITED TO THE DURATION OF THIS WRITTEN WARRANTY.
THIS WARRANTY SUPERCEDES ALL OTHER ORAL OR
WRITTEN WARRANTIES.
Some states do not allow the exclusion or limitations of
incidential and consequential damages or limitations on how
long an implied warranty lasts, so the above limitations may not
apply to you. This warranty gives you specific rights and you
may have other rights which vary from state to state.
How to Obtain Service
If a defect is noted within the warranty period, the customer
should contact a CFM Corporation Authorized Dealer or CFM
Corporation if the purchase was direct with the following information:
1. Name, address, and telephone number of the pur-
chaser.
2. Date of purchase.
3. Serial number from the label on the back.
4. Nature of the defect or damage.
5. Any relevant information or circumstances, e.g., installation, mode of operation when defect was noted.
A warranty claim will then start in process. CFM Corporation
reserves the right to withhold final approval of a warranty claim
pending a visual inspection of the defect by authorized representatives.
-
-
-
-
2000941
43

CFM Corporation
2695 Meadowvale Blvd. • Mississauga, Ontario, Canada L5N 8A3
800-668-5323 • www.cfmcorp.com
© CFM Corporation
 Loading...