

Vermeiren Luna 2, Luna Basic 2, Luna UL 2 Instruction Manual
VERMEIREN
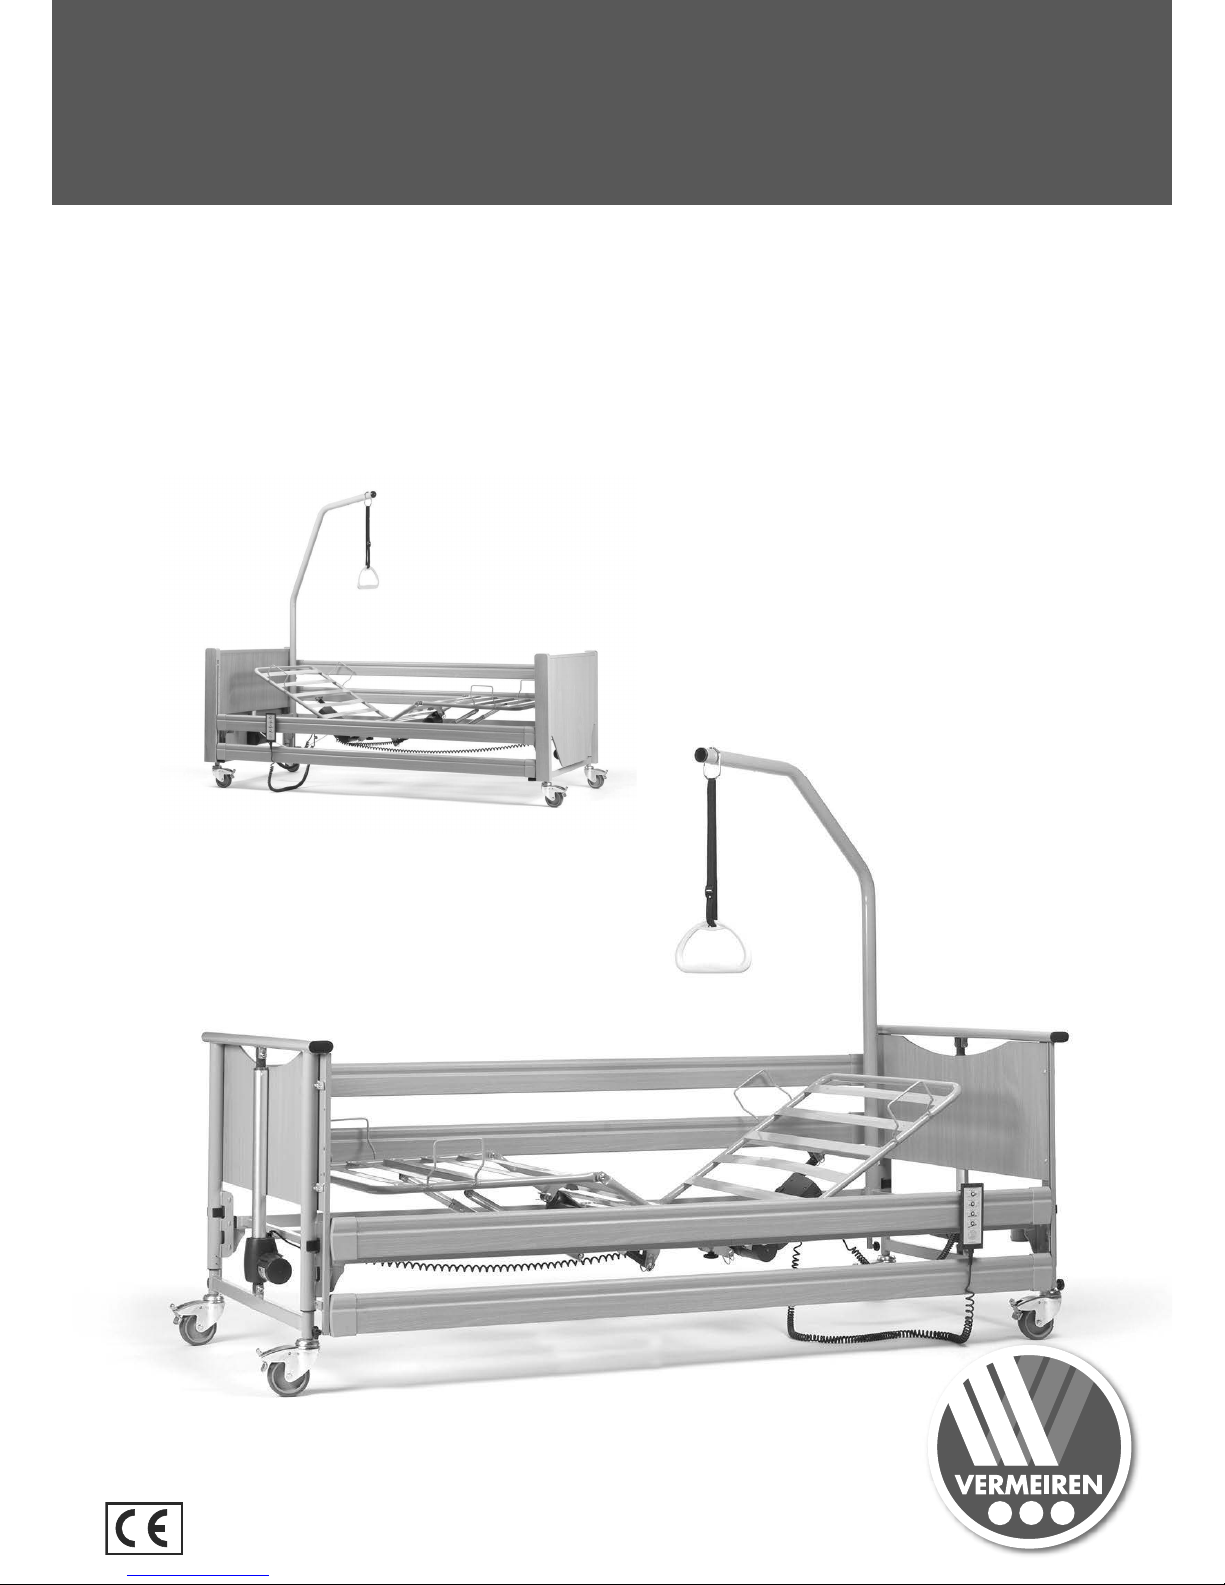
Luna 2 - Luna Basic 2
Luna UL 2
I N S T R U C T I O N M A N U A L
M O D E D ’ E M P L O I
G E B R U I K S A A N W I J Z I N G
G E B R A U C H S A N W E I S U N G
I S T R U Z I O N I P E R L ' U S O
MANUA L D E I N S T R UCC I ON E S

Instructions to the specialist dealer
This instruction manual is part and parcel of the product and must accompany every product sold.
Version: C, 2016-06
All rights reserved, including translation.
No part of this manual may be reproduced in any form what so ever (print, photocopy, microfilm or any other process) without
written permission of the publisher, or processed, duplicated or distributed by using electronic systems.
© N.V. Vermeiren N.V. 2016
Instructions pour les distributeurs
Ce manuel d'instructions fait partie du produit et doit accompagner chaque produit vendu.
Version : C, 2016-06
Tous droits réservés, y compris la traduction.
Aucune partie de ce manuel ne peut être reproduite, sous quelque forme que ce soit (imprimée, photocopie, microfilm ou tout autre
procédé) sans l'autorisation écrite du publicateur, ni traitée, dupliquée ou distribuée à l'aide de systèmes électroniques.
© N.V. Vermeiren N.V. 2016
Instructies voor de vakhandelaar
Deze handleiding is deel van het product en dient bij iedere product te worden geleverd.
Versie: C, 2016-06
Alle rechten, inclusief vertaling, voorbehouden.
Niets uit deze handleiding mag geheel of gedeeltelijk in enige vorm (druk, fotokopie, microfilm of ieder ander procedé) zonder de
schriftelijke toelating van de uitgever worden gereproduceerd of met behulp van elektronische systemen worden verwerkt,
gekopieerd of verspreid.
© N.V. Vermeiren N.V. 2016
Hinweise für den Fachhändler
Diese Gebrauchsanweisung ist Bestandteil des Produkts und ist bei jeder Produkts auszuhändigen.
Version: C, 2016-06
Alle Rechte, auch an der Übersetzung, vorbehalten.
Kein Teil der Gebrauchsanweisung darf in irgendeiner Form (Druck, Fotokopie, Mikrofilm oder einem anderen Verfahren) ohne
schriftliche Genehmigung des Herausgebers reproduziert oder unter Verwendung elektronischer Systeme verarbeitet, vervielfältigt
oder verbreitet werden.
© N.V. Vermeiren N.V. 2016
Istruzioni per il rivenditore
Il presente Manuale di istruzioni è parte integrante del prodotto e deve essere fornito assieme alla prodotto.
Versione: C, 2016-06
Tutti i diritti riservati (anche sulla traduzione).
Il presente manuale non può essere riprodotto, neppure parzialmente, con alcun mezzo (stampa, fotocopia, microfilm o altro
procedimento) senza l’autorizzazione scritta della casa produttrice, né elaborato, duplicato o distribuito con l’ausilio di sistemi
elettronici.
© N.V. Vermeiren N.V. 2016
Instrucciones destinadas a los distribuidores especializados
El presente manual de instrucciones es parte integrante del producto y se debe adjuntar a todas las producto que se vendan.
Versión: C, 2016-06
Todos los derechos reservados, incluidos los de la traducción.
Se prohíbe la reproducción total o parcial del presente manual de cualquier forma (impresión, fotocopia, microfilm o cualquier otro
procedimiento), así como la edición, copia o distribución empleando sistemas electrónicos, sin el permiso escrito del editor.
© N.V. Vermeiren N.V. 2016

Luna 2, Luna Basic 2, Luna UL 2
2016-06
Page1
Contents
Preface ................................................................................................. 2
1 Product description ................................................................. 3
1.1 Intended Use ................................................................................................................ 3
1.2 Technical specifications .............................................................................................. 4
1.3 Components ................................................................................................................. 5
1.4 Explanation of symbols ............................................................................................... 6
1.5 Accessories .................................................................................................................. 6
1.6 For your safety ............................................................................................................ 7
2 Use ............................................................................................. 8
2.1 Handset with lock function ......................................................................................... 8
2.2 Operating the steering casters ..................................................................................... 9
2.3 Strain relief ................................................................................................................ 10
2.4 Power cable ............................................................................................................... 10
2.5 Emergency lowering of the headrest ......................................................................... 11
2.6 Side railings (For Luna 2, Luna Basic 2) .................................................................. 11
2.7 Side railings (For Luna UL 2) ................................................................................... 13
2.8 Lifting pole ................................................................................................................ 14
2.9 Rastomat (when available) ........................................................................................ 14
2.10 Transfer in and out the bed ........................................................................................ 14
2.11 Transport ................................................................................................................... 15
2.12 Cable placement ........................................................................................................ 16
2.13 Remarks on electromagnetic compatibility (EMC) .................................................. 16
3 Installation and adjustment .................................................. 18
3.1 T ools .......................................................................................................................... 18
3.2 Manner of delivery .................................................................................................... 18
3.3 Assembly ................................................................................................................... 19
4 Maintenance ........................................................................... 22

Luna 2, Luna Basic 2, Luna UL 2
2016-06
Page2
Preface
First of all we want to thank you for putting your trust in us by selecting one of our products.
The Vermeiren beds are the result of many years of research and experience. During the
development, special attention was given to the ease of use and the serviceability of the
bed.
The expected lifetime for your bed is strongly influenced by the care and maintenance of the
bed.
This manual will help you get acquainted with the operation of your bed.
Following the user instructions and the maintenance instructions are an essential part of the
warranty.
This manual reflects the latest product developments. Vermeiren has the right to introduce
changes without the obligation to adapt or replace previously delivered models.
For any further questions, please consult your specialist dealer.

Luna 2, Luna Basic 2, Luna UL 2
2016-06
Page3
1 Product description
1.1 Intended Use
With the Luna 2 model, you have acquired a nursing bed that was developed entirely for
your comfort. This nursing bed offers various individual adjustment possibilities which are
explained below.
The nursing bed is designed for a single adult patient (from 12 years, up to 140 kg max).
The bed shall be used with a suitable mattress (min. RG 35, 120 mm thick, max. 20 kg)
The Luna 2 nursing bed is designed for dry indoors use on level, solid floors.
The different types of fittings and accessories, and the modular construction allow full use by
persons disabled by:
paralysis
loss of limbs (leg amputation)
limb defects or deformations
stiff or damaged joints
heart insuffiencies and poor blood circulation
balance disturbances
cachexia (decrease in muscle)
and also for aged persons.
When providing for individual requirements:
body size and weight (max. 140kg)
physical and psychological condition
residential circumstances
environment
should be taken into consideration.
The bed shall be used as application environment 4: "care provided in a domestic area
where ME equipment is used to alleviate or compensate for an injury, disability or disease".
Your bed should only be used on surfaces where all four wheels are touching the ground.
The bed should not be used as a ladder, nor is it a transport for heavy or hot objects.
When used on mats, carpeted floors or loose floor coverings, the floor covering can get
damaged and it is difficult to push over such surfaces (without patient).
Use only Vermeiren approved accessories.
The manufacturer is not liable for damage caused by the lack of or improper service or as a
result of not following instructions from this manual.
Compliance with the user and maintenance instructions are an essential part of the
guarantee conditions.
Luna 2, Luna Basic 2, Luna UL 2
2016-06
Page4
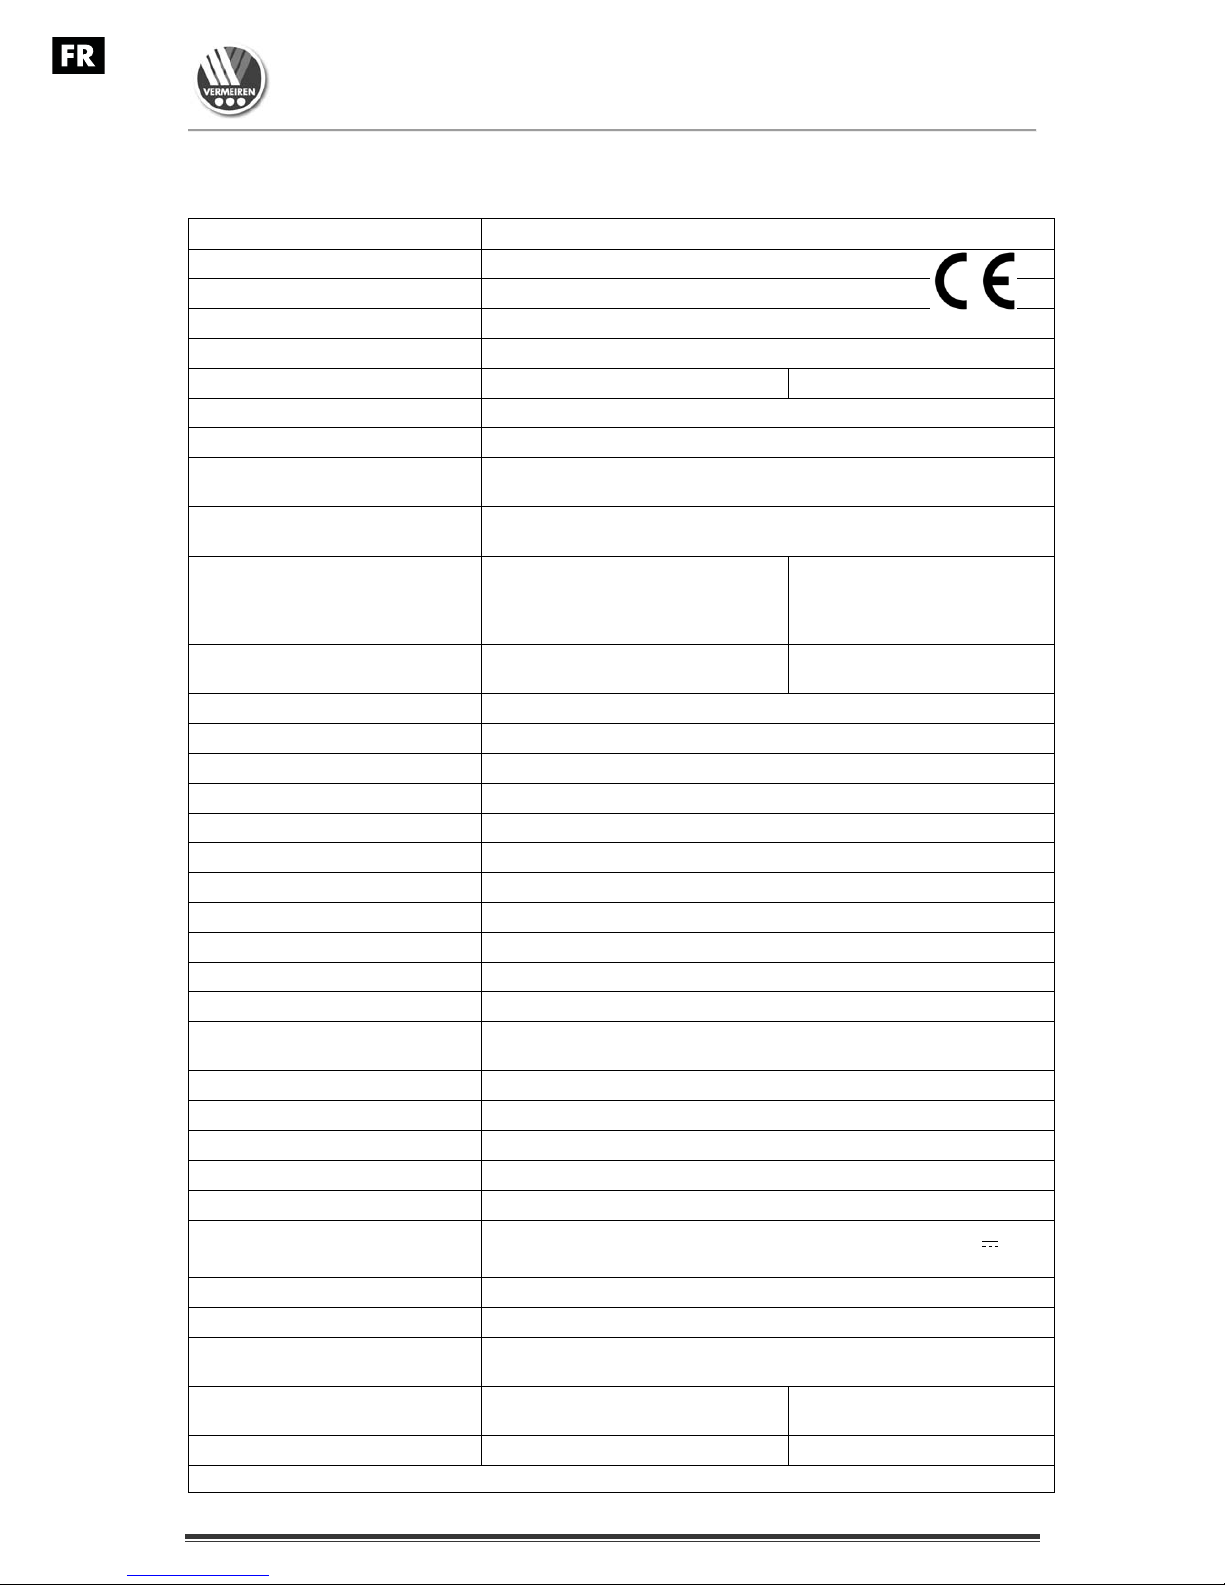
1.2 Technical specifications
Technical terms below are valid for the bed in standard settings.
If other accessories are used, the tabulated values will change.
Make
V
ermeiren
Address
V
ermeirenplein 1/15, B-2920 Kalmthout
Type bed
Model Luna 2, Luna Basic 2, Luna UL 2
Maximum occupant mass 140 kg
Description Min. Max.
Length Luna 2, Luna Basic 2: 2170 mm; Luna UL 2: 2180 mm
Width Luna 2: 1020 mm; Luna Basic 2: 1015 mm; Luna UL 2: 1025 mm
Height (without lifting pole) Luna 2, Luna Basic 2: 840 mm - 1250 mm
Luna UL 2: 726 mm - 1136 mm
Height (with lifting pole) Luna 2, Luna Basic 2: 1675 mm - 2080 mm
Luna UL 2: 1590 mm - 1995 mm
Height adjustment of the bed
surface (position 1)
Luna 2, Luna Basic 2:
335 mm (without mattress)
Luna UL 2:
205 mm (without mattress)
Luna 2, Luna Basic 2:
745 mm (without mattress)
Luna UL 2:
615 mm (without mattress)
Height adjustment of the bed
surface (position 2)
400 mm (without mattress)
Not for Luna UL 2
810 mm (without mattress)
Not for Luna UL 2
Folded length 445 mm
Folded width 935 mm
Folded height 1045 mm
Total mass Luna 2: 98,15 kg; Luna Basic 2: 83,7 kg; Luna UL 2: 96,35 kg
Adjustment of the back section 83°
Max. thigh angle 31.7°
Max. angle for lower leg -14,8°
Max. safe load 175 kg
Lifting pole Nominal load 80 kg
Mattress Min. RG 35, thickness 120 mm, 2000 x 900 mm, max. 20 kg
Under clearance for patient lift 160 mm
Steering casters (4 pieces) Luna 2, Luna Basic 2: Ø 100 mm, can be locked
Luna UL 2: Ø 75 mm, can be locked
Front part of motor LA273100-A01405040, Linak
Back section motor LA270022-00, Linak
Leg section motor LA270022-00, Linak
Handset HBW074-072, Linak
Transformer CB6404+10019, Linak
Nominal voltage, transformer
U input: 230 V
, ± 10%, 50 Hz, current: max. 1.5 A, output voltage: 24V ,
max. 70 VA
Period switched on 10%, max. 6 min/hour
Noise level < 65 dB(A)
Class / Kind of protection Protection class II, application part Type B / IP54 (spray protection)
Storage and use temperature + 5 °C + 41 °C
Storage and use humidity 30% 70%
We reserve the right to introduce technical changes. Measurement tolerance ± 15 mm / 1,5 kg / °
Table 1: Technical specifications

Luna 2, Luna Basic 2, Luna UL 2
2016-06
Page5
The bed complies to the requirements set up in:
EN 60601-2-52: Medical electrical equipment - Part 2-52: Particular requirements for the
basic safety and essential performance of medical beds
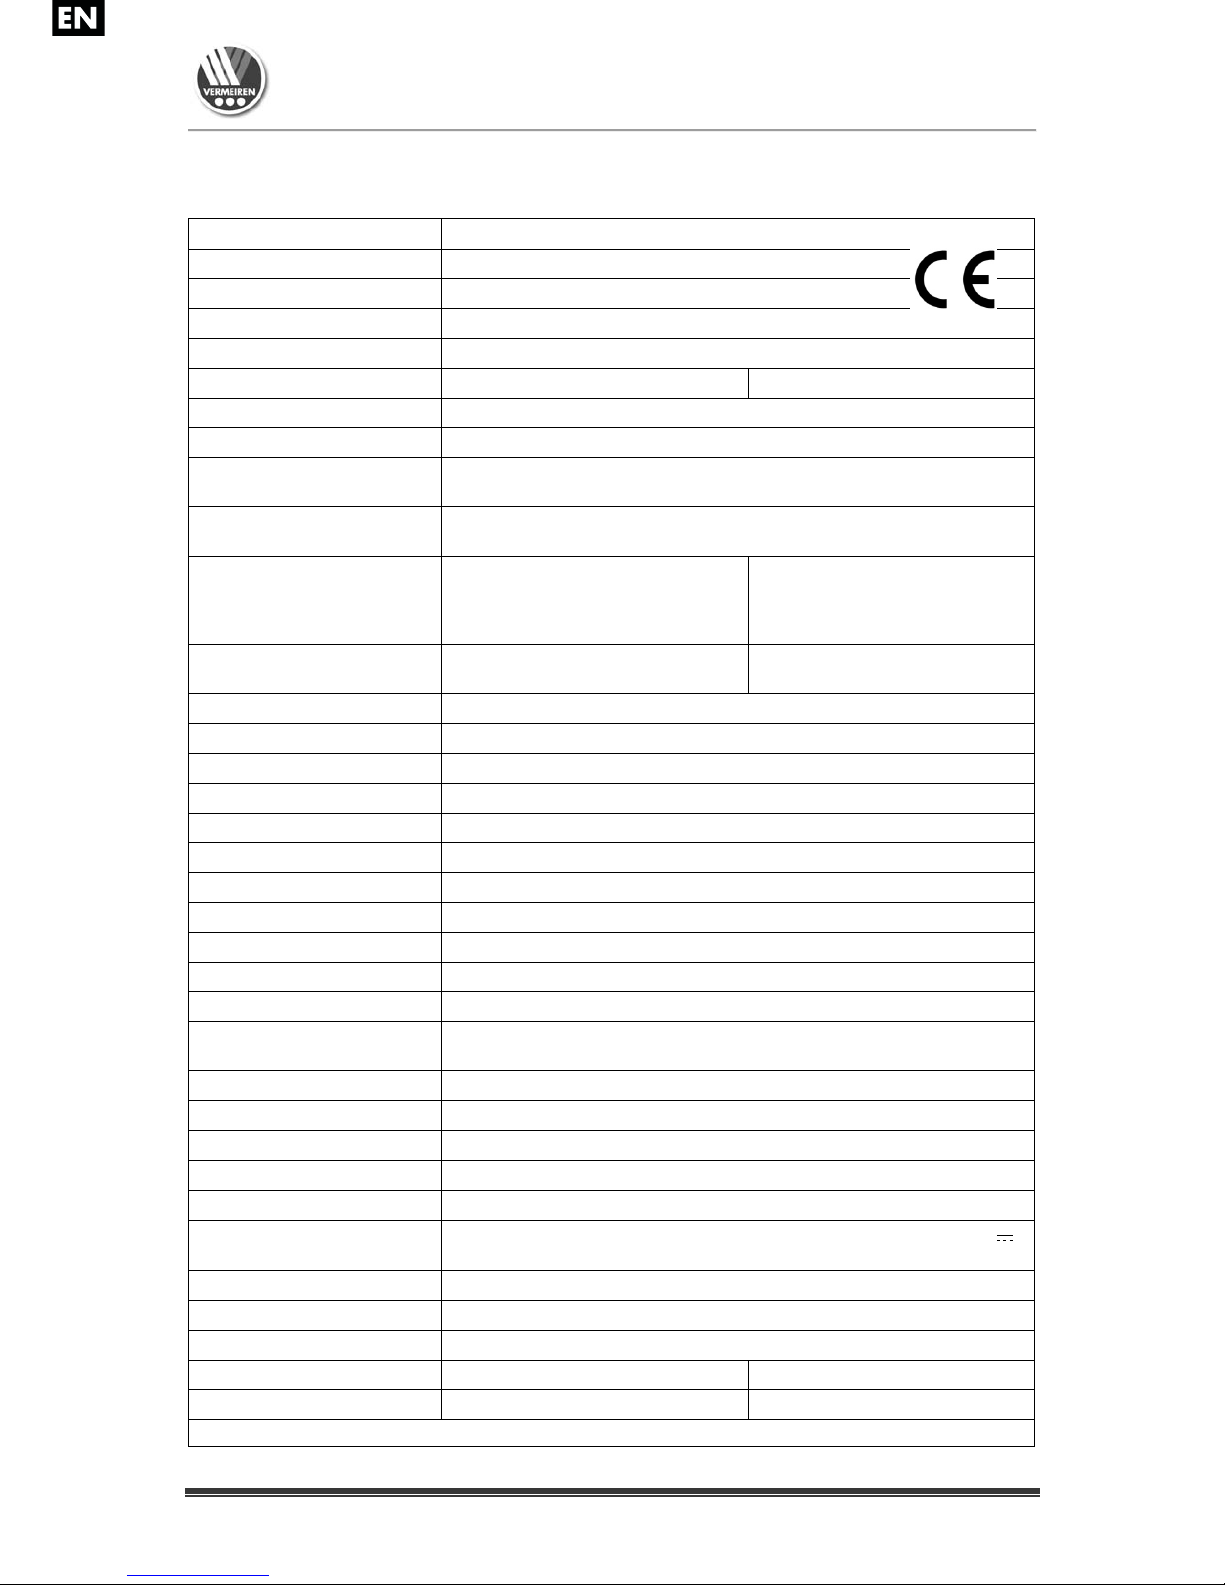
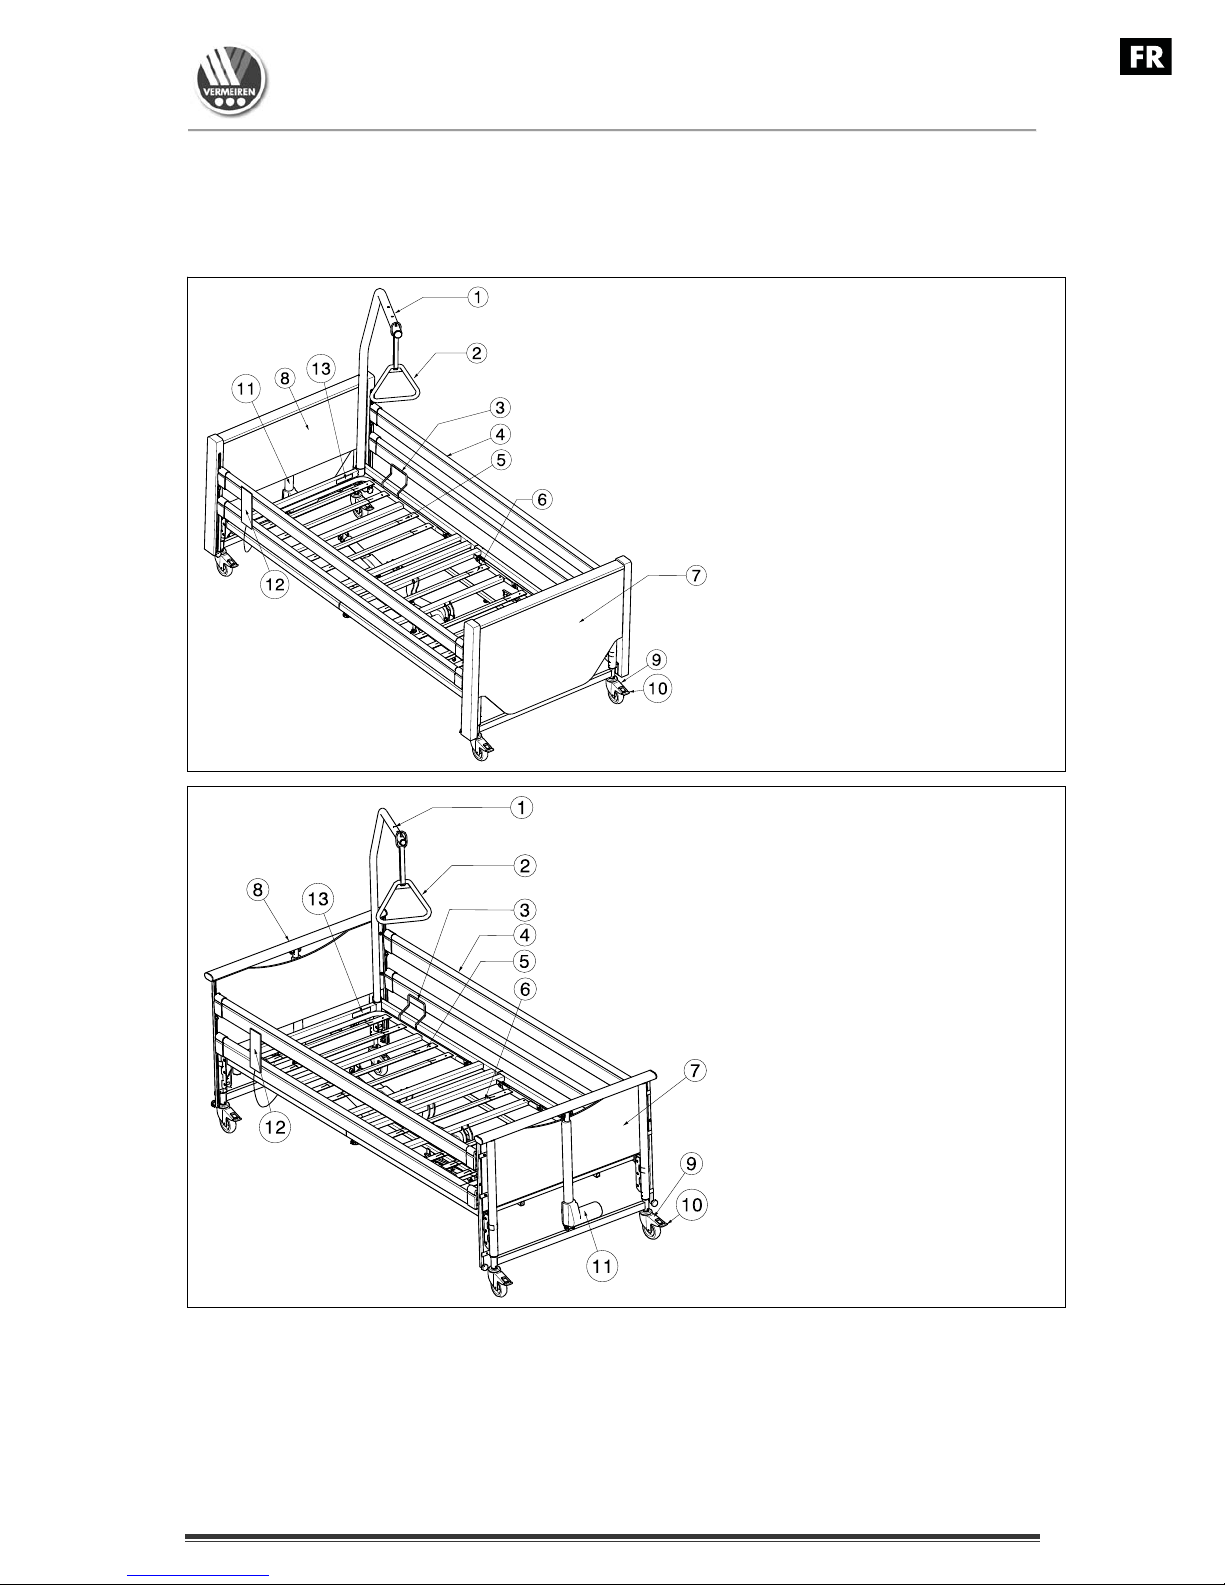
1.3 Components
1 = Lifting pole
2 = Triangle
3 = Mattress retainer
4 = Side rail
5 = Head end
6 = Foot end
7 = Foot panel
8 = Head panel
9 = Caster
10 = Wheel lock
11 = Motor
12 = Handset
13 = Identification plate
Luna 2
1 = Lifting pole
2 = Triangle
3 = Mattress retainer
4 = Side rail
5 = Head end
6 = Foot end
7 = Foot panel
8 = Head panel
9 = Caster
10 = Wheel lock
11 = Motor
12 = Handset
13 = Identification plate
Luna Basic 2
Luna 2, Luna Basic 2, Luna UL 2
2016-06
Page6
1.4 Explanation of symbols
Maximum mass
CE conformity
L Safety instructions
Observe the instructions for use
The correct procedure or method of use
Incorrect procedure or method of use
Protection class II
Type B application
1.5 Accessories
L WARNING: Precautions shall be taken if accessories not listed below are used.
Third bedside wood
F
Type designation
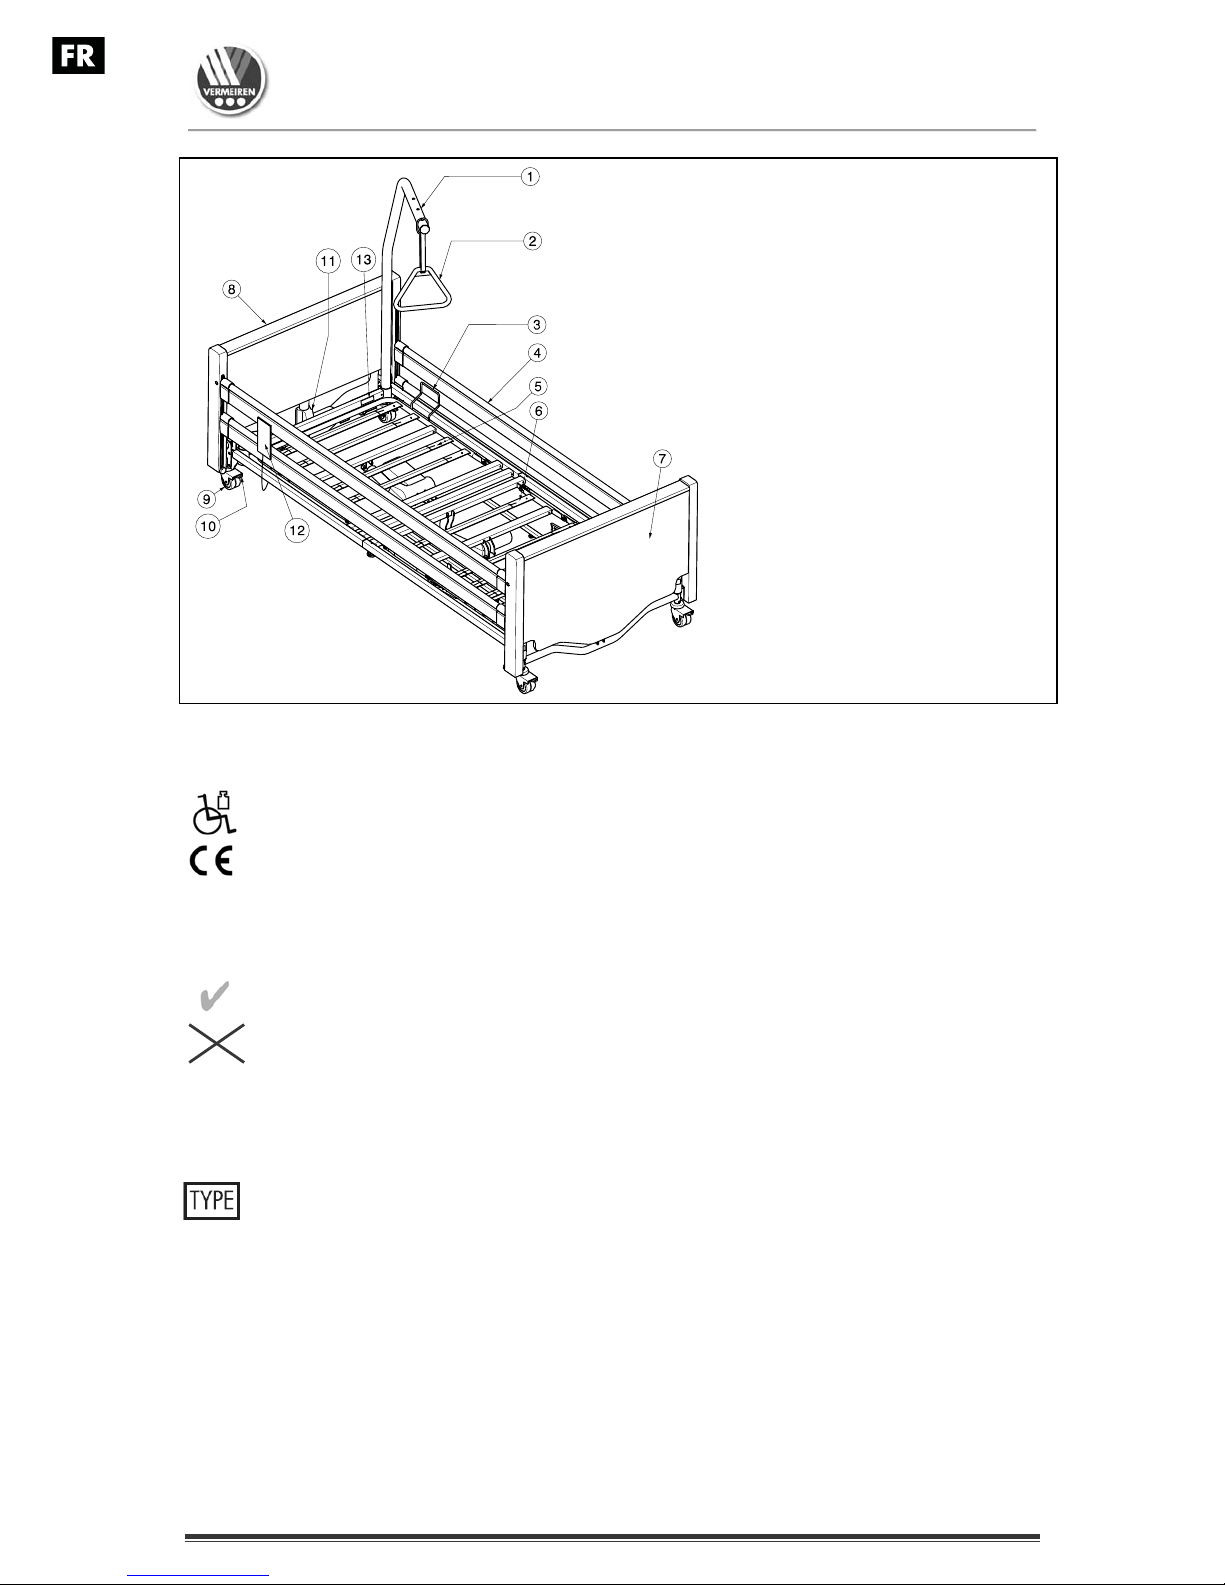
1 = Lifting pole
2 = Triangle
3 = Mattress retainer
4 = Side rail
5 = Head end
6 = Foot end
7 = Foot panel
8 = Head panel
9 = Caster
10 = Wheel lock
11 = Motor
12 = Handset
13 = Identification plate
Luna UL 2

Luna 2, Luna Basic 2, Luna UL 2
2016-06
Page7
1.6 For your safety
l Carefully read the instruction manual before using the nursing bed.
l Place and use your nursing bed only on straight and level surfaces and ensure that
all four steering castors stand securely on the floor.
l When the bed is placed in position, make sure that no obstacles are present inside
the entire adjustment range.
L If the patient is not supervised, the bed must be adjusted beforehand to the lowest
position to reduce the danger of injury by falling when getting into, getting out of, or
lying on the bed.
L If the patient is not under supervision, the side railings on both sides should be raised
to the highest position. The railings may only be lowered on one or both sides when a
supervisor is present.
L Watch your hands when assembling, disassembling or using the bed -- danger of
squashing !
L When transporting the bed, grasp it only by solid frame parts and wooden parts.
L All four steering castors must always be locked before using the nursing bed.
L Medical-electrical treatments are forbidden inside the nursing bed !
L Do not lean against or on the side railings -- danger of accidents !
L Avoid leaning out sideways with the upper body -- danger of accidents !
L Do not rest your legs on other objects -- danger of accidents !
L When adjusting hinges, joints or other clamps, make sure that no body parts or
objects are present -- danger of squashing !
L Do not place your hands between the frame and the mattress when adjusting leg or
back rests -- danger of squashing !
L Use only power sockets conforming to VDE (220 V / 230 V, 50 Hz) for plugging in.
L Plugs must only be pulled out by grasping the plug itself; never pull on the cable.
L Lock handset with locking function each time after use.
L The nursing bed must only be used in dry rooms.
L Only use mattresses which comply with the prescriptions of the bed manufacturer.
L If the lifting pole is distorted, it should be replaced.
L The side railings must be fitted even if the relevant side is situated against the wall.
L Do not undertake repairs on your own -- danger of accidents !
L Do not open any housings of the driving system -- danger of accidents !
L A patient may only be conveyed in the nursing bed when lying in the lowest horizontal
position.
L Make sure that all power cables are laid without kinks, shearing or other mechanical
damages.
L All cables should be laid without making contact with the floor and with no kinks.
L No additional mechanical or electric appliances may be used or fitted.
L Servicing, inspection, repairs and disinfection should only be undertaken by
authorized, trained persons.
L Use only genuine replacement parts of the manufacturer for your nursing bed.
L Do not exceed the maximum load of 140 kg as stated by the manufacturer.
Luna 2, Luna Basic 2, Luna UL 2
2016-06
Page8
L The use of open flames like candles or glowing objects like cigarettes is forbidden
inside the nursing bed.
L Replace the side railings if they are bent or broken, otherwise there is a risk of the
patient falling out of the bed.
L Use of your bed could influence other electrical devices (noises). Avoid using such
devices at the same time.
L Obey all safety and operational instructions.
L Electrically operated bed is placed with a distance to the power supply plug.
L The medical bed shall only be used with a hoist that can positioned under the limited
space of the medical bed.
2 Use
This chapter describes the everyday use. These instructions are for the user and the
specialist dealer.
The bed is delivered fully assembled by your specialist dealer. The instructions intended for
the specialist dealer on how to set up the bed are given in § 3.
L WARNING: Avoid squeezing from routing cables of other equipment between
parts of the medical bed.
L WARNING: The medical bed shall only be used with a hoist that can positioned
under the limited space of the bed.
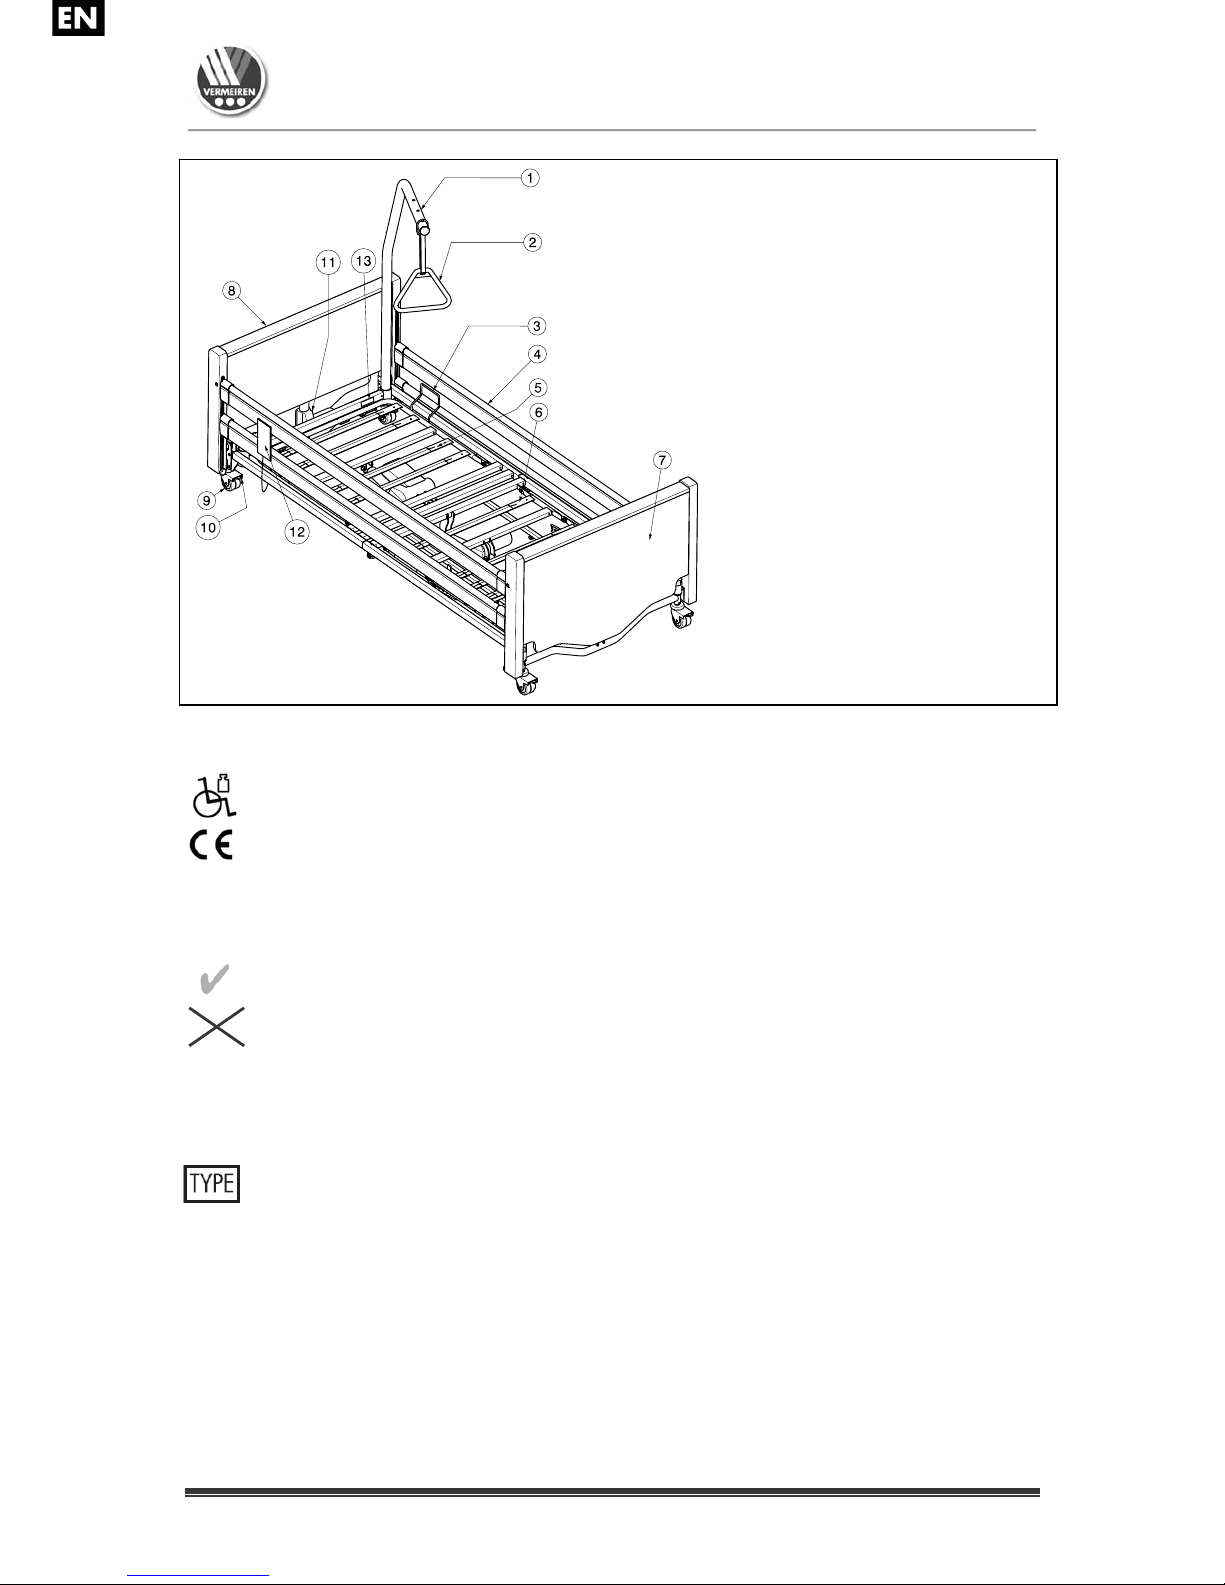
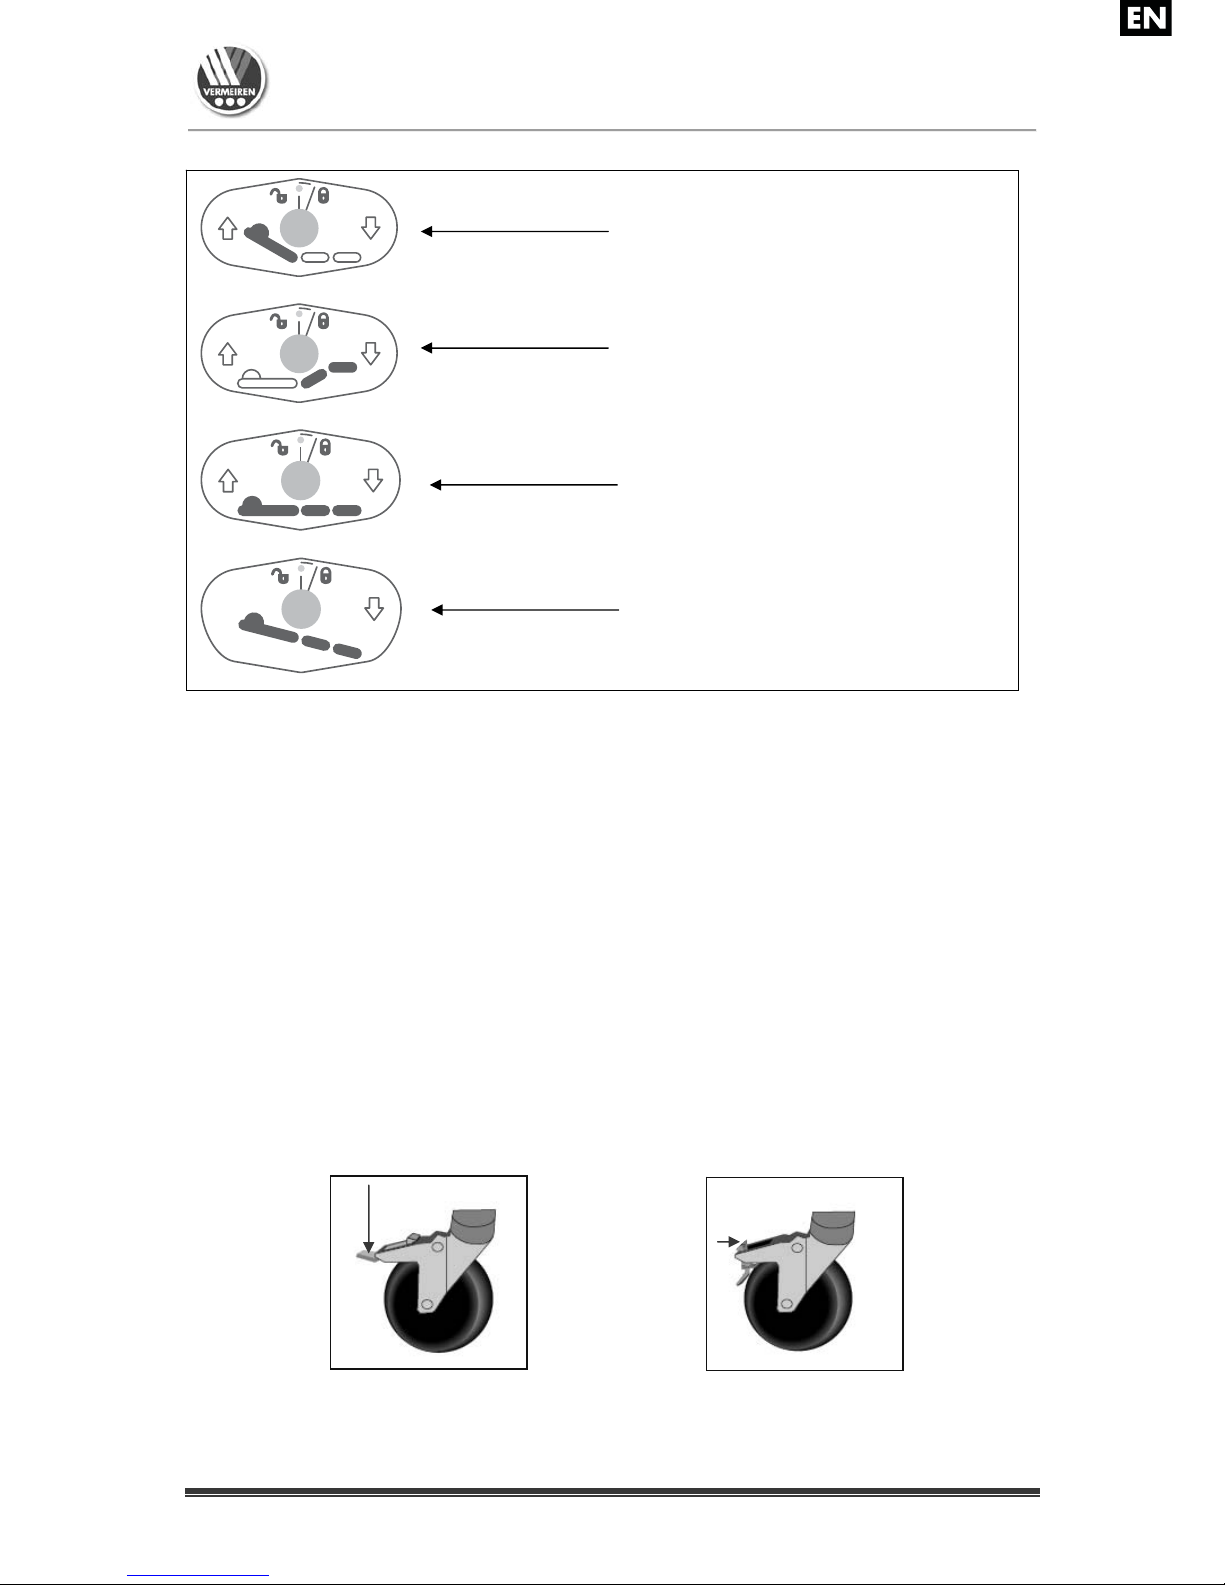
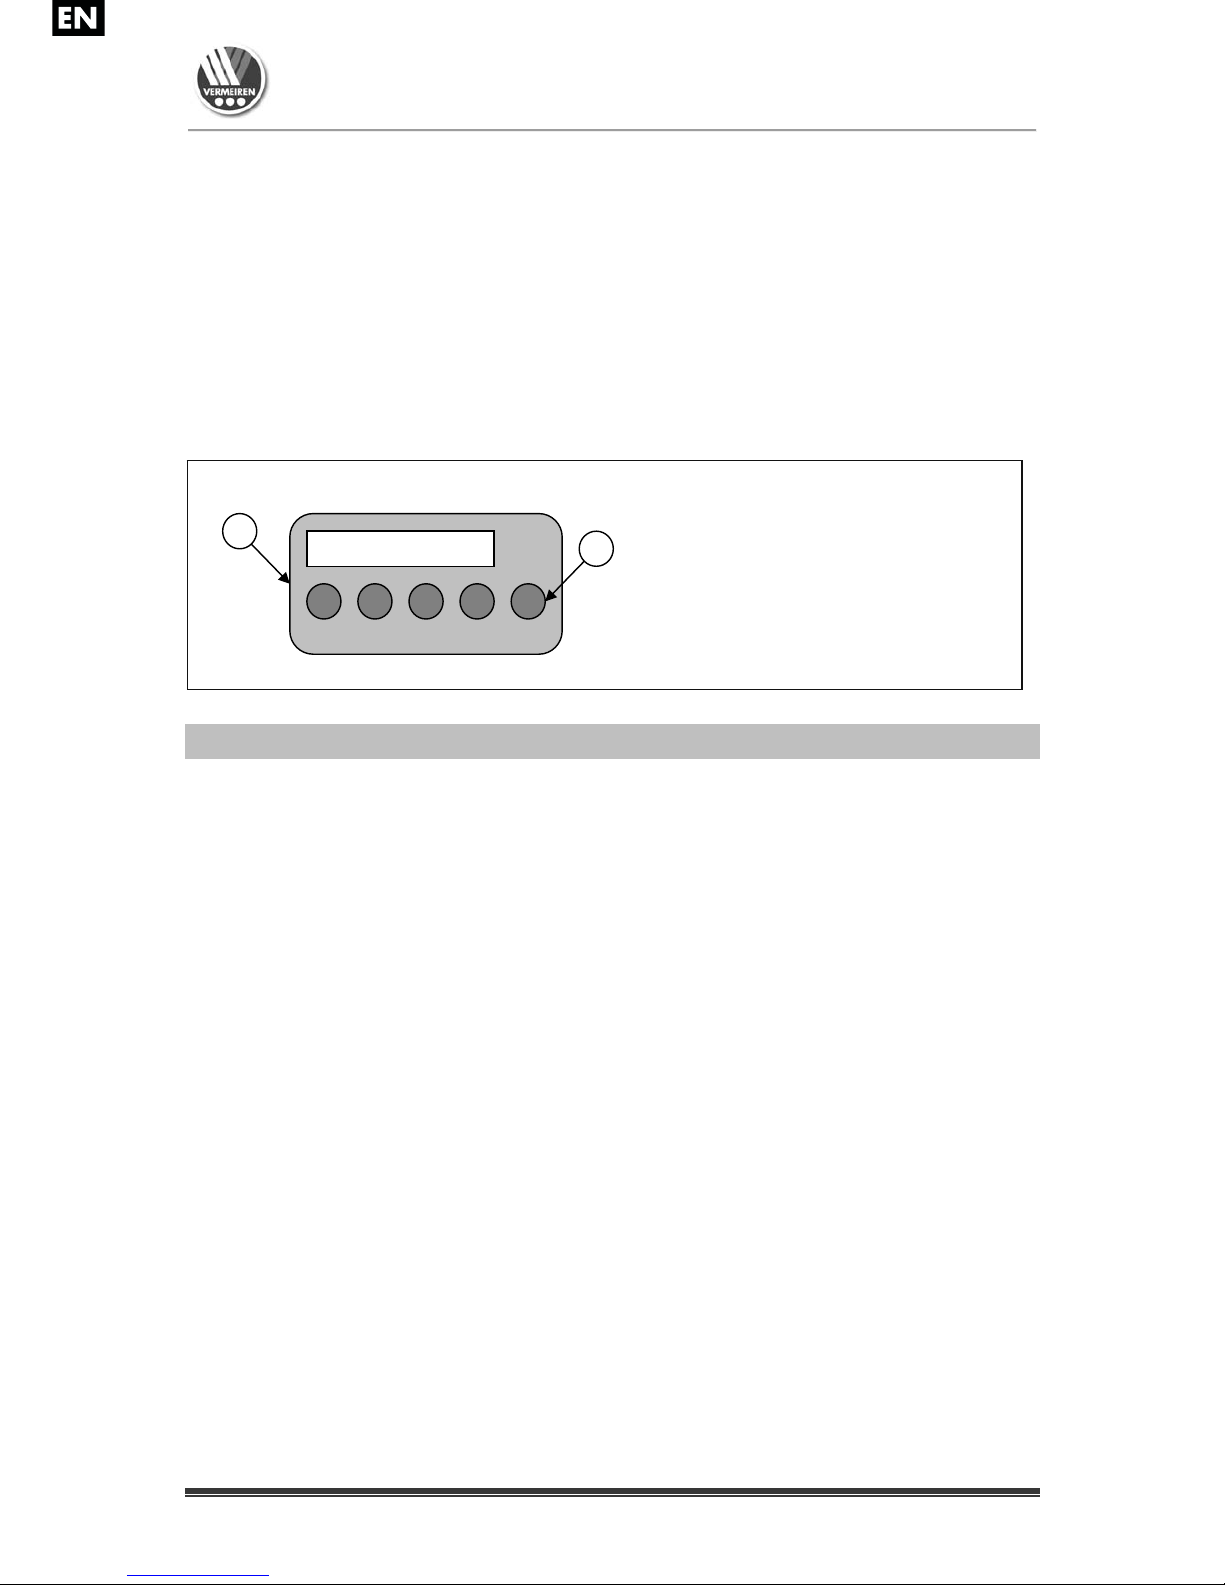
2.1 Handset with lock function
The handset has a lock function.
It allows for one or more functions to be disabled or
released.
Precautionary measures:
• To switch from lock and release positions, a small
button between both handset buttons needs to be
turned with help of a key.
The key shall only be available to nursing personnel.
Lock position
Release position
Luna 2, Luna Basic 2, Luna UL 2
2016-06
Page9
Following adjustments can be used:
2.2 Operating the steering casters
L WARNING: Good operation of the steering casters is influenced by wear and
contamination of the tires (water, oil, …) – Check the condition of the tires
before each use.
L WARNING: The steering casters can wear – Check the operation of the steering
casters before each use.
L WARNING: Danger of accidents - All steering casters should always be braked. If
only one caster is braked, the free running wheels rotate around the locked one.
All steering wheels can be locked to prevent involuntary rolling.
Securing (A)
Push the surface of the tilting lever downwards by foot until it brakes the wheel.
Releasing (B)
Push the surface of the tilting lever forwards by foot until the wheel is released.
A
Back section down and up function
Leg down and up function
Mattress support platform down and up
Anti trendelenburg
Luna 2, Luna Basic 2, Luna UL 2
2016-06
Page10
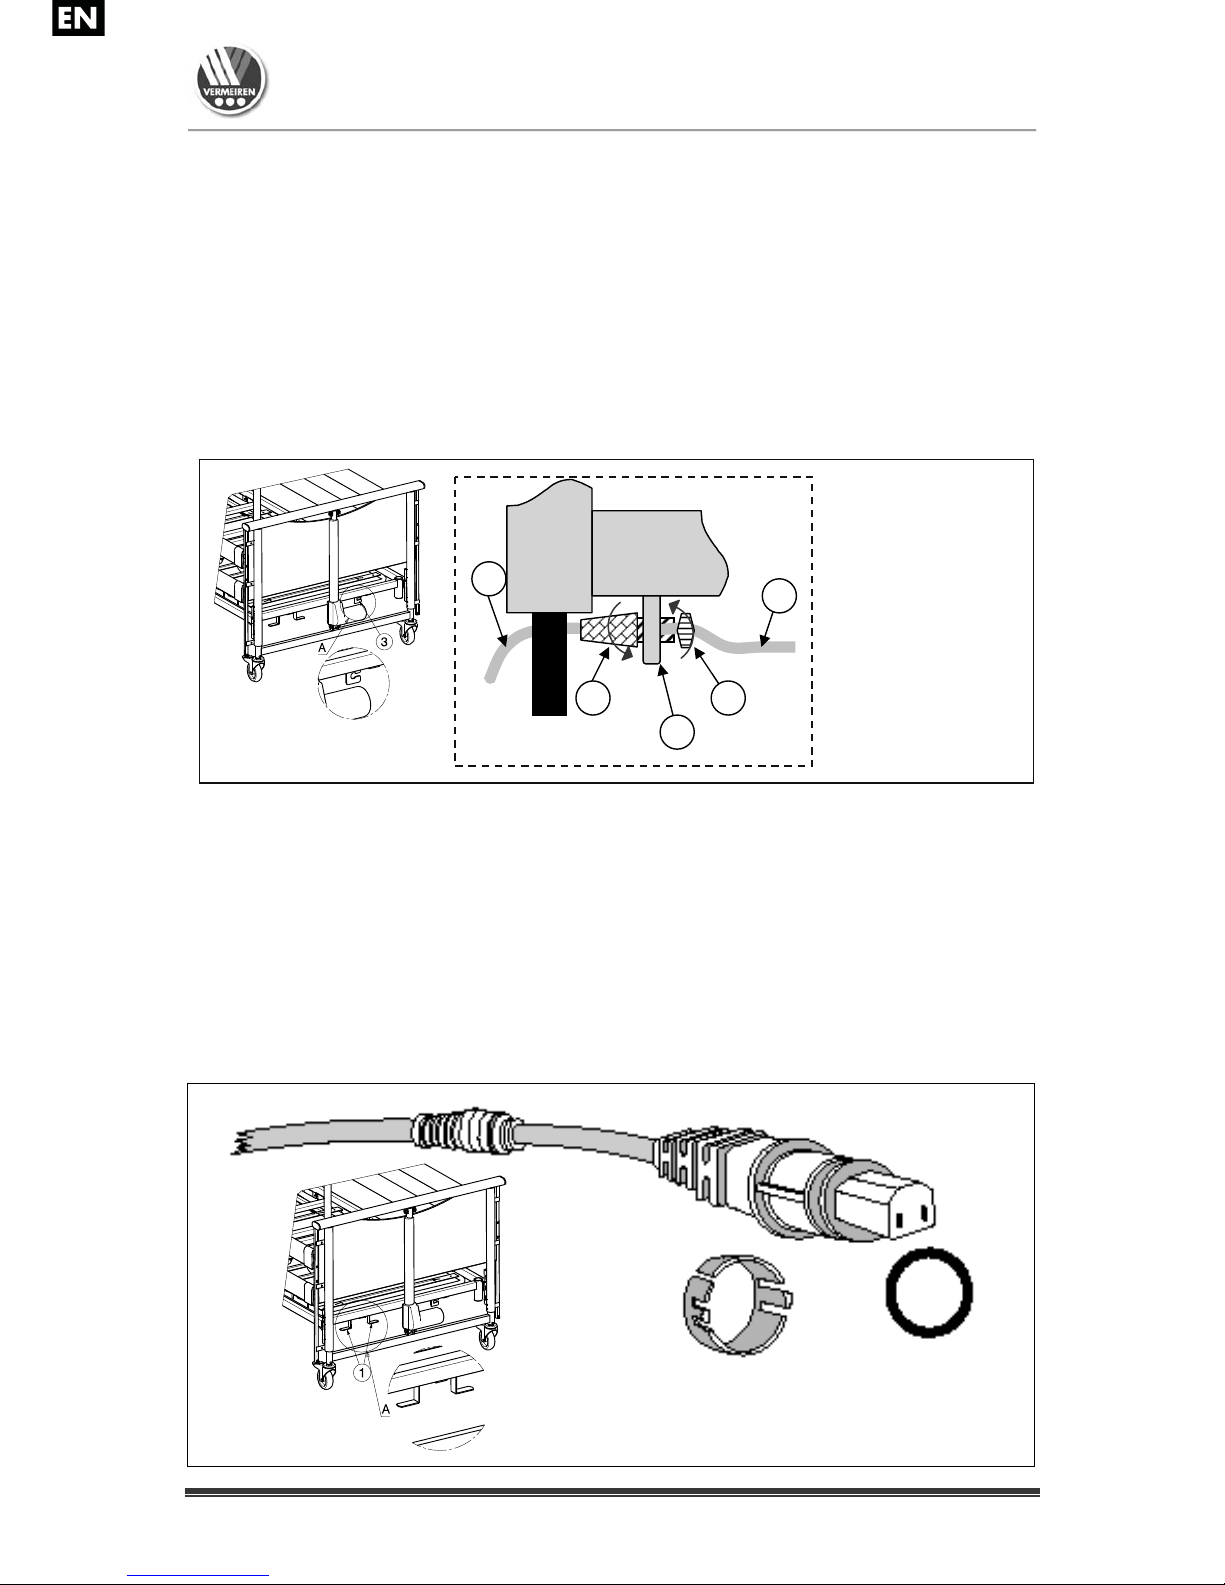
2.3 Strain relief
L WARNING: Do not remove the relief unit.
L WARNING: Nothing must be fitted to or hung on the relief unit.
Below the cross bar of the head slatted frame there is a socket for attaching the relief unit.
Insert the relief unit of the power cable into the suspension .
Pull the desired length of the power cable in such a way that the power cable
can be laid under the slatted frame without sagging. Be careful to avoid that the cable
come under the traction in any adjustment position.
Fasten the power cable by properly tightening the relief unit of the power cable .
Fasten the position of the relief unit by properly tightening the fixing screws .
2.4 Power cable
L WARNING: Nothing but the power cable should be suspended here.
L WARNING: The power cable can be damaged - The power cable must be
carefully positioned without kinks, pulling, shearing or other mechanical
damages and without making contact with the floor.
To ensure that your power cable stays properly functional and in a technically secure
condition even after protracted use, and in the case that you do not operate your bed
electrically, we have at the spar of the slatted frame provided a device where you migh t
safely leave the rolled-up cable beneath the nursing bed
.
1 = Power cable
(power connection)
2 = Power cable
(Transformer
connection)
3 = Holder
Strain relief
4 = Strain relief
Power cables
5 = Screw joint
Strain relief
2
1
4
3
5
Luna 2, Luna Basic 2, Luna UL 2
2016-06
Page11
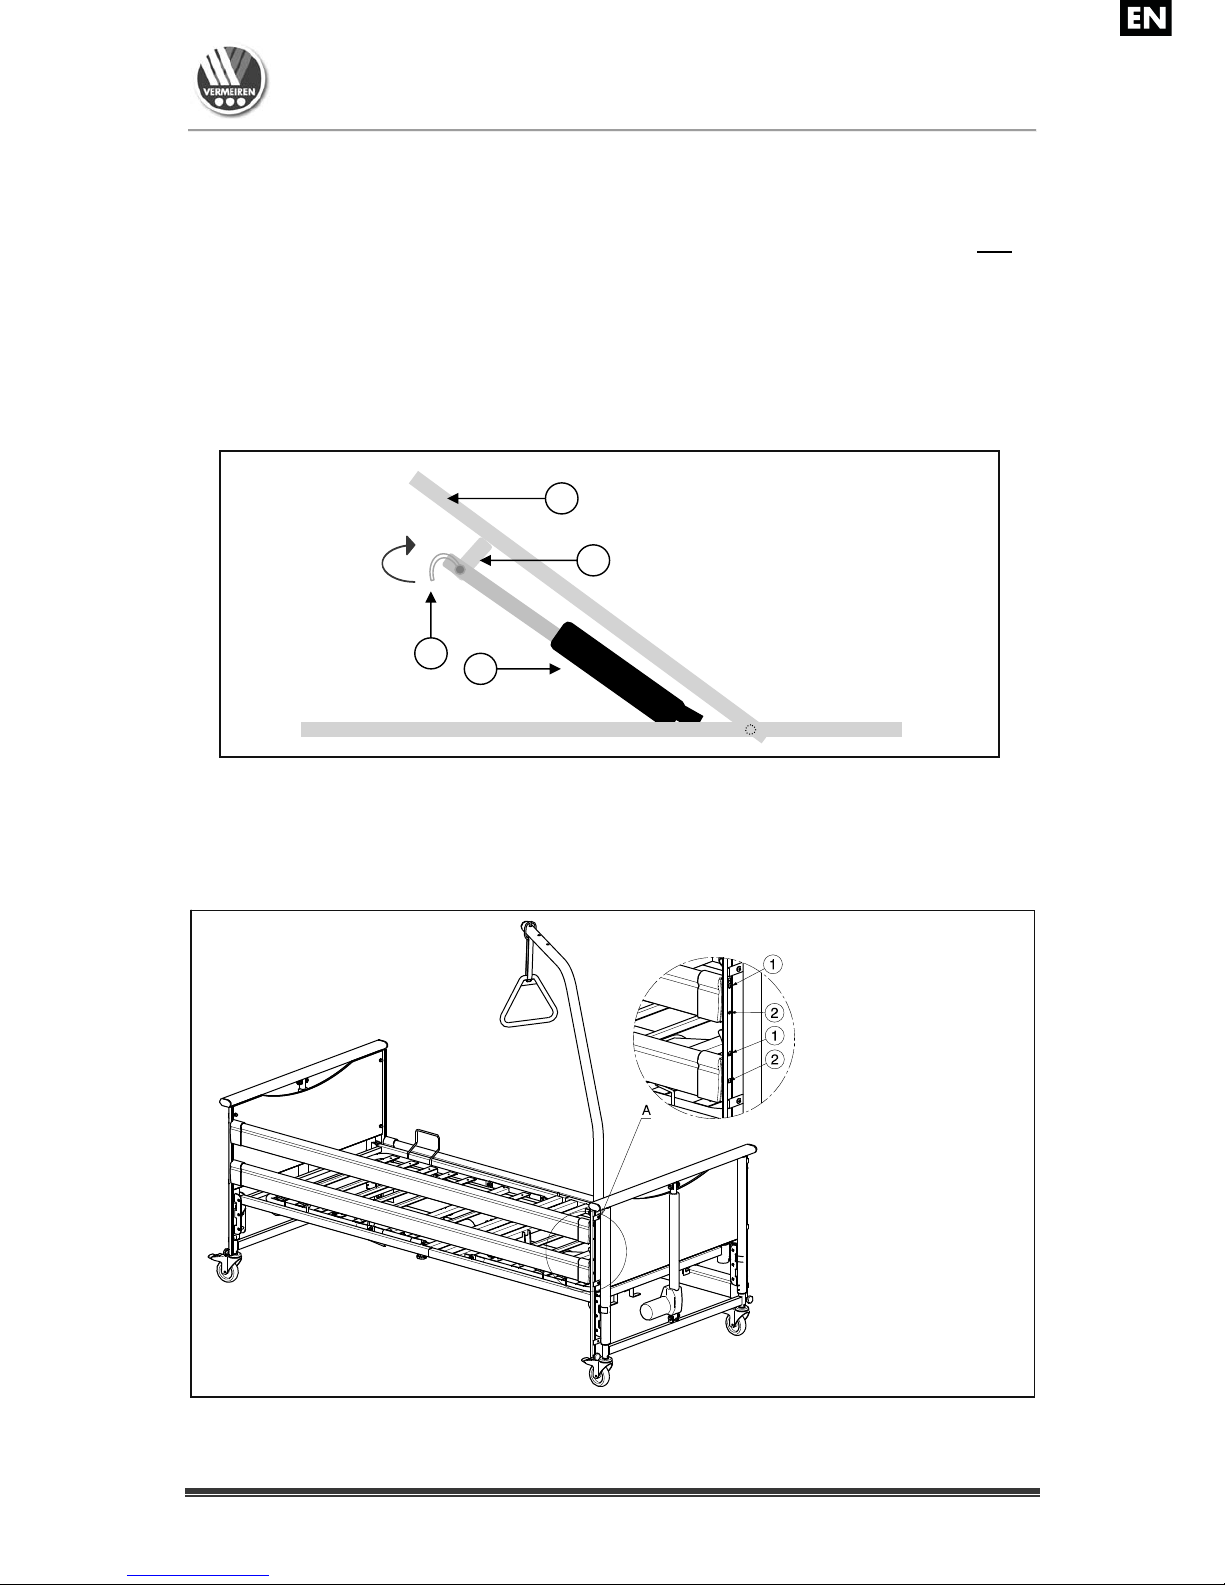
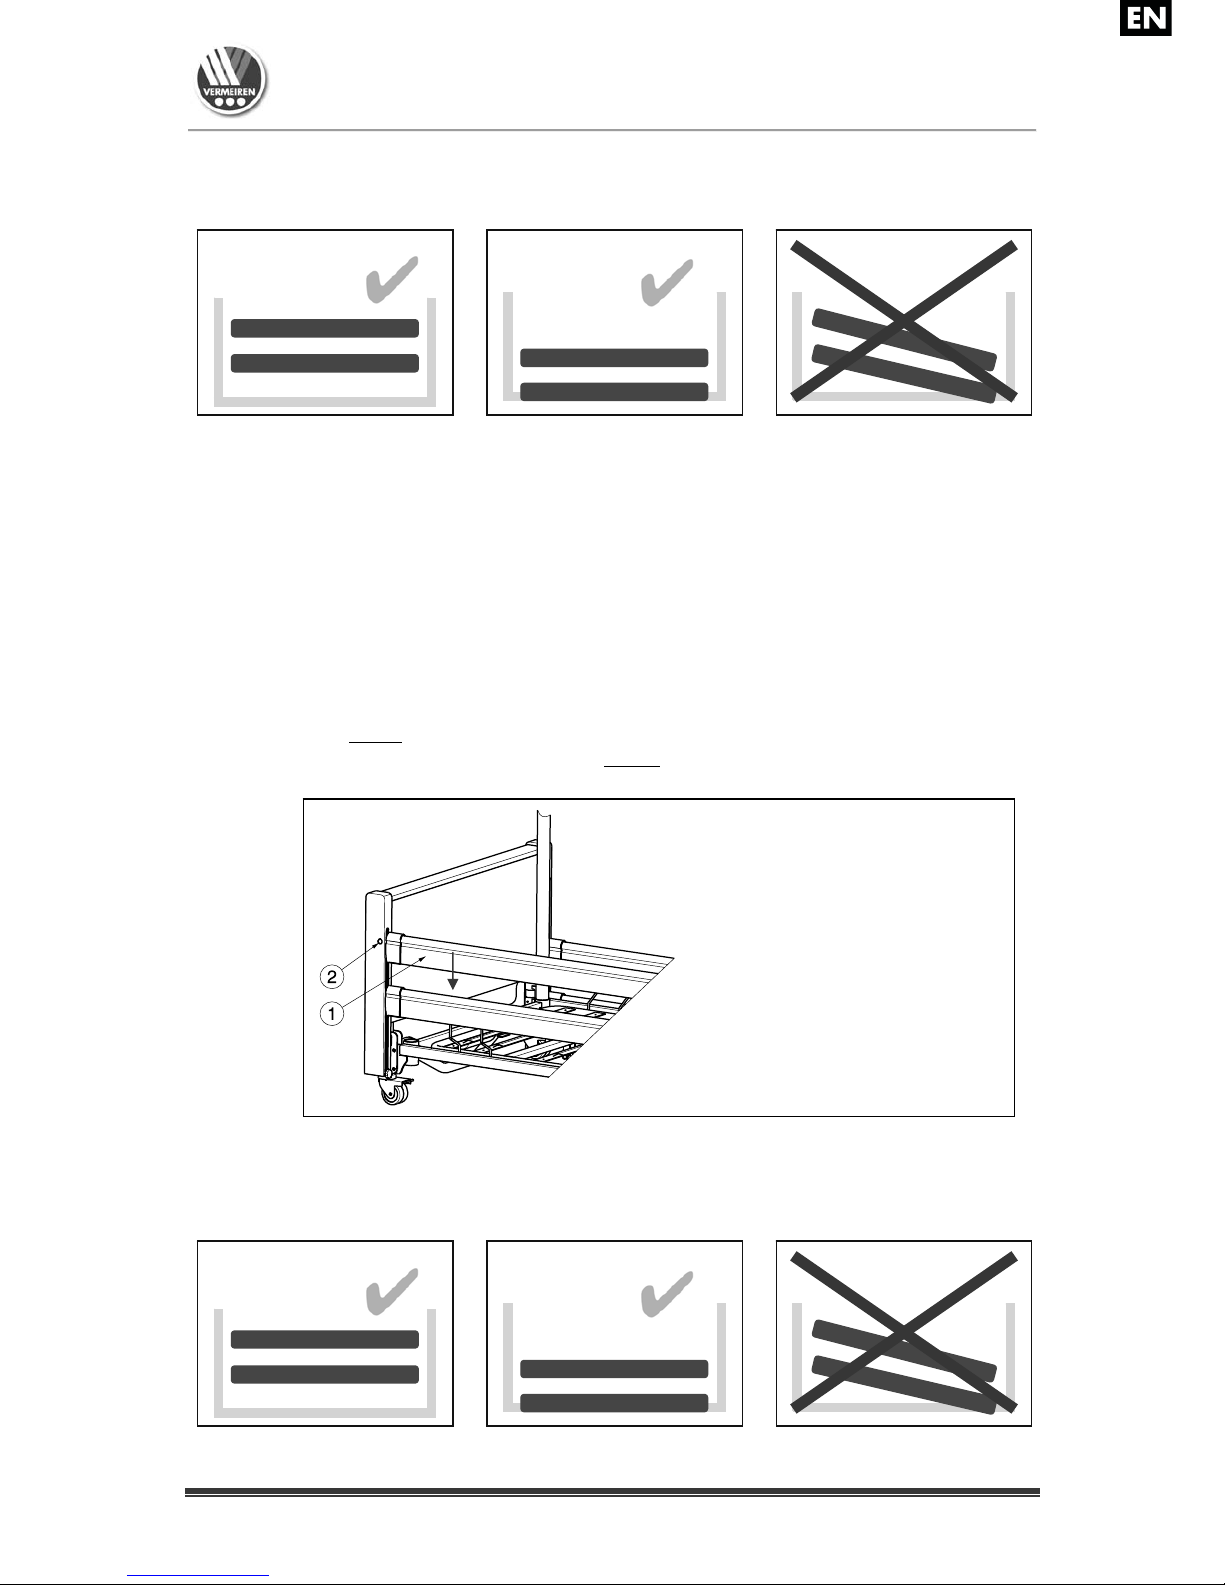
2.5 Emergency lowering of the headrest
L
WARNING: Risk of injury - Make sure that there are no objects or body parts
between the headrest and the frame.
L WARNING: Risk of injury - Emergency lowering is only permitted if at least two
persons are available.
The headrest can be lowered manually (emergency lowering in the case of motor failure).
Procedure: 1. Turn the securing loop of the upper motor over.
2. One person holds the side of the headrest while another person pulls
the suspension pin out and removes the motor from its holder.
3. Lower the headrest gently.
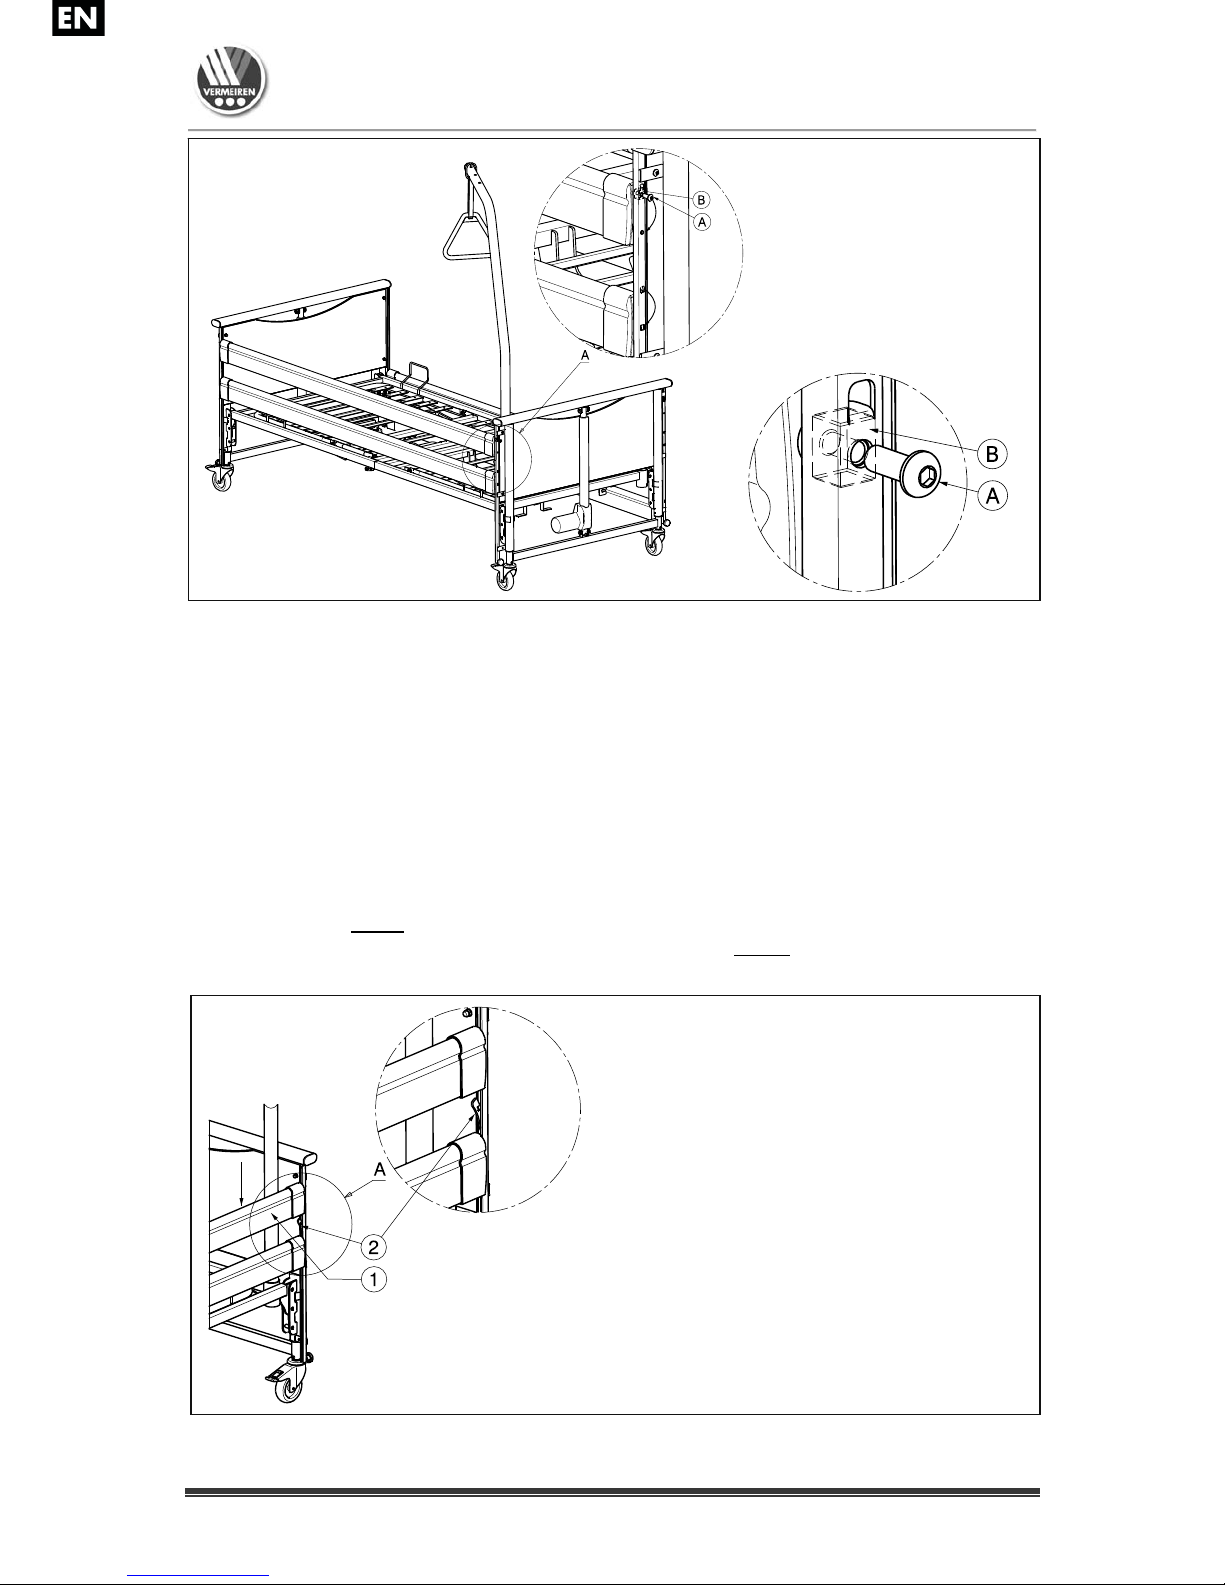
2.6 Side railings (For Luna 2, Luna Basic 2)
L WARNING: Risk of injury, entrapment - Place the side rails in the lowest position
when the slatted frame is mounted in the lowest height. To respect the patient
entrapment area according European standards.
To place the side rails in the lowest position it is necessary to mount the screw Ⓐ and stop
Ⓑ in the lowest hole (range 60 mm).
3
4
1
2
1 = Suspension pin
2 = Motor attachment
3 = Headrest frames
4 = Headrest motor
1 = Highest position
2 = Lowest position
Luna 2, Luna Basic 2, Luna UL 2
2016-06
Page12
The side railings can be lowered on one side.
Lowering
L WARNING: Risk of squashing - Secure the side railings against falling
involuntarily.
L WARNING: Risk of squashing - No objects or body parts may extend
above the lying surface!
L WARNING: Risk of injury - Do not lower the side railings on one side if
the patient is not supervised.
Raise the upper
side slat gently, press and keep the arresting knob on the guide of
the side rail pressed in and lower the side railing slowly
. (Always take hold of the
upper wooden slat only)!
1 = Upper side rail
2 = Arresting knob
A = Screw
B = Stop
Luna 2, Luna Basic 2, Luna UL 2
2016-06
Page13
If raising the side railings or covering these are required for additional security of the patient
(e.g. very skinny patient), it should be noted that no functions of the bed should be impaired,
nor the CE-conformable implementation as when first delivered.
2.7 Side railings (For Luna UL 2)
The side railings can be lowered on one side.
Lowering
L WARNING: Risk of squashing - Secure the side railings against falling
involuntarily.
L WARNING: Risk of squashing - No objects or body parts may extend
above the lying surface!
L WARNING: Risk of injury - Do not lower the side railings on one side if
the patient is not supervised.
Raise the upper
side slat gently, press the arresting knob on the side of the headrest
or foot-end and lower the side railing slowly
. (Always take hold of the upper wooden
slat only !)
If raising the side railings or covering these are required for additional security of the patient
(e.g. very skinny patient), it should be noted that no functions of the bed should be impaired,
nor the CE-conformable implementation as when first delivered.
1 = Upper side railing
2 = Arresting knob

Luna 2, Luna Basic 2, Luna UL 2
2016-06
Page14
2.8 Lifting pole
The lifting pole can be mounted on either side of the headrest.
Insert the lifting pole (1) as far as it will go into the relevant socket (2).
Let the groove on the lifting pole (3) slide over the tube in the socket.
Pull the metal loop over the end of the upper frame (4) until the bolts engage one of
the three socket holes (5).
Also pull strap (6) into the metal loop and through the triangle (7); then fix its length.
Secure the strap.
Check that you cannot turn the lifting pole anymore, than the lifting pole is firmly
secured.
2.9 Rastomat (when available)
L CAUTION: Risk of injury - No people or objects allowed close to where adjusting
is being done.
To adjust the lying surface for the lower leg, grip the foot-end toggle strap in the middle of the
frame. Pull the lying surface for the lower leg to the desired height. The Rastomat will click
into the notch locks at intervals of approx. 20mm. To lower the surface for the lower leg, use
the foot-end toggle strap and pull it to the upper position. The Rastomat will then remove the
lock. You can now completely lower the leg surface slowly until it rests on the bed frame.
Only make adjustments when the grips are at the foot of the bed. Otherwise the bed can tip
over and the adjustment mechanism damaged.
2.10 Transfer in and out the bed
L CAUTION: In case you cannot perform the transfer in a safe manner, ask
someone to assist you.
1. Position you as close as possible to the bed.
2. Check the brakes from the bed are in the on position.
3. Remove or fold down the side railings of the bed.
4. Transfer to/from the bed.
1 = Lifting pole
2 = Socket lifting pole
3 = Groove
4 = Upper frame boom
5 = Socket holes
6 = Strap
7 = Triangle

Luna 2, Luna Basic 2, Luna UL 2
2016-06
Page15
2.11 Transport
L WARNING: Risk of injury – See that the bed is attached properly. So you can
avoid injury from the passengers during collision or sudden braking.
L WARNING: Risk of injury – Use for attaching the bed and passenger NEVER the
same seatbelt.
L WARNING: Risk of injury – Patients may only be transported when recumbent in
the lowest horizontal position.
To avoid damage when transported, the lifting pole should be detached. Unplug the power
cable and check that no cables hang near the floor.
Should the bed be transported over greater distances, use the transport set to do so.
Installing the transport set:
The bed can be mounted by following instructions to the transportset:
1. Grasp the panels .
2. Mount the attachment of the transportset in the
attachment of the panels . And lock with the
locking clamps . Mount the transportset in the
lowest position of the panels.
3. Lock the brakes of the panels .
4. Grasp the feet-end and hold this with the motor
located to the bottom side.
5. Slide the tube of the feet-end in the tube of the
transportset . Secure the feet-end with the
starknobs .
6. Grasp the head-end and hold this with the motor
located to the upper side.
7. Slide the tube of the head-end in the tube of the
transportset . Secure the head-end with the
starknobs .
Luna 2, Luna Basic 2, Luna UL 2
2016-06
Page16
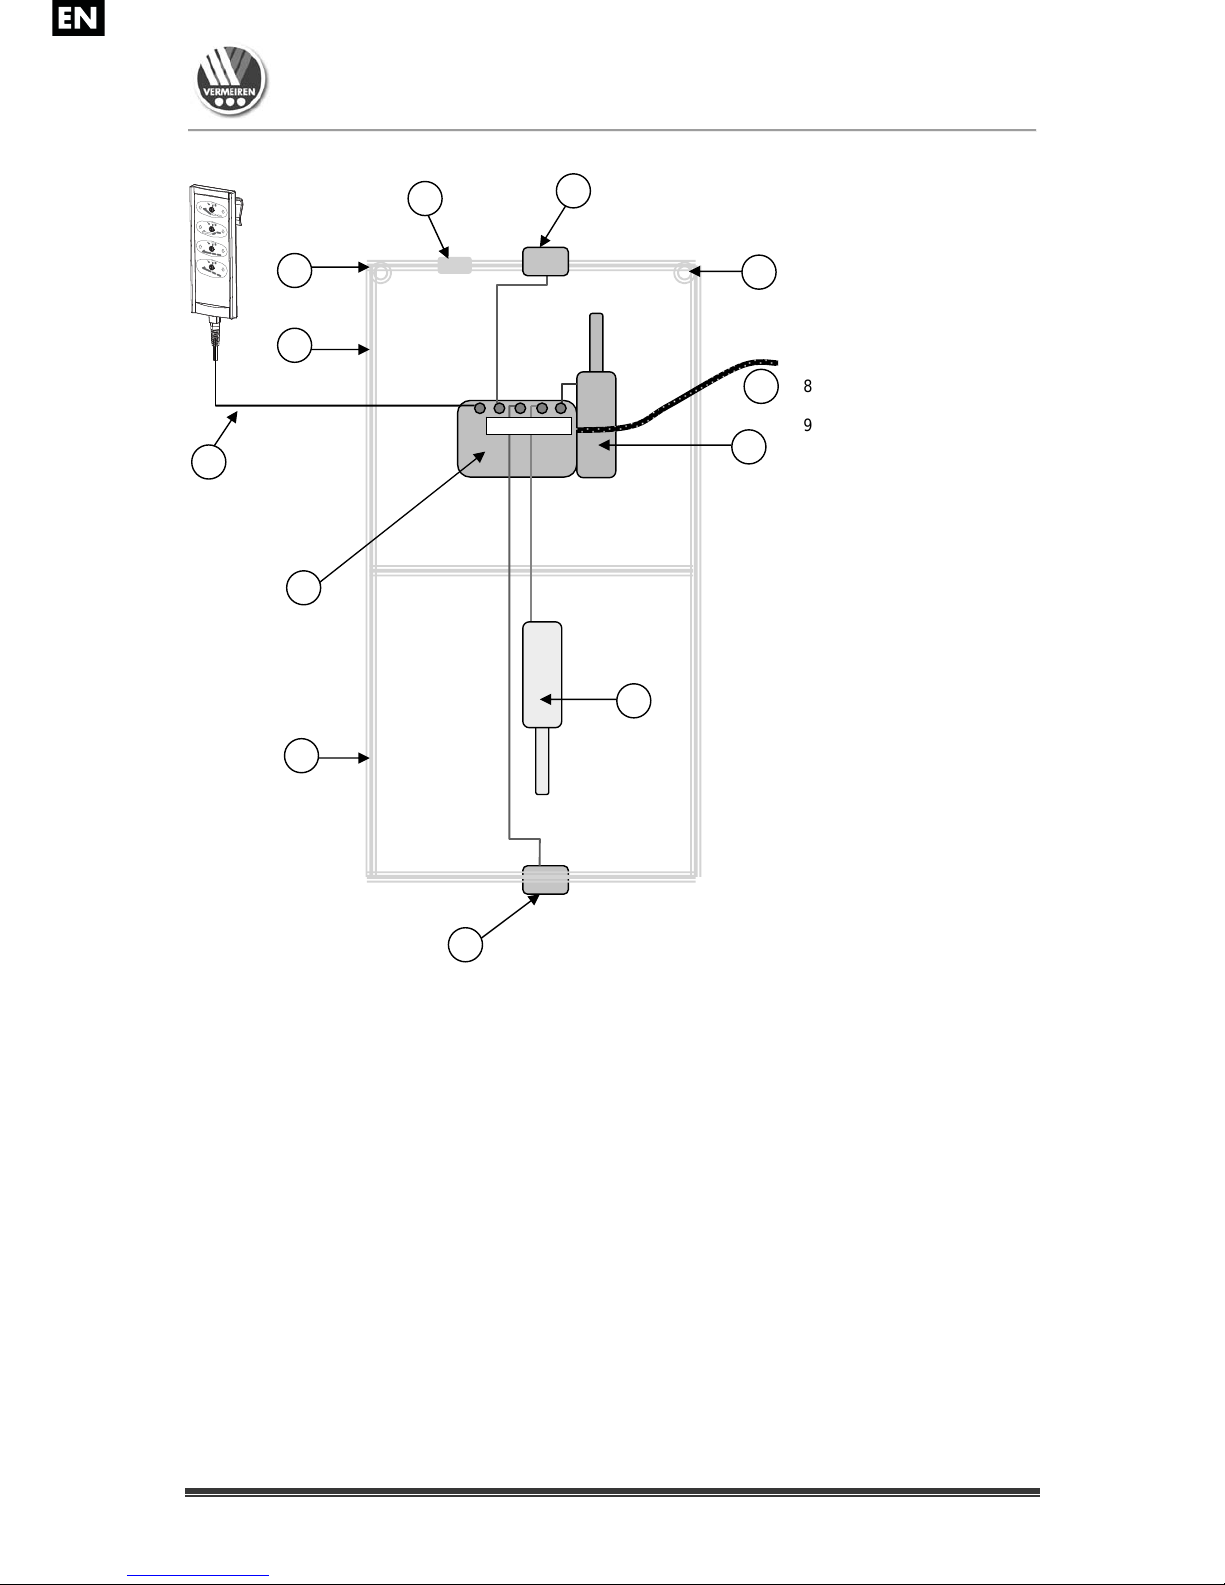
2.12 Cable placement
2.13 Remarks on electromagnetic compatibility (EMC)
Disruption of electrical equipment from electromagnetic fields in the surroundings can
not be entirely avoided. Possible consequences are:
Possible sources of radiation include:
• Portable receiver and transmission devices (receiver and transmitter with fixed
antennae)
- Walkie-talkies, cell phones or cordless telephones
- other personal broadcast devices
• Mobile medium-range transmitting and receiving devices (external car antennas)
- Hands-free mobile speaking devices (fixed installation)
• Other home appliances
- Laptop
- etc.
Devices such as electric shavers and hair dryers should have no influence. However they
need to function properly and have proper wiring regardless of their influence. Please read
the appropriate instruction manual from the relevant manufacturer.
1 = Head slatted frame
2 = Feet slatted frame
3 = Sockets lifting pole
4 = Relief device
5 = Power cable
6 = Transformer / control
box
7 = Motor of headrest
surface
8 = Knee-bending angle
motor
9 = Motor of head part
10 = Motor of foot part
11 = Handset
All cables inside the bed
frame, have been fitted in
such a way that prevents
contact with the floor as
well as squashing or
pinching.
4 3 2 1
10
4
3
5
6
3
1
7
9
2
11
8

Luna 2, Luna Basic 2, Luna UL 2
2016-06
Page17
To reduce the effect of electromagnetic sources of interference, please read the following
warnings:
L Do not use any portable television or radio devices in the immediate vicinity of the
nursing bed.
L Do not use any walkie talkies or mobile phones in the immediate vicinity of the
nursing bed.
L Should any unintended movements occur, remove the power plug for the nursing bed
from the wall socket.
Guidelines and manufacturer's declaration - Electromagnetic transmissions
The nursing bed is intended for operations in surroundings described below. The customer or bed user
needs to make sure that it will be operated in surroundings of this type.
Electromagnetic
radiation
measurements
Agreement
Electromagnetic surroundings - Guidelines
HF - Radiation
pursuant to CISPR 11
(partial)
Group 1
The nursing bed uses HF energy exclusively for its internal
function. Therefore its HF radiation is very low and it is
unlikely that neighboring electronic devices will be
disrupted.
HF - Radiation
pursuant to CISPR 11
(partial)
Class B
The nursing bed is suitable for use in all facilities which are solely used as
living areas and which have an immediate connection to the
public power supply, which also supplies the building
which is being used as living quarters.
Transmission of
harmonics in accordance
with
IEC 61000-3-2
Class A
Transmission of
Voltage fluctuations/
flickers pursuant to
IEC 61000-3-3
In accordance with
Guidelines and manufacturer's declaration - Electromagnetic resistance
The nursing bed is intended for operations in surroundings described below. The customer or the
user of the nursing bed needs to make sure that it will be operated in surroundings of this type.
Resistance
tests
IEC 60601
Test level
Compliance level Electromagnetic surroundings -
Guidelines
Discharge of static
electricity (ESD)
pursuant to
IEC 61000-4-2
± 6 kV contact discharge
± 8 kV Air discharge
± 6 kV contact discharge
± 8 kV Air discharge
Flooring needs to be made of wood or
concrete or covered with ceramic tiles
If the floor is covered with synthetic
material, then relative humidity needs to
be at least 30%.
Quick stray
electrical
factors / bursts pursuant
to
IEC 61000-4-4
± 2 kV for power cables
± 1 kV for input and
output cables
± 2 kV for power cables
± 1 kV for input and
output cables
The quality of the power voltage
needs to meet standards typical in a
commercial or hospital environment.
Surges
pursuant to
IEC 61000-4-5
± 1 kV Series mode
voltage
± 2 kV Common-mode
voltage
± 1 kV Series mode voltage
± 2 kV Common-mode voltage
The quality of the power voltage
needs to meet standards typical in a
commercial or hospital environment.
Voltage drops,
Short-term disruptions
And Fluctuations in the
supply voltage
pursuant to
IEC 61000-4-11
< 5 % VT
(>95 % drop in VT )
for ½ period
40 % V
T
(60 % drop in VT )
for 5 periods
70 % V
T
(30 % drop in VT )
for 25 periods
< 5 % V
T
(>95 % drop in VT )
for 5 seconds
< 5 % VT
(>95 % drop in VT )
for ½ period
40 % V
T
(60 % drop in VT )
for 5 periods
70 % V
T
(30 % drop in VT )
for 25 periods
< 5 % V
T
(>95 % drop in VT )
for 5 seconds
The quality of the power voltage
needs to meet standards typical in a
commercial or hospital environment.
Should the user of the nursing bed
require the continuous function even with
the occurrence of disruptions to the
power supply, it is recommended that the
nursing bed receive undisrupted power
from an emergency source or a battery.
Luna 2, Luna Basic 2, Luna UL 2
2016-06
Page18
Magnetic field for the
Supply frequency
(50/60 Hz) pursuant to
IEC 61000-4-8
3 A/m 3 A/m
Magnetic fields with the grid frequency
should comply to those normal in the
commercial or hospital environments.
NOTE VT is the grid alternating voltage before applying the test level.
3 Installation and adjustment
The instructions in this chapter are for the specialist dealer.
The Vermeiren Luna 2 has been designed to be adjust with a minimum of replacements
parts.
There is no need for extra stock of spare parts.
To find a service facility or specialist dealer near you, contact the nearest Vermeiren facility.
A list of Vermeiren facilities can be found on the last page.
L WARNING: Risk of unsafe settings - Use only the settings described in this
manual.
3.1 Tools
To set up the bed no tools are needed.
3.2 Manner of delivery
The Vermeiren Luna 2 shall be delivered with:
2 front parts incl. motors + wooden lagging Approx. 22,7 kg / piece
Slatted frame, foot-end incl. motor Approx. 17,25 kg
Slatted frame, head-end incl. transformer and motor Approx. 18,15 kg
Side railings (2 x 2 wooden slats) Approx. 5,25 kg / piece
Lifting pole + triangular grip Approx. 6,05 kg
Handset Approx. 0,30 kg
Instruction Manual
The Vermeiren Luna basic 2 shall be delivered with:
2 front parts incl. motors + wooden lagging Approx. 15,5 kg / piece
Slatted frame, foot-end incl. motor Approx. 17,25 kg
Slatted frame, head-end incl. transformer and motor Approx. 18,15 kg
Side railings (2 x 2 wooden slats) Approx. 5,25 kg / piece
Lifting pole + triangular grip Approx. 6,05 kg
Handset Approx. 0,30 kg
Instruction Manual
The Vermeiren Luna UL 2 shall be delivered with:
2 front parts incl. motors + wooden lagging Approx. 21,8 kg / piece
Slatted frame, foot-end incl. motor Approx. 17,25 kg
Slatted frame, head-end incl. transformer and motor Approx. 18,15 kg
Side railings (2 x 2 wooden slats) Approx. 5,25 kg / piece
Lifting pole + triangular grip Approx. 6,05 kg
Handset Approx. 0,30 kg
Instruction Manual
The nursing bed may only be used with the parts listed here. If parts are omitted or if foreign
furnishings, components or electrical systems are included, then this bed is not regarded as
a nursing bed supplied by the manufacturer, and you use it at your own risk. Then the CE
conformity and the warranty of the manufacturer do not apply.
Luna 2, Luna Basic 2, Luna UL 2
2016-06
Page19
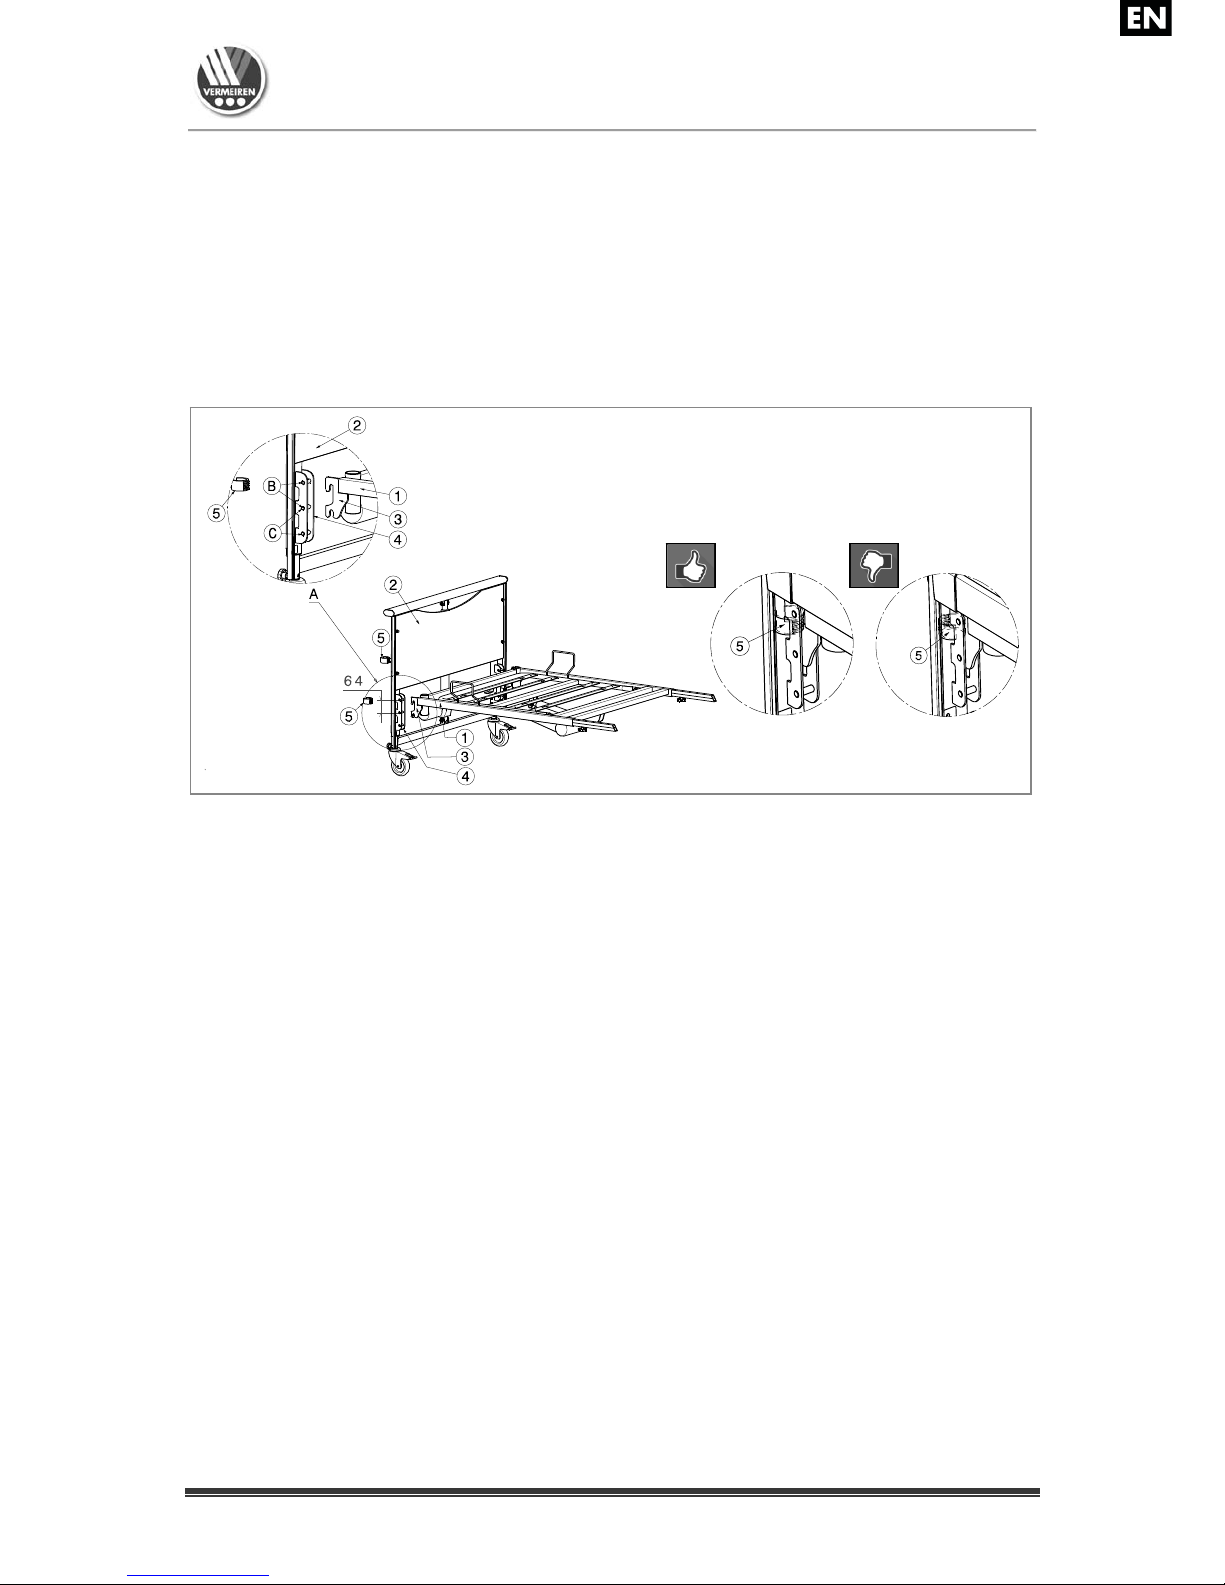
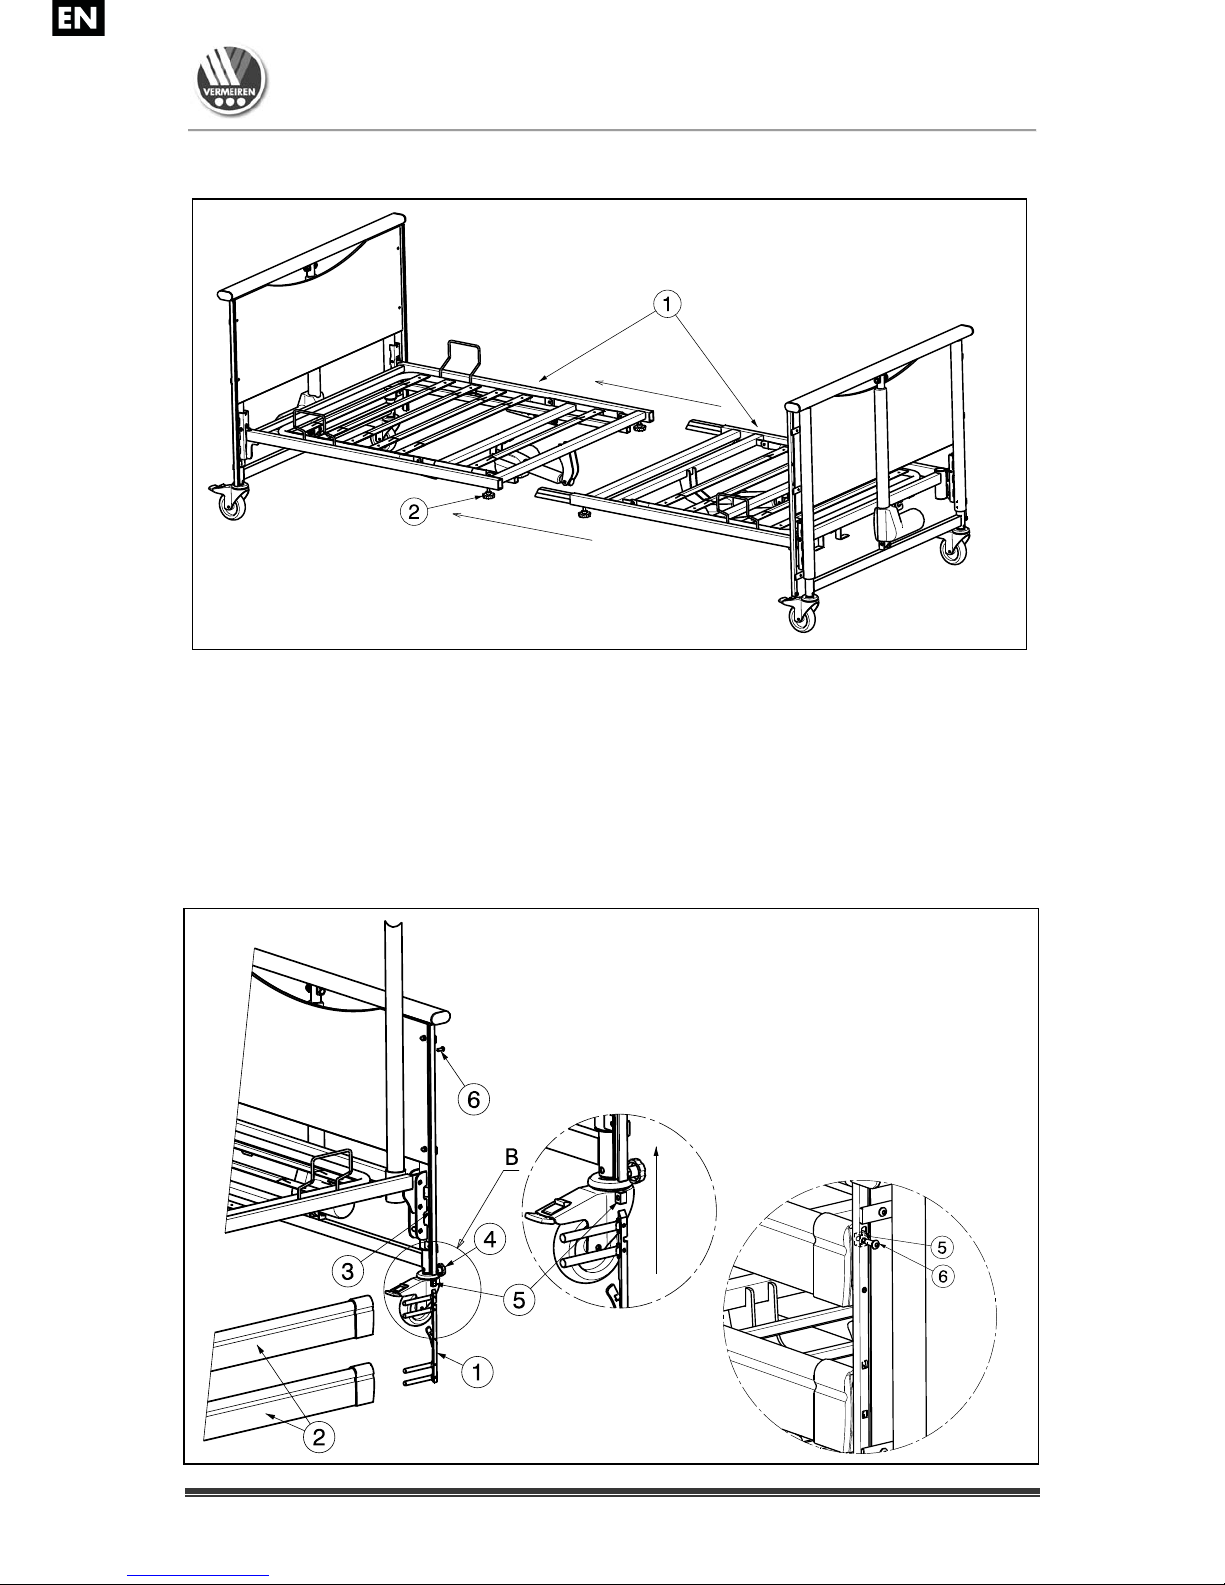
3.3 Assembly
L CAUTION: Chance of pinching - Do not place fingers between the components of
the bed.
L CAUTION: Risk of clamping - Keep fingers away from moving parts of the bed.
L CAUTION: Risk of injury - Check that both hooks of the attachment slatted frame
are mounted around the tubes of the attachment panels.
You should obey the assembly instructions of your nursing bed as explained below.
3.3.1 Head panel / feet panel
Mount the attachment of the slatted frame on the attachment of the head panel .
Secure the slatted frame with the locking clamps .
Repeat for the feetpanel. Check that the slatted frames are mounted very well.
N.B: The slatted frame headrest is fitted with sockets for the lifting pole as well as a
power
cable suspension.
The slatted frame can be mounted in 2 different positions (Ⓑ, Ⓒ): step 64 mm (not for Luna
UL 2).
Protect the electric cable to the motor against damage by squashing.
1 = Slatted frame
2 = Head and foot panels
3 = Attachment slatted frame
4 = Attachment pan els
5 = Locking clamp
Luna 2, Luna Basic 2, Luna UL 2
2016-06
Page20
3.3.2 Slatted Frame
Loosen the fixing screws , if necessary.
Erect both slatted frames and insert them into each other flush.
Then properly retighten the fixing screws of the slatted frame connection.
Protect the electric cable to the motor against damage by squashing.
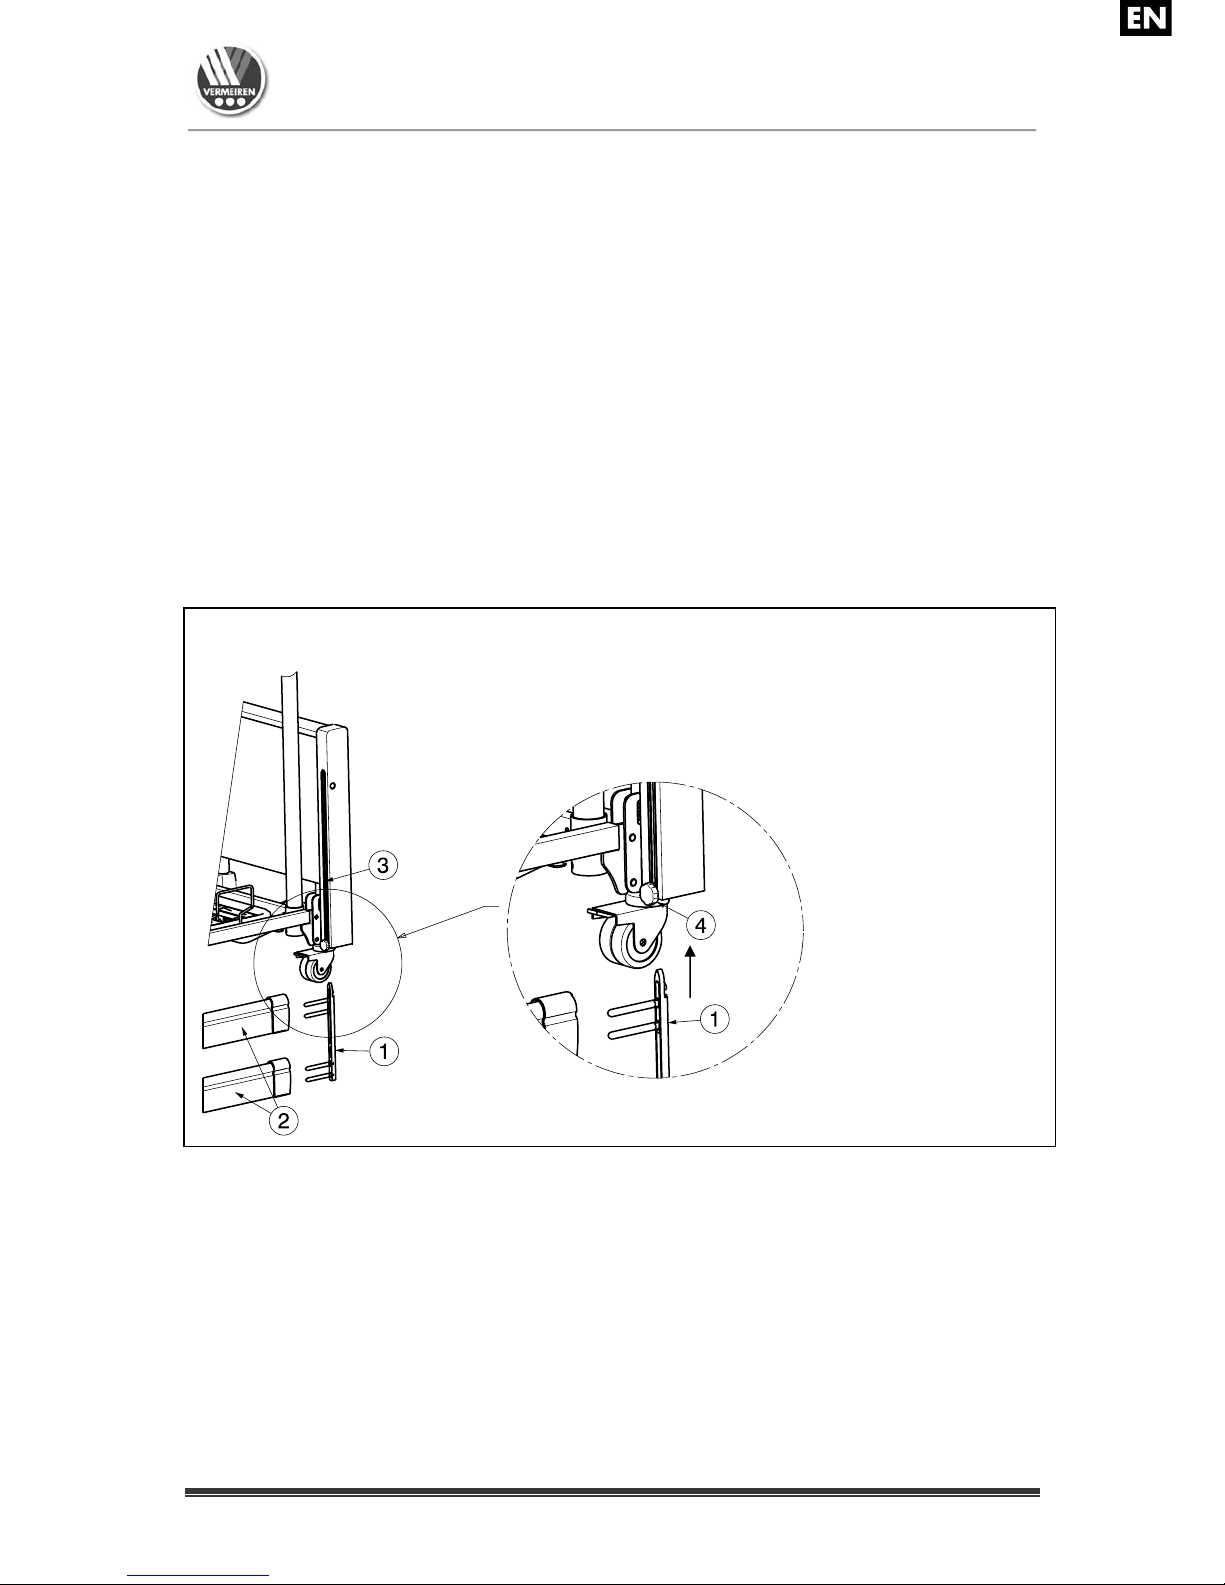
3.3.3 Wooden side railings (For Luna 2, Luna Basic 2)
Adjust the height of the bed in the middle. With a too low height it is not possible to mount
the side rails. With a too high height you must pull the side rails too far upwards.
1 = Slatted frames
2 = Fixing screws
1 = Bolt rails
2 = Wood slats (2 pieces each side)
3 = Sliding rail
4 = Locknut
5 = Stop
6 = Screw
Luna 2, Luna Basic 2, Luna UL 2
2016-06
Page21
1. Insert the stop and screw (lowest hole slatted frame lowest position; highest
hole slatted frame highest position).
2. Loosen the locknuts , if necessary.
3.
Insert the bolt rails on the right and left in the upper wood slat . Insert the bolt
rails right and left in the lower wood slat .
4.
Slide the entire bolt rails + wooden slats in the relevant sliding rail from the
head and foot panel. Grasp the upper wooden slat upwards until the wooden side rail
locks in position.
5.
Insert the locknuts and tighten them manually.
6.
Repeat these steps for the other side.
To release the wooden side rails refer to paragraph 2.6.
3.3.4 Wooden side railings (For Luna UL 2)
Adjust the height of the bed in the middle. With a too low height it is not possible to mount
the side rails. With a too high height you must pull the side rails too far upwards.
1. Loosen the locknuts , if necessary.
2.
Insert the bolt rails on the right and left in the upper wood slat . Insert the bolt
rails right and left in the lower wood slat .
3.
Slide the entire bolt rails + wooden slats in the relevant sliding rail from the
head and foot panel. Grasp the upper wooden slat upwards until the wooden side rail
locks in position.
4.
Insert the locknuts and tighten them manually.
5.
Repeat these steps for the other side.
To release the wooden side rails refer to paragraph 2.7.
1 = Bolt rails
2 = Wood slats (2 pieces each side)
3 = Sliding rail
4 = Locknut
Luna 2, Luna Basic 2, Luna UL 2
2016-06
Page22
3.3.5 Transformer connections
L CAUTION: Risk of injury - Do not touch the plug with wet hands.
L CAUTION: Risk of injury - Do not place any objects on the connection and the
cable, and protect these against mechanical loads.
1. A 220 V / 230 V, 50 Hz power socket conforming to the VDE specifications is required
2. The diagram for the transformer connections is given in the figure below:
Take hold of the plug only to remove it from the power socket.
The power cable must be laid without any loops or kinks and should not pass around sharp
edges.
Protect the power cable and the cable leading to the handset from being crushed.
4 Maintenance
For the maintenance manual of the beds refer to the Vermeiren website:
www.vermeiren.com.
1 2 3 4
5
6
1 = Connection of panels motor
2 = Connection of knee-bending angle motor
3 = Connection of head-end motor
4 = Connection of foot-end motor
5 = Handset
6 = Transformer / control box
The cables of the motors and connections of the
transformers bear the same numbers.

Luna 2 Luna Basic 2, Luna UL 2
2016-06
Page1
Table des matières
Préface ................................................................................................. 2
1 Description du produit ............................................................ 3
1.1 Utilisation prévue ........................................................................................................ 3
1.2 Spécifications techniques ............................................................................................ 4
1.3 Composants ................................................................................................................. 5
1.4 Explication des symboles ............................................................................................ 6
1.5 Accessoires .................................................................................................................. 6
1.6 Règles de sécurité ........................................................................................................ 7
2 Utilisation ................................................................................. 8
2.1 Télécommande avec fonction de verrouillage ............................................................ 8
2.2 Actionnement des roulettes directrices ....................................................................... 9
2.3 Soulagement de traction ............................................................................................ 10
2.4 Câble d'alimentation .................................................................................................. 10
2.5 Abaissement d'urgence du appuie-tête ...................................................................... 11
2.6 Barreaux latéraux (Pour Luna 2, Luna Basic 2) ........................................................ 12
2.7 Barreaux latéraux (Pour Luna UL 2) ......................................................................... 13
2.8 Potence de levage ...................................................................................................... 14
2.9 Rastomat (le cas échéant) .......................................................................................... 15
2.10 Transfert dans et hors du lit ....................................................................................... 15
2.11 Transport ................................................................................................................... 15
2.12 Câblage ...................................................................................................................... 17
2.13 Conseils relatifs aux appareils électromagnétiques ................................................... 17
3 Installation et réglage ............................................................ 19
3.1 Outils ......................................................................................................................... 19
3.2 Mode de livraison ...................................................................................................... 20
3.3 Montage ..................................................................................................................... 20
4 Maintenance ........................................................................... 24

Luna 2 Luna Basic 2, Luna UL 2
2016-06
Page2
Préface
Nous tenons tout d'abord à vous remercier de nous avoir fait confiance en choisissant l'un
de nos produits.
Les lits Vermeiren sont le résultat de nombreuses années de recherche et d'expérience. Au
cours du développement, une attention spéciale a été portée sur la facilité d'utilisation et les
possibilités d'entretien du produit.
La longévité de votre lit sera largement fonction des soins et de l'entretien dont celui-ci fera
l'objet.
Ce manuel vous aidera à connaître le fonctionnement de votre lit.
Le respect des instructions d'utilisation et des instructions de maintenance est une condition
essentielle de la garantie.
Ce manuel reflète les derniers développements du produit. Vermeiren est autorisé à
apporter des modifications sans devoir pour autant adapter ou remplacer les modèles
fournis précédemment.
Pour toute question, consultez votre distributeur.

Luna 2 Luna Basic 2, Luna UL 2
2016-06
Page3
1 Description du produit
1.1 Utilisation prévue
Avec le modèle Luna 2, vous avez fait l’acquisition d’un lit de soins entièrement conçu pour
votre confort. Ce lit vous offre différentes possibilités de réglage individuel expliquées ciaprès.
Le lit de soins est destiné à un seul patient (d'au moins 12 ans, jusqu’a poids max. du 140
kg).
Il sera utilisé avec un matelas adapté (min. RG 35, épaisseur 120 mm, 20 kg max).
Le lit de soins Luna 2 est conçu pour être utilisé sur un sol plat et dur dans un local intérieur
sec.
Les différents types d'équipements et d'accessoires et la construction modulaire permettent
une utilisation complète par des personnes souffrant des handicaps suivants:
paralysie,
de la perte de membres (amputation des jambes),
déficience ou malformation de membres,
de contractions ou d'affections articulatoires,
insuffisances cardiaques et mauvaise circulation sanguine,
troubles de l'équilibre,
cachexie (perte musculaire),
et les personnes gériatriques
Le fauteuil doit répondre à des exigences :
de la taille et du poids corporel (maximum 140kg),
d’état physique et psychologique,
d’environnement de vie,
d’environnement
Il sera utilisé en environnement d'application de type 4 : "soins à domicile avec équipements
médicaux destinés à atténuer l'incidence de blessures, d'un handicap ou d'une maladie".
Le lit doit être utilisé sur un sol plan permettant aux quatre roues d'être en contact avec le
sol.
Le lit ne doit pas être utilisé comme échelle, ni pour le transport d'objets lourds ou chauds.
Tapis, moquettes et revêtements flottants sont susceptibles d'être endommagés par les
roulettes et ne permettent pas de faire rouler facilement le lit (sans le patient).
Utilisez uniquement des accessoires approuvés par Vermeiren.
Le fabricant n'est pas responsable des dommages causés par l'absence ou l'inadéquation
de l'entretien, ou par le non-respect des instructions de ce manuel.
Le respect des instructions d'utilisation et des instructions de maintenance est une condition
essentielle de la garantie.
Luna 2 Luna Basic 2, Luna UL 2
2016-06
Page4
1.2 Spécifications techniques
Les indications techniques ci-dessous sont valides pour le lit avec ses réglages standard.
Lorsque d'autres accessoires sont utilisés, les données sont modifiées.
Marque
V
ermeiren
Adresse
V
ermeirenplein 1/15, B-2920 Kalmthout
Type Lit
Modèle Luna 2, Luna Basic 2, Luna UL 2
Poids max. du patient 140 kg
Description Min. Max.
Longueur Luna 2, Luna Basic 2: 2170 mm; Luna UL 2: 2180 mm
Largeur Luna 2: 1020 mm; Luna Basic 2: 1015 mm; Luna UL 2: 1025 mm
Hauteur (sans potence de levage) Luna 2, Luna Basic 2: 840 mm - 1250 mm
Luna UL 2: 726 mm - 1136 mm
Hauteur (avec potence de levage) Luna 2, Luna Basic 2: 1675 mm - 2080 mm
Luna UL 2: 1590 mm - 1995 mm
Surface de couchage réglable en
hauteur (position 1)
Luna 2, Luna Basic 2:
335 mm (sans matelas)
Luna UL 2:
205 mm (sans matelas)
Luna 2, Luna Basic 2:
745 mm (sans matelas)
Luna UL 2:
615 mm (sans matelas)
Surface de couchage réglable en
hauteur (position 2)
400 mm (sans matelas)
Pas pour Luna UL 2
810 mm (sans matelas)
Pas pour Luna UL 2
Longueur pliée 445 mm
Largeur pliée 935 mm
Hauteur plié 1045 mm
Masse totale Luna 2: 98,15 kg; Luna Basic 2: 83,7 kg; Luna UL 2: 96,35 kg
Réglage du dossier 83°
Angle max. de la cuisse 31,7°
Angle max. de la jambe -14,8°
Charge utile sûre max. 175 kg
Potence de levage Charge nominale 80 kg
Matelas min. RG 35, 120 mm d’épaisseur, 2000 x 900 mm, max. 20 kg
Hauteur libre pour le lève-personnes 160 mm
Roulettes (4 pièces) Luna 2, Luna Basic 2: Ø 100 mm, blocables
Luna UL 2: Ø 75 mm, blocables
Moteur panneaux LA273100-A01405040, Linak
Moteur appuie-tête LA270022-00, Linak
Moteur zone jambes LA270022-00, Linak
Télécommande HBW074-072, Linak
Transformateur CB6404+10019, Linak
Tension nominale du transfor m ateur
U entrée: 230 V
, ± 10%, 50 Hz, courant: max. 1,5 A, U out: 24V , max.
70 VA
Temps de fonctionnement 10%, max. 6 min/heure
Niveau acoustique < 65 dB (A)
Classe de protection/degré de
protection
Classe de protection II, partie d’application type B / IP54 (protégé contre les
projections d’eau)
Température de stockage et
d'utilisation
+ 5 °C + 41 °C
Humidité de stockage et d'utilisation 30% 70%
Nous nous réservons le droit d’apporter des modifications technique s. Tolérance de mesures ± 15 mm / 1,5 kg / °.
Tableau 1 : Spécifications techniques
Luna 2 Luna Basic 2, Luna UL 2
2016-06
Page5
Le lit est conforme aux normes suivantes :
EN 60601-2-52: Appareils électro médicaux - Article 2-52 : exigences particulières pour la
sécurité de base et les performances essentielles des lits médicaux
1.3 Composants
1 = Potence de levage
2 = Triangle
3 = Retenue de matelas
4 = Barreau latéral
5 = Appuie-tête
6 = Appuie-pied
7 = Panneau arrière
8 = Panneau frontal
9 = Roulette directrice
10 = Blocage de roulette
1 1 = Moteur
12 = Télécommande
13 = Plaque d'identification
Luna 2
1 = Potence de levage
2 = Triangle
3 = Retenue de matelas
4 = Barreau latéral
5 = Appuie-tête
6 = Appuie-pied
7 = Panneau arrière
8 = Panneau frontal
9 = Roulette directrice
10 = Blocage de roulette
1 1 = Moteur
12 = Télécommande
13 = Plaque d'identification
Luna Basic 2
Luna 2 Luna Basic 2, Luna UL 2
2016-06
Page6
1.4 Explication des symboles
Poids maximum
Conformité CE
L Directives en matière de sécurité
Lire le mode d’emploi
Procédure /utilisation correctes
Procédure /utilisation incorrectes
Classe de protection II
Partie d’application type B
1.5 Accessoires
L AVERTISSEMENT : des précautions devront être prises en cas d'utilisation
d'accessoires non répertoriés ci-dessous.
Bois poste soignant
F
Désignation type
1 = Potence de levage
2 = Triangle
3 = Retenue de matelas
4 = Barreau latéral
5 = Appuie-tête
6 = Appuie-pied
7 = Panneau arrière
8 = Panneau frontal
9 = Roulette directrice
10 = Blocage de roulette
1 1 = Moteur
12 = Télécommande
13 = Plaque d'identification
Luna UL 2
 Loading...