

Vermeiren Lyna II, Lindsey Instruction Manual
VERMEIREN
Lyna II - Lindsey
I N S T R U C T I O N M A N U A L
M O D E D ’ E M P L O I
G E B R U I K S A A N W I J Z I N G
G E B R A U C H S A N W E I S U N G
I S T R U Z I O N I P E R L ' U S O
MAN U A L DE INSTRUCCIONES
I N S T R U K C J A O B S Ł U G I

Instructions to the specialist dealer
This instruction manual is part and parcel of the product and must accompany every product sold.
Version: E, 2016-08
All rights reserved, including translation.
No part of this manual may be reproduced in any form what so ever (print, photocopy, microfilm or any other process) without
written permission of the publisher, or processed, duplicated or distributed by using electronic systems.
© Vermeiren GROUP 2016
Instructions pour les distributeurs
Ce manuel d'instructions fait partie du produit et doit accompagner chaque produit vendu.
Version : E, 2016-08
Tous droits réservés, y compris la traduction.
Aucune partie de ce manuel ne peut être reproduite, sous quelque forme que ce soit (imprimée, photocopie, microfilm ou tout autre
procédé) sans l'autorisation écrite du publicateur, ni traitée, dupliquée ou distribuée à l'aide de systèmes électroniques.
© Vermeiren GROUP 2016
Instructies voor de vakhandelaar
Deze handleiding is deel van het product en dient bij iedere product te worden geleverd.
Versie: E, 2016-08
Alle rechten, inclusief vertaling, voorbehouden.
Niets uit deze handleiding mag geheel of gedeeltelijk in enige vorm (druk, fotokopie, microfilm of ieder ander procedé) zonder de
schriftelijke toelating van de uitgever worden gereproduceerd of met behulp van elektronische systemen worden verwerkt,
gekopieerd of verspreid.
© Vermeiren GROUP 2016
Hinweise für den Fachhändler
Diese Gebrauchsanweisung ist Bestandteil des Produkts und ist bei jeder Produkts auszuhändigen.
Version: E, 2016-08
Alle Rechte, auch an der Übersetzung, vorbehalten.
Kein Teil der Gebrauchsanweisung darf in irgendeiner Form (Druck, Fotokopie, Mikrofilm oder einem anderen Verfahren) ohne
schriftliche Genehmigung des Herausgebers reproduziert oder unter Verwendung elektronischer Systeme verarbeitet, vervielfältigt
oder verbreitet werden.
© Vermeiren GROUP 2016
Istruzioni per il rivenditore
Il presente Manuale di istruzioni è parte integrante del prodotto e deve essere fornito assieme alla prodotto.
Versione: E, 2016-08
Tutti i diritti riservati (anche sulla traduzione).
Il presente manuale non può essere riprodotto, neppure parzialmente, con alcun mezzo (stampa, fotocopia, microfilm o altro
procedimento) senza l’autorizzazione scritta della casa produttrice, né elaborato, duplicato o distribuito con l’ausilio di sistemi
elettronici.
© Vermeiren GROUP 2016
Instrucciones destinadas a los distribuidores especializados
El presente manual de instrucciones es parte integrante del producto y se debe adjuntar a todas las producto que se vendan.
Versión: E, 2016-08
Todos los derechos reservados, incluidos los de la traducción.
Se prohíbe la reproducción total o parcial del presente manual de cualquier forma (impresión, fotocopia, microfilm o cualquier otro
procedimiento), así como la edición, copia o distribución empleando sistemas electrónicos, sin el permiso escrito del editor.
© Vermeiren GROUP 2016
Instrukcje dla wyspecjalizowanego sprzedawcy
Niniejsza instrukcja obsługi jest nieodłączną częścią produktu i musi być dołączona do każdego sprzedawanego produktu.
Wersja: E, 2016-08
Wszelkie prawa zastrzeżone, łącznie z tłumaczeniem.
Żadna część niniejszej instrukcji nie może być powielana w jakiejkolwiek formie (drukowanej, fotokopii, mikrofilmu ani innej) bez
pisemnej zgody wydawcy, nie może być również przetwarzana, kopiowana ani rozprowadzana za pomocą systemów
elektronicznych.
© Vermeiren GROUP 2016

Lyna II, Lindsey
2016-08
1
Contents
1. Technical details .................................................. 2
2. Components ......................................................... 2
3. Explanation of symbols ........................................ 3
4. Check after delivery ............................................. 3
5. Intended use ........................................................ 3
6. Before use ............................................................ 3
7. Fold and unfold the walking frame (Fig. 1)........... 3
8. Height adjustment handgrips (Fig. 2) ................... 4
9. Carrying walking frame ........................................ 4
10. Changing to articulating walking frame (Fig. 3
and 4) ................................................................... 4
11. Walking with non-articulating walking frame ........ 4
12. Walking with articulating walking frame (only
for Lyna II walking frame) ..................................... 5
13. Transfer wheelchair to walking frame Lyna II ...... 5
14. Transfer wheelchair to walking frame Lindsey ..... 5
15. Safety instructions ................................................ 5
16. Maintenance, Inspection, cleaning....................... 5
Table des matières
1. Caractéristiques techniques ................................. 6
2. Composants ......................................................... 6
3. Explication des symboles ..................................... 7
4. Contrôle lors de la réception ................................ 7
5. Utilisation ............................................................. 7
6. Avant utilisation .................................................... 7
7. Plier et déplier le cadre de marche (Fig. 1) .......... 7
8. Ajustez les poignées en hauteur (Fig. 2) ............. 7
9. Portez le cadre de marche ................................... 8
10. Changer l'articulation du cadre de marche
(Fig. 3 et 4) ........................................................... 8
11. Marcher avec un cadre de marche non articulé... 8
12. Marcher avec un cadre de marche articulé
(seulement pour le Lyna II) .................................. 8
13. Transfert du fauteuil roulant vers le cadre de
marche Lyna II ..................................................... 9
14. Transfer du fauteuil roulant vers le cadre de
marche Lindsey .................................................... 9
15. Consignes de sécurité ......................................... 9
16. Maintenance, Inspection, Entretien...................... 9
Inhoudsopgave
1. Technische gegevens ........................................ 10
2. Onderdelen ........................................................ 10
3. Gebruikte symbolen ........................................... 11
4. Controle bij ontvangst ........................................ 11
5. Gebruik .............................................................. 11
6. Vóór gebruik ....................................................... 11
7. Op- en openvouwen van het loopkader (Fig. 1) 11
8. Hoogteverstelling handgrepen (Fig. 2)............... 11
9. Dragen van het loopkader .................................. 12
10. Veranderen naar articulerend loopkader
(Fig. 3 en 4) ........................................................ 12
11. Wandelen met niet-articulerend loopkader ........ 12
12. Wandelen met articulerend loopkader
(enkel voor Lyna II loopkader) ........................... 12
13. Transfer van rolstoel naar loopkader Lyna II ..... 13
14. Transfer van rolstoel naar loopkader Lindsey .... 13
15. Veiligheidsinstructies ......................................... 13
16. Onderhoud, Inspectie, Schoonmaken................ 13
Inhalt
1. Technische Daten .............................................. 14
2. Bauteile .............................................................. 14
3. Zeichenerklärung ............................................... 15
4. Prüfungen nach der lieferung ............................. 15
5. Zweckbestimmung ............................................. 15
6. Vor Gebrauch ..................................................... 15
7. Zu- und Aufklappen des Gehgestell
(Abb. 1) .............................................................. 15
8. Höheneinstellung Handgriffe (Abb. 2) ................ 15
9. Transport Gehgestell ......................................... 16
10. Ändern in reziprokes Gehgestell (Abb. 3 und 4) 16
11. Gehen mit starrem Gehgestell .......................... 16
12. Gehen mit reziprokem (nur Modell Lyna II) ....... 16
13. Vom Rollstuhl zum Gehgestell Lyna II .............. 17
14. Vom Rollstuhl zum Gehgestell Lindsey ............. 17
15. Sicherheitsanweisungen ................................... 17
16. Wartung, Inspektion, Pflege .............................. 17
Indice
1. Dati tecnici ......................................................... 18
2. Componenti ....................................................... 18
3. Significato dei simboli ........................................ 19
4. Controllo dopo la consegna ............................... 19
5. Utilizzo previsto ................................................. 19
6. Prima di utilizzarlo si deve ................................. 19
7. Apertura e chiusura del deambulatore (Fig. 1) .. 19
8. Regolazione dell'altezza delle maniglie di spinta
(Fig. 2) ............................................................... 19
9. Spostamento del deambulatore ........................ 20
10. Modifica del deambulatore articolato
(Fig. 3 e 4) ......................................................... 20
11. Muoversi con il deambulatore non articolato ..... 20
12. Muoversi con il deambulatore articolato
(solo per il modello Lyna II) .............................. 20
13. Trasferimento dalla carrozzina al
demabulatore Lyna II ......................................... 21
14. Trasferimento dalla carrozzina al
demabulatore Lindsey ....................................... 21
15. Istruzioni per la sicurezza .................................. 21
16. Manutenzione, Controllo, Pulizia ....................... 21
Índice
1. Datos téchnicos ................................................. 22
2. Componentes .................................................... 22
3. Explicación de los símbolos .............................. 23
4. Comprobaciíon tras la entrega .......................... 23
5. Uso previsto ...................................................... 23
6. Antes de usar .................................................... 23
7. Plegado y desplegado del caminador
(imagen 1) ......................................................... 23
8. Ajuste de la altura de las empuñaduras
(Imagen 2) ......................................................... 23
9. Transportar el caminador .................................. 24
10. Cambiar a un caminador articulado
(Imagen 3 y 4) ................................................... 24
11. Caminar con un caminador no articulado .......... 24
12. Caminar con el caminador articulado (solo para
caminador Lyna II) ............................................. 24
13. Transferencia de la silla al caminador Lyna II ... 25
14. Transferencia de la silla al caminador Lindsey . 25
15. Instrucciones de seguridad ............................... 25
16. Mantenimiento, Inspección, Cuidados .............. 25
Spis treści
1. Dane techniczne ................................................ 26
2. Elementy składowe ........................................... 26
3. Objaśnienia symboli .......................................... 27
4. Kontrola po dostawie ......................................... 27
5. Przeznaczenie ................................................... 27
6. Przed użyciem należy ....................................... 27
7. Składanie i rozkładanie balkonik (Rys. 1) .......... 27
8. Regulacja wysokości uchwyty (Rys. 2) ............. 27
9. Przenoszenia balkonika .................................... 28
10. Zmiana na zablokowany balkonik (Rys. 3 i 4) ... 28
11. Poruszanie się z niezablokowanym
balkonikiem
...................................................... 28
12. Poruszanie się z balkonikiem (tylko balkonik
Lyna II ) ............................................................. 28
13. Przenoszenie się z wózka .... rehabilitacyjnego na
balkonik ............................................................. 29
14. Zmiana pozycji z wózka na balkonik Lindsey .... 29
15. Instrukcje bezpieczeństwa ................................ 29
16. Konserwacja, Kontrola, Pielęgnacja .................. 29
Lyna II, Lindsey
2016-08
2
INSTRUCTION MANUAL
Walking frame Lyna II, Lindsey
1. Technical details
L WARNING: Risk of unsafe settings -
Use only the settings described in
this manual.
Make
V
ermeiren
Address
V
ermeirenplein 1/15,
B-2920 Kalmthout
Type Walking frame
Model Lyna II
Total width 540 mm
Total length 470 mm
Maximum height 960 mm
Minimum height 780 mm
Width (folded) 120 mm
Length (folded) 510 mm
Height (folded) 780 mm - 955 mm
Distance between
handgrips
495 mm
Weight 2,65 kg
Max. inclination
forwards
10°
Max. inclination
backwards
5°
Max. inclination
sideways
8°
Maximum user weight
max. 130 kg
Turning diameter 1180 mm
Maximum angle
handgrips
0° (not articulating)
3,5° (articulating)
Storage temperature +5°C - +41°C
We reserve the right to introduce technical changes.
Measurement tolerance +/- 15 mm / 1,5 kg / °
Make
V
ermeiren
Address
V
ermeirenplein 1/15,
B-2920 Kalmthout
Type Walking frame
Model Lindsey
Total width 590 mm
Total length 540 mm
Maximum height 970 mm (handgrip 1)
710 mm (handgrip 2)
Minimum height 790 mm (handgrip 1)
535 mm (handgrip 2)
Width (folded) 120 mm
Length (folded) 605 mm
Height (folded) 790 mm - 970 mm
Distance between
handgrips
475 mm
Weight 2,75 kg
Max. inclination
forwards
10°
Max. inclination
backwards
5°
Max. inclination
sideways
8°
Maximum user weight
max. 130 kg
Turning diameter 1510 mm
Maximum angle
handgrips
0° (not articulating)
Storage temperature +5°C - +41°C
We reserve the right to introduce technical changes.
Measurement tolerance +/- 15 mm / 1,5 kg / °
First of all we wish to thank you for the trust
you placed in us by selecting a VERMEIREN
product.
Before using the walking frame, read the
instruction manual carefully: it will familiarise
you with this product.
If you have any further questions, please
consult your specialist dealer.
To find a service facility or specialist dealer
near you, contact the nearest Vermeiren
facility. A list of Vermeiren facilities can be
found on the last page.
Visually impaired people can contact the
dealer for the instructions for use.
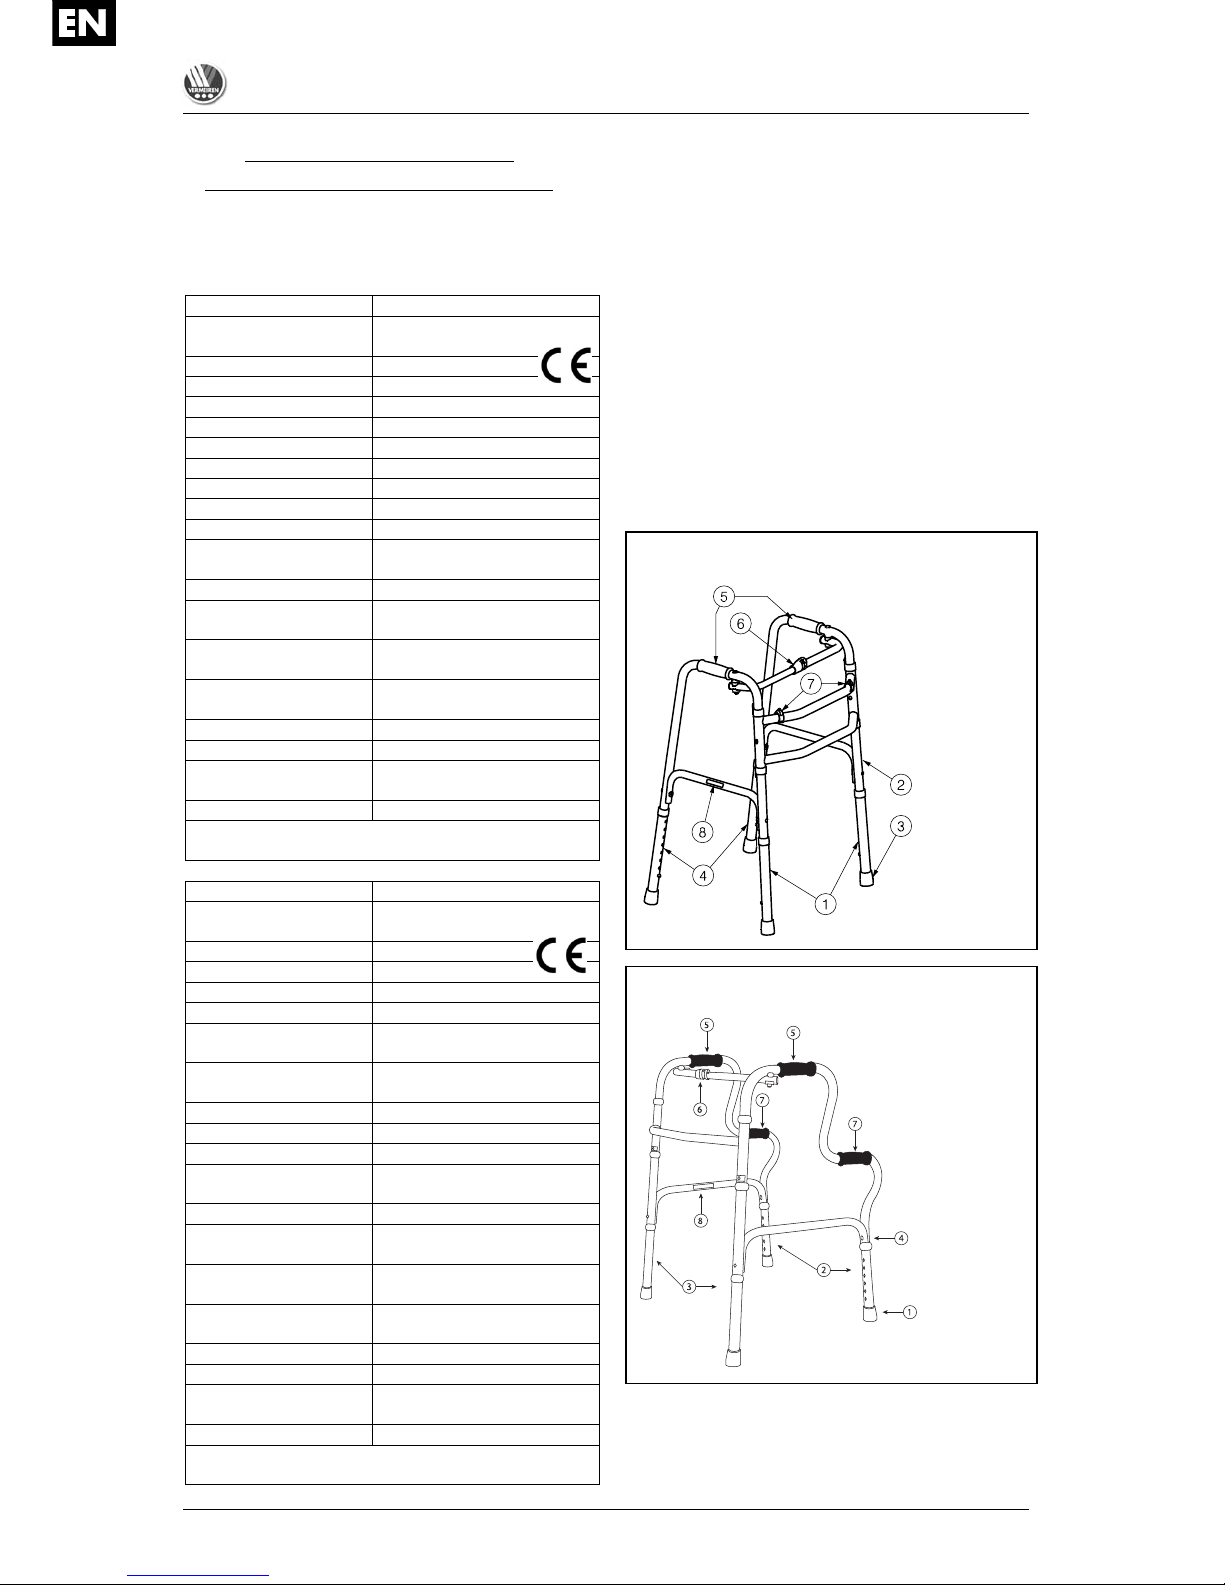
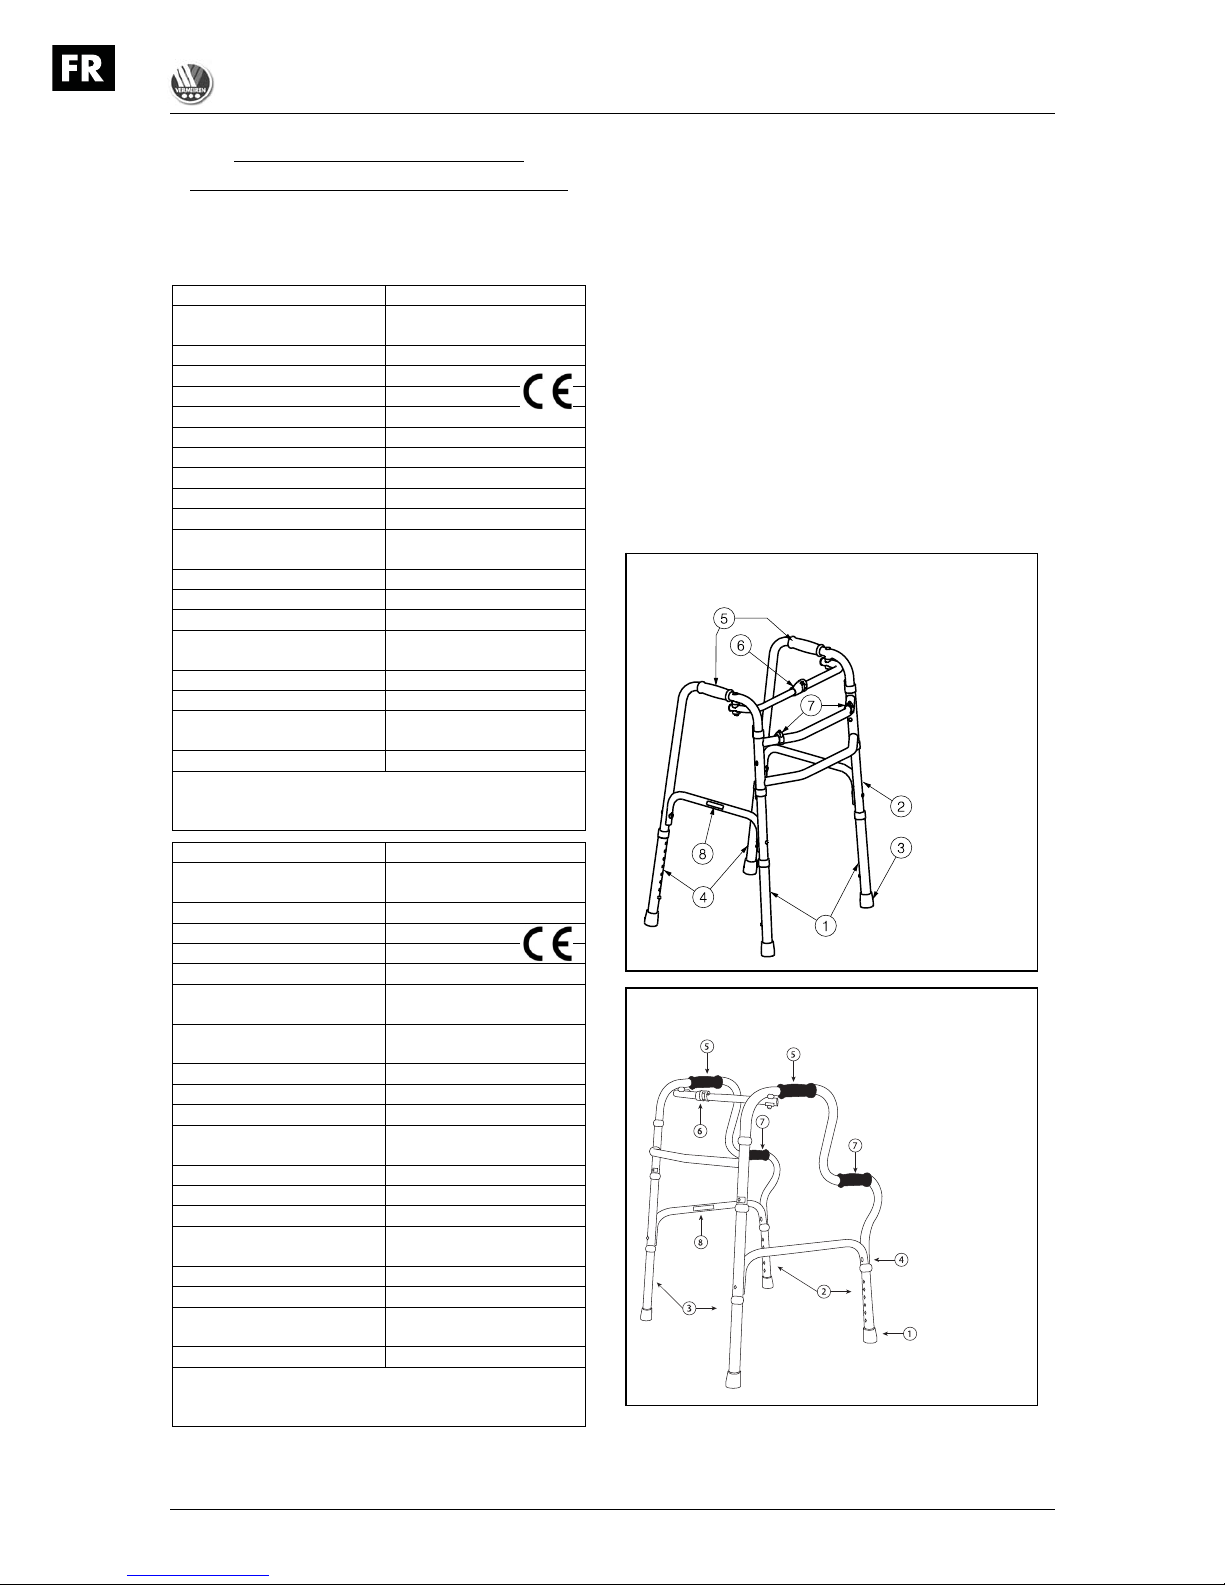
2. Components
1 = Front legs
2 = Frame
3 = Tip
4 = Rear legs
5 = Handgrips
6 = Locking pin folding
walking frame
7 = Clips for
articulating
walking frame
8 = Identification plate
LYNA II
1 = Tip
2 = Rear legs
3 = Front legs
4 = Frame
5 = Handgrips 1
6 = Locking pin folding
walking frame
7 = Handgrips 2
8 = Identification plate
LINDSEY
Lyna II, Lindsey
2016-08
3
3. Explanation of symbols
Maximum mass
CE conformity
Type designation
4. Check after delivery
Unpack your product and verify if the delivery
is complete. Following items should be
included:
walking frame with 4 tips (mounted)
height adjustable handgrips
manual
Verify your product for transport damage. If
you find any damages after delivery proceed
as follows:
contact the transporter
have a list made of any problems
contact your supplier
5. Intended use
L WARNING: Risk of falling - Do not use
the walking frame if you have weak
arm function or poor equilibrium.
The walking frame will compensate the lack of
adequate support by the legs by leaning on,
or moving with, the walking frame with usage
of the upper limbs or chest. The walking frame
will provide a better stability, support and
safety during walking.
However, it cannot be used by persons with a
visible weakened hand and/or arm function
and also not by persons with a balance
problem.
The walking frame can be used indoor and
outdoor.
The walking frame should only be used on
surfaces where all four tips are touching the
ground. Not to be used on rocky terrain or
steep hills (see technical details: max.
inclination) so the walking frame can become
unstable.
The product is not meant for transport of
people and/or goods.
6. Before use
Remove all packaging before using the
walking frame for the first time.
Unfold the walking frame.
Adjust the handgrips in the desired
height.
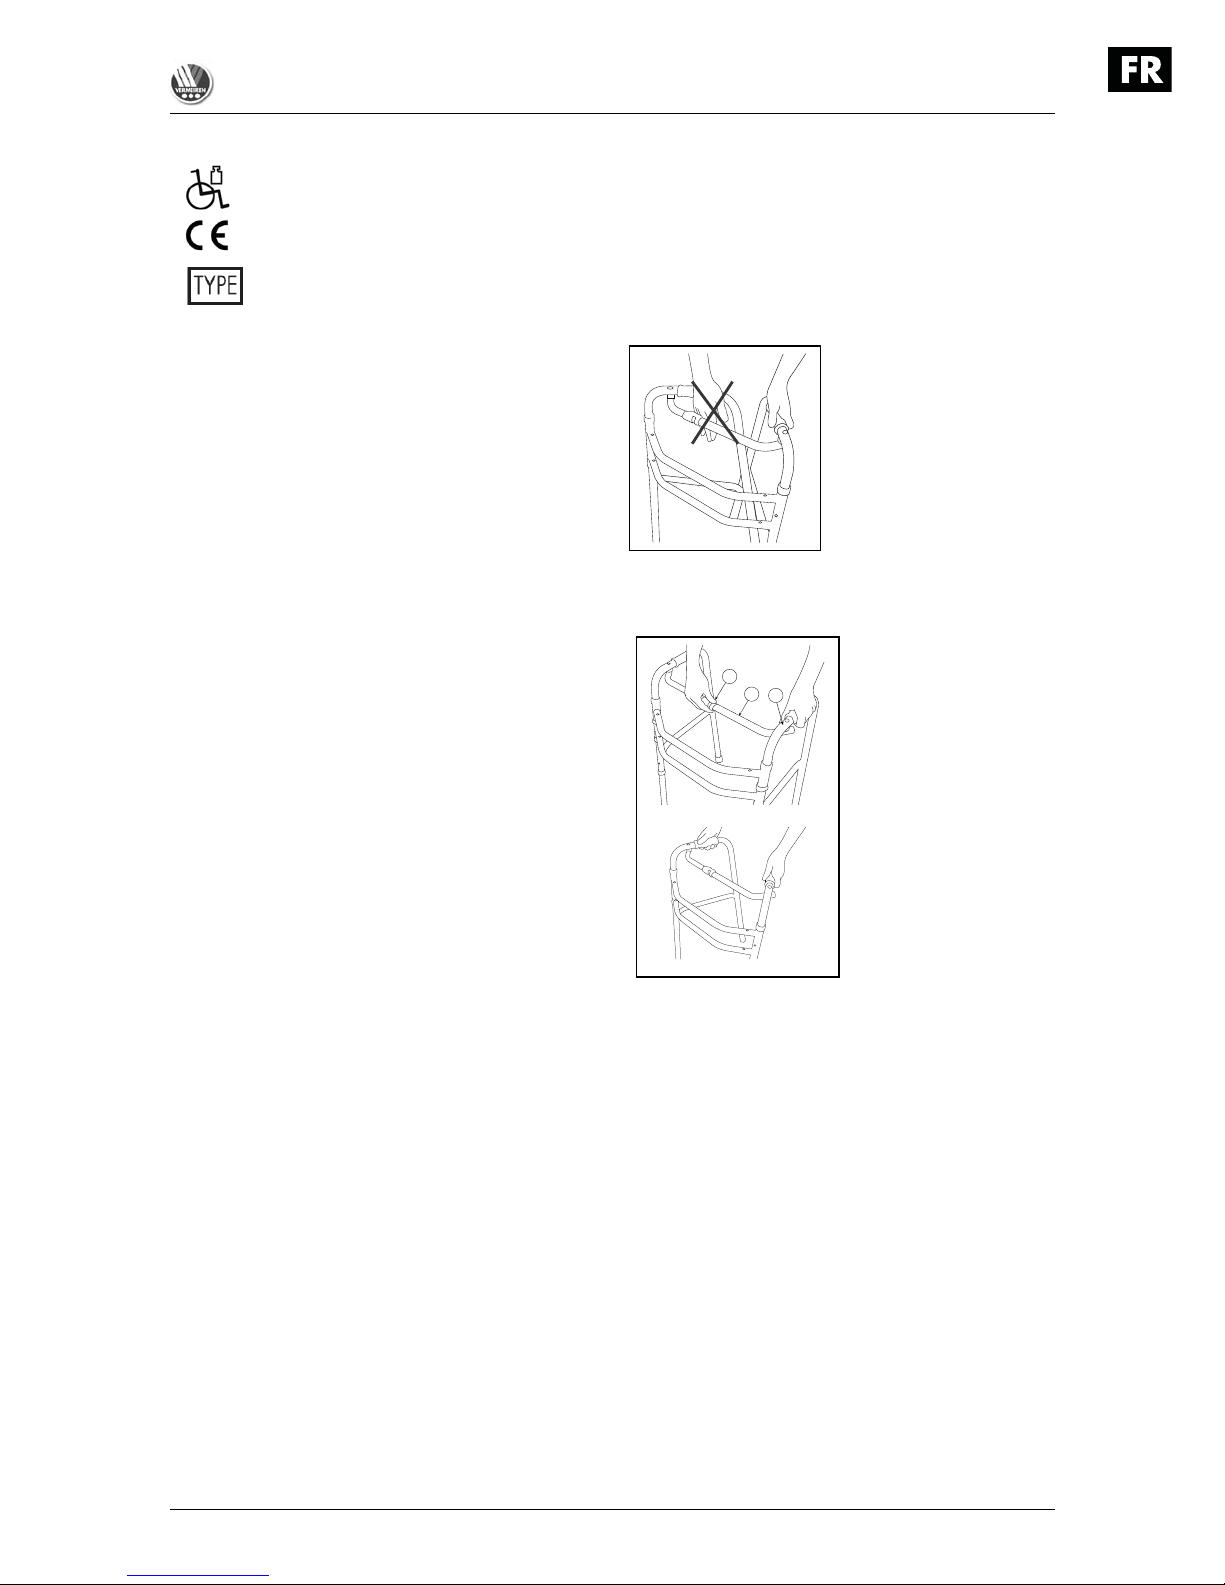
7. Fold and unfold the walking
frame (Fig. 1)
L WARNING: Risk of injury - Do not
press on the locking pin ( in Fig. 1)
unless you fold the walking frame.
L WARNING: Risk of injury - Check that
the walking frame is completely unfold
before using it.
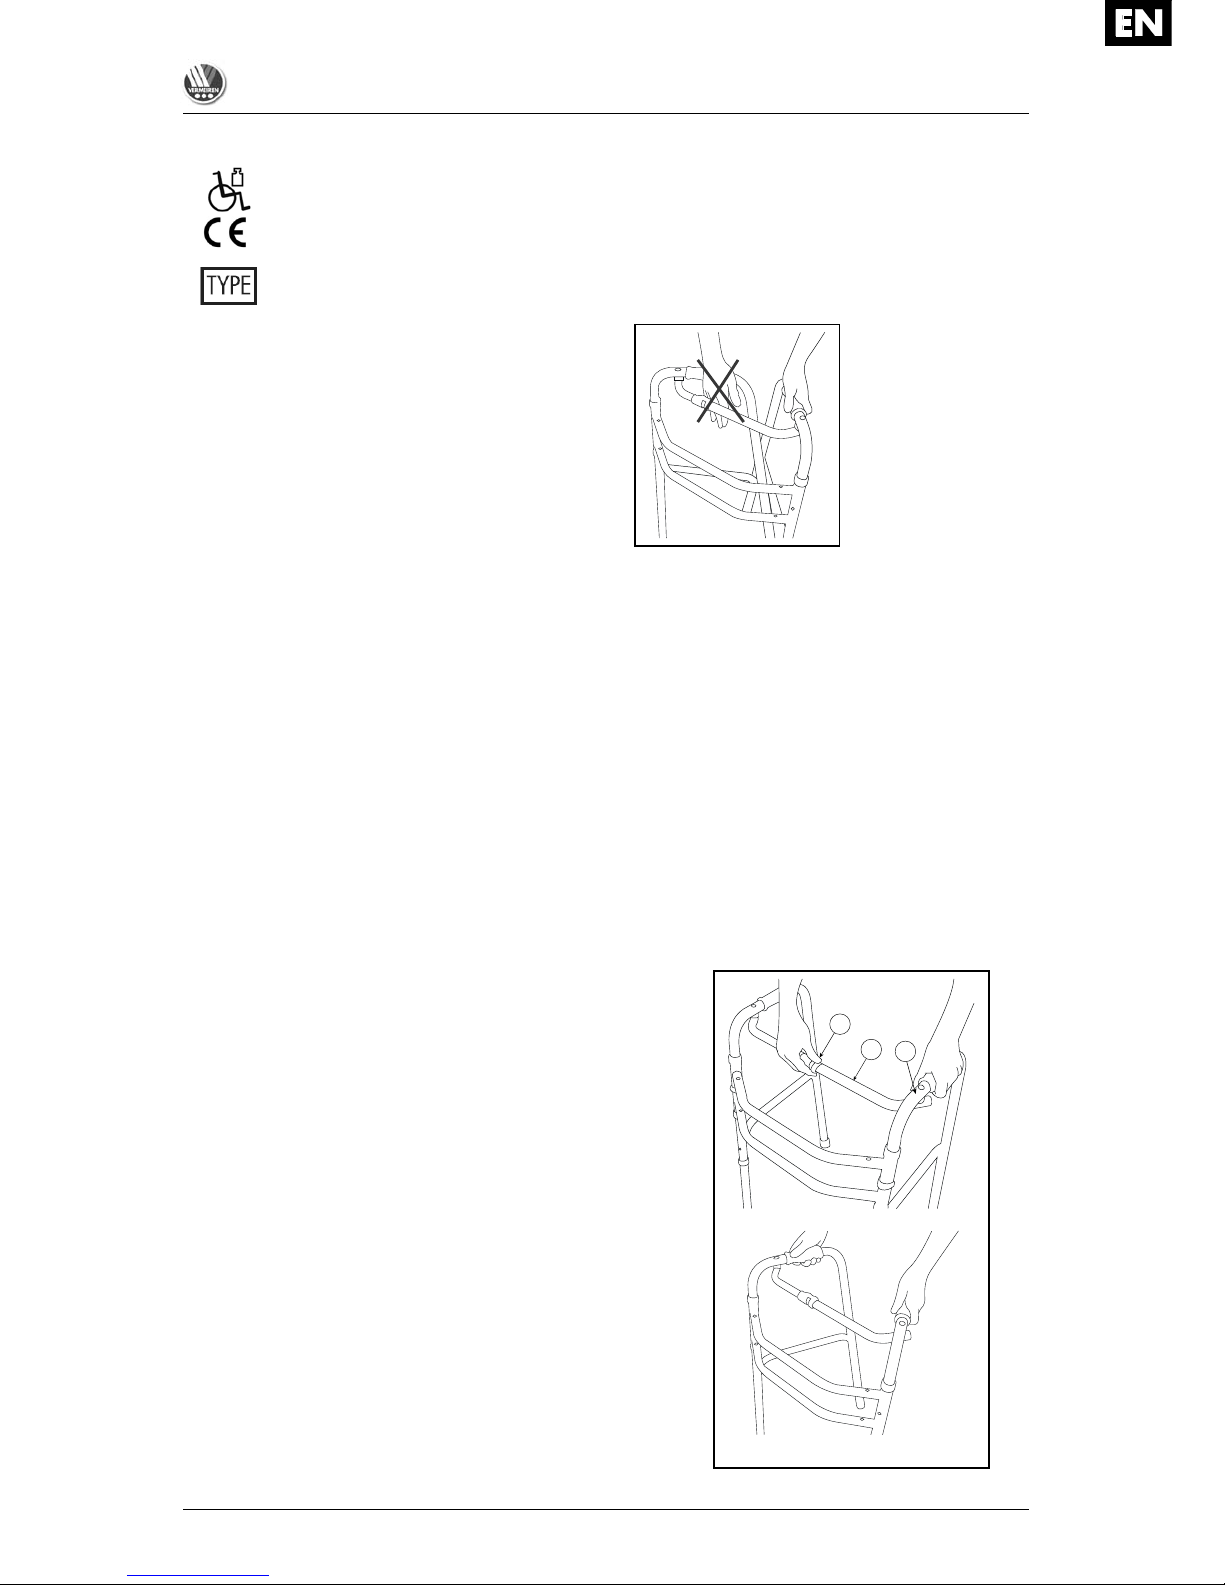
L WARNING:
Risk of clamping Keep fingers,
buckles and
clothes away from
the entrapment
zone.
To transport the walking frame in the car
or airplane you can fold the walking frame.
1. Folding walking frame
Press the locking pin
in the middle of
the bar
.
Grasp the handgrips.
Fold the side frames
one by one,
inwards.
2. Unfolding walking frame
Grasp the handgrips.
Fold the side frames
one by one,
outwards until it clicks in position.
Check that the side frames
are well
fixated and cannot move inwards,
before using the walking frame.
Fig. 1 – Folding / Unfolding walking frame
1
2
3
Lyna II, Lindsey
2016-08
4
8. Height adjustment handgrips
(Fig. 2)
L CAUTION: Risk of falling - Secure the
handgrips firmly before using the
walking frame. Check that the spring
pin is firmly fixated in a hole.
L CAUTION: Risk of falling - Do not
exceed the maximum height
adjustment of the handgrips, your
walking frame will not be stable
anymore.
L CAUTION: Risk of tipping over - Place
the four legs at the same height.
Before using the walking frame you must
adjust the handgrips in the correct height.
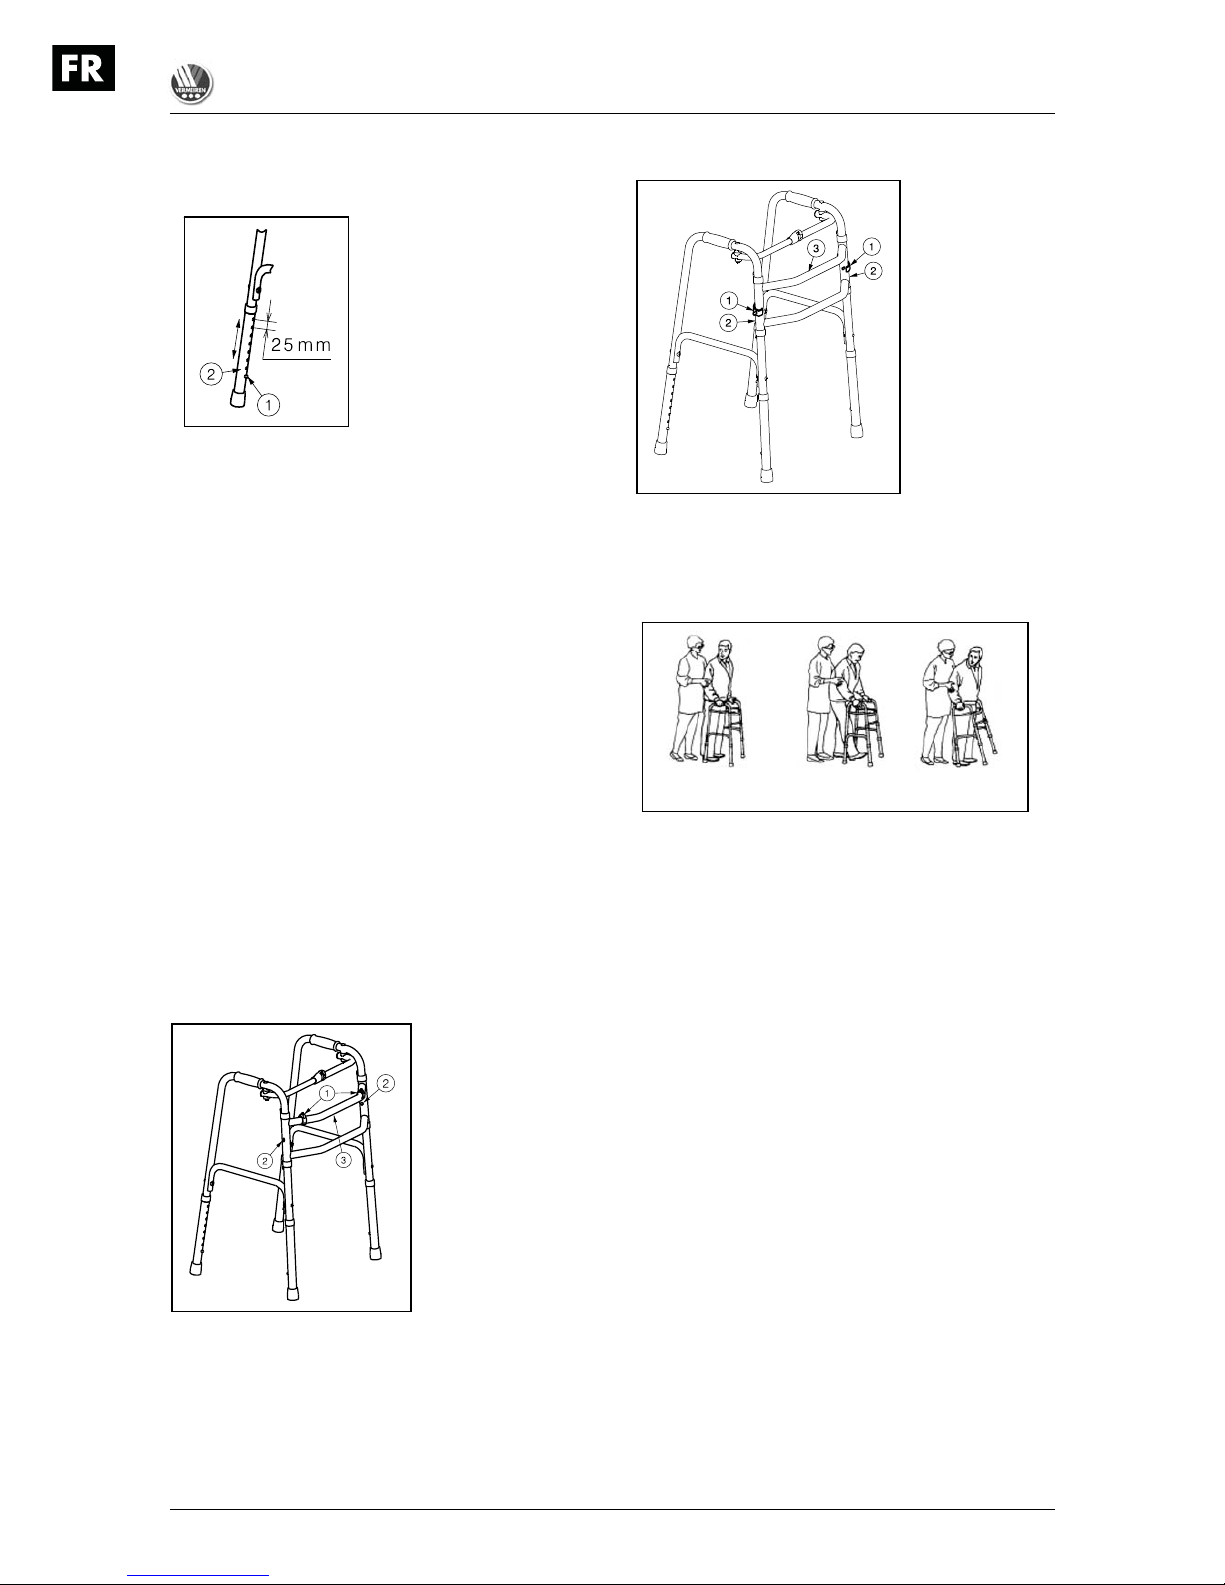
Fig. 2 – Adjustment handgrips
The handgrips can be
adjusted in height by
following steps:
Press on the spring
pin
.
Move the leg
until
the desired height (8
different positions:
steps from 25 mm).
Check that the spring pin
is clicked
back and firmly fixated in a hole.
Adjust the other legs with the same
instructions.
Check that all legs are placed in the
same position. When standing straight,
the handgrips should be as high as your
wrists. Leave your arms hanging loose.
Elbows should be flexed at 20° to 30°.
9. Carrying walking frame
The best way to carry the walking frame is to
grasp the walking frame on the handgrips
when the walking frame is folded or unfolded.
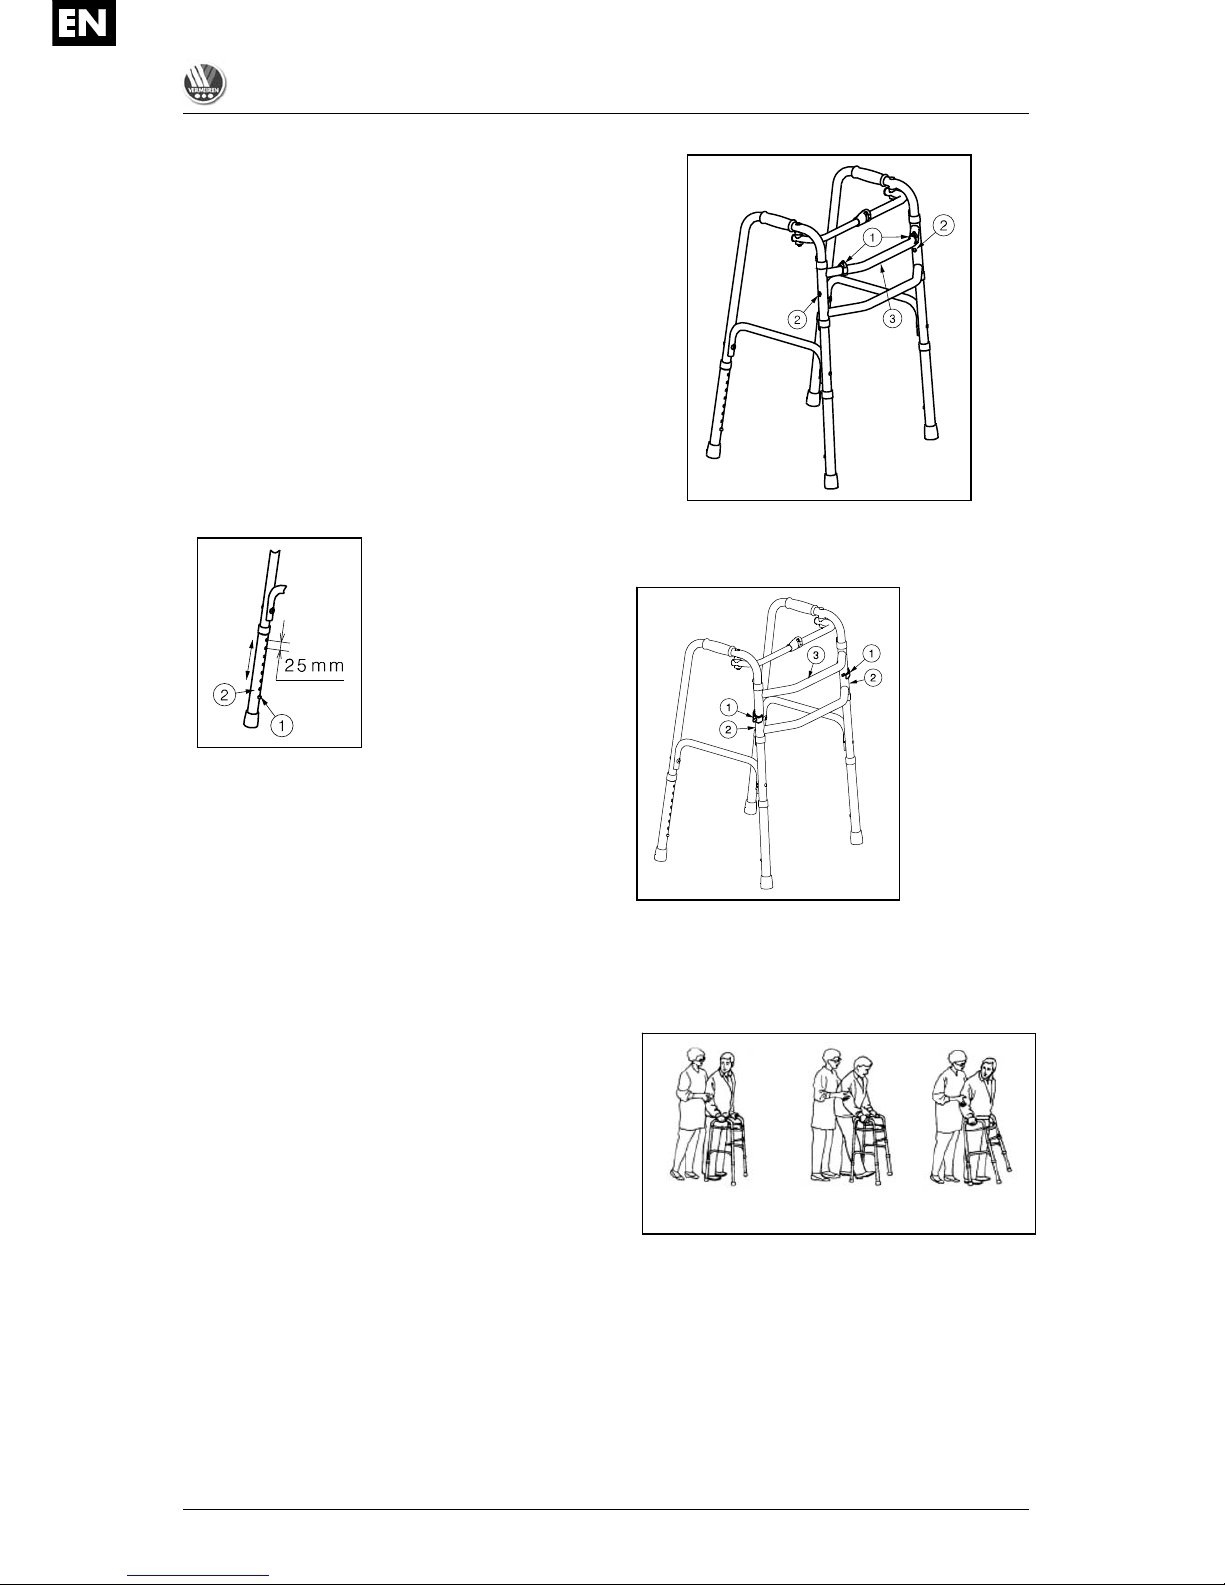
10. Changing to articulating
walking frame (Fig. 3 and 4)
For the Lyna II walking frame there is the
possibility to change these to an articulating or
non-articulating walking frame.
Adjust the walking frame to articulating
walking frame (Fig. 3):
Remove the locking clips
out the holes
of the side tubes
on the front of the
walking frame.
Place the locking clips
in the holes of
the top tube
.
Now the side frames of the walking frame
can be articulated (0° - 3,5°). The
advantage is that these give you always
a stable support.
Fig. 3 – Articulating walking frame
Adjust the walking frame to non-articulating
walking frame (Fig.4):
Fig. 4 – Non-Articulating walking frame
Remove the
locking clips
out the
holes of the
top tube
.
Replace the
locking clips
in the holes
of the side
tubes
on
the front of
the walking
frame.
Now the side frames of the walking frame
cannot articulated (0°).
11. Walking with non-articulating
walking frame
Step 1:
Align the middle of your feet with the rear legs
of the walking frame.
Step 2:
Lift the walking frame up and place it in front
of you making sure all four legs end up on the
floor.
Step 3:
Carefully walk forward one step at a time.
Step 1
Step 2 Step 3
Lyna II, Lindsey
2016-08
5
12. Walking with articulating
walking frame (only for Lyna II
walking frame)
Step 1:
Align the middle of your feet with the rear legs
of the walking frame.
Step 2:
Slide one side frame with the handgrip
forward. Afterwards slide the other side frame
with the handgrip forward.
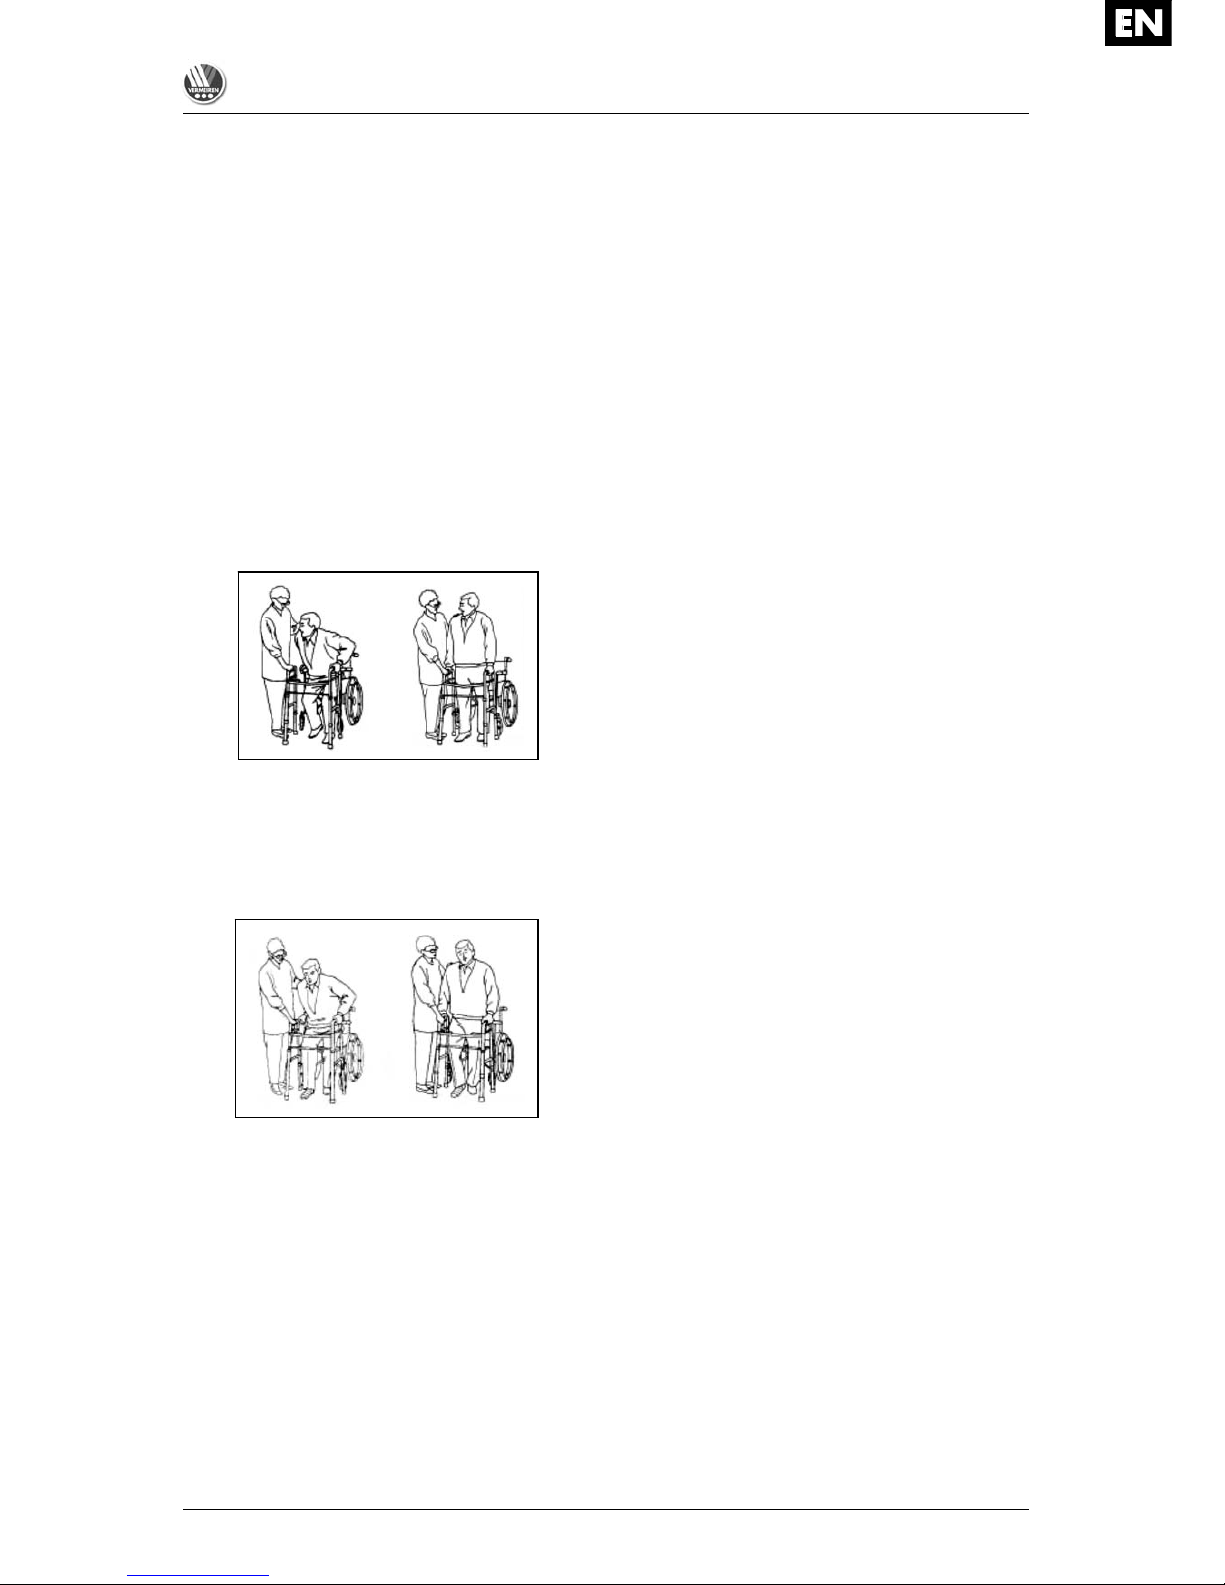
13. Transfer wheelchair to walking
frame Lyna II
Make certain the wheels of the wheelchair are
locked. Lift your body by pushing down on the
armrests and carefully transfer, one hand at a
time, to the walking frame (ask assistance if
you feel uncertain).
(with lower extremity injury to right leg or foot)
Make certain the wheels of the wheelchair are
locked. Lift your body by pushing down on the
armrests and carefully transfer the left hand
first, followed by the right hand (If the injury is
on the left leg or foot, transfer the right hand
first, followed by the left).
14. Transfer wheelchair to walking
frame Lindsey
The walking frame Lindsey have less high
handgrips to get easier and safer out the
wheelchair, bed, ... .
Make certain the wheels of the wheelchair,
bed, ... are locked. Lift your body by pushing
down on the armrests and carefully transfer,
one hand at a time, grasp first the less high
handgrips of the walking frame, afterwards the
higher handgrips.
15. Safety instructions
Check that the walking frame is in a
perfect condition before using it. If there
are damaged/missing parts change these
immediately by a qualified technician.
Do not sit on your walking frame - Risk of
tipping over or injury.
Use only the handgrips as support.
Risk of burns – Be careful when using in
hot or cold environments (sunshine,
extreme cold, saunas, etc.) for a
sufficient amount of time and when
touching.
Before every usage, check that the
locking pins for height adjustment of your
handgrips are firmly locked.
Verify if the safety against unwanted
folding/unfolding is functioning properly.
Only proceed moving with your walking
frame when you are standing comfortably
and when both your hands are resting on
the handgrips.
Do not hold the handgrips with wet
hands. If you do so, you can loose your
grip and loose your balance.
When you detect that your body is getting
tired, check that you can find a place for
resting.
The maximum user weight for your
walking frame is 130 kg.
When using the walking frame outdoors,
find yourself flat and stable areas to use
your walking frame. Avoid curbs and/or
deep holes. Find a place where the curbs
are beveled.
Avoid bumpy or sandy roads. Otherwise
you might loose control over the stability
of your walking frame.
Be aware of: throw rugs, toys, drapes,
animals, cracks in the floor, liquids or
puddles.
Do not proceed with your walking frame
into traffic. Always stay on the pavement.
Avoid roads, slopes with a very steep
inclination (the maximum angles are
mentioned in the technical details).
Do not use your walking frame on
staircases, escalators.
Exercise when walking on slope
surfaces, wet or slippery surfaces.
Take note of the instructions for care and
service. The manufacturer is not liable for
damage caused by improper
servicing/care.
16. Maintenance, inspection,
cleaning
For the maintenance manual of the walking
frames refer to the Vermeiren website:
www.vermeiren.com.
Lyna II, Lindsey
2016-08
6
MANUEL D'INSTRUCTION
Cadre de marche Lyna II, Lindsey
1. Caractéristiques techniques
L AVERTISSEMENT : Risque de réglages
dangereux - N'utilisez que les réglages
décrits dans ce manuel.
Marque
V
ermeiren
Adresse
V
ermeirenplein 1 / 15
B-2920 Kalmthout
Type Cadre de marche
Modèle Lyna II
Largeur totale 540 mm
Longueur totale 470 mm
Hauteur maximale 960 mm
Hauteur minimale 780 mm
Largeur (plié) 120 mm
Longueur (plié) 510 mm
Hauteur (plié) 780 mm - 955 mm
Distance entre les
poignées
495 mm
Poids 2,65 kg
Max. inclinaison avant 10°
Max. inclinaison en arrière 5°
Max. inclinaison en
latérale
8°
Poids maxi utilisateur
Max. 130 kg
Diámetro de giro 1180 mm
Angle maximum de
poignées
0° (non articulé)
3,5° (articulé)
Température de stockage +5°C - +41°C
Nous nous réservons le droit d’apporter des
modifications techniques. Tolérance de mesures ±
15 mm / 1,5 kg / °.
Marque
V
ermeiren
Adresse
V
ermeirenplein 1 / 15
B-2920 Kalmthout
Type Cadre de marche
Modèle Lindsey
Largeur totale 590 mm
Longueur totale 540 mm
Hauteur maximale 970 mm (Poignée 1)
710 mm (Poignée 2)
Hauteur minimale 790 mm (Poignée 1)
535 mm (Poignée 2)
Largeur (plié) 120 mm
Longueur (plié) 605 mm
Hauteur (plié) 790 mm - 970 mm
Distance entre les
poignées
475 mm
Poids 2,75 kg
Max. inclinaison avant 10°
Max. inclinaison en arrière 5°
Max. inclinaison en
latérale
8°
Poids maxi utilisateur
Max. 130 kg
Diámetro de giro 1510 mm
Angle maximum de
poignées
0° (non articulé)
Température de stockage +5°C - +41°C
Nous nous réservons le droit d’apporter des
modifications techniques. Tolérance de mesures ±
15 mm / 1,5 kg / °.
Nous tenons tout d'abord à vous remercier pour
la confiance que vous nous accordez en optant
pour un produit VERMEIREN.
Avant d'utiliser le cadre de marche, lisez
attentivement le mode d'emploi; il vous permettra
de vous familiariser avec la manipulation de ce
produit.
Pour toute question, consultez votre distributeur.
Pour trouver un service d'entretien ou un
revendeur spécialisé près de chez vous,
contactez l'établissement Vermeiren le plus
proche. Vous trouverez une liste des
établissements sur la dernière page.
Les personnes souffrant de problèmes visuels
peuvent prendre contact avec le revendeur pour
les instructions d'utilisation.
2. Composants
1 = Embout
2= Pieds arrière
3= Pieds avant
4 = Châssis
5 = Poignées 1
6 = Goupille de
blocage plié
cadre de marche
7 = Poignées 2
8 = Plaque
d'identification
LINDSEY
1= Pieds avant
2 = Châssis
3 = Embout
4= Pieds arrière
5 = Poignées
6 = Goupille de
blocage plié
cadre de marche
7 = Clips d’articulation
cadre de marche
8 = Plaque
d'identification
LYNA II
Lyna II, Lindsey
2016-08
7
3. Explication des symboles
Poids maximum
Conformité CE
Désignation type
4. Contrôle lors de la réception
Déballez le produit et contrôlez si la livraison est
complète. Se trouvent dans le paquet:
Cadre de marche avec 4 embouts pré-
montés
Poignées réglables en hauteur
Mode d’emploi
Vérifiez bien que le colis n’ait pas subi de dégâts
pendant le transport. Si vous constatez que ce
produit ou le colis présentent, contre toute
attente, des défauts, procédez comme suit:
Déposez immédiatement une déclaration
auprès du transporteur;
Faites enregistrer les dégâts;
Informez votre revendeur immédiatement.
5. Utilisation
L AVERTISSEMENT : Risque de chute -
N'utilisez pas le cadre de marche si
vous avez les bras fébriles ou des
problèmes d'équilibre.
Le cadre de marche sert à compenser la
diminution de la résistance ou de la capacité des
extrémités inférieures par l’utilisation de la force
ou du soutien des extrémités supérieures ou du
tronc, et à assister et assurer la marche.
Il ne faut pas utiliser le cadre de marche pour des
personnes qui souffrent d’une réduction des
fonctions des mains/bras ou d’importants
troubles de l’équilibre.
Le cadre de marche peut s'utiliser à l'intérieur
comme à l'extérieur.
Le cadre de marche doit être utilisé sur des
surfaces où les 4 embouts sont en contact avec
le sol. Ne pas utiliser sur des terrains rocheux ou
pentes raides (voir les détails techniques:
inclinaison maxi) le cadre de marche deviendrai
instable.
Le produit ne peut être utilisé pour transporter
des personnes et/ou des objets.
6. Avant utilisation
Retirez tous les emballages avant d'utiliser le
cadre de marche pour la première fois.
Déplier le cadre de marche.
Ajustez les poignées jusqu'à la hauteur
souhaitée.
7. Plier et déplier le cadre de marche
(Fig. 1)
L AVERTISSEMENT : Risque de lésions -
N'appuyez pas sur la goupille de
verrouillage (dans la Fig. 1) sauf si
vous voulez plier le cadre de la marche.
L AVERTISSEMENT : Risque de lésions -
Vérifiez que le cadre de marche soit
complètement déplié avant de l'utiliser.
L AVERTISSEMENT :
Risque de coincement –
Maintenez vos doigts,
boucles (de ceinture) et
vêtements à l'écart des
zones représentant des
goulots d'étranglement.
Pour transporter le cadre de marche dans la
voiture ou en avion, vous pouvez le plier.
Fig. 1 – Plier / déplier le cadre de marche
1. Plier le cadre de
marche
Appuyez sur la
goupille de
verrouillage au le
milieu de la barre .
Prenez les poignées.
Pliez les cadres
latéraux un par un,
vers l'intérieur.
2. Déplier le cadre de marche
Prenez les poignées.
Pliez les cadres latéraux un par un, vers
l'extérieur jusqu'à ce qu'ils s'enclenchent.
Vérifiez que les cadres latéraux soient
bien fixés et ne peuvent pas se déplacer
vers l'intérieur, avant d'utiliser le cadre de
marche.
8. Ajustez les poignées en hauteur
(Fig. 2)
L ATTENTION : Risque de chute - Fixez
fermement les poignées avant
d’utiliser le cadre de marche. Assurez vous que la goupille soit bien fixée
dans un trou.
L ATTENTION : Risque de chute - Ne
dépassez pas le réglage de la hauteur
maximale des poignées, car votre
cadre de marche ne sera plus stable.
L ATTENTION : Risque de basculement -
Placez les quatre pieds à la même
hauteur.
1
2
3
Lyna II, Lindsey
2016-08
8
Avant d'utiliser le cadre de marche, il est
nécessaire d'en ajuster la hauteur.
Fig. 2 – Réglage des poignées
Suivez la procédure cidessous pour ajuster la
hauteur des poignées :
Poussez sur le goupille
de blocage .
Déplacez le pied
à la
hauteur souhaitée (8
positions différentes :
écarts de 25 mm.).
Vérifiez que la goupille soit fermement
cliquée sur l’arrière dans son logement.
Réglez l'autre pied de la même manière.
Vérifiez que tous les pieds soient placés
dans la même position. Quand vous êtes
debout, les poignées doivent arriver à
hauteur de vos poignets. Pour ce faire,
laissez vos bras pendre. Vos coudes soient
pliés à environ 20 à 30°.
9. Portez le cadre de marche
La meilleure façon de porter le cadre de marche
par la poignée lorsqu’il est lié ou déplié.
10. Changer l’articulation du cadre de
marche (Fig. 3 et 4)
Pour le cadre de marche Lyna II, vous avez la
possibilité de le modifier en un cadre de marche
articulé ou non.
Pour ajuster le cadre de marche afin qu’il soit
articulé (Fig. 3):
Retirer les clips de verrouillage des trous
des tubes latéraux sur l'avant du cadre
de marche.
Placez les clips de verrouillage dans les
trous du tube supérieur
.
Maintenant, les
cadres latéraux
du cadre de
marche peuvent
être articulés (0 °
- 3,5 °).
L'avantage est
que ceux-ci
donnent toujours
un support
stable.
Fig. 3 – Cadre de marche articulé
Ajustez le cadre de marche afin qu’il soit non
articulé (Fig.4):
Fig. 4 – Cadre de marche non articulé
Retirer les clips
verrouillage
des trous
supérieurs
.
Replacez les
clips de
verrouillage
dans les trous
des tubes
latéraux sur le
devant du cadre
de marche.
Maintenant, les cadres latéraux du cadre ne
peuvent plus être articulés (0°).
11. Marcher avec un cadre de marche
non articulé
1ère étape:
Alignez le milieu de vos pieds avec les pieds
arrières du cadre de marche.
2ème étape:
Déplacez le cadre de marche vers l'avant
(assurez-vous que les 4 pieds du cadre de
marche sont posés au sol).
3ème étape:
Avancez prudemment pas à pas.
12. Marcher avec un cadre de marche
articulé (seulement pour le Lyna II)
1ère étape:
Alignez le milieu de vos pieds avec les pieds
arrière du cadre de marche.
2ème étape:
Faites glisser un cadre de côté avec la poignée
avant. Ensuite, glissez l'autre côté latéral avec la
poignée avant également.
1ère
2ème 3ème
Lyna II, Lindsey
2016-08
9
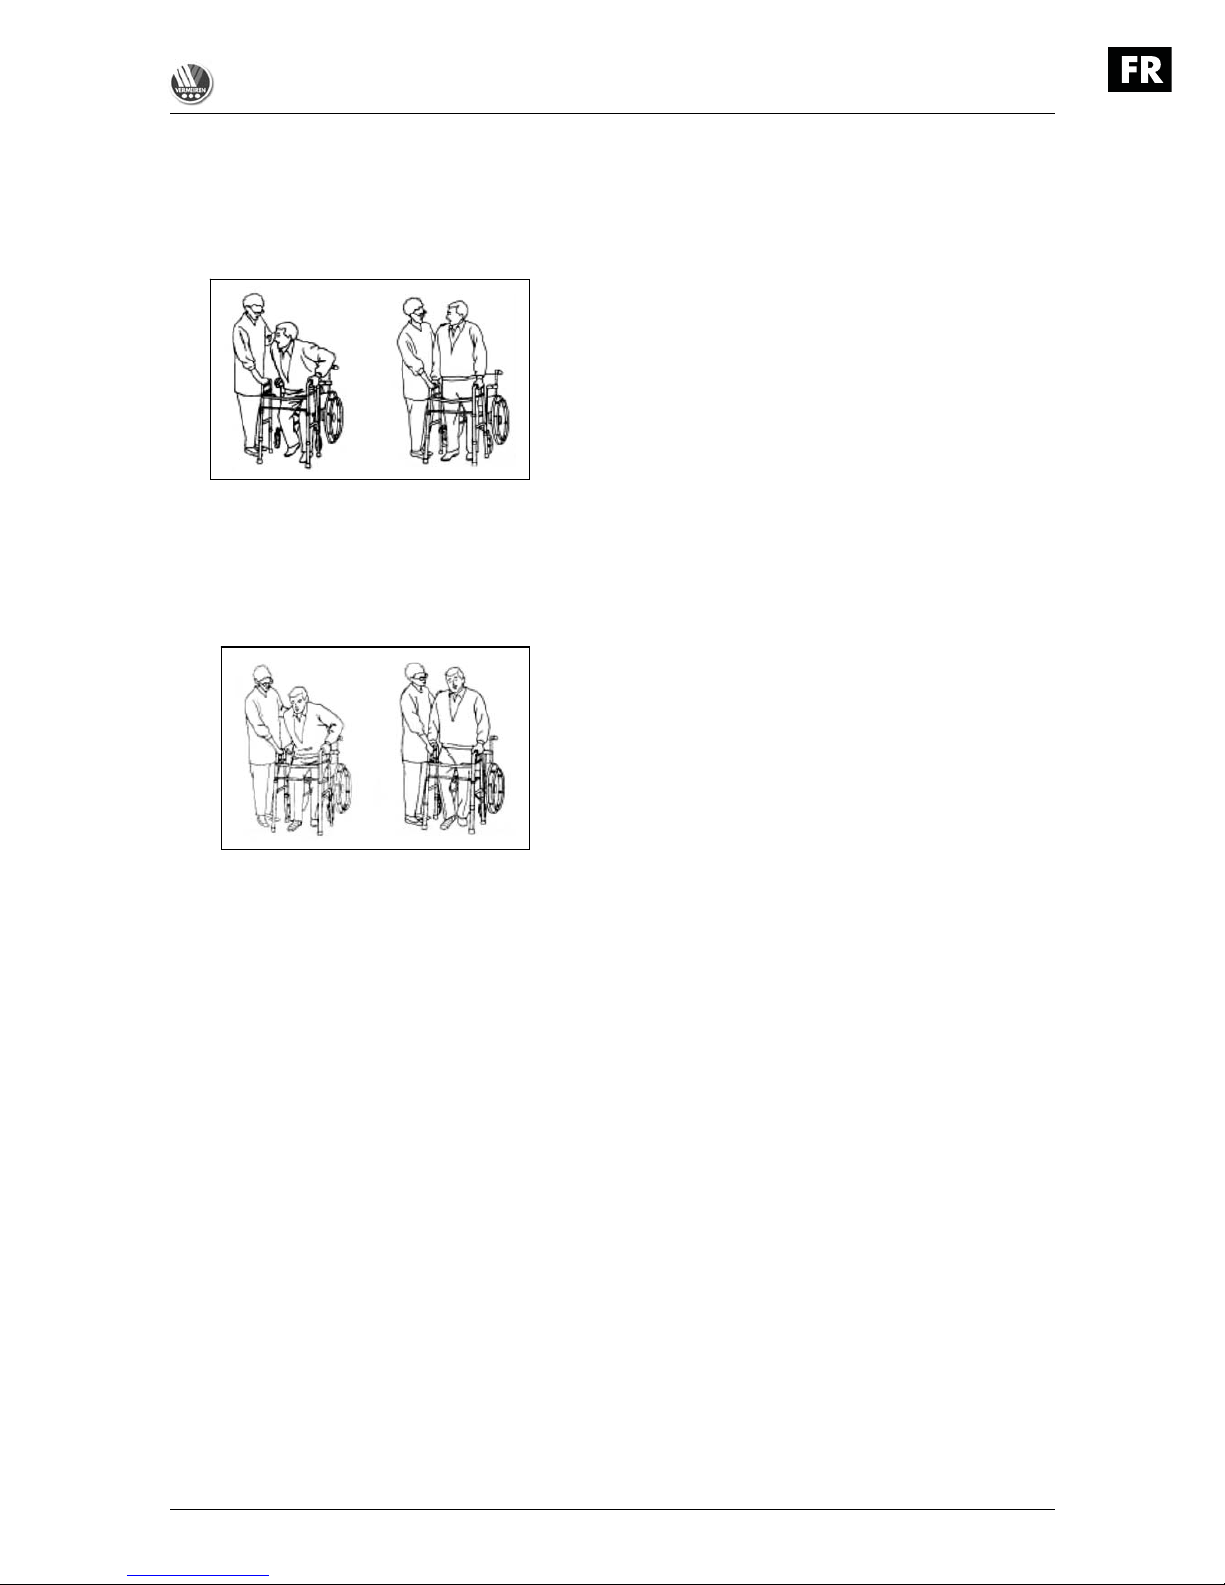
13. Transfert du fauteuil roulant vers
le cadre de marche Lyna II
Assurez-vous que les freins du fauteuil roulant
soient bloqués. Levez vous en vous aidant des
accoudoirs, une main à la fois (Demandez de
l'aide à une tierce personne si nécessaire).
(avec un(e) des deux pieds/jambes blessé(e))
Assurez-vous que les freins du fauteuil roulant
soient bloqués. Assurez-vous que les freins du
fauteuil roulant soient bloqués. Levez vous en
vous aidant des accoudoirs, en commençant par
la main opposée à la jambe blessée, puis
continuer avec l'autre main.
14. Transfert du fauteuil roulant vers
le cadre de marche Lindsey
Le cadre de marche Lindsey a des poignées
moins élevées afin de les attraper plus facilement
en se levant du lit, fauteuils… .
Assurez-vous que les freins du fauteuil roulant,
lit, ... soient bloqués. Levez vous en vous aidant
des accoudoirs,
et transférez la personne
soigneusement, d'une part, en saisissant la
poignée la moins haute.
15. Consignes de sécurité
Vérifiez que le cadre de marche soit dans un
parfait état avant de l'utiliser. S'il y a des
pièces endommagées / manquant changez
les immédiatement par un technicien
qualifié.
Ne pas s’assoir sur le cadre de marche -
Risque de basculement ou risque de
lésions.
Utilisez uniquement les poignées de
support.
Risque de brûlures – Soyez prudent lorsque
vous conduisez dans des environnements
chauds ou froids de disposer d'assez de
temps et lors des contacts.
Vérifiez que la goupille de blocage des
poignées soit serrée avant d’utiliser le cadre
de marche.
Vérifiez que la sécurité pour le
pliage/dépliage involontaire du cadre de
marche soit bien enclenchée.
Ne commencez à avancer que lorsque vous
êtes bien droit et que vous avez saisi les
poignées avec vos deux mains.
Ne saisissez pas les poignées si vous avez
les mains humides - elles pourraient glisser
et vous faire perdre prise.
Lorsque vous sentez votre corps fatigué,
trouvez un endroit pour vous reposer.
Le produit supporte une charge
maximale de 130 kg.
Lors de l’utilisation à l’extérieur, empruntez
uniquement des chemins plats et évitez les
bordures hautes. Évitez les bordures et / ou
les trous profonds. Cherchez un endroit où
la bordure est surbaissée.
Évitez d’aller sur les pavés ou sur des
surfaces de ce type - Vous pourriez perdre
le contrôle de votre cadre de marche.
Attention aux: tapis, jouets, rideaux,
animaux, fissures dans le sol, sols humides
ou glissants.
Ne vous promenez pas avec votre cadre de
marche au milieu du flot du trafic. Empruntez
des trottoirs plats.
Eviter les routes, les pentes avec une
inclinaison très raide (les angles maximaux
sont mentionnés dans les détails
techniques).
N’utilisez pas votre cadre de marche dans
les escaliers/escalators.
Suivez les instructions pour les soins et le
contrôle. Le fabricant n’offre aucune
garantie si le siège si celui-ci n’est pas
utilisé conformément à sa destination et si
les contrôles mentionnés dans le mode
d’emploi n’ont pas été effectués.
16. Maintenance, Inspection, Entretien
Le mode d'emploi des cadres de marche se
trouve sur le site Internet de Vermeiren,
www.vermeiren.fr, www.vermeiren.be.
 Loading...