

Vermeiren Ceres 3, Ceres 4 User Manual [de]
VERMEIREN
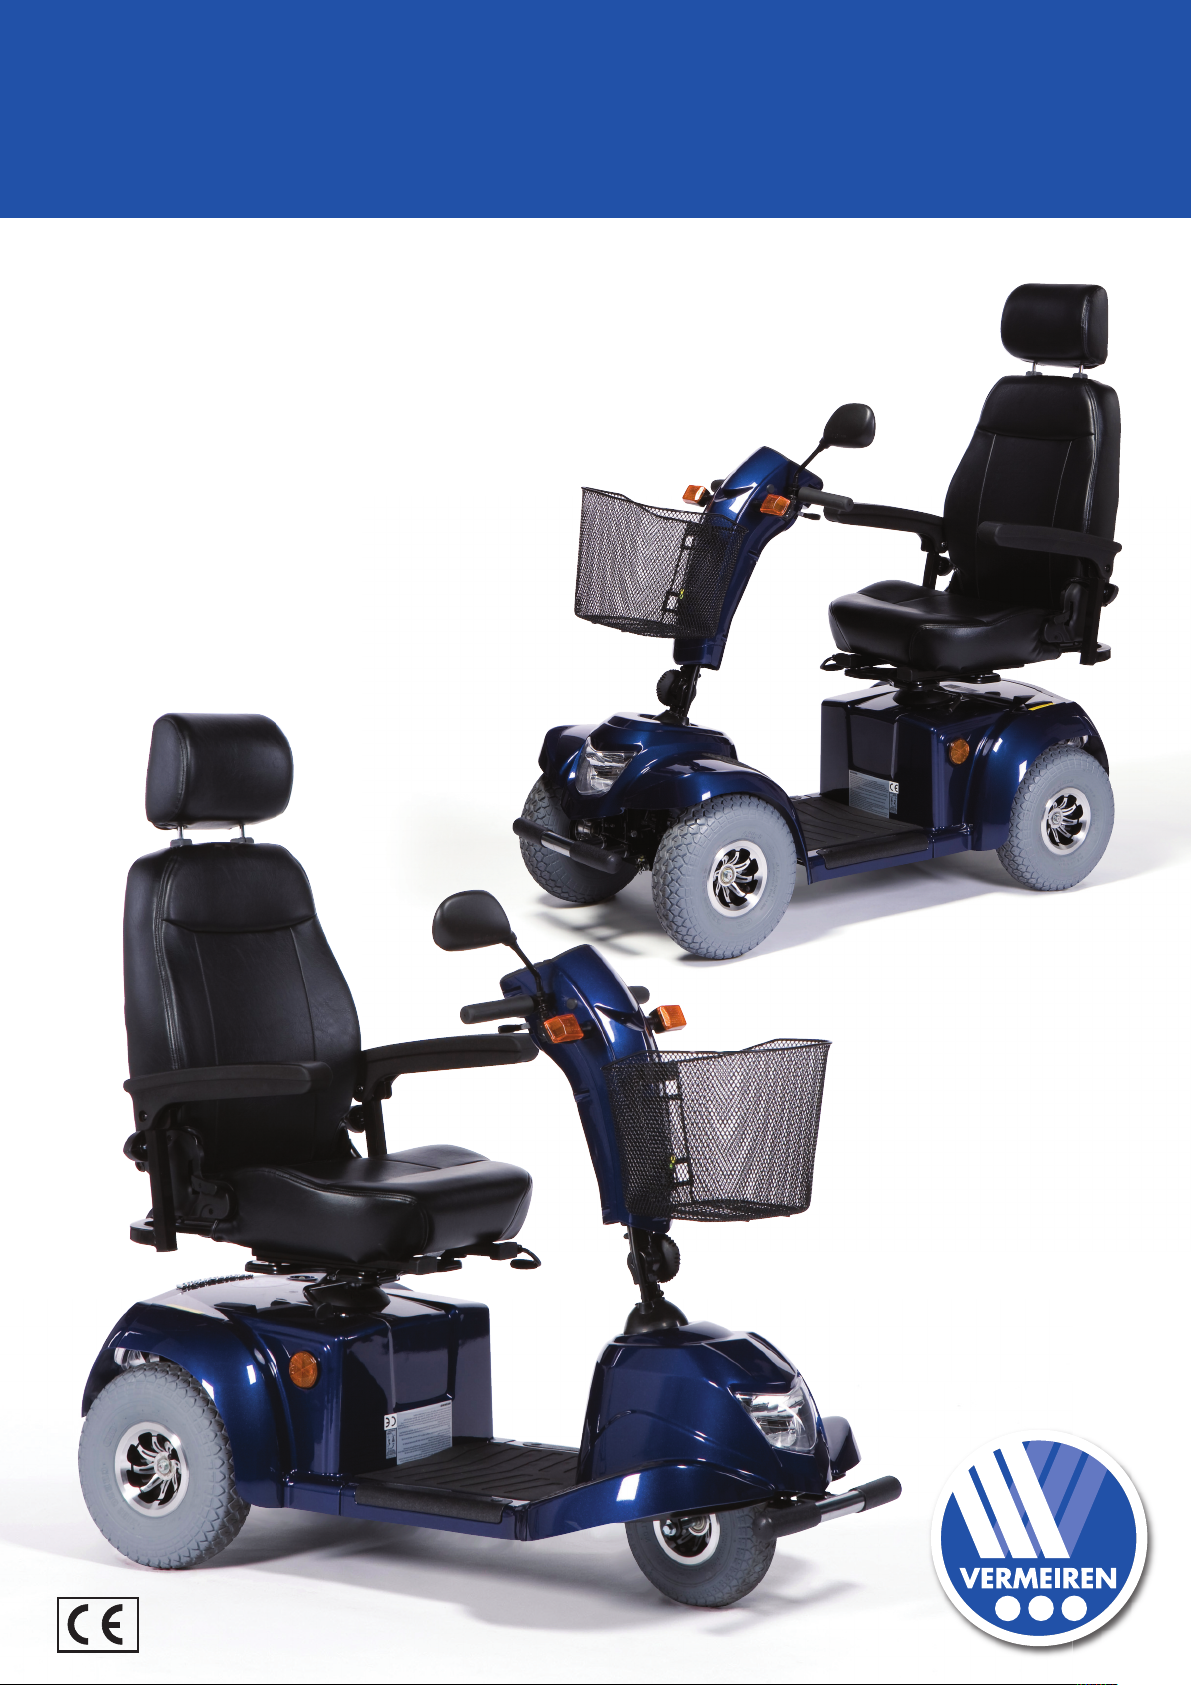
Ceres 3 / Ceres 4
I N S T R U C T I O N M A N U A L
M O D E D ’ E M P L O I
G E B R U I K S A A N W I J Z I N G
GEBRAUCHSANWEISUNG
I S T R U Z I O N I P E R L ' U S O
MANUAL DE INSTRUCCIONES

SCOOTERS Instruction Manual
2
Last updated: July-10
Notice to the specialist dealer:
This instruction manual is part and parcel of the product and it should accompany each product delivered.
1. Edition 2010
All rights reserved, including translation.
No part of this manual may be reproduced in any form whatsoever (print, photocopy, microfilm or any other
process) without written permission of the publisher, or processed, duplicated, or distributed by using electronic
systems.
Vermeiren Co. Ltd, 2010

SCOOTERS Instruction Manual
Last updated: Jan-09
3
CONTENTS
Section Page
Contents............................................................................................................................................... 3
Preface................................................................................................................................................. 4
General notes ...................................................................................................................................... 4
Allowed and disallowed usages .......................................................................................................... 4
For your safety ..................................................................................................................................... 5
Remarks on electromagnetic compatibility (EMC) ............................................................................... 6
Learning how to use your scooter ........................................................................................................ 7
• Readying the scooter for use......................................................................................................... 7
• Handling after usage ..................................................................................................................... 7
• Parking the scooter........................................................................................................................ 7
• Your first trip with the scooter ........................................................................................................ 7
• Moving backward........................................................................................................................... 7
• Going uphill.................................................................................................................................... 8
• Going downhill ............................................................................................................................... 8
• Uneven terrain .............................................................................................................................. 8
Charging the batteries.......................................................................................................................... 9
Battery storage..................................................................................................................................... 10
Thermal fuses ...................................................................................................................................... 10
Tip protectors ....................................................................................................................................... 10
Transporting the scooter ...................................................................................................................... 11
Using ramps ......................................................................................................................................... 11
Servicing .............................................................................................................................................. 11
Inspection ............................................................................................................................................. 12
Care ..................................................................................................................................................... 13
Disinfection .......................................................................................................................................... 14
Guarantee ............................................................................................................................................ 14
Statement of conformity ....................................................................................................................... 14
Service plan ......................................................................................................................................... 15
Addresses ............................................................................................................................................ 16

SCOOTERS Instruction Manual
Last updated: Jan-09
4
PREFACE
First of all we want to thank you for putting your trust in us by selecting one of our Scooters.
The expected working life of your vehicle depends essentially on your care and maintenance. This
instruction manual will help you to familiarize yourself with the operation of your Scooter and advise
you on keeping your it in a good operating condition to ensure a long working life.
This instruction manual reflects the latest level of development of the product. However, our firm,
Vermeiren, reserves the right to introduce changes without any obligation to adapt or replace
previously delivered models.
Keep in mind that your Scooter will remain in an excellent working condition and keep on functioning
perfectly even after many years, on condition that you follow our advice.
For any further questions please consult your specialist dealer.
GENERAL NOTES
The electric Scooter has been designed for outside uses. Only a few models are suitable for inside
uses thanks to their specific type of construction. However, users must make sure that the Scooter’s
turning circle diameter and uses comply with the space inside.
When using your Scooters on streets or footpaths, please obey existing laws and regulations.
You do not need a driver’s licence nor vehicle insurance with the models limited to a top speed of six
km/h. But for various reasons we recommend that you nonetheless take out insurance.
For the models capable of exceeding 6km/h, you will need a driver’s licence. These models’ Contents
of the Consignment include an operating permit meeting road traffic licensing regulations that you
must present to your insurer.
Use only the supplied battery charger and no other charging equipment.
We wish to point out that sources of electromagnetic waves (e.g. cell phones) are liable to create
interferences. The electronics of the scooter itself could affect other electric appliances too.
Even if you have been informed by your specialist dealer about the operational elements of your
scooter and their use, we recommend that you read the following pages very carefully.
We reserve the right to introduce technical changes. Our general business conditions apply.
ALLOWED AND DISALLOWED USAGES
The main use of the electric scooter is to comfortably transport people. The number of seats equals
the maximum number of people that it can transport. The scooter has been designed to transport
people only, no goods, nor any persons under the age of 12. Models with a top speed exceeding
6km/h may not be used to transport persons under the age of 16.
The scooter must not be used as ladder or support either for people or objects.
Neither should it be used by people obviously suffering from physical or mental limitations that render
them incapable of safely handling the scooter in traffic.
These limitations could involve:
• hemiplegics or paraplegics
• the loss of limbs (arm amputation)
• limb defects or deformations (if resulting in reduced equilibrium and steering abilities)
• contractures or damage done to joints (if resulting in reduced equilibrium and steering abilities)
• balance disturbances or cachexia
• mental disorders
• damage to the cerebral cortex owing to psychological disorders

SCOOTERS Instruction Manual
Last updated: Jan-09
5
When putting your electric scooter to use
• body size and weight
• physical and psychological condition
• residential circumstances and
• the environment
should also be taken into consideration.
In principle, the electric scooters are limited to uses on sidewalks. Only the models with an operating
permit complying with road traffic licencing regulations (exceeding 6km/h) may be used on urban
roads. Under no circumstances may it be used for driving on larger roads or expressways.
The manufacturer shall decline all liability for damage caused by improper uses.
FOR YOUR SAFETY
L
No additional passengers may be taken.
L Before getting on or off, taking apart or transporting your scooter, turn the start key to the “off”
position.
L When transporting the scooter, no person may be transferred along with it.
L Test the effects on the handling of the scooter when its center of gravity is shifted, for example
on up or down gradients, on laterally sloping ground or when driving over uneven terrain.
L When picking up objects lying in front of, next to, or behind the scooter, take care that you do
not lean too far sideways for fear of tipping over.
L Avoid putting your scooter into the free-wheeling position on slopes.
L Never reverse uphill.
L Reduce speed when you go round corners.
L While driving, hold the handle bars with both hands.
L Put your legs and feet on the surfaces provided for them during the drive.
L Do not use your scooter in rainy conditions.
L When storing or parking your scooter outside, protect it with a shrouding cover against
humidity.
L High levels of humidity or very cold conditions can reduce the performance of your scooter.
L Use your scooter strictly in accordance with regulations. Avoid driving straight over obstacles
(e.g. step, edge of the curb) or down from high ledges.
L Obey traffic regulations when driving on public roads. Please take other road-users into
consideration.
L As is the case with any other vehicle, you must never be under the influence of alcohol or
medicine while driving your scooter. This also applies to indoor driving.
L When traveling outdoors, adapt your driving to weather and traffic conditions.
L When driving in the dark, wear bright clothing or clothing with reflectors to be more visible, and
make sure that the reflectors on the scooter are visible clearly.
L Make sure that the lights of your scooter are free from dirt and/or other objects that could hide
them.
L Never use your scooter as a seat in an automobile or other vehicle.
L Check that the profile depth of the tyres is adequate.

SCOOTERS Instruction Manual
Last updated: Jan-09
6
L Be careful when using sources of fire such as cigarettes, since they can set the seat and back
covers alight.
L Make sure that the maximum load is not exceeded.
L If your scooter has pneumatic tyres, be careful to pump them to the correct pressure (see
pressure indication on the tyres).
REMARKS ON ELECTROMAGNETIC COMPATIBILITY (EMC)
Interfering electromagnetic fields may have a negative effect on the scooter’s electronic systems.
These can include:
• Disengagement of the engine brake
• Uncontrollable behavior by the scooter
• Unintentional steering movements
In the presence of very strong or enduring interfering fields, the electronic systems could even break
down entirely or suffer permanent damage.
Possible sources of radiation include:
• Portable receiver and transmitter installations (receiver and transmitter with fixed antenna)
- Transmitting and receiving sets
- Cell phones or cordless telephones
- portable TV, radio and navigation devices
- other personal transmitting devices
• Mobile medium-range transmitting and receiving devices (e.g. car antennas)
- Fixed transmitting and receiving sets
- Fixed mobile transmitting and receiving devices
- Fixed radio, TV and navigation systems
• Long-range transmitting and receiving devices
- Radio and television towers
- Amateur radio sets
• Other home devices
- CD player
- Notebook
- Microwave oven
- Cassette recorder
- etc.
Devices like electric shavers and hair dryers will have no influence provided that they function
perfectly and their cabling be in an excellent condition. Please conform to the operating instructions
accompanying such electric instruments to ensure troublefree operating of your scooter.
To reduce the effect of electromagnetic sources of interference, please heed the following warnings:
L Avoid using any portable TV or radio in the immediate environment of your scooter for as long
as it is turned on.
L Avoid using any transmitter-receiver or mobile telephone in the immediate environment of your
scooter for as long as it is turned on.
L Check the area for transmitter masts and avoid using the scooter close to them.
L If involuntary movements or braking occur, turn off the scooter as soon as it is safe to do so.

SCOOTERS Instruction Manual
Last updated: Jan-09
7
LEARNING HOW TO USE YOUR SCOOTER
• READYING THE SCOOTER FOR USE
When you use your scooter for the first time, make sure that it is standing on level ground. All wheels
must be in contact with the ground.
First insert the key and turn 90° to the right (depending on the model there can be an ON / OFF switch
– please see the relevant Operating Manual). Make sure that the motor is engaged. See to it that your
seat is at a height best suited to yourself. Sit down on the seat and verify that both armrests have
been adjusted to your forearms or folded down and that the seat has been locked in the driving
position.
Now turn the speed control to the minimum position (anticlockwise), or turn the ON/OFF button to the
ON position. Your scooter is now ready for use.
• HANDLING AFTER USAGE
Before getting off from your scooter, make sure that all four wheels touch the ground simultaneously.
Next turn the key to the “OFF” (charge indicator goes out) or press the ON/OFF button to turn off the
integrated light (charge indicator goes out).
• PARKING THE SCOOTER
Once your scooter has been turned off, no command can be sent to the driving system. You will be
unable to deactivate the electromagnetic brakes before turning on your scooter again. Always park
your scooter on sites that are well guarded or clearly visible.
• YOUR FIRST TRIP
Once you are seated on your scooter and have started it as described above, take hold of the Thandle bar with both hands, put your thumbs on the accelerator (in the case of the delta handle bar,
grasp the thinnest part of the bars with both hands) and use your fingers, or one finger only, to pull the
speed lever in the required direction, i.e.:
ACTION BY THE RIGHT HAND = FORWARD MOVEMENT
ACTION BY THE LEFT HAND = BACKWARD MOVEMENT
To brake, let go of the drive lever, which will let it return to the zero position and slow down your
scooter to a gentle stop. Practise pulling away and braking to get accustomed to the scooter. You
need to be able to estimate how your scooter will react when you drive or brake.
For corners and bends, use both hands to turn the handle bar in the direction you wish to take. The
front wheels will turn accordingly and steer the scooter into a new direction. It is very important that
you ensure that there is enough space allowing you to go around bends and corners. Narrow
passages must preferably be approached in a large curve so as to allow you to enter the narrowest
part as straight from the front as possible. Bear in mind that your scooter’s back part will in most cases
be wider than the front part.
L You need to greatly reduce your speed before you enter a curve or corner.
Take care not to enter curves and corners diagonally. By ‘cutting the corner’, chances are that your
rear wheels will run into obstacles and destabilize your scooter.
L Accustom yourself with the driving behavior of your scooter.
L Always maintain an adequate distance from corners and obstacles.
• BACKWARD MOVEMENT
Rearward driving requires increased concentration and care (LEFT HAND ACTION). This explains
why we have greatly reduced the speed of rearward movement in comparison with forward driving.
But we still recommend that you put the speed lever on minimum when you drive backward.
Do not forget that the steering direction with rearward drives is the opposite of when you go forward,
and that your scooter will turn directly in the required direction.
L Accustom yourself with the driving behavior of your scooter.

SCOOTERS Instruction Manual
Last updated: Jan-09
8
L Always go backward in the lowest speed possible.
L Always look to the back when you go backward.
• GOING UPHILL
When you go uphill, be careful that the slope does not exceed the maximum gradient your scooter is
capable of climbing (see “Technical Details” in your scooter’s manual).
Always approach slopes directly from the front and, to avoid tipping over, see to it that all four wheels
stay in contact with the ground at all times (ramps, driveways, etc.) Your scooter is powered through a
differential. Both drive wheels should therefore stay in contact with the ground at all times. Should one
of the drive wheels no longer be in contact with the ground, a safety device will cut the transmission of
energy to the wheels, bringing the scooter to a halt.
If you come to a stop on a slope by letting go of the accelerator, the engine break will prevent your
scooter from rolling backward. As soon as the accelerator returns to zero position, the engine break is
activated.
To resume your uphill drive, push the accelerator throttle open fully to ensure the release of a
sufficient amount of power. This will allow your scooter to slowly ascend the slope.
If your scooter is unable to drive up, turn the speed control up and try again.
L Accustom yourself with the driving behavior of your scooter.
L Never put your scooter in the free-wheeling position on uphill slopes.
• GOING DOWNHILL
Never drive down slopes that your scooter will be unable to ascend again. For detailed information on
the gradients your scooter is capable of handling, please refer to the corresponding manual.
Always approach downhill slopes directly from the front. Slantwise approaches can lead to some of
the wheels no longer staying in contact with the ground (danger of tipping over). If one of the back
wheels fails to make contact, the transmission of power will be cut and the scooter come to a
standstill.
The weight of the scooter will increase your downhill speed. Turn the speed control down and adjust
your speed to the conditions.
Avoid sharp bends on downhill slopes. The weight of your scooter could cause your scooter to lift up
on one side or even fall over around bends.
L Accustom yourself with the driving behavior of your scooter.
L Avoid sharp bends.
L Avoid putting your scooter into the free-wheeling position on slopes.
• UNEVEN TERRAIN
Your scooter has been designed for outside driving in particular. It is thus fully capable of driving over
uneven terrain (grass, gravel, cobble stones, etc.). Nevertheless, on certain soils such as sand, mud
or loose gravel, output can be reduced or your scooter even be brought to a standstill.
The following models are not suited to uneven terrain:
TE UL7-4, TE GK-8, TE 787-L, TE 787-NA, TE 777-NA.
For more information, please refer to “Technical Details” in the corresponding manuals. If you are
unsure whether your scooter will be able to drive across an uneven patch, it is best avoided.

SCOOTERS Instruction Manual
Last updated: Jan-09
9
CHARGING THE BATTERIES
The light emitting diode (LEDs) in the steering unit indicates the remaining capacity of your batteries.
Recharge the batteries on a daily basis. If you don’t do that and you keep on driving, the output of your
scooter will drop very significantly (uphills, bends, dim headlights). If you ignore these signals too, your
scooter will turn off. You should now immediately recharge your scooter with the accompanying
battery charger. Kindly also observe the accompanying operating instructions.
1. Turn the key to OFF and take it out.
2. Turn the protecting flap of the charging socket (steering column, with UL7-4: battery kit)
2a. with TE-777 NA / TE-787 NA: Connection of loading plug in loading device compartment
under the seat.
3. Insert the plug of the loading device into the loading socket of the scooter.
4. Insert the mains plug of the loading device into the socket. Switch the loading device to ON (a
few models have no ON/OFF switch; with these the loading device starts operating
automatically when you insert the mains cable).
5. The loading device now starts to charge and the LED (orange) goes on, which indicates that it
is busy charging.
6. Once the charging process is complete, the LED (orange) turns green, thereby indicating that
loading is complete.
7. First switch off the loading device (if there is no ON/OFF switch, pull out the mains plug).
8. Pull out the loading plug from the loading socket of the scooter. Your scooter is again ready for
use.
L Always take out the key before you start charging.
L Charge your scooter’s batteries strictly in accordance with the description above. If you charge
the batteries too early, they will gradually lose capacity, thus cutting your scooter’s traveling
range.
L The manufacturer shall decline all liability for damage caused by incorrect charging.
L Use only genuine original batteries. We do not accept any liability for damage caused by using
batteries not supplied by us.
L Do not expose the batteries to temperatures below 5° Celsius or above 50° Celsius.
L If the batteries are opened, all liability of the manufacturer is voided as well as any claim.
If you decide not to use your scooter for a prolonged period, you must nevertheless recharge it
regularly to keep it in a running condition ready for immediate use.
L If the batteries are not being used for a prolonged period, they will discharge slowly by
themselves (in-depth discharging). Then it becomes impossible to recharge them with the
supplied battery charger. When batteries are not in use, they must be recharged at least every
4 to 8 weeks (depending on the charge indicator).
L Note that if you recharge the batteries too frequently, they will eventually lose their capacity
irretrievably.
L Use only the supplied battery charger and no other charging equipment.
L The manufacturer shall decline all liability for damage caused by improper charging.
L In every case the charging cycle must not be interrupted. The battery charger has an indicator
showing you when the charging cycle has been completed (also see the Instruction Manual of
the loading device).
SCOOTERS Instruction Manual
Last updated: Jan-09
10
BATTERY STORAGE
If you no longer use your scooter, you could leave it connected to the battery charger. Charging is
automatically controlled by the battery charger. If you remove and store the batteries, kindly note the
following:
• Remove the cable clamps from the poles of the battery.
• The positive pole must at least be covered by a pole cap.
• Make sure that no objects can make contact with both poles during the time of storage (danger of
short circuits!).
• Batteries should only be stored in dry, well-ventilated spaces at a temperature between 5°C and
+40°C. +20°C).
• Protect the plugs and sockets against corrosion.
• Protect the batteries against deep discharging (see the chapter on battery charging).
If you have further questions, consult your specialist dealer who will gladly help you in regard to
storage and servicing of your batteries.
L If batteries are not used, they can discharge fully.
THERMAL SAFETY MECHANISM
To protect the motor against overload, your scooter comes with a thermal safety mechanism that will
automatically cut the motor to prevent overheating and thus rapid wear and tear or breakdowns. You
can access the thermal safety device through a gap in back of the synthetic cover. For those models
that have no synthetic cover, the thermal safety mechanism will be located on the battery boxes.
The thermal safety device can go loose if you go up or down slopes that exceed the maximum
gradient indicated. Nominal loads that exceed the maximum permitted could also cause the device to
jump out. Likewise, if you keep on driving with the engine brake on, it could result in overload. The
maximum values not to exceed are indicated in the chapter on “Technical Details” of the
corresponding manual.
To be able to use the scooter again, remove the overload and wait till the motor has cooled off. Then
gently press the thermal safety mechanism back in. Your scooter is now ready for use again.
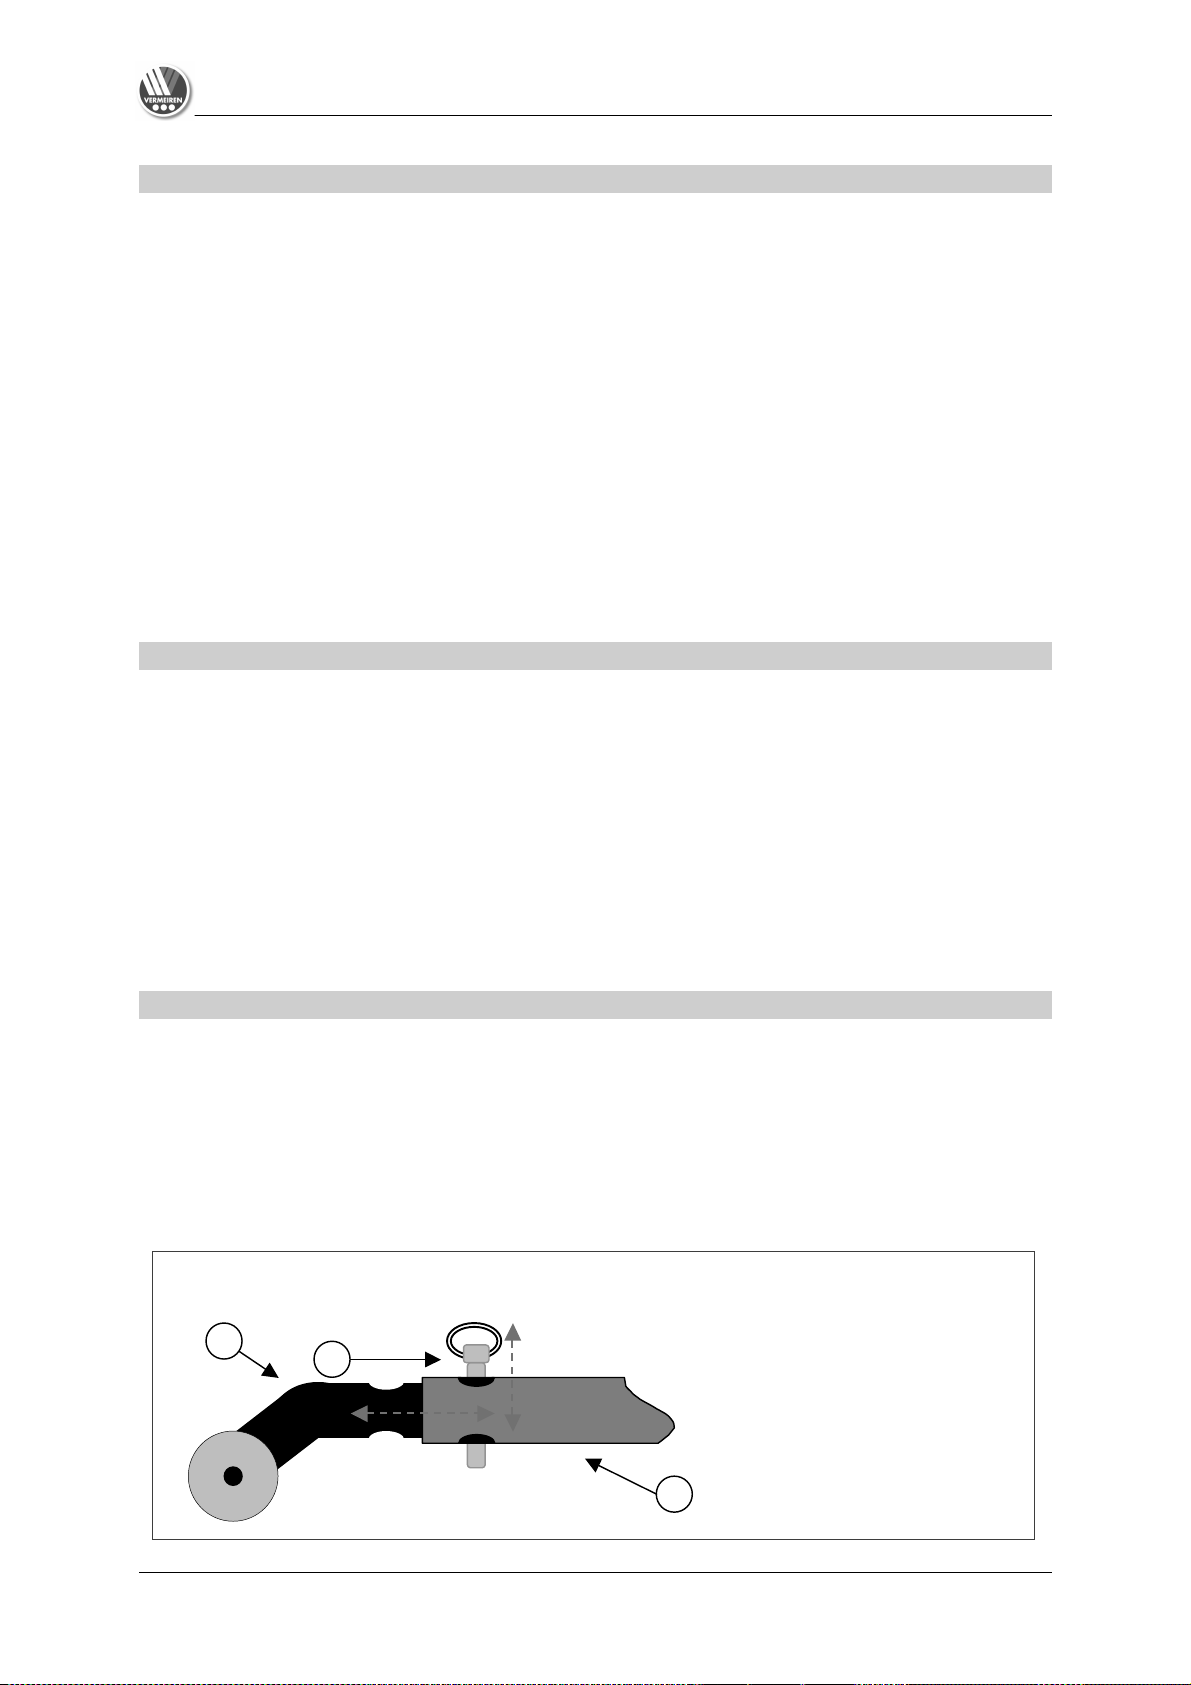
TIP PROTECTOR
A tip protector fixed to the frame is part of the standard equipment of some of the models. It is thus not
possible to remove it. The tip protector is there for your safety. It prevents the scooter from tipping
over backward when you drive over small obstacles that do NOT exceed the maximum height
specified.
With other models, the tip protector can be removed.
• Pull out the safety pins of the tip protector.
• Then pull out the tip protector.
• Insert the safety pins into the holes of the frame again to avoid losing them.
1
2
1 = Safety pin
2 = Tip protector
3 = Rear frame
3

SCOOTERS Instruction Manual
Last updated: Jan-09
11
Reverse these actions when putting the tip protector back.
• Pull out the safety pins.
• Insert the tip protector into the tail pipe of both the left and right parts of the rear frame. Make sure
the holes are on top of each other.
• Push in the fastening pins as far as they will go.
L Put the tip protector back before using the scooter.
L NEVER put the tip protector back on one side only.
TRANSPORTING THE SCOOTER
If your scooter is to be transported, please note the following:
Before picking up the scooter all movable parts must be removed (basket, armrests, etc.). You could
also remove the batteries / battery boxes from the seat to save weight.
As gel batteries are closed battery systems, removal for the purpose of transportation will cause no
problem.
L When raising the scooter, it should be held by fixed parts of the frame only.
L To prevent damage, all loose parts should be removed prior to transportation.
L When assembling, make sure that all screws are retightened properly.
L To prevent personal injury or damage to the scooter, there should be no people or objects
under the scooter during transportation.
L Likewise, there must be no people or objects on the foot rests or seat during transportation.
USING RAMPS
Should you wish to use ramps to drive over an obstacle, please note the following:
For your own safety, find out from the manufacturer what the maximum load is that the ramps can
bear. Drive on the ramps at the lowest speed possible. Also see the instructions in chapter “Your first
trip with the scooter”.
If another person is pushing you, note that the considerable weight of the electric scooter generates
large reverse forces.
L Observe the instructions on the maximum load of the ramps used.
L We shall decline all liability for injury or damage caused by an improper choice of ramps.
SERVICING
Like all other technical products, your electric scooter will require servicing. Below follows a list of
actions to be taken to ensure that you keep on enjoying the benefits of your scooter, even long after
you purchased it.
BEFORE DRIVING
Check the tyres for visible damage and/or soiling. Remove any dirt as it could impair the roadholding capacity of the tyres. When a tyre is damaged, please go see an authorized workshop
for repair.
Before driving, check the motor brake. If it does not function properly, please consult your
specialist dealer.
Check the tyre pressure and inflate them if necessary.
Make sure that all screws are tightened properly.

SCOOTERS Instruction Manual
Last updated: Jan-09
12
Switch on the electronics after verifying that the motor is engaged. The load indicator indicates
the level of the batteries. If the battery charge is sufficient for the intended route, you can set
out.
APPROX. EVERY 8 WEEKS
Depending on the frequency of use, check the following:
1. Dirt under the rear chassis (carefully remove any dirt as it can corrode the plugs).
2. Dirt / corrosion on the poles of the batteries (be careful to keep the poles of the batteries
clean as dirt may damage the batteries).
L Remove the pole connectors before cleaning the poles of the batteries.
L Be careful not to put any objects capable of conducting an electric current between the
poles of the batteries.
3. Tighten moving parts that can be removed.
APPROX. EVERY 6 MONTHS
Depending on the frequency of use check the following:
1. Cleanness
2. General condition
3. Function of the wheels
If resistance to rolling is too great, clean the wheel bearings and check tyre pressure.
4. Check the following greasing points (do not use WD40 lubricating agents):
a) Wheel axles
b) Wheel bearings
c) All movable parts
INSPECTION
In principle we recommend annual inspections, but at least before usage is resumed. The following
checks must at least be performed and documented by authorized persons:
• Check the cabling (especially for: crushing, abrasion, cuts, visible insulation of the inner
conductor, visible metallic veins, kinks, lumpiness, color changes of the outer sleeve, brittle
spots)
• Visual inspection of the frame parts to check for plastic deformation and/or wear and tear
(basic frame, seat frame, back frame, side parts, motor suspensions)
• Electric leads to be securely placed to avoid shearing, crushing and other mechanical stresses
and strains.
• Visually check all housings for damage, screws must be securely fixed, seals and gaskets
should not exhibit visible damage.
• Measure the resistance of the protective braid (O) according to VDE 0702-1
• Measure the residual diversion current (A) according to VDE 0702-1
• Measure insulation resistance (MO) according to VDE 0702-1
• Check functioning of the armrests (locking, load, deformation, wear and tear caused by loads)
• Check the functioning of the drives (during a test drive noises, speed, free running, etc.), if
necessary: Measure the performance, first with no load and then with the nominal load, to
check for wear and tear of the motors by comparing the values of the electric current with the
values when the scooter was delivered.
• Check the condition of the batteries, covers, tubes, and tyres.
Checking measurements may only be carried out by skilled persons trained on the scooter and not
unless under the supervision of an electrician acquainted with the checking instruments and
processes. Only an electrician is able to release the scooter for use after performing measurements or
servicing.
The service must only be confirmed in the service plan when at least the above-mentioned aspects
have been checked. If your specialist dealer does not perform the required services, then contact the
manufacturer. We shall gladly refer you to authorized specialist dealers in your area.
The manufacturer is not liable for damage caused by lacking or improper service.

SCOOTERS Instruction Manual
Last updated: Jan-09
13
CARE
Your scooter will require regular care if you want it to remain visually attractive also. Note the following
hints:
COVERS
Clean the covers with hot water. You can remove stubborn dirt by washing with a mild commercial
detergent. Stains can be removed by using a sponge or a soft brush.
The textile cover is washable; use only a cloth moistened by a mild commercial detergent.
L Do not use strong cleaning liquids like solvents, nor use hard brushes.
L We shall decline all liability for damage caused by the use of improper cleaning agents.
L Take care that you do not soak the covers.
L Never use steam or pressure jets.
PLASTIC PARTS
Clean all plastic parts of your scooter with commercial plastic cleaners. Take note of special product
information.
SURFACE LAYERS
The high quality of the surface layers guarantees optimal protection against corrosion. If the outer coat
is damaged by scratches or in other ways, treat the place with varnish obtainable from your specialist
dealer. Occasional greasing of the movable parts will ensure that you enjoy your scooter for a long
time. (do not use WD40 lubricating agents).
Initially the chrome parts only require rubbing with a dry cloth. Dull places or stubborn dirt should be
treated with a suitable chrome polish.
Dulling can be avoided by lightly greasing steel parts with Vaseline.
To guarantee the long-term preservation of your scooter, we recommend that you take it to your
specialist dealer for inspection once a year. These inspections can be confirmed in the "Service plan"
section.
L The manufacturer shall decline liability for damage/injury caused by insufficient maintenance.
ELECTRONICS
Wipe the steering unit with a cloth moistened
by a few drops of a commercial domestic cleaner. Do not
use any abrasives or sharp-edged polishing equipment like a metal scrubber or brush, since these can
scratch the surface of the steering unit.
L Regularly check the plug connectors for corrosion or damage, since it could affect the
efficiency of the electronics.
L To avoid involuntary conduction of currents, remove the batteries before performing any
maintenance.

SCOOTERS Instruction Manual
Last updated: Jan-09
14
DISINFECTION
Strictly abide by the instructions for use of any disinfectants you use on your scooter.
Disinfecting should be performed only by skilled hygiene workers trained to know the effects of the
different types of disinfectants on different materials. In principle disinfection by scrubbing/wiping only
is allowed.
Special attention must be given to electronic parts since they have open sockets and must therefore
be protected against moisture. The cable plug must also be protected against moisture.
L Wear suitable protective clothing because the disinfectants can irritate the skin on contact. For
this purpose you should also take note of the product information of the solutions concerned.
L Unauthorized persons are employed at your own risk.
L The manufacturer shall decline liability for damage and injury caused by improper
implementation of the disinfection.
Kindly consult your specialist dealer if you have further queries about disinfection;
he will gladly assist you.
GUARANTEE
Excerpt from the "General business conditions":
(…)
5. The guarantee period for warranty claims is 24 months (12 months for batteries).
(…)
The guarantee excludes damage arising from structural changes to our products, insufficient maintenance,
defective or improper handling or storage or the use of pirate parts. Likewise, the guarantee excludes working
parts subject to natural wear and tear.
(…)
STATEMENT OF CONFORMITY
The manufacturer or his authorized representative:
N.V. VERMEIREN and Company
Address:
Vermeirenplein 1/15, B-2920 Kalmthout (Belgium)
declares that
all electric scooters,
are made in full conformity with the following European guidelines -- including the latest changes -- and
with the national laws on which these guidelines are based:
EMC Directive 89/336 (EMV-Richtlinie)
Date : 01 April 2003 Place: Kalmthout (Belgium)
Signature:
Name: M. Van Herck
SCOOTERS Instruction Manual
Last updated: Jan-09
15
SERVICE PLAN
Model / type:
Serial number:
The scooter was serviced:
Dealer's stamp
Date :
Dealer's stamp
Date :
Dealer's stamp
Date :
Dealer's stamp
Date :
Dealer's stamp
Date :
Dealer's stamp
Date :
Dealer's stamp
Date :
Dealer's stamp
Date :
Dealer's stamp
Date :
Dealer's stamp
Date :
Dealer's stamp
Date :
Dealer's stamp
Date :

Belgium
Germany
N.V. Vermeiren N.V.
Vermeiren Deutschland GmbH
Vermeirenplein 1 / 15
B-2920 Kalmthout
Tel: +32(0)3 620 20 20
Fax: +32(0)3 666 48 94
website: www.vermeiren.be
e-mail: info@vermeiren.be
Wahlerstraße 12 a
D-40472 Düsseldorf
Tel: +49(0)211 94 27 90
Fax: +49(0)211 65 36 00
website: www.vermeiren.de
e-mail: info@vermeiren.de
France
Austria
Vermeiren France S.A.
L. Vermeiren Ges. mbH
Z. I., 5, Rue d´Ennevelin
F-59710 Avelin
Tel: +33(0)3 28 55 07 98
Fax: +33(0)3 20 90 28 89
website: www.vermeiren.fr
e-mail: info@vermeiren.fr
Winetzhammerstraße 10
A-4030 Linz
Tel: +43(0)732 37 13 66
Fax: +43(0)732 37 13 69
website: www.vermeiren.at
e-mail: info@vermeiren.at
Italy
Switzerland
Reatime S.R.L.
Vermeiren Suisse S.A.
Via Torino 5
I-20039 Varedo MI
Tel: +39 0362 55 49 50
Fax: +39 0362 54 30 91
website: www.reatime.it
e-mail: info@reatime.it
Hühnerhubelstraße 64
CH-3123 Belp
Tel: +41(0)31 818 40 95
Fax: +41(0)31 818 40 98
website: www.vermeiren.ch
e-mail: info@vermeiren.ch
Poland
The Netherlands
Vermeiren Polska Sp. z o.o
Vermeiren Nederland B.V.
ul. Łączna 1
PL-55-100 Trzebnica
Tel: +48(0)71 387 42 00
Fax: +48(0)71 387 05 74
website: www.rehapola.pl
e-mail: info@vermeiren.pl
Domstraat 50
NL-3864 PR Nijkerkerveen
Tel: +31(0)33 2536424
Fax: +31(0)33 2536517
website: www.vermeiren.com
e-mail: info@vermeiren.be
Spain
Czech Republic
Vermeiren Iberica, S.L.
Vermeiren ČR S.R.O.
Trens Petits, 6. - Pol. Ind. Mas Xirgu.
17005 Girona
Tel: +34 902 48 72 72
Fax: +34 972 40 50 54
website: www.vermeiren.es
e-mail: info@vermeiren.es
Sezemická 2757/2 - VGP Park
193 00 Praha 9 - Horní Počernice
Tel: +420 731 653 639
Fax: +420 596 121 976
website: www.vermeiren.cz
e-mail: info@vermeiren.cz
R.E.: N.V. Vermeiren N.V., Vermeirenplein 1/15 - 2920 Kalmthout - Belgium – 06/2009
Manual Ceres 3 / Ceres 4
Stand: July-10
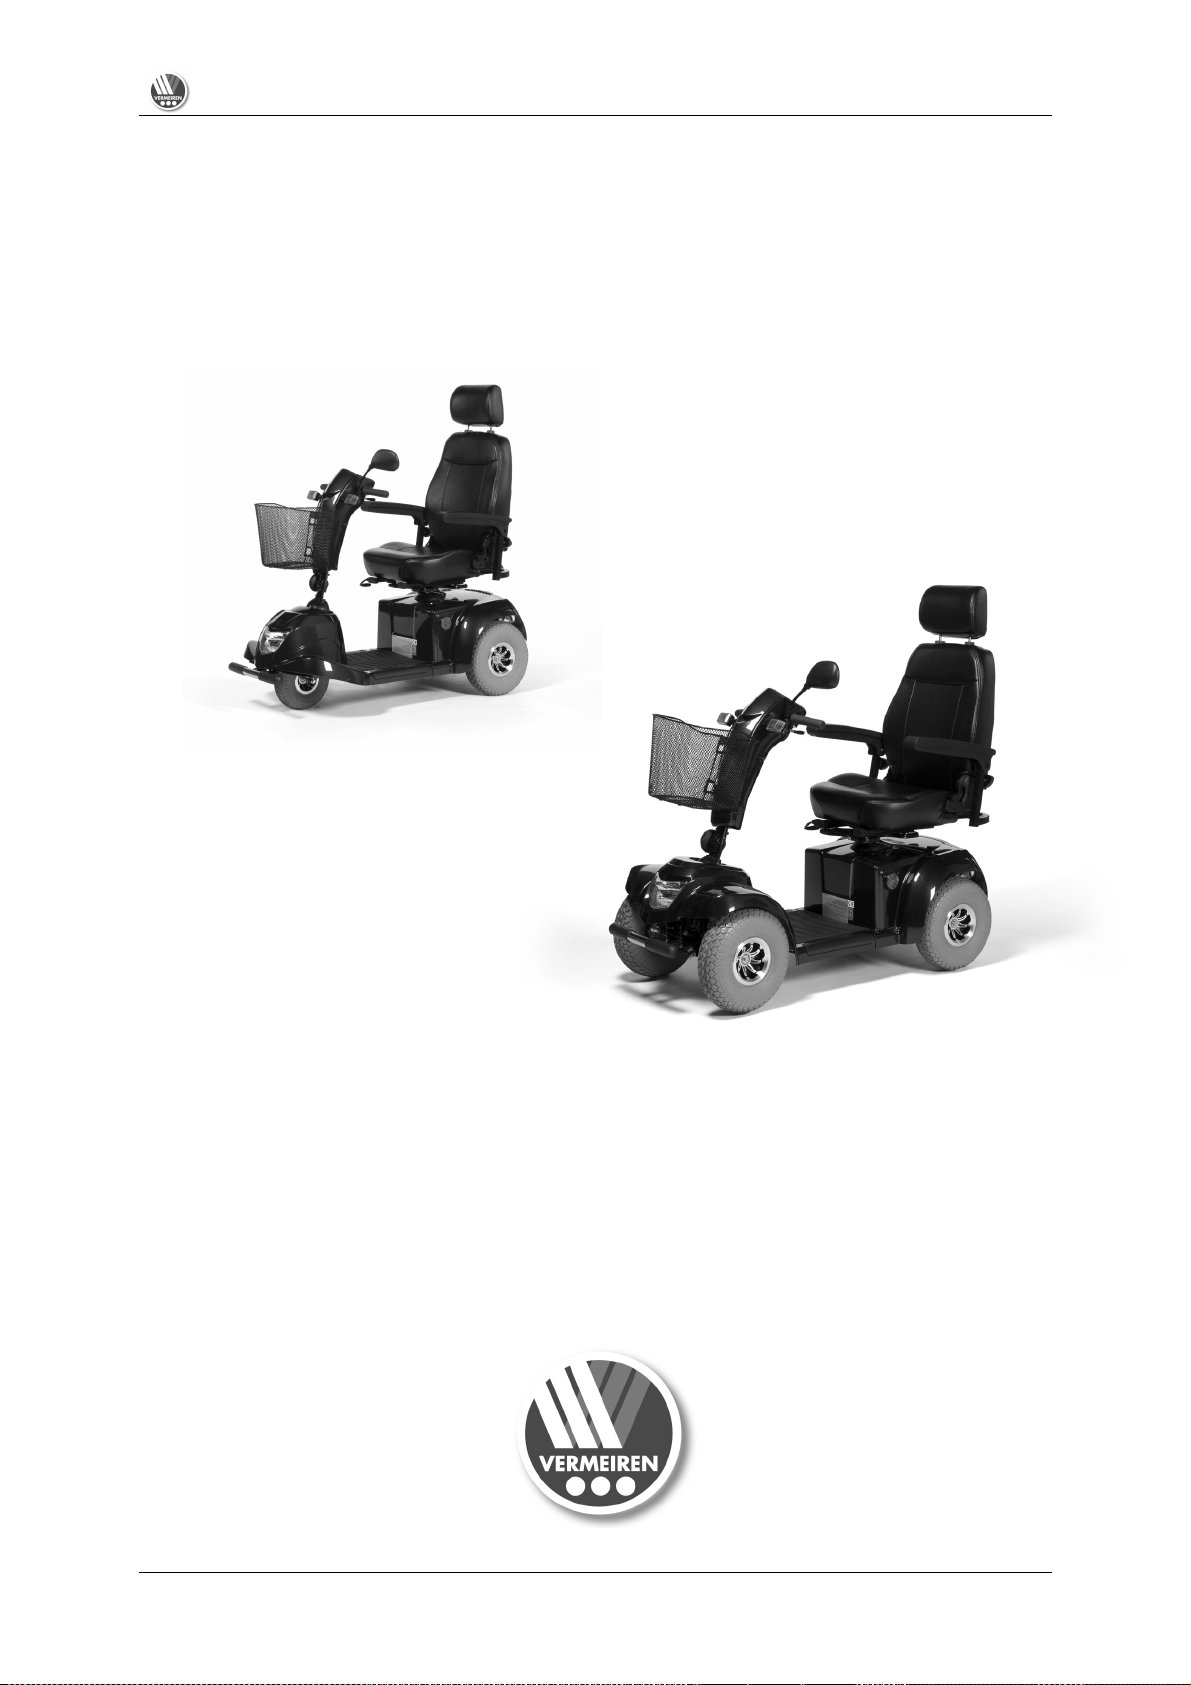
2
Manual
Ceres 3
Ceres 4

SCOOTERS Instruction Manual
Last updated: Feb-09
2
TECHNICAL DETAILS
(given in terms of the standard adjustments when delivered)
MEASUREMENTS
Ceres 3
Ceres 4
Length
127 cm
131 cm
Width
61 cm
61 cm
Height
116 cm
116 cm
Total weight
92 kg
94,7 kg
Motor
Nom. 470 Watt
Nom. 470 Watt
Batteries
36 Ah x 2 / 50Ah x 2
36 Ah x 2 / 50Ah x 2
Battery charger
4 Amp (external)
4 Amp (external)
Turning radius
975 mm
1350 mm
Handle bar
T-handle
T-handle
Operating temperature of the
electronics
-10°C to +40°C
-10°C to +40°C
Lights
Serial
Serial
Indicator light
Serial
Serial
Drive wheels (number)
100 x 260 mm air (1)
127 x 320 air (2)
Rear wheels (number)
127 x 320 mm air (2)
127 x 320 air (2)
Max. speed
9,6 km/h
12 km/h
Traveling range
Approx. 32-40 km
Approx. 32-40 km
Nominal load (max. load)
135 kg
135 kg
Max. gradient
>8°
>8°
Max. obstacle height
10 cm
10 cm
Tip protector
Serial, removable
Serial, removable
Mirror
Optional
Optional
Shopping basket
Serial
Serial
Measurement tolerance +/-1.5cm/kg/degree
All specifications apply to the state as delivered and optimum environmental conditions. Changes in
outdoor temperatures, humidity, uphills, downhills, soils and battery levels can reduce output.
0
SCOOTERS Instruction Manual
Last updated: Feb-09
3
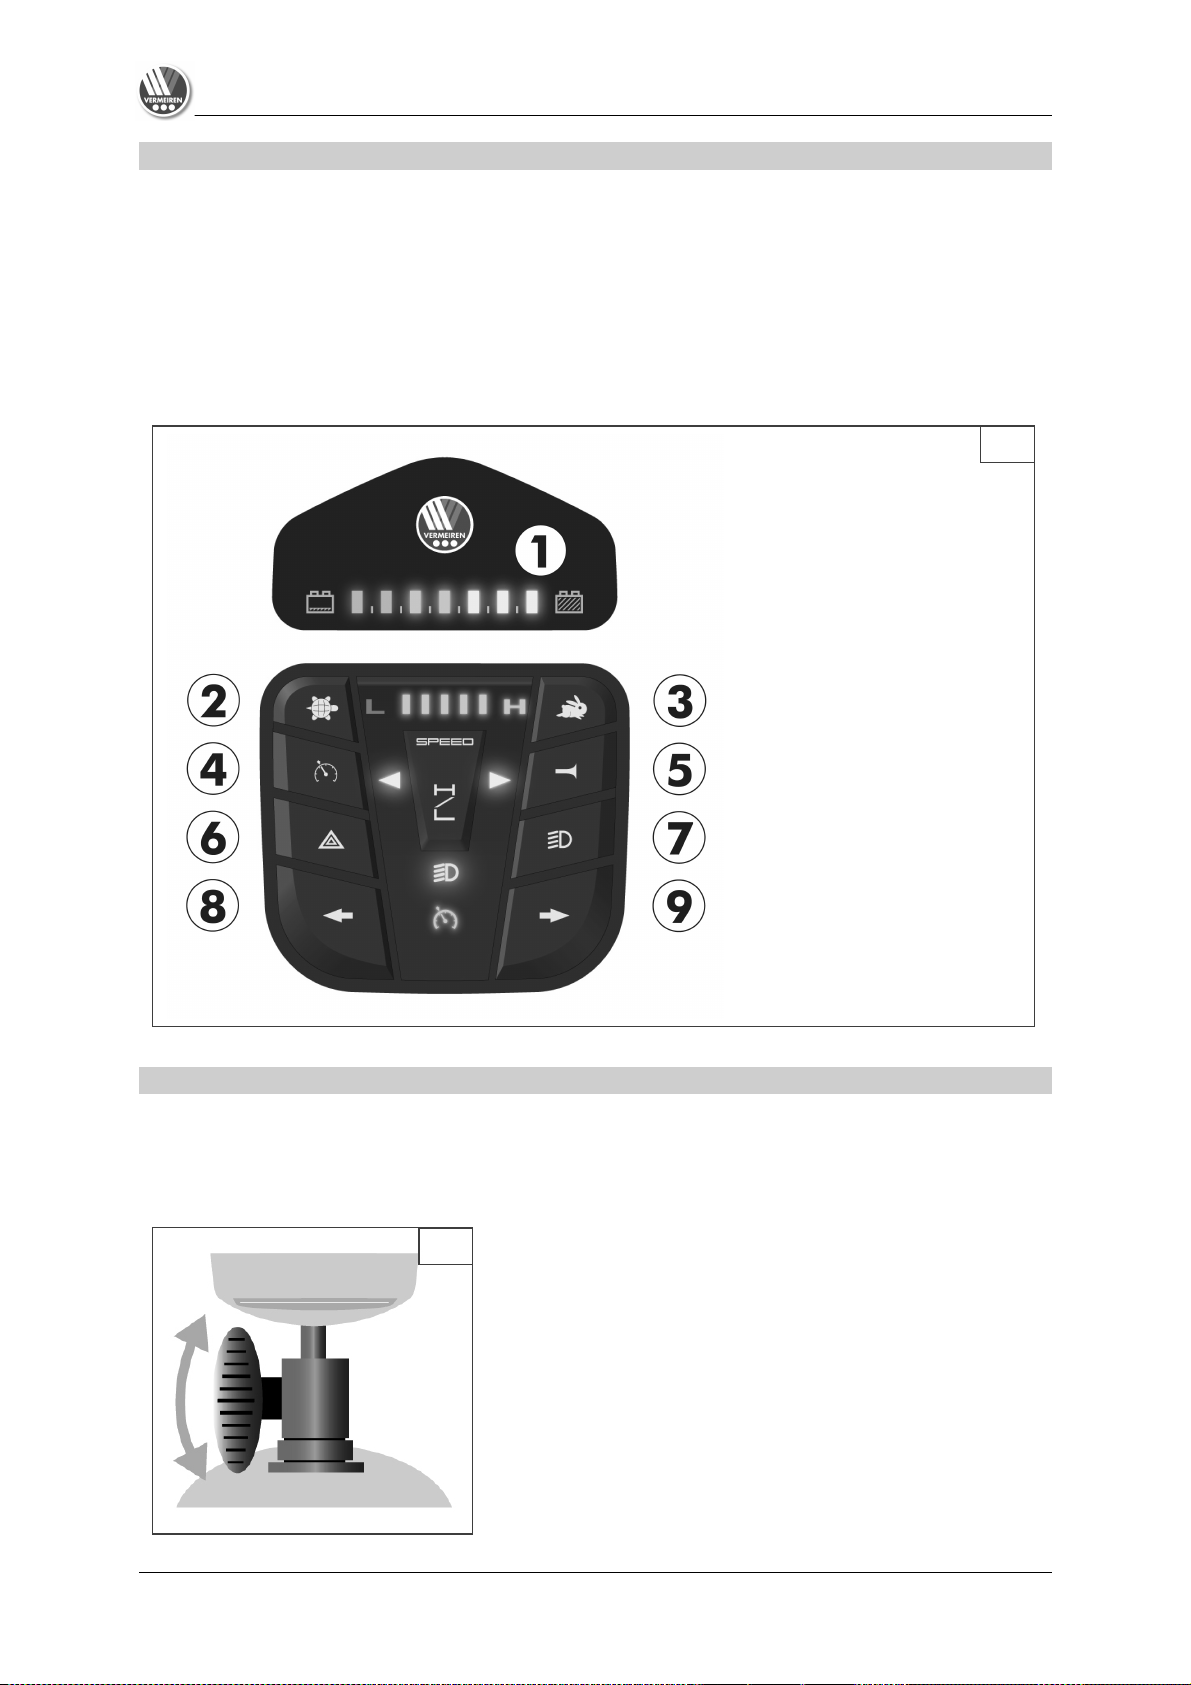
STEERING
• Put the ON/OFF key switch on.
• The battery level indicator shows the current level of your batteries.
• Now turn the speed control to the desired driving speed.
• Pull the drive lever with your fingers toward the handle bars (right lever for forward movement, left
lever for backward movement).
• To sound the horn, press the horn button.
• To put on the front and back lights, press the lights button (7).
• To put on the emergency flashers, press button (6).
• To put on the indicator lights, press the desired button (8-9) (left = left indicator, right = right
indicator).
ADJUSTING THE STEERING UNIT
The tiller can be adjusted in to many different positions to suit each driver.
Loosen the knob to adjust the tiller to positions you want. (Fig. B)
Tighten the knob to secure the tiller.
L Never adjust the angle while you are driving.
L Turn the scooter off before you adjust the angle of the
steering column.
1 = Battery level indicator
2 = Speed control (slow)
3 = Speed control (fast)
4 = Speed switch
5 = Horn
6 = Emergency lights
7 = Lights (front and rear)
8 = Indicator (left)
9 = Indicator (right)
A
B
SCOOTERS Instruction Manual
Last updated: Feb-09
4
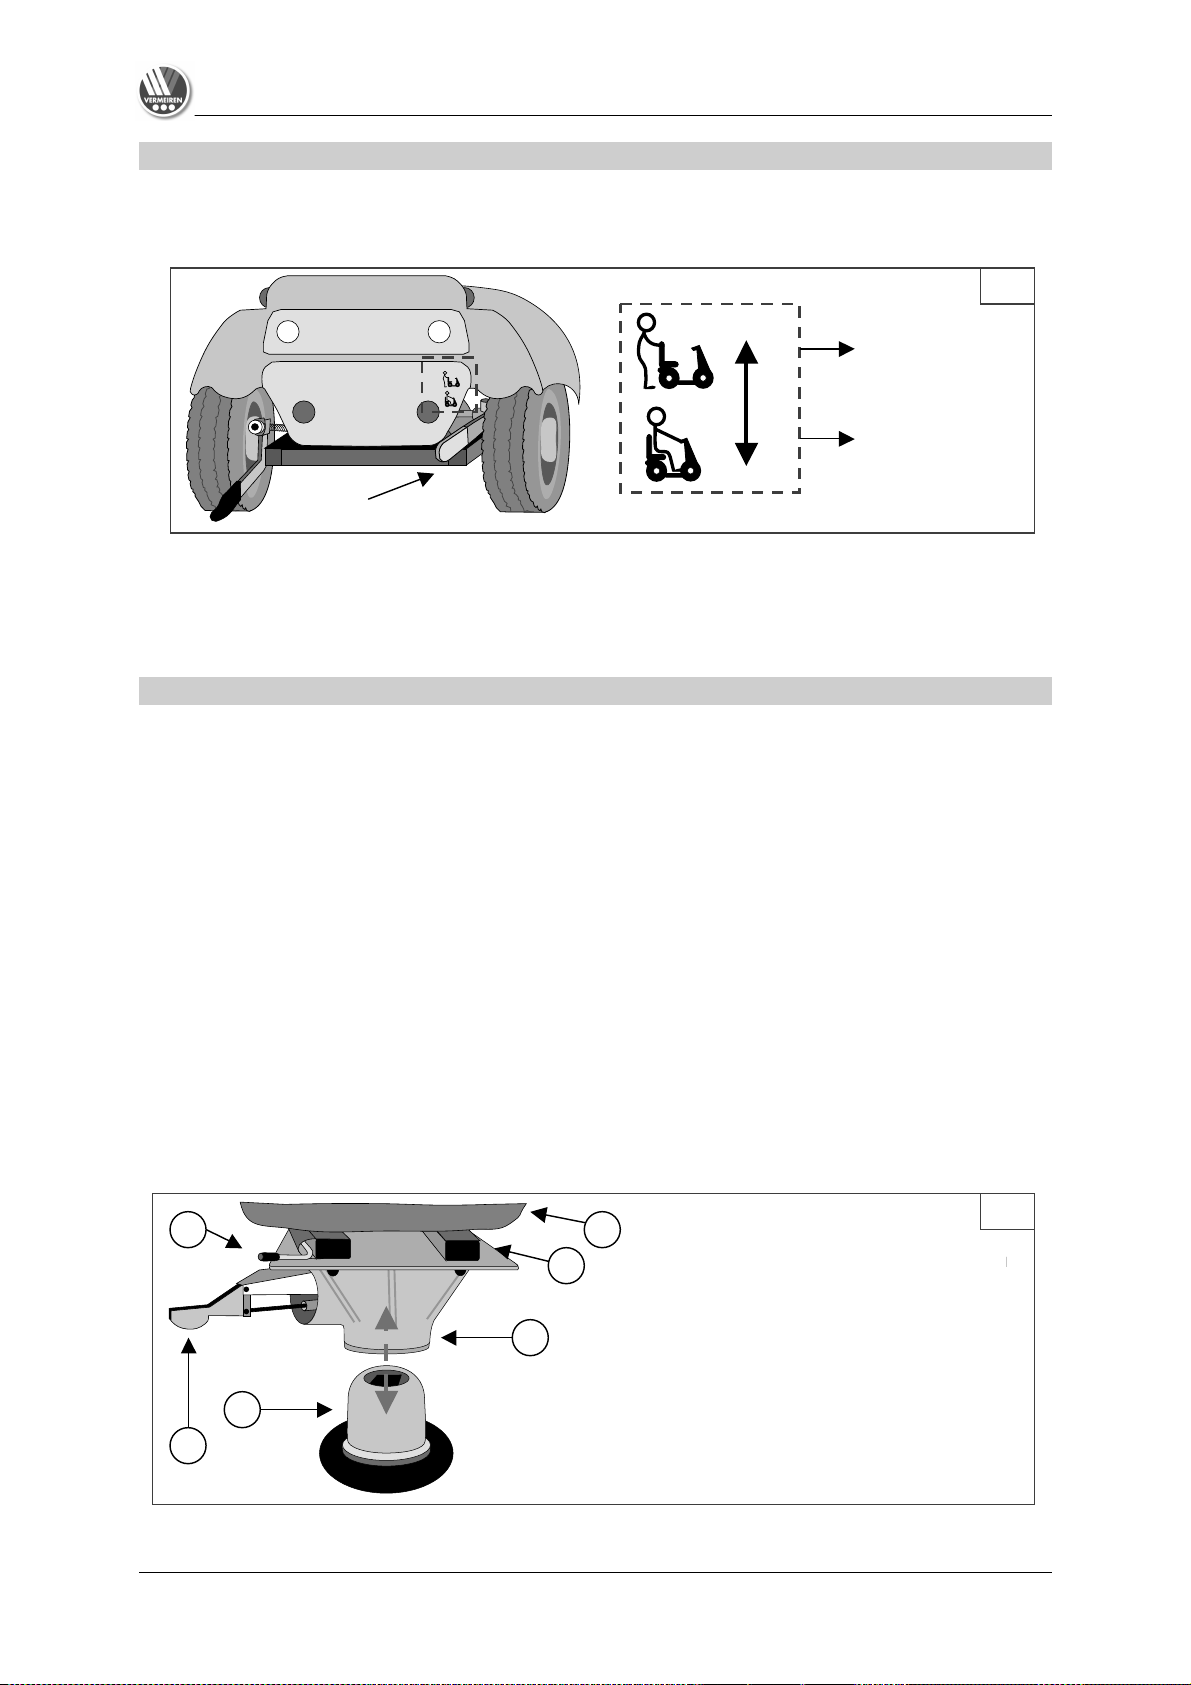
NEUTRAL
• Put the motor stop lever on neutral (see label). This separates the motor from the gears. You will
now be able to push the scooter.
• Put the motor stop lever on drive. This will again interlock the motor and gears. You will now be
able to again drive the scooter.
L Never put the scooter in neutral while you are driving.
L To prevent the motor from overheating, never pick up the electronic drive before stopping the
motor/gears.
SEAT
Removable seat (diagram D)
• Pull the seat lever (red) up.
• Pull the seat up and out.
Locking the seat in place (diagram D)
Do the reverse when you want to replace the seat.
• Put the receiver on the seat guide and press as far down as it will go (gentle to and fro turning of
the seat will facilitate the process).
• When you hear the seat lock in place, the seat lever (red) must be in a horizontal position. If it is
still pulled upward, the seat has not been locked in place yet.
Swivel seat (diagram D)
• Pull the seat lever (red) up.
• Turn the seat in the desired direction.
• Let go of the seat lever, and the seat will
always stop after 90°.
Height adjustment (diagram D)
• Pull upward the lever used to adjust the seat height.
• Move the seat forward or backward.
• To lock the seat in place, let go of the lever once the seat has reached the desired position.
C
Motor stop lever
Neutral
Drive
1 = Seat
2 = Seat depth rail
3 = Seat depth adjustment lever
4 = Receiver
5 = Seat guide
6 = Seat lever (red)
D
1 2 4 3 5
6
SCOOTERS Instruction Manual
Last updated: Feb-09
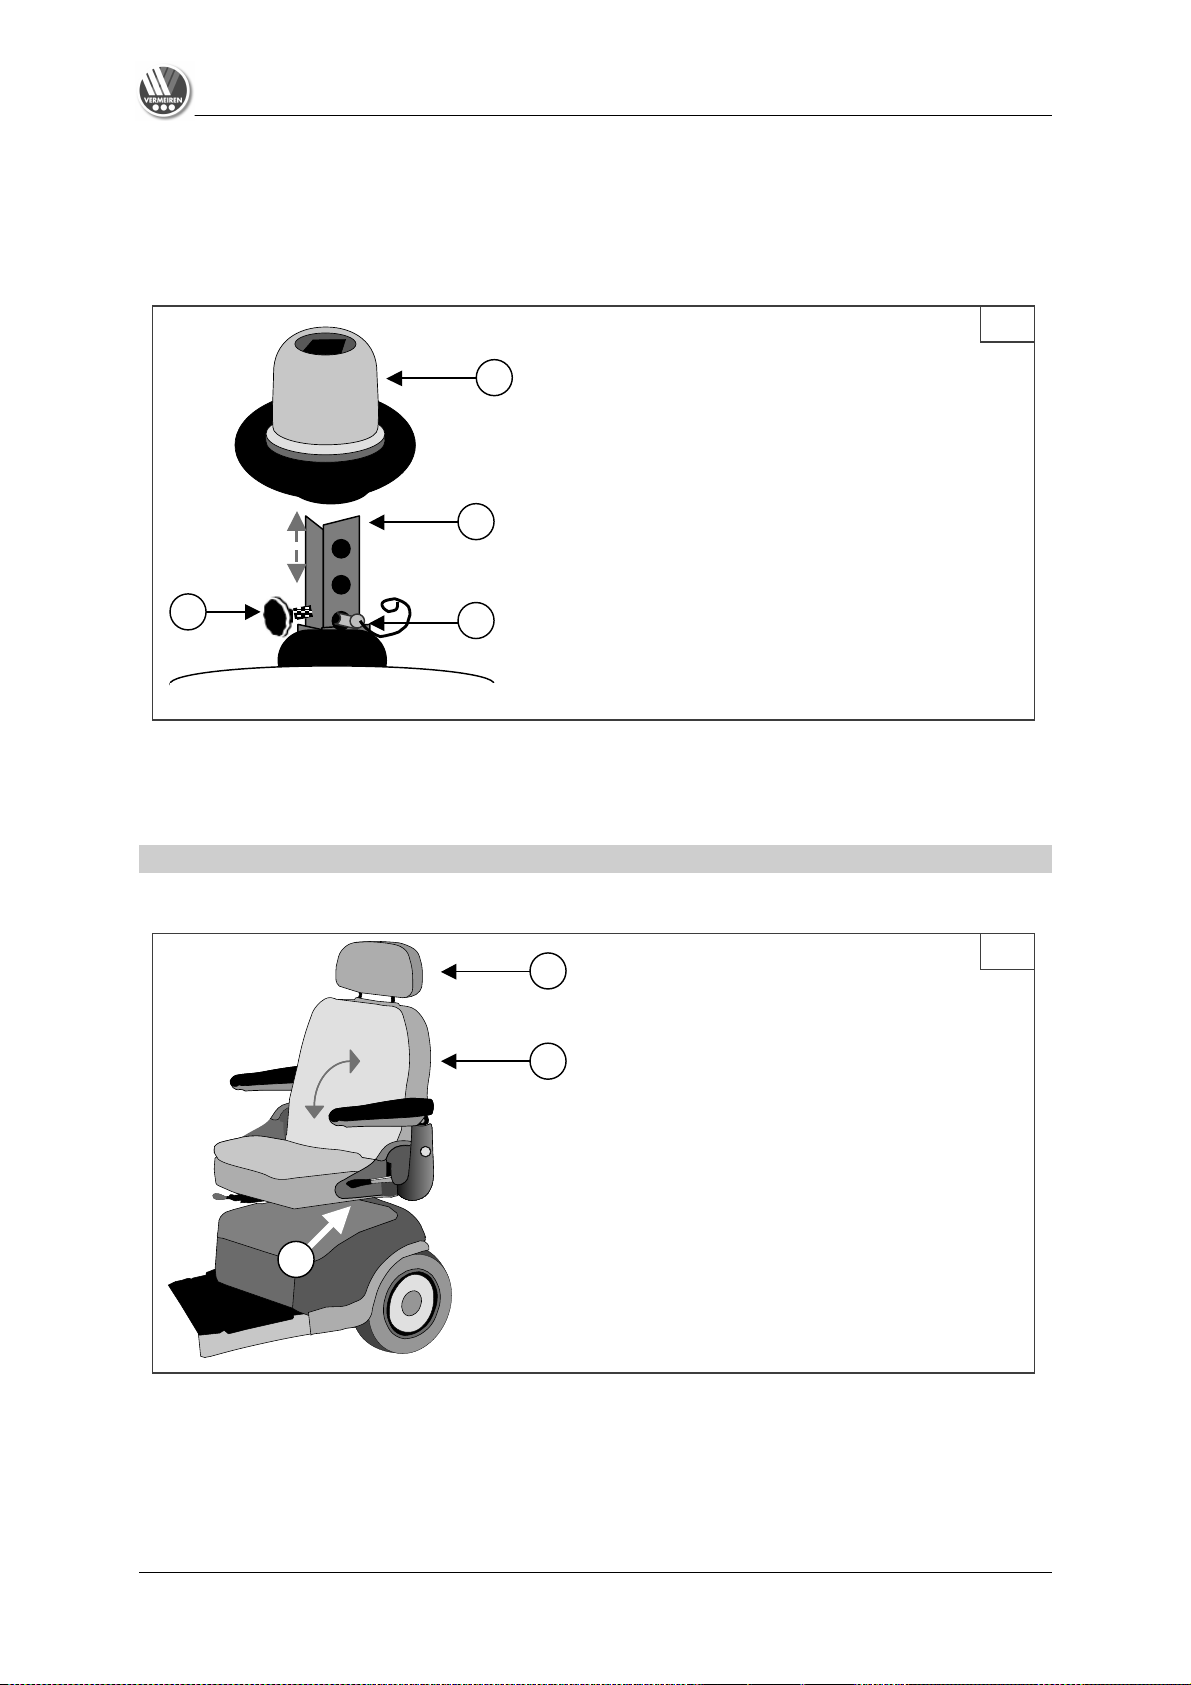
5
Adjusting the height of the seat (diagram E)
• Loosen the fixing screws to adjust the seat height.
• Pull out the safety pins.
• You can now adjust the seat up or down.
• Insert the safety pins again and secure them with the attached loop by putting the loop over the
end of the pins. This ensures that the pins have been inserted completely.
• Properly tighten the seat height fixing screw again.
L Never perform adjustments while you are driving.
L Make sure that the seat is locked in place securely.
BACK
A tilt lever has been added to the side of the back rest (transition to seat upholstery). Press this lever
down to release the backrest and fold it forward.
The seat can be turned 45 or 90 degrees.
Pull the seat adjustment lever forward and turn the seat.
Release the lever, then continue turning the seat until it locks in position.
The seat can be slided backward and forward for a comfortable driving position. To slide the seat,
pull the lever at the front of the seat and reposition as required.
E
1 2 4
3
1 = Seat guide
2 = Skid pipe height adjustment
3 = Fixing screw of seat height
4 = Safety pin
F
1 = Seat system
2 = Tilt lever
3 = Head rest
1 2 3
SCOOTERS Instruction Manual
Last updated: Feb-09
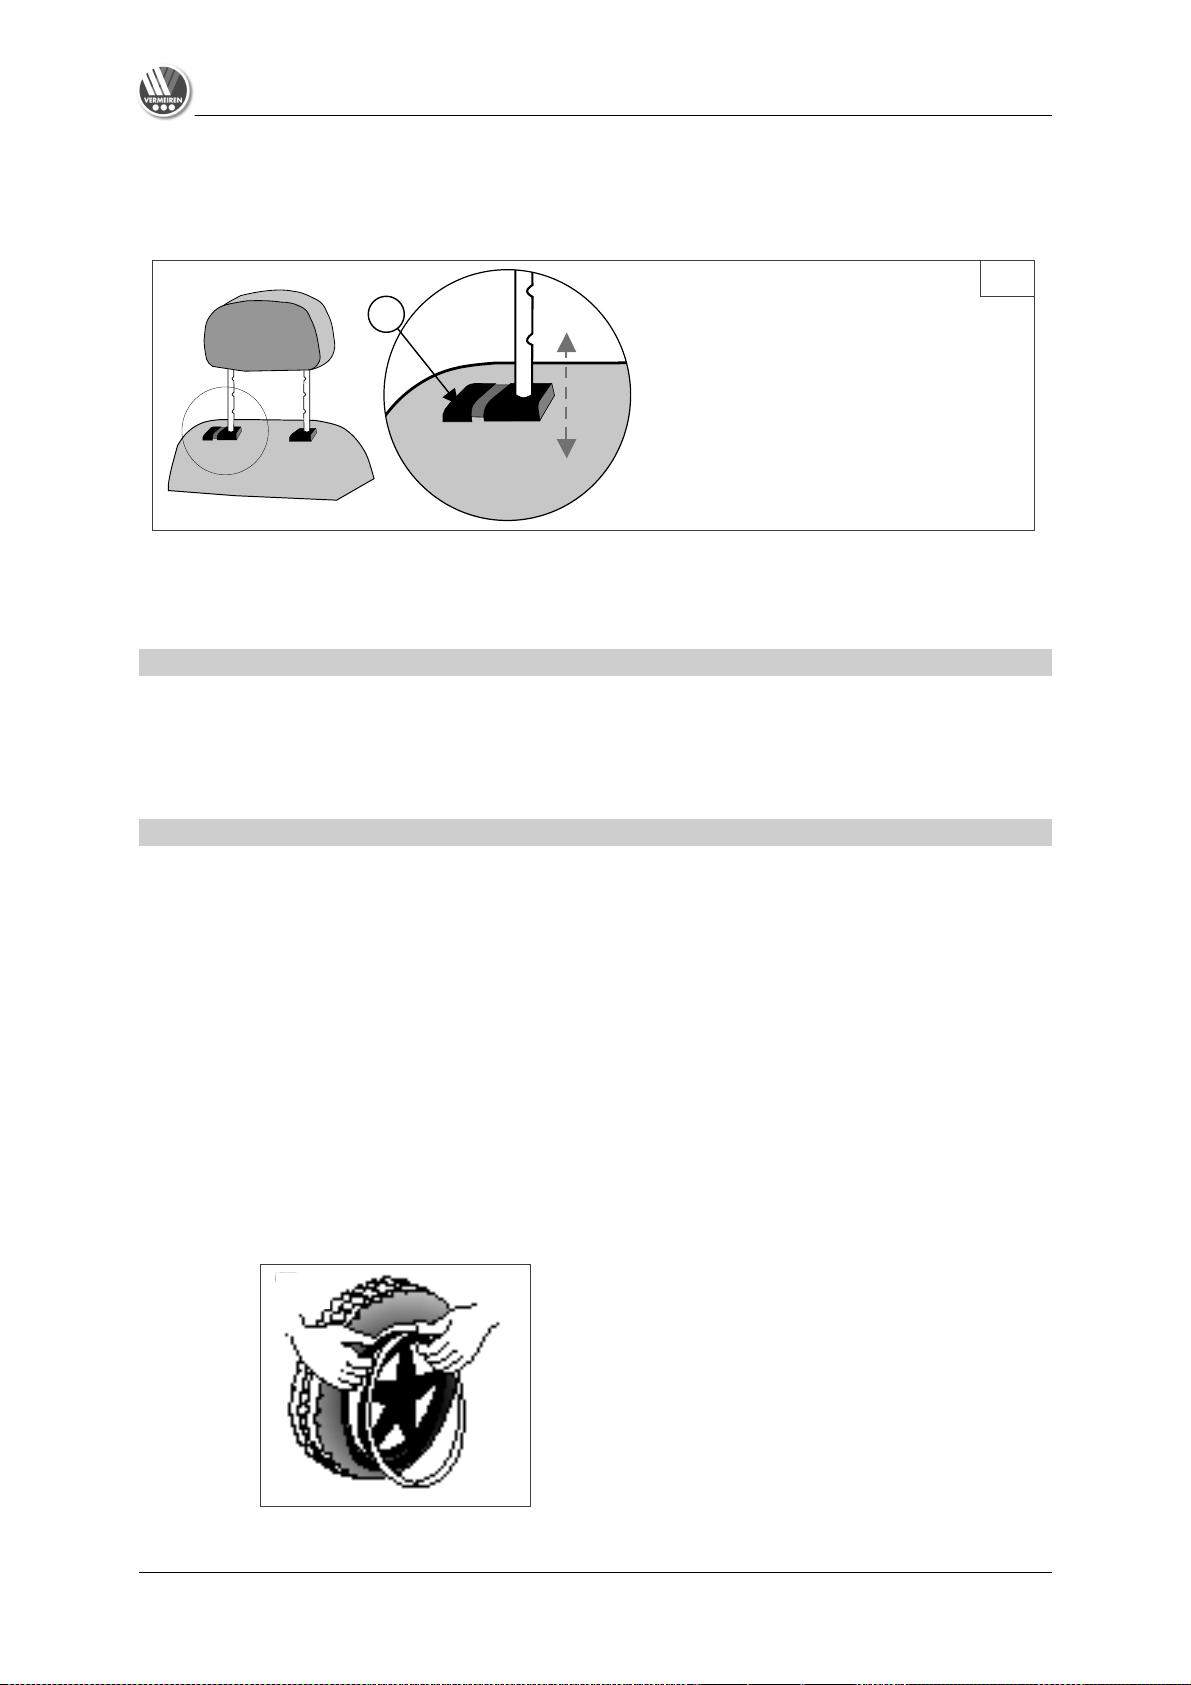
6
Head rest:
• Gently press the locking pin toward the head rest.
• Move the head rest to the desired height.
• Now let go of the locking pin again.
• The head rest audibly locks into place.
L
Never perform adjustments while you are driving.
ARMRESTS
The width of the seat can be changed by adjusting the arm rests.
Loosen the knobs at the back of the seat frame, then adjust the armrest by sliding the armrest.
Once satisfied with the width, tighten the knob.
TYRE CHANGING
If you want to change the tyres or inner tubes, you should note the following:
Before you can remove a tyre, you must let all the air out of the tube, and insert a tyre lever between
the tyre and the rim. Then slowly and carefully push the lever downwards. This will pull the tyre over
the edge of the rim. If you then move the lever along the rim, the tyre will jump out. Now carefully
remove the tyre from the rim and then remove the tube.
L There must be no air in the tube before it can be removed.
L If handled improperly, the rim might be damaged. Rather let an expert perform these activities.
Note the following before inserting the new tube:
Check the rim bed and the inside wall of the tyre for foreign matter and clean these properly if
necessary. Check the condition of the rim bed, especially around the position of the air valve. Please
use only genuine original replacement parts. No liability is accepted for damage caused by nongenuine replacement parts. Kindly contact your specialist dealer.
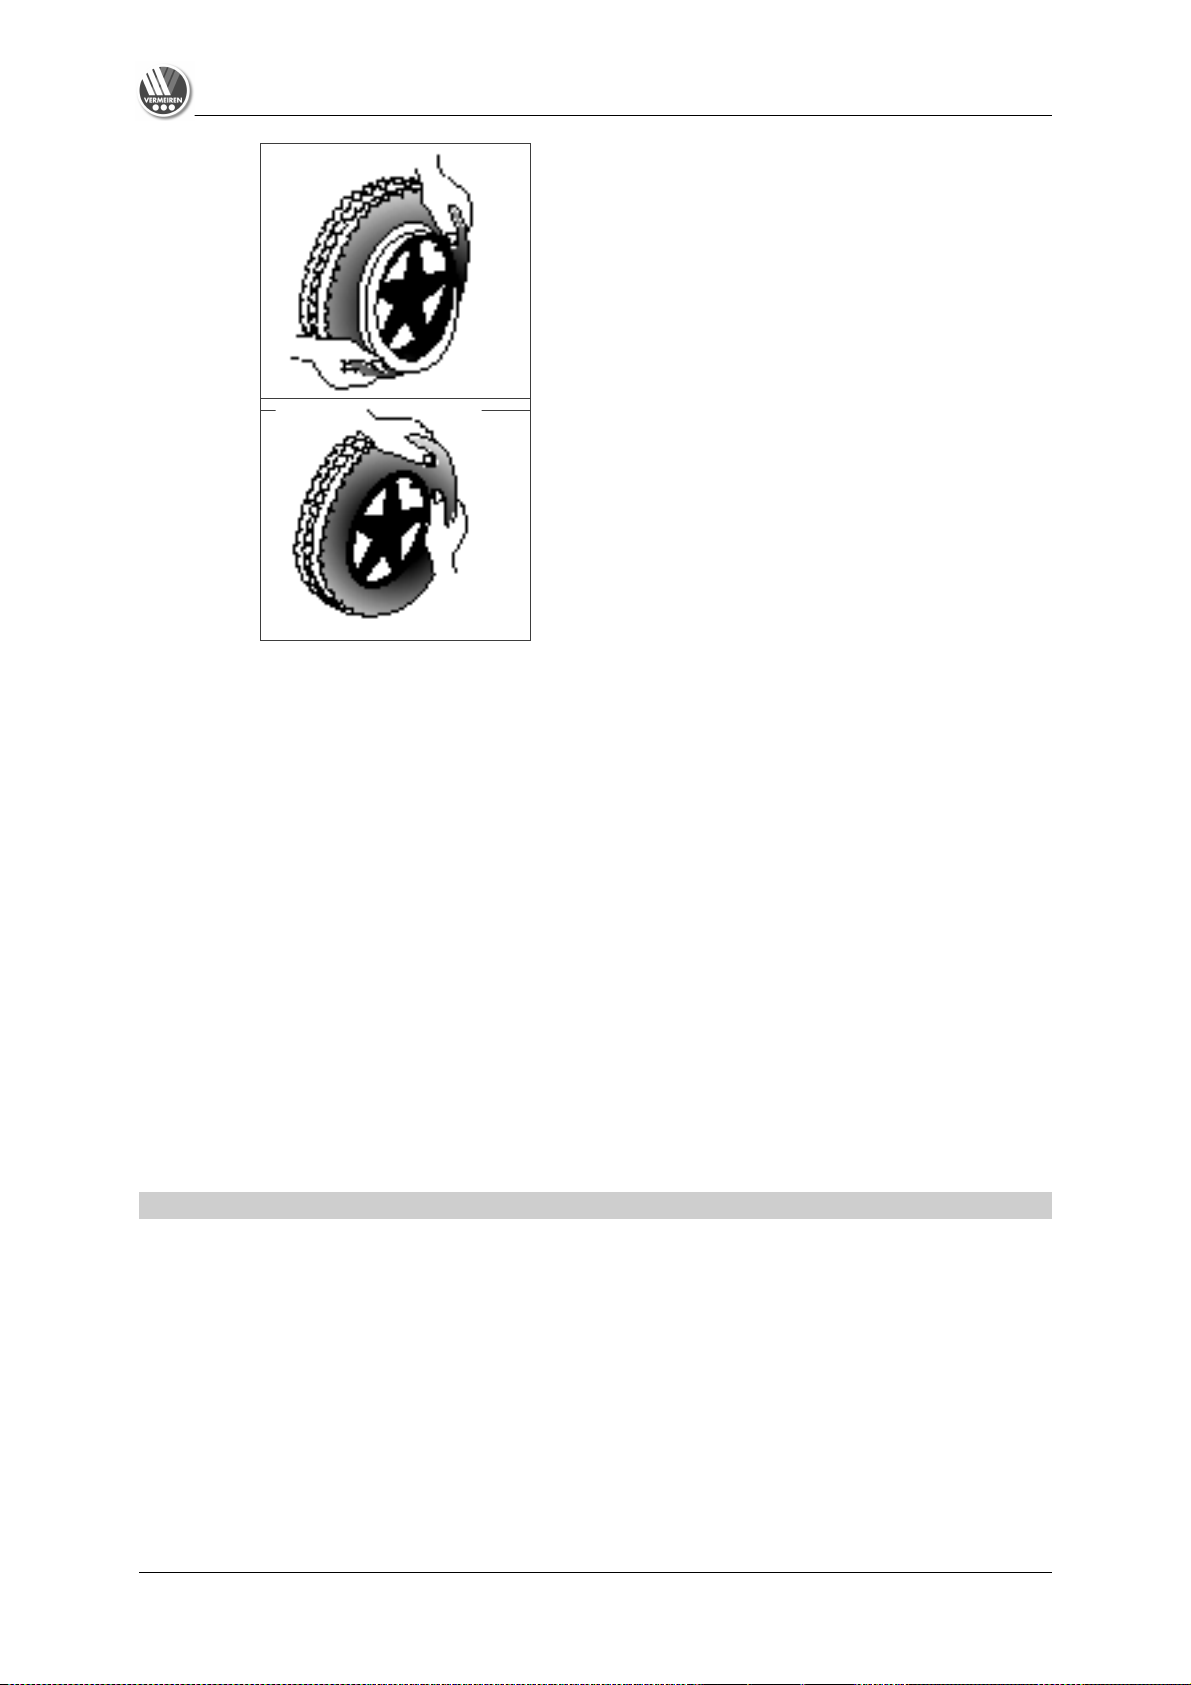
Assembly:
Put the deflated tube around the center of the rim.
Make sure that the valve juts out the valve opening in
the rim.
G
1 = Locking pin
1
SCOOTERS Instruction Manual
Last updated: Feb-09
7
Push the tyre over the edge of the rim, starting behind
the air valve. Inflate the tube slightly until it is round,
and place it inside the tyre.
Check all around on both sides that the tube is not pinched between the rim and the edge of the tyre.
Lightly push the air valve inwards and pull it out again to make sure that the tyre is positioned properly
in the region of the air valve.
To ensure that the wheel is inflated correctly, admit only so much air initially that the tyre can still be
easily pushed inwards by using your thumbs. If the check-lines are equidistant from the edge of the
rim on both sides of the tyre, then the tyre is centered properly. If not - let out the air and position the
tyre afresh. Now the tyre can be inflated to its full operating pressure (note the maximum) and the
valve cap should be replaced.
If the tube fits snugly inside the tyre without any folds
(in the case of folds: let out some air), then the upper
side of the tyre can be pressed lightly onto the rim
with both hands, starting at the air valve.
L
When mounting a tyre, make sure that no objects or body parts are pinched between the tyre
and the rim, since that could cause damage and/or injury.
L Only an expert can guarantee correct assembly. Work not done by your specialist dealer,
would void any warranty claims.
L When inflating the tyres, always check that the pressure is correct. The correct pressure is
given on the tyre walls.
L Use only inflating equipment which complies with regulations and indicates the pressure in
bar.
DISASSEMBLING & ASSEMBLING
The chassis – situated below the seat and arm rests – can also be taken apart. Proceed as follows:
• Switch the scooter off
• Remove the seat (see “Seat” chapter).
• Lift off the rear plastic cover (held in place by Velcro fasteners).
L
Bear in mind that the cables of the rear lights are connected to the plastic cover. Unplug the
plugs before entirely removing the plastic cover.
SCOOTERS Instruction Manual
Last updated: Feb-09
8
• Unplug all battery plugs (not the pole connectors) and all cable plug- and socket connections.
• Loosen the straps used to fasten the batteries in place.
• Lift the batteries out.
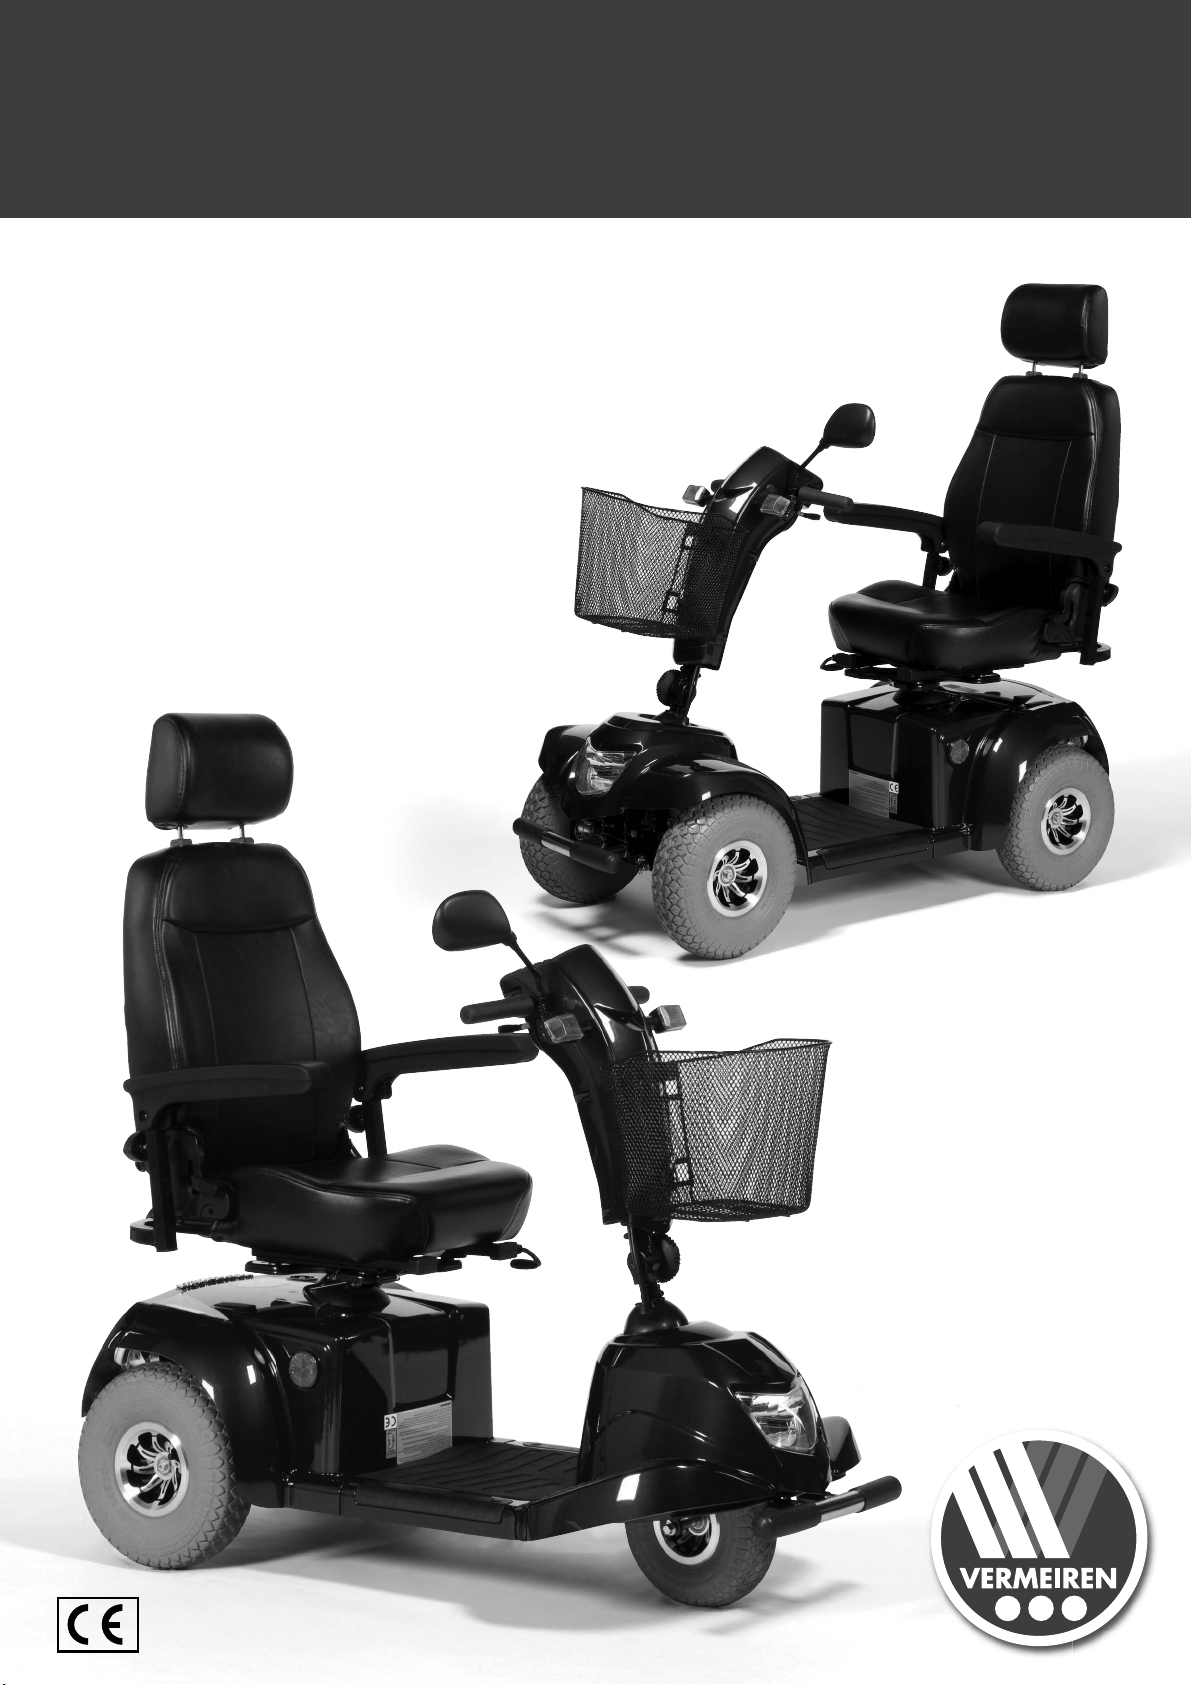
The following diagram illustrates how the front and rear parts of the chassis are connected
(diagram K):
• Pull out the safety pins.
• Pull apart the front and rear frames.
To reassemble, please proceed as follows (diagram K):
• Insert the supports of the front and rear frames into each other in such a way that the holes for the
safety pins are in line.
• Push the fastening pins into the support holes as far as they will go.
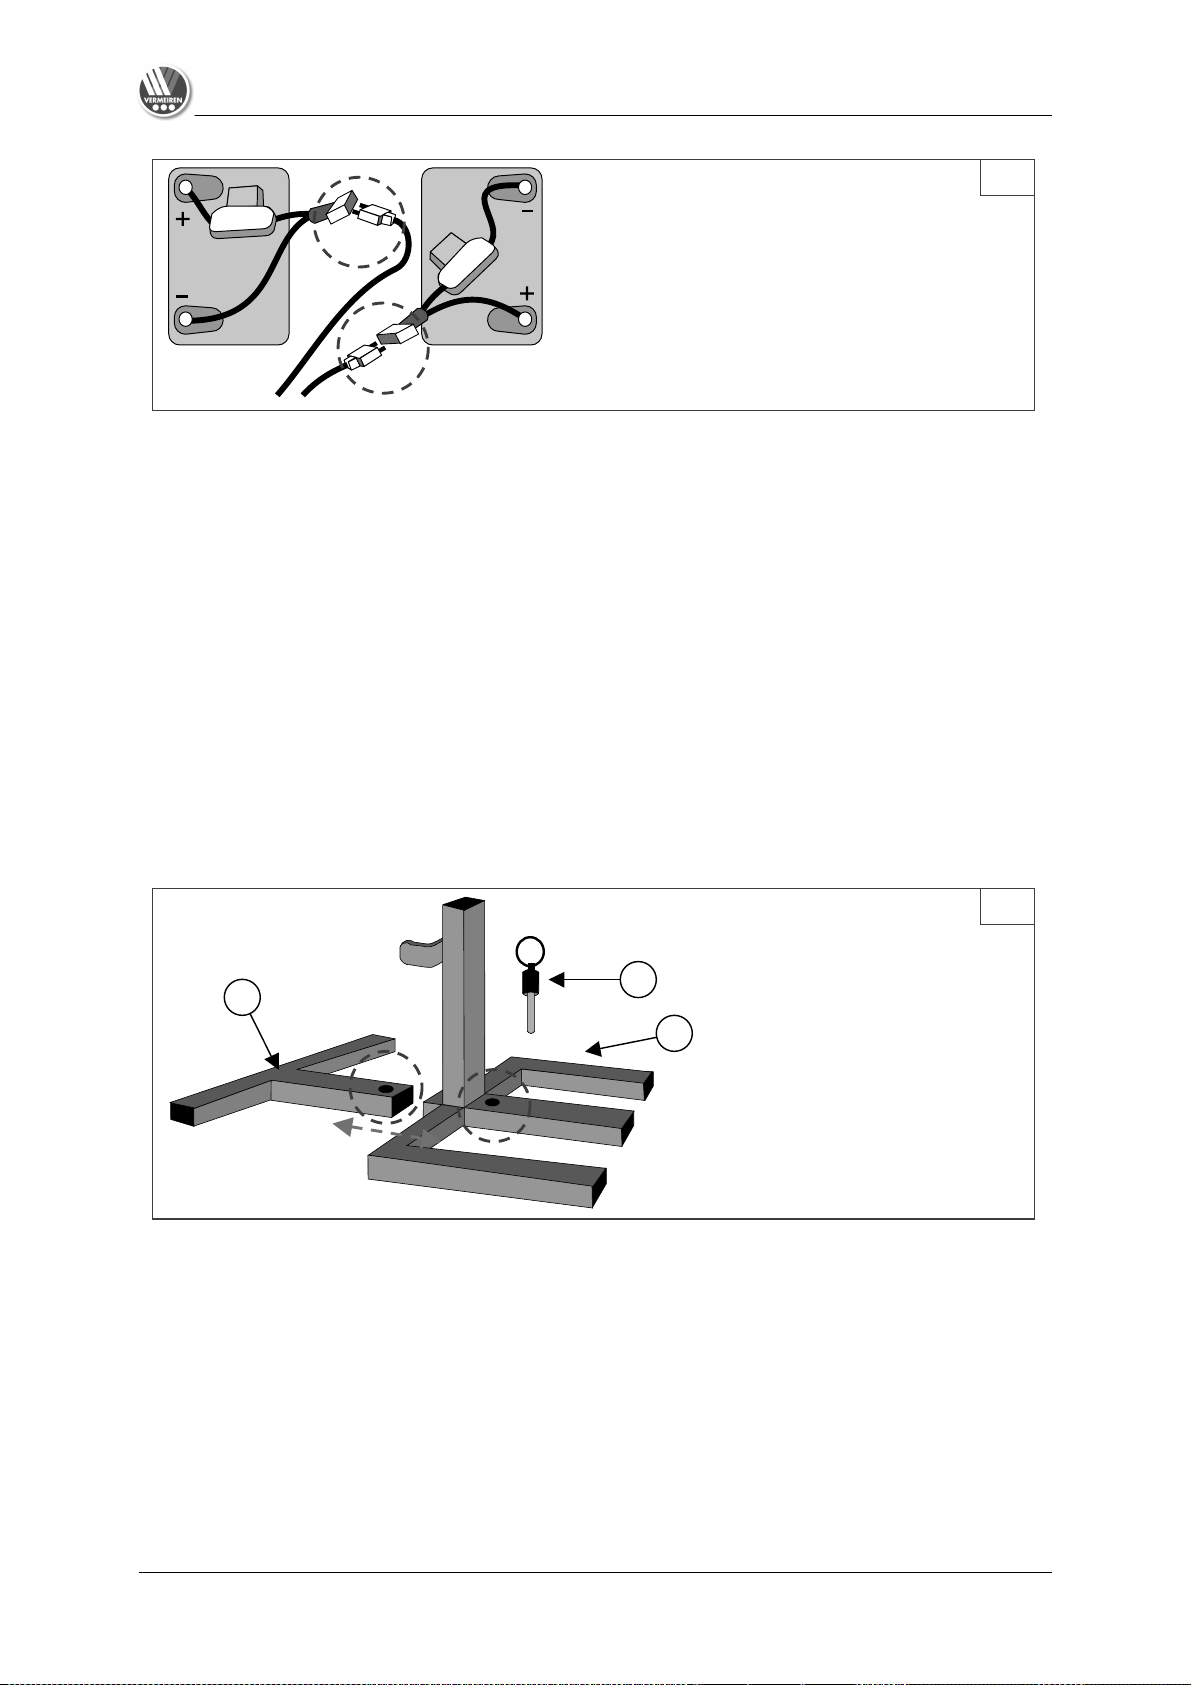
• Reconnect the plugs linking the front and rear parts of the frame (plugs of the same color go
together).
• Put the batteries back in and connect to the battery plugs (plugs of the same color go together,
diagram J).
• Use the straps to tighten the batteries in such a way that they won’t move, even during drives.
L
Always turn the scooter off before disassembling it.
L Be careful not to cut or bruise yourself with the cables during assembling or disassembling.
J
K
1 2 3
1 = Rear frame
2 = Front frame
3 = Safety pin

SCOOTERS Instruction Manual
Last updated: Feb-09
9
TROUBLESHOOTING
The following list will assist you with the troubleshooting of your scooter.
Problem
Cause
The scooter refuses to go once started.
No indication of load level
• Key not in place or switched on.
• Battery plug not connected (batteries not making
contact).
• Thermal safety fuses disengaged.
• Batteries defective (totally discharged).
• Defective control unit.
• Electronic box defective.
• Loom of cables defective.
The scooter refuses to go once started.
Load level insufficient.
• Motor/gears in neutral.
• Potentiometer of the rocker meter defective/loose
• Magnetic brake defective
• Motor defective.
• Electronic box defective.
Thermal safety fuses disengage.
• Motor worked too hard (see “Technical details”).
• Thermal safety fuses defective.
Batteries cannot be charged.
• Batteries not fitted correctly.
• ON/OFF switch of the battery box not switched on.
• Loading socket defective
• Wrong charger.
• Loading device defective
VERMEIREN
Ceres 3 / Ceres 4
I N S T R U C T I O N M A N U A L
M O D E D ’ E M P L O I
G E B R U I K S A A N W I J Z I N G
GEBRAUCHSANWEISUNG
I S T R U Z I O N I P E R L ' U S O
MANUAL DE INSTRUCCIONES

Notice SCOOTER
Version: Feb-09
2
Avertissement pour les revendeurs :
Ce mode d’emploi fait partie intégrante du produit et doit être remis avec chaque produit.
1. Edition 2008
Tous droits, également ceux de la traduction, réservés.
Aucune partie de ce mode d’emploi ne peut être reproduite sous quelque forme que ce soit (impression,
photocopie, microfilm ou autre procédé) sans l’autorisation écrite de l’éditeur ou traitée, reproduite ou diffusée à
l’aide de systèmes électroniques.
Vermeiren Belgique, 2008

Notice SCOOTER
Version: Feb-09
3
TABLE DES MATIÈRES
Chapitre Page
Table des matières .............................................................................................................................. 3
Avant-propos........................................................................................................................................ 4
Généralités........................................................................................................................................... 4
Domaine d’utilisation / Exclusions........................................................................................................ 4
Pour votre sécurité ............................................................................................................................... 5
Conseils pour les appareils électromagnétiques ................................................................................. 6
Formation de conduite ......................................................................................................................... 7
• Montée........................................................................................................................................... 7
• Descente ....................................................................................................................................... 7
• Garage........................................................................................................................................... 7
• Première utilisation ........................................................................................................................ 7
• Marche arrière ............................................................................................................................... 8
• Côtes ............................................................................................................................................. 8
• Pentes ........................................................................................................................................... 8
• Terrain non carrossable ................................................................................................................ 9
Charger les batteries............................................................................................................................ 9
Stockage des batteries ........................................................................................................................ 10
Protection contre le basculement......................................................................................................... 11
Coupe-circuit thermique ....................................................................................................................... 11
Transport du scooter............................................................................................................................ 11
Transport via des rampes .................................................................................................................... 12
Maintenance ........................................................................................................................................ 12
Inspection............................................................................................................................................. 13
Entretien............................................................................................................................................... 13
Désinfection ......................................................................................................................................... 14
Garantie ............................................................................................................................................... 15
Déclaration de conformité .................................................................................................................... 15
Programme d’entretien ........................................................................................................................ 16
Filiales .................................................................................................................................................. 17

Notice SCOOTER
Version: Feb-09
4
AVANT-PROPOS
Nous tenons tout d’abord à vous remercier pour la confiance que vous nous accordez en optant pour
l’un de nos scooters.
La durée de vie de votre véhicule dépend fortement du soin dont vous faites preuve lors de son
utilisation. Ce mode d’emploi doit vous aider à vous familiariser avec l’utilisation de votre scooter et
vous donne quelques conseils pour maintenir celui-ci en état de fonctionnement et lui assurer une
longue durée de vie.
Ce mode d’emploi reflète l’état le plus récent du développement du produit. La société Vermeiren se
réserve toutefois le droit d’apporter des modifications sans obligation d’adapter ou de remplacer les
modèles livrés précédemment.
N’oubliez pas que le respect de nos instructions vous permettra de conserver votre scooter en parfait
état de conservation et de fonctionnement, même après des années d’utilisation.
Si vous avez d’autres questions, veuillez vous adresser à votre revendeur.
GÉNÉRALITÉS
Les scooters électriques ont été conçus pour une utilisation en extérieur. Quelques modèles sont par
leur conception également adaptés à une utilisation en intérieur. Il convient toutefois de vérifier que
les conditions d’espace conviennent au rayon de braquage et à la conduite.
Si vous voulez utiliser votre scooter dans la rue ou sur les trottoirs, vous devez veiller à respecter les
dispositions légales en vigueur.
Pour les modèles limités à six kilomètres/heure, un permis de conduire et une assurance ne sont pas
obligatoires. Pour diverses raisons, nous vous conseillons quand même de souscrire une assurance.
Pour les versions allant au-delà de six kilomètres/heure, une assurance est obligatoire, mais pas de
permis de conduire. Vous recevrez avec ces modèles une autorisation d’utilisation pour le service
allemand StVZO, à remettre à votre assurance.
Pour charger les batteries, utilisez exclusivement le chargeur de batterie livré avec le fauteuil.
Nous tenons à vous signaler que des pannes peuvent être provoquées par des sources
électromagnétiques (ex. : téléphone portable, etc.) et que l’électronique du scooter peut elle-même
causer des perturbations sur d’autres appareils électriques.
Même si votre revendeur vous a renseigné sur les organes de commande de votre scooter et sur leur
manipulation, il n’empêche que vous devez lire attentivement les pages qui suivent.
Sous réserve de modifications techniques. Nos conditions commerciales générales sont applicables.
DOMAINE D’UTILISATION / EXCLUSIONS
Le scooter électrique permet de transporter les personnes confortablement. Le nombre de places
assises détermine le nombre maximum de personnes qui peuvent être transportées. L’utilisation du
scooter est exclue pour le transport d’objets et pour le transport de personnes de moins de 12 ans.
Les modèles dont la vitesse maximale est supérieure à six kilomètres/heure sont réservés aux
personnes de 16 ans et plus.
Le scooter ne doit pas être utilisé pour tirer des personnes ou des objets, ni comme escabeau.
L’utilisation est également exclue pour les personnes qui ne sont pas capables de manipuler leur
scooter dans la circulation, du fait d'importants handicaps physiques ou mentaux.
Les origines de ces handicaps peuvent être :
• Hémiplégie et paraplégie
• Perte de membres (amputation des bras)

Notice SCOOTER
Version: Feb-09
5
• Défaut/déformation des membres (lorsque la fonction d’équilibre et de direction est limitée)
• Contractures/lésions des articulations (lorsque la fonction d’équilibre et de direction est limitée)
• Troubles de l’équilibre ou cachexie
• Démences
• Traumatismes avec influence sur le cortex cérébral
Lors de l’utilisation du scooter électrique, il faut également faire attention aux éléments suivants :
• Taille et poids du corps
• Etat physique et psychique
• Habitation
• Environnement
Le scooter électrique est principalement prévu pour une utilisation sur les trottoirs. Seuls les modèles
avec autorisation d’utilisation pour le service allemand StVZO (plus de 6 km/h) peuvent être utilisés
sur des voies de circulation en agglomération. L’utilisation sur les routes nationales et autoroutes est
interdite.
Le fabricant décline toute responsabilité pour les dégâts causés par une utilisation contraire à
ces recommandations.
POUR VOTRE SÉCURITÉ
L Le transport d’autres personnes est interdit.
L Commencez toujours par tourner votre clé en position arrêt avant de monter ou descendre, de
démonter ou de transporter votre scooter.
L Lors du transport du scooter, le transfert de personnes est interdit.
L Étudiez les effets des déplacements du centre de gravité sur le comportement du scooter, par
exemple sur les tronçons en pente, les montées, les inclinaisons latérales ou lors du passage
sur des endroits accidentés.
L Lorsque vous prenez des objets qui se trouvent devant, sur le côté ou derrière le scooter,
veillez à ne pas vous pencher trop loin hors du scooter, car il y a un risque de basculement en
raison du déplacement du centre de gravité.
L Evitez de mettre votre scooter en position roue libre dans les pentes.
L Ne prenez jamais une côte en marche arrière.
L Réduisez votre vitesse dans les virages.
L Tenez le guidon à deux mains lorsque vous conduisez.
L Reposez vos jambes/pieds sur les surfaces prévues à cet effet lors de la conduite.
L Vous ne devez pas utiliser votre scooter par temps de pluie.
L Si vous garez ou gardez le scooter en extérieur, utilisez une bâche qui le protège de l’humidité.
L Un froid et un taux d’humidité de l’air importants peuvent nuire aux performances de votre
scooter.
L Utilisez votre scooter exclusivement en suivant les dispositions en vigueur. Évitez, par
exemple, de vous diriger contre un obstacle (marche, bordure) sans freiner ou de sauter des
paliers d’escalier.
L Lorsque vous vous déplacez dans la circulation routière, n’oubliez pas que vous devez
respecter le code de la route. Respectez les autres personnes dans la circulation.
L Comme pour la conduite d’autres véhicules, vous ne devez pas conduire votre scooter sous
l’influence de l’alcool ou de médicaments. Ceci vaut également pour l’intérieur.
L À l’extérieur de votre habitation, adaptez votre comportement de conduite aux conditions
météorologiques et routières existantes.
 Loading...