

Page 1
VERMEIREN
Antares 3 / 4
(WT-T3J/WT-T4J)
INSTRUCTION MANUAL
M O D E D ’ E M P L O I
G E B R U I K S A A N W I J Z I N G
GEBRAUCHSANWEISUNG
ISTRUZIONI PER L'USO
MANUAL DE INSTRUCCIONES
Page 2

1.
PREFACE AND INTRODUCTION ……..…………………………………
3
2.
SAFETY NOTICE…………………………………………………………...….
2.1 Before driving
2.2 While driving
2.3 Labeling
2.4 EMI
4
3.4.PARTS INTRODUCTION……………..……………….. …………………….
OPERATION…………………………………………………………………....
4
.1 Control panel
4.2 How to operate your scooter
4.3 How to set to freewheel mode
8
9
5.
DRIVING ON THE ROAD……………………………………………………..
14
6.
BATTERY CHARGING AND CARE………………………...…………….....
6.1 Charging the battery
6.2 Battery
6.3 Replacing batteries
15
7.
INSPECTION AND MAINTENANCE……………………………………..…
7.1 Inspection
7.2 Regular checking record
7.3 Battery and tire
7.4 Storage
7.5 Moving about
7.6 Disassembly
7.7 Assembly
19
8.
TROUBLESHOOTING ……………………………..……………..…………
249.SPECIFICATION …………….………...……………………………..………
25
10.
WARRANTY………………………………………………………………….....
26
TABLE OF CONTENTS
2
Page 3

Warning
Improper usage could result in serious injury or death
Attention
Improper usage could lead to injury and/or damage to your scooter.
Suggestion
Follow these instructions to keep your vehicle in a good operating
order.
1 . P R E FACE A N D INT R O DUCT I O N
Please carefully read this owner’s manual before using the vehicle. Improper use of the
vehicle could result in harm, injury or traffic accidents. To ensure that you get the most
your scooter, please read this owner’s manual before using.
♦
This owner’s manual includes operation instructions for every aspect of the vehicle,
assembly instructions, as well as instructions for how to deal with possible accidents.
♦
The symbols used in this manual are explained overleaf:
♦
This manual includes a copy of repair and maintenance record chart and warranty
information. Please keep it in a safe place or in the scooter.
♦
If someone else uses the scooter, please make sure that you provide him or her with
this owner’s handbook for his or her consideration.
♦
As designs change some illustrations and pictures in the manual may not correspond
to the vehicle that you purchased. We reserve the right to make design modifications.
Our Scooters have been designed and manufactured to provide a comfortable and secure
yet affordable solution for some mobility requirements.
3
Page 4

2 . S A F E T Y NO T ICE
2.1 BEFORE DRIVING
The user needs to be familiar with the usage and operation of this vehicle before driving.
Therefore, please follow the commendations in this safety notice.
The same traffic rules apply to the use of this vehicle as apply to pedestrians
■
♦
For your safety, please follow and adhere to the same traffic laws as pedestrians.
♦
Please do not drive your scooter after consuming alcohol or when you are tired.
♦
Please be careful when driving your scooter in low light. It has not been designed for
use at night.
♦
Be extremely cautions when driving you scooter in busy areas or in shopping malls.
♦
Ride on the pavement, single carriage roads, or pedestrian areas only. Never ride on
motorways or dual carriageways.
♦
Be aware of traffic when crossing or using roads.
Practice operating your vehicle
■
Before using the scooter in busy or potentially dangerous areas, familiarize yourself
with the operation of your scooter. Please practice in a wide and open area like a park.
In order to avoid accidents with your scooter whilst driving, please bear in mind
driving motions, such as accelerating, stopping, turning, reversing, up-and down
ramps.
♦
Please turn the speed dial to minimum value for your initial practice.
♦
Be sure someone accompanies you for safety when driving on the roads for the first
time.
♦
Only use higher speed setting when you are confident that you can easily operate
and control your scooter.
The Scooter is only to be used by one person at a time
■
Do not carry passengers on your scooter (including children)
Do not use this vehicle to carry or haul goods
■
♦
The maximum weight that can be carried is 115kg/250lbs (including occupant and
any goods).Refer to “MAX LOAD WEIGHT” in “9. SPECIFICATION”
♦
Maximum loading weight for basket is 3kg (7 lb).
Please carry out daily inspections.
■
Refer to the section entitled “DAILY CHECKING”
4
Page 5

2 . S A F E T Y NO T ICE
2.2 WHILE DRIVING
Do not use your vehicle under the circumstances below.
■
♦
On surfaces that are muddy, gravelly, bumpy, narrow, snowed over, icy, or canal
towpaths not guarded by any fence or hedge. Keep away from places where you
might get the wheels stuck.
♦
Do not drive at night or when it is raining, snowing, misty, or windy.
♦
Do not drive your vehicle in an “S” pattern or make erratic turnings.
♦
Do not take the scooter onto escalators.
♦
UNDER NO CIRCUMSTANCES SHOULD THE SCOOTER BE USED AS A
SEAT IN A MOTOR VEHICLE (E.G. CARS, BUSES, TRAINS, ETC).
About Mobile Phones and other electrical equipment
■
♦
Do not use a mobile phone or other wireless communication devices while driving.
♦
Always switch off the scooter and remove the ignition key before using a mobile
phone.
♦
Do not charge the mobile phone or any other electrical devices from your scooter’s
battery.
Automatic Power Shut Down
■
In order to avoid accidental battery run down, your scooter is equipped with an
automatic power shut down facility. If the scooter is switched on, after remaining
undisturbed for a period of thirty minutes it will automatically turn off. When this
situation occurs, simply switch your scooter off and back on and it will be ready to use
once again.
Ramps, inclines and drops
■
♦
Do not drive onto steep ramps greater than the specified gradient. Refer to the
section entitled “CLIMBING ANGLE” in “9. SPECIFICATION“
♦
Always use a low speed setting when ascending or descending a gradient.
♦
Do not drive on roads with large drops or potholes. Refer to the section entitled
“MAX. GROUND CLEARANCE” in “ 9. SPECIFICATION”.
♦
Please slow down when driving on roads with inclines.
♦
Do not make sudden turns when driving on gravel roads or ramps.
♦
Always lean forward when climbing a steep gradient.
♦
Do not travel on gradients exceeding those stated on the diagram overleaf.
5
Page 6

2. SA F E TY NO TICE
2.4 EMI
Caution: It is very important that you read this information regarding the possible
effects of electromagnetic interference on your electric SCOOTER.
Note: Some mobile telephones and similar transmit signal while they are ON, even
when not being used;
This portion of the content will provide the user with basic information that describes
the problems with EMI, known sources of EMI, protective measures either to lessen the
possibility or exposure or to minimize the degree of exposure, and suggested action
should unexpected or erratic movement occur.
ELECTROMAGNETIC INTERFERENCE (EMI) FROM RADIO WAVE
■
SOURCES
Powered vehicle may be susceptible to electromagnetic interference (EMI), which is
interfering electromagnetic energy (EM) emitted from sources such as radio stations,
TV stations, amateur radio (HAM) transmitters, two-way radios, and mobile phones.
The interference (from radio wave sources) can cause the powered scooter to release its
brakes, move by itself, or move in unintended direction
s. It can also permanently
damage the powered scooter’s control system. The intensity of the interfering EM
energy can be measured in volts per meter (V/m). Each powered scooter can resist EMI
up to a certain intensity. This is called its “immunity level”. The higher the immunity
level, the greater the protection. At this time, current technology is capable of
achieving at least a 20 V/m immunity level, which would provide useful protection
from the more common sources of radiated EMI. This powered scooter model as
shipped, with no further modification, has an immunity level of 20 V/m without any
accessories.
There are a number of sources of relatively intense electromagnetic fields in the
everyday environment. Some of these sources are obvious and easy to avoid. Others
are not apparent and exposure is unavoidable. However, we believe that by following
the warning listed below, your risk to EMI will be minimized.
The sources of radiated EMI can be broadly classified into three types:
•
Hand-held portable transceivers ( transmitter -receivers with the antenna mounted
directly on the transmitting unit. Examples include: citizens band (CB) radios, “
walkie talkie”, security, fire, and police transceivers, cellular telephones and other
personal communication devices.
•
Medium-range mobile transceivers, such as those used in police cars, fire trucks,
ambulances and taxis. These usually have the antenna mounted on the outside of the
scooter.
6
Page 7

2. SA F E TY NO TICE
•
Note: Other types of hand-held devices, such as cordless phones, laptop computers,
AM/FM radios, TV sets, CD player, and cassette players, and small
appliances, such as electric shavers and hair dryers, so far as we know, are not
likely to cause EMI problems to your powered scooter.
Long-range transmitters and transceivers, such as commercial broadcast transmitter
(radio and TV broadcast antenna towers) and amateur (HAM) radios.
■
POWERED VEHICLE ELECTROMAGNETIC INTERFERENCE (EMI)
Because EM energy rapidly becomes more intense as one moves closer to the
transmitting antenna (source), the EM fields from hand-held radio wave sources
(transceivers) are of special concern. It is possible to unintentionally bring high levels
of EM energy very close to the control system of power chair while using these
devices. This can affect powered vehicle movement and braking. Therefore, the
warnings listed below are recommended to prevent possible interference with the
control system of the powered scooter.
■
WARNINGS
Electromagnetic interference (EMI) from sources such as radio and TV stations,
amateur radio (HAM) transmitters, two-way radios, and mobile phones can affect
powered scooter and motorized scooter. Following the warnings listed below should
reduce the chance of unintended brake release or powered scooter movement which
could result in serious injury.
Do not operate hand-held transceivers-receivers), such as citizens band (CB)
•
radios, or turn ON personal communication devices, such as cellular phones, while
the powered vehicle is turned ON;
•
Be aware of nearby transmitters, such as radio or TV stations, and try to avoid
coming close to them;
•
If unintended movement or brake release occurs, turn the powered vehicle OFF as
soon as it is safe;
•
Be aware that adding accessories or components, or modifying the powered
vehicle, may make it more susceptible to EMI ( Note: There is no easy way to
evaluate their effect on the overall immunity of the powered scooter).
•
Report all incidents of unintended movement or brake release to the powered
scooter manufacturer, and note whether there is a source of EMI nearby,
IMPORTANT INFORMATION
•
20 Volts per meter (V/m) is a generally achievable and useful immunity level against
EMI (the higher the level, the greater the protection);
•
This product has an immunity level of 20 V/m without any accessories and
connected to it.
7
Page 8
3 . PA R T S IN T R O DUCT I O N
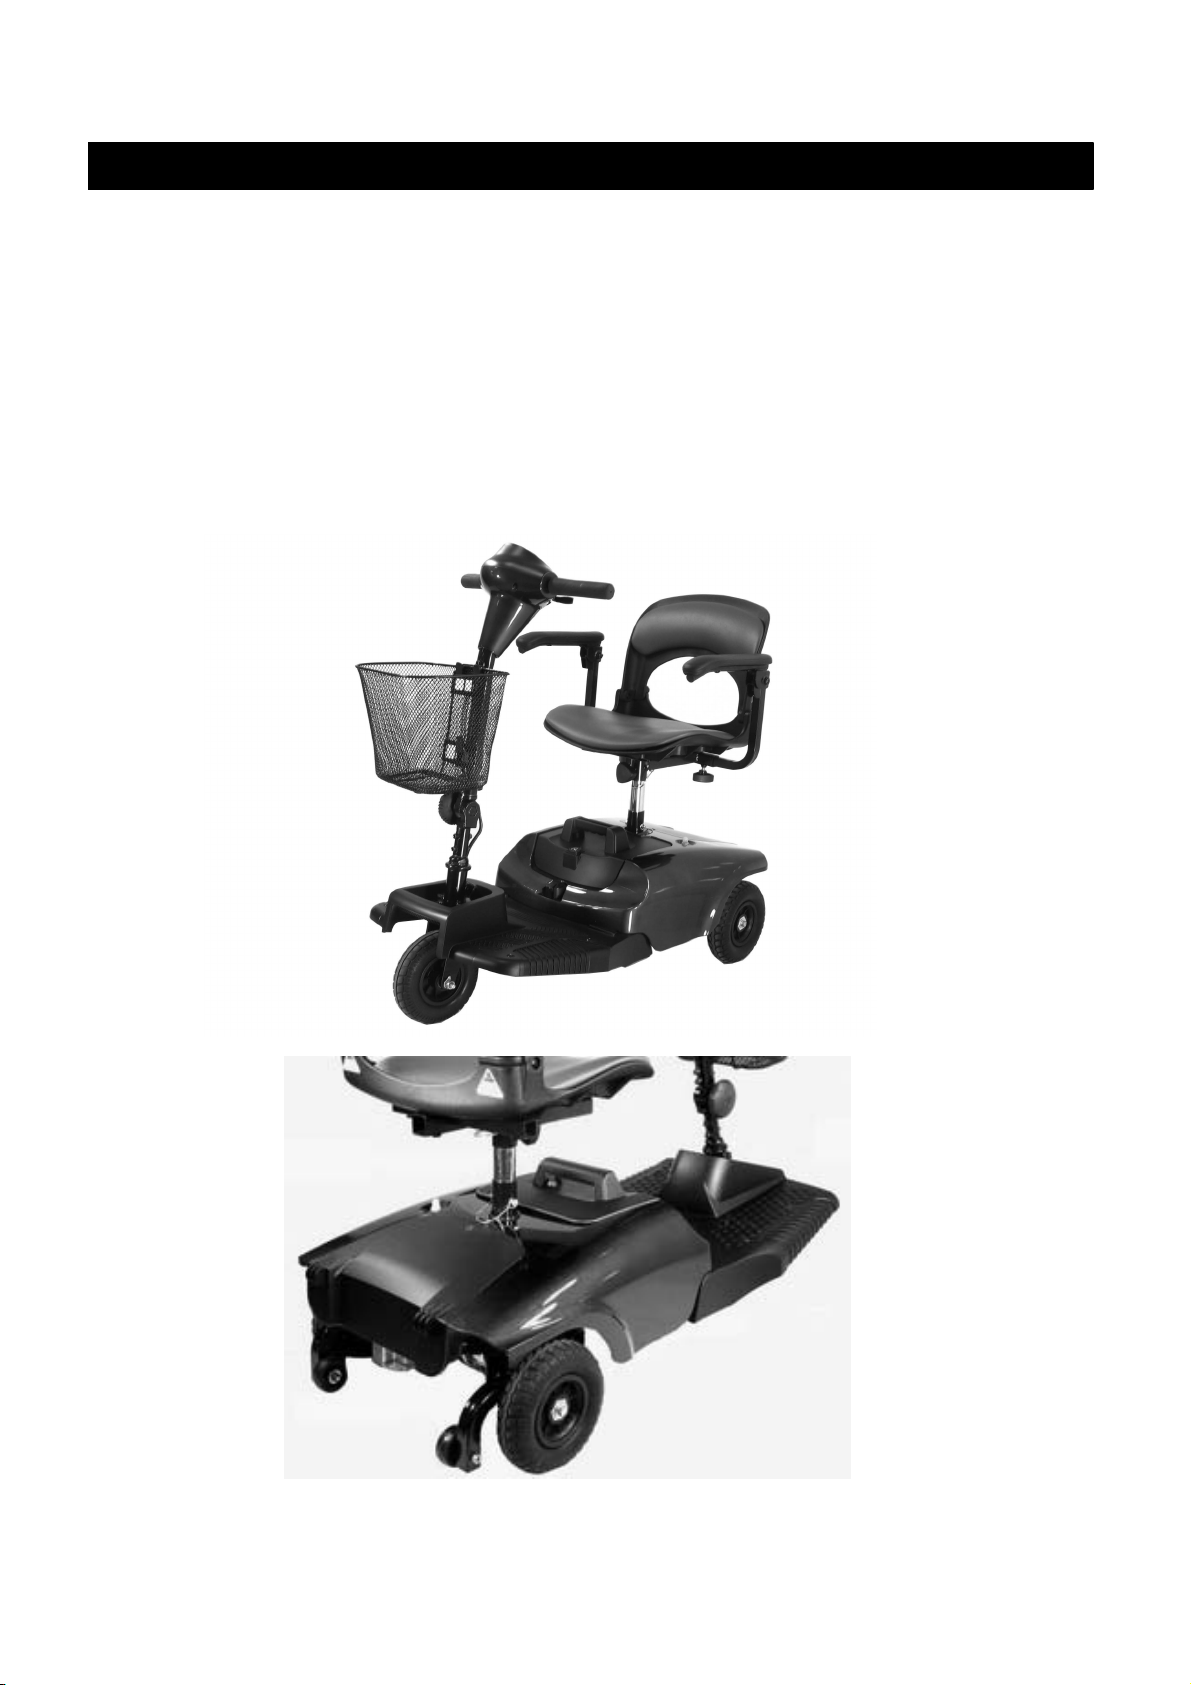
PARTS DESCRIPTION
1. Control panel 2. Basket
3. Charger Socket 4. Tiller Adjustment Knob 5. Seat
6. Seat Rotation Lever 7. Battery Pack 8. Freewheel Lever
9. Anti-tip wheels 10. Seat Height Adjustment Pin
1
3
2
4
10
5
6
7
8
9
8
Page 9

4 . O P E R AT I ON
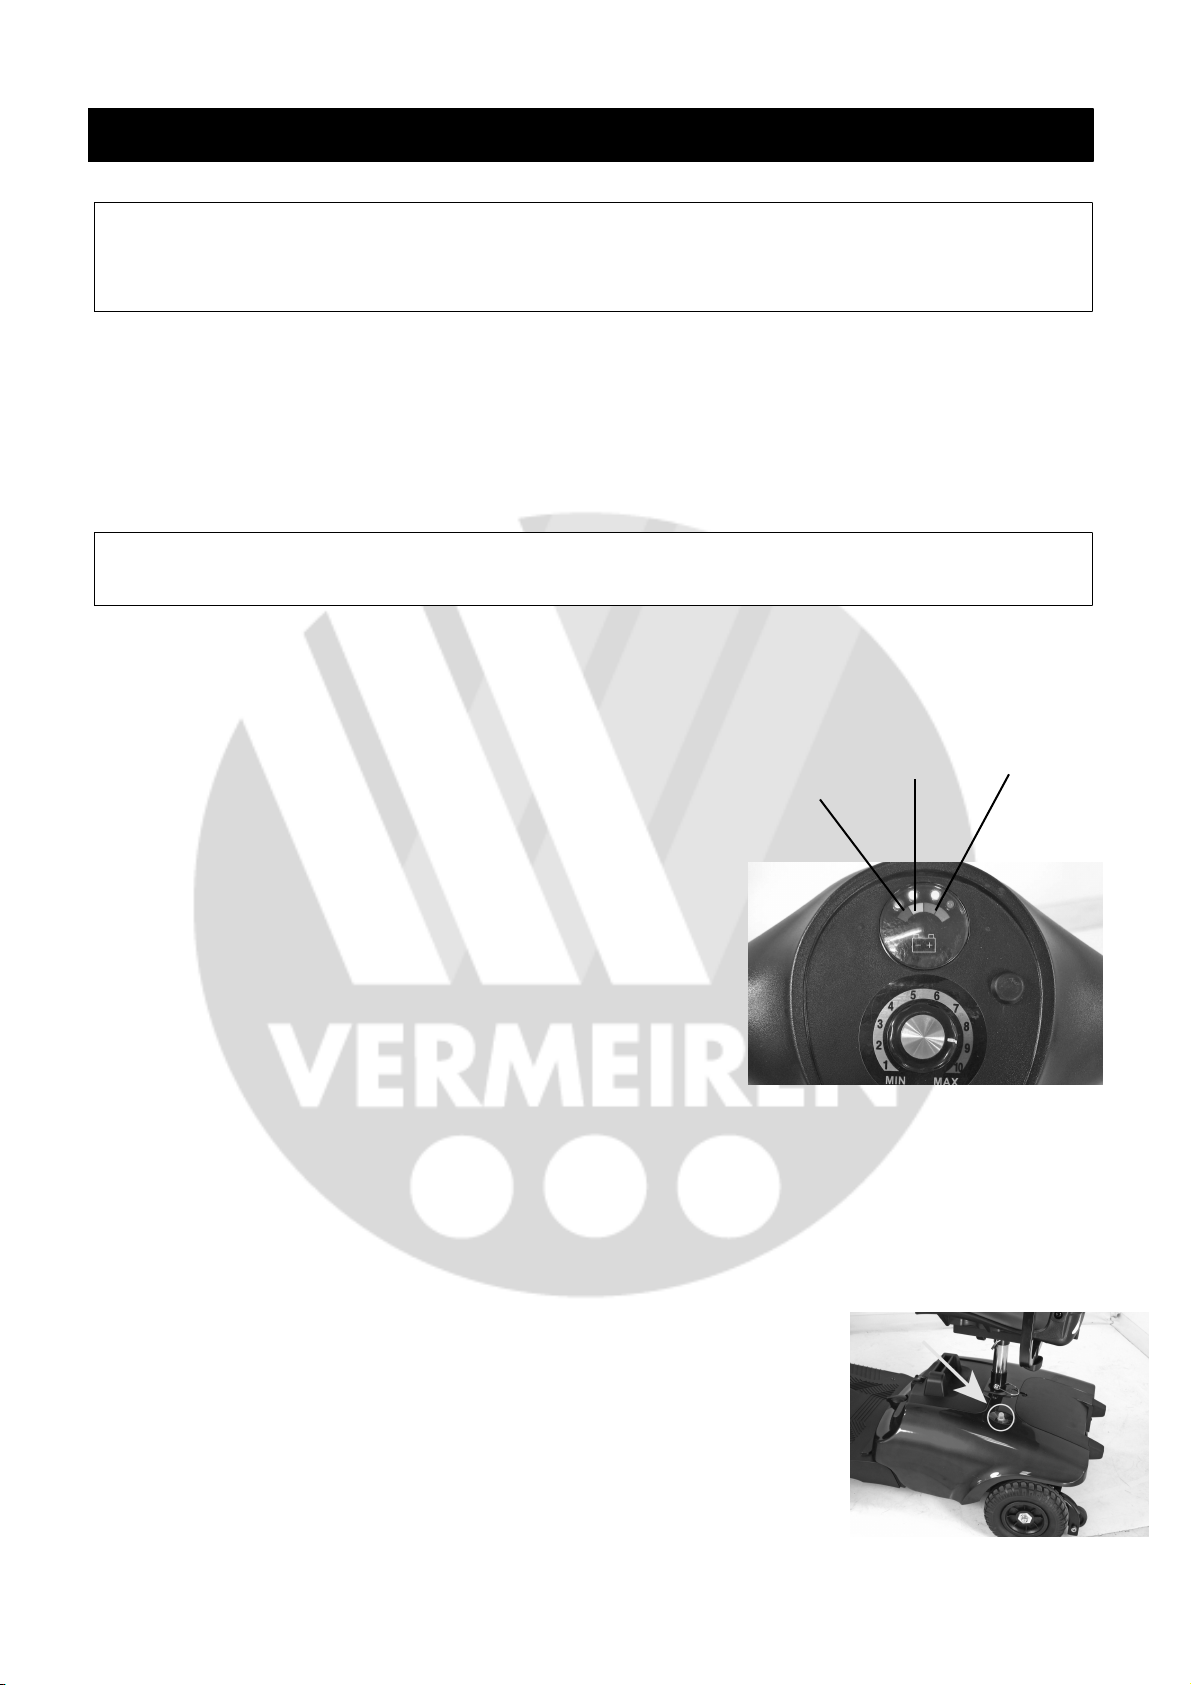
4.1 CONTROL PANEL
1. Speed Dial
3. Battery Indicator 4. Power Switch
3
1
4.2 HOW TO OPERATE YOUR SCOOTER
■ Power switch
♦
To switch the power on, turn the key
clockwise in the ignition. The power eye should illuminate.
♦
To switch the power off, turn the key anticlockwise . The power eye should switch
off and the key can be removed if required.
■ Moving and Braking
♦
Push the right-hand side speed control lever forwards with your right thumb and the
scooter will move forward.
♦
Push the left-hand side speed control lever forwards with your left thumb and the
scooter will move backward.
♦
To brake , release the speed control lever which will return to neutral and activate
the electromagnetic brake automatically .This will bring the scooter to a prompt
stop.
♦
The speed control lever allows you to control the speed of the scooter up to a
4
maximum speed determined by the Speed Dial .The further the speed control lever
is deflected, the faster the scooter will go.
Braking
■
Electro-magnetic brake: Release the speed control lever completely, and the
electromagnetic brake will be activated automatically, and the scooter will stop.
9
Page 10
4. OPE R AT ION
Warning
When on a gradient NEVER set the vehicle to the freewheel mode. The electromagnetic
brakes will not be applied. This may result in injury or damage.
Seat
Attention
Return the seat to the forward position before driving.
■
♦
The seat can be rotated and locked in position at 45 degrees intervals.
♦
Push the seat adjustment lever forward and swivel the seat.
♦
Release the lever, and then continue swiveling the seat until it locks in position.
Battery indicator
■
The battery indicator on the tiller console uses
a color code to indicate the approximate power
remaining in your batteries. Green indicates
(40~100%) capacity, yellow a draining charge(10
~30%),and red indicates that an immediate
recharge is necessary.
♦
The remaining power suggested by the battery
RED
YELLOW GREEN
indicator will vary by the actual driving time
incurred and how you drive. Repeated starting,
stopping, climbing will consume the power
more quickly.
Main Circuit Breaker (Reset Button)
■
When the voltage in your scooter’s batteries becomes low or the scooter is heavily
strained because of excessive loads or steep inclines, the main circuit breaker may tip
to protect the motor and electronics from damage.
♦ The main circuit breaker rest button pops out when the
breaker trips.
♦ When the breaker trips, the entire electrical system of your
scooter shuts down.
♦ Allow a minute or two for your scooter’s electronics to “rest”.
♦ Push in the reset button to reset the main circuit breaker.
10
Page 11
4 . O P E R AT I ON
Suggestion
1. You should recharge the batteries after each time the vehicle is used to ensure
maximum range. The batteries should be charged up at least once a week even if the
scooter is not used.
2. After charging or replacing a new battery, drive the vehicle for 2-3 minutes to make
sure the battery capacity is sufficient.
3. In wintertime, the battery may respond more slowly and the battery range may be
reduced.
4. When driving on a gradient, the battery indicator light might move up and down. This
is a normal phenomenon so please do not worry.
5. Even if the battery is used properly, it is natural for the battery’s capacity to reduce
with time, which results in reduced battery range compared to a brand new battery.
Therefore, when you find the battery’s range is about only 50% of the range when the
batteries were new, it is time to replace the batteries. Please see your dealer about
replacement batteries. If you continue to use the old battery
when it should be
replaced, it could lead to a rapid decline in performance.
6. The battery range will be reduced when driving frequently on a slope or rough terrain,
as this leads to greater consumption of power.
7. The batteries have a six-month warranty covering manufacturing defects. This
warranty does not cover faults due to incorrect battery recharging.
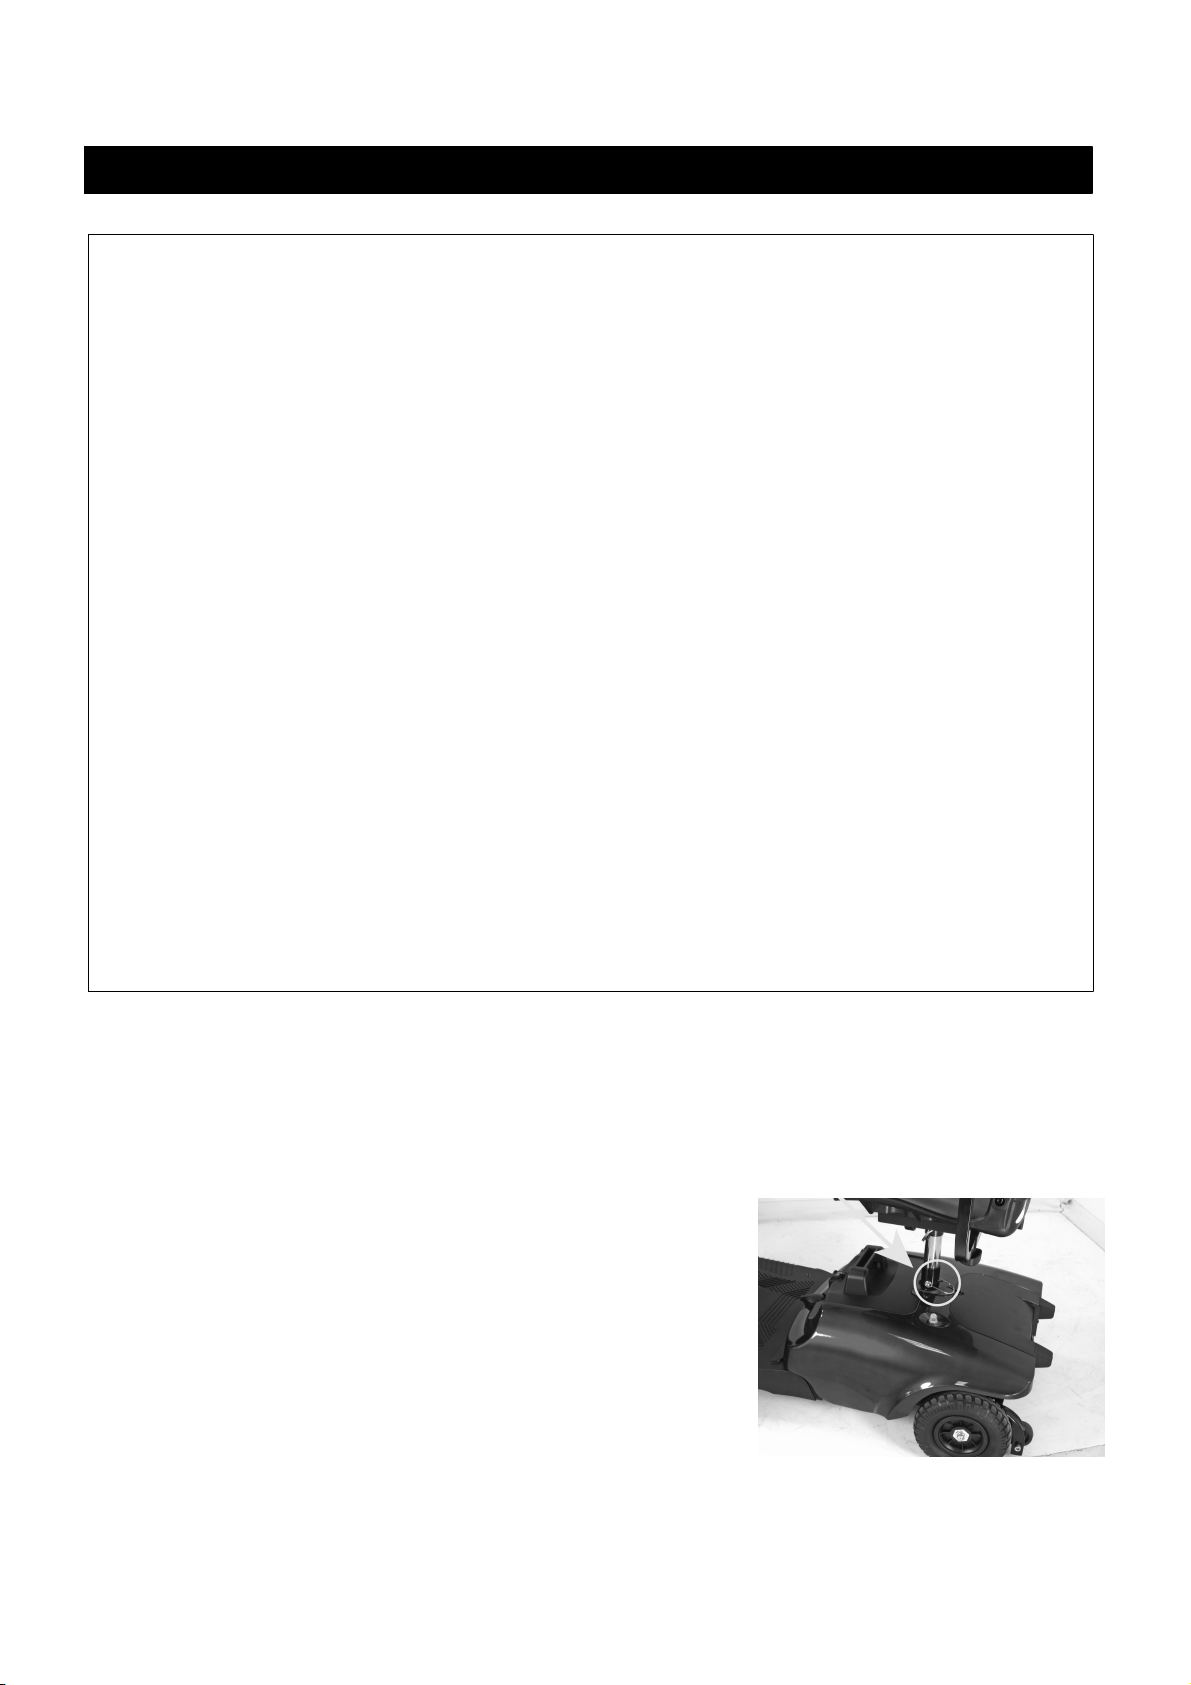
How to adjust the seat height
■
1. Remove the seat from your scooter.
2. Remove the pin lock from the lower seat post.
3. Adjust the upper seat post to the desired seat height.
4. Move the upper seat post so that there is a hole to
insert the locking pin.
5. Insert the pin lock and replace seat replace seat.
Pin lock
11
Page 12
4 . O P E R AT I ON
Warning
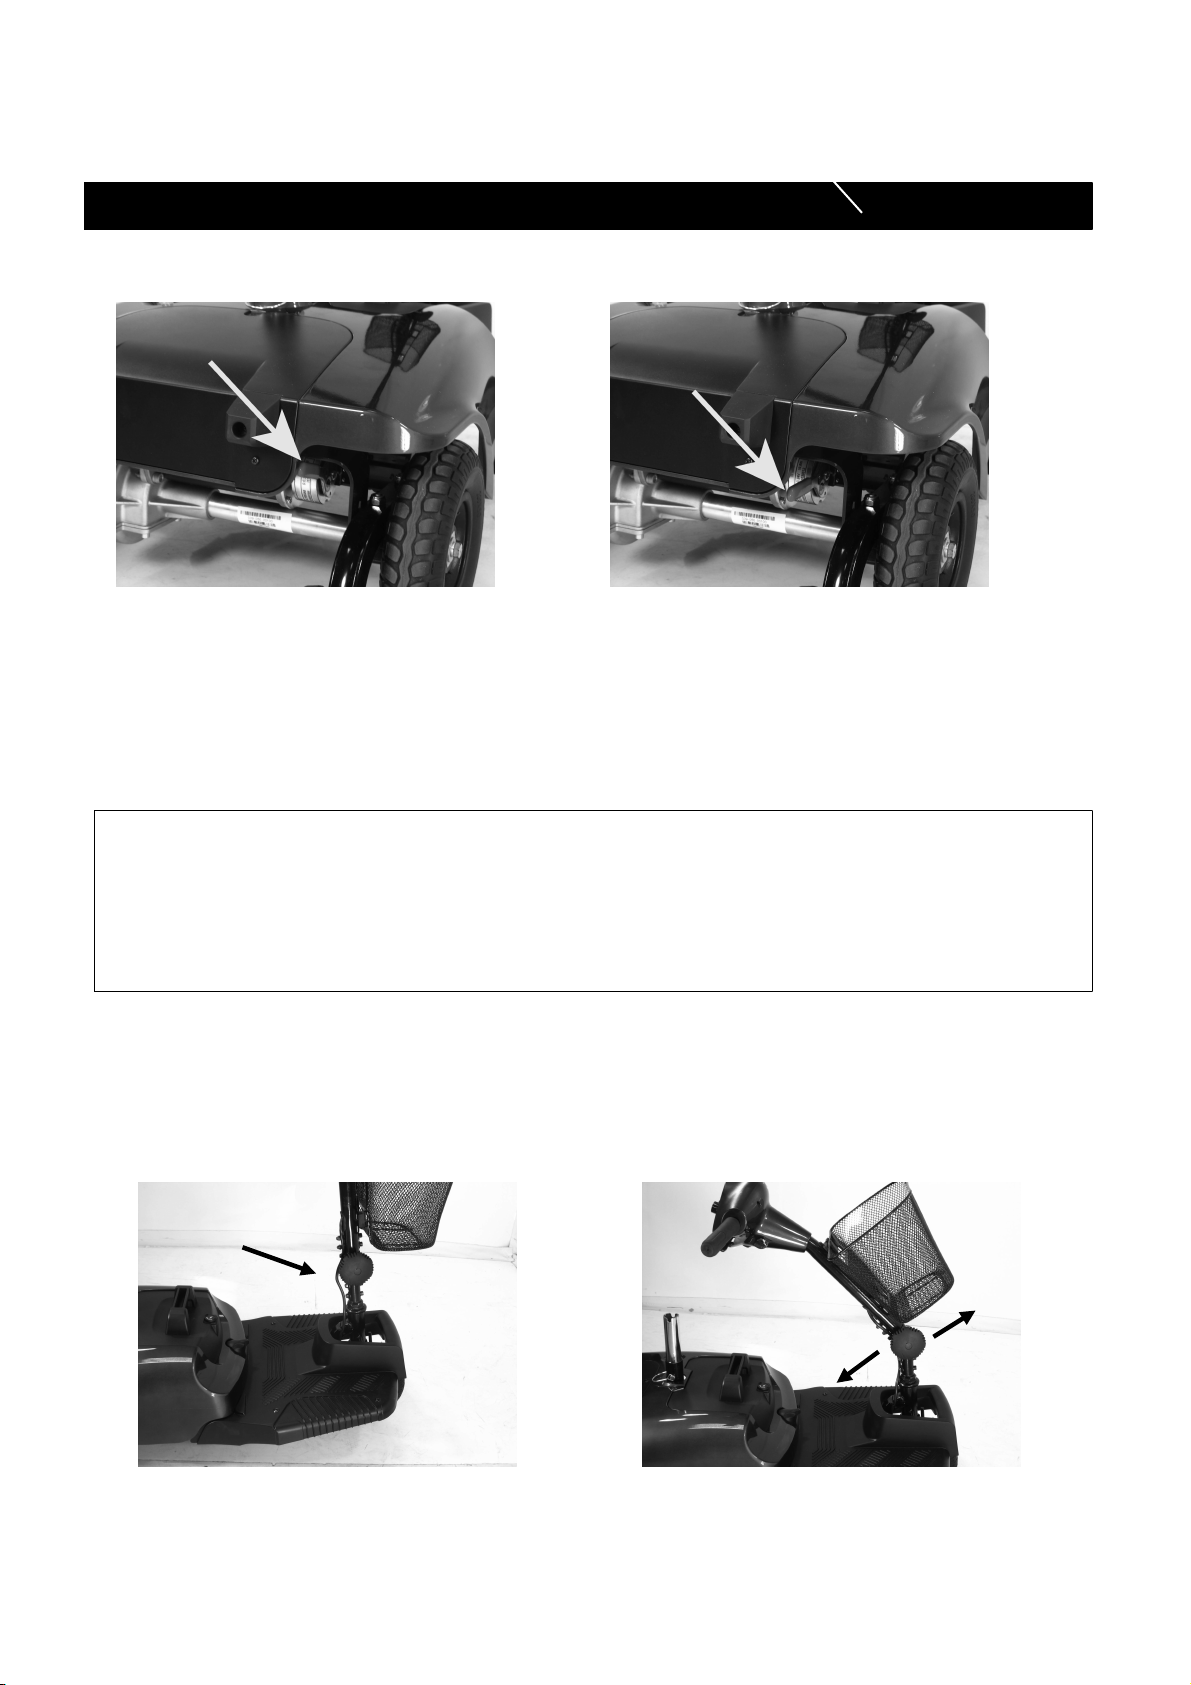
Never operate the freewheel lever while seated on the scooter or on an incline!
OPERATION OF THE FREEWHEEL LEVER
‧ Always pull UP FIRMLY for freewheel mode
‧ Always push DOWN FIRMLY for drive mode
.3 How to set to freewheel mode
Lever
Fig 4.1 Fig 4.2
◆ Engaged mode (Fig. 4.1): Push the lever completely and the scooter can be driven by
Lever
motor power.
◆Freewheel Mode (Fig 4.2):Pull the lever up and the scooter can be moved manually.
Tiller Adjustment
■
The tiller can be adjusted in to many different positions to suit each driver.
1. Loosen the knob to adjust the tiller to positions you want. (Fig. 4.3)
2. Once decide the position, tighten the knob to secure the tiller.( Fig.4.4)
Adjustment
knob
Fig. 4.3 Fig. 4.4
12
Page 13

4 . O P E R AT I ON
Warning
♦ Please hold the tiller before loosening the tiller adjustment knob.
♦ Before lifting or driving the scooter make certain the tiller adjustment knob is fully
tightened.
♦ Never attempt to adjust the tiller while the scooter is motion.
13
Page 14

5. DRI V I NG ON T H E ROAD
Starting and Driving
Attention
1.
Do not push both RH & LH sides of the speed control lever simultaneously. This
might leave you unable to control your scooter.
2. Do not turn the power switch to OFF while driving as this will lead to an emergency
stop and possible risk of accident and injury.
3. Do not set to the highest speeds whilst driving indoors.
4. Do not adjust the speed dial whilst driving, a sudden change in speed may cause
danger to you and others, and may cause damage to your scooter.
5. Do not place magnetic devices near the area of the operation handle as this could
affect the safe operation of your scooter. The scooter controller is located under the
foot way.
6. Do be careful whilst driving in heavy traffic or crowded areas.
7. Whilst reversing the vehicle, beware of people or objects behind you.
Attention
1. The stopping distance will vary with your forward / reverse speed. Therefore please
begin braking as early as you can.
2. When parking your scooter, be sure to park on flat ground and then turn the power to
“OFF” before you dismount.
■
•
Make sure the seat is installed properly.
•
Make sure the tiller has been secured properly.
•
Fold down the armrests so you can rest your arms on them.
•
Turn the power switch to “ON”.
•
Check battery indicator to see whether there is enough power for your journey. If you
have any doubt about the remaining power, please recharge the batteries before
departure.
•
Set the speed dial to a position you feel safe and comfortable with.
•
Check the forward/reverse speed lever works correctly.
•
Make sure the electromagnetic brake works correctly.
•
Before driving, ensure it is safe to do in the environment around you.
♦
Stopping
•
Release the speed control lever completely. The vehicle will naturally brake and stop.
•
Turn the power off. Then pull out the key.
14
Page 15
6 . BAT T E RY C H ARG I N G AND C A R E
Attention
♦
While returning the battery pack to the battery pack cavity of shroud, beware of finger
or hands.
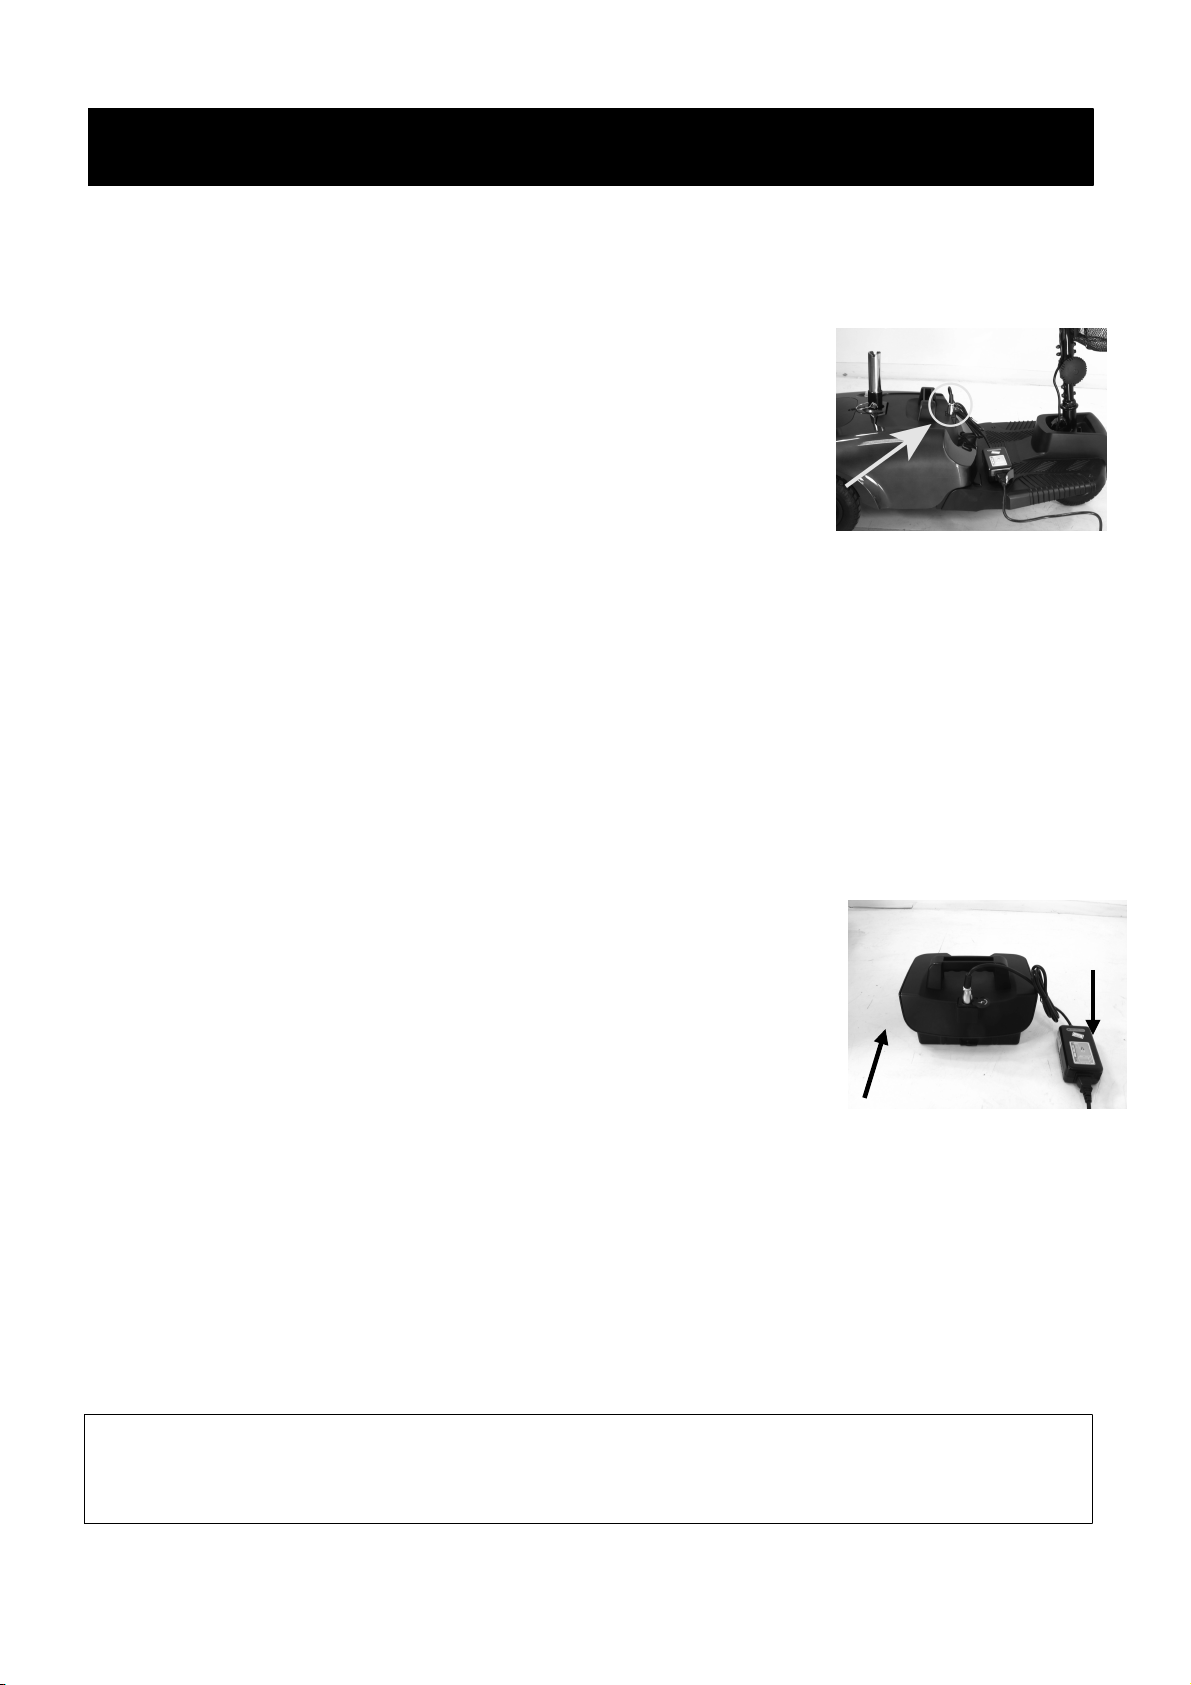
•
CHARGING THE BATTERY
Method 1: On board Charging (see photograph overleaf)
■
Follow the procedure below step by step:
Turn the power switch to (OFF)
•
Plug the charger’s power cord into the mains.
•
Open the charging socket cap on the rear shroud. Then connect
•
the charger’s round plug to the charging socket.
Switch on the charger.
•
Both the charger’s red and orange LED will be lit when beginning charging. The
•
Charger socket
charging duration is about 6 hours. To ensure optimum performance a 10-hour charge is
recommended.
Both the charger’s LED will be lit during the charging process. The orange LED will
•
turn green when charging is complete.
Turn off the charger, disconnect the power cord and the round plug from charger socket
•
on the scooter.
Method 2 Off-board Charging (see photograph overleaf)
■
1. Turn the power switch to (OFF)
2. Remove the battery pack by opening the battery
compartment and lifting out the battery pack by the handle.
3. Plug the charger’s power cord into the mains.
4. Plug the charger’s round plug into the charging socket of
the battery pack.
5. Switch on the charger.
6. Both the charger’s red and orange LED will be lit when
beginning charging. The charging duration is about 6 hours.
To ensure optimum performance a 10-hour charge is
recommended.
7. Both the charger’s LED will be lit during the charging process.
The orange LED will turn green when charging is complete.
8. Turn off the charger, disconnect the power cord and the round
plug from charger socket on the battery pack.
Charger
Power Pack
15
Page 16

6 . BAT T E RY C H ARG I N G AND C A R E
Charging Hours
■
The charging duration is about 6 hours. To ensure optimum performance a 10-hour
charge is recommended. But we do not recommend a charging more than 24
consecutive hours.
Batteries (Inside the Pack)
■
1. The Antares is powered by two sealed lead-acid deep-cycle batteries.
2. The batteries supplied with the scooter are 12 V 12Ah batteries.
3. Size : 5.94 “× 3.89 “ x 3.74 “ (Width x Height x Thickness)
(151mm×99mm×95mm)
Warning
•
Keep away from flammable objects while charging as it may lead to fire or explosion
of battery.
•
Do not smoke while charging as the battery may release hydrogen gas. Always charge
your battery in a well-ventilated space.
•
Never connect or disconnect the plug or cord with wet hands while charging. Do not
connect or disconnect the plug or cord when they are wet, it may lead to electric
shock.
Attention - Please follow the rules below to avoid accidents while charging.
•
Please use the supplied charger only, and recharge the battery to its full capacity every
time. You may damage the battery and scooter if you use a charger, which is not to the
correct specification.
•
Please charge in a well-ventilated space where it is not directly exposed to the
sunlight. Do not charge in surroundings where it is humid or under rainfall and
morning dews.
•
Do not charge in temperatures less than -10C or higher than +50°C as the charger
may not work well and the batteries may become damaged.
•
BATTERY
♦
Do not expose the battery to temperatures below 10C or above 50C when
charging or storing the vehicle. Under the above temperature range can cause the
battery either to freeze or over heat. This will damage the batteries and shorten their
life.
♦
These batteries are maintenance free and there is no need to refill with water.
You are required to recharge the batteries on a regular basis. Even if the scooter is
stood idle, you should charge the batteries at least once a week.
16
Page 17

6 . BAT T E RY C H ARG I N G AND C A R E
♦
Suggestion – How to maximize your batteries efficiency and service life
•
Fully recharge your new battery before its first time use.
•
Be sure to charge the battery fully every time. The battery life will be seriously
shortened or decayed if the battery is repeatedly used without being fully charged.
•
Always complete the charging until the orange LED light turns green. NEVER stop
charging before it is complete.
•
Keep your batteries fully charged whenever possible.
•
If you do not use your scooter for a long time, it should be charged at least every week
to keep the battery in a fully usable condition.
•
The ambient temperature will affect charging time. Charging time will be longer in the
winter.
•
After charging, do not leave the charger socket plugged in to the scooter, as this will
cause a power drain on the scooter and temporarily reduce its range.
The batteries carry a six-month manufacturer's warranty. This warranty only covers
issues relating to manufacturing faults, and not faults relating to failure to recharge the
batteries as instructed above.
Cleaning the battery
■
If the batteries are contaminated by water, battery acid, dust or other substances, they
will discharge quickly. The batteries supplied with the scooter are sealed and as such
are maintenance free with no risk of battery leakage. Please follow the steps below to
clean the battery.
•
Turn the scooter power switch to OFF.
•
Follow the procedure in the next section “Replacing the Batteries”.
•
Use a clean cloth to wipe off the soiled area.
•
Take out the battery.
•
Clean the battery with a clean cloth. If the terminal is covered by white powder, please
wipe it clean using warm water.
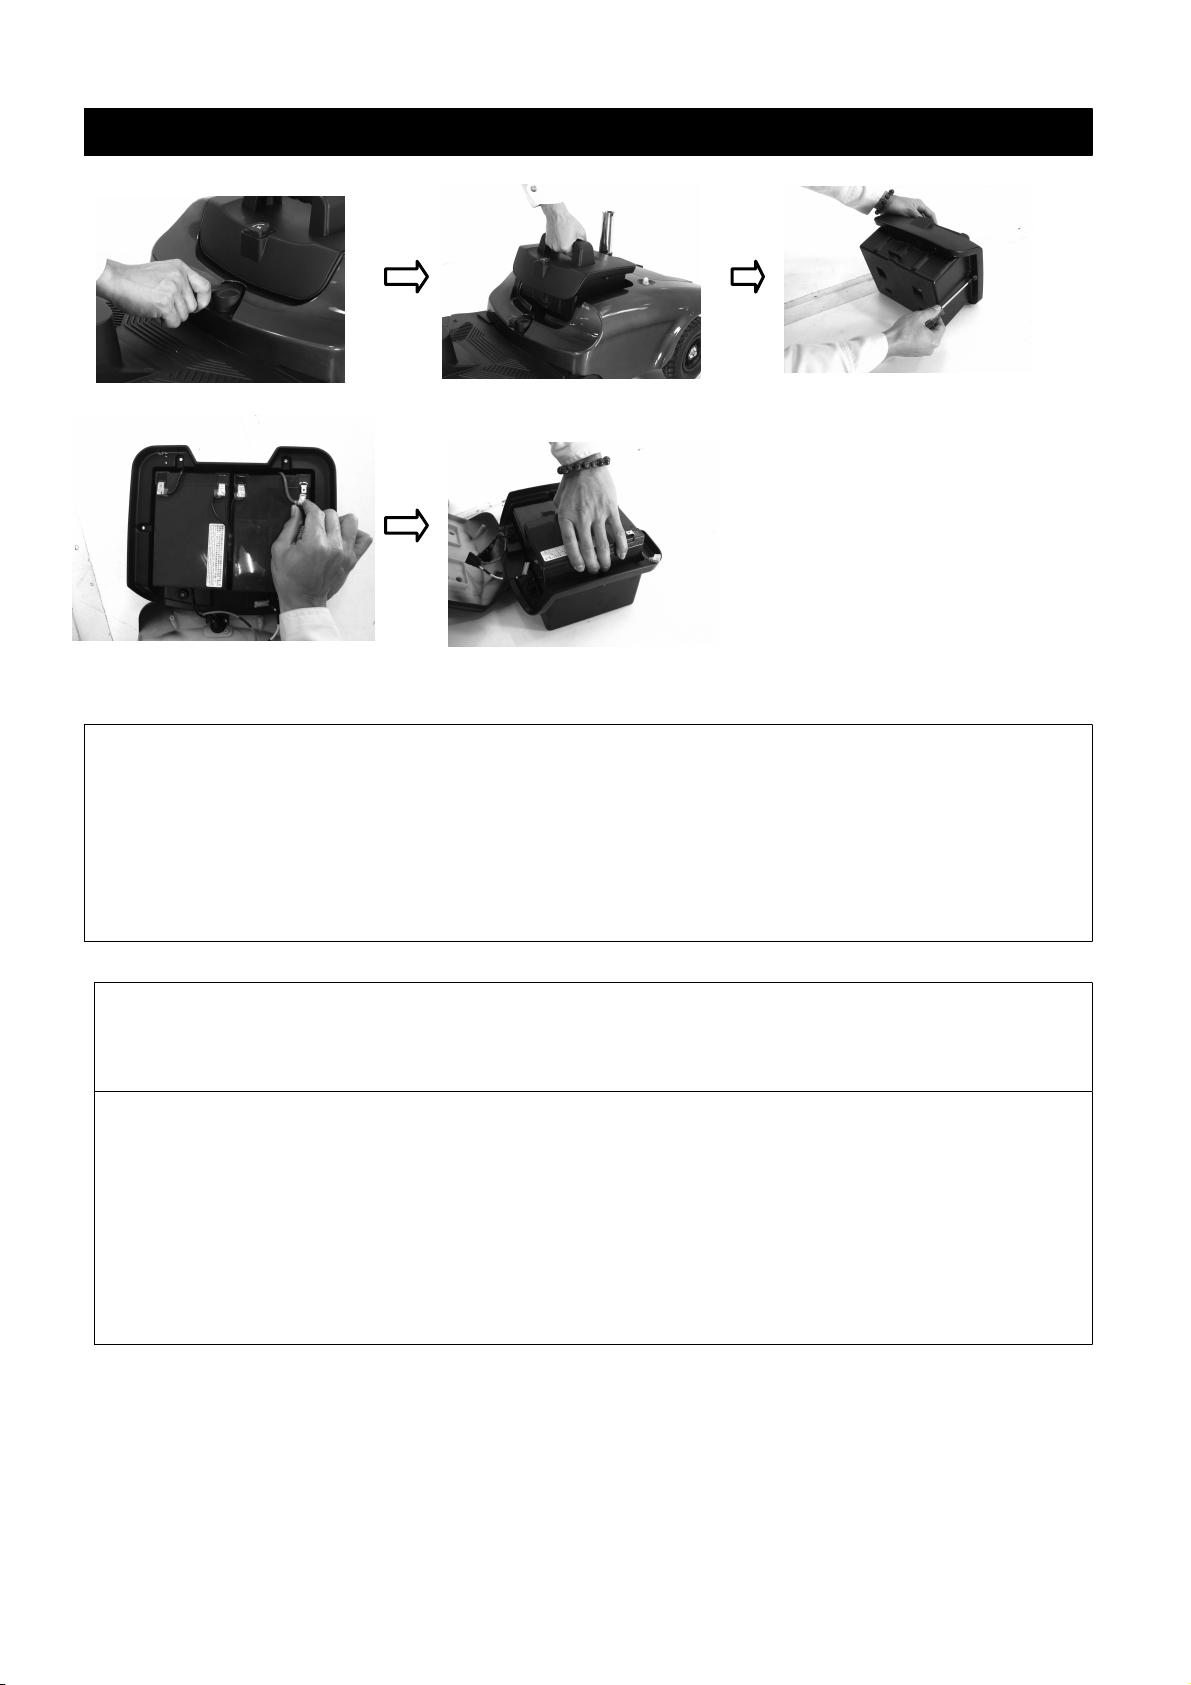
•
REPLACING BATTERIES
Batteries replacement
■
Follow the procedure below step by step to replace the batteries:
•
Remove the battery pack from the scooter.
•
Open the battery pack then disconnect the cables from the four battery terminals.
•
Remove the batteries from the battery pack.
•
Place new batteries inside the pack.
•
Connect the red cable to the positive(+) battery terminal and black cable to the
negative(-) on the other battery.
•
Connect up the fused cable between the two batteries and close the battery pack.
17
Page 18
6 . BAT T E RY C H ARG I N G AND C A R E
Warning
•
The wiring system and charger are well situated in the battery pack while being
assembled in plant. Do not attempt to re-locate the wiring system by yourself. The
improper layout of wiring system may result in the wires pinched by battery box,
which might result in the electronic system failure.
•
Be sure the battery wires are connected to their right battery terminal.
Suggestions
If necessary, ask for help from your dealer for advice about maintaining and
replacing the battery.
Suggestions
•
Make sure the terminals are installed properly and put the cover back on.
•
Do not use the battery to charge telecom equipment or other items.
•
Battery efficiency will vary with outside conditions; the driving distances will be
shorter in the winter. If the vehicle is not used for a long time, please charge the
battery at least every week.
•
Replace both batteries together.
18
Page 19

7 . IN S P E C T ION A N D MAIN T E N ANCE
7.1 INSPECTION
YEAR
1234YEAR
1234Service Dates
Service Dates
Controller
Upholstery
On/off switch
Seat
Control Lever
Back
Braking
Armrests
Recharge point
Electrics
Batteries
Connections condition
Levels
Harness
Connections
Test run
Discharge test
Forwards
Wheels and Tires
Reverse
Wear
Emergency stop
Pressure
Left turn
Bearings
Right turn
Wheel nuts
Slope test
Motors
Over obstacles
Wiring
List Items repaired
Noise
Connections
Brake
Brushes
Chassis
Condition
Steering
•
Clean the scooter with a damp cloth and dust down approximately once a week to
preserve the appearance of the scooter.
•
Adjust the tiller height and return to the original position and swivel the seat once a
week to ensure the parts adjust and remove smoothly and easily when required.
•
Check for signs of wear and tear on the tires and the upholstery on a regular basis.
•
For optimum performance and to increase the lifespan of your scooter, it is
recommended that you have your scooter serviced once a year.
7.2 REGULAR CHECKING RECORD
To make sure your scooter is correctly serviced, take it to your dealer for regular
maintenance checks. This should be at six months intervals after an initial inspection
after one month. Your dealer may charge a fee for this. The checking record is shown
overleaf.
19
Page 20

7 . IN S P E C T ION A N D MAIN T E N ANCE
7.3 BATTERY, FUSE AND TIRE
Suggestion
Ask for help from your dealer to inspect or replace the fuse, since the tiller shroud has
to be removed first before you can replace the fuse.
Attention
1. When tread depth is below 0.5mm it can easily lead to vehicle slippage, making
braking distances longer. Therefore replace the tyres as early as possible when
they are found to have insufficient tread depth.
2. The Antares scooter comes with solid tyres so there is no need to check tyre
pressure.
Suggestion
Please store the scooter in a location where it is out of direct sunlight, rain, or dew.
When storing for a long time, please charge the battery to full power and then disconnect
the battery terminal. For details inquire to your dealer.
Battery
■
Refer to the section entitled “6. BATTERY CHARGING AND CARE ”.
Fuse
■
If the battery charger is turned on and no LED are lit, check the fuse.
Tires
■
The condition of the tires depends on how you drive and use your scooter.
♦
Please check the tread depth regular.
♦
Replace the tires when the tread depth is less than 0.5 mm.
7.4 STORAGE
Make sure the scooter is stored under the following circumstances:
- Ensure the seat is set in the “Forward”position
- Ensure the scooter is switched off
- Ensure the charger is disconnected when not in use
20
Page 21
7 . IN S P E C T ION A N D MAIN T E N ANCE
7.5 MOVING ABOUT
♦
Switch off the power with power key before moving. Always dismount from the
scooter before moving.
♦
Lift the scooter by the chassis, and not by the shroud. Lifting the scooter by the
bumper could cause damage or injury.
♦
For your safety, always ask for help if required. You will need two people when
moving or lifting the scooter whole. If you are on your own, please disassembly the
scooter before lifting. Refer to the section below.
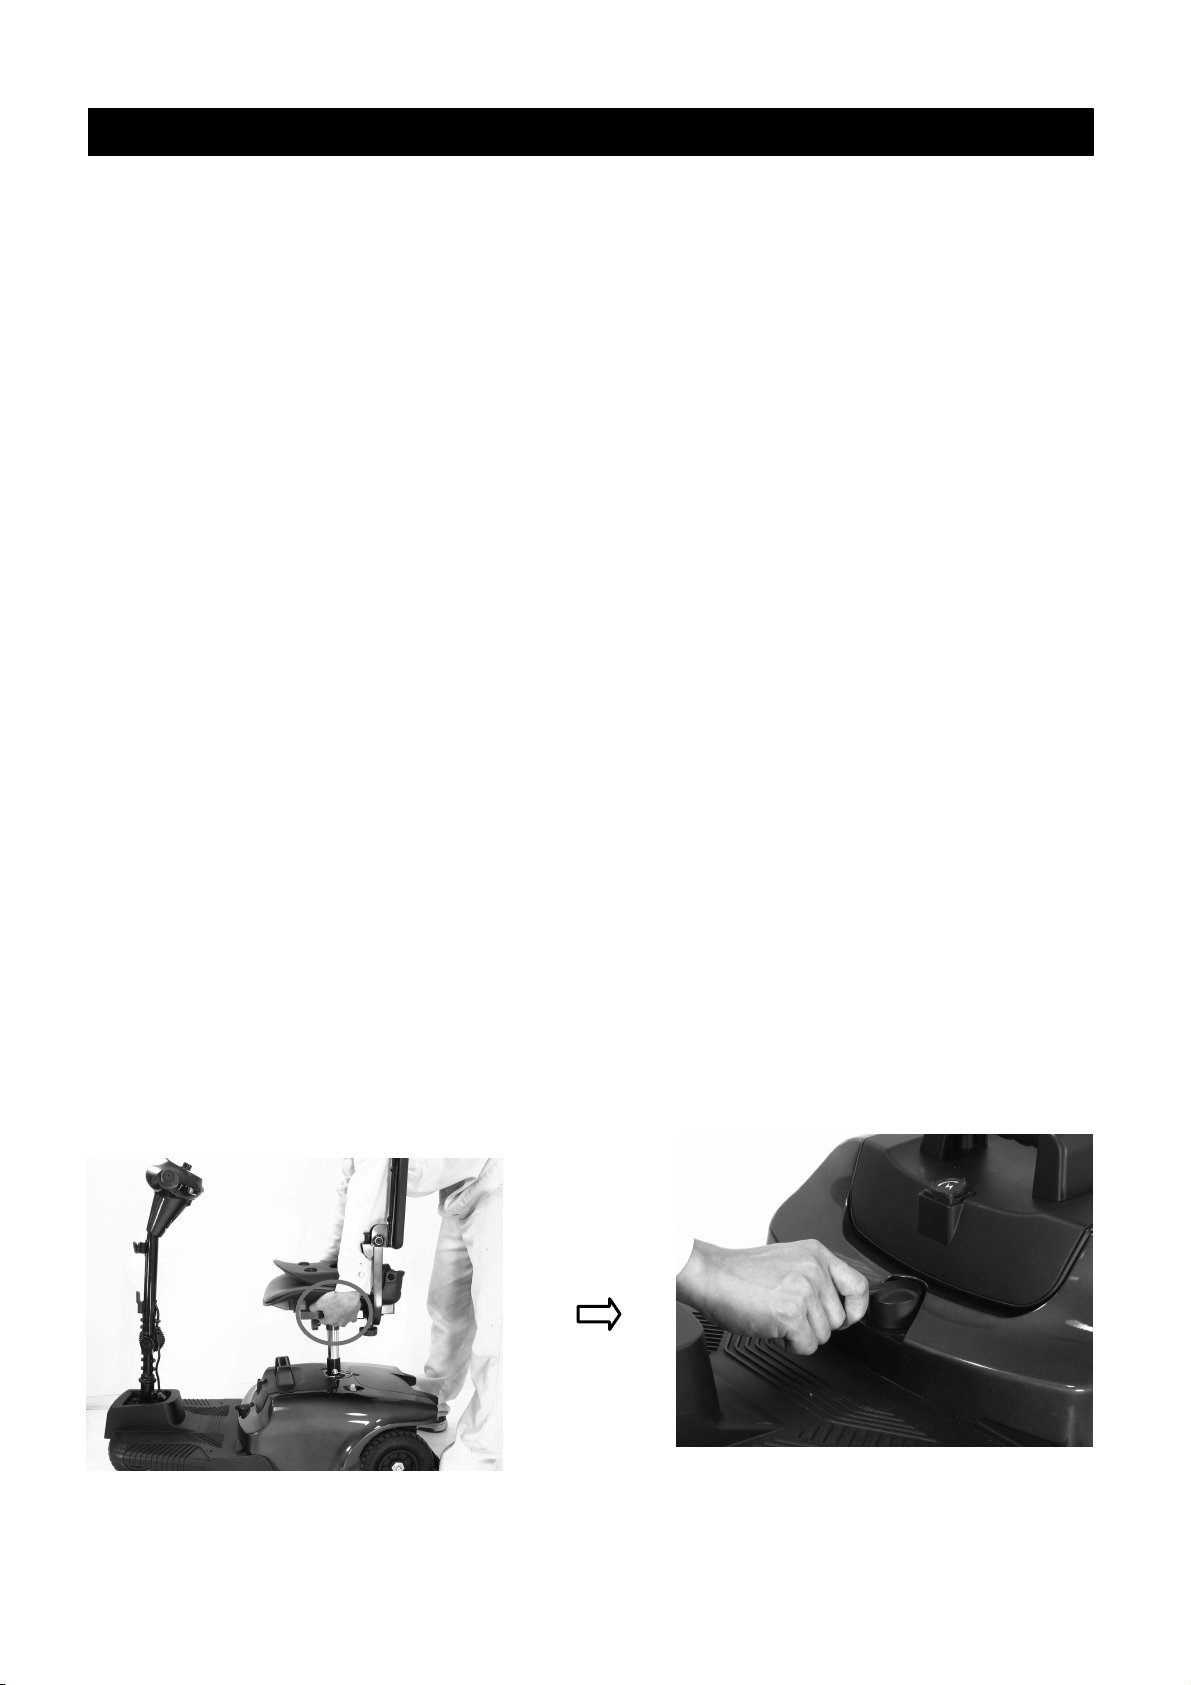
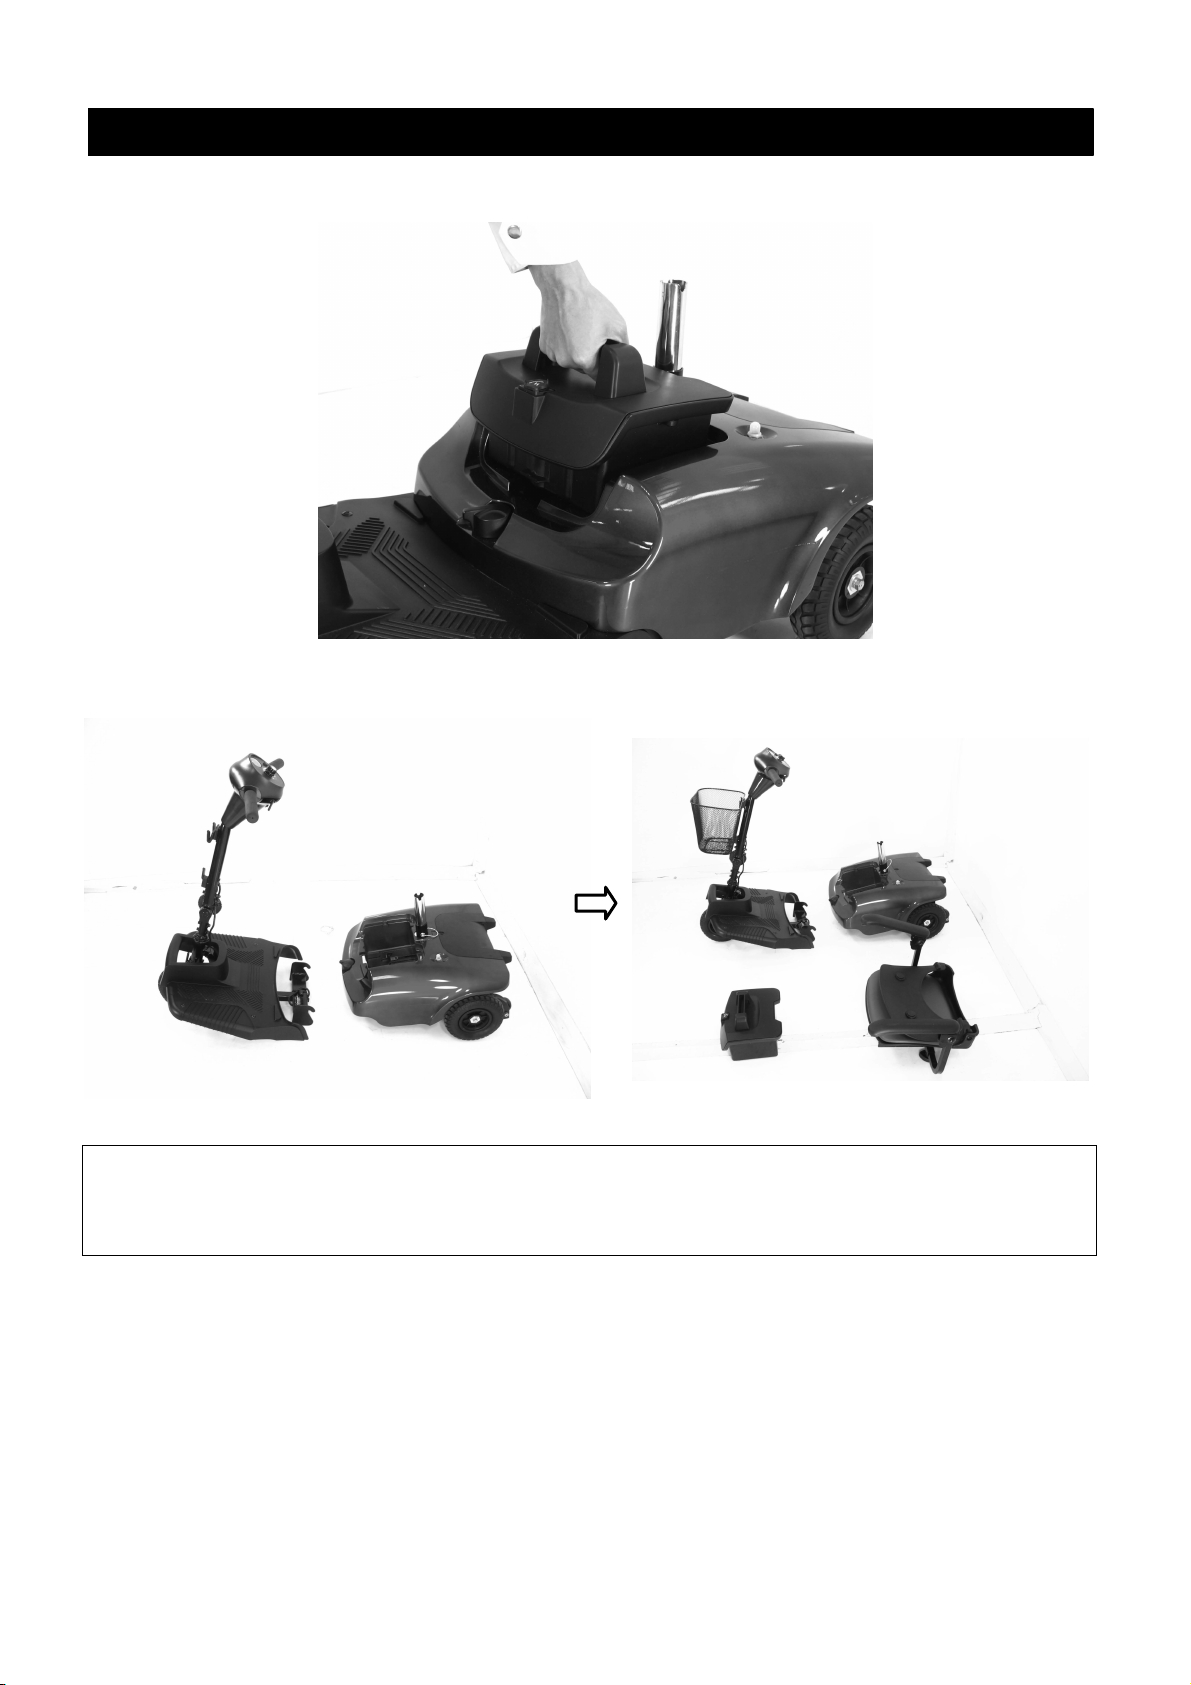
7.6 DISASSEMBLING THE SCOOTER
Please follow the steps.
•
Push the Seat Rotate Lever whilst pulling up on the seat to remove.
•
Loosen the seat post knob and remove the locking pin. Then remove the upper seat
post
•
Open the battery compartment lid and lift out the battery pack.
•
Loosen the tiller adjustment knob and fold down the tiller and retighten knob.
•
Lock the front wheel and tiller by pulling the wheel lock catch down.
•
Push back on the seat post to pivot the scooter’s rear section rearward until the rear
section is standing vertically on the rear bumper.
•
Unplug the electrical connector linking the front and rear sections.
•
Lift the front section up until the lower pegs are longer in contact with the curved
locking brackets on the rear section.
Antares
21
Page 22
7 . IN S P E C T ION A N D MAIN T E N ANCE
Warning
Always unplug the rear section electrical connector before separating the two
sections.
22
Page 23

7.7 ASSEMBLING THE SCOOTER
Suggestion
The assembly process is essentially the disassembly process in reverse. First study the
text and photographs in the disassembly procedure before re-assembling the scooter.
7 . IN S P E C T ION A N D MAIN T E N ANCE
Warning
After assembling the Antares, make absolutely certain the tiller adjustment knob is fully
tightened.
1. Position the front and rear sections of Antares
2. Align the lower curved locking brackets of the front section with
the corresponding pegs on the front of the rear section.
3. Plug in electrical connector to connect the front and rear sections.
4. Holding the lower seat post, slowly pivot the rear section forward until
the curved locking brackets are fully connected on to the top rear pegs.
5. Loosen tiller adjustment knob, raise the tiller to the desired position, and then tighten
the tiller adjustment knob.
6. Reinstall the upper seat post at the desired height. Secure with the locking pin and
tighten the seat post knob.
7. Reinstall the batteries by lowering it in to place.
8. Replace the seat and rotate it until it locks into its correct position.
Knob lock
23
Page 24

8 . TR O U B LESH O O TIN G
TROUBLE SHOOTING
Problem
Symptom
Remedy
The scooter will not
switch on
•
B a t t e r i e s n o t
connected
•
R e a r a n d f r o n d
sections not connected
•
Circuit breaker has
tripped
•
Check b a t teries a r e
connected
•
Check connection on front
– to - rear loom
•
Push c ircuit breaker
button to rest
The scooter switch on
but will not run
•
Flat batteries
•
Charger plugged in
•
Motor in freewheel
mode
•
Check battery power
•
Unplug charger
•
Re-engage the freewheel
lever
Scooter appears slow
•
Flat batteries
•
Speed setting slow
•
Check battery power and /
or recharge
•
Check the speed dial is
not set at low
The seat moves whilst
in use
•
Seat note locked in
position
•
Slowly rotate the seat
until it drops in to place
and is secure
The tiller appears
loose
•
Tiller adjustment knob
loose
•
T i g h t e n t h e t i l l e r
adjustment knob
Involuntary h o rn
sounds
•
There is fault on the
scooter
•
Ensure the control lever
is released and switch the
s c o o t e r o n a n d o f f
recharge batteries
■
If you have trouble with your scooter, you can inspect the following before taking you
scooter to the dealer.
If you cannot solve the problem, contact your dealer for assistance.
24
Page 25

9 . S P E C I F I C AT I O N
S P E C I F I C AT I O N S
Model
Antares 3 - Antares 4
Dimension (L x W x H mm)
(L x W x H inch)
965 x 480 x 980mm - 970 x 480 x 980mm
38”x19”x38.5”
Weight(Kg),W/I battery
40 kg/88 lbs - 41 kg/90 lbs
Weight(Kg),W/I battery
W/O battery
30 kg/66 lbs - 31 kg/68 lbs
Battery
12V 12 Ah x 2
Charger
1.8A off board
Front Tire
8”x2”/200x50mm
Rear Tire
8”x2”/200x50mm
Driving System
Direct rear wheels (with differential gear)
Brake System
Electromagnetic brake
Control Method
By speed control lever
Top Speed
6 km/hr / 4 mph
Climbing angle
>8°
Cruising range (see note)
10~12 km / 6~7.5 miles
Max. User weight
115 kg / 250 lbs
Remark: The manufacturer reserves the right to modify the specification if necessary. The
final specification is subject to the individual scooter you purchase from your dealer.
Note:
Maximum driving distance is based on an ambient temperature of 20°C, a 75kg driver
and a brand new fully charged battery by a constant driving speed at 6 km/h with 70%
battery power discharged.
25
Page 26
10. WARRANTY
Warranty Conditions:
Name
Address
Tel
Postcode
•
Any work or replacement part installation must be carried out by an authorized dealer / service agent.
•
To apply the warranty should your scooter require attention please contact the designated service agent listed below.
•
Warranty: 24 months of construction errors and components not subject to wear, excluding batteries (6 months). Any repaired or
replaced parts will be covered by this warranty for the balance of the warranty period on the scooter.
•
Consumable items supplied will not generally be covered during the normal warranty period unless such items require repair or
replacement clearly as a direct result of a manufacturing or material defect.
Such items include (among others): upholstery, tires and batteries.
•
The above warranty conditions apply to brand new scooters purchased at the full retail price. If you are unsure whether your scooter is
covered, check with the service agent.
•
Under normal circumstances, no responsibility will be accepted where the scooter has failed as a direct result of:
•
The scooter part not having been maintained in accordance with the manufacturer’s recommendations.
•
Failure to use the manufacturer’s specified parts
•
The scooter or part having been damaged due to neglect, accident or improper use
•
The scooter or part having been altered from the manufacturer’s specifications or repairs having been attempted before the service
agent is notified
Please note your local service agent’s contact details in the box below. In the event of your scooter requiring attention, contact them and give
all relevant details so they can act quickly.
The manufacturer reserves the right to alter without notices any weights, measurements or other technical data shown in this manual. All
figures, measurements and capacities shown in this manual are approximate and do not constitute specifications.
26
Page 27
10. WARRANTY
10.1 VIN (VEHICLE INDIFICATION NUMBER)
Model
Antares
VIN
Motor serial #
Key #
Name
Sex
口Male 口Female
Date of Birth
Year Month Day
Address
Model
Antares
Scooter VIN:
VIN
Motor Serial No:
Key #
Date of Purchase
Year Month Day
Purchaser Signature
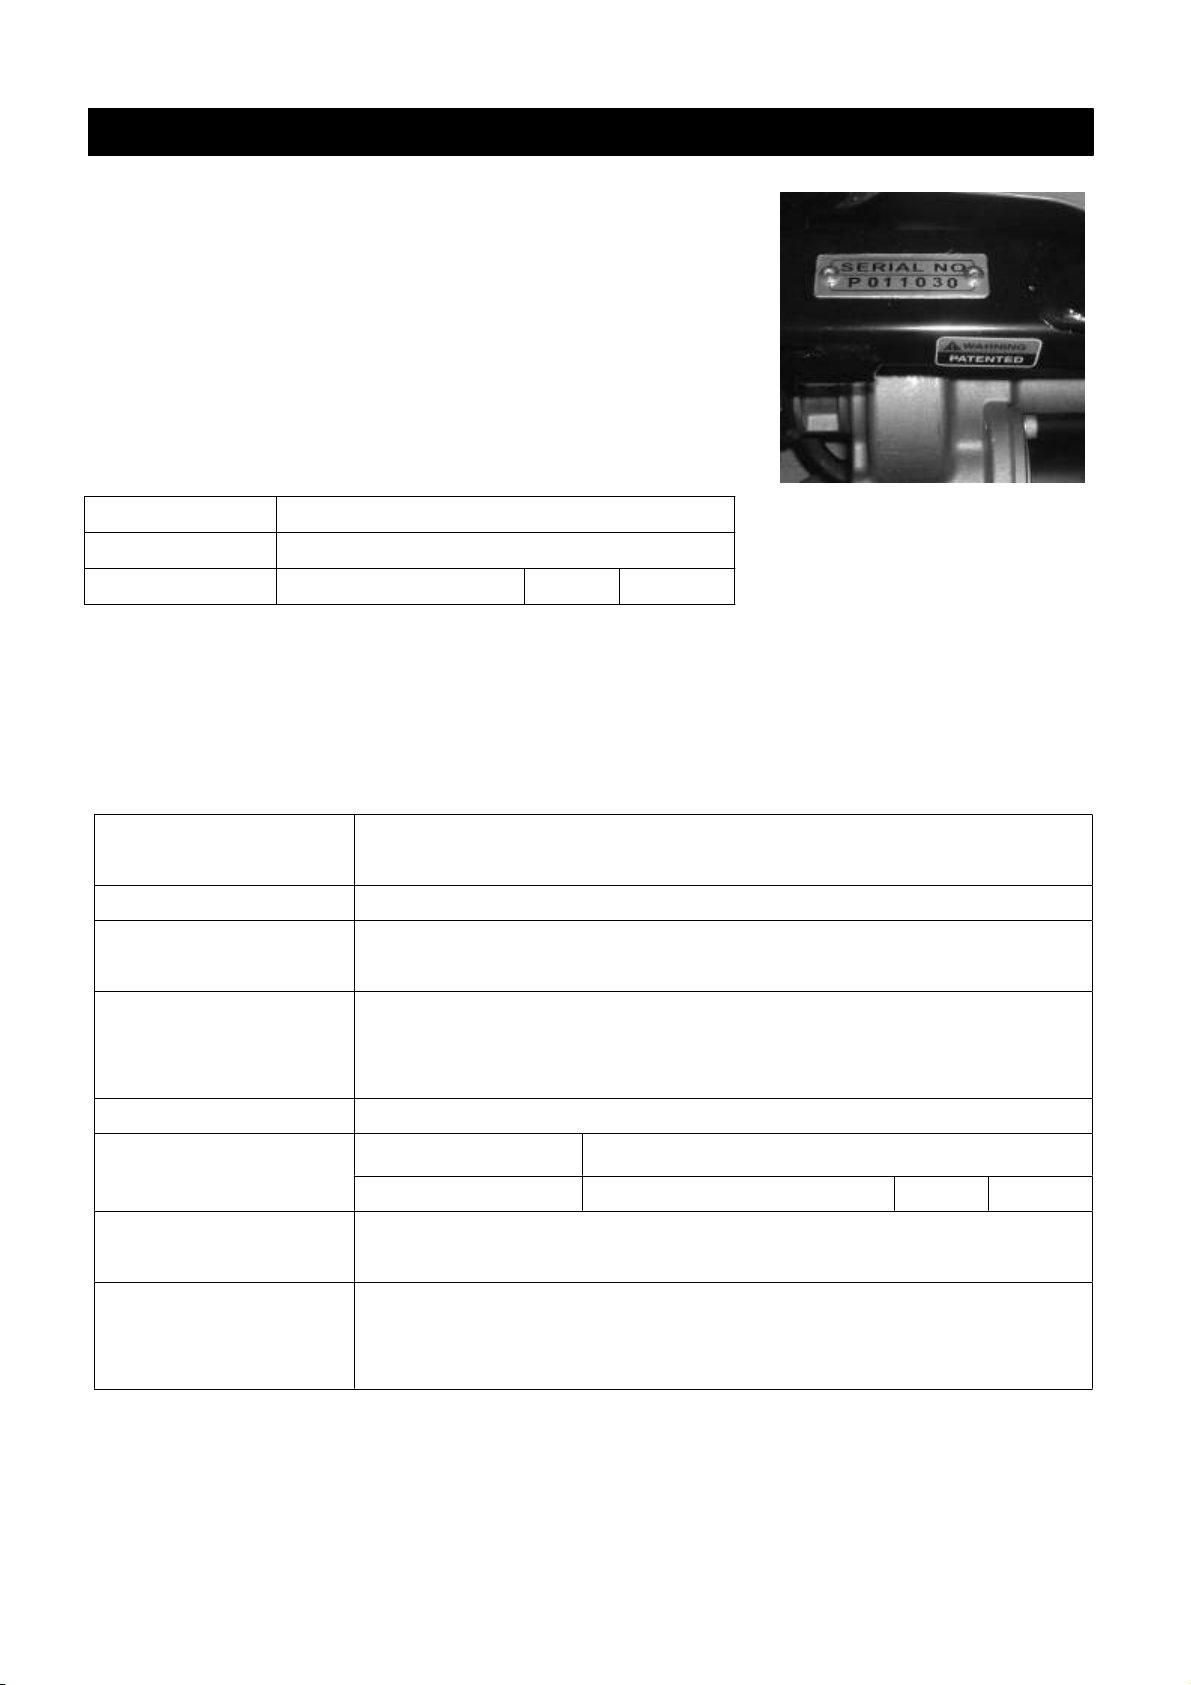
To ensure the correct after sales service and warranty
service support , please write down the vehicle
identification number that is stuck on the back right-hand
side of the frame.
………………………………………………………………………………………………………………………………
Warranty Application Form
27
Page 28

1.
PRÉFACE ET INTRODUCTION……………………………………………..
29
2.
NOTICE DE SÉCURITÉ ………………………………………………...…….
2.1 Avant de prendre la route
2.2 Sur la route
2.3 Marquage et étiquetage
2.4 Interférences électromagnétiques
30
3.
4.
PRÉSENTATION DES COMPOSANTS ….. ……………...……………...….
FONCTIONNEMENT…...…………………………………………………......
4.1 Tableau de bord
4.2 Comment mettre en service votre scooter
4.3 Comment enclencher le mode roue libre
35
36
5.
EMPRUNTER LES ROUTES ….…………………………..…………….…...
41
6.
CHARGEMENT DE LA BATTERIE ET ENTRETIEN ………………….....
6.1 Chargement de la batterie
6.2 Batterie
6.3 Batteries de remplacement
42
7.
INSPECTION ET MAINTENANCE……………………………..………..…
7.1 Inspection
7.2 Dossier des contrôles réguliers
7.3 Batterie et pneu
7.4 Entreposage
7.5 Déménagement
7.6 Démontage
7.7 Montage
46
8.
DÉPANNAGE ………….…………………..………..……………..…………
51
9.
SPÉCIFICATION …………….………………………………………..………
52
10.
GARANTIE…………………………………………………..……………….....
53
TABLE DE MATIÈRES
28
Page 29

Avertissement
Une mauvaise utilisation peut occasionner des dommages
corporels graves, voire entraîner la mort
Attention
Une mauvaise utilisation peut occasionner des dommages
corporels et/ou matériels à votre scooter.
Suggestion
Suivez ces instructions pour maintenir votre véhicule en bon état
de fonctionnement.
1. P R EFACE E T I NTRO D U C TIO N
Nous vous recommandons de lire attentivement le présent manuel avant d’utiliser le
véhicule. Toute utilisation abusive du véhicule peut éventuellement avoir pour
conséquence d’occasionner des dommages matériels et corporels et de provoquer des
accidents de la circulation. Pour avoir l’assurance de tirer le maximum possible de votre
achat, nous vous prions de lire d’abord le présent manuel d’utilisation.
♦
Le présent manuel contient des instructions de service concernant l’ensemble des
aspects touchant au véhicule, des instructions de montage de même que des
instructions quant à l’attitude à adopter en cas d’accident.
♦
Les symboles utilisés dans le présent manuel sont expliqués au verso :
♦
Le présent manuel contient une copie du support d’enregistrement des réparations et
de la maintenance ainsi que des renseignements ayant trait à la garantie. Conservez-la
en lieu sûr ou dans le scooter.
♦
Si quelqu’un d’autre utilise le scooter, faites en sorte de lui remettre le présent
manuel pour sa gouverne personnelle.
♦
Comme les modèles peuvent changer, certaines illustrations et photos reprises dans le
manuel peuvent éventuellement ne plus correspondre au véhicule que vous avez
acheté. Nous nous réservons à tout moment le droit d’apporter des modifications à
nos modèles.
Nos scooters ont été étudiés et fabriqués pour vous offrir une solution confortable et sûre,
quoique à des conditions abordables, afin de répondre à vos besoins dans le domaine de
la mobilité.
29
Page 30

2. NOTICE DE SÉCURITÉ
2.1 Avant de prendre la route
L’utilisateur doit se familiariser avec l’utilisation et le fonctionnement de son véhicule
avant de prendre la route. Par conséquent, nous vous saurions gré de bien vouloir
suivre les recommandations qui vous sont faites dans la présente notice de sécurité.
Les mêmes règles de la circulation que celles applicables aux piétons s’appliquent
■
à l’usage de ce véhicule
♦
Pour votre sécurité, suivez de votre plein gré la réglementation routière applicable
aux piétons.
♦
Ne prenez pas la route après avoir consommé de l’alcool ou lorsque vous êtes
fatigué.
♦
Soyez prudent lorsque vous vous déplacez avec votre scooter quand la luminosité est
faible. Ce scooter n’a pas été conçu pour un usage nocturne.
♦
Soyez extrêmement prudent lorsque vous conduisez votre scooter dans les endroits
de forte affluence ou dans les centres commerciaux.
♦
Déplacez-vous sur le trottoir, sur les routes à chaussée unique ou dans les zones
réservées aux piétons uniquement. Ne roulez jamais sur les autoroutes ni sur les
routes à deux bandes de circulation.
♦
Faites attention à la circulation en traversant ou en empruntant la route.
Exercez-vous aux commandes de votre véhicule
■
Avant d’utiliser le scooter dans des zones de presse ou potentiellement dangereuses,
familiarisez-vous avec le fonctionnement de votre scooter. Nous vous conseillons
vivement d’effectuer vos essais dans un endroit non confiné et situé à l’extérieur
comme un parc par exemple. Afin d’éviter les accidents avec votre scooter en
conduisant, gardez toujours la maîtrise de votre véhicule lors de manœuvres telles que
accélérer, arrêter, tourner, faire demi-tour, monter et descendre les rampes.
♦
Tournez le sélecteur de vitesses à sa valeur maximale pour votre premier essai.
♦
Pour votre sécurité, faites en sorte de vous faire accompagner par quelqu’un lorsque
vous prenez la route pour la première fois.
♦
Ne sélectionnez la vitesse supérieure que dans la mesure seulement où vous êtes sûr
de maîtriser parfaitement les commandes et les réactions de votre scooter.
Le scooter ne doit être utilisé que par une personne à la fois
■
Abstenez-vous de transporter des passagers sur votre scooter (enfants compris).
N’utilisez pas ce véhicule pour transporter des objets ou les remorquer
■
♦
Le poids maximum pouvant être transporté est de 115 kg/250 lbs (occupants et
objets compris). Veuillez vous référer à la « CHARGE MAXIMALE » indiquée au
point 9. SPÉCIFICATION.
♦
La charge maximale pour le panier est de 3 kg (7 lb).
Effectuez des inspections quotidiennes.
■
30
Page 31

2 . N O T ICE D E S ÉCUR I T É
2.2 Sur la route
N’utilisez pas votre véhicule dans les conditions décrites ci-dessous
■
♦
Sur surfaces humides, graveleuses, cahoteuses, enneigées ou verglacées, dans des passages étroits
ou sur les chemins de halage le long des canaux non protégés par une barrière ou une haie. Tenezvous à distance des endroits où vous pourriez vous embourber.
♦
Ne conduisez pas la nuit ou lorsqu’il pleut, neige ou vente ou lorsqu’il y a du brouillard.
♦
Ne conduisez pas votre véhicule en zigzag ou en faisant des manœuvres aberrantes.
♦
N’empruntez pas les escaliers roulants avec votre scooter.
♦
LE SCOOTER NE DEVRAIT EN AUCUNE CIRCONSTANCE ÊTRE UTILISÉ COMME UN
SIÈGE DANS UN VÉHICULE A MOTEUR (PAR EXEMPLE VOITURES, BUS, TRAINS,
ETC.).
Des téléphones mobiles et autres équipements électriques
■
♦
N’utilisez pas de téléphone mobile ou d'appareils de communication sans fil en
conduisant.
♦
Toujours couper le contact du scooter et retirer la clé de contact avant d’utiliser un téléphone
mobile.
♦
Ne rechargez pas votre téléphone mobile ou tout autre appareil électrique avec la
batterie de votre scooter.
Coupure automatique de l’alimentation électrique
■
Afin d’éviter que votre batterie ne tombe accidentellement à plat, votre scooter est équipé d’un
dispositif de coupure automatique de l’alimentation électrique. Si votre scooter est sous tension,
l’alimentation électrique sera coupée automatiquement après une période de trente minutes
d’inactivité. Dans un cas de ce genre, coupez tout simplement l’alimentation de votre scooter,
remettez-le sous tension et il sera de nouveau prêt pour une nouvelle utilisation.
Rampes, plans inclinés et descentes
■
♦
Ne tentez pas de franchir des rampes dont la pente est raide et supérieure à celle préconisée.
Reportez-vous à la rubrique intitulée FRANCHIR DES PENTES AU POINT 9. SPÉCIFICATION.
♦
Toujours utiliser une vitesse lente pour gravir ou descendre une pente.
♦
N’empruntez pas de routes pleines de trous ou de nids de poule. Reportez-vous à la rubrique
intitulée HAUTEUR MAX. AU-DESSUS DU SOL au point 9. SPÉCIFICATION.
♦
Ralentissez lorsque la route amorce une descente.
♦
Ne donnez pas de mouvements brusques au guidon de votre scooter sur route en gravier ou dans
des pentes.
♦
Penchez-vous toujours vers l’avant lorsque vous gravissez une forte pente.
♦
N’empruntez pas un chemin dont la pente est supérieure à celles indiquées dans le diagramme
reproduit au verso.
31
Page 32

2 . N O T ICE D E S ÉCUR I T É
Figure 1 : pentes maximales recommandées
2.3 Marquage et étiquetage
Nous vous recommandons de lire attentivement toutes les marques et autres étiquettes
appliquées sur le scooter avant de l’utiliser. Ne les enlevez surtout pas ; elles peuvent
vous rafraîchir la mémoire.
AVERTISSEMENT
LISEZ LE MANUEL D’UTILISATION ET
CHARGEZ LA BATTERIE AVANT TOUTE
UTILISATION
Ne dépassez pas les pentes ou les poids limites
recommandés
AVERTISSEMENT
Déconnectez avant de séparer le châssis
AVERTISSEMENT
•
Tenez en main la colonne de direction avant de libérer le bouton de
réglage
•
Avant de soulever ou de déplacer le scooter, assurez-vous que le
bouton de réglage est parfaitement bloqué
•
N'essayez jamais de régler la colonne de direction alors que le scooter
est en mouvement
AVERTISSEMENT
Ne jamais manipuler la manette de roue libre en étant
assis sur le siège du scooter ou dans une pente !
FONCTIONNEMENT DE LA MANETTE DE
ROUE LIBRE
•
Toujours tirer en SOULEVANT FERMEMENT
pour engager le mode roue libre
•
Toujours pousser VERS LE BAS
ATTENTION :
Les ondes radio peuvent perturber les commandes du scooter.
Les sources émettant des ondes radio, telles que les stations radiophoniques, les émetteurs de radioamateur, les postes émetteurs-récepteurs et les téléphones cellulaires,
peuvent perturber les scooters à moteur électrique. En respectant les avertissements énoncés ci-dessous, les chances pour que les freins se relâchent intempestivement ou
qu'un déplacement du scooter motorisé provoque des lésions corporelles graves sont minimisées au maximum.
N’allumez PAS d’appareils de communication personnels manuels, tels que postes de radio bande publique et téléphones cellulaires, quand le scooter est sous tension.
•
Informez-vous quant à la présence de stations de radio et de télédiffusion à proximité et tâchez de vous en tenir éloigné.
•
Si des déplacements imprévus ou un relâchement intempestif des freins devaient se produire, coupez l’alimentation électrique du scooter dès que le danger est écarté.
•
Sachez qu’en ajoutant des accessoires ou des composants ou en modifiant le scooter électrique, celui-ci peut éventuellement être davantage sensible aux interférences
•
provenant de sources émettant des ondes radio. (Note: il n’existe aucun moyen facile d’évaluer leurs effets sur le scooter électrique).
Avisez le fabricant de tous les incidents dus à des déplacements ou à des relâchements de frein intempestifs et informez-vous de l’existence d’une source à proximité
•
produisant des ondes radio.
32
FERMEMENT pour engager le mode en prise
Page 33

2 . N O T ICE D E S ÉCUR I T É
2.4 Interférences électromagnétiques
Attention : il est très important que vous lisiez ces informations concernant les
incidences possibles des interférences électromagnétiques sur votre scooter électrique.
(Remarque : certains téléphones mobiles et autres appareils du même genre
transmettent un signal lorsqu’ils sont allumés et ce quand bien même ils ne sont pas
utilisés ;
Cette partie du manuel fournit à l’utilisateur des renseignements de base concernant les
problèmes soulevés par les interférences électromagnétiques, les sources connues de ces
interférences, les mesures protectrices destinées soit à réduire la possibilité de leur survenance
ou l’exposition à celles-ci, soit à minimiser le degré d'exposition et enfin concernant les
mesures que nous vous suggérons de prendre si des mouvements intempestifs devaient se
produire.
■
INTERFERENCES ELECTROMAGNETIQUES PROVENANT DE SOURCES
EMETTANT DES ONDES RADIO
Les véhicules électriques peuvent être sensibles aux interférences électromagnétiques,
consistant dans de l’énergie électromagnétique parasite produite par des sources telles que des
stations de radio et de télédiffusion, des émetteurs de radioamateur, des postes récepteursémetteurs et des téléphones mobiles Les interférences (provenant de sources émettant des
ondes radio) peuvent amener le scooter électrique à relâcher ses freins, à se déplacer
intempestivement ou dans des directions non désirées. Elles peuvent également endommager
de manière définitive le système de commande du scooter électrique. L’intensité de l’énergie
électromagnétique parasite peut être mesurée en volts par mètre (V/m). Chaque scooter
électrique peut résister à des interférences électromagnétiques ne dépassant pas une certaine
intensité. C’est ce que l’on appelle communément le « niveau d’insensibilité ». Plus ce
niveau d’insensibilité est élevé, plus la protection est grande. Aujourd'hui, la technologie
actuelle est capable d'atteindre un niveau d'insensibilité d'au moins 20 V/m, ce qui fournirait
une protection utile contre les sources d’interférences électromagnétiques irradiées les plus
communes. Ce modèle de scooter électrique, tel qu’expédié sans autre modification, possède
un niveau d’insensibilité de 20 V/m sans accessoires.
Il existe un certain nombre de sources de champs électromagnétiques relativement intenses
dans notre environnement quotidien. Certaines de ces sources sont évidentes et faciles à
éviter. D’autres ne sont pas apparentes et une exposition est inévitable. Quoi qu’il en soit,
nous considérons qu’en suivant les avertissements énoncés ci-dessous, il vous est possible de
minimiser les risques encourus.
Les sources d’interférences électromagnétiques irradiées peuvent être grosso modo classées en
trois types différents :
•
émetteurs-récepteurs manuels avec l’antenne montée directement sur l’émetteur.
Exemples : postes de radio bande publique et autres appareils de communication
personnels.
•
émetteurs-récepteurs mobiles de portée moyenne, tels que ceux utilisés dans les voitures de
police, les camions de pompier, les ambulances et les taxis.
Ces appareils ont en général l’antenne montée sur le capot du scooter.
33
Page 34

2 . N O T ICE D E S ÉCUR I T É
•
Remarque : d’autres types d’appareils manuels, tels que téléphones sans fil, ordinateurs
de bureau, postes de radio AM/FM, téléviseurs, lecteurs de CD et de cassettes et les
petits appareillages, tels que les rasoirs électriques et les sèche-cheveux ne sont pas,
pour autant que nous le sachions, susceptibles de causer des problèmes dus aux
interférences électromagnétiques à votre scooter électrique.
Emetteurs et récepteurs de longue portée, tels que les émetteurs de radiodiffusion
commerciale (tours à antennes de radio et de télédiffusion) et les radioamateurs (HAM).
■
INTERFERENCES ELECTROMAGNETIQUES DES VEHICULES ELECTRIQUES
Comme l’énergie électromagnétique devient plus intense à mesure que l'on se rapproche de
l'antenne de transmission (source), les champs électromagnétiques dus à des appareils à
main produisant des ondes radios (transmetteurs) sont d’une nature particulièrement
préoccupante. En utilisant ces appareils, il est possible d’amener par inadvertance les
niveaux élevés d’énergie électromagnétique à un niveau très proche de celui du système de
commande du fauteuil roulant. Cela peut perturber les déplacements et le freinage des
véhicules électriques. Par conséquent, tous les avertissements figurant ci-dessous sont
recommandés pour prévenir toute interférence possible avec le système de commande du
scooter électrique.
■
AVERTISSEMENTS
Les interférences électromagnétiques provenant de sources, telles que les stations de radio et
de télédiffusion, les émetteurs de radioamateur, les postes émetteurs-récepteurs et les
téléphones cellulaires, peuvent perturber les scooters électriques et motorisés. En respectant
les avertissements énoncés ci-dessous, les chances pour que les freins se relâchent
intempestivement ou qu'un déplacement du scooter motorisé provoque des lésions
corporelles graves sont minimisées au maximum.
•
Ne faites pas fonctionner d’émetteurs-récepteurs manuels, tels que des postes de radio
bande publique, ou ALLUMER des appareils de communication personnels, tels que des
téléphones cellulaires, quand le scooter électrique est SOUS TENSION.
•
Informez-vous quant à la présence d’émetteurs à proximité, tels que des stations de radio
et de télédiffusion et tâchez de vous en tenir éloigné.
•
Si des déplacements imprévus ou un relâchement intempestif des freins devaient se
produire, COUPEZ le contact électrique du scooter dès que tout danger est écarté.
•
Sachez qu’en ajoutant des accessoires ou des composants ou en modifiant le scooter
électrique, celui-ci peut éventuellement être davantage sensible aux interférences
électromagnétiques. (Note : il n’existe aucun moyen facile d’évaluer leurs effets sur
l’insensibilité globale du scooter électrique).
•
Avisez le fabricant de tous les incidents dus à des déplacements ou à des relâchements de
frein intempestifs et informez-vous de l’existence d’une source d’interférences
électromagnétiques dans le voisinage.
INFORMATIONS IMPORTANTES
•
20 Volts par mètre (V/m) est un niveau d’insensibilité utile contre les interférences
électromagnétiques en général atteignable (plus le niveau est élevé, plus la protection est
importante) ;
•
Ce produit possède un niveau d’insensibilité de 20 V/m sans accessoires connectés.
34
Page 35

3 . P R É S E N TAT I O N D ES C O M P O SANT S
DESCRIPTION DES PIÉCES
1. Tableau de bord 2. Panier 3. Prise du chargeur
4. Bouton de réglage de la 5. Siège
colonne de direction
6. Levier de rotation du siège 7. Ensemble batteries 8. Manette roue libre
9. Roues anti-bascule 10. Bouton du tube d’appui du siège
1
3
89
2
5
6
4
7
10
9
8
35
Page 36

4. FONCTIONNEMENT
4.1 TABLEAU DE BORD
1. Sélecteur de vitesses
3. Témoin de batterie 4. Contacteur
4.2 COMMENT METTRE EN SERVICE VOTRE
SCOOTER
■
Contacteur
♦
Tournez la clé dans le sens des aiguilles d’une montre pour mettre sous
tension. Le témoin de mise sous tension doit être allumé.
♦
Tournez la clé dans le sens contraire des aiguilles d’une montre pour mettre hors tension.
Le témoin de mise sous tension doit s’éteindre et la clé peut être si nécessaire retirée.
■ Sélecteur de vitesses
Tournez le sélecteur de vitesses pour déterminer la vitesse maximale de votre
3
1
4
-
scooter. Tournez le sélecteur dans le sens des aiguilles d’une montre pour
augmenter la vitesse sélectionnée et dans le sens inverse pour la diminuer.
■ Se déplacer et freiner
♦
Poussez vers l’avant la manette de commande de la vitesse située à main droite avec votre
pouce droit pour faire avancer le scooter.
♦
Poussez vers l’avant la manette de commande de la vitesse située à main gauche avec
votre pouce gauche pour faire marche arrière.
♦
Pour freiner, relâchez la manette de commande de la vitesse pour revenir au point mort et
actionner automatiquement le frein électromagnétique. Le scooter s’immobilisera
immédiatement.
♦
La manette de commande de la vitesse vous permet de contrôler la vitesse du scooter
jusqu’à la vitesse maximale fixée au moyen du sélecteur. Plus la manette de commande de
la vitesse sera inclinée, plus rapide sera la vitesse du scooter.
Freinage
■
Frein électromagnétique : relâchez la manette de commande de la vitesse, le frein
électromagnétique sera actionné automatiquement et le scooter s’immobilisera.
36
Page 37

4. FONCTIONNEMENT
Avertissement
Lorsque vous êtes dans une pente, ne JAMAIS mettre le véhicule en mode roue libre. Le
frein électromagnétique ne fonctionnera pas, ce qui peut entraîner des dommages
matériels et corporels.
■
Attention
Ramenez le siège vers l’avant avant de démarrer.
Siège
♦
Le siège peut pivoter et être bloqué à intervalles de 45 degrés.
♦
Poussez le levier de réglage du siège vers l’avant et faites pivoter le siège.
♦
Relâchez le levier et continuez ensuite à déplacer le siège jusqu’à ce qu’il se bloque.
Témoin de batterie
■
ROUGE
JAUNE
VERT
Le témoin de batterie situé au tableau de bord utilise
un code couleur pour indiquer la charge résiduelle
approximative renfermée dans vos batteries. Vert
indique une capacité de 40 à 100 %, jaune une capacité
de 10 à 30 % et rouge indique qu’une recharge
immédiate est nécessaire.
♦
La charge restante suggérée par le témoin de
batterie variera en fonction du temps réel de
conduite et du mode de conduite. Des démarrages
et des arrêts répétés ainsi que des montées
fréquentes épuiseront plus rapidement les
batteries.
Coupe-circuit principal (bouton de réenclenchement)
■
Lorsque le voltage des batteries de votre scooter devient trop faible ou que le scooter est en
surcharge ou parce que la pente s’incline, le coupe-circuit principal peut déclencher pour
éviter d’endommager le moteur et l’électronique.
♦
Le bouton de réenclenchement du coupe-circuit
10
principal sort de son logement lorsque l’interrupteur
déclenche.
♦
L’interrupteur lorsqu’il déclenche coupe le système
8
électrique complet de votre scooter.
♦
Attendez une ou deux minutes pour que l’électronique
de votre scooter se réenclenche.
9
♦ Enfoncez le bouton de réenclenchement pour
réinitialiser le coupe-circuit principal.
37
Page 38

4. FONCTIONNEMENT
Suggestion
1. Il y a lieu de recharger les batteries chaque fois que le véhicule a été utilisé pour
s’assurer que l’autonomie sera suffisamment grande. Les batteries devraient être
rechargées au moins une fois par semaine si le scooter n’est pas utilisé.
2. Après avoir chargé ou installé une nouvelle batterie, faites rouler le véhicule pendant 2
ou 3 minutes pour vous assurer que la charge de la batterie est suffisante.
3. En hiver, la batterie peut répondre plus lentement et son autonomie peut être réduite.
4. Lorsque vous gravissez une pente, le témoin indicateur de batterie peut monter et
descendre. C’est un phénomène normal qui ne doit pas vous inquiéter.
5. Même si la batterie est utilisée convenablement, il est normal que sa charge diminue
au fil du temps, ce qui réduira d’autant son autonomie par rapport à une batterie toute
nouvelle. Par conséquent, lorsque vous sentez que l’autonomie des batteries n’est plus
que de 50 % de celle de batteries neuves, le temps est venu de les remplacer. Veuillez
consulter votre distributeur concernant les batteries de remplacement. Si vous
continuez à utiliser les anciennes batteries alors qu’elles devraient être remplacées,
cela entraînera une chute rapide des performances.
6. L’autonomie des batteries sera réduite en franchissant fréquemment des pentes ou en
empruntant un terrain difficile, ce genre d’environnement entraînant une grande
consommation d’énergie.
7. Les batteries ont une garantie de douze mois contre les défauts de fabrication. Cette
garantie ne couvre pas les défauts dus à un mauvais rechargement des batteries.
Réglage le plus bas Réglage le plus
haut
Comment régler la hauteur du siège
■
1. Retirez le siège de votre scooter.
2. Retirez la goupille de fixation du tube d’appui
inférieur du siège.
3. Réglez le tube d’appui supérieur du siège à la hauteur
du siège désirée.
4. Déplacez le tube d’appui supérieur du siège jusqu’à
ce que vous rencontriez un trou permettant d’insérer
la goupille de fixation.
5. Insérez la goupille de fixation et remettez le siège en place.
Goupille
38
Page 39

4. FONCTIONNEMENT
Avertissement
N’actionnez jamais le levier roue libre assis dans le scooter ou en étant dans une pente !
ACTIONNEMENT DU LEVIER ROUE LIBRE
‧ Toujours tirer FERMEMENT VERS LE HAUT pour enclencher le mode roue libre
‧ Toujours pousser FERMEMENT VERS LE BAS pour enclencher le mode En prise
4.4 Comment enclencher le mode roue libre
Levier Levier
Fig. 4.1 Fig. 4.2
Mode En prise (Fig. 4.1) : poussez le levier complètement et le scooter peut être
◆
actionné par le moteur électrique.
◆ Mode roue libre (Fig. 4.2):tirer le levier vers le haut et scooter peut être déplacé à la
main.
■
Réglage de la colonne de direction
La colonne de direction peut être réglée dans différentes positions en fonction du conducteur.
1. Dévissez le bouton de blocage et réglez la colonne de direction à la position qui vous
convient le mieux. (Fig. 4.3)
2. Une fois la position décidée, resserrez le bouton pour bloquer la colonne de direction.
(Fig. 4.4) Bouton de réglage
Bouton de
réglage
Fig. 4.3 Fig. 4.4
39
Page 40

4. FONCTIONNEMENT
Avertissement
♦ Tenez en main la colonne de direction avant de desserrer le bouton de réglage.
♦ Avant de soulever ou de conduire le scooter, assurez-vous que le bouton de réglage
est serré à fond.
♦ N'essayez jamais de régler la direction tant que le scooter est en mouvement.
40
Page 41

5 . EM P R U NTER L E S RO U T E S
Démarrage et conduite
Attention
1. N’actionnez pas simultanément les manettes de commande de la vitesse située à main droite
et à main gauche. Cela peut vous faire perdre le contrôle de votre scooter.
2. Ne coupez pas l’interrupteur d’alimentation électrique en roulant, ce qui provoquera un arrêt
d’urgence pouvant entraîner un accident et vous risquez de surcroît de vous blesser.
3. Ne sélectionnez pas les vitesses les plus élevées lorsque vous circulez à l’intérieur des
bâtiments.
4. Ne réglez pas la vitesse en conduisant : tout changement brusque de vitesse peut vous mettre
vous-même ainsi qu’autrui en danger et endommager votre scooter.
5. Ne placez pas d’appareils magnétiques à proximité de la manette de commande car cela
pourrait perturber le bon fonctionnement de votre scooter. La commande du scooter est
située sous le marchepied.
6. Soyez prudent lorsque le trafic est intense ou lorsque vous vous déplacez dans la foule.
7. En faisant marche arrière, faites attention aux personnes ou aux objets se trouvant derrière
vous.
Attention
1. La distance d’arrêt variera en fonction de votre vitesse en marche avant ou en marche arrière. Par
conséquent, commencez à freiner aussitôt que cela vous est possible.
2. Lorsque vous parquez votre scooter, veillez à le parquer sur un sol horizontal et coupez ensuite le
contact avant de descendre.
■
•
Assurez-vous que le siège est bien installé.
•
Assurez-vous que la colonne de direction est convenablement fixée.
•
Dépliez les accoudoirs vers le bas de telle manière à ce que vos bras reposent dessus.
•
Placez le contacteur en position « ON » (Marche).
•
Contrôlez le témoin de batterie pour voir s'il y a assez d’électricité pour effectuer votre
parcours. Si vous avez le moindre doute quant à la charge encore disponible, rechargez les
batteries avant de partir.
•
Réglez la vitesse à une position où vous sentez à l’aise et en sécurité.
•
Vérifiez si la manette marche avant/marche arrière fonctionne correctement.
•
Assurez-vous que le frein électromagnétique fonctionne correctement.
•
Avant de partir, assurez-vous de l’absence de tout danger dans votre environnement
immédiat.
♦
Arrêt
•
Relâchez complètement le levier de commande de la vitesse. Le véhicule va freiner et
s’immobiliser de lui-même.
•
Coupez le contact. Enlevez ensuite la clé.
41
Page 42

6. CHARGEMENT DE LA BATTERIE ET ENTRETIEN
Attention
♦
En réinstallant le bloc-batterie dans son logement, faites attention de ne pas coincer vos
doigts ou vos mains.
En réinstallant le bloc-batterie dans son logement, faites attention de ne pas coincer vos
doigts ou vos mains.
•
CHARGEMENT DE LA BATTERIE
■
Méthode 1 : chargement à bord (voir photo )
Suivez pas à pas la procédure suivante :
•
Placez le contacteur sur « OFF » (Coupé).
•
Branchez le câble d’alimentation du chargeur dans une
prise du réseau.
•
Ouvrez le clapet de la prise de chargement située sur le
capot arrière. Branchez ensuite la fiche ronde du chargeur
dans la prise de chargement.
•
Allumez le chargeur.
•
Les diodes rouge et orange du chargeur s’allument en
Prise du chargeur
même temps lorsque le chargement commence. La durée de chargement est d’environ 6
heures. Une charge de 10 heures est recommandée pour que des performances optimales
puissent être garanties.
•
Les deux diodes du chargeur restent allumées pendant le processus de chargement. La diode
orange passe au vert lorsque le chargement est terminé.
•
Éteignez le chargeur, débranchez le câble d’alimentation et enlevez la fiche ronde
de la prise du chargeur équipant le scooter.
■
Méthode 2 : chargement en dehors du scooter (voir photo)
1. Placez le contacteur sur « OFF » (Coupé).
2. Retirez le bloc-batterie en ouvrant le compartiment à batteries
Batteries
et en le soulevant par la poignée pour le sortir.
3. Branchez le câble d’alimentation du chargeur dans une prise
du réseau.
4. Enfoncez la fiche ronde du chargeur dans la prise de
chargement prévue dans le bloc-batterie.
Chargeur
5. Allumez le chargeur.
6. Les diodes rouge et orange du chargeur s’allument en même
temps lorsque le chargement commence. La durée de chargement est d’environ 6 heures.
Une charge de 10 heures est recommandée pour que des performances optimales puissent être
garanties.
7. Les deux diodes du chargeur restent allumées pendant le processus de chargement.
La diode orange passe au vert lorsque le chargement est terminé.
8. Éteignez le chargeur, débranchez le câble d’alimentation et enlevez la fiche ronde de
la prise située sur le bloc-batterie.
42
Page 43

6 . CHA R G E M EN T D E L A B AT T E R I E E T E N T RET I E N
Heures de chargement
■
La durée de chargement est d’environ 6 heures. Une charge de 10 heures est recommandée
pour que des performances optimales puissent être garanties. Nous recommandons toutefois
de charger vos batteries pendant plus de 24 heures consécutives.
Batteries (à l’intérieur de ensemble)
■
1. Le Antares est alimenté par deux batteries au plomb hermétiques à décharge
poussée.
2. Les batteries fournies avec le scooter sont des batteries de 12 V 12 Ah.
3. Dimensions : 5.94 “× 3.89 “ x 3.74 “ (longueur x hauteur x largeur)
(151mm×99mm×95mm)
Avertissement
•
Tenir éloignées des objets inflammables pendant le chargement pour éviter les risques
d’incendie ou d’explosion.
•
Ne fumez pas pendant le chargement car la batterie peut libérer de l’hydrogène. Toujours
charger votre batterie dans un endroit bien ventilé.
Ne jamais brancher ou débrancher la fiche ou le câble d’alimentation pendant le
chargement en ayant les mains humides. Ne branchez pas et ne débranchez pas la fiche ou
le câble d’alimentation s’ils sont humides : cela peut provoquer un choc électrique.
Attention – Suivez les règles ci-après pour éviter les accidents pendant le chargement.
•
Utilisez exclusivement le chargeur de votre Antares et rechargez chaque fois la batterie à
fond. Vous risqueriez sinon d’endommager la batterie et votre scooter en employant un
chargeur qui ne correspond pas exactement à la spécification.
•
Effectuez le chargement dans un endroit bien ventilé qui n’est pas directement exposé aux
rayons du soleil. N’effectuez pas de chargement dans un environnement humide, lorsqu’il
pleut ou dans la rosée du matin.
•
N’effectuez aucun chargement à des températures inférieures à -10C ou supérieures à +50°
C vu que le chargeur ne peut pas bien fonctionner dans de telles conditions et que les
batteries risquent d’être endommagées.
•
BATTERIE
♦
Ne laissez pas les batteries à des températures inférieure à 10C ou supérieures à 50C
lorsque vous les chargez ou rentrez le véhicule au garage. Tout entreposage en dessous ou
au-dessus de la plage de températures indiquée peut geler ou surchauffer les batteries. Cela
endommagera les batteries et raccourcira leur durée de vie.
♦
Ces batteries sont sans entretien et il n'y a pas lieu de remettre de l'eau.
Vous êtes censés recharger les batteries à intervalles réguliers. Nous vous conseillons de
recharger les batteries au moins une fois par semaine même si le scooter est resté à l’arrêt.
43
Page 44

6 . CHA R G E M EN T D E L A B AT T E R I E E T E N T RET I E N
Les batteries sont garanties par l’usine pendant une durée de six mois. Cette garantie ne couvre
Suggestion – Comment maximaliser les performances et la durée de vie de vos
batteries
•
Chargez à fond votre nouvelle batterie avant de l’utiliser pour la première fois.
•
Veillez chaque fois à recharger la batterie à fond. La durée de vie de la batterie sera
sérieusement raccourcie ou altérée si la batterie est de manière répétitive utilisée sans être
complètement chargée.
•
Ne jamais cesser de charger tant que la diode électroluminescente orange n’est pas passée au
vert. Ne JAMAIS arrêter le chargement avant qu’il ne soit terminé.
•
Maintenez chaque fois que possible vos batteries complètement chargées.
•
Si vous n’utilisez pas votre scooter pendant une longue période, il devrait être chargé au
mois une fois par semaine pour garder les batteries dans de bonnes conditions d’utilisation.
•
La température ambiante va influencer la durée de chargement. Le temps de chargement sera
plus long en hiver.
•
Après chargement, ne laissez pas la prise du chargeur branchée sur le scooter car cela
consomme de l’énergie et réduira temporairement l’autonomie.
que les défauts de fabrication et non les défauts résultant d’un mauvais chargement ou d’un
chargement contraire aux instructions ci-dessus.
Nettoyage de la batterie
■
Les batteries vont se décharger rapidement si elles sont contaminées par de l’eau, de l’acide
pour batterie, des poussières ou d’autres substances. Les batteries fournies avec le scooter
sont hermétiques et sont en temps que telles sans entretien et ne présentent aucun risque de
coulage. Veuillez suivre les étapes énoncées ci-après pour nettoyer les batteries.
•
Placez le contacteur du scooter sur « OFF » (Coupé).
•
Suivez la procédure exposée dans la rubrique suivante intitulée Remplacement des batteries.
•
Utilisez un chiffon propre pour essuyez les surfaces souillées.
•
Sortez les batteries.
•
Nettoyez les batteries avec un chiffon propre. Si les bornes sont recouvertes d’une poudre
blanche, essuyez-les en utilisant de l’eau chaude jusqu’à ce qu’elles soient propres.
•
REMPLACEMENT DES BATTERIES
Remplacement des batteries
■
Suivez pas à pas la procédure décrite ci-dessous pour remplacer les batteries :
•
Retirez le bloc-batterie du scooter.
•
Ouvrez le bloc-batterie et débranchez ensuite les câbles des quatre bornes de la batterie.
•
Enlevez les batteries de leur bloc.
•
Placez de nouvelles batteries à l’intérieur du bloc.
•
Connectez le câble rouge avec la borne positive (+) de la batterie et le câble noir
avec la borne négative (-) de l’autre batterie.
•
Reliez le câble fusible entre les deux batteries et fermez le bloc-batterie.
44
Chargeur
Batteries
Page 45

6 . CHA R G E M EN T E T E NT R E T I E N DE S B AT T ERI E S
Avertissement
•
Le système de câblage et le chargeur sont aménager dans le bloc-batterie à des endroits
étudiés lorsqu’ils sont montés en usine. N’essayez pas de déplacer vous-même le système de
câblage. Une mauvaise disposition du système de câblage peut provoquer un pinçage des fils
par le boîtier des batteries, ce qui risquerait de provoquer une panne du système électronique.
•
Assurez-vous que les fils des batteries sont branchés sur les bornes correctes.
Suggestions
Si nécessaire, demandez à votre distributeur de vous aider et de conseiller en ce qui
concerne l’entretien et le remplacement des batteries.
Suggestions
•
Assurez-vous que les bornes sont convenablement installées et remettez le couvercle à sa
place.
•
N’utilisez pas les batteries pour charger des équipements de télécommunication ou autres.
•
Les performances des batteries variant en fonction des conditions extérieures, les distances
de déplacement seront plus courtes en hiver. Si le véhicule n’est pas utilisé pendant une
période prolongée, veuillez charger les batteries au moins une fois par semaine.
•
Remplacez les deux batteries en même temps.
45
Page 46

7 . IN S P E C T ION E T M AINT E N A NCE
7.1 INSPECTION
ANNEE
1234ANNEE
123
4
Date de service
Date de service
Contrôleur
Revêtement
Int. Marche arrêt
Fauteuil
Levier de commande
Partie arrière
Freins
Accoudoirs
Prise de charge
Electronique
Batteries
Condition des
raccordements
Niveaux
Câblage
Raccordement
Essayage
Teste de décharge
Marche avant
Roues/pneus
Marche arrière
Usage
Freinage de secours
Pression
Tourner à gauche
Roulements
Tourner à droit
Ecrou de roues
Monter
Moteurs
Prendre des
obstacles
Câblage
Reparations faites
Bruit
Raccordement
Frein
Contacts
Châssis
Condition
Commande
•
Nettoyez le scooter avec un linge humide et enlevez la poussière environ une fois par
semaine pour préserver l’aspect extérieur du scooter.
•
Réglez la hauteur de la colonne de direction et revenez à la position initiale ; faites pivoter le
siège une fois par semaine pour vous assurer que les pièces s’ajustent entre elles et se
déplacent sans problèmes.
•
Vérifiez régulièrement les traces d’usure sur les pneus et sur le revêtement.
•
Pour optimiser les performances et augmenter la durée de vie de votre scooter, il est
recommandé de faire entretenir votre véhicule une fois par an.
7.2 DOSSIER DE CONTRÔLE RÉGULIER
Pour être sûr que votre scooter sera convenablement entretenu, portez-le à votre distributeur
pour lui faire subir des contrôles de maintenance réguliers. Cela devrait se faire à intervalles de
six mois après l'inspection initiale ayant lieu quant à elle après un mois. Votre distributeur peut
se faire rémunérer pour ce service. Le dossier de contrôle est reproduit au verso
.
46
Page 47

7 . IN S P E C T ION E T M AINT E N A NCE
7.3 BATTERIE, FUSIBLE ET PNEU
Suggestion
Demander de l’aide à votre distributeur pour qu’il inspecte et remplace le fusible du fait
que le capot de la colonne de direction doit être déposé avant de pouvoir remplacer le
fusible.
Attention
1. Lorsque la profondeur des rainures est inférieure à 0,5 mm, cela peut facilement
amener le véhicule à déraper facilement tout en allongeant les distances de
freinage. Par conséquent, remplacez les pneus aussi vite que possible lorsque la
profondeur de leurs rainures est jugée insuffisante.
2. Le scooter Antares est monté à la livraison avec des pneus pleins faisant en
sorte que le contrôle de leur pression est inutile.
Suggestion
Placez le scooter dans un endroit à l’abri des rayons directs du soleil, de la pluie ou de la
rosée. Lorsqu’il est entreposé pendant une longue durée, chargez les batteries à pleine
charge et débranchez les câbles des bornes. Pour plus ample informé, contactez votre
distributeur.
Batterie
■
Reportez-vous à la rubrique 6 intitulée CHARGEMENT ET ENTRETIEN DES BATTERIES.
■
Fusible
Vérifiez le fusible si le chargeur de batterie est allumé et qu’aucune diode n’est allumée.
Pneus
■
L’état des pneus dépend de la façon dont vous conduisez et de l’usage de votre scooter.
♦
Contrôlez régulièrement l’épaisseur des rainures.
♦
Remplacez les pneus lorsque la profondeur des rainures est inférieure à 0,5 mm.
7.4 ENTREPOSAGE
Faites en sorte d’entreposer votre scooter de la manière suivante :
-
assurez-vous que le siège est placé vers l’avant
-
assurez-vous que le scooter est hors tension
-
assurez-vous que le chargeur est débranché lorsqu’il n’est pas en service
47
Page 48

7 . IN S P E C T ION E T M AINT E N A NCE
7.5 DÉMÉNAGEMENT
♦
Coupez le courant avec le clé de contact avant de déménager.
Toujours démonter le scooter avant de déménager.
♦
Soulevez le scooter par le châssis et non par le capot.
Soulevez le par le pare-chocs peut occasionner des dommages matériels
ou corporels.
♦
Pour votre sécurité, demandez toujours de l’aide si cela s’avère nécessaire. Deux
personnes sont nécessaires pour déménager ou soulever le scooter complet.
Si vous êtes seul, démonter le scooter avant de le soulever. Reportez-vous à la
rubrique figurant ci-dessous.
7.6 DÉMONTAGE DU SCOOTER
Procédez comme suit :
•
Poussez le levier de rotation du siège tout en le soulevant pour le retirer.
•
Desserrez le bouton de fixation du tube s’appui du siège et enlevez la goupille de blocage.
Déposez ensuite le tube supérieur d’appui du siège.
•
Ouvrez le couvercle du compartiment à batteries et soulevez le bloc-batterie pour le retirer de
son logement.
•
Desserrez le bouton de réglage de la colonne de direction, inclinez-la vers le bas et resserrez
le bouton.
•
Bloquez la roue avant et la colonne de direction en tirant sur le bouton de blocage de roue
pour le déposer.
•
Repoussez le tube d’appui du siège pour faire pivoter la partie arrière du scooter vers
l’arrière jusqu’à ce que cette dernière repose à la verticale sur son pare-chocs.
•
Débranchez le connecteur électrique reliant les parties avant et arrière.
•
Soulevez la partie frontale jusqu’à ce que les pattes inférieures ne touchent plus les étriers de
fixation courbes situés dans la partie arrière.
48
Page 49

7 . IN S P E C T ION E T M AINT E N A NCE
Avertissement
Suggestion
Le processus de montage est identique au processus de démontage sauf qu’il s’effectue
dans le sens inverse. Étudiez d’abord le texte et les photographies dans la procédure de
démontage avant de remonter le scooter.
Toujours déconnectez le raccord électrique de la partie arrière avant de séparer
les deux parties.
7.7 MONTAGE DU SCOOTER
49
Page 50

7. I N SPE C T I O N ET M A I N TENA N C E
1. Positionnez les parties avant et arrière du Antares.
Avertissement
Après avoir monté le scooter, soyez absolument certain que le bouton de réglage de la
colonne de direction est serré à fond.
2. Alignez les étriers de fixation courbes de la partie avant avec les pattes correspondantes
situées sur l’avant de la partie arrière.
3. Connectez le raccord électrique pour raccorder les parties avant et arrière.
4. En tenant le tube inférieur d’appui du siège, faites pivoter lentement la partie arrière
vers l’avant jusqu’à ce que les étriers de fixation soient complètement engagés dans les
pattes arrière supérieures.
5. Desserrez le bouton de réglage de la colonne de direction, soulevez la colonne à la position
désirée et serrez ensuite le bouton de fixation.
6. Réinstallez le tube supérieur d’appui du siège à la hauteur désirée. Bloquez le tube avec la
goupille d'arrêt et serrez le bouton de fixation.
7. Réinstallez les batteries en les descendant dans leur logement.
8. Remettez le siège en place et faites-le pivoter en position correcte.
50
Page 51

8 . DÉ PA N NAG E
DÉPANNAGE
Problème
Symptôme
Remède
Le scooter ne se met pas
sous tension
•
Batteries non raccordées
•
Parties avant et arrière
déconnectées
•
Déclenchement du coupecircuit
•
Vérifier si les batteries sont
raccordées
•
Vérifiez le raccordement entre
les deux parties
•
Enfoncez le bouton du coupecircuit pour le réenclencher
Le scooter est sous
tension mais ne veut pas
démarrer
•
Batteries à plat
•
Chargeur connecté
•
Moteur en mode roue libre
•
Vérifier la charge de la
batterie
•
Déconnecter le chargeur
•
Ré en ga ge r le levier de
commande du mode roue
libre
Le scooter semble lent
•
Batteries à plat
•
Sélecteur de vitesses
positionné sur lent
•
Vérifier la charge de la
batterie et/ou recharger
•
Vérifier si le sélecteur de
vitesses n’est pas positionné
sur lent
Le s i ège b ouge e n
roulant
•
Siège non bloqué en
position
•
Faire pivoter légèrement le
siège jusqu’à ce qu’il se mette
en position et soit stable
La colonne de direction
n’est pas bien fixée
•
Bouchon de réglage de la
colonne desserré
•
Serrer le bouton de réglage de
la colonne
Le Klaxon se met en
marche
intempestivement
•
Le scooter est défaillant
•
S’assurer que la manette de
commande est relâchée,
allumer et éteindre le scooter
et recharger les batteries
■
Si vous avez des problèmes avec votre scooter, vous pouvez effectuer les contrôles suivants
avant de le ramener chez votre distributeur.
Contacter votre distributeur pour obtenir son aide si vous ne pouvez pas résoudre le problème.
51
Page 52

9 . SP É C I F I CAT I O N
S P É CIF I C AT I O N S
Modèle
Dimensions (long x larg x haut en
mm)
Dimensions (long x larg x haut en
pouces)
965x480x980 mm - 970 x 480 x 980mm
38 “x 19” x 38.5”
Poids (Kg), avec batteries
40 kg / 88 lb - 41 kg/90 lbs
Poids (Kg), avec batteries
sans batteries
Batterie
12V 12 Ah x 2
Chargeur
1,8 Amp off bard
Pneu avant
200 x 50mm plein
Pneu arrière
200 x 50mm plein
Système de direction
Roues avant directrices (avec différentiel)
Système de freinage
Frein électromagnétique
Méthode de commande
Par levier de commande de vitesses
Vitesse maximale
Pente maximale
> 8°
Autonomie (voir note)
10 – 12 km / 6-7.5 miles
Poids max. de l’utilisateur
115 kg / 250 lbs
30 kg / 66 lb - 31 kg/68 lbs
serrure à bouton
Antares 3 - Antares 4
6 km/hr / 4 mph
Remarque : Le fabricant se réserve le droit d’apporter s’il y a lieu des changements à la
spécification. La spécification finale est fonction du scooter que vous avez acheté chez votre
distributeur.
Note :
La distance maximale de parcours est basée sur une température ambiante de 20° C, un
conducteur de 75 kg et des batteries neuves complètement chargées, une vitesse constante de
roulage de 6 km/h et des batteries déchargées à 70 %.
52
Page 53

10. GARANTIE
Conditions de garantie :
Nom
Adresse
Tél.
Code postal
•
Tout travail ou toute installation d’une pièce de remplacement doit être impérativement effectué par un distributeur ou un
intermédiaire agréé.
•
Pour faire éventuellement appel à la garantie couvrant votre scooter, veuillez contacter l’intermédiaire désigné repris ci-dessous.
•
Garantie: 24 mois de construction et composants erreurs ne sont pas soumises à l’usure, à l’exclusion des batteries (6 mois). Toute
réparation ou toute pièce remplacée sera couverte par la présente garantie pendant le reste de la période de garantie couvrant le
scooter.
•
Les consommables fournis ne sont en général pas couverts pendant la durée normale de garantie, sauf si ces consommables
doivent être réparés ou remplacés à la suite d’un défaut de fabrication ou de matière évident.
Éléments entre autres non couverts : revêtement, pneumatiques et batteries.
•
Les conditions de garantie stipulées ci-dessus s'appliquent aux nouveaux scooters achetés au prix de détail plein. Vérifiez avec votre
intermédiaire si vous avez des doutes quant à la couverture de votre scooter.
•
Dans des circonstances normales, nous déclinons toute responsabilité en cas de défaillance du scooter résultant directement de
l’une des causes directes suivantes :
•
le composant du scooter n’a pas été entretenu selon les recommandations faites par le fabricant.
•
la non-utilisation des pièces spécifiées par le fabricant.
•
le scooter ou l’un de ses composants a été endommagé à la suite d’une négligence, d’un accident ou d’une mauvaise utilisation.
•
le scooter ou l’un de ses composants a été modifié par rapport aux spécifications du fabricant ou des réparations ont été
effectuées avant que l’intermédiaire ait été avisé.
Veuillez noter les coordonnées de l’intermédiaire à contacter indiquées dans le cadre ci-dessous. Au cas où votre scooter nécessiterait un
examen, contactez cet intermédiaire et donnez-lui tous les renseignements nécessaires pour que celui-ci puisse prendre rapidement les
dispositions qui s’imposent.
Le fabricant se réserve le droit de modifier sans préavis les poids, dimensions et autres données techniques indiquées dans le présent
manuel. Toutes les illustration, dimensions et capacités indiquées dans le présent manuel sont approximatives et ne constituent pas des
spécifications.
Intermédiaire agréé
53
Page 54

10. GARANTIE
10.1 NUMÉRO D’IDENTIFICATION DU VÉHICULE (NIV)
Nom
Sexe
口Masculin 口Féminin
Date de naissance
Jour Mois Année
Adresse
Modèle
口Antares
NIV du scooter :
NIV
N° de série du moteur :
N° de clé
Date d’achat
Jour Mois Année
Signature de l’acheteur
Modèle
Antares
NIV
N° de série du
moteur
N° de clé
Pour assurer un service après-vente correct et une application
sans problèmes de la garantie, veuillez inscrire le numéro
d’identification du véhicule collé sur le côté droit du châssis.
………………………………………………………………………………………………………………………………
Formulaire d’appel à la garantie
54
Page 55

1.
VOORWOORD EN INLEIDING ……..……………………………………
56
2.
OPMERKING OVER VEILIGHEID….………………………………...…….
2.1 Voor het rijden
2.2 Tijdens het rijden
2.3 Labels
2.4 Elektromagnetische storing
57
3.
4.
ONDERDELEN……………..……………….. ……………...……………...….
BEDIENING…………………………………………………………………......
4
.1 Bedieningspaneel
4.2 Hoe gebruikt u de scooter?
4.3 Hoe stelt u de vrijloopmodus in?
62
63
5.
RIJDEN OP DE WEG………………………………………..…………….…...
68
6.
BATTERIJ OPLADEN EN ONDERHOUD……………………….……….....
6.1 De batterij opladen
6.2 Batterij
6.3 Batterijen vervangen
69
7.
INSPECTIE EN ONDERHOUD…………………………………...………..…
7.1 Inspectie
7.2 Record van routinecontrole
7.3 Batterijen en band
7.4 Opslag
7.5 De scooter verplaatsen
7.6 Demonteren
7.7 Monteren
73
8.
PROBLEMEN OPLOSSEN ………….……………..……………..…………
78
9.
SPECIFICATIES …………….………………………………………..………
79
10.
GARANTIE…………………………………………………..……………….....
80
INHOUDSOPGAVE
55
Page 56

Waarschuwing
Verkeerd gebruik kan ernstig letsel of dood tot gevolg hebben.
Let op
Verkeerd gebruik kan letsel en/of schade aan de scooter tot gevolg
hebben.
Suggestie
Volg deze instructies om ervoor te zorgen dat uw voertuig goed
blijft werken.
1 . V O ORWO O R D EN I N L E IDIN G
Lees alstublieft zorgvuldig deze gebruikershandleiding voordat u het voertuig gebruikt. Verkeerd
gebruik van het voertuig kan schade, letsel of verkeersongelukken veroorzaken. Om optimaal
van uw scooter te profiteren, leest u voor gebruik deze gebruikershandleiding.
♦
In deze gebruikershandleiding vindt u instructies over het gebruik van alle aspecten van het
voertuig, montage-instructies en aanwijzingen voor het voorkomen van mogelijke
ongelukken.
♦
De symbolen die in deze handleiding worden gebruikt, worden aan ommezijde uitgelegd:
♦
In deze handleiding vindt u een exemplaar van de reparatie- en onderhoudsrecord en de
garantiegegevens. Bewaar deze op een veilige plaats of in de scooter.
♦
Als iemand anders de scooter gebruikt, zorgt u ervoor dat u hem of haar deze
gebruikershandleiding geeft zodat hij of zij de handleiding kan raadplegen.
♦
Aangezien ontwerpen worden gewijzigd, komen bepaalde illustraties en foto's in de
handleiding mogelijk niet overeen met het voertuig dat u hebt aangeschaft. Wij behouden
ons het recht voor wijzigingen te maken in het ontwerp.
Onze scooters zijn ontworpen en gefabriceerd voor een comfortabele, maar toch betaalbare
oplossing voor bepaalde mobiele eisen.
56
Page 57

2 . O P M E R K ING OVE R V E I LIGH E I D
2.1 VOOR HET RIJDEN
De gebruiker moet vertrouwd zijn met het gebruik en de bediening van dit voertuig voordat hij
of zij gaat rijden. Volg daarom alstublieft de aanbevelingen in deze veiligheidsopmerking.
Voor gebruikers van dit voertuig gelden dezelfde verkeersregels als voor voetgangers
■
♦
Houd u voor uw veiligheid aan dezelfde verkeersregels als de regels die voor voetgangers
gelden.
♦
Rijd niet in uw scooter nadat u alcohol hebt gedronken of wanneer u moe bent.
♦
Wees voorzichtig wanneer u met de scooter bij weinig licht rijdt. De scooter is niet
ontworpen om 's nachts mee te rijden.
♦
Wees uitermate voorzichtig wanneer u met de scooter in drukke omgevingen of in
winkelcentra rijdt.
♦
Rijd alleen op de verharde weg, op rijwegen of op wandelpaden. Rijd nooit op
(auto)snelwegen of vierbaanswegen.
♦
Houd rekening met het verkeer wanneer u oversteekt of op de weg rijdt.
Oefen in het gebruik van uw scooter
■
Voordat u met de scooter in een druk of potentieel gevaarlijk gebied rijdt, maakt u zich
vertrouwd met het gebruik van uw scooter. Oefen in een wijd en open gebied, bijvoorbeeld
een park. Om tijdens het rijden ongelukken met uw scooter te voorkomen, houdt u rekening
met de rijbewegingen, zoals accelereren, stoppen, draaien, keren en verkeersdrempels.
♦
Zet de snelheidsknop op de minimumwaarde wanneer u begint met oefenen.
♦
Zorg ervoor dat voor uw veiligheid iemand u begeleidt wanneer u voor het eerst op de weg
rijdt.
♦
Stel de snelheid pas hoger in wanneer u de scooter goed kunt gebruiken en beheerst.
De scooter mag slechts door één persoon tegelijk worden gebruikt
■
Neem geen passagiers op uw scooter mee (bijvoorbeeld kinderen)
Gebruik dit voertuig niet om goederen te vervoeren of te trekken
■
♦
Het toelaatbare maximumgewicht is 115 kg (inclusief rijder en eventuele artikelen).
Raadpleeg 'MAXIMAAL TOELAATBAAR GEWICHT' in '9. SPECIFICATIES'.
♦
Het maximale toelaatbare gewicht voor de mand bedraagt 3 kilo.
Inspecteer de scooter dagelijks.
■
57
Page 58

2 . O P M E R K ING OVE R V E I LIGH E I D
2.2 TIJDENS HET RIJDEN
Gebruik uw voertuig niet in de hierna vermelde omstandigheden.
■
♦
Op oppervlakken die modderig, grindachtig, hobbelig, nauw, besneeuwd of bevroren zijn,
of op jaagpaden die niet met hekken of heggen zijn afgeschermd. Blijf uit de buurt van
plaatsen waar de wielen kunnen vastlopen.
♦
Rijd niet 's nachts, of wanneer het regent, sneeuwt, mistig of winderig is.
♦
Rijd uw voertuig niet in een S-patroon, of maak geen onregelmatige bochten.
♦
Neem de scooter niet mee de roltrap op.
♦
IN GEEN GEVAL MAG DE SCOOTER WORDEN GEBRUIKT ALS EEN STOEL IN
EEN MOTORVOERTUIG (BIJVOORBEELD IN AUTO'S, BUSSEN, TREINEN,
ENZOVOORT).
Het gebruik van mobiele telefoons en andere elektrische apparaten
■
♦
Gebruik geen mobiele telefoon of ander draadloos communicatieapparaat wanneer u
rijdt.
♦
Schakel altijd de scooter uit en haal de sleutel uit het contact voordat u een mobiele
telefoon gebruikt.
♦
Laad mobiele telefoons of andere elektrische apparaten niet op met de batterijen van uw
scooter.
Automatische uitschakeling van de voeding
■
Om te voorkomen dat de batterij per ongeluk leeg geraakt, is uw scooter voorzien van een
automatische uitschakeling van de voeding. Als de scooter is ingeschakeld en dertig minuten
niet wordt gebruikt, wordt de scooter automatisch uitgeschakeld. In dit geval schakelt u de
scooter uit en in, waarna het voertuig weer klaar is voor gebruik.
Drempels, hellingen en dalingen
■
♦
Rijd niet op steile drempels die de gespecificeerde hoek overschrijden. Raadpleeg de sectie
genaamd 'KLIMHOEK' in '9. SPECIFICATIES'.
♦
Stel altijd een lage snelheid in wanneer u een drempel op en af rijdt.
♦
Rijd niet op wegen met grote dalingen of kuilen. Raadpleeg de sectie genaamd
'MAXIMALE RUIMTE TUSSEN WEG EN VOERTUIG' in '9. SPECIFICATIES'.
♦
Verlaag uw snelheid wanneer u op wegen met hellingen rijdt.
♦
Keer niet plotseling om wanneer u op grindwegen of verkeersdrempels rijdt.
♦
Leun altijd voorover wanneer u een steile helling oprijdt.
♦
Rijd niet op hellingen met hoeken die de hoeken in het diagram aan ommezijde
overschrijden.
58
Page 59

2 . O P M E R K ING OVE R V E I LIGH E I D
Afbeelding 1. Maximale aanbevolen klimhoeken
2.3 Labels
Lees alstublieft zorgvuldig alle labels op de scooter voordat u gaat rijden.
Verwijder de labels niet.
WAARSCHUWING
LEES DE GEBRUIKERSHANDLEIDING
EN LA AD DE B ATTERI J OP VO OR
GEBRUIK
Ove r schr i jd nie t de aa nbevo l en
klimhoeken of gewichtslimieten.
WAARSCHUWING
Loskoppelen voordat u het frame
scheidt.
WAARSCHUWING
* Houd de stuurkolom vast voordat u de
stuurkolomknop losdraait.
* Voordat u in de scooter rijdt of deze optilt,
controleert u of de stuurkolomknop goed is
vastgedraaid.
* Probeer nooit de stand van de stuurkolom te
veranderen wanneer de scooter beweegt.
WAARSCHUWING
Gebruik nooit de vrijloophendel wanneer u
op de scooter zit, of wanneer u op een heuvel
staat
GEBRUIK VAN DE VRIJLOOPHENDEL
* Altijd STEVIG OMHOOG trekken voor
vrijloopmodus.
* Altijd STEVIG OMLAAG drukken voor
rijmodus.
WAARSCHUWING:
Radiogolven kunnen de besturing van de scooter beïnvloeden.
Bronnen van radiogolven, zoals radiostations, amateurradiozenders (HAM), tweewegradio's en mobiele telefoons kunnen elektrisch
aangedreven scooters beïnvloeden. Volg de onderstaande waarschuwing om de kans op onbedoelde remdeblokkering of beweging van de
scooter te voorkomen, wat tot ernstig letsel kan leiden .
•
Schakel GEEN persoonlijke handheld communicatieapparaten in, zoals CB-radio's (Citizen Band) of mobiele telefoons wanneer de
elektrisch aangedreven scooter is ingeschakeld.
•
Houd rekening met de aanwezigheid van zenders, zoals radio- en televisiestations, en probeer uit de buurt van de stations te blijven.
•
Als een ongewenste beweging of remdeblokkering plaatsvindt, zet u de scooter UIT zodra u dit veilig kunt doen.
•
Houd er rekening mee dat het toevoegen van accessoires en onderdelen, of het wijzigen van de elektrische scooter, het voertuig
gevoeliger maakt voor storing van radiogolven. (Opmerking: het is niet eenvoudig om de invloed van radiogolven op de elektrische
scooter te meten.)
•
Meld alle incidenten van ongewenste beweging of remdeblokkering aan de fabrikant van de elektrische scooter en geef aan of er een
bron van radiogolven in de buurt was.
59
Page 60

2 . O P M E R K ING OVE R V E I LIGH E I D
2.4 Elektromagnetische storing
Let op: het is zeer belangrijk dat u deze informatie over de mogelijke invloed van
elektromagnetische storing op uw elektrische SCOOTER leest.
Opmerking: sommige mobiele telefoons en dergelijke apparaten geven alleen een
signaal af wanneer ze zijn ingeschakeld, zelfs wanneer ze niet worden gebruikt.
In de volgende paragrafen krijgt u basisinformatie over de problemen die zich met
elektromagnetische storing kunnen voordoen, bekende bronnen van elektromagnetische
storing, maatregelen die u kunt nemen om de mogelijkheid of blootstelling te minimaliseren,
of om de mate van blootstelling te minimaliseren, en de actie die u moet ondernemen indien
zich onverwachte of afwijkende bewegingen voordoen.
ELEKTROMAGNETISCHE STORING VAN RADIOGOLVEN
■
BRONNEN
Een elektrisch aangedreven voertuig kan gevoelig zijn voor elektromagnetische storing. Dit is
een storing veroorzaakt door de elektromagnetische energie afkomstig van bronnen zoals
radiostations, televisiestations, amateurradiozenders (HAM), tweewegradio's en mobiele
telefoons. De storing (van radiogolfbronnen) kan tot gevolg hebben dat de remmen van de
elektrische scooter worden gedeblokkeerd, de scooter zelf gaat bewegen of in een ongewenste
richting beweegt. Tevens kan het elektrische besturingssysteem van de scooter permanente
schade oplopen. De intensiteit van de storende elektromagnetische energie kan in volt per
meter (V/m) worden gemeten. Elektrische scooters kunnen tot een bepaalde intensiteit
elektromagnetische storing weerstaan. Dit wordt het 'immuniteitsniveau' genoemd. Hoe hoger
het immuniteitsniveau, des te groter de bescherming. Op dit moment wordt met de huidige
technologie een immuniteitsniveau van ten minste 20 V/m bereikt, wat voor een nuttige
bescherming tegen de meer algemene bronnen van uitgestraalde elektromagnetische storing
zou moeten zorgen. Dit elektrische scootermodel heeft bij levering en zonder verdere
wijzigingen een immuniteitsniveau van 20 V/m zonder enige accessoires.
In uw alledaagse omgeving is een aantal bronnen met relatief intense elektromagnetische
velden aanwezig. Sommige bronnen zijn voor de hand liggend en kunnen gemakkelijk worden
vermeden. Andere bronnen zijn minder duidelijk en blootstelling is onvermijdelijk. Wij
geloven echter dat wanneer u de onderstaande waarschuwing ter harte neemt, het risico op
elektromagnetische storing wordt geminimaliseerd.
Bronnen die elektromagnetische storing veroorzaken, kunnen in drie typen worden ingedeeld:
1.Draagbare handheld transceivers (zenders-ontvangers met antenne die rechtstreeks
aan de zender is bevestigd. Voorbeelden: CB-radio's (Citizen Band, 'walkie-talkie',
beveiligings-, brandweer- en politietransceivers, mobiele telefoons en andere persoonlijke
communicatieapparaten.
2.Mobiele transceivers van het middenbereik, bijvoorbeeld in politieauto's,
brandweerwagens, ambulances en taxi's. De antenne van deze apparaten is meestal aan de
buitenkant bevestigd.
60
Page 61

2 . O P M E R K ING OVE R V E I LIGH E I D
3.Langeafstandszenders en -transceivers, zoals commerciële zenders (radio- en
Opmerking: Andere soorten handheld apparaten, zoals draadloze telefoons,
laptopcomputers, AM/FM-radio's, televisies, cd-spelers en cassettespelers, en
kleine apparaten, zoals elektrische scheerapparaten en föhns, veroorzaken
voor zover wij weten geen problemen met elektromagnetische storing voor uw
scooter.
televisiezendtorens) en amateurradio's (HAM).
■
ELEKTROMAGNETISCHE STORING VAN DE SCOOTER
Aangezien elektromagnetische energie intenser wordt naarmate we dichter bij de
zendantenne (bron) komen, zijn de elektromagnetische velden van handheld
radiogolfbronnen (transceivers) van speciaal belang. Het is mogelijk om per ongeluk
elektromagnetische storing met een hoog energieniveau zeer dicht bij het besturingssysteem
van de elektrische scooter te brengen wanneer u dergelijke apparaten gebruikt. Dit kan het
bewegen en het remmen van het elektrische voertuig beïnvloeden. De onderstaande
waarschuwingen worden daarom aanbevolen om een mogelijk storing met het
besturingssysteem van de elektrische scooter te voorkomen.
■
WAARSCHUWINGEN
De elektromagnetische storing van bronnen zoals radio- en televisiestations,
amateurradiozenders (HAM), tweewegradio's en mobiele telefoons kunnen elektrische
scooters en motorscooters beïnvloeden. De hieronder vermelde waarschuwingen moeten de
kans op onbedoelde remdeblokkering of beweging van de elektrische scooter voorkomen,
wat tot ernstig letsel zou kunnen leiden.
1.Gebruik geen handheld transceivers, zoals CB-radio's (Citizen Band), of schakel geen
persoonlijke communicatieapparaten zoals mobiele telefoons IN wanneer het elektrische
voertuig is INGESCHAKELD.
2.Wees u bewust van zenders in uw omgeving, zoals radio- en televisiestations, en blijf uit
de buurt van de stations.
3.Als de scooter onbedoeld beweegt of als de rem wordt gedeblokkeerd, schakelt u het
elektrische voertuig UIT zodra dat veilig is.
4.Houd er rekening mee dat het toevoegen van accessoires of onderdelen, of het wijzigen
van het elektrisch aangedreven voertuig, het voertuig gevoeliger maakt voor
elektromagnetische storing. (Opmerking: er is geen gemakkelijke manier om het effect van
de storing op de algehele elektrische scooter te meten.)
5.Meld alle incidenten met onverwachte beweging of deblokkering van de rem aan de
fabrikant van de scooter en geef aan of er een bron van elektromagnetische storing in de
buurt was.
BELANGRIJKE INFORMATIE
20 volt per meter (V/m) is een algemeen bereikbaar en nuttig immuniteitsniveau tegen
elektromagnetische storing (hoe hoger het niveau, des te groter de bescherming).
Dit product heeft zonder aangesloten accessoires een immuniteitsniveau van 20 V/m.
61
Page 62

3. ONDERDELEN
BESCHRIJVING VAN DE ONDERDELEN
1. Besturingspaneel 2. Mand 3. Contact van batterijlader
4. Instelknop van stuurkolom 5. Stoel 6. Stoeldraaiknop 7. Batterij
8. Vrijloophendel 9. Anti-tippingwielen 10. Stoelpostknop
1
3
2
5
6
4
7
10
8
1
9
62
Page 63

4. BEDIENING
4.1 BESTURINGSPANEEL
1. Snelheidsknop
3. Batterij-indicator 4. Aan/uit-knop
3
-
1
4.2 HOE GEBRUIKT U DE SCOOTER?
■ Aan/uit-knop
♦
Als u de voeding wilt inschakelen, draait u de sleutel
met de klok mee. Het voedingslampje moet gaan
branden.
♦
Als u de voeding wilt uitschakelen, draait u de sleutel tegen de klok in. Het
voedingslampje dooft en u kunt indien nodig de sleutel verwijderen.
■ Snelheidsknop
Draai aan de snelheidsknop om de maximumsnelheid van de scooter in te stellen.
Draai de knop met de klok mee om de snelheid te vergroten en draai de knop tegen de
klok in om de snelheid te verlagen.
■ Rijden en remmen
♦
Druk de snelheidshendel aan de rechterkant met uw rechterduim naar voren. De scooter
rijdt vooruit.
♦
Druk de snelheidshendel aan de linkerkant met uw linkerduim naar voren. De scooter rijdt
4
achteruit.
♦
Als u wilt remmen, laat u de snelheidshendel los. Deze keert terug in de neutraalstand en
de elektromagnetische rem wordt automatisch geactiveerd. De scooter komt snel tot
stilstand.
♦
U kunt met de snelheidshendel de snelheid van de scooter regelen tot een
maximumsnelheid die u hebt ingesteld met de snelheidsknop. Hoe verder u de
snelheidshendel indrukt, des te sneller de scooter rijdt.
Remmen
■
Elektromagnetische rem: laat de snelheidshendel volledig los. De elektromagnetische rem
wordt automatisch geactiveerd en de scooter komt tot stilstand.
63
Page 64

4. BEDIENING
Waarschuwing
Op een heuvel mag u het voertuig NOOIT instellen op de vrijloopmodus. De
elektromagnetische remmen worden niet toegepast. Dit kan letsel of schade tot gevolg
hebben.
Stoel
Let op
Zet de stoel weer rechtop voordat u gaat rijden.
■
♦
U kunt de stoel draaien en vastzetten in een positie met intervallen van 45 graden.
♦
Druk de stoelhendel naar voren en draai de stoel.
♦
Laat de hendel los en blijf de stoel draaien totdat deze zichzelf vergrendelt.
Batterij-indicator
■
De batterij-indicator op de stuurkolom gebruikt
een kleurcode om de resterende spanning van de
batterijen aan te geven. Groen geeft een capaciteit van
(40~100%) aan, geel een bijna lege batterij (10~30%)
en rood geeft aan dat de batterij onmiddellijk moet
worden opgeladen.
♦
De resterende spanning die door de batterij-
ROOD
GEEL GROEN
indicator wordt aangegeven, varieert naar gelang
de daadwerkelijke rijtijd en uw manier van rijden.
Herhaaldelijk starten, stoppen en klimmen
verbruikt de energie sneller.
Hoofdcircuitbreker (knop Reset)
■
Wanneer het voltage in de batterijen van de scooter laag is, of wanneer de scooter sterk
overbelast is vanwege zware ladingen of steile hellingen, kan de hoofdcircuitbreker
omschakelen om de motor en de elektronica tegen schade te
beschermen.
♦ De rustknop van de hoofdcircuitbreker komt omhoog
wanneer de breker omschakelt.
♦ Wanneer de breker omschakelt, wordt het hele elektrische
systeem van uw scooter afgesloten.
♦ Laat de elektronica van uw scooter een minuut of twee 'rusten'.
♦ Druk de resetknop in om de hoofdcircuitbreker te resetten.
64
Page 65

4. BEDIENING
Suggestie
1. Telkens wanneer u het voertuig hebt gebruikt, moet u de batterijen opladen zodat u een
maximale afstand kunt afleggen. De batterijen moeten minimaal eenmaal per week
worden opgeladen, zelfs wanneer u de scooter niet gebruikt.
2. Nadat u de batterij hebt opgeladen of hebt vervangen door een nieuwe batterij, rijdt u
gedurende twee of drie minuten met het voertuig om te controleren of de
batterijcapaciteit voldoende is.
3. In de winter reageert de batterij mogelijk langzamer en wordt het batterijbereik
wellicht verkleind.
4. Wanneer u op een helling rijdt, gaat de batterij-indicator mogelijk op en neer. Dit is
een normaal verschijnsel waarover u zich geen zorgen hoeft te maken.
5. Zelfs als u de batterij op correcte wijze gebruikt, neemt de batterijcapaciteit na verloop
van tijd af, wat een verkort batterijbereik tot gevolg heeft vergeleken met een nieuwe
batterij. Als u constateert dat het batterijbereik slechts 50% bedraagt ten opzichte van
nieuwe batterijen, is het tijd om de batterijen te vervangen. Raadpleeg uw dealer over
het vervangen van de batterijen. Als u de oude batterij blijft gebruiken als deze zou
moeten worden vervangen, kunnen de prestaties snel afnemen.
6. Het batterijbereik neemt af wanneer u regelmatig op een heuvel of op onbegaanbaar
terrein rijdt, aangezien u hierdoor meer energie verbruikt.
7. De batterijen hebben een garantie van twaalf maanden tegen productiefouten. Deze
garantie geldt niet voor storingen die veroorzaakt worden door het verkeerd opladen
van de batterij.
De stoelhoogte instellen
■
1. Haal de stoel van de scooter.
2. Haal de borgpen uit de onderste stoelpost.
3. Stel de bovenste stoelpost op de gewenste stoelhoogte
in.
4. Verplaats de bovenste stoelpost zodanig dat er een
opening is waarin u de borgpen kunt steken.
5. Steek de borgpen in de opening en zet de stoel terug.
borgpen
65
Page 66

4. BEDIENING
Waarschuwing
Gebruik nooit de vrijloophendel wanneer u op de scooter zit of wanneer u op een heuvel
bent!
GEBRUIK VAN DE VRIJLOOPHENDEL
Altijd STEVIG OMHOOG trekken voor vrijloopmodus.
Altijd STEVIG OMLAAG drukken voor rijmodus.
4.3 De vrijloopmodus instellen
Hendel Hendel
Afbeelding 4.1
Afbeelding 4.2
◆ Ingeschakelde modus (afbeelding 4.1): druk de hendel helemaal in; de scooter kan worden
aangestuurd met motorvermogen.
◆Vrijloopmodus (afbeelding 4.2):druk de hendel omhoog; de scooter kan met de hand
worden verplaatst.
Langzaamst snelst
Stuurkolom instellen
■
U kunt de stuurkolom in vele verschillende standen zetten, naar gelang de wens van de
bestuurder.
1. Draai de knop los om de stuurkolom in te stellen in de gewenste stand. (Afbeelding 4.3)
2. Nadat u de stand hebt bepaald, draait u de knop vast om de stuurkolom vast te zetten
( afbeelding 4.4).
Instelknop
Afbeelding 4.3 Afbeelding 4.
66
Page 67

4. BEDIENING
Waarschuwing
♦ Houd het stuur vast voordat u de stuurkolomknop losmaakt.
♦ Voordat u de scooter optilt of erin rijdt, controleert u of de stuurkolomknop goed is
vastgedraaid.
♦ Tracht nooit de hoogte van de stuurkolom te wijzigen wanneer de scooter beweegt.
67
Page 68

5. RIJDEN OP DE WEG
■
Let op
1. Druk niet gelijktijdig de rechter- en linker snelheidshendel in. U kunt dan mogelijk uw
scooter niet besturen.
2. Zet de aan/uit-schakelaar niet in de stand OFF wanneer u rijdt, aangezien dan een noodstop
wordt gemaakt, die een ongeluk en letsel tot gevolg kan hebben.
3. Stel niet de hoogste snelheid in wanneer u binnenshuis rijdt.
4. Draai niet aan de snelheidsknop tijdens het rijden, een onverwachte verandering van
snelheid kan gevaarlijk zijn voor u en anderen, en kan schade aan de scooter veroorzaken.
5. Zet geen magnetische apparaten in de buurt van de gebruikshendel aangezien dit de veilige
werking van de scooter kan beïnvloeden. De scootercontroller bevindt aan de onderzijde.
6. Wees voorzichtig wanneer het verkeer druk is, of wanneer u in drukke gebieden rijdt.
7. Wanneer u met het voertuig achteruitrijdt, moet u rekening houden met de mensen of de
dingen achter u.
Let op
1. De remweg varieert naar gelang de snelheid waarmee u voor- of achteruitrijdt. Rem
daarom zo spoedig mogelijk.
2. Wanneer u de scooter parkeert, controleert u of deze op een vlakke ondergrond staat
en zet u vervolgens de sleutel in de stand 'OFF' voordat u afstapt.
daarom zo spoedig mogelijk.
en zet u vervolgens de sleutel in de stand 'OFF' voordat u afstapt.
Starten en rijden
1. Zorg dat de stoel correct is geplaatst.
■
2. Zorg dat de stuurkolom goed is vastgemaakt.
■
3. Vouw de armsteunen omlaag zodat u uw armen op de steunen kunt laten rusten.
■
4. Zet de aan/uit-schakelaar op 'AAN'.
■
5. Controleer de batterij-indicator om te zien of er voldoende energie voor uw reis is. Als u
■
twijfels hebt over de resterende hoeveelheid energie, laadt u de batterijen opnieuw op voor
vertrek.
6. Zet de snelheidsknop op een stand waarbij u zich veilig voelt en die u comfortabel vindt.
■
7. Controleer of de snelheidshendel voor vooruit en achteruit correct werkt.
■
8. Controleer of de elektromagnetische rem correct werkt.
■
9. Voordat u gaat rijden, controleert u of u veilig in de omgeving om u heen kunt rijden.
■
♦
Stoppen
•
Laat de snelheidshendel helemaal los. Het voertuig remt op natuurlijk wijze en stopt.
•
Schakel het voertuig uit. Haal vervolgens de sleutel uit het slot.
68
Page 69

6 . BAT T E R IJ O P L A D EN E N O N DERH O U D
6.1 DE BATTERIJ OPLADEN
Let op
♦
Wanneer u het battery pack terugzet in de opening, moet u op uw vingers en handen
passen.
Methode 1: aan boord opladen (zie foto)
■
Volg de procedure stap voor stap:
•
Zet de aan/uit-schakelaar op 'OFF'.
•
Steek de stekker van de batterijoplader in het stopcontact.
•
Open de dop van het contact van de batterijoplader op de
achterste kolom. Sluit vervolgens de ronde plug van de oplader
op het contact aan.
•
Schakel de oplader in.
•
De rode en de oranje LED van de oplader gaan branden
•
wanneer het opladen begint. De oplaadduur bedraagt ongeveer
zes uur. Voor optimale prestaties raden wij een oplaadduur van
tien uur aan.
•
De beide LED's van de oplader branden tijdens het
oplaadproces. De oranje LED verandert in groen wanneer het
opladen is voltooid.
•
Schakel de oplader uit, haal de stekker uit het stopcontact en de
ronde plug uit het contact van de scooter.
Methode 2 Niet aan boord opladen (zie foto aan ommezijde)
■
1. Zet de aan/uit-schakelaar op 'OFF'.
2. Verwijder het battery pack door het batterijcompartiment te openen en til het battery pack
door dit bij de handgreep vast te pakken.
3. Steek de stekker van de oplader in het stopcontact.
4. Steek de ronde plug van de oplader in het contact van
het battery pack.
5. Schakel de oplader in.
6. De rode en de oranje LED van de oplader gaan branden
wanneer het opladen begint.
De oplaadduur bedraagt ongeveer zes uur.
Voor optimale prestaties raden wij een oplaadduur van tien uur
aan.
7. Tijdens het oplaadproces branden beide LED's van de oplader.
De oranje LED verandert in groen wanneer het opladen is
voltooid.
8. Schakel de oplader uit, haal de stekker uit het stopcontact en de
ronde plug uit het contact van het battery pack.
C o nta ct v a n
batterijoplader
Batterij
Oplader
69
Page 70

6 . BAT T E R IJ O P L A D EN E N O N DERH O U D
Oplaadtijden
■
De oplaadduur bedraagt ongeveer zes uur. Voor optimale prestaties raden wij een oplaadduur
van tien uur aan. Wij raden echter geen oplaadduur van meer dan 24 uur achtereen aan.
Batterijen (binnen in het Pack)
■
1. De Antares wordt van stroom voorzien door twee verzegelde diepe-cyclus zuurloodbatterijen.
2. De batterijen die bij de scooter worden geleverd, zijn batterijen van 12 V 12 Ah.
3. Grootte: 5,94 × 3,89 x 3,74 inch (breedte x hoogte x dikte)
(151 × 99 × 95 mm)
Waarschuwing
1. Houd de batterijen tijdens het opladen uit de buurt van brandbare voorwerpen, omdat dit
brand of een explosie van de batterijen tot gevolg kan hebben.
2. Rook niet wanneer u de batterijen oplaadt omdat hierdoor mogelijk waterstofgas vrijkomt.
Laad de batterijen altijd op in een goed geventileerde ruimte.
3. Sluit nooit de stekker op het stopcontact aan met natte handen en trek het nooit met natte
handen uit het stopcontact. Als u de stekker met natte handen aansluit of uit het stopcontact
haalt, kan dit een elektrische schok tot gevolg hebben.
Let op - Volg alstublieft de onderstaande regels om ongelukken tijdens het opladen te
voorkomen
1. Gebruik alleen de oplader van uw Antares en laad de batterijen altijd op totdat de volledige
capaciteit is bereikt. U beschadigt mogelijk de batterijen en de scooter als u een oplader gebruikt
die niet de correcte specificaties heeft.
2. Laad de batterijen op in een goed geventileerde ruimte waar de batterijen niet worden
blootgesteld aan direct zonlicht. Laad de batterijen niet op in een vochtige omgeving , wanneer
het regent of bij morgendauw.
3. Laad de batterijen niet op bij temperaturen lager dan -10C of hoger dan +50°C aangezien
de oplader mogelijk niet correct werkt en de batterijen beschadigd kan raken.
•
BATTERIJ
♦
Stel de batterijen niet bloot aan temperaturen lager dan 10C of hoger dan 50C tijdens
het opladen, of wanneer u het voertuig opslaat. Onder de bovengenoemde
temperatuurbereiken kunnen de batterijenbevriezen of oververhit raken. Hierdoor raken de
batterijen beschadigd en wordt de levensduur verkort.
♦
Deze batterijen zijn onderhoudsvrij en hoeven niet met water te worden bijgevuld.
U bent verplicht de batterijen regelmatig op te laden. Zelfs als u de scooter niet gebruikt,
moet u de batterijen minimaal eenmaal per week opladen.
70
Page 71

6 . BAT T E R IJ O P L A D EN E N O N DERH O U D
♦
Suggestie – Hoe optimaliseert u de effiency en de levensduur van de batterijen?
•
Laad de nieuwe batterijen volledig op wanneer u deze voor het eerst gebruikt.
•
Zorg dat u de batterijen altijd volledig oplaadt. De levensduur van de batterijen neemt
aanzienlijk af, of gaat achteruit als u de batterijen herhaaldelijk gebruikt zonder deze
volledig op te laden.
•
Laad de batterijen altijd op totdat de oranje LED verandert in een groene LED. Stop NOOIT
met laden voordat dit gebeurt.
•
Houd de batterijen te allen tijde volledig opgeladen
•
Als u de scooter langere tijd niet gebruikt, moet u de batterijen ten minste eenmaal per week
opladen om de batterijen in een volledig bruikbare conditie te houden.
•
De omgevingstemperatuur beïnvloedt de oplaadtijd. Het opladen duurt 's winters langer.
•
Laat na het opladen nooit de plug van de oplader in de scooter zitten, dit veroorzaakt een
stroomlekkage in de scooter en verkort tijdelijk het bereik.
De batterijen hebben zes maanden fabrieksgarantie. Deze garantie dekt alleen problemen met
betrekking tot productiefouten, geen fouten vanwege het niet opladen van de batterijen
volgens bovenstaande instructies.
De batterij reinigen
■
Als de batterijen vuil zijn geworden vanwege water, batterijenzuur, stof of andere stoffen,
raken de batterijen snel leeg. De batterijen die bij de scooter zijn geleverd, zijn verzegeld en
daarom onderhoudsvrij. Er is geen risico op batterijlekkage. Volg de onderstaande stappen
om de batterijen te reinigen.
•
Zet de aan/uit-knop van de scooter op 'OFF'.
•
Volg de procedure in het volgende gedeelte 'De batterijen vervangen'.
•
Gebruik een schone doek om het vuil weg te vegen.
•
Verwijder de batterij.
•
Reinig de batterij met een schone doek. Als het contactpunt is bedekt met wit poeder, maakt
u het schoon met warm water.
•
BATTERIJEN VERVANGEN
De batterijen vervangen
■
Volg de onderstaande procedure stap voor stap om de batterijen te vervangen:
•
Haal het battery pack uit de scooter.
•
Open het battery pack en koppel de kabels van de vier batterijcontactpunten los.
•
Haal de batterijen uit het battery pack.
•
Plaats nieuwe batterijen in het pack.
•
Sluit de rode kabel aan op het positieve (+) batterijcontactpunt en de zwarte kabel op het
negatieve (-) contactpunt op de andere batterij.
•
Sluit de gefuseerde kabel aan tussen de twee batterijen en sluit het battery pack.
71
Page 72

6 . BAT T E R IJ O P L A D EN E N O N DERH O U D
Waarschuwing
•
Het bedradingssysteem en de oplader worden tijdens de fabricage in het battery pack
verwerkt. Tracht niet zelf het bedradingssysteem te verplaatsen. Een verkeerde indeling van
het bedradingssysteem heeft mogelijk tot gevolg dat de kabels door de batterijbox beklemd
raken, wat een storing van het elektronische systeem tot gevolg kan hebben.
•
Controleer of de batterijkabels op de juiste batterijcontactpunten zijn aangesloten.
Suggesties
Vraag indien nodig uw dealer om hulp en advies over het onderhoud en het vervangen van
de batterijen.
Suggesties
•
Controleer of de contactpunten correct zijn bevestigd en plaats het deksel.
•
Gebruik de batterijen niet om telecommunicatieapparatuur of andere voorwerpen op te
laden.
•
De efficiency van de batterijen varieert naar gelang de externe omstandigheden. De
rijafstand is 's winters korter. Als u het voertuig gedurende langere tijd niet gebruikt, moet u
de batterij tenminste elke week opladen.
•
Vervang beide batterijen tegelijk.
72
Page 73

7. INSPECTIE EN ONDERHOUD
7.1 INSPECTIE
JAAR
1234JAAR
1234Servicedatums
Servicedatums
Controleur
Bekleding
Aan/uit-schakelaar
Stoel
Besturingshendel
Achterzijde
Remmen
Armsteunen
Oplaadpunt
Elektronica
Batterijen
C o n d i t i e v a n
aansluitpunten
Niveaus
Kabelbundel
Aansluitingen
Testrit
Ontladingstest
Vooruit
Wielen en banden
Achteruit
Slijtage
Noodstop
Druk
Linksaf
Lagers
Rechtsaf
Wielmoeren
Hellingtest
Motoren
Over obstakels
Bekabeling
Vermeld gerepareerde
items
Geluid
Aansluitingen
Rem
Sleepcontacten
Chassis
Conditie
Sturing
•
Maak de scooter schoon met een vochtige doek en stof de scooter ongeveer eenmaal per
week af zodat deze er goed blijft uitzien.
•
Stel de stuurkolom in op de oorspronkelijke hoogte en kantel de stoel eenmaal per week om
te controleren of de onderdelen bewegen, en zich indien nodig soepel en gemakkelijk laten
verwijderen.
•
Controleer de banden en de bekleding regelmatig op slijtage.
•
Voor optimale prestaties en ter verhoging van de levensduur van de scooter raden wij u aan
de scooter eenmaal per jaar een onderhoudsbeurt te geven.
7.2 RECORD VAN ROUTINECONTROLE
Om ervoor te zorgen dat de scooter correct wordt onderhouden, brengt u deze naar de dealer
voor regelmatige onderhoudscontroles. U moet dit met intervallen van zes maanden doen, na
de eerste inspectie die na de eerste maand plaatsvindt. Uw dealer kan u hiervoor kosten in
rekening brengen. De controlekaart vindt u aan hieronder.
73
Page 74

7. INSPECTIE EN ONDERHOUD
7.3 BATTERIJ, ZEKERING EN BANDEN
Suggestie
Vraag uw dealer om hulp bij het inspecteren of vervangen van de zekering, aangezien de
stuurkolom moet worden verwijderd voordat u de zekering kunt vervangen.
Let op
1. Wanneer het profiel minder dan 0,5 mm is, kan het voertuig gemakkelijk slippen,
waardoor de remafstand toeneemt. Vervang daarom de banden zo vroeg mogelijk als u
constateert dat het profiel ontoereikend is.
2. De Antares is voorzien van volle rubberen banden, dus hoeft u de bandenspanning
niet te controleren.
Suggestie
Zet de scooter op een plaats buiten direct zonlicht, regen of dauw. Wanneer u de scooter
voor langere tijd opslaat, laadt u de batterij volledig op en koppelt u de batterijcontacten
los. Vraag uw dealer om details.
Batterij
■
Raapleeg hoofdstuk 6 genaamd '6. BATTERIJ OPLADEN EN ONDERHOUD'.
Zekering
■
Als de batterijoplader is ingeschakeld en er geen LED brandt, controleert u de zekering.
Banden
■
De conditie van de banden hangt af van uw rijwijze en de manier waarop u de scooter gebruikt.
♦
Controleer regelmatig het profiel van de band.
♦
Vervang de banden wanneer het profiel minder dan 0,5 mm bedraagt.
7.4 OPSLAG
Controleer of u de scooter onder de volgende omstandigheden opslaat:
-
Controleer of de stoel in de stand 'Voorwaarts' staat.
-
Controleer of de scooter is uitgeschakeld.
-
Controleer of de oplader is losgekoppeld indien u deze niet gebruikt.
74
Page 75

7. INSPECTIE EN ONDERHOUD
7.5 DE SCOOTER VERPLAATSEN
♦
Schakel de voeding uit met de sleutel voordat u scooter verplaatst.
Stap altijd af van de scooter voordat u deze verplaatst.
♦
Til de scooter op aan het chassis, niet aan de stuurkolom.
Het optillen van de scooter aan de bumper kan schade of letsel veroorzaken.
♦
Vraag voor uw veiligheid indien nodig om hulp. Er zijn twee personen nodig om de
scooter in zijn geheel te verplaatsen of op te tillen. Als u alleen bent, demonteert u de
scooter voordat u deze optilt. Raadpleeg het onderstaande gedeelte.
7.6 DE SCOOTER DEMONTEREN
Volg de onderstaande stappen.
•
Druk de stoeldraaiknop in terwijl u de stoel omhoog trekt om deze te verwijderen.
•
Draai de stoelpostknop los en verwijder de borgpen. Verwijder vervolgens de bovenste
stoelpost.
•
Open het deksel van het batterijcompartiment en til het battery pack eruit.
•
Draai de stuurkolomknop los, klap het stuur in en draai de knop vast.
•
Vergrendel het voorwiel en het stuur door de wielvergrendeling omlaag te trekken.
•
Druk de stoelpost terug om het achterste deel van de scooter achterwaarts te draaien totdat
het achterste deel verticaal op de achterbumper staat.
•
Koppel de elektrisch plug los die het voorste en achterste deel met elkaar verbindt.
•
Til het voorste deel omhoog totdat de onderste pinnen geen contact meer maken met de
gebogen vergrendelingsbeugels op het achterste gedeelte.
Antares
75
Page 76

7. INSPECTIE EN ONDERHOUD
Waarschuwing
Suggestie
Het montageproces is hoofdzakelijk het demontageproces in omgekeerde volgorde. Bestudeer
eerst de tekst en de foto's van de demontageprocedure voordat u de scooter gaat monteren.
Koppel altijd de elektrische plug van het achterste gedeelte los voordat u de twee stukken
scheidt.
7.7 DE SCOOTER MONTEREN
76
Page 77

7. INSPECTIE EN ONDERHOUD
1. Plaats de voorste en achterste gedeelten van de Antares.
Waarschuwing
Nadat u de scooter hebt gemonteerd, moet u er absoluut zeker van zijn dat de
stuurkolomknop helemaal is vastgedraaid.
2. Houd de onderste gebogen vergrendelingsbeugels van het voorste deel tegenover de
bijbehorende pinnen aan de voorzijde van het achterste deel.
3. Bevestig de elektrische plug om het voorste gedeelte en het achterste gedeelte met
elkaar te verbinden.
4. Houd de onderste stoelpost vast en draai langzaam het achterste gedeelte naar voren
totdat de gebogen vergrendelingsbeugels volledig contact maken met de bovenste
achterpinnen.
5. Draai de stuurregelknop los, til het stuur omhoog in de gewenste stand en draai de
stuurkolomknop vast.
6. Zet de bovenste stoelpost op de gewenste hoogte. Bevestig de borgpen en maak draai de
stoelpostknop vast.
7. Zet de batterijen terug op hun plaats.
8. Zet de stoel terug op zijn plaats en draai de stoel totdat deze in de juiste stand wordt
vergrendeld.
77
Page 78

8 . PR O B L EMEN O P LOS S E N
PROBLEMEN OPLOSSEN
Probleem
Symptoom
Oplossing
U kunt de scooter niet
inschakelen.
•
De batterijen zijn niet
aangesloten.
•
De voorkant en de
achterkant zijn niet
aangesloten.
•
De circuitbreker is
omgeschakeld.
•
C o n t r o l e e r o f d e
b a t t e r i j e n z i j n
aangesloten.
•
Controleer de aansluiting
van de voorkant en de
achterkant.
•
D r u k d e
circuitbrekerknop in.
De scoo ter w ord t
ingeschakeld, maar
loopt niet.
•
De batterijen zijn leeg.
•
D e o p l a d e r i s
aangesloten.
•
De motor staat in de
vrijloopmodus.
•
C o n t r o l e e r d e
batterijspanning.
•
Koppel de oplader los.
•
Zet de vrijloophendel
weer vast.
D e s c o o t e r l i j k t
langzaam.
•
De batterijen zijn leeg.
•
Snelheid langzaam
ingesteld.
•
C o n t r o l e e r d e
batterijspanning en/of
laad de batterijen op.
•
C o n t r o l e e r o f d e
snelheidsknop niet laag
staat.
De stoe l b ewee gt
tijdens het gebruik.
•
D e s t o e l i s n i e t
vergrendeld.
•
Draai de stoel langzaam
totdat deze op zijn plaats
valt en vastzit.
Het stuur lijkt los te
zitten.
•
De stuurkolomknop is
los.
•
Draai de stuurkolomknop
vast.
De claxon maakt
onverwachts geluid.
•
Er is een fout met de
scooter.
•
C o n t r o l e e r o f d e
besturingshendel vrij
staa t e n scha k el d e
scooter in een uit, en laad
de batterijen op.
■
Als u problemen hebt met uw scooter, kunt u het volgende proberen voordat u de scooter naar de
dealer brengt.
Als u het probleem niet kunt oplossen, vraagt u de dealer om hulp.
78
Page 79

9 . S P E C I F I C AT I E S
S P E CIF I C AT I E S
Model
Antares 3 - Antares 4
Afmetingen (L x D x H mm)
(L x D x H inch)
965 x 480 x 980 mm - 970 x 480 x 980mm
38 x 19 x 38.5 inch
Gewicht (kg), met batterij
40 kg / 88 lbs - 41 kg/90 lbs
Gewicht (kg), met batterij
zonder batterij
Batterij
12 V 12 Ah x 2
Oplader
1.8 Amp off Board
Voorwielband
8”x2” / 200x50 mm, massief
Achterwielband
8”x2” / 200x50 mm, massief
Aandrijfsysteem
Direct op achterwielen (met differentiaal)
Remsysteem
Elektromagnetische rem
Stuurmethode
Met snelheidshendel
Topsnelheid
6 km/uur / 4 mph
Klimhoek
> 8°
Actieradius (zie opmerking)
10-12 km / 6-7.5 miles
Max. gebruikersgewicht
115 kg / 250 lbs
30 kg / 66 lbs - 31 kg/68 lbs
Opmerking: de fabrikant behoudt zich het recht voor indien nodig de specificatie te wijzigen. De
uiteindelijke specificatie is afhankelijk van de scooter die u bij de dealer aanschaft.
Opmerking:
De maximale rijafstand is gebaseerd op een omgevingstemperatuur van 20°C, een bestuurder
van 75 kg en een nieuwe en volledig opgeladen batterij bij een constante rijsnelheid van 6 km/u
met 70% batterijspanningontlading.
79
Page 80

10. GARANTIE
Garantievoorwaarden:
Naam
Adres
Tel.
Postcode
•
Eventuele werkzaamheden of de installatie van vervangingsonderdelen moeten worden uitgevoerd door een erkende dealer of
onderhoudstechnicus.
•
Indien uw scooter tijdens de garantieperiode gerepareerd moet worden, neemt u contact op met de hieronder vermelde
onderhoudstechnicus.
•
Garantie: 24 maanden op constructie fouten en onderdelen niet onderhevig aan slijtage, uitgezonderd batterijen (6 maanden).
•
De bijgeleverde verbruiksartikelen worden in het algemeen niet gedekt door de normale garantieperiode, tenzij dergelijke artikelen
moeten worden gerepareerd of vervangen ten gevolge van een productiefout of een materiaaldefect.
Het gaat hierbij (onder andere) om artikelen als: bekleding, banden en batterijen.
•
De bovenstaande garantievoorwaarden gelden voor nieuwe scooters die tegen de geldende winkelprijs zijn aangeschaft. Als u niet
zeker weet of uw scooter door garantie is gedekt, neemt u contact op met de onderhoudstechnicus.
•
Onder normale omstandigheden wordt geen verantwoordelijkheid aanvaardt als de scooter defect raakt omdat:
•
Het scooteronderdeel niet is onderhouden conform de aanbevelingen van de fabrikant.
•
De door de fabrikant opgegeven onderdelen niet zijn gebruikt.
•
De scooter, of een deel ervan, is beschadigd door nalatigheid, ongeluk of verkeerd gebruik.
•
De scooter, of deel ervan, is gewijzigd ten opzichte van de specificaties van de fabrikant, of getracht is reparaties uit te voeren
voordat de onderhoudstechnicus werd ingeschakeld.
Noteer de contactgegevens van uw plaatselijke onderhoudstechnicus in het onderstaande vak. Indien uw scooter gerepareerd moet
worden, neemt u contact op met de technicus en geeft u alle details door zodat snel actie kan worden ondernomen.
De fabrikant behoudt zich het recht voor zonder voorafgaande kennisgeving gewichten, maten of andere technische gegevens in deze
handleiding te wijzigen. Alle afbeeldingen, maten en capaciteiten die in deze handleiding staan, vormen een benadering en zijn geen
specificaties.
Erkende onderhoudstechnicus
80
Page 81

10. GARANTIE
10.1 VIN (VOERTUIG IDENTIFICATIE NUMMER)
Naam
Geslacht
口Man 口Vrouw
Geboortedatum
Jaar Maand Dag
Adres
Model
口Antares
VIN van scooter:
VIN
Motorserienummer:
Sleutelnr
Aankoopdatum
Jaar Maand Dag
Handtekening eigenaar
Model
Antares
VIN
Motorserienr.
Sleutelnr.
Voor correcte aftersales-service en ondersteuning voor
garantieservice noteert u het voertuigidentificatienummer dat
zich aan de rechterachterkant van het frame bevindt.
………………………………………………………………………………………………………………………………
Garantieaanvraagformulier
81
Page 82

1.
VORWORT UND EINLEITUNG……..……………….....................…....……
83
2.
SICHERHEITSHINWEIS……………………………...…………………...….
2.1 Vor der Fahrt
2.2 Während der Fahrt
2.3 Kennzeichnung
2.4 EMI
84
3.4.VORSTELLUNG DER TEILE ……………..………………..………………..
BETRIEB……………………………...………………………....……………....
4
.1 Bedienfeld
4.2 Betrieb des Scooters
4.3 Einstellen des Freilaufmodus
89
90
5.
FAHREN AUF DER STRASSE ……………………...………………………..
95
6.
LADEN UND PFLEGEN DER BATTERIEN …………………………….....
6.1 Laden der Batterie
6.2 Batterie
6.3 Austausch der Batterie
96
7.
INSPEKTION UND WARTUNG………………………………….........…..…
7.1 Inspektion
7.2 Protokoll über regelmäßige Inspektion
7.3 Batterie und Reifen
7.4 Lagerung
7.5 Bewegen
7.6 Demontage
7.7 Montage
100
8.
BESEITIGEN VON STÖRUNGEN……..……….……..…………
105
9.
TECHNISCHE DATEN ……….…………………………..………
106
10.
GEWÄHRLEISTUNG …………………….……………………………....
107
INHALTSVERZEICHNIS
82
Page 83

Warnung
Unsachgemäße Nutzung kann zu schweren Verletzungen oder zum
Tod führen
Achtung
Unsachgemäße Nutzung kann zu Verletzungen und/oder
Beschädigung des Scooters führen.
Vorschlag
Befolgen Sie diese Anweisungen, um Ihr Fahrzeug in gutem
Betriebszustand zu halten.
1. VO R W O RT U N D EINL E I T U NG
Bitte lesen Sie diese Bedienungsanleitung vor Nutzung des Fahrzeugs sorgfältig durch. Eine
unsachgemäße Nutzung des Fahrzeugs könnte zu Schäden, Verletzungen oder Verkehrsunfällen
führen. Damit Sie den Scooter optimal nutzen können, lesen Sie bitte vor der Benutzung diese
Bedienungsanleitung.
♦
Diese Bedienungsanleitung enthält Informationen zu allen Aspekten des Fahrzeugs,
Montageanweisungen sowie Anweisungen zum Verhalten bei möglichen Unfällen.
♦
Die in diesem Handbuch verwendeten Symbole sind auf der folgenden Seite erläutert:
♦
Diese Anleitung enthält eine Kopie des Reparatur- und Wartungsprotokolls und der
Gewährleistungsinformationen. Bewahren Sie diese an einem sicheren Ort oder im Scooter
auf.
♦
Wenn jemand anders den Scooter nutzt, achten Sie darauf, ihm oder ihr diese
Bedienungsanleitung zur Beachtung zur Verfügung zu stellen.
♦
Da sich das Design ändern kann, entsprechen einige Abbildungen in dieser Anleitung
möglicherweise nicht dem Fahrzeug, das Sie erworben haben. Wir behalten uns das Recht
vor, Änderungen am Design vorzunehmen.
Unsere Scooter wurden dafür entworfen und gefertigt, eine bequeme und sichere, aber trotzdem
bezahlbare Lösung für einige Mobilitätsanforderungen zu bieten.
83
Page 84

2. SICHERHEITSHINWEIS
2.1 VOR DER FAHRT
Der Benutzer muss vor der Fahrt mit Bedienung und Betrieb des Fahrzeugs vertraut sein.
Beachten Sie daher immer die Empfehlungen in diesem Sicherheitshinweis.
Für die Nutzung dieses Fahrzeugs gelten die gleichen Verkehrsregeln wie für Fußgänger
■
♦
Zu Ihrer Sicherheit befolgen und beachten Sie bitte die gleichen Verkehrsregeln wie
Fußgänger.
♦
Fahren Sie den Scooter nicht, wenn Sie Alkohol getrunken haben oder müde sind.
♦
Seien Sie vorsichtig, wenn Sie den Scooter in schlechten Lichtverhältnissen fahren. Er ist
nicht für die Nutzung während der Nacht vorgesehen.
♦
Seien Sie besonders vorsichtig, wenn Sie den Scooter in belebten Zonen oder
Einkaufszentren fahren.
♦
Fahren Sie nur auf dem Bürgersteig, einspurigen Straßen oder in Fußgängerzonen. Fahren
Sie nie auf Schnellstraßen oder zweispurigen Straßen.
♦
Achten Sie beim Befahren oder Überqueren von Straßen auf den Verkehr.
Üben Sie die Bedienung Ihres Fahrzeugs
■
Machen Sie sich mit der Bedienung des Scooters vertraut, bevor Sie ihn in belebten oder
möglicherweise gefährlichen Umgebungen verwenden. Üben Sie auf einem großen, freien
Gelände, beispielsweise in einem Park. Um Unfälle während der Fahrt mit dem Scooter zu
vermeiden, berücksichtigen Sie Fahrbewegungen wie Beschleunigen, Anhalten, Wenden,
Rückwärtsfahren, Hoch- und Herunterfahren von Rampen.
♦
Drehen Sie den Geschwindigkeitsregler zum Üben anfangs auf den minimalen Wert.
♦
Lassen Sie sich aus Sicherheitsgründen von jemandem begleiten, wenn Sie zum ersten Mal
auf der Straße fahren.
♦
Nutzen Sie die höhere Geschwindigkeitseinstellung erst, wenn Sie sicher sind, dass Sie
Ihren Scooter leicht nutzen und steuern können.
Der Scooter darf nur von einer Person auf einmal verwendet werden.
■
Befördern Sie keine Passagiere (einschließlich Kindern) auf Ihrem Scooter.
Verwenden Sie dieses Fahrzeug nicht zum Tragen oder Schleppen von Gütern
■
♦
Das maximal zu befördernde Gewicht beträgt 115kg/250 lbs (einschließlich Fahrer und
ggf. Gütern). Siehe „MAX. BELASTUNG“ in „9. TECHNISCHE DATEN“.
♦
Die maximale Last für den Korb beträgt 3 kg (7 lb).
Führen Sie tägliche Inspektionen durch.
■
Siehe Abschnitt „TÄGLICHE INSPEKTION“.
84
Page 85

2. SICHERHEITSHINWEIS
2.2 WÄHREND DER FAHRT
Setzen Sie das Fahrzeug nicht unter den folgenden Umständen ein.
■
♦
Auf Oberflächen, die schlammig, beschottert, uneben, schmal, überschneit oder vereist
sind, oder auf Pfaden, die nicht durch einen Zaun oder eine Hecke gesichert sind. Halten
Sie sich von Orten fern, an denen die Gefahr besteht, die Räder festzuklemmen.
♦
Fahren Sie nicht in der Nacht oder wenn es regnet, schneit, neblig oder windig ist.
♦
Fahren Sie keine „S“-Kurven oder ziellose Wendungen.
♦
Fahren Sie mit dem Scooter nicht auf Rolltreppen.
♦
DER SCOOTER DARF UNTER KEINEN UMSTÄNDEN ALS SITZ IN EINEM
MOTORFAHRZEUG (AUTO, BUSSE, ZÜGE USW.) VERWENDET WERDEN.
Mobiltelefone und andere elektrische Geräte
■
♦
Verwenden Sie während der Fahrt keine Mobiltelefone oder andere Geräte mit drahtloser
Kommunikation.
♦
Schalten Sie den Scooter immer aus und ziehen Sie den Zündschlüssel ab, bevor Sie ein
Mobiltelefon verwenden.
♦
Laden Sie das Mobiltelefon oder andere elektrische Geräte nicht mit der Batterie des
Scooters auf.
Automatische Abschaltung
■
Um ein versehentliches Leerlaufen der Batterie zu vermeiden, verfügt der Scooter über eine
automatische Abschaltfunktion. Wenn der Scooter eingeschaltet ist und dreißig Minuten lang
nicht verwendet wird, schaltet er sich automatisch ab. Schalten Sie in diesem Fall den
Scooter einfach aus und wieder ein, und er ist wieder einsatzbereit.
Rampen, Steigungen und Stufen
■
♦
Fahren Sie nicht auf steile Rampen mit einem größeren als dem angegebenen
Steigungswinkel. Siehe Abschnitt „STEIGUNGSWINKEL“ in „9. TECHNISCHE
DATEN“.
♦
Verwenden Sie beim Herauf- oder Herunterfahren auf Steigungen immer eine niedrige
Geschwindigkeitseinstellung.
♦
Fahren Sie nicht auf Straßen mit starken Stufen oder Schlaglöchern. Siehe Abschnitt
„MAX. BODENFREIHEIT“ in „9. TECHNISCHE DATEN“.
♦
Fahren Sie auf Straßen mit Steigungen langsamer.
♦
Fahren Sie keine engen Kurven beim Fahren auf Schotterstraßen oder Rampen.
♦
Lehnen Sie sich beim Erklimmen einer steilen Steigung immer nach vorne.
♦
Fahren Sie nicht auf Steigungen, die steiler sind als im Diagramm auf der nächsten Seite
angegeben.
85
Page 86

2. SICHERHEITSHINWEIS
Abb. 1. Max. empfohlene Steigungswinkel
2.3 Kennzeichnung
Lesen Sie die gesamte Kennzeichnung auf dem Scooter sorgfältig, bevor Sie ihn fahren.
Entfernen Sie sie nicht, sondern lassen Sie sie als Referenz an Ort und Stelle.
WARNUNG
Lenksäule festhalten, bevor Sie den
Einstellknopf lösen
Vor Anheben oder Fahren des
Warnung
Vor Betrieb
Bedienungsanleitung
lesen und Batterien
aufladen
Empfohlene Steigungswinkel
und Gewischte nicht
überschreiben
WARNUNG
Vor dem Teilen des
Rahmens abtrennen
Scooters sicherstellen, dass der
Einstellknopf gesichert ist.
Die Lenksäule nie verstellen,
während sich der Scooter bewegt.
WARNUNG
Den Freilaufhebel nie betätigen, während
Sie auf dem Scooter sitzen oder auf einer
Neigung!
BETRIEB DES FREILAUFHEBELS
FEST NACH OBEN ziehen für den
Freilaufmodus
FES T NAC H U N TE N drüc k en für
Fahrmodus
WARNUNG
Funkwellen können die Steuerung des Scooters beeinträchtigen.
Quellen von Funkwellen, wie Radiosender, Amateurfunksender (HAM), Funksprechgeräte und Mobiltelefone können sich
auf motorisierte Scooter auswirken. Die Beachtung der folgenden Warnungen sollte das Risiko eines unbeabsichtigten
Lösens der Bremse oder einer unbeabsichtigten Bewegung des angetriebenen Scooters verhindern, die zu schweren
Verletzungen führen können. .
Schalten Sie keine tragbaren Kommunikationsgeräte wie CB-Funk-Radios und Mobiltelefone ein, während der
•
angetriebene Scooter eingeschaltet ist.
Achten Sie auf Transmitter in der Nähe, beispielsweise Radio- und Fernsehsender, und vermeiden Sie es möglichst, in
•
ihre Nähe zu kommen.
Wenn es zu unbeabsichtigten Bewegungen oder Lösen der Bremse kommt, schalten Sie den angetriebenen Scooter
•
aus, sobald sie dies sicher tun können.
Beachten Sie, dass das Hinzufügen von Zubehör oder Komponenten oder das Vornehmen von Änderungen am
•
angetriebenen Scooter ihn anfälliger für Interferenz durch Funkwellen machen kann. (Hinweis: Es gibt keine
einfache Möglichkeit, ihre Auswirkung auf den angetriebenen Scooter zu bestimmen.)
Melden Sie jedes Auftreten von unbeabsichtigter Bewegung oder Lösen der Bremse dem Hersteller des angetriebenen
•
Scooters und notieren Sie, ob es eine Quelle von Funkwellen in der Nähe gibt.
86
Page 87

2. SICHERHEITSHINWEIS
2.4 EMI
Achtung: Es ist sehr wichtig, diese Informationen bezüglich der möglichen
Auswirkungen von elektromagnetischer Interferenz auf ihren elektrischen SCOOTER
lesen.
Hinweis: Einige Mobiltelefone und ähnliche Geräte übertragen ein Signal, wenn sie
eingeschaltet sind, auch wenn sie gerade nicht verwendet werden.
Dieser Abschnitt enthält grundlegende Informationen zu Problemen mit EMI, bekannten EMIQuellen, Schutzmaßnahmen, um die Möglichkeit der oder Aussetzung oder den Grad der
Aussetzung zu minimieren, und empfohlenen Maßnahmen, falls unerwartete oder erratische
Bewegungen auftreten.
ELEKTROMAGNETISCHE INTERFERENZ (EMI) VON
■
FUNKWELLENQUELLEN
■
Angetriebene Fahrzeuge können anfällig für elektromagnetische Interferenz (EMI) sein, d. h.
elektromagnetische Energie, die von Quellen wie Radiosendern, Fernsehsendern,
Amateurfunksendern (HAM), Funksprechgeräten und Mobiltelefonen ausgehen kann. Die
Interferenz (von Funkwellenquellen) kann dazu führen, dass der angetriebene Scooter seine
Bremsen löst, sich von selbst bewegt oder sich in eine unbeabsichtigte Richtung bewegt.
Außerdem kann sie das Steuersystem des angetriebenen Scooters permanent beschädigen. Die
Stärke der elektromagnetischen Interferenz-Energie kann in Volt pro Meter (V/m) gemessen
werden. Jeder angetriebene Scooter kann EMI bis zu einer gewissen Stärke aushalten. Diese
bezeichnet man als „Störfestigkeit“. Je höher die Störfestigkeit ist, desto besser ist der Schutz.
Derzeit kann man mit aktueller Technologie Störfestigkeitspegel von mindestens 20 V/m
erzielen, was einen ausreichenden Schutz gegen die gängigsten Quellen ausgestrahlter EMI
bietet. Das angetriebene Scooter-Modell hat, so wie es versandt wird und ohne weitere
Änderung oder Zubehör, eine Störfestigkeit von 20 V/m.
Es gibt eine Reihe von Quellen relativ intensiver elektromagnetischer Felder in der
alltäglichen Umgebung. Einige dieser Quellen sind offensichtlich und leicht zu vermeiden.
Andere sind nicht offensichtlich, und eine Aussetzung lässt sich nicht verhindern. Wir
glauben jedoch, dass das Risiko von EMI durch die Einhaltung der folgenden Warnungen
minimiert werden kann.
Die Quellen von ausgestrahlter EMI lassen sich grob in drei Kategorien einteilen:
•
Tragbare Transceiver (Sender und Empfänger mit an der Sendeeinheit angebrachter
Antenne. Beispielsweise: CB-Funk-Radios, Walkie-Talkies, Sicherheits-, Feuer- und
Polizeitransceiver, Mobiltelefone und andere persönliche Kommunikationsgeräte.
•
Mobile Transceiver mit mittlerer Reichweite, wie sie beispielsweise in Polizei- und
Feuerwehrfahrzeugen, Krankenwagen und Taxis eingesetzt werden. Bei ihnen befindet
sich die Antenne normalerweise an der Außenseite des Fahrzeugs.
87
Page 88

2. SICHERHEITSHINWEIS
•
Hinweis: Soweit wir wissen, ist es unwahrscheinlich, dass andere Arten von
tragbaren Geräten wie schnurlose Telefone, Laptops, AM/FM-Radios,
Fernseher, CD-Player und Kassettenrecorder sowie Elektrokleingeräte wie
elektrische Rasierer und Haartrockner EMI-Probleme für ihren angetriebenen
Scooter verursachen.
Langstreckentransmitter und -transceiver wie kommerzielle Sendeeinrichtungen (Radio-
und Fernsehsendemasten) und Amateurfunksender (HAM).
■
ELEKTROMAGNETISCHE INTERFERENZ (EMI) FÜR ANGETRIEBENE
FAHRZEUGE
Da die EM-Energie schnell zunimmt, wenn man sich der übertragenden Antenne (Quelle)
nähert, sind die EM-Felder von tragbaren Quellen von Funkwellen (Transceivern) besonders
zu beachten. Bei der Benutzung solcher Geräte kann der Scooter unbeabsichtigt starker
EM-Energie ausgesetzt werden. Das kann sich auf Bewegung und Bremsung des
angetriebenen Fahrzeugs auswirken. Daher wird die Einhaltung der folgenden Warnungen
empfohlen, um mögliche Interferenz mit dem Steuerungssystem des angetriebenen Scooters
zu verhindern.
■
WARNUNGEN
Elektromagnetische Interferenz (EMI) von Quellen wie Radio- und Fernsehstationen,
Amateurfunksender (HAM), Funksprechgeräten und Mobiltelefonen kann sich auf
angetriebene und motorisierte Scooter auswirken. Die Beachtung der folgenden Warnungen
sollte das Risiko eines unbeabsichtigten Lösens der Bremse oder einer unbeabsichtigten
Bewegung des angetriebenen Scooters verhindern, die zu schweren Verletzungen führen
können.
•
Betreiben Sie keine tragbaren Sende-/Empfangsgeräte wie CB-Funk-Radios und schalten
Sie keine persönlichen Kommunikationsgeräte wie Mobiltelefone ein, während das
angetriebene Fahrzeug eingeschaltet ist;
•
Achten Sie auf Transmitter in der Nähe, beispielsweise Radio- und Fernsehsender, und
vermeiden Sie es möglichst, in ihre Nähe zu kommen.
•
Wenn es zu unbeabsichtigten Bewegungen oder Lösen der Bremse kommt, schalten Sie
das angetriebene Fahrzeug aus, sobald sie dies sicher tun können.
•
Beachten Sie, dass das Hinzufügen von Zubehör oder Komponenten oder das Vornehmen
von Änderungen am angetriebenen Fahrzeugs es anfälliger für EMI machen kann
(Hinweis: Es gibt keine einfache Möglichkeit, ihre Auswirkung auf die
Gesamtstörfestigkeit des angetriebenen Scooters zu bestimmen).
•
Melden Sie jedes Auftreten von unbeabsichtigter Bewegung oder Lösen der Bremse dem
Hersteller des angetriebenen Scooters und notieren Sie, ob es eine EMI-Quelle in der
Nähe gibt.
WICHTIGE INFORMATION
•
20 Volt pro Meter (V/m) ist eine im Allgemeinen erreichbare und ausreichende
Störfestigkeit gegen EMI (Je höher die Stufe ist, desto besser ist der Schutz);
•
Dieses Produkt hat ohne angeschlossenes Zubehör eine Störfestigkeit von 20 V/m.
88
Page 89

3. VO R S T E LLU N G DER T E I L E
BESCHREIBUNG DER TEILE
1. Bedienfeld 2. Korb
3. Ladegerätbuchse 4. Lenksäulen-Einstellknopf 5. Sitz
6. Sitzdrehhebel 7. Batteriepack 8. Freilaufhebel
9. Kippschutzräder 10. Sitzpfostenknopf
1
3
2
5
6
4
7
10
9
8
89
Page 90

4. BETRIEB
4.1 BEDIENFELD
3
1. Geschwindigkeitsregler
3. Batterieanzeige 4. Hauptschalter
4.2 BETRIEB DES SCOOTERS
■ Hauptschalter
♦
Um den Strom einzuschalten, drehen Sie
den Zündschlüssel im Uhrzeigersinn. Die
Stromanzeige sollte aufleuchten.
♦
Um den Strom abzuschalten, drehen Sie den Schlüssel gegen den Uhrzeigersinn. Die
Stromanzeige sollte erlöschen und der Schlüssel kann falls erforderlich abgezogen
werden.
■ Geschwindigkeitsregler
Drehen Sie den Geschwindigkeitsregler, um die Höchstgeschwindigkeit des Scooters
festzulegen. Drehen Sie den Regler im Uhrzeigersinn, um die Geschwindigkeits-einstellung zu
erhöhen, und gegen den Uhrzeigersinn, um die Geschwindigkeits-einstellung zu senken.
-
1
4
■ Fahren und Bremsen
♦
Drücken Sie den Geschwindigkeitshebel auf der rechten Seite mit dem rechten Daumen
nach vorne, und der Scooter fährt vorwärts.
♦
Drücken Sie den Geschwindigkeitshebel auf der linken Seite mit dem linken Daumen
nach vorne, und der Scooter fährt rückwärts.
♦
Zum Bremsen lassen Sie den Geschwindigkeitshebel los. Er kehrt in die Neutralstellung
zurück und aktiviert automatisch die elektromagnetische Bremse. Dadurch wird der
Scooter sofort angehalten.
♦
Mit dem Geschwindigkeitshebel können Sie die Geschwindigkeit des Scooters bis zur
Höchstgeschwindigkeit regeln, die durch den Geschwindigkeitsregler vorgegeben ist. Je
weiter der Geschwindigkeitshebel bewegt wird, desto schneller fährt der Scooter.
Bremsen
■
Elektromagnetische Bremse: Lassen Sie den Geschwindigkeitshebel los. Die
elektromagnetische Bremse wird dann automatisch aktiviert und der Scooter hält an.
90
Page 91

4. BETRIEB
Warnung
Schalten Sie das Fahrzeug auf einer geneigten Strecke NIEMALS in den Freilaufmodus.
Die elektromagnetischen Bremsen werden nicht betätigt. Das kann zu Verletzungen oder
Sachschäden führen.
■
Achtung
Bringen Sie den Sitz vor der Fahrt wieder in Vorwärtsrichtung.
Sitz
♦
Der Sitz kann gedreht und in 45-Grad-Stufen in seiner Position verriegelt werden.
♦
Drücken Sie den Sitzeinstellhebel nach vorne und schwenken Sie den Sitz.
♦
Lassen Sie den Hebel los und schwenken Sie den Sitz weiter, bis er einrastet.
Batterieanzeige
■
Die Batterieanzeige auf dem Bedienfeld verwendet
♦
einen Farbcode, um die ungefähre Restladung der
Batterie anzuzeigen. Grün bedeutet eine Kapazität
von 40~100%, gelb eine baldiges Leerlaufen
(10~30%), und rot bedeutet, dass ein sofortiges
Wiederaufladen erforderlich ist. Die von der
Batterieanzeige angezeigte Restladung ist
abhängig von der tatsächlichen Fahrzeit und Ihrer
Fahrweise. Wiederholtes Anfahren, Anhalten,
Steigen verbraucht mehr Energie.
Haupttrennschalter (Reset-Schalter)
■
Wenn die Ladung der Batterien des Scooters zur Neige geht oder der
Scooter durch übermäßige Lasten oder steile Steigungen stark belastet
wird, kann der Haupttrennschalter auslösen, um Motor und Elektronik
ROT
GELB
GRÜN
vor Beschädigungen zu schützen.
Der Reset-Schalter des Haupttrennschalters springt heraus, wenn der
Schalter auslöst.
Wenn der Schalter auslöst, wird die gesamte elektrische Anlage Ihres Scooters abgeschaltet.
Lassen Sie die Elektronik des Scooters ein bis zwei Minuten „ruhen“.
Drücken Sie den Reset-Schalter, um den Haupttrennschalter zurückzusetzen.
91
Page 92

4. BETRIEB
Vorschlag
1. Sie sollten die Batterien nach jeder Nutzung des Fahrzeugs aufladen, um eine
maximale Reichweite zu gewährleisten. Die Batterien sollten mindestens einmal
wöchentlich aufgeladen werden, auch wenn der Scooter nicht verwendet wird.
2. Fahren Sie nach dem Aufladen oder Einsetzen einer neuen Batterie 2-3 Minuten, um
sicherzugehen, dass die Batteriekapazität ausreichend ist.
3. Im Winter kann die Batterie langsamer reagieren und die Batteriereichweite kann
geringer sein.
4. Beim Fahren auf einer Steigung kann die Batterieanzeige schwanken. Das ist normal
und kein Grund zur Besorgnis.
5. Auch bei ordnungsgemäßer Nutzung der Batterie verringert sich die Kapazität im
Laufe der Zeit, was zu einer Verringerung der Batteriereichweite im Vergleich zu
neuen Batterien führt. Wenn Sie feststellen, dass die Batteriereichweite nur noch etwa
50 % der Reichweite einer neuen Batterie beträgt, wird es Zeit für einen
Batteriewechsel. Wenden Sie sich für Ersatzbatterien an Ihren Händler. Wenn Sie die
alte Batterie weiter verwenden, wenn sie ausgetauscht werden sollte, kann das zu
einem schnellen Abfallen der Leistung führen.
6. Die Batteriereichweite verringert sich bei häufigen Fahrten auf Abhängen oder
unebenen Oberflächen, da dabei mehr Energie verbraucht wird.
7. Die Batterien haben eine zwölfmonatige Gewährleistung auf Herstellungsfehler. Diese
Gewährleistung gilt nicht für Fehler aufgrund unsachgemäßer Aufladung der Batterie.
Einstellen der Sitzhöhe
■
1. Nehmen Sie den Sitz vom Scooter ab.
2. Entfernen Sie den Sicherungsstift vom unteren
Sitzpfosten.
3. Stellen Sie den oberen Sitzpfosten auf die gewünschte
Sitzhöhe ein.
4. Bewegen Sie den oberen Sitzpfosten so, dass es eine
Öffnung zum Einstecken des Sicherungsstiftes gibt.
5. Setzen Sie den Sicherungsstift ein und bringen Sie den
Sitz wieder an.
92
Page 93

4. BETRIEB
Warnung
Betätigen Sie den Freilaufhebel nie, während Sie auf dem Scooter sitzen oder auf einer
Neigung!
BETÄTIGEN DES FREILAUFHEBELS
♦ Ziehen Sie den Hebel FEST NACH OBEN für den Freilaufmodus
♦ Drücken Sie den Hebel FEST NACH UNTEN für den Fahrmodus
Abb. 4.3 Abb. 4.4
4.3 Einstellen des Freilaufmodus
Hebel
Hebel
Abb. 4.1 Abb. 4.2
♦ Antriebsmodus (Abb. 4.1): Drücken Sie den Hebel ganz nach unten, und der Scooter kann
vom Motor angetrieben werden.
♦ Freilaufmodus (Abb4.2): Ziehen Sie den Hebel nach oben, und der Scooter kann manuell
bewegt werden.
■
Einstellen der Lenksäule
Die Lenksäule kann abhängig von den Anforderungen des Fahrers in viele verschiedene
Positionen eingestellt werden.
1. Lösen Sie den Knopf, um die Lenksäule in die gewünschte Stellung zu bringen. (Abb. 4.3)
2. Wenn Sie die gewünschte Position erreicht haben, ziehen Sie den Knopf an, um die
Lenksäule zu sichern. (Abb. 4.4)
Einstellknop
93
Page 94

4. BETRIEB
Warnung
♦ Halten Sie die Lenksäule fest, bevor Sie den Einstellknopf lösen.
♦ Bevor Sie den Scooter anheben oder fahren, vergewissern Sie sich, dass der
Einstellknopf gesichert ist.
♦ Versuchen Sie nie, die Lenksäule zu verstellen, während sich der Scooter bewegt.
10
8
9
94
Page 95

5. FA H R E N AU F DER S T R A SSE
Starten und Fahren
Achtung
1.
Drücken Sie die Geschwindigkeitshebel auf der linken und rechten Seite nicht
gleichzeitig. Sie können den Scooter dann möglicherweise nicht mehr kontrollieren.
2. Schalten Sie den Hauptschalter während der Fahrt nicht aus, da das zu einer
Notbremsung und zu Unfall- und Verletzungsgefahr führt.
3. Fahren Sie im Haus nicht mit Höchstgeschwindigkeit.
4. Verstellen Sie den Geschwindigkeitsregler nicht während der Fahrt; eine plötzliche
Geschwindigkeitsänderung kann Sie und andere gefährden und Ihren Scooter
beschädigen.
5. Platzieren Sie keine magnetischen Geräte in Nähe des Betriebshebels, da dies den
sicheren Betrieb Ihres Scooters beeinträchtigen könnte. Der Controller des Scooters
befindet sich unter der Fußplatte.
6. Seien Sie vorsichtig, wenn Sie in dichtem Verkehr oder belebten Gegenden fahren.
7. Achten Sie beim Rückwärtsfahren auf Menschen oder Gegenstände hinter Ihnen.
Achtung
1.Der Bremsweg ist abhängig von der Geschwindigkeit beim Vorwärts-/
Rückwärtsfahren. Fangen Sie daher so früh wie möglich mit dem Bremsen an.
2.Wenn Sie Ihren Scooter parken, achten Sie darauf, auf einer flachen Oberfläche zu
parken und schalten Sie den Strom aus, bevor Sie absteigen.
Rückwärtsfahren. Fangen Sie daher so früh wie möglich mit dem Bremsen an.
parken und schalten Sie den Strom aus, bevor Sie absteigen.
■
1. Vergewissern Sie sich, dass der Sitz richtig installiert ist.
2. Vergewissern Sie sich, dass die Lenksäule ordnungsgemäß gesichert ist.
3. Klappen Sie die Armlehnen herunter, sodass Sie Ihre Arme darauf legen können.
4. Schalten Sie den Hauptschalter ein.
5. Prüfen Sie die Batterieanzeige, um sicherzugehen, dass die Ladung für Ihre Fahrt ausreicht.
Bei Zweifeln bezüglich der verbleibenden Ladung laden Sie die Batterien vor der Abfahrt auf.
6. Setzen Sie den Geschwindigkeitsregler auf ein Stellung, mit der Sie sich sicher fühlen.
7. Prüfen Sie, ob der Vorwärts-/Rückwärtsfahrhebel ordnungsgemäß funktioniert.
8. Vergewissern Sie sich, dass die elektromechanische Bremse ordnungsgemäß funktioniert.
9. Vergewissern Sie sich vor der Fahrt, dass es in der Umgebung sicher ist.
♦
Anhalten
♦
Lassen Sie den Geschwindigkeitshebel vollständig los. Das Fahrzeug bremst ab und hält an.
♦
Schalten Sie den Strom ab. Ziehen Sie dann den Schlüssel ab.
95
Page 96

6 . LA D E N U ND P F L E G EN D E R BAT T E R IEN
6.1 LADEN DER BATTERIE
Achtung
♦
Wenn Sie den Batteriepack wieder in das Batteriefach einsetzen, achten Sie auf Ihre
Finger bzw. Hände.
■
Methode 1: Laden der eingelegten Batterie (siehe Foto auf der nächsten Seite)
Befolgen Sie das folgende Verfahren Schritt für Schritt:
•
Schalten Sie den Hauptschalter aus.
•
Schließen Sie das Netzkabel des Ladegeräts an.
•
Öffnen Sie die Abdeckung der Ladebuchse an der hinteren
Verkleidung. Schließen Sie dann den runden Stecker des
Ladegeräts an die Ladebuchse an.
•
Schalten Sie das Ladegerät ein.
•
Die rote und orange LED des Ladegeräts leuchten auf, wenn
der Ladevorgang begonnen wird. Die Ladedauer beträgt etwa 6
Stunden. Für eine optimale Leistung wird eine Aufladedauer
von 10 Stunden empfohlen.
•
Beide LEDs des Ladegeräts leuchten während des
Ladeprozesses.
•
Die orange LED wird grün, wenn der Ladeprozess
abgeschlossen ist.
•
Schalten Sie das Ladegerät aus, ziehen Sie das Netzkabel und
den runden Stecker von der Ladebuchse am Scooter ab.
Ladegerätbuchse
Methode 2: Laden der entnommenen Batterie (siehe Foto auf der nächsten Seite)
■
• Schalten Sie den Hauptschalter aus.
• Entnehmen Sie den Batteriepack, indem Sie das Batteriefach öffnen und den Batteriepack
am Griff herausheben.
• Schließen Sie das Netzkabel des Ladegeräts an.
Power Pack
• Schließen Sie den runden Stecker des Ladegeräts an die
Ladebuchse des Batteriepacks an.
• Schalten Sie das Ladegerät ein.
• Die rote und orange LED des Ladegeräts leuchten auf, wenn
der Ladevorgang begonnen wird. Die Ladedauer beträgt etwa
6 Stunden. Für eine optimale Leistung wird eine
Aufladedauer von 10 Stunden empfohlen.
Ladegerät
• Beide LEDs des Ladegeräts leuchten während des
Ladeprozesses. Die orange LED wird grün, wenn der Ladeprozess abgeschlossen ist.
• Schalten Sie das Ladegerät aus, ziehen Sie das Netzkabel und den runden Stecker von der
Ladebuchse am Batteriepack ab.
96
Page 97

6 . LA D E N U ND P F L E G EN D E R BAT T E R IEN
Ladestunden
■
Die Ladedauer beträgt etwa 6 Stunden. Für eine optimale Leistung wird eine Aufladedauer
von 10 Stunden empfohlen. Wir empfehlen allerdings keine Dauerladung über mehr als 24
Stunden.
Batterien (im Batteriepack)
■
1. Der Antares wird von zwei versiegelten tief entladenden Bleisäurebatterien angetrieben.
2. Bei den mit dem Scooter mitgelieferten Batterien handelt es sich um 12V-12Ah Batterien.
3. Größe 5,94 “ × 3,89 “ x 3,74 “ (Breite x Höhe x Tiefe) (151 mm × 99 mm × 95 mm)
Warnung
•
Halten Sie beim Laden Abstand von entflammbaren Objekten, da es zu Feuer oder
Explosion der Batterie kommen kann.
•
Rauchen Sie nicht während des Ladevorgangs, da die Batterie Wasserstoff freisetzen
kann. Laden Sie die Batterie immer in einem gut belüfteten Raum.
•
Stecker und Kabel beim Laden nie mit nassen Händen verbinden oder trennen. Kabel
oder Stecker nicht verbinden oder trennen, wenn sie nass sind; das kann zu
elektrischen Schlägen führen.
Achtung: Bitte beachten Sie die folgenden Richtlinien, um Unfälle beim Laden zu
vermeiden.
•
Verwenden Sie nur das Ladegerät von Antares und laden Sie die Batterie jedes Mal
auf volle Kapazität auf. Die Verwendung eines Ladegeräts mit falscher Spezifikation
kann Batterie und Scooter beschädigen.
•
Laden Sie die Batterie in einem gut belüfteten Raum, der vor direkter
Sonneneinstrahlung geschützt ist. Laden Sie nicht in feuchten Umgebungen, im Regen
oder Morgentau.
•
Laden Sie nicht bei Temperaturen unter -10 °C oder über +50 °C, da das Ladegerät
möglicherweise nicht ordnungsgemäß funktioniert und die Batterien beschädigen
kann.
•
6.2 BATTERIE
♦
Setzen Sie die Batterie beim Aufladen und bei Lagerung des Fahrzeugs keinen Temperaturen
unter 10 °C oder über 50 °C aus. Außerhalb des genannten Temperaturbereichs kann die
Batterie gefrieren oder überhitzen. Das beschädigt die Batterien und verkürzt ihre
Lebensdauer.
♦
Diese Batterien sind wartungsfrei und müssen nicht mit Wasser aufgefüllt werden.
Pin lock
Sie müssen die Batterien regelmäßig aufladen. Auch wenn der Scooter nicht verwendet wird,
sollten Sie die Batterien mindestens einmal wöchentlich aufladen.
97
Page 98

6 . LA D E N U ND P F L E G EN D E R BAT T E R IEN
♦
Vorschlag: Maximierung der Effizienz und Lebensdauer der Batterie
- Laden Sie die neue Batterie vor der ersten Nutzung vollständig auf.
-Achten Sie darauf, die Batterie jedes Mal vollständig aufzuladen. Die
Batterielebensdauer wird deutlich reduziert, wenn die Batterie wiederholt verwendet
wird, ohne vollständig geladen zu sein.
- Führen Sie den Ladevorgang immer aus, bis die orange LED grün wird. Brechen Sie
den Ladevorgang NIEMALS vorzeitig ab.
- Halten Sie die Batterien immer möglichst vollständig geladen.
- Wenn Sie den Scooter längere Zeit nicht nutzen, sollte er mindestens jede Woche
aufgeladen werden, um die Batterie betriebsfähig zu halten.
-
Die Umgebungstemperatur wirkt sich auf die Ladezeit aus. Im Winter ist die Ladezeit
länger.
- Lassen Sie die Buchse des Ladegeräts nach dem Aufladen nicht an den Scooter
angeschlossen, da dies einen Stromabfluss am Scooter verursacht und seine Reichweite
zeitweilig reduziert.
Für die Batterien gilt eine sechsmonatige Herstellergewährleistung. Die Gewährleistung gilt
nur für Probleme aufgrund von Herstellungsfehlern und nicht Fehler aufgrund der
Nichteinhaltung der oben genannten Anweisungen zum Aufladen der Batterie.
Reinigen der Batterie
■
Wenn die Batterien durch Wasser, Batteriesäure, Staub oder andere Substanzen verunreinigt
sind, werden sie schnell entladen. Die mit dem Scooter mitgelieferten Batterien sind
versiegelt; daher sind sie wartungsfrei und es besteht kein Risiko von Batterieleckage.
Gehen Sie zur Reinigung wie folgt vor:
1. Schalten Sie den Hauptschalter des Scooters aus.
2. Befolgen Sie das Verfahren im nächsten Abschnitt „Austausch der Batterien“.
3. Wischen Sie den verschmutzten Bereich mit einem sauberen Tuch ab.
4. Nehmen Sie die Batterie heraus.
5. Reinigen Sie die Batterie mit einem sauberen Tuch. Wenn die Klemme mit einem
weißen Pulver bedeckt ist, wischen Sie sie mit warmem Wasser sauber.
•
AUSTAUSCH DER BATTERIEN
Austausch der Batterien
■
Gehen Sie zum Austausch der Batterien wie folgt vor:
1. Entfernen Sie den Batteriepack aus dem Scooter:
2. Öffnen Sie den Batteriepack und trennen Sie die Kabel von den vier Batterieklemmen.
3. Entfernen Sie die Batterien aus dem Batteriepack.
4. Setzen Sie neue Batterien in den Pack ein.
5. Schließen Sie das rote Kabel an die positive (+) Klemme der einen und das schwarze Kabel
an die negative (-) Klemme der anderen Batterie an.
6. Schließen Sie das gesicherte Kabel zwischen den beiden Batterien und schließen Sie den
Batteriepack.
98
Page 99

6 . LA D E N U ND P F L E G EN D E R BAT T E R IEN
Warnung
Die Verdrahtung und das Ladegerät werden bei der Montage im Werk richtig in den
Batteriepack eingesetzt. Versuchen Sie nicht, die Verkabelung selbst neu zu verlegen. Ein
falsches Layout der Verkabelung kann dazu führen, dass die Drähte durch den
Batteriekasten eingeklemmt werden, was zu einem Ausfall des elektrischen Systems
führen kann.
Achten Sie darauf, dass die Batteriekabel an die richtige Batterieklemme angeschlossen
sind.
Vorschläge
Fragen Sie bei Bedarf Ihren Händler um Rat bezüglich Wartung und Austausch der
Batterie.
Vorschläge
Achten Sie darauf, dass die Klemmen richtig angebracht sind, und bringen Sie die
Abdeckung wieder an.
Verwenden Sie die Batterie nicht zum Aufladen von Telekommunikations- oder
anderen Geräten.
Die Batterieleistung variiert in Abhängigkeit von den Außenbedingungen; die
Reichweite ist im Winter geringer. Wenn das Fahrzeug lange nicht verwendet wird,
laden Sie die Batterie mindestens einmal wöchentlich auf.
Tauschen Sie beide Batterien gemeinsam aus.
99
Page 100

7. I N SPE K T I O N UND W A RTUN G
7.1 INSPEKTION
JAHR
123
4
JAHR
123
4
Wartungsdaten
Wartungsdaten
Controller
Polsterung
Ein/Aus-Schalter
Sitz
Steuerungshebel
Rückenlehne
Bremsen
Armlehnen
Aufladepunkt
Elektrik
Batterien
Verbindungszustand
Ladung
Kabelbaum
Anschlüsse
Probefahrt
Entladetest
Vorwärts
Reifen und Räder
Rückwärts
Verschleiß
Notbremsung
Druck
Linkskurve
Lager
Rechtskurve
Radmuttern
Gefälletest
Motoren
Über Hindernisse
Verkabelung
Liste reparierter Teile
Lärm
Anschlüsse
Bremse
Bürsten
Chassis
Zustand
Steuerung
•
Reinigen Sie den Scooter mit einem feuchten Tuch und stauben Sie ihn etwa einmal
wöchentlich ab, um das gute Aussehen des Scooters zu erhalten.
•
Passen Sie die Höhe der Lenksäule an und drehen Sie den Sitz zur Seite und zurück in die
ursprüngliche Position einmal wöchentlich, um sicherzugehen, dass die Teile bei Bedarf
einfach und problemlos eingestellt und entfernt werden können.
•
Prüfen Sie Reifen und Polster regelmäßig auf Anzeichen von Verschleiß.
•
Für optimale Leistung und Lebensdauer Ihres Scooters wird empfohlen, den Scooter
mindestens einmal jährlich warten zu lassen.
7.2 PROTOKOLL ÜBER REGELMÄSSIGE INSPEKTION
Um sicherzugehen, dass Ihr Scooter ordnungsgemäß gewartet wird, bringen Sie ihn
regelmäßig zur Wartung zu Ihrem Händler. Nach der Anfangsinspektion nach einem Monat
sollte das in Abständen von sechs Monaten erfolgen. Ihr Händler stellt Ihnen dafür
möglicherweise eine Gebühr in Rechnung. Das Prüfprotokoll ist auf der nächsten Seite
gezeigt.
100
 Loading...