

Page 1
VERMEIREN
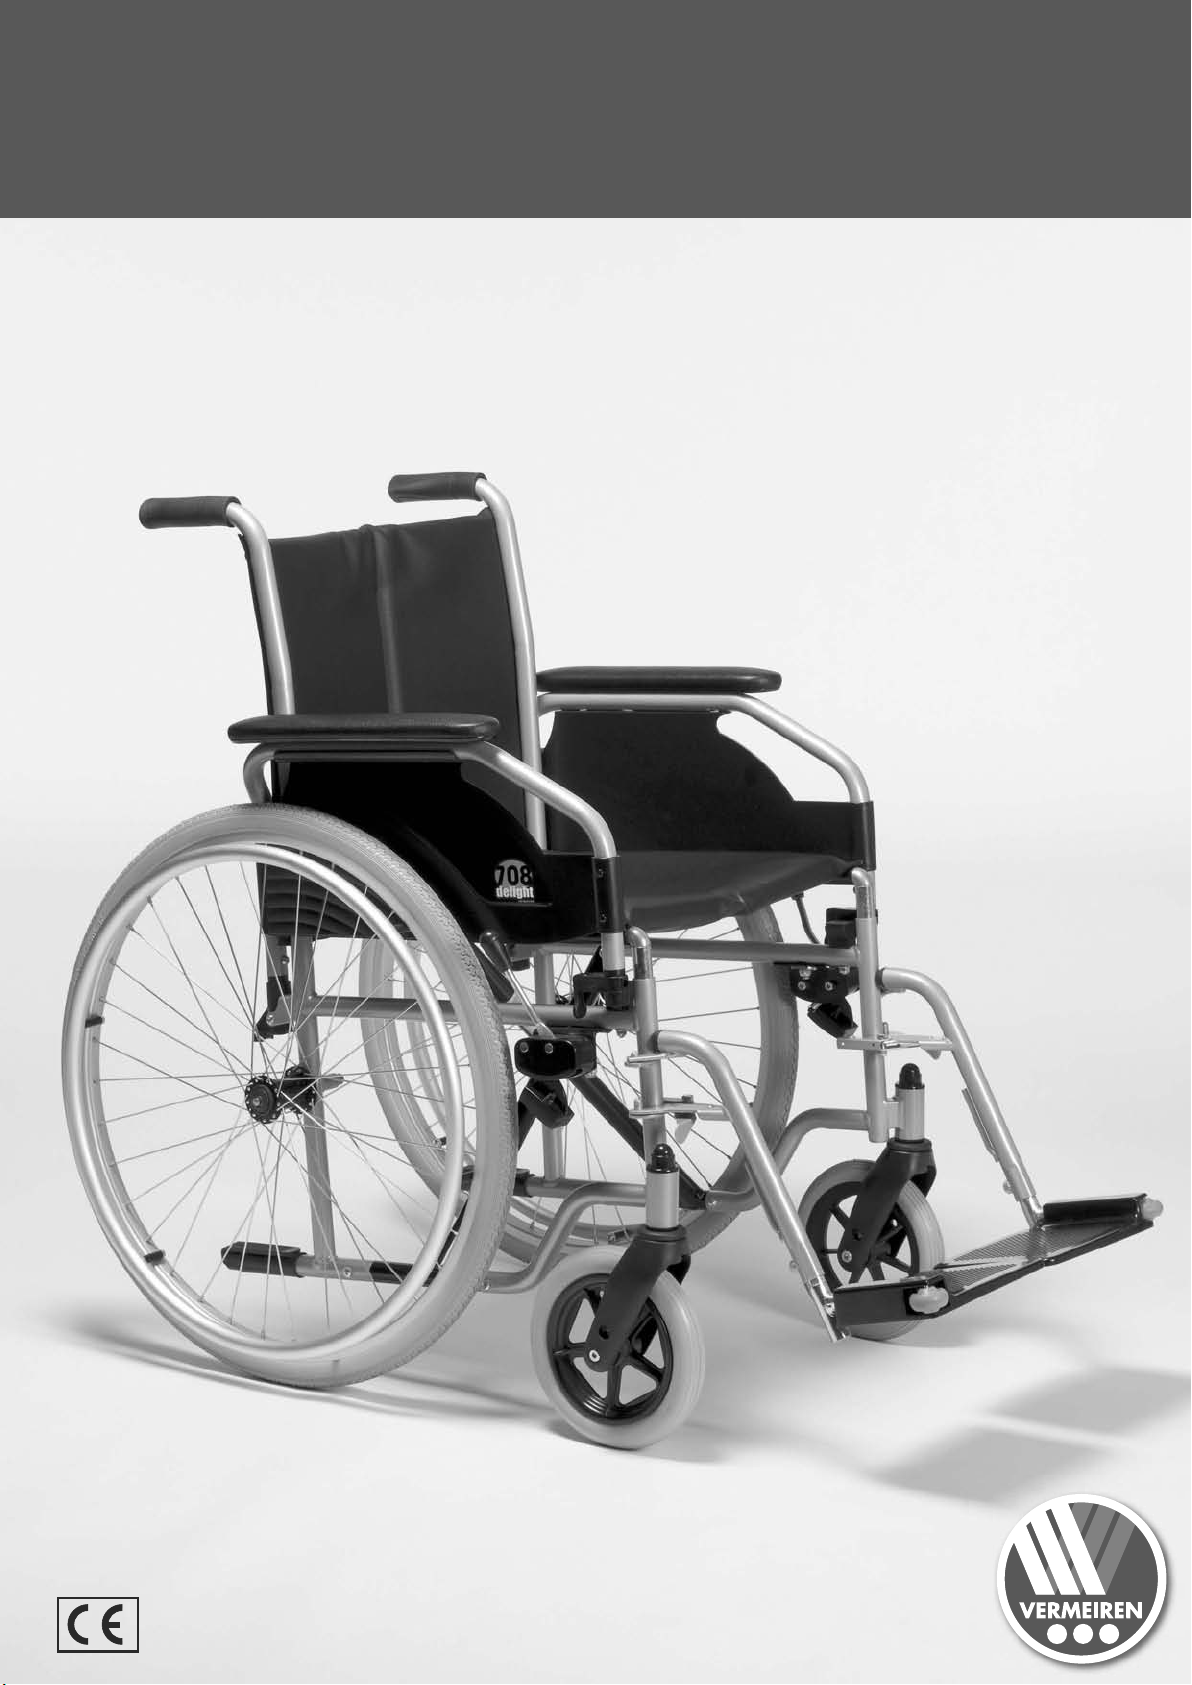
708D
I N S T R U C T I O N M A N U A L
M O D E D ’ E M P L O I
G E B R U I K S A A N W I J Z I N G
G E B R A U C H S A N W E I S U N G
I S T R U Z I O N I P E R L ' U S O
M A N U A L D E I N S T R U C C I O N E S
Page 2

Instructions to the specialist dealer
This instruction manual is part and parcel of the product and must accompany every product sold.
Version: B, May 2011
All rights reserved, including translation.
No part of this manual may be reproduced in any form what so ever (print, photocopy, microfilm or any other process) without
written permission of the publisher, or processed, duplicated or distributed by using electronic systems.
© N.V. Vermeiren N.V. 2011
Instructions pour les distributeurs
Ce manuel d'instructions fait partie du produit et doit accompagner chaque produit vendu.
Version : B, Mai 2011
Tous droits réservés, y compris la traduction.
Aucune partie de ce manuel ne peut être reproduite, sous quelque forme que ce soit (imprimée, photocopie, microfilm ou tout
autre procédé) sans l'autorisation écrite du publicateur, ni traitée, dupliquée ou distribuée à l'aide de systèmes électroniques.
© N.V. Vermeiren N.V. 2011
Instructies voor de vakhandelaar
Deze handleiding is deel van het product en dient bij iedere product te worden geleverd.
Versie: B, mei 2011
Alle rechten, inclusief vertaling, voorbehouden.
Niets uit deze handleiding mag geheel of gedeeltelijk in enige vorm (druk, fotokopie, microfilm of ieder ander procedé) zonder
de schriftelijke toelating van de uitgever worden gereproduceerd of met behulp van elektronische systemen worden verwerkt,
gekopieerd of verspreid.
© N.V. Vermeiren N.V. 2011
Hinweise für den Fachhändler
Diese Gebrauchsanweisung ist Bestandteil des Produkts und ist bei jeder Produkts auszuhändigen.
Version: B, Mai 2011
Alle Rechte, auch an der Übersetzung, vorbehalten.
Kein Teil der Gebrauchsanweisung darf in irgendeiner Form (Druck, Fotokopie, Mikrofilm oder einem anderen Verfahren) ohne
schriftliche Genehmigung des Herausgebers reproduziert oder unter Verwendung elektronischer Systeme verarbeitet,
vervielfältigt oder verbreitet werden.
© N.V. Vermeiren N.V. 2011
Istruzioni per il rivenditore
Il presente Manuale di istruzioni è parte integrante del prodotto e deve essere fornito assieme alla prodotto.
Versione: B, Maggio 2011
Tutti i diritti riservati (anche sulla traduzione).
Il presente manuale non può essere riprodotto, neppure parzialmente, con alcun mezzo (stampa, fotocopia, microfilm o altro
procedimento) senza l’autorizzazione scritta della casa produttrice, né elaborato, duplicato o distribuito con l’ausilio di sistemi
elettronici.
© N.V. Vermeiren N.V. 2011
El presente manual de instrucciones es parte integrante del producto y se debe adjuntar a todas las producto que se vendan.
Versión: B, mayo 2011
Todos los derechos reservados, incluidos los de la traducción.
Se prohíbe la reproducción total o parcial del presente manual de cualquier forma (impresión, fotocopia, microfilm o cualquier
otro procedimiento), así como la edición, copia o distribución empleando sistemas electrónicos, sin el permiso escrito del
editor.
© N.V. Vermeiren N.V. 2011
Instrucciones destinadas a los distribuidores especializados
Page 3

708D
2011-05
Contents
Preface ...................................................................................................................................... 2
1 Productdescription...................................................................................................... 3
1.1 Intended Use ................................................................................................................ 3
1.2 Technical specifications .............................................................................................. 4
1.3 Components ................................................................................................................. 5
1.4 Accessories .................................................................................................................. 5
1.5 Location identification plate........................................................................................ 5
1.6 Explanation of symbols ............................................................................................... 6
1.7 Safety rules .................................................................................................................. 6
2 Use ................................................................................................................................ 6
2.1 Carrying the wheelchair .............................................................................................. 7
2.2 Mounting the rear wheels ............................................................................................ 7
2.3 Unfolding the wheelchair ............................................................................................ 7
2.4 Mounting or removing of the footrests ....................................................................... 7
2.5 Operating the brakes.................................................................................................... 8
2.6 Mounting or removing of arm supports ...................................................................... 8
2.7 Transfer in and out the wheelchair .............................................................................. 9
2.8 Correct position in the wheelchair .............................................................................. 9
2.9 Riding the wheelchair.................................................................................................. 9
2.10 Moving on slopes ...................................................................................................... 10
2.11 Negotiating steps or kerbs ......................................................................................... 10
2.12 Fold up the wheelchair .............................................................................................. 11
2.13 Taking off the wheels ................................................................................................ 12
2.14 Transport in the car .................................................................................................... 12
2.15 Use of the wheelchair as seat in a motor vehicle ...................................................... 12
3 Installation and adjustment ..................................................................................... 14
3.1 Tools .......................................................................................................................... 14
3.2 Manner of delivery .................................................................................................... 14
3.3 Anatomical seat (OPTIONAL) ................................................................................. 15
3.4 Anatomical back (OPTIONAL) ................................................................................ 15
3.5 Adjust the brakes ....................................................................................................... 15
3.6 Adjusting of the footrests .......................................................................................... 16
4 Maintenance .............................................................................................................. 16
4.1 Regular Maintenance................................................................................................. 16
4.2 Shipping and storage ................................................................................................. 17
4.3 Care ........................................................................................................................... 17
4.4 Inspection .................................................................................................................. 18
4.5 Disinfection ............................................................................................................... 18
5 Guarantee .................................................................................................................. 20
6 Disposal ...................................................................................................................... 20
7 Declaration of conformity ........................................................................................ 20
8 Maintenance plan...................................................................................................... 21
9 Disinfection book ...................................................................................................... 21
Page 1
Page 4

708D
2011-05
Preface
First of all we want to thank you for putting your trust in us by selecting one of our
wheelchairs.
The Vermeiren wheelchairs are the result of many years of research and experience. During
the development, special attention was given to the ease of use and the serviceability of the
wheelchair.
The expected lifetime of your wheelchair is strongly influenced by the care and maintenance
of the wheelchair.
This manual will help you get acquainted with the operation of your wheelchair.
Following the user instructions and the maintenance instructions are an essential part of the
warranty.
This manual reflects the latest product developments. Vermeiren has the right to introduce
changes without the obligation to adapt or replace previously delivered models.
For any further questions, please consult your specialist dealer.
Page 2
Page 5

708D
2011-05
1 Productdescription
1.1 Intended Use
The wheelchair is intended for people with walking difficulties or no walking abilities.
The wheelchair is designed to transport 1 person.
The wheelchair is suited for indoor and outdoor use.
The user can propel the wheelchair by himself or have the wheelchair pushed by an
attendant.
The different types of fittings and accessories, and the modular construction allow full use by
persons disabled by:
paralysis
loss of limbs (leg amputation)
limb defects or deformations
stiff or damaged joints
heart insuffiencies and poor blood circulation
balance disturbances
cachexia (decrease in muscle)
and also for aged persons.
When providing for individual requirements:
body size and weight (max. 120kg (264.6 lb.))
physical and psychological condition
residential circumstances
environment
should be taken into consideration.
Your wheelchair should only be used on surfaces where all four wheels are touching the
ground and where there is sufficient contact to propel the wheels equally.
You should practice for use on uneven surfaces (cobblestones, etc.), slopes, curves and to
get past obstacles (kerbs, etc.).
The wheelchair should not be used as a ladder, nor is it a transport for heavy or hot objects.
When used on mats, carpeted floors or loose floor coverings, the floor covering can get
damaged.
Use only Vermeiren approved accessories.
The manufacturer is not liable for damage caused by the lack of or improper service or as a
result of not following instructions from this manual.
Compliance with the user and maintenance instructions are an essential part of the
guarantee conditions.
Page 3
Page 6

708D
Make
Vermeiren
Address
Vermeirenplein 1/15, B-2920 Kalmthout
Type
Manual wheelchair
Model
708D
Maximum occupant mass
120 kg (264.6 lb.)
Description
Dimensions
Effective seat width
390 mm
(15.35 in.)
420 mm
(16.54 in.)
440 mm
(17.32 in.)
460 mm
(18.11 in.)
480 mm
(18.90 in.)
500 mm
(19.69 in.)
Overall width (depends on the seat width)
560 mm
(22.04 in.)
590 mm
(23.23 in.)
610 mm
(24.02 in.)
630 mm
(24.80 in.)
650 mm
(25.59 in.)
670 mm
(26.38 in.)
Description
Dimensions Min.
Dimensions Max.
Overall length with legrest
1060 mm (40.94 in.)
Folded length without legrest
810 mm (31.89 in.)
Folded width
280 mm (11.02 in.)
Folded height
920 mm (36.22 in.)
Total mass
± 18 kg (39.68 lb.)
Mass of heaviest part
10,10 kg (22.05 lb.)
Masses of parts that can be dismantled or
removed
Foot supports: 1,90 kg (4.19 lb.); Arm supports: 1,85 kg (2.20 lb.);
Rear wheels: 4,15 kg (8.82 lb.)
Static stability downhill
15°
Static stability uphill
15°
Static stability sideways
15°
Obstacle climbing
60 mm (2.36 in.)
Seat plane angle
5°
Effective seat depth
430 mm (16.93 in.)
Seat surface height at front edge
500 mm (19.69 in.)
Backrest angle
5°
Backrest height
420 mm (16.54 in.)
Distance between footrest and seat
420 mm (16.54 in.)
500 mm (19.69 in.)
Angle between seat and footrest
9°
Distance between armrest and seat
220 mm (8.66 in.)
Front location of armrest structure
300 mm (11.81 in.)
Handrim diameter
535 mm (21.06 in.)
Horizontal location of axle (deflection)
-7 mm (-0.28 in.)
Minimum turning radius
1619 mm (63.74 in.)
Diameter Krypton PU Rear wheels
24"
Tyre pressure, rear (driving) wheels
Max. 3.5 bar
Diameter Krypton PU steering wheels
200 mm (8 in.)
Tyre pressure, steering wheels
Max. 2.5 bar
Storage and use temperature
+ 5 °C (+41 °F)
+ 41 °C (+106 °F)
Storage and use humidity
30%
70%
We reserve the right to introduce technical changes. Measurement tolerance ± 15 mm / 1,5 kg / ° (0.59 in. / 3,3 lb. / 1,5°)
2011-05
1.2 Technical specifications
Technical terms below are valid for the wheelchair in standard settings.
If other footrest / arm support or other accessories are used, the tabulated values will change.
Table 1: Technical specifications 708D
Page 4
Page 7
708D
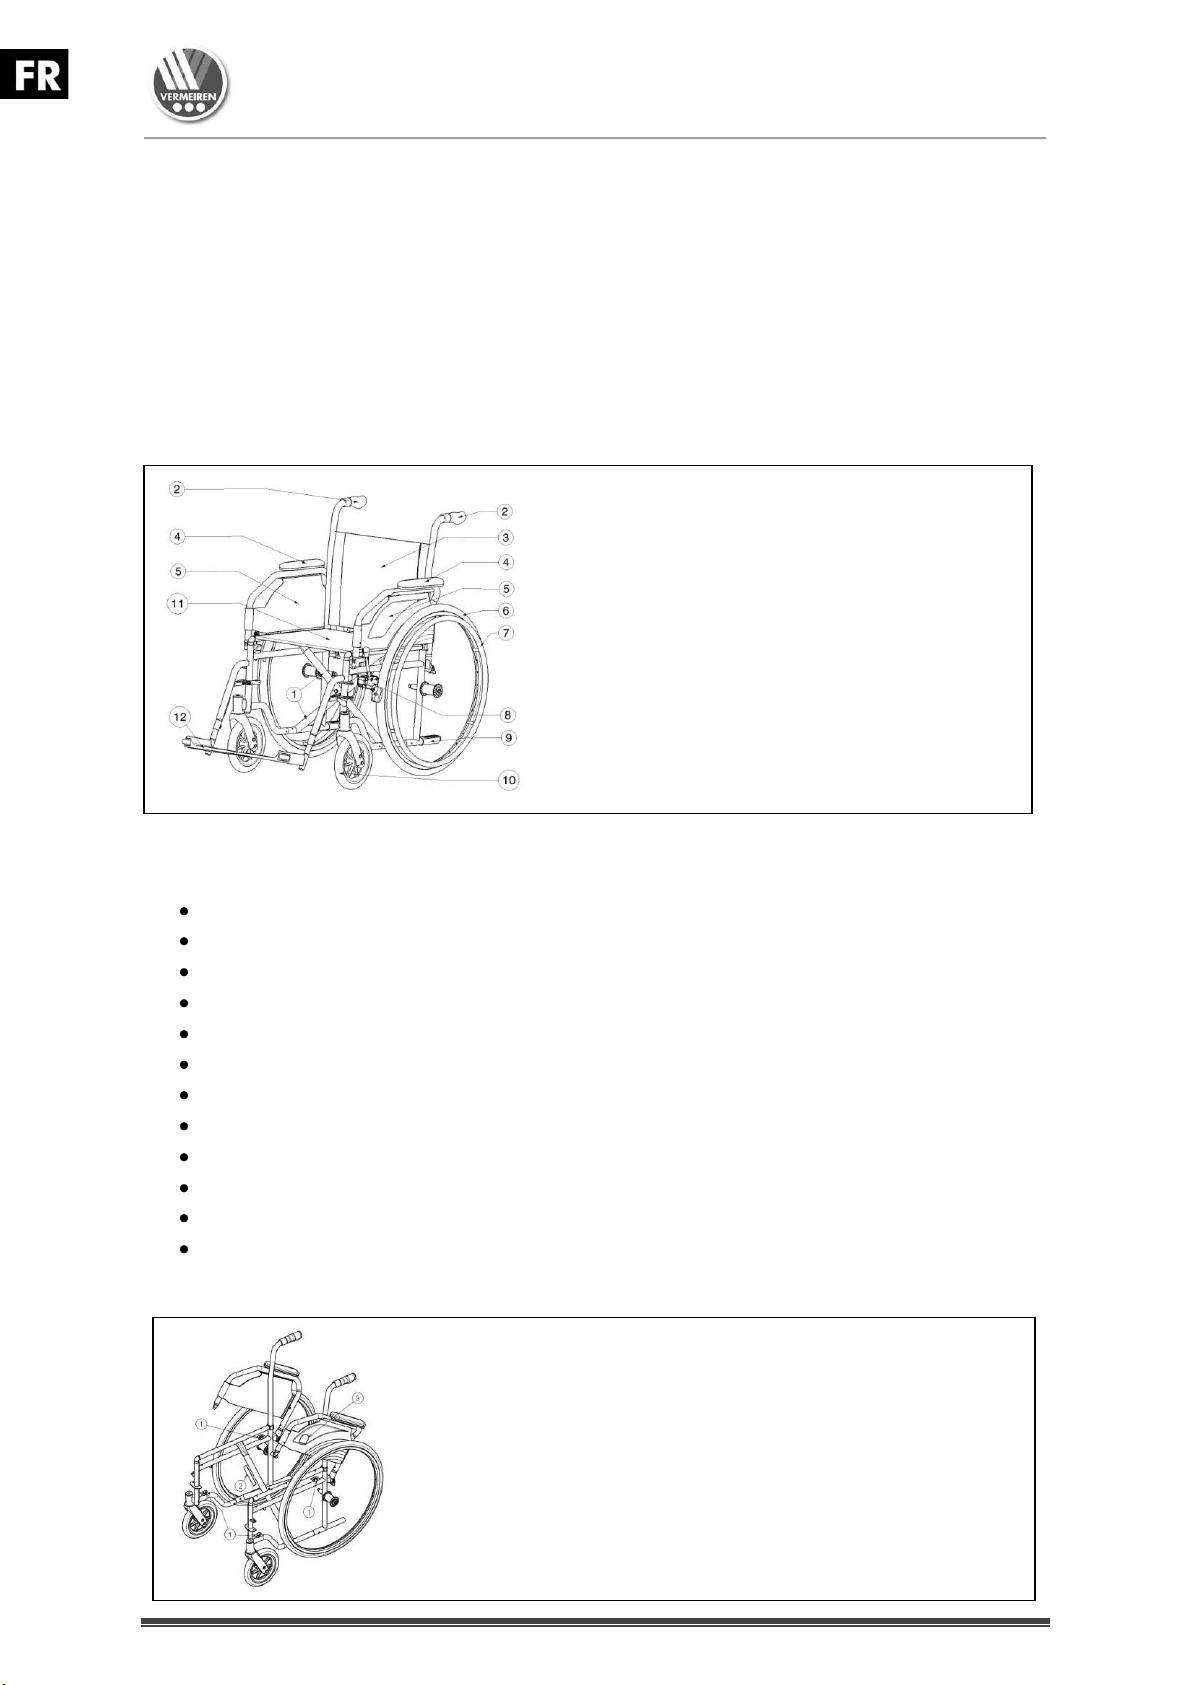
1 = Taxi hooks
2 = Identification plate
3 = Name 708D
1 = Cross
2 = Handles
3 = Back
4 = Arm pads
5 = Arm supports
6 = Driving wheels (rear wheels)
7 = Hand rims
8 = Brakes
9 = Tip cap
10 = Steering wheels (Front wheels)
11 = Seat
12 = Footrests
2011-05
The wheelchair complies to the requirements set up in:
ISO 7176-8: Requirements and test methods for static, impact and fatigue strengths.
EN 1021-1: Assessment of the ignitability of upholstered furniture - Ignition source
smouldering cigarette
EN 1021-2: Assessment of the ignitability of upholstered furniture - Ignition source match
flame equivalent
ISO 7176-19: Wheeled mobility devices for use as seats in motor vehicles.
1.3 Components
1.4 Accessories
The following accessories are available for the 708D:
Armrests (B02, B03, B05, B66)
Leg supports (B06, B07, B08, BZ7, BZ8, BZ9, BZ10, BK7, BL7, BA6, BK6)
Table (B12)
Crutch holder (B31)
Back (L14, L24, L44)
Anterior pelvic belt (B58) for mounting over the backrest tube
Anti-tipping device (B78) for mounting on the bottom back frame
Drum brakes for the attendant (B74) for mounting on the push handles
Transit wheelchair (T30)
Moving the axle back (AMP)
Quick release (B80)
Lowering seat height to 470 mm (S)
1.5 Location identification plate
Page 5
Page 8

708D
2011-05
1.6 Explanation of symbols
Maximum mass
Indoor and outdoor use
Down slope
Up slope
CE conformity
1.7 Safety rules
L To prevent injury and/or damage to your wheelchair, make sure that no objects
and/or body parts are caught in the spokes of the driving wheels.
L The parking brakes should be applied before getting into and out of the wheelchair.
L When getting into and out of the wheelchair, do not stand on the footplates. These
should be folded up beforehand, or the leg supports should be swung completely
outwards out of the way.
L Investigate the effects of shifting the centre of gravity on the behavior of the wheelchair,
for example on up or down gradients, on laterally sloping ground, or when overcoming
obstacles. Obtain support from an attendant.
L If you want to pick up something (lying in front of, on the side, or to the rear of the
wheelchair), you should not lean too far out to avoid tipping over.
L When moving through doors, arches, etc. ensure that there is enough room at the sides
so that you do not get your hands or arms caught or crushed and that there is no
damage to the wheelchair.
L Only use your wheelchair according to regulations. For example, avoid uncontrolled
rolling against obstacles (steps, kerbs, doorframes, etc) or dropping down from ledges.
The manufacturer cannot assume liability for damage caused by overloading, collision
or other improper use.
L Stairs may only be negotiated when aided by another person. If furnishings like drive-on,
ramps or lifts are available, use them.
L When moving on the public highway, you are subject to the rules of the road.
L When driving your wheelchair, you should not be under the influence of alcohol or
medicine as in the case of driving other vehicles. This also applies to indoor driving.
L When travelling outdoors, adapt your driving to weather and traffic conditions.
L When transporting the wheelchair, never pick it up by grasping movable parts (armrests,
leg supports, etc.)
L To be better visible when driving in the dark, wear the brightest possible clothing or
clothes with reflectors, and check that the reflectors mounted on the sides and rear of
the wheelchair are clearly visible.
L Be careful when using possible causes of fire such as cigarettes since they may set the
seat and back covers alight.
L Never exceed the maximum load of 120 kg (264.6 lb.).
2 Use
This chapter describes the everyday use. These instructions are for the user and the
specialist dealer.
The wheelchair is delivered fully assembled by your specialist dealer. The instructions
intended for the specialist dealer on how to set up the wheelchair are given in § 3.
Page 6
Page 9

708D
2011-05
2.1 Carrying the wheelchair
The best way to carry the wheelchair is to make use of the wheels and roll the wheelchair.
If this is not possible (e.g. when the rear wheels are taken off for transportation in a car),
firmly grasp the frame on the front and the grips. Do not use the foot or arm rests or the
wheels to grasp the wheelchair.
2.2 Mounting the rear wheels
1. Take the rear wheel and push on button .
2. Keep the button pushed in and mount the rear
wheels axle till it stops.
3. Release the button.
4. Check that the wheel is secured.
2.3 Unfolding the wheelchair
L CAUTION: Risk of clamping – Keep fingers away from moving parts of the
wheelchair.
1. Position yourself behind the wheelchair.
2. Use the hand-grips to open the wheelchair as much as possible.
3. Position yourself at the front of the wheelchair.
4. Push both seating tubes down till they are fixed in their position.
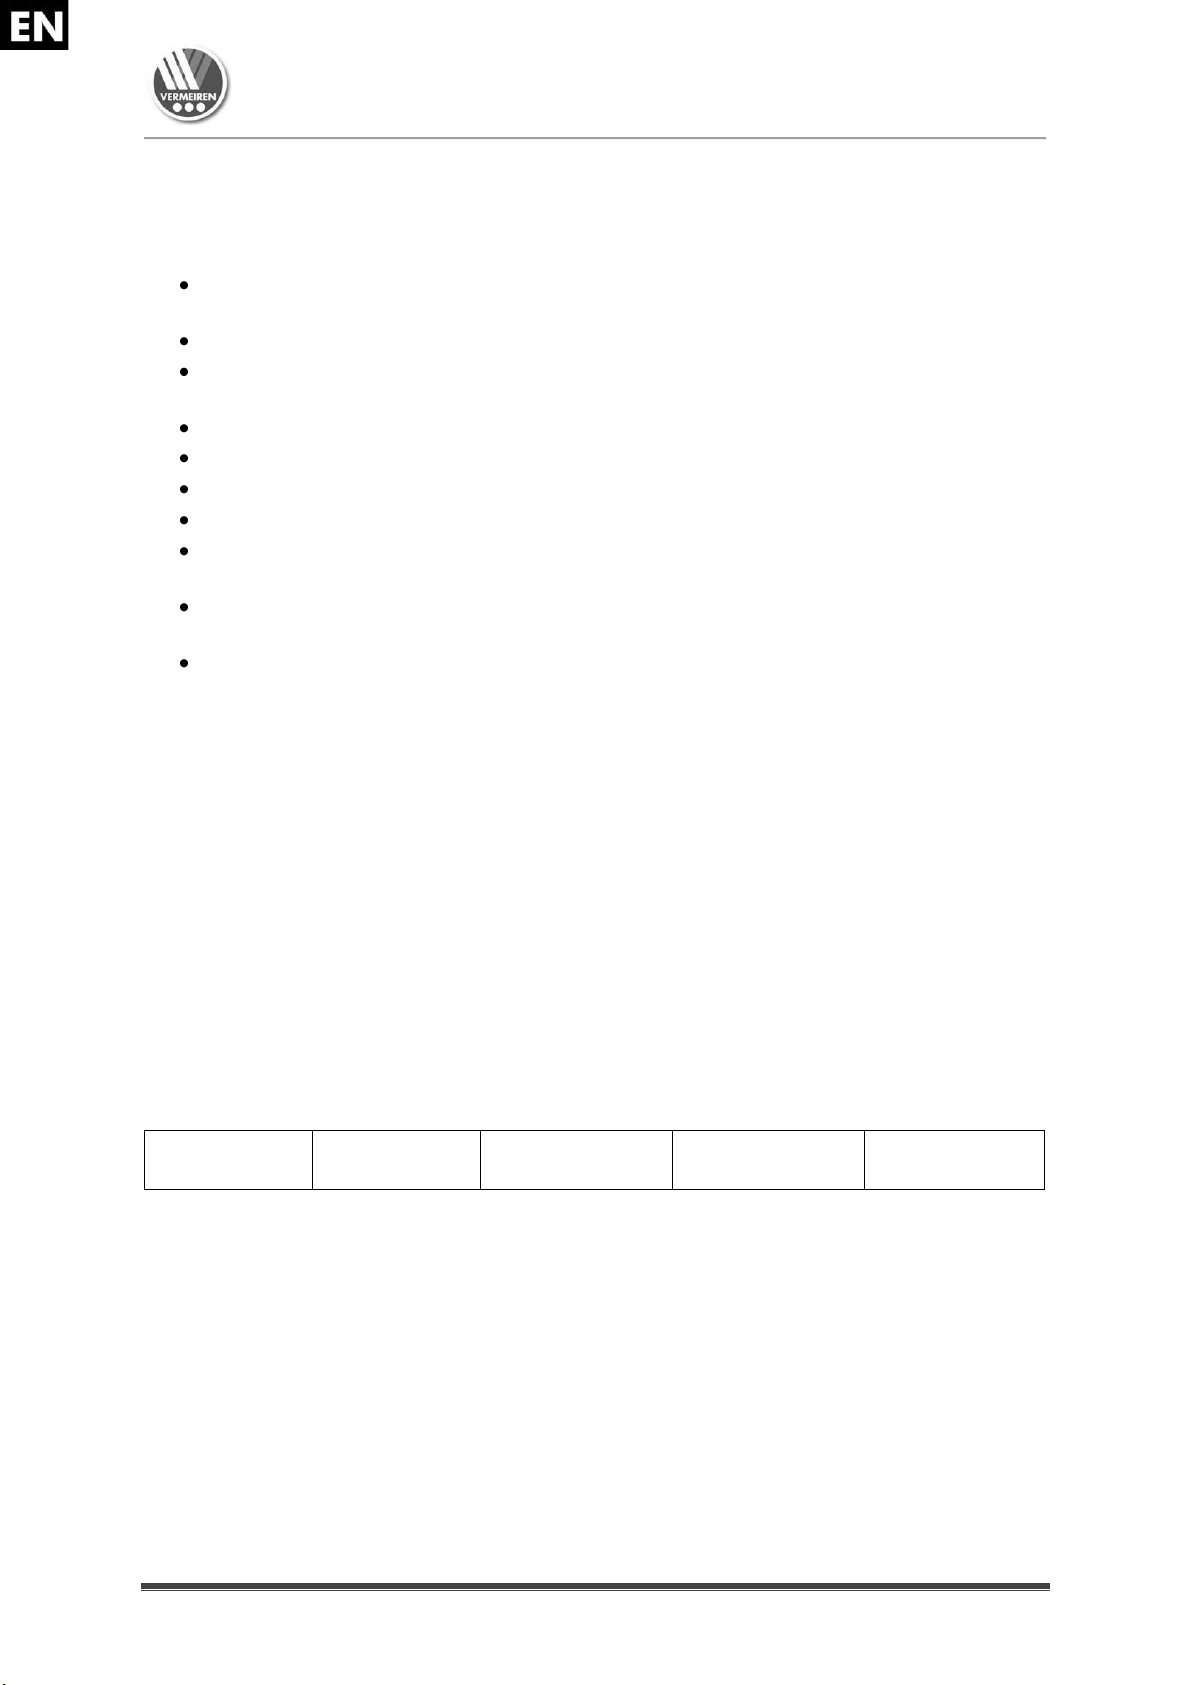
2.4 Mounting or removing of the footrests
L WARNING: Risk of injury – Check that the leg supports are securely locked in
place before use.
L CAUTION: Risk of clamping – Keep objects and people away from the leg
supports swing range.
The mounting of the footrests is done as follows:
1. Hold the footrest sideways at the outside of the
wheelchairs frame.
2. Mount the holes of the footrest on the pins
located on the frame.
3. Turn the footrest inwards till it clicks in position. If this
lock is a little stiff, press the handle gently back.
4. Turn the foot plate downwards.
5. Replace the calf strap in the hooks .
To take off the footrests:
1. Remove the calf strap by unhooking it on both sides.
2. Pull back the lever near the footrest
attachment.
3. Turn the footrest to the outside of the wheelchair.
4. Lift the holes of the footrest out of the pins
located on the frame .
Page 7
Page 10
708D
A
B
2011-05
2.5 Operating the brakes
L WARNING: The brakes are not used to slow down the wheelchair during
movements – Use the brake only to prevent the wheelchair from unintended
movements.
L WARNING: Good operation of the brakes is influenced by wear and
contamination of the tires (water, oil, mud, …) – Check the condition of the tires
before each use.
L WARNING: The brakes are adjustable and can wear – Check the operation of the
brakes before each use.
To apply the brakes:
1. Push the brake handles forward till you feel a
distinctive click.
L CAUTION: Risk of unintended movement –
Make sure the wheelchair is on a flat
horizontal surface before releasing the
brakes. Never release both brakes
simultaneously.
To release the brakes:
1. Release one brake by pulling the handle
backwards.
2. Hold the hand-rim of the release wheel with
your hand.
3. Release the second brake by pulling the handle
backwards.
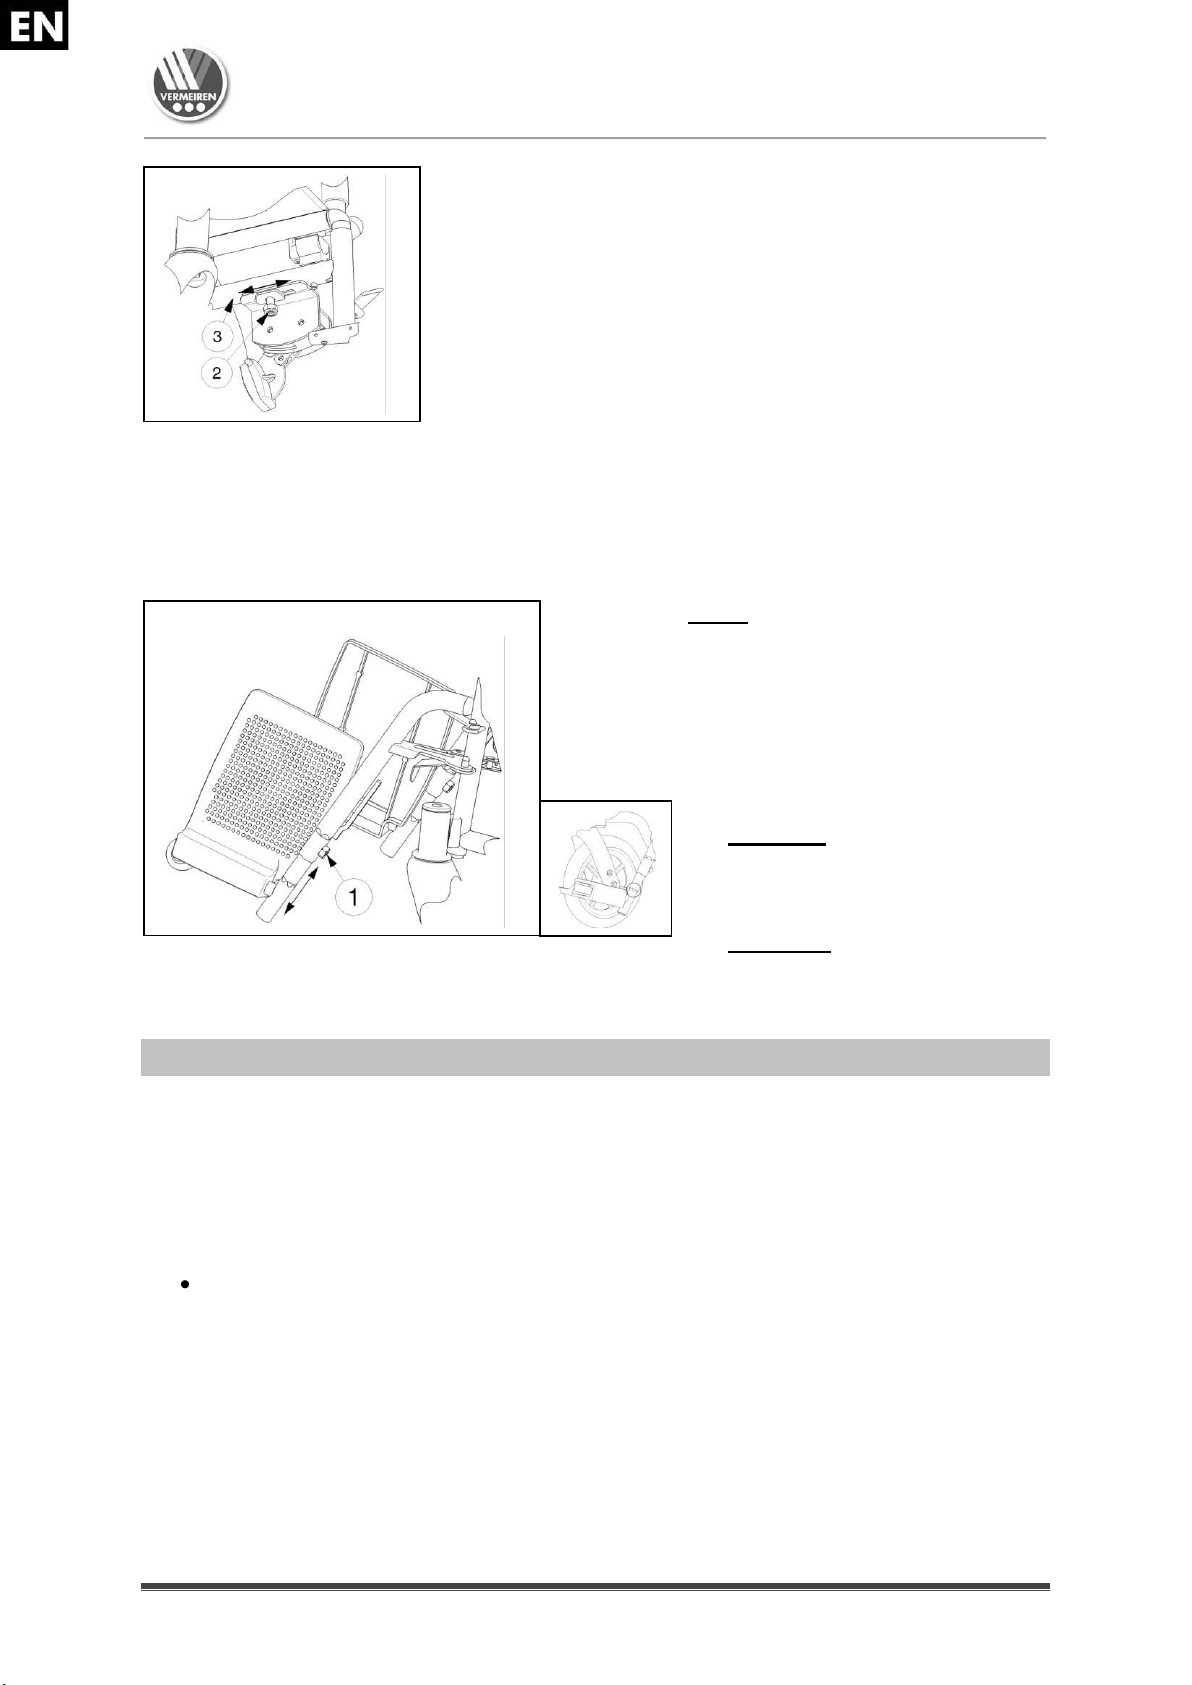
2.6 Mounting or removing of arm supports
L CAUTION: Risk of clamping – Keep fingers, buckles and clothes away from the
bottom side of the arm support.
The arm supports of the wheelchair can be mounted by following instructions.
1. Mount the rear tube of the arm rest in tube hood . (Fig A)
2. Make sure the arm support is mounted very well.
3. Fold the arm rest forward.
4. Pull the lever on tube hood upwards. (Fig B)
5. Click the front tube of the arm rest in tube hood . (Fig B)
Page 8
Page 11

708D
C
D
2011-05
To open and remove the arm rest:
1. Pull lever and pull the front of the arm rest upwards. (Fig C)
2. Fold the arm rest backwards.
3. To remove the arm rest, pull the rear of the arm support from tube hood . (Fig D)
2.7 Transfer in and out the wheelchair
L CAUTION: In case you can not perform the transfer in a safe manner, ask
someone to assist you.
L CAUTION: Risk of tipping over of the wheelchair – Do not stand on the foot
plates.
1. Position the wheelchair as close as possible to
the chair, couch or bed to/from you wish to
transfer.
2. Check both brakes from the wheelchair are in
the on position.
3. Fold the foot plates upwards to prevent
standing on them.
4. If the transfer is on the side of the wheelchair,
fold the arm support on that side upwards.
(see § 2.6)
5. Transfer to/from the wheelchair.
2.8 Correct position in the wheelchair
Some recommendations for a comfortable use of the wheelchair:
Position your backside as close as possible to the back rest.
Make sure your upper legs are horizontal – If needed adjust the length of the foot
rests. (see § 3.6.1)
2.9 Riding the wheelchair
L WARNING: Risk of clamping – Prevent your fingers from being caught by the
wheels spokes.
L WARNING: Risk of clamping – Be careful passing through restricted passages
(e.g. doors).
L WARNING: Risk of burns – Be careful when driving in hot or cold environments
(sunshine, extreme cold, saunas, etc.) for a sufficient amount of time and when
touching - Surfaces can assume the environment temperatures.
Page 9
Page 12
708D
2011-05
1. Release the brakes.
2. Take both hand rims at their highest position.
3. Lean forward and push the hand rims forward until straight arms.
4. Swing your arms loosely back to the hand rims topside and repeat the movement.
2.10 Moving on slopes
L WARNING: Control your speed – Moving on slopes as slow as possible.
L WARNING: Consider the capacities of your attendant – If your attendant does not
have enough force to control the wheelchair, put on the brakes.
L WARNING: Risk of tipping over – Lean forward to move your centre of gravity
forward. To improve a better stability.
1. If available on the wheelchair, wear the safety belt.
2. Do not attempt moving on too high slopes. The maximum
slope angles (upwards and downwards) are mentioned in
table 1.
3. Ask an attendant to help you moving on the slope.
4. Lean forward to move your centre of gravity forward.
2.11 Negotiating steps or kerbs
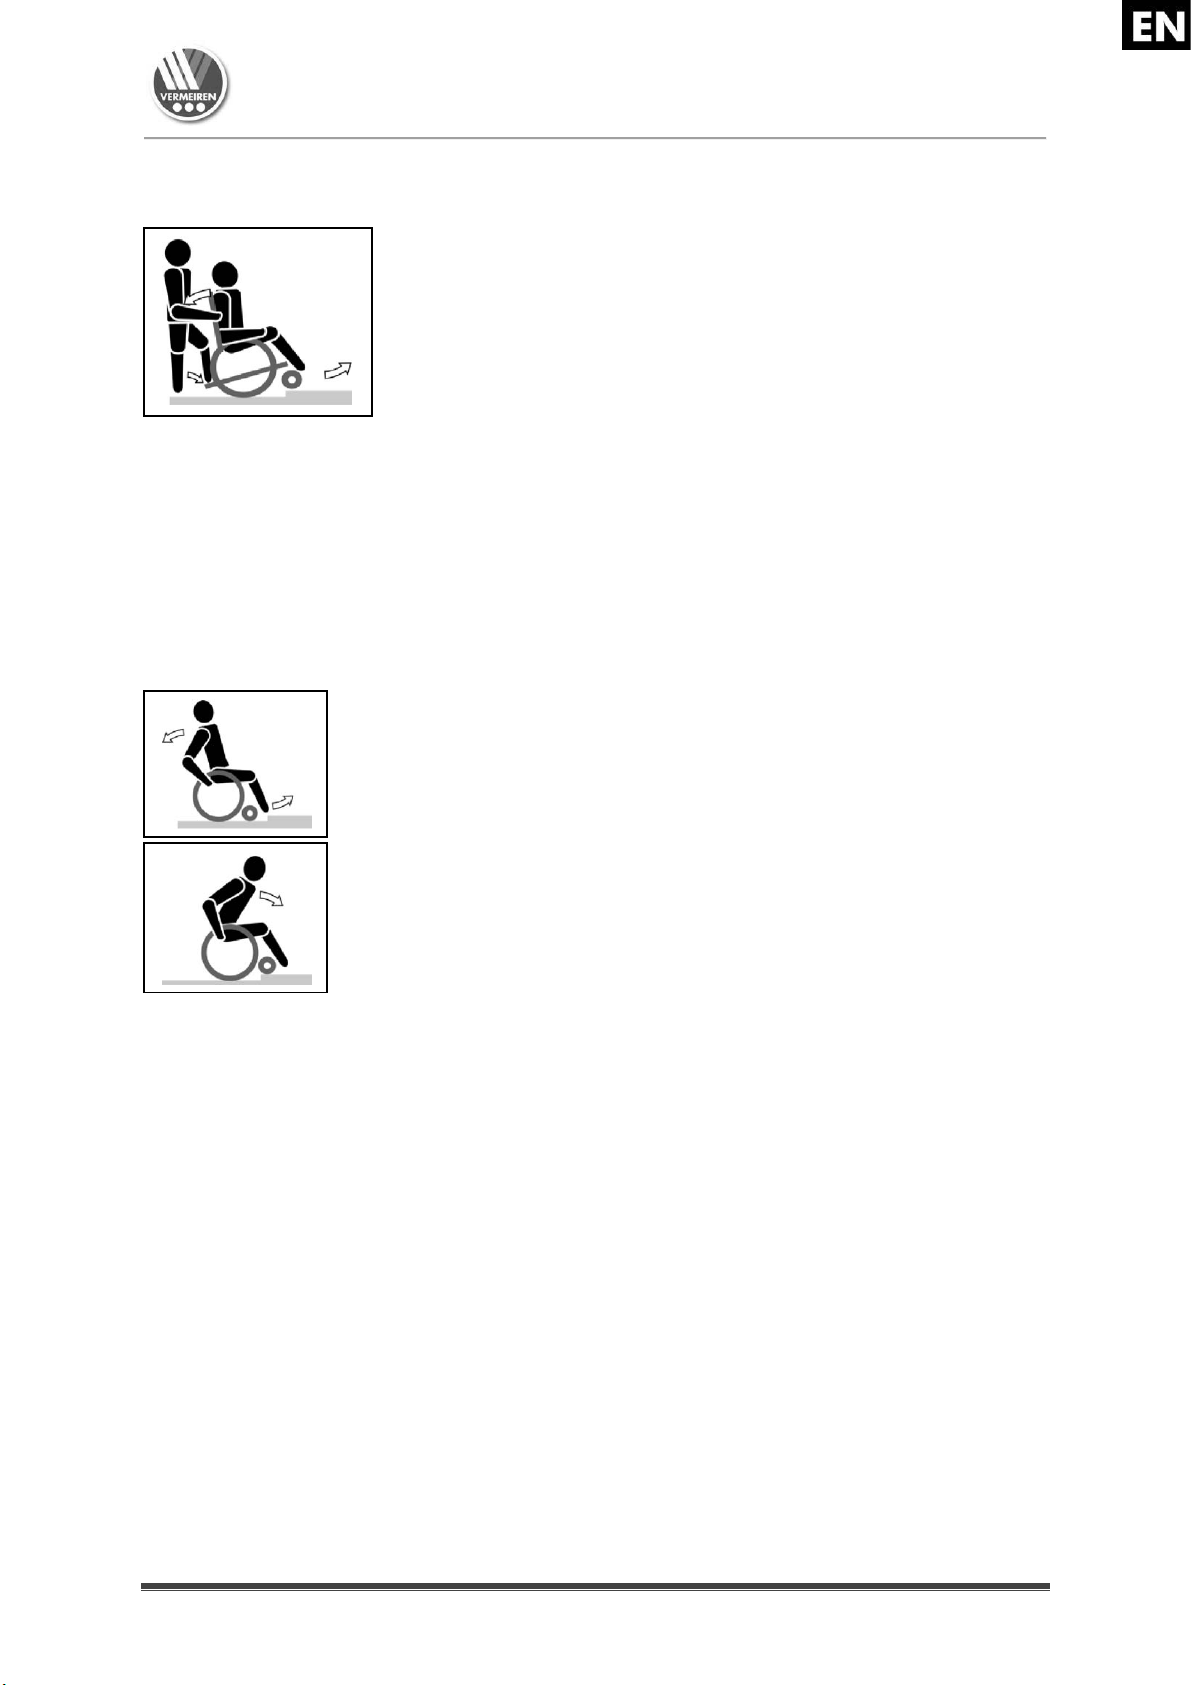
2.11.1 Getting down steps or kerbs
Riding down low kerbs can be done moving forwards. Make sure that the foot rests do not
touch the ground.
A practiced user can negotiate small steps or kerbs by himself:
L WARNING: Risk of tipping over – If you do not have
enough experience with your wheelchair, ask
assistance of an attendant.
1. Bring balance on the rear wheels to reduce the pressure on
the front wheels.
2. Negotiate the kerbs.
Higher kerbs can be taken forward with an attendant:
1. Ask the attendant to tip the wheelchair slightly backwards.
2. Get past the kerbs while moving on the rear wheels.
3. Put the wheelchair back on the four wheels.
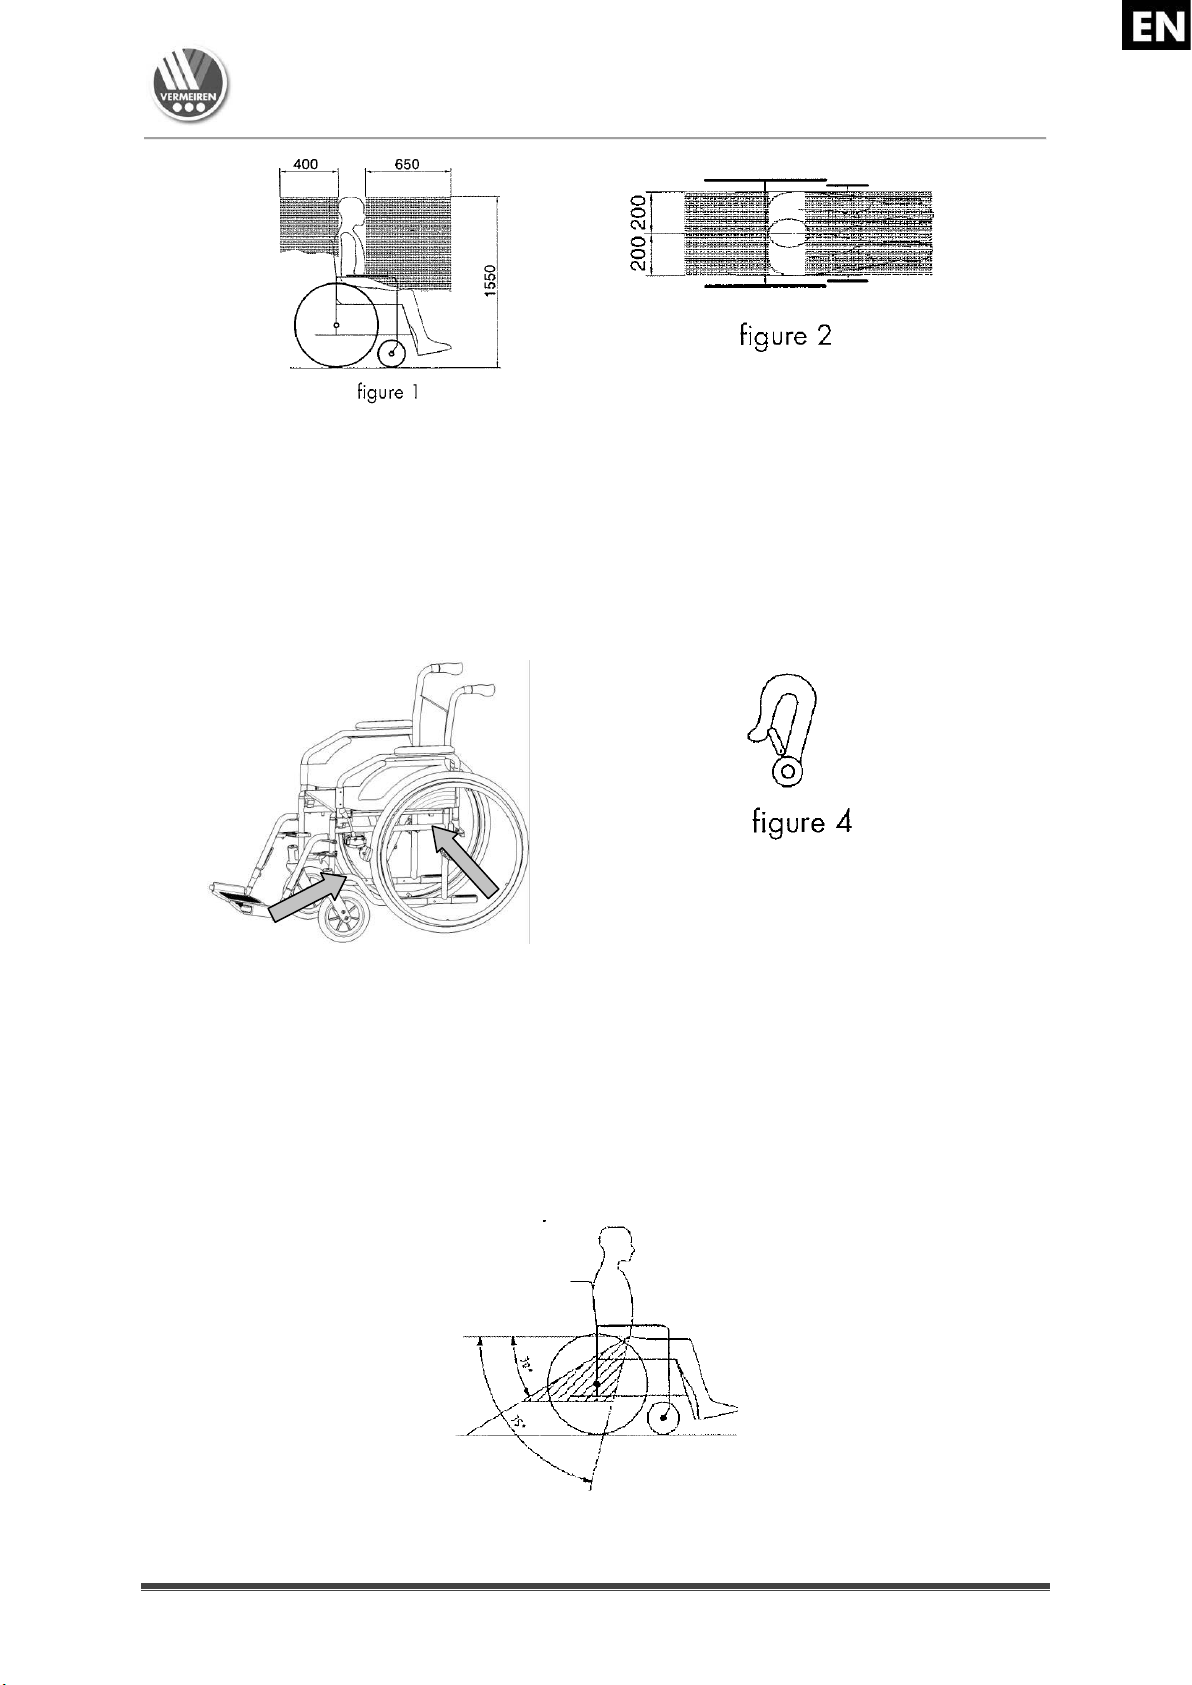
An experienced user can negotiate higher kerbs by himself. This is
best done backwards.
1. Turn the wheelchair to have the rear wheels facing the
kerb.
2. Lean forward to move your centre of gravity forward.
3. Move the wheelchair close to the kerbs.
4. Use the hand rim to roll-off wheelchair from the kerb in a
controlled manner.
Page 10
Page 13
708D
2011-05
2.11.2 Moving up steps or kerbs
Moving up steps or kerbs with attendant as follows:
1. Prevent the foot rests from touching the kerb.
2. Ask the attendant to tip the wheelchair backwards, just
enough to move the front wheels over the kerb.
3. Lean backwards to move your centre of gravity above the rear
wheel.
4. Place the front wheels on the kerb.
5. Roll rear wheels of the wheelchair over the kerb.
Higher kerbs are negotiated backwards:
1. Turn the wheelchair to have the rear wheels facing the kerb.
2. Lean backwards and move your centre of gravity above the rear wheels.
3. Ask the attendant to pull the wheelchair on the kerb.
4. Take back the normal position in the wheelchair.
An experienced user can negotiate kerbs by himself:
L WARNING: Risk of tipping over – If you have not enough experience to control
the wheelchair, get help from an attendant.
1. Drive until the kerbs.
2. Ensure that the footrest do not touch the kerbs.
3. Lean backwards so you are balancing on the rear wheels.
4. Role the frontwheels balancing over the kerbs.
5. Bend forward for more stability.
6. Role the rear wheels over the kerbs.
2.11.3 Taking of stairs
Taking of stairs while you staying in the wheelchair shall be according following rules:
L WARNING: Risk of tipping over – Taking of stairs shall always with 2 attendants.
1. Remove the footrests.
2. One attendant tip the wheelchair slightly backwards.
3. The second attendant take the front of the frame.
4. Stay calm, avoid sudden movements and keep your arms inside the wheelchair.
5. Take the steps on the rear wheels of the wheelchair.
6. Mounting the footrests back after taking the stair.
2.12 Fold up the wheelchair
L CAUTION: Chance of pinching – Do not place fingers between the components
of the wheelchair.
1. Fold or remove the footplates (see § 2.4).
2. Take the seat on the front side and backside and pull it up.
Page 11
Page 14

708D
2011-05
2.13 Taking off the wheels
To facilitate the transport off the wheelchair the rear wheels can be taken off:
1. Make sure the brakes standing in the off
position.
2. Take the wheelchair to the side frame where
you want to remove the wheel.
3. Press the button in the center of the wheel
hub.
4. Pull the wheel away from the frame.
2.14 Transport in the car
L WARNING: Risk of injury – See that the wheelchair is attached properly. So you
can avoid injury from the passengers during collision or sudden braking.
L WARNING: Risk of injury – Use for attaching the wheelchair and passenger
NEVER the same seatbelt.
1. Remove footrests and accessories.
2. Store footrests and accessories safely.
3. If possible, fold the wheelchair and remove the wheels.
4. Place the wheelchair in the luggage place.
5. If the wheelchair and the passenger compartment is NOT separated, attach the
frame of the wheelchair securely to the vehicle. You can use the available safety
belts in the vehicle.
2.15 Use of the wheelchair as seat in a motor vehicle
L WARNING: The wheelchair has passed the crash of ISO 7176-19: 2008 and, as
such, has been designed and tested for use only as forward-facing seat in a
motor vehicle.
L WARNING: The wheelchair's pelvic belt alone is not suited as an occupant
restraint belt.
The wheelchair is tested using the four-point strap-tie system and a 3-point occupant-
restraint system.
Whenever feasable, use the seat of the vehicle and store the wheelchair in the cargo area.
Steps to secure the wheelchair in a motor vehicle:
1. Check that the vehicle is equipped with a suitable wheelchair tie down and occupantrestraint system, conform ISO 10542.
2. Check that the components of the wheelchair tie down and occupant restraint system
are not frayed, contaminated, damaged or broken.
3. If equipped with an adjustable seat and/or back tilt, make sure that the wheelchair
user is sitting as upright as possible. If the user's condition prevents this, a risk
assessment should be done to evaluate the user's safety during transit.
4. Remove all mounted accessories such as trays and respiratory equipment, and
secure them in a safe place.
5. Position the wheelchair facing forward in the travelling direction, centrally between
the tie-down rails mounted in the floor of the vehicle.
6. Make sure that the indicated zones around the wheelchair user are clear from rigid
vehicle parts.
Page 12
Page 15
708D
2011-05
7. Mount the front securement straps according to the instructions of the strap-system
manufacturer at the indicated place. (figure 3)
This place is marked on the wheelchair with a symbol. (figure 4)
8. Roll back the wheelchair until the front straps are tight.
9. Apply the wheelchair brake.
10. Mount the back securement straps according to the instructions of the strap-system
manufacturer at the indicated place. (figure 3)
11. This place is marked on the wheelchair with a symbol. (figure 4)
figure 3
Steps to secure the wheelchair user:
1. Remove both arm rests.
2. If present, attach the wheelchair's pelvic belt.
3. Attach the occupant restraint belts according to the instructions of the strap-system
manufacturer.
4. Wear the pelvic belt low across the front of the pelvis, so that the angle of the pelvic
belt is within the preferred zone of 30° to 75° to the horizontal, similar to that shown
below.
Page 13
Page 16
708D
2011-05
5. A steeper (greater) angle within the preferred zone is desirable.
6. Adjust the belt tightly according to the instructions of the strap-system manufacturer,
consistent with the user's comfort.
7. Ensure that the restraint belt connects in a straight line to the anchor point in the
vehicle and that no bends in the belt are visible, for instance at the axle of the rear
wheel.
8. Install the arm rests, if desired. make sure that belts are not twisted or held away
from the body by wheelchair components such as arm rests or wheels.
3 Installation and adjustment
The instructions in this chapter are for the specialist dealer.
The Vermeiren wheelchairs 708D has been designed entirely for your comfort.
To find a service facility or specialist dealer near you, contact the nearest Vermeiren facility.
A list of Vermeiren facilities can be found on the last page.
L WARNING: Risk of unsafe settings - Use only the settings described in this
manual.
L WARNING: Variation of allowed adjustments can still change the stability of your
wheelchair (tilt back or sideways).
3.1 Tools
To set up the wheelchair the following tools are needed.
Wrench set n° 10 to n° 19
Allen key set n° 4 to n° 5
Screwdriver Phillips head
3.2 Manner of delivery
The Vermeiren 708D shall be delivered with:
1 frame with arm supports, rear and front wheels (seat height of 500 mm - 19.69 in.,
seat angle of 5°)
1 pair footrests
Back and seat cushions
Tools
Manual
Accessories (optional)
Pump (with pneumatic tyres only)
Page 14
Page 17
708D
2011-05
Before use check if everything is included and that no products are damaged (example by
transport, ...).
3.3 Anatomical seat (OPTIONAL)
L WARNING: Risk of injury – Check that the seat is secure before use.
L WARNING: Risk of injury – Avoid getting your fingers caught during the
assembly process.
If you have opted for an anatomical padded seat, place it on
the tubular cross-hinge so that the seat's supports engage
equally with the cross-hinge. In the wooden base you will find
slots that are placed in the hinge's cross-pieces. To fold up the
wheelchair, remove the seat by pulling it upwards.
3.4 Anatomical back (OPTIONAL)
L WARNING: Risk of injury – Check that the backrest is secure before use.
L WARNING: Risk of injury – Avoid getting your fingers caught during the
assembly process.
To use the anatomical backrest, proceed as follows:
1. Unscrew the flexible backrest.
2. Loosely screw on the brackets for the backrest.
3. Insert the backrest into the brackets from above.
4. Tighten the screws holding the brackets for the
backrest.
5. Insert and tighten the safety screws for the
backrest.
6. Add the armrests.
3.5 Adjust the brakes
L WARNING: Risk of injury – Brakes may only be adjusted by your specialist
dealer.
Adjust the brakes according following rules:
1. Install the wheels according § 2.2.
2. Disconnect the brakes by pulling lever
backwards.
Page 15
Page 18
708D
2011-05
3. Loosen the selflocking nut so the brake
mechanism can slide over the frame tube .
4. Pull the brake mechanism over the tube to the desired
position. (the adjustments range shall be possible
between the groove on the brake montage plate)
5. Retighten the selflocking nut .
6. Check working of the brakes.
7. If necessary repeat the above steps until the brakes are
adjusted well.
3.6 Adjusting of the footrests
3.6.1 Length of the footrests
L CAUTION: Risk of damage – Avoid that the footrests make any contact with the
ground. Keep a minimum distance from 60 mm (2.36 in.) above the ground.
Adjust the length of the footrests as follow:
1. Remove the Allen screw on the lower end
of the upper part of the leg support.
2. Adjust the length of the footrest to a
comfortable length by moving the
hexagonal inner tube out or in.
3. Tighten the Allen screw properly.
The minimum length is when the
footrest tube changes from
hexagonal in round.
The maximum length is until the
mark in the tube. (These mark is a
straight line)
4 Maintenance
Lifetime of the wheelchair is influenced by its use, storage, regular maintenance, servicing
and cleaning.
4.1 Regular Maintenance
The maintenance activities to ensure a good condition for your Vermeiren wheelchair are
described below:
Before every ride
Check the tyres and make them clean. If necessary change the tire.
Check screw fastenings are secured.
Check the brakes and adjusted if necessary.
Check the wheelchair (cleanliness, cracks, damage on structural parts ... .)
and make it clean. If necessary change the coating.
Page 16
Page 19

708D
2011-05
Every 8 weeks: inspected and lubricating or adjusting from
Arm supports
Footrests
Brake lever
Wheel axles
Every 6 months or for every new user
General review
Disinfection
Frontwheels, possibly clean bearings
For your convenience, on the back of this manual is a maintenance plan.
Repairing and assembling of spare parts for your wheelchair may only be performed by the
specialist dealer.
Only authorized Vermeiren spare parts may be installed.
4.2 Shipping and storage
The shipping and storage of the wheelchair shall be according following instructions:
Store in a dry place (between +5 °C and +41 °C).
The relative humidity of the air should be between 30% and 70%.
Provide sufficient covering or packaging to protect the wheelchair from rust and
foreign bodies. (e.g. salt water, sea air, sand, dust).
Store all removed parts together in one place (or mark them if necessary) to avoid
mixing up with other products when re-assembling.
Components must be stored without being subjected to strains (Do not put too heavy
parts on the wheelchair, not clamping between something, ...).
4.3 Care
4.3.1 Seat and back cushion
The cleaning of the seat and back cushion shall be according:
Clean seat and back with a cloth moistened with hot water. Be aware that you do not
soak the seat and back cushion.
Use a mild commercial detergent for removing stubborn dirt.
Stains can be removed by using a sponge or a soft brush.
Do not use strong cleaning liquids like solvents, nor use hard brushes.
Never clean with steam and/or pressure washers.
4.3.2 Plastic parts
Clean plastic parts of your wheelchair with commercial plastic cleaners. Only use a soft
brush or soft sponge. Examples of plastic parts are the armrests, handles, tyres and ... .
4.3.3 Coating
The high quality of the surface layer guarantees optimal protection against corrosion. If the
outer coat is damaged by scratching or in some other way, get your specialist dealer to
repair the affected surface.
When cleaning, only use warm water and normal household detergents and soft brushes
and cloths. Ensure that no wetness gets into the tubes.
Initially the zinc parts only require rubbing with a dry cloth. Stubborn dirt can best be
removed by using a suitable commercial zinc polish.
Page 17
Page 20
708D
Date of the
disinfection
Reason
Specification
Substance and
concentration
Signature
2011-05
4.4 Inspection
In principle we recommend one inspection every year, and a minimum of one before usage
is resumed. All of the following checks must be performed and documented by authorized
persons:
Check the frame parts and the hinged tubes for plastic deformation, cracks and
impaired functioning.
Visually check for damage to the paintwork (danger of corrosion)
Check the operation of the wheels (free running, level rolling, axle play, tyres, profile,
condition of the rims, air pressure in the case of air tyres, floating axles, etc.)
Check the solidity and seating of all screws.
Verify the amount of grease on the metal joints of movable parts
The condition and security of the guides and axles of the steering wheels
Visually check all plastic parts for cracks and brittle spots
Check the functioning of the armrests and leg supports (locking, load, deformation,
wear caused by loads).
Check the operation of other detachable parts (example: anti-tipping device, personal
safety belt, fitting back/seat, etc.)
Completeness of the delivery condition, instruction manual available?
The service must only be signed off in the maintenance plan if a minimum of all the abovementioned aspects have been checked.
4.5 Disinfection
L WARNING: Dangerous Products - The use of disinfectants is restricted to
authorized personnel.
L WARNING: Dangerous Products, change on irritate your skin - You should wear
suitable protective clothing because the disinfectants could irritate your skin. For
this purpose you should also take note of the product information of the solutions
concerned.
All parts of the wheelchair can be treated by scrubbing with a disinfectant.
All steps taken to disinfect rehabilitation equipment, their components or other accessory
parts are to be recorded in a disinfection report containing a minimum of the following
information (with product documentation appended):
Table 2: Example of a disinfection book
Abbreviations used in column 2 (reason):
V = Suspected infection IF = Infection case W = Repetition I = Inspection
For a blank sheet of a disinfection book see § 9.
The recommended disinfectants for scrubbing (based on the list provided by the Robert
Koch Institute, RKI) are standing in the table below. The current state of the disinfectants
included in the RKI list can be obtained from the Robert Koch Institute (RKI) (homepage:
www.rki.de).
Page 18
Page 21

708D
Active substance
Product name
Laundry
disinfection
Surface
disinfection
(scrubbing/wiping
disinfection)
Disinfection of excretions
1 part sputum or stools + 2 parts
diluted solution or 1 part urine + 1 part
diluted solution
Area of
effectiveness
Manufacturer or
Supplier
Sputum
Stools
Urine
Diluted
solution
Time to take
effect
Diluted
solution
Time to take
effect
Diluted
solution
Time to take
effect
Diluted
solution
Time to take
effect
Diluted
solution
Time to take
effect
%
Hr. % Hr. % Hr. % Hr. % Hr.
Phenol or phenol
derivative
Amocid 1 12 5 6 5 4 5 6 5 2 A Lysoform
Gevisol
0,5
12 5 4 5 4 5 6 5 2 A Schülke & Mayr
Helipur 6 4 6 4 6 6 6 2 A B. Braun
m-cresylic soap
solution (DAB
6)
1
12 5 4 A
Phenol 1 12 3 2 A
Chlorine, organic
or inorganic
substances with
active chlorine
Chloramin-T
DAB 9
1,5
12
2,5 2 5 4 A1B
Clorina
1, 5
12
2,5 2 5 4 A1B
Lysoform
Trichlorol
2
12 3 2 6 4
A1B
Lysoform
Per combinations
Apesin AP1002
4 4 AB
Tana
PROFESSIONAL
Dismozon pur2
4 1 AB
Bode Chemie
Perform2 3 4
AB
Schülke & Mayr
Wofesteril2
2 4 AB
Kesla Pharma
Formaldehyde
and/or other
aldehydes or
derivatives
Aldasan 2000
4 4 AB
Lysoform
Antifect FD 10
3 4 AB
Schülke & Mayr
Antiseptica
surface
disinfection 7
3 6 AB
Antiseptica
Apesin AP30
5 4 A
Tana
PROFESSIONAL
Bacillocid
special
6 4 AB
Bode Chemie
Buraton 10F
3 4 AB
Schülke & Mayr
Desomed A
2000
3 6 AB
Desomed
Hospital
disinfectant
cleaner
8 6 AB
Dreiturm
Desomed
Perfekt
7 4 AB*
Desomed
Formaldehydesolution (DAB
10), (formaline)
1,5
12 3 4
AB
Incidin Perfekt
1
12 3 4
AB
Ecolab
Incidin Plus
8 6 A
Ecolab
Kohrsolin
2
12 3 4
AB
Bode Chemie
Lysoform
4
12 5 6
AB
Lysoform
Lysoformin
3
12 5 6
AB
Lysoform
Lysoformin
2000
4 6 AB
Lysoform
Melsept 2 12 4 6
AB
B. Braun
Melsitt 4 12
10 4 AB
B. Braun
Minutil 2 12 6 4
AB
Ecolab
Multidor 3 6
AB
Ecolab
Nûscosept
5 4
AB
Dr. Nüsken
Chemie
Optisept 7 4
AB*
Dr. Schumacher
Pursept-FD
7 4 AB*
Merz
Ultrasol F
3
12 5 4
AB
Fresenius Kabi
Amphoteric
surfactants
(amfotensiden)
Tensodur 103
2
12 A MFH Marienfelde
Lye
Lime-milk3
20 6 A3B
1 Not effective against myco-bacteria when service disinfecting, especially in the presence of blood.
2 Not suitable for disinfecting blood-contaminated or porous surfaces (e.g. raw wood).
3 Useless for tuberculosis; preparation of Lime-milk: 1 part dissolved lime (calcium hydroxide) + 3 parts water.
* Checked for effectiveness on viruses in accordance with checking methods of the RKI (Federal Health Reporting 38 (1995) 242).
A: Suitable for killing vegetative bacterial germs including myco-bacteria as well as fungi, including fungal spores.
B: Suitable for deactivating viruses.
2011-05
Table 3: Disinfectants
Kindly consult your specialist dealer if you have queries on matters related to disinfection; he
will gladly assist you.
Page 19
Page 22
708D
2011-05
5 Guarantee
Excerpt from the "General Business Conditions":
(...)
5. The guarantee period for warranty claims is 24 months. As a result of our superior quality
requirements, we can increase the time bar on warranty claims beyond these fundamental,
statutory requirements for
(...)
-Frame and cross-hinge of wheelchairs 5 years
The guarantee excludes damage arising from structural changes to our products, insufficient
maintenance, defective or improper handling or storage or the use of non-original parts.
Likewise, the guarantee excludes parts or working parts subject to natural wear and tear.
(...)
6 Disposal
When disposing of the wheelchair, contact your local disposal centre or return the product to
your specialist dealer who, after submitting it to a hygienic procedure, will be able to send it
back to the manufacturer who will dispose of and recycle it correctly, separating it into its
component materials.
Packaging materials can be taken to disposal or recycling centers or to your specialist
dealer.
7 Declaration of conformity
Page 20
Page 23

708D
Date
Maintenance
Remarks
Paraph
1/1/2011
Greasing and general servicing
non
Date of the
disinfection
Reason
Specification
Substance and
concentration
Signature
Abbreviations used in column 2 (reason):
V = Suspected infection IF = Infection case W = Repetition I = Inspection
2011-05
8 Maintenance plan
9 Disinfection book
Page 21
Page 24

708D
2011-05
Table des matières
Préface ...................................................................................................................................... 2
1 Description du produit ............................................................................................... 3
1.1 Utilisation prévue ........................................................................................................ 3
1.2 Caractéristiques techniques ......................................................................................... 4
1.3 Composants ................................................................................................................. 5
1.4 Accessoires .................................................................................................................. 5
1.5 Emplacement de la plaque d’identification ................................................................. 5
1.6 Explication des symboles ............................................................................................ 6
1.7 Pour votre sécurité ....................................................................................................... 6
2 Utilisation..................................................................................................................... 7
2.1 Transport du fauteuil roulant ....................................................................................... 7
2.2 Montage des roues arrière ........................................................................................... 7
2.3 Dépliage du fauteuil roulant ........................................................................................ 7
2.4 Placer ou enlever les supports pour les pieds .............................................................. 7
2.5 Actionnement des freins .............................................................................................. 8
2.6 Montage ou retrait des repos-bras ............................................................................... 8
2.7 Transfert dans et hors du fauteuil roulant .................................................................... 9
2.8 Position correcte du fauteuil roulant ......................................................................... 10
2.9 Déplacements avec le fauteuil roulant ...................................................................... 10
2.10 Déplacements en pente .............................................................................................. 10
2.11 Passage de marches ou de bordures de trottoirs ........................................................ 11
2.12 Pliage du fauteuil roulant .......................................................................................... 12
2.13 Retrait des roues ........................................................................................................ 12
2.14 Transport en voiture .................................................................................................. 13
2.15 Utilisation du fauteuil roulant comme siège dans un véhicule.................................. 13
3 Installation et réglage ............................................................................................... 15
3.1 Outils ......................................................................................................................... 15
3.2 Importance de la livraison ......................................................................................... 15
3.3 Assise anatomique (EN OPTION) ............................................................................ 16
3.4 Dossier anatomique (EN OPTION) .......................................................................... 16
3.5 Réglages des freins .................................................................................................... 16
3.6 Réglages des repose-pieds ......................................................................................... 17
4 Maintenance .............................................................................................................. 17
4.1 Maintenance régulière ............................................................................................... 17
4.2 Expedition et stockage .............................................................................................. 18
4.3 Entretien .................................................................................................................... 18
4.4 Inspection .................................................................................................................. 19
4.5 Désinfection .............................................................................................................. 19
5 Garantie ..................................................................................................................... 21
6 Mise au rebut ............................................................................................................. 21
7 Déclaration de conformité ........................................................................................ 21
8 Plan de maintenance ................................................................................................. 22
9 Journal de désinfection............................................................................................. 22
Page 1
Page 25

708D
2011-05
Préface
Nous tenons tout d'abord à vous remercier de nous avoir fait confiance en choisissant l'un
de nos fauteuils roulants.
Les fauteuils roulants Vermeiren sont le résultat de nombreuses années de recherche et
d'expérience. Au cours du développement, une attention spéciale a été portée sur la facilité
d'utilisation et les possibilités d'entretien du fauteuil roulant.
La durée de vie attendue de votre fauteuil roulant est fortement influencée par l'entretien et
la maintenance dont il bénéficie.
Ce manuel vous aidera à connaître le fonctionnement de votre fauteuil roulant.
Le respect des instructions d'utilisation et des instructions de maintenance est une condition
essentielle de la garantie.
Ce manuel reflète les derniers développements du produit. Vermeiren est autorisé à
apporter des modifications sans devoir pour autant adapter ou remplacer les modèles
fournis précédemment.
Pour toute question, consultez votre distributeur.
Page 2
Page 26

708D
2011-05
1 Description du produit
1.1 Utilisation prévue
Le fauteuil roulant est destiné aux personnes qui ont des difficultés à marcher ou sont dans
l'impossibilité de marcher.
Le fauteuil roulant est destiné au transport d'une seule personne.
Le fauteuil roulant est destiné à une utilisation en intérieur et en extérieur.
L'utilisateur peut lui-même faire avant le fauteuil roulant ou se faire pousser par une autre
personne.
Les différents types d'équipements et d'accessoires et la construction modulaire permettent
une utilisation complète par des personnes souffrant des handicaps suivants :
paralysie,
perte des membres (amputation de jambe),
déficiences ou déformations des membres,
articulations raides ou abîmées,
insuffisances cardiaques et mauvaise circulation sanguine,
troubles de l'équilibre,
cachexie (perte musculaire),
ainsi que par des personnes âgées.
En cas de fourniture pour des besoins individuels:
la taille et le poids (maximum 120 kg),
l'état physique et psychologique,
la nature de la résidence,
l'environnement
doivent être pris en considération.
Votre fauteuil roulant ne doit être utilisé que sur des surfaces où les quatre roues touchent le
sol et où le contact est suffisant pour entraîner les roues de manière équilibrée.
Il est recommandé de s'entraîner à un usage sur des surfaces irrégulières (pavés, etc.),
pentes, courbes et à passer des obstacles (bordures de trottoirs, etc.).
Le fauteuil roulant ne doit pas être utilisé comme échelle, ni pour le transport d'objets lourds
ou chauds.
En cas d'utilisation sur des paillassons, moquettes ou revêtements de sols non fixés, le
revêtement de sol peut être endommagé.
Utilisez uniquement des accessoires approuvés par Vermeiren.
Le fabricant n'est pas responsable des dommages causés par l'absence ou l'inadéquation
de l'entretien, ou par le non-respect des instructions de ce manuel.
Le respect des instructions d'utilisation et de maintenance est une condition essentielle de la
garantie.
Page 3
Page 27

708D
Marque
Vermeiren
Adresse
Vermeirenplein 1/15, B-2920 Kalmthout
Type
Fauteuil roulant manuel
Modèle
708D
Masse maximale de l'occupant
120 kg
Description
Dimensions
Largeur d'assise efficace
390 mm
420 mm
440 mm
460 mm
480 mm
500 mm
Largeur totale (en fonction de la largeur d'assise)
560 mm
590 mm
610 mm
630 mm
650 mm
670 mm
Description
Dimensions Minimum
Dimensions Maximum
Longueur totale avec repose-jambe
1060 mm
Longueur plié sans repose-jambe
810 mm
Largeur plié
280 mm
Hauteur plié
920 mm
Masse totale
± 18 kg
Masse de la partie la plus lourde
10,10 kg
Des masses de pièces qui peuvent être
démontés ou retirés
Repose-pieds: 1,90 kg; Repose-bras: 1,85 kg;
Roues arrière: 4,15 kg
Stabilité statique en descente
15°
Stabilité statique en montée
15°
Stabilité statique latérale
15°
Passage d'obstacle
60 mm
Angle du plan d'assise
5°
Profondeur d'assise efficace
430 mm
Hauteur de la surface d'assise sur le bord avant
500 mm
Angle du dossier
5°
Hauteur du dossier
420 mm
Distance entre le repose-pieds et le siège
420 mm
500 mm
Angle entre le repose-pieds et le siège
9°
Distance entre l'accoudoir et le siège
220 mm
Emplacement avant de la structure des
accoudoirs
300 mm
Diamètre de la main-courante
535 mm
Emplacement horizontal de l'essieu (flèche)
-7 mm
Rayon de braquage minimum
1619 mm
Diamètre des roues arrière Krypton PU
24"
Pression des pneus, roues arrière (motrices)
Max. 3.5 bar
Diamètre des roues directrices Krypton PU
200 mm
Pression des pneus, roues directrices
Max. 2.5 bar
Température de stockage et d'utilisation
+ 5 °C
+ 41 °C
Humidité de stockage et d'utilisation
30%
70%
Nous nous réservons le droit d’apporter des modifications techniques. Tolérance de mesure ± 15 mm / 1,5 kg /°
2011-05
1.2 Caractéristiques techniques
Les indications techniques ci-dessous sont valides pour le fauteuil roulant avec ses réglages
standard. En cas d'utilisation d'autres repose-pieds / repose-bras ou autres accessoires, les
valeurs indiquées sont modifiées.
Tableau 1 : Caractéristiques techniques 708D
Page 4
Page 28
708D
1 = Taxi crochets
2 = Plaque d’identification
3 = Nom 708D
1 = Traverse
2 = Poignées
3 = Dossier
4 = Manchettes
5 = Repos-bras
6 = Roues motrices (roues arrière)
7 = Mains-courantes
8 = Freins
9 = Patte d’inclinaison
10 = Roues directrices (roues
avant)
11 = Siège
12 = Repose-pieds
2011-05
Le fauteuil roulant satisfait aux exigences posées dans :
la norme ISO 7176-8 : Exigences et méthodes d'essai pour la résistance statique, la
résistance aux chocs et la résistance à la fatigue
la norme EN 1021-1 : Meubles - Evaluation de l'allumabilité des meubles garnis -
Partie 1 : Cigarette fumante comme source d'inflammation
la norme EN 1021-2 : Meubles - Détermination de l'allumabilité des meubles garnis -
Partie 2 : Equivalent de la flamme d'une allumette comme source d'inflammation
la norme ISO 7176-19 : Utilisation d'un fauteuil roulant dans un véhicule
1.3 Composants
1.4 Accessoires
Les accessoires suivants sont disponibles pour le 708D :
Accoudoirs (B02, B03, B05, B66)
Repose-jambes (B06, B07, B08, BZ7, BZ8, BZ9, BZ10, BK7, BL7, BA6, BK6)
Table (B12)
Support pour béquilles (B31)
Dossier (L14, L24, L44)
Ceinture pour le bassin Anterior (B58) pour fixer aux tubes du dossier
Appareil anti-culbute (B78) pour fixer à la structure inférieure
Frein à tambour pour l'accompagnateur (B74) pour fixer aux poignées
Fauteuil roulant de transit (T30)
Déplacement de l'essieu vers l'arrière (AMP)
Roues amovibles (B80)
Réduire la hauteur d'assise à 470 mm (S)
1.5 Emplacement de la plaque d’identification
Page 5
Page 29

708D
2011-05
1.6 Explication des symboles
Poids maximum
Usage intérieur et extérieur
Descente
Montée
CE conformité
1.7 Pour votre sécurité
L Lorsque vous utilisez les roues motrices, veillez à ce qu’aucun objet et/ou partie du
corps ne puisse prendre dans les rayons, sous peine de blessures et/ou de dégâts à
votre fauteuil roulant.
L Il convient de serrer les freins de stationnement avant de s’asseoir ou de sortir du
fauteuil roulant.
L Ne montez pas sur les repose-pieds pour vous asseoir ou pour sortir du fauteuil roulant.
Il faut d’abord les rabattre vers le haut ou faire basculer le repose-pied complet vers
l’extérieur.
L Étudiez les effets des déplacements du centre de gravité sur le comportement du
fauteuil, par exemple sur les parcours en pente, les montées, les inclinaisons latérales
ou lors du passage d’obstacles. Profitez de l’assistance de votre accompagnateur.
L Lorsque vous prenez des objets (qui se trouvent devant, sur le côté ou derrière le
fauteuil roulant), veillez à ne pas vous pencher trop loin hors du fauteuil, car il y a un
risque de basculement en raison du déplacement du centre de gravité.
L Lors du passage de porte, sous des voûtes, etc., il faut vérifier que la place est
suffisante sur le côté, afin de ne pas risquer de se coincer les mains ou les bras, ni
d’endommager le fauteuil.
L Utilisez votre fauteuil roulant exclusivement en suivant les dispositions en vigueur.
Évitez, par exemple, de vous diriger contre un obstacle (marche, bordure, huisserie)
sans freiner ou de sauter de paliers d’escalier. Le fabricant décline toute responsabilité
pour les dégâts causés par une collision ou une surcharge ou toute autre utilisation
inappropriée.
L Les escaliers ne peuvent être franchis qu’avec l’aide d’un accompagnateur/d’une
accompagnatrice. S’il existe des installations, comme des rampes d’accès ou des
ascenseurs, utilisez-les.
L Lorsque vous vous déplacez dans la circulation routière, vous devez respecter le code
de la route.
L Comme pour la conduite d’autres véhicules, vous ne devez pas conduire votre fauteuil
roulant sous l’influence de l’alcool ou de médicaments. Ceci vaut également pour
l’intérieur.
L À l’extérieur de votre habitation, adaptez votre comportement de conduite aux
conditions météorologiques et routières existantes.
L Pour transporter le fauteuil roulant, ne jamais le prendre par des pièces mobiles
(accoudoirs, repose-jambes, etc.), mais uniquement aux éléments du cadre qui sont
fixes.
L Pour être bien visibles dans l’obscurité, portez des vêtements clairs ou réfléchissants et
veillez à ce que les réflecteurs placés sur le côté et à l’arrière du fauteuil roulant soient
bien visibles.
L Soyez prudent avec le feu, en particulier avec les cigarettes incandescentes ; en effet,
le tissu du siège et du dossier risque de s’enflammer.
L Veillez à ne pas dépasser la charge utile maximale (120 kg).
Page 6
Page 30
708D
2011-05
2 Utilisation
Ce chapitre décrit l'utilisation quotidienne. Ces instructions sont destinées à l'utilisateur
et au distributeur.
Le fauteuil roulant est livré entièrement assemblé par votre distributeur. Les instructions
destinées au distributeur pour le réglage du fauteuil roulant sont indiquées au § 3.
2.1 Transport du fauteuil roulant
Le meilleur moyen de déplacer le fauteuil roulant consiste à le faire rouler sur ses roues.
Si cela n'est pas (par exemple en cas de retrait des roues arrière pour le transport dans une
voiture), saisir fermement le cadre à l'avant et les poignées. Ne pas saisir le fauteuil roulant
par les accoudoirs ni par les repose-pieds.
2.2 Montage des roues arrière
1. Prenez la roue arrière et poussez sur le
bouton .
2. Maintenez le bouton enfoncé et montez
l'essieu arrière jusqu'à ce qu'il soit bloqué.
3. Relâchez le bouton.
4. Vérifiez que les roues sont bloquées.
2.3 Dépliage du fauteuil roulant
L ATTENTION : risque de pincement, laissez les doigts à l'écart des pièces
mobiles du fauteuil roulant.
1. Placez-vous derrière le fauteuil roulant.
2. Utilisez les poignées pour ouvrir le fauteuil roulant autant que possible.
3. Placez-vous à l'avant du fauteuil roulant.
4. Poussez sur les deux tubes de l'assise vers le bas jusqu'à ce qu'ils soient fixés à leur
place.
2.4 Placer ou enlever les supports pour les pieds
L AVERTISSEMENT : Risque de lésion - Contrôlez que les repose-jambes sont
bien fixés avant d'utiliser le fauteuil roulant.
L PRUDENCE : Risque de se coincer – Ne pas placer d'objets ou de personnes sur
le chemin de la partie à tourner du fauteuil roulant.
L'installation des repose-pieds se fait de la manière
suivante :
1. Gardez le repose-pieds en oblique sur la partie
externe de la structure du fauteuil.
2. Montez les crans du repose-pieds au niveau des
broches fixées à la structure.
3. Tournez le repose-jambes vers l'intérieur jusqu'à ce
que le verrouillage se rive automatiquement (si vous
éprouvez des difficultés lorsque vous devez river,
exercer légèrement une pression sur le verrouillage).
4. Tournez la plaque pour les pieds vers le bas.
5. Replacez maintenant la bande pour les mollets dans
les crochets .
Page 7
Page 31

708D
2011-05
Vous devez procéder de la même manière pour enlever les repose-pieds :
1. Enlevez d'abord la bande pour les mollets en la détachant du crochet des deux côtés .
2. Poussez le levier se trouvant à proximité de la fixation des repose-pieds vers l'arrière.
3. Tournez le repose-pieds vers l'extérieur du fauteuil roulant.
4. Tirez les crans du repose-pieds des broches fixées à la structure.
2.5 Actionnement des freins
L AVERTISSEMENT : les freins ne servent pas à ralentir le fauteuil roulant en
mouvement. Ne les utilisez que pour empêcher des mouvements non souhaités
du fauteuil roulant.
L AVERTISSEMENT : le bon fonctionnement des freins dépend de l'usure et de
l'état des pneus (eau, huile, boue, …). Vérifiez l'état des pneus avant chaque
utilisation.
L AVERTISSEMENT : les freins sont réglables et peuvent s'user. Contrôlez le
fonctionnement des freins avant chaque utilisation.
Pour actionner les freins :
1. Poussez les poignées de freins vers l'avant
jusqu'à ce que vous sentiez un clic net.
L ATTENTION : risque de mouvement non
souhaité. Vérifiez que le fauteuil roulant se
trouve sur une surface horizontale plane
avant de relâcher les freins. Ne relâchez
jamais les deux freins en même temps.
Pour relâcher les freins :
1. Relâchez un frein en tirant une poignée vers
l'arrière.
2. Maintenez avec votre main la main-courante de
la roue relâchée.
3. Relâchez le deuxième frein en tirant la poignée
vers l'arrière.
2.6 Montage ou retrait des repos-bras
L ATTENTION : risque de pincement, laissez les doigts, boucles et vêtements à
l'écart du bas du repose-bras.
Les repose-bras du fauteuil roulant peuvent être monté en les instructions suivant.
1. Montez le tube arrière de l'accoudoir dans le logement de tube . (Fig A)
2. Vérifiez que le support de bras est parfaitement installé.
3. Pliez l'accoudoir vers l'avant.
4. Tirez le levier sur le logement de tube vers le haut. (Fig B)
5. Verrouillez le tube avant de l'accoudoir dans le logement de tube . (Fig B)
Page 8
Page 32

708D
A
B
C
D
2011-05
Pour ouvrir et retirer l'accoudoir:
1. Appuyez sur le levier et tirez l'avant de l'accoudoir vers le haut. (Fig C)
2. Pliez l'accoudoir vers l'arrière.
3. Pour retirer l'accoudoir, tirez l'arrière du repose-bras hors du logement de tube .
(Fig D)
2.7 Transfert dans et hors du fauteuil roulant
L ATTENTION : si vous ne pouvez pas réaliser le transfert en toute sécurité,
demandez à quelqu'un de vous aider.
L ATTENTION : risque de basculer hors du fauteuil roulant. Ne vous levez pas sur
les plaques repose-pieds.
1. Placez le fauteuil roulant aussi près que
possible de la chaise, du canapé ou du lit
concerné par le transfert.
2. Vérifiez que les deux freins du fauteuil
roulant sont actionnés.
3. Basculez les plaques repose-pieds vers le haut
pour éviter de marcher dessus.
4. Si le transfert est réalisé sur le côté du
fauteuil roulant, rabattez le repose-bras de ce
côté vers le haut (voir § 2.6).
5. Procédez au transfert vers/depuis le fauteuil
roulant.
Page 9
Page 33

708D
2011-05
2.8 Position correcte du fauteuil roulant
Recommandations pour une utilisation confortable du fauteuil roulant :
Placez votre dos aussi proche que possible du dossier.
Assurez-vous que vos cuisses soient horizontales. Réglez la longueur des repose-
pieds si nécessaire (voir § 3.6.1).
2.9 Déplacements avec le fauteuil roulant
L AVERTISSEMENT : risque de pincement, évitez de laisser vos doigts se prendre
dans les rayons des roues.
L AVERTISSEMENT : risque de pincement, soyez prudent lors de passages dans
des endroits étroits (par exemple les portes).
L AVERTISSEMENT : risque de brûlures – Soyez prudents lorsque vous
conduisez dans des environnements chauds ou froids (soleil, froid extrême,
saunas, etc.) - Les parties métalliques peuvent subir les températures de
l'environnement et devenir très chaudes ou très froides.
1. Relâchez les freins.
2. Saisissez le haut des deux mains-courantes.
3. Penchez-vous en avant et poussez les mains-courantes vers l'avant jusqu'à ce que
vos bras soient tendus.
4. Ramenez doucement vos bras vers le haut des mains-courantes et répétez ce
mouvement.
2.10 Déplacements en pente
L AVERTISSEMENT : contrôlez votre vitesse, déplacez-vous sur les pentes aussi
lentement que possible.
L AVERTISSEMENT : tenez compte des capacités de votre accompagnateur. S'il
n'a pas assez de force pour contrôler le fauteuil roulant, actionnez les freins.
L AVERTISSEMENT : risque de basculement. Penchez-vous vers l'avant pour
déplacer votre centre de gravité vers l'avant. Vous gagnerez ainsi en stabilité.
1. Si le fauteuil roulant est équipé d'une ceinture de sécurité,
utilisez-la.
2. N'essayez pas de franchir des pentes trop difficiles. Les
angles de pente maximum (montée et descente) sont
indiqués dans le tableau 1.
3. Demandez à un assistant de vous aider à franchir une
pente.
4. Penchez-vous vers l'avant pour déplacer votre centre de
gravité vers l'avant.
Page 10
Page 34

708D
2011-05
2.11 Passage de marches ou de bordures de trottoirs
2.11.1 Descente de marches ou de bordures de trottoirs
Il est possible de descendre de petites bordures de trottoirs en avançant. Assurez-vous que
les repose-pieds ne touchent pas le sol.
Un utilisateur entraîné peut franchir seul de petites marches
ou bordures de trottoirs :
L AVERTISSEMENT : risque de basculement. Si
vous n'êtes pas assez expérimenté avec votre
fauteuil roulant, demandez de l'aide à quelqu'un.
1. Mettez plus de poids sur les roues arrière pour réduire
la pression sur les roues avant.
2. Franchissez les bordures de trottoirs.
Il est possible de franchir des bordures de trottoirs plus hautes avec un assistant :
1. Demandez à l'assistant d'incliner légèrement le fauteuil roulant vers l'arrière.
2. Franchissez les bordures de trottoirs en roulant sur les roues arrière.
3. Reposez le fauteuil roulant sur ses quatre roues.
Un utilisateur entraîné peut franchir seul des bordures de
trottoirs plus hautes. L'idéal est de les franchir en marche
arrière.
1. Tournez le fauteuil roulant, roues arrière face à la
bordure de trottoir.
2. Penchez-vous vers l'avant pour déplacer votre centre
de gravité vers l'avant.
3. Reculez près de la bordure de trottoir.
4. Utilisez la main-courante pour contrôler la descente de
la bordure de trottoir.
2.11.2 Montée de marches ou de bordures de trottoirs
Montez des marches ou bordures de trottoirs avec un assistant de la manière suivante :
1. Les repose-pieds ne doivent pas toucher la bordure de
trottoir.
2. Demandez à l'assistant d'incliner légèrement le fauteuil
roulant vers l'arrière, juste assez pour placer les roues
avant en haut de la bordure de trottoir.
3. Penchez-vous vers l'arrière pour déplacer votre centre
de gravité au-dessus de la roue arrière.
4. Placez les roues avant sur la bordure de trottoir.
5. Montez la bordure du trottoir avec les roues arrière du
Franchissez les bordures de trottoirs hautes en marche arrière :
1. Tournez le fauteuil roulant, roues arrière face à la bordure de trottoir.
2. Penchez-vous vers l'arrière et déplacez votre centre de gravité au-dessus de la roue
arrière.
3. Demandez à l'assistant de tirer le fauteuil roulant sur la bordure de trottoir.
4. Reprenez votre position normale dans le fauteuil roulant.
fauteuil roulant.
Page 11
Page 35

708D
2011-05
Un utilisateur entraîné peut franchir seul des bordures de trottoirs.
L AVERTISSEMENT : risque de basculement. Si vous n'êtes pas assez
expérimenté pour contrôler le fauteuil roulant, demandez de l'aide à quelqu'un.
1. Roulez jusqu'aux bordures de trottoirs.
2. Assurez-vous que les repose-pieds ne touchent pas les
bordures de trottoirs.
3. Penchez-vous vers l'arrière pour déplacer votre centre
de gravité vers les roues arrière.
4. Franchissez la bordure de trottoir avec les roues avant.
5. Penchez-vous vers l'avant pour plus de stabilité.
6. Franchissez la bordure de trottoir avec les roues
arrière.
2.11.3 Passage d'escaliers
Le passage d'escaliers en restant sur le fauteuil roulant doit toujours se faire dans le respect
des règles suivantes :
L AVERTISSEMENT : risque de basculement. Toujours passer des escaliers avec
2 assistants.
1. Retirez les repose-pieds.
2. Un assistant incline légèrement le fauteuil roulant vers l'arrière.
3. Le deuxième assistant attrape l'avant du châssis.
4. Restez calme, évitez les mouvements brusques et gardez les bras à l'intérieur du
fauteuil roulant.
5. Passez les marches sur les roues arrière du fauteuil roulant.
6. Remontez les repose-pieds après le passage des escaliers.
2.12 Pliage du fauteuil roulant
L ATTENTION : risque de pincement. Ne placez pas vos doigts entre les éléments
du fauteuil roulant.
1. Pliez ou retirez les repose-pieds (voir § 2.4).
2. Saisissez l'avant et l'arrière du siège et tirez vers le haut.
2.13 Retrait des roues
Les roues arrière peuvent être retirées pour faciliter le transport du fauteuil roulant :
1. Vérifiez que les freins ne sont pas actionnés.
2. Placez-vous du côté du fauteuil roulant dont
vous voulez retirer la roue.
3. Appuyez sur le bouton au centre du moyeu.
4. Tirez la roue hors du châssis.
Page 12
Page 36

708D
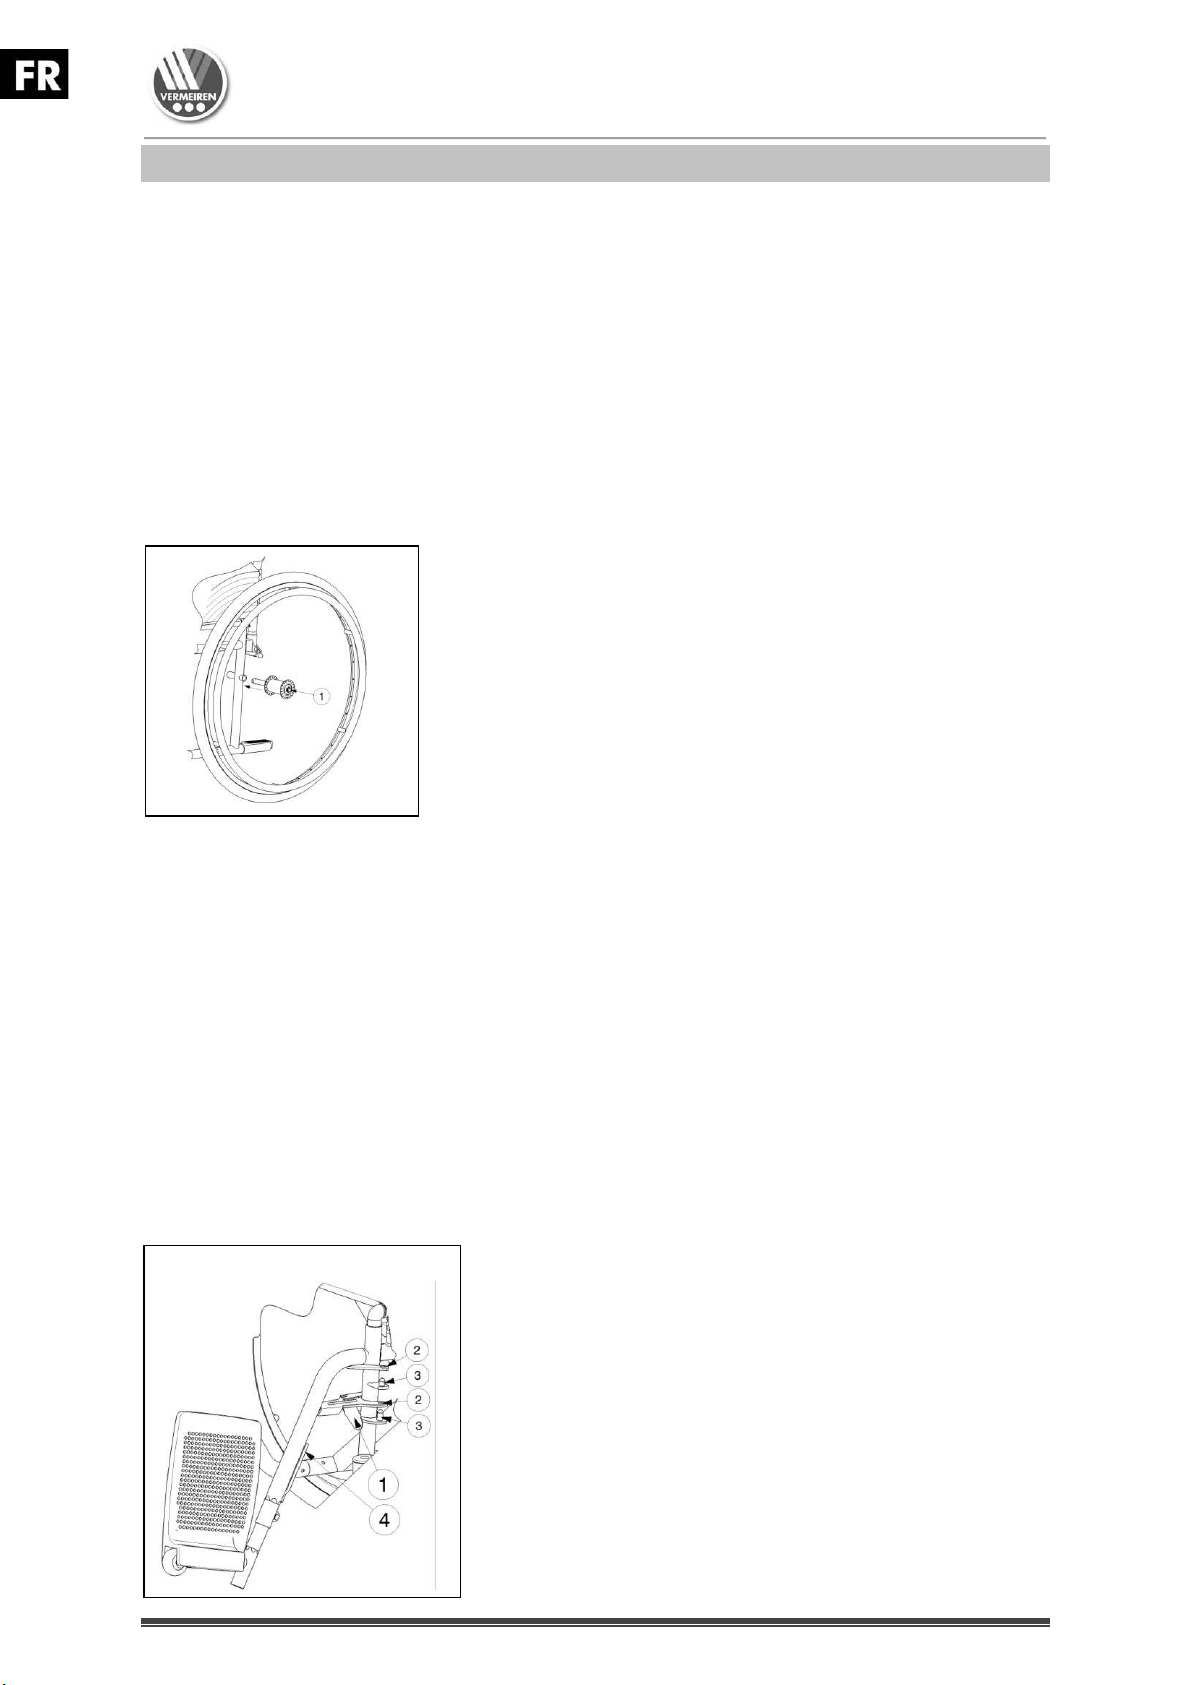
2011-05
2.14 Transport en voiture
L AVERTISSEMENT : risque de blessure. Vérifiez que le fauteuil roulant est bien
fixé. Vous éviterez ainsi des blessures des passagers en cas de collision ou de
freinage brutal.
L AVERTISSEMENT : risque de blessure. N'utilisez JAMAIS la même ceinture pour
attacher le passager et le fauteuil roulant.
1. Retirez les repose-pieds et les accessoires.
2. Stockez les repose-pieds et les accessoires en toute sécurité.
3. Si possible, pliez le fauteuil roulant et retirez les roues.
4. Placez le fauteuil roulant dans le compartiment à bagages.
5. Si le fauteuil roulant n'est PAS séparé de l'habitacle, fixez correctement le châssis du
fauteuil roulant au véhicule. Vous pouvez utiliser les ceintures de sécurité du
véhicule.
2.15 Utilisation du fauteuil roulant comme siège dans un véhicule
L AVERTISSEMENT: Le fauteuil roulant a passé le crash test ISO 7176-19: 2008,
et donc a été conçu et testé uniquement pour une utilisation en tant que
passager du véhicule.
L AVERTISSEMENT: La ceinture pelvienne seule n’est pas adaptée pour être
utilisée comme ceinture de sécurité pour tout autre passager.
Le fauteuil est testé avec 4 points d’attache et une ceinture 3 points.
Dès que possible, utilisez le siège du véhicule et emportez votre fauteuil dans le coffre.
Etapes pour fixer le fauteuil dans un véhicule:
1. Vérifiez que le véhicule est équipé d’un système d’accroches pour fauteuils roulant,
ISO 10542.
2. Vérifiez que les systèmes d’accroche sont en bon état de fonctionnement (Ne pas
utiliser si les points d’accroches sont endommagés).
3. Si le fauteuil a une assise ou un dossier réglable, faites en sorte que l’utilisateur soit
le plus droit possible dans son fauteuil. Si l’état de santé de l’utilisateur empêche
ceci, une évaluation des risques et nécessaire pour évaluer la sécurité de l’utilisateur
pendant le transport.
4. Retirez du fauteuil les accessoires tels que tablette, équipement respiratoire et
sécurisez les pour le transport.
5. Dans la voiture, positionnez le fauteuil roulant face à la route et centré entre les
points d’accroche.
6. Assurez vous qu'il n'y ait aucune partie ou objet du véhicule autour de l'utilisateur qui
pourraient le blesser. Ces parties à sécuriser correspondent aux zones grises sur le
schéma.
Page 13
Page 37

708D
2011-05
7. Fixez les sangles avant de sécurité comme indiqué par le fabricant. (figure 3)
Les points d’accroches sont indiqués sur le fauteuil roulant par un symbole. (figure
4).
8. Reculez le fauteuil de façon à ce que les sangles avant soient tendues.
9. Actionnez les freins du fauteuil roulant.
10. Fixez les sangles arrière de sécurité comme indiqué par le fabricant. (figure 3)
11. Les points d’accroches sont indiqués sur le fauteuil roulant par un symbole. (figure
4).
figure 3
Etapes pour sécuriser l’utilisateur du fauteuil roulant.
1. Retirez les deux accoudoirs.
2. Si le fauteuil a une ceinture de sécurité, bouclez la.
3. Attachez l’utilisateur du fauteuil comme indiqué par le fabricant des sangles de
sécurité.
4. Portez la ceinture de sécurité du bassin de façon à ce qu’elle soit positionnée comme
sur le dessin ci-dessous, dans une zone de 30 à 75° par rapport à l’horizontal.
5. Pour le confort du patient, préférez le plus grand angle de la zone hachurée (préférez
l'angle de 75° à l'angle des 30°).
6. Ajustez la ceinture de sécurité comme indiqué par le fabricant pour que celle-ci soit
tendue tout en gardant le confort de l’utilisateur.
7. Assurez vous que les ceintures soient correctement fixées sans être pliées ou
torsadées.
8. Vous pouvez installer à nouveau les accoudoirs si cela est nécessaire. Assurez vous
que les ceintures ne sont pas coincées pas certaines parties du fauteuil comme les
accoudoirs, les roues, etc.
Page 14
Page 38

708D
Les ceintures ne doivent pas être
éloignées du corps par les parties
comme les accoudoirs ou les roues
La ceinture pelvienne doit avoir un contact
parfait avec le devant du corps de l'utilisateur.
2011-05
3 Installation et réglage
Les instructions de ce chapitre sont destinées au distributeur.
Le fauteuil roulant 708D a été dessiné entièrement pour votre confort.
Pour trouver un service d'entretien ou un revendeur spécialisé près de chez vous, contactez
l'établissement Vermeiren le plus proche. Vous trouverez une liste des établissements sur la
dernière page.
L AVERTISSEMENT: risque de limitations dangereuses - N'utiliser que les
limitations décrites dans ce manuel.
L AVERTISSEMENT: une variation des réglages autorisés peut avoir une incidence
sur la stabilité de votre fauteuil roulant (inclinaison en arrière ou latérale).
3.1 Outils
Les outils suivants sont requis pour le montage du fauteuil roulant.
Jeu de clés de 10 à 19
Jeu de clés Allen de 4 à 5
Tournevis à tête Philips
3.2 Importance de la livraison
Le Vermeiren 708D est livré de la manière suivante :
1 structure montée avec des accoudoirs, des roues avant et arrière (hauteur d'assise
fixée à 500 mm, angle d'assise à 5°)
1 paire de repose-pieds
Coussins pour le dos et l'assise
Outils
Mode d’emploi
Accessoires (en option)
Pompe (uniquement avec pneumatiques)
Avant l'utilisation, contrôlez si tout a été livré et s'il n'y a pas de détérioration au niveau des
produits (par exemple : causées par le transport...).
Page 15
Page 39

708D
2011-05
3.3 Assise anatomique (EN OPTION)
L AVERTISSEMENT : Danger de lésion - Contrôlez que le siège est bien fixé avant
l'utilisation.
L AVERTISSEMENT : Danger de lésion - Evitez que vos doigts ne se coincent
pendant le processus de montage.
Si vous avez choisi un fauteuil anatomique, vous devez alors le
placer sur la structure dépliée en sorte que la fixation de cette
assise est bien fixée de manière uniforme sur la structure. Vous
trouverez sur le châssis en bois des échancrures dans
lesquelles vous pouvez placer les traverses de la structure.
Pour plier le fauteuil roulant, vous enlevez l'assise vers le haut.
3.4 Dossier anatomique (EN OPTION)
L AVERTISSEMENT : Danger de lésion - Contrôlez que le siège est bien fixé avant
l'utilisation.
L AVERTISSEMENT : Danger de lésion - Evitez que vos doigts ne se coincent
pendant le processus de montage.
Si vous désirez utiliser un dossier anatomique, vous devez
procéder de la manière suivante :
1. Déboulonnez le dossier flexible.
2. Boulonnez légèrement les fixations du dossier.
3. Placez le dossier depuis le haut dans les supports.
4. Boulonnez les boulons du dossier.
5. Serrez les boulons de sécurité du dossier.
6. Monter les accoudoirs.
3.5 Réglages des freins
L AVERTISSEMENT : Danger de lésion - Faites régler les freins par un
commerçant spécialisé et agréé.
Vous devez régler les freins de la manière suivante :
1. Montez les roues comme cela est décrit au § 2.2.
2. Détachez les freins en tirant le levier vers l'arrière.
3. Déboulonnez l'écrou qui se verrouille tout seul en sorte
que le mécanisme de freinage puisse glisser sur el
conduit de la structure.
4. Glissez le mécanisme de freinage sur le conduit
jusqu'à la position souhaitée. (La portée de réglage du
frein se trouve entre l'encoche de la plaque du montage
du frein)
5. Refixez l'écrou qui se verrouille tout seul .
6. Contrôlez le fonctionnement des freins.
7. Si nécessaire, répétez les étapes précédentes jusqu'à ce
que les freins soient bien réglés.
Page 16
Page 40

708D
2011-05
3.6 Réglages des repose-pieds
3.6.1 Longueur des repose-pieds
L PRUDENCE : Risque de détérioration – Assurez-vous que les repose-pieds ne
traînent pas sur le sol. Garez une distance minimale de 60 mm avec le sol.
Réglez la longueur des repose-pieds de la
manière suivante :
1. Enlevez la vis à six pans creux sur le
dessous de la partie externe du repose-jambe.
2. Réglez le repose-pieds sur une longueur
confortable en déplaçant le conduit hexagonal
en dehors et en dedans.
3. Serrez bien la vis à six pans creux .
La longueur minimale est obtenue
lorsque le conduit du reposepieds passe de hexagonal à rond.
La longueur maximale est
marquée sur le conduit. (Cette
marque est une ligne droite).
4 Maintenance
La durée de vie du fauteuil roulant est influencée par son utilisation, de son stockage, de sa
maintenance régulière, de l'entretien et du nettoyage.
4.1 Maintenance régulière
Les activités de maintenance requises pour garantir le bon état de votre fauteuil roulant
Vermeiren sont décrites ci-dessous :
Avant tout déplacement
Contrôlez et nettoyez les pneus. Remplacez les pneus si nécessaire.
Contrôlez toutes les vis sont bien serrées.
Contrôlez les freins et réglez-les si nécessaire.
Contrôlez le fauteuil roulant (propreté, fissures, dommages sur les pièces de
structure, etc.) et nettoyez-le. Remplacez le revêtement si nécessaire.
Toutes les 8 semaines : inspection, lubrification et réglage de
Repose-bras
Repose-pieds
Levier de freins
Essieux des roues
Tous les 6 mois ou pour tout nouvel utilisateur
Révision générale
Désinfection
Roues avant, nettoyer les roulements si nécessaire
Vous trouverez un plan de maintenance au verso de ce manuel.
Seul le distributeur peut se charger de la réparation et de l'assemblage des pièces
détachées de votre fauteuil roulant.
N'installez que des pièces de rechange autorisées par Vermeiren.
Page 17
Page 41

708D
2011-05
4.2 Expedition et stockage
Respectez les instructions suivantes pour le expedition or le stockage du fauteuil roulant :
Stockez le fauteuil roulant uniquement dans des locaux secs (+5°C à +41°C).
À une humidité relative de 30 % à 70 %.
Utilisez suffisamment de protections ou emballages pour mettre le fauteuil roulant à
l'abri de la rouille et des corps étrangers. (Par exemple eau salée, air salin, sable,
poussière).
Stockez toutes les pièces retirées ensemble, au même endroit (ou repérez-les si
nécessaire) pour éviter de les mélanger avec d'autres produits lors du remontage.
Les composants doivent être stockés sans subir de contrainte (ne placez pas de
pièces trop lourdes sur le fauteuil roulant, ne le coincez pas entre d'autres objets,
etc.).
4.3 Entretien
4.3.1 Coussin d’assise et le dos
Respectez les instructions suivantes pour le nettoyage le coussin d’assise et le dos:
Nettoyez le coussin d’assise et le dos avec un tissu humidifié avec de l'eau
chaude. Veillez à ne pas tremper le coussin d’assise et le dos.
Utilisez un détergent doux vendu dans le commerce pour enlever les taches
rebelles.
Vous pouvez utiliser une éponge ou une brosse douce pour éliminer les taches.
N'utilisez pas de produits de nettoyage agressifs tels que des solvants ni de
brosses à poils durs.
N'utilisez jamais de vapeur ni de nettoyeur haute pression pour le nettoyage.
4.3.2 Pièces en plastique
Nettoyez les éléments en plastique de votre fauteuil roulant avec un produit de nettoyage
conçu à cet effet. Utilisez exclusivement une éponge ou brosse douce.
Les pièces en plastique sont par exemple les accoudoirs, poignées, pneus, etc. .
4.3.3 Enduit
La grande qualité de la couche de surface garantit une protection optimale contre la
corrosion. Si la couche externe est endommagée par une rayure ou autre, faites réparer la
surface concernée par votre distributeur.
Pour le nettoyage, utilisez exclusivement de l'eau chaude et des détergents domestiques
normaux avec des brosses ou tissus doux. Veillez à ne pas faire entrer d'humidité dans les
tubes.
À l'origine, les pièces en zinc n'ont besoin que d'être frottées avec un tissu sec. Vous pouvez
éliminer les taches rebelles avec un polish pour zinc du commerce.
Page 18
Page 42

708D
Date de
désinfection
Motif
Spécification
Substance et
concentration
Signature
2011-05
4.4 Inspection
En principe, nous recommandons une inspection chaque année, et au minimum une avant
la remise en service. Tous les contrôles suivants doivent être réalisés et documentés par des
personnes autorisées :
Contrôlez sur les pièces du châssis et les tubes l'absence de déformation du
plastique, de fissures et de dysfonctionnements.
Contrôlez visuellement l'absence de dommage au niveau de la peinture (risque de
corrosion)
Contrôlez le fonctionnement des roues (rotation correcte, sans voile, jeu de l'essieu,
pneus, profil, état des mains-courantes, pression d'air dans le cas de pneus gonflés,
axes flottants, etc.)
Contrôlez la solidité et le serrage de toutes les vis.
Contrôlez la quantité de graisse sur les joints métalliques des pièces mobiles
Contrôlez l'état et la sécurité des guides et axes des roues directrices
Contrôlez visuellement l'absence de fissures et de points de rupture sur toutes les
pièces en plastique
Contrôlez le fonctionnement des accoudoirs et repose-jambes (verrouillage, charge,
déformation, usure liée aux charges).
Contrôlez le fonctionnement des autres pièces détachables (par exemple : système
anti-basculement, sangle de sécurité personnelle, liaison dossier/siège, etc.)
Fourniture de l'ensemble des pièces, manuel d'instructions disponible?
L'entretien ne doit être validé dans le plan de maintenance que si au minimum tous les
éléments indiqués ci-dessus ont été contrôlés.
4.5 Désinfection
L AVERTISSEMENT : produits dangereux, l'utilisation de désinfectants est
réservée au personnel autorisé.
L AVERTISSEMENT : produits dangereux, irritants pour la peau. Vous devez porter
des vêtements de protection adaptés car les désinfectants peuvent irriter votre
peau. Vous devez pour cela également tenir compte des informations relatives
aux produits utilisés.
Toutes les pièces du lève-personne peuvent être traitées par récurage avec un désinfectant.
Toutes les mesures prises pour désinfecter des équipements réutilisés, leurs composants ou
accessoires doivent être notées dans un rapport de désinfection contenant au minimum les
informations suivantes (avec documentation des produits jointe) :
Tableau 2: Exemple de journal de désinfection
Abréviations utilisées dans la colonne 2 (motif) :
V = Infection suspectée IF = Cas d'infection W = Répétition I = Inspection
Pour une feuille vierge d'un journal de désinfection, voir § 9.
Les désinfectants recommandés pour le récurage (d'après la liste fournie par le Robert Koch
Institute, RKI) sont présentés dans le tableau ci-dessous. L'état actuel des désinfectants
présents dans la liste RKI est disponible auprès du Robert Koch Institute (RKI) (page
d'accueil : www.rki.de).
Page 19
Page 43

708D
Substance
active
Nom du produit
Désinfectant
de
blanchisserie
Désinfection
de surface
(récurage/
essuyage)
Désinfection des excrétions
1 volume crachat ou de selles + 2
volumes de solution diluée ou 1
volume d'urine + 1 volume de solution
diluée
Zone
d'efficacité
Fabricant ou
fournisseur
Crachat
Selles
Urine
Solution
diluée
Durée pour
faire effet
Solution
diluée
Durée pour
faire effet
Solution
diluée
Durée pour
faire effet
Solution
diluée
Durée pour
faire effet
Solution
diluée
Durée pour
faire effet
% h % h % h % h %
h
Phénol ou dérivé
de phénol
Amocid 1 12 5 6 5 4 5 6 5 2 A Lysoform
Gevisol
0,5
12 5 4 5 4 5 6 5 2 A Schülke & Mayr
Helipur 6 4 6 4 6 6 6 2 A B. Braun
Solution
savonneuse mcresylic (DAB 6)
1
12 5 4 A
Phénol 1 12 3 2 A
Chlore,
substances
organiques ou
anorganiques
avec chlore actif
Chloramine-T
DAB 9
1,5
12
2,5 2 5 4 A1B
Clorina
1,5
12
2,5 2 5 4 A1B
Lysoform
Trichlorol 2 12 3 2 6 4
A1B
Lysoform
Par
combinaisons
Apesin AP1002
4 4 AB
Tana
PROFESSIONAL
Dismozon pur2
4 1 AB
Bode Chemie
Perform2 3 4
AB
Schülke & Mayr
Wofesteril2 2 4
AB
Kesla Pharma
Formaldéhyde
et/ou autres
aldéhydes ou
dérivés
Aldasan 2000
4 4 AB
Lysoform
Antifect FD 10
3 4 AB
Schülke & Mayr
Antiseptica
désinfection de
surface 7
3 6 AB
Antiseptica
Apesin AP30
5 4 A
Tana
PROFESSIONAL
Bacillocid special
6 4 AB
Bode Chemie
Buraton 10F
3 4 AB
Schülke & Mayr
Desomed A 2000
3 6 AB
Desomed
Nettoyant
désinfectant pour
hôpitaux
8 6 AB
Dreiturm
Desomed Perfekt
7 4 AB*
Desomed
Solution
formaldéhyde
(DAB 10),
(formaline)
1,5
12 3 4
AB
Incidin Perfekt
1
12 3 4
AB
Ecolab
Incidin Plus
8 6 A
Ecolab
Kohrsolin 2 12 3 4
AB
Bode Chemie
Lysoform 4 12 5 6
AB
Lysoform
Lysoformin
3
12 5 6
AB
Lysoform
Lysoformin 2000
4 6 AB
Lysoform
Melsept 2 12 4 6
AB
B. Braun
Melsitt 4 12
10 4 AB
B. Braun
Minutil 2 12 6 4
AB
Ecolab
Multidor 3 6
AB
Ecolab
Nûscosept 5 4
AB
Dr. Nüsken
Chemie
Optisept 7 4
AB*
Dr. Schumacher
Pursept-FD
7 4 AB*
Merz
Ultrasol F
3
12 5 4
AB
Fresenius Kabi
Surfactants
amphotères
(amfotensiden)
Tensodur 103
2
12 A MFH Marienfelde
Lye
Lait de chaux3
20 6 A3B
1 Pas efficace contre les myco-bactéries lors de la désinfection d'entretien, principalement en présence de sang.
2 Ne convient pas pour désinfecter des surfaces poreuses ou contaminées de sang (par exemple bois brut).
3 Pas efficace pour la tuberculose ; préparation de lait de chaux : 1 volume de chaux dissoute (hydroxyde de calcium) + 3 volumes d'eau.
* Efficacité contrôlée sur les virus conformément aux méthodes de contrôle de RKI (Federal Health Reporting 38 (1995) 242).
A : convient pour tuer les germes bactériens végétatifs, y compris les myco-bactéries et champignons, y compris les spores fongiques.
B : convient pour désactiver les virus.
2011-05
Consultez votre distributeur pour toute question relative à la désinfection ; il sera heureux de
vous aider.
Tableau 3: Désinfectants
Page 20
Page 44

708D
2011-05
5 Garantie
Extrait des Conditions générales de vente :
(...)
5. La durée de garantie est de 24 mois. Grâce à nos exigences élevées en matière de
qualité, nous pouvons prolonger la période de garantie au-delà de cette période de base
pour
(...)
-Châssis et articulation transversale des fauteuils roulants 5 ans
La garantie exclut les dommages liés à des modifications structurelles apportées à nos
produits, à une maintenance insuffisante, à une manipulation ou un stockage déficients ou
inappropriés ou à l'utilisation de pièces autres que les pièces d'origine. Par ailleurs, la
garantie exclut les pièces ou pièces de travail soumises à une usure naturelle.
(...)
6 Mise au rebut
Lors de la mise au rebut du fauteuil roulant, contactez votre centre de collecte local ou
retournez le produit à votre distributeur qui, après l'avoir soumis à une procédure d'hygiène,
sera en mesure de le renvoyer au fabricant, qui se chargera de sa mise au rebut et de son
recyclage corrects, en le séparant en différents matériaux entrant dans sa composition.
Les emballages peuvent être déposés dans des centres de collecte ou de recyclage ou
après de votre distributeur.
7 Déclaration de conformité
Page 21
Page 45

708D
Date
Maintenance
Remarques
Signature
1/1/2011
Lubrification et entretien général
non
Date de
désinfection
Motif
Spécification
Substance et
concentration
Signature
Abréviations utilisées dans la colonne 2 (motif) :
V = Infection suspectée IF = Cas d'infection W = Répétition I = Inspection
2011-05
8 Plan de maintenance
9 Journal de désinfection
Page 22
Page 46

708D
2011-05
Inhoudsopgave
Voorwoord ................................................................................................................................. 2
1 Productomschrijving .................................................................................................. 3
1.1 Toepassingsgebied ....................................................................................................... 3
1.3 Technische specificaties .............................................................................................. 4
1.4 Componenten .............................................................................................................. 5
1.5 Accessoires .................................................................................................................. 5
1.6 Locatie identificatieplaat ............................................................................................. 5
1.7 Gebruikte symbolen .................................................................................................... 6
1.8 Voor uw veiligheid ...................................................................................................... 6
2 Gebruik ........................................................................................................................ 6
2.1 Dragen van de rolstoel................................................................................................. 7
2.2 Plaatsen van de achterwielen....................................................................................... 7
2.3 Uitvouwen van de rolstoel........................................................................................... 7
2.4 Plaatsen of verwijderen van de voetsteunen ............................................................... 7
2.5 Bedienen van de rem ................................................................................................... 8
2.6 Plaatsen of verwijderen van de armsteunen ................................................................ 8
2.7 Transfer in en uit de rolstoel ........................................................................................ 9
2.8 Correcte positie in de rolstoel...................................................................................... 9
2.9 Rijden met de rolstoel ................................................................................................. 9
2.10 Rijden op hellingen ................................................................................................... 10
2.11 Nemen van hindernissen (trottoirs) ........................................................................... 10
2.12 Opvouwen van de rolstoel ......................................................................................... 12
2.13 Afnemen van de wielen ............................................................................................. 12
2.14 Transport in de auto ................................................................................................... 12
2.15 Gebruik van de rolstoel als zit in een motorvoertuig ................................................ 12
3 Montage en afstelling ................................................................................................ 14
3.1 Gereedschap .............................................................................................................. 14
3.2 Leveringsomvang ...................................................................................................... 15
3.3 Anatomische zit (OPTIONEEL) .............................................................................. 15
3.4 Anatomische rug (OPTIONEEL) .............................................................................. 15
3.5 Afstellen van de remmen........................................................................................... 16
3.6 Afstellen van de voetsteunen..................................................................................... 16
4 Onderhoud................................................................................................................. 17
4.1 Periodiek Onderhoud................................................................................................. 17
4.2 Verpakking en opslag ................................................................................................ 17
4.3 Verzorging ................................................................................................................. 17
4.4 Inspectie .................................................................................................................... 18
4.5 Desinfecteren ............................................................................................................. 19
5 Garantie ..................................................................................................................... 21
6 Afvalverwerking ....................................................................................................... 21
7 Verklaring van overeenstemming ............................................................................ 21
8 Onderhoudsplan ....................................................................................................... 22
9 Desinfectiejournaal ................................................................................................... 22
10 Clusteromschrijvingen ............................................................................................. 23
Pagina 1
Page 47

708D
2011-05
Voorwoord
We willen U danken voor het vertrouwen dat U in onze producten stelt.
De rolstoelen van Vermeiren zijn het resultaat van jarenlange studies en ervaringen. Bij de
ontwikkeling werd veel aandacht besteed aan een eenvoudige bediening en een gemakkelijk
onderhoud.
De levensduur van Uw rolstoel hangt in sterke mate af van de zorg waarmee U de rolstoel
behandelt.
Deze handleiding maakt U vertrouwd met de bediening van Uw rolstoel. In dit document
vindt U ook enkele onderhoudsadviezen zodat Uw rolstoel lang meegaat.
Het naleven van de gebruiks- en onderhoudsinstructies vormen een essentieel onderdeel
van de garantiebepalingen.
Deze handleiding houdt rekening met de recentste productontwikkelingen. De Firma
Vermeiren behoudt zich echter het recht voor om wijzigingen door te voeren zonder verplicht
te zijn voordien geleverde modellen aan te passen of te vervangen.
Als U nog vragen hebt, neemt U best contact op met Uw vakhandelaar.
Pagina 2
Page 48

708D
2011-05
1 Productomschrijving
1.1 Toepassingsgebied
De rolstoel is bedoeld voor mensen die moeilijk of niet kunnen lopen.
De rolstoel is ontworpen voor het transport van 1 persoon.
De rolstoel kan zowel binnenshuis als buiten gebruikt worden.
De gebruiker kan de rolstoel zelf voortbewegen of laten duwen door een begeleider.
De rolstoel biedt door zijn modulaire opbouw verschillende aanpassingsmogelijkheden voor
mensen die moeilijk kunnen lopen door:
verlamming
verlies van ledematen (beenamputatie)
defect of aandoeningen van ledematen
contracturen en gewrichtsaandoeningen
hart- en bloedsomloopinsufficiëntie
evenwichtsstoornissen
cachexie (afname van het spierweefsel)
geriatrische patiënten
Hou bij de individuele verzorging rekening met:
grootte en lichaamsgewicht (max. 120 kg)
fysieke en psychische gesteldheid
woonomgeving
milieu
Uw rolstoel mag alleen gebruikt worden op ondergronden waarbij alle vier de wielen de
grond raken en waarbij het bodemcontact voldoende is voor een gelijkmatige aandrijving van
alle wielen. Extra oefening is nodig voor het rijden op ongelijkmatige ondergrond (kasseien,
etc.), hellingen en bochten (zijdelings omvallen), evenals het nemen van hindernissen (bvb.
Trottoirranden).
De rolstoel dient niet als klimtoestel of om hete of zware voorwerpen te transporteren.
Het gebruik van de rolstoel op tapijten, tapijtvloeren of andere losse vloerbedekkingen kan
slijtage van de vloerbedekking tot gevolg hebben.
Gebruik enkel door Vermeiren goedgekeurde accessoires.
Vermeiren is niet aansprakelijk voor schade door gebrekkig of onvoldoende onderhoud of als
gevolg van het niet naleven van instructies van deze handleiding.
Het naleven van de gebruiks- en onderhoudsinstructies vormen een essentieel onderdeel
van de garantiebepalingen.
Pagina 3
Page 49

708D
Merk
Vermeiren
Adres
Vermeirenplein 1/15, B-2920 Kalmthout
Type
Manual wheelchair
Model
708D
Maximale massa gebruiker
120 kg
Omschrijving
Afmetingen
Effectieve zitbreedte
390 mm
420 mm
440 mm
460 mm
480 mm
500 mm
Totale breedte (afhankelijk van de zitbreedte)
560 mm
590 mm
610 mm
630 mm
650 mm
670 mm
Omschrijving
Afmetingen Min.
Afmetingen Max.
Totale lengte inclusief voetsteun
1060 mm
Lengte dichtgevouwen zonder voetsteun
810 mm
Breedte dichtgevouwen
280 mm
Hoogte dichtgevouwen
920 mm
Totaal gewicht
± 18 kg
Gewicht zwaarste onderdeel
10,10 kg
Massa van onderdelen die kunnen worden
gedemonteerd of verwijderd
Voetsteunen: 1,90 kg; Armsteunen: 1,85 kg;
Achterwielen: 4,15 kg
Statische stabiliteit bergaf
15°
Statische stabiliteit bergop
15°
Statische stabiliteit zijwaarts
15°
Maximum hoogte hindernis
60 mm
Zithoek
5°
Effectieve zitdiepte
430 mm
Zithoogte aan voorzijde
500 mm
Rughoek
5°
Rughoogte
420 mm
Afstand tussen zit en voetsteun
420 mm
500 mm
Hoek tussen zit en voetsteun
9°
Afstand tussen armsteun en zit
220 mm
Afstand voorzijde armsteunen
300 mm
Diameter aandrijfhoepel
535 mm
Horizontale afstand van de as (uitwijking)
-7 mm
Minimale draaicirkel
1619 mm
Diameter Krypton PU achterwielen
24"
Bandenspanning aandrijfwielen / achterwielen
(enkel voor luchtbanden)
Max. 3.5 bar
Diameter Krypton PU stuurwielen
200 mm
Bandenspanning stuurwielen (enkel voor
luchtbanden)
Max. 2.5 bar
Opslag en gebruikstemperatuur
+ 5 °C
+ 41 °C
Opslag en gebruiksluchtvochtigheid
30%
70%
Technische wijzigingen voorbehouden. Meettolerantie ± 15 mm / 1,5 kg / °
2011-05
1.3 Technische specificaties
Onderstaande technische gegevens zijn geldig voor de rolstoel in standaard afstelling.
Wanneer er andere voetsteunen/armsteunen of andere accessoires worden gebruikt,
worden de opgegeven waarden gewijzigd.
Table 1: Technical specifications 708D
Pagina 4
Page 50

708D
1 = Taxi haken
2 = Identificatieplaat
3 = Naam 708D
1 = Kruis
2 = Handvaten
3 = Rug
4 = Armkussens
5 = Armsteunen
6 = Aandrijfwielen (achterwielen)
7 = Grijphoepels
8 = Remmen
9 = Trapdop
10 = Stuurwielen (voorwielen)
11 = Zit
12 = Voetsteunen
2011-05
De rolstoel voldoet aan de eisen gesteld in:
ISO 7176-8: Eisen en testmethodes voor statische, impact en vermoeiing sterktes
EN 1021-1: Meubelen - Beoordeling van de ontvlambaarheid van beklede meubelen -
Deel 1: Smeulende sigaret als ontstekingsbron
EN 1021-2: Meubelen - Bepaling van de ontsteekbaarheid van beklede meubelen -
Deel 2: Equivalent van de lucifervlam als ontstekingsbron
ISO 7176-19: Gebruik van een rolstoel in een voertuig
1.4 Componenten
1.5 Accessoires
Volgende accessoires zijn beschikbaar voor de 708D:
Armsteunen (B02, B03, B05, B66)
Beensteunen (B06, B07, B08, BZ7, BZ8, BZ9, BZ10, BK7, BL7, BA6, BK6)
Tafel (B12)
Krukkenhouder (B31)
Rug (L14, L24, L44)
Anterior bekkengordel (B58) om te bevestigen aan de tubes van de rug
Anti-tipping apparaat (B78) om te bevestigen aan het onderste frame
Trommelrem voor begeleider (B74) om te bevestigen aan de handgrepen
Transitrolstoel (T30)
Asachteruitverplaatsing (AMP)
Afneembare wielen (B80)
Zithoogte verlagen naar 470 mm (S)
1.6 Locatie identificatieplaat
Pagina 5
Page 51

708D
2011-05
1.7 Gebruikte symbolen
Maximum gewicht
Gebruik voor binnen en buiten
Afdaling
Helling
CE conformiteit
1.8 Voor uw veiligheid
L Let erop dat bij het gebruik van de aandrijfwielen geen voorwerpen en/of lichaamsdelen
tussen de spaken terechtkomen. Dit kan immers letsel en/of schade aan de rolstoel
veroorzaken.
L Voor het in- en uitstappen in en uit de rolstoel dient u de handremmen vast te zetten.
L Gebruik de voetsteunen nooit om in en uit de rolstoel te stappen. Deze dienen naar
boven te worden geklapt of de volledige voetsteun dient naar buiten te zijn
weggedraaid.
L Onderzoek het effect van een veranderd zwaartepunt op het gedrag van de rolstoel
(bijv. op hellingen, op zijdelingse hellingen of bij het overwinnen van hindernissen).
Maak gebruik van hulp van een begeleider.
L Let er bij het opnemen van voorwerpen (die zich voor, opzij of achter de rolstoel
bevinden) op dat u niet te ver uit de rolstoel leunt. Anders kan de rolstoel kantelen.
L Bij het rijden door deuren, openingen e.d. moet aan de zijkant voldoende plaats zijn,
anders bestaat er gevaar op letsel aan handen en armen en op beschadiging van de
rolstoel.
L Gebruik uw rolstoel alleen voor de beschreven doeleinden. Vermijd bijv. om zonder
remmen tegen een hindernis te rijden (stoeprand, stootsteen) of van treden te springen.
De fabrikant is niet aansprakelijk voor schade als gevolg van overbelasting of botsingen
bij het gebruik dat niet in overeenstemming is met het doel van het product.
L Trappen mogen alleen met behulp van een begeleider worden genomen. Wanneer er
bijv. hellingen of liften beschikbaar zijn, dient u deze te gebruiken.
L Bij gebruik van de de openbare weg dient u zich te houden aan de verkeersregels.
L Net zoals voor andere voertuigen geldt dat u de rolstoel niet mag gebruiken onder
invloed van alcohol of geneesmiddelen. Dit geldt ook voor verplaatsingen binnenshuis.
L Pas uw rijstijl bij ritten buiten de woning aan aan het weer en het verkeer.
L Bij het transporteren van de rolstoel mag u deze nooit vastnemen aan bewegende delen
(armsteunen, voetsteunen, enz.). U moet de rolstoel altijd vastnemen aan het vaste
frame.
L Zorg ervoor dat u in het donker goed zichtbaar bent. Draag lichte kleding of kleding met
reflectoren en zorg ervoor dat de reflectoren opzij en achteraan de rolstoel goed
zichtbaar zijn.
L Let op met brandende voorwerpen, zoals sigaretten. De rug- en zitbekleding kunnen
vlam vatten.
L Let erop dat de maximale belasting (120kg) niet wordt overschreden.
2 Gebruik
Dit hoofdstuk beschrijft het normaal gebruik. Deze instructies zijn van toepassing voor de
gebruiker en de vakhandelaar.
De rolstoel wordt gemonteerd en afgesteld door Uw vakhandelaar. De instructies voor de
montage en afstelling van de rolstoel staat in § 3.
Pagina 6
Page 52

708D
2011-05
2.1 Dragen van de rolstoel
De beste manier om de rolstoel te dragen is om gebruik te maken van de wielen en zo de
rolstoel verder te rollen.
Als dit niet mogelijk is (bv. wanneer de achterwielen verwijderd zijn voor het transporteren in
de auto), grijp de rolstoel stevig vast aan de voorzijde van het frame en de handgrepen.
Gebruik de voet of armsteunen of de wielen niet om de rolstoel vast te nemen.
2.2 Plaatsen van de achterwielen
1. Neem het achterwiel en druk naafknop in.
2. Houdt de naafknop ingedrukt en plaats het
achterwiel in de asbus tot deze niet meer verder
kan.
3. Laat de naafknop los.
4. Kijk na of het wiel goed vastzit.
2.3 Uitvouwen van de rolstoel
L VOORZICHTIG: Kans op klemmen – Houd vingers niet tussen de onderdelen van
de rolstoel.
1. Ga aan de achterzijde van de rolstoel staan.
2. Gebruik de handgrepen van de duwers om de rolstoel zo ver mogelijk te openen.
3. Ga aan de voorzijde van de rolstoel staan.
4. Duw beide buizen waaraan de zit bevestigd is verder naar beneden.
2.4 Plaatsen of verwijderen van de voetsteunen
L WAARSCHUWING: Gevaar voor letsel – Controleer dat de beensteunen goed
zijn bevestigd, voor U de rolstoel gebruikt.
L VOORZICHTIG: Kans op klemmen – Geen voorwerpen of personen in het weg te
draaien gedeelte van de rolstoel.
Het plaatsen van de voetsteunen gaat als volgt:
1. Hou de voetsteun zijdelings aan de buitenkant van het
frame van de stoel.
2. Monteer de gaten van de voetsteun aan de pennen
bevestigd aan het frame.
3. Draai de beensteun naar binnen totdat de
vergrendeling automatisch vastklikt (gaat het inklikken
wat zwaar, druk dan de vergrendeling licht aan).
4. Draai de voetplaat naar beneden.
5. Plaats nu de kuitband terug in de haken .
Om de voetsteunen af te nemen gaat U als volgt te werk:
1. Verwijder eerst de kuitband door hem aan beide
kanten los te maken van de haken .
2. Druk de naast de ophanging van de beensteunen
aangebrachte hendel naar achteren.
3. Draai de voetsteun naar de buitenkant van de rolstoel
4. Trek de gaten van de voetsteun uit de pennen
bevestigd aan het frame .
Pagina 7
Page 53

708D
A
B
2011-05
2.5 Bedienen van de rem
L WAARSCHUWING: De rem dient niet om af te remmen tijdens het rijden -
Gebruik de rem enkel om te vermijden dat de rolstoel in stilstaande positie
wegrolt.
L WAARSCHUWING: De werking van de handrem wordt beïnvloed door slijtage en
vervuiling van de banden (water, olie, slijk, ...) – Controleer voor elk gebruik de
staat van de banden.
L WAARSCHUWING: De rem is instelbaar en kan verlopen – Controleer voor elk
gebruik de goede werking van de remmen.
Om de remmen in te schakelen:
1. Druk de hendels van de remmen naar voren
tot U een duidelijke klik voelt.
L VOORZICHTIG: Gevaar op
ongecontroleerde beweging - zorg ervoor
dat alvorens de remmen lost gezet worden,
de rolstoel vlak staat. Los nooit beide
remmen tegelijk.
Om de remmen uit te schakelen:
1. Zet eerst één rem los door de hendel naar
achteren te trekken.
2. Houdt het ongeremde wiel vast aan de hoepel.
3. Los de andere rem door de bedieningsknop
naar achteren te trekken.
2.6 Plaatsen of verwijderen van de armsteunen
L VOORZICHTIG: Kans op klemmen – Houd vingers, gespen en kledingsstukken
weg van de onderkant van de armsteun.
De armsteunen van de rolstoel kunnen worden gemonteerd met volgende instructies:
1. Plaats de achterzijde van de armsteun in dop . (Fig A)
2. Zorg ervoor dat de armsteun goed bevestigd is.
3. Kantel de armsteun naar voor.
4. Trek de hendel op dop omhoog. (Fig B)
5. Plaats de voorzijde van de armsteun in dop tot deze vastklikt. (Fig B)
Pagina 8
Page 54

708D
C
D
2011-05
Voor het openen en afnemen van de armsteun gaat U als volgt te werk:
1. Druk op knop en trek de voorzijde van de armsteun omhoog. (Fig C)
2. Klap de armsteun naar achter.
3. U verwijdert de armsteun door de achterzijde van de armsteun uit dop te trekken.
(Fig D)
2.7 Transfer in en uit de rolstoel
L VOORZICHTIG: Indien U de transfer niet veilig op eigen kracht kan doen, vraag
dan hulp van iemand anders.
L VOORZICHTIG: Kans op kantelen van de rolstoel - Niet op de voetplaten staan.
1. Plaats de rolstoel zo dicht mogelijk bij
stoel, zetel of bed van/naar waar U zich wilt
verplaatsen.
2. Zorg dat beide remmen van de rolstoel aan
staan.
3. Klap de voetplaten omhoog zodat U er niet
op gaat staan.
4. Indien U zich langs de zijkant in of uit de
rolstoel wilt verplaatsen, klap dan de
armsteun aan die zijde omhoog. (zie § 2.6)
5. Verplaats U van of naar de rolstoel.
2.8 Correcte positie in de rolstoel
Enkele aanbevelingen om comfortabel van Uw rolstoel gebruik te maken:
Plaats Uw zitvlak zo dicht mogelijk bij de rugleuning.
Zorg dat Uw bovenbenen horizontaal zijn – Stel eventueel de lengte van de
voetsteunen bij. (zie § 3.6.1)
2.9 Rijden met de rolstoel
L WAARSCHUWING: Kans op knellen – Houd Uw vingers niet tussen de spaken.
L WAARSCHUWING: Kans op knellen – Let op wanneer U door nauwe
doorgangen, zoals deuren, rijdt.
L WAARSCHUWING: Gevaar voor brandwonden - Wees voorzichtig bij het rijden
in extreem warme of koude omgevingen (zon, extreme kou, sauna's, enz.) voor
een bepaalde tijd en bij het aanraken - de oppervlakken kunnen de
omgevingstemperatuur aannemen.
Pagina 9
Page 55

708D
2011-05
1. Zet de remmen los.
2. Neem de aandrijfhoepels aan de bovenzijde vast.
3. Leun voorwaarts en draai de hoepels naar voor tot Uw armen gestrekt zijn.
4. Breng Uw handen terug naar de bovenzijde van de hoepels en herhaal de beweging.
2.10 Rijden op hellingen
L WAARSCHUWING: Houd Uw snelheid onder controle – Neem hellingen steeds
met de laagst mogelijke snelheid.
L WAARSCHUWING: Houd rekening met de capaciteiten van Uw begeleider –
Blokkeer de rem van zodra U merkt dat Uw begeleider onvoldoende kracht heeft
om de rolstoel onder controle te houden.
L WAARSCHUWING: Kans op kantelen – Leun voorover om Uw zwaartepunt naar
voor te verplaatsen. Zo kan de stabiliteit beter behouden blijven.
1. Bevestig de veiligheidsgordel, als de rolstoel hiermee uitgerust
is.
2. Neem geen te steile helling. De maximale hoek bergop en
bergaf staat in tabel 1.
3. Vraag een begeleider om U te helpen de helling te nemen.
4. Buig lichtjes voorover om Uw zwaartepunt naar voren te
verplaatsen.
2.11 Nemen van hindernissen (trottoirs)
2.11.1 Afrijden van trottoirs
Het afrijden van een laag trottoir kan voorwaarts gedaan worden. Let hierbij op dat de
voetsteunen de grond niet raken.
Het afrijden van lage trottoirs kan door een geoefend
gebruiker zelf gedaan worden:
L WAARSCHUWING: Kantelgevaar - Indien U Uw
rolstoel onvoldoende beheerst, vraag hulp van een
begeleider.
1. Breng de balans op de achterwielen om de druk op de
voorwielen te verminderen.
2. Neem de hindernis.
3.
Hogere trottoirs kunnen met een begeleider voorwaarts genomen worden:
1. Laat de begeleider de rolstoel lichtjes naar achter kantelen.
2. Rijd op de achterwielen het trottoir af.
3. Zet de rolstoel terug op de vier wielen.
4.
Een geoefend gebruiker kan een hoger trottoir zelf afrijden. Dit
kan het best achterwaarts gedaan worden.
1. Draai U met de achterwielen naar het trottoir toe.
2. Leun voorover om het zwaartepunt naar de voorkant
van de rolstoel te verplaatsen.
3. Breng de rolstoel naar de rand van de hindernis.
4. Gebruik de hoepels om Uw rolstoel gecontroleerd van
het trottoir af te rollen.
Pagina 10
Page 56

708D
2011-05
2.11.2 Oprijden van trottoirs
Trottoirs oprijden kan met begeleider als volgt:
1. Zorg er voor dat de voetsteunen het trottoir niet raken.
2. Laat de begeleider de rolstoel lichtjes achterover
kantelen tot er voldoende ruimte onder de voorwielen
is om de hindernis te nemen.
3. Leun hierbij een beetje achterover om het zwaartepunt
boven de achterwielen te houden.
4. Plaats de voorwielen op het trottoir.
5. Laat de rolstoel op de achterwielen over de hindernis
duwen.
Een hoger trottoir kan best achterwaarts genomen worden:
1. Draai de rolstoel met de achterwielen naar het trottoir toe.
2. Leun een beetje achterover en breng het zwaartepunt boven de achterwielen.
3. Laat de begeleider de rolstoel op het trottoir trekken.
4. Neem Uw normale positie in de rolstoel terug aan.
Het oprijden van trottoirs kan door een geoefend gebruiker zelf gedaan worden:
L WAARSCHUWING: Kantelgevaar – Indien U Uw rolstoel onvoldoende beheerst,
vraag hulp van een begeleider.
1. Rijd tot aan het trottoir.
2. Zorg ervoor dat de voetsteunen het trottoir niet raken.
3. Leun achterover zodat U op de achterwielen
balanceert.
4. Rol al balancerend de voorwielen over het trottoir
5. Leun voorover om meer stabiliteit te hebben.
6. Rol de achterwielen over de hindernis.
2.11.3 Nemen van trappen
Het nemen van trappen terwijl U in de rolstoel zit doet U als volgt.
L WAARSCHUWING: Kantelgevaar – Voor het nemen van trappen zijn altijd 2
begeleiders nodig.
1. Verwijder de voetsteunen.
2. Laat één begeleider de rolstoel lichtjes naar achteren kantelen.
3. De andere begeleider neemt het frame aan de voorzijde vast.
4. Blijf rustig zitten, vermijd plotselinge bewegingen en houd Uw armen binnen de
rolstoel.
5. Laat de rolstoel op de achterwielen de treden nemen.
6. Monteer de voetsteunen na de hindernis.
Pagina 11
Page 57

708D
2011-05
2.12 Opvouwen van de rolstoel
L VOORZICHTIG: Kans op klemmen – Houd vingers niet tussen de onderdelen van
de rolstoel.
1. Klap de voetplaten omhoog, of verwijder ze (zie § 2.4).
2. Neem de zit aan voor- en achterzijde en trek deze omhoog.
2.13 Afnemen van de wielen
Om het transport van de rolstoel te vergemakkelijken, kunnen de achterwielen worden
afgenomen:
1. Zorg ervoor dat de remmen afstaan.
2. Neem de rolstoel vast aan het frame aan de
zijde waar U het wiel wil afnemen.
3. Druk op de knop in het midden van de naaf
van het wiel.
4. Trek het wiel van het frame weg.
2.14 Transport in de auto
L WAARSCHUWING: Gevaar voor letsel – Zorg er voor dat de rolstoel voldoende
vastgemaakt is om verwonding van de inzittenden tijdens aanrijding of plots
remmen te voorkomen.
L WAARSCHUWING: Gevaar voor letsel – Gebruik voor het vastmaken van de
rolstoel en de passagiers NOOIT dezelfde gordel.
1. Verwijder voetsteunen en accessoires.
2. Berg deze veilig weg.
3. Indien mogelijk, vouw de rolstoel op en verwijder de wielen.
4. Plaats de rolstoel in de bagageruimte.
5. Indien de rolstoel en de passagiersruimte NIET gescheiden zijn, sjor het frame van
de rolstoel goed vast aan het voertuig. U kunt hiervoor gebruik maken van de
veiligheidsgordels die in het voertuig voorhanden zijn.
2.15 Gebruik van de rolstoel als zit in een motorvoertuig
L WAARSCHUWING: De rolstoel heeft de crashtest volgens ISO 7176-19: 2008
doorstaan en is zodanig ontworpen en getest om alleen te worden gebruikt als
een naar voren gerichte zit in een motorvoertuig.
L WAARSCHUWING: Gebruik de bekkengordel van de rolstoel niet als riem
voor inzittenden, deze is hiervoor niet geschikt.
De rolstoel is getest met een vierpunts rolstoelvastzetsysteem en een driepunts
veiligheidssysteem voor inzittenden.
Probeer zoveel mogelijk gebruik te maken van de zetel van het voertuig en de rolstoel te
bewaren in de laadruimte.
Procedure om de rolstoel vast te maken aan het voertuig:
1. Controleer of het voertuig is uitgerust met een geschikt rolstoel vastzetsysteem en
een veiligheidssysteem voor inzittenden volgens ISO 10542.
Pagina 12
Page 58

708D
Figuur 1
Figuur 2
Figuur 4
2011-05
2. Controleer dat de onderdelen van het rolstoel vastzetsysteem en het
veiligheidssysteem voor inzittenden niet versleten, vervuild, beschadigd of gebroken
zijn.
3. Indien uitgerust met een verstelbare zit en/of een kantelbare rug, controleer of de
rolstoelgebruiker zo recht mogelijk zit. Als de toestand van de gebruiker dit niet toe
laat, moet een risicoanalyse worden uitgevoerd om de veiligheid van de gebruiker
tijdens transport te evalueren.
4. Verwijder alle gemonteerde accessoires zoals dienbladen en beademingsapparatuur
en zet ze op een veilige plaats.
5. Positioneer de rolstoel naar voren in de rijrichting, centraal tussen de vastzet rails die
zijn vastgemaakt in de vloer van het voertuig.
6. Zorg ervoor dat de aangegeven zones rond de rolstoelgebruiker niet in aanraking
komt met de stijve onderdelen van het voertuig.
7. Maak de voorste veiligheidsgordels vast volgens de instructies van het op de
aangegeven plaats riem-systeem van de fabrikant. (Figuur 3)
Deze plaats is gemarkeerd op de rolstoel door een symbool (Figuur 4)
8. Rol de rolstoel naar achteren tot de voorste gordels strak zijn?
9. Zet de remmen van de rolstoel aan.
10. Maak de achterste veiligheidsgordels vast volgens de instructies van het op de
aangegeven plaats riem-systeem van de fabrikant (Figuur 3)
11. Deze plaats is gemarkeerd op de rolstoel door een symbool (Figuur 4)
Figuur 3
Procedure om de rolstoelgebruiker vast te maken:
1. Verwijder beide armsteunen.
2. Indien aanwezig, bevestig de rolstoel bekkengordel.
3. Bevestig het veiligheidssysteem voor inzittenden volgens de instructies van het riemsysteem van de fabrikant.
4. Draag de bekkengordel laag over de voorkant van de bekken, zodat de hoek van de
bekkengordel binnen de gewenste zone van 30° tot 75° met de horizontale is,
analoog zoals hieronder aangegeven.
Pagina 13
Page 59

708D
Gordels mogen niet weggehouden
worden van het lichaam door
rolstoel onderdelen zoals
armsteunen of wielen.
De bekkengordel moet volledig contact maken
met de voorkant van het lichaam vlakbij de
kruising van de dij en het bekken.
2011-05
5. Een steilere (grotere) hoek binnen de gewenste zone is wenselijk.
6. Trek de riem strak aan volgens de instructies van het riem-systeem van de fabrikant
en in overeenstemming met het comfort van de gebruiker.
7. Zorg ervoor dat de veiligheidsriem verbonden wordt in een rechte lijn aan het
ankerpunt van het voertuig en dat er geen bochten in de riem zichtbaar zijn,
bijvoorbeeld op de as van het achterwiel.
8. Installeer de armleuningen indien gewenst. Zorg ervoor dat de gordels niet gedraaid
zijn of weggehouden worden van het lichaam door rolstoel onderdelen zoals
armsteunen of wielen.
3 Montage en afstelling
De in dit hoofdstuk beschreven instructies zijn bestemd voor de vakhandelaar.
De Vermeiren 708D rolstoelen zijn voor Uw volledige comfort ontworpen.
Om een servicepunt of vakhandelaar in uw buurt te vinden, neemt u contact op met de
dichtsbijzijnde Vermeiren faciliteit. Een lijst van de Vermeiren faciliteiten zijn terug te vinden
op de laatste bladzijde.
L WAARSCHUWING: Risico bij onveilige beperkingen - Gebruik enkel de
beperkingen beschreven in deze handleiding.
L WAARSCHUWING: Variaties van de toelaatbare instellingen kunnen de stabiliteit
van Uw rolstoel beïnvloeden (naar achteren of op zij kantelen).
3.1 Gereedschap
Om Uw rolstoel op te bouwen is het volgende gereedschap nodig:
Steek-/ringsleutel set n° 10 tot n° 19
Inbussleutel set n° 4 tot n° 5
Kruiskopschroevendraaier
Pagina 14
Page 60

708D
2011-05
3.2 Leveringsomvang
De Vermeiren 708D wordt als volgt geleverd:
1 frame gemonteerd met armsteunen, achter- en voorwielen (zithoogte ingesteld op
500 mm, zithoek op 5°)
1 paar voetsteunen
Rug en zit kussens
Gereedschap
Handleiding
Accessoires (optioneel)
Pomp (enkel met luchtbanden)
Voor gebruik controleer of alles is meegeleverd en of er geen beschadiging is aan de
producten (bv. door transport, ...).
3.3 Anatomische zit (OPTIONEEL)
L WAARSCHUWING: Gevaar voor letsel – Controleer dat de zitting stevig zit voor
gebruik.
L WAARSCHUWING: Gevaar voor letsel – Vermijd dat uw vingers geklemd
geraken tijdens het montage proces.
Hebt u gekozen voor een anatomsche zit, dan
plaatst u deze op de uitgeklapte buisstructuur zodat de
ophanging van de zitting gelijkmatig op het frame vastklikt. In
het houten onderstel vindt u uitsparingen waarin de
dwarsbalken van het frame geplaatst kunnen worden. Om de
rolstoel op te vouwen neemt u de zitting langs boven weg.
3.4 Anatomische rug (OPTIONEEL)
L WAARSCHUWING: Gevaar voor letsel – Controleer dat de zitting stevig zit voor
gebruik.
L WAARSCHUWING: Gevaar voor letsel – Vermijd dat uw vingers geklemd
geraken tijdens het montage proces.
Als U een anatomische rug wilt gebruiken, dan gaat U als
volgt te werk:
1. Schroef de flexibele rug los.
2. Schroef de rugbevestigingen losjes vast.
3. Steek de rug van bovenaf in de houders.
4. Draai de schroeven van de rug vast.
5. Draai de veiligheidsschroeven van de rug vast.
6. Armsteunen monteren.
Pagina 15
Page 61

708D
2011-05
3.5 Afstellen van de remmen
L WAARSCHUWING: Gevaar voor letsel – Laat de remmen afstellen door een
erkend vakhandelaar.
Het afstellen van de remmen doet U als volgt:
1. Monteer de wielen zoals beschreven in § 2.2.
2. Zet de remmen los door hendel naar achteren te
trekken.
3. Maak de zelfborgende moer los zodat het
remmechanisme kan schuiven over de buis van het
frame .
4. Schuif het remmechanisme over de buis tot de
gewenste positie. (Het afstelbereik van de rem is tussen
de groef van de remmontageplaat)
5. Maak de zelfborgende moer terug vast.
6. Controleer de werking van de remmen.
7. Indien nodig herhaal voorgaande stappen tot de remmen
goed afgesteld staan.
3.6 Afstellen van de voetsteunen
3.6.1 Lengte van de voetsteunen
L VOORZICHTIG: Kans op beschadiging – Zorg er voor dat de voetsteunen niet
over de grond slepen. Houd een minimum afstand van 60 mm tot de grond aan.
Stel de lengte van de voetsteunen als volgt in:
1. Verwijder de inbusschroef aan de
onderkant van het uitwendige deel van de
beensteun.
2. Stel de voetsteun op een comfortabele
lengte in door de hexagonale buis uit en in
te bewegen.
3. Draai de inbusschroef goed vast.
De minimum lengte is wanneer de
buis van de voetsteun veranderd
van hexagonaal naar rond.
De maximum lengte is aan het
merkteken in de buis. (Dit
merkteken is een rechte streep)
Pagina 16
Page 62

708D
2011-05
4 Onderhoud
De verwachte levensduur van de rolstoel wordt beïnvloed door het gebruik, opslag,
regelmatig onderhoud en schoonmaak.
4.1 Periodiek Onderhoud
Om Uw Vermeiren rolstoel in goede conditie te houden dient U regelmatig het volgende
onderhoud te plegen:
Voor iedere rit
Controleer de staat van de banden en maak schoon of vervang indien nodig.
Controleer dat alle schroefverbindingen goed vastzitten.
Controleer de staat van de remmen en stel ze opnieuw af indien nodig.
Controleer de staat van de rolstoel (netheid, scheuren, schade aan dragende
onderdelen, ...) en maak schoon of vervang indien nodig.
Om de 8 weken: nakijken en eventueel smeren of afstellen van
Armsteunen
Voetsteunen
Remhendel
Wielassen
Elke 6 maanden of voor elke nieuwe gebruiker
Algemeen nazicht
Desinfectie
Voorwielen, eventueel lagers reinigen
Voor Uw gemak is achteraan deze handleiding een onderhoudsplan voorzien.
Reparaties en het monteren van wisselstukken voor Uw rolstoel mogen enkel door de
vakhandelaar uitgevoerd worden.
Enkel door Vermeiren toegelaten wisselstukken mogen gemonteerd worden.
4.2 Verpakking en opslag
Om de rolstoel te verpakken of te bewaren dienen volgende instructies gevolgd te worden:
Alleen in droge ruimte opslagen (tussen +5°C en +41°C).
De relatieve luchtvochtigheid van 30% tot 70%.
Beschermen door voldoende afdekking of verpakking tegen roest en binnendringen
van vreemde voorwerpen (bijv. zout water, zeelucht, zand, stof).
Alle gedemonteerde onderdelen duidelijk opslaan (eventueel labelen), opdat bij het
monteren achteraf geen verwarring met andere producten mogelijk is.
Alle componenten moeten onbelast worden opgeslagen (geen te zware voorwerpen
op de rolstoelonderdelen leggen, nergens tussen klemmen, ...).
4.3 Verzorging
4.3.1 Zit- en rugkussen
Bij het reinigen van het zit- en rugkussen let op onderstaande punten:
Reinig het zit- en rugkussen met een doek die met warm water is bevochtigd. Let op dat
de zit- en rugkussen niet te vochtig wordt gemaakt.
Bij hardnekkige vlekken kunt u de bekleding afwassen met een gangbaar fijnwasmiddel.
Vlekken kunt u verwijderen met een sponsje of een zachte borstel.
Gebruik geen aggresieve reinigingsmiddelen, zoals oplosmiddelen of harde borstels.
Reinigen met stoom- en/of hogedrukreinigers is niet toegestaan.
Pagina 17
Page 63

708D
2011-05
4.3.2 Kunststof onderdelen
Behandel kunststof onderdelen van de rolstoel met een gangbaar reinigingsmiddel voor
kunststof. Gebruik alleen een zachte borstel of zachte spons.
Voorbeelden van kunststof onderdelen zijn armleggers, handvaten, banden, enz..
4.3.3 Coatings
Door de hoogwaardige oppervlaktebehandeling is een optimale corrosiebescherming
gegarandeerd. Wanneer de coating door krassen e.d. is beschadigd, laat u deze door uw
vakhandelaar repareren.
Voor het schoonmaken gebruikt u alleen warm water en algemeen verkrijgbare
huishoudelijke reinigingsmiddelen, evenals zachte borstels en doeken. Let op dat er geen
vochtigheid in de buizen komt.
Voor de verzinkte onderdelen volstaat meestal schoonwrijven met een droge doek. Moeilijk
te verwijderen vuil kunt u best verwijderen met een speciaal reinigingsmiddel voor zink.
4.4 Inspectie
In principe adviseren wij een jaarlijkse inspectie en in ieder geval voor ieder nieuw gebruik.
Deze inspectie mag uitsluitend door bevoegde personen worden uitgevoerd. De volgende
controles dienen minstens te worden uitgevoerd en gedocumenteerd.
Controleren van het frame en het kruiswerk op plastische vervorming, scheurtjes en
slechte werking.
Visuele controle op lakschade (corrosiegevaar)
Functiecontrole van de wielen (vrijloop, rechtlijnigheid, asspeling, banden, profiel,
toestand van de velgen, bandenspanning bij luchtbanden, steekassen enz.)
Controle of de schroefverbindingen goed vastzitten
Toestand van de smering bij metalen bewegende delen
Toestand en grip van geleiders en assen bij de stuurwielen
Visuele controle van alle kunststof onderdelen op scheuren en breekbare punten
Werking van de armsteunen en voetsteunen (vergrendeling, belasting, vervorming,
slijtage door belasting).
Werking van andere afneembare delen (bv. anti-tipping, veiligheidsriem, vaste
rugleuning/zit, enz.)
Volledige levering, gebruiksaanwijzing aanwezig?
Laat het onderhoud alleen in het onderhoudsplan opnemen wanneer minstens de hiervoor
vermelde profielen zijn gecontroleerd.
Pagina 18
Page 64

708D
Datum van
desinfectie
Reden
Specificatie
Middel en
concentratie
Handtekening
Werkzame stof
Productnaam
Wasdesinfectie
Oppervlaktedesinfectie
(schuur/wisdesinfectie)
Desinfectie van afscheidingen
1 deel braaksel of stoelgang + 2 delen
gebr.-verd. of 1 deel urine + 1 deel gebr.verd.
Werkingsbereik
Fabrikant of
leverancier
Braaksel
Stoelgang
Urine
Gebruiksver
dunning
Inwerktijd
Gebruiksver
dunning
Inwerktijd
Gebruiksver
dunning
Inwerktijd
Gebruiksver
dunning
Inwerktijd
Gebruiksver
dunning
Inwerktijd
%
uur % uur % uur % uur % uur
Fenol of
fenolderivaat
Amocid 1 12 5 6 5 4 5 6 5 2 A Lysoform
Gevisol
0,5
12 5 4 5 4 5 6 5 2 A Schülke & Mayr
Helipur 6 4 6 4 6 6 6 2 A B. Braun
m-Kresolzeepoplossing (DAB
6)
1
12 5 4 A
Phenol 1 12 3 2 A
Chloor, organ. of
anorgan. substanties
met actieve chloor
Chloramin-T
DAB 9
1,5
12
2,5 2 5 4 A1B
Clorina
1, 5
12
2,5 2 5 4 A1B
Lysoform
Trichlorol
2
12 3 2 6 4
A1B
Lysoform
Per-verbindingen
Apesin AP1002
4 4 AB
Tana
PROFESSIONAL
Dismozon pur2
4 1 AB
Bode Chemie
Perform2 3 4
AB
Schülke & Mayr
Wofesteril2
2 4 AB
Kesla Pharma
2011-05
4.5 Desinfecteren
L WAARSCHUWING: Gevaarlijke produkten - Het gebruik van
desinfecteermiddelen is voorbehouden aan bevoegd vakpersoneel.
L WAARSCHUWING: Gevaarlijke produkten, kans op huidirretaties - Draag
gepaste beschermkledij. Het desinfecteermiddel kan bij contact met de huid
irritaties veroorzaken. Volg ook de aanwijzingen op de betreffende oplossingen.
Alle delen van de rolstoel kunnen worden behandeld met een schuurdesinfectie.
Alle maatregelen ter desinfectie van revalidatiemiddelen, hun componenten of andere
accessoires worden bijgehouden in een desinfectiejournaal. Dit journaal bevat minstens de
volgende gegevens en wordt bij de betreffende productdocumentatie bewaard:
Tabel 2: Voorbeeld desinfectiejournaal
Afkortingen voor de gegevens in kolom 2 (reden):
V = Vermoeden van infectie IF = Infectie W = Nieuw gebruik I = Inspectie
Voor een blanco invulblad van een desinfectiejournaal zie § 9.
De geadviseerde desinfecteermiddelen voor de schuurdesinfectie (conform RKI-lijst) staan
in onderstaande tabel. De actuele stand van de in de RKI-lijst opgenomen
desinfecteermiddelen kan worden opgevraagd bij het Robert-Koch-Institut (RKI)
(internetpagina: www.rki.de).
Pagina 19
Page 65

708D
Werkzame stof
Productnaam
Wasdesinfectie
Oppervlaktedesinfectie
(schuur/wisdesinfectie)
Desinfectie van afscheidingen
1 deel braaksel of stoelgang + 2 delen
gebr.-verd. of 1 deel urine + 1 deel gebr.verd.
Werkingsbereik
Fabrikant of
leverancier
Braaksel
Stoelgang
Urine
Gebruiksver
dunning
Inwerktijd
Gebruiksver
dunning
Inwerktijd
Gebruiksver
dunning
Inwerktijd
Gebruiksver
dunning
Inwerktijd
Gebruiksver
dunning
Inwerktijd
%
uur % uur % uur % uur % uur
Formaldehyde
en/of andere
aldehyden of
derivaten
Aldasan 2000
4 4 AB
Lysoform
Antifect FD 10
3 4 AB
Schülke & Mayr
Antiseptica
oppervlakte
desinfectie 7
3 6 AB
Antiseptica
Apesin AP30
5 4 A
Tana
PROFESSIONAL
Bacillocid
special
6 4 AB
Bode Chemie
Buraton 10F
3 4 AB
Schülke & Mayr
Desomed
A2000
3 6 AB
Desomed
Ontsmettingsreiniger
Ziekenhuis
8 6 AB
Dreiturm
Desomed
Perfekt
7 4 AB*
Desomed
Formaldehydeoplossing (DAB
10), (formaline)
1,5
12 3 4
AB
Incidin Perfekt
1
12 3 4
AB
Ecolab
Incidin Plus
8 6 A
Ecolab
Kohrsolin
2
12 3 4
AB
Bode Chemie
Lysoform
4
12 5 6
AB
Lysoform
Lysoformin
3
12 5 6
AB
Lysoform
Lysoformin
2000
4 6 AB
Lysoform
Melsept
2
12 4 6
AB
B. Braun
Melsitt 4 12
10 4 AB
B. Braun
Minutil 2 12 6 4
AB
Ecolab
Multidor 3 6
AB
Ecolab
Nûscosept
5 4 AB
Dr. Nüsken Chemie
Optisept 7 4
AB*
Dr. Schumacher
Pursept-FD
7 4 AB*
Merz
Ultrasol F
3
12 5 4
AB
Fresenius Kabi
Amfotere
oppervlakteactieve
stoffen
(amfotensiden)
Tensodur 103
2
12 A MFH Marienfelde
Loog
Kalkmelk3
20 6
A3B
1 Onvoldoende werkzaam tegen mycobacteriën, in het bijzonder in aanwezigheid van bloed bij de oppervlaktedesinfectie.
2 Niet geschikt voor het desinfecteren van merkbare met bloed besmette vlakken of van poreuze oppervlakken (bijv. onbehandeld hout).
3 Onbruikbaar bij tuberculose; bereiding van de kalkmelk: 1 deel opgeloste kalk (calciumhydroxide) + 3 delen water.
* Effectiviteit tegen virussen gecontroleerd volgens de proefmethode van het RKI [Bundesgesundheitsblatt 38 (1995) 242].
A: Geschikt voor het vernietigen van vegetatieve bacteriële kiemen, inclusief mycobacteriën en van schimmels, inclusief schimmelsporen.
B: Geschikt voor het inactiveren van virussen.
2011-05
Voor meer informatie over desinfecteren kunt u contact opnemen met de vakhandelaar. Hij
helpt u graag verder.
Tabel 3: Desinfecteermiddelen
Pagina 20
Page 66

708D
2011-05
5 Garantie
Uittreksel uit de algemene verkoopsvoorwaarden:
(...)
5. De verjaringstermijn voor garantie aanspraken bedraagt 24 maanden. Op grond van onze
hoge kwaliteitseisen kunnen wij boven deze basisgarantie de verjaringstermijn voor
aanspraken wegens defecten verhogen voor
(...)
-frame en constructie van rolstoelen 5 jaar
Wij zijn niet aansprakelijk voor schade die ontstaat door constructieve wijzigingen aan onze
producten, gebrekkig onderhoud, gebrekkige of onoordeelkundige behandeling of bewaring
of gebruik van niet-originele wisselstukken. De garantie op slijtagedelen of onderdelen die
onderhevig zijn aan een natuurlijk slijtage, is eveneens uitgesloten.
(...)
6 Afvalverwerking
Als U de rolstoel wilt wegdoen, stelt U zich in verbinding met de plaatselijke
verantwoordelijken of bezorgt U het product terug bij de vakhandel. Deze kan, na
hygiënische reiniging, de rolstoel aan de fabrikant terugsturen. De fabrikant kan voor
vakkundige verwerking en hergebruik (gescheiden naar grondstof) zorg dragen.
Verpakkingsmateriaal kan bij de betreffende verwerkingsplaatsen en hergebruikinstellingen
of bij Uw vakhandelaar afgegeven worden.
7 Verklaring van overeenstemming
Pagina 21
Page 67

708D
Datum
Onderhoud
Opmerkingen
Paraaf
1/1/2011
Smering & algemeen nazicht
geen
Datum van
desinfectie
Reden
Specificatie
Middel en
concentratie
Handtekening
Afkortingen voor de gegevens in kolom 2 (reden):
V = Vermoeden van infectie IF = Infectie W = Nieuw gebruik I = Inspectie
2011-05
8 Onderhoudsplan
9 Desinfectiejournaal
Pagina 22
Page 68

708D
Transport
duw/
hoepelen
TH
Hoepelrolstoel bedoeld voor gebruik in en om
huis en op straat. De rolstoel is uitgevoerd met
duwhandvatten en kiepvoorziening voor het
duwen. De voetsteunen zijn instelbaar. De
voetplaat of -platen kunnen door de gebruiker
worden weg geklapt voor een transfer.
De rolstoel is opvouwbaar, zodat deze in de
kofferbak van een auto of in een stationwagen
kan worden meegenomen.
2011-05
10 Clusteromschrijvingen
De 708D met 24 inch achterwielen voldoen voor:
Pagina 23
Page 69

708D
2011-05
Inhalt
Vorwort ...................................................................................................................................... 2
1 Produktbeschreibung ................................................................................................. 3
1.1 Verwendungszweck ..................................................................................................... 3
1.2 Technische Daten ........................................................................................................ 4
1.3 Komponenten .............................................................................................................. 5
1.4 Zubehör ....................................................................................................................... 5
1.5 Positionstypenschild .................................................................................................... 5
1.6 Zeichenerklärung ......................................................................................................... 6
1.7 Für ihre sicherheit........................................................................................................ 6
2 Verwendung ................................................................................................................. 7
2.1 Transportieren des Rollstuhls ...................................................................................... 7
2.2 Montage der Hinterräder ............................................................................................. 7
2.3 Auseinanderklappen des Rollstuhl .............................................................................. 7
2.4 An- oder Abbauen der Fußplatten ............................................................................... 7
2.5 Betätigen der Bremsen ................................................................................................ 8
2.6 An- oder Abbauen der Armauflagen ........................................................................... 9
2.7 Setzen in den Rollstuhl .............................................................................................. 10
2.8 Prüfen Sie, ob die Sitzposition korrekt ist. ................................................................ 10
2.9 Fahren mit dem Rollstuhl .......................................................................................... 10
2.10 Bewegen an Steigungen ............................................................................................ 10
2.11 Überwinden von Stufen und Bordsteinen ................................................................. 11
2.12 Zusammenklappen des Rollstuhls ............................................................................. 12
2.13 Abnehmen der Hinterräder ........................................................................................ 13
2.14 Transport in einem Auto ............................................................................................ 13
2.15 Nutzung des Rollstuhls als Sitz in einem PKW ........................................................ 13
3 Zusammenbau und Einstellung ............................................................................... 15
3.1 Werkzeug ................................................................................................................... 16
3.2 Lieferumfang ............................................................................................................. 16
3.3 Anatomischer Sitz (optional) .................................................................................... 16
3.4 Anatomische Rückenlehne (optional) ....................................................................... 16
3.5 Einstellen der Bremsen.............................................................................................. 17
3.6 Einstellen der Fußplatten ........................................................................................... 17
4 Wartung ..................................................................................................................... 18
4.1 Regelmäßige Wartung ............................................................................................... 18
4.2 Verpackung und Lagerung ........................................................................................ 18
4.3 Pflege ......................................................................................................................... 19
4.4 Inspektion .................................................................................................................. 19
4.5 Desinfektion .............................................................................................................. 20
5 Garantie ..................................................................................................................... 22
6 Entsorgung ................................................................................................................ 22
7 Übereinstimmungserklärung ................................................................................... 22
8 Wartungsplan ............................................................................................................ 23
9 Desinfektionsbuch ..................................................................................................... 23
Seite 1
Page 70

708D
2011-05
Vorwort
Zuerst möchten wir uns für das Vertrauen bedanken, das Sie in uns gesetzt haben, indem
Sie sich für einen unserer Rollstühle entschieden haben.
Die Vermeiren Rollstühle sind das Ergebnis langjähriger Forschung und Erfahrung. In der
Entwicklungsphase wurde besonderer Wert auf Bedienerfreundlichkeit und leichte Wartung
des Rollstuhls gelegt.
Die zu erwartende Lebensdauer Ihres Rollstuhls hängt stark von der Wartung und Pflege ab,
die für den Rollstuhl aufgewendet wird.
Diese Bedienungsanleitung soll Ihnen helfen, sich mit der Benutzung Ihres Rollstuhls
vertraut zu machen.
Das Befolgen der Bedienungsanleitung und der Wartungshinweise bildet einen wesentlichen
Teil der Garantiebedingungen.
Diese Bedienungsanleitung spiegelt die neuesten Produktentwicklungen wider. Das
Unternehmen Vermeiren behält sich jedoch das Recht vor, Änderungen vorzunehmen.
Dabei besteht jedoch keine Verpflichtung, die früher ausgelieferten Modelle anzupassen
oder zu ersetzen.
Sollten Sie weitere Fragen haben, so wenden Sie sich bitte an Ihren Fachhändler.
Seite 2
Page 71

708D
2011-05
1 Produktbeschreibung
1.1 Verwendungszweck
Der Rollstuhl ist ausschließlich für den Transport von gehbehinderten oder gehunfähigen
Menschen vorgesehen.
In dem Rollstuhl kann eine Person transportiert werden.
Der Rollstuhl kann sowohl im Innen- als auch im Außenbereich eingesetzt werden.
Der Rollstuhlfahrer kann den Rollstuhl entweder selbst antreiben oder von einer zweiten
Person geschoben werden.
Die Vielfalt an Ausstattungs- und Zubehörvarianten sowie die modulare Bauweise erlauben
den Transport eines Menschen bei Gehbehinderung/Gehunfähigkeit aufgrund von:
Lähmungen
Gliedmaßenverlust (Beinamputation)
Gliedmaßendefekt oder -deformation
Gelenkkontrakturen oder -schäden
Herzkrankheiten oder schwachem Blutkreislauf
Gleichgewichtsstörungen
Kachexie (Muskelschwund)
und für ältere Menschen.
Bei der individuellen Versorgung sind außerdem:
Körpergröße und -gewicht (max. 120 kg)
körperlicher und geistiger Zustand
Wohnverhältnisse
Umgebung
zu beachten.
Ihr Rollstuhl darf nur auf Flächen verwendet werden, auf denen alle vier Räder den Boden
berühren und ausreichend Kontakt vorhanden ist, um die Räder gleichmäßig anzutreiben.
Sie sollten die Verwendung des Rollstuhls auf unebenen Flächen (Pflastersteinen usw.),
Abhängen, Kurven sowie das Umfahren von Hindernissen (Bordsteinen usw.) üben.
Der Rollstuhl darf nicht als Leiter oder als Transportmittel für schwere oder heiße Objekte
verwendet werden.
Wird der Rollstuhl auf Matten, Auslegeware oder Teppichböden verwendet, könnten diese
Bodenbeläge beschädigt werden.
Verwenden Sie ausschließlich von Vermeiren genehmigtes Zubehör.
Für Schäden durch nicht oder mangelhaft durchgeführte Wartung oder durch
Nichtbeachtung der folgenden Anweisungen übernimmt der Hersteller keine Haftung.
Das Befolgen der Bedienungsanleitung und der Wartungshinweise bildet einen wesentlichen
Teil der Garantiebedingungen.
Seite 3
Page 72

708D
Hersteller
Vermeiren
Adresse
Vermeirenplein 1/15, B-2920 Kalmthout
Typ
Manueller Rollstuhl
Modell
708D
Max. zulässiges Gewicht des Fahrers
120 kg
Beschreibung
Abmessungen
Effektive Sitzbreite
390 mm
420 mm
440 mm
460 mm
480 mm
500 mm
Gesamtbreite (abhängig von der Sitzbreite)
560 mm
590 mm
610 mm
630 mm
650 mm
670 mm
Beschreibung
Abmessungen Min.
Abmessungen Max.
Gesamtlänge mit Beinstütze
1060 mm
Länge zusammengeklappt
810 mm
Breite zusammengeklappt
280 mm
Höhe zusammengeklappt
920 mm
Gesamtgewicht
± 18 kg
Gewicht des schwersten Teils
10,10 kg
Gewichte von Teilen, die demontierbar oder
abnehmbar sind
Fußplatten: 1,90 kg; Armauflagenträger: 1,85 kg;
Hinterräder: 4,15 kg
Statische Stabilität bergab
15°
Statisch Stabilität bergauf
15°
Statische Stabilität seitwärts
15°
Überfahren von Hindernissen
60 mm
Winkel der Sitzebene
5°
Effektive Sitztiefe
430 mm
Höhe der Sitzoberfläche an der Vorderkante
500 mm
Rückenlehnenwinkel
5°
Rückenlehnenhöhe
420 mm
Abstand zwischen Fußplatte und Sitz
420 mm
500 mm
Winkel zwischen Sitz und Fußplatte
9°
Abstand zwischen Armauflage und Sitz
220 mm
Vordere Höhe der Armauflagenstruktur
300 mm
Greifreifendurchmesser
535 mm
Horizontale Lage der Achse (Deflektion)
-7 mm
Kleinster Wenderadius
1619 mm
Durchmesser der Krypton PU-Hinterräder
24"
Reifendruck, Hinterräder (Antriebsräder)
Max. 3.5 bar
Durchmesser der Krypton PU-Lenkräder
200 mm
Reifendruck, Lenkräder
Max. 2.5 bar
Temperaturbereich für Lagerung und Nutzung
+ 5 °C
+ 41 °C
Luftfeuchtigkeitsbereich für Lagerung und
Nutzung
30%
70%
Technische Änderungen vorbehalten. Messtoleranzen ± 15 mm / 1,5 kg / °
2011-05
1.2 Technische Daten
Die im Folgenden aufgeführten technischen Daten gelten für einen Rollstuhl in der
Standardkonfiguration. Wurden eine Fußplatte und/oder eine Armauflage oder anderes
Zubehör montiert, ändern sich die in der Tabelle aufgeführten Werte.
Tablle 1: Technische Daten 708D
Seite 4
Page 73

708D
1 = Taxi Haken
2 = Positionstypenschild
3 = Name 708D
1 = Schere
2 = Handgriffe
3 = Rückenlehne
4 = Armauflagen
5 = Armauflagenträger
6 = Antriebsräder (Hinterräder)
7 = Greifreifen
8 = Bremsen
9 = Kipphilfe
10 = Lenkräder (Vorderräder)
11 = Sitz
12 = Fußplatten
2011-05
Der Rollstuhl entspricht den Anforderungen der folgenden Normen:
ISO 7176-8: Anforderungen und Prüfungen für statische Festigkeit, Stoßfestigkeit und
Dauerfestigkeit.
EN 1021-1: Bewertung der Entzündbarkeit von Polstermöbeln - Teil 1: Zündquelle:
Glimmende Zigarette
EN 1021-2: Bewertung der Entzündbarkeit von Polstermöbeln - Teil 2: Eine einem
Streichholz vergleichbare Gasflamme als Zündquelle
ISO 7176-19: Mobilitätseinrichtungen (Rollstühle) zur Anwendung als Sitz in
Motorfahrzeugen.
1.3 Komponenten
1.4 Zubehör
Für den 708D ist das folgende Zubehör erhältlich:
Armlehnen (B02, B03, B05, B66)
Beinstützen (B06, B07, B08, BZ7, BZ8, BZ9, BZ10, BK7, BL7, BA6, BK6)
Tisch (B12)
Gehstützenhalter (B31)
Rückenlehne (L14, L24, L44)
Vorderer Beckengurt (B58) zur Befestigung über das Rückenlehnenrohr
Anti-Kippvorrichtung (B78) zur Befestigung am unteren Rückenlehnenrahmen
Trommelbremsen für den Begleiter (B74) zur Montage an den Schiebegriffen
Übergangsrollstuhl (T30)
Bewegen der Achse nach hinten (AMP)
Schnelllösevorrichtung (B80)
Absenken der Sitzhöhe auf 470 mm (S)
1.5 Positionstypenschild
Seite 5
Page 74

708D
2011-05
1.6 Zeichenerklärung
Max. Gewicht
Innen- und Außenbereich
Hangabwärts
Hangaufwärts
CE Konformität
1.7 Für ihre sicherheit
L Achten Sie darauf, dass bei Nutzung der Antriebsräder keine Gegenstände und/oder
Körperteile in die Speichen hineinragen, da sonst Verletzungen und/oder
Beschädigungen an Ihrem Rollstuhl auftreten können.
L Vor dem Ein-/Aussteigen in den/aus dem Rollstuhl sind die Feststellbremsen zu
betätigen.
L Steigen Sie beim Ein-/Aussteigen in den/aus dem Rollstuhl nicht auf die Fußplatten.
Diese sind vorher nach oben zu klappen oder die ganze Fußstütze nach außen
abzuschwenken.
L Erforschen Sie die Auswirkungen von Schwerpunktverlagerungen auf das Verhalten des
Rollstuhles, zum Beispiel auf Gefällestrecken, Steigungen, seitlichen Neigungen oder
beim Überwinden von Hindernissen. Nutzen Sie die Unterstützung durch eine
Begleitperson.
L Achten Sie beim Ergreifen von Gegenständen (die vor, seitlich oder hinter dem Rollstuhl
liegen) darauf, dass Sie sich nicht zu weit aus dem Rollstuhl lehnen, da durch
Schwerpunktverlagerung eine Kippgefahr besteht.
L Bei Durchfahrten von Türen, Bögen usw. muss seitlich ausreichend Platz vorhanden
sein, da sonst Quetschgefahr für Ihre Hände/Arme besteht und Schäden am Rollstuhl
entstehen.
L Setzen Sie Ihren Rollstuhl nur bestimmungsgemäß ein. Vermeiden Sie z.B. ein
ungebremstes Fahren gegen ein Hindernis (Stufe, Bordsteinkante, Türzarge usw.) oder
Herunterspringen von Absätzen. Für Schäden, die durch Kollision, Überlast oder
andere, nicht bestimmungsgemäße Nutzung entstehen, haftet der Hersteller nicht.
L Treppen dürfen nur mit Hilfe von Begleitpersonen überwunden werden. Sind dafür
Einrichtungen, wie z.B. Auffahrrampen oder Aufzüge vorhanden, sind diese zu nutzen.
L Sie unterliegen bei Fahrten im öffentlichen Straßenverkehr der
Straßenverkehrsordnung.
L Wie auch beim Führen anderer Fahrzeuge sollten Sie mit Ihrem Rollstuhl nicht unter
Alkoholeinfluss oder Medikamenteneinwirkung stehen. Dies gilt auch in Innenräumen.
L Stellen Sie Ihr Fahrverhalten bei Fahrten außerhalb der Wohnung auf die gegebenen
Witterungs- und Straßenverhältnisse ein.
L Zum Transport des Rollstuhles diesen nie an beweglichen Teilen (Armlehnen,
Beinstützen etc.) fassen, sondern nur an festen Rahmenteilen.
L Tragen Sie zum "Besser-Gesehen-Werden" im Dunkeln möglichst helle Kleidung oder
Kleidung mit Reflektoren und achten Sie darauf, dass die seitlich und rückwärtig am
Rollstuhl angebrachten Reflektoren gut sichtbar sind.
L Vorsicht beim Umgang mit Feuer, insbesondere brennenden Zigaretten; Sitz- und
Rückenbespannung könnten sich entzünden.
L Achten sie darauf, dass die maximale Zuladung (max. 120 kg) nicht überschritten wird.
Seite 6
Page 75

708D
2011-05
2 Verwendung
In diesem Kapitel wird die tägliche Verwendung beschrieben. Diese Anweisungen richten
sich an den Benutzer und an den Fachhändler.
Der Rollstuhl wird Ihnen vollständig aufgebaut von Ihrem Fachhändler geliefert.
Anweisungen für den Fachhändler, wie der Rollstuhl zusammengebaut und eingerichtet
wird, befinden sich in § 3.
2.1 Transportieren des Rollstuhls
Am besten lässt sich der Rollstuhl transportieren, indem die Räder verwendet und der
Rollstuhl geschoben wird.
Sollte dies nicht möglich sein (beispielsweise wenn die Hinterräder für den Transport in
einem Auto abgenommen wurden), greifen Sie den Rahmen fest an der Vorderseite und an
den Griffen. Greifen Sie den Rollstuhl nicht an den Fuß- oder Armstützen oder den Rädern.
2.2 Montage der Hinterräder
1. Nehmen Sie das Hinterrad in die Hand und
drücken Sie auf den Arretierstift .
2. Halten Sie den Arretierstift gedrückt und
schieben Sie das Hinterrad bis zum Anschlag
auf die Achse.
3. Lassen Sie den Arretierstift los.
4. Prüfen Sie, ob die Räder sicher auf der Achse
sitzen.
2.3 Auseinanderklappen des Rollstuhl
L VORSICHT: Klemmgefahr – Halten Sie Ihre Finger fern von sich bewegenden
Teilen des Rollstuhls.
1. Stellen Sie sich hinter den Rollstuhl.
2. Ziehen Sie den Rollstuhl an den Handgriffen so weit wie möglich auseinander.
3. Stellen Sie sich vor den Rollstuhl.
4. Drücken Sie mit den Händen auf die Rohre an den Seiten der Sitzfläche, bis sie in
ihren Positionen einrasten.
2.4 An- oder Abbauen der Fußplatten
L WARNUNG: Verletzungsgefahr – Achten Sie darauf, dass die Beinstützen vor
Gebrauch des Rollstuhls fest arretiert sind.
L VORSICHT: Quetschgefahr – Halten Sie Objekte und Personen vom
Schwenkbereich der Beinstützen fern.
Seite 7
Page 76

708D
2011-05
Die Fußplatten werden wie folgt montiert:
1. Halten Sie die Fußplatten seitlich an die Außenseite
des Rollstuhlrahmens.
2. Montieren Sie die Bohrungen der Fußstütze an den
Stiften am Rahmen.
3. Schwenken Sie die Fußplatte nach innen, bis sie in
der Endposition einrastet. Wenn diese Verriegelung
etwas zu fest erscheint, drücken Sie den Griff
vorsichtig zurück.
4. Schwenken Sie die Fußplatte nach unten.
5. Hängen Sie den Ledersteifen in die Haken ein.
So bauen Sie die Fußplatten ab:
1. Nehmen Sie den Lederstreifen an beiden Seiten aus
den Haken.
2. Ziehen Sie den Hebel an der Fußplattenbefestigung
nach hinten.
3. Schwenken Sie die Fußplatte zur Außenseite des
Rollstuhls.
4. Heben Sie die Bohrungen der Fußplatte aus den
Stiften am Rahmen.
2.5 Betätigen der Bremsen
L WARNUNG: Die Bremsen dienen nicht dazu, die Bewegung des Rollstuhls
abzubremsen – sie dienen ausschließlich dazu, unbeabsichtigte Bewegungen des
Rollstuhls zu verhindern.
L WARNUNG: Die ordnungsgemäße Funktion der Bremsen kann durch Verschleiß
oder Schmutz (auch Wasser, Öl, Schlamm usw.) beeinträchtigt werden.
Überprüfen Sie daher vor jeder Rollstuhlnutzung den Zustand der Reifen.
L WARNUNG: Die Bremsen sind einstellbar und können verschleißen. Überprüfen
Sie daher vor jeder Rollstuhlnutzung den Zustand der Bremsen.
So betätigen Sie die Bremsen:
1. Drücken Sie die Bremshebel nach vorn, bis
sie ein deutliches Klicken fühlen.
L VORSICHT: Gefahr einer unbeabsichtigten
Bewegung. Achten Sie darauf, dass der
Rollstuhl auf einer flachen, horizontalen
Fläche steht, bevor Sie die Bremsen lösen.
Lösen Sie niemals beide Bremsen
gleichzeitig.
So lösen Sie die Bremsen:
1. Lösen Sie eine Bremse, indem Sie den Griff
nach hinten ziehen.
2. Fassen Sie den Greifreifen des Rads mit der
gelösten Bremse mit Ihrer Hand.
3. Lösen Sie die zweite Bremse, indem Sie den
Griff nach hinten ziehen.
Seite 8
Page 77

708D
C
D
A
B
2011-05
2.6 An- oder Abbauen der Armauflagen
L VORSICHT: Klemmgefahr – Halten Sie Ihre Finger, Schnallen oder
Kleidungsstücke fern von der Unterseite der Armauflage.
Die Armauflagen des Rollstuhl können weggeklappt oder abgebaut werden.
1. Schieben Sie das hintere Rohr der Armauflage in die Rohraufnahme . (Abb. A)
2. Stellen Sie sicher, dass die Armlehnen korrekt eingehangen sind.
3. Klappen Sie die Armauflage nach vorne.
4. Drücken Sie den Hebel am vordern Armlehnenende nach unten. (Abb. B)
5. Schieben Sie das vordere Rohr der Armauflage in die Rohraufnahme . (Abb. B)
So entriegeln Sie eine Armauflage und bauen sie ab:
1. Drücken Sie den Hebel und ziehen Sie die Vorderseite der Armauflage nach
oben. (Abb C)
2. Klappen Sie die Armauflage nach hinten.
3. Um die Armlehne abzunehmen, ziehen Sie die Armlehne aus der hinteren
Armlehnenaufnahme . (Abb. D)
Seite 9
Page 78

708D
2011-05
2.7 Setzen in den Rollstuhl
L VORSICHT: Falls Sie sich nicht allein sicher in den Rollstuhl setzen können,
bitten Sie jemanden um Hilfe.
L VORSICHT: Kipprisiko des Rollstuhls – nicht auf die Fußplatten stellen.
1. Stellen Sie den Rollstuhl so nahe wie
möglich an den Stuhl, die Couch oder das
Bett, von dem Sie zum Rollstuhl wechseln
möchten.
2. Achten Sie darauf, dass beide Bremsen des
Rollstuhls betätigt sind.
3. Klappen Sie die Fußplatten nach oben,
damit Sie sich nicht versehentlich darauf
stellen.
4. Wenn Sie sich von der Seite in den Rollstuhl
setzen, klappen Sie die Armauflage an der
entsprechenden Seite nach oben. (Siehe § 2.6)
5. Setzen Sie sich in den Rollstuhl.
2.8 Prüfen Sie, ob die Sitzposition korrekt ist.
Einige Empfehlungen für die komfortable Verwendung des Rollstuhls:
Setzen Sie sich möglichst weit nach hinten, so dass Ihr Rücken an der Rückenlehne
anliegt.
Achten Sie darauf, dass Ihre Oberschenkel möglichst horizontal stehen.
Gegebenenfalls müssen Sie die Länge der Fußplatten einstellen. (Siehe § 3.6.1)
2.9 Fahren mit dem Rollstuhl
L WARNUNG: Klemmgefahr – Halten Sie Ihre Finger von den Radspeichen fern.
L WARNUNG: Klemmgefahr – Seien Sie in engen Durchfahren (z. B. Türen)
vorsichtig.
L WARNUNG: Verletzungsgefahr – Achten Sie darauf, dass Sie das Gerät
keinen extremen Temperaturen aussetzen (Sonnenschein, extreme Kälte,
Sauna etc.), da sich die verwendeten Materialien den
Umgebungstemperaturen angleichen, was bei Berührung zu Verletzungen
führen kann - Umgebungstemperaturen können Oberflächen verändern.
1. Lösen Sie die Bremsen.
2. Legen Sie beide Hände an die oberste Position des Greifreifens.
3. Lehnen Sie sich nach vorn und drücken Sie die Greifreifen nach vorn, bis beide Arme
gerade sind.
4. Schwingen Sie Ihre Arme lose zurück an die Oberkante der Greifreifen und
wiederholen Sie die Bewegung.
2.10 Bewegen an Steigungen
L WARNUNG: Kontrollieren Sie Ihre Geschwindigkeit – Bewegen Sie sich an
Steigungen so langsam wie möglich.
L WARNUNG: Berücksichtigen Sie die Kräfte Ihres Helfers – Wenn Ihr Helfer nicht
stark genug ist, den Rollstuhl zu kontrollieren, betätigen Sie die Bremsen.
L WARNUNG: Kippgefahr – Lehnen Sie sich nach vorn, um Ihren Schwerpunkt
nach vorne zu verlagern. So sorgen Sie für bessere Stabilität.
Seite 10
Page 79

708D
2011-05
1. Falls Ihr Rollstuhl mit einem Sicherheitsgurt ausgestattet ist,
sollten Sie ihn stets anlegen.
2. Versuchen Sie nicht, zu steile Steigungen hinauf zu
fahren. Die maximalen Steigungswinkel (sowohl auf- als
auch abwärts), sind in Tabelle 1 aufgeführt.
3. Bitten Sie einen Helfer, Sie beim Hinauffahren der Steigung zu
unterstützen.
4. Lehnen Sie sich nach vorn, um Ihren Schwerpunkt nach
vorne zu verlagern.
2.11 Überwinden von Stufen und Bordsteinen
2.11.1 Hinunterfahren von Stufen und Bordsteinen
Stufen und Bordsteine können vorwärts überwunden werden. Achten Sie darauf, dass die
Fußplatten den Boden nicht berühren.
Ein geübter Fahrer kann Stufen und Bordsteine problemlos
allein hinunterfahren:
L WARNUNG: Kippgefahr – Falls Sie noch
unerfahren im Umgang mit dem Rollstuhl sind,
lassen Sie sich helfen.
1. Verlagern Sie das Gewicht auf die Hinterräder, um die
Vorderräder zu entlasten.
2. Fahren Sie den Bordstein hinunter.
Auch höhere Bordsteine können mit einem Helfer vorwärts überwunden werden:
1. Bitten Sie den Helfer, den Rollstuhl etwas nach hinten zu kippen.
2. Fahren Sie den Bordstein hinunter, während Sie die Hinterräder bewegen.
3. Setzen Sie den Rollstuhl wieder auf alle vier Räder.
Ein erfahrener Fahrer kann auch höhere Bordsteine alleine
überwinden. Die erfolgt dann am besten rückwärts.
1. Drehen Sie den Rollstuhl so, dass die Hinterräder zum
Bordstein stehen.
2. Lehnen Sie sich nach vorn, um Ihren Schwerpunkt
nach vorne zu verlagern.
3. Bewegen Sie den Rollstuhl so nach wie möglich an den
Bordstein.
4. Drücken Sie vorsichtig am Greifreifen, um den Rollstuhl
langsam den Kantstein hinunterfahren zu lassen.
2.11.2 Hinauffahren von Stufen und Bordsteinen
So überwinden Sie Stufen oder Bordsteine mit einem Helfer:
1. Achten Sie darauf, dass die Fußplatten den Bordstein
nicht berühren.
2. Bitten Sie den Helfer, den Rollstuhls gerade so weit
nach hinten zu kippen, das die Vorderräder über dem
Bordstein stehen.
3. Lehnen Sie sich nach hinten, um Ihren Schwerpunkt
nach hinten über die Hinterräder zu verlagern.
4. Setzen Sie die Vorderräder auf den Bordstein.
5. Rollen Sie die Hinterräder des Rollstuhls über den
Bordstein.
Seite 11
Page 80

708D
2011-05
Höhere Bordsteine können Sie rückwärts überwinden:
1. Drehen Sie den Rollstuhl so, dass die Hinterräder zum Bordstein stehen.
2. Lehnen Sie sich nach hinten, und bringen Sie den Schwerpunkt über die Hinterräder.
3. Bitten Sie den Helfer, den Rollstuhl über den Bordstein zu ziehen.
4. Nehmen Sie wieder die normale Position auf dem Rollstuhl ein.
Ein erfahrener Fahrer kann auch höhere Bordsteine alleine überwinden:
L WARNUNG: Kippgefahr – Wenn Sie noch unerfahren in der Handhabung
eines Rollstuhls sind, lassen Sie sich von einer zweiten Person helfen.
1. Fahren Sie bis an den Bordstein heran.
2. Achten Sie darauf, dass die Fußplatten den Bordstein
nicht berühren.
3. Lehnen Sie sich nach hinten, um den Schwerpunkt auf
die Hinterräder zu verlagern.
4. Rollen Sie die Vorderräder vorsichtig über den
Bordstein.
5. Lehnen Sie sich nach vorn, um mehr Stabilität zu
erhalten.
6. Rollen Sie die Hinterräder über den Bordstein.
2.11.3 Überwinden von Treppen
Auch eine Treppe kann mit einem Rollstuhl überwunden werden, wenn die folgenden Regeln
beachtet werden:
L WARNUNG: Kippgefahr – Treppen sollten immer mit zwei Helfern überwunden
werden.
1. Bauern Sie die Fußplatten ab.
2. Ein Helfer kippt den Rollstuhl etwas nach hinten.
3. Der zweite Helfer fasst den Rollstuhl am vorderen Rahmen.
4. Bleiben Sie ruhig, vermeiden Sie plötzliche Bewegungen, und halten Sie die Arme
am Körper.
5. Überwinden Sie die Stufen mit den Hinterräder des Rollstuhls.
6. Bauen Sie die Fußplatten nach dem Überwinden der Treppe wieder am Rollstuhl an.
2.12 Zusammenklappen des Rollstuhls
L VORSICHT: Quetschgefahr – Achten Sie beim Zusammenklappen des Rollstuhls
auf Ihre Finger.
1. Klappen Sie die Fußplatten ein oder bauen Sie sie ab (siehe § 2.4).
2. Fassen Sie den Sitz an der vorderen und hinteren Seite und ziehen Sie die Sitzfläche
nach oben.
Seite 12
Page 81

708D
2011-05
2.13 Abnehmen der Hinterräder
Für eine einfacheren Transport des Rollstuhls können die Hinterräder abgenommen werden:
1. Stellen Sie sicher, dass die Bremsen gelöst
sind.
2. Drehen Sie die Seite des Rollstuhls zu sich, an
der Sie das Rad abnehmen möchten.
3. Drücken Sie den Arretierstift in der Mitte der
Radnabe.
4. Ziehen Sie das Rad vom Rahmen ab.
2.14 Transport in einem Auto
L WARNUNG: Verletzungsgefahr – Achten Sie darauf, den Rollstuhl
ordnungsgemäß zu befestigen. So vermeiden Sie Verletzungen der
Fahrzeuginsassen bei einer Kollision oder einem plötzlichen Bremsmanöver.
L WARNUNG: Verletzungsgefahr – Verwenden Sie zum Sichern des Rollstuhls und
des Fahrzeuginsassens NIEMALS den gleichen Sicherheitsgurt.
1. Bauen Sie die Fußplatten und evtl. vorhandenes Zubehör ab.
2. Bewahren Sie die Fußplatten und das Zubehör an einem sicheren Ort auf.
3. Wenn möglich, klappen Sie den Rollstuhl zusammen und bauen Sie die Hinterräder
ab.
4. Transportieren Sie den Rollstuhl nach Möglichkeit im Kofferraum oder Gepäckraum.
5. Wenn der Gepäckraum und der Fahrgastraum NICHT voneinander getrennt sind,
befestigen Sie den Rahmen des Rollstuhls sicher am Fahrzeug. Sie können hierzu
verfügbare Sicherheitsgurte im Fahrzeug verwenden.
2.15 Nutzung des Rollstuhls als Sitz in einem PKW
L WARNUNG: Der Rollstuhl hat den Crash-Test gemäß ISO 7176-19: 2008
bestanden und ist konstruiert und ausgelegt zur Nutzung als Sitz in einem
PKW nur in Blickrichtung nach vorne.
L WARNUNG: Ein Rollstuhlrückhaltegurt Ist nicht als Sicherheitsgurt zu
verwenden.
Der Rollstuhl wurde getested unter Verwendung eines 5-Punkt Rückhaltegurtsystems
(Rollstuhl) und eines 3-Punkt-Sicherheitsgurtes (Nutzer).
Grundsätzlich ist, wenn möglich, bevorzugt ein vorhandener PKW-Sitz zu verwenden und
der Rollstuhl sicher im Gepäckraum zu verstauen.
Sicheres Verzurren des Rollstuhls innerhalb des PKW’s.
1. Prüfen Sie, ob der PKW mit einem PKW-Gurtsystem und einem Sicherheitsgurt
gemäß ISO 10542 ausgestattet ist.
2. Prüfen Sie, dass alle Komponenten des PKW-Gurtsystems (Rollstuhl) und des
Sicherheitsgurtes (Nutzer) nicht ausgefranst, verschmutzt, beschädigt oder geknickt
sind.
3. Ist der Rollstuhl mit verstellbaren Sitz-/Rückensystemen ausgestattet, sind diese in
eine Position zu bringen, die den Nutzer in eine möglichst aufrechte Sitzposition
bringt. Lässt der Zustand des Nutzers dies nicht zu, sind die Risiken die den
Transport in einer anderen Position zur Folge haben, festzustellen und zu bewerten.
Seite 13
Page 82

708D
Abb. 1
Abb. 2
Abb. 4
2011-05
4. Entfernen Sie alle angebauten Teile und Zubehörteile, wie z.B. Körbe, Taschen,
Beatmungsequipement, usw., und verstauen Sie diese gesondert sicher im
Gepäckraum.
5. Positionieren Sie den Rollstuhl in Vorwärtsrichtung mittig zwischen den Schienen des
PKW-Gurtsystems, die im Boden des PKW´s eingebaut sind.
6. Stellen Sie sicher, dass keine Fahrzeugteile/-bauten in die unten angegebenen
Sicherheitszonen um den Nutzer herum gebaut sein dürfen (Abb.1 / Abb. 2).
7. Montieren Sie die vorderen Gurte des Rollstuhl-Gurtsystems gemäß den Angaben
des jeweiligen Herstellers an den angegebenen Positionen am Rollstuhl. (Abb. 3)
Diese Stellen sind am Rollstuhl mit einem Symbol markiert. (Abb. 4)
8. Ziehen Sie den Rollstuhl soweit nach hinten, bis die vorderen Gurte gespannt sind.
9. Betätigen Sie nun die Bremsen des Rollstuhls.
10. Montieren Sie die hinteren Gurte des Rollstuhl-Gurtsystems gemäß den Angaben
des jeweiligen Herstellers an den angegebenen Positionen am Rollstuhl. (Abb. 3)
11. Diese Stellen sind am Rollstuhl mit einem Symbol markiert. (Abb. 4)
Abb. 3
Sicheres Anschnallen des Nutzers:
1. Entfernen Sie beide Armlehnen des Rollstuhls.
2. Wenn vorhanden, legen Sie den Rollstuhlgurt an.
3. Legen Sie den Sicherheitsgurt des PKW’s an gemäß den Angaben des jeweiligen
Herstellers.
4. Legen Sie den Gurt so über dem vorderen Becken des Nutzers an, dass der
Gurtriemen in einem Winkel zwischen 30° und 75° Grad zur Horizontalen liegt (siehe
auch nachfolgende Zeichnung).
Seite 14
Page 83

708D
Grute sollen kompletten Kontakt über den
Brustkorb haben bis zum seitlichen Becken
und Oberschenkel
Bauteile des Rollstuhls dürfen den Gurt
nicht vom Körper des Nutzers fernhalten
(z.B. Armlehnen, Räder usw.
2011-05
5. Je größer (steiler) der Winkel des Gurtriemens innerhalb der markierten Fläche,
desto besseren Halt kann das Gurtsystem bieten.
6. Legen Sie den Gurt stramm gemäß den Angaben des jeweiligen Herstellers an, ohne
den Nutzer zu verletzen oder zu behindern.
7. Stellen Sie sicher, dass die Gurte in einer direkten Linie zur Gurtaufhängung des
PKW´s angebracht werden und dass keine Knicke und Verdrehungen in den Riemen
sichtbar sind, zum Beispiel durch die Hinterradachse.
8. Die Armlehnen können angebracht werden. Stellen Sie sicher, dass die Gurte nicht
verdreht sind und der Gurt stramm am Körper des Nutzers liegt. Bauteile des
Rollstuhls (Armlehnen, Räder usw.) dürfen den Gurt nicht vom Körper des Nutzers
ferngehalten.
3 Zusammenbau und Einstellung
Die Anweisungen in diesem Kapitel richten sich an den Fachhändler.
Die Vermeiren-Rollstühle 708D wurden unter besonderer Berücksichtigung von hohem
Komfort für den Benutzer konzipiert.
Um einen Fachhändler in Ihrer Nähe zu finden, stehen Ihnen unsere Niederlassungen gerne
zur Verfügung. Eine Auflistung aller Vermeiren Niederlassungen finden Sie auf der letzten
Seite dieser Gebrauchsanweisung.
L WARNUNG: Nutzen Sie das Produkt nur gemäß den technischen Vor- und
Angaben dieser Gebrauchsanweisung.
L WARNUNG: Änderungen an den zulässigen Einstellungen können die Stabilität
des Rollstuhls verändern (Kippen nach hinten oder zur Seite).
Seite 15
Page 84

708D
2011-05
3.1 Werkzeug
Für die Montage des Rollstuhl und für Einstellungen werden die folgenden Werkzeuge
benötigt:
Schraubenschlüsselsatz Größe 10 bis 19
Inbusschlüsselsatz Größe 4 bis 5
Kreuzschlitzschraubendreher
3.2 Lieferumfang
Der Lieferumfang des Rollstuhls Vermeiren 708D umfasst:
1 Rahmen mit Armauflagen, Hinter- und Vorderrädern (Sitzhöhe von 500 mm,
Sitzwinkel von 5°)
1 Paar Fußplatten
Rücken- und Sitzkissen
Werkzeuge
Handbuch
Zubehör (optional)
Pumpe (nur bei Luftreifen)
Prüfen Sie vor der Verwendung, ob alle aufgeführten Artikel in der Lieferung enthalten und
nicht beschädigt sind (beispielsweise durch den Transport).
3.3 Anatomischer Sitz (optional)
L WARNUNG: Verletzungsgefahr – Prüfen Sie vor der Verwendung, ob der Sitz
sicher befestigt ist.
L WARNUNG: Verletzungsgefahr – Quetschgefahr für die Finger während des
Zusammenbaus.
Wenn Sie sich für einen anatomischen, gepolsterten Sitz
entschieden haben, positionieren Sie ihn auf der Rohrschere,
so dass der Sitzträger gleichmäßig in die Schere einrastet.
Seitlich an der Holzplatte befinden sich Schienen, die in die
Querrohre der Schere einrasten. Zum Zusammenfalten des
Rollstuhls müssen Sie die Sitzfläche abnehmen, indem Sie sie
nach oben ziehen.
3.4 Anatomische Rückenlehne (optional)
L WARNUNG: Verletzungsgefahr – Prüfen Sie vor der Verwendung, ob die
Rückenlehne sicher befestigt ist.
L WARNUNG: Verletzungsgefahr – Quetschgefahr für die Finger während des
Zusammenbaus.
Zum Einhängen der Rückenlehne gehen Sie wie folgt vor:
1. Schrauben Sie die flexible Rückenlehne ab.
2. Lösen Sie die Schrauben an den Halterungen für die
Rückenlehne.
3. Setzen Sie die Rückenlehne von oben in die Halterungen
ein.
4. Ziehen Sie die Schrauben an den Halterungen für die
Rückenlehne fest.
5. Setzen Sie die Sicherungsschrauben für die Rückenlehne
ein und ziehen Sie sie fest.
6. Setzen Sie die Armlehnen an.
Seite 16
Page 85

708D
2011-05
3.5 Einstellen der Bremsen
L WARNUNG: Verletzungsgefahr – Bremsen dürfen nur vom Fachhändler
eingestellt werden.
So stellen Sie die Bremsen ein:
1. Bauen Sie die Räder gemäß den Anweisungen in § 2.2
an.
2. Lösen Sie die Bremsen, indem Sie den Hebel nach
hinten ziehen.
3. Lösen Sie die selbstsichernde Mutter , so dass der
Bremsmechanismus über das Rahmenrohr geschoben
werden kann.
4. Ziehen Sie den Bremsmechanismus über das Rohr in
die gewünschte Position. (Der Einstellungsbereich liegt
zwischen den Nuten auf der Bremsmontageplatte.)
5. Ziehen Sie die selbstsichernde Mutter wieder fest.
6. Prüfen Sie die ordnungsgemäße Funktion der Bremsen.
7. Wiederholen Sie die oben stehenden Schritte
gegebenenfalls, bis die Bremsen korrekt eingestellt sind.
3.6 Einstellen der Fußplatten
3.6.1 Länge der Fußplatten
L VORSICHT: Risiko der Beschädigung – Achten Sie darauf, dass die Fußplatten
den Boden nicht berühren. Achten Sie auf einen Abstand von mindestens 60 mm
zwischen der Fußplatte und dem Boden.
So stellen Sie die Länge der Fußplatten ein:
1. Drehen Sie die Inbusschraube am
unteren Ende des oberen Teils der
Beinstütze heraus.
2. Stellen Sie die Länge der Fußplatte auf eine
angenehme Länge ein, indem Sie das
sechseckige Innenrohr weiter einschieben
oder herausziehen.
3. Ziehen Sie die Inbusschraube wieder
fest.
Die minimale Länge befindet sich
an der Stelle, an der der
sechseckige Bereich des
Fußplattenrohr in den runden
Bereich übergeht.
Die maximale Länge ist am Rohr
mit einer geraden Linie
gekennzeichnet.
Seite 17
Page 86

708D
2011-05
4 Wartung
Die Lebenszeit des Rollstuhl hängt ab von der Art der Nutzung, der Einlagerung,
regelmäßigen Kontrollen, Service und Pflege.
4.1 Regelmäßige Wartung
Die Wartungsarbeiten dienen dazu, den ordnungsgemäßen Zustand Ihres Vermeiren
Rollstuhls über lange Zeit sicherzustellen:
Vor jeder Fahrt
Überprüfen Sie die Bereifung und reinigen Sie sie gegebenenfalls. Falls
erforderlich, wechseln Sie den Reifen.
Überprüfen Sie die Verschraubungen fest angezogen sind.
Überprüfen Sie die Bremsen und stellen Sie sie gegebenenfalls ein.
Überprüfen Sie den Rollstuhl (Sauberkeit, Risse, Beschädigungen an den
tragenden Teilen usw.) .) und reinigen Sie sie gegebenenfalls. Bessern Sie,
falls erforderlich, die Lackierung aus.
Alle 8 Wochen: Überprüfen und Schmieren der folgenden Teile:
Armauflagen
Fußplatten
Bremshebel
Radachsen
Alle 6 Monate oder für jeden neuen Benutzer
Allgemeine Durchsicht
Desinfektion
Lenkräder, gegebenenfalls Lager reinigen
Zu Ihrer Bequemlichkeit haben wir den Wartungsplan auf der Rückseite dieser
Bedienungsanleitung abgedruckt.
Reparatur und Montage von Ersatzteilen für Ihren Rollstuhl dürfen nur von einem
Fachhändler durchgeführt werden.
Es dürfen nur autorisierte Vermeiren Ersatzteile verwendet werden.
4.2 Verpackung und Lagerung
Bei der Verpackung und Lagerung des Rollstuhl sind die folgenden Hinweise zu beachten:
Lagern Sie den Rollstuhl nur bei Temperaturen von +5°C bis +41°C).
Einlagerung bei Luftfeuchtigkeit von 30 % à 70 %.
Achten Sie darauf, den Rollstuhl ausreichend abzudecken oder zu verpacken, um ihn
vor Rost und Fremdkörpern zu schützen (z. B. Salzwasser, Seeluft, Sand, Staub).
Alle abgebauten Teile zusammen an einem Ort lagern (ggf. kennzeichnen), damit bei
Wiederaufbau keine Verwechslung mit anderen Produkten auftreten kann.
Alle Bauteile müssen belastungsfrei gelagert werden (legen Sie keine schweren Teile
auf den Rollstuhl, klemmen Sie den Rollstuhl nicht zwischen anderen Teilen ein
usw.).
Seite 18
Page 87

708D
2011-05
4.3 Pflege
4.3.1 Sitz und Rückenkissen
Bei der Reinigung des Sitzes und des Rückenkissens ist Folgendes zu beachten:
Reinigen Sie den Sitz und die Rückenlehne mit einem mit warmem Wasser
angefeuchteten Tuch. Achten Sie darauf, dass sich der Sitz und das Rückenkissen
nicht mit Wasser vollsaugen.
Bei hartnäckiger Verschmutzung können die Bezüge mit einem handelsüblichen
Feinwaschmittel gewaschen werden.
Flecken können mit einem Schwamm oder mit einer weichen Bürste entfernt werden.
Verwenden Sie keine aggressiven Reinigungsmittel, z. B. Lösungsmittel, oder harte
Bürsten.
Die Bezüge dürfen nicht mit einem Dampf- oder Hochdruckreiniger behandelt werden.
4.3.2 Kunststoffteile
Reinigen Sie alle Kunststoffteile Ihres Rollstuhls mit einem handelsüblichen
Kunststoffreiniger. Verwenden Sie nur eine weiche Bürste oder einen weichen Schwamm.
Kunststoffteile sind z. B. die Armauflagen, Griffe, Bereifung usw. .
4.3.3 Lackierung
Durch die hochwertige Lackierung wird ein optimaler Korrosionsschutz gewährleistet. Falls
die Lackierung durch Kratzer oder ähnliches beschädigt wird, sollten Sie einen Fachhändler
aufsuchen, um die betroffene Oberfläche instand setzen zu lassen.
Verwenden Sie zur Reinigung der Lackierung nur warmes Wasser und handelsübliche
Haushaltsreiniger mit einer weichen Bürste und ein Tuch. Achten Sie darauf, dass kein
Wasser in die Rohre eintritt.
Bei leichtem Schmutz reiben Sie die verzinkten Teile einfach mit einem trockenen Tuch
sauber. Hartnäckiger Schmutz wird am besten mit einem handelsüblichen Zinkpolitur
entfernt.
4.4 Inspektion
Grundsätzlich empfehlen wir jährliche Inspektionen, mindestens jedoch vor jedem
Wiedereinsatz. Die folgenden Prüfungen müssen von autorisierten Personen durchgeführt
und dokumentiert werden.
Prüfung der Rahmenteile und der Rohrschere auf Verformung, Risse und
Funktionsbeeinträchtigungen.
Sichtprüfung der Lackierung auf Schäden (Korrosionsgefahr)
Funktionsprüfung der Räder (Freilauf, Geradeauslauf, Achsspiel, Bereifung, Profil,
Lassen Sie sich den Wartungsdienst nur dann im Wartungsplan unterzeichnen, wenn
mindestens die oben genannten Punkte überprüft wurden.
Felgenzustand, bei Luftbereifung Reifendruck, Pendelachsen usw.)
Prüfung aller Schraubverbindungen auf Festigkeit und korrekten Sitz.
Zustand und Menge des Schmiermittels bei metallisch geführten beweglichen Teilen
Zustand und Sicherheit der Führungen und Achsen der Lenkräder.
Sichtprüfung aller Kunststoffteile auf Risse und spröde Stellen
Funktionsprüfung der Armauflagen und Beinstützen (Verriegelung, Belastung,
Verformung, Verschleiß durch Belastung.
Überprüfung der Funktion der abnehmbaren Teile (Beispiel: Antikippvorrichtung,
Sicherheitsgurt, Rücken- oder Sitzkissen usw.)
Vollständigkeit des Auslieferungszustands, Gebrauchsanweisung vorhanden?
Seite 19
Page 88

708D
Datum der
Desinfektion
Grund
Spezifikation
Verwendete
Substanz und
Konzentration
Unterschrift
Wirkstoff
Produktname
Wäschedesinfektion
Oberflächendesinfektion
(Wasch-/Wisch-
desinfektion)
Desinfektion von Ausscheidungen
1 Teil Auswurf oder Stuhl + 2 Teile
verdünnte Lösung oder 1 Teil Harn +
1 Teil verdünnte Lösung
Wirksamkeitsbereich
Hersteller bzw.
Lieferant
Auswurf
Stuhl
Harn
Verdünnte Lösung
Dauer bis Wirksamkeit
Verdünnte Lösung
Dauer bis Wirksamkeit
Verdünnte Lösung
Dauer bis Wirksamkeit
Verdünnte Lösung
Dauer bis Wirksamkeit
Verdünnte Lösung
Dauer bis Wirksamkeit
%
Std. % Std. % Std. % Std. % Std.
Phenol oder
Phenolderivat
Amocid 1 12 5 6 5 4 5 6 5 2 A Lysoform
Gevisol
0,5
12 5 4 5 4 5 6 5 2 A Schülke & Mayr
Helipur 6 4 6 4 6 6 6 2 A B. Braun
m-cresole
Seifenlösung
(DAB 6)
1
12 5 4 A
Phenol 1 12 3 2 A
Chlor,
organische oder
anorganische
Substanzen mit
Aktivchlor
Chloramin-T
DAB 9
1,5
12
2,5 2 5 4 A1B
Clorina
1, 5
12
2,5 2 5 4 A1B
Lysoform
Trichlorol
2
12 3 2 6 4
A1B
Lysoform
Perverbindungen
Apesin AP1002
4 4 AB
Tana
PROFESSIONAL
Dismozon pur2
4 1 AB
Bode Chemie
Perform2 3 4
AB
Schülke & Mayr
Wofesteril2
2 4 AB
Kesla Pharma
2011-05
4.5 Desinfektion
L WARNUNG: Schädliche Produkte - Desinfektionsmittel dürfen nur von
autorisiertem Personal eingesetzt werden.
L WARNUNG: Gefährliche Produkte, die zu Hautveränderungen führen können.
Tragen Sie geeignete Schutzkleidung, da die Desinfektionslösung bei Hautkontakt
Reizungen auslösen kann. Achten Sie dabei auch auf die Produktinformationen
der jeweiligen Lösung.
Alle Teile des Patientenlifters können mit einem Desinfektionsmittel abgerieben werden.
Alle Desinfektionsmaßnahmen an Rehabilitationsgeräten, deren Komponenten oder
Zubehörteilen müssen in einem Desinfektionsbuch festgehalten werden. Dabei sind
mindestens die folgenden Informationen aufzuführen und eine Produktdokumentation
beizufügen:
Tabelle 2: Beispiel eines Desinfektionsbuchs
Abkürzungen für die Eintragungen in Spalte 2 (Grund):
V = Vermutete Infektion IF = Infektionsfall W = Wiederholung I = Inspektion
Eine leere Seite eines Desinfektionsbuchs finden Sie in § 9.
Für die Verwendung am Patientenlifter werden die in der folgenden Liste aufgeführten
Desinfektionsmittel (basierend auf einer Liste des Robert Koch Instituts, RKI) empfohlen.
Der aktuelle Stand der in die RKI-Liste aufgenommenen Desinfektionsmittel kann beim
Robert-Koch-Institut (RKI) nachgefragt werden (Homepage: www.rki.de).
Seite 20
Page 89

708D
Wirkstoff
Produktname
Wäschedesinfektion
Oberflächendesinfektion
(Wasch-/Wisch-
desinfektion)
Desinfektion von Ausscheidungen
1 Teil Auswurf oder Stuhl + 2 Teile
verdünnte Lösung oder 1 Teil Harn +
1 Teil verdünnte Lösung
Wirksamkeitsbereich
Hersteller bzw.
Lieferant
Auswurf
Stuhl
Harn
Verdünnte Lösung
Dauer bis Wirksamkeit
Verdünnte Lösung
Dauer bis Wirksamkeit
Verdünnte Lösung
Dauer bis Wirksamkeit
Verdünnte Lösung
Dauer bis Wirksamkeit
Verdünnte Lösung
Dauer bis Wirksamkeit
%
Std. % Std. % Std. % Std. % Std.
Formaldehyd
und/oder
sonstige
Aldehyde bzw.
Derivate
Aldasan 2000
4 4 AB
Lysoform
Antifect FD 10
3 4 AB
Schülke & Mayr
Antiseptica
FlächenDesinfektion 7
3 6 AB
Antiseptica
Apesin AP30
5 4 A
Tana
PROFESSIONAL
Bacillocid special
6 4 AB
Bode Chemie
Buraton 10F
3 4 AB
Schülke & Mayr
Desomed
A2000
3 6 AB
Desomed
Desinfektionsreiniger
Hospital
8 6 AB
Dreiturm
Desomed
Perfekt
7 4 AB*
Desomed
Formaldehyd
(DAB 10),
(Formalin)
1,5
12 3 4
AB
Incidin Perfekt
1
12 3 4
AB
Ecolab
Incidin Plus
8 6 A
Ecolab
Kohrsolin
2
12 3 4
AB
Bode Chemie
Lysoform
4
12 5 6
AB
Lysoform
Lysoformin
3
12 5 6
AB
Lysoform
Lysoformin 2000
4 6 AB
Lysoform
Melsept 2 12 4 6
AB
B. Braun
Melsitt 4 12
10 4 AB
B. Braun
Minutil 2 12 6 4
AB
Ecolab
Multidor 3 6
AB
Ecolab
Nûscosept
5 4 AB
Dr. Nüsken Chemie
Optisept 7 4
AB*
Dr. Schumacher
Pursept-FD
7 4 AB*
Merz
Ultrasol F
3
12 5 4
AB
Fresenius Kabi
Amphoterische
Tenside
(Amfotensiden)
Tensodur 103
2
12 A MFH Marienfelde
Lye
Kalkmilch3
20 6 A3B
1 Unwirksam gegen Mykobakterien bei einer routinemäßigen Desinfektion, insbesondere in Gegenwart von Blut.
2 Ungeeignet zur Desinfektion von deutlich mit Blut kontaminierten Flächen oder von porösen Oberflächen (z. B. rohem Holz).
3 Unbrauchbar bei Tuberkulose; Bereitung der Kalkmilch: 1 Teil gelöschter Kalk (Calciumhydroxid) + 3 Teile Wasser.
* Geprüft auf Wirksamkeit gegen Viren gemäß den Prüfmethoden des RKI (Gesundheitsbericht 38 (1995) 242).
A: Geeignet zur Abtötung von vegetativen bakteriellen Keimen einschließlich Mykobakterien sowie von Pilzen einschließlich pilzlicher Sporen.
B: Geeignet zur Inaktivierung von Viren.
2011-05
Für Rückfragen zur Desinfektion wenden Sie sich bitte an Ihren Fachhändler, der Ihnen
gerne weiterhelfen wird.
Tabelle 3: Desinfektionsmittel
Seite 21
Page 90

708D
2011-05
5 Garantie
Auszug aus den allgemeinen Geschäftsbedingungen:
(...)
5. Die Verjährungsfrist für Gewährleistungsansprüche beträgt 24 Monate. Aufgrund unserer
hohen Qualitätsstandards können wir den Zeitraum für Gewährleistungsansprüche für die
folgenden Bauteile über diese gesetzlich vorgeschriebene Frist hinaus verlängern
(...)
- Rahmen und Schere von Rollstühlen 5 Jahre
Wir übernehmen keine Gewähr bei Schäden, die durch konstruktive Veränderungen an
unseren Produkten, mangelnde Wartung, fehlerhafte oder unsachgemäße Behandlung oder
Lagerung oder Verwendung von anderen als Original-Ersatzteilen entstanden sind. Die
Gewährleistung auf Verschleißteile bzw. auf Teile, die einer natürlichen Abnutzung
unterliegen, wird ebenfalls ausgeschlossen.
(...)
6 Entsorgung
Wenden Sie sich zur Entsorgung des Rollstuhls an den Ihr lokales Recyclingcenter oder
geben Sie das Produkt an den Fachhändler zurück. Dieser wird den Rollstuhl nach einer
fachgerechten Reinigung bzw. Desinfektion an den Hersteller zurücksenden, der den
Rollstuhl entsorgt bzw. recycelt.
Die Verpackungsmaterialien können Sie entweder in das Recycling geben oder bei Ihrem
Fachhändler lassen.
7 Übereinstimmungserklärung
Seite 22
Page 91

708D
Datum
Wartung
Anmerkungen
Namenszeichen
1/1/2011
Schmierung und allgemeine
Wartung
keine
Datum der
Desinfektion
Grund
Spezifikation
Verwendete
Substanz und
Konzentration
Unterschrift
Abkürzungen für die Eintragungen in Spalte 2 (Grund):
V = Vermutete Infektion IF = Infektionsfall W = Wiederholung I = Inspektion
2011-05
8 Wartungsplan
9 Desinfektionsbuch
Seite 23
Page 92

708D
2011-05
Indice
Premessa ............................................................................................... 2
1 Descrizione del prodotto .......................................................... 3
1.1 Utilizzo previsto .......................................................................................................... 3
1.2 Specifiche tecniche ...................................................................................................... 4
1.3 Componenti ................................................................................................................. 5
1.4 Accessori ..................................................................................................................... 5
1.5 Posizione della targhetta di identificazione ................................................................. 5
1.6 Significato dei simboli ................................................................................................ 6
1.7 Sicurezza ..................................................................................................................... 6
2 Utilizzo ....................................................................................... 7
2.1 Trasporto della carrozzina ........................................................................................... 7
2.2 Montaggio delle ruote posteriori ................................................................................. 7
2.3 Apertura della carrozzina ............................................................................................ 7
2.4 Montaggio o rimozione dei poggiapiedi ..................................................................... 7
2.5 Utilizzo dei freni.......................................................................................................... 8
2.6 Montaggio o rimozione dei poggiabraccia .................................................................. 8
2.7 Trasferire la carrozzina all'interno e all'esterno ........................................................... 9
2.8 Posizione corretta nella carrozzina ............................................................................ 10
2.9 Utilizzo della carrozzina............................................................................................ 10
2.10 Spostamento sulle pendenze...................................................................................... 10
2.11 Affrontare gradini e scalini ....................................................................................... 11
2.12 Ripiegare la carrozzina .............................................................................................. 12
2.13 Smontare le ruote ...................................................................................................... 12
2.14 Trasporto in auto ....................................................................................................... 13
2.15 Uso della carrozzina quale sedile su un'autovettura .................................................. 13
3 Installazione e regolazione ..................................................... 15
3.1 Attrezzi ...................................................................................................................... 15
3.2 Modalità di consegna ................................................................................................ 15
3.3 Sedile anatomico (FACOLTATIVO) ......................................................................... 16
3.4 Schienale anatomico (FACOLTATIVO) ................................................................... 16
3.5 Regolare i freni .......................................................................................................... 16
3.6 Regolazione dei poggiapiedi ..................................................................................... 17
4 Manutenzione .......................................................................... 17
4.1 Manutenzione regolare .............................................................................................. 17
4.2 Trasporto e conservazione ......................................................................................... 18
4.3 Pulizia ........................................................................................................................ 18
4.4 Controllo.................................................................................................................... 19
4.5 Disinfezione .............................................................................................................. 20
5 Garanzia .................................................................................. 22
6 Smaltimento ............................................................................. 22
7 Dichiarazione di conformità .................................................. 22
8 Piano di manutenzione ........................................................... 23
9 Guida alla disinfezione ........................................................... 23
Pagina 1
Page 93

708D
2011-05
Premessa
Ringraziamo per la fiducia accordataci con l’acquisto di una carrozzina di nostra produzione.
Le carrozzine Vermeiren sono il risultato di molti anni di ricerca ed esperienza. Durante lo
sviluppo, è stata dedicata attenzione speciale alla facilità d'uso e alla praticità della
carrozzina.
La durata della carrozzina dipende fortemente dalla cura e manutenzione che vi si dedicano.
Il presente manuale ha lo scopo di aiutare ad acquisire familiarità con il funzionamento della
carrozzina.
Attenersi alle istruzioni operative e di manutenzione costituisce parte integrante della
garanzia.
Questo manuale riflette gli sviluppi più recenti dei prodotti. Vermeiren si riserva il diritto di
apportare modifiche senza preavviso, senza essere tenuta a sostituire o adattare modelli
forniti in precedenza.
Per qualsiasi chiarimento, rivolgersi al rivenditore.
Pagina 2
Page 94

708D
2011-05
1 Descrizione del prodotto
1.1 Utilizzo previsto
La carrozzina è destinata a persone con difficoltà motorie o incapacità di deambulazione.
La carrozzina è destinata al trasporto di una sola persona.
La carrozzina può essere utilizzata sia all'interno che in spazi esterni.
La carrozzina può essere spinta direttamente dalla persona o da un accompagnatore.
Le diverse versioni di allestimento egli accessori e la concezione modulare consentono
l’utilizzo della carrozzina da parte di persone con impossibilità/difficoltà di deambulazione in
seguito a:
paralisi
amputazione di arti inferiori
difetti o deformazioni degli arti inferiori
contratture o lesioni articolari
insufficienza cardiaca e cardiocircolatoria
disturbi dell'equilibrio
cachessia (deterioramento della massa muscolare)
e per usi geriatrici.
Nella valutazione delle esigenze personali, le seguenti condizioni:
corporatura e peso corporeo (120 kg max)
condizioni psico-fisiche
abitazioni
ambiente
devono essere prese in considerazione.
La carrozzina deve essere utilizzata solo su superfici che consentono il contatto adeguato
delle quattro ruote e dove sia possibile spingere in modo uniforme le ruote.
Esercitarsi su superfici sconnesse (ciottoli, ecc.), pendenze, curve e a superare gli ostacoli
(scalini, ecc.).
Non utilizzare la carrozzina come scala, né per trasportare oggetti pesanti o caldi.
Quando utilizzata su pavimenti con tappeti, moquette o rivestimenti, la carrozzina può
danneggiarli.
Utilizzare solo gli accessori approvati Vermeiren.
La casa costruttrice non può essere ritenuta responsabile per danni causati dalla mancanza
di manutenzione adeguata o risultanti dal mancato rispetto delle istruzioni contenute nel
presente manuale.
La conformità con le istruzioni operative e di manutenzione è parte integrante della garanzia.
Pagina 3
Page 95

708D
Produttore
Vermeiren
Indirizzo
Vermeirenplein 1/15, B-2920 Kalmthout
Tipo
Carrozzina manuale
Modello
708D
Peso massimo dell'occupante
120 kg
Descrizione
Dimensioni
Larghezza effettiva del sedile
390 mm
420 mm
440 mm
460 mm
480 mm
500 mm
Larghezza complessiva (dipende dalla larghezza del
sedile)
560 mm
590 mm
610 mm
630 mm
650 mm
670 mm
Descrizione
Dimensioni Min.
Dimensioni Max.
Lunghezza complessiva con bracciolo
1060 mm
Lunghezza ripiegata senza bracciolo
810 mm
Larghezza ripiegata
280 mm
Altezza ripiegata
920 mm
Massa totale
± 18 kg
Massa della parte più pesante
10,10 kg
Masse di parti che possono essere smontato o rimosso
Poggiapiedi: 1,90 kg; Poggiabraccia: 1,85 kg;
Ruote posteriori: 4,15 kg
Stabilità statica in discesa
15°
Stabilità statica in salita
15°
Stabilità statica lateralmente
15°
Superamento degli ostacoli
60 mm
Angolazione del piano del sedile
5°
Profondità effettiva del sedile
430 mm
Altezza della superficie del sedile all'estremità frontale
500 mm
Angolazione dello schienale
5°
Altezza dello schienale
420 mm
Distanza tra poggiapiedi e sedile
420 mm
500 mm
Angolazione tra sedile e poggiapiedi
8°
Distanza tra braccioli e sedile
9°
Posizione anteriore della struttura del bracciolo
220 mm
Diametro dei corrimano
300 mm
Posizione orizzontale dell'asse (deflessione)
535 mm
Raggio di sterzata minimo
-7 mm
Diametro delle ruote posteriori in PU kripton
1619 mm
Pressione di gonfiaggio pneumatici, ruote
motrici/posteriori
24"
Diametro delle ruote direttrici in PU kripton
Max. 3.5 bar
Pressione di gonfiaggio pneumatici, ruote direttrici
200 mm
Temperatura di utilizzo e di conservazione
+ 5 °C
+ 41 °C
Umidità di utilizzo e di conservazione
30%
70%
Ci riserviamo il diritto di apportare modifiche tecniche. Tolleranza ± 15 mm / 1,5 kg / °
2011-05
1.2 Specifiche tecniche
I termini tecnici riportati di seguito sono applicabili alla carrozzina con configurazione standard.
Se sono utilizzati altri poggiapiedi/ poggiabraccia o accessori, i valori in tabella cambiano.
Tabella 1: Specifiche tecniche 708D
Pagina 4
Page 96

708D
1 = Taxi ganci
2 = Targhetta di identificazione
3 = Nome 708D
1 = Crociera
2 = Impugnature
3 = Schienale
4 = Braccioli
5 = Poggiabraccia
6 = Ruote direttrici (ruote anteriori)
7 = Corrimano
8 = Freni
9 = Calotta ribaltamento
10 = Ruote direttrici (ruote anteriori)
11 = Sedile
12 = Poggiapiedi
2011-05
La carrozzina è conforme ai requisiti stabiliti dalle normative:
ISO 7176-8: Requisiti e test per prove di stabilità, d'urto e di fatica.
EN 1021-1: Verifica dell'accendibilità dei mobili imbottiti - Sorgente di accensione: sigaretta
in combustione lenta
EN 1021-2: Verifica dell'accendibilità dei mobili imbottiti - Sorgente di accensione: fiamma
equivalente a quella di un fiammifero
ISO 7176-19: Dispositivi per la mobilità con ruote per utilizzo come sedili nei veicoli a
motore.
1.3 Componenti
1.4 Accessori
Per il modello 708D sono disponibili gli accessori seguenti:
Braccioli (B02, B03, B05, B66)
Poggiagambe (B06, B07, B08, BZ7, BZ8, BZ9, BZ10, BK7, BL7, BA6, BK6)
Tavolino (B12)
Porta stampella (B31)
Schienale (L14, L24, L44)
Cintura pelvica anteriore (B58) per montaggio sul tubo dello schienale
Dispositivo antiribaltamento (B78) per montaggio sul telaio inferiore dello schienale
Freni a tamburo per l'accompagnatore (B74) per montaggio sulle impugnature di
spinta
Carrozzina da transito (T30)
Spostamento dello schienale dell'asse (AMP)
Apertura rapida (B80)
Abbassamento dell'altezza del sedile fino a 47 cm (S)
1.5 Posizione della targhetta di identificazione
Pagina 5
Page 97

708D
2011-05
1.6 Significato dei simboli
Peso massimo
Uso interno ed sterno
Pendenza in basso
Pendenza in alto
CE conformità
1.7 Sicurezza
L Verificare che nessun oggetto o parte del corpo finisca tra i raggi delle ruote motrici
onde evitare lesioni e/o danni alla sedia a rotelle.
L Prima di salire/scendere sulla/dalla sedia a rotelle azionare i freni di stazionamento.
L Durante la salita/discesa sulla/dalla sedia non appoggiarsi alle pedane. Ribaltare le
pedane verso l'alto o spostare l'intero poggiapiedi di lato.
L Verificare le conseguenze di spostamenti del baricento sul comportamento della sedia,
ad esempio in tratti in discesa e in salita, inclinazioni laterali o superamento di ostacoli.
Lasciarsi aitare da un accompagnatore.
L Quando si afferrano oggetti posti davanti, di fianco e dietro alla sedia prestare
attenzione a non sporgersi troppo per non correre il rischio di ribaltarsi a causa dello
spostamento del baricentro.
L Quando si passa attraverso porte, archi ecc. deve sempre esserci spazio a sufficienza
lateralmente, in quanto può insorgere il pericolo di schiacciamento di mani/braccia e
danni alla sedia a rotelle.
L Utilizzare la sedia in modo appropriato, evitando, ad esempio, di procedere senza
frenare verso ostacoli (gradini, spigoli, telai di porte, ecc.) o di saltare giù da sporgenze.
La casa costruttrice declina ogni e qualsiasi responsabilità per danni derivanti da
sovraccarico o collisione o altri, risultanti da un impiego improprio.
L Scendere le scale solo con l'ausilio di accompagnatori. Servirsi, se presenti, di appositi
sistemi, come rampe o ascensori.
L Rispettare il codice della strada quando si viaggia su strade pubbliche.
L Come per tutti gli altri veicoli è vietata la guida in stato di ebbrezza o sotto l'effetto di
farmaci. Ciò vale anche per gli spostamenti all'interno.
L Durante la marcia fuori casa tenere conto delle condizioni atmosferiche e del traffico.
poggiapiedi, ecc.) ma per il telaio.
L Per poter essere visti nell'oscurità indossare abiti chiari o dotati di catarifrangenti e
verificare che i catadiottri applicati lateralmente e posteriormente alla sedia siano ben
visibili.
L Prestare attenzione al fuoco, soprattutto alle sigarette accese, perché i rivestimenti del
sedile e dello schienale sono infiammabili.
L Attenzione a non superare la portata massima (120 kg).
Pagina 6
L Per il trasporto della sedia a rotelle non afferrarla per le parti mobili (braccioli,
Page 98

708D
2011-05
2 Utilizzo
In questo capitolo viene descritto l'utilizzo quotidiano. Le presenti istruzioni sono
destinate all'utente e al rivenditore.
La carrozzina viene fornita completamente assemblata dal rivenditore. Le istruzioni destinate
al rivenditore, relative alla configurazione della carrozzina sono descritte nel § 3.
2.1 Trasporto della carrozzina
Il modo migliore per trasportare la carrozzina è facendola scorrere usufruendo delle ruote.
Se ciò non è possibile (per es. quando le ruote posteriori sono tolte per il trasporto in auto),
afferrare saldamente il telaio dalla parte anteriore e dalle impugnature. Non utilizzare la
parte inferiore, i braccioli o le ruote per afferrare la carrozzina.
2.2 Montaggio delle ruote posteriori
1. Prendere la ruota posteriore e premere sul
pulsante .
2. Tenere premuto il pulsante e montare
l'asse delle ruote posteriori fino a quando non
si arresta.
3. Rilasciare il pulsante.
4. Verificare che le ruote siano fissate.
2.3 Apertura della carrozzina
L ATTENZIONE: rischio di intrappolamento. Tenere le dita lontane dalle parti in
movimento della carrozzina.
1. Posizionarsi dietro la carrozzina.
2. Utilizzare le impugnature per aprire la carrozzina il più possibile.
3. Posizionarsi davanti alla carrozzina.
4. Premere entrambi i tubi della seduta verso il basso fino a quando non si fissano in
posizione.
2.4 Montaggio o rimozione dei poggiapiedi
L AVVERTENZA: rischio di lesioni – Prima dell'uso, verificare che i poggiagambe
siano bloccati saldamente nella posizione corretta.
L ATTENZIONE: rischio di intrappolamento - Mantenere una distanza adeguata
delle persone e degli oggetti rispetto al raggio di rotazione dei poggiagambe.
Montare i poggiapiedi nel modo seguente:
1. Reggere i poggiapiedi lateralmente dalla parte esterna
del telaio della carrozzina.
2. Inserire nei fori dei poggiapiedi i perni situati sul
telaio.
3. Ruotare i poggiapiedi verso l'interno fino a quando non
scatta nella posizione corretta. Se il bloccaggio risulta
un po' difficoltoso, premere delicatamente
l'impugnatura all'indietro.
4. Ruotare la pedana poggiapiedi verso il basso.
5. Inserire la cintura per il polpaccio nei ganci .
Pagina 7
Page 99

708D
2011-05
Per rimuovere i poggiapiedi:
1. Rimuovere la cintura per il polpaccio sganciandola da entrambi i lati.
2. Tirare all'indietro la leva situata accanto all’alloggiamento dei poggiapiedi.
3. Ruotare i poggiapiedi verso l'esterno della carrozzina.
4. Sfilare dai fori dei poggiapiedi i perni situati sul telaio.
2.5 Utilizzo dei freni
L AVVERTENZA: non utilizzare i freni per rallentare la carrozzina durante i
movimenti, utilizzarli solo per prevenire movimenti indesiderati della carrozzina.
L AVVERTENZA: sull'adeguato funzionamento dei freni incide l'usura e la
sporcizia accumulata sugli pneumatici (acqua, olio, fango, ecc.). Verificare la
condizione degli pneumatici prima di ciascun utilizzo.
L AVVERTENZA: i freni sono regolabili e possono usurarsi. Verificare il
funzionamento dei freni prima di ciascun utilizzo.
Per frenare:
1. Spingere le impugnature dei freni in avanti
fino a sentire un clic.
L ATTENZIONE: rischio di movimento
indesiderato. Accertarsi che la carrozzina
sia su una superficie orizzontale prima di
rilasciare i freni. Non rilasciare entrambi i
freni contemporaneamente.
Per rilasciare i freni:
1. Rilasciare un freno tirando l'impugnatura
all'indietro.
2. Reggere il corrimano della ruota di rilascio con
la mano.
3. Rilasciare l'altro freno tirando le impugnature
all'indietro.
2.6 Montaggio o rimozione dei poggiabraccia
L ATTENZIONE: rischio di intrappolamento. Tenere le dita, le fibbie e gli indumenti
lontani dalla parte laterale del poggiabraccia.
I poggiabraccia della carrozzine possono essere montato le istruzioni seguendo.
1. Montare il tubo posteriore del bracciolo sul coperchio del tubo . (Fig A)
2. Accertarsi che il poggiabraccia sia montato correttamente.
3. Piegare in avanti il bracciolo.
4. Tirare la leva sul coperchio del tubo verso l'alto. (Fig B)
5. Far scattare il tubo anteriore del bracciolo sul coperchio del tubo . (Fig B)
Pagina 8
Page 100

708D
A
B
C
D
2011-05
Per aprire e rimuovere il bracciolo:
1. Premere la leva e tirare la parte anteriore del bracciolo verso l'alto. (Fig C)
2. Piegare all'indietro il bracciolo.
3. Per rimuovere il poggiabraccia, tirare la parte posteriore del poggiabraccia dal
coperchio del tubo . (Fig D)
2.7 Trasferire la carrozzina all'interno e all'esterno
L ATTENZIONE: nel caso in cui non si riesca a eseguire il trasferimento in modo
sicuro, chiedere assistenza.
L ATTENZIONE: rischio di ribaltamento della carrozzina. Non reggersi in piedi
sulle pedane.
1. Posizionare la carrozzina il più vicino
possibile alla sedia, alla poltrona o al letto
da/verso cui si desidera trasferirsi.
2. Verificare che entrambi i freni della carrozzina
siano in posizione di attivazione.
3. Ripiegare le pedane verso l'alto per evitare di
reggersi in piedi sopra di essa.
4. Se il trasferimento avviene dalla parte
laterale della carrozzina, ripiegare il
poggiabraccia che si trova da quel lato
verso l'alto. (vedere § 2.6)
5. Trasferimento da/verso la carrozzina.
Pagina 9
 Loading...