

Vermeiren 28 Instruction Manual

VERMEIREN
28
I N S T R U C T I O N M A N U A L
M O D E D ’ E M P L O I
G E B R U I K S A A N W I J Z I N G
G E B R A U C H S A N W E I S U N G
I N S T R U K C J A O B S Ł U G I

Instructions to the specialist dealer
This instruction manual is part and parcel of the product and must accompany every product sold.
Version: B, 2014-05
All rights reserved, including translation.
No part of this manual may be reproduced in any form what so ever (print, photocopy, microfilm or any other process) without
written permission of the publisher, or processed, duplicated or distributed by using electronic systems.
© N.V. Vermeiren N.V. 2014
Instructions pour les distributeurs
Ce manuel d'instructions fait partie du produit et doit accompagner chaque produit vendu.
Version : B, 2014-05
Tous droits réservés, y compris la traduction.
Aucune partie de ce manuel ne peut être reproduite, sous quelque forme que ce soit (imprimée, photocopie, microfilm ou tout autre
procédé) sans l'autorisation écrite du publicateur, ni traitée, dupliquée ou distribuée à l'aide de systèmes électroniques.
© N.V. Vermeiren N.V. 2014
Instructies voor de vakhandelaar
Deze handleiding is deel van het product en dient bij iedere product te worden geleverd.
Versie: B, 2014-05
Alle rechten, inclusief vertaling, voorbehouden.
Niets uit deze handleiding mag geheel of gedeeltelijk in enige vorm (druk, fotokopie, microfilm of ieder ander procedé) zonder de
schriftelijke toelating van de uitgever worden gereproduceerd of met behulp van elektronische systemen worden verwerkt,
gekopieerd of verspreid.
© N.V. Vermeiren N.V. 2014
Hinweise für den Fachhändler
Diese Gebrauchsanweisung ist Bestandteil des Produkts und ist bei jeder Produkts auszuhändigen.
Version: B, 2014-05
Alle Rechte, auch an der Übersetzung, vorbehalten.
Kein Teil der Gebrauchsanweisung darf in irgendeiner Form (Druck, Fotokopie, Mikrofilm oder einem anderen Verfahren) ohne
schriftliche Genehmigung des Herausgebers reproduziert oder unter Verwendung elektronischer Systeme verarbeitet, vervielfältigt
oder verbreitet werden.
© N.V. Vermeiren N.V. 2014
Instrukcje dla wyspecjalizowanego sprzedawcy
Niniejsza instrukcja obsługi jest nieodłączną częścią produktu i musi być dołączona do każdego sprzedawanego produktu.
Wersja: B, 2014-05
Wszelkie prawa zastrzeżone, łącznie z tłumaczeniem.
Żadna część niniejszej instrukcji nie może być powielana w jakiejkolwiek formie (drukowanej, fotokopii, mikrofilmu ani innej) bez
pisemnej zgody wydawcy, nie może być również przetwarzana, kopiowana ani rozprowadzana za pomocą systemów
elektronicznych.
© N.V. Vermeiren N.V. 2014

28
2014-05
Page1
Contents
Preface ...................................................................................................................................... 2
1 Product description..................................................................................................... 3
1.1 Intended Use ................................................................................................................ 3
1.2 Technical specifications .............................................................................................. 4
1.3 Components ................................................................................................................. 5
1.4 Accessories .................................................................................................................. 5
1.5 Explanation of symbols ............................................................................................... 6
1.6 Safety rules .................................................................................................................. 6
2 Use ................................................................................................................................ 7
2.1 Carrying the wheelchair .............................................................................................. 7
2.2 Mounting the rear wheels (if quick release axle is available) ..................................... 7
2.3 Unfolding the wheelchair ............................................................................................ 7
2.4 Mounting or removing of the footrests ....................................................................... 7
2.5 Operating the brakes .................................................................................................... 8
2.6 Mounting or removing of armrests .............................................................................. 9
2.7 Transfer in and out the wheelchair .............................................................................. 9
2.8 Correct position in the wheelchair .............................................................................. 9
2.9 Riding the wheelchair .................................................................................................. 9
2.10 Moving on slopes ...................................................................................................... 10
2.11 Negotiating steps or curbs ......................................................................................... 10
2.12 Fold up the wheelchair .............................................................................................. 11
2.13 Taking off the wheels (if quick release axle is available) ......................................... 12
2.14 Transport in the car .................................................................................................... 12
3 Installation and adjustment ..................................................................................... 12
3.1 T ools .......................................................................................................................... 12
3.2 Manner of delivery .................................................................................................... 13
3.3 Anatomical seat (OPTIONAL) ................................................................................. 13
3.4 Anatomical backrest (OPTIONAL) .......................................................................... 13
3.5 Adjust the brakes ....................................................................................................... 14
3.6 Adjusting of the footrests .......................................................................................... 14
4 Maintenance .............................................................................................................. 14

28
2014-05
Page2
Preface
First of all we want to thank you for putting your trust in us by selecting one of our
wheelchairs.
The Vermeiren wheelchairs are the result of many years of research and experience. During
the development, special attention was given to the ease of use and the serviceability of the
wheelchair.
The expected lifetime of your wheelchair is strongly influenced by the care and maintenance
of the wheelchair.
This manual will help you get acquainted with the operation of your wheelchair.
Following the user instructions and the maintenance instructions are an essential part of the
warranty.
This manual reflects the latest product developments. Vermeiren has the right to introduce
changes without the obligation to adapt or replace previously delivered models.
For any further questions, please consult your specialist dealer.

28
2014-05
Page3
1 Product description
1.1 Intended Use
The wheelchair is intended for people with walking difficulties or no walking abilities.
The wheelchair is designed to transport 1 person.
The wheelchair is suited for indoor and outdoor use.
The user can propel the wheelchair by himself or have the wheelchair pushed by an
attendant.
The different types of fittings and accessories, and the modular construction allow full use by
persons disabled by:
paralysis
loss of limbs (leg amputation)
limb defects or deformations
stiff or damaged joints
heart insuffiencies and poor blood circulation
balance disturbances
cachexia (decrease in muscle)
and also for aged persons.
When providing for individual requirements:
body size and weight (max. 110 kg or 150 kg wheelchair with anatomic cushions)
physical and psychological condition
residential circumstances
environment
should be taken into consideration.
Your wheelchair should only be used on surfaces where all four wheels are touching the
ground and where there is sufficient contact to propel the wheels equally.
You should practice for use on uneven surfaces (cobblestones, etc.), slopes, curves and to
get past obstacles (curbs, etc.).
The wheelchair should not be used as a ladder, nor is it a transport for heavy or hot objects.
When used on mats, carpeted floors or loose floor coverings, the floor covering can get
damaged.
Use only Vermeiren approved accessories.
The manufacturer is not liable for damage caused by the lack of or improper service or as a
result of not following instructions from this manual.
Compliance with the user and maintenance instructions are an essential part of the
guarantee conditions.

28
2014-05
Page4
1.2 Technical specifications
Technical terms below are valid for the wheelchair in standard settings.
If other footrests / armrests or other accessories are used, the tabulated values will change.
Make
V
ermeiren
Address
V
ermeirenplein 1/15, B-2920 Kalmthout
Type Manual wheelchai
r
Model 28
Maximum occupant mass 110 kg
150 kg wheelchairs with anatomic cushions
Description Dimensions
Effective seat width
390 mm 440 mm 500 mm 550 mm
Overall width (depends on the seat width)
560 mm 610 mm 670 mm 750 mm
Folded width
290 mm 290 mm 310 mm 350 mm
Description Dimensions Min. Dimensions Max.
Overall length with footrest
1110 mm
Folded length without footrest
860 mm
Folded height
920 mm
Total mass
± 20 kg
Mass of heaviest part
12 kg
Masses of parts that can be dismantled or
removed
Footrests: 1,90 kg;
A
rmrests: 1,85 kg;
Rear wheels: 4,15 kg
Static stability downhill
15°
Static stability uphill
15°
Static stability sideways
15°
Obstacle climbing
60 mm
Seat plane angle
5°
Effective seat depth
430 mm
Seat surface height at front edge
500 mm
Backrest angle
5°
Backrest height
420 mm
Distance between footplate and seat
420 mm 520 mm
Angle between seat and footplate
9°
Angle between seat and leg of footrest
115°
Distance between armpad and seat
230 mm
Front location of armrest structure
220 mm
Handrim diameter
535 mm
Horizontal location of axle (deflection)
-3 mm
Minimum turning radius
1680 mm
Diameter PU Rear wheels
24"
Tyre pressure, rear (driving) wheels (for air
tyres)
Max. 3.5 bar
Diameter PU steering wheels
200 mm
Tyre pressure, steering wheels (for air tyres)
Max. 2.5 bar
Storage and use temperature
+ 5 °C + 41 °C
Storage and use humidity
30% 70%
We reserve the right to introduce technical changes. Measurement tolerance ± 15 mm / 1,5 kg/ °
Table 1: Technical specifications 28
28
2014-05
Page5
The wheelchair complies to the requirements set up in:
ISO 7176-8: Requirements and test methods for static, impact and fatigue strengths.
EN 1021-1: Assessment of the ignitability of upholstered furniture - Ignition source
smouldering cigarette
EN 1021-2: Assessment of the ignitability of upholstered furniture - Ignition source match
flame equivalent
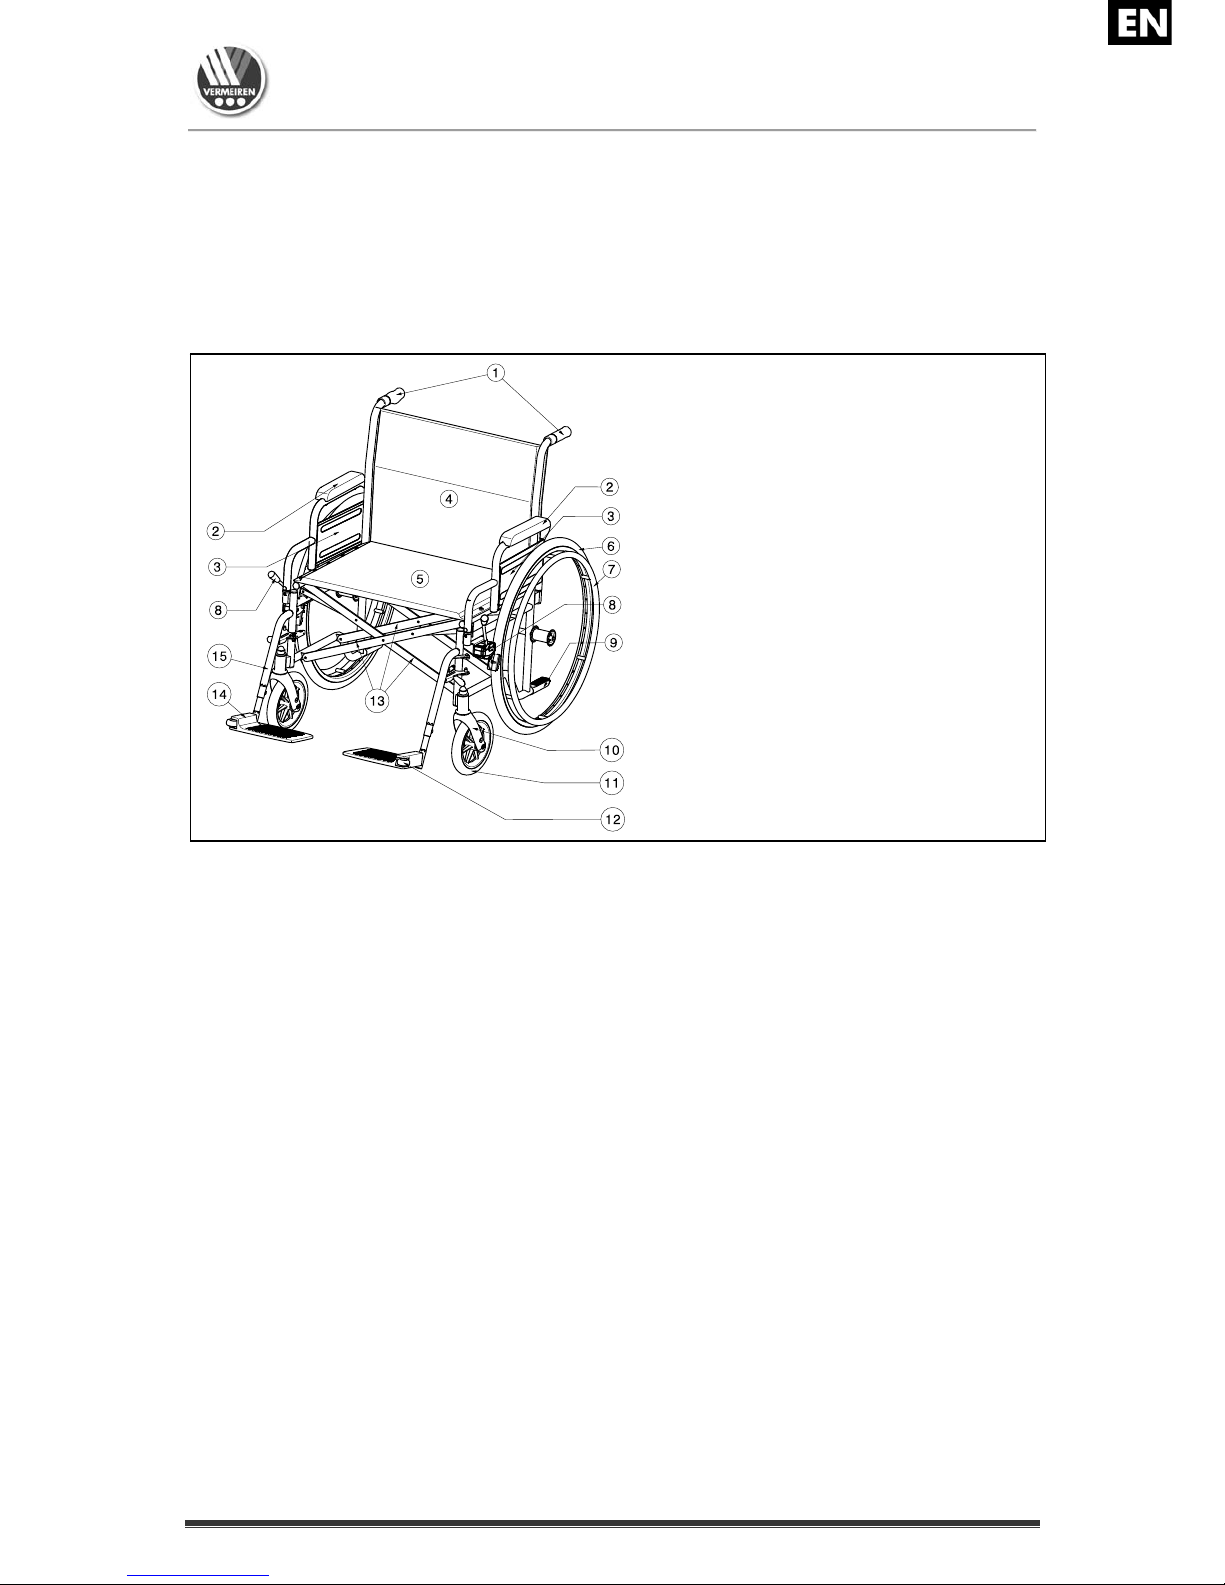
1.3 Components
1.4 Accessories
The following accessories are available for the 28:
Armrests (B02, B05, B66, B66O)
Footrests, Leg rests (B07, B08, B09, B10, BZ7, BZ8, BZ9, BZ10, BK7, BL6, BL7,
BA6, BK6)
Table (B12)
Crutch holder (B31)
Serum holder (B52)
Backrest (L14, L24)
Anterior pelvic belt (B20, B58) for mounting over the backrest tube
Anti-tipping device (B78) for mounting on the bottom back frame
Drum brakes for the attendant (B74) for mounting on the push handles
Transit wheelchair (T30)
Moving the axle back (AMP)
Quick release (B80)
Travelling wheels (B86)
Head rest (B47, L55, L58)
Push bar (B90)
Side supports/pellots (L04)
1 = Handgrips
2 = Armpads
3 = Armrests
4 = Backrest
5 = Seat
6 = Driving wheel (Rear wheel)
7 = Handrim
8 = Brakes
9 = Tip cap
10 = Front fork
11 = Steering wheels (Front
wheels)
12 = Wheel for stopping
13 = Double cross
14 = Footplate
15 = Footrests

28
2014-05
Page6
1.5 Explanation of symbols
Maximum mass
Indoor and outdoor use
Maximum Safe Slope
CE conformity
1.6 Safety rules
L
To prevent injury and/or damage to your wheelchair, make sure that no objects
and/or body parts are caught in the spokes of the driving wheels.
L The parking brakes should be applied before getting into and out of the wheelchair.
L When getting into and out of the wheelchair, do not stand on the footplates. These
should be folded up beforehand, or the footrests should be swung completely
outwards out of the way.
L Investigate the effects of shifting the centre of gravity on the behavior of the wheelchair,
for example on up or down gradients, on laterally sloping ground, or when overcoming
obstacles. Obtain support from an attendant.
L If you want to pick up something (lying in front of, on the side, or to the rear of the
wheelchair), you should not lean too far out to avoid tipping over.
L When moving through doors, arches, etc. ensure that there is enough room at the sides
so that you do not get your hands or arms caught or crushed and that there is no
damage to the wheelchair.
L Only use your wheelchair according to regulations. For example, avoid uncontrolled
rolling against obstacles (steps, curbs, doorframes, etc) or dropping down from ledges.
The manufacturer cannot assume liability for damage caused by overloading, collision
or other improper use.
L Stairs may only be negotiated when aided by another person. If furnishings like drive-on,
ramps or lifts are available, use them.
L When moving on the public highway, you are subject to the rules of the road.
L When driving your wheelchair, you should not be under the influence of alcohol or
medicine as in the case of driving other vehicles. This also applies to indoor driving.
L When travelling outdoors, adapt your driving to weather and traffic conditions.
L When transporting the wheelchair, never pick it up by grasping movable parts (armrests,
footrests, etc.)
L To be better visible when driving in the dark, wear the brightest possible clothing or
clothes with reflectors, and check that the reflectors mounted on the sides and rear of
the wheelchair are clearly visible.
L Never exceed the maximum load (see table 1: Maximum occupant mass).
Type designation
Not intended to be used as a seat in a Motor vehicle

28
2014-05
Page7
2 Use
This chapter describes the everyday use. These instructions are for the user and the
specialist dealer.
The wheelchair is delivered fully assembled by your specialist dealer. The instructions
intended for the specialist dealer on how to set up the wheelchair are given in § 3.
2.1 Carrying the wheelchair
The best way to carry the wheelchair is to make use of the wheels and roll the wheelchair.
If this is not possible (e.g. when the rear wheels are taken off for transportation in a car),
firmly grasp the frame on the front and the grips. Do not use the foot- or armrests or the
wheels to grasp the wheelchair.
2.2 Mounting the rear wheels (if quick release axle is available)
1. Take the rear wheel and push on button .
2. Keep the button pushed in and mount the rear
wheels axle till it stops.
3. Release the button
.
4. Check that the wheel is secured.
2.3 Unfolding the wheelchair
L
CAUTION: Risk of clamping – Keep fingers away from moving parts of the
wheelchair.
1. Position yourself behind the wheelchair.
2. Use the hand-grips to open the wheelchair as much as possible.
3. Position yourself at the front of the wheelchair.
4. Push both seating tubes down till they are fixed in their position.
2.4 Mounting or removing of the footrests
L
WARNING: Risk of injury – Check that the footrests are securely locked in
place before use.
L CAUTION: Risk of clamping – Keep objects and people away from the footrests
swing range.

28
2014-05
Page8
The mounting of the footrests is done as follows:
1. Hold the footrest sideways at the outside of the
wheelchairs frame.
2. Mount the holes of the footrest on the pins
located on the frame.
3. Turn the footrest inwards till it clicks in position.
If this lock is a little stiff, press the handle gently
back.
4. Turn the footplate downwards.
5. Replace the calf strap in the hooks .
To take off the footrests:
1. Remove the calf strap by unhooking it on both
sides.
2. Pull back the lever near the footrest
attachment.
3. Turn the footrest to the outside of the
wheelchair.
4. Lift the holes of the footrest out of the pins
located on the frame .
2.5 Operating the brakes
L
WARNING: The brakes are not used to slow down the wheelchair during
movements – Use the brake only to prevent the wheelchair from unintended
movements.
L WARNING: Good operation of the brakes is influenced by wear and
contamination of the tires (water, oil, mud, …) – Check the condition of the tires
before each use.
L WARNING: The brakes are adjustable and can wear – Check the operation of the
brakes before each use.
To apply the brakes:
1. Push the brake handles forward till you feel a
distinctive click.
L CAUTION: Risk of unintended movement –
Make sure the wheelchair is on a flat
horizontal surface before releasing the
brakes. Never release both brakes
simultaneously.
To release the brakes:
1. Release one brake by pulling the lever
backwards.
2. Hold the hand-rim of the released wheel with
your hand.
3. Release the second brake by pulling the lever
backwards.
28
2014-05
Page9
2.6 Mounting or removing of armrests
L
CAUTION: Risk of clamping – Keep fingers, buckles and clothes away from the
bottom side of the armrest.
L CAUTION: Risk of clamping – Check the armrests are securely fixated before
using the wheelchair.
The armrests of the wheelchair can be removed
by following instructions.
1. Press on the button
located on the
front of the armrest.
2. Lift the armrest out the tubes
mounted on
the seat frame.
The armrests of the wheelchair can be mounted
by following instructions.
1. Mount the armrest in the tubes of the
seat frame
.
2. Press on the armrest until the armrest
button clicks in the hole.
3. Check that the armrest is firmly fixated.
2.7 Transfer in and out the wheelchair
L
CAUTION: In case you cannot perform the transfer in a safe manner, ask
someone to assist you.
L CAUTION: Risk of tipping over of the wheelchair – Do not stand on the
footplates.
1. Position the wheelchair as close as possible
to the chair, couch or bed to/from you wish to
transfer.
2. Check both brakes from the wheelchair are in
the on position.
3. Fold the footplates upwards to prevent
standing on them.
4. If the transfer is on the side of the wheelchair,
remove the armrest on that side
(see § 2.6).
5. Transfer to/from the wheelchair.
2.8 Correct position in the wheelchair
Some recommendations for a comfortable use of the wheelchair:
Position your backside as close as possible to the backrest.
Make sure your upper legs are horizontal – If needed adjust the length of the
footplates. (see § 3.6.1)
2.9 Riding the wheelchair
L
WARNING: Risk of clamping – Prevent your fingers from being caught by the
wheels spokes.

28
2014-05
Page10
L WARNING: Risk of clamping – Be careful passing through restricted passages
(e.g. doors).
L WARNING: Risk of burns – Be careful when driving in hot or cold environments
(sunshine, extreme cold, saunas, etc.) for a sufficient amount of time and when
touching - Surfaces can assume the environment temperatures.
1. Release the brakes.
2. Take both hand rims at their highest position.
3. Lean forward and push the hand rims forward until straight arms.
4. Swing your arms loosely back to the hand rims topside and repeat the movement.
2.10 Moving on slopes
L
WARNING: Control your speed – Moving on slopes as slow as possible.
L WARNING: Consider the capacities of your attendant – If your attendant does not
have enough force to control the wheelchair, put on the brakes.
L WARNING: Risk of tipping over – Lean forward to move your centre of gravity
forward. To improve a better stability.
1. If available on the wheelchair, wear the safety belt.
2. Do not attempt moving on too high slopes. The maximum
slope angles (upwards and downwards) are mentioned in
table 1.
3. Ask an attendant to help you moving on the slope.
4. Lean forward to move your centre of gravity forward.
2.11 Negotiating steps or curbs
2.11.1 Getting down steps or curbs
Riding down low curbs can be done moving forwards. Make sure that the footplates do not
touch the ground.
A practiced user can negotiate small steps or curbs by himself:
L WARNING: Risk of tipping over – If you do not have
enough experience with your wheelchair, ask
assistance of an attendant.
1. Bring balance on the rear wheels to reduce the pressure on
the front wheels.
2. Negotiate the curbs.
Higher curbs can be taken forward with an attendant:
1. Ask the attendant to tip the wheelchair slightly backwards.
2. Get past the curbs while moving on the rear wheels.
3. Put the wheelchair back on the four wheels.
An experienced user can negotiate higher curbs by himself. This is
best done backwards.
1. Turn the wheelchair to have the rear wheels facing the
curbs.
2. Lean forward to move your centre of gravity forward.
3. Move the wheelchair close to the curbs.
4. Use the hand rim to roll-off wheelchair from the curbs in a
controlled manner.

28
2014-05
Page11
2.11.2 Moving up steps or curbs
Moving up steps or curbs with attendant as follows:
1. Prevent the footplates from touching the curbs.
2. Ask the attendant to tip the wheelchair backwards, just
enough to move the front wheels over the curbs.
3. Lean backwards to move your centre of gravity above the rear
wheel.
4. Place the front wheels on the curbs.
5. Roll rear wheels of the wheelchair over the curb.
Higher curbs are negotiated backwards:
1. Turn the wheelchair to have the rear wheels facing the curbs.
2. Lean backwards and move your centre of gravity above the rear wheels.
3. Ask the attendant to pull the wheelchair on the curbs.
4. Take back the normal position in the wheelchair.
An experienced user can negotiate curbs by himself:
L WARNING: Risk of tipping over – If you have not enough experience to control
the wheelchair, get help from an attendant.
1. Drive until the curbs.
2. Ensure that the footplates do not touch the curbs.
3. Lean backwards so you are balancing on the rear wheels.
4. Role the front wheels balancing over the curbs.
5. Bend forward for more stability.
6. Role the rear wheels over the curbs.
2.11.3 Taking of stairs
Taking of stairs while you staying in the wheelchair shall be according following rules:
L WARNING: Risk of tipping over – Taking of stairs shall always with 2 attendants.
1. Remove the footrests.
2. One attendant tip the wheelchair slightly backwards.
3. The second attendant take the front of the frame.
4. Stay calm, avoid sudden movements and keep your arms inside the wheelchair.
5. Take the steps on the rear wheels of the wheelchair.
6. Mounting the footrests back after taking the stair.
2.12 Fold up the wheelchair
L
CAUTION: Chance of pinching – Do not place fingers between the components
of the wheelchair.
1.
Fold or remove the footplates (see § 2.4).
2. Take the seat on the front side and backside and pull it up.

28
2014-05
Page12
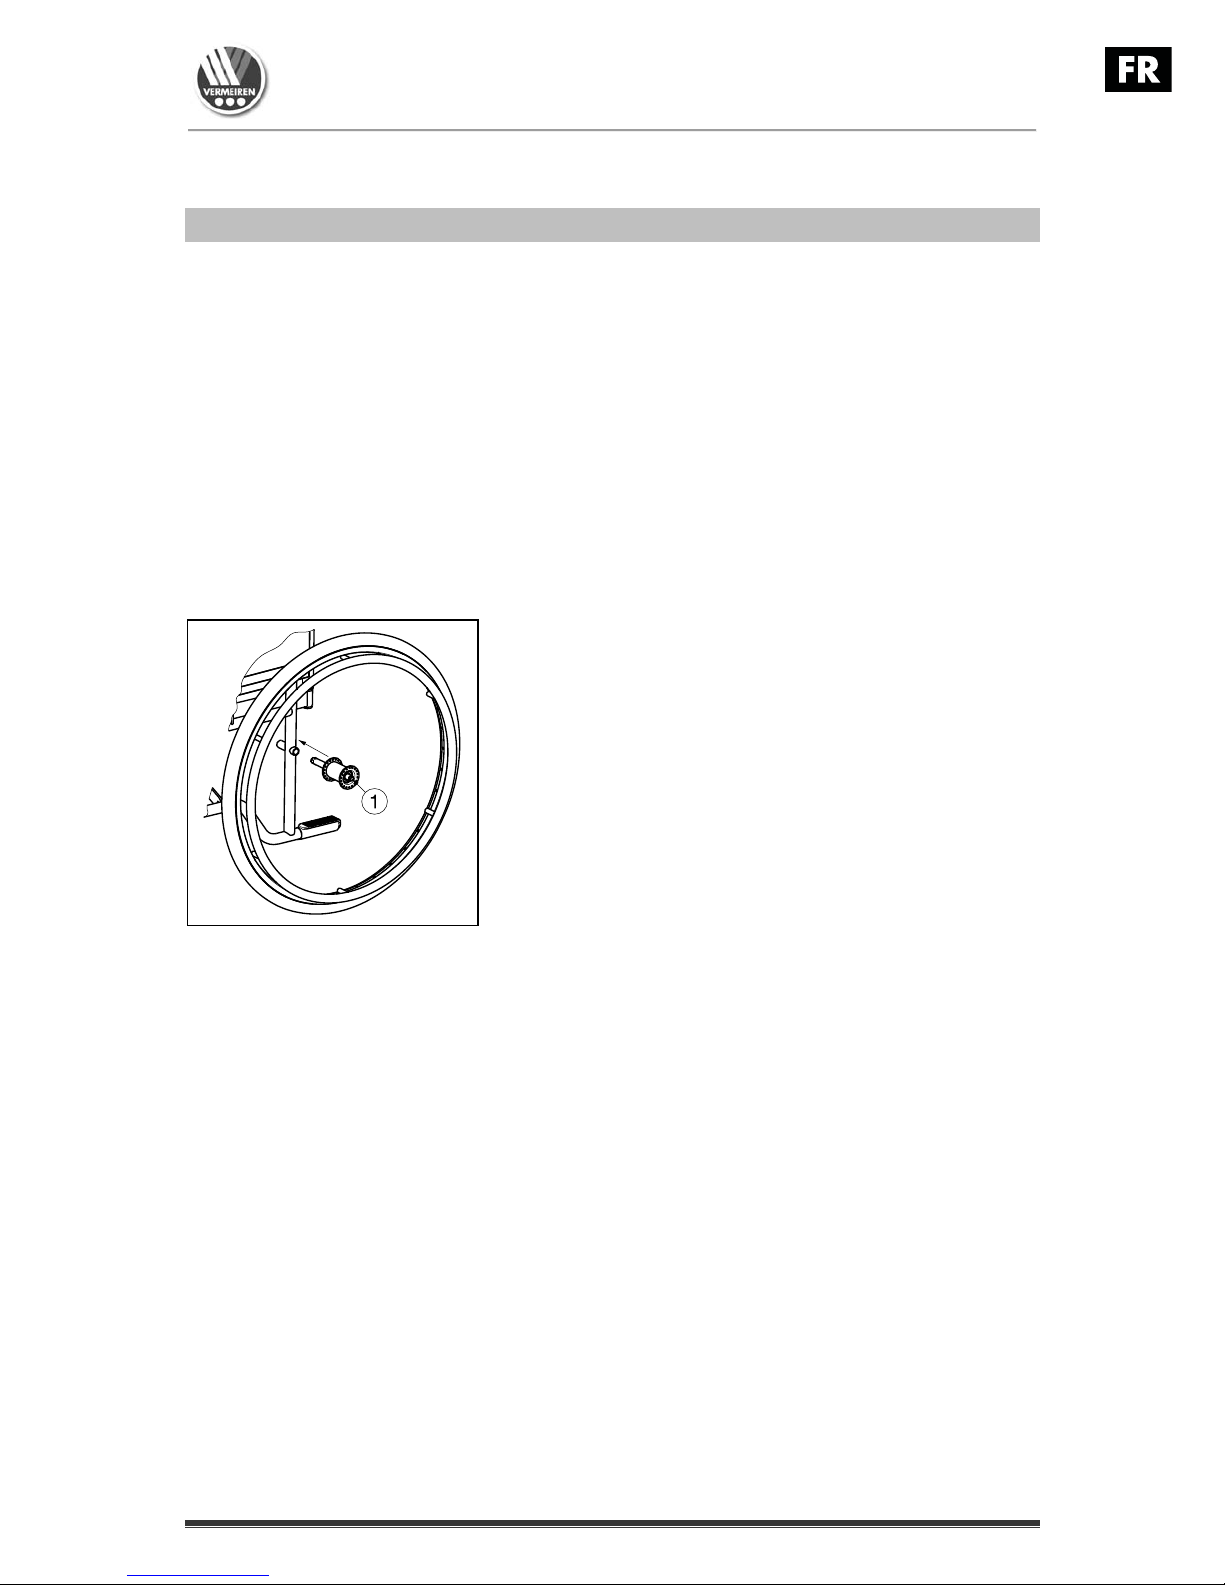
2.13 Taking off the wheels (if quick release axle is available)
To facilitate the transport off the wheelchair the rear wheels can be taken off:
1. Make sure the brakes standing in the off
position.
2. Take the wheelchair to the side frame where
you want to remove the wheel.
3. Press the button
in the center of the wheel
hub.
4. Pull the wheel away from the frame.
2.14 Transport in the car
L
DANGER: Risk of injury – The wheelchair is not suited for use as a seat in a
motor vehicle.
L WARNING: Risk of injury – See that the wheelchair is attached properly. So you
can avoid injury from the passengers during collision or sudden braking.
L WARNING: Risk of injury – Use for attaching the wheelchair and passenger
NEVER the same seatbelt.
Never use your wheelchair as a seat in an automobile or other vehicle. The wheelchair shall
be marked with following symbol.
To transport the wheelchair in the car use following steps:
1. Remove footrests, armrests and accessories.
2. Store footrests and accessories safely.
3. If possible, fold the wheelchair and remove the wheels.
4. Place the wheelchair in the luggage place.
5. If the wheelchair and the passenger compartment is NOT separated, attach the
frame of the wheelchair securely to the vehicle. You can use the available safety
belts in the vehicle.
3 Installation and adjustment
The instructions in this chapter are for the specialist dealer.
The Vermeiren wheelchairs 28 has been designed entirely for your comfort.
To find a service facility or specialist dealer near you, contact the nearest Vermeiren facility.
A list of Vermeiren facilities can be found on the last page.
L WARNING: Risk of unsafe settings - Use only the settings described in this
manual.
L WARNING: Variation of allowed adjustments can still change the stability of your
wheelchair (tilt back or sideways).
3.1 Tools
To set up the wheelchair the following tools are needed.
Wrench set n° 10 to n° 19
Allen key set n° 4 to n° 5
Screwdriver Phillips head

28
2014-05
Page13
3.2 Manner of delivery
The Vermeiren 28 shall be delivered with:
1 frame with armrests, rear and front wheels (seat height of 500 mm, seat angle of
5°)
1 pair footrests
Back and seat cushion
Tools
Manual
Accessories (optional)
Pump (with pneumatic tyres only)
Before use check if everything is included and that no products are damaged (example by
transport, ...).
3.3 Anatomical seat (OPTIONAL)
L
WARNING: Risk of injury – Check that the seat is secured before use.
L WARNING: Risk of injury – Avoid getting your fingers caught during the
assembly process.
If you have opted for an anatomical padded seat, place it on
the tubular cross-hinge so that the seat's supports engage
equally with the cross-hinge. In the wooden base you will find
slots that are placed in the hinge's cross-pieces. To fold up the
wheelchair, remove the seat by pulling it upwards.
3.4 Anatomical backrest (OPTIONAL)
L
WARNING: Risk of injury – Check that the backrest is secured before use.
L WARNING: Risk of injury – Avoid getting your fingers caught during the
assembly process.
To use the anatomical backrest, proceed as follows:
1. Unscrew the flexible backrest.
2. Loosely screw on the brackets for the backrest.
3. Insert the backrest into the brackets from above.
4. Tighten the screws holding the brackets for the
backrest.
5. Insert and tighten the safety screws for the
backrest.
6. Add the armrests.

28
2014-05
Page14
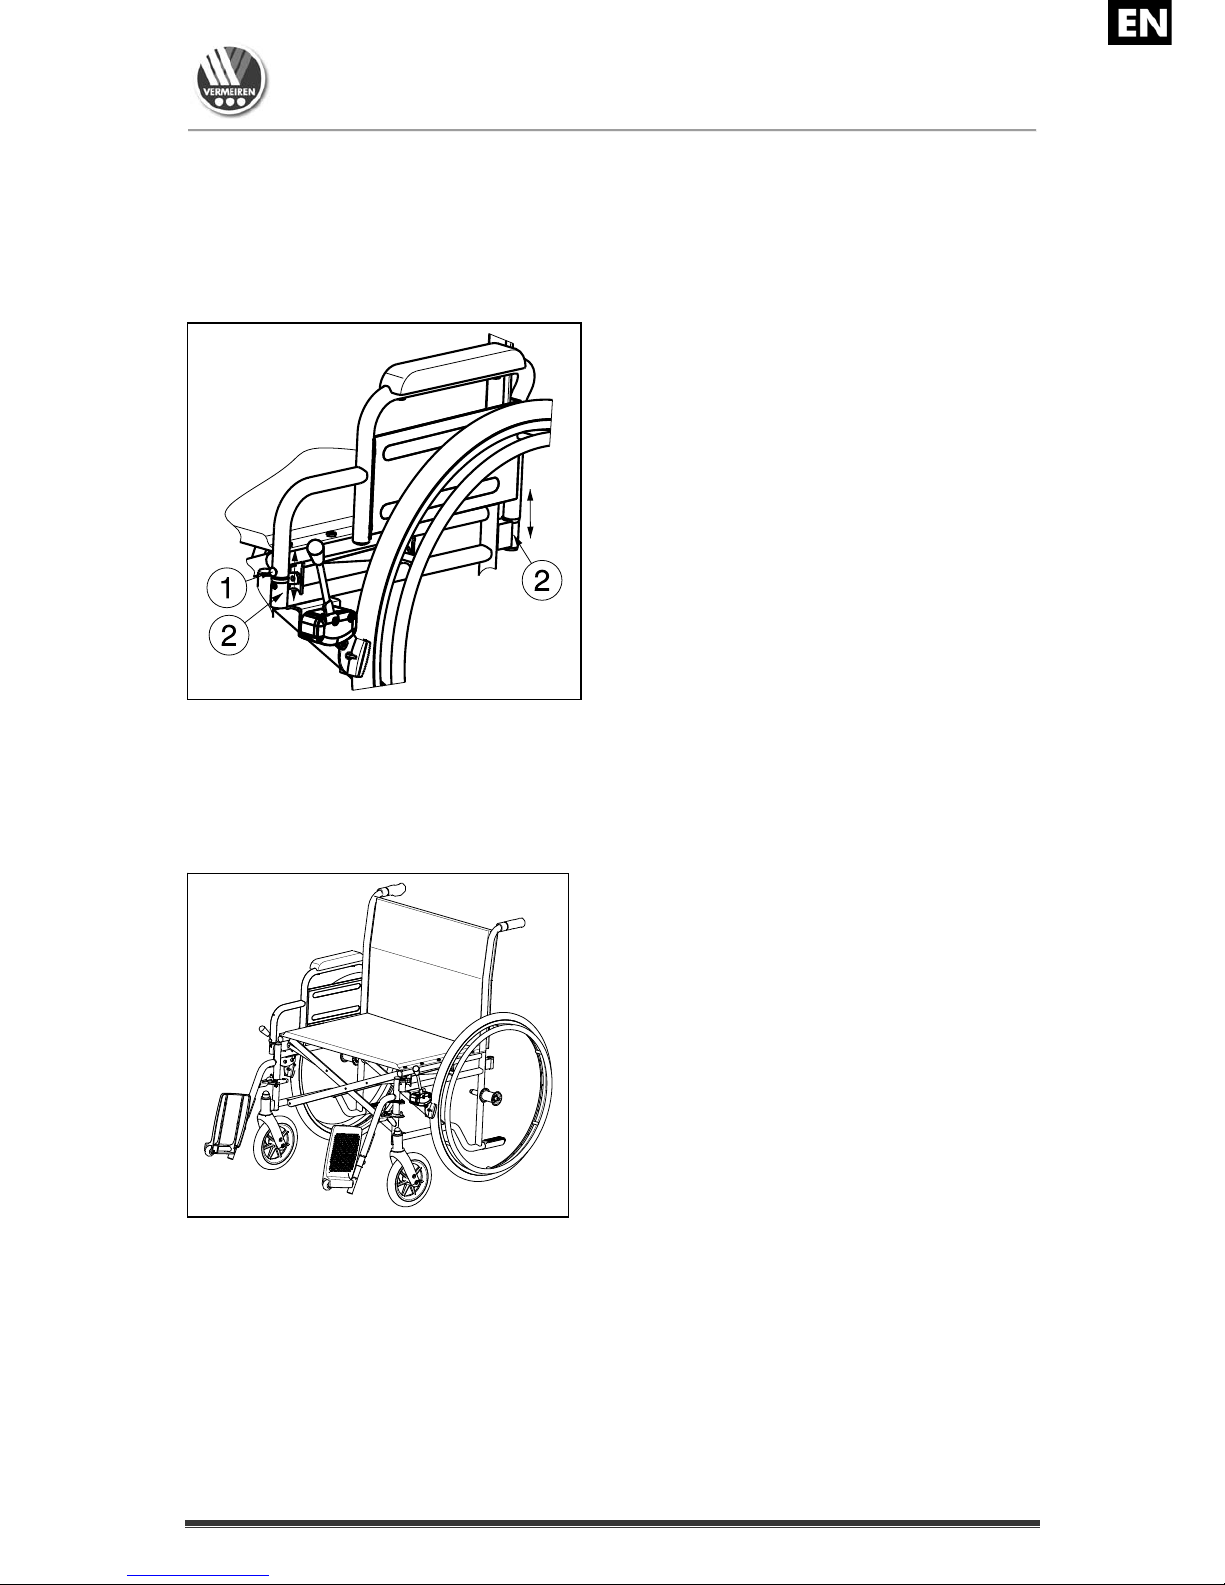
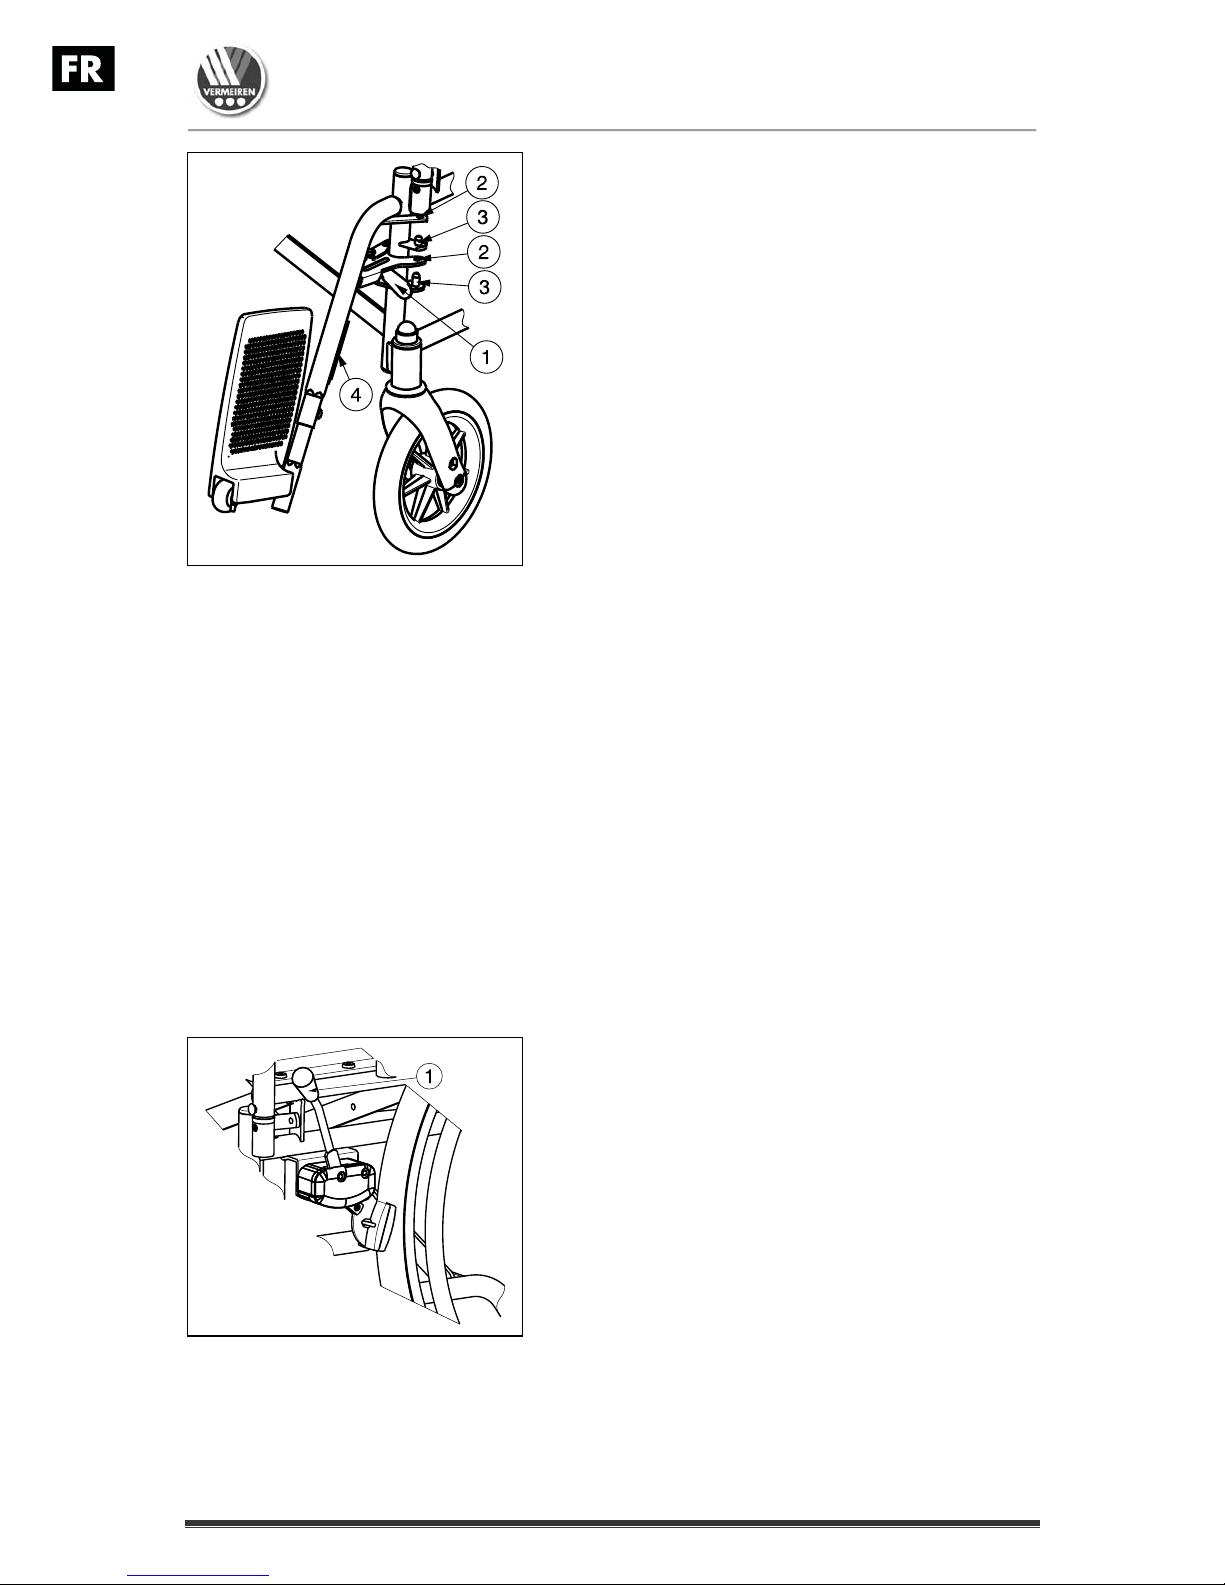
3.5 Adjust the brakes
L
WARNING: Risk of injury – Brakes may only be adjusted by your specialist
dealer.
Adjust the brakes according following rules:
1. Install the wheels according § 2.2.
2. Disconnect the brakes by pulling lever
backwards.
3. Loosen the selflocking nut
so the brake
mechanism can slide over the frame tube
.
4. Pull the brake mechanism over the tube
to
the desired position. (the adjustment range:
37 mm step less, shall be possible between the
groove on the brake montage plate)
5. Retighten the selflocking nut .
6. Check working of the brakes.
7. If necessary repeat the above steps until the
brakes are adjusted well.
3.6 Adjusting of the footrests
3.6.1 Length of the footrests
L
CAUTION: Risk of damage – Avoid that the footrests make any contact with the
ground. Keep a minimum distance from 60 mm above the ground.
Adjust the length
(range of 100 mm: step less)
of the footrests as follow:
1. Remove the Allen screw
on the lower end
of the upper part of the footrest.
2. Adjust the length of the footrest to a
comfortable length by moving the
hexagonal inner tube out or in.
3. Tighten the Allen screw
properly.
The minimum
length is when the
footplate tube changes from
hexagonal in round.
The maximum
length is until the
mark in the tube. (These mark is a
straight line).
4 Maintenance
For the maintenance manual of the wheelchairs refer to the Vermeiren website:
www.vermeiren.be.

28
2014-05
Page1
Table des matières
Préface ...................................................................................................................................... 2
1 Description du produit ............................................................................................... 3
1.1 Utilisation prévue ........................................................................................................ 3
1.2 Spécifications techniques ............................................................................................ 4
1.3 Composants ................................................................................................................. 5
1.4 Accessoires .................................................................................................................. 5
1.5 Explication des symboles ............................................................................................ 6
1.6 Règles de sécurité ........................................................................................................ 6
2 Utilisation ..................................................................................................................... 7
2.1 Transport du fauteuil roulant ....................................................................................... 7
2.2 Montage des roues arrière (si l'axe à démontage rapide est présent) ......................... 7
2.3 Dépliage du fauteuil roulant ........................................................................................ 7
2.4 Placer ou enlever les repose-pieds .............................................................................. 7
2.5 Utilisation des freins .................................................................................................... 8
2.6 Montage ou retrait des accoudoirs .............................................................................. 9
2.7 Transfert dans et hors du fauteuil roulant .................................................................... 9
2.8 Position correcte du fauteuil roulant ........................................................................... 9
2.9 Déplacements avec le fauteuil roulant ...................................................................... 10
2.10 Déplacements en pente .............................................................................................. 10
2.11 Passage de marches ou de bordures de trottoirs ........................................................ 10
2.12 Pliage du fauteuil roulant .......................................................................................... 12
2.13 Retrait des roues (si l'axe à démontage rapide est présent) ....................................... 12
2.14 Transport en voiture .................................................................................................. 12
3 Installation et réglage ............................................................................................... 13
3.1 Outils ......................................................................................................................... 13
3.2 Mode de livraison ...................................................................................................... 13
3.3 Assise anatomique (en option) .................................................................................. 14
3.4 Dossier anatomique (en option) ................................................................................ 14
3.5 Réglages des freins .................................................................................................... 14
3.6 Réglages des repose-pieds ......................................................................................... 15
4 Maintenance .............................................................................................................. 15

28
2014-05
Page2
Préface
Nous tenons tout d'abord à vous remercier de nous avoir fait confiance en choisissant l'un
de nos fauteuils roulants.
Les fauteuils roulants Vermeiren sont le résultat de nombreuses années de recherche et
d'expérience. Au cours du développement, une attention spéciale a été portée sur la facilité
d'utilisation et les possibilités d'entretien du fauteuil roulant.
La durée de vie attendue de votre fauteuil roulant est fortement influencée par l'entretien et
la maintenance dont il bénéficie.
Ce manuel vous aidera à connaître le fonctionnement de votre fauteuil roulant.
Le respect des instructions d'utilisation et des instructions de maintenance est une condition
essentielle de la garantie.
Ce manuel reflète les derniers développements du produit. Vermeiren est autorisé à
apporter des modifications sans devoir pour autant adapter ou remplacer les modèles
fournis précédemment.
Pour toute question, consultez votre distributeur.

28
2014-05
Page3
1 Description du produit
1.1 Utilisation prévue
Le fauteuil roulant est destiné aux personnes qui ont des difficultés à marcher ou sont dans
l'impossibilité de marcher.
Le fauteuil roulant est destiné au transport d'une seule personne.
Le fauteuil roulant est destiné à une utilisation en intérieur et en extérieur.
L'utilisateur peut lui-même faire avant le fauteuil roulant ou se faire pousser par une autre
personne.
Les différents types d'équipements et d'accessoires et la construction modulaire permettent
une utilisation complète par des personnes souffrant des handicaps suivants:
paralysie,
de la perte de membres (amputation des jambes),
déficience ou malformation de membres,
de contractions ou d'affections articulatoires
insuffisances cardiaques et mauvaise circulation sanguine,
troubles de l'équilibre,
cachexie (perte musculaire),
et les personnes gériatriques
En cas de fourniture pour des besoins individuels :
de la taille et du poids corporel (maximum 110 kg ou 150 kg fauteuil roulant avec
coussins anatomiques),
de l’état physique et psychologique,
la nature de la résidence,
l'environnement
Votre fauteuil roulant ne doit être utilisé que sur des surfaces où les quatre roues touchent le
sol et où le contact est suffisant pour entraîner les roues de manière équilibrée.
Il est recommandé de s'entraîner à un usage sur des surfaces irrégulières (pavés, etc.),
pentes, courbes et à passer des obstacles ( bordures de trottoirs, etc.).
Le fauteuil roulant ne doit pas être utilisé comme échelle, ni pour le transport d'objets lourds
ou chauds.
En cas d'utilisation sur des paillassons, moquettes ou revêtements de sols non fixés, le
revêtement de sol peut être endommagé.
Utilisez uniquement des accessoires approuvés par Vermeiren.
Le fabricant n'est pas responsable des dommages causés par l'absence ou l'inadéquation
de l'entretien, ou par le non-respect des instructions de ce manuel.
Le respect des instructions d'utilisation et des instructions de maintenance est une condition
essentielle de la garantie.

28
2014-05
Page4
1.2 Spécifications techniques
Les indications techniques ci-dessous sont valides pour le fauteuil roulant avec ses réglages
standard. En cas d'utilisation d'autres repose-pieds/accoudoirs ou autres accessoires, les
valeurs indiquées sont modifiées.
Marque
V
ermeiren
Adresse
V
ermeirenplein 1/15, B-2920 Kalmthout
Type Fauteuil roulant manuel
Modèle 28
Poids max. du patient 110 kg
150 kg fauteuil roulant avec coussins anatomiques
Description Dimensions
Largeur d'assise efficace
390 mm 440 mm 500 mm 550 mm
Largeur totale (en fonction de la largeur d'assise)
560 mm 610 mm 670 mm 750 mm
Largeur plié
290 mm 290 mm 310 mm 350 mm
Description Dimensions min. Dimensions max.
Longueur totale avec repose-pied
1110 mm
Longueur plié sans repose-pied
860 mm
Hauteur plié
920 mm
Masse totale
± 20 kg
Masse de la partie la plus lourde
12 kg
Des masses de pièces qui peuvent être démontés
ou retirés
Repose-pieds : 1,90 kg;
A
ccoudoirs : 1,85 kg ;
Roues arrières: 4,15 kg
Stabilité statique en descente
15°
Stabilité statique en montée
15°
Stabilité statique latérale
15°
Passage d'obstacle
60 mm
Angle du plan d'assise
5°
Profondeur d'assise efficace
430 mm
Hauteur de la surface d'assise sur le bord avant
500 mm
Angle du dossier
5°
Hauteur du dossier
420 mm
Distance entre le repose-pied et le siège
420 mm 520 mm
Angle entre le palette et le siège
9°
Angle entre le jambe de repose-pied et le siège
115°
Distance entre la manchette et le siège
230 mm
Emplacement avant de la structure des accoudoirs
220 mm
Diamètre de la main-courante
535 mm
Emplacement horizontal de l'essieu (flèche)
-3 mm
Rayon de braquage minimal
1680 mm
Diamètre des roues arrière PU
24"
Pression des pneus, roues arrières (roues motrices)
(pour les pneus à air)
Max. 3,5 bars
Diamètre des roues directrices PU
200 mm
Pression des pneus, roues directrices (pour les
pneus à air)
Max. 2,5 bars
Température de stockage et d'utilisation
+ 5 °C + 41 °C

28
2014-05
Page5
Humidité de stockage et d'utilisation
30% 70%
Nous nous réservons le droit d'apporter des modifications . Tolérances ± 15 mm / 1,5 kg / °
Tableau 1 : Spécifications techniques 28
Le fauteuil roulant satisfait aux exigences posées dans :
ISO 7176-8: Exigences et méthodes de test pour les forces statiques, d'impact et de fatigue.
EN 1021-1 : Evaluation de l'allumabilité des meubles garnis - Cigarette fumante comme
source d'inflammation
EN 1021-2 : Détermination de l'allumabilité des meubles garnis - Equivalent de la flamme
d'une allumette comme source d'inflammation
1.3 Composants
1.4 Accessoires
Les accessoires suivants sont disponibles pour le 28 :
Accoudoirs (B02, B05, B66, B66O)
Repose-pieds, repose-jambes (B06, B07, B08, BZ7, BZ8, BZ9, BZ10, BK7, BL7,
BA6, BK6)
Tablette (B12)
Porte béquille (B31)
Porte sérum (B52)
Dossier (L14, L24)
Ceinture de sécurité (B20, B58) à monter sur les tubes du dossier
Anti-bascule (B78) à fixer sur le cadre arrière inférieur
Frein à tambour pour l'accompagnateur (B74) pour fixer aux poignées
Kit poussete (T30)
Kit amputé: deport des roues arrières (AMP)
Axe à démontage rapide (B80)
Roues à batons (B86)
Appui-tête (B47, L55, L58)
Barre de poussée (B90)
Supports latéraux, Pelottes (L04)
1 = Poignées de poussée
2 = Manchettes
3 = Accoudoirs
4 = Dossier
5 = Siége
6 = Roue motrices (roue
arrière)
7 = Mains-courante
8 = Freins
9 = Monte trottoir
supplémentataire
10 = Fourche avant
11 = Roues directrices (roues
avant)
12 = Roue d'arrêté
13 = Double traverse
14 = Palette
15 = Repose-pieds
28
2014-05
Page6
1.5 Explication des symboles
Poids maximum
Usage intérieur et extérieur
Pente sécurisée maximale
Conformité CE
1.6 Règles de sécurité
L
Lorsque vous utilisez les roues motrices, veillez à ce qu’aucun objet et/ou partie du
corps ne puisse prendre dans les rayons, sous peine de blessures et/ou de dégâts à
votre fauteuil roulant.
L Actionnez les freins de stationnement avant de vous installer ou de quitter votre fauteuil
roulant.
L Ne montez pas sur les palettes pour vous asseoir ou pour sortir du fauteuil roulant. Il
doit être repliés vers le haut ou tout le repose-pied doit être tourné vers l'extérieur.
L Observez les effets sur le comportement du fauteuil roulant lorsque vous déplacez son
centre de gravité, sur une pente ou une montée, sur un sol avec une pente latérale ou
lors du franchissement d'obstacles par exemple. Faites-vous aider par un
accompagnateur.
L Lorsque vous prenez des objets (qui se trouvent devant, à côté ou derrière le fauteuil
roulant), veillez à ne pas trop vous pencher en dehors du fauteuil roulant. Car il y a un
risque de basculement en raison du déplacement du centre de gravité.
L Lorsque vous franchissez des portes, des arches, etc., assurez-vous d'avoir assez
d'espace sur les côtés de façon à ne pas coincer ou écraser vos mains ou vos bras et à
ne pas endommager votre fauteuil roulant.
L Utilisez votre fauteuil roulant exclusivement en suivant les dispositions en vigueur. Par
exemple, évitez de perdre le contrôle lorsque vous vous dirigez vers des obstacles
(marches, bordures, chambranles, etc.) ou lorsque vous descendez d'un rebord. Le
fabricant n'assume aucune responsabilité en cas de dommages causés par une
surcharge, une collision ou toute autre utilisation inadaptée.
L Les escaliers ne peuvent être franchis qu’avec l’aide d’un accompagnateur/d’une
accompagnatrice. Si un élévateur, des rampes ou des ascenseurs sont disponibles,
utilisez-les.
L Lors de tout déplacement sur la voie publique, vous êtes soumis au code de la route.
L Lorsque vous utilisez votre fauteuil roulant, vous ne devez pas être sous l'influence de
l'alcool ou de médicaments comme pour la conduite d'autres véhicules. Ceci vaut
également pour l’intérieur.
L Lors de déplacements à l'extérieur, adaptez votre conduite aux conditions climatiques et
du trafic.
L Lors du transport du fauteuil roulant, ne la saisissez jamais par les pièces mobiles
(accoudoir, repose-pieds, etc.).
L Pour être bien visibles dans l’obscurité, portez les vêtements les plus clairs possible ou
des vêtements réfléchissants et vérifiez que les réflecteurs fixés sur les côtés et à
l'arrière de votre fauteuil roulant sont clairement visibles.
Désignation type
Ne convient pas pour être utilisé comme siège dans un véhicule motorisé
28
2014-05
Page7
L Veillez à ne pas dépasser la charge utile maximale (Voir tableau 1: Poids max. du
patient).
2 Utilisation
Ce chapitre décrit l'utilisation quotidienne. Ces instructions sont destinées à l'utilisateur
et au distributeur.
Le fauteuil roulant est livré entièrement assemblé par votre distributeur. Les instructions
destinées au distributeur pour le réglage du fauteuil roulant sont indiquées au § 3.
2.1 Transport du fauteuil roulant
Le meilleur moyen de déplacer le fauteuil roulant consiste à le faire rouler sur ses roues.
Si cela n'est pas (par exemple en cas de retrait des roues arrière pour le transport dans une
voiture), saisir fermement le cadre à l'avant et les poignées. Ne pas saisir le fauteuil roulant
par les repose-pieds ni par les accoudoirs.
2.2 Montage des roues arrière (si l'axe à démontage rapide est
présent)
1. Prenez la roue arrière et poussez sur le bouton
.
2. Maintenez le bouton enfoncé et montez l'essieu
arrière jusqu'à ce qu'il soit bloqué.
3. Relâchez le bouton .
4. Vérifiez que la roue est bloquée.
2.3 Dépliage du fauteuil roulant
L
ATTENTION : risque de coincement - Laissez les doigts à l'écart des pièces
amovibles du fauteuil roulant.
1. Placez-vous derrière le fauteuil roulant.
2. Utilisez les poignées pour ouvrir le fauteuil roulant autant que possible.
3. Placez-vous à l'avant du fauteuil roulant.
4. Poussez sur les deux tubes de l'assise vers le bas jusqu'à ce qu'ils soient fixés à leur
place.
2.4 Placer ou enlever les repose-pieds
L
AVERTISSEMENT : risque de blessures – Vérifiez que les repose-pieds sont
fermement installé avant d'utiliser le fauteuil roulant.
L ATTENTION : risque de blocage – Ne pas placer d'objets ou vos doigts au
niveau de la partie amovible du repose-pieds.
28
2014-05
Page8
L'installation de repose-pied se fait de la manière
suivante :
1. Gardez le repose-pied en oblique sur la partie
externe de la structure du fauteuil roulant.
2. Montez les crans
du repose-pied au niveau
des broches
fixées à la structure.
3. Basculez le repose-pied vers l'intérieur jusqu'à
ce qu'il se bloque en position. Si vous éprouvez
des difficultés lorsque vous devez river, exercer
légèrement une pression sur le verrouillage.
4. Tournez la palette vers le bas.
5. Replacez maintenant la bande pour les mollets
dans les crochets
.
Pour retirer le repose-pied :
1. Enlevez d'abord la bande pour les mollets en la
détachant du crochet
des deux côtés.
2. Poussez le levier
se trouvant à proximité de
la fixation de repose-pied vers l'arrière.
3. Tournez le repose-pied vers l'extérieur du
fauteuil roulant.
4. Tirez les crans
du repose-pied des broches
fixées à la structure.
2.5 Utilisation des freins
L
AVERTISSEMENT : les freins n'ont pas pour but de ralentir le fauteuil roulant
lors de déplacements – Ne les utilisez que pour éviter des mouvements non
souhaités.
L AVERTISSEMENT : le fonctionnement du freins à mains ont influencé par
l'usure et les salissures des pneus (eau, huile, boue...). Vérifiez l'état des pneus
avant chaque utilisation.
L AVERTISSEMENT : les freins sont réglables et sont sujets à l'usure – Vérifiez
leur fonctionnement avant chaque utilisation.
Pour actionner les freins :
1. Poussez les poignées de freins
vers l'avant
jusqu'à ce que vous sentiez un clic net.
L ATTENTION : risque de mouvements non
souhaités. Vérifiez que le fauteuil roulant se
trouve sur une surface horizontale plane
avant de relâcher les freins. Ne relâchez
jamais les deux freins en même temps.
Pour relâcher les freins :
1. Relâchez un frein en tirant la poignée
vers l'arrière.
2. Saisissez la main-courante (si disponible) de la
roue libre avec la main.
3. Désactivez l'autre frein en tirant le levier
vers
l'arrière.
 Loading...