

Vermeer D60x90 Navigator Maintenance Manual
D60x90 Navigator
®
Horizontal Directional Drill
Maintenance
Manual
D60x90_m1_04
Serial No. 101 Order No. 105400BQ9

Introduction
This manual explains the proper operation of your machine. Study and understand these instructions thoroughly before operating or
maintaining the machine. Failure to do so could result in personal injury or equipment damage. Consult your Vermeer dealer if you
do not understand the instructions in this manual, or need additional information.
The instructions, illustrations, and specifications in this manual are based on the latest information available at time of publication.
Yo ur m a ch in e ma y ha ve p ro du ct improvements and features not yet contained in this manual.
The maintenance intervals are based on normal operating conditions. When operating under severe conditions, the maintenance
intervals should be shortened.
To prov ide a bet ter view, s ome photo grap hs or illustrations in the maintenance sections may show the machine shields removed.
Never operate the machine with the shields removed - keep all shields in place. If removing a shield is necessary, return it
to its operating position before operating the machine.
Verm eer Corpor ation reserv es the right to ma ke changes at any time without notice or obligation.
This manual is supplied with each machine. Refer to it for all lubrication and maintenance procedures. Keep this manual with the
machine for ready reference. Store it in a protected location when not in use.
Additional copies of the manuals, and Operations and Safety video, are available from your dealer. Use the reorder numbers on the
front cover to order additional manuals.
Copies of this manual, and the Operations and Safety video, are available in Spanish from your dealer.
Su distribuidor dispone de ejemplares en español de este manual y del vídeo de Operaciones y Seguridad.
NOTICE TO OWNER
Replacement manuals are free of charge by registering your used Vermeer machine. Your machine’s Operator’s, Maintenance and
Parts Manuals may be available online at www.myvermeer.com. For questions about online or printed manuals, or to register a used
machine, contact the Customer Data Department by telephone: 800-829-0051 or 641-628-3141; email: customerdata@vermeer.com;
internet: www.vermeer.com
50219 USA.
or www.myvermeer.com; or, letter: Customer Data Dept., Vermeer Corporation, PO Box 200, Pella IA
D60x90 Navigator HDD Maintenance

SERVICE
Service instructions are contained in a separate service manual. Service manuals can be obtained by contacting your Vermeer dealer.
If you are considering servicing the machine without the assistance of a Vermeer dealer, remember this is a complex machine which
often involves complex service procedures.
There are also many components which are not user-serviceable. Do not attempt any service which you do not fully understand, nor
any service that you cannot do accurately and safely with proper tools and equipment. If you encounter a problem that you do not
understand or cannot solve, contact your Vermeer dealer.
TRADEMARKS
VERMEER, VERMEER Logo, and NAVIGATOR are trademarks of Vermeer Manufacturing Company.
JOHN DEERE is a trademark of Deere & Company.
CHEVRON and DELO are trademarks of Chevron Intellectual Property LLC.
MOBIL and DELVAC are trademarks of Exxon Mobil Corporation.
SHELL and ROTELLA are trademarks of Shell Trademark Management B.V.
D60x90 Navigator HDD Maintenance

This page intentionally left blank.

Table of Contents
Safety Messages. . . . . . . . . . . . . . . . . . . . . . . . . 10-1
Safety Symbol Explanation . . . . . . . . . . . . . . . . . . . . . . . . . .10-1
Welding Precautions . . . . . . . . . . . . . . . . . . . . . 11-1
Welding Alert - Electronic Components . . . . . . . . . . . . . . . . . 11-1
Drill Rod Care and Inspection . . . . . . . . . . . . . . . . . . . . . . . . 20-9
Water Swivel - Check . . . . . . . . . . . . . . . . . . . . . . . . . . . . . 20-10
Greasing. . . . . . . . . . . . . . . . . . . . . . . . . . . . . . . . . . . . 20-10
Packing Leaks . . . . . . . . . . . . . . . . . . . . . . . . . . . . . . . 20-10
Vise Dies - Inspect/Clean . . . . . . . . . . . . . . . . . . . . . . . . . . 20-10
Vises - Grease. . . . . . . . . . . . . . . . . . . . . . . . . . . . . . . . . . . 20-11
Front Roller Guides - Grease . . . . . . . . . . . . . . . . . . . . . . . 20-11
Shutdown Procedure . . . . . . . . . . . . . . . . . . . . . 12-1
Maintenance - 50 Service Hours or Weekly . . . 25-1
Grease Chart . . . . . . . . . . . . . . . . . . . . . . . . . . . . 15-1
Maintenance - 10 Service Hours or Daily . . . . . 20-1
Machine - Grease . . . . . . . . . . . . . . . . . . . . . . . . . . . . . . . . .20-1
Machine Inspection . . . . . . . . . . . . . . . . . . . . . . . . . . . . . . . .20-1
Engine Maintenance . . . . . . . . . . . . . . . . . . . . . . . . . . . . . . .20-1
Fluid Levels - Check . . . . . . . . . . . . . . . . . . . . . . . . . . . . . . . 20-1
Fuel Tank - Fill . . . . . . . . . . . . . . . . . . . . . . . . . . . . . . . . 20-2
Fuel/Water Separators - Check/Drain. . . . . . . . . . . . . . . 20-3
Hydraulic Fluid Level - Check . . . . . . . . . . . . . . . . . . . . . 20-4
Engine Crankcase Oil - Check/Fill . . . . . . . . . . . . . . . . . 20-4
Coolant Level - Check/Fill. . . . . . . . . . . . . . . . . . . . . . . . 20-5
Air Cleaner Restriction Indicator - Check. . . . . . . . . . . . . . . . 20-6
Air Intake Screen - Check/Clean . . . . . . . . . . . . . . . . . . 20-6
Dust Discharge Valve - Empty . . . . . . . . . . . . . . . . . . . . 20-7
Accumulator Pressure - Check . . . . . . . . . . . . . . . . . . . . . . . 20-7
Auto Greaser - Check/Refill . . . . . . . . . . . . . . . . . . . . . . . . . .20-8
Piston Wash Water Tank - Drain/Clean/Refill . . . . . . . . . . . . 20-8
Rotation Gearbox Oil - Check . . . . . . . . . . . . . . . . . . . . . . . .20-9
D60x90 Navigator HDD Maintenance Table of Contents i
Rack Frame Pivot - Grease. . . . . . . . . . . . . . . . . . . . . . . . . . 25-1
Rack Frame Pivot Cylinders - Grease. . . . . . . . . . . . . . . . . . 25-1
Gearbox Slide - Grease. . . . . . . . . . . . . . . . . . . . . . . . . . . . . 25-2
Rear Outriggers - Grease . . . . . . . . . . . . . . . . . . . . . . . . . . . 25-2
Drilling Fluid Pump Crankcase Oil Level - Check . . . . . . . . . 25-3
Track Planetary Gearbox Oil Level - Check . . . . . . . . . . . . . 25-3
Bolts - Check. . . . . . . . . . . . . . . . . . . . . . . . . . . . . . . . . . . . . 25-4
Maintenance - 100 Service Hours . . . . . . . . . . . 30-1
Engine Maintenance . . . . . . . . . . . . . . . . . . . . . . . . . . . . . . . 30-1
Engine Oil and Filter - Initial Change/Replacement . . . . 30-1
Radiator and Oil Cooler - Clean . . . . . . . . . . . . . . . . . . . . . . 30-2
Battery Voltage - Check . . . . . . . . . . . . . . . . . . . . . . . . . . . . 30-2
Safety Signs Maintenance. . . . . . . . . . . . . . . . . . . . . . . . . . . 30-2
Overall Machine - Check. . . . . . . . . . . . . . . . . . . . . . . . . . . . 30-3
Backup Alarm - Check. . . . . . . . . . . . . . . . . . . . . . . . . . . . . . 30-4
Hydraulic System - Check. . . . . . . . . . . . . . . . . . . . . . . . . . . 30-4
Hydraulic Enable - Check . . . . . . . . . . . . . . . . . . . . . . . . . . . 30-5
Operator Presence System - Check . . . . . . . . . . . . . . . . . . . 30-6

Neutral Start Interlock - Check . . . . . . . . . . . . . . . . . . . . . . . 30-7
Drilling Fluid System - Check . . . . . . . . . . . . . . . . . . . . . . . . 30-7
Ground Drive System - Inspect. . . . . . . . . . . . . . . . . . . . . . . 30-8
Track Tension - Check . . . . . . . . . . . . . . . . . . . . . . . . . . 30-8
Cooling System - Refill . . . . . . . . . . . . . . . . . . . . . . . . . . 50-3
Maintenance - 4500 Hours . . . . . . . . . . . . . . . . . 55-1
Diesel Particulate Filter (DPF) - Forced Regeneration. . . . . .55-1
Maintenance - 250 Service Hours . . . . . . . . . . . 35-1
Hydraulic Fluid Filters - Initial Replacement . . . . . . . . . . . . . 35-1
Hydraulic Fluid Flow Direction . . . . . . . . . . . . . . . . . . . . . 35-2
Maintenance - 500 Service Hours or Yearly . . . 40-1
Engine Maintenance. . . . . . . . . . . . . . . . . . . . . . . . . . . . . . . 40-1
Fuel Filters - Replace . . . . . . . . . . . . . . . . . . . . . . . . . . . 40-2
Engine Oil and Filter - Change/Replace . . . . . . . . . . . . . 40-3
Battery Terminals - Check . . . . . . . . . . . . . . . . . . . . . . . . . . 40-4
Battery Terminals - Clean . . . . . . . . . . . . . . . . . . . . . . . . 40-5
Hydraulic Fluid Filters - Replace. . . . . . . . . . . . . . . . . . . . . . 40-6
Drilling Fluid Pump Crankcase - Initial Oil Change. . . . . . . . 40-6
Maintenance - 1000 Service Hours . . . . . . . . . . 45-1
Track Gearbox Oil - Change. . . . . . . . . . . . . . . . . . . . . . . . . 45-1
Hydraulic Fluid - Change . . . . . . . . . . . . . . . . . . . . . . . . . . . 45-2
Hydraulic Fluid - Drain . . . . . . . . . . . . . . . . . . . . . . . . . . . 45-2
Strainer - Clean and Inspect . . . . . . . . . . . . . . . . . . . . . . 45-3
Tank - Fill . . . . . . . . . . . . . . . . . . . . . . . . . . . . . . . . . . . . . 45-3
Drilling Fluid Pump Crankcase Oil - Change . . . . . . . . . . . . 45-4
Maintenance - 3000 Service Hours . . . . . . . . . . 50-1
Engine Maintenance. . . . . . . . . . . . . . . . . . . . . . . . . . . . . . . 50-1
Cooling System - Drain and Clean . . . . . . . . . . . . . . . . . . . . 50-2
ii Table of Contents D60x90 Navigator HDD Maintenance
Maintenance As Required. . . . . . . . . . . . . . . . . . 60-1
Engine Maintenance . . . . . . . . . . . . . . . . . . . . . . . . . . . . . . .60-1
Engine Compartment - Clean . . . . . . . . . . . . . . . . . . . . . 60-1
Engine Cooling Compartment - Clean Out . . . . . . . . . . . 60-1
Battery - Replace . . . . . . . . . . . . . . . . . . . . . . . . . . . . . . . . . .60-2
Fuses . . . . . . . . . . . . . . . . . . . . . . . . . . . . . . . . . . . . . . . . . . .60-4
Behind Seat in Cab . . . . . . . . . . . . . . . . . . . . . . . . . . . . . 60-4
On Engine . . . . . . . . . . . . . . . . . . . . . . . . . . . . . . . . . . . . 60-5
Air Cleaner Element - Replace. . . . . . . . . . . . . . . . . . . . . . . .60-6
Rack and Pinion - Clean . . . . . . . . . . . . . . . . . . . . . . . . . . . .60-7
Rod Guide Rollers - Replace . . . . . . . . . . . . . . . . . . . . . . . . .60-8
Vise Die Grips - Replace . . . . . . . . . . . . . . . . . . . . . . . . . . . .60-8
Track Tension - Adjust . . . . . . . . . . . . . . . . . . . . . . . . . . . . . .60-9
Track Tension - Increase . . . . . . . . . . . . . . . . . . . . . . . . 60-9
Track Tension - Decrease. . . . . . . . . . . . . . . . . . . . . . . . 60-9
Gearbox Guides - Replace. . . . . . . . . . . . . . . . . . . . . . . . . .60-10
Gearbox Guides - Adjust. . . . . . . . . . . . . . . . . . . . . . . . 60-10
Storage. . . . . . . . . . . . . . . . . . . . . . . . . . . . . . . . . . . . . . . . .60-11
Preparing for Storage . . . . . . . . . . . . . . . . . . . . . . . . . . 60-11
Removing from Storage . . . . . . . . . . . . . . . . . . . . . . . . 60-12
Troubleshooting . . . . . . . . . . . . . . . . . . . . . . . . . 70-1
Engine System. . . . . . . . . . . . . . . . . . . . . . . . . . . . . . . . . . . .70-1
Electrical System . . . . . . . . . . . . . . . . . . . . . . . . . . . . . . . . . .70-1
Hydraulic System . . . . . . . . . . . . . . . . . . . . . . . . . . . . . . . . . .70-2

Drilling Fluid System . . . . . . . . . . . . . . . . . . . . . . . . . . . . . . .70-3
Strike Alert . . . . . . . . . . . . . . . . . . . . . . . . . . . . . . . . . . . . . . .70-4
Remote Lockout System . . . . . . . . . . . . . . . . . . . . . . . . . . . .70-5
Specifications . . . . . . . . . . . . . . . . . . . . . . . . . . . 80-1
Lubricants . . . . . . . . . . . . . . . . . . . . . . . . . . . . . . . . . . . . . . .80-1
Engine. . . . . . . . . . . . . . . . . . . . . . . . . . . . . . . . . . . . . . . 80-2
Machine Specifications . . . . . . . . . . . . . . . . . . . . . . . . . . . . .80-3
D60x90 Navigator HDD Maintenance Table of Contents iii

This page intentionally left blank.

Section 10: Safety Messages
General safety messages appear in this Safety Messages section. Specific safety messages are located in
appropriate sections of the manual where a potential hazard may occur if the instructions or procedures are not
followed.
A signal word “DANGER”, “WARNING”, or “CAUTION” is used with the safety alert symbol.
Safety signs with signal word “DANGER”, “WAR NING”, or “CAUTION” are located near specific hazards.
DANGER
WARNING
CAUTION
NOTICE
Indicates a hazardous situation that, if not avoided, will result in death or serious injury.
Indicates a hazardous situation that, if not avoided, could result in death or serious injury.
Indicates a hazardous situation that, if not avoided, could result in minor or moderate injury.
Indicates information considered important, but not hazard-related.
SAFETY SYMBOL EXPLANATION
This is the safety alert symbol. This symbol is used in combination with an exclamation mark or
other symbols to alert you to the potential for bodily injury or death.
WAR NING: Read Operator’s Manual and safety signs, and watch the operations and safety
video, before operating machine.
D60x90 Navigator HDD Maintenance Safety Messages 10-1

WAR NING: Wear perso nal p rote ctive equi pment . Wear close-fitting clothing and confine
long hair. Always wear a hard hat, safety glasses, and safety shoes.
WAR NING: Keep spectators away.
WAR NING: Exhaust fumes can be fatal.
If operating in an enclosed area, remove exhaust fumes with an exhaust pipe extension to
the outside.
DANGER: Rotating drill string or cutters can kill.
Stay away from rotating drill rod and cutting tool.
10-2 Safety Messages D60x90 Navigator HDD Maintenance

DANGER: Rotating drill string can kill. Unexpected start-up possible.
Lock out before working on drill string.
WAR NING: Keep hands, feet, and clothing away from power-driven parts. Keep shields
in place and properly secured.
WAR NING: Use Shutdown Procedure before servicing, cleaning, repairing or
transporting machine. Follow Shutdown Procedure, page 12-1.
WAR NING: Make no modifications to this equipment unless specifically recommended by Vermeer
Corporation.
WAR NING: Be sure that all safety devices, including shields, are installed and functioning properly
after servicing the machine.
D60x90 Navigator HDD Maintenance Safety Messages 10-3
WAR NING: When HEST (High Exhaust System Temperature) Light is displayed, the
exhaust gas temperature could exceed 1100°F (600°C) during regeneration. High
temperature may cause in fire, burn, or explosion hazards, which may result in personal
injury or death. Do not expose flammable material or explosive atmospheres to exhaust
gas or to exhaust system components during regeneration.
WAR NING: To prevent fi res, routinely cle ar any combustible material from the engine
exhaust system. Tier 4 Interim / Stage IIIB emission compliant exhaust systems use
extreme high temperature that can ignite combustible material.
WAR NING: Servicing machine during DPF regeneration can result in serious personal
injury. Avoid exposure and skin contact with hot exhaust gases and hot exhaust system
components.
WAR NING: If regeneration is performed within any indoor service/maintenance facility, ensure the
exhaust removal system is capable of withstanding temperatures exceeding 1100°F (600°C).
WAR NING: Fail u re to follow any of the prec eding safety instructions or those that follow within this manual,
could result in serious injury or death. This machine is to be used only for those purposes for which it was
intended as explained in the Operator’s Manual.
10-4 Safety Messages D60x90 Navigator HDD Maintenance
Section 11: Welding Precautions
2
1
3
4
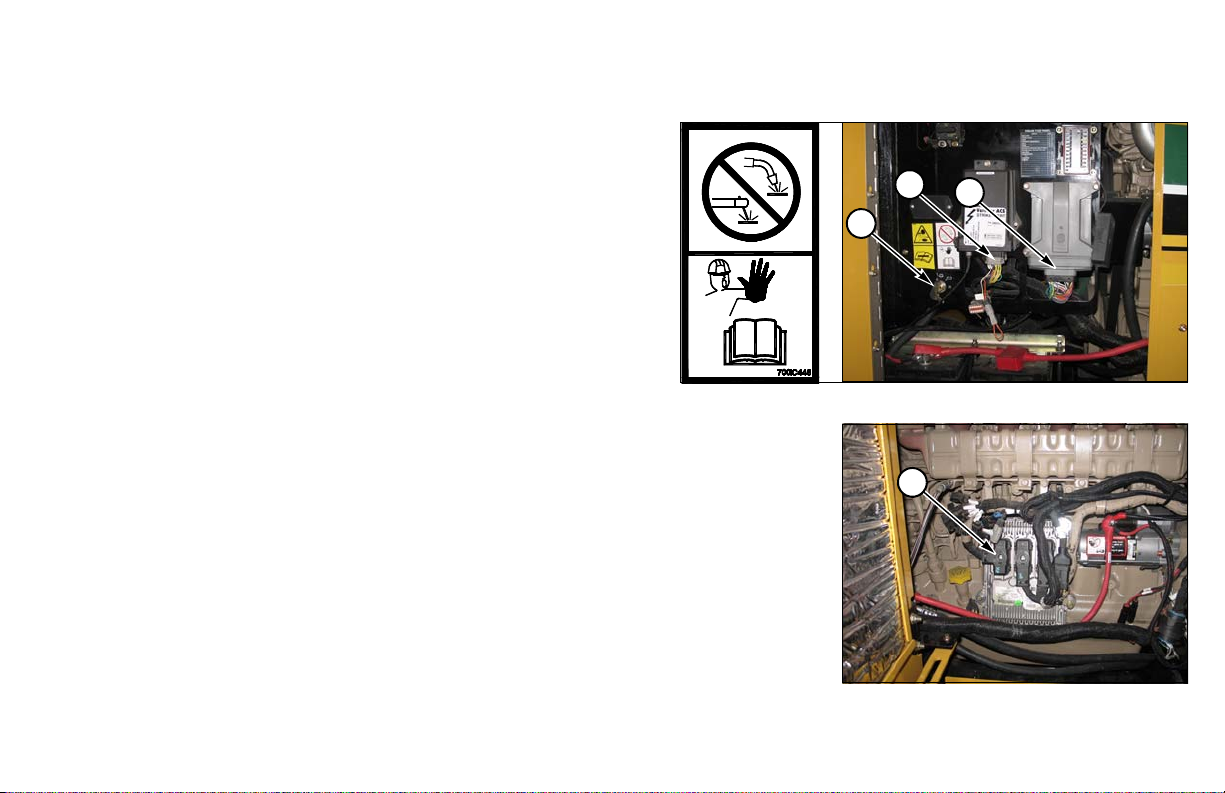
WELDING ALERT - ELECTRONIC COMPONENTS
NOTICE: Electronic modules and controllers will be damaged from
stray voltages and currents generated during welding if not
unplugged before welding.
To prevent exte nsive and cos tly damage to th e electric al
components:
Step 1: Turn Battery Disconnect Switch (1) to DISCONNECT.
NOTICE: Disconnecting the battery ground with the battery
disconnect switch will not prevent damage to the electronic
components during welding. Each of the modules must have the
electrical connector unplugged from the module.
Step 2: Unplug Strike Alert (2) and pump controller (POM) modules (3).
Step 3: Unplug three engine ECUs (4).
D60x90 Navigator HDD Maintenance Welding Precautions 11-1

Step 4: Under the seat, unplug three connectors, to the cab controller (5), the
5
6
7
8
9
10
Remote Lockout (RLC) module (6) and the DCIM module (7).
In cab machine, access through foot panel in front of operator seat; in noncab machine, tip seat forward and lift panel.
Step 5: Unplug carriage controller (CCU) (8), rack controller (ROM) (9), and vise controller (VOM) (10).
11-2 Welding Precautions D60x90 Navigator HDD Maintenance

Section 12: Shutdown Procedure
Step 1: Shut off drilling fluid pump.
Step 2: Reduce engine speed to idle.
Step 3: Wai t 2 minutes to s hut of f engine when shutting down after operating at full power.
Step 4: Shut off engine and remove key.
For your safety and th e safety o f others, us e t he shutdown procedure before working on the machine for any
reason, including servicing, cleaning, unplugging, or inspecting.
If working on the drill string or drill tools at a remote location away from the machine, follow Lockout Procedure
- With Remote Lockout or the Lockout Procedure - Without Remote Lockout System in the Overview Section of the
Operator’s Manual.
A variation of the above procedure may be used if instructed within this manual or if an emergency requires it.
D60x90 Navigator HDD Maintenance Shutdown Procedure 12-1

This page intentionally left blank.
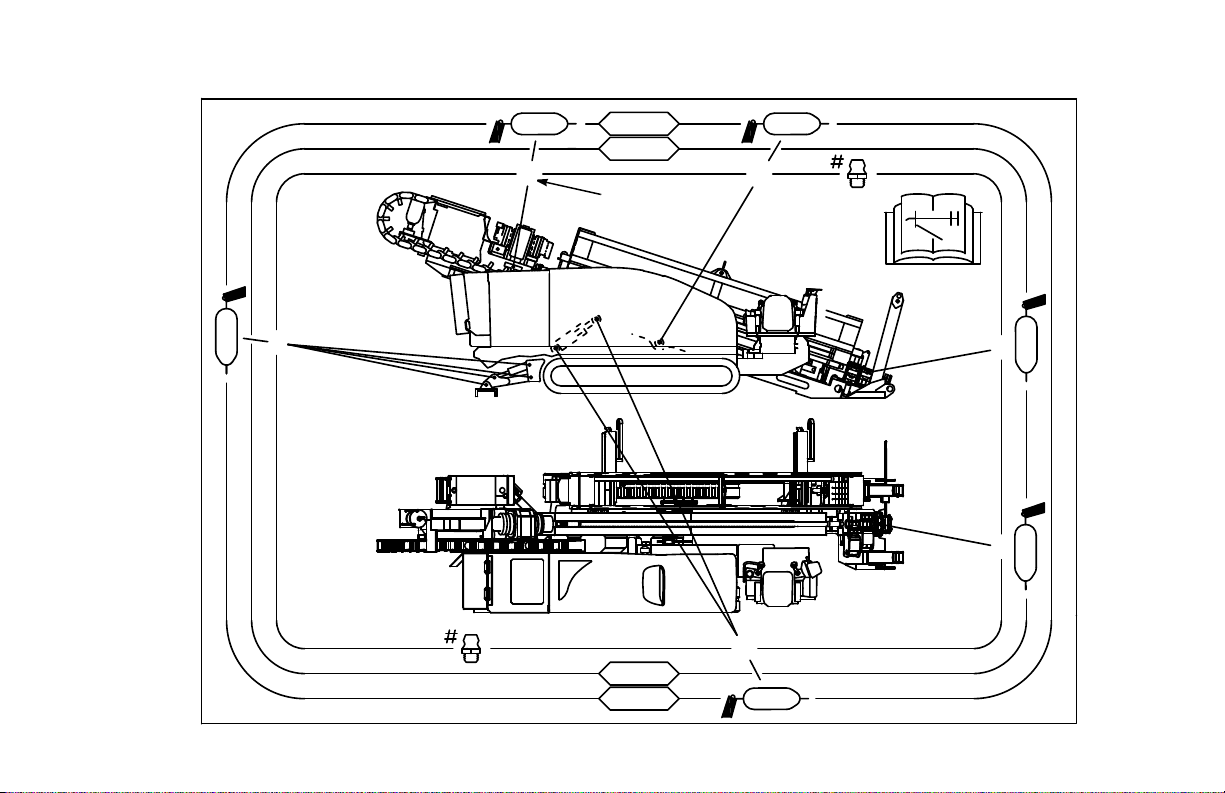
Section 15: Grease Chart
50h
10h
2
4
700IF752 Rev A
2
4
50h
10h
1
1
9
2
4
2
5
2
Outriggers
Gearbox slide
Rack pivot cylinder
Rack pivot
Vises
Roller
guides
D60x90 Navigator HDD Maintenance Grease Chart 15-1

This page intentionally left blank.

Section 20: Maintenance - 10 Service Hours or Daily
MACHINE - GREASE
As a general rule, grease machine after it is shut down for the day. This protects the metal under the seals from
corrosion caused by condensation as the temperature drops.
Ensure all fittings and grease applicator nozzle are clean before applying grease. If any grease fittings are
missing, replace them immediately.
MACHINE INSPECTION
•Inspect machine daily and check for leaks before starting.
•If stabilizer or rack hydraulic cylinders drift, contact your Vermeer dealer for repair.
•Check vise dies daily and remove accumulated debris or dirt. Clean with a wire brush.
ENGINE MAINTENANCE
Visually inspect engine daily and make any necessary adjustments and repairs before starting.
Refer to the Engine Operation Manual supplied with each machine for complete instructions.
FLUID LEVELS - CHECK
Check fluid levels daily before operating the machine. Refer to the Engine Operation Manual.
D60x90 Navigator HDD Maintenance 10 Service Hours or Daily 20-1
Fuel Tank - Fill
1
2
2
15 mg/kg
S
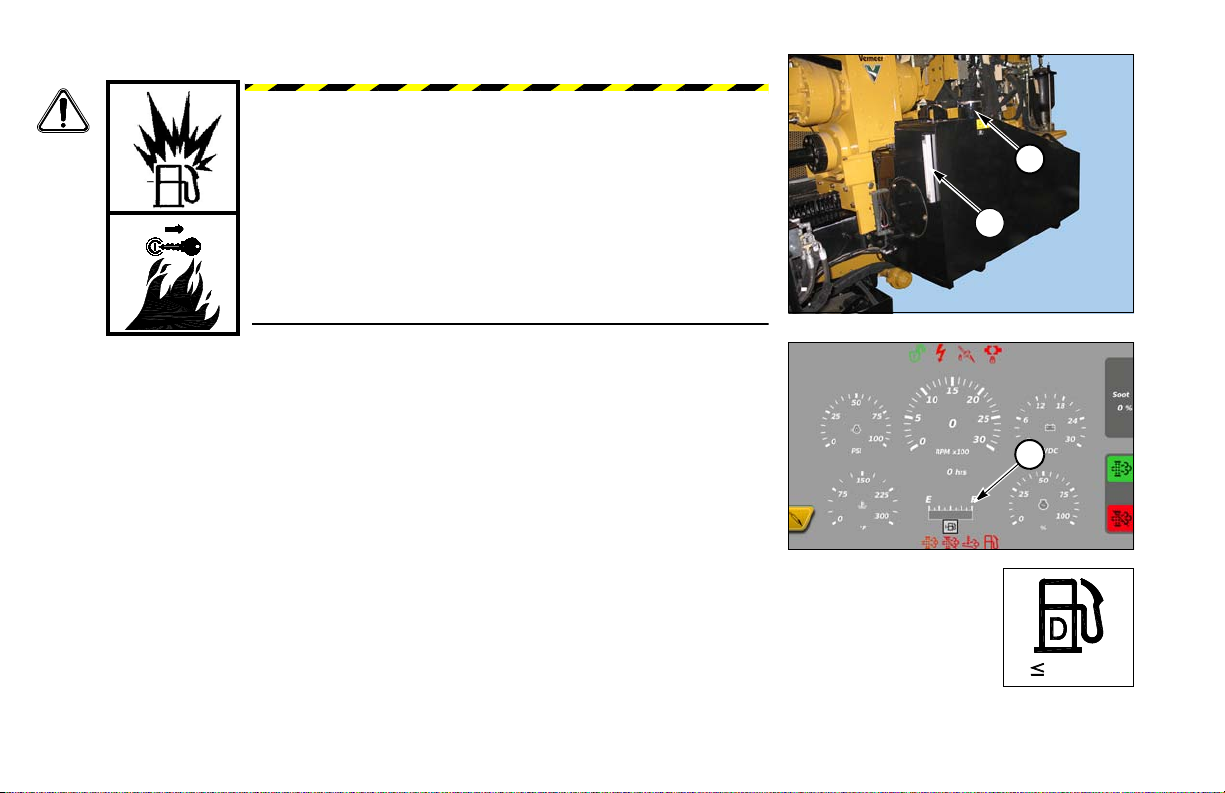
WAR NING: Fuel and fumes can explode and burn.
Shut off engine before refueling. No flame. No smoking.
Fill tank before raising rack.
Fill fuel tank at the end of each day to prevent condensation. Do not fill to the very
top, leave room for expansion.
(1) Fill Cap
(2) Fuel Gauge
To meet governm ent emissi on requirements use diesel fuel with a low or ultra low
sulfur content, less than 15 ppm or 0.0015% (15 mg/kg).
NOTICE: Use of higher content sulfur fuel will cause engine damage and void engine warranty.
20-2 10 Service Hours or Daily D60x90 Navigator HDD Maintenance
Fuel/Water Separators - Check/Drain
4
3
2
1
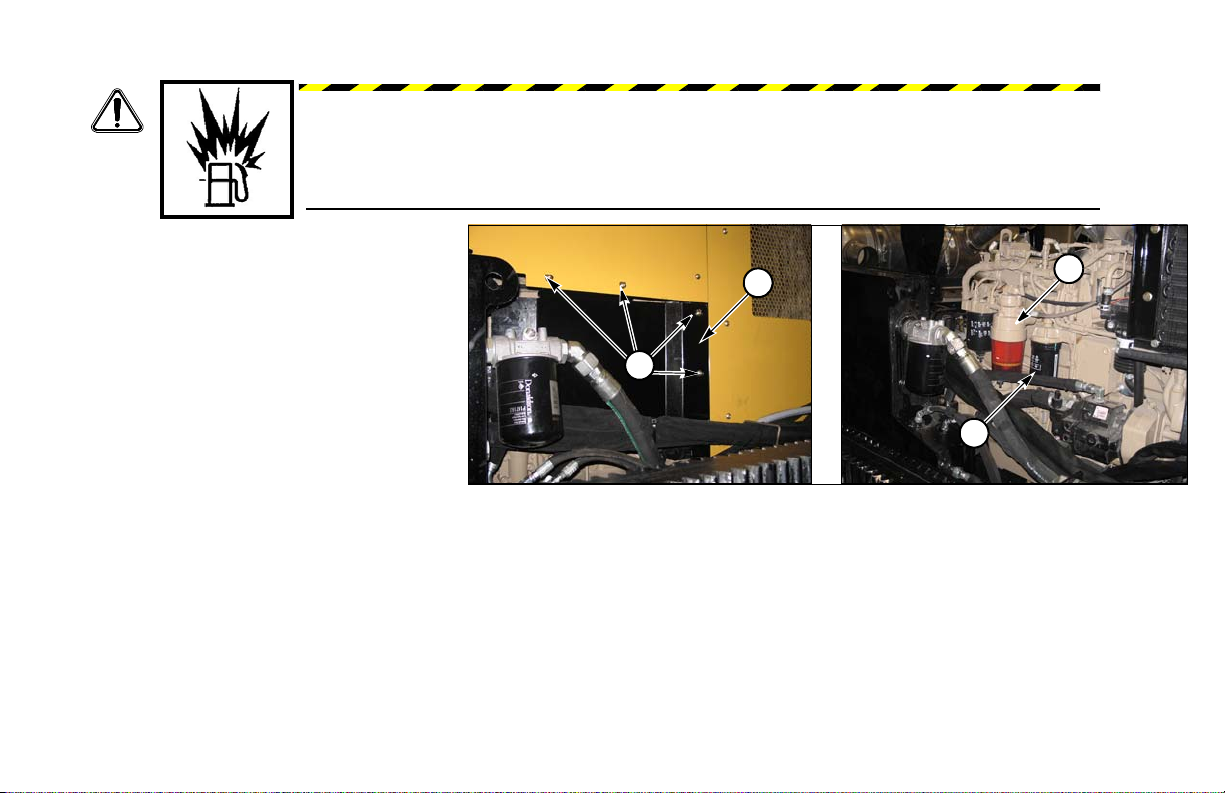
WAR NING: Fuel and fumes can catch fire or explode, resulting in serious burns or death.
Never work around fuel while smoking or near an open flame.
To access fi lters, remov e f our bolts (1)
and panel (2).
(3) Primary Fuel Filter with
Wat er Se parato r
(4) Secondary Fuel Filter
Check fuel filters for water or debris.
Drain water as needed based on daily
visual inspection. Refer to “Fuel Filters
- Replace,” page 40-2.
Do not spill fuel. Catch expelled fuel in
an appropriate container.
Refer to the Engine Operation Manual supplied with the machine for instructions.
D60x90 Navigator HDD Maintenance 10 Service Hours or Daily 20-3
Hydraulic Fluid Level - Check
2
1
1
Clean hydraulic fluid is very important. Do not spill dirt or other contaminants into
the tank. Filter all hydraulic fluid through a 5-micron filter before adding it to the
tank.
Follow Shutdown Procedure, page 12-1. Check hydraulic fluid level.
Keep tank filled to mid-gauge level. Machine must be level and in transport position.
Use proper fluid. Refer to “Lubricants,” page 80-1.
Step 1: Open engine cover.
Step 2: Remove fill cap (1).
Step 3: Fill to sight gauge level (2).
Step 4: Install fill cap.
Step 5: Close engine cover.
Engine Crankcase Oil - Check/Fill
With engine level, fill to full mark on dipstick. Do not overfill.
Use engine break-in oil during first 100 hours of operation.
(1) Dipstick and Fill Cap
20-4 10 Service Hours or Daily D60x90 Navigator HDD Maintenance

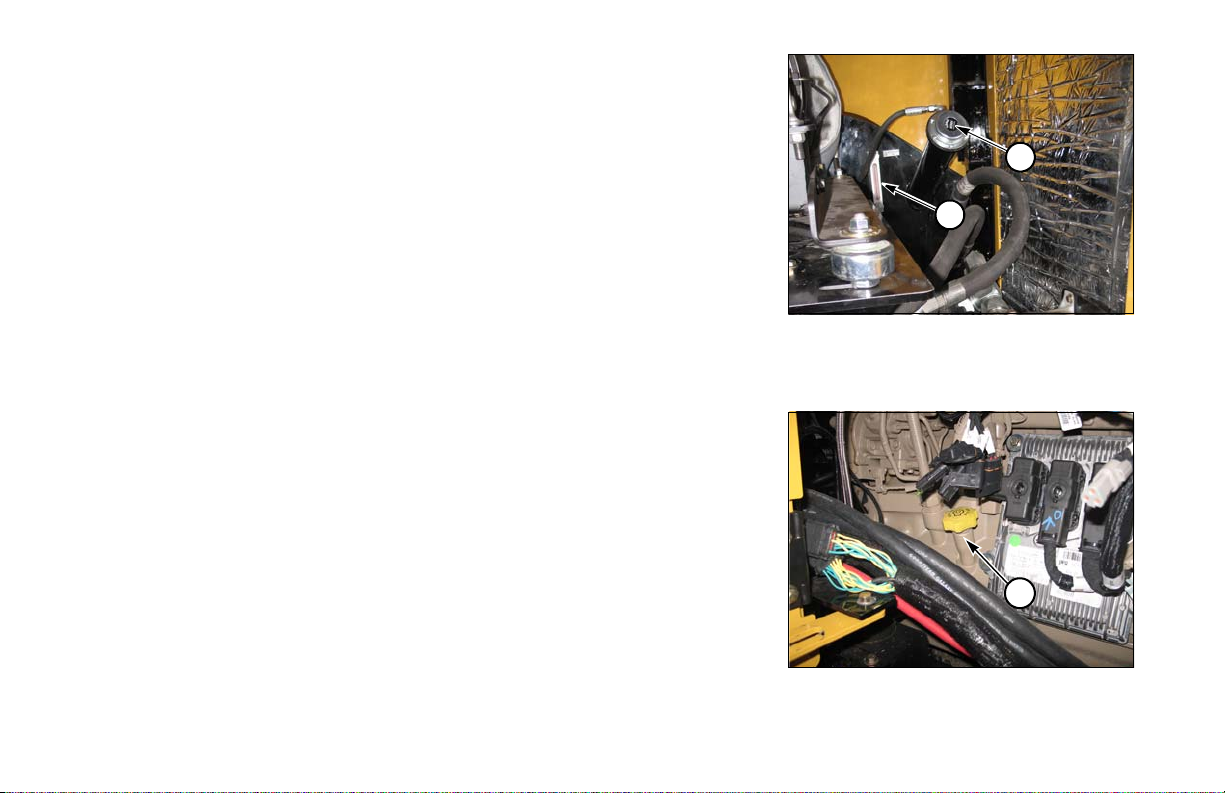
Coolant Level - Check/Fill
1
WAR NING: Hot fluid under pressure can scald.
Allow engine to cool before opening radiator cap.
Do not remove overfill bottle cap (1) from a hot engine. Wait until the temperature
has cooled before removing the overfill bottle cap. Failure to do so can result in
personal injury from heated coolant spray or steam. Remove cap slowly to relieve
coolant system pressure.
Make a 50/50 mixture of coolant and distilled or deionized water. Add to cold fill line
when engine is cold; fill to hot fill line when engine is hot.
Radiator is located under the overfill bottle.
NOTICE: This machine was factory-filled with a 50/50 mixture of Shell Rotella ELC
NF (Extended Life Nitrite Free) coolant for -34° (-37°C) protection. Compatible
coolants include Chevron Delo ELC NF and Exxon Mobil Delvac ELC NF. Never add
pure antifreeze to the system; always dilute to a 50/50 mixture.
D60x90 Navigator HDD Maintenance 10 Service Hours or Daily 20-5
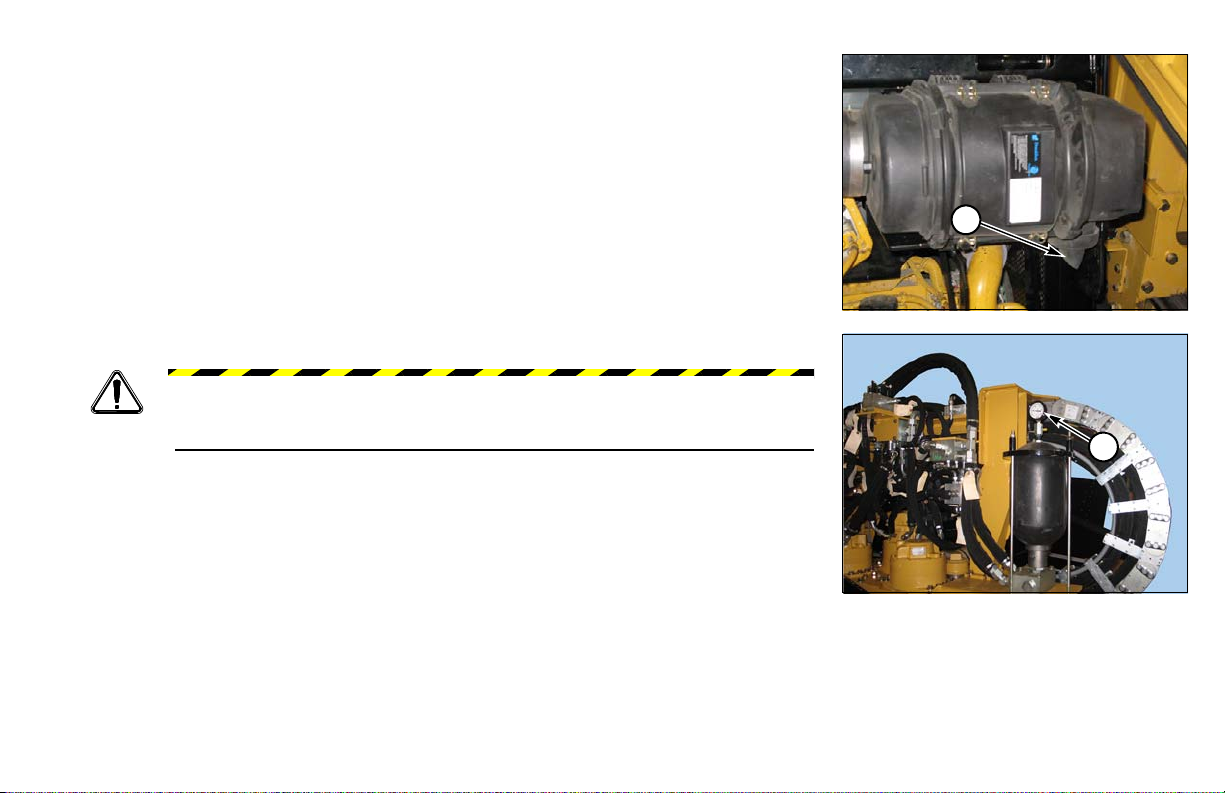
AIR CLEANER RESTRICTION INDICATOR - CHECK
1
2
Check air cleaner restriction indicator daily. When the indicator (1) shows a colored
band (usually red), filter elements must be replaced. Push button on top of indicator to
reset.
• Do not remove the element until the indicator shows it needs to be replaced.
• Do not wash or blow out the element; it must be replaced.
Refer to “Air Cleaner Element - Replace,” page 60-6.
NOTICE: The air restriction indicator will not function properly if:
•Element is damaged or not seated properly in housing.
•Air cleaner housing or element is damaged. If so, unfiltered air may be entering engine.
•Air transfer duct between air cleaner and engine is damaged or its clamps are loose.
•Air duct between air cleaner and restriction indicator is damaged or pinched.
Air Intake Screen - Check/Clean
Blocked air flow increases engine temperature. Check air intake screen (2) for dirt
and debris. Remove screen and clean with compressed air or water.
20-6 10 Service Hours or Daily D60x90 Navigator HDD Maintenance
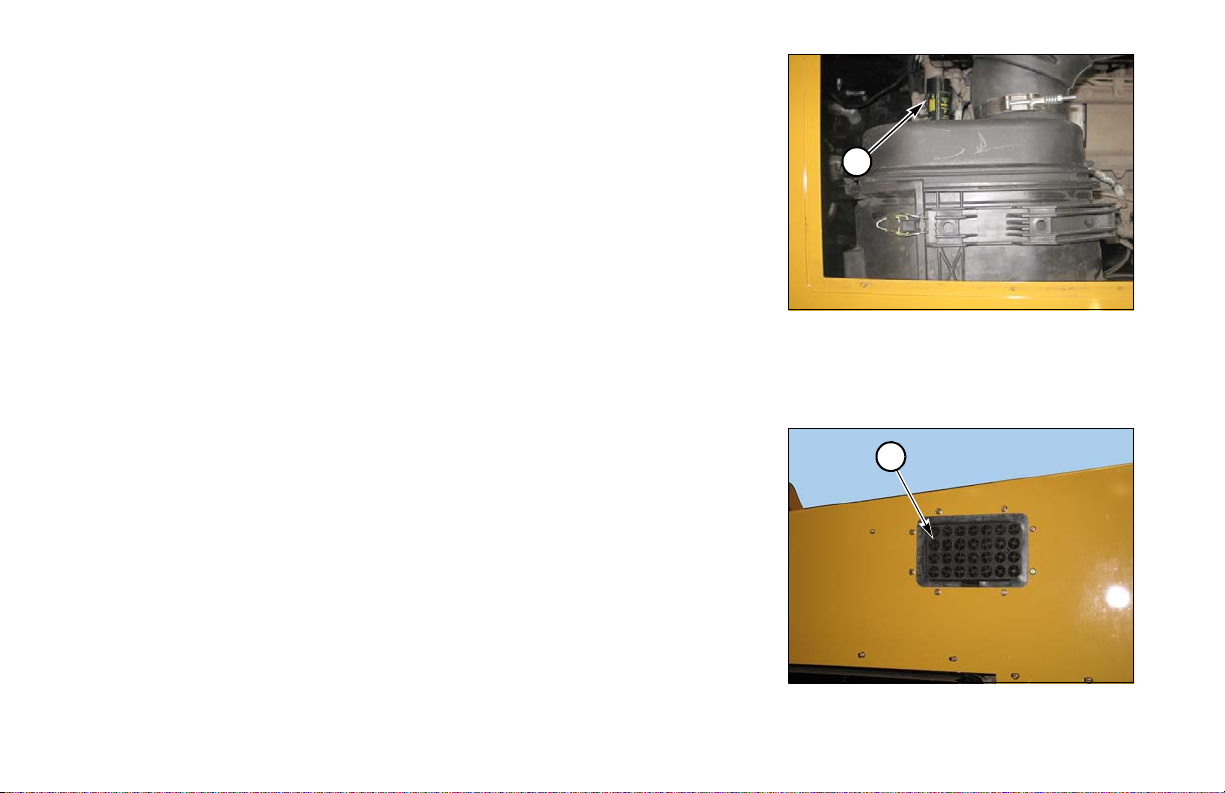
Dust Discharge Valve - Empty
1
1
Empty dust discharge valve (1) by pressing apart lips of discharge slot.
Remove any caked dirt by pressing together the upper section of the valve.
ACCUMULATOR PRESSURE - CHECK
WARNING: Accumulator is under pressure. Do not attempt to disassemble
or service accumulator. If accumulator requires service, contact your
Verm eer dealer.
Check accumulator pre-charge pressure on gauge (1) before starting the machine
each day. Machine must be shut down a sufficient length of time to allow hydraulic
oil to cool to ambient temperature and residual pressures in the hydrostatic closed
loops to bleed down to atmospheric pressure.
Pre-charge pressure should be 230–250 psi (16–17 bar). If pressure is too low, contact
your Vermeer service dealer.
Operation of accumulator without sufficient pre-charge can cause bladder failure.
D60x90 Navigator HDD Maintenance 10 Service Hours or Daily 20-7
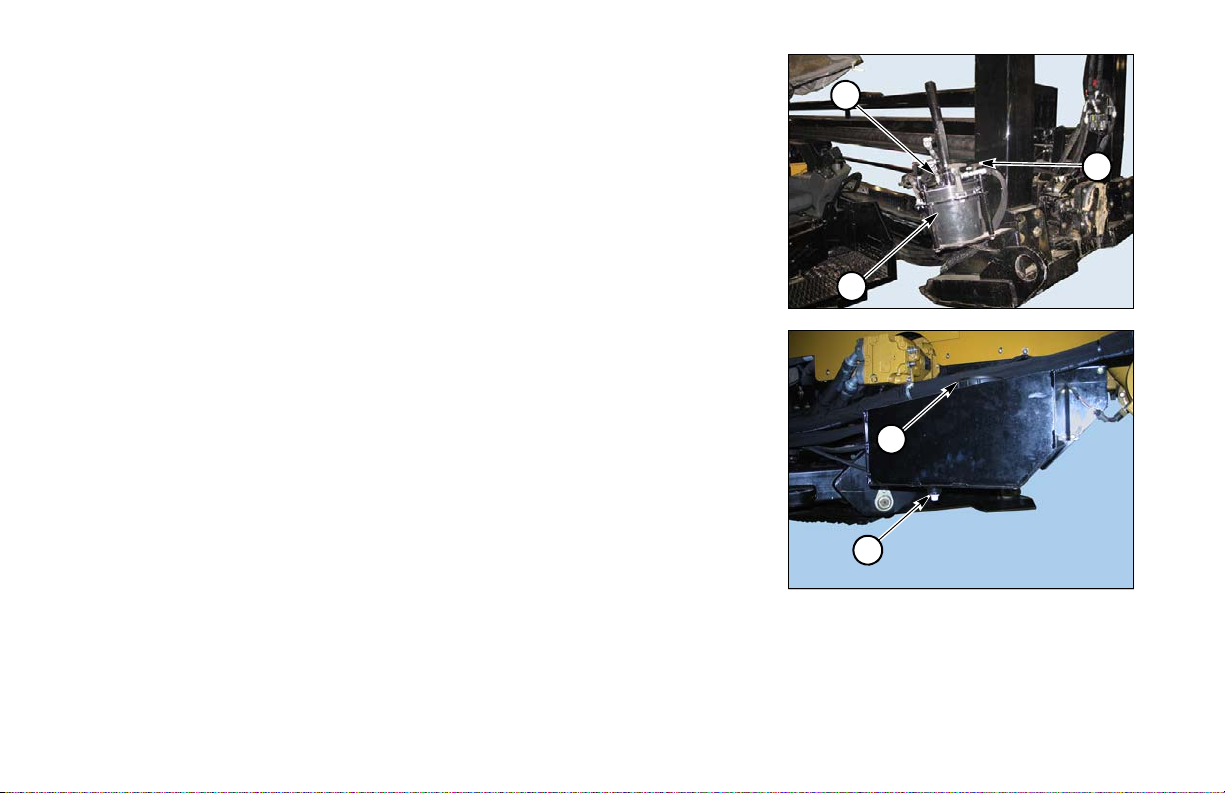
AUTO GREASER - CHECK/REFILL
1
2
3
1
2
Check the level of grease in bucket (1) each day at start-up by removing top cap.
Refill as needed.
To refill, p ump grease in to fitting (2), or open three latches (3) and replace bucket.
PISTON WASH WATER TANK - DRAIN/CLEAN/REFILL
Drain fluid from plug (1) on bottom of tank and flush out contaminants. Refill (2)
using ethanol-based glycol RV-type anti-freeze if used in freezing temperatures.
20-8 10 Service Hours or Daily D60x90 Navigator HDD Maintenance
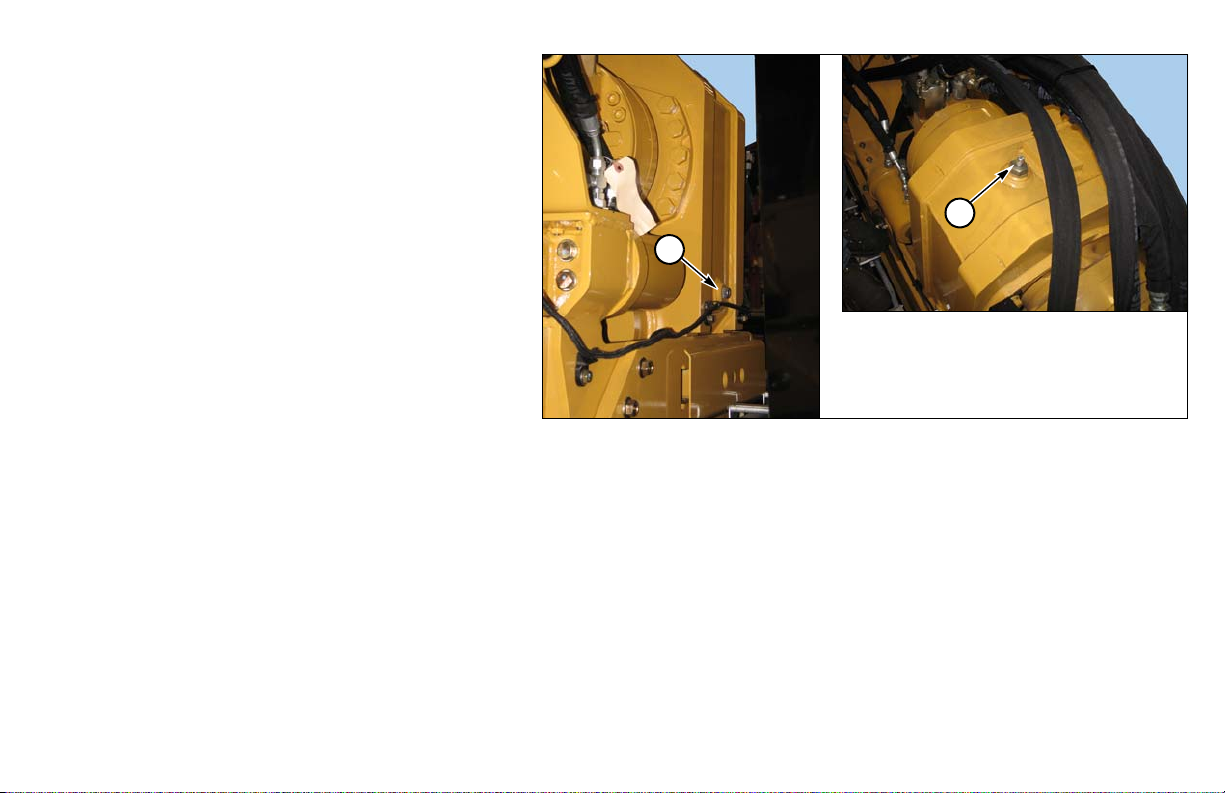
ROTATION GEARBOX OIL - CHECK
2
1
Maintain oil level at sight gauge (1). Fill at plug
(2) on other side of gearbox. Refer to
“Lubricants,” page 80-1. Capacity is 6 qt (5.7 L).
DRILL ROD CARE AND INSPECTION
•Do not exceed bend radius of the drill rod.
•Do not over-torque or under-torque drill
rods. Doing so will cause premature failure
of the drill rod.
•Move leading rod to back of rod box after
each job to prevent excessive wear on the
lead rod.
•Inspect drill rod before and during each
use.
•Remove any rod from drill string with damaged or worn ends.
•Remove any rod from drill string that are bent.
•Use proper thread or profile gauge to check for damaged thread.
•After rods are coupled together, check for fluid leakage at the joint.
•Leaking drill rod joints indicate damaged shoulders, which will not torque properly.
•Check shoulders for dents, gouges, or high spots.
•Dress damaged shoulders with a file.
D60x90 Navigator HDD Maintenance 10 Service Hours or Daily 20-9
 Loading...