

Verizon Wireless CDM8950 User Manual


CHAPTER 1. BEFORE USING CDM8950
BEFORE USING ................................................................................ 6
INSIDE THE PAC KAGE .................................................................. 6
HANDSET DESCRIPTIONS .............................................................. 7
DISPLAY INDICATORS .................................................................... 9
INSTALL BATTERY ....................................................................... 12
REMOVE BATTERY ...................................................................... 12
CHARGING YOUR BATTERY .......................................................... 13
BATTERY HANDLING INFORMATION ............................................. 13
CHAPTER 2. BASIC OPERATION
BASIC OPERATION ......................................................................... 16
TURNING THE PHONE ON/OFF ..................................................... 16
ACCESSING THE MENU ................................................................ 16
MENU SUMMARY ....................................................................... 17
MAKING A CALL ......................................................................... 20
ANSWERING CALLS .................................................................... 20
ENDING A CALL .......................................................................... 20
MISSED CALL NOTIFICATION ........................................................ 20
WAIT/PAUSE FEATURE ................................................................ 21
MAKING AN INTERNATIONAL CALL .............................................. 21
3-WAY CALLING ......................................................................... 21
CALL WAITING FUNCTION ........................................................... 22
CALLING A NUMBER FROM CONTACTS .......................................... 22
ADJUSTING VOLUME ................................................................... 22
ADJUSTING THE CALL VOLUME .................................................... 22
CALLER ID FUNCTION ................................................................. 22
VIBRATE ON/OFF MODE .............................................................. 23
SPEAKERPHONE MODE .............................................................. 23
MUSIC PLAYER .......................................................................... 23
AVAILABLE OPTIONS DURING A CALL ........................................... 23
MAKING AN EMERGENCY CALL .................................................... 24
CHAPTER 3. MEMORY FUNCTION
MEMORY FUNCTION ...................................................................... 26
STORING A PHONE NUMBER ....................................................... 26
ENTERING LETTERS, NUMBERS & SYMBOLS ................................. 30
ONE, TWO, THREE-TOUCH DIALING .............................................. 32
Table of Contents
1
Contents
Contents
081002_CDM8950_ECHO_EN_REV00.indd 1081002_CDM8950_ECHO_EN_REV00.indd 1 2008.10.6 6:17:28 PM2008.10.6 6:17:28 PM

CHAPTER 4. MENU FUNCTION
CONTACTS .....................................................................................34
NEW CONTACT ........................................................................... 34
CONTACT LIST ............................................................................ 34
GROUPS .................................................................................... 34
SPEED DIALS ..............................................................................36
IN CASE OF EMERGENCY ............................................................. 37
MY NAME CARD ......................................................................... 38
RECENT CALLS............................................................................... 40
RECENT CALLS............................................................................ 40
MISSED ..................................................................................... 40
RECEIVED .................................................................................. 40
DIALED ......................................................................................41
BLOCKED ................................................................................... 41
ALL ........................................................................................... 42
VIEW TIMERS .............................................................................42
SETTINGS ...................................................................................... 43
BLUETOOTH MENU ..................................................................... 43
SOUNDS SETTINGS ..................................................................... 46
DISPLAY SETTINGS ..................................................................... 48
PHONE SETTINGS ....................................................................... 53
CALL SETTINGS .......................................................................... 60
MEMORY ................................................................................... 61
PHONE INFO .............................................................................. 63
SET UP WIZARD.......................................................................... 65
VOICE TOOLS .................................................................................66
VOICE COMMANDS ..................................................................... 66
TOOLS ........................................................................................... 72
CALCULATOR .............................................................................. 72
CALENDAR .................................................................................72
ALARM CLOCK ............................................................................74
STOP WATCH .............................................................................. 76
WORLD CLOCK ........................................................................... 76
NOTEPAD ................................................................................... 77
MY VERIZON ................................................................................. 78
MY VERIZON .............................................................................. 78
CHAPTER 5. MEDIA CENTER
microSD ....................................................................................... 80
USING THE microSD CARD ........................................................... 80
MEDIA CENTER .............................................................................. 81
MUSIC & TONES.......................................................................... 81
PICTURE & VIDEO ....................................................................... 85
2
Table of Contents
Contents
Contents
GAMES ...................................................................................... 89
MOBILE WEB ............................................................................. 90
BROWSE & DOWNLOAD .............................................................. 91
EXTRAS ..................................................................................... 92
MEDIA CENTER INFO ...................................................................92
CHAPTER 6. MESSAGING MENU
MESSAGING .................................................................................. 94
WHEN A NEW MESSAGE ARRIVES ................................................ 94
NEW MESSAGE ...........................................................................94
INBOX ....................................................................................... 97
SENT ......................................................................................... 98
DRAFTS ..................................................................................... 98
VOICEMAIL ................................................................................ 99
MOBILE IM ................................................................................ 99
EMAIL ......................................................................................100
CHAT ........................................................................................100
ERASE MESSAGES ......................................................................100
SETTINGS .................................................................................101
CHAPTER 7. SAFETY AND WARRANTY
SAFETY ........................................................................................104
SAFETY INFORMATION FOR WIRELESS HANDHELD PHONES ..........104
SAFETY INFORMATION FOR FCC RF EXPOSURE .............................107
SAR INFORMATION ....................................................................107
FCC HEARING-AID COMPATIBILITY (HAC) REGULATIONS FOR
WIRELESS DEVICES ....................................................................108
FDA CONSUMER UPDATE ............................................................110
AVOID POTENTIAL HEARING LOSS. ..............................................114
FCC COMPLIANCE INFORMATION ................................................116
WARRANTY ..................................................................................117
12 MONTH LIMITED WARRANTY .................................................117
INDEX LIST ...................................................................................119
Table of Contents
3
Contents
Contents
081002_CDM8950_ECHO_EN_REV00.indd 2-3081002_CDM8950_ECHO_EN_REV00.indd 2-3 2008.10.6 6:17:30 PM2008.10.6 6:17:30 PM

BEFORE USING CDM8950
CHAPTER 1
BEFORE USING CDM8950
This chapter provides important information about using the
CDM8950 including:
Inside the package
Handset descriptions
Display indicators
Install battery
Remove battery
Charging your battery
Battery handling information
Note
Note
4
Table of Contents
081002_CDM8950_ECHO_EN_REV00.indd 4-5081002_CDM8950_ECHO_EN_REV00.indd 4-5 2008.10.6 6:17:30 PM2008.10.6 6:17:30 PM
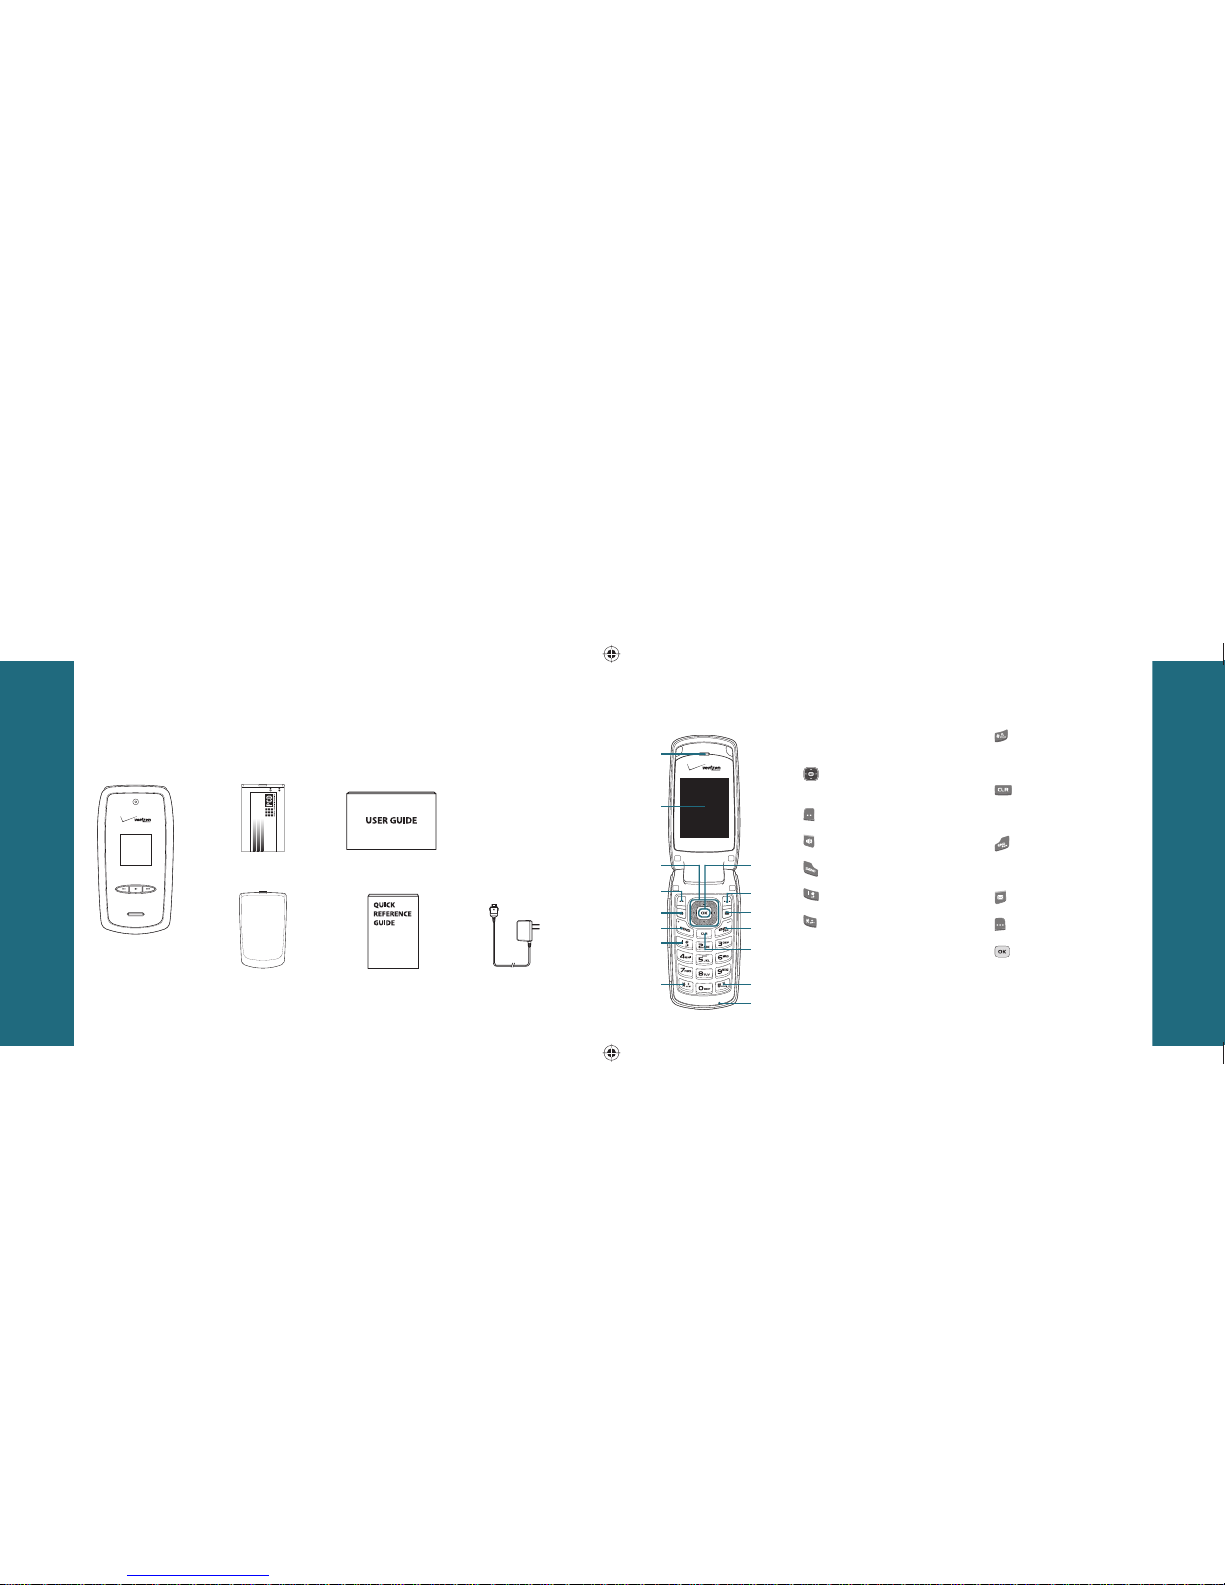
INSIDE THE PACKAGE
This package should include all items pic tured below. If any are missing or different, immediately contact
the retailer where you purchased the phone.
6
Chapter 1 − Before Using CDM8950
Before Using
Before Using
HANDSET DESCRIPTIONS
Before Using CDM8950 − Chapter 1
7
Before Using
Before Using
Handset
Wall Charger
User Guide
1. Earpiece: Allows you to hear the other caller.
2. Main Display Screen: Displays all the information
needed to operate your phone.
3. [ ] Directional Key: Allows you to scroll
through phone menu options and provides a
shortcut to phone functions from idle mode.
4. [ ] Left Soft Key: Press to display the Message
menu or access the function listed above the key.
5. [
] Speakerphone Key: Press to turn
Speakerphone On or Off.
6. [ ] SEND Key: Press to make or receive a call.
In standby mode, press to access your All Calls list.
7. [ ] Voicemail Key: Press and hold to
automatically dial your voicemail system.
8. [ ] International Dial Key: Press and hold to
enter a plus “+”. A “+” is reserved for international
dialing. In text input mode, press to change to
Capital Mode.
9. Microphone: Allows the other caller to hear you
clearly when you are speaking to them.
10. [
] Vibrate Mode Key: Press and hold to
place your device in Vibrate mode. When entering
text, press to select a word in predictive mode or
to enter a space.
11. [ ] CLR Key: When entering a phone num-
ber or text, press to delete a single space or character. Press and hold to delete entire words. Press
this key once in a menu to go back one level.
12. [
] END/POWER Key: Press and hold the
End Key to turn power on/off. Press the End Key
to end a call or browser session, and/or return
to idle mode.
13. [ ] My Messaging Key: Press to access the
New TXT Message field.
14. [ ] Right Soft Key: Press to display Contacts
or to access the function listed above the key.
15. [ ] Menu/OK Key: Allows you to access the
Menu screen. It also allows you to accept choices
when navigating through a menu.
QRG (Quick Reference Guide)
Battery Cover
Standard Battery
13
12
11
10
9
14
15
1
2
4
3
5
6
7
8
081002_CDM8950_ECHO_EN_REV00.indd 6-7081002_CDM8950_ECHO_EN_REV00.indd 6-7 2008.10.6 6:17:31 PM2008.10.6 6:17:31 PM

8
Chapter 1 − Before Using CDM8950
Before Using
Before Using
Before Using CDM8950 − Chapter 1
9
Before Using
Before Using
DISPLAY INDICATORS
Icon Icon Descriptions
D Signal Strength: Digital service is available.
EV Signal Strength: EV service is available.
1X Signal Strength: 1X service is available.
EV & 1X Signal Strength: EV/1X ser vice is available.
EV & D Signal Strength: EV/Digital ser vice is available.
Airplane Mode: Transmitting and receiving information is restricted.
Roaming: The phone is outside of the home ser vice area.
SSL (Secured Socket Layer): Indicates that secure communication
between client and server has been established during data
communication using encryption.
Voice Privacy: Indicates Voice Privacy mode is active.
Data Call: Data Session is in progress.
Dormant: Phone is in a dormant state during a data call. Phone
reverts to Dormant mode when there hasn’t been activity on a page
for some time — the connection is still ac tive and you can make and
receive calls.
Icon Icon Descriptions
No Service: Phone cannot receive a signal from the system.
TTY: TTY mode is active.
Voice Call: A call is in progress.
* No icon indicates the phone is in idle mode.
E911: Location Service of your phone is E911.
Location On: Location Service of your phone is Location On.
Bluetooth: Indicates Bluetooth mode.
Bluetooth Active: Indicates Bluetooth Active mode.
Bluetooth Connected: Indicates a Bluetooth Device is connected.
Battery Level: Battery charging level — the more blocks, the
stronger the charge.
AVR Active: AVR mode is active.
21
22
23
24
25
26
17
19
20
18
16
16. Camera Lens: Built-in camera lens.
17. Front Display Screen: This screen displays
incoming calls, messages, signal, battery
strength, time, day and date.
18. [
] Music Keys: In idle mode,
press to activate the Music player.
19. External Speaker: Listen to music, ringtones,
and sounds.
20. Charging / Data Jack: Plug in the Wall Charger
or USB Cable. (purchased separately)
21. Wrist Strap Eyelet: Accessory eyelet. (optional
straps and lanyards - purchased separately)
22. [
] AVR Key: In idle mode, with the flip open,
press to activate VoiceSignal™.
23. [ ] Volume Keys: Allows you to adjust the
master volume in idle mode or adjust the voice
volume during a call.
24. [ ] Headset Jack: Plug in the Headset
Connector here to use a headset.
(purchased separately)
25. [ ] Camera Key: Press to access Camera
Viewfinder mode, with the flip open.
26. [
] microSD Card Slot: Insert a microSD™
memory card to increase memory capacity.
(purchased separately)
081002_CDM8950_ECHO_EN_REV00.indd 8-9081002_CDM8950_ECHO_EN_REV00.indd 8-9 2008.10.6 6:17:33 PM2008.10.6 6:17:33 PM

Icon Icon Descriptions
AVR Listening: Indicates AVR listening.
All Sounds Off: Ringer volume is set to off.
Alarm Only: Phone will alert you with an alarm tone.
Vibrate Only: Phone will vibrate when call is received.
Speakerphone: Speakerphone mode is active.
Missed Calls: Indicates you have missed calls.
Message: Indicates you have new message.
Calendar Appointment: Event Alarm is active.
Voicemail: Indicates you have voicemail messages.
Alarm On: Appears when an alarm is set.
Recent Calls Icons
Dialed Call Missed Call
Received Call
New Contacts Icons
Mobile1 Group
Mobile2 Picture
Home Ringtone
Work Fax
E-mail 1 Picture Message
E-mail 2 Speed Dial
10
Chapter 1 − Before Using CDM8950
Before Using
Before Using
Message Icons
New/Unread Message
Unopened Message
Notification
Opened/Read Message
Opened Downloaded
Picture Message
Message Delivered Corrupt Message
Incomplete Delivery
Pending Message
Send
Sent Message,
Delivery Failed
Unread MMS
Message Locked Read MMS
Text Message Draft Sent Message
Picture Message Draft Unread WAP Push
Priority Read WAP Push
Message Icons
Multiple Message
Delivered
Pending Message
Send
Multiple Message
Failed
Multiple SMS/
MMS Ack
Multiple Message
Incomplete
Before Using CDM8950 − Chapter 1
11
Before Using
Before Using
081002_CDM8950_ECHO_EN_REV00.indd 10-11081002_CDM8950_ECHO_EN_REV00.indd 10-11 2008.10.6 6:17:36 PM2008.10.6 6:17:36 PM

INSTALL BATTERY
1. Remove the battery cover from the unit.
2. Slide the battery into the slot by aligning the contacts located at the
bottom of the unit and press down until you hear the “click”.
3. Align the cover tabs with the slots at the top of the device and slide
the battery cover back onto the unit.
REMOVE BATTERY
1. To remove the battery, push down on the top of the battery while
inserting your finger into the slot (1) and pulling up from the back of
the battery and slide it out (2).
2. Align the cover tabs with the slots at the top of the device and slide
the battery cover back onto the unit.
If the battery is not correctly placed in the compar tment, the handset will not turn on
and/or the battery may detach during use.
12
Chapter 1 − Before Using CDM8950
Before Using
Before Using
CHARGING YOUR BATTERY
1. To charge the phone, open the Charging/Data Jack cover on the
bottom of the phone and connect the charger adapter. Plug the other
end into a standard outlet.
2. To remove the adapter connection, squeeze the adapter’s side
buttons (1) and pull (2).
• When you charge the battery with the phone power off, you will see a charging status
screen. You cannot operate the phone until it is powered on.
•
The battery is not fully charged at the time of purchase. Fully charge the battery
before use.
•
It is more efficient to charge the battery with the handset powered off.
•
Battery operating time gradually decreases over time.
•
If the battery fails to perform normally, you may need to replace the battery.
BATTERY HANDLING INFORMATION
DO’S
•
Only use the battery and charger approved for use with the CDM8950.
•
Only use the battery for its original purpose.
•
Try to keep batteries in a temperature between 41 °F (5 °C) and 95 °F (35 °C). If
the battery is stored in temperatures above or below the recommended range,
give it time to warm up or cool down before using.
•
Completely drain the batter y before recharging.
•
Store the discharged battery in a cool, dark and dry place.
•
Purchase a new battery when the battery’s operating time gradually decreases
after fully charging.
•
Properly dispose of the battery according to local laws.
DON’TS
•
Don’t attempt to disassemble the battery – it is a sealed unit with no ser vice-
able parts.
•
Don’t accidentally short circuit the battery by carrying it in your pocket or purse
with other metallic objects such as coins, clips and pens. This may critically
damage the battery.
•
Don’t leave the battery in extremely hot or cold temperatures. Otherwise, it could
significantly reduce the capacity and lifetime of the battery.
•
Don’t dispose of the battery by placing into a fire.
Before Using CDM8950 − Chapter 1
13
Before Using
Before Using
081002_CDM8950_ECHO_EN_REV00.indd 12-13081002_CDM8950_ECHO_EN_REV00.indd 12-13 2008.10.6 6:17:40 PM2008.10.6 6:17:40 PM

BASIC OPERATION
CHAPTER 2
BASIC OPERATION
This chapter addresses and explains the basic features of your
phone including:
14
Chapter 1 − Before Using CDM8950
Note
Note
Turning the phone on/off
Accessing the menu
Menu summary
Making a call
Answering calls
Ending a call
Missed call notification
Wait/Pause feature
Making an international call
3-way calling
Call waiting function
Calling a number from contacts
Adjusting volume
Adjusting the call volume
Caller ID function
Vibrate on/off mode
Speakerphone mode
Music player
Available options during a call
Making an emergency call
081002_CDM8950_ECHO_EN_REV00.indd 14-15081002_CDM8950_ECHO_EN_REV00.indd 14-15 2008.10.6 6:17:41 PM2008.10.6 6:17:41 PM

TURNING THE PHONE ON/OFF
TURNING THE PHONE ON
1. Press and hold the END Key until the display turns on.
• If Enter Lock Code appears on the display, enter your 4-digit lock code to unlock your
phone.
•
The default lock code is the last 4 digits of your Mobile Telephone Number.
TURNING THE PHONE OFF
1. Press and hold the END Key until the display turns off.
• Immediately change or recharge the battery when BATTERY LOW appears on the
display. Memory may possibly be damaged if the phone turns off due to the battery
completely draining.
• Turn the phone off before removing or replacing the battery. If the phone is on,
unsaved data may be lost.
ACCESSING THE MENU
Your phone can be customized via the menu. Each function can be accessed
by scrolling with the Directional Key
or by pressing the number that
corresponds with the menu item.
1. To access the menu, press the OK Key [MENU].
2. To scroll through the menu, press the Directional Key
up, down,
left or right.
3. To return to the previous page, press the CLR Key
. To exit the
current menu, press the END Key .
4. To access the Messaging menu, press the Left Soft Key
[Message].
5. To access the Contact List press the Right Soft Key
[Contacts].
All directions in this manual are based on the Grid Menu Layout and Water Display
Themes. If you have changed either of these settings, the directions may vary.
16
Chapter 2 − Basic Operation
Basic Operation
Basic Operation
MENU SUMMARY
Main Menu 2ND DEPTH 3RD DEPTH
Contacts 1. New Contact
2. Contact List
3. Groups
4. Speed Dials
5. In Case of Emergency
6. My Name Card
Messaging 1. New Message 1. TXT Message
2. Picture Message
3. Video Message
4. Voice Message
2. Inbox
3. Sent
4. Drafts
5. Voicemail
Main Menu 2ND DEPTH 3RD DEPTH
Messaging 6. Mobile IM
7. Email 1. Mobile Email
2. Mobile Web Mail
8. Chat
Recent Calls 1. Missed
2. Received
3. Dialed
4. Blocked (“Blocked”
appears only when
Call Restriction is set)
5. All
6. View Timers
My Ringtones 1. Get New Ringtones
Basic Operation − Chapter 2
17
Basic Operation
Basic Operation
081002_CDM8950_ECHO_EN_REV00.indd 16-17081002_CDM8950_ECHO_EN_REV00.indd 16-17 2008.10.6 6:17:42 PM2008.10.6 6:17:42 PM

Main Menu 2ND DEPTH 3RD DEPTH
Media Center 1. Music & Tones 1. V CAST Music I Rhapsody
2. Get New Ringtones
3. My Ringtones
4. My Music
5. My Sounds
6. Sync Music
2. Picture & Video 1. V CAST Videos
2. Get New Pictures
3. My Pictures
4. My Videos
5. Take Picture
6. Record Video
7. Online Album
3. Games 1. Get New Applications
4. Mobile Web
5. Browse & Download 1. Get New Applications
Mobile Email
VZ Navigator
6. Extras 1. Get New Applications
Main Menu 2ND DEPTH 3RD DEPTH
My Pictures
Games 1. Get New Applications
V CAST Music
Settings & Tools
1. My Verizon
2. Tools 1. Voice Commands
2. Calculator
3. Calendar
4. Alarm Clock
5. Stop Watch
6. World Clock
7. Notepad
3. Bluetooth Menu 1. Add New Device
4. Sounds Settings 1. Easy Set Up
2. Call Sounds
3. Alert Sounds
4. Keypad Volume
5. Service Alerts
6. Device Connect
7. Power On/Off
18
Chapter 2 − Basic Operation
Basic Operation
Basic Operation
Main Menu 2ND DEPTH 3RD DEPTH
Settings & Tools
5. Display Settings 1. Easy Set Up
2. Banner
3. Backlight
4. Wallpaper
5. Display Themes
6. Main Menu Settings
7. Dial Fonts
8. Menu Font Size
9. Clock Format
6. Phone Settings 1. Airplane Mode
2. Set Shortcuts
3. Voice Commands Settings
4. Language
5. Location
6. Security
7. System Select
8. NAM Selection
7. Call Settings 1. Answer Options
2. Auto Retry
3. TTY Mode
4. One Touch Dial
5. Voice Privacy
6. DTMF Tones
Main Menu 2ND DEPTH 3RD DEPTH
Settings & Tools
8. Memory 1. S ave Options
2. Phone Memory
3. Card Memory
9. Phone Info 1. My Number
2. SW/HW Version
3. Icon Glossary
4. Software Update
0. Set Up Wizard
Basic Operation − Chapter 2
19
Basic Operation
Basic Operation
081002_CDM8950_ECHO_EN_REV00.indd 18-19081002_CDM8950_ECHO_EN_REV00.indd 18-19 2008.10.6 6:17:43 PM2008.10.6 6:17:43 PM

MAKING A CALL
1. Enter the phone number including the area code if needed and press
the SEND Key .
• To erase one digit at a time press the CLR Key .
• To erase the entire number, press and hold the CLR Key .
• When you place or receive a call from phone numbers stored in your contact list with
a contact name, the name will be displayed.
•
If you activate the Auto Retry function, the phone will automatically re-dial the
number (Refer to page 60).
•
You can also place calls using Voice-Activated Dialing. Please refer to page 66 for
more details.
ANSWERING CALLS
1. When your phone rings or vibrates, press the SEND Key to
answer the incoming call. (Depending on your phone’s settings, you
may also answer incoming calls by opening the phone or by pressing
any key.)
2. To ignore incoming calls, press the Right Soft Key
[Ignore].
In Auto w/ Hands-free a call is automatically answered after a preset number of ring
tones (Refer to page 60).
ENDING A CALL
1. To end a call, press the END Key .
MISSED CALL NOTIFICATION
When an incoming call is not answered, the Missed Call icon appears on the
display.
TO DISPLAY THE MISSED CALL ENTRY FROM THE
NOTIFICATION SCREEN:
1. Select the entry View Now and press the OK Key .
2. To dial the phone number, press the SEND Key
.
TO DISPLAY A MISSED CALL ENTRY FROM STANDBY MODE:
1. Press the OK Key [MENU], select Recent Calls then press the OK
Key .
2. Press 1. Missed.
3. Highlight the entry you wish to view and press the OK Key
[OPEN].
4. To dial the phone number, press the SEND Key
.
20
Chapter 2 − Basic Operation
Basic Operation
Basic Operation
WAIT/PAUSE FEATURE
Pauses are used for automated systems (i.e., voice mail or calling cards).
Insert a pause after a phone number and enter another group of numbers.
The second set of numbers is dialed automatically after the pause. This feature
is useful for dialing into systems that require a code.
Wait (W)
The phone stops dialing until you press the Left Soft Key
[Release] to
advance to the next number.
2-Sec Pause
The phone waits 2 seconds before sending the next string of digits
automatically.
1. Enter the phone number.
2. Press the Right Soft Key
[Options].
3. Select 2-Sec Pause or Wait then press the OK Key
.
4. Enter additional number(s) (pin number or credit card number).
5. To dial press the SEND Key
or press the Left Soft Key [Save].
MAKING AN INTERNATIONAL CALL
1. Press and hold the * Key . The “+” required for international calls
will be displayed.
2. Enter the countr y code, area code and phone number.
3. Press the SEND Key
.
3WAY CALLING
With 3-Way Calling, you can talk to two people at the same time.
When using this feature, the normal airtime rates will be applied for each of
the two calls.
1. Enter the phone number to call and press the SEND Key .
2. Once you have established the connection, enter the second phone
number you wish to call and then press the SEND Key
again.
3. When you’re connected to the second party, press the SEND Key
again to begin your 3-Way call.
If one of the people you called hangs up during your call, you and the remaining caller
stay connected. If you initiated the call and are the first to hang up, all three calls are
disconnected.
Basic Operation − Chapter 2
21
Basic Operation
Basic Operation
081002_CDM8950_ECHO_EN_REV00.indd 20-21081002_CDM8950_ECHO_EN_REV00.indd 20-21 2008.10.6 6:17:43 PM2008.10.6 6:17:43 PM

CALL WAITING FUNCTION
If you are on a call and you receive another incoming call, you will hear two
beeps and the caller’s phone number will appear on the display. With Call
Waiting, you may put the active call on hold while you answer the other
incoming call.
1. To answer another call while on the phone, press the SEND
Key
. This places the first call on hold. To switch back to the first
caller, press the SEND Key again.
CALLING A NUMBER FROM CONTACTS
1. Press the Right Soft Key [Contacts].
2. Press the Directional Key up or down
/ to select the Contact
entry then press the OK Key [VIEW].
3. Select the phone number.
4. Press the SEND Key
to place the call.
It will automatically dial the default number from the contact entry. If the contact has
multiple numbers scroll and select the number to dial and press SEND Key .
ADJUSTING VOLUME
To adjust the master volume:
Press the Volume Keys up or down to selec t All Sounds Off, Alarm Only,
Vibrate Only, Low, Medium Low, Medium, Medium High or High and press
the OK Key [SET].
• Press the Volume Keys up or down to adjust Earpiece volume during a call.
•
To listen to the volume of the ringtone, press the Left Soft Key [Play].
ADJUSTING THE CALL VOLUME
To adjust the earpiece volume during a call, press the volume keys up or
down. To increase the volume, press the volume key up. To decrease the
volume, press the volume key down.
CALLER ID FUNCTION
Caller ID displays the number of the person calling when your phone
rings. If the caller’s identity is stored in Contacts, the name appears on
the screen.
22
Chapter 2 − Basic Operation
Basic Operation
Basic Operation
VIBRATE ON/OFF MODE
Vibrate Mode mute the tones and activates an alert for an incoming call or
message.
1. To activate, press and hold the # Key .
2. To deactivate, press and hold the # Key
again.
SPEAKERPHONE MODE
The Speakerphone feature lets you hear audio through the speaker and talk
without holding the phone.
To activate the Speakerphone, press the Speakerphone Key .
If you press the Speakerphone Key when you are not on a call,
Speakerphone mode will be active for one minute and turn itself off
automatically.
MUSIC PLAYER
To display My Music with the phone closed, press and hold , select
a music file by pressing / and press [PLAY]. Press
[PAUSE] to stop the music player while it is playing.
AVAILABLE OPTIONS DURING A CALL
During a phone call, you can access the following features by pressing the
Right Soft Key [Options]:
MESSAGING
To access the Messaging Menu during a call:
1. Press the Right Soft Key [Options], scroll to Messaging and press
the OK Key .
CONTACT LIST
To view your Contact List during a call:
1. Press the Right Soft Key [Options], scroll to Contact List and press
the OK Key .
RECENT CALLS
To view your Recent Calls list during a call:
1. Press the Right Soft Key [Options], scroll to Recent Calls and press
the OK Key .
BLUETOOTH MENU
To access the Bluetooth Menu during a call:
Basic Operation − Chapter 2
23
Basic Operation
Basic Operation
081002_CDM8950_ECHO_EN_REV00.indd 22-23081002_CDM8950_ECHO_EN_REV00.indd 22-23 2008.10.6 6:17:45 PM2008.10.6 6:17:45 PM

MEMORY FUNCTION
CHAPTER 3
MEMORY FUNCTION
This chapter addresses memory functions including:
Storing a phone number
Entering letters, numbers & symbols
One, Two, Three-touch dialing
1. Press the Right Soft Key [Options], scroll to Bluetooth Menu and
press the OK Key .
If an Audio device is connected, Audio To Phone/Audio To Device is displayed in the
options menu instead of Bluetooth Menu.
MAIN MENU
To access the Main Menu during a call:
1. Press the Right Soft Key [Options], scroll to Main Menu and press
the OK Key
.
2. Scroll to selec t menus.
NOTEPAD
To compose and send notes during a call:
1. Press the Right Soft Key [Options], scroll to Notepad and press
the OK Key .
MAKING AN EMERGENCY CALL
The 911 feature automatically places the phone in Emergency Call Mode when
you dial the preprogrammed emergency number, 911. It also operates in Lock
Mode and out of the service area.
911 IN LOC K MODE
To make an emergency call in Lock Mode:
1. Enter 911 and press the SEND Key .
2. The call connec ts.
3. The phone maintains Emergency Mode for 5 minutes. When the call
ends, the phone returns to Lock Mode.
911 USING ANY AVAILABLE SYSTEM
To make an Emergency Call using any available system:
1. Enter 911 and press the SEND Key .
2. The call connec ts.
3. The phone will stay in Emergency Mode for 5 minutes. While the
phone is in the Emergency Mode for 5 minutes, the phone can
receive an incoming call from any available system or you can make
outgoing calls even in the Emergency Callback Mode.
In this case, making a call can automatically end the Emergency
Callback Mode.
The 911 call does not appear in the recent call list.
24
Chapter 2 − Basic Operation
Basic Operation
Basic Operation
081002_CDM8950_ECHO_EN_REV00.indd 24-25081002_CDM8950_ECHO_EN_REV00.indd 24-25 2008.10.6 6:17:46 PM2008.10.6 6:17:46 PM

STORING A PHONE NUMBER
ADDING A NEW CONTACT
1. Enter the phone number you want to save.
2. Press the Left Soft Key
[Save], select Add New Contact, then press
the OK Key
.
3. Scroll and select Mobile 1, Mobile 2, Home, Work or Fax, then press
the OK Key
.
4. Enter the information in all the fields then press the OK Key
[SAVE]. The number reappears after saving. Press the END Key
to exit.
Press the Left Soft key [Save], then select Update Existing to add another phone
number to a contact already stored in memory.
OPTIONS TO CUSTOMIZE YOUR CONTACTS
Once the basic phone number and name information is stored in your Contacts, you
can edit and/or customize the entries.
1. Press the Right Soft Key [Contacts] then select the Contact you
want to edit.
2. Press the Left Soft Key
[Edit].
3. Edit the information then press the OK Key
[SAVE] to save.
ADDING OR CHANGING GROUPS
To organize your Contacts into groups:
1. Press the Right Soft Key [Contacts], then select the Contact you
want to add to a group.
2. Press the Left Soft Key
[Edit].
3. Scroll to the Group Field then press the Left Soft Key
[Set].
4. Select No Group, Family or Work and press the OK Key
.
5. To create new group, press the Left Soft Key
[New]. Enter the
group name then press the OK Key [SAVE].
6. Press the OK Key
[SAVE] to save.
CHANGING THE CALL RINGTONE
To identify who is calling by setting different ringtones for different phone numbers
in your Contacts:
1. Press the Right Soft Key [Contacts], then select the Contact
you want to edit.
2. Press the Left Soft Key
[Edit].
26
Chapter 3 − Memory Function
Memory Function
Memory Function
3. Scroll to R ingtone then press the Left Soft Key [Set].
4. Scroll and selec t a Ringtone. To listen the selected ringtone, press
the Left Soft Key
[Play]. To stop press the Left Soft Key
[Stop]. Press the OK Key to set the ringtone.
5. Press the OK Key
[SAVE] to save.
ADDING OR CHANGING THE PICTURE ID
To select a picture or graphic to assign to a Caller ID:
1. Press the Right Soft Key [Contacts], then select the Contact
you want to edit.
2. Press the Left Soft Key
[Edit].
3. Scroll to the Picture Field and press the Left Soft Key
[Set]
4. Scroll and selec t the picture to set. To view the selected picture
press the Left Soft Key
[View]. Press the OK Key to select
the image.
5. Press the OK Key
[SAVE] to save.
ADDING OR CHANGING AN EMAIL ADDRESS
Adding or changing an Email Add.
1. Press the Right Soft Key [Contacts], then select the Contact
you want to edit.
2. Press the Left Soft Key
[Edit].
3. Scroll to E-mail1 or E-mail 2 to edit.
4. Enter the email address then press the OK Key
[SAVE] to save.
ADDING A SPEED DIAL ENTRY
To add an entry to Speed Dial:
1. Press the Right Soft Key [Contacts], then select the Contact you
want to add to Speed Dial.
2. Press the Left Soft Key
[Edit].
3. Select the phone number to add speed dial then press the R ight
Soft Key
[Options].
4. Select Set Speed Dial and press the OK Key
, choose a Speed
Dial location, then press the OK Key [SET].
5. To save the entry select Ye s then press the OK Key
.
Memory Function − Chapter 3
27
Memory Function
Memory Function
081002_CDM8950_ECHO_EN_REV00.indd 26-27081002_CDM8950_ECHO_EN_REV00.indd 26-27 2008.10.6 6:17:48 PM2008.10.6 6:17:48 PM

6. Press the OK Key [SAVE] to save.
EDITING CONTACTS ENTRIES
ADDING A PHONE NUMBER FROM IDLE MODE
1. Enter the phone number you want to save (up to 32 digits).
2. Press the Left Soft Key
[Save].
3. Scroll to Update Existing then press the OK Key
.
4. Scroll and select the contact to update then press the OK Key
.
5. Select Mobile 1, Mobile 2, Home, Work or Fax then press the OK
Key
.
6. If a phone number is already assigned to the category you
selected, select Yes or No to overwrite the entry, then press the
OK Key
. The number reappears after saving. Press the END
Key to exit.
ADDING A PHONE NUMBER FROM THE CONTACT LIST SCREEN
1. Press the Right Soft Key [Contacts]. Your Contacts display
alphabetically.
2. Scroll to the contact to update then press the Left Soft Key
[Edit].
3. Select the appropriate category field, then enter the phone
number.
4. Press the OK Key
[SAVE].
DEFAULT NUMBER
The phone number saved when a Contact is created is the Default
Number. If more than one number is saved in a Contact entry, another
number can be set as the Default Number.
The Default Number cannot be deleted. The entire Contact entry can be deleted or
another number can be assigned as the Default Number allowing you to delete the
original number and keep the Contact entry.
CHANGING THE DEFAULT NUMBER
1. Press the Right Soft Key
[Contacts]. Your Contacts display
alphabetically.
2. Scroll to the contact to update then press the Left Soft Key
[Edit].
3. Scroll to the number to assign as the default number then press
the Right Soft Key
[Options].
28
Chapter 3 − Memory Function
Memory Function
Memory Function
4. Select Set As Default then press the OK Key .
5. Select Ye s then press the OK Key
set as default number.
6. Press the OK Key
[SAVE] to save.
EDITING STORED PHONE NUMBERS
1. Press the Right Soft Key
[Contacts]. Your Contacts display
alphabetically.
2. Scroll to highlight the Contact entry you want to edit then press
the Left Soft Key
[Edit].
3. Scroll to highlight the phone number.
4. Edit the phone number as necessary then press the OK Key
[SAVE].
DELETING
DELETING A PHONE NUMBER FROM A CONTACT
1. Press the Right Soft Key
[Contacts]. Your Contacts display
alphabetically.
2. Scroll to the contact to update and press the Left Soft Key
[Edit].
3. Scroll to the number you want to delete.
4. Press and hold the Clear Key to delete.
5. Press the OK Key
[SAVE] to save.
DELETING A CONTACT ENTRY
1. Press the Right Soft Key
[Contacts] then select the Contact you
want to delete.
2. Press the Right Soft Key
[Options] then scroll to Erase and press
the OK Key .
3. Select Ye s and then press the OK Key
to erase.
DELETING A SPEED DIAL
1. Press the Right Soft Key [Contacts] then select the Contact you
want to edit.
2. Press the Left Soft Key
[Edit].
3. Scroll to the phone number stored in Speed Dial then press the
Right Soft Key
[Options].
4. Select Remove Speed Dial and press the OK Key
.
Memory Function − Chapter 3
29
Memory Function
Memory Function
081002_CDM8950_ECHO_EN_REV00.indd 28-29081002_CDM8950_ECHO_EN_REV00.indd 28-29 2008.10.6 6:17:50 PM2008.10.6 6:17:50 PM

5. Select Ye s and press the OK Key to erase.
6. Press the OK Key
[SAVE] to save.
ENTERING LETTERS, NUMBERS & SYMBOLS
The text entering mode (Alpha editor) allows to input text, numbers and
symbols. The default mode is [Abc] mode.
Key Key Functions
Ab c: Press to change mode.
Predictive Mode: T9 Word
Multi-tap Mode: Abc ABC
Numbers: 123
Symbols: Symbols
Next: Press to view the next matching word in the predictive mode.
Space: Press to select the word in predictive mode and to add a space.
Ca ps Lock: Press to change to capital mode.
In the multi-tap mode: [Abc], [ABC] and [abc]
In the predictive mode: [T9 Word]. [T9 WORD] and [T9 word]
Clear: Press to delete a character or press and hold to delete an
entire word.
MULTITAP MODE
Use the digit keys to enter letters, numbers and characters.
Each of the following keys will scroll through these sequential options
listed by language. The limitation is 160 characters.
Key English Spanish
. @ ? ! - , & : ' / and 1
a b c 2 a á b c 2
d e f 3 d e é f 3
g h i 4 g h i í 4
j k l 5
m n o 6 m n ñ o ó 6
p q r s 7
t u v 8
w x y z 9
30
Chapter 3 − Memory Function
Memory Function
Memory Function
Press the key labeled with the target letter once for the first letter and
twice for the second letter and so on.
1. To enter the letter “C”, press
three times. To enter the number “2”
you can press and hold the in order for the number 2 to show.
PREDICTIVE MODE
The predictive mode automatically compares your keystrokes with an internal
linguistic dictionary to determine the correct word. It will display the most
commonly used word first.
1. Press the OK Key [MENU], scroll to Messaging and press the OK
Key , select New Message and press the OK Key .
2. Scroll to TXT Message, Picture Message, Video Message or Voice
Message and press the OK Key
.
3. Scroll to Te xt field and press the Left Soft Key
[Abc], scroll to T9
Word and press the OK Key .
4. Press the number keys to input the sequential characters. Press
Key to view the matching word.
For example, to write “Hello”, press
.
5. To select the word press
Key.
NUMERIC MODE
Allows to enter numbers.
1. Press the Left Soft Key [Abc], scroll to 123 and press the OK Key
.
2. Press a key to input the corresponding number. Example
: 2.
SYMBOL MODE
Allows to enter symbols.
1. Press the Left Soft Key [Abc], scroll to Symbols and press the OK
Key .
2. Select the symbol you want to enter by using the Directional Key.
.
Memory Function − Chapter 3
31
Memory Function
Memory Function
081002_CDM8950_ECHO_EN_REV00.indd 30-31081002_CDM8950_ECHO_EN_REV00.indd 30-31 2008.10.6 6:17:51 PM2008.10.6 6:17:51 PM

MENU FUNCTIONS
CHAPTER 4
MENU FUNCTION
This chapter addresses accessing the menu and using its functions
and features to customize your phone.
32
Chapter 3 − Memory Function
Memory Function
Memory Function
New contact
Contact list
Groups
Speed dials
In case of emergency
My name card
Recent calls
Missed
Received
Dialed
Blocked
All
View timers
Bluetooth menu
Sounds settings
Display settings
Phone settings
Call settings
Memory
Phone info
Set up wizard
Voice commands
Calculator
Calendar
Alarm clock
Stop watch
World clock
Notepad
My Verizon
ONE, TWO, THREETOUCH DIALING
Ideal for frequently dialed numbers, this feature allows contact entries to be
dialed via the keypad with only one, two, or three key presses.
For details on assigning to the Speed Dial, see page 27.
ONETOUCH DIALING:
1-9 : Press and hold the number you wish to connect to for more than
1 second.
TWOTOUCH DIALING:
10-19 : Press the first digit then press and hold the second digit of the
number to dial.
Speed Dial entries 95(#Warranty Center), 96(#DATA), 97(#BAL),
98(#MIN) and 99(#PMT) are already assigned to Verizon Wireless Account
Information.
•
#Warranty Center is a VZW Customer Service VRU number (Free call) that connects to the
Verizon Wireless warranty center.
•
#DATA is a VZW Customer Service VRU number (Free call) that provides customers information
about their Verizon Wireless billing balance.
•
#BAL is a VZW Customer Service VRU number (Free call) that provides customers information
about their Verizon Wireless billing balance.
•
#MIN is a VZW Customer Service VRU number (Free call) that provides customers information
about their Verizon Wireless usage.
•
#PMT is a VZW Customer Service VRU number (Free call) that allows a user to make a bill
payment, either with a payment option they have already set up or using a new, one time
payment option.
THREETOUCH DIALING:
Press the first and second digits then press and hold the third digit of the
number to dial.
Speed Dial entry 411 (Director y Assistance) is already assigned to
Directory Assistance.
•
Directory Assistance: Information about directory listing database.
081002_CDM8950_ECHO_EN_REV00.indd 32-33081002_CDM8950_ECHO_EN_REV00.indd 32-33 2008.10.6 6:17:54 PM2008.10.6 6:17:54 PM

Entries can be retrieved by name or group.
NEW CONTACT
TO ADD A NEW NUMBER TO CONTACT
For details on adding a new contact, see page 26.
CONTACT LIST
You can review all the entries stored in your Contact List or quickly find an
entry by entering a name or its character. The contact’s listed in Alphabetical
Order.
1. Press the OK Key [MENU], select Contacts and press the OK Key
, scroll to Contact List and press the OK Key .
2. Enter a name in the Go To field or scroll to the contact to find.
3. To edit the contact, press the Left Soft Key
[Edit]. To view the
details, press the OK Key [VIEW].
4. For more options, press the Right Soft Key
[Options]. You can
choose from the following: New Contact, Erase, New TXT Message,
New Picture Message, New Video Message, New Voice Message, Set
As ICE Contact, Call, Erase All or Send Name Card.
5. To call the selected contact, press the SEND Key
.
GROUPS
Allows you to classify phone entries into groups. The default groups - No
Group, Family and Work - cannot be erased or renamed.
TO ADD NEW GROUP
For details on adding new groups, see page 26.
TO ASSIGN PHONE NUMBER TO GROUP
1. Press the OK Key [MENU], select Contacts and press the OK Key
, scroll to Groups and press the OK Key .
2. Scroll to the Group Field to add the contact then press the OK Key
[VIEW].
3. To add a contact, press the OK Key
[ADD]. Scroll to the contact
to add and press the OK Key [MARK] and press the Left Soft Key
[Done] to add.
34
Chapter 4 − Menu Function
Contacts
Contacts
TO CHANGE GROUP NAME
1. Press the OK Key [MENU], select Contacts and press the OK Key
, scroll to Groups and press the OK Key .
2. Scroll to the Group Field to rename then press the Right Soft Key
[Options] and select Rename, then press the OK Key
.
3. Enter the new group name and press the OK Key
[SAVE].
ERASE GROUP
1. Press the OK Key [MENU], select Contacts and press the OK Key
, scroll to Groups and press the OK Key .
2. Scroll to the Group Field to erase then press the Right Soft Key
[Options].
3. Scroll to Erase and press the OK Key
.
4. Select Yes and press the OK Key
to erase the group.
TO SEND A TXT MESSAGE TO A GROUP
1. Press the OK Key [MENU], select Contacts and press the OK Key
, scroll to Groups and press the OK Key .
2. Select the group you want to send a message to and press the Right
Soft Key
[Options].
3. Scroll to New TXT Message, press the OK Key
, and then write
the message.
For detail on writing TXT Message, see page 94.
4. To send, press the OK Key
[SEND] or press the SEND Key .
TO SEND A PICTURE MESSAGE TO A GROUP
1. Press the OK Key [MENU], select Contacts and press the OK Key
, scroll to Groups and press the OK Key .
2. Select the group you want to send a message to and press the Right
Soft Key
[Options].
3. Scroll to New Picture Message, press the OK Key
, and then write
the message.
For detail on writing Picture Message, see page 95.
These options will vary depending on the message contents.
4. Scroll to the Picture field and press the Left Soft Key [My Pics].
Scroll and select the picture to inser t and press the OK Key .
Menu Function − Chapter 4
35
Contacts
Contacts
081002_CDM8950_ECHO_EN_REV00.indd 34-35081002_CDM8950_ECHO_EN_REV00.indd 34-35 2008.10.6 6:17:55 PM2008.10.6 6:17:55 PM

5. To send, press the OK Key [SEND] or press the SEND Key .
TO SEND A VIDEO MESSAGE TO A GROUP
1. Press the OK Key [MENU], select Contacts and press the OK Key
, scroll to Groups and press the OK Key .
2. Select the group you want to send a video message to and press the
Right Soft Key
[Options].
3. Scroll to New Video Message, press the OK Key
, and then write
the message.
For detail on writing Video Message, see page 96.
These options will vary depending on the message contents.
4. Scroll to the Video field and press the Left Soft Key [Videos]. Scroll
and select the video to insert and press the OK Key .
5. To send, press the OK Key
[SEND] or press the SEND Key .
TO SEND A VOICE MESSAGE TO A GROUP
1. Press the OK Key [MENU], select Contacts and press the OK Key
, scroll to Groups and press the OK Key .
2. Scroll to one of the group categories and press the OK Key
[VIEW].
3. Scroll to the contact or enter the contact name in to the Go To field.
Press the Right Soft Key
[Options], select New Voice Message and
then press the OK Key .
4. Press the OK Key
to start recording. Press the OK Key [STOP]
to stop recording and save it.
5. Enter the message and press the OK Key
.
6. Scroll to the Subject field and write the subjec t.
7. Scroll to the Name Card field. Press the Left Soft Key
[Add] and
scroll to My Name Card or Contacts. Press the OK Key and select
the card or the contact to insert and press the OK Key .
8. To send, press the OK Key
[SEND] or press the SEND Key .
SPEED DIALS
For details on assigning speed dial, see page 27.
TO ERASE A SAVED SPEED DIAL
For details on deleting assigned speed dial, see page 29.
36
Chapter 4 − Menu Function
Contacts
Contacts
IN CASE OF EMERGENCY
Your phone has a special menu to organize your emergency contacts and
personal information.
TO ASSIGN EMERGENCY CONTACTS
To register up to three different Contacts to ICE:
1. Press the OK Key [MENU], select Contacts and press the OK Key
, scroll to In Case of Emergency and press the OK Key .
2. Scroll to select Contact1, Contact 2 or Contact 3 and press the OK Key
[ADD].
3. Select From Contacts and press the OK Key
, then scroll to the
contact to assign and press the OK Key . Or, select New Contact
and press the OK Key , then enter the fields and press the OK
Key [SAVE].
4. The contact name will display instead of Contact 1, Contact 2 and
Contact 3.
TO REASSIGN EMERGENCY CONTACTS
1. Press the OK Key [MENU], select Contacts and press the OK Key
, scroll to In Case of Emergency and press the OK Key .
2. Scroll to the contact you want to re-assign, press the Right S oft Key
[Options], then select Re-assign and press the OK Key .
3. Select From Contacts and press the OK Key
, then scroll to the
contact to assign and press the OK Key
. Or, select New Contact
and press the OK Key , then enter the contact information in the
appropriate fields and press the OK Key [SAVE].
TO ERASE ASSIGNED EMERGENCY CONTACTS
1. Press the OK Key [MENU], select Contacts and press the OK Key
, scroll to In Case of Emergency and press the OK Key .
2. Scroll to the contact you want to erase, press the Right Soft Key
[Options] and select Unassign.
3. Press the OK Key
.
TO CALL AN ASSIGNED EMERGENCY CONTACT
1. Press the OK Key [MENU], select Contacts and press the OK Key
, scroll to In Case of Emergency and press the OK Key .
2. Scroll to the contact you want to call then press the Left Soft Key
[Call] or press the SEND Key .
Menu Function − Chapter 4
37
Contacts
Contacts
081002_CDM8950_ECHO_EN_REV00.indd 36-37081002_CDM8950_ECHO_EN_REV00.indd 36-37 2008.10.6 6:17:57 PM2008.10.6 6:17:57 PM

TO ADD PERSONAL INFO
To store a Medical Record Number or other information that may be useful in case
of an emergency:
1. Press the OK Key [MENU], select Contacts and press the OK Key
, scroll to In Case of Emergency and press the OK Key .
2. Scroll to Personal Info then press the OK Key
[VIEW].
3. Select Note 1, Note 2 or Note 3 then press the OK Key
[ADD].
4. Enter the information then press the OK Key
[SAVE].
5. The information you enter now will display instead of Note 1,
Note 2 and Note 3.
TO EDIT SAVED PERSONAL INFO
1. Press the OK Key [MENU], select Contacts and press the OK Key
, scroll to In Case of Emergency and press the OK Key .
2. Scroll to Personal Info then press the OK Key
[VIEW].
3. Select the Note you want to edit then press the OK Key
[VIEW].
4. Press the OK Key
[EDIT]. Edit the Note then press the OK Key
[SAVE].
TO ERASE SAVED PERSONAL INFO
1. Press the OK Key [MENU], select Contacts and press the OK Key
, scroll to In Case of Emergency and press the OK Key .
2. Scroll to Personal Info then press the OK Key
[VIEW].
3. Select the Note you want to erase then press the R ight Soft Key
[Erase].
4. To erase, scroll to Yes, then press the OK Key
.
MY NAME CARD
A Name Card with the handset’s mobile number automatically appears.
EDIT MY NAME CARD
1. Press the OK Key [MENU], select Contacts and press the OK Key
, scroll to My Name Card and press the OK Key .
2. Press the Left Soft Key
[Edit].
3. Edit the My Name Card then press the OK Key
[SAVE].
SEND MY NAME CARD
1. Press the OK Key [MENU], select Contacts and press the OK Key
38
Chapter 4 − Menu Function
Contacts
Contacts
, scroll to My Name Card and press the OK Key .
2. Press the Right Soft Key
[Send].
3. Select New Message and press the OK Key
.
4. Select TXT Message, Picture Message, Video Message or Voice
Message and press the OK Key
.
5. Enter the phone number and message and press the OK Key
[SEND].
SEND MY NAME CARD TO ANOTHER BLUETOOTH DEVICE
Turn on Bluetooth on both devices (steps 1-4) and turn Discovery Mode to On.
1. Press the Right Soft Key [Contacts].
2. Scroll to a contact and press the Right Soft Key
[Options].
3. Scroll to Send Name Card and press the OK Key
.
4. Press the Left Soft Key
[Turn On].
5. Press the Right Soft Key
[Options] and select Discovery Mode and
press the OK Key . Select On and press the OK Key .
6. With Add New Device selected, press the OK Key
. The handset
will prompt you with the following message on the LCD screen:
PLACE DEVICE YOU ARE CONNECTING TO IN DISCOVERABLE MODE.
Press the OK Key
.
7. Scroll to the desired device and press the OK Key
[PAIR].
8. If applicable, the device may prompt you for the Passkey. Consult the
Bluetooth® accessory (sold separately) instructions for the
appropriate password (typically 0000 - 4 zeroes). Enter the passkey
and press the OK Key
.
9. The screen displays Before Connecting To [Device Name], select either
Always Ask or Always Connect and press the OK Key
.
10. The information is then sent via Bluetooth to the receiving device.
Menu Function − Chapter 4
39
Contacts
Contacts
081002_CDM8950_ECHO_EN_REV00.indd 38-39081002_CDM8950_ECHO_EN_REV00.indd 38-39 2008.10.6 6:17:59 PM2008.10.6 6:17:59 PM

40
Chapter 4 − Menu Function
Recent Calls
Recent Calls
DIALED
Displays information about the 90 most recently dialed numbers. Place a call
to a dialed call by simply pressing the SEND Key
.
1. Press the OK Key [MENU], select Recent Calls and press the OK
Key
, scroll to Dialed and press the OK Key .
2. Scroll to a dialed call to do the following.
•
Press the OK Key [OPEN] to view the entry.
•
Press the SEND Key to place a call to the number.
•
Press the Right Soft Key [Options] to select:
Save to Contacts: To store the phone number in your Contacts.
Erase: To erase a call listing.
Lock/Unlock: To lock or unlock a call listing.
Erase All: To erase all Dialed Call entries.
View Timers: To display usage time.
•
Press the Left Soft Key [Message] to select:
TXT Message: To send a TXT message to the contact.
Picture Message: To send a Picture message to the contact.
Video Message: To send a Video message to the contact.
Voice Message: To send a Voice message to the contact.
BLOCKED
This menu appears only when Incoming Call Restriction is set.
1. Press the OK Key [MENU], select Recent Calls and press the OK
Key , scroll to Blocked and press the OK Key .
2. Scroll to a blocked call to do the following.
•
Press the OK Key [OPEN] to view the entry.
•
Press the SEND Key to place a call to the number.
•
Press the Right Soft Key [Options] to select:
Erase: To erase a call listing.
Lock/Unlock: To lock or unlock a call listing.
Erase All: To erase all Blocked Call entries.
View Timers: To display usage time.
•
Press the Left Soft Key [Message] to select:
TXT Message: To send a TXT message to the contact.
Picture Message: To send a Picture message to the contact.
Video Message: To send a Video message to the contact.
Voice Message: To send a Voice message to the contact.
Please refer to page 57 for more details on Restrictions.
Menu Function − Chapter 4
41
Recent Calls
Recent Calls
RECENT CALLS
The Recent Calls menu is a list of the last phone numbers or Contact entries
for calls you placed, accepted, missed or blocked. It is continually updated as
new numbers are added to the beginning of the list and the oldest entries are
removed from the bottom of the list.
MISSED
Displays information about the 90 most recently missed calls. Place a call to a
missed call by simply pressing the SEND Key
.
1. Press the OK Key [MENU], select Recent Calls and press the OK
Key , scroll to Missed and press the OK Key .
2. Scroll to a missed call to do the following.
•
Press the OK Key [OPEN] to view the entry.
•
Press the SEND Key to place a call to the number.
•
Press the Right Soft Key [Options] to select:
Save to Contacts: To store the phone number in your Contacts.
Erase: To erase a call listing.
Lock/Unlock: To lock or unlock a call listing.
Erase All: To erase all Missed Call entries.
View Timers: To display usage time.
•
Press the Left Soft Key [Message] to select:
TXT Message: To send a TXT message to the contact.
Picture Message: To send a Picture message to the contact.
Video Message: To send a Video message to the contact.
Voice Message: To send a Voice message to the contact.
RECEIVED
Displays information about the 90 most recently received calls. Place a call to a
received call by simply pressing the SEND Key .
1. Press the OK Key [MENU], select Recent Calls and press the OK
Key , scroll to Received and press the OK Key .
2. Scroll to a received call to do the following.
•
Press the OK Key [OPEN] to view the entry.
•
Press the SEND Key to place a call to the number.
•
Press the Right Soft Key [Options] to select:
Save to Contacts: To store the phone number in your Contacts.
Erase: To erase a call listing.
Lock/Unlock: To lock or unlock a call listing.
Erase All: To erase all Received Call entries.
View Timers: To display usage time.
•
Press the Left Soft Key [Message] to select:
TXT Message: To send a TXT message to the contact.
Picture Message: To send a Picture message to the contact.
Video Message: To send a Video message to the contact.
Voice Message: To send a Voice message to the contact.
081002_CDM8950_ECHO_EN_REV00.indd 40-41081002_CDM8950_ECHO_EN_REV00.indd 40-41 2008.10.6 6:18:1 PM2008.10.6 6:18:1 PM

42
Chapter 4 − Menu Function
Recent Calls
Recent Calls
BLUETOOTH MENU
Bluetooth technology connectivity enables wireless connections between
electronic devices. If connected with a Bluetooth Handsfree device, you can
use your phone more freely. Since devices with Bluetooth connectivity communicate using radio waves, your phone and the other device do not need to
be in direct line-of-sight. The two devices only need to be within 10 meters
(30 feet) of each other. The connection can be subject to interference from
obstructions such as walls or other electronic devices.
This device is compliant with Bluetooth specification, supporting the following profiles: Headset, Handsfree, Dial Up Networking, Object Push, and
File Transfer. To ensure interoperability between other devices supporting
Bluetooth technology, use approved enhancements for this model. Check with
the manufacturers of other devices to determine their compatibility with this
phone. There may be restrictions on using Bluetooth technology in some locations. Check with your local authorities or Verizon Wireless. If you want more
information on this function, visit the Bluetooth Technology organization Web
site: https://www.bluetooth.org/.
Important: Features using Bluetooth technology or allowing such features to run in
the background while using other features, increase the demand on battery power and
reduce the battery life.
BLUETOOTH ON/OFF
To activate Bluetooth®:
1. Press the OK Key [MENU], select Settings & Tools and press the
OK Key , scroll to Bluetooth Menu and press the OK Key .
2. Press the Left Soft Key
[Turn On/Turn Off].
ADD NEW DEVICE
Pairing with other device, establish and register a 1-to-1 connection with the
target device.
1. Press the OK Key [MENU], select Settings & Tools and press the
OK Key , scroll to Bluetooth Menu and press the OK Key ,
select Add New Device and press the OK Key .
2. If the Bluetooth® power is switched off, select Yes and press the OK
Key
to activate.
3. The handset will prompt you with the following message on the LCD
screen: PLACE DEVICE YOU ARE CONNECTING TO IN DISCOVERABLE
MODE. Press the OK Key
.
4. The device will search the available device and list it. Scroll to selec t
the device you wish to pair and press the OK Key
[PAIR].
Menu Function − Chapter 4
43
Settings
Settings
ALL
Displays information about the most recently received, dialed and missed calls.
1. Press the OK Key [MENU], select Recent Calls and press the OK
Key , scroll to All and press the OK Key .
2. Scroll to a call to do the following.
•
Press the OK Key [OPEN] to view the entry.
•
Press the SEND Key to place a call to the number.
•
Press the Right Soft Key [Options] to select:
Save to Contacts: To store the phone number in your Contacts.
Erase: To erase a call listing.
Lock/Unlock: To lock or unlock a call listing.
Erase All: To erase all All Call entries.
View Timers: To display usage time.
•
Press the Left Soft Key [Message] to select:
TXT Message: To send a TXT message to the contact.
Picture Message: To send a Picture message to the contact.
Video Message: To send a Video message to the contact.
Voice Message: To send a Voice message to the contact.
Shortcut: To view a quick list of all your calls, press the SEND Key from idle mode.
VIEW TIMERS
Checks the usage time and manages your calls within the limit you set.
1. Press the OK Key [MENU], select Recent Calls and press the OK
Key , scroll to View Timers and press the OK Key .
2. Scroll to view the information about Last Call, All Calls, Received
Calls, Dialed Calls, Roaming Calls, Transmit Data, Received Data, Total
Data, Last Reset, Lifetime Calls and Lifetime Data Counter.
•
Press the Left Soft Key [Reset] to reset highlighted timer.
•
Press the Right Soft Key [Reset All] to reset all timers.
081002_CDM8950_ECHO_EN_REV00.indd 42-43081002_CDM8950_ECHO_EN_REV00.indd 42-43 2008.10.6 6:18:2 PM2008.10.6 6:18:2 PM

5. If applicable, the handset may prompt you for the password. Consult
the Bluetooth® accessory (sold separately) instructions for the appropriate password (typically 0000—4 zeroes). Enter the password and
press the OK Key
.
Note: You do not need to input the password for pairing when the password of the
Bluetooth® Headset or hands-free kit is 0000. When Auto Pair Handsfree is set to On,
the device will try to autopair with the handset.
6. Connect to: (device name) will appear on screen. Select Ye s and press
the OK Key
.
7. Once connected, you will see the device listed in the Bluetooth Menu
and the Bluetooth® device connected icon will appear at the top of
the LCD screen when connected to the Bluetooth® device.
• In the Bluetooth Menu, you can disconnect the connected device with an icon by
pressing the END Key .
•
When an audio device is connected, you can select another device and the connection
is automatically transferred from that audio device to the other one.
•
If multiple devices are displayed scroll and select the devices you want to connect.
OPTIONS
1. Press the OK Key [MENU], select Settings & Tools and press the
OK Key , scroll to Bluetooth Menu and press the OK Key .
2. Scroll to select the paired device.
3. Press the Right Soft Key
[Options].
•
If an Audio Device is connected, press the Right Soft Key [Options], to choose from the
following options:
Remove Device: Removes a device from the pairing list.
Rename Device: Renames a paired device.
Service Discovery: Search for the services that the selec ted device supports.
Send Name Card: Send the stored phonebook to a selected device.
Device Info: Displays device information.
•
If a PC or Other Device is connected, press the Right S oft Key [Options], to choose from
the following options:
Remove Device: Removes a device from the pairing list.
Rename Device: Renames a paired device.
Incoming Security: Sets permissions for connecting to an incoming device.
Service Discovery: Search for the services that the selec ted device supports.
Send Name Card: Send the stored phonebook to a selected device.
Send Picture: Send photos stored in My Pictures to a selec ted device.
Send Video: Send videos stored in My Videos to a selected device.
Get Name Card: Request and receive the Name card information of the other side.
Device Info: Displays device information.
44
Chapter 4 − Menu Function
Settings
Settings
SETTINGS
MY PHONE NAME
To edit the Bluetooth® name of your phone:
1. Press the OK Key [MENU], select Settings & Tools and press the
OK Key
, scroll to Bluetooth Menu and press the OK Key .
2. Press the Right Soft Key
[Options], scroll to My Phone Name
and press the OK Key
.
3. Use the numeric keypad to enter a new custom name.
4. Press the OK Key
to save and exit.
DISCOVERY MODE
To set whether your device is able to be searched for by other Bluetooth® devices in
the area:
1. Press the OK Key [MENU], select S ettings & Tools and press the
OK Key , scroll to Bluetooth Menu and press the OK Key .
2. Press the Right Soft Key
[Options], scroll to Discovery Mode
and press the OK Key .
If Bluetooth power is not on, you will be prompted to turn it on in order to proceed.
3. Scroll to selec t On or Off and press the OK Key .
SUPPORTED PROFILES
To view brief descriptions of the profiles supported by the phone:
1. Press the OK Key [MENU], select Settings & Tools and press the
OK Key
, scroll to Bluetooth Menu and press the OK Key .
2. Press the Right Soft Key
[Options], scroll to Supported Profiles
and press the OK Key
.
3. Scroll to selec t Headset, Handsfree, Dial Up Networking, Object
Push or File Transfer and press the OK Key
[VIEW].
AUTO PAIR HANDSFREE
To set Auto Pair Handsfree On/Off:
1. Press the OK Key [MENU], select Settings & Tools and press the
OK Key , scroll to Bluetooth Menu and press the OK Key .
2. Press the Right Soft Key
[Options], scroll to Auto Pair Handsfree
and press the OK Key .
3. Scroll to selec t On or Off and press the OK Key
.
Menu Function − Chapter 4
45
Settings
Settings
081002_CDM8950_ECHO_EN_REV00.indd 44-45081002_CDM8950_ECHO_EN_REV00.indd 44-45 2008.10.6 6:18:4 PM2008.10.6 6:18:4 PM

SOUNDS SETTINGS
EASY SET UP
To set up phone sounds using the Easy Set Up Wizard:
1. Press the OK Key [MENU], select Settings & Tools and press the
OK Key
, scroll to Sounds Settings and press the OK Key ,
select Easy Set Up and press the OK Key .
2. Select the ringer type and press the OK Key
[SET]. To skip the
step, press the Right Soft Key [Skip].
3. Select the ringtone and press the OK Key
[SET]. To listen to the
ringtone, press the Left Soft Key [Play].
4. Select the volume of the keypad and press the OK Key
[SET].
5. Select the alerts ringer type for text messaging and press the OK
Key
[SET].
6. Select the alerts ringtone for text messaging and press the OK Key
[SET]. To listen to the ringtone, press the Left Soft Key [Play].
7. Select the ringer type for multimedia messaging and press the OK
Key
[SET].
8. Select the ringtone for multimedia messaging and press the OK Key
[SET]. To listen to the ringtone, press the Left Soft Key [Play].
9. Select the alerts ringer type for voicemail messaging and press the
OK Key
[SET].
10. Select the alerts ringtone for voicemail messaging and press the
OK Key
[SET]. To listen to the ringtone, press the Left Soft Key
[Play].
CALL SOUNDS
To set ringtones for types of incoming calls:
1. Press the OK Key [MENU], select Settings & Tools and press the
OK Key , scroll to Sounds Settings and press the OK Key ,
select Call Sounds and press the OK Key .
CALL RINGTONE
1. Press the OK Key
[MENU], select Settings & Tools and press the
OK Key , scroll to Sounds Settings and press the OK Key ,
select Call Sounds and press the OK Key , selec t Call Ringtone
and press the OK Key .
2. Scroll to selec t a ringtone and press the OK Key
to save.
46
Chapter 4 − Menu Function
Settings
Settings
To listen to the ringtone, press the Left Soft Key [Play].
CALL VIBRATE
1. Press the OK Key
[MENU], select Settings & Tools and press the
OK Key , scroll to Sounds Settings and press the OK Key ,
select Call Sounds and press the OK Key , selec t Call Vibrate
and press the OK Key .
2. Scroll to selec t On or Off and press the OK Key
.
ALERT SOUNDS
To select the alert type for a new message:
1. Press the OK Key [MENU], select Settings & Tools and press the
OK Key , scroll to Sounds Settings and press the OK Key ,
select Alert Sounds and press the OK Key .
2. Scroll to selec t TXT Message, Pic-Video Message or Voicemail and
press the OK Key
.
3. Scroll to selec t one of the following options and press the OK Key
.
•
Tone: Scroll to select a ringer and press the OK Key . To listen to the alert tone, press
the Left Soft Key [Play].
•
Vibrate: Scroll to selec t On or Off and press the OK Key .
•
Reminder: Scroll to select Once, Every 2 Minutes, Every 15 Minutes or Off and press
the OK Key .
EMERGENCY TONE
To set the alert for emergency dialing:
1. Press the OK Key [MENU], select Settings & Tools and press the
OK Key , scroll to Sounds Settings and press the OK Key ,
select Alert Sounds and press the OK Key .
2. Scroll to select Emergency Tone and press the OK Key
.
3. Scroll to select Alert, Vibrate or Off and press the OK Key
.
KEYPAD VOLUME
To set the keypad volume:
1. Press the OK Key [MENU], select Settings & Tools and press the
OK Key , scroll to Sounds Settings and press the OK Key ,
select Keypad Volume and press the OK Key .
2. Adjust the volume by pressing the Directional Key up or down
/
and press the OK Key to save.
Menu Function − Chapter 4
47
Settings
Settings
081002_CDM8950_ECHO_EN_REV00.indd 46-47081002_CDM8950_ECHO_EN_REV00.indd 46-47 2008.10.6 6:18:6 PM2008.10.6 6:18:6 PM

SERVICE ALERTS
To set any of the three Alert options to either On or O ff:
1. Press the OK Key [MENU], select Settings & Tools and press the
OK Key , scroll to Sounds Settings and press the OK Key ,
select Service Alerts and press the OK Key .
2. Scroll to selec t one of the following options and press the OK Key
.
•
ERI: The Enhanced Roaming Indicator (ERI) feature displays a text banner on the display
screen informing the handset user of which systems the wireless device is using as compared to the service plan they purchased. The ERI Banner text changes to tell a customer if
they are using the: Verizon Wireless Network, Extended Network or Roaming.
•
Minute Beep: Alerts you every minute during a call.
•
Call Connect: Alerts you when the call is connec ted.
3. Scroll to selec t On or Off and press the OK Key .
DEVICE CONNECT
To turn Device Connect On/Off:
1. Press the OK Key [MENU], select Settings & Tools and press the
OK Key , scroll to Sounds Settings and press the OK Key ,
select Device Connect and press the OK Key .
2. Scroll to selec t On or Off and press the OK Key
.
POWER ON/OFF
To set the phone to sound a tone when the phone is powered on/off :
1. Press the OK Key [MENU], select Settings & Tools and press the
OK Key , scroll to Sounds Settings and press the OK Key ,
select Power On/Off and press the OK Key
.
2. Select Power On or Power Off and press the OK Key
.
3. Scroll to selec t On or Off and press the OK Key
.
DISPLAY SETTINGS
Allows you to customize the display.
EASY SET UP
To set up display options using the Easy Set-Up Wizard:
1. Press the OK Key [MENU], select Settings & Tools and press the
OK Key , scroll to Display Settings and press the OK Key ,
select Easy Set Up and press the OK Key .
2. Enter the text to be displayed on your main screen and press the OK
Key
[SET]. To skip the step, press the Right Soft Key [Skip].
48
Chapter 4 − Menu Function
Settings
Settings
For details on how to write, see page 30.
3. Selec t the duration for backlight and press the OK Key
[SET].
4. Selec t the duration for backlight of the keypad and press the OK Key
[SET].
5. Select the theme for displaying and press the OK Key
[SET]. To
preview the theme, press the Left Soft Key [Preview].
6. Select the image for the main screen and press the OK Key
[SET].
To preview the image, press the Left Soft Key [View].
7. Select the image for the front screen and press the OK Key
[SET].
To preview the image, press the Left Soft Key [View].
8. Select the layout for displaying main menu and press the OK Key
[SET]. To preview the layout style, press the Left Soft Key
[Preview].
9. Select the type for displaying main menu and press the OK Key
[SET]. To preview the layout type, press the Left Soft Key [Help].
10. Select the size of font for dialing and press the OK Key
[SET]. To
preview the font size, press the Left Soft Key [Preview].
11. Select the style of the clock for the main screen and press the OK
Key
[SET]. To preview the style of the clock, press the Left Soft
Key [Preview].
12. Select the style of the clock for the front screen and press the OK
Key
[SET]. To preview the style of the clock, press the Left Soft
Key
[Preview].
If you change the layout of the Main Menu or Theme, the instructions for this guide will
no longer apply, as these are the default settings.
BANNER
To set your Personal or ERI Banner:
PERSONAL BANNER
The Personal Banner can be up to 16 characters and is displayed on your phone’s screen
in standby mode.
1. Press the OK Key [MENU], select Settings & Tools and press the
OK Key , scroll to Display Settings and press the OK Key ,
select Banner and press the OK Key , selec t Personal Banner
and press the OK Key .
2. Enter your banner text (up to 16 characters) and press the OK
Key
.
Menu Function − Chapter 4
49
Settings
Settings
081002_CDM8950_ECHO_EN_REV00.indd 48-49081002_CDM8950_ECHO_EN_REV00.indd 48-49 2008.10.6 6:18:8 PM2008.10.6 6:18:8 PM

ERI BANNER
If you use ERI Service, ERI Text is shown on the sub banner.
1. Press the OK Key [MENU], select Settings & Tools and press the
OK Key , scroll to Display Settings and press the OK Key ,
select Banner and press the OK Key
, select ERI Banner and
press the OK Key .
2. Scroll to selec t On or Off and press the OK Key
.
BACKLIGHT
To set the duration for backlight illumination for the Main Screen and Keypad:
1. Press the OK Key [MENU], select Settings & Tools and press the
OK Key , scroll to Display Settings and press the OK Key ,
select Backlight and press the OK Key .
2. Select Display or Keypad and press the OK Key
.
3. Scroll to select 7 Seconds, 15 Seconds, 30 Seconds, Always On or
Always Off and press the OK Key
.
Even if Always On is selected for the Backlight setting, the backlight will turn off when
the phone is closed.
WALLPAPER
To choose the kind of Main LCD or Front LCD background to be displayed on the
phone:
MAIN SCREEN
To choose the Main LCD background to be displayed on the phone:
1. Press the OK Key [MENU], select Settings & Tools and press the
OK Key , scroll to Display Settings and press the OK Key ,
select Wallpaper and press the OK Key
, select Main Screen
and press the OK Key .
2. Select My Pictures or My Videos and press the OK Key
.
3. Selec t the image and press the OK Key
. To view the image,
press the Left Soft Key [View]. To play the video clip, press the
Left Soft Key [Play].
4. Press the R ight Soft Key
[Get New], then scroll to Get New
Applications and press the OK Key to download other
available selections.
FRONT SCREEN
To choose the Front LCD background to be displayed on the phone:
1. Press the OK Key [MENU], select Settings & Tools and press the
50
Chapter 4 − Menu Function
Settings
Settings
OK Key , scroll to Display Settings and press the OK Key ,
select Wallpaper and press the OK Key
, select Front Screen
and press the OK Key .
2. Select the image and press the OK Key
. To view the image,
press the Left Soft Key [View].
3. Press the R ight Soft Key
[Get New], then scroll to Get New
Applications and press the OK Key to download other avail-
able selections.
DISPLAY THEMES
To choose the background screen:
1. Press the OK Key [MENU], select Settings & Tools and press the
OK Key , scroll to Display Settings and press the OK Key ,
select Display Themes and press the OK Key .
2. Scroll to selec t Black Space, Classic or Water and press the OK Key
[SET].
• To preview the selected the Display Themes, press the Left Soft Key [Preview].
•
To display descriptions the Display Themes, press the Right Soft Key [Help].
•
The default setting is Water.
MAIN MENU SETTINGS
To change the Main Menu layout and type:
TO SET GRID MENU LAYOUT
1. Press the OK Key
[MENU], select Settings & Tools and press the
OK Key , scroll to Display Settings and press the OK Key ,
select Main Menu Settings and press the OK Key , select Menu
Layout and press the OK Key .
2. Scroll to select Grid and press the OK Key
.
• To preview the selected the Grid Menu Layout, press the Left Soft Key
[Preview].
•
The default setting is Grid.
REPLACE GRID MENU ITEMS
1. Press the OK Key
[MENU], select Settings & Tools and press
the OK Key , scroll to Display Settings and press the OK Key
, select Main Menu Settings and press the OK Key , select
Replace Menu Items and press the OK Key .
2. Scroll to select the item you want to replace and press the OK Key
[EDIT].
Menu Function − Chapter 4
51
Settings
Settings
081002_CDM8950_ECHO_EN_REV00.indd 50-51081002_CDM8950_ECHO_EN_REV00.indd 50-51 2008.10.6 6:18:10 PM2008.10.6 6:18:10 PM

To display descriptions for the Replace Menu Items, press the Right Soft Key
[Help].
3. Scroll to select My Ringtones, My Pictures, V CAST Music, Games,
Mobile IM, Email or VZ Navigator and press the OK Key [SET]
and press the Left Soft Key
[Done] to save.
POSITION GRID MENU ITEMS
1. Press the OK Key
[MENU], select Settings & Tools and press
the OK Key
, scroll to Display Settings and press the OK Key
, select Main Menu Settings and press the OK Key , select
Position Menu Items and press the OK Key .
2. Scroll to select the item you want to move then press the OK Key
[MOVE].
To display descriptions for the Position Menu Items, press the R ight Soft Key
[Help].
3. Scroll to change the position of this item then press the OK Key
[SWAP] and press the Left Soft Key [Done] to save.
RESET GRID MENU SETTINGS
1. Press the OK Key [MENU], select Settings & Tools and press the
OK Key
, scroll to Display Settings and press the OK Key ,
select Main Menu Settings and press the OK Key
, select Reset
Menu Settings and press the OK Key .
2. Scroll to select one of the following options and press the OK
Key
.
•
Menu Layout: To restore menu layout to the initial menu layout. (Grid)
•
Menu Items: To restore menu items to the initial content of the menu.
•
Item Positions: To restore main menu items to their initial positions.
•
All: To restore all to your initial main menu settings.
To display descriptions for the Reset Menu Settings, press the Right Soft Key
[Help].
DIAL FONTS
To set the font size:
1. Press the OK Key [MENU], select Settings & Tools and press the
OK Key , scroll to Display Settings and press the OK Key ,
select Dial Fonts and press the OK Key .
2. Scroll to select Normal or Large Only and press the OK Key
.
To preview the selected the Dial Font size, press the Left Soft Key [Preview].
52
Chapter 4 − Menu Function
Settings
Settings
MENU FONT SIZE
To set the menu font size:
1. Press the OK Key [MENU], select Settings & Tools and press the
OK Key , scroll to Display Settings and press the OK Key ,
select Menu Font Size and press the OK Key
.
2. Scroll to select Normal or Large and press the OK Key
.
CLOCK FORMAT
To choose the kind of clock to be displayed on the Main LCD or Front LCD screen:
1. Press the OK Key [MENU], select Settings & Tools and press the
OK Key , scroll to Display Settings and press the OK Key ,
select Clock Format and press the OK Key .
2. Select Main Clock or Front Clock and press the OK Key
.
3. Scroll to selec t one of the following settings and press the OK Key
.
•
Main Clock: Analog/Large Analog/Digital12/Large Digital12/Digital24/
Large Digital24/Off (“Large Digital12” is the default setting for this device.)
•
Front Clock: Digital/Analog/Minimize/Off (“Digital” is the default setting for this device.)
To preview the selected the Main Screen or Front Screen Clock format, press the Left
Soft Key [Preview].
PHONE SETTINGS
AIRPLANE MODE
In Airplane Mode, all menu functions can be accessed except making calls, receiving
calls, data connection and Bluetooth®. Activating Airplane Mode will disable all
wireless communications. In Airplane Mode, services that support Location On
functions like Chaperone are temporarily disabled.
1. Press the OK Key [MENU], select Settings & Tools and press the
OK Key
, scroll to Phone Settings and press the OK Key ,
select Airplane Mode and press the OK Key .
2. Scroll to select On or Off and press the OK Key
.
SET SHORTCUTS
Your phone offers you the option of assigning a shortcut key (Directional Key left,
right, up and down) to a favorite or often-used function. In addition, choose menu
settings for each of the shortcut options under Set My Shortcuts (Directional Key
right).
To connect Set My Shor tcuts menu, in idle mode, press the Directional Key right
and press the Left Soft Key [Settings].
1. Press the OK Key [MENU], select Settings & Tools and press
the OK Key , scroll to Phone Settings and press the OK Key
Menu Function − Chapter 4
53
Settings
Settings
081002_CDM8950_ECHO_EN_REV00.indd 52-53081002_CDM8950_ECHO_EN_REV00.indd 52-53 2008.10.6 6:18:12 PM2008.10.6 6:18:12 PM

, select Set Shortcuts and press the OK Key , select Set My
Shortcuts and press the OK Key
.
2. Scroll to selec t Shortcut 1, Shortcut 2, Shortcut 3 or Shortcut 4 and
press the OK Key
[SET].
3. Scroll to selec t one of the following functions and press the OK Key
.
•
Alarm Clock / • Bluetooth Menu / • Bluetooth On/Off / • Browse & Download /
•
Calculator / • Calendar / • Call Settings / • Chat / • Display Settings / • Extras /
•
Games / • Get New Extra / • Get New Game / • Get New Pictures /
•
Get New Ringtones / • Get New Browse & Download / • Media Center /
•
Messaging Inbox / • Mobile IM / • Mobile Web / • Mobile Web Mail /
•
Music & Tones / • My Music / • My Pictures / • My Ringtones / • My Sounds /
•
My Verizon / • My Videos / • New Contact / • New TXT Message /
•
New Picture Message / • New Video Message / • New Voice Message /
•
Online Album / • Phone Settings / • Picture & Video / • Play All Songs /
•
Settings & Tools / • Sounds Settings / • Sync Music / • Tools /
•
V CAST Music I Rhapsody / • V Cast Videos / • Download Application Alphabet
The Download Application Alphabet option only appears when you have downloaded
Brew Applications.
In idle mode, pressing the Directional Key right will display the My Shortcuts
screen. On the My Shortcuts screen, you can scroll to select a function and press the
OK Key to access the function. If you want to relocate a func tion on My Shortcuts,
press the Right Soft Key [Move], scroll using the Directional Key and press
the OK Key [SAVE]. Or you can press the Left Soft Key [Settings] to Set My
Shortcuts or Set Directional Keys.
RESETTING MY SHORTCUTS
To restore My Shortcuts to their original defaults:
1. Press the OK Key [MENU], select Settings & Tools and press
the OK Key
, scroll to Phone Settings and press the OK Key
, select Set Shortcuts and press the OK Key , select Set My
Shortcuts and press the OK Key .
2. Scroll to selec t Shortcut 1, Shortcut 2, Shortcut 3 or Shortcut 4 and
press the Right Soft Key
[Options].
3. Selec t Reset Shortcut (1, 2, 3 or 4) or Reset My Shortcuts and press
the OK Key
.
4. Scroll to selec t Yes and press the OK Key
.
SET DIRECTIONAL KEYS
In idle mode, you can specify the function that is accessed when you press the
Directional Key up, down or left.
1. Press the OK Key [MENU], select Settings & Tools and press
the OK Key , scroll to Phone Settings and press the OK Key
, select Set Shortcuts and press the OK Key , select Set
Directional Keys and press the OK Key .
54
Chapter 4 − Menu Function
Settings
Settings
2. Scroll to select UP Directional Key, LEFT Directional Key or DOWN
Directional Key and press the OK Key
[SET].
3. Scroll to select one of the following functions and press the OK
Key
.
•
Alarm Clock / • Bluetooth Menu / • Bluetooth On/Off / • Browse & Download
/
•
Calculator / • Calendar / • Call Settings / • Chat / • Display Settings /
•
Extras / • Games / • Get New Extra / • Get New Game / • Get New Pictures /
•
Get New Ringtones / • Get New Browse & Download / • Media Center /
•
Messaging Inbox / • Mobile IM / • Mobile Web / • Mobile Web Mail /
•
Music & Tones / • My Music / • My Pictures / • My Ringtones / • My Sounds /
•
My Verizon / • My Videos / • New Contact / • New TXT Message /
•
New Picture Message / • New Video Message / • New Voice Message /
•
Online Album / • Phone Settings / • Picture & Video / • Play All Songs /
•
Settings & Tools / • Sounds Settings / • Sync Music / • Tools /
•
V CAST Music I Rhapsody / • V Cast Videos / • Download Application Alphabet
The Download Application Alphabet option only appears when you have
downloaded Brew Applications.
RESETTING THE DIRECTIONAL KEY SETTINGS
Use the following procedure to specify the default directional key settings.
1. Press the OK Key [MENU], select Settings & Tools and press
the OK Key , scroll to Phone Settings and press the OK Key
, select Set Shortcuts and press the OK Key , select Set
Directional Keys and press the OK Key
.
2. Scroll to select UP Directional Key, LEFT Directional Key or DOWN
Directional Key and press the Right Soft Key
[Options].
3. Selec t Reset (UP, LEFT or DOWN) Key or Reset Directional Keys and
press the OK Key
.
4. Scroll to select Yes and press the OK Key
.
VOICE COMMANDS SETTINGS
You can use voice commands to control your device.
MODE
1. Press the OK Key
[MENU], select Settings & Tools and press the
OK Key , scroll to Phone Settings and press the OK Key ,
select Voice Commands Settings and press the OK Key .
2. Select Mode and press the OK Key
, then select one of the
following:
•
Prompt: Reads out only the command prompts in voice command.
•
Readout: Reads out prompts, menus, outgoing contact name, status information
and confirming message recipient (contact name and type or number) when using
the Send command.
•
Tones Only: Will only prompt the user with a tone (in place of the Readout prompt).
Menu Function − Chapter 4
55
Settings
Settings
081002_CDM8950_ECHO_EN_REV00.indd 54-55081002_CDM8950_ECHO_EN_REV00.indd 54-55 2008.10.6 6:18:15 PM2008.10.6 6:18:15 PM

If you change the setting details in the phone’s mode in Voice Commands, it will
affect the mode in Sound (refer to page 70) or vice versa.
CALL ALERT
1. Press the OK Key
[MENU], select Settings & Tools and press the
OK Key , scroll to Phone Settings and press the OK Key ,
select Voice Commands Settings and press the OK Key .
2. Selec t Call Alert and press the OK Key
, then select one of the
following and press the OK Key
:
•
Ring Only: Deactivate Caller ID. You can hear ringtone only.
•
Caller ID + Ring: Playback the Caller ID once and you will hear ringtone.
•
Name Repeat: Activate Caller ID. You will hear the caller’s details repeatedly.
For more information about the enhanced voice commands supported by your
device, see Voice Tools. Please refer to page 66 for more details.
LANGUAGE
To set the bilingual feature to either English or Spanish:
1. Press the OK Key [MENU], select Settings & Tools and press the
OK Key , scroll to Phone Settings and press the OK Key ,
select Language and press the OK Key .
2. Scroll to selec t English or Español and press the OK Key
.
LOCATION
To select whether your location will always appear in the network or during
emergency use:
1. Press the OK Key [MENU], select Settings & Tools and press the
OK Key
, scroll to Phone Settings and press the OK Key ,
select Location and press the OK Key .
2. Scroll to selec t one of the following settings and press the OK Key
.
•
Location On: Your location is now available to the network.
•
E911 Only: Your location will be hidden from the network and applications, except
for 911.
When the Lock S etting is selected for Location Settings under Restrictions on the
Security Menu, you will need to enter a Lock Code. The default Lock Code is the last 4
digits of your Mobile Telephone Number.
SECURITY
The Security menu allows you to electronically secure the phone.
EDIT CODES
To set a new Lock Code:
1. Press the OK Key [MENU], select Settings & Tools and press the
OK Key , scroll to Phone Settings and press the OK Key ,
56
Chapter 4 − Menu Function
Settings
Settings
select Security and press the OK Key .
2. Enter the four-digit lock code and press the OK Key
.
The default Lock Code is last 4 digits of your Mobile Telephone Number.
3. Selec t Edit Codes and press the OK Key .
4. Scroll to select one of the following settings and press the OK
Key
.
•
Phone Only: Allows you to edit the Lock Code for Security. (The default Lock Code is
the last 4 digits of your Mobile Telephone Number.)
•
Calls & Services: Allows you to edit the Lock Code for Restrictions. ( The default Lock
Code is the last 4 digits of your Mobile Telephone Number.)
5. If Phone Only is selected, enter the new four-digit code in the
Enter New Code field. Enter the new four-digit code again in the
Re-enter New Code field and press the OK Key ,
6. If Calls & Services is selected, enter the current lock code in the
Enter Current Code field. Enter the new four-digit code in the
Enter New Code field. Enter the new four-digit code again in the
Re-enter New Code field.
7. Press the OK Key
.
RESTRICTIONS
Use the following procedure to configure Location Setting, Calls and Messages
restrictions.
1. Press the OK Key [MENU], select Settings & Tools and press the
OK Key
, scroll to Phone Settings and press the OK Key ,
select Security and press the OK Key .
2. Enter the four-digit lock code and press the OK Key
.
The default Lock Code is last 4 digits of your Mobile Telephone Number.
3. Select Restrictions and press the OK Key .
4. Enter the four- digit Lock Code again and press the OK Key
.
5. Select one of the following settings and press the OK Key
:
•
Location Setting: Unlock Setting/Lock Setting.
•
Calls: Incoming Calls/Outgoing Calls
For Incoming Calls, set Allow All/Contacts Only/Block All.
For Outgoing Calls, set Allow All/Contacts Only/Block All.
•
Messages: Incoming Messages/Outgoing Messages
For Incoming Messages, set Allow All/Block All.
For Outgoing Messages, set Allow All/Block All.
•
Dial-Up Modem: Allow/Block.
6. Press the OK Key .
Menu Function − Chapter 4
57
Settings
Settings
081002_CDM8950_ECHO_EN_REV00.indd 56-57081002_CDM8950_ECHO_EN_REV00.indd 56-57 2008.10.6 6:18:17 PM2008.10.6 6:18:17 PM
 Loading...